Diamond Chain Maintenance Guide · Diamond Chain Maintenance Guide diamondchain.com 6 | 1-800 S...
12
From standard drive chains to specialty applications, Nothing Outlasts a Diamond ® . Diamond Chain Maintenance Guide
Transcript of Diamond Chain Maintenance Guide · Diamond Chain Maintenance Guide diamondchain.com 6 | 1-800 S...

From standard drive chains to specialty applications, Nothing Outlasts a Diamond®.
Diamond Chain Maintenance Guide

diamondchain.com | 1-800 US CHAIN (872-4246)Diamond Chain Maintenance Guide2
Since its founding in 1890, the Diamond Chain Company has been singularly focused on producing the best roller chain. It’s why the Wright Brothers chose Diamond Chain for their flying machine, why Henry Ford chose Diamond Chain for his automobile, and why thousands of companies choose Diamond Chain every day for their needs.
Diamond Chain Company offers two series of roller chains, Diamond Series and Sapphire Series. This catalog is focused on the maintenance aspects of roller chain and applies to both series of product.
Diamond Chain Company
Table of ContentsInstallation . . . . . . . . . . . . . . . . 3Lubrication . . . . . . . . . . . . . . . . 5Inspections . . . . . . . . . . . . . . . . 7
Elongation Limits . . . . . . . . . . . . . 8 Troubleshooting . . . . . . . . . . . . . 9 Instructions. . . . . . . . . . . . . . . . 11
Diamond Chain Company is proud to be based in Indianapolis, Indiana, since its founding in 1890. Shown is the headquarters and manufacturing facility located at 402 Kentucky Avenue.
Industry-leading performance and innovation
Basic chain offering for general applications

diamondchain.com | 1-800 US CHAIN (872-4246) Diamond Chain Maintenance Guide 3
To obtain maximum service-life and efficiency from a chain drive, it is necessary that certain precautions in installation be taken. Chain drive installation is relatively simple and good results may be obtained when the following conditions are met: 1. The roller chain, sprockets, and other components are in good condition. 2. The sprockets are properly aligned. 3. Provision is made for adequate lubrication. 4. The chain is correctly tensioned.
Condition of ComponentsShafting, bearings, and foundations should be supported rigidly to maintain the initial alignment. Roller chain should be free of grit and dirt. Wash chain in kerosene when required and then re-lubricate.
Drive AlignmentMisalignment results in uneven loading across the width of the chain and may cause roller linkplate and sprocket tooth wear. Drive alignment involves two things: parallel shaft alignment and sprocket axial alignment.
1. Shafts should be parallel and level. This condition may be readily checked by the use of a straight edge, and a machinist’s level. If there is axial movement of the shaft (as in the case of an electric motor), lock the shaft in the normal running position before aligning the sprockets.
Most single strand drives will perform acceptably if the shafts are parallel and in the same plane within .050 in/ft (4.2 mm/m) or 1/4°. However, high speed, high horsepower, or multiple strand drives should be aligned within the tolerance obtained from the following formula:
Tolerance = .00133 CD (in/ft), or .111 CD (mm/m) Where: CD = center distance, in inches or mm. P x CS P x CS P = chain pitch, in inches or mm.
CS = number of chain strands.
2. Sprocket axial alignment can be checked with a straight edge which will extend across the finished sides of the two sprockets. Normally, it is good practice to align the sprockets as close to the shaft bearing as possible. For long center distances, use a taut cord, or wire long enough to extend beyond each of the sprockets. The maximum allowable amount of axial misalignment is obtained from the following formula:
Max. Offset = 0.045 P in inches or mm where P = chain pitch in inches or mm. This formula applies to both single and multiple strand chains.
Installing the ChainRe-check all preceding adjustments for alignment and make certain all set screws, bolts and nuts are tight. Fit chain around both sprockets and bring the free ends together on one sprocket for connection. The sprocket teeth will locate the chain end links. Install the connecting link and connecting link coverplate, and the spring clip or cotter pins. On larger pitch or heavy multiple strand chains, it may be necessary to lock the sprockets for this operation. When press fit coverplates are used, be careful not to drive the plate on so far as to grip the roller links. Stiff joints can result if this is done. On drives with long spans, it may be necessary to support the chain with a plank or bar as the connection is made.
Installation

diamondchain.com | 1-800 US CHAIN (872-4246)Diamond Chain Maintenance Guide4
Recommended Possible Mid-Span Movement, A-C, of Slack SpanDimensions in Inches
Drive Center-Line
Tangent Length Between Sprockets
5"12.7cm
10"25.4cm
15"38.1cm
20"50.8cm
30"76.2cm
40"101.6cm
60"152.4cm
80"203.2cm
100"254cm
in in in in in in in in inmm mm mm mm mm mm mm mm mm
Horizontal to 45 0.25 0.50 0.75 1.00 1.50 2.00 3.00 4.00 5.006.35 12.70 19.05 25.40 38.10 50.80 76.20 101.60 127.00
Vertical to 45 0.12 0.25 0.38 0.50 0.75 1.00 1.50 2.00 2.503.05 6.35 9.65 12.70 19.05 25.40 38.10 50.80 63.50
Taut Span
CBA
Chain TensionCheck chain tension to be certain the slack span has 4-6% mid-span movement in horizontal drives and 2-3% in vertical drives. Please reference the table below.

diamondchain.com | 1-800 US CHAIN (872-4246) Diamond Chain Maintenance Guide 5
Roller chain consists of a series of connected traveling metallic bearings which must be properly lubricated to obtain the maximum service life of the chain. Although many slow speed drives operate successfully with little or no lubrication beyond the initial factory lubrication, proper lubrication will greatly extend the useful life of every chain drive. The chain drive requires lubrication for six purposes: 1. To resist wear of the pin-bushing joint. 2. To cushion impact loads. 3. To dissipate any heat generated. 4. To flush away foreign materials. 5. To lubricate chain-sprocket contact surfaces. 6. To prevent rust or corrosion.
A good grade of clean petroleum oil without additives, free flowing at the prevailing temperatures, should be used. Some additives leave a varnish or gum deposit which prevents the oil from entering chain joints. Heavy oils and greases are generally too stiff to enter the chain joints and should not be used.
With proper lubrication, a separating wedge of lubrication is formed between the pins and bushings in the chain joints much like that formed in journal bearings. The viscosity of the lubricant greatly affects its film strength, and its ability to separate moving parts. The highest viscosity oil which will flow between the chain linkplates and fill the pin-bushing areas will provide the best wear life. This is essential to minimize metal to metal contact and, if supplied in sufficient volume, the lubricant also provides effective cooling and impact dampening at higher speeds.
Note: Speeds beyond the maximum recommended for chain operation are indicated in the horsepower
rating tables with zero horsepower. Operation at these or higher speeds will result in excessive galling of
the chain pins and bushings regardless of the volume of oil applied.
Chain drives should be protected from abrasive and corrosive conditions and the oil supply kept free of contamination. Periodic oil changes are encouraged.
Note: Oil should be applied to the lower span of chain on the upper edges of linkplates since access of oil
to pin-bushing joints is possible only through the clearances between the roller chain linkplates.
The elongation of roller chain is the result of wear caused by friction between the pins and bushings, and regardless of the size or type of chain, in order for any lubricant to reach the critical pin/bushing area it should be applied to the upper edges of linkplates in the slack span. Lubricant applied only to the chain’s rollers will not provide an adequate supply to the internal wearing surfaces. However, the chain’s rollers will receive adequate lubrication due to spillage over the linkplate edges when lubricant is properly applied.
The table indicates the lubricant viscosity recommended for various surrounding temperatures:
Ambient Temperature Degrees F
Recommended Lubricants
SUS Viscosity 100°F / 38°C SAE Engine Oil SAE Gear Oil ISO AGMA
20° to 40°F / -7° to 4°C 200-400 20 80W 46 or 68 1 or 2
40° to 100°F / 4° to 38°C 400-650 30 85W 100 3
100° to 120°F / 38° to 49°C 650-950 40 90 150 4
120° to 140°F / 49° to 60°C 950-1450 50 90 220 5
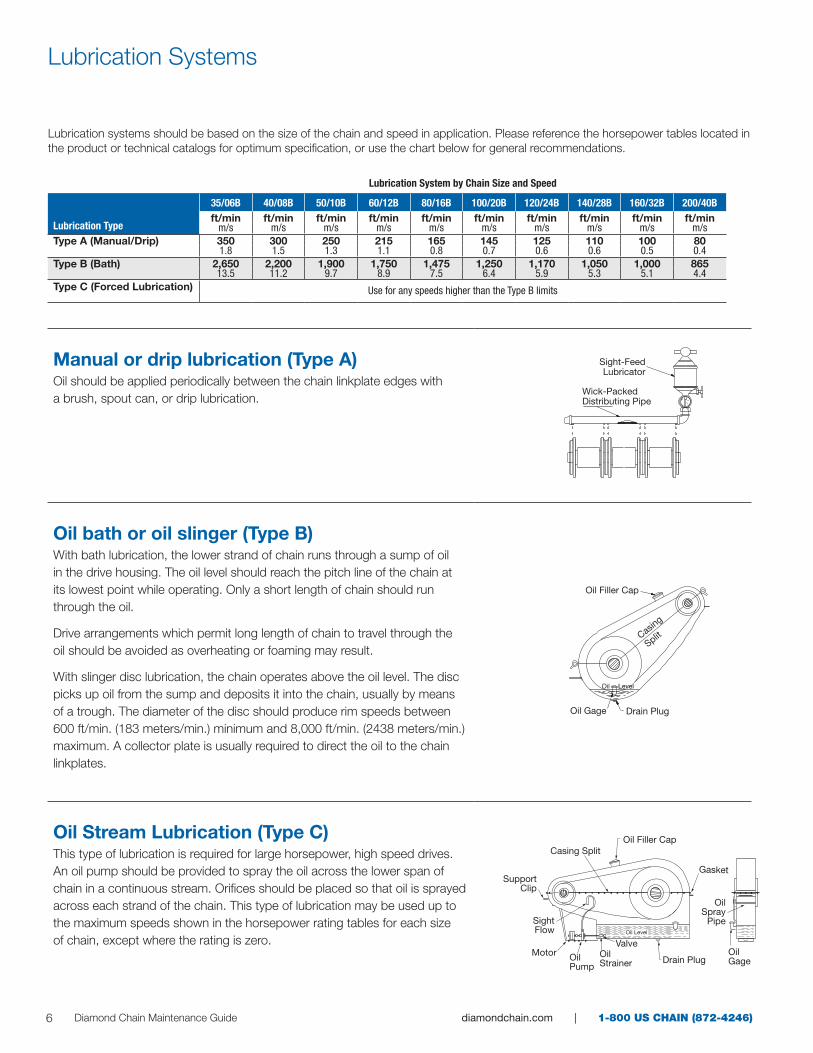
There are three basic types of lubrication for roller chain drives. Close adherence to the recommended type of lubrication is essential to obtaining maximum service life of a chain drive.
The recommended type of lubrication as shown in the horsepower rating tables is determined by the chain speed and the amount of power transmitted.
Lubrication
Roller
Roller Link Plate
Pin Link Plate
Bushing
Pin
diamondchain.com | 1-800 US CHAIN (872-4246)Diamond Chain Maintenance Guide6
Manual or drip lubrication (Type A)Oil should be applied periodically between the chain linkplate edges with a brush, spout can, or drip lubrication.
Oil bath or oil slinger (Type B)With bath lubrication, the lower strand of chain runs through a sump of oil in the drive housing. The oil level should reach the pitch line of the chain at its lowest point while operating. Only a short length of chain should run through the oil.
Drive arrangements which permit long length of chain to travel through the oil should be avoided as overheating or foaming may result.
With slinger disc lubrication, the chain operates above the oil level. The disc picks up oil from the sump and deposits it into the chain, usually by means of a trough. The diameter of the disc should produce rim speeds between 600 ft/min. (183 meters/min.) minimum and 8,000 ft/min. (2438 meters/min.) maximum. A collector plate is usually required to direct the oil to the chain linkplates.
Oil Stream Lubrication (Type C)
Gasket
Drain PlugOilGage
OilSpray
Pipe
ValveOil Strainer
Oil Pump
Motor
SightFlow
SupportClip
Casing SplitOil Filler Cap
Oil Level
This type of lubrication is required for large horsepower, high speed drives. An oil pump should be provided to spray the oil across the lower span of chain in a continuous stream. Orifices should be placed so that oil is sprayed across each strand of the chain. This type of lubrication may be used up to the maximum speeds shown in the horsepower rating tables for each size of chain, except where the rating is zero.
Lubrication System by Chain Size and Speed
Lubrication Type
35/06B 40/08B 50/10B 60/12B 80/16B 100/20B 120/24B 140/28B 160/32B 200/40Bft/min ft/min ft/min ft/min ft/min ft/min ft/min ft/min ft/min ft/min
m/s m/s m/s m/s m/s m/s m/s m/s m/s m/sType A (Manual/Drip) 350 300 250 215 165 145 125 110 100 80
1.8 1.5 1.3 1.1 0.8 0.7 0.6 0.6 0.5 0.4Type B (Bath) 2,650 2,200 1,900 1,750 1,475 1,250 1,170 1,050 1,000 865
13.5 11.2 9.7 8.9 7.5 6.4 5.9 5.3 5.1 4.4Type C (Forced Lubrication) Use for any speeds higher than the Type B limits
Lubrication systems should be based on the size of the chain and speed in application. Please reference the horsepower tables located in the product or technical catalogs for optimum specification, or use the chart below for general recommendations.
Lubrication Systems
Drain Plug
Oil Filler Cap
Casing
Split
Oil Gage
Oil LevelLevel
Sight-FeedLubricator
Wick-PackedDistributing Pipe

diamondchain.com | 1-800 US CHAIN (872-4246) Diamond Chain Maintenance Guide 7
All chain drives should receive regular maintenance. Each drive should be inspected after the initial 100 hours of operation. Thereafter, most drives may be inspected at 500 hour intervals. However, drives subject to shock loads or severe operating conditions should be inspected at 200 hour intervals.
At each inspection, the following items should be checked and corrected, if necessary:
1. Check Lubrication On slow speed drives, be sure the lubrication schedule is being followed and if the chain is covered with dirt and debris, clean the chain with an approved solvent and relubricate it. If drip lubrication is used, check for adequate oil flow and be sure it is being applied at the proper location on the chain (refer to the Lubrication section). With bath or pump lubrication, check oil level and add oil if needed. Check oil for contamination and change oil as needed. It is recommended to change the oil after the first 100 hours of operation and each 500 hours thereafter. If pump lubrication is used, check each orifice to be sure it is clear and is directing oil onto the chain properly.
2. Check Chain Tension Refer to the Installation section and check chain tension. Adjust the drive as needed to maintain the proper sag in the slack span. If elongation exceeds the available adjustment, remove two pitches of chain and reconnect.
3. Check Chain Wear Roller chains should be replaced promptly when worn (elongated beyond 3%) or when the chain rollers begin to “ride high” near the tips of the teeth on relatively large sprockets. If the chain is worn excessively, replace the entire chain. Do not connect or splice a new section to a worn chain. Do not continue to run a chain worn in excess of 3% (or less in some applications) because the chain will not engage the sprockets properly and increased damage to the sprockets may occur.
NOTE: Contact Diamond Chain for your free wear gauge by emailing [email protected].
4. Check Sprocket Tooth Wear Check for roughness or binding when the chain engages or disengages from the sprocket. Inspect the sprocket teeth for reduced tooth section and “hooked” tooth tips. If these conditions are present, the sprocket teeth are excessively worn and the sprocket should be replaced. Do not run new chain on worn sprockets as it will cause the new chain to wear rapidly. Conversely, do not run a worn chain on new sprockets as it will cause the new sprockets to wear rapidly. As a general rule, replace the sprockets with every third chain replacement.
5. Check Sprocket Alignment If there is noticeable wear on the inside surfaces of the chain roller linkplates, the sprockets may be misaligned. Realign the sprockets as outlined in the Installation section to prevent further abnormal chain and sprocket wear.
6. Check for Drive Interference Check for interference between the drive and other parts of the equipment. If there is any, correct it immediately. Interference can cause abnormal and potentially destructive wear on the chain or the interfering part. If the edges of the chain linkplates impact against a rigid part, linkplate fatigue and chain failure can result. Check for and eliminate any buildup of debris or foreign material between the chain and sprockets. A relatively small amount of debris in the sprocket roll seat can cause tensile loads great enough to break the chain if forced through the drive.
7. Check for Failure Inspect the chain for cracked, broken, or deformed parts. If any of these conditions are found, replace the entire chain. Even though portions of the chain may appear to be in good condition, in all likelihood, the entire chain has been damaged. Warning: Roller chains that have been damaged under excessive loading due to an accident, or otherwise, should be completely replaced because the chain, as well as the damaged component, has been loaded to a degree that has impaired its ability to transmit normal loading.
8. Evidence of Lubrication One of the first indications that a roller chain is not receiving adequate lubrication is that the external areas around the joints will most likely have a reddish/brown (rusty) color. The inadequate lubrication can be confirmed by removing a link (most commonly the connecting link) and examining the surface of the pins. The color of the pins will generally be dark brown, even blue, if the chain has been running with inadequate lubrication. Additionally, the surface of poorly lubricated pins will be rough, grooved, or even show evidence of galling. Properly lubricated chains will not exhibit the rusty color at the joints, and the pins of the connecting links, when removed, will be generally smooth, shiny and have an obvious coating of lubricant on the surface.
Inspections
Tooth Form Altered Due to Wear

diamondchain.com | 1-800 US CHAIN (872-4246)Diamond Chain Maintenance Guide8
Elongation Limits
FOR REFERENCE ONLY
u 3.0% Max. Elongation Adjustable Center Distance Drives
u 1.5% Max. Elongation Fixed Center Distance Drives
NOTE: Contact Diamond Chain for your free wear gauge by emailing
Measuring Length
Measurement of Chain for Wear Elongation
Chain Wear Elongation LimitsMeasured Length
ANSI Chain No.Chain Pitch
PitchesNominal At 3% Wear
Inch mm Inch mm Inch mm
25 0.250 6.35 48 12 305 12.375 314
35 0.375 9.52 32 12 305 12.375 314
41 0.500 12.70 24 12 305 12.375 314
40 0.500 12.70 24 12 305 12.375 314
50 0.625 15.88 20 12.5 318 12.875 327
60 0.750 19.05 16 12 305 12.375 314
80 1.000 25.40 12 12 305 12.375 314
100 1.250 31.75 20 25 635 25.750 654
120 1.500 38.10 16 24 610 24.719 628
140 1.750 44.45 14 24.5 622 25.250 641
160 2.000 50.80 12 24 610 24.719 628
200 2.500 63.50 10 25 635 27.750 654
240 3,000 76.20 8 24 610 24.719 628

diamondchain.com | 1-800 US CHAIN (872-4246) Diamond Chain Maintenance Guide 9
Troubleshooting Guide
CONDITION/SYMPTOM POSSIBLE CAUSE WHAT TO DOTight Joints Dirt or foreign material in chain joints. Clean and re-lubricate chain.
Inadequate lubrication. Replace chain. Re-establish proper lubrication.
Misalignment. Replace sprockets and chain if needed. Realign sprockets.
Internal corrosion or rust. Replace chain. Eliminate cause of corrosion or protect chain.
Overload bends pins or spreads roller linkplates. Replace chain. Eliminate cause of overload.
Rusted Chain Exposed to moisture. Replace chain. Protect from moisture.
Water in lubricant. Change lubricant. Protect lubrication system from water. Replace chain.
Inadequate lubrication. Provide or re-establish proper lubrication. Replace chain if needed.
Turned Pins Overload. Replace chain. Eliminate cause of overload.
Inadequate lubrication. Replace chain. Re-establish proper lubrication.
Enlarged Holes Overload. Replace chain. Eliminate cause of overload.
Broken Pins Broken Linkplates
Extreme Overload. Replace chain. Replace sprockets if indicated. Eliminate cause of overload or redesign drive for larger pitch chain.
Broken, Cracked or Deformed Rollers Speed too high. Replace chain. Reduce speed.
Sprockets too small. Replace chain. Use larger sprockets, or possibly redesign drive for smaller pitch chain.
Chain riding too high on sprocket teeth. Replace chain. Re-tension chain more often.
Pin Galling Speed or load too high. Reduce speed or load. Possibly redesign drive for smaller pitch chain.
Inadequate lubrication. Provide or re-establish proper lubrication.
Chain Climbs Sprocket Teeth Excess chain slack. Re-tension chain.
Excessive chain wear. Replace and re-tension chain.
Excessive sprocket wear. Replace sprockets and chain.
Excessive overload. Replace chain. Eliminate cause of overload.

diamondchain.com | 1-800 US CHAIN (872-4246)Diamond Chain Maintenance Guide10
CONDITION/SYMPTOM POSSIBLE CAUSE WHAT TO DOMissing or Broken Cotters Cotters installed improperly. Install new cotters per manufacturer’s instructions.
Vibration. Replace chain. Reduce vibration. Use larger sprockets.
Excessively high speed. Replace chain. Reduce speed. Redesign drive for smaller pitch chain.
Exposed Chain Surfaces Corroded or Pitted
Exposure to corrosive environment. Replace chain. Protect from hostile environment.
Cracked Linkplates (Stress Corrosion)
Exposure to corrosive environment combined with stress from press fits.
Exposure to corrosive environment combined with stress from press fits.
Cracked Linkplates (Fatigue) Load is greater than chain’s dynamic capacity. Replace chain. Reduce dynamic loading or redesign drive for larger chain.
Battered Linkplate Edges Chain striking an obstruction. Replace chain. Eliminate interference.
Worn Linkplate Contours Chain rubbing on casing, guide, or obstruction. Replace chain if 5% or more of height worn away. Re-tension chain.Eliminate interference.
Excessive Noise Chain striking an obstruction. Replace chain. Eliminate interference.
Loose casing or shaft mounts. Tighten fasteners.
Excess chain slack. Re-tension chain.
Excessive sprocket wear. Replace and re-tension chain.
Sprocket misalignment. Replace chain and sprockets, if needed. Realign sprockets.
Inadequate lubrication. Replace chain if needed. Re-establish proper lubrication.
Chain pitch too large Redesign drive for smaller pitch chain.
Too few sprocket teeth. Check to see if larger sprockets can be used. If not, redesign drive.
Wear on Inside of Roller Linkplates and One Side of Sprockets
Sprocket misalignment. Replace sprockets and chain if needed. Realign drive. Re-tension chain.
Chain Clings to Sprocket Excessive sprocket wear. Replace sprockets and chain.
Sprocket misalignment. Replace sprockets and chain if needed. Realign sprockets.
Troubleshooting Guide

diamondchain.com | 1-800 US CHAIN (872-4246) Diamond Chain Maintenance Guide 11
Instructions
When Disassembling or Assembling Chains:
WARNING
1) All personnel in the immediate service area should wear Personal Protective Equipment including safety glasses and shoes.
2) Always observe proper lockout-tagout procedures, and support the chain and equipment during service to prevent unexpected movement.
3) Once installed, ensure the chain drive is properly guarded to prevent injury or property damage. Consult the original equipment manufacturer for guarding details.
Chain Dissassembly: Removal of chain via the connecting link
1) Remove the cotters or spring clip from the connecting link.
2) Remove the cover plate and disassemble the link. Remove the chain from the equipment.
Removal of chain via pin extraction
1) If the chain is riveted, grind the pin heads off from one link such that the ends are flush with the link plate. If the chain uses cotters, remove them from one link. It is only necessary to perform this operation on one side of the chain.
2) From the same side of the chain as step 1, drive the pins out of the link plate using a Diamond Chain pin extractor (e.g. models PE113, PE135, PERE157, or PE-Max). Multiple strand chain will require a hammer and punch, or a press to remove the pins.
3) Remove the plate and disassemble the link. Remove the chain from the equipment
Chain Installation: 1) Install the chain and couple using a connecting link.
2) Install the cover plate to the connecting link. NOTE: Press fit cover plates use an interference fit and require tools to assemble.
3) Install spring-clips or cotter pins. NOTE: Avoid using bent or worn spring-clips or cotters. After installation, lightly tap pin ends to position parts snug against the
cover plate for additional support

402 Kentucky Avenue Indianapolis, IN 46225
1-800 US CHAIN (872-4246)
diamondchain.com
Diamond Chain Company is the recognized world leader in the design
and manufacture of high quality, high performance roller chain.
Since 1890, Diamond Chain has produced tens of thousands of types of roller chain for
a wide variety of applications from oil field to conveyors to combines.
Diamond Chain's commitment to quality includes being certified by both
ISO 9001:2015 and the American Petroleum Institute.
Doc ID: 11255_201903