Diabetic Neuropathic Pilon and Ankle Osseous Trauma and
18
357 INTRODUCTION The surgical treatment of the neuropathic pilon and ankle os- seous trauma and dislocations may be accomplished with a tra- ditional surgical approach with some additional steps needed to ensure healing and decrease complications. The initial clinical presentation is a valuable predictor of what additional surgical steps might be required. Radiographic examination of the pathologic ankle and distal tibia is absolutely necessary any time a neuropathic patient describes a questionable event or any re- lated symptoms. Subtle dislocations should be further examined by radiographic comparison of the contralateral ankle and dis- tal tibia. A CT scan should also be obtained to confirm a diagno- sis and determine the severity of pathology. Undiagnosed and improperly treated ankle and distal tibia osseous trauma and dislocations can rapidly progress to a Charcot joint. If the fixa- tion is inadequate or the fixation is being minimally protected, the severity of peripheral neuropathy has an extremely high risk of developing a Charcot joint at the affected or the adjacent fractured site(s). SURGICAL TECHNIQUE OF NEUROPATHIC DISTAL TIBIAL EXTRA-ARTICULAR FRACTURES The complexity and level of the distal tibial fracture pattern are the determining factors for surgical planning. Distal tibial frac- tures can be described as intra-articular and extra-articular. Muller et al. have described the AO/ASIF distal tibial fracture classification, which is divided into categories A, B, and C (1). AO/ASIF type A fractures are defined as fractures occurring above and not involving the distal tibial articular surface. The distal tibial fractures not involving the articular surface are the focus of this section. If the mechanism of injury is secondary to a crush injury, hyperbaric oxygen therapy may also be considered. Surgical correction may be performed at the closest time possible from the traumatic event. Extended surgical treatment timing reduces chances of anatomic alignment. To execute a proper reduction and stabilization of the distal tibia, the appro- priate external fixator construct must be built preoperatively. A multi-ringed Ilizarov type external fixator is the authors’ preferred choice. Long tibia and fibula views consisting of ante- rior-posterior, medial oblique, and lateral views should be assessed routinely when evaluating this pathology. If there is any secondary fracture line that may appear to extend distal into the ankle mortise, a CT scan should be ordered and as- sessed because it will affect the external fixator ring construct and surgical reduction. Also, if a multisegmental and/or com- minuted fracture is suspected, a CT scan should be ordered and thoroughly reviewed. The external fixator construct should always consist of a minimum of two ring fixation blocks above and below where the fracture lies on the tibia. These blocks are called the proxi- mal fixation block and the distal fixation block. Each fixation block is comprised of two full rings connected individually by four threaded rods. Two different ring constructs exist for dis- tal tibial fractures. The proximal fixation block remains consis- tent by connecting two rings with four fully threaded rods with a distance of 150 mm between the two. However, the distal fix- ation block may vary depending whether or not two rings can fit on the distal tibia remaining above the ankle joint and below the distal aspect of the tibial fracture. If two rings will not fit, the distal fixation block will be modified and consist of a foot plate and an ankle ring. Once the distal and proximal fixation blocks have been constructed, the two blocks are then con- nected using four fully threaded rods. The distance between the two blocks should span just above and below the distal tib- ial fracture (Fig. 26.1). It is highly recommended that all tran- sosseous wires be olive wires for additional stability. During intraoperative anesthesia, the contralateral limb malleolar position is examined. Most of the time, the surgeon will observe an external rotation of the fractured limb and a varus ankle. However, this is not always the case, and examina- tion of the fractured limb with the normal limb is necessary to better understand the rotational and angulated deformity. In the event of an open distal tibial fracture, the wound should be cleansed and débrided appropriately depending on the open Diabetic Neuropathic Pilon and Ankle Osseous Trauma and Dislocations Luis E. Marin Lawrence A. DiDomenico Emmanouil D. Stamatis Thomas Zgonis CHAPTER 26 15833_Ch26.qxd 3/31/09 12:27 PM Page 357
Transcript of Diabetic Neuropathic Pilon and Ankle Osseous Trauma and

357
INTRODUCTION
The surgical treatment of the neuropathic pilon and ankle os-seous trauma and dislocations may be accomplished with a tra-ditional surgical approach with some additional steps needed toensure healing and decrease complications. The initial clinicalpresentation is a valuable predictor of what additional surgicalsteps might be required. Radiographic examination of thepathologic ankle and distal tibia is absolutely necessary any timea neuropathic patient describes a questionable event or any re-lated symptoms. Subtle dislocations should be further examinedby radiographic comparison of the contralateral ankle and dis-tal tibia. A CT scan should also be obtained to confirm a diagno-sis and determine the severity of pathology. Undiagnosed andimproperly treated ankle and distal tibia osseous trauma anddislocations can rapidly progress to a Charcot joint. If the fixa-tion is inadequate or the fixation is being minimally protected,the severity of peripheral neuropathy has an extremely high riskof developing a Charcot joint at the affected or the adjacentfractured site(s).
SURGICAL TECHNIQUE OFNEUROPATHIC DISTAL TIBIALEXTRA-ARTICULAR FRACTURES
The complexity and level of the distal tibial fracture pattern arethe determining factors for surgical planning. Distal tibial frac-tures can be described as intra-articular and extra-articular.Muller et al. have described the AO/ASIF distal tibial fractureclassification, which is divided into categories A, B, and C (1).AO/ASIF type A fractures are defined as fractures occurringabove and not involving the distal tibial articular surface. Thedistal tibial fractures not involving the articular surface are thefocus of this section. If the mechanism of injury is secondary to acrush injury, hyperbaric oxygen therapy may also be considered.
Surgical correction may be performed at the closest timepossible from the traumatic event. Extended surgical treatmenttiming reduces chances of anatomic alignment. To execute a
proper reduction and stabilization of the distal tibia, the appro-priate external fixator construct must be built preoperatively.A multi-ringed Ilizarov type external fixator is the authors’preferred choice. Long tibia and fibula views consisting of ante-rior-posterior, medial oblique, and lateral views should beassessed routinely when evaluating this pathology. If there isany secondary fracture line that may appear to extend distalinto the ankle mortise, a CT scan should be ordered and as-sessed because it will affect the external fixator ring constructand surgical reduction. Also, if a multisegmental and/or com-minuted fracture is suspected, a CT scan should be orderedand thoroughly reviewed.
The external fixator construct should always consist of aminimum of two ring fixation blocks above and below wherethe fracture lies on the tibia. These blocks are called the proxi-mal fixation block and the distal fixation block. Each fixationblock is comprised of two full rings connected individually byfour threaded rods. Two different ring constructs exist for dis-tal tibial fractures. The proximal fixation block remains consis-tent by connecting two rings with four fully threaded rods witha distance of 150 mm between the two. However, the distal fix-ation block may vary depending whether or not two rings canfit on the distal tibia remaining above the ankle joint and belowthe distal aspect of the tibial fracture. If two rings will not fit,the distal fixation block will be modified and consist of a footplate and an ankle ring. Once the distal and proximal fixationblocks have been constructed, the two blocks are then con-nected using four fully threaded rods. The distance betweenthe two blocks should span just above and below the distal tib-ial fracture (Fig. 26.1). It is highly recommended that all tran-sosseous wires be olive wires for additional stability.
During intraoperative anesthesia, the contralateral limbmalleolar position is examined. Most of the time, the surgeonwill observe an external rotation of the fractured limb and avarus ankle. However, this is not always the case, and examina-tion of the fractured limb with the normal limb is necessary tobetter understand the rotational and angulated deformity. Inthe event of an open distal tibial fracture, the wound should becleansed and débrided appropriately depending on the open
Diabetic Neuropathic Pilon andAnkle Osseous Trauma andDislocations
Luis E. MarinLawrence A. DiDomenico
Emmanouil D. StamatisThomas Zgonis
C H A P T E R
26
15833_Ch26.qxd 3/31/09 12:27 PM Page 357

358 Chapter 26 Diabetic Neuropathic Pilon and Ankle Osseous Trauma and Dislocations
nature of the wound. If indeed an open fracture is beingtreated, operating time should be performed within the“golden period” of 6-hour time window in conjunction withintravenous (IV) antibiotics correlating with the contaminationlevel and nature of the wound. The surgical team should re-gown and drape following open fracture protocol beforecontinuing with the external fixation application and fracturereduction. Intraoperative soft tissue and bone cultures are alsoimperative throughout the procedure.
Tibial fracture reduction techniques are next performed sys-tematically. The preconstructed four-ringed external fixator orthree ringed and a foot plate is placed over the leg. Under flu-oroscopy, the foot and ankle are manually distracted androtated, allowing reduction of the tibial fracture. Manual side-to-side compression may be applied at the level of the fractureto aid in reduction. Manual distraction of the foot and ankleshould correct varus/valgus, procurvatum/recurvatum, andaxial shortening. Clinically, the patella, anterior tibial crest,and the second ray should line up. The lateral fluoroscopicview should show the proximal and distal tibia lined up parallelwithout anterior or posterior translation (Fig. 26.2). The an-teroposterior (AP) fluoroscopic views should show the anklejoint perpendicular to long axis of the proximal and distal tibia.Once reduction is confirmed, the external fixator is attached tothe proximal tibia with a transosseous wire to the high proxi-mal ring of the proximal fixation block. This wire is tensionedto 110- to 130-kg force and secured. Maintaining the triplanereduction, a distal transosseous wire is placed on the most distalring of the distal fixation block. This may be the foot plate orankle ring depending on what kind of fracture presented. Thiswire is tensioned between 70- to 90-kg force and secured. Atthis point, the fracture should be “out to length” and thereshould be no center of rotational angulation. If a slightvarus/valgus, procurvatum/recurvatum, and shortening/overlengthening exists, the threaded rods connecting the proximaland distal fixation block can be adjusted.
Next, focus is aimed at stabilizing and compressing the frac-ture site. This is performed by a dual olive tensioning tech-nique. The leading edge of the fracture is examined. If thereis anatomic alignment, this step can be cut short by simply
placing a transosseous olive wire from the proximal fracturering and a transosseous wire from the top ring of the distal fix-ation block. With these olives opposing each other, a tappingtechnique should then be performed until they abut the cor-tex; then, tension and secure. If the leading edge of the frac-ture has a “step-off,” a transosseous olive wire is used to reducethe fracture. Correlating with the step off, a proximal tran-sosseous olive wire is placed from the proximal fracture ring.The olive must be abutting either the lateral or medial cortex.
Figure 26.1 Neuropathic distal tibial extra-articular fracture external fixator construct.
Figure 26.2 Neuropathic distal tibial extra-articular fractureclosed reduction.
15833_Ch26.qxd 3/31/09 12:27 PM Page 358

Surgical Technique of Neuropathic Distal Tibial Extra-Articular Fractures 359
If the distal tibia is laterally deviated as depicted in Figure 26.3of the AO/ASIF A1 treatment pathway, the proximal olive wireshould be against the medial proximal tibial cortex. The distalolive should be against the lateral distal cortex of the distaltibia. These olive wires may be strategically loosely secured tothe ring one to two holes backward or forward depending ontheir orientation. This movement in the ring holes is to createa sagittal plane compression moment. This is called “walkingback” the wire technique. Once these olive wires are in place, atensioner is placed over the two wires opposite the olive. After atensioner is over the distal olive wire and the proximal olivewire, the tensioner is gently tightened, pulling the distal andproximal tibia together. The end of the wire opposite to theolive is tightly fixated to the ring. The tensioner is loosened andre-tightened between 110- to 130-kg force. The olive should notmove upon the second tensioning. If a large “butterfly” frag-ment is displaced, a third transosseous olive wire can be placesand tensioned as per the previously mentioned technique.Once the tibial fracture has been reduced and stabilized, theproximal and distal fixation block should be completed.Respecting the lower extremity anatomic “safe zones,” threeconverging transosseous wires or two transosseous wires and a
half pin should be placed per ring. If a foot plate was utilized, itis fixated by a second converging transosseous olive wirethrough the calcaneus and two converging transosseous olivewires on the forefoot/midfoot region (Figs. 26.3 and 26.4).
The surgical technique of neuropathic distal tibial extra-articular fractures is depicted in diagrams. The surgical tech-nique diagrams are not implying that all AO/ASIF A1, A2, andA3 can be treated as depicted. However, one should keep inmind the methods and apply as deemed appropriate.
SURGICAL TECHNIQUE OFNEUROPATHIC DISTAL TIBIALPERIARTICULAR FRACTURES
The complexity of the articular disturbance inherent to thedistal tibial periarticular fracture makes anatomic fracture re-duction extremely challenging. Not only is the pilon fracture asevere intra-articular pathology, but it also produces severesoft tissue pathology. The distal tibial periarticular fracturezone of injury is notorious for dictating when and what kind ofsurgery can be performed. Depending on the severity of the
Figure 26.3 Neuropathic distal tibial extra-articular fracture technique for AO/ASIF A1 and A3.
AO/ASIF A1 AO/ASIF A3
Step 11. Preconstructed External Fixator Placed over Leg2. Grasp Foot & Ankle Close Reducing the Distal &
Proximal Tibia Segments—see Neuropathic Distal Tibia Extra-articular Closed Reduction
3. Slide External Fixator into Alignment4. Place High Proximal Tibial Wire, Tension &
Secure
Step 21. While Holding Reduction of Distal & Proximal
Tibia, Place an Ankle Ring Wire Parallel to the High Proximal Wire, Tension & Secure
2. Place an Olive Wire Just Above and Below the Fracture. One Olive Wire Extends From the Proximal Fracture Ring & the Other Olive Extends from the Distal Facture Ring
3. If Further Sagittal Fracture Compression is Needed, utilize “Walking Back” the Olive Wire Technique
4. Dual Tensioning Technique Performed Reducing & Stabilizing Tibial Fracture
Step 31. After Confirming Corrected Tri-plane Alignment
under Fluoroscopy, Add a Third Olive Wire for Fracture Fragment Reduction (if needed)
2. Complete Construct of Distal & Proximal Fixation Block
15833_Ch26.qxd 3/31/09 12:27 PM Page 359

360 Chapter 26 Diabetic Neuropathic Pilon and Ankle Osseous Trauma and Dislocations
intra-articular fracture pattern, realistic surgical outcomes mustbe thoroughly discussed with the patient. The neuropathic pa-tient is projected to have a much poorer surgical outcome thanthe non-neuropathic patient. The goal of surgery is restora-tion of the distal tibia anatomic alignment. A more traditionalpilon surgical approach involves initial stabilization and distrac-tion with a monolateral external fixator. A second surgery is thenperformed approximately 2–3 weeks after the traumatic event.This second surgery involves an open reduction and internal fix-ation (ORIF) combined with plating of the medial tibia. Theneuropathic limb is at risk with this procedure. Open reductionand internal fixation of a neuropathic pilon fracture increaseschances of infection and wound dehiscence. A modification ofthis technique is required to minimize postoperative complica-tions. This technique revolves around immediate closed reduc-tion, percutaneous fixation, and a stable strategic application ofa multi-ring external fixator. As with most complex fracture pat-terns, no one technique exists; however, a combination of tech-niques with underlying principles remains.
A high-energy pilon at the authors’ institutions is treatedsimilar to a crush injury. Surgery is performed as soon as possi-ble to the traumatic event. Surgical planning is correlated
with radiographs and CT scans. Hyperbaric oxygen therapy isimplemented when necessary. If surgery is delayed, hyperbaricoxygen may begin preoperatively and continue postoperatively.If an open distal tibial periarticular fracture is observed, it isa surgical emergency and is treated using an open fractureprotocol.
Ruedi-Allgower classification of pilon fractures and theAO/ASIF distal tibial fracture classification can be used to gen-erally describe radiographic pathologic anatomy of pilon frac-tures (1,2). The goals of distal tibial periarticular fracturesurgery are to restore anatomic distal tibia alignment to set thestage for a functional ankle joint. If a distal fibular fractureand/or syndesmotic rupture and diastasis injury coexist, theymust also be anatomically aligned. The tibia is the major loadbearer and the fibula plays a minor role. Historically, distal tib-ial periarticular fracture surgery methods focused on platingthe fibula regardless of the fracture pattern and location. If thefibula is brought to length and plated, certain postoperativemeasures should be taken before weight-bearing to prevent avarus ankle mortise by removing the distal plate screws beforeweight-bearing. If a fibula fracture is about 4 cm above theankle mortise and there is no syndesmotic diastasis injury, it
Figure 26.4 Neuropathic distal tibial extra-articularfracture technique for AO/ASIF A2.
AO/ASIF A2
Step 11. Preconstructed External Fixator
Placed over Leg2. Grasp Foot & Ankle Close
Reducing—see Neuropathic Tibia Close Reduction Diagram
3. Slide External Fixator into Alignment4. Place High Proximal Tibial Wire,
Tension & Secure
Step 21. While Holding Reduction of Tibia, Place a Calcaneal
Wire Parallel to the High Proximal Wire, Tension & Secure to Foot Plate2. Place an Olive Wire Just Above and Below the Fracture. One Olive Wire
Extends From the Proximal Fracture Ring & the Other Olive Extends from the Distal Fracture Ring
3. If Further Sagittal Fracture Compression is Needed, Utilize “Walking Back” the Olive Wire Technique
4. Dual Tensioning Technique Performed Reducing & Stabilizing Tibial Fracture
Step 31. After Confirming Corrected
Tri-plane Alignment under Fluoroscopy, Add an Olive Wire for Fracture Fragment Reduction (if needed)
2. Complete Construct of Distal & Proximal Fixation Block
15833_Ch26.qxd 3/31/09 12:27 PM Page 360

Surgical Technique of Neuropathic Distal Tibial Periarticular Fractures 361
usually does not need fixation. However, if the fibular fractureoccurs with a concomitant syndesmotic diastasis injury, a syn-desmotic screw and/or plate should applied. A fibular fractureat the level of the ankle joint should be fixated using platingand screws in most cases. The premise is that a correctly alignedarticular surface of the distal tibia, medial malleolus, and lat-eral malleolus is the only outcome that will restore the architec-ture for a functional ankle joint.
The authors’ preferred choice is to use a multi-ringed circu-lar type external fixator consisting of a foot plate and threecircular rings. The foot plate and each of the three rings areconnected by four threaded rods. Avoid using long threadedrods connecting multiple rings because they will limit postoper-ative adjustments. The frame construct should be planned pre-operatively from true anatomic AP, calcaneal axial, and laterallong view radiographs from the foot to proximal tibia. Theframe construct should consist of two fixation blocks called theproximal and distal fixation block. The four rings are desig-nated as foot plate, ankle ring, proximal fracture ring, and highproximal ring (Fig. 26.5). The proximal fracture ring and thehigh proximal ring should be connected by four threaded rodswith a distance spanning the tibia of at least 150 mm for an op-timally stable block (3). The two fixation blocks are then con-nected by four threaded rods. The distance from the ankle ringand the proximal fracture ring is dictated by how high the pilonfracture lines extend into the proximal metaphyseal portion of
the tibia. This distance may range from 60 to 110 mm. A com-mon treatment pathway exists for similar type pilon pathologi-cal anatomy (Fig. 26.6). Once the patient is under anesthesia,distraction of the foot and ankle is performed allowing ligamen-totaxis to reduce the pilon. The distraction maneuver is per-formed to bring the fibula and distal tibial peri-articular fractureout to length and attempt to acutely reduce frontal, sagittal, andtransverse plane rotation associated with the traumatic event.
AO/ASIF B1, B2, and Ruedi-Allgower I type pilon injuriesare described as the least destructive to the articular surfacewith minimal fracture displacement (2,3). Primary percuta-neous fixation can be performed. The fracture orientation andplane determines the screw(s) orientation. CT scan correlationis very helpful. Using 4.0-mm cannulated partially threadedscrews, the fractures can be compressed and stabilized. It is im-portant to examine the fracture pattern preoperatively to besure the cancellous portion of the screw will pass the fracturesite maximizing screw lag technique. Once the distal tibial peri-articular fracture has been fixated, the fibula may be addressed.A fibular fracture below or at the level of the ankle joint with�2 mm of displacement should be fixated. A combination of aplate and screws may be used combined with a percutaneoustechnique. The tibia and fibula syndesmosis should always bestressed. If a syndesmotic ligament rupture has occurred, itmust be reduced and stabilized. The syndesmotic screw inser-tion should be held until the tibial articular surface has been
Figure 26.5 Neuropathic distal tibial peri-articular exter-nal fixator construct and terminology.
Figure 26.6 Neuropathic distal tibial periarticular treatment algorithm.
15833_Ch26.qxd 3/31/09 12:27 PM Page 361

362 Chapter 26 Diabetic Neuropathic Pilon and Ankle Osseous Trauma and Dislocations
restored and fixated. The syndesmosis is addressed by one totwo 4.0-mm cannulated fully threaded cancellous screws ap-plied to the lateral aspect of the fibula through the lateral as-pect of the tibia, and anchoring in the medial cortex of thetibia. The screw should stop just before exiting the medial as-pect of the tibial cortex. A transosseous olive wire may be usedas an alternative syndesmosis reduction and stabilization tech-nique. The wire is placed just above the ankle joint goingthrough the fibula and tibia in the frontal plane with the olivewire abutting the lateral cortex of the fibula. The tensioner isplaced over the wire opposite the olive and gently tightenedunder live fluoroscopy visualizing reduction of the tibia andfibular diastasis. Fibular fractures above the level of the anklejoint by 4 cm that do not have a concomitant syndesmotic rup-ture do not need plate and screw fixation. Intraoperative viewshould confirm correct placement of the olive wire(s) and thefibular should be stressed to confirm reduction and stability.
A prebuilt multi-ring external fixator is placed on the leg.This frame is applied to serve as a force neutralizer and jointstabilizer. The first wire is placed across the calcaneus allowing1- to 1.5-cm plantar fat pad projection plantarly. The frame isthen grasped and pulled distal from the patient, serving to dis-tract the ankle joint and fracture fragments. While distracting,a tibial wire is placed parallel to the calcaneal wire to the highproximal ring. After checking for anterior and posterior spac-ing of the tibia and calf, the rest of the frame wires can be com-pleted. Each of the three circular rings should be fixated to thetibia with three transosseous olives or two transosseous wiresand a half pin. All tibial wires should be converging consistentwith the lower extremity safe zones and tensioned to about 110-to 130-kg force. The foot plate is fixated by two converging tran-sosseous olive wires through the calcaneus and forefoot. Thefoot plate wires are tensioned to 70- to 90-kg force (Fig. 26.7).
AO/ASIF C2 and Ruedi-Allgower type II are described asmultifragmental intra-articular minimally displaced distal tibialfractures (1,2). These fractures can retract into an anatomicrealignment with traction and closed reduction techniques ifperformed as soon as possible to the traumatic event. However,there are times when these types of fractures do not respond totraction and a percutaneous manipulation combined with op-posing olive wire reduction technique must be used.
Initially, the foot and ankle are distracted while an assistantstabilizes the knee. While distracting, the surgeon is waitingfor a “deep click” that can be felt and sometimes heard.Distraction may continue for a continuous 5–10 minutes andfluoroscopic views will confirm that the joint has been reduced.Sometimes anatomic and other times percutaneous manipula-tion is needed to further align the articular surface. After theclosed reduction, surgery may begin. Fluoroscopy determinesthe appropriate next steps. If ankle joint alignment has beenrestored, percutaneous screws may be placed to hold the reduc-tion and compress and stabilize the fractures. This techniquewas previously described in the treatment of AO/ASIF B1, B2,and Ruedi-Allgower type I.
In the event that the AO/ASIF C2 and Ruedi-Allgower type IIdo not respond to percutaneous manipulation, a more aggressivereduction technique must be employed. The prebuilt three ringand foot plate external fixator is placed over the leg. A calcanealwire is place from medial to lateral and anchored to the footplate allowing 1 to 1.5 cm of plantar fat pad projection plantarly.The external fixator is then grasped while an assistant stabilizes
the knee and pulled away from the patient pulling the calcaneusin aggressive traction. If this maneuver does not reduce the joint,a percutaneous introduction of a periosteal elevator may used tofree and reduce fragments. This is a maneuver aimed at pushingplantarly the articular fragment of the joint that has becomelodged in the metaphyseal portion of the tibia. Sometimes, mul-tiple strategically placed tibial stab incisions anterior lateral andanterior medial are necessary to locate and reduce fracture frag-ments. Once the fragment has been reduced, large reductionforceps are used to reduce the anterior and posterior widenedtibia. The proximal fixation block must be stabilized by placingtwo to three transosseous olive wires anchored and tensioned tothe high proximal ring and the proximal fracture ring. After theproximal fixation block has been stabilized, percutaneous 4-mmcannulated partially threaded screws are then placed from ante-rior to posterior or posterior to anterior correlating with the frac-ture pattern anatomy of the CT scan. The sagittal plane of thepilon has been stabilized. The frontal plane is the next focus.Large medial and lateral pilon fracture fragments meet in the ar-ticular surface forming an “articular gap.” This articular gap mustbe reduced. One transosseous olive wire is placed from medial tolateral tibia just above the ankle joint, not coursing through thefibula with the olive abutting the medial tibial cortex. A secondtransosseous olive wire is placed from lateral to medial tibia 2 to5 cm above the ankle joint, also avoiding the fibula abutting thelateral tibial cortex. A tensioner is placed on the wire opposite tothe olive. Simultaneously, both tensioners are tightened underlive fluoroscopy visualizing bone reduction. Once the articular
Figure 26.7 Neuropathic distal tibial periarticular technique forAO/ASIF B1, B2, and Ruedi-Allgower type I.
15833_Ch26.qxd 3/31/09 12:27 PM Page 362

Surgical Technique of Neuropathic Distal Tibial Periarticular Fractures 363
gap reduction has been confirmed, the transosseous olive wiresare fixated to the ankle ring. The end of the wire opposite to theolive is tightly fixated to the ankle ring. The tensioner is loosenedand retightened between 110 to 130 kg force. The olive shouldnot move upon the second tensioning. Next, the distal fixationblock is to be completed. The foot plate is fixated by a secondconverging transosseous olive wire through the calcaneus andtwo converging transosseous olive wires at the forefoot/midfootregion. The foot plate wires are then tensioned between 70 to 90kg force (Fig. 26.8).
AO/ASIF B3, C3, and Ruedi-Allgower type III are describedas the most destructive of the distal tibial periarticular fracturesbecause of the severely comminuted intra-articular displaced
distal tibial fractures (1,2). These injuries generally have a poorfunctional outcome. The goals remain restoring the ankle mor-tise, correcting the varus or valgus distal tibia, and fixating thefibula appropriately. By holding to the original goals of pilonsurgery, a plantigrade tibia will be the outcome capable of alater joint destructive procedure such as an arthrodesis. If a pri-mary arthrodesis is decided upon, the definitive surgery shouldbe performed no earlier than 21 days after the traumatic event.The details of a primary arthrodesis are outside of the scope ofthis chapter.
AO/ASIF B3, C3, and Ruedi-Allgower type III are initiallymanually distracted and reduction of the tibia and fibula isattempted. The fibula fracture is examined, and as mentioned,
Figure 26.8 Neuropathic distal tibial periarticular technique for AO/ASIF C2 and Ruedi-Allgower II.
15833_Ch26.qxd 3/31/09 12:27 PM Page 363

364 Chapter 26 Diabetic Neuropathic Pilon and Ankle Osseous Trauma and Dislocations
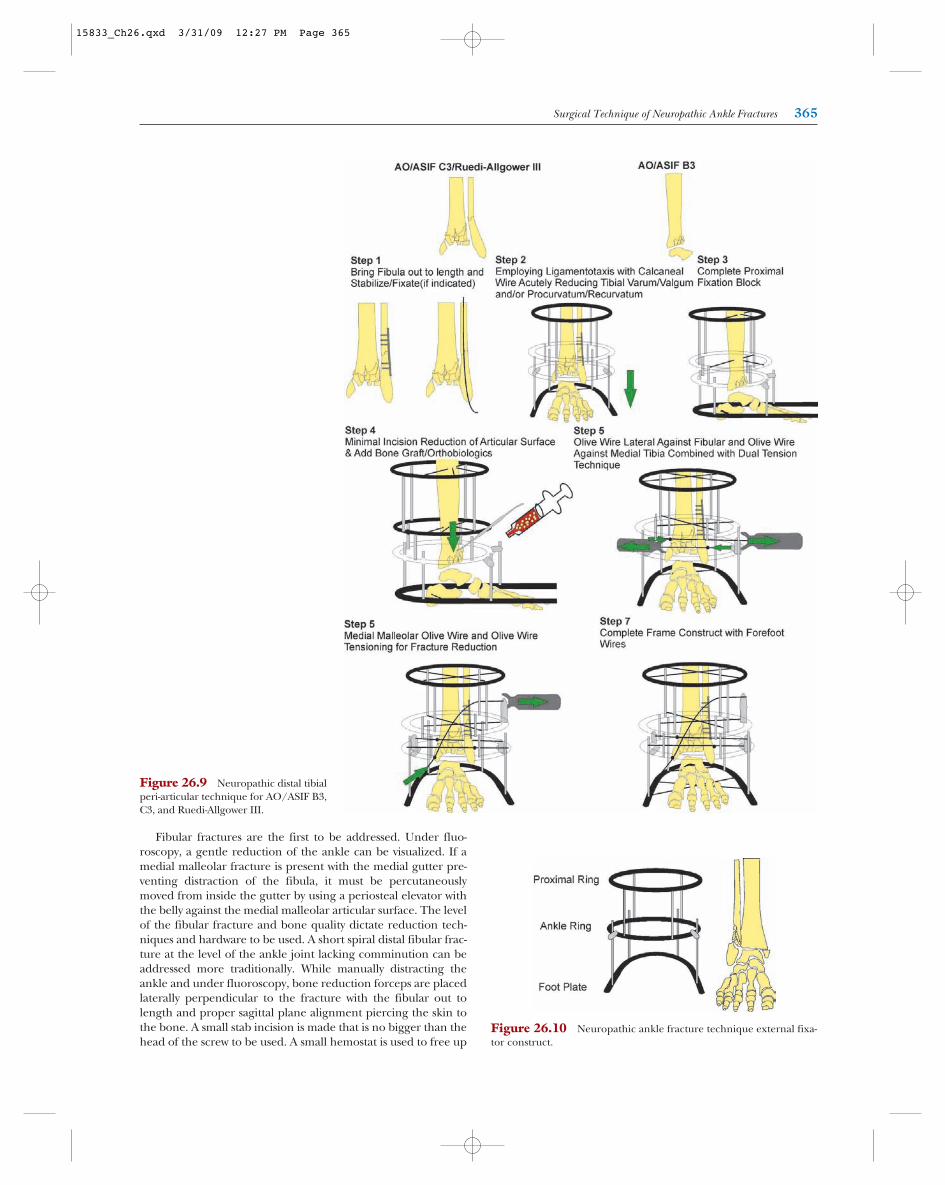
may need stabilization and fixation. This stage of pilon fracturecan be highly variable. The surgical example has a high fibulafracture and a syndesmotic injury. The fibula is brought out tolength and stabilized using a combination of plate screws or anintramedullary wire coursing from the distal fibula to proximalfibula. The preconstructed external fixator consisting of threerings and a foot plate is placed over the leg. A calcaneal wire isplace and correction to lateral and anchored to the foot plate al-lowing 1 to 1.5 cm of plantar fat pad projection plantarly. The ex-ternal fixator is then grasped while an assistant stabilizes theknee and pulled away from the patient pulling the calcaneus inaggressive traction. Multiple fluoroscopic views should be takento ensure the gross alignment in the frontal, sagittal, and trans-verse plane and correction to a rectus position. Once this is con-firmed, the proximal fixation block is stabilized using previouslymentioned techniques. A percutaneous introduction of a pe-riosteal elevator or blunt instrument may be used to free andreduce fragments of the articular surface lodged proximally inthe metaphyseal bone. The comminuted metaphyseal portion ofthe tibia should be structurally and biologically augmented usinga combination of cancellous bone chips and an orthobiologicrich in growth factors. The surgical technique case exampleshows a syndesmotic ankle injury. The distal tibia must bereduced and stabilized in the frontal plane. A transosseous olivewire is placed from the lateral fibula parallel to the ankle jointand at the level of the syndesmosis with the olive against the lat-eral cortex of fibula. A second transosseous olive wire is placedjust above the most proximal medial distal tibial periarticularfracture line. This wire is also parallel to the ankle joint, with theolive abutting the medial cortex of tibia. The distal olive wire istemporarily fixated to the ankle ring and the proximal olive wireis also temporarily fixated to the proximal fracture ring. Thesewires may extend from their ring by fixation posts. A tensioner isplaced on the distal wire opposite the olive. A second tensioneris placed on the proximal wire on the side opposite the olive.The tensioners are gently tightened at the same time, pulling therespective olive wires toward one another under fluoroscopy.Once there has been adequate reduction of the distal tibia in thefrontal plane, the end of the wire opposite to the olive is tightlyfixated to the ankle ring. The tensioner is loosened and re-tightened between 110 to 130 kg force. The olive should notmove upon the second tensioning. If a medial malleolar typefracture exists in an area of heavily comminuted bone, a tran-sosseous olive wire can be directed in the frontal plane from dis-tal medial tibia to proximal lateral tibia. A washer can be placedin combination with the olive wire to increase reduction surfacearea against a comminuted medial malleolar fracture compo-nent. This wire should exit the lateral tibia above the distal tibialperiarticular fracture. The wire is anchored to the proximal frac-ture ring and gently tensioned under fluoroscopy, watching me-dial malleolar fracture reduction. Once reduced, the wire isattached to the foot plate and attached to the proximal fracturering extending from a post without any added tensioning. Thefoot plate is fixated by a second converging transosseous olivewire through the calcaneus and two converging transosseousolive wires through the forefoot/midfoot region. The foot platewires are tensioned between 70 to 90 kg force (Fig. 26.9).
A final important point should be stressed. After the reduc-tion olive wires have been placed and reduction has been at-tempted, it is not uncommon that fracture reduction does notbecome aligned as much as one would hope. Many times, a
rotational component may be revealed and counter productivewires are noted. These wires may be moved or replaced whilecorrecting the rotational fracture component.
SURGICAL TECHNIQUE OFNEUROPATHIC ANKLE FRACTURES
Surgical repair and successful outcome of the neuropathicankle fracture lies solely on the patient’s healing potential.Each and every ankle fracture has a different presentation thatmust be recognized and treated appropriately. As with anyankle fracture, the goal of surgery is restoration of theanatomic joint alignment. The neuropathic ankle fracture hasa much higher complication rate. Complications include butare not limited to infection, nonunion, malunion, dehiscence,osteomyelitis, hardware failure, and development of a Charcotfoot/ankle. The surgical techniques that follow are aimed atthe anatomic reduction and stabilization of the neuropathicankle fracture by minimizing postoperative complications.Dense peripheral neuropathy alone makes the postoperativeoutcome more challenging and one may expect early patientweight-bearing because of their inability to sense pain and feeltheir lower extremities.
In the situation of the neuropathic ankle, soft tissue viabilityand surgical wound coverage are of equal importance, as arethe fracture pattern and pathoanatomy. Open reduction andinternal fixation provide the best fracture fixation; however,the neuropathic limb demands additional fixation and stabilityconsisting of circular external fixation stabilization. Not allneuropathic ankle fractures need this approach, but many ofthe patients’ risks of noncompliance, surgery-induced Charcotneuroarthropathy, multiple comorbidities, dense peripheralneuropathy, and peripheral vascular disease are heavily consid-ered candidates for additional fixation with external fixation.Primary ankle arthrodesis may also be considered in severelycomminuted intra-articular tibial plafond and ankle fractures.
Treatment of the neuropathic ankle fracture begins imme-diately upon presentation to the physician. Dislocation of theankle joint needs relocation immediately with application of amildly compressive type of dressing and temporary splinting.This alone can prevent avoidable fracture blisters and skinnecrosis. The sooner the surgery can be performed to the trau-matic event, the better the outcome will be. The soft tissue en-velope must be addressed and protected immediately.Stabilizing the fracture will in return stabilize the soft tissues ifa minimally invasive technique is used properly. If massiveedema exists, mild compression and immobilization mustcontinue until the skin lines return to normal. This may take7 to 21 days for the zone of injury to clearly define itself.Radiographs will dictate the size of the external fixator chosen.The authors’ choice is a foot plate with two circular rings. Thefoot plate and rings are attached using three levels of fourthreaded rods (Fig. 26.10). The construct is designed for jointand fracture stability. Fracture reduction will be dependent ona percutaneous open reduction and internal fixation. Severalmethods have been described to use external fixation and tran-sosseous wires for ankle fracture stabilization as well as perma-nent fixation. It is the authors’ opinion that this method maybe avoided. Better longer-term outcomes are obtained when anelement of internal fixation is simultaneously used.
15833_Ch26.qxd 3/31/09 12:27 PM Page 364
Surgical Technique of Neuropathic Ankle Fractures 365
Figure 26.10 Neuropathic ankle fracture technique external fixa-tor construct.
Figure 26.9 Neuropathic distal tibialperi-articular technique for AO/ASIF B3,C3, and Ruedi-Allgower III.
Fibular fractures are the first to be addressed. Under fluo-roscopy, a gentle reduction of the ankle can be visualized. If amedial malleolar fracture is present with the medial gutter pre-venting distraction of the fibula, it must be percutaneouslymoved from inside the gutter by using a periosteal elevator withthe belly against the medial malleolar articular surface. The levelof the fibular fracture and bone quality dictate reduction tech-niques and hardware to be used. A short spiral distal fibular frac-ture at the level of the ankle joint lacking comminution can beaddressed more traditionally. While manually distracting theankle and under fluoroscopy, bone reduction forceps are placedlaterally perpendicular to the fracture with the fibular out tolength and proper sagittal plane alignment piercing the skin tothe bone. A small stab incision is made that is no bigger than thehead of the screw to be used. A small hemostat is used to free up
15833_Ch26.qxd 3/31/09 12:27 PM Page 365

366 Chapter 26 Diabetic Neuropathic Pilon and Ankle Osseous Trauma and Dislocations
deep tissue to bone. A cannulated interfragment screw is placedfrom proximal anterior to distal posterior perpendicular to thefracture. Once the screw is tightened and if a good bicorticalpurchase is achieved, the bone reduction forceps can be re-moved. A one third semitubular plate is next chosen to allow twoscrews below the fracture and two to three screws above the frac-ture. Depending on the degree of comminution or osteoporosis,a locking plate option should be considered. The plate must bebent to the anatomy of the fibula. A longitudinal full-thicknessincision no bigger than 1 cm is made just at the distal lateral as-pect of the fibula. A periosteal elevator is then used to create alayer for the plate beneath the deep tissue and ideally beneaththe periosteum. The plate is gently slid from distal to proximalagainst the fibula. The plate is checked for alignment under flu-oroscopy for length and appropriate number of screw holesproximal and distal to the fracture. The first screw will be corticaland located just above the fibular fracture. A longitudinal full-thickness incision is made just over the hole in the plate no morethan the size of this cortical screw to be placed. A small hemostatis introduced into the incision to free up any soft tissue sur-rounding the plate hole to allow the screw head to obtain a di-rect contact to the plate. The next screws to be placed are justbelow the fracture. The previous incision that the plate was intro-duced through will allow adequate exposure while inserting thecancellous screws. If the fibula remains at length and reduced atthis point, the rest of the available screws may be placed. Beforeplacing the last proximal cortical screw in the plate, the syn-desmosis must be stressed. Gently pulling on the distal fibulaunder fluoroscopy with a bone hook, the ankle fracture ischecked for a diastasis injury. If indeed a diastasis injury exists, afully threaded cortical screw is placed using the minimal incisiontechnique in the most proximal hole of the fibular plate.
The next focus is the medial malleolar fracture. An incisionno bigger than 1 cm is made at the distal aspect of the medicalmalleolar fracture. Blunt dissection is carried down to the pe-riosteum. A bone hook is then placed grasping the distal tip ofthe malleolus. The bone hook is then pulled proximal, at-tempting temporary fracture reduction. If a rotational compo-nent or soft tissue entrapment appears to inhibit reduction, thefollowing technique may be employed. A small stab incision ismade at the medial gutter of the ankle joint. Blunt dissection iscarried down to the joint. A small periosteal elevator is thenintroduced through the incision. A sweep of the fracture siteis performed. The bone hook at the tip of the medial malleolusis pulled proximal while rotating the periosteal elevator againstthe fracture fragment. Once the fracture has been reduced, itis then fixated using two parallel cannulated 4-mm partiallythreaded screws. If a posterior malleolar fracture involves30% of the distal tibial articular surface, a percutaneous ante-rior to posterior or posterior to anterior cannulated 4-mm par-tially threaded screw may be placed. Depending on the stabilityof fixation, patient condition/physiologic status, a decision toapply an external fixator should be considered (Fig. 26.11).
A severely comminuted fibular fracture at the level of theankle joint can pose a challenging task of obtaining stable fi-xation and reduction. A percutaneous approach may be used inthe following manner. A 1-cm incision is made longitudinally atthe distal aspect of the fibula. Blunt dissection is carried down tothe level of bone. A periosteal elevator is then used to create alayer for the plate beneath the deep tissue and the periosteum. Aplate is chosen and contoured in the previously mentioned fash-
ion. The plate length is chosen, not modeled after the presentlyshortened fibula, but instead to an “ideal” fibula out to length.The plate is then slid through the incision so that two to threescrew holes are proximal to the comminuted portion of thefibula. The plate is placed lateral to the fibula and a lateral fluo-roscopic view is taken to make sure that the plate is directly overthe fibula. At that time, the distal portion of the fibula can re-main in a malaligned position which will be addressed later in theprocedure. Once views confirm appropriate plate position in thesagittal plane, a cortical screw is placed in the most proximalplate hole. Simultaneous manual distraction of the ankle and dis-traction of the distal fibula using bone reduction forceps is per-formed. Once the first screw is placed, a second cortical screw isplaced just below the most proximal screw. While the secondscrew is tightened, the plate will reduce the fibula from its valgusposition, buttressing the comminuted portion and distal fibula.The distal fibula may need manipulation with the bone forcepsto recreate the lateral gutter. One to two cancellous screws areplaced in the distal portion of the fibula. Fluoroscopic viewsshould be taken to confirm fibular length as well as sagittal andfrontal plane alignment. Bone graft should be placed in the com-minuted fibula through the distal incision. The syndesmosisshould be stressed and treated appropriately. If the medial malle-olus is noncomminuted, it should be reduced and fixated as pre-viously mentioned. However, if a comminuted medial malleolusis encountered, an olive wire reduction technique may be per-formed. This technique is performed after the ankle joint exter-nal fixator is applied. The distal tip of the medial malleolus ispierced by a transosseous olive wire without crossing the fracturesite. It is then manipulated by rotating the fragment with theolive wire assisted by a periosteal elevator. Once alignment of themedial gutter is obtained, the olive wire is advanced from distalmedial to proximal lateral. The goal is for the olive wire to abutthe distal medial malleolar fragment and the end of the wire toexit the proximal lateral tibial cortex. Once the olive exits the lat-eral tibial cortex, it is then loosely fixated to the ring it is closestto whether it is the ankle or more proximal ring. A tensioner isplaced over the wire opposite to the olive. Gently under fluo-roscopy, the wire is tensioned reducing the fragment and provid-ing compression across the fracture site. The olive wire is then se-cured the foot plate and circular ring. A second olive wire may beapplied in a similar way as well.
Severely comminuted and unstable neuropathic ankle frac-tures benefit from a multi-ringed external fixator. The externalfixator may function to further stabilize the ankle or add to frac-ture reduction and stabilization. The chosen configuration is twofull rings and a foot plate connected by four threaded rods. Thedistance from the foot plate to the ankle joint should place theankle ring 2 to 4 cm above the ankle joint. The proximal ring dis-tance from the ankle joint should be 150 mm from the anklering. The external fixator is applied after percutaneous fracturereduction and stabilization is performed. The prebuilt externalfixation is placed over the foot and ankle. The foot plate isplaced to allow plantar projection of the heel. A transosseous cal-caneal wire is placed medial to lateral and tensioned between 70to 90 kg force. While grasping the foot plate, manual traction dis-tally is performed. This is done to attempt ankle joint arthrodias-tasis and aid in ligamentotaxis fracture reduction. A transosseoustibial wire is placed, avoiding the fibula parallel to the calcanealwire and tensioned to about 110 kg force. Once foot and anklealignment is confirmed in the frame, a second converging
15833_Ch26.qxd 3/31/09 12:27 PM Page 366

Postoperative Management 367
transosseous tibial wire is then placed and tensioned. A secondconverging calcaneal wire is then placed and followed by twoconverging metatarsal wires that are tensioned in a similar way.Next, two converging proximal tibial wires are placed and ten-sioned to about 110 kg force. It is recommended to use all olivewires. The ankle stabilization frame is now complete (Fig. 26.12).
POSTOPERATIVE MANAGEMENT
The estimated time for bony consolidation is approximatelydouble the time normally estimated for a healthy patient.Prolonged stabilization is essential to prevent neuropathicfractures from progressing into a Charcot deformity. The worstcase scenario should always be assumed.
The patient is kept in the hospital for 3 to 7 days postopera-tively for glucose control, pain management, appropriate IV an-tibiotics, and to ensure that the patient is medically stable and
able to rehabilitate before discharge. The patient receives 10 to14 days of prophylactic low molecular weight heparin therapy,which is started 12 hours postoperatively and 1 week of oral an-tibiotics in accordance with the medical and infectious diseaseteams. The patient is seen weekly until the sutures and/or sta-ples are removed at 3 to 4 weeks and then once every 2 weeks forthe remaining months. Postoperative radiographs are obtainedat 2 to 4 weeks and then once a month until healing is complete.Close and constant monitoring is absolutely imperative.
The pin or wire sites are covered with Betadine-soaked gauzeand the frame must be kept dry. Patients are instructed not totake showers and are educated on pin or wire site care that is tobe done weekly. Patient compliance is strongly emphasized andstrict pin or wire site care must be maintained. Stability is alsoof the utmost importance. The wires and pins must be checkedat each visit to guarantee that the tension has not been lost.Retensioning can be achieved using the manual tensioningtechnique.
Figure 26.11 Neuropathic ankle fracture technique of noncomminuted fibula.
15833_Ch26.qxd 3/31/09 12:27 PM Page 367

368 Chapter 26 Diabetic Neuropathic Pilon and Ankle Osseous Trauma and Dislocations
DISTAL TIBIA EXTRA-ARTICULAR FRACTURES
The patient is kept non–weight-bearing for 10 to 14 days. Afterthis point the patient is encouraged to be full weight-bearing astolerated with a walker and/or crutch assistance. In a normalpatient bony consolidation normally takes 14 to 16 weeks. A pa-tient with diabetic neuropathy will generally have consolida-tion at 16 to 24 weeks. The frame should be dynamized whensigns of consolidation appear, usually around 10 to 16 weekspostoperatively. The patient is then encouraged to walk fullweight-bearing for 2 to 3 weeks. If no problems occur theframe may be removed in the hospital setting. The patient
then progresses into a walking device or pretibial brace for 4 to6 weeks. After that, the patient may progress into a custommolded diabetic shoe as tolerated. A final postoperative visit isdone at 6 months. Patient education is paramount throughoutthe postoperative course (Figs. 26.13 and 26.14).
DISTAL TIBIA PERIARTICULAR FRACTURES
The type of injury will dictate the postoperative care. A rota-tional or low-energy pilon fracture will be treated like a distaltibia fracture. A high-velocity pilon fracture is much more com-plicated. Because of the high forces involved with severe pilon
Figure 26.12 Neuropathic ankle fracture technique of comminuted fibula.
15833_Ch26.qxd 3/31/09 12:27 PM Page 368

Postoperative Management 369
Figure 26.13 A neuropathic distaltibia extra-articular fracture (A) treatedwith a circular external fixator andpercutaneous internal fixation (B,C). Finalpostoperative pictures at 6 months follow-up (D,E).
fractures, these injuries are considered the same as crush in-juries. Inpatient treatment may include the use of hyperbaricoxygen therapy. The patient is kept non–weight-bearing with awalker or crutch assistance for 6 to 8 weeks. If radiographs showsigns of consolidation, the patient is encouraged to be partialweight-bearing with assistance after this point. It is important tomaintain arthrodiastasis across the ankle joint during this time.
The frame should be dynamized when signs of consolida-tion appear, usually around 10 to 12 weeks postoperatively. Thepatient is then encouraged to walk full weight-bearing for 2 to3 weeks. If no problems occur the frame may be removed. Thepatient then progresses into a walking device for 1 to 2 months.After that, the patient may progress into a custom molded dia-betic shoe as tolerated. A final postoperative visit is done at 6 months. Patient education is paramount throughout the post-operative course (Fig. 26.15).
ANKLE FRACTURES
The patient is kept non–weight-bearing for 6 to 8 weeks.After this point the patient is encouraged to be full weight-bearing as tolerated with assistance. In a normal patient bonyconsolidation normally takes 6 to 8 weeks. A patient with dia-betic neuropathy will generally have consolidation at 12 to16 weeks. The frame should be dynamized when signs ofconsolidation appear, usually around 10 to 12 weeks postop-eratively. The patient is then encouraged to walk full weight-bearing for 2 to 3 weeks. If no problems occur the framemay be removed. The patient then progresses into a walkingdevice for 4 to 6 weeks. After that, the patient may progressinto a custom molded diabetic shoe as tolerated. Anklebracing is encouraged for 6 to 8 months (Figs. 26.16and 26.17).
B,C
D,E
A
15833_Ch26.qxd 3/31/09 12:27 PM Page 369

370 Chapter 26 Diabetic Neuropathic Pilon and Ankle Osseous Trauma and Dislocations
Figure 26.14 A case example of an extra-articularankle fracture with a simultaneous severely comminutedintra-articular calcaneal fracture (A,B), treated by an ORIFfor the ankle fracture and a primary subtalar joint arthrode-sis using a multiplane circular external fixation device forbetter rigidity and stability (C,D). A final 10-month postop-erative outcome (E,F).
A B,C
D,E
F
15833_Ch26.qxd 3/31/09 12:27 PM Page 370

Postoperative Management 371
Figure 26.15 A high-velocity pilon fracture (A,B), treated immediately by a delta distraction frame toallow consolidation of the soft tissues and provide immediate reduction and stability (C,D), followed by aprimary ankle arthrodesis by using a multiplane circular external fixation device (E,F). Final 10-monthpostoperative outcome (G,H).
A–C
D–F
HG
15833_Ch26.qxd 3/31/09 12:27 PM Page 371

372 Chapter 26 Diabetic Neuropathic Pilon and Ankle Osseous Trauma and Dislocations
Figure 26.16 Preoperative clinical and radiographic pictures of a bimalleolar diabetic neuropathic anklefracture with skin blisters and necrosis (A,B), treated with a multiplane circular external fixator (C), followedby an early limited weight-bearing (D). Final postoperative outcome (E).
A B
C–E
15833_Ch26.qxd 3/31/09 12:27 PM Page 372

Postoperative Management 373
Figure 26.17 A severe bimalleolar ankle fracture-dislocation in a diabetic neuropathic patient (A,B),followed by an immediate reduction (C) and further stabilization with a multiplane circular external fixationdevice (D,E). (continued)
A–C
ED
15833_Ch26.qxd 3/31/09 12:27 PM Page 373

374 Chapter 26 Diabetic Neuropathic Pilon and Ankle Osseous Trauma and Dislocations
CONCLUSION
Neuropathic pilon and ankle fractures are very challengingto the reconstructive surgeon. Sound principles and tech-niques of external fixation are necessary to minimize postoper-ative complications. Timing of surgery, soft tissue monitoring,proper surgical and offloading techniques, as well as anunderstanding of the bone and wound healing in a patient withdense peripheral diabetic neuropathy, are paramount for along-term successful outcome. Additional adjunctive therapiesincluding but not limited to electrical bone stimulation, ortho-biologics, and postoperative shoe and brace therapy are be-yond the scope of this chapter.
ACKNOWLEDGMENT
The authors would like to thank Dennis McBroom for his excel-lent contributions with the graphic designs.
REFERENCES1. Muller ME, Nazarian S, Koch P, et al. The comprehensive classification of
fractures of long bones. Berlin: Springer-Verlag, 1994.2. Ruedi TP, Allgower M. Fractures of the lower end of the tibia into the ankle
joint. Injury 1969;1:92–99.3. Hutson JJ. Practical biomechanics for the application of Ilizarov fixators to
fractures of the tibia. Techn Orthop 2002;17:15–25.
Figure 26.17 (Continued) After 8 weeks the patientunderwent a primary ankle arthrodesis with a circularfixator (F,G), which was kept for an additional 12weeks. Final 8-month postoperative outcome (H,I).H,I
F,G
15833_Ch26.qxd 3/31/09 12:27 PM Page 374