DevPack Quick Start Guide v2 ENG - Logen Solutions Quick Start Guide v2...4 Introduction DevPack is...
15
LOGEN SOLUTIONS Quick Start Guide with Visual Basic 6 DevPack Developers edition of CubeMaster VERSION 2.0 LAST MODIFIED February 19, 2007
Transcript of DevPack Quick Start Guide v2 ENG - Logen Solutions Quick Start Guide v2...4 Introduction DevPack is...

LOGEN SOLUTIONS
Quick Start Guide with Visual Basic 6
DevPack Developers edition of CubeMaster
VERSION 2.0
LAST MODIFIED February 19, 2007

2
Copyright© 2007 LOGEN SOLUTIONS, CO., LTD. All Rights Reserved Worldwide.
L i a b i l i t i e s a n d R e s t r i c t i o n s
S o f t w a r e d e s c r i b e d i n t h i s d o c u m e n t i s f u r n i s h e d u n d e r a l i c e n s e a g r e e m e n t . T h i s s o f t w a r e m a y b e u s e d o r c o p i e d o n l y i n a c c o r d a n c e w i t h t h e t e r m s o f t h i s a g r e e m e n t .
N o p a r t o f t h i s p u b l i c a t i o n m a y b e r e p r o d u c e d , s t o r e d i n a r e t r i e v a l s y s t e m , o r t r a n s m i t t e d i n a n y f o r m o r a n y m e a n s e l e c t r o n i c o r m e c h a n i c a l , i n c l u d i n g p h o t o c o p y i n g a n d r e c o r d i n g f o r a n y p u r p o s e o t h e r t h a n t h e p u r c h a s e r ’ s p e r s o n a l u s e w i t h o u t t h e w r i t t e n p e r m i s s i o n o f L O G E N S O L U T I O N S C O . , L T D .
T r a d e m a r k s
C u b e M a s t e r a n d D e v P a c k l o g o a r e t r a d e m a r k s o f L O G E N S O L U T I O N S . A l l o t h e r b r a n d n a m e s a n d p r o d u c t n a m e s i n c l u d e d i n t h i s p u b l i c a t i o n a r e t r a d e m a r k s , r e g i s t e r e d t r a d e m a r k s , o r t r a d e n a m e s o f t h e i r r e s p e c t i v e h o l d e r s . L O G E N S O L U T I O N S h a s a t t e m p t e d t o a p p r o p r i a t e l y c a p i t a l i z e a l l s u c h b r a n d n a m e s a n d p r o d u c t n a m e s , b u t L O G E N S O L U T I O N S c a n n o t a t t e s t t o t h e a c c u r a c y o f t h i s i n f o r m a t i o n .
P r i n t D a t e : February 19, 2007

3
Table of Contents
Introduction ____________________________________________________ 4
1. Load Simulation Engine - Optimizer G3 ________________________________ 4
2. Simulation Browser Control - SimBrowser ______________________________ 5
3. Interactions of two components ________________________________________ 5
Tutorials _______________________________________________________ 6
1. Get Ready__________________________________________________________ 6
2. Add source codes ____________________________________________________ 8
3. Run the application_________________________________________________ 15
4
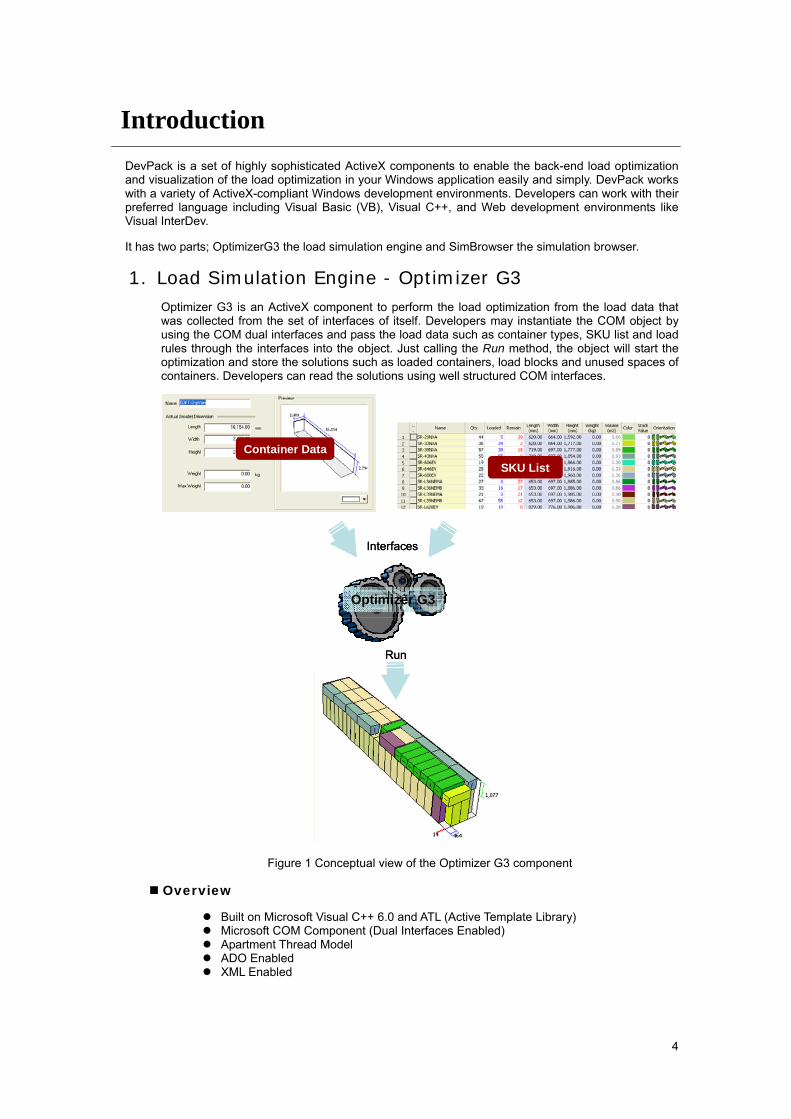
Introduction DevPack is a set of highly sophisticated ActiveX components to enable the back-end load optimization and visualization of the load optimization in your Windows application easily and simply. DevPack works with a variety of ActiveX-compliant Windows development environments. Developers can work with their preferred language including Visual Basic (VB), Visual C++, and Web development environments like Visual InterDev.
It has two parts; OptimizerG3 the load simulation engine and SimBrowser the simulation browser.
1. Load Simulation Engine - Optimizer G3 Optimizer G3 is an ActiveX component to perform the load optimization from the load data that was collected from the set of interfaces of itself. Developers may instantiate the COM object by using the COM dual interfaces and pass the load data such as container types, SKU list and load rules through the interfaces into the object. Just calling the Run method, the object will start the optimization and store the solutions such as loaded containers, load blocks and unused spaces of containers. Developers can read the solutions using well structured COM interfaces.
Container DataSKU List
Optimizer G3
Interfaces
Run
Container DataSKU List
Optimizer G3
Interfaces
Run
Figure 1 Conceptual view of the Optimizer G3 component
Overview
Built on Microsoft Visual C++ 6.0 and ATL (Active Template Library) Microsoft COM Component (Dual Interfaces Enabled) Apartment Thread Model ADO Enabled XML Enabled

5
File Properties
Name: OptimizerG3.dll Size: 340KB Version Latest : 5,3,0,0
To visualize the solutions of the object, developers can use the simulation browser control that will be described at next section.
2. Simulation Browser Control - SimBrowser SimBrowser is an ActiveX control to visualize the solutions passed from the Optimizer G3 and allows the users to see it in a graphics user interfaces. They can change the properties of all objects of the solutions through the integrated graphical interfaces and apply those changes to the Optimizer G3 back.
Optimizer G3
Pass
SimBrowserOptimizer G3
Pass
SimBrowser
Figure 2 Conceptual view of the SimBrowser control
Overview
Built on Microsoft Visual C++ 6.0 and MFC Microsoft COM ActiveX Control ADO Enabled
File Properties
Name: SimBrowser.ocx Size: 904KB Version Latest: 5,3,0,0
3. Interactions of two components Optimizer G3 takes a part of logic tier by running the optimization without graphical user interfaces and SimBrowser takes a part of presentation tier by showing the solutions passed from the OptimizerG3 on the monitor in 2D & 3D graphics enabled interfaces that are same the CubeMaster. The users can see, analyze and change the load data on the fly within SimBrowser, and re-run the optimization by pressing command buttons or popup menus. Developers can access the changed load data using OptimizerG3 after the changes applied back.

6
Tutorials This chapter describes how to make a Microsoft Visual Basic Windows application that performs load optimization using DevPack. One command button on a window of the application will allow the user to start a load simulation and see the load data on the monitor in 3D graphics.
To start this tutorial, prepare your MS Visual Basic as the following instructions.
1. Get Ready
Create New Project
Start your MS Visual Basic 6.0. Create a new project by click on Standard EXE item on the New File tab on the New Project dialog window as below picture. You will see new form appears on the screen after new project created.
Figure 3 Start a new project
Configure the Form
Resize the form to make it fully adjusted to the screen where we will put the SimBrowser ActiveX control later.
Figure 4 Resize new form

7
Register SimBrowser Control
To make your MSVB to recognize the SimBrowser control in the current project, you should register it as below steps.
Click the Project - Components, and open the Component dialog window Search ‘VMS DevPack Simulation Browser Control’ in the list and activate it Click the ‘OK’ and close the dialog
You will see an icon appears on the tool box after successful registration.
Figure 5 Register SimBrowser control
Locate SimBrowser Control on the Form
Drag the icon on the tool box and drop it on the form to locate the SimBrowser control on the form. You will see an integrated graphical user interfaces same of the analysis view of CubeMaster appears in the control area.
Figure 6 Locate SimBrowser control on the form
8
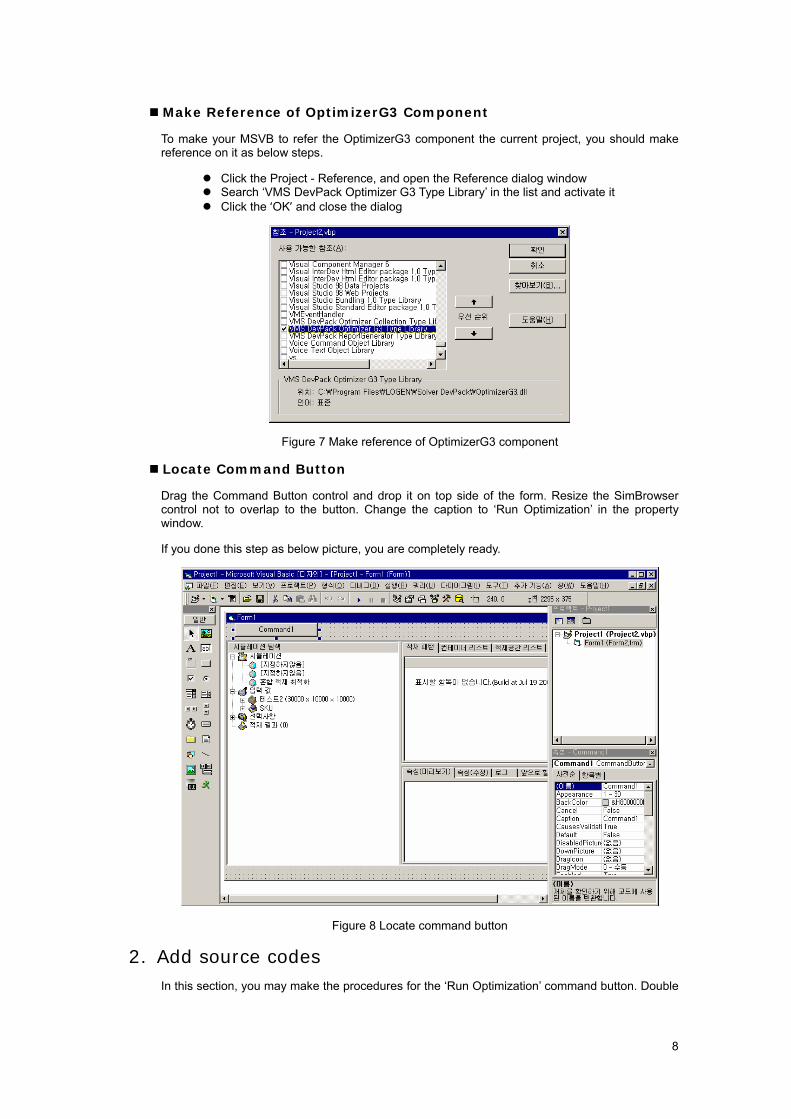
Make Reference of OptimizerG3 Component
To make your MSVB to refer the OptimizerG3 component the current project, you should make reference on it as below steps.
Click the Project - Reference, and open the Reference dialog window Search ‘VMS DevPack Optimizer G3 Type Library’ in the list and activate it Click the ‘OK’ and close the dialog
Figure 7 Make reference of OptimizerG3 component
Locate Command Button
Drag the Command Button control and drop it on top side of the form. Resize the SimBrowser control not to overlap to the button. Change the caption to ‘Run Optimization’ in the property window.
If you done this step as below picture, you are completely ready.
Figure 8 Locate command button
2. Add source codes In this section, you may make the procedures for the ‘Run Optimization’ command button. Double

9
click the command button control and move to the script window where you will describe the procedures.
Figure 9 Entering source codes
To make the load optimization work when the user clicks on the command button, you involve the following steps in the procedure of the command button;
Instantiate and initialize the OptimizerG3 COM object Pass a title and description to the object Pass a container data to the object Pass a SKU list to the object Run the optimization of the object Read the results of the object Visualize the optimization of the object Destroy the instance of the object
Each step will be described at next section.
Instantiate and initialize the OptimizerG3 COM object
Type the following codes to instantiate the OptimizerG3 COM object.
Dim oOptimizer As New MLMATLCOMSRVLib.MixLoadCom
Type the following codes to initialize the object by calling the method Reset. This will clean all allocated memory and make the object stay at initial state.
oOptimizer.Reset
Pass a title and description to the object
You can pass a title and description of the optimization using the Title and SubTitle properties of the object. These properties are optional. Type the following codes to pass the title and description to the OptimizerG3 COM object.
oOptimizer.Title = "My First Load Optimization" oOptimizer.SubTitle = "Using Visual Basic Windows Application"
Pass a container data to the object
A container is any object that you may wish to load with cargos. In CubeMaster, this is either a rectangular container, or one with an irregularly shaped floor and/or ceiling. Examples of rectangular containers are ocean containers, pallets, crates, trucks and large cartons. Examples of irregular containers are split-level trailers, and airline containers (Unit Load Devices, ULD's), which may have cut-off corners along the top and/or bottom.
Call the SetContainer method to pass the container data to the object. Fill the following fields as

10
the parameters of the method;
Table 1 Parameters of SetContainer method
Sub SetContainer(Type As CntType, Name As String, OutLength As Double, OutWidth As Double, OutHeight As Double, NetWeight As Double, MaxWeight As Double, LengthSlack As Double, WidthSlack As Double, HeightSlack As Double, MaxCE As Double, Color As Long, Dummy As Long)
Parameters Description
CntType Container type Assign one from the following types; typeBox=0, Box or carton typePallet=1, Pallet typeContainer=2, Sea Van typeTruck=3, Trucks typeAircraft=4, ULD
OutLength Container length
OutWidth Container width
OutHeight Container height
NetWeight Container weight
MaxWeight Max weight including the net weight. The total load weight of the container will not exceed this field.
LengthSlack, WidthSlack, HeightSlack
Slacks inside the container. The load size of the container will be OutLength- LengthSlack, OutWidth-WidthSlack, OutHeight-HeightSlack. Assign 0 if not applicable.
MaxCE Max load efficiency in percentage. The total load volume efficiency in the container will not exceed this field. Assign 0 if not applicable.
Color Container color in graphics. Use RGB scheme to assign the color. (eg. Use RGB(128,128,128) to assign a gray color)
Dummy Reserved field. Assign 0 always.
In the tutorial, you will load a 20 FT sea van without max weight and volume efficiency. The color of the container will be white. In reference of the above table, type the following codes to pass the container data.
oOptimizer.SetContainer typeContainer, "20ft", 5867, 2330, 2350, 0, 0, 0, 0, 0, 0, RGB(255, 255, 255), 0
Pass a SKU list to the object
A SKU is any rectangular item that can be loaded into one of containers. Examples of SKU objects are boxes, cartons, or even whole pallets.
Use ISKUs object to pass a SKU list to the OptimizerG3 COM object. The ISKUs is an IDispatch derived object that allows you to add, remove and search SKUs. This object is automatically instantiated and attached to the OptimizerG3 COM instance when you create it. To access the ISKUs instance inside the OptimizerG3 object, use the SKUs property of the OptimizerG3 COM object as the following codes;
Dim oSKUs Set oSKUs = oOptimizer.SKUs
Once you get the ISKUs instance, you can add new SKU by calling the AddNewSKU method of the object. This method will create an instance of new ISKU object that is an IDispatch derived object and return the reference of the instance that allows you to define a SKU data.
Dim oSKU Set oSKU = oSKUs.AddNewSKU
The following table shows the main properties and methods of the ISKU object. For more information please refer the reference guide.

11
Table 2 Members of ISKU object
Members Description
Name Sets or returns the name of SKU (characters to identify the SKU)
Description Sets or returns the description of SKU (characters to describe the SKU)
GroupName Sets or returns the group name (characters to define the group). Assign the destination of cargo when you optimize the milk run.
Length Sets or returns SKU Length
Width Sets or returns SKU Width
Height Sets or returns SKU Height
CountToLoad Sets or returns SKU quantity to load. Assign the order quantity of the SKU.
Weight Sets or returns SKU Weight
Orientation Sets or returns the orientations permitted for loading the SKU in container. An orientation is one particular way of loading a SKU. For a rectangular box, there are six orientations: flat, on its side, on its end, and for each of these three positions, turned by 90 degrees or not.
Use the following type to define one position;
dir1=1, dir2=2, dir3=4, dir4=8, dir5=16, dir6=32, dirBasic=3, dirAll=63
Combine several types to permit multiple positions, for example, use dir1 + dir2 to permit the basic orientation that is the same dirBasic.
LoadSequence Sets or returns the sequence for loading the SKU. Pleae note that the SKUs with small number placed earlier than ones with large numbers. The load sequence can be used for two purposes:
1. To load in drop sequence (First-In-Last-Out) 2. To load in picking sequence
Color Sets or returns the color of RGB format
In the tutorial, your SKU list has two SKU types “AA-101” and “BB-303”. To pass these SKU list to the OptimizerG3 COM object, type the following codes.
Dim oSKUs, oSKU Set oSKUs = oOptimizer.SKUs Set oSKU = oSKUs.AddNewSKU oSKU.Name=”AA-101” oSKU.Length=690 oSKU.Width=900 oSKU.Height=500 oSKU.CountToLoad=100 oSKU.Orientation=dirBasic Set oSKU = oSKUs.AddNewSKU oSKU.Name=”BB-303” oSKU.Length=900 oSKU.Width=800 oSKU.Height=550 oSKU.CountToLoad=100 oSKU.Orientation=dirBasic
Run the optimization of the object
Call the Run method of the OptimizerG3 COM object to run the optimization after you passed the container data and SKU list to the object correctly.
Type the following codes.
oOptimizer.Run(FALSE)

12
The Run method has one parameter bShowProgressBar which determines to show the progress bar or not during the optimization. Assign FALSE to prevent the progress bar otherwise TRUE. We recommend assigning FALSE to this parameter since the optimization without the progress bar is much faster than with the progress bar. This parameter does not affect in the web environment (always regarded as FALSE).
Detect errors from the object
Use the DataErrorType property of the OptimizerG3 COM object to detect errors rose during run of the optimization. It returns several types as the following table.
Table 3 Return types of the DataErrorType property
Type Description
errorEmptyItemList The optimization failed to run since the SKU list is empty
errorItemHasZeroLoadCount The optimization succeeded even one or more SKUs have no quantity to load
errorItemIsTooBig The optimization succeeded even sizes of one or more SKUs are greater than the size of container
errorInvalidContainerSize The optimization failed to run since the size of container is not valid
errorInvalidItemSize The optimization succeeded even sizes of one or more SKUs are not valid
errorValid The optimization succeeded without errors
errorLockeyNotFound The optimization failed to run since the lock key is not detected. (The OptimizerG3 requires the USB dongle key to validate the run time license)
You can handle each type using the syntax of ‘Select Case’. Type the following codes to handle the DataErrorType.
Select Case oOptimizer.DataErrorType Case errorEmptyItemList MsgBox “The SKU list is empty” Case errorInvalidContainerSize MsgBox “Invalaid container size” Case errorInvalidItemSize MsgBox “Invalid SKU size” Case errorItemHasZeroLoadCount MsgBox “Some SKU has no quantity” Case errorItemIsTooBig MsgBox “Some SKU too big” Case errorLockeyNotFound MsgBox “Lock key not found” Case Else End Select
Read the results of the object
Use IContainers object to read the results of the OptimizerG3 COM object after successful run of the optimization. The IContainers is an IDispatch derived object that allows you to read the load summary such as the number of loading containers, the total number of cartons loaded and the average volume efficiency.
The IContainers object is automatically instantiated and attached to the OptimizerG3 COM instance after the optimization is successful. To access the IContainers instance of the OptimizerG3 object, use the Containers property of the OptimizerG3 COM object as the following codes;
Dim oContainers

13
Set oContainers = oOptimizer.Containers
Once you get the IContainers instance, you can access all loading container by calling the Count property and Item method of the object. The Count property returns the number of loading containers in the results. The Item method requires one parameter index which means the position of the loading container in the array. It will dispatch an instance of existing IContainer object and return the reference of the instance that allows you to access a loading container data.
The following codes iterates all the loading containers;
Dim oContainer For i = 1 To oContainers.Count Set oContainer = oContainers.Item(i) Next i
The following two tables show the main properties and methods of the IContainers and IContainer respectively. For more information please refer the reference guide.
Table 4 Members of IContainers object
Members Description
Count Returns the number of loading containers
Item(long index) Returns an instance of loading container at position Index (1≤ Index ≤ Count)
AverageCubeEfficiency Returns the average cube efficiency in percentage
TotalLoadCount Returns the total number of SKUs loaded in the results
TotalGrossLoadCount Returns the total number of pieces loaded in the results (differs from the TotalLoadCount when the pallet load was used as SKU)
AddEmptyContainer() Add an empty container into the results and returns the reference of the instance of the container
Table 5 Members of IContainer
Members Description
ID Returns the sequence number of loading container. Identifies the loading container.
Name Set or returns the name of loading container. The default name of the loading container is combination of container type and sequence number (eg. ‘40FT #1’ )
CubeEfficiency Returns the volume efficiency of loading container
ItemCount Returns the total number of SKUs in loading container
LoadedWeight Returns the weight of loading container
Length, Width, Height Returns the size of loading container
NetWeight Returns the weight of the container type used
In the tutorial, type the following codes to print the information of all loading containers.
Dim oContainers, oContainer Set oContainers = oOptimizer.Containers For i = 1 To oContainers.Count Set oContainer = oContainers.Item(i) Debug.Print CStr(oContainer.ID) + "th loading container:" Debug.Print " # of Cargos=" + CStr(oContainer.ItemCount) Debug.Print " Cube Efficiency=" + CStr(oContainer.CubeEfficiency * 100) + "%" Debug.Print " Load Weight =" + CStr(oContainer.LoadedWeight) Next i
Visualize the optimization of the object
You can visualize the load optimization that was collected and created from the OptimizerG3 instance by passing the reference of the instance to the SimBrowser control located on the form. This will allow the users to see and analyze the load optimization in the graphical user interfaces

14
which is the same CubeMaster.
Type the following codes to visualize the load optimization. The ‘SolverControl1’ is the name of the SimBrowser control created on the form.
SolverControl1.ResultStream = oOptimizer.GetResultBLOBStream
Destroy the instance of the object
Destroy the instance of the OptimizerG3 object by assigning Nothing to it. Type the following codes.
Set oOptimizer = Nothing
Whole source codes
Dim oOptimizer As New MLMATLCOMSRVLib.MixLoadCom oOptimizer.Reset oOptimizer.Title = "My First Load Optimization" oOptimizer.SubTitle = "Using Visual Basic Windows Application" oOptimizer.SetContainer typeContainer, "20ft", 5867, 2330, 2350, 0, 0, 0, 0, 0, 0, RGB(255, 255, 255), 0 Dim oSKUs, oSKU Set oSKUs = oOptimizer.SKUs Set oSKU = oSKUs.AddNewSKU oSKU.Name=”AA-101” oSKU.Length=690 oSKU.Width=900 oSKU.Height=500 oSKU.CountToLoad=100 oSKU.Orientation=dirBasic Set oSKU = oSKUs.AddNewSKU oSKU.Name=”BB-303” oSKU.Length=900 oSKU.Width=800 oSKU.Height=550 oSKU.CountToLoad=100 oSKU.Orientation=dirBasic oOptimizer.Run(FALSE) Select Case oOptimizer.DataErrorType Case errorEmptyItemList MsgBox “The SKU list is empty” Case errorInvalidContainerSize MsgBox “Invalaid container size” Case errorInvalidItemSize MsgBox “Invalid SKU size” Case errorItemHasZeroLoadCount MsgBox “Some SKU has no quantity” Case errorItemIsTooBig MsgBox “Some SKU too big” Case errorLockeyNotFound MsgBox “Lock key not found” Case Else End Select Dim oContainers, oContainer, i Set oContainers = oOptimizer.Containers For i = 1 To oContainers.Count Set oContainer = oContainers.Item(i) Debug.Print CStr(oContainer.ID) + "th loading container:" Debug.Print " # of Cargos=" + CStr(oContainer.ItemCount) Debug.Print " Cube Efficiency=" + CStr(oContainer.CubeEfficiency * 100) + "%"
15
Debug.Print " Load Weight =" + CStr(oContainer.LoadedWeight) Next i SolverControl1.ResultStream = oOptimizer.GetResultBLOBStream Set oOptimizer = Nothing
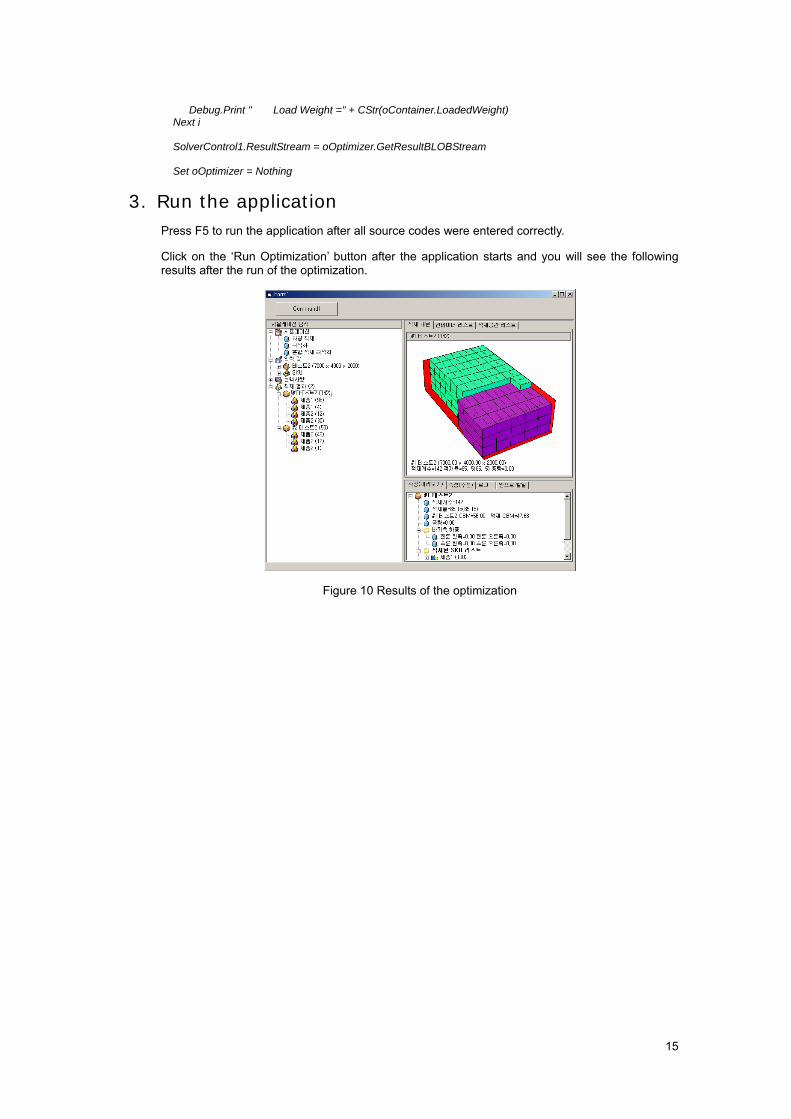
3. Run the application Press F5 to run the application after all source codes were entered correctly.
Click on the ‘Run Optimization’ button after the application starts and you will see the following results after the run of the optimization.
Figure 10 Results of the optimization