Development Coach NCCP Workshop Coach Workbook · Volleyball Canada has provided the Athlete...
150
Development Coach NCCP Workshop Coach Workbook
Transcript of Development Coach NCCP Workshop Coach Workbook · Volleyball Canada has provided the Athlete...

Development Coach
NCCP Workshop
Coach Workbook

Sept 6, 2018 © Coaching Association of Canada and Volleyball Canada
2
VOLLEYBALL CANADA – Development Coach Workbook
National Coaching Certification Program All Rights Reserved Volleyball Canada Copyright © Coaching Association of Canada and Volleyball Canada – 2018
Acknowledgements
Main writer:
James Sneddon, Volleyball Canada
Past and Present Technical Contributors and Advisors
Alain G Marion, MSc, Sport Advisor
Merv Mosher, York University
Doug Anton, Volleyball Canada
Pierre Baudin, University of Alberta
Kiran Mistry, Volleyball Canada
Brian Newman, Volleyball Canada
Chris Dahl, Volleyball BC
Luke Harris, Newfoundland and Labrador Volleyball Association
Jason Trepanier, Volleyball Nova Scotia
Mischa Harris, MSc, Kinesiologist

Sept 6, 2018 © Coaching Association of Canada and Volleyball Canada
3

Sept 6, 2018 © Coaching Association of Canada and Volleyball Canada
4

Sept 6, 2018 © Coaching Association of Canada and Volleyball Canada
5

6
WORKSHOP OUTLINE
THEMES Pages
Session 1 Activities
Practice Plan and Workshop Layout 8
Ice Breaker Activity 9
Sequence of Building a Plan 11
Athlete Development Framework 12
Applying LTAD Framework to a Practice Plan 19
Worksheet 1a Practice Plan Template 20
4 Pillars Resource Material 21
Understanding Stages of Skill Development 33
Teaching Points 36
Summary of Coaching Methodology 38
Observational Practice 39
Worksheet 1b Method 1 Drill Plan 41
Worksheet 1c Simulated Play Drill Plan 43
Session 2 Activities
Teaching Activity 1 45
NCCP Teaching Process Worksheets 45
Reflection Sheets 52
Teaching Activity 2 - Building a Method 2 Drill 56
Session 3 Activities
Teaching Activity 3 62
NCCP Teaching Process Worksheets 63
Reflection Sheets 68
Notes on Beach Skills and Tactics 72
Notes on Sitting Volleyball Skills and Tactics 73

June 1, 2018 © Coaching Association of Canada and Volleyball Canada
7
WORKSHOP OUTLINE (CONTINUED)
THEMES Pages
Session 4 Activities
Teaching Activity 4 75
Teaching Team Play and Systems - Resource Materials 76
Strength Training 101
Cool Down 102
Evaluating a Practice 103
Teaching Reflection 104
Support to Athletes in Training Evaluation Process 105
How to test progress 106
Competition Basics 108
LTAD Competition Guidelines 113
Action Cards 116
References and Suggested Readings 118
Appendix 1- Practice Plan, Drill Plan Extras and Methodology 119
Appendix 2 – Skill Descriptions 134

June 1, 2018 © Coaching Association of Canada and Volleyball Canada
8
Practice Plan and Workshop Layout The table below represents the layout of a high-quality practice plan AND the topics and flow of the Development Coach workshop.
Planning Objectives Assessments, Coaching Methodology, LTAD
Welcome
Introductions, setting the tone, objectives
Warm-up Fun, active, general and/or specific warm-ups, include skills, include competitions, integrate speed work (5min)
Main Part Teach new skills and systems early
Progress through stage appropriate drills/games/activities using sound coaching methodology
Modify drills to maintain optimal state of learning
Use the 5-Step NCCP Teaching Process
Modify volume and intensity based on the phase of season
Integrate Strength, Stamina, Psychological and Life Skills into practice as appropriate
Cool Down Use recovery principles and tools. Work on suppleness
Reflection Evaluate practice and assess players. Consider next practice.
Competition Use key coaching skills to support the competitive experience.
Assess development toward objectives.

June 1, 2018 © Coaching Association of Canada and Volleyball Canada
9
Ice Breaker Activity – Move around and mingle with other coaches. Introduce yourselves
and pick each other’s brain on one of the situations listed. Important: you and the other
coach can’t select the same situation! Try to meet as many different colleagues and get
as many tips as possible during the allotted time.
Coach’s first name
To… An approach that I’ve tried and really works well is to …
Get players to be on time for practices …
Inject fun into serious training activities …
Make sure I never forget something important…
Make sure new players are well integrated into the team…
Promote and develop good sportsmanship…
Celebrate a huge win with the players …
Encourage work ethics in players…
Develop a good team spirit…

June 1, 2018 © Coaching Association of Canada and Volleyball Canada
10
Coach’s first name
To… An approach that I’ve tried and really works well is to …
Keep my assistant(s) motivated…
Encourage my athletes to do some conditioning on their own between practices …
To relax myself and focus before an important game …
Encourage my athletes to have sound nutritional habits …
Make players more independent and self-directed…
Cheer up a player who seems to be having a bad day…
Prevent cliques from developing in my team…
Keep my cool under pressure or when I know I can get frustrated…

June 1, 2018 © Coaching Association of Canada and Volleyball Canada
11
Sequence of building a plan…
Athlete Development Framework
Athlete Development Matrix
Seasonal Plan
Practice Plan
Drill Plan
Volleyball Canada has provided the Athlete Development Framework and Matrix as a guideline and unifying agent for clubs and coaches. A sample season plan has also been provided and should be modified as needed by a technical leader. It is the role of the coach to apply the season plan by developing practice plans and drill plans to meet the needs of the athletes.

June 1, 2018 © Coaching Association of Canada and Volleyball Canada
12
ATHLETE DEVELOPMENT FRAMEWORK
TECHNICAL/TACTICAL PHYSICAL PSYCHOLOGICAL LIFE SKILLS
BASIC AND INTERMEDIATE SKILLS PHYSICAL LITERACY SELF-AWARENESS INJURY PREVENTION & RECOVERY
FOR INDOOR, BEACH OR SITTING STRUCTURAL TOLLERANCE MOTIVATION SLEEP
>> SEE SKILL LISTS PHYSICAL MEASUREMENTS TASK ENGAGEMENT NUTRITION/HYDRATION
SYSTEMS FOR EACH STAGE STRENGTH MINDFULNESS DISORDERED EATING EDUCATION
>> SEE SYSTEMS LISTS SPEED SELF-REFLECTION SOCIAL MEDIA USE
SUPPLENESS PLANNING AND GOAL SETTING SCHOOLING PLAN
STAMINA LISTENING AND ASKING QUESTIONS ALCOHOL AND CANNABIS
CRITICAL THINKING SOCIO-CULTURAL EDUCATION
LEARNER VS PERFORMER MODE ETHICAL CHOICES
FOCUS TIME MANAGEMENT
CUE-READING & DECISION-MAKING BUDGETING
MANAGING ENERGY TRAVEL STRATEGIES
RESILIENCE POSITIVE PERSONAL RELATIONSHIPS
LEADERSHIP SKILLS COMMITMENT
COMMUNICATION SITTING SPECIFIC ITEMS
CONNECTING WITH TEAMMATES >>RESOURCES OR SUPPORT NETWORKS
SUPPORT AND FEEDBACK >>MAINTENANCE OF PROTHLETICS/EQUIPMENT
CONFIDENCE/COURAGE >>MANAGING A LACK OF ACCESSIBILITY
>>PAIN OR CONDITION MANAGEMENT
June 1, 2018 © Coaching Association of Canada and Volleyball Canada
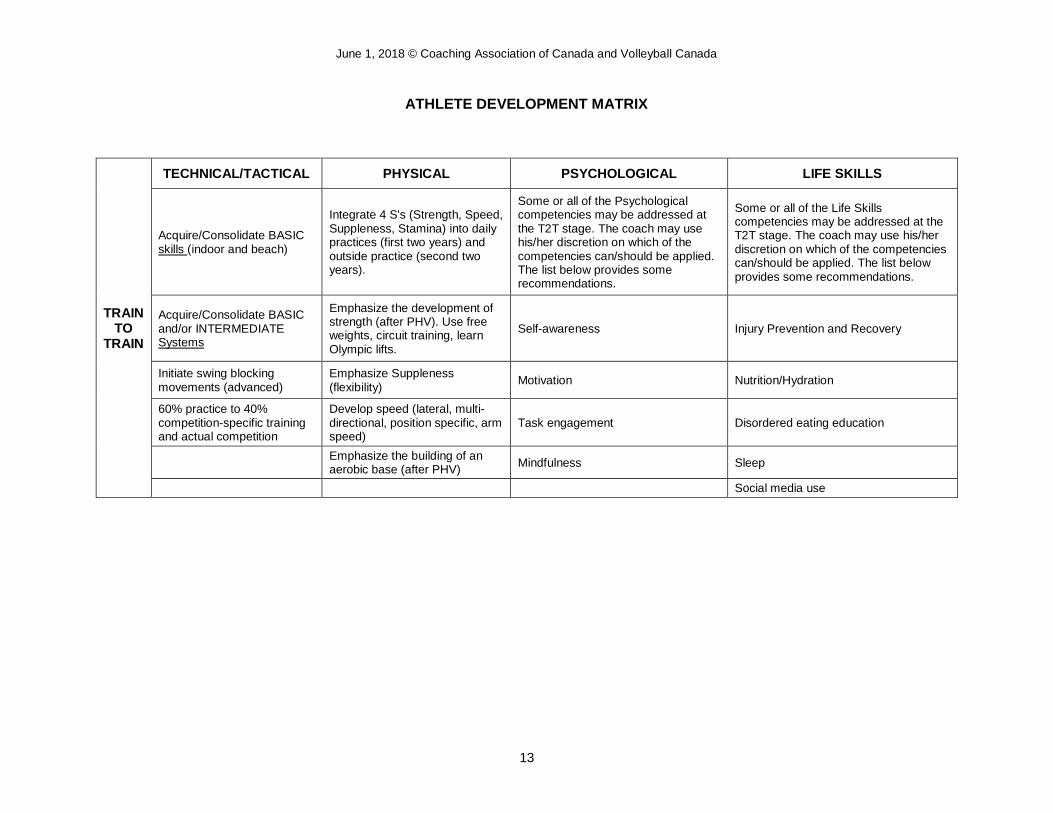
13
ATHLETE DEVELOPMENT MATRIX
TRAIN TO
TRAIN
TECHNICAL/TACTICAL PHYSICAL PSYCHOLOGICAL LIFE SKILLS
Acquire/Consolidate BASIC skills (indoor and beach)
Integrate 4 S's (Strength, Speed, Suppleness, Stamina) into daily practices (first two years) and outside practice (second two years).
Some or all of the Psychological competencies may be addressed at the T2T stage. The coach may use his/her discretion on which of the competencies can/should be applied. The list below provides some recommendations.
Some or all of the Life Skills competencies may be addressed at the T2T stage. The coach may use his/her discretion on which of the competencies can/should be applied. The list below provides some recommendations.
Acquire/Consolidate BASIC and/or INTERMEDIATE Systems
Emphasize the development of strength (after PHV). Use free weights, circuit training, learn Olympic lifts.
Self-awareness Injury Prevention and Recovery
Initiate swing blocking movements (advanced)
Emphasize Suppleness (flexibility)
Motivation Nutrition/Hydration
60% practice to 40% competition-specific training and actual competition
Develop speed (lateral, multi-directional, position specific, arm speed)
Task engagement Disordered eating education
Emphasize the building of an aerobic base (after PHV)
Mindfulness Sleep
Social media use

June 1, 2018 © Coaching Association of Canada and Volleyball Canada
14
TRAIN TO TRAIN (First two years) Males: 13/14
Females: 12/13
26-34 week season (including school and club)
3-4 practices/week @ 90-120 min
1.5 match/week @ 1 hr or 1 tournament per month
2-3 physical training integrated into practice sessions
60% training to 40% competition-specific training and actual competition
SKILLS LEGEND
1 Acquisition
2 Early Consolidation
3 Late Consolidation
PHYSICAL LEGEND
1 Develop
2 Maintain
Week 1 2 3 4 5 6 7 8 9 10 11 12 13 14 15 16
Date (starting Monday) 0
2-J
an
09
-Ja
n
16
-Ja
n
23
-Ja
n
30
-Ja
n
06
-Feb
13
-Feb
20
-Feb
27
-Feb
06
-Mar
13
-Mar
20
-Mar
27
-Mar
03
-Ap
r
10
-Ap
r
17
-Ap
r
Competition or Event
To
urn
am
en
t
To
urn
am
en
t
To
urn
am
en
t
To
urn
am
en
t
14
U P
rovin
cia
ls
Practices/week
SKILLS
Serve/Pass 1 1 1 1 1 1 1 1 2 2 2 2 2 2 3 3
Set/Attack 1 1 1 1 1 1 1 1 2 2 2 2 2 2 3 3
Block/Defend 1 1 1 1 1 1 1 1 1 2 2 2 2
Offensive Systems 1 1 1 1 1 1 1
Defensive Systems 1 1 1 1 1 1 1
Transition 1 1 1 1 1 1 1 1
PHYSICAL
Strength 1 1 1 1 1 1 1 1 1 1 1 2 2 2 2 2
Speed 1 1 1 1 1 1 1 1 1 1 1 1 1 1 1 1
Suppleness 1 1 1 1 1 1 1 1 1 1 1 1 1 1 1 1
Stamina 1 1 1 1 1 1 1 1 2 2 2 2 2 2 2 2
PSYCHOLOGICAL
Self-awareness x x x x
Motivation x x x x
Task engagement
LIFE SKILLS
Injury Prevention and Recovery x x x x x
Sleep x x x x
Nutrition/Hydration x x x x

June 1, 2018 © Coaching Association of Canada and Volleyball Canada
15
TRAIN TO TRAIN (Second two years) Males: 15/16
Females: 14/15
26-34 week season (including school and club)
3-5 practices/week @ 90-120 min
1.5 match/week @ 1 hr or 1 tournament per month
2-3 physical training sessions @ 30-45 min outside of practice
60% training to 40% competition-specific training and actual competition
SKILLS LEGEND
1 Acquisition
2 Early Consolidation
3 Late Consolidation
4 Refinement
PHYSICAL LEGEND
1 Develop
2 Maintain
Week 1 2 3 4 5 6 7 8 9 10 11 12 13 14 15 16 17 18 19 20
Date (starting Monday) 0
2-J
an
09
-Ja
n
16
-Ja
n
23
-Ja
n
30
-Ja
n
06
-Feb
13
-Feb
20
-Feb
27
-Feb
06
-Mar
13
-Mar
20
-Mar
27
-Mar
03
-Ap
r
10
-Ap
r
17
-Ap
r
24
-Ap
r
01
-Ma
y
08
-Ma
y
15
-Ma
y
Competition or Event
To
urn
am
en
t
To
urn
am
en
t
To
urn
am
en
t
16
U P
rovin
cia
ls
16
U N
atio
na
ls
Practices/week
SKILLS
Serve/Pass 2 2 2 2 2 2 2 2 3 3 3 3 3 3 3 4 4 4 4
Set/Attack 2 2 2 2 2 2 2 2 3 3 3 3 3 3 3 4 4 4 4 4
Block/Defend 2 2 2 2 2 3 3 3 3
Offensive Systems 1 1 1 2 2 2 2 2 3 3 3 3 3
Defensive Systems 1 1 1 2 2 2 2 3 3 3 3 3 3
Transition 2 2 2 2 2 2 2 2 3 3 3 3
PHYSICAL
Strength 1 1 1 1 1 1 1 1 1 1 1 1 1 1 2 2 2 2 2
Speed 1 1 1 1 1 1 1 1 1 1 1 1 1 1 1 1 1 1 1 1
Suppleness 1 1 1 1 1 1 1 1 1 1 1 1 1 1 1 1 1 1 1 1
Stamina
PSYCHOLOGICAL
Mindfulness x x x x x
Self-reflection x x x x x
Goal Setting x x x
LIFE SKILLS
Disordered eating x x x x x x
School planning x x x x x
Social media x x x x
Add others

June 1, 2018 © Coaching Association of Canada and Volleyball Canada
16
Practice Plan
Goal: Physical:
Season/Phase: Week: Psychological:
Training Load: , , → ❑ EAP Life Skills:
Time
Objective Stage/Method Teaching Points Drill

June 1, 2018 © Coaching Association of Canada and Volleyball Canada
17
Drill Plan
GOAL:
Skill(s)/ Variation(s)
Key Cues Key Decisions
TIME OF ACTIVITY:
EQUIPMENT:
SAFETY:
DRILL NAME
Objective/Success Criteria:
Drill Description:
Teaching Points:
Variation:
Adjustments:
Harder:
Easier:

June 1, 2018 © Coaching Association of Canada and Volleyball Canada
18
SEASON PLANNING As a starting point, Volleyball Canada has offered a Train to Train Athlete Development Matrix (CW
13), and the table below as a guideline on how much time should be spent in the four major pillars of
athlete development: Technical/Tactical, Physical, Psychological and Life Skills. For the Train to Train
athlete the focus is primarily on Skills and Systems (Technical/Tactical).
The table below represents a guideline on what areas should be emphasized during the early, mid and
late phases of the season. Percentages are only an estimate and may be modified.
PHASE OF SEASON & EMPHASIS
Skills Emphasis
Systems/Tactics Emphasis
Physical Conditioning
Emphasis
Mental & Life Skills
Emphasis
Early Season Major Focus: A high number of ball
contacts
60% 20% 15% 5%
Mid Season Major Focus: Intensity as well as work to rest ratios must be gradually raised to meet competition requirements
50% 25% 15% 10%
Late Season Major Focus: The number of ball contacts exceeds competition requirements for a particular skill. Intensity and rest time is increased.
40% 35% 10% 15%

June 1, 2018 © Coaching Association of Canada and Volleyball Canada
19
Applying LTAD to a Practice Plan Activity In small groups, review your assigned sections of the Athlete
Development Framework and apply them to a Practice Plan (objectives
and time). Groups will be asked to present a summary of your findings (for
2-3 min).
Answer these questions when you present to the group:
1. Which elements should I apply?
2. When will I apply them within the practice?
3. How will I apply them?
4 groups of 2-3 people
Group A – Technical/Tactical (p. 21-22) – presents first
Group B – Physical (p. 23-26) – presents second
Group C – Psychological (p. 27-30) – presents third
Group D – Life Skills (p. 30-32) – presents fourth

June 1, 2018 © Coaching Association of Canada and Volleyball Canada
20
Worksheet 1a: Practice Plan Outline
Goal: Physical:
Season/Phase: Week: Psychological:
Training Load: , , → ❑ EAP Life Skills:
Time
Objective Stage/Method Teaching Points Drill

June 1, 2018 © Coaching Association of Canada and Volleyball Canada
21
TECHNICAL / TACTICAL SKILLS Improving skills is the primary training GOAL for most LTAD stages and constitutes the majority of time spent within a Train to Train volleyball practice. Within the core part of the practice, the Train to Train stage should apply around 75% of the time toward skill development and 25% toward systems/team play development. An OBJECTIVE for the Train to Train stage practice is to improve the BASIC indoor and beach skills listed below. This may take all 4 years to accomplish within the Train to Train stage (13-16). Intermediate skills may also be introduced at this stage; however, emphasis should be placed on consolidating basic skills before moving on to intermediate skills, which are addressed mainly in the Learn to Compete stage. Intermediate skills are dealt with in the Advanced Development Coach workshop. TRAIN TO TRAIN SKILLS
Phase of Play BASIC Skills (Indoor) BASIC Skills (Beach)
Serving
Standing float Standing float
Jump Float Jump Float
Jump Float - Step Spike Serve - Power
Spike Serve - Power
Passing Forearm pass for the above serves Forearm pass
Overhead pass (volley)
Free ball pass Free ball pass
Non-setter 2nd ball set
Setting
14 (High Ball) Release from reception + footwork
73 (Back Set) Setting from a pass 4-5m off the net
51 (Quick Attack) Calling the shot
*Backcourt sets (A,B,C)
*Combinations (X's and Tandems)
Attacking
Line Line (over)
Cross-court Cross-court
Tip
51 (Quick Attack)
Blocking Middle movements Blocking Line, Cross, Ball
Outside blocker movements Peeling Line
Defending
Basic dig Digging short roll behind blocker
*Ball Pursuit and Retrieval Hard driven
*Overhead Dig Double axe handle dig
*Dive
*Roll and/or Sprawl
*Pancake *These skills should be taught in the Train to Train stage, but are not evaluated in the Development Coach context
An ASSESSMENT of skills should first be made, which supports the development of the season plan by a technical leader. An adjustment may or may not be required to the practice plan, based on the coaches’ regular re-assessments of athletes skills. New skills and tactics should be taught early in the practice, after warm-up, when the athletes are fresh. Special consideration should be made for the skills of serving and passing when building a practice plan. In
general, serving and passing are linked to success at any level of play and are considered weaker skills in

June 1, 2018 © Coaching Association of Canada and Volleyball Canada
22
Canada compared to other nations. Often, serving practice is given low priority in the T2T context. To offset this
trend, coaches are encouraged to include serving/passing in as many of their skill/drill activities as possible even
if they are not the primary focus. Alternatively, brief 5-minute serving/passing drills can be interspersed between
all other drills/games/activities in the practice. Using this method, the total time spent on serving (and passing)
will increase and these skills can subsequently improve.
The number of weeks it takes to acquire a skill can vary greatly and will depend on a number of factors (prior volleyball experience, prior physical literacy, Psychological readiness, strength, speed, etc.). However, anecdotal evidence suggests it typically takes a Train to Train athlete 6-8 weeks to acquire a basic volleyball skill if practicing 2-3x a week. If there are large gaps in which athletes do not practice a skill recently acquired (2 weeks) there is also a risk of regression. It is important to factor in the maintenance of recently developed skills when planning a practice.
SYSTEMS
Systems are methods of organizing a team’s collective movements within the games’ cycle of actions. Systems
can be sub-divided into three categories of Offensive Systems, Defensive Systems and Transition.
Consolidation of BASIC or intermediate systems are recommended for athletes in the Train to Train stage. See
table below:
TRAIN TO TRAIN AND LEARN TO COMPETE SYSTEMS/TACTICS
Basic Intermediate Advanced
Offensive Systems 6-6 4-2, 6-3, 6-2, 5-1 5-1
Serve Reception Formations “W” Formation W, 4-person, 3-person 3-person, 2-person
Defensive Systems Spread Block System Spread Block System Bunch-Read System
Blockers 1-blocker 1 and 2-blocker 2 and 3-blocker
Defenders 6-up 6-back High starting position, read and react
Coverage 2-3 2-3 or 3-2 Read and react, plan by rotation
Transitions All movements from one cycle of action to another
When should systems be trained within a practice?
Within the core part of the T2T practice (and based on the phase of season) systems should be trained up to
25% of the time, and skills should be developed for around 75% of the time.
Players should be exposed to new information early in the practice or the first activity after the warm-up or speed
work. If a system is new to players it should be taught early in the practice. If a system is being reviewed, then
placing system development at the end of practice is advised. Scrimmaging and Simulated Play Drills are
typically appropriate near the end of practice but could also be alternated with skill work.
How can systems be taught?
For a detailed explanation of how to teach the 4-2 Offensive System, with a W serve receive, a 6-up defence
using two blockers and 2-3 coverage, reference this section of the workbook.

June 1, 2018 © Coaching Association of Canada and Volleyball Canada
23
PHYSICAL
The table below represents some guidelines on how to promote the broad concepts of PHYSICAL LITERACY and STRUCTURAL TOLLERANCE within the Train to Train athlete. Physical Literacy is the application of a wide variety of basic human movements, fundamental movement skills and fundamental sports skills. Physical literacy sets athletes up for future excellence and lifelong participation. It is achieved mainly through the early LTAD stages of Fundamentals and Learn to Train. However, athletes in the Train to Train stage still benefit from participation in multiple sports and activities that develop a wide range of movement patterns. Structural tolerance is defined as “the ability to withstand years of progressive training load without the incidence of injury or fatigue”. Essentially, the coach must be mindful of what type of training took place before the athlete arrived in their gym and plan to slowly and progressively increase the amount of practice and physical training to build the athlete’s ‘engine’ in order to withstand increased training demands in the later stages.
TRAIN TO TRAIN M: 12-16 years F: 11-15 years
PHYSICAL LITERACY GUIDELINES
Other Sports 1-2 during the year. Ideally other sports do not conflict with volleyball season. Beach volleyball
should be 1 of the other sports. Integrated Sitting volleyball sessions can benefit all players.
Agility, Balance,
Coordination
While many of the ABC’s are achieved through participation in multiple sports, drills and activities
that promote strength, core strength and agility can also be intentionally added to the practice
plan to support literacy in a wide range of movements. These activities can be integrated through
warm-up, volleyball drills, speed work, or strength workout within the practice.
STRUCTURAL TOLLERANCE GUIDELINES
Practices/Week 3-5
Matches/Week 1.5 matches/week or 1 tournament/month
Practice to Match Ratio 60% practice to 40% competition-specific training and actual competition
Weeks/Year 26-34
Physical Training
YEARS 1 & 2: 2x/week @ 30-45 min (integrated within practice or outside practice). 14 year olds
can manage a maximum of every second day.
YEARS 3 & 4: 2-4x/week @ 45 minutes (outside practice)
Training Load
Training load is the total amount of volleyball, non-volleyball and physical training during a
practice, season or year.
YEARS 1 & 2: a maximum 9 sessions/week for all sports (3 volleyball, 3 other sport, 3 physical
training).
YEARS 3 & 4: Maximum 9 sessions/week (1 session = 90 min of a practice, match, or work out).
For example: 6 volleyball + 3 physical training = 9… or 5 volleyball + 4 physical training = 9.
All athletes should have 6 hours between practices if doing two practices a day and have 1 full
day off per week.
Coaches in this stage should monitor the total number of activities the players participate in order
to build the players’ capacity to withstand training and minimize burnout and injuries. Coaches
should also monitor the estimated volume of jumps for each practice. The number of jumps
should gradually increase to meet the demands of training and competition events. Sharp
increases in jumps from day-to-day or week-to-week greatly increase the risk of chronic or acute
injuries. Training load can be recorded and monitored within the practice plan with great
specificity or with simple symbols (, , →).

June 1, 2018 © Coaching Association of Canada and Volleyball Canada
24
STRENGTH The sensitive period for strength in girls is immediately after Peak Height Velocity (PHV) or at the onset of menarche, while for boys it is 12 to 18 months after PHV. PHV can be measured by monitoring the growth rate of your athletes.1 Measurements should be done every three months, measuring standing height, sitting height and arm span. See figure below for the sensitive periods of adaptation for strength. During the first two years of the Train to Train stage, strength training sessions can be integrated into the practice plan. During, the second two years of the Train to Train stage, it may be appropriate for athletes to transition toward strength training outside of practice. Coaches may initially employ one in-practice strength session, and 1 outside of the practice setting, building to two or more sessions outside of practice. The Train to Train stage is identified as the stage in which the athletes’ “engine” is built. When integrating strength sessions into the volleyball practice, it is recommended it be applied just after the last skill development or team play activity and right before the cool-down. Athletes should be most alert and prepared to learn when they are fresh – just after the warm-up. Strength training should not be used to fatigue the athletes prior to practice. Prior to PHV, volleyball coaches can employ a variety of strength training exercises’ using mainly body weight, medicine balls and Swiss balls (for balance and coordination). An emphasis on core strength is essential. Teaching proper lifting form is recommended to prepare athletes for weighted exercises post-PHV. For example, Olympic lifts can be taught at this stage with very little weight, with the support of a certified Strength and Conditioning coach.
1 Canadian Sport for Life – LTAD 2.0 (page 33)

June 1, 2018 © Coaching Association of Canada and Volleyball Canada
25
SPEED
The latest research for training speed follows a new paradigm, which is that speed can and
should be trained all year round. Training duration should be no more than 5 minutes in length
at the beginning of practice after a proper warm-up. Athletes can practice game-like volleyball
movements (or tag games) to produce maximum effort for 5 seconds, and then receive a full
recovery before executing similar or other movements.
The previous recommendation that is currently on all Sport for Life material is: “For boys, the
first sensitive period for speed occurs between the ages of 7 and 9 years, and the second
occurs between the ages of 13 and 16. For girls, the first sensitive period for speed occurs
between the ages of 6 and 8 years, and the second occurs between the ages of 11 and 13.”2
SUPPLENESS (FLEXIBILITY)
The sensitive period for suppleness for both genders occurs between the ages of 6 and 10.
Although flexibility training during puberty yields good results, special attention should be paid to
flexibility during the adolescent growth spurt, due to stresses on muscles, ligaments and
tendons by the rapidly growing bones.3
In addition to static stretching at the conclusion of the cool-down, volleyball players are
encouraged to purchase a ‘Foam Roller” and a lacrosse/tennis ball to use after practice and
away from the gym. Using these two tools to massage and expand muscles after the
continuous contractions during a practice will support recovery and prevent muscle tightness,
which in turn can prevent chronic or acute injuries.
STAMINA (ENDURANCE)
The sensitive period for stamina occurs at the onset of the adolescent growth spurt. Aerobic
capacity training is recommended before athletes reach PHV. Aerobic power should be
introduced progressively after PHV when growth rate decelerates.4
Stamina is best developed prior to the volleyball season and serves as a critical recovery
element for the physical challenges of the season. During the season, volleyball-specific
stamina can be built or maintained through the manipulation of the volume and intensity of
training (practice drills). Reducing the rest time between repetitions or activities is a primary
method to increase the demands and expand the athletes’ capacity for stamina.
2 Canadian Sport for Life – LTAD 2.0 (page 33)
3 Canadian Sport for Life – LTAD 2.0 (page 33)
4 Canadian Sport for Life – LTAD 2.0 (page 33)

June 1, 2018 © Coaching Association of Canada and Volleyball Canada
26
PHYSICAL ATTRIBUTES
Physical attributes are body measurements that are influential to success in volleyball (height and reach) AND the physical qualities
that support success in volleyball, such as jumping ability, quickness and arm speed. Provincial and National Volleyball
Organizations use standardized physical tests to monitor athlete improvement, and as a tool to support selection for elite programs.
Below is a sample of testing benchmarks used. Strength, Speed, Suppleness and Stamina are the primary areas coaches can focus
on to support athlete improvement.
MALE INTERNATIONAL PHYSICAL INDICATORS
16U NATIONAL TEAM
POSITION MIDDLE/OPPOSITE OUTSIDE SETTER/LIBERO
POINTS 5 4 3 2 1 5 4 3 2 1 5 4 3 2 1
SPIKE TOUCH (CM) 340+ 335+ 330+ 325+ 320+ 330+ 325+ 320+ 315+ 310+ 325+ 320+ 315+ 310+ 305+
BLOCK TOUCH (CM) 315+ 310+ 305+ 300+ 295+ 310+ 305+ 300+ 295+ 290+ 305+ 300+ 295+ 290+ 285+
T-TEST (SEC) 9 9.5 10 10.5 11 9 9.5 10 10.5 11 9 9.5 10 10.5 11
FEMALE INTERNATIONAL PHYSICAL INDICATORS
16U NATIONAL TEAM
POSITION MIDDLE/OPPOSITE OUTSIDE SETTER/LIBERO
POINTS 5 4 3 2 1 5 4 3 2 1 5 4 3 2 1
SPIKE TOUCH (CM) 310+ 305+ 300+ 295+ 290+ 305+ 300+ 295+ 290+ 285+ 300+ 295+ 290+ 285+ 280+
BLOCK TOUCH (CM) 300+ 295+ 290+ 285+ 280+ 295+ 290+ 285+ 280+ 275+ 290+ 285+ 280+ 275+ 275+
T-TEST (SEC) 9.5 10 10.5 11 11.5 9.5 10 10.5 11 11.5 9.5 10 10.5 11 11.5

June 1, 2018 © Coaching Association of Canada and Volleyball Canada
27
Special note: The list of Psychological and life skills elements below were developed by Volleyball Canada in
partnership with Provincial Territorial Associations, and the larger volleyball community. The
elements are not exhaustive, nor definitive. However, they have been chosen to enhance unity,
and to create a common language. Furthermore, they have been developed to represent the
collective vision to support all athletes toward excellence in sport as well as building positive
contributing members of Canadian society.
PSYCHOLOGICAL
PSYCHOLOGICAL WELLBEING AND PERFORMANCE
Concepts and strategies related to psychological skills can be introduced to athletes at an early
age. Initially, this involves instilling foundational principles of helpful attitude, productive focus
and imagination, while emphasizing effort and fun. As athletes’ progress through the stages of
LTAD, mental skills and strategies are introduced and developed to help athletes handle the
increasing pressures and demands of competitive sport. The development of psychological well-
being and performance is a dynamic process that fluctuates depending on:
• the time and effort put towards developing the mental skills and attributes, and
• the athletes’ openness to self-learning and reflecting on competitive experiences.
In order to provide athletes with the opportunity to reach their personal performance potential, it
is imperative that mental fitness be incorporated throughout their long-term development.
Below is a list of elements within the Psychological pillar of the Athlete Development
Framework, a basic definition, and an outcome for athletes/coaches to work toward. For
activities to support athletes’ application of these concepts, Volleyball Canada recommends:
Trainwave, Volleyball Edition by Kyle Paquette PhD, Jamie Collins PhD, Adam Kingsbury
PhD(c), 2017, and/or other resources developed by registered Sport Psychology practitioners.
Additional information can be found at marblelabs.ca.
SELF-AWARENESS Ability to have an accurate perception of self (e.g., awareness of his/her habits, personality traits, strengths and gaps both in and outside of sport). Achieved through ongoing assessments. MOTIVATION Ability to monitor and manage one's own quality of motivation for long-term performance, satisfaction, and well-being in and outside of sport. Athletes create goals related to the various components of high performance (i.e., technical, tactical, physical, and psychological skills). Athletes understand the concept of multi-domain management (i.e., school, family, friends, and sport). Coaches and parents are mindful of having realistic expectations based on athletes’ ability and time availability.

June 1, 2018 © Coaching Association of Canada and Volleyball Canada
28
TASK ENGAGEMENT Ability to identify situational tasks (i.e., most important task at hand) that require his/her attention to achieve a given outcome in and outside of sport. Athletes identify basic situational tasks related to learning and performance both on and off the court that require their attention. Coaches regularly emphasize that task engagement increases likelihood of appropriate action and decision-making. Coaches are primarily responsible for monitoring and positively reinforcing athletes’ task engagement. MINDFULNESS Ability to understand and monitor the highly variable and ever-changing nature of his/her thoughts, emotions, and actions in and outside of sport. Athletes understand that variability in thought, emotion, and behaviour is part of the human experience. They also understand that “controlling” these occurrences are not the objective, but rather to recognize them and manage the impact they have on task engagement. SELF-REFLECTION Ability to continually identify and monitor strengths and gaps both in his/her learning and ability to perform required skills in and outside of sport. Athletes can identify personal and athletic strengths and challenges; they also regularly reflect on their knowledge of volleyball (e.g., tactical and technical). PLANNING AND GOAL SETTING Ability to continually create appropriate plans to support his/her development and performance in and outside of sport. Athletes identify individual season-long learning and developmental objectives pre-season; they reflect on objectives mid-season and post-season. LISTENING AND ASKING QUESTIONS Ability to receive information by carefully listening to the messages of others; the ability to consistently ask relevant questions for maximum clarity. Athletes regularly reflect on what distracts them from listening and concentrating during short learning activities, coaching instructions, play and training; their awareness of distractions is positively reinforced by coaches. Athletes regularly generate questions in small groups related to training tasks; their curiosity and questions are positively reinforced by coaches. CRITICAL THINKING Ability to develop an in-depth understanding of relevant concepts and skills related to their successful performance in and outside of sport. Athletes regularly represent their surface understanding of the various components of performance (i.e., technical, tactical, physical, and psychological); their ability to make sense of the learning content is positively reinforced by coaches. LEARNER VS PERFORMER MODE Ability to understand and adjust mindset (e.g., attentional patterns and feedback) based to two modes of operating: learner mode vs. performer mode. Athletes are taught the two modes used during training and matches, and they regularly determine or are instructed by the coach whether they are engaging in development or performance related tasks. Two modes of operating are learned and regularly reinforced by coaches in training and competition: the “learner” and the “performer”.

June 1, 2018 © Coaching Association of Canada and Volleyball Canada
29
FOCUS Ability to manage "on-task" and "off-task" focus; ability to understand and recognize attentional strengths and limitations (e.g., common distractions). Mindfulness meditation is introduced with an emphasis on paying attention both internally and externally, as well as to experience and understand the normalcy and frequency of distraction on and off the court. CUE-READING AND DECISION MAKING Ability to understand patterns in performance, identify cues for each pattern, and make the appropriate decisions based on the presentation of cues in action. Athletes have a deep and broad understanding of game strategy and performance tactics. Athletes’ daily training environment are designed to according to sound skill acquisition and motor learning principles. Training promotes having strong on-court vision (i.e., visual processing abilities) and efficient decision-making. MANAGING ENERGY Ability to identify and monitor activities that help to conserve or replenish chronic energy (long-term); ability to adjust acute energy in performance. Athletes are introduced to concept of “functional” vs. “non-functional” emotional states and how the stress response is associated with a reduction in long-term energy during training and competition. RESILIENCE Ability to identify his/her default responses to adversity and to develop plans to manage themselves in a competitive and professional fashion. Athletes are taught the importance of failure rate (30-40%) and the role of failure in the learning process. The concept of process vs. outcome is heavily emphasized and results of competition are always contextualized in relation to preparation. Coaches prioritize the positive reinforcement of appropriate failure rate and process focus during training and competition. LEADERSHIP Ability to empower teammates by taking ownership and responsibility to bring energy and productivity to all activities and to create a safe environment for others. Athletes are deliberately taught ethical and moral reasoning, decision-making, and prosocial behaviours. COMMUNICATION Ability to communicate openly and honestly to create a shared understanding of objectives, strategies, and to accelerate learning and development. Athletes develop a shared repertoire of language with their teammates related to training and performance objectives and tasks; they also regularly communicate their ideas and perspectives irrespective of whether they align with those of their coach and teammates; this is positively reinforced by coaches. CONNECTING WITH TEAMMATES Ability to regularly develop perspectives of empathy and compassion; ability to continually monitor and work to improve the quality of relationship with others. SUPPORT AND FEEDBACK Ability to regularly provide verbal and non-verbal support to teammates in training and competition; they are also required to provide occasional feedback to their teammates related to their personal and athletic strengths and weaknesses.

June 1, 2018 © Coaching Association of Canada and Volleyball Canada
30
CONFIDENCE/COURAGE The belief in one’s skills and one's ability to use his/her skills to achieved a desired outcome. Sustainable confidence comes from having a realistic sense of one’s abilities and imperfections both as a person and a performer. Confidence can result in courage, which is the ability to confront danger, pain, uncertainty, intimidation or stressful/risky situations.
LIFE SKILLS
INJURY PREVENTION & RECOVERY
Applying pre and post exercise routines to minimize injury and promote recovery. For example,
the use of proper warm-up and cool down, use of foam rollers and balls, use of bands, ice,
massage, tailored programs to create muscle balance and muscle functionality.
The need and use of specific recovery strategies, as well as the frequency at which they should
be employed, will vary according to the stage of LTAD and the athlete’s level of competition.
Optimal management of the recovery process also requires careful attention be given to the
other life activities of the athlete outside of sport. They can also be fairly demanding and
represent significant sources of both fatigue and stress.
Poor planning, excessive training and participation in too many competitions can all induce
severe levels of fatigue. The same detrimental outcome can come from the improper
management of the athlete’s recovery process.
SLEEP
Sleep is also considered part of the recovery process. However, more and more research has
shown the critical nature of sleep, which has prompted sleep to be a category of its own.
Understanding and applying sleep best practices including hours per day, naps, sleep routines,
are an essential part of athlete development. See resources at the sportforlife.ca website.
NUTRITION/HYDRATION
Understanding and applying nutritional foundations/education: making good food choices, meal
planning, grocery shopping and reading labels, hydration, competition meals, snacks
DISORDERED EATING EDUCATION
Disordered eating refers to a wide range of abnormal eating behaviours, many of which are
shared with diagnosed eating disorders. The main thing differentiating disordered eating from an
eating disorder is the level of severity and frequency of behaviours
Coaches can focus on healthy eating habits, energy balance and healthy body image; raise
awareness of disordered eating and eating disorders among athletes and coaches; educate on
signs and symptoms of disordered eating and eating disorders; understand their role as

June 1, 2018 © Coaching Association of Canada and Volleyball Canada
31
potential triggers of disordered eating (undue focus on athletes’ weight); know where outside
professional support can be obtained (e.g. eating disorder clinics); develop strategies to identify
disordered eating and eating disorders in athletes along with treatment and recovery strategies.
SOCIAL MEDIA USE
Coaches and clubs may have policies in place on when cell phones can be used. Some teams
provide a portable ‘cubby’ for cell phones that must be stored during practice time to avoid the
temptation to check their phone during practice. Teams may also have education seminars on
and how social media should be used. For example, a good rule of thumb is ‘don’t post anything
you wouldn’t want to be on the News, or that your grandmother would not approve. Seeking the
advice of experts in this area is well advised.
SCHOOLING PLAN
In designing an effective training program, the demands of school must be considered. These
include integrating school academic loads and duties, school related stresses, and the timing of
exams. When possible, training camps and competition tours should complement, not conflict,
with the timing of major school academic events.
ALCOHOL AND CANNABIS EDUCATION
Alcohol or cannabis abuse is a previous psychiatric diagnosis in which there is recurring harmful
use of alcohol or cannabis despite its negative consequences. While alcohol and cannabis are
legal for individuals at various ages across the country, there is significant opportunity for its use
to have a negative impact on the athletes’ lives’ and development. Communication with parents
should be held if talks are planned with athletes below the legal age. Several resources are
available that demonstrate the effects of alcohol on performance, while the effects of cannabis
are much less understood and studied.
SOCIO-CULTURAL EDUCATION
The socio-cultural aspects of sport are significant and must be managed with proper planning.
Socialization via sport will ensure that general societal values and norms are internalized
through sport participation. This occurs at the community level and as an athlete progresses
through the LTAD stages, leads to international exposure.
Exposure to various cultures provides broadening of perspectives, including ethnicity awareness
and national diversity. Within the travel schedule, recovery can include education related to the
competition location, including history, geography, architecture, cuisine, literature, music and
visual arts. With proper planning, sport can offer much more than simply commuting between
hotel room and competition.
Sport socialization refers to the sport subculture in a particular sport. Sport subcultures are very
diverse; just consider the differences between rugby, gymnastics, soccer or swimming
subcultures. Within each sport subculture, it is important that coaches and parents guard
against group dynamics that create a culture of abuse or bullying. Ethics training should be
integrated into training and competition plans at all stages of LTAD.

June 1, 2018 © Coaching Association of Canada and Volleyball Canada
32
Overall socio-cultural activity is not a negative distraction or an interference with training or
competition activities. It is a positive contribution to development of the participant as a person.
ETHICAL CHOICES
Relating to moral principles or the branch of knowledge dealing with ethical standards. Avoiding
activities or organizations that do harm to people or the environment. The Canadian Centre for
Ethics in Sport is a good resource to explore the many ethical issues that face the sporting
community. Coaches can proactively educate athletes on making positive choices.
TIME MANAGEMENT
Organizing and prioritizing daily, weekly, monthly and yearly activities. This trait benefits from
self-management in that athletes can take ownership over their schedule, set priorities and
thinking ahead to optimize their performance.
BUDGETING
A later stage element necessary for planning all facets of life including school, employment,
sporting activities, shopping for meals etc. Athlete may not have picked up this skill in the school
setting or at home and would benefit from exposure to a budgeting or financial planning
professional.
TRAVEL STRATEGIES
Athletes who travel significant distances can experience travel fatigue, jet lag, and the effects of
time change, which in turn can significantly hamper performance. Travel strategies include
sleep strategies (often provided by sleep experts), meal planning for pre and post-competition,
and seeking out services such as physiotherapy, chiropractic, ice and massage prior to
departure.
COMMITMENT
The state or quality of being dedicated to a cause or activity. Committed individuals choose to
restrict their freedoms of action to enhance the cause or activity. Committed individuals
understand the necessity of investing the effort to reach common goals. Athletes may benefit
from understanding the definition of commitment. Secondly, coaches may consider focussing on
athletes’ ability for delayed gratification.

June 1, 2018 © Coaching Association of Canada and Volleyball Canada
33
Understanding Stages of Skill Development
A Describe in a sentence what serving would look like in the initiation and acquisition stage. Refer to the definitions below
B - Describe in a sentence what passing would look like in the early consolidation stage. Refer to the definitions below
C - Describe in a sentence what setting would look like in the late consolidation stage. Refer to the definitions below
D - Describe in a sentence what attacking would look like in the refinement stage Refer to the definitions below

June 1, 2018 © Coaching Association of Canada and Volleyball Canada
34
Stages of Skill Development Review from eLearning:
With the exception of Initiation, these stages should not be viewed as clear-cut steps with a
well-defined beginning and end. Rather, they represent a continuum in which the participant’s
mastery of the skill improves, his or her needs change, and practice conditions should be
adjusted.
Q: What stages of skill development do Train to Train (13-16) athletes typically reside? A: Initiation, Acquisition and Consolidation Definitions of the stages:
Initiation
The first contact the athlete has with a particular skill.
The athlete may have no idea of what to do to perform the skill.
Acquisition
The early stage of learning where the athlete becomes capable of (1) coordinating key
components of movements and (2) executing them in the correct order, thus performing a rough
form of the skill.
The movements are not well synchronized or under control yet, and they lack rhythm and flow.
The execution is inconsistent and lacks precision. The athlete has to think about what he or she
is doing while performing the skill.

June 1, 2018 © Coaching Association of Canada and Volleyball Canada
35
Both form and performance tend to deteriorate markedly when the athlete tries to execute
movements too quickly or is under pressure, as may be the case in a competitive situation.
Consolidation
The athlete can execute the movements or the skill with correct form. Movement control,
synchronization, and rhythm are good when performing the skill under easy and stable
conditions. The movements can be repeated consistently and with precision under these
conditions.
Some elements of performance can be maintained when the athlete is under pressure,
conditions change, or demands increase, but performance remains inconsistent.
The athlete begins to develop a more personal style.
Refinement
The athlete can execute the movements in a way that is very close to the ideal in terms of form
and speed. The performance is very consistent and precision is high, even under very
demanding conditions and in situations that are both complex and varied.
Only minor fine-tuning may be necessary to achieve optimal execution, and a fairly personal
style is established.
All components of the movement have been automated, which enables the athlete to focus on
the environment while performing and to make rapid adjustments as necessary.
The athlete can reflect critically on his or her performance to make corrections.

June 1, 2018 © Coaching Association of Canada and Volleyball Canada
36
Teaching Points
Guidelines Teaching points are best applied if…
• Linked to the demonstration and explanation of the skill – so the athletes can see and hear the
correct execution at the same time.
• Highlight the critical components that athletes should do and how
• Few in number. Best is one at a time, or the athlete can choose to focus on 1 of 3 options
• Provided before execution of the skill, as apposed to feedback, which takes place after
execution
• Repeated several times
• Are in the form of “External Focus of Attention”
Definition of External Focus of Attention:
The coach explained to the athletes that during skill execution, they must focus their attention on the
intended outcome. For example, “pass the ball in a straight line to the setter’s hands”… NOT “think
about keeping your arms straight while you pass” (which is internal focus of attention).
One-page skill descriptors provided in Appendix 2

June 1, 2018 © Coaching Association of Canada and Volleyball Canada
37
Applying Coaching
Methodology to a
Practice Plan
&
Building a Drill

June 1, 2018 © Coaching Association of Canada and Volleyball Canada
38
SUMMARY OF THE CHARACERISTICS OF VC’s COACHING METHODS
Method 1 / Acquisition Drills
Whole skill, at their own pace, lots of repetitions, athlete must shift their focus from
ball to self to surroundings cyclically, decisions are based on where to move and where
to place the ball, and athletes find solutions through trial and error plus coach feedback.
Use Observational Practice when appropriate to enhance learning.
Method 2 / Early Consolidation Drills
Coach provides cues, which they must read correctly, then make the right decisions, and
then execute proficiently. Only 2 cues are provided initially and only 1 cue is
presented per attempt. Athletes receive multiple repetitions before switching out.
“Directed play conditions”. In directed play conditions the coach can give the signals to
ensure s/he knows what the cue was (in order to correctly interpret if the athlete made
the right read). Or if the coach is proficient in reading the cue and is able to quickly
recognize both the cue and the athlete’s reaction to the cue, then directly providing the
cues or signals is not necessary. In the second case, the coach must position himself or
herself to “see what the athlete sees”.
Method 3 / Late Consolidation Drills
Live opposition but given a slight “time or space advantage” at the beginning of the
drill. Number of cues is only limited to ‘live game-like’ situation and is not directed by the
coach.
*Simulated Play & Refinement Drills
At this stage, the players must become capable of reading cues, making decisions, and
performing the skills correctly (1) under variable conditions that replicate typical
game conditions and intensity, or (2) when they are exposed to the most challenging
competitive situations that can be faced at their level of play. In this second case,
athletes should be put into disadvantaged situations. Athletes should primarily solve
problems on their own or asked to critically reflect after their actions.
*Simulated Play drills should be used in every practice for each stage of development:
Acquisition, Early Consolidation, Late Consolidation, and Refinement. The coach must
manipulate the focus of the drills to meet specific objectives that are appropriate for each stage
of skill development.
See appendix for greater detail on the above coaching methodology

June 1, 2018 © Coaching Association of Canada and Volleyball Canada
39
What is Observational Practice and how is it integrated into a Method 1 drill? Observational Practice is when athletes work in pairs executing a skill. Athletes take turns executing the skill and observing one another. For example, in a serving drill, one athlete serves, while the other observes. Shea et al. conducted some experiments and found the following… Group 1 of athletes (physical only): executed 60 repetitions of a skill Group 2 of athletes (combined group): executed 30 repetitions of a skill, observing their partner after each attempt Group 1 and 2 showed the same results in acquiring a skill. However, Group 2 the Observational Practice (or combined) group outperformed the first group in the transfer test. This is to say that those athletes exposed to observational practice retained the skill better and performed better than the control group with half the amount of repetitions. The implications of this are significant in terms of achieving our desired results (transfer skills to the game), reducing the training load on the body and reducing injuries.

June 1, 2018 © Coaching Association of Canada and Volleyball Canada
40
Method 1 Drill and Observational Practice Checklist
❑ Does the drill reference safety?
❑ Are the athletes practicing the whole skill?
❑ Are the athletes executing the drill at their own pace?
❑ Are the key cues and decisions listed? Is the athlete encouraged to shift their focus from ball to self to surroundings cyclically?
❑ Do they get a lot of repetitions, without too many in a row? For example, 3 reps in a row before switching
❑ Is the objective and success criteria concrete and specific?
❑ Is the drill description and drawings clear?
❑ Do the teaching points reference cue-reading, decision-making and skill execution?
❑ Is the number of teaching points 3 or under?
❑ Do any of the teaching points use “external focus of attention”?
❑ Is a variation of the drill provided? A variation changes the focus of a drill for example, from outside attack to middle attack.
❑ Are adjustments listed in situations when fewer athletes show up than anticipated? Are adjustments that make the drill harder or easier listed?
❑ Are the athletes in groups of 2 or 3, and given the chance to observe one another in between repetitions if appropriate?
❑ Are the athletes prompted to tell their partner 1 piece of positive specific feedback?
❑ Are the objective/success criteria specific and appropriate for the stage of skill development?
❑ Does the drill apply the motor learning research of “specificity”?
Specificity is…
❑ Does the drill apply the motor learning research of “random practice”?
Random practice is…
❑ Does the drill apply motor learning research of the “ideal challenge zone” (2 out of 3 or 66%)?
Ideal Challenge Zone is…

June 1, 2018 © Coaching Association of Canada and Volleyball Canada
41
Worksheet 1b: Method 1 Drill
GOAL:
Skill(s)/ Variation(s)
Key Cues Key Decisions
TIME OF ACTIVITY:
EQUIPMENT:
SAFETY:
DRILL NAME
Objective/Success Criteria:
Drill Description:
Teaching Points:
Variation:
Adjustments:
Harder:
Easier:

June 1, 2018 © Coaching Association of Canada and Volleyball Canada
42
Simulated Play Drill Checklist
❑ Does the drill reference safety?
❑ Is the activity game-like?
❑ Is the activity a game (competitive or cooperative) where the ball can cross the net in a rally situation?
❑ Is the game modified or restricted to increase the use of the skills or tactics being learned. For example, play 3 vs 3. Getting a block gives one additional point; game to 15.
❑ Are the number of players in the game appropriate for the skill or tactic being learned?
❑ Is the court size appropriate for the stage of skill development to encourage lots of contacts?
❑ Are the key cues and decisions listed?
❑ Is the objective and success criteria concrete and specific?
❑ Is the drill description and drawings clear?
❑ Do the teaching points reference cue-reading, decision-making and skill execution?
❑ Is the number of teaching points 3 or under?
❑ Do any of the teaching points use “external focus of attention”?
❑ Is a variation of the drill provided? A variation changes the focus of a drill for example, from outside attack to middle attack.
❑ Are adjustments listed in situations when fewer athletes show up than anticipated? Are adjustments that make the drill harder or easier listed?
❑ Are the objective/success criteria specific and appropriate for the stage of skill development?
❑ Does the drill apply the motor learning research of “specificity”? see Appendix
❑ Does the drill apply the motor learning research of “random practice”? See Appendix
❑ Does the drill apply motor learning research of the “ideal challenge zone” (2 out of 3 or 66%)? See Appendix

June 1, 2018 © Coaching Association of Canada and Volleyball Canada
43
Worksheet 1c: Simulated Play Drill
GOAL:
Skill(s)/ Variation(s)
Key Cues Key Decisions
TIME OF ACTIVITY:
EQUIPMENT:
SAFETY:
EVALUATION:
DRILL NAME
Objective/Success Criteria:
Drill Description:
Teaching Points:
Variation:
Adjustments:
Harder:
Easier:

June 1, 2018 © Coaching Association of Canada and Volleyball Canada
44
Teaching Activity 1
Saturday Afternoon
1:30 – 5:00 pm

June 1, 2018 © Coaching Association of Canada and Volleyball Canada
45
Teaching Activity 1 Delivery of a Method 1 Drill
1. Coaches get back into the groups that created the Method 1 drill in the
first session and spend 10 minutes preparing to run the drill. Use
Worksheets 1, 2, 3 to support your preparations.
2. All coaches must participate in delivering the drill
3. All coaches not coaching in the drill are players in the drill
4. The format for each drill will be as follows:
• 5 minutes Group Organizes, Explains and Demonstrates the drill
• 5 minutes Group runs the drill and provides feedback
• 3 minutes All groups complete reflection sheets
• 7 minutes Debrief
Group A Serving
Group B Passing
Group C Setting
Group D Attacking
Reflection Sheets order of completion:
Group A – Self Reflection WS 5
Group B – Organization/Explanation/Demonstration WS 2
Group C – Implementing Method 1 Drill WS 3
Group D – Assessing Feedback WS 4
The order of completion then rotates upwards from B to A, C to B, D to C and A to D.

June 1, 2018 © Coaching Association of Canada and Volleyball Canada
46
Worksheet 1 – Representation of the coaching/teaching process
Observation
❑ Ensure athletes are actively engaged
❑ Move around but don’t interfere
❑ Observe both individuals and the group
❑ Verify if success criteria are achieved
❑ Identify the cause(s) of error + prioritize
Organization and Set-up
❑ Reflects safety considerations
❑ Equipment necessary is available/ready
❑ Available space/equipment used adequately
❑ Allows at least 50% motor involvement time
❑ Must allow coach to observe effectively
Can someone else
do the
demonstration
better than me?
Explanations and Demonstrations
❑ Describe the aim of the drill/exercise/activity
❑ Outline what is to be done and how, including
beginning and end
❑ Describe points of reference/cues
❑ Identify criteria of successful performance
Intervention and Feedback
❑ Recognize successful performance
❑ Feedback is specific, constructive, and focuses on what to improve + how
❑ Feedback timing + amount are adequate
❑ If necessary, explain/demonstrate again, or adapt activity
Effects of the Feedback
❑ Give athletes time to practise again to check whether they have acted on the feedback
Did I give athletes
enough time to
practise before
stopping them to give
feedback?
Did I remember to
ask athletes to give
me feedback before
giving them mine?

June 1, 2018 © Coaching Association of Canada and Volleyball Canada
47
Worksheet 2 – Organization
When organizing an activity: o Think about how to begin and finish the activity or a drill. o Take into account the safety issues of the activity or drill.
o Plan for the equipment that will be necessary before the activity or the drill takes place. The equipment must be verified for safety before the session, and prepared ahead of time so that it is available at the time of the activity.
o Organize the activity in a way that allows each athlete to remain active during at least 50% of the practice time allowed; more is desirable, unless pauses are required for recovery.
o Ensure athletes can progress at their own pace whenever possible.
o Ensure participants can begin the activity quickly and efficiently after the instructions are given.
o Ensure individual players, pairs, or groups have sufficient space to
perform the training task safely and correctly.
Set up the environment in such a way as to allow yourself to move around, and see every player without interfering with the activity.

June 1, 2018 © Coaching Association of Canada and Volleyball Canada
48
Worksheet 3 (1 of 2): Explanations/Demonstrations 1-Control potential distractions – Position athletes with potential distractions behind
them. Example of distractions: sun in the eyes, activity in the street, other athletes training or talking, spectators, etc.
2- Choose an effective formation for the group – See examples on the back.
3- Explanation – The explanation serves to:
• Describe the aim of the movement, exercise, or activity about to be performed
• Outline what is to be done and how
• Describe key points of reference/cues for the athletes
The explanation often comes before the demonstration. It should be brief, clear, and use words all athletes can understand. The athletes must have a clear idea of what they should be trying to do during the activity or the movement (the intention behind the action).
4- Demonstration – The purpose of the demonstration is to show athletes how a particular skill or activity should be done, and to give them a good visual model.
• The skill or movement must be demonstrated as accurately as possible, a few times, and from a variety of angles and speeds. This will ensure that a mental picture of the movement, and of the speed and accuracy required, is left with the group.
• A few key descriptive points about the execution movement should also be emphasized verbally as the demonstration is being performed, as well as how it should be performed.
• A few key criteria of successful performance or execution should be emphasized.
Coaches do not have to perform the demonstrations themselves all the time. Sometimes, it is preferable to use an athlete, a video, etc. Avoid repeating the demonstration too many times, as athletes who have already seen it enough may “switch off”.

June 1, 2018 © Coaching Association of Canada and Volleyball Canada
49
Worksheet 3: Explanation/Demonstration (2 of 2) Group formations that can be used during explanations and demonstrations.

June 1, 2018 © Coaching Association of Canada and Volleyball Canada
50
Assessment Worksheets to Be Used After
Each Group Has Lead its Method 1 Drill
After a group leads a drill: they fill in a self-assessment form
Each time you participate and observe: focus on a separate aspect
and use a separate assessment worksheet to note your observations
When a group or a coach leads its activity: all the other coaches
must participate.

June 1, 2018 © Coaching Association of Canada and Volleyball Canada
51
Notes on an effective warm-up and speed session…

June 1, 2018 © Coaching Association of Canada and Volleyball Canada
52
Worksheet 2 –organization, explanation, and demonstration of a Method 1
drill
Name/group: ________________________ Activity assessed: ______________________
Assessment
Yes No
1 Equipment was ready for the start of the demonstration.
2 All athletes were appropriately positioned to see and hear the explanation/demonstration.
3 Purpose of the activity/drill was clearly outlined.
4 Explanation was clear, accurate, concise and was combined with the demonstration (if appropriate).
5 Explanation outlined criteria of a successful performance by athletes.
6 Demonstration gave a good idea of the technique/task/drill.
7 Demonstration directed the attention of the athletes to an external focus of attention (target, outcome, ball direction or trajectory, expected effect).
8 Skill demonstration was repeated from different angles.
9 Athletes were involved in an appropriate way in the demo (if necessary).
10 Technical elements of the demonstration were executed correctly.
11 Voice was loud enough and choice of words was adequate.
12 Coach checked that the athletes had a good understanding.
13 Safety aspects were emphasized when appropriate.
14 Organization allowed for adequate use was of space, time, equipment.
Overall assessment:
( ) Excellent performance
( ) Good performance, some adjustments required, but generally well done
( ) One or two serious mistakes, room for improvement, but acceptable
( ) Major improvements needed
Comments ________________________________________________________________
__________________________________________________________________________

June 1, 2018 © Coaching Association of Canada and Volleyball Canada
53
Worksheet 3 – Implementation of Method 1 drill
Name/group: ________________________ Activity assessed: ______________________
Assessment
Yes No
1 Athletes could practice at their own pace.
2 Practice conditions were safe, stable, and predictable.
3 Athletes practiced using the whole skill.
4 Athletes could find some solutions by themselves through trial and
error.
5 Athletes learned how to shift their attention quickly and cyclically
from the ball to their surroundings (basic cue-reading and decision-
making)
6 Drill fostered the acquisition of the proper form when executing
specific techniques/skills.
7 Athletes had sufficient time/opportunities to practice.
8 The coach observed the athletes from an adequate vantage point.
9 The coach observed individual and group performances.
10 The coach applied Observational Practice when appropriate
Overall assessment:
( ) Excellent performance
( ) Good performance, some adjustments required, but generally well done
( ) One or two serious mistakes, room for improvement, but acceptable
( ) Major improvements needed
Comments:
__________________________________________________________________________
__________________________________________________________________________

June 1, 2018 © Coaching Association of Canada and Volleyball Canada
54
Worksheet 4 – Implementation and feedback
Group observed: _____________________________________
Assessment
Yes No
1 Intervention was done when necessary
For example, degree/type of engagement by athletes not adequate; safety or behaviour situation; etc.
2 Skill execution that was below expectation was noted (given athlete’s proficiency level and/or stage of learning progression).
3 Important cues missed by athlete(s) were noted.
4 Important decisions missed by athlete(s) were noted.
5 When proposing corrections, cause(s) of error were correctly identified.
For example, incorrect cue reading, decision-making, or skill execution.
6 When feedback was necessary it was not offered during the execution.
7 Questions were used to guide athletes to a solution or intended
improvement.
8 Feedback was positive and specific and not negative or humiliating.
For example: “You did _______perfectly!”
9 Feedback was clear and concise and relevant to the most important performance factors; it emphasized what to improve, and how;
For example, the coach referred to the critical performance factor, outlined correction and how to achieve it (e.g., expected outcomes of actions, target, ball trajectory, etc.).
10 The coach explained to the athletes that during skill execution, they must
focus their attention on the intended outcome.
For example, “pass the ball in a straight line to the setter’s hands”, NOT “think about keeping your arms straight while you pass”.
11 Intervention was done when necessary
For example, degree/type of engagement by athletes not adequate; safety or behaviour situation; etc.
Overall assessment:
( ) Excellent performance
( ) Good performance, some adjustments required, but generally well done
( ) One or two serious mistakes, room for improvement, but acceptable
( ) Major improvements needed
Comments: ________________________________________________________________
__________________________________________________________________________

June 1, 2018 © Coaching Association of Canada and Volleyball Canada
55
Worksheet 5 – Self-Assessment – Leading a Method 1 Drill Assessment
While leading my Method 1 drill, I … Yes No
1 Outlined the purpose of the drill.
2 Clearly explained the general pattern of the drill.
3 Clearly explained which cues to watch.
4 Clearly explained the appropriate decisions for each cue.
5 Effectively used Observational Practice if appropriate.
6 Chose a good position from which to lead the activity.
7 Watched the players actions and took my eyes off the ball.
8 Made interventions when necessary (degree/type of engagement by
athletes not adequate; success rate below expectation; etc.).
9 Detected cues or decisions missed by athlete(s)/participants.
10 Detected execution that was below expectation (given athlete’s
proficiency level and/or stage of learning progression).
11 Correctly identified cause(s) of error.
12 Offered feedback when necessary, and it was not offered during the
execution.
13 Recognized successful performance, and athlete(s) informed.
14 Used questions to engage athlete(s) in a reflection.
15 Offered constructive feedback, which focused on critical aspect(s)
of performance.
16 Emphasized what to improve, and how; aspects such as expected
outcome of actions, target, ball trajectory, etc. were included.
Comments: ________________________________________________________________
__________________________________________________________________________

June 1, 2018 © Coaching Association of Canada and Volleyball Canada
56
Building a Method 2 Drill In the same groups that presented the Method 1 drill, coaches discuss and plan how they will ‘advance’ their Method 1 drill into a Method 2 drill. Use the definition below, Worksheet 1c (p. 57) and Method 2 Checklist (p. 58) to build your drill. Groups have 15 minutes to prepare.
5 minutes
Groups will present and run their Method 2 drill. Coaches may choose to use only a whiteboard to explain the drill or preferably use the court and “athletes”.
3 minutes
Debrief - At the completion of each presentation the Learning Facilitator along with the rest of the group reviews the drill and validates that it meets the Method 2 checklist criteria.
Definition of a Method 2 Drill:
Method 2 / Early Consolidation Drills
Coach provides cues, which athletes must read correctly, then make the right decisions, and
then execute proficiently. Only 2 cues are provided initially and only 1 cue is presented per
attempt. Athletes receive multiple repetitions before switching out.
“Directed play conditions”. In directed play conditions the coach can give the signals to
ensure s/he knows what the cue was (in order to correctly interpret if the athlete made the right
read). Or if the coach is proficient in reading the cue and is able to quickly recognize both the
cue and the athlete’s reaction to the cue, then directly providing the cues or signals is not
necessary. In the second case, the coach must position himself or herself to “see what the
athlete sees”.

June 1, 2018 © Coaching Association of Canada and Volleyball Canada
57
Worksheet 1d: Method 2 Drill
GOAL:
Skill(s)/ Variation(s)
Key Cues Key Decisions
TIME OF ACTIVITY:
EQUIPMENT:
SAFETY:
DRILL NAME
Objective/Success Criteria:
Drill Description:
Teaching Points:
Variation:
Adjustments:
Harder:
Easier:

June 1, 2018 © Coaching Association of Canada and Volleyball Canada
58
Method 2 Checklist
Assessment
Yes No
1 The coach clearly explained the general pattern of the drill to the athlete.
2 The coach clearly explained the decision option(s) for the athlete during the drill.
3 The coach clearly explained the cues the athlete had to read during the drill.
4 The number of cues the athlete had to read and interpret during the drill was manageable (2 initially, up to 4 eventually).
5 The decision options the coach has linked to each cue are technically and tactically sound.
6 The coach signaled/indicated the cues clearly during the drill.
7 The coach signaled/indicated the cues to the right person(s) during the drill.
8 The coach signaled/indicated the cues at the right moment during the drill.
9 The coach made a correct assessment of how the athlete(s) performed during the drill.
10 If the coach chose to provide feedback, the information was clear, specific, and focused on the right elements of cue reading and decision-making.
11 The athletes had the opportunity to do a few consecutive repetitions.

June 1, 2018 © Coaching Association of Canada and Volleyball Canada
59
Sample Method 2 Blocking Drill
Drill name: To block or not to block?
Initial set up: See figure. Drill description: [simple description] Blockers A and B determine whether to block or transition off the net to pass a freeball. [Detailed]. The Tosser tosses a ball to a setter who sets to Attacker C. The toss will be either: i] a ball that can be attacked or ii] a ball that must be played over with a forearm pass or overhead pass (off the net). The coach [Δ] either provides a signal to the setter to determine which of the two options will be provided or asks the setter to deliver the good and poor sets randomly. Players A and B must read the play and determine whether to block the attack or back up and pass the ball to a target. Players A and B must also communicate their decision with each other as quickly as possible. Blockers should rotate out based on success criteria. Success criteria could be: 3 successful decisions, then rotate out with a new group of 2.
Reminder for coaches: Observe how quickly the blockers read the set and intention of the attacker. Drill variations: i] the location of the attackers and blockers can be changed to other places along the net. Loading options: i] Increase the number of attackers. ii] Blockers are given less time to read the play before seeing the set and attacker. iii) Increase the speed of cue-reading - blockers are instructed to either block or pull their hands down based on an attack or tool attempt.
Sample Method 3 Drill – Setting

June 1, 2018 © Coaching Association of Canada and Volleyball Canada
60
Drill name: See the middle
Initial set up: 1-2 Setters, 1-2 Middle attackers, 1-2 Outside Attackers, Blockers, Tosser. Drill description: [simple description] Ball is tossed to Setter who sets any of the front row attackers. Middle blocker leaves early in any direction just prior to the set. Advantage is to the offence, as the middle moves early, the pass is good and the setter has 3 options. [Detailed]. Toss to the setter, the middle then leaves early in either direction prior to the set. The setter may choose to set the opposite direction or set in the same direction but to the outside attack (fast). Success criteria: Offense is successful 70% of the time.
Reminder for coaches: The setter will need to watch the ball and use peripheral vision to see the middle move in either direction.
Drill variations: i) Middle attacker approaches using a different pattern.
Loading options: i) Reduce the time that the middle leaves early ii) add a fourth back row option for the setter

June 1, 2018 © Coaching Association of Canada and Volleyball Canada
61
Teaching Activity 3
Sunday Morning
9:00 am – 12:00 pm

June 1, 2018 © Coaching Association of Canada and Volleyball Canada
62
Teaching Activity 3 Delivery of a Simulated Play Drill
1 Coaches return to the groups that created the Simulated Play drill and spend
10 minutes preparing to run the drill. Use Worksheets 1, 2, 3 to support
preparations.
2 All coaches must participate in delivering the drill
3 All coaches not coaching in the drill are players in the drill
4 The format for each drill will be as follows:
• 5 minutes Group Organizes, Explains and Demonstrates the Drill
• 5 minutes Group runs the drill and provides feedback
• 3 minutes All groups complete reflection sheets
• 7 minutes Debrief
Group A Setting
Group B Attacking
Group C Blocking
Group D Defending
Reflection Sheets order of completion:
Group A – Self Reflection WS 5 (p.71)
Group B – Organization/Explanation/Demonstration WS 2 (p.68)
Group C – Implementing Simulated Play Drill WS 3 (p.69)
Group D – Assessing Feedback WS 4 (p.70)
The order of completion then rotates upwards from B to A, C to B, D to C and A to D.

June 1, 2018 © Coaching Association of Canada and Volleyball Canada
63
Worksheet 1 – Representation of the coaching/teaching process
Observation
❑ Ensure athletes are actively engaged
❑ Move around but don’t interfere
❑ Observe both individuals and the group
❑ Verify if success criteria are achieved
❑ Identify the cause(s) of error + prioritize
Organization and Set-up
❑ Reflects safety considerations
❑ Equipment necessary is available/ready
❑ Available space/equipment used adequately
❑ Allows at least 50% motor involvement time
❑ Must allow coach to observe effectively
Can someone else
do the
demonstration
better than me?
Explanations and Demonstrations
❑ Describe the aim of the drill/exercise/activity
❑ Outline what is to be done and how, including
beginning and end
❑ Describe points of reference/cues
❑ Identify criteria of successful performance
Intervention and Feedback
❑ Recognize successful performance
❑ Feedback is specific, constructive, and focuses on what to improve + how
❑ Feedback timing + amount are adequate
❑ If necessary, explain/demonstrate again, or adapt activity
Effects of the Feedback
❑ Give athletes time to practise again to check whether they have acted on the feedback
Did I give athletes
enough time to
practise before
stopping them to give
feedback?
Did I remember to
ask athletes to give
me feedback before
giving them mine?

June 1, 2018 © Coaching Association of Canada and Volleyball Canada
64
Worksheet 2 – Organization
When organizing an activity: o Think about how to begin and finish the activity or a drill. o Take into account the safety issues of the activity or drill.
o Plan for the equipment that will be necessary before the activity or the drill takes place. The equipment must be verified for safety before the session, and prepared ahead of time so that it is available at the time of the activity.
o Organize the activity in a way that allows each athlete to remain active during at least 50% of the practice time allowed; more is desirable, unless pauses are required for recovery.
o Ensure athletes can progress at their own pace whenever possible.
o Ensure participants can begin the activity quickly and efficiently after the instructions are given.
o Ensure individual players, pairs, or groups have sufficient space to
perform the training task safely and correctly.
Set up the environment in such a way as to allow yourself to move around, and see every player without interfering with the activity.

June 1, 2018 © Coaching Association of Canada and Volleyball Canada
65
Worksheet 3 (1 of 2): Explanations/Demonstrations 1-Control potential distractions – Position athletes with potential distractions behind
them. Example of distractions: sun in the eyes, activity in the street, other athletes training or talking, spectators, etc.
2- Choose an effective formation for the group – See examples on the back.
3- Explanation – The explanation serves to:
• Describe the aim of the movement, exercise, or activity about to be performed
• Outline what is to be done and how
• Describe key points of reference/cues for the athletes
The explanation often comes before the demonstration. It should be brief, clear, and use words all athletes can understand. The athletes must have a clear idea of what they should be trying to do during the activity or the movement (the intention behind the action).
4- Demonstration – The purpose of the demonstration is to show athletes how a particular skill or activity should be done, and to give them a good visual model.
• The skill or movement must be demonstrated as accurately as possible, a few times, and from a variety of angles and speeds. This will ensure that a mental picture of the movement, and of the speed and accuracy required, is left with the group.
• A few key descriptive points about the execution movement should also be emphasized verbally as the demonstration is being performed, as well as how it should be performed.
• A few key criteria of successful performance or execution should be emphasized.
Coaches do not have to perform the demonstrations themselves all the time. Sometimes, it is preferable to use an athlete, a video, etc. Avoid repeating the demonstration too many times, as athletes who have already seen it enough may “switch off”.

June 1, 2018 © Coaching Association of Canada and Volleyball Canada
66
Worksheet 3: Explanation/Demonstration (2 of 2) Group formations that can be used during explanations and demonstrations.

June 1, 2018 © Coaching Association of Canada and Volleyball Canada
67
Assessment Worksheets to Be Used After
Each Group Has Lead its Simulated Play Drill
After a group leads a drill: they fill in a self-assessment form Each time you complete an assessment sheet: focus on a separate aspect, and use a separate assessment worksheet to note your observations When a group or a coach leads its activity: all the other coaches must participate

June 1, 2018 © Coaching Association of Canada and Volleyball Canada
68
Worksheet 2 – Organization, explanation, and demonstration of a
Simulated Play drill
Name/group: ________________________ Activity assessed: ______________________
Assessment
Yes No
1 Equipment was ready for the start of the demonstration.
2 All athletes were appropriately positioned to see and hear the explanation/demonstration.
3 The purpose of the drill was clearly explained.
Example: “In this drill we will focus on the Left Side attackers and their ability to read cues, make decisions, and execute.”
4 Explanation outlined the objective/success criteria of the drill.
How do they win or get out of the drill? What is a successful performance? Consider all 3 elements of CR + DM + SE.
5 The coach clearly explained what cues to read during the drill.
For example, “look at the setter’s release, the ball, then the hitter to see if it is off or tight.”
6 Clearly explained how the game would be modified or restricted to increase the use of the skills being learned. For example, play 3 vs 3. Getting a block gives one additional point; game to 7.
7 Introduced new tactical concepts, both individual and team, involving the skill being learned. For example, Team A will force the front row Left Side to pass a short serve.
8 The decision options the coach has linked to each cue were technically and tactically sound.
For example, would the decisions a player had to make transfer into a realistic game situation?
9 Demonstration directed the attention of the athletes to an external focus of attention (target, outcome, ball direction or trajectory, expected effect).
Overall assessment:
( ) Excellent performance
( ) Good performance, some adjustments required, but generally well done
( ) One or two serious mistakes, room for improvement, but acceptable
( ) Major improvements needed
Comments ________________________________________________________________
__________________________________________________________________________

June 1, 2018 © Coaching Association of Canada and Volleyball Canada
69
Worksheet 3 – Implementation of Simulated Play drill
Name/group: ________________________ Activity assessed: ______________________
Assessment
Yes No
1 The game/activity had variable conditions that replicate typical game conditions or intensity. The game may be 6 v 6 or smaller sided games.
2 The focus of the game materialized, and the resulting situation allowed players to work on the intended technical/tactical elements.
3 The athletes could replicate specific game situations in which they have to make appropriate tactical choices under some pressure. For example, team down by 3, the serve has to be in, and difficult enough to pull the opponent’s setter off the net.
4 The implementation of the drill supported the stated purpose.
For example, if the stated purpose was to improve the Left Side attackers’ ability to read cues, make decisions and execute – Did the drill allow this to be achieved?
5 Position selected to observe the group and individual athletes was good.
6 Athletes had sufficient time to play the game and apply/learn the intended concepts.
7 The coach observed individual and group performances.
Overall assessment:
( ) Excellent performance
( ) Good performance, some adjustments required, but generally well done
( ) One or two serious mistakes, room for improvement, but acceptable
( ) Major improvements needed
Comments:
__________________________________________________________________________
__________________________________________________________________________

June 1, 2018 © Coaching Association of Canada and Volleyball Canada
70
Worksheet 4 – Interventions and feedback
Group observed: _____________________________________
Assessment
Yes No
1 Intervention was done when necessary
For example, degree/type of engagement by athletes not adequate; safety or behaviour situation; etc.
2 Skill execution that was below expectation was noted (given athlete’s proficiency level and/or stage of learning progression).
3 Important cues missed by athlete(s) were noted.
4 Important decisions missed by athlete(s) were noted.
5 When proposing corrections, cause(s) of error were correctly identified.
For example, incorrect cue reading, decision-making, or skill execution.
6 When feedback was necessary it was not offered during the execution.
7 Questions were used to guide athletes to a solution or intended
improvement.
8 Feedback was positive and specific and not negative or humiliating.
For example: “You did _______perfectly!”
9 Feedback was clear and concise and relevant to the most important performance factors; it emphasized what to improve, and how;
For example, the coach referred to the critical performance factor, outlined correction and how to achieve it (e.g., expected outcomes of actions, target, ball trajectory, etc.).
10 The coach explained to the athletes that during skill execution, they must
focus their attention on the intended outcome.
For example, “pass the ball in a straight line to the setter’s hands”, NOT “think about keeping your arms straight while you pass”.
11 Athletes primarily solved problems on their own or were asked to critically reflect after their actions.
Overall assessment:
( ) Excellent performance
( ) Good performance, some adjustments required, but generally well done
( ) One or two serious mistakes, room for improvement, but acceptable
( ) Major improvements needed
Comments: ________________________________________________________________
__________________________________________________________________________

June 1, 2018 © Coaching Association of Canada and Volleyball Canada
71
Worksheet 5 – Self-Assessment – Leading a Simulated Play Drill Assessment
While leading my Simulated Play drill, I … Yes No
1 Outlined the purpose of the drill.
2 Clearly explained the general pattern of the drill.
3 Clearly explained which cues to watch.
4 Clearly explained the appropriate decisions for each cue.
5 Chose a good position from which to lead the activity.
6 Clearly explained how the game would be modified or restricted to
increase the use of the skills being learned.
For example, play 3 vs 3. Getting a block gives one additional point; game to
7.
7 The focus of the game materialized, and the resulting situation
allowed players to work on the intended technical/tactical
elements.
8 Watched the players actions and took my eyes off the ball.
9 Made interventions when necessary (degree/type of engagement by
athletes not adequate; success rate below expectation; etc.).
10 Detected cues and decisions missed by athlete(s)/participants.
11 Detected execution that was below expectation (given athlete’s
proficiency level and/or stage of learning progression).
12 Correctly identified cause(s) of error.
13 Offered feedback when necessary, and it was not offered during the
execution.
14 Recognized successful performance, and athlete(s) informed.
15 Used Questions to engage athlete(s) in a reflection.
16 Offered constructive feedback, which focused on critical aspect(s)
of performance.
17 Emphasized what to improve, and how; aspects such as expected
outcome of actions, target, ball trajectory, etc. were included.
Comments: ________________________________________________________________
__________________________________________________________________________

June 1, 2018 © Coaching Association of Canada and Volleyball Canada
72
Notes on Beach Skills, Tactics and Rules…

June 1, 2018 © Coaching Association of Canada and Volleyball Canada
73
Notes on Sitting Skills, Tactics and Rules…

June 1, 2018 © Coaching Association of Canada and Volleyball Canada
74
Session 4
Sunday Afternoon
1:00 pm – 5:00 pm

June 1, 2018 © Coaching Association of Canada and Volleyball Canada
75
Teaching Activity 4
5 NEW groups of 1-2 people are formed
15 minutes of preparation time to deliver a session on “systems”. Refer to WB 99-102 for “How
to Teach Systems” to support your preparations.
Group A Defensive Systems (6-up and 6-back) (CW 91-97, 102)
Group B Coach Teach Tripleball rules (CW 104-105)
Group C Coach Teach 4-2 (CW 86, 101)
Group D Coach Teach 6-3 (CW 106, 101)
Group E Coach Teach 6-2 (CW106, 101)
Coaches deliver the above sections with the following format:
All coaches in a group present.
Coaches who are not presenting are players in the activity
15 minutes per group
• 10 minutes coaching and instruction
• 5 minutes debrief (LF lead)

June 1, 2018 © Coaching Association of Canada and Volleyball Canada
76
Teaching Team Play and Systems
Although rallies can be won in a number of ways, the basic object of the game of volleyball is for a
team on one side of the net to send a ball over the net and ground it on the opposition’s court.
Consequently, the team receiving the ball is trying to prevent it from landing on their court and return it
to the opposing team (refer to the Volleyball Canada Rulebook for a complete description of the
game). Most often, each team is composed of six players but games involving teams of two, three, or
four are often played as well, especially outdoors. This chapter will be limited to discussion of teams of
six players.
Initial Court Positioning
The positions of the playing members of each team on the court are indicated by numbers between 1
and 6, as shown below. The players on both teams must be in the following relative positions at the
instant the ball is contacted for the serve to start play:
Position 1 must be behind 2 and to the right of 6.
Position 2 must be in front of 1 and to the right of 3.
Position 3 must be in front of 6 and between 4 and 2.
Position 4 must be in front of 5 and to the left of 3.
Position 5 must be behind 4 and to the left of 6.
Position 6 must be behind 3 and between 5 and 1.
These positions are determined according to the positions of the players feet on the floor as follows:
1. Each front-row player (positions 2, 3 & 4) must have at least part of their most forward foot
closer to the center line than the most forward foot of their corresponding back-row player.
2. The players in positions 1 and 2 must have at least part of their most right foot closer to the
right side line than the most right foot of their corresponding middle-row player.
3. The players in positions 4 and 5 must have at least part of their most left foot closer to the left
side line than the most left foot of their corresponding middle-row player.
Once the ball has been served, players may move to any position on their half of the court or free
zone. However, there are two limitations on the actions of the players in the back row (5, 6, and 1):
1. Back-row players may only attack the ball in the front zone of the court if some part of the ball
is below the height of the top of the net. However, they may attack the ball at any height as
long as the takeoff for their jump is from behind the attack line.
2. Back-row players may not block the ball or participate in forming a block at the net.
1
234
5 6

June 1, 2018 © Coaching Association of Canada and Volleyball Canada
77
Finally, in addition to indicating the order of rotation for players, it is common for coaches to use these
numbers to indicate general areas of the court. That is: 1 indicates the back right zone, 2 the front
right, 3 the front center, 4 the front left, 5 the back left, and 6 the back center.
Player Rotation
When the team receiving the serve wins a rally, gaining the right to serve, its players must rotate one
position clockwise before the next rally can begin. That is: the player in 1 rotates to position 6, the
player in position 2 rotates to position 1, etc.
Cycle of Action
Although founded on specific skills, the game of volleyball is cyclical in nature. This involves the
movement or transition from one phase of the game to the next. Successful team play is, in large part,
determined by a team’s ability to make the transitions found in the game smoothly and consistently. It
is critical that the coach have a good conceptual understanding of the cycle of actions in volleyball.
Service Reception
Service
Preparation for Attack
InformationGathering
Transition to Defensive Ready
Attack Coverage
Attack
Transition to Final Defensive Positions
Defensive Ready
Defence and Attack Reception

June 1, 2018 © Coaching Association of Canada and Volleyball Canada
78
The basic cycle of actions for volleyball is graphically illustrated in figure 9.2. The different phases of
the game are indicated by the rectangular blocks. The solid arrows indicate the most common player
movements or transition between these phases, while the dashed arrows indicate potential transitions
if some point in the cycle is not completed as anticipated but the rally continues. As can be seen in this
figure, a rally in the game of volleyball starts with a team either serving or receiving serve. The rally
then continues with the successful (or partially successful) execution of skills and transition between
succeeding phases of the game in a cyclical manner.
The remainder of this chapter will focus on presenting basic systems of play that may be used by
teams. This information will be presented within the framework of the basic cycle of actions as shown
previously.
SYSTEMS As in other sports, the game of volleyball is more enjoyable and teams are more successful when an
organized system of play is established for the athletes. Volleyball systems may be unspecialized or
specialized:
Unspecialized
All players are expected to perform all of the roles required in volleyball. In such a system, the tasks
will usually be assigned to a specific position on the court. For example, whoever is in position 3 (front
center) on the court will be required to set the ball while players in position 2 (front right) or position 4
(front left) will be expected to attack.
Specialized
A specialized system features specific roles for some or all the athletes, usually based upon their
specific strengths as a volleyball player. For example, one or two players (with particularly good
overhead passing skills) may be assigned setting duties for all or most situations. Also, players can be
assigned a designated position on the court from which to attack or defend.
Offensive Systems
Offensive systems of play are generally identified using terminology that identifies the number of
hitters in the system with the first number and the number of specialized setters with the second
number. Two basic offensive systems of play will be presented in this manual:
6–0 System
This is an unspecialized system of play with all players hitting and no specialized setters. This system
is most often used in lower levels of recreational play. There are three common variations used: a) the
player in rotational position 3 sets; b) the player in rotational position 2 sets and; c) the player in
rotational position 1 sets.

June 1, 2018 © Coaching Association of Canada and Volleyball Canada
79
The primary advantage of this system is that all players have the opportunity to play every position as
they rotate to it and no switching of positions is required. The biggest weakness of this system is that it
is difficult to take advantage of the specific strengths of team members. Another disadvantage is that
all players must learn all six different positions on the court.
4–2 System
This is a specialized system of play with four players designated as hitters and two players as setters.
This system is most often used in intermediate levels of recreational play and lower levels of
competitive play. There are two common variations used: setter switches to position 2; and setter
switches to position 3. The typical starting rotational order for the players must have the setters
diagonally opposite each other, as shown in figure 9.3.
The biggest advantage of this system is that some specialization is possible to take advantage of
players’ strengths without difficult transitions being required during the switching. The major
disadvantage of this system is that there are only two designated hitters in the front row at any time,
putting some limitations on the possible attack options.

June 1, 2018 © Coaching Association of Canada and Volleyball Canada
80
Service Reception Service reception is usually considered the most important aspect of
the game of volleyball. Failure to pass the serve, directly results in a
point for the opponent while a poor pass makes it more difficult to
attack effectively and earn a sideout. The biggest factor affecting
service reception is the ability of the players to execute a forearm
pass, but utilization of a proper formation can improve the athlete’s
chances of being successful. The locations the players start on the
floor when receiving the opponent’s serve, is termed the service
reception formation.
W Formation
The most common formation for recreational and lower levels of
competitive play is the “W” formation. The starting position for this
formation uses three players spread across the court standing just
behind the attack line approximately equal distances from the server.
Two players stand in a second line about 3 meters behind and filling
the gaps between the front-row players. The front-row players should
be about the same distance from the server and the back-row players
about the same distance from the server. This basic alignment for the
“W” is shown in figure 9.4. The exact location of the players in the “W”
may also be determined by the opposition serves. If the balls are
usually served deep the whole formation can be backed up while it
may be moved forward if the serves are often short. This formation
covers a relatively large area of the court but there is no guarantee
that a ball will necessarily travel directly to a passer. There are two
common methods used to cover the remainder of the court.
The simplest method is to assign specific areas of the court to each
passer. An example, showing the zones that may be assigned to each
passer, is illustrated in figure 9.5. This zone method, while easy to
implement, may cause problems when a serve approaches an
intersection between two or even three passers. The solution is good
communication between the players.
A better method, but more difficult to teach, has the players move in
an overlapping manner, as shown in figure 9.6. These movement
patterns help to prevent balls from dropping between two passers. A
basic rule that often helps the passers is, “Any ball reaching you
above shoulder height should not be played” as it is either for the
passer behind you or is out of bounds if you are in the second row of
passers.

June 1, 2018 © Coaching Association of Canada and Volleyball Canada
81
Attack Coverage
When a player is attacking, the other members of the team should move to
positions that will maximize the chances of recovering a ball that might be blocked
by the opposition. It is most important that initially these players should be
encouraged to move to a spot near the attacker, closely watch the ball as it is being
hit, and attempt to dig it up if it is blocked by the opposition. However, the
effectiveness of the attack coverage can be increased if the players move to cover
designated areas of the court behind their attacker. The basic formations that are
generally used will locate players around the attacker in one of two zones.
Some players will be responsible for balls rebounding off the block close to the
attacker while the others will be responsible for balls travelling farther back into the
court. A good basic formation that might be used for this purpose is the 2-3
formation. The first number indicates the number of players in the first line of
coverage while the second number indicates the number of players in the second
line of coverage. The basic alignment of the players for this formation is shown in
figure 9.7.
Serve-Receive to Attack Transitions
The attack and coverage phase can be learned once the following have been
established: the type of offence, the serve-receive formation, the attack-coverage
patterns, and the transitions from the serve-receive phase to the offensive-ready
phase. These transitions are shown on the next page for a 4-2 offence using a “W”
serve-receive formation and a 2-3 attack coverage. Figure 9.9 shows the “W”
formation when the setter is in position 4 with the arrows indicating the movement
the players make as the ball is passed toward the setter. The position of the players
at the end of their movement is the offensive ready position. From here the attack is
then initiated. In this instance the setter in position 4 moves along the net to the
right side of the court and turns to face the two front-row attackers who are in
positions 2 and 3. Figure 9.10 shows the final positions of the players in offensive
ready with the arrows indicating their movement to attack and attack coverage if the
ball is set to the hitter outside.
Figures 9.12 and 9.13 are the same transitions for the next rotation when the setter
is in position 3 and figures 9.15 and 9.16 are for the third rotation when the setter is
in position 2. The final three rotations using this system would look like the first
three but using the second setter in the 4-2 system who has now rotated to the
front court.
The advantage of having the setter switch to the right side of the court to set is that,
it is usually not necessary for the setter to make back sets which tend to be more
difficult for younger or less experienced players. This system also more easily
permits the use of a middle attacker. The most common alternative to the setter
switching to the right side of the court is to have him/her switch to the center of the
court. The primary advantage of this option is that the attack is spread out more
across the net. The serve-receive to attack transitions for the setter in the center
version of the 4-2 offence with the ball being set to right side of the court are shown
in figures 9.17 to 9.25.

June 1, 2018 © Coaching Association of Canada and Volleyball Canada
82

June 1, 2018 © Coaching Association of Canada and Volleyball Canada
83

June 1, 2018 © Coaching Association of Canada and Volleyball Canada
84
Defensive Systems
Two basic defensive systems are generally used in volleyball. They are usually identified based on the
general location taken up by the player in rotational position 6 (back center) when they are playing
defence. Having chosen the basic defensive formation, the coach will then decide whether to use a
one-blocker system or a two-blocker system. With athletes younger or less experienced in volleyball, it
may be better to use a one-blocker system because of the problems caused when two players attempt
to coordinate a blocking effort. With more experienced volleyball players a two-blocker system is most
often used.
6-up Defensive System
The 6-up defensive system has a basic alignment with the position 6 person playing up closer to the
net than those in positions 1 and 5. The basic starting or defensive ready position for this system is
shown in figure 9.26. This system is most appropriate for use against opposition that does not hit the
ball hard to the perimeter of the court and tips much of the time. The biggest weakness of this
alignment is in the deep middle part of the court.
6-up Defensive-Ready to Attack-Reception Transitions Using One Blocker
From their defensive ready positions, the players must make the transition to their positions for
defence and attack reception. The arrows in figures 9.27, 9.29, and 9.31 indicate the proper
movements of the players when the opposition is preparing to attack from various court locations. The
resulting positions for the players are shown in figures 9.28, 9.30, and 9.32. The shaded area behind
the blocker is called the “shadow” of the block and is the area of the court that is theoretically
protected by the block. From these final positions, the back court players will react to where the ball
goes, moving in an overlapping manner, as shown in the defensive final position figures on the next
page.
When the attack is directed from the opponent’s right side of the court rather than the left side, the
transitions and movements for the players are the mirror image of those used for a left side attack
(figures 9.29 and 9.30). When attack is directed from the middle of the net, the transitions and
movements are shown in figures 9.31 and 9.32.
15
6
Figure 9.26Defensive ready position for the 6-up
defence.
234

June 1, 2018 © Coaching Association of Canada and Volleyball Canada
85

June 1, 2018 © Coaching Association of Canada and Volleyball Canada
86

June 1, 2018 © Coaching Association of Canada and Volleyball Canada
87

June 1, 2018 © Coaching Association of Canada and Volleyball Canada
88

June 1, 2018 © Coaching Association of Canada and Volleyball Canada
89

June 1, 2018 © Coaching Association of Canada and Volleyball Canada
90

June 1, 2018 © Coaching Association of Canada and Volleyball Canada
91
EXAMPLE OF A COMPLETE CYCLE OF ACTIONS At the beginning of this chapter, a flow chart was presented to illustrate the basic cycle of the game of
volleyball. Now that some basic systems of play have been introduced, a complete cycle can be
demonstrated. Below, the different phases of the game are shown and the transition or movement of
players between each is illustrated. In this example, a 4-2 offensive system is used with the setter
switching to the right side of the court to set. A “W” serve-receive pattern, 6-up defence using two
blockers, and a 2-3 attack coverage pattern is also used. It is important to note that for simplicity, the
players will maintain their rotational order number throughout the complete cycle.

June 1, 2018 © Coaching Association of Canada and Volleyball Canada
92
How to Teach Systems The coach should use a progressive approach when teaching organized team play to the athletes. This helps
to reduce the confusion, disorganization and frustration of volleyball players when they are asked to use an
unfamiliar system of play. The following section outlines steps that may be used to introduce systems of play
to a volleyball team.
Step 1. Individual Transitions
The basic transitions used in team play should be taught before any actual systems are
instituted with the team. These should be introduced during drills that are used to teach the
basic skills of the game. The coach can accomplish this by designing drills that require the
athlete to execute a skill or sequence of skills involving the movement required in game
transitions.
Step 2. Paper Introduction
Having decided which systems of play will be used by the team, the coach should then prepare
handouts for the team that clearly illustrate the positioning of all players and their required
movement patterns and responsibilities. This “playbook” should include the following:
• Serve reception to offensive ready to attack and coverage for all different rotations.
• Defensive ready to attack reception for attack on the right, middle and left sides of the
court.
• Defensive ready to free ball reception to offensive ready to attack and coverage.
This should be given to the players at least two days before the practice during which the
systems will be introduced. The coach should review the material at a blackboard session,
ensuring that the information is clearly understood. The playbook can then be taken home by
the players and studied before the next practice.
Step 3. Team Catch and Throw
The first practice session involving systems of play should have six players on the court walk
through the various transitions while catching and throwing the ball. This takes the pressure of
skill execution off of the athletes and helps to ensure that a controlled situation exists. The
players can then concentrate on understanding the system with the coach easily intervening as
necessary. Focus first on the basic transitions outlined in step 2 above then combine the
transitions to form complete cycles of action.
Step 4. Easy Ball Team Transitions
Having learned the systems of play in controlled drills of catch and throw, the team members
can now be introduced to team play when actually playing the ball. At this point, easy balls
should be tossed by the coach to initiate the team play. This makes it easier for the athletes to
execute the skills successfully and thus concentrate on proper team play. Again it is best if a
progressive approach is used as in step 3 with simple transitions first.
Step 5. Team Transition Drills
When the team is successful at least 90% of the time with easy balls, team play drills
demanding skill execution under more game-like situations may be introduced. These drills
should include all six positions on the court and may demand simple transitions such as

June 1, 2018 © Coaching Association of Canada and Volleyball Canada
93
defensive ready to attack reception or more complex transitions such as serve-receive to
offensive ready to attack and coverage. Initially, these drills should be controlled by the coach,
ensuring that the direction and speed of the ball are within the skill capabilities of the players.
Player-oriented drills should only be used if the athletes have the necessary control of the ball
and understanding of the systems to ensure that the purpose of the drill is not compromised.
Following are two examples of team transition drills:

June 1, 2018 © Coaching Association of Canada and Volleyball Canada
94

June 1, 2018 © Coaching Association of Canada and Volleyball Canada
95
Step 6. Controlled Scrimmage/Modified Games
The final step prior to actual competition has the players participating in controlled scrimmages
or modified games. This usually involves 6 vs 6 situations with the coach intervening either to
provide feedback to the athletes or to control the pace of the action by putting another ball into
play, immediately at the end of a rally. Alternatively, special rules can be intro-duced into play
to emphasize a particular phase of the game. For example, a team may have to score five
times from service reception before they may rotate. This could help to emphasize the serve-
receive to attack patterns of play. Generally, it is inadvisable to have many scrimmages without
some sort of control being applied by the coach.
Once the systems and transitions are basically understood, steps 1, 5 and 6 should be used
on a regular basis to reinforce the learning that has taken place. Gradually, the demands of
these drills should be increased until the players can execute the skills at or above the levels
required in competition and within the framework of the chosen systems of team play.

June 1, 2018 © Coaching Association of Canada and Volleyball Canada
96
Tripleball
Tripleball Sequence The goal of Tripleball is to promote better skill development through more rallies, increase
participation, and encourage meaningful competition and fun.
Overview of the Tripleball Sequence:
a) The game follows a sequence of three
rallies (service, tossed ball 1, tossed ball
2).
* 1st rally – introduced by the server
* 2nd rally – tossed ball given to the
receiving team
* 3rd rally – tossed ball given to the
serving team
b) The service rotates between teams after
each three-ball sequence.
c) A team must rotate and introduce a new
server when it is their turn to serve.
d) Every ball introduced is worth one point.
Note:
a) Time-outs cannot occur during a 3-ball sequence. These requests must be made before
the introduction of serve.
Guidelines for Tossers:
a) The Head Coach, Assistant Coach or a volunteer may be the “Tosser” and introduce
balls to their own team.
b) Balls are tossed underhand with two hands, with little to no spin and above the height of
the antennae to allow athletes time to play the ball.
c) The Tosser can step into the court to introduce the ball but must immediately move a
safe distance away from the court after the toss.
d) The free ball must be tossed directly to the athlete in the centre back position
(rotationally in position 6), otherwise a replay will occur.
e) The free ball will be introduced when the front row players are at the net and ready to
transition; the Tosser verbally cues the athletes by calling “Free Ball”.
f) Tossers must encourage a fast-paced transition between an end of a rally and the next
toss.
Ball Retrievers:
a) It is recommended to have volunteers or athletes who are not involved in the set, to be
designated as Ball Retrievers. At the completion of each rally, athletes should be
encouraged to quickly roll balls to the Ball Retrievers to speed up the pace of the game.

June 1, 2018 © Coaching Association of Canada and Volleyball Canada
97
Tripleball Rules
Standard Volleyball Rules with the following exceptions:
• Tripleball sequence is required.
• Athletes must play the tossed ball with a forearm pass, otherwise a replay will occur.
• No specialization: each rotation will have a different designated setter. The player in position #3
#2, or #1 in service reception will be the designated setter; this position must be noted on the
score-sheet by the coach. However, it is strongly recommended that court position #1 only be
used for advanced 13U teams capable of adding this level of difficulty without reducing the
number of rallies or pass, set, attack sequences.
• No Libero
• No overhand pass on the serve
13U substitution rules:
• All players listed on the score sheet must start the first or second set.
• Substitutions are not permitted in the first or second set. In the case of injury, an Exceptional
Substitution may be made. The injured/ill player may not return to the same set,but may return
to play in subsequent sets.
• Any line up can be used at the start of the third set.
• Substitution requests can only occur between a three-ball sequence
• Teams switch sides in the third set once a team reaches 8 points. If this occurs during a three-
ball sequence then the switch will be made after the sequence is complete.

June 1, 2018 © Coaching Association of Canada and Volleyball Canada
98
The 6-3 Offensive System (coach chooses 1 of 3 options below)
The 3 setters (S) on the court are not lined up next to each other (H = Hitter). When one of the setters rotates into positions 1 & 6 they become the designated setter. All other positions remain in place (no specialization out of reception). ADVANTAGES: • Athletes are exposed to a variety of positions
and encouraged to develop a well-rounded skill set.
• Athletes are introduced to the concept of penetrating from the back row to set.
• Setters are tasked with developing front sets and back sets
• Team is able to utilize three front row attackers in all rotations.
• Setters can learn an offence that attacks across all 9m of the net.
CHALLENGES: • Teams will be required to switch on defence
when the setter is in rotation 6 so that the setter can transition from position 1.
Setter in 6 Setter in 1
The 3 setters (S) on the court are not lined up next to each other (H = Hitter). When one of the setters rotates into positions 3 & 2 they become the designated setter. All other positions remain in place (no specialization out of reception). ADVANTAGES: • Athletes are exposed to a variety of positions
and encouraged to develop a well-rounded skill set.
• Setters are tasked with developing front sets and back sets
• Athletes are introduced to attacking out of position 2 as a right side AND as a middle
• Setters can be introduced to the setter dump/attack
• Teams do not have to switch defensively. CHALLENGES: • The team is without three front row attackers
for 100% of their rotations due to the front row setter.
Setter in 3 Setter in 2

June 1, 2018 © Coaching Association of Canada and Volleyball Canada
99
The 6-2 Offensive System
6-2 (6 hitters and 2 setters)
How it works: 2 setters are lined up opposite each other. Whichever setter is in the back row becomes
the setter for that rally. The other players can switch into specialized positions if you prefer, meaning
middles switch into position 3 when they are in the front row or leftsides into position 4, etc…
Advantages: There are always 3 hitters in the front row and your hitters should get some great sets
with your best 2 setters getting every second contact. As a club, you’re also making sure that you are
developing multiple setters while at the same time allowing them to work on their attacking abilities.
Disadvantages: Not the best system for developing young athletes (13-14U), because it may
specialize players too early in their development.
Recommended age group: Senior High School/16U and up
The 3 setters (S) on the court are not lined up next to each other (H = Hitter). When one of the setters rotates into positions 2 & 1 they become the designated setter. All other positions remain in place (no specialization out of reception). ADVANTAGES: • Athletes are exposed to a variety of positions
and encouraged to develop a well-rounded skill set.
• Athletes are introduced to the concept of penetrating from the back row to set.
• Setters are tasked with developing front sets and back sets
• Athletes are introduced to attacking out of position 2 as a right side AND as a middle (sing the step/slide pattern)
• Setters can be introduced to the setter dump/attack
• Teams do not have to switch defensively to accommodate a setter in 1 or 2 situation.
CHALLENGES: • The team is without three front row attackers
for 50% of their rotations due to the front row setter.
Setter in 2 Setter in 1

June 1, 2018 © Coaching Association of Canada and Volleyball Canada
100
Training Strength in the Train to Train stage
In most sports, development of the various types of strength (maximum strength, speed-strength, strength-endurance) is difficult to achieve through the sport or activity itself. In addition, certain guidelines must be followed to avoid injuries, particularly among children and beginners. Specific strength-development methods, as well as particular safety measures that must be considered and implemented, are covered in other NCCP workshops. The following considerations are provided for guidance, and they are aimed at young athletes getting started in strength training.
In general, exercises involve localized muscle masses. In most of these exercises, the resistance is provided by the body weight of the athlete or by relatively light weights.
It is recommended that athletes avoid heavy loads. Ensure that athletes are able to perform at least 12 to 15 consecutive repetitions of each exercise. Under such conditions, strength-endurance becomes the primary ability trained.
The speed of execution must be moderate and controlled; athletes must end the exercise when the quality of execution starts to deteriorate.
It is possible to use jumping or hopping exercises; the speed of execution and muscle contraction are higher, and these exercises will therefore develop speed-strength (muscle power).
Avoid exercises that could excessively overload the spine (compression stress).
While developing strength, aim for muscle balance; for instance, develop both the upper- and lower-body muscle groups, the muscles in front and behind body segments, and muscles on both the right and left sides. Sample circuit below. Consult a certified Strength and Conditioning coach before beginning any routine.
• Glute Bridges - 10
• Bear Crawls – 20 steps
• Trunk Rotations (windshield wipers) – 5/side
• Downward Dog to High Lunge – 3/side
• 2 rounds
• Forearm Side Plank – 20 sec/side
• Mountain Climbers – 10/side
• Single Leg Hip Hinging – 10/side
• High plank to squat – 10
• 2 rounds https://www.dropbox.com/s/i7cero337n2z76w/14U%20Strength%20Circuit.mov?dl=0 Athletes/coaches can go from one exercise to the next without any rest and go through 2 times back to back before resting for about 1-2 min before the second group of exercises. In a practice setting, athletes should not rush the movements and maintain a “quiet” core during the movements. Coaches watch and help with technical adjustments.

June 1, 2018 © Coaching Association of Canada and Volleyball Canada
101
Notes on applying a proper Cool-Down…

June 1, 2018 © Coaching Association of Canada and Volleyball Canada
102
Evaluation Form – Plan a Practice
Evidence of Achievement Yes No S
afe
ty &
Lo
gis
tics
Identified athletes’ ages, abilities, and performance levels
If appropriate, identify potential risk factors (equipment, surface, player movements, ball flight; etc.) given activities planned.
Outline facilities and equipment required to achieve training goal(s)
Provide a timeline for the session’s activities
Select activities whose duration and general characteristics support the achievement of the session’s goal(s)
Select activities whose duration and general characteristics are adapted to the age and ability level of the players, as well as the part of the session in which they are scheduled.
Plan for an adequate number of activities given the overall duration of the session.
Produces an Emergency Action Plan that is consistent with NCCP standards.
Str
uc
ture
& L
ink
ag
es
wit
h P
lan
Clearly identify one or more goals for the practice that are consistent with the training objectives and priorities identified.
Indicates key teaching points for each activity.
Identify activities for the main segments of the training session: warm-up (general/specific), main part, and cool-down.
Describe planned activities through illustration, diagram, and/or explanation.
Identify warm-up activities that prepare athletes adequately for the main part of the practice.
Include activities that promote the development of cue reading and decision-making, consistent with the players’ experience and level of play.
Ensure the order of activities is optimal during the session (activities focussing on new learning or improving speed, power and motor abilities must be scheduled early in the main part, when athletes are not fatigued).
Evidence of Achievement Yes No
Me
tho
do
log
y
When Method 1 is used, ensure activities have appropriate cue reading, decision-making, and skill execution characteristics.
When Method 2 is used, ensure activities have appropriate cue reading, decision-making, and skill execution characteristics.
When Method 3 is used, ensure activities have appropriate cue reading, decision-making, and skill execution characteristics.
When Simulated Play is used, ensure activities have appropriate intentions given players’ experience, and the stage of skill development they are at.
Correctly apply loading parameters (adjustments) where necessary.
Ensure activities contribute to the development of skill(s) and that training/practice conditions are appropriate to the stage of skill development (Acquisition, Consolidation, Refinement)
Ensure activities contribute to the development of athletic abilities that are important in Volleyball, and that they match the players’ physical maturation level.

June 1, 2018 © Coaching Association of Canada and Volleyball Canada
103
Practice Evaluation Take a few moments to reflect about what you have learned in this workshop, and how you might adjust your approach to teaching in the future. Note your comments or your thoughts in the space below.
Things I learned about Organization and Explanation/Demonstration Technical things I learned about providing effective Feedback Technical things I learned teaching Skills and Systems

June 1, 2018 © Coaching Association of Canada and Volleyball Canada
104
Provide Support to Athletes in Training Evaluation
Ensure that the practice environment is safe
Criteria Y N
1 The coach plans for and uses the facility in ways that reflect an awareness of and control for potential risk factors. The coach ensures that the training area is made as safe as is reasonable and considers the safety of all participants when making decisions about the utilization of facility space.
2 The coach reinforces and teaches appropriate competitive rules to enable a safe practice environment
3 The coach continually surveys the practice environment and makes adjustments to activities, participant behaviours, etc. to minimize any related risks.
Implement an appropriately structured and organized practice
4 Is the coach able to follow his/her plan as it is written? Does the written plan conform to what is observed on the court and are the procedures outlined in the plan being respected?
5 Main practice segments are evident and include an introduction, warm-up, main part, cool-down, and conclusion
6 All equipment is available and ready to use.
7 Effective use of time: The duration of the session’s activities, transitions, and of waiting times are adequate given the age and level of the players. Players are engaged in activity at least 50% of the time
8 Ensure activities contribute to the development of Volleyball skills and/or athletic abilities, i.e., the drills, exercises, methods and training load are adequate for the training task identified and suit the level of the players involved.
9 Distribution of attention: Does the coach regularly look and observe the entire group during drills and play? Does the coach respond appropriately to what he/she sees?
10 Adjustments: The coach makes appropriate adjustments to activities that are not producing desired results.
Responsible Coaching
10 The coach is dressed in sports attire appropriate for coaching in a volleyball situation.
11 The coach uses language that demonstrates a respect for participants and other stakeholders.
12 The coach behaves in a manner that honours sport and respects participants
13 The coach identifies appropriate expectations for athlete behaviour and reinforces these expectations as required.
Make interventions that promote learning
14 Implementation of Method 1 & Simulated Play Drills As per forms 2-5.

June 1, 2018 © Coaching Association of Canada and Volleyball Canada
105
How to Test Progress Below is a sample setting skill testing drill, which includes standards and test protocols for 16U.
Coaches may use these drills to test and measure skill development over the course of the season.
See full excel spreadsheet for details.

June 1, 2018 © Coaching Association of Canada and Volleyball Canada
106
Supporting the Competitive Experience

June 1, 2018 © Coaching Association of Canada and Volleyball Canada
107
Competitions Basics Volleyball Etiquette Good management of a volleyball match begins long before the team arrives at the competition venue. All team members must first have a clear understanding of the rules and etiquette that govern the game. Just as coaches need to teach the athletes all of the skills and systems of volleyball, they must also teach them the rules and etiquette of the game. In Canada, the rules of the game of volleyball are generally established by Volleyball Canada although individual leagues or conferences may have some individual differences. Consult the annual Volleyball Canada Rule Book for the general rules governing the game. For league variations, contact the appropriate league authorities. In addition to the written rules of the game, there is much etiquette that has developed to make the game a more enjoyable experience for all participants. Below are some of the key points of etiquette that the coach should teach to volleyball players. Warm-up Etiquette During the normal 10-minute on court warm-up, both teams usually form attack lines in the court at positions 3 and 4. After the 4–5-minute mark, the teams move the attack line to court positions 2 and 3. In this case, both lines of players of each team hit the ball to position 5. After 8 minutes of court time, both teams are allowed to serve for 2 minutes. When a team is hitting along with the opposition during a match warm-up, both teams will hit the ball to position 1 of the opposition’s side of the court (commonly referred to hitting the ball “down the line”). This will ensure that athletes from both sides do not get hit by an attack. When the teams are hitting from the middle position (court position 3), they should also hit to position 1 of the other side. This is assuming both teams are on the court for their 10-minute on court warm-up. An alternative to the above 10-2 warm-up format, is the 5-5 warm-up format. Each team is allowed 5 minutes on the entire court while the other team is off the court. Teams usually use this time to warm-up their attacking and serving skills. The team not on the court is usually involved in serve-receive drills behind the hitting team’s baseline. Coaches should check league or tournament rules for specific warm-up format details. If a volleyball goes into the opposition’s court, it should be retrieved immediately. Do not leave the ball in their court. If an opponent’s volleyball comes onto your court, return the ball to the person who claims it. If no one claims it, roll the ball toward their bench. To prevent injury, DO NOT roll the ball back onto their court. Promptly clear the court when the official asks upon conclusion of the allotted warm-up period. At the end of the warm-up, collect all of your team’s volleyballs and roll any of the opponent’s balls toward their bench. Match Etiquette When the referee calls for the teams to line-up along the baseline, the captain should stand on the right hand side of the baseline (near the serving area). The other five or six athletes (six if

June 1, 2018 © Coaching Association of Canada and Volleyball Canada
108
the Libero position is being used) should be to the captain’s left. If the Libero position is being used, once the players are called into the court by the referee, the Libero moves outside of the court (along the sideline near their team’s bench). After confirming the starting locations for all players the official will signal the Libero to enter the court if a player is to be replaced for the first rally. The only athlete who can ask the referee or umpire a question is the captain. If the team has more than one captain, it is the floor captain (the one who is the designated on the court) who can ask for clarifications or interpretations. If the coach has a question, it must be asked by the captain. It is unsportsmanlike to talk across the net to the opposition during a match. At the end of each set, teams line up along the baseline with the captain to the right of the other athletes. At the whistle, the athletes jog in a counter clockwise direction around the court to the other side of the court and then proceed directly to the bench on that side of the court. The coaches and players not on the court are also required to change benches. Post-Match Etiquette At the end of the match, the athletes line up on the baseline (just as at the beginning of a set). The referee will then whistle for the teams to come to the net and shake hands. Players should also shake the hand of each official. In some regions of the country, a team cheer for the opposition is given and then the two teams shake hands. The captain must sign the score sheet at the end of the match. Although it is the captain’s responsibility to thank the officials, the coach should also thank them for their services. Regardless of the result of the match, this gesture from the leaders of the team will provide the other members with examples of sportsmanship. Since the athletes’ personal development is one of the goals of most coaches, teaching the players the value of sportsmanship, in as many environments as possible, is a great benefit. Regardless of the outcome of the match, all team members must exhibit proper behaviours on and off the court. The athletes will usually behave in a manner similar to that which the coach exhibits in practice and in match situations. The players must know exactly what behaviours are expected from them, and one of the best times to inform them of these expectations is in the practice environment. Pre-match activities Before a team begins to play a match, the coach needs to prepare the athletes to compete. There are a number of pre-match tasks the coach must do that will provide the team with the best opportunity to achieve their highest level of performance. Following are the duties most often performed by a volleyball coach prior to the beginning of the match. Pre-Match Meeting A team meeting is usually held prior to the match assuming time permits. The meeting should take place early enough so that after its completion the players have sufficient time to properly warm-up for the match. The coach will review the game plan with the athletes; the amount of information disclosed varying according to the age of the players. For example, with a young team, such as a junior high school, the coach will review the one or two main goals that the team has been working toward all week in practice. An older team, such as an 18U club team,

June 1, 2018 © Coaching Association of Canada and Volleyball Canada
109
will be able to handle more information. Along with the team goals, the meeting could include a strategy which will be used to defeat the opposing team. The meeting may also include some time for psychological preparation when the coach can focus on preparing the players mentally for the upcoming match. After the meeting with the entire team, the coach may wish to have individual talks with some of the athletes. These may involve any individual assignments, goals or tactical considerations for a specific player. Often the coach and team captain will meet regarding the coin toss. Advantages of choosing to start with the serve or a particular side of the court are outlined. The choice will be based upon: location of any barriers above the court (such as basketball nets), gym lighting, who is serving first, crowd concerns or even team superstitions. Pre-Match Warm-up Before a match starts, each athlete on the team should go through a warm-up routine to prepare for competition. Often there are time and court access constraints that demand that the warm-up be concise and effective. Therefore, as a part of preparations for competition, the team should rehearse their match warm-up activities. Rehearsing the warm-up will make the athletes feel comfortable with the routine and able to execute it easily. Generally, a warm-up for a match should consist of the following elements:
1. Raise the body temperature to performance levels. Usually, this is accomplished with a light run.
2. Dynamic movements. 3. Volleyball ball skills. This will usually involve the athletes doing a basic ball
handling drill (e.g. “pepper” which is explained in Chapter 14), a drill involving attack and, some serving.
It will take a minimum of 20 minutes to properly complete this type of warm-up. If the playing schedule of the competition provides less than 20 minutes on the court, the coach should complete the first one or two elements prior to gaining access to the court. The coach’s responsibilities for the warm-up will vary depending on the level of the program. If the head coach has an assistant coach capable of running the warm-up, then the head coach can prepare for other duties before the match. If assistance is not available, then the head coach may be physically involved in executing certain coaching skills such as tossing for attack and serving for service reception. Roster and Line-up Forms Prior to each match, the coach must provide the scorekeeper(s) with their team roster and prior to each set, a starting line-up. The roster—usually consisting of no more than 15 players—must be submitted to the scorekeeper before the coin toss takes place. The coach may find it easier to have a roster typed and copied in advance to simply hand to the scorekeeper. The starting line-up for each set is placed on a rotation card, signed, and given to the umpire or scorekeeper. Pre-Set Meeting The final task the coach should complete prior to each set (game) of a match is to give the team any final messages before the starting line-up enters the court. The information provided at these times will often be situational. Typically, the coach will announce the starting line-up, remind the team of the match goals, review any plans for the set, and possibly provide a motivational thought. Especially for a younger team, the best philosophy is to keep it short and simple. Let the athletes play!

June 1, 2018 © Coaching Association of Canada and Volleyball Canada
110
Match Activities Bench Player Management The responsibilities of the players who are on the court have usually been outlined in the match plan, but those athletes not playing at any point in the match must also clearly understand the duties that are expected of them. Will the extra players participate by taking notes or statistics, or will they be monitoring the opposition to help their teammates who are playing? The coach needs to assign these duties, and also give the players tasks to perform when the teams change sides between the sets. Will the players on the bench move the bags to the other bench, or talk to the players on the starting line-up regarding what they observed during the last set, or both? The manner in which the bench is managed will be determined by the coach and should be explained at a practice prior to the match. Match Communication Despite all of the communication between players and coaches that has taken place prior to a match beginning, there are still times when the coach is required to intervene. There are generally three different times when this process of intervention can happen: Time-Outs A team has two, time-outs per set, that can be used by the coach to intervene in the match. Time-outs may be used to: Break the opponents’ momentum when they score several points in a row. A good general rule to follow is that when the opponents score three straight points a time-out should be called. Give tactical or technical information to the players. The coach may want to re-emphasize the game plan or notify players of a change in the tactical plans. They may also alert players to minor problems they observe with a player’s technique. Re-establish the players’ confidence or good mental state that may have been lost. Give the athletes a rest. Regardless of the rationale for the time-out, the coach must be brief, clear and to the point during the brief time allotted for time-outs. Time-out management and strategies must be developed and practiced ahead of time. Such matters as thirst quenching policies should be discussed prior to any match to maximize the effectiveness of time-outs. Substitutions A coach can intervene during a game by making one or several player changes. For each set of a match, the coach can make a total of six substitutions. A coach may choose to change the players on the court for one of the following reasons:
1. To replace a player experiencing difficulties executing a particular skill or skills. However, frequent use of substitutions for this reason may lead to lower levels of confidence. This is especially true at the developmental stages of a younger or inexperienced player.
2. To take advantage of the special skills of a player who is on the bench. A player may enter the match to play a specialized role such as blocking or passing.
3. To disrupt the flow of the game and allow the athletes a chance to regroup. This is beneficial if all of the time-outs have been used.

June 1, 2018 © Coaching Association of Canada and Volleyball Canada
111
4. To pass along tactical information to the other members on the court. 5. To remove an injured player.
The rationale for making substitutions should be planned ahead of time. Just as the line-up should be determined before the match begins, the substitutions must be thought out and evaluated prior to competition. Giving Instructions from the Bench Coaches are permitted to talk to the players, who are on the court, from the bench. When taking advantage of this, the coach should: 1.Make remarks between rallies that are positive and reassuring allowing the players to play without distracting comments. 2.Keep messages short and clear. 3.Limit the number of times comments are made. The coach has to develop and implement a philosophy for the type and amount of intervention! End of match activities Cool-down After a match, the coach must ensure that an appropriate cool-down is done by the team members. The competition schedule may force the team off the court immediately after the match, but a cool-down should still be conducted, even if it is off the court. Post-Match Meeting Following the completion of the cool-down, the coach will usually conduct a post-match team meeting. This should be a brief talk that can be used to exchange thoughts about the match. The length of the meeting should be limited to 5-10 minutes, and it should end on a positive note. Regardless of the outcome of the match, the coach should provide an environment to allow general comments about the match, and evaluation of the team’s goals for the match. These comments should be related to the level of performance of the team, and not the result. Especially after a less than desirable performance, the comments should be constructive in nature to help the athletes for the next match, and more importantly, for the next set of practice sessions. Coaches should be honest with themselves prior to the meeting. Regardless of any personal feelings, they must exhibit a calm manner, and provide support to the team as a whole as well as to individual players who may not have had a great performance. Again, the emphasis at the developmental level is on performance and not results. This is to ensure that the players leave the competitive environment on a positive note, and as members of a team. Conclusion Good match management is required to give the team the opportunity to demonstrate the skills that have been acquired during the athletes’ many hours of practice. A good volleyball coach will take the time to develop sound management principles and practices for volleyball competitions.

June 1, 2018 © Coaching Association of Canada and Volleyball Canada
112
LTAD Competition Guidelines
Does your team apply an LTAD recommended game format for their stage of development?
Do your players specialize by position according to LTAD guidelines?
Does your team apply one of the LTAD recommended offensive and defensive systems?
Does your team have and appropriate roster size according to the T2T guidelines?
Does your team apply the T2T guidelines for playing time?
Does your team’s type of competition adhere to the T2T guidelines?
COMPETITION GUIDELINES
Game Format
YEARS 1 & 2: Tripleball if required in your region or if fewer than 50% of serves result
in a 3rd contact (attack).
YEARS 3 & 4: Standard Volleyball
Position Specialization YEARS 1 & 2: no specialization or play 2+ positions.
YEARS 3 & 4: No Libero (boys)
Team Systems YEARS 1 & 2: 6-6, 6-3, or 4-2 Offensive Systems. 6-up or 6-back Defensive System
YEARS 3 & 4: 6-2 or 5-1 Offensive Systems. 6-back Defensive System
Roster Size
12 players. Teams may also benefit from training as a larger group of 20 (with 2-3
courts) then splitting into two groups of 10 for competition. This method encourages a
quality practice environment and more playing time for each player.
Playing Time
YEARS 1 & 2: Fair Play rules apply.
YEARS 3 & 4: Coaches can balance providing playing time for all players, and
identifying roles for all for culminating competitions. For example, 75% of the season,
playing time is equal, then in the final 25% of the season player roles are identified.
Competition Level YEARS 1 & 2: primarily local and some provincial.
YEARS 3 & 4: some local, some provincial, and some interprovincial.

June 1, 2018 © Coaching Association of Canada and Volleyball Canada
113
Supporting Players in Competition
The role and the importance of competition for young players
After answering the LTAD Competition Guidelines that presents Volleyball Canada’s perspective on competition, take a few moments to reflect on the guidelines and record your point of view. My initial reaction after reading the guidelines is: ( ) I agree completely ( ) I agree, but … I strongly disagree ( )
A few key points to explain my position:

June 1, 2018 © Coaching Association of Canada and Volleyball Canada
114
Individual Reflection: The role and Importance of Competition in Young, Developing Players
Take a few moments to reflect about important aspects that were raised during the discussions on the competitive experience and young players. Record the issues that you would like to address or the ideas that you would like to implement.

June 1, 2018 © Coaching Association of Canada and Volleyball Canada
115
Action Card 1 Date:
I will START:
I will CONTINUE:
I will STOP:

June 1, 2018 © Coaching Association of Canada and Volleyball Canada
116
Action Card 2 Date:
I will START:
I will CONTINUE:
I will STOP:

June 1, 2018 © Coaching Association of Canada and Volleyball Canada
117
References and Suggested Readings
Bain Steven, McGown Carl. Motor Learning Principles and the Superiority of Whole Training in Volleyball Shea, C.H., Wulf, G., & Whitacre, C. (1999). Enhancing training efficiency and effectiveness through the sue of dyad training. Journal of Motor Behaviour, 31, 119-125. Shea, C.H., Wright, D.L., Wulf, G., & Whitacre, C. (2000). Physical and observational practice afford unique learning opportunities. Journal of Motor Behaviour, 32(1), 27-36. Granados, C., & Wulf, G. (2007). Enhancing motor learning through dyad practice: Contributions of observation and dialogue. Research Quarterly for Exercise & Sport, 78(3), 197-203. Fédération Internationale de Volleyball: Coaches Manual. Fédération Internationale de Volleyball, Switzerland, 168 pages, 2011.
Fédération Internationale de Volleyball: Top Volley: Technical Booklet 2002 Men’s Game, Technique and Tactics. Fédération Internationale de Volleyball, Switzerland, 31 pages, 2002.
Lee, T. D., Ezekiel, H. J., Wishart, L. R., Letho, N. K., and Marley, T. L. Series of articles “Application of Motor Learning Principles: The Physiotherapy Client as a Problem Solver” (parts 1-4), published in Physiotherapy Canada, 2000 and 2001
Vickers, J. Decision Training: A New Approach to Coaching. National Multisport Centre – Pacific, 2001.
Wulf, G. and Prinz, W. (2001). Directing Attention to Movement Effects Enhances Learning: A Review, published in Psychonomic Bulletin & Review, 8(4), 648-660.
Volleyball Canada: Volleyball for Life: Long-Term Athlete Development for Volleyball in Canada, Volleyball Canada (ISBN 978-920412-27-5), 64 pages, 2006.
Internet links
International Volleyball Federation: http://www.fivb.org/
Volleyball Canada: http://www.volleyball.ca/
Volleyball Canada Development Model: http://vcdm.org/coaches/view/all-ages
Volleyball Canada’s Skills Page: http://coach.volleyball.ca/index.php?page=255

June 1, 2018 © Coaching Association of Canada and Volleyball Canada
118
Appendix 1

June 1, 2018 © Coaching Association of Canada and Volleyball Canada
119
Practice Plan
Goal: Physical:
Season/Phase: Week: Psychological:
Training Load: , , → ❑ EAP Life Skills:
Time
Objective Stage/Method Teaching Points Drill

June 1, 2018 © Coaching Association of Canada and Volleyball Canada
120
Practice Plan
Goal: Physical:
Season/Phase: Week: Psychological:
Training Load: , , → ❑ EAP Life Skills:
Time
Objective Stage/Method Teaching Points Drill

June 1, 2018 © Coaching Association of Canada and Volleyball Canada
121
Practice Plan
Goal: Physical:
Season/Phase: Week: Psychological:
Training Load: , , → ❑ EAP Life Skills:
Time
Objective Stage/Method Teaching Points Drill

122
Drill Plan PURPOSE:
Skill(s)/Variation(s) Key Cues Key Decisions
TIME OF ACTIVITY:
EQUIPMENT:
SAFETY:
EVALUATION:
DRILL NAME HERE
Warm up Description:
Execution Criteria:
Key Teaching Points:
Variation:
Adjustments:
Easier:
Harder:

June 1, 2018 © Coaching Association of Canada and Volleyball Canada
123
Drill Plan PURPOSE:
Skill(s)/Variation(s) Key Cues Key Decisions
TIME OF ACTIVITY:
EQUIPMENT:
SAFETY:
EVALUATION:
DRILL NAME HERE
Warm up Description:
Execution Criteria:
Key Teaching Points:
Variation:
Adjustments:
Easier:
Harder:

June 1, 2018 © Coaching Association of Canada and Volleyball Canada
124
Drill Plan PURPOSE:
Skill(s)/Variation(s) Key Cues Key Decisions
TIME OF ACTIVITY:
EQUIPMENT:
SAFETY:
EVALUATION:
DRILL NAME HERE
Warm up Description:
Execution Criteria:
Key Teaching Points:
Variation:
Adjustments:
Easier:
Harder:

125
Making the Linkage between Stages of Skill Development and Methodology
STAGES of PLAYER LEARNING/DEVELOPMENT
CUE READING & DECISION-MAKING PROGRESSIONS
Initiation Acquisition
What it is, and what to expect as a coach…
The first contact the athlete has with a
particular skill.
The athlete may have no idea of what to do to perform the skill.
The early stage of learning
where the athlete becomes capable of (1) coordinating key components of movements and (2) executing them in the correct order, thus performing a rough form of the skill.
The movements are not well synchronized or under control yet, and they lack rhythm and flow. The execution is inconsistent and lacks precision. The athlete has to think about what he or she is doing while performing the skill.
Both form and performance tend to deteriorate markedly when the athlete tries to execute movements too quickly or is under pressure, as may be the case in a competitive situation.
Should be fairly limited at these early stages, yet
nonetheless be incorporated into tasks.
Method 1/Acquisition drills: Focus should be predominantly on self, immediate surroundings, and target.
Coaches should insist that athletes focus on aspects such as: awareness of position of own body or body part(s) before executing the skill (not during execution); awareness of own position on the court (all times); location of target or partner; awareness of ball position; assessment of ball velocity and trajectory.
Decision-making will primarily involve aspects such as: remaining on the spot vs moving right, left, front or back to perform the skill; direction in which the ball should be hit; level of force and speed to be applied when contacting the ball.
At this stage, athletes need to…
Have a clear mental image of what correct execution looks like (good demonstrations). Understand the fundamental positions, stances, and patterns involved in the action. Feel safe when performing the skill. Reach a comfort level with some movements or feelings that may be unfamiliar and that are part of the skill to be learned.
Understand clearly what they have to do, why it fits into the ‘game concept’, and have a good mental picture of the task about to be performed.
Perform a lot of repetitions of the whole skill at their own pace and under conditions that are relatively stable, easy, and safe.
Practise on both sides, if appropriate.
Learn how to shift their attention quickly and cyclically from the ball to their surroundings.
Find some solutions by themselves through trial and error, based on some feedback from the coach.
When Playing the Game (Simulated Play during practice, or competition)…
See recommendations on the following pages.

June 1, 2018 © Coaching Association of Canada and Volleyball Canada
126
Guidelines: Using Simulated Play with players who are New to the Game
Purposes
• give players an opportunity to enjoy the game
• learn about the game itself
• increase understanding of the game
• learn the rules
Suggested formats Alternate acquisition drills/activities with Simulated Play. Modify the game or set restrictions to increase the use of the skills being learned (e.g. 2 vs 2, short court, passing and setting only, game to 7). Use skills that are associated in the cycle of actions (e.g., serving and passing; passing and setting; setting and attacking; etc.).
Exploit teaching moments to introduce key concepts about rules, cycle of actions (becoming familiar with the phases of play and what must be done in each), how to use the skill during play, etc. Guidelines: Using Simulated Play with athletes who are in the Acquisition stage for some (or all...) skills - but have some playing experience Purposes
• give players an opportunity to enjoy the game
• further the understanding of the game and the rules
• nurture a competitive attitude
• add new challenges for players
• assess players ability
• prepare players for competition
Suggested formats Alternate acquisition drills/activities with Simulated Play. Increase number of skills that are associated in the cycle of actions. Modify the game or set restrictions to increase the use of the skills being learned (e.g. 4 vs 4, hitting line only, game to 11). Use all skills i.e. those being learned and those athletes are already familiar with. Reward players for correctly executing the skill during Simulated Play.

June 1, 2018 © Coaching Association of Canada and Volleyball Canada
127
Continue exploiting teaching moments to introduce or reinforce understanding of rules, cycle of actions (phases of play and what must be done in each), how to use the skill during play, etc. Guidelines: Using Simulated Play with athletes who are in the Acquisition stage for some skills - but have a fair amount of playing experience
Purposes
• give players an opportunity to enjoy the game
• nurture the competitive attitude
• provide challenges for players
• assess players' ability
• prepare players for competition
Suggested formats
Alternate acquisition drills/activities with Simulated Play. Use all skills that are
associated in the cycle of actions when possible.
Modify the game or set restrictions to increase the use of the skills being learned
(e.g. 6 vs 6, tooling the block gives 2 points, game to 25).
Use all skills i.e. those being learned and those athletes are already familiar with.
Reward players for correctly executing the skill during Simulated Play.
Continue exploiting teaching moments to introduce or reinforce understanding of
tactical concepts, both individual and team, and how such concepts fit within
each phase of play of the offensive and defensive cycles of actions.

June 1, 2018 © Coaching Association of Canada and Volleyball Canada
128
Integrating Cue Reading and Decision-Making into Skill Development
STAGE of PLAYER LEARNING/DEVELOPMENT: CONSOLIDATION
What it is, and what to expect as a coach…
CUE READING & DECISION-MAKING PROGRESSIONS
The athlete can execute the movements or
the skill with correct form. Movement control, synchronization, and rhythm are good when performing the skill under easy and stable conditions. The movements can be repeated consistently and with precision under these conditions.
Some elements of performance can be maintained when the athlete is under pressure, conditions change, or demands increase, but performance remains inconsistent.
The athlete begins to develop a more personal style.
Athletes must continue to focus on self, immediate surroundings, and target. However, in Steps 2 and 3, the goal is to expand and build the player’s decision-making capacity, so that he/she can produce a response that is both correct and well executed when presented with specific cues. Method 2/Early Consolidation Drills - The skill/action is used under “directed play conditions”; the coach provides specific cues that the player(s) must read correctly, then make the right decisions, and then execute the related skill(s). The coach must first explain the pattern of the drill, how it “connects” with a game situation, what the cues are, how to read/interpret them, and what a “good decision” would be under the circumstances. Initially, the coach selects 2 cues. He or she then creates situations whereby the player(s) is/are presented with one of these cues; the player(s) must read the cue correctly and produce the proper response, i.e. make a good decision + execute the skill correctly. Initially, the options are therefore limited (cue A or cue B; and decision A or Decision B). Important: It is preferable to give the same player(s) multiple repetitions before switching roles, as this allows them to assimilate more efficiently the « problem-solving process » of the drill. When the athlete(s) is/are comfortable (rate of success is about 70 % or 2 out of 3), the exercise may be “loaded” (see table for loading options) and/or more options may be introduced (i.e., Cue C, Cue D, etc.). Method 3/Late Consolidation Drills - Athletes must now read cues, make decisions, and execute the skills against a “live opposition” BUT they benefit from a slight “time or space advantage” at the beginning of the drill. This increases the probability that the player(s) will be successful but forces them to read cues and make decisions quickly, and with some element of pressure being present. Some key decisions players must make include: (1) selection of adequate action(s) to perform given the play situation; (2) choosing optimal timing for execution; (3) determining optimal trajectory and direction to impart the ball; (4) choosing optimal position on the court relative to teammates, opponents, and the net.
At this stage, athletes need to…
Be exposed to a variety of situations and
perform a lot of repetitions under varied conditions. Have clear objectives for both form (correct execution) and the result of actions.
Be challenged by more complex and demanding tasks or conditions, and find more solutions through trial and error, based on less frequent feedback from the coach.
Practise the movements or the skill in conditions where fatigue prevails or that replicate competitive demands, and deal with the consequences of errors.
When Playing the Game (Simulated Play during practice, or competition)…
See recommendations on the following page.

June 1, 2018 © Coaching Association of Canada and Volleyball Canada
129
Guidelines: Using Simulated Play with athletes who are in the Early Consolidation stage for some skills - and have playing experience
Purposes
• give players an opportunity to enjoy the game
• further the understanding of the game and the rules
• nurture a competitive attitude
• add new challenges for players
• assess players ability
• prepare players for competition
Suggested formats
Vary Method 2 drills/activities (and other methods as necessary) with Simulated
Play. Use all skills that are associated in the cycle of actions when possible.
Modify the game or set restrictions to increase the use of the skills being learned
(e.g. 6 vs 6, digging the ball to the centre of the court gives one additional point,
game to 15).
Use all skills i.e. those being learned and those athletes are already familiar with.
Reward players for correctly executing the skill during simulated play.
Continue exploiting teaching moments to introduce or reinforce understanding of
tactical concepts, both individual and team, and how such concepts fit within each
phase of play of the offensive and defensive cycles of actions.

June 1, 2018 © Coaching Association of Canada and Volleyball Canada
130
Integrating Cue Reading and Decision-Making into Skill
Development
STAGE of PLAYER LEARNING/DEVELOPMENT: FINAL STAGE of CONSOLIDATION & REFINEMENT
What it is, and what to expect as a coach… CUE READING & DECISION-MAKING
The athlete can execute the movements in a way that is very close to the ideal in terms of form and speed. The performance is very consistent and precision is high, even under very demanding conditions and in situations that are both complex and varied.
Only minor fine-tuning may be necessary to achieve optimal execution, and a fairly personal style is established.
All components of the movement have been automated, which enables the athlete to focus on the environment while performing and to make rapid adjustments as necessary.
The athlete can reflect critically on his or her performance to make corrections.
Simulated Play/Refinement Drills - At this stage, the players must become capable of reading cues, making decisions, and performing the skills correctly (1) under variable conditions that replicate typical game conditions and intensity, or (2) when they are exposed to the most challenging competitive situations that can be faced at their level of play. To provide an adequate challenge, the coach must create complex and demanding situations whereby the athletes are required to:
• Perform correctly in game-like
conditions.
• Read cues, make correct decisions, and
use the skills in simulated game
conditions, but in disadvantaged
situations (e.g. late start relative to
opposition; outnumbered situation; etc.)
At this stage, athletes need to…
Reflect critically on their own performance after the action.
Learn how to adapt and solve the problems they encounter on their own.
When Playing the Game (Simulated Play during practice, or competition)…
See recommendations on the following pages.

June 1, 2018 © Coaching Association of Canada and Volleyball Canada
131
Guidelines: Using Simulated Play with athletes who are in the Late Consolidation stage for some skills - and have playing experience
Purposes
• give players an opportunity to enjoy the game
• further the understanding of the game and the rules
• nurture a competitive attitude
• add new challenges for players
• assess players ability
• prepare players for competition
Suggested formats Vary Method 3 drills/activities (and other methods as necessary) with Simulated Play. Use all skills that are associated in the cycle of actions when possible. Modify the game or set restrictions to increase the use of the skills being learned (e.g. 6 vs 6, slowing down the ball on a block gives one additional point, game to 25). Use all skills i.e. those being learned and those athletes are already familiar with. Reward players for correctly executing the skill during simulated play. Introduce new tactical concepts, both individual and team, involving the skill; continue exploiting teaching moments to reinforce understanding of how the various tactical concepts the athlete has been exposed to fit within each phase of play of the offensive and defensive cycles of actions.
Using Simulated Play with athletes who are in the Refinement stage for some skills - and have playing experience
Purposes
• give players an opportunity to enjoy the game
• further the understanding of the game and the rules
• nurture a competitive attitude
• add new challenges for players
• assess players ability
• prepare players for competition
Suggested formats With this type of athletes, most of the activities used during practice will likely involve Method 3 drills and Simulated Play. All skills that are associated in the cycle of actions must be used when possible. Modify the game or set restrictions to work on specific individual or team tactics, and practice the implementation of game plans. Use Simulated Play to replicate specific game situations in which athletes have to make appropriate tactical choices under some pressure (e.g., team down by 3,

June 1, 2018 © Coaching Association of Canada and Volleyball Canada
132
the serve has to be in, and difficult enough to pull the opponent's setter off the net).

June 1, 2018 © Coaching Association of Canada and Volleyball Canada
133
Appendix 2
Skill Descriptions

134

June 1, 2018 © Coaching Association of Canada and Volleyball Canada
135

June 1, 2018 © Coaching Association of Canada and Volleyball Canada
136

June 1, 2018 © Coaching Association of Canada and Volleyball Canada
137

June 1, 2018 © Coaching Association of Canada and Volleyball Canada
138

June 1, 2018 © Coaching Association of Canada and Volleyball Canada
139

June 1, 2018 © Coaching Association of Canada and Volleyball Canada
140

June 1, 2018 © Coaching Association of Canada and Volleyball Canada
141

June 1, 2018 © Coaching Association of Canada and Volleyball Canada
142

June 1, 2018 © Coaching Association of Canada and Volleyball Canada
143

June 1, 2018 © Coaching Association of Canada and Volleyball Canada
144

June 1, 2018 © Coaching Association of Canada and Volleyball Canada
145

June 1, 2018 © Coaching Association of Canada and Volleyball Canada
146

June 1, 2018 © Coaching Association of Canada and Volleyball Canada
147

June 1, 2018 © Coaching Association of Canada and Volleyball Canada
148

June 1, 2018 © Coaching Association of Canada and Volleyball Canada
149
Appendix 3 Specificity Specificity is a principle of training according to which adaptations are determined by the nature and magnitude of the training stimulus. This concept implies that, to maximize adaptation, the nature and the conditions of training activities must be designed to replicate closely those encountered in competition. Specificity therefore applies to variables such as type of activity, muscle masses involved, motor pattern, speed of movement, environmental conditions, power output, duration of effort, and cognitive and perceptual demands.
The zone of optimal difficulty or challenge When the requirements of an activity are too high for the ability of the athlete, he or she may become anxious or discouraged and may have trouble learning. On the other hand, when the requirements are too low, the athlete may quickly show signs of boredom or lack of interest. The difficulty level associated with the task must therefore be optimal; the athlete must feel that he or she has the ability to succeed but that the activity represents a challenge. In other words, the athlete will be motivated to learn when challenged at the appropriate level, which implies that there must be a reasonable chance of success or failure when he or she performs a task. As a general rule, if athletes succeed about 2 times out of 3, the activity represents a suitable challenge.

June 1, 2018 © Coaching Association of Canada and Volleyball Canada
150
Planning Guidelines for Constant, Variable, or Random Practice (excerpt from NCCP Multisport Module Plan a Practice)
Type of Practice
Definition Examples Most Effective For or When …
Not Recommended For or When …
Constant Practice
❑ A practice sequence in which the same tasks or movements are repeated under the same conditions from one repetition to another
❑ Throwing a ball 10 times at the same speed, from the same spot, to the same target
❑ The athlete is in the initiation or acquisition stage of skill development
❑ Massed practice is an effective method
❑ The athlete is beyond the initiation or acquisition stages of skill development, in particular, for discrete or open skills
Variable Practice
❑ A practice sequence in which the same tasks or movements are repeated but where one aspect of the execution is changed from one repetition to another
❑ Throwing a ball 10 times, but varying one of the following each time: speed, distance, velocity, target
❑ The athlete is in the consolidation stage of skill development
❑ Massed practice is an effective method
❑ Distinct skills or movements are performed during the same practice
❑ The athlete is in the initiation stage of skill development
Random
Practice*
❑ A practice schedule in which various discrete or serial skills that are required for performance in the sport are practised in random order, and where the learner does not practise the same task on two consecutive attempts
❑ In tennis: moving backward to do a backhand, then serving, then moving forward to return a volley
❑ In basketball, practising non-repeating types of shots
❑ Serial skills that are already acquired
❑ Skills that are both discrete and open
❑ The athlete is in the consolidation stage of skill development, or is beyond this stage
❑ When distinct skills or movements are scheduled to be performed during the same practice
❑ The athlete is in the initiation or acquisition stage of skill development
* There is strong evidence that random practice, while sometimes associated with inferior performance in the short term, results in superior performance in the long term. In other words, when constant practice is used to learn a skill or task, the performance during the session is often better compared to random practice, but the latter promotes better skill retention and overall performance in the long run. This suggests that random practice may be a very effective approach for both discrete and serial skills, as well as for open skills. The reasons for this may be that random practice causes athletes to forget short-term solutions to the task at hand; this could engage them actively in the learning process, by eliminating automatic repetitions.