Developing a Project with i-Movie and i-DVD · 3. Next, select New Project. 4. ... The following...
11
Developing a Project with i-Movie ® and i-DVD ®
-
Upload
truongdiep -
Category
Documents
-
view
214 -
download
0
Transcript of Developing a Project with i-Movie and i-DVD · 3. Next, select New Project. 4. ... The following...

Developing a Project with i-Movie® and i-DVD®

2
Copyright© 2010 -‐ Information Technology Services Kennesaw State University This document may be downloaded, printed, or copied, for educational use, without further permission of the Information Technology Services Department (ITS), provided the content is not modified and this statement is not removed. Any use not stated above requires the written consent of the ITS Department. The distribution of a copy of this document via the Internet or other electronic medium without the written permission of the ITS Department is expressly prohibited. Published by Kennesaw State University The publisher makes no warranties as to the accuracy of the material contained in this document and therefore is not responsible for any damages or liabilities incurred from its use. This document is an independent document and has not been authorized, sponsored, or otherwise approved by Apple Inc. iMovie, iDVD, Macintosh, and Mac are registered trademarks of Apple Inc.

3
Table of Contents Introduction ................................................................................................................................... 4 Learning Objectives ....................................................................................................................... 4 Creating a Project .......................................................................................................................... 5 Transferring Video from the Camera to the Computer ................................................................. 5 Adding Clips to the Project ........................................................................................................... 6 Editing Clips in the Project Window ............................................................................................. 7 Adding Titles to the Project ........................................................................................................... 7 Adding Transitions ........................................................................................................................ 8 Adding Music and Sounds ............................................................................................................. 9 Adjusting the Settings for Music and Sounds ............................................................................... 9 Recording a Voiceover ................................................................................................................ 10 Exporting the Project ................................................................................................................... 10 Moving Your Project to a DVD .................................................................................................. 11

4
Introduction Multimedia presentations are a great way to communicate with people. The Macintosh®
computer is an excellent tool to use to develop such presentations. This booklet, Developing a Project with i-Movie®
and i-DVD®, has been created to provide assistance to you with your project. As you use and explore i-Movie and i-DVD on your Mac®, you will find that they have many fine features to help you develop effective presentations. This booklet explains step-by-step how to operate the foundational concepts of these packages. This learning guide is recommended for intermediate-level Macintosh users. Learning Objectives The learning objectives in this document include:
• Having the ability to create a project. • Understanding how to transfer video from the camera to the computer. • Being able to add video to the project. • Knowing how to edit clips in the project window. • Having the ability to add titles to the project. • Being able to add transitions, music, and sounds to the project. • Understanding how to adjust the settings for music and sounds. • Having the ability to record a voiceover for the project. • Knowing how to export a project from i-Movie and move the project to a DVD.
5
Creating a Project The following explains how to create a project using the iMovie software:
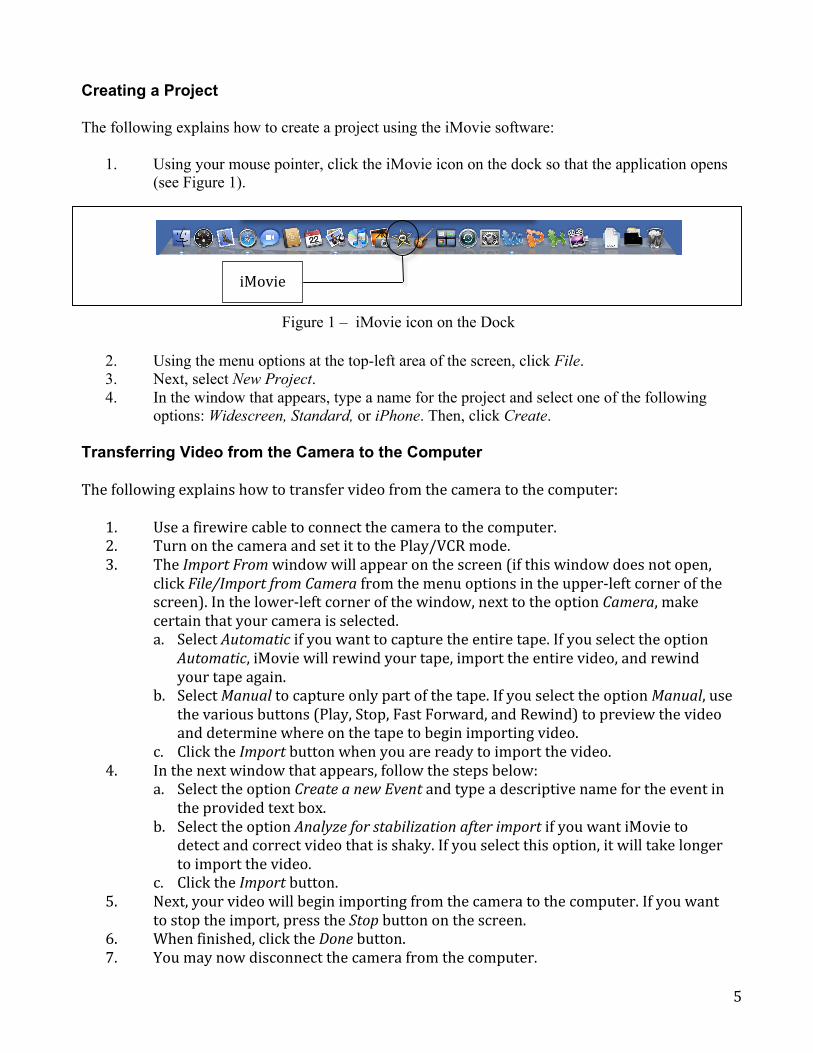
1. Using your mouse pointer, click the iMovie icon on the dock so that the application opens (see Figure 1).
Figure 1 – iMovie icon on the Dock
2. Using the menu options at the top-left area of the screen, click File. 3. Next, select New Project. 4. In the window that appears, type a name for the project and select one of the following
options: Widescreen, Standard, or iPhone. Then, click Create. Transferring Video from the Camera to the Computer The following explains how to transfer video from the camera to the computer:
1. Use a firewire cable to connect the camera to the computer. 2. Turn on the camera and set it to the Play/VCR mode. 3. The Import From window will appear on the screen (if this window does not open,
click File/Import from Camera from the menu options in the upper-‐left corner of the screen). In the lower-‐left corner of the window, next to the option Camera, make certain that your camera is selected. a. Select Automatic if you want to capture the entire tape. If you select the option
Automatic, iMovie will rewind your tape, import the entire video, and rewind your tape again.
b. Select Manual to capture only part of the tape. If you select the option Manual, use the various buttons (Play, Stop, Fast Forward, and Rewind) to preview the video and determine where on the tape to begin importing video.
c. Click the Import button when you are ready to import the video. 4. In the next window that appears, follow the steps below:
a. Select the option Create a new Event and type a descriptive name for the event in the provided text box.
b. Select the option Analyze for stabilization after import if you want iMovie to detect and correct video that is shaky. If you select this option, it will take longer to import the video.
c. Click the Import button. 5. Next, your video will begin importing from the camera to the computer. If you want
to stop the import, press the Stop button on the screen. 6. When finished, click the Done button. 7. You may now disconnect the camera from the computer.
iMovie

6
Adding Clips to the Project Your video has now been transferred to iMovie. The following explains how to build your project:
1. You will see your footage in the Event Browser (see Figure 2) of i-Movie. To play this footage, click the Play Button (see Figure 2) in the lower-left corner of i-Movie.
2. It is now time to determine what part of this footage you would like to select to include in the final project. To do this, click on any of the clips in the Event Browser (see Figure 2).
3. A yellow box will now appear over a segment of the video. This yellow box allows you to select what part of the video you would like to add to your project. Adjust the size of this yellow box to capture the part of the video that will be added to the project. The following steps explain how to adjust the size of the yellow box: a. To change the size of the yellow box, allow your mouse to hover within the borders of
this yellow box. b. You will see that your mouse pointer now appears as a hand. Move this hand over the
small rectangle at the beginning or end of the yellow box and the hand will become a double-arrow.
c. When you see the double-arrow, hold the mouse button down and move the mouse to the left or right. As you do this, you are adjusting the size of the yellow box.
4. Next, move the selected video from the Event Browser to the Project Window (see Figure 2). The following steps explain how to transfer the video: a. Allow your mouse pointer to hover within the yellow selection box. Your mouse pointer
will appear as a hand. b. Hold down the mouse button and drag the selected clip to the Project Window. c. When the clip is within the Project Window, release your mouse button and the clip will
be added to this window. 5. To add other segments of the video footage to the Project Window, simply follow steps
two through four listed previously.
Event Browser
Project Window
Figure 2 -‐ iMovie Interface
Event Browser Play Button
Project Window Play Button

7
Editing Clips in the Project Window The following explains how to edit clips in the Project Window:
1. Press the play button in the Project Window (see Figure 2) to preview your project.
2. Once all of the video has been placed in the Project Window, you may want to re-‐order the sequence of the clips. To do this, simply click on the clip and drag it to the new location (when you do this, you will see a large green line appear indicating the location where the clip will be relocated).
3. To remove a clip from the Project Window, follow the steps below: a. Using your mouse pointer, click on the clip to select it.
b. In the upper-‐left area of your screen, click Edit from the available menu options.
c. Next, click Delete Selection.
Adding Titles to the Project The following steps explain how to add titles to the project:
1. Click the T icon on the Edit Browser (see Figure 3). 2. Determine which Title Option you would like to add from the Browser Window (see
Figure 3). 3. To add the title to a clip, drag the title from the Edit Browser (see Figure 3) and place
it on top of a clip in the Project Window (see Figure 2). 4. To add an introductory title slide, drag the title option from the Edit Browser until
your cursor is to the left of the first clip. When you see a green bar to the left of the clip, release your mouse button and the title slide will appear to the left of the first clip.
5. In the next window that appears, select the background of your choice.
T icon on the Edit Browser
Figure 3 – The iMovie Interface
Title Options

8
Click here to adjust the length that the title is displayed
Add your text here
Figure 4 – The iMovie Interface
6. Enter the text that you want displayed in the Edit Browser (see Figure 4). 7. Adjust the length of time that this title will be displayed in the Project Window
(see Figure 4.)
Adding Transitions The following steps explain how to add transitions to your project:
1. Click the Transition Icon on the Edit Browser (see Figure 5). 2. Determine the type of transition that you want to include in your presentation from the
available options in the Edit Browser (see Figure 5). 3. Click-and-drag the transition of your choice from the Edit Browser to the Project
Window (see Figure 5). As you drag the transition over the video footage in the Project Window, a green bar will display between the video segments indicating where the transition will be applied. When you release your mouse, the transition will be placed in the Project Window.
Figure 5 – The iMovie Interface
Transition Icon on the Edit Browser
Transition Options
Transition Example in the Project Window
9
Adding Music and Sounds The following steps explain how to add music and sounds to your project:
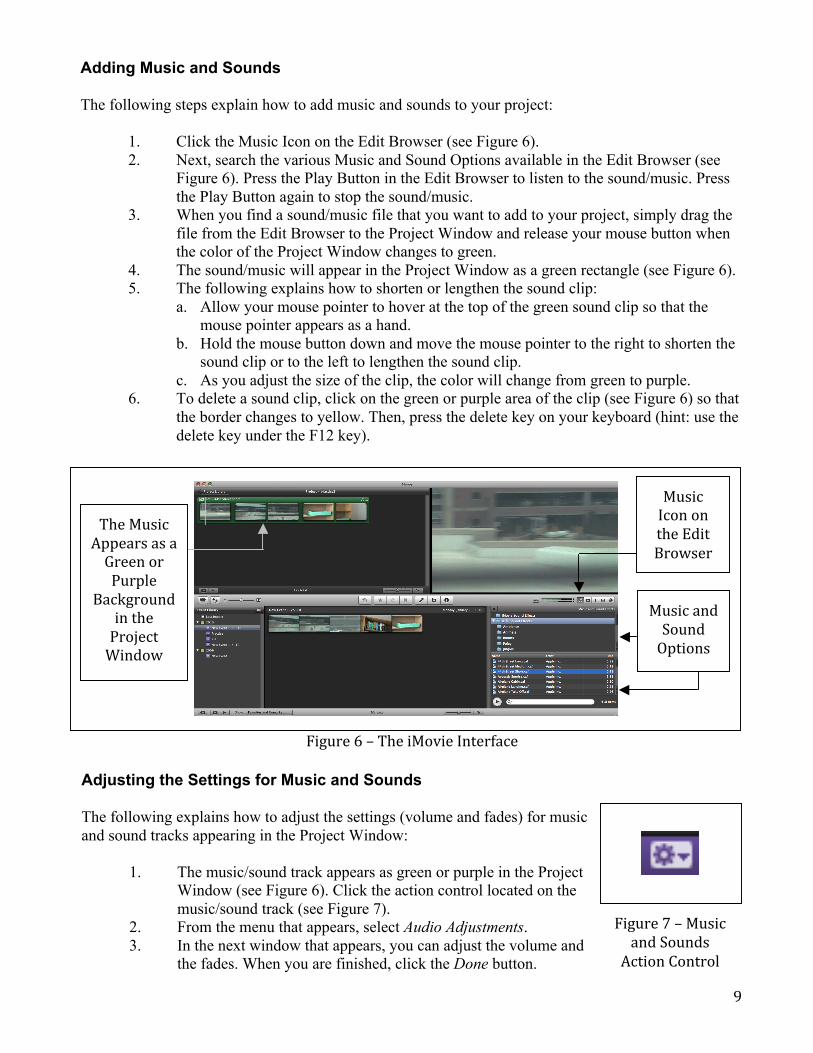
1. Click the Music Icon on the Edit Browser (see Figure 6). 2. Next, search the various Music and Sound Options available in the Edit Browser (see
Figure 6). Press the Play Button in the Edit Browser to listen to the sound/music. Press the Play Button again to stop the sound/music.
3. When you find a sound/music file that you want to add to your project, simply drag the file from the Edit Browser to the Project Window and release your mouse button when the color of the Project Window changes to green.
4. The sound/music will appear in the Project Window as a green rectangle (see Figure 6). 5. The following explains how to shorten or lengthen the sound clip:
a. Allow your mouse pointer to hover at the top of the green sound clip so that the mouse pointer appears as a hand.
b. Hold the mouse button down and move the mouse pointer to the right to shorten the sound clip or to the left to lengthen the sound clip.
c. As you adjust the size of the clip, the color will change from green to purple. 6. To delete a sound clip, click on the green or purple area of the clip (see Figure 6) so that
the border changes to yellow. Then, press the delete key on your keyboard (hint: use the delete key under the F12 key).
Figure 6 – The iMovie Interface
Music Icon on the Edit Browser
Music and Sound Options
The Music Appears as a Green or Purple
Background in the Project Window
Adjusting the Settings for Music and Sounds The following explains how to adjust the settings (volume and fades) for music and sound tracks appearing in the Project Window:
1. The music/sound track appears as green or purple in the Project Window (see Figure 6). Click the action control located on the music/sound track (see Figure 7).
2. From the menu that appears, select Audio Adjustments. 3. In the next window that appears, you can adjust the volume and
the fades. When you are finished, click the Done button.
Figure 7 – Music and Sounds Action Control

10
Recording a Voiceover The following explains how to record a voiceover for your project:
1. Click the Voiceover button on the iMovie toolbar (see Figure 8). 2. In the Voiceover Menu that appears, you will see the Record From: option. Select one
of the following choices here: Built-in Microphone or Built-in Line Input 3. When you are ready to begin speaking, click on a segment of a clip in the Project
Window (see Figure 8). The place where you click is where your voice will begin in the project.
4. After you click on the video segment, a screen will appear with a three-second countdown before the recording begins. After this three-second countdown ends, you may begin speaking and your voice will be recorded.
5. To stop the recording, press the space bar. 6. Your recording will appear in the project as a purple icon. 7. If you decide to remove the recording from the project, simply select the purple icon
and press the delete key (hint: use the delete key under the F12 key). 8. You may close the Voiceover Menu when you are finished recording.
Voiceover Button
Figure 8 – The iMovie Interface
Project Window
Exporting the Project The following steps explain how to export the project out of i-Movie so that it can be shared with other computers:
1. From the menu options at the top of the screen, select Share. 2. Next, click Export Movie. 3. In the next window that appears on your screen, enter a name for the file, determine
the location where the project will be saved (hint: if you save this project to the desktop, it is easy to find), and the size to export. When done, click the Export button.

11
Moving Your Project to a DVD The following steps explain how to move your project to a DVD:
1. Open i-DVD on your computer. The following steps explain how to find i–DVD on your Mac: a. Double-click the following icon on your desktop: Macintosh HD. b. In the next window, double-click the Applications folder. c. In the next window, double-click the i-DVD icon to open the software.
2. In the next window that appears, click Magic i-DVD. 3. In the upper-left corner of the next window, you will see DVD Title. In the text box
provided, enter a title for your DVD. 4. Next, just below the area where you typed the title, select a theme for your DVD. 5. In the upper-right area of the window, click the button Movies. 6. In the window just below the Movies button that you just clicked, you will see an
arrow to the left of the i-Movie icon. Click this arrow so that it is pointing downwards. 7. You will now see a list of the projects in i-Movie. Drag the project that you want to
place on a DVD to the window labeled, Drop Movies Here:. 8. To see a preview of your DVD, click the Preview button in the lower-left area of the
window. 9. When you are finished previewing your project, you will see a window that appears as
a remote control on your desktop. Click the Exit button on this remote control window to return to your project.
10. When you are ready to transfer the project to a DVD, click the Burn button in the lower-right area of the window.
11. Next, insert a DVD into your computer. The project will now be moved onto the DVD.