DESlock+ Enterprise Server - DESlock+...
88
Version 2.0.6 DESlock+ Enterprise Server
Transcript of DESlock+ Enterprise Server - DESlock+...
Version 2.0.6
DESlock+
Enterprise Server

Version 2.0.6
Overview
The DESlock+ Enterprise Server is a Browser based tool for the management of Users and machines running DESlock+. It prov ides al l the necessary functions to al low an administrator to specify Security settings (Full Disk Encryption, Encryption usage and endpoint control) at the users’ workstations. Data transferred between users and the Enterpr ise server can be kept onsite, or use a “cloud” based proxy Server. Al l functional communications between the Enterprise Server and Users are ful ly Encrypted. Data held on Proxy Servers is also Encrypted.
DESlock+ provides the user with Full Disk, Folder, and Email encryption, together with Secure Data Deletion, Encrypted Virtual disks, Encrypted Archives, and Removable Media (Memory devices) control. DESlock+ includes FIPS 140-2 Certif ied encryption algorithms.
The DESlock+ Enterprise Server al lows the Administrator to def ine the DESlock+ feature set for each user, to restrict or empower as necessary. Lost User passwords can be recovered with the Enterprise Server, even for Full Disk encrypted workstations. Lost or stolen workstations can be remotely disabled, or set to self disable af ter communication with the server has been lost. The use of removable Media (memory Sticks) can be control led to prevent Data Loss or imports of harmful programs.

Version 2.0.6
Features
• Secure – communication between the Enterprise Server and the Users are encrypted using RSA. Data on any Proxy Server is also encrypted.
• Resilient – Server (local or cloud based) can safely self repair in the event of fai lure.
• Flexible – Single or Multiple Organisations, with either on site or widely distributed users.
• Browser Based with simple window display.
• Easy to understand Interface, with 3 main information area’s (Panels), showing the relationship, properties, and in depth detai ls of any selected user, key or grouping.
• Multiple Keys - Up to 64 different encryption keys can be used throughout the organisation.
• Key Sharing - Encryption keys can be shared between users and departments, through Encryption Groups.
• Administrator control - 3 Administrator levels, each with differing control functions (SuperAdmin, Admin and Helpdesk).
• Team profiles - can be propagated though the organisation simply and effectively.
• Remote Full Disk Encryption - initiation of Full Disk Encryption is performed remotely.
• Wide Distribution of Clients - Client workstations may be based locally or control led via remote server, or through the internet.
Version 2.0.6
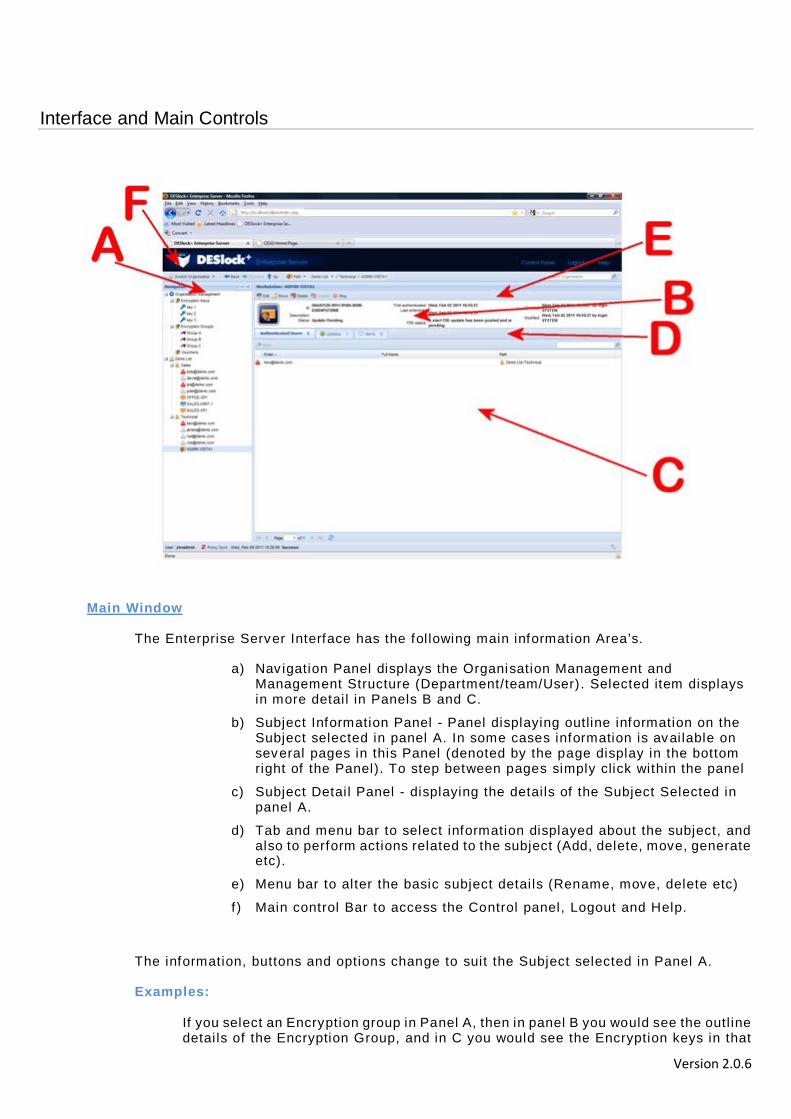
Interface and Main Controls
Main Window
The Enterprise Server Interface has the fol lowing main information Area’s.
a) Nav igation Panel displays the Organisation Management and Management Structure (Department/team/User). Selected item displays in more detai l in Panels B and C.
b) Subject Information Panel - Panel displaying outline information on the Subject selected in panel A. In some cases information is available on several pages in this Panel (denoted by the page display in the bottom right of the Panel). To step between pages simply click within the panel
c) Subject Detai l Panel - displaying the detai ls of the Subject Selected in panel A.
d) Tab and menu bar to select information displayed about the subject, and also to perform actions related to the subject (Add, delete, move, generate etc).
e) Menu bar to alter the basic subject detai ls (Rename, move, delete etc)
f ) Main control Bar to access the Control panel, Logout and Help.
The information, buttons and options change to suit the Subject selected in Panel A. Examples:
If you select an Encryption group in Panel A, then in panel B you would see the outl ine detai ls of the Encryption Group, and in C you would see the Encryption keys in that

Version 2.0.6
group (once you have selected the Encryption Keys Tab in Menu Bar D), or the Users who have been issued with those Keys (Select Users Tab In Group in menu bar D) If you select the highest part of the Management structure in Panel A, you wil l be able to see the Total number of Users, Workstations, Teams, Encryption Key Groups, Keys, Policy, Updates and Alerts that are def ined below that point. You can f il ter the displayed information by using the search field on the right of the Menu bar. Note, Tabs on the Menu Bar (D) only display information on the current level.
Navigation Panel (A)
The Nav igation panel (A), is where the structure and management of the organisation is displayed. This is where Encryption Keys, Encryption groups and Licence Vouchers are displayed; this is also where the Teams (departments, physical or functional groupings), the users within the teams and the workstations, are shown. The panel has two main display groupings, Organisation Management and the current selected Organisation Name (defined when the Enterprise server was instal led) – in this example the Organisation Name is Demo Ltd.
Organisation Management.
Within the Organisation Management there are three subdivisions, Encryption Keys, Encryption Groups, and Vouchers. This is also where Workstation Policy is defined. Workstation policy is used mainly to specify how the workstation and Enterprise Server interact, together with certain general DESlock+ settings.
Encryption keys. Where new Encryption Keys are generated, stored, and renamed or deleted.
Encryption Groups. Where Encryption keys are grouped together for ease of control. New groups may be generated, keys added and removed.
Vouchers. To use DESlock+ each user need to have a l icence, which are sold by DES in voucher form for multi user Organisations. This al lows the l icences to be bulk purchased, then distributed in a control led manner by the System Administrator.
Workstation Policy. Workstation policy controls how the Enterprise Server, user and workstation can interact with regard to the DESlock+ encryption and interfaces with external Data sources. For example, time periods are def ined af ter which the workstation may lock out access if i t cannot connect to the Server. As another example, users may not be permitted to read or write data to external media (USB memory devices).
Organisation Name.
Within the Organisation Name section (which will appear as your Company Name – eg DEMO Ltd) you can specify Teams, Users and workstations. You can also def ine the Group policy that is used as a template for all teams (and sub-teams) created below it, although these can be modif ied to suit team requirements.
Teams - Teams are used to al low a logical representation of the organisation to be def ined, which wil l simplify the al location of policies and keys. Hav ing defined the basic policies for the top level of the organisation, the departmental profiles can be def ined. The policies of each team generated is based upon the policies of the preceding level.
Version 2.0.6
Users – Users are def ined by email address and may be generated individually or in blocks (by CSV fi le or similar). Users within a particular team are controlled by the Group policy at that level. Users are added by selecting the Team, then clicking the Users Tab (menu bar D).
Workstations –Workstations are added by instal l ing DESlock+ on the workstation itself , which wil l then authenticate itself with the Enterprise Server.
Organisational Policy - Group Policy mainly controls how DESlock+ functions and appears for the user, which menus and controls they have access to.
Subject Information (B)
Panel B displays outl ine information about the item selected in the Navigation Panel (A). The information displayed changes dependant on the type of i tem selected. Information displayed may therefore be on Encryption Keys, Encryption Groups, Vouchers, Organisation, Team, Users or Workstations.
For certain Subject types there may be controls in the Menu Bar (E) at the top of the Section al lowing the Administrator to Rename, Move or Delete, or (in some cases) communicate information to the Subject.
Subject Details (C)
Panel C shows information based on the subject Selected in the Navigation Panel (A). The controls shown and the information displayed wil l be tailored to the type of Subject selected.
Most importantly, the Menu Bar (D) will provide different Tabs and Controls al lowing the Subject to be edited. For example, if a Team is selected in the Navigation Panel, the Subject Detai l panel wil l show different information depending on the selected Tab :
Users Tab selected - full l ist of the users, al lowing you to add additional users, move them to different Teams, edit, delete, Generate activation Code, and post Key-Files
Workstation Tab – Displays al l the workstations in that Team, allowing them to be edited and deleted.
Teams Tab – Displays al l sub teams.
Encryption Key Groups – displays the Key-Groups active within the Team.
Keys – displays the Keys al located within the Team
Group Policy – Displays the Policies active at that Team Level – which can be altered to suit the security requirements of the Team. If you change a Policy setting for a team or user, i t won’t become active unti l you Post an up to date Key-File to that user or team members.
Updates – prov ides a l ist of updates that have been applied.
Alerts – Displays information on any changes made to the Team (New

Version 2.0.6
users, key-f i le postings, workstations changes etc etc)
For certain Tabs there wil l also be a search box available, al lowing you to locate specific information.

Version 2.0.6
Installation and Configuration Outline
In order to use the Enterprise Server, the fol lowing actions must be performed. Each of these actions are described later in this Manual. Where applicable the heading l inks to the appropriate section.
1. Network Configuration. The Enterprise Server can be operated in several different configurations. Wholly on your site with internal servers, with a separate Server Proxy under your control, or using a cloud based Proxy operated by DES. Rev iew the instal lation pre-requisites.
2. Software Installation. Instal l the Enterprise Server
3. Control Panel and Admin Interface. The Control Panel is used to def ine the basic configuration of the Enterprise Server, Admin users, communications protocols, security settings.
4. Policy Settings. Set the Workstation and Organisational Policies. See the Policy section for detai ls on the settings. Once these are conf igured they form the default policy setting for the Enterprise Server. Al l Workstations wil l use the Workstation Policy, and all Teams and users use the Organisational Policy. Both policy types can be tai lored to suit the requirements of different teams and users at a later time.
5. Vouchers and Licences. Purchase Vouchers f rom DES to allow the issue of l icenses.
6. Encryption Groups and Keys. Define the Encryption Keys and Groups.
7. Teams. Def ine the Teams, normally based on the Organisation structure.
8. Group Policy. This may be used to make adjustments in the Team Level policy. When the team is defined, i t wil l take the current policy setting of the preceding level as i ts default. In the first instance, i t wil l inherit the Top level organisational Policy. Once the team is def ined you should make any changes you require to the Group Policy to ref lect the If required you can edit the Team policy to ref lect the permissions at that level. See Group Policy Section for details.
9. Team Users. Define the Team users. Team users are def ined by Email Addresses. These can be entered singly or in blocks (cut and paste) – see the Organisation Manager Section.
10. User Specific Encryption Groups. If required, you may then allocate the users specific Encryption groups, other than those inherited f rom the Team def init ion.
11. Create Workstation Install. Use the merge tool to create an instal lable DESlock+ package, which is then sent to the Workstations.
12. Workstation Installation. The user runs the Instal l f i le on receipt (double click on the fi le), which wil l instal l DESlock+ and import the policy setting to that machine as one operation. The user then reboots the machine. During the Instal l , the machine will automatical ly register and report i ts status to the Enterprise Server.
13. Activation Code. Administrator issues an Activation code f rom the Voucher to the User. Sent to user Via Email.

Version 2.0.6
14. Authentication. User starts computer, then is prompted for their Activation code (sent via email) and sets their password. The user may then Log into DESlock+ and use the features as def ined by their Administrator.
15. Workstation. The Workstation wil l then appear in Enterprise tool and may be encrypted.
16. Updates. From this point on, if the user detai ls are changed (key groups added, policy changed) the Status of the user wil l alter and they wil l require a new Key-File to be supplied. The Administrator then sends the Key-File (Keys and Policy) to the user. Once the User has logged on, DESlock+ wil l automatically implement the policy settings for that user.
17. Full Disk Encryption. If required (and the l icence includes FDE), once the Workstation has been authenticated the Administrator can init iate Full Disk Encryption for that machine. During this operation the Administrator defines the Login password for that user.
Before you start to instal l and conf igure the Enterprise server, i t will be of considerable benef it to plan out how you wil l define your organisation. You need to be aware of how it wil l be spli t into teams, what Encryption Keys and Key groupings you wil l need, and what policies you have to set, both at workstation and Group Level. The more logically your organisation is def ined, the simpler i t wil l be to control and disseminate the Security aspects of DESlock+
Version 2.0.6
System Configuration and Installation
Preparing for first use
Instal lation
The DESlock+ Enterprise Server can be instal led on any Windows XP (SP3) or later workstation. The Enterprise Server should be instal led in a location which is backed up to avoid potential loss of data. A proxy Server may also be used as an additional feature to improve ease of access and additional security for the Administrative Data.
There are three instal lations that may be required, Enterprise Server, Proxy and Client. Each of these is covered in more detail elsewhere within this manual.
Conf iguration
Before the DESlock+ Enterprise Server can be used, i t must be configured. This is mainly performed during the MSI instal lation.That is, a database is created and the basic operating parameters def ined.
You wil l need to supply:
• Instal lation Folder Location for the Enterpriser Server (or use default)
• Sub folder location for access on the Web Server (eg http:// localhost/dlpes)
• Licence fi le details, as supplied by DES
• SQL Server details (Name, Username, Password, Database name)
• Enterprise Server details (Organisation name, Admin Name, Admin password)
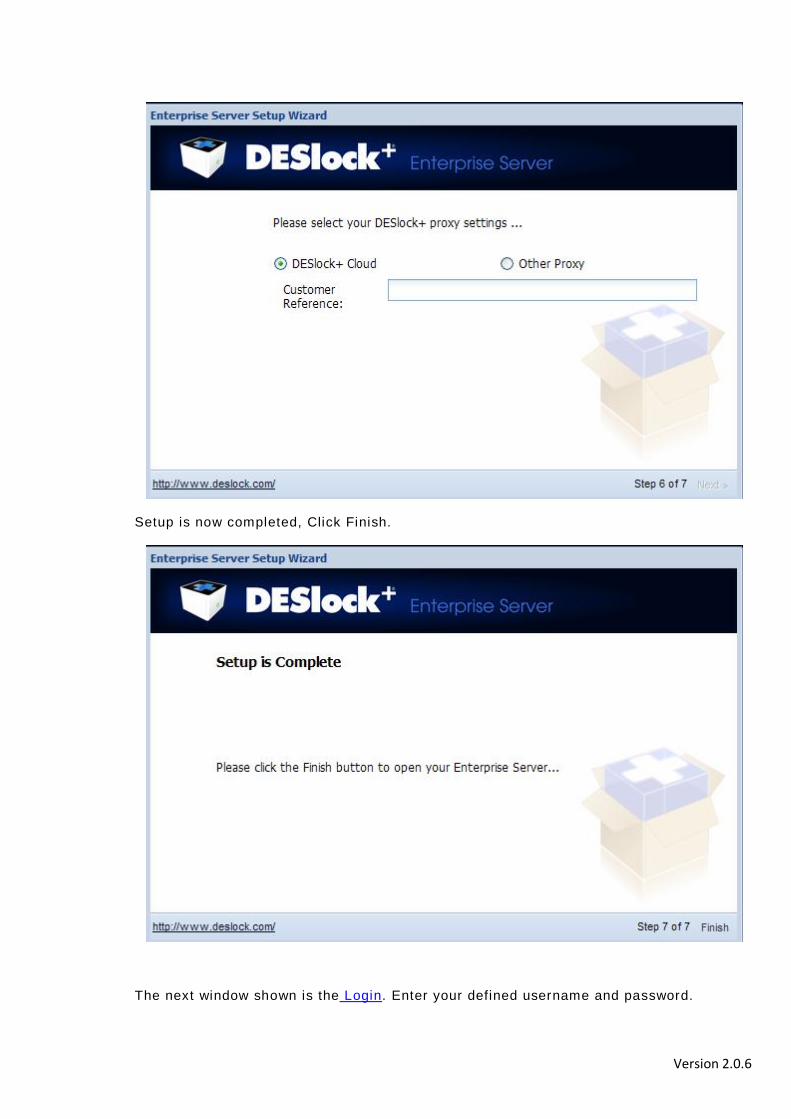
• DESlock+ Proxy Settings and customer reference (Supplied by DES)
DESlock+ (version 4.1.12 or greater) wil l be required on al l workstations, which wil l need registering with the Enterprise Server. Later sections wil l explain this in more detai l .
Once the configuration of the Enterprise Server has been completed, you wil l then need to generate encryption keys that wil l be used by the system, see the section DESlock+ Encryption Keys->Key Manager.
After the encryption keys have been generated we strongly adv ise you take a local backup by copying the sof tware Key-f ile, using the DESlock+ Utili ties. Note, once a change has been made to a Key-f ile the DESlock+ Key-fi le backup Util ity will automatical ly start.

Version 2.0.6
System Requirements Enterprise Server System
The Minimum requirements for the Enterprise Server are:
To Guest O/S • 1Gb RAM - Or more, dependant on Operating System used. • 30Gb of drive space, Minimum. • 32 bit OS - XP SP3 or greater. • 64 bit OS - Windows 2003 or greater.
Pre instal led sof tware
• SQL Server 2005 Express • Apache 2+ or IIS 6+ • PHP 5.3
Other requirements
Access to the internet on port 443 for connection to the cloud proxy
Optional
SMTP account detai ls
Admin User Interface Web Browser
The minimum requirements for the Administration Interface web browser are:
• Microsof t Internet Explorer 8 or greater • Mozilla Firefox version 3.6 or greater
Server Proxy Requirements Client PC requirements
• Windows XP SP2 or greater • 64MB Disk space • Access to Server Proxy (either HTTPS or Lan)
Version 2.0.6
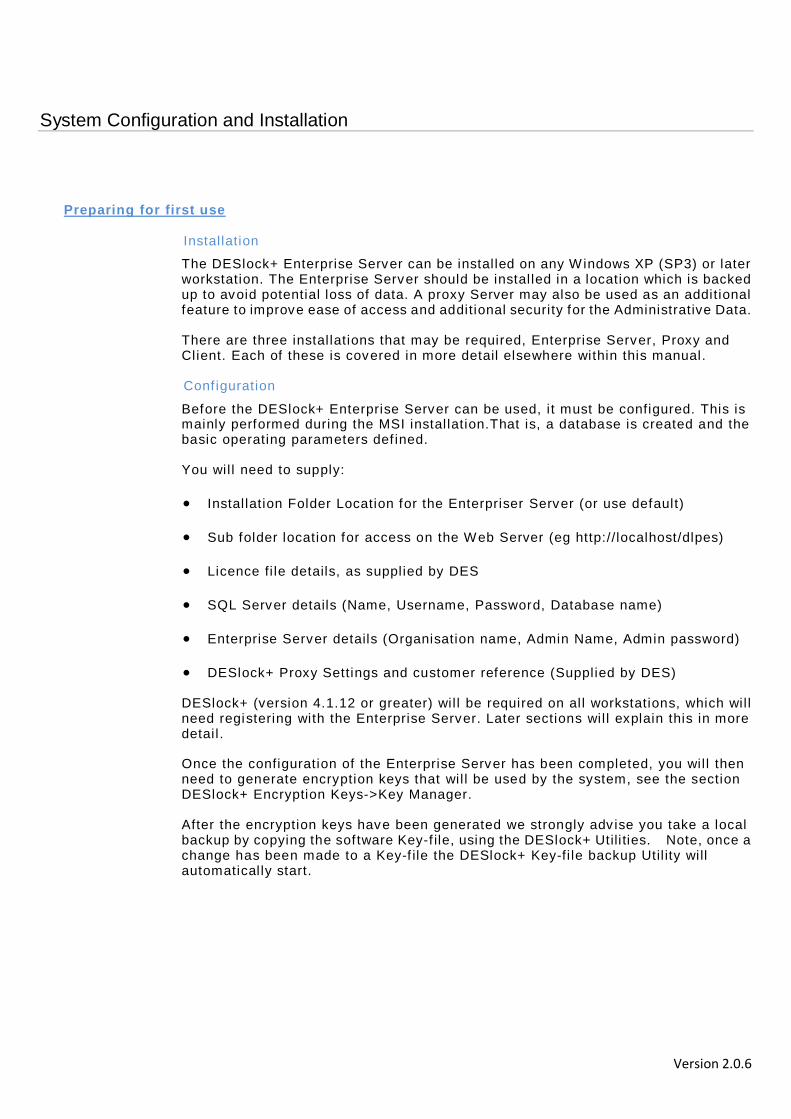
Network Configurations
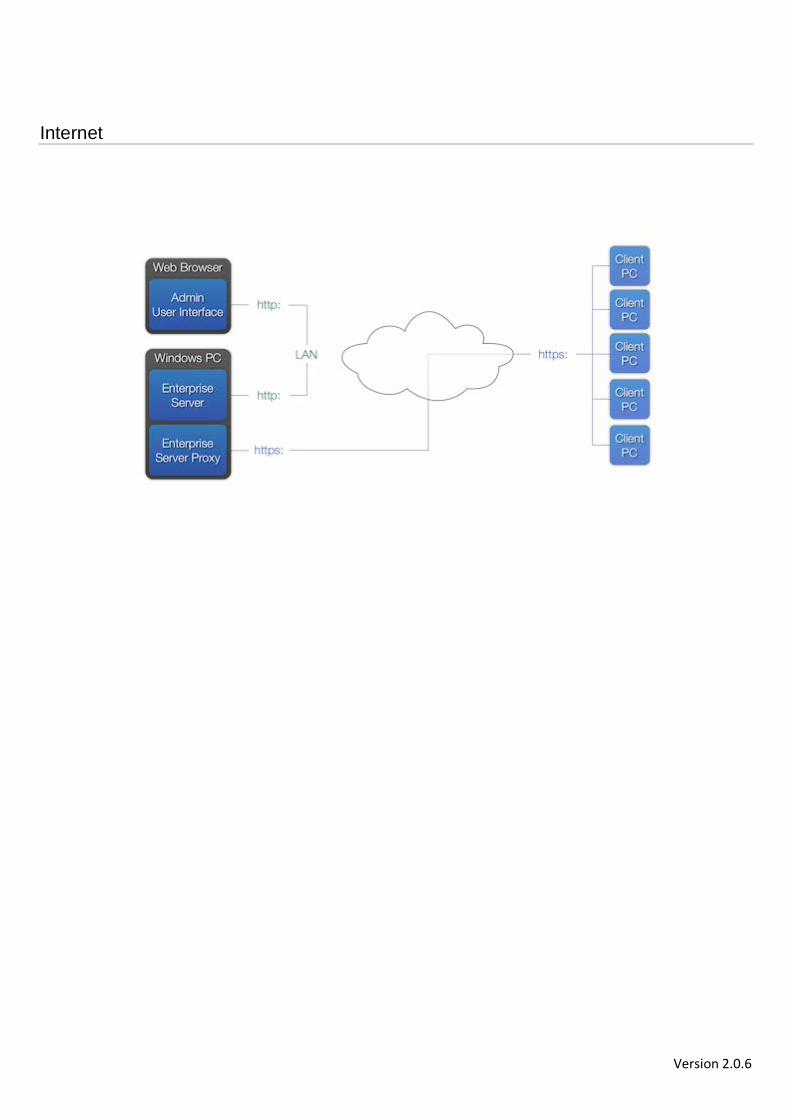
Standard Configuration
The Enterprise Server can be conf igured to operate in several ways, whichever is best suited to your organisational requirements. Each different system provides the same control between the Administrator and the Clients, and the same level of security. Any off site or cloud based data is always encrypted, as are the communications between the Enterprise Server and the Client.
There are 4 essential components in the system
• Admin User Interface - This is the administration f ront end, accessed by a Web
browser f rom any PC with a Local Area connection to the Enterprise Server i tself . So, as an Administrator, you can use the Enterprise Server Package f rom any location that has access to the PC/Server that is hosting the sof tware. The Web browser can be on any PC, even a Client PC, or the Enterprise Server PC. We currently support Internet Explorer (7 or greater) or Firefox.
• Enterprise Server - The main System Database, containing the details accessed by the Admin user interface. This also controls the communication with the Server Proxy. This must be instal led on a Windows based computer, satisfying the minimum System requirements (Windows XP SP3+ or Windows Server 2003+)
• Enterprise Server Proxy - the communications interface between the Enterprise Server and the Client PCs. All data on the Server Proxy is encrypted. The Server may be physical ly on your site, or a remote system residing in the Cloud. DES have a Secure server available for your use if required. The Server Proxy can also be on the same on site PC as the Enterprise Server
• Client PC - The users workstation. Multiple users can use the same machine, each with a different account, and different encryption keys. Client PCs can be based anywhere with access to the Server Proxy. So, depending on Network organisation, the Client may have LAN or Internet access.
There are Five basic Network conf igurations defined.

Version 2.0.6
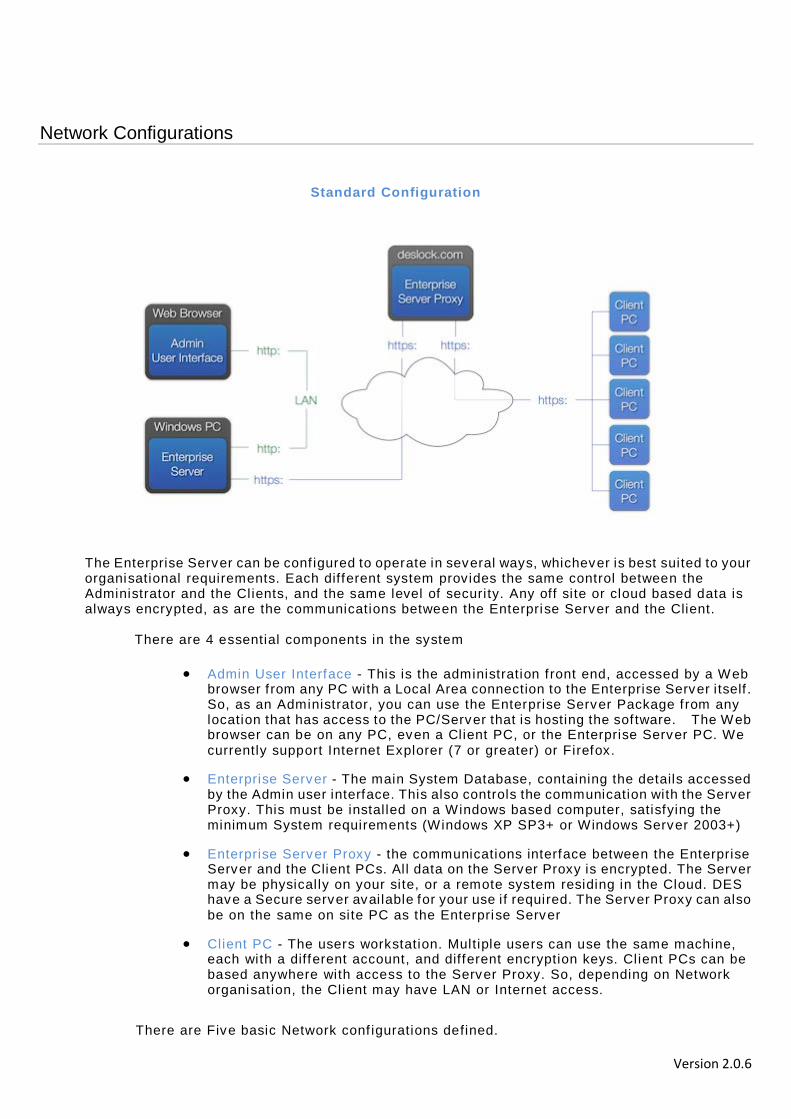
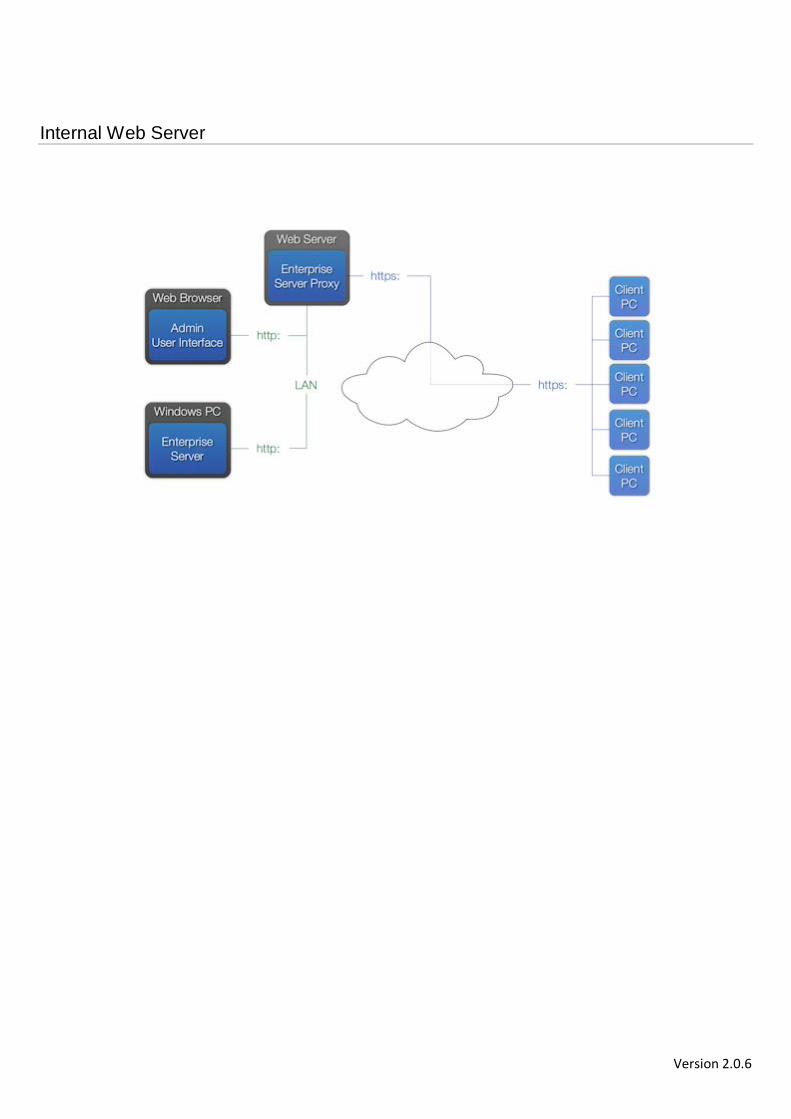
• Standard Conf iguration (DESlock Server Proxy, Cloud based) - shown above. • Company or 3rd Party Server Proxy, Cloud Based. • Internet • Internal Web Server • Local Area Network.
The standard conf iguration, as shown above, uses our own Server Proxy - Cloud Based - for your secure communications. The components are the four outlined above. There are minimum requirements for these components specified in System Requirements. There are no real differences between the Performance, Security or Reliabili ty of the other conf igurations, they are included purely to give you possible set up scenarios.
Version 2.0.6
Company or 3rd Party proxy

Version 2.0.6
Local Area Network
Version 2.0.6
Internal Web Server
Version 2.0.6
Internet

Version 2.0.6
Software Installation
The complete Enterprise Server instal lation, including the SQL server, Apache web server and PHP 5.3 is relatively simple, essential ly just a few clicks. This will instal l the Enterprise Server and the necessary programs. Once instal led, the Enterprise Server can be accessed using most common browsers. If you already have your own SQL server or wish to instal l the components separately, see the Step by step instal lation section for more detai ls. Copy the supplied fi les (Preinstal l .exe and Instal lers folder) to a suitable location on your PC. The instal lers folder contains the latest versions of the programs to be instal led.
Double cl ick preinstal l.exe to start the instal lation. Click start on the following window.
The program wil l then instal l PHP, SQL Server, Apache then DESlock+ Enterprise Server.
On completion cl ick launch, this wil l start the conf iguration process of the Enterprise Server.
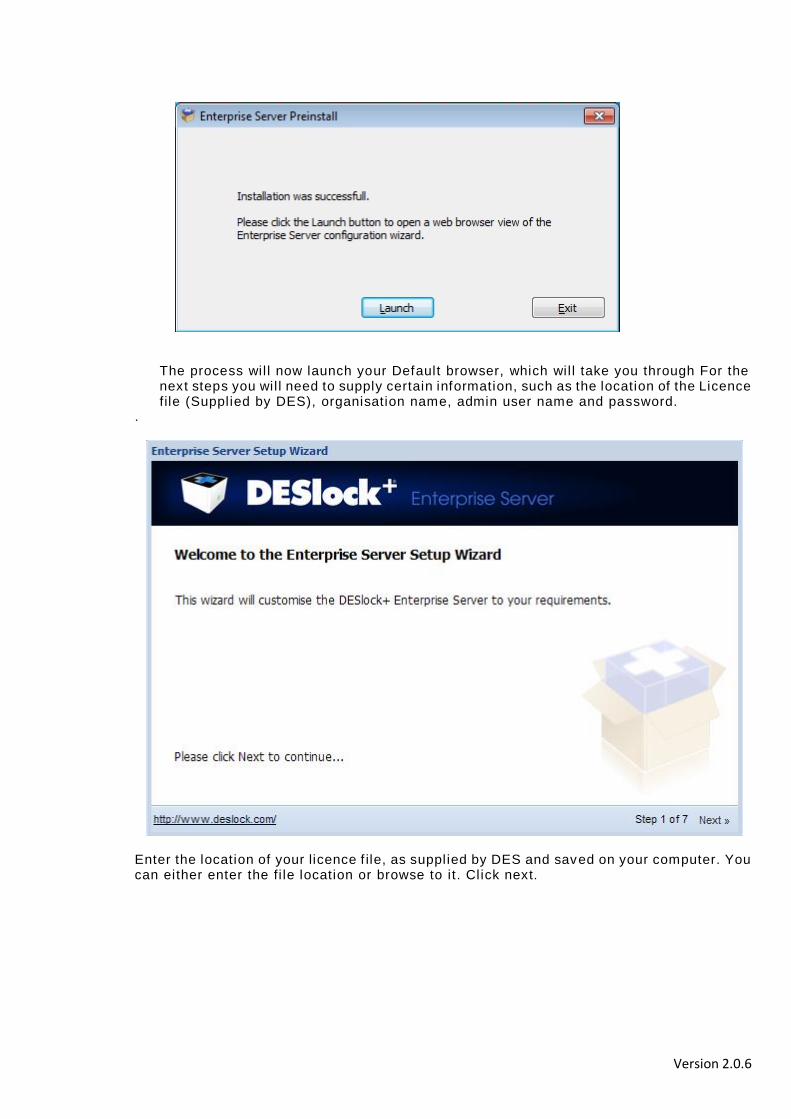
Version 2.0.6
The process wil l now launch your Default browser, which wil l take you through For the next steps you wil l need to supply certain information, such as the location of the Licence file (Supplied by DES), organisation name, admin user name and password.
.
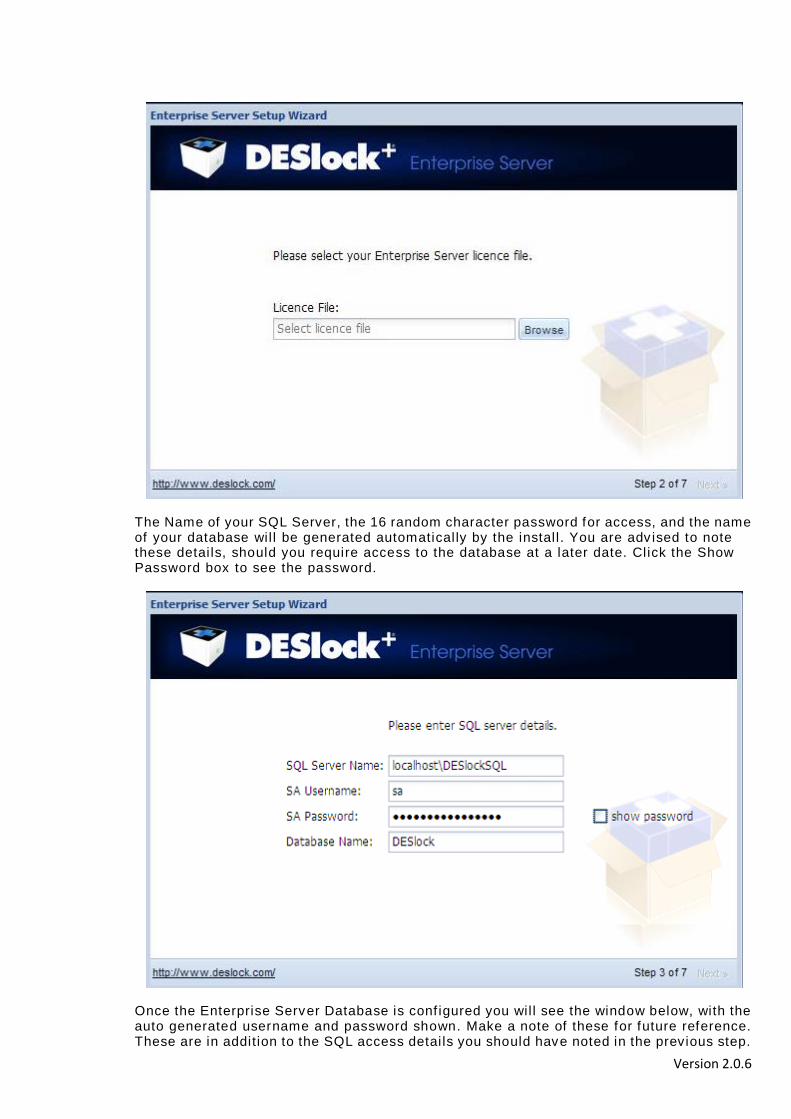
Enter the location of your licence f ile, as supplied by DES and saved on your computer. You can either enter the fi le location or browse to i t. Click next.
Version 2.0.6
The Name of your SQL Server, the 16 random character password for access, and the name of your database wil l be generated automatical ly by the instal l . You are adv ised to note these detai ls, should you require access to the database at a later date. Click the Show Password box to see the password.
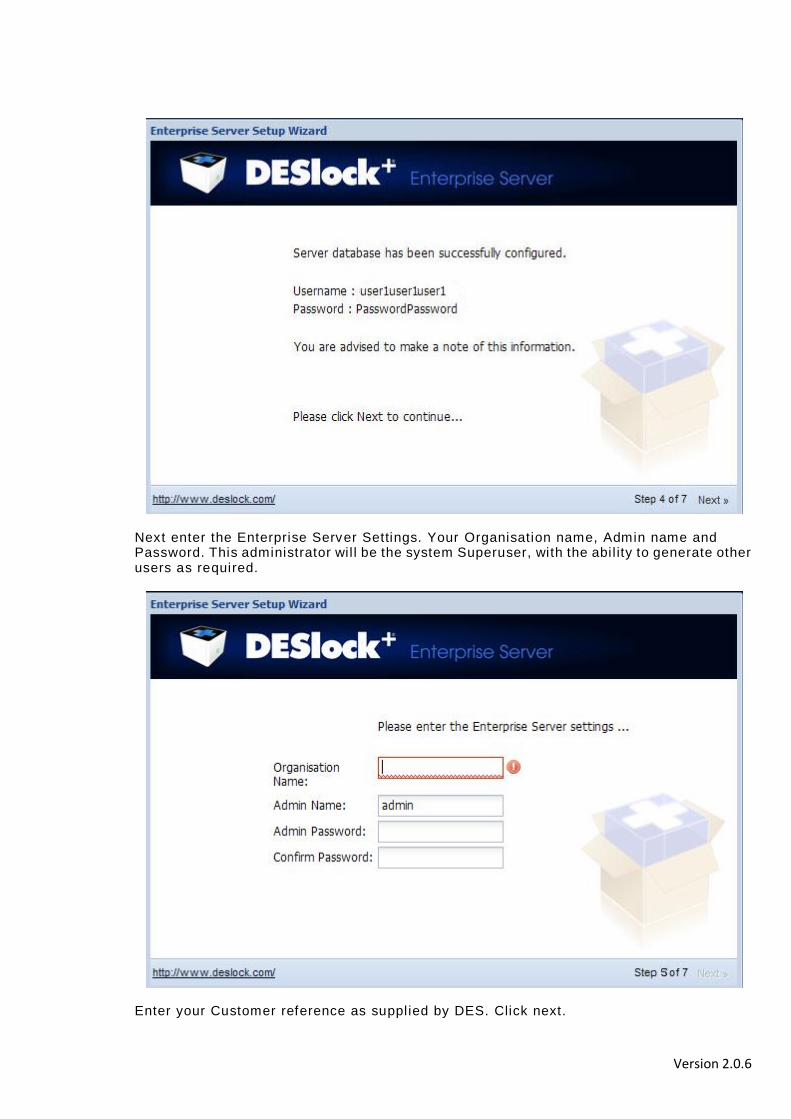
Once the Enterprise Server Database is conf igured you wil l see the window below, with the auto generated username and password shown. Make a note of these for future reference. These are in addition to the SQL access detai ls you should have noted in the previous step.
Version 2.0.6
Next enter the Enterprise Server Settings. Your Organisation name, Admin name and Password. This administrator wil l be the system Superuser, with the abil ity to generate other users as required.
Enter your Customer reference as supplied by DES. Click next.
Version 2.0.6
Setup is now completed, Click Finish.
The next window shown is the Login. Enter your defined username and password.
Version 2.0.6
Step by step installation
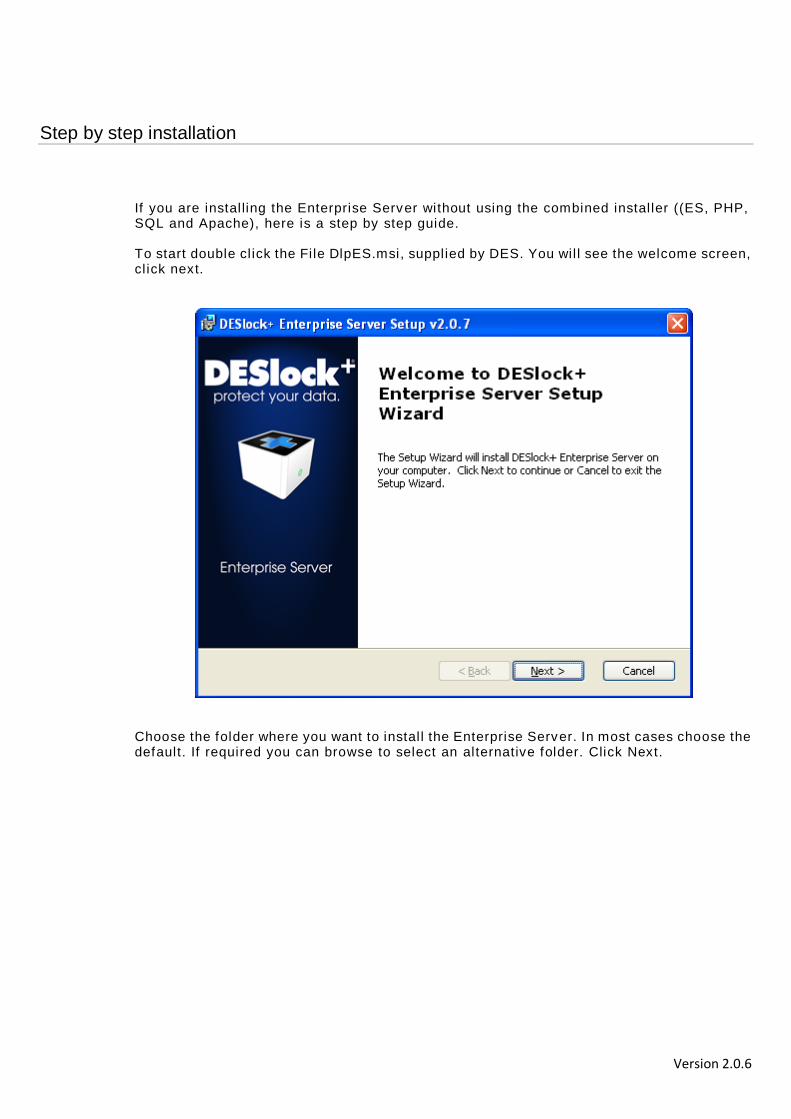
If you are instal ling the Enterprise Server without using the combined instal ler ((ES, PHP, SQL and Apache), here is a step by step guide. To start double cl ick the File DlpES.msi, supplied by DES. You wil l see the welcome screen, cl ick next.
Choose the folder where you want to instal l the Enterprise Server. In most cases choose the default. If required you can browse to select an alternative folder. Click Next.

Version 2.0.6
Select the Sub Folder name for the Web Server. This can be any legal folder name. Click next.
Once these choices have been made, click instal l . The Wizard wil l instal l the Enterprise Server as required.

Version 2.0.6
The Wizard wil l now complete the instal lation, and may require your computer to be restarted af ter the instal lation has completed. To access enter the address http://localhost/"yourfoldername" into your web browser. Use the name you specified in the previous window.
Version 2.0.6
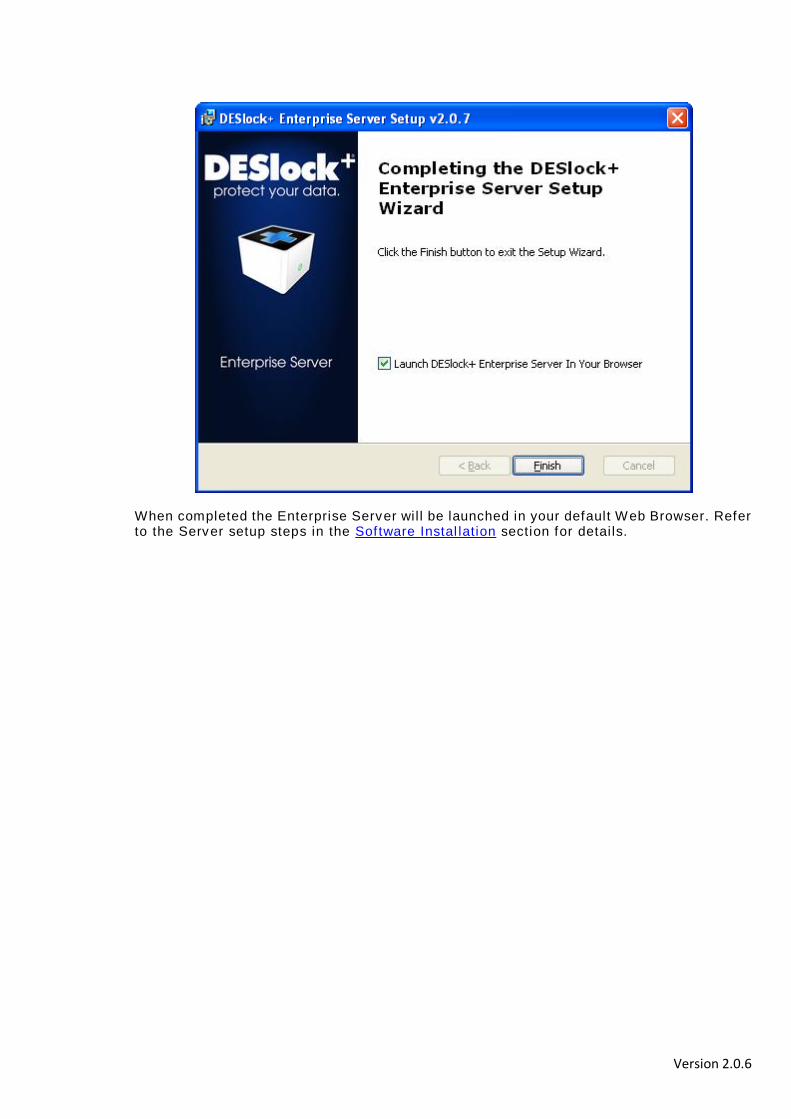
When completed the Enterprise Server wil l be launched in your default Web Browser. Refer to the Server setup steps in the Software Instal lation section for detai ls.

Version 2.0.6
Login
To start the DESlock+ Enterprise Server, you will need to Login. Navigate to the network location where your copy of the DESlock+ Enterprise Server has been instal led. Depending on your browser, you wil l see a screen similar to the one below. Enter your username and Password and cl ick Log in.
First Use.
Once you are logged into the Enterprise Server you wil l need to familiarise yourself with the interface, set up the Workstation and Group Policy’s, define the structure of your Organisation. This process is outl ined in the Instal lation and Conf iguration Outline section and in more detai l elsewhere in the manual.
Version 2.0.6
Main Control Bar and Control Panel
Main Control Bar
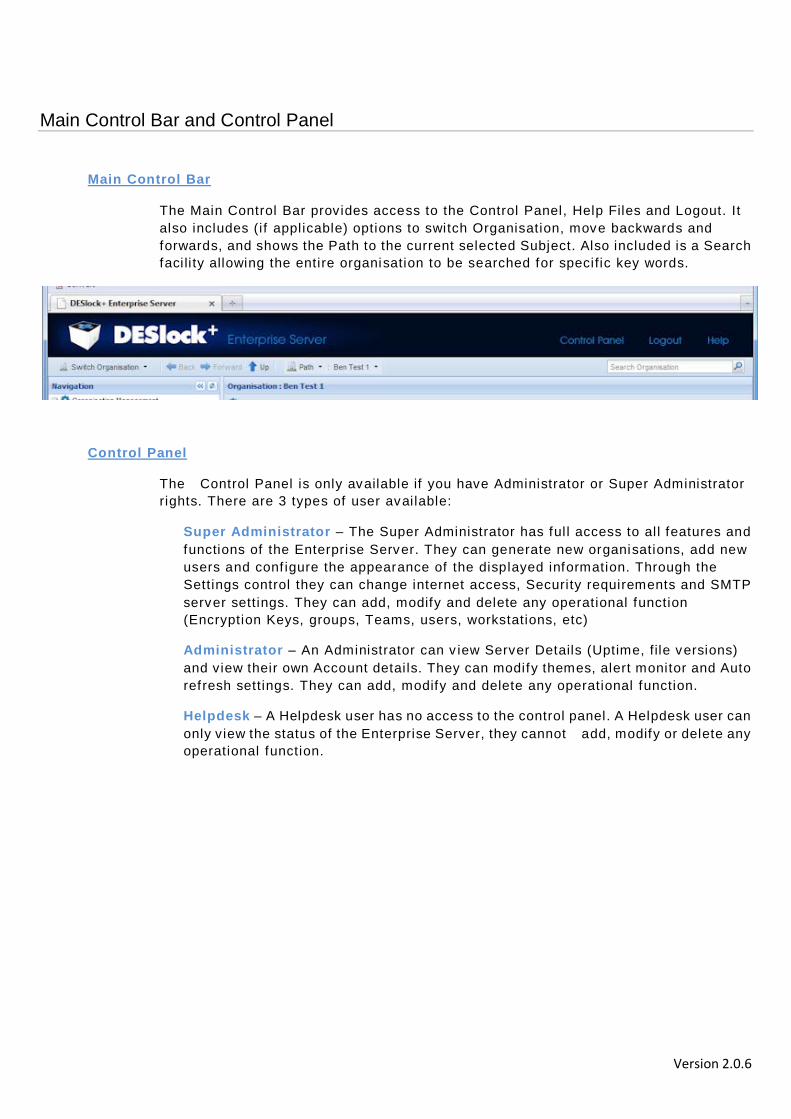
The Main Control Bar provides access to the Control Panel, Help Files and Logout. It also includes (i f applicable) options to switch Organisation, move backwards and forwards, and shows the Path to the current selected Subject. Also included is a Search faci li ty allowing the entire organisation to be searched for specific key words.
Control Panel
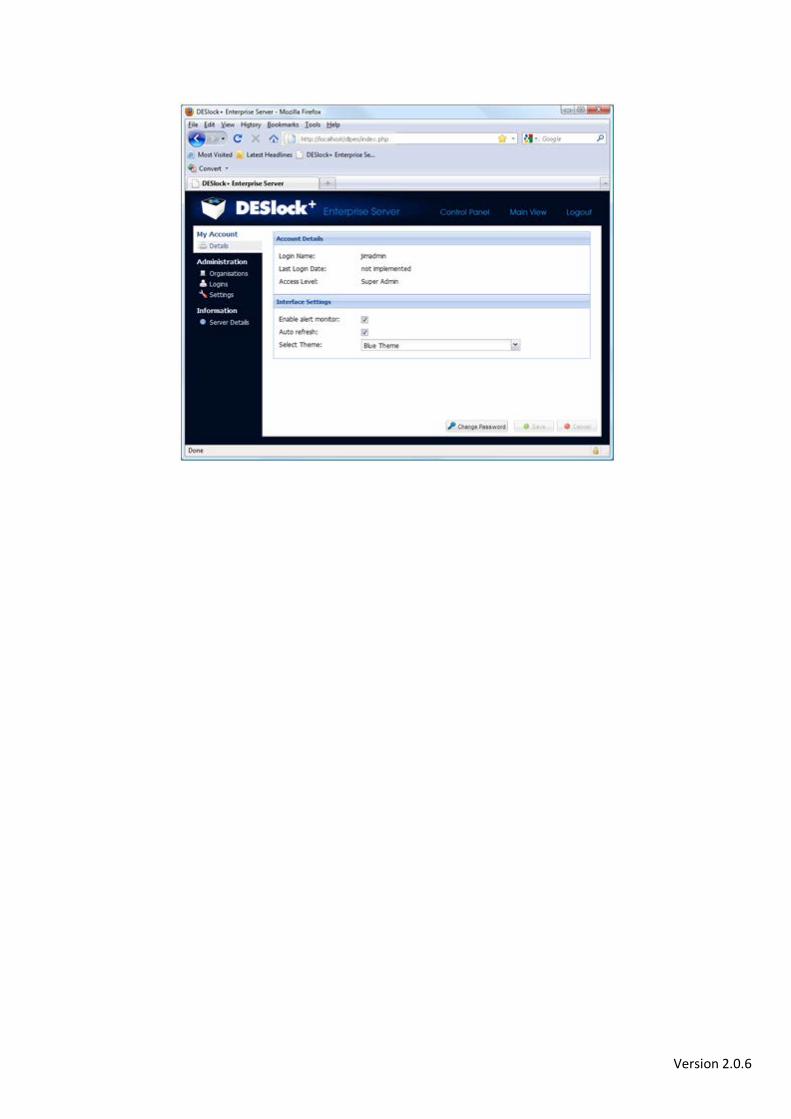
The Control Panel is only available if you have Administrator or Super Administrator rights. There are 3 types of user available:
Super Administrator – The Super Administrator has ful l access to al l features and functions of the Enterprise Server. They can generate new organisations, add new users and conf igure the appearance of the displayed information. Through the Settings control they can change internet access, Security requirements and SMTP server settings. They can add, modify and delete any operational function (Encryption Keys, groups, Teams, users, workstations, etc)
Administrator – An Administrator can v iew Server Details (Uptime, file versions) and view their own Account detai ls. They can modify themes, alert monitor and Auto refresh settings. They can add, modify and delete any operational function.
Helpdesk – A Helpdesk user has no access to the control panel. A Helpdesk user can only view the status of the Enterprise Server, they cannot add, modify or delete any operational function.
Version 2.0.6

Version 2.0.6
Control Panel Settings
Administration
In the Administration Section, a Super Administrator can create new Organisations, New users, and modify the Settings of the Enterprise Server.
Organisations
To generate a new Organisation, select Organisations (which wil l display a list of existing organisations in the right hand panel).
o Click add at the bottom of the panel.
o Enter the new organisation name in the Add Organisation window.
o Click Create.
Logins
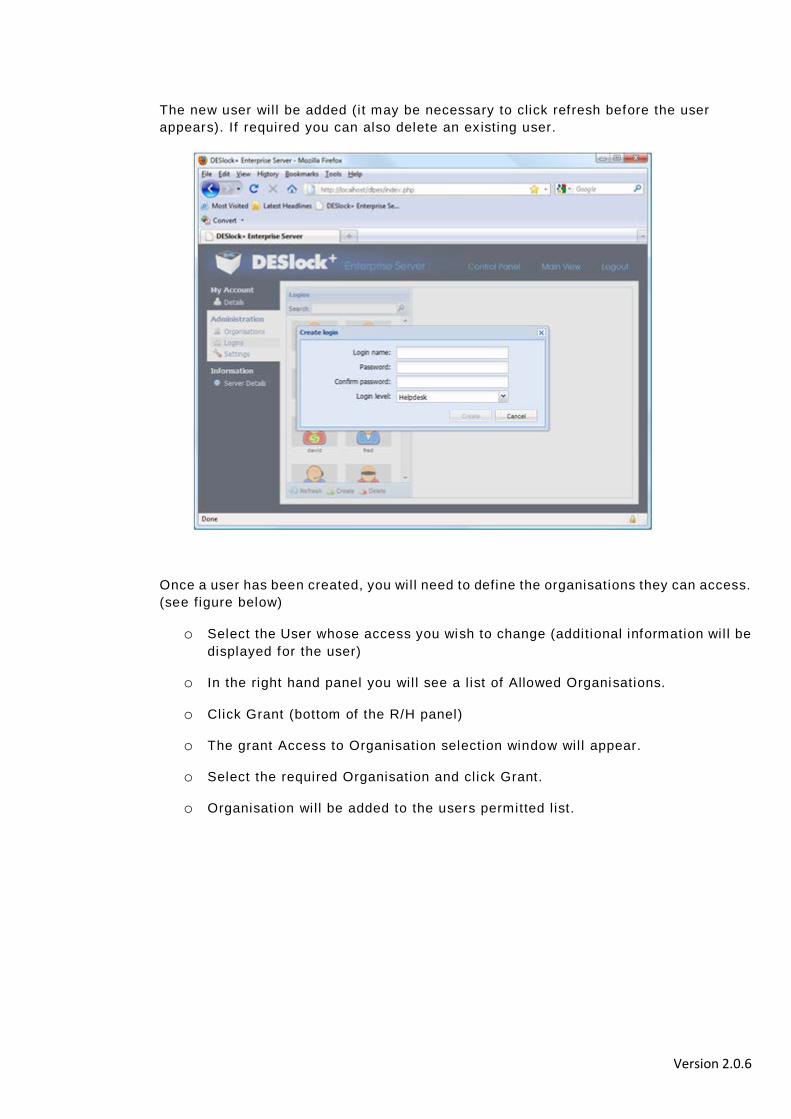
To add a new User (Super Admin, Admin or Helpdesk), select Logins;
o Click Create.
o Prov ide the Login Name, Password, Password conf irmation and the login level.
o Click Create.
Version 2.0.6
The new user wil l be added (i t may be necessary to click refresh before the user appears). If required you can also delete an existing user.
Once a user has been created, you wil l need to define the organisations they can access. (see figure below)
o Select the User whose access you wish to change (additional information wil l be displayed for the user)
o In the right hand panel you wil l see a l ist of Allowed Organisations.
o Click Grant (bottom of the R/H panel)
o The grant Access to Organisation selection window wil l appear.
o Select the required Organisation and cl ick Grant.
o Organisation wil l be added to the users permitted l ist.
Version 2.0.6
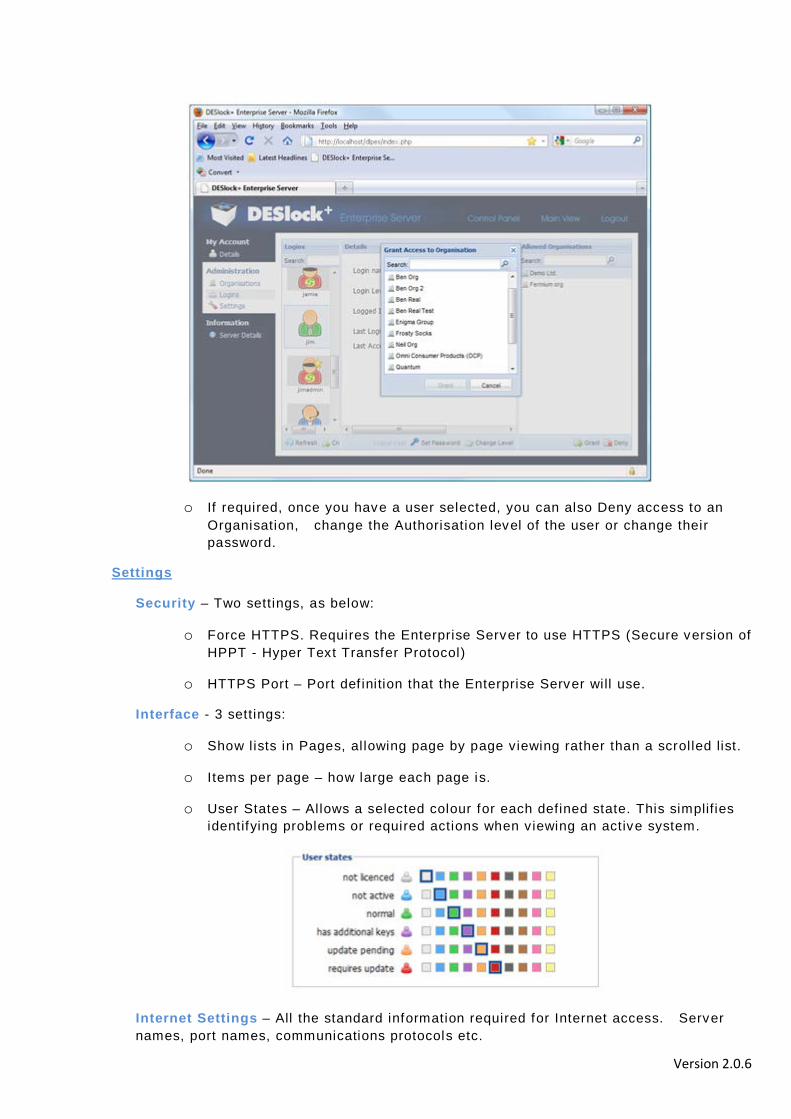
o If required, once you have a user selected, you can also Deny access to an Organisation, change the Authorisation level of the user or change their password.
Settings
Security – Two settings, as below:
o Force HTTPS. Requires the Enterprise Server to use HTTPS (Secure version of HPPT - Hyper Text Transfer Protocol)
o HTTPS Port – Port def inition that the Enterprise Server will use.
Interface - 3 settings:
o Show l ists in Pages, al lowing page by page viewing rather than a scrol led list.
o Items per page – how large each page is.
o User States – Allows a selected colour for each defined state. This simplif ies identifying problems or required actions when viewing an active system.
Internet Settings – All the standard information required for Internet access. Server names, port names, communications protocols etc.

Version 2.0.6
SMTP Server – Specification page for SMTP server access, providing the Enterprise Server with mail faci li ties.

Version 2.0.6
Policy Settings
There are two Policy Settings that are required for the operation for the DESlock+ Enterprise Server, Workstation Policy and Group Policy. Workstation policy controls how the Enterprise Server, user and workstation can interact with regard to the DESlock+ encryption and interfaces with external Data sources, basical ly the physical environment of the workstation. Group Policy mainly controls how DESlock+ functions and appears for the user, which menus and controls they have access to, the sof tware environment.
Workstation Policy - Workstation Policy is defined by selecting Organisation Management in the Navigation Panel. Then select Workstation Policy Tab in the Subject Detai l Menu Bar. Then select the Policy you wish to view or amend, then click Veiw/Change settings. Workstation Policy controls how the Enterprise Server, user and workstation can interact with regard to the DESlock+ features and how the user can interface with external Data sources. For example, the network path to the Enterprise Server is defined here, display message text is defined, permitted length of time for “out of contact with Server” periods, and external media permissions. For Full details of al l the settings and their use see DLP Conf iguration Document.PDF.
Group Policy - Group Policy is def ined by selecting the Organisation name (Demo Ltd in the example) in the Navigation panel, then the Group Policy in the Subject Detai l Menu. Group Policy mainly controls how DESlock+ functions and appears for the user, which Controls and Menus they have access to. For ful l details of all the Policy settings in Group Policy, see the Document DLP Conf iguration Document.PDF

Version 2.0.6
Workstation Policy definition
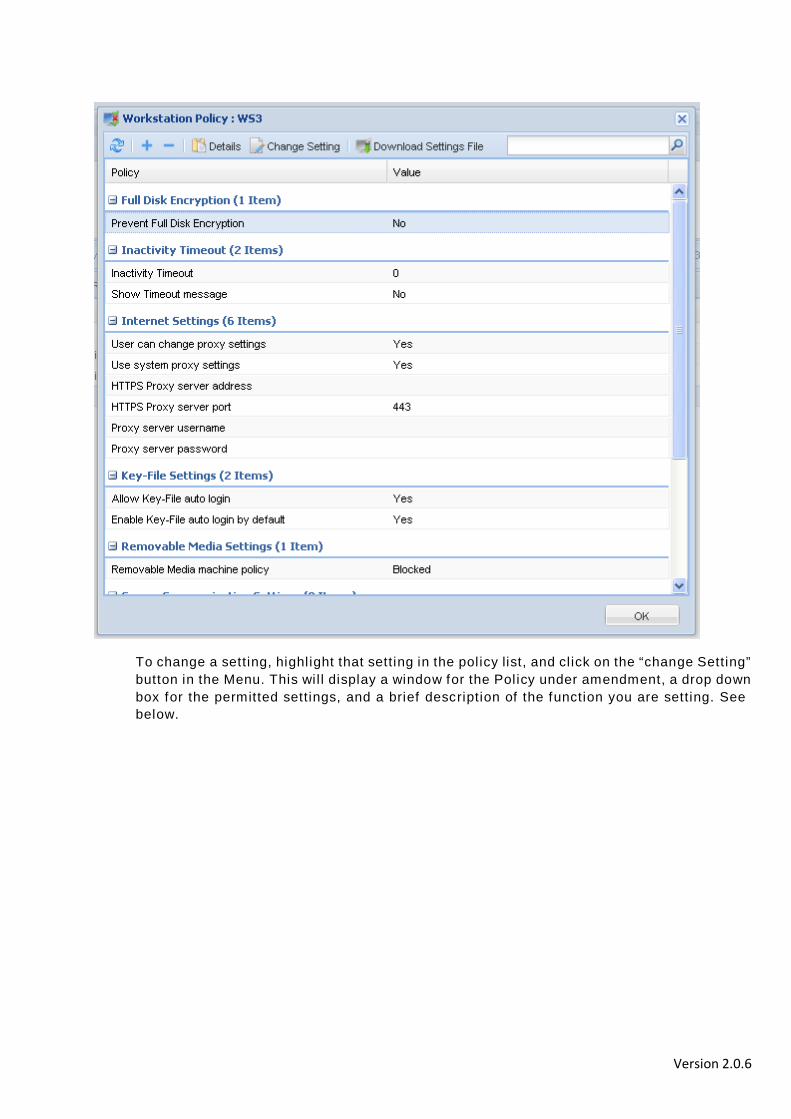
To define the Workstation policy, select the Organisation Manager f rom the Navigation panel, then select the Workstation Policy Tab in the Subject Detai l Panel. Select the default pol icy if you require to alter the default settings, or create a new policy file and amend that. To create a new fi le Click "Add" and give the name of the new Policy.
The new policy f ile wil l be created. To change any policy settings select the f i le to be altered and cl ick the “View/Change Settings” button, and the policy window wil l open, with a brief description of all the policies and settings wil l be shown. To show more detai l click the "detai ls" button.
Version 2.0.6
To change a setting, highl ight that setting in the policy list, and cl ick on the “change Setting” button in the Menu. This wil l display a window for the Policy under amendment, a drop down box for the permitted settings, and a brief description of the function you are setting. See below.

Version 2.0.6
If a new setting is to be used on an existing workstation, the policy f ile has to be downloaded and applied by an admin user on the workstation.
Group Policy definition
To def ine the Group policy, select the Organisat ion Name (Demo Ltd in the example) in the Nav igation Panel, then select the Group Policy Tab in the Subject Detai l Panel as previously shown.
If you then click the “details” button, a brief description of al l the settings wil l be shown against each Policy.
To change a setting, highlight that setting in the policy l ist, and cl ick on the “Change Setting”

Version 2.0.6
button in the Menu Bar. This wil l display a window for the Policy under amendment, a drop down box for the permitted settings, and the same brief description of the function of the setting. See below. Select the response you want, or def ine the text required, and cl ick ok to save the new setting.
Version 2.0.6
Vouchers and Licences
Vouchers
DES sell business l icences on what we call Vouchers, so you may buy a voucher for 100 l icences, then issue them as required to your users. Vouchers are purchased f rom the DESlock+ website.
• Go to www.deslock.com
• Log into your account (your email address and Site password) or register as a new user.
• Purchase the required number of l icences – Quantit ies more than one wil l be issued as vouchers.
• The DESlock+ l icensing Server will send an Email to the registered users email address with the Voucher detai ls, which includes a Voucher code and a Security Code.
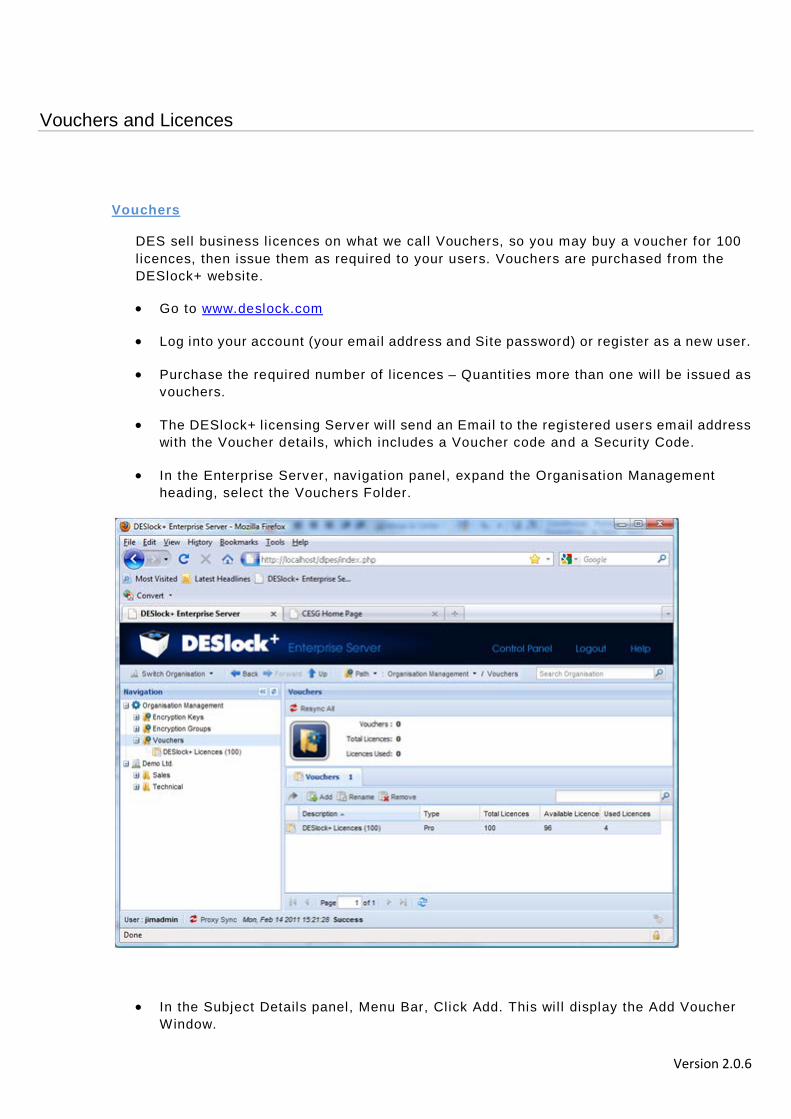
• In the Enterprise Server, navigation panel, expand the Organisation Management heading, select the Vouchers Folder.
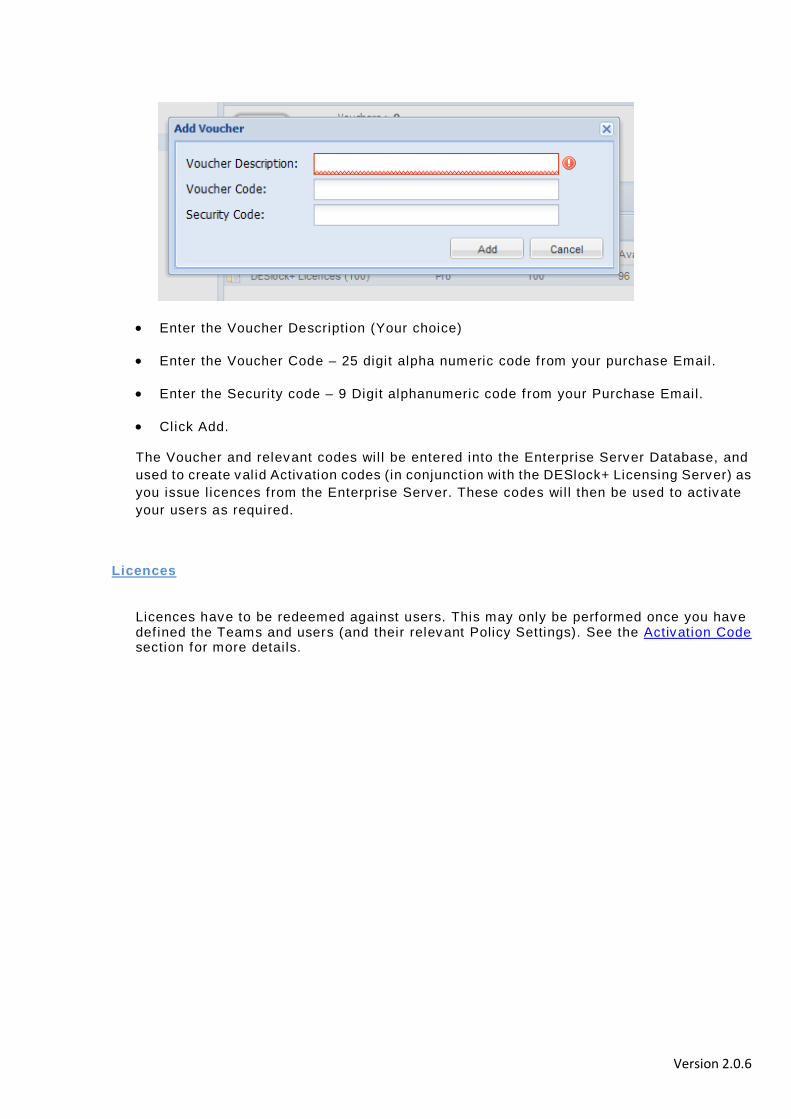
• In the Subject Details panel, Menu Bar, Click Add. This wil l display the Add Voucher Window.
Version 2.0.6
• Enter the Voucher Description (Your choice)
• Enter the Voucher Code – 25 digit alpha numeric code f rom your purchase Email.
• Enter the Security code – 9 Digit alphanumeric code f rom your Purchase Email.
• Click Add.
The Voucher and relevant codes wil l be entered into the Enterprise Server Database, and used to create val id Activation codes (in conjunction with the DESlock+ Licensing Server) as you issue l icences f rom the Enterprise Server. These codes wil l then be used to activate your users as required.
Licences
Licences have to be redeemed against users. This may only be performed once you have def ined the Teams and users (and their relevant Policy Settings). See the Activation Code section for more detai ls.
Version 2.0.6
Encryption Groups and Keys
Encryption Groups and Keys can be created in either order, groups then keys, or keys f irst. In this example we are creating Encryption Keys f irst.
Encryption Keys
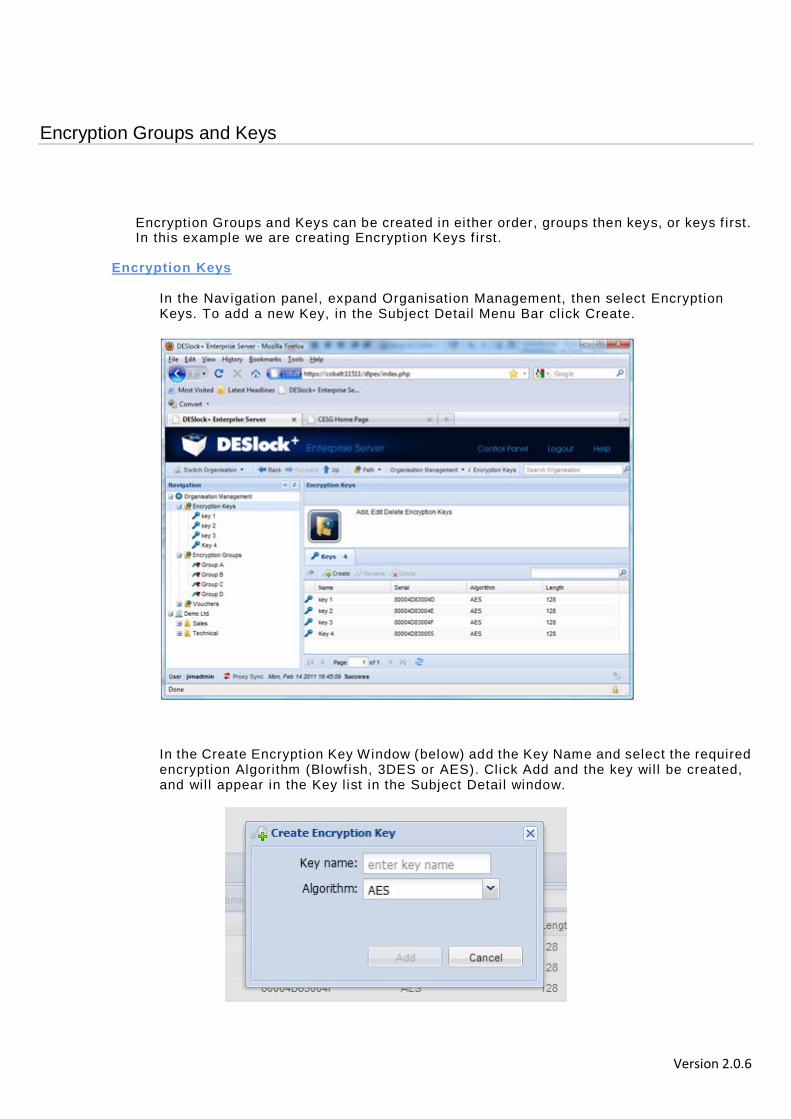
In the Nav igation panel, expand Organisation Management, then select Encryption Keys. To add a new Key, in the Subject Detai l Menu Bar cl ick Create.
In the Create Encryption Key Window (below) add the Key Name and select the required encryption Algorithm (Blowf ish, 3DES or AES). Click Add and the key wil l be created, and wil l appear in the Key l ist in the Subject Detai l window.

Version 2.0.6
Encryption Groups
To Add an Encryption Group, select Organisation Management in the Nav igate panel, expand it then select Encryption Groups. To add a group, cl ick create in the Subject Detai l Menu Bar.
Then, in the Create Encryption Key Group window (below), add the name of the new group and cl ick Add. The new group wil l then appear in the Encryption Group folder in the Nav igation panel.
Add Encryption Keys to the Group.
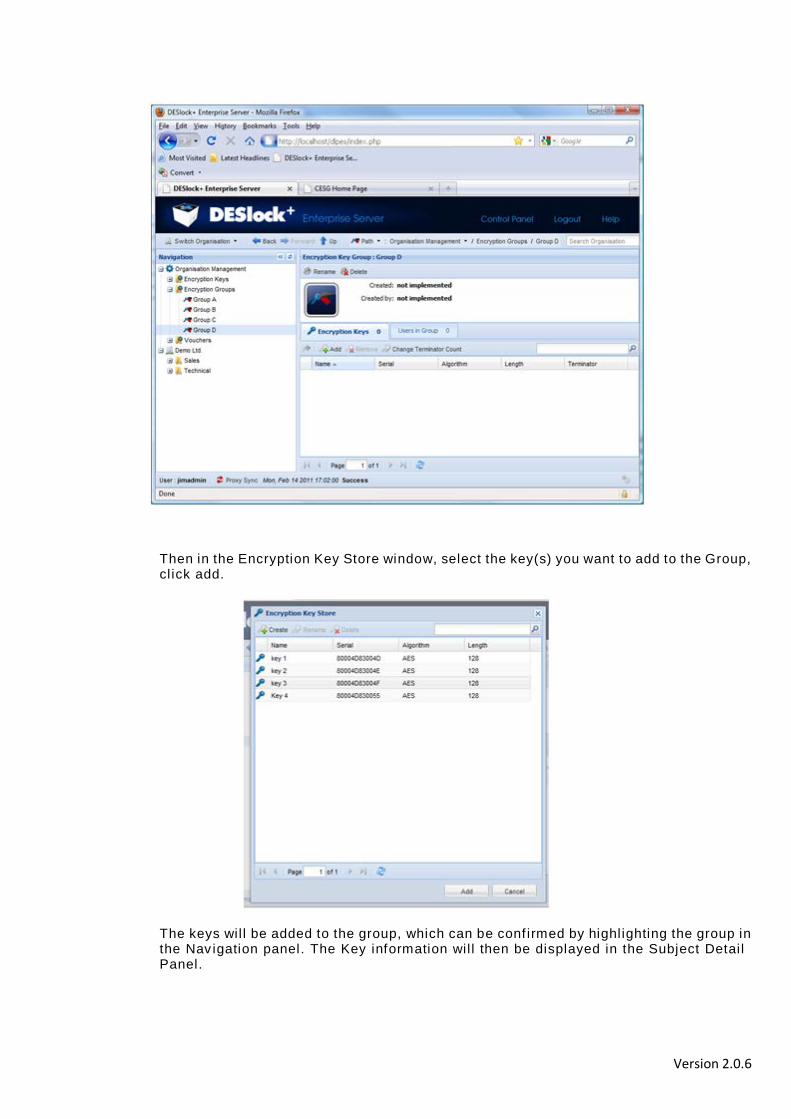
You may then add the required keys to the Group. Select the Group in the nav igation Panel (Organisation Management/Encryption Group/Group name). Click Add in the Subject Detai l Menu Bar.
Version 2.0.6
Then in the Encryption Key Store window, select the key(s) you want to add to the Group, cl ick add.
The keys wil l be added to the group, which can be conf irmed by highl ighting the group in the Nav igation panel. The Key information wil l then be displayed in the Subject Detai l Panel.

Version 2.0.6
Encryption Key import Encryption keys may be imported into the Enterprise Server from external Key Files. For example, if an organisation already has DESlock Encryption keys in use within their security system, it will be logical to use the Enterprise Server to control and distribute these existing keys more effectively. This can only be done if the keys are first imported into the Enterprise Server.
To do this the Enterprise Server and the Encryption Key holder have to be able to exchange data securely. This is necessary so that the Key holders key can only be used by the Enterprise Server - if the exchange is intercepted/lost or stolen the key contained in the file will be unobtainable (encrypted) and of no use to them. Key transfers are secured by RSA encryption.
The process is as follows, in simple terms:
• Admin requests the key from the Key Holder, by generating a special request file (with a
keyfile extension of .DLR) • The Key Holder then issues the key to Admin, using the Request file (.DLR) to encrypt the key.
This results in the generation of an update file (.DLU) • The Key Holder sends this update file to Admin. • Admin updates their Key-File with the update, which adds the key just received from the Key
Holder.
For the Enterprise Server the process is as follows:
1. In the Navigation window, select Encryption Keys, then click Download Request File.
2. The file will be saved where specified (depending on your browser) with the name KeyRequest.dlr.
3. Send this file to the holder of the key you require (by Email, or over your network).
4. The Holder of the required key will right click on their DESlock+ icon in their system tray and
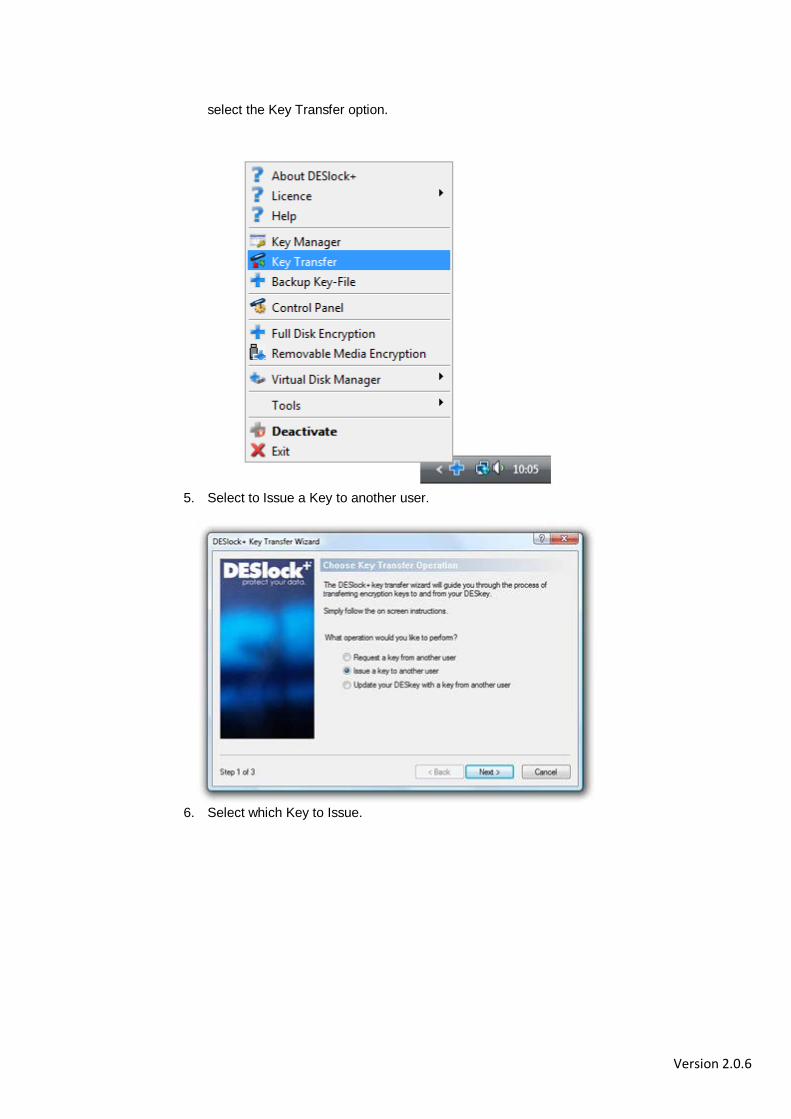
Version 2.0.6
select the Key Transfer option.
5. Select to Issue a Key to another user.
6. Select which Key to Issue.

Version 2.0.6
7. Specify the Terminator code for the key being issued. This must not be set at 0, as this will
prevent the key being used by the Enterprise Server. A value of 1 will allow the key to be distributed within the Enterprise Server but not issued by any of the Enterprise Servers clients. A value of 2 or more will allow the key to be onward issued by the Enterprise Servers clients, assuming the transfer of Keys is permitted by their Policy settings.
8. Specify the location of the Update file, and complete the process.

Version 2.0.6
9. The Issue file (DLU) is then sent to the Enterprise Server by Email/file transfer.
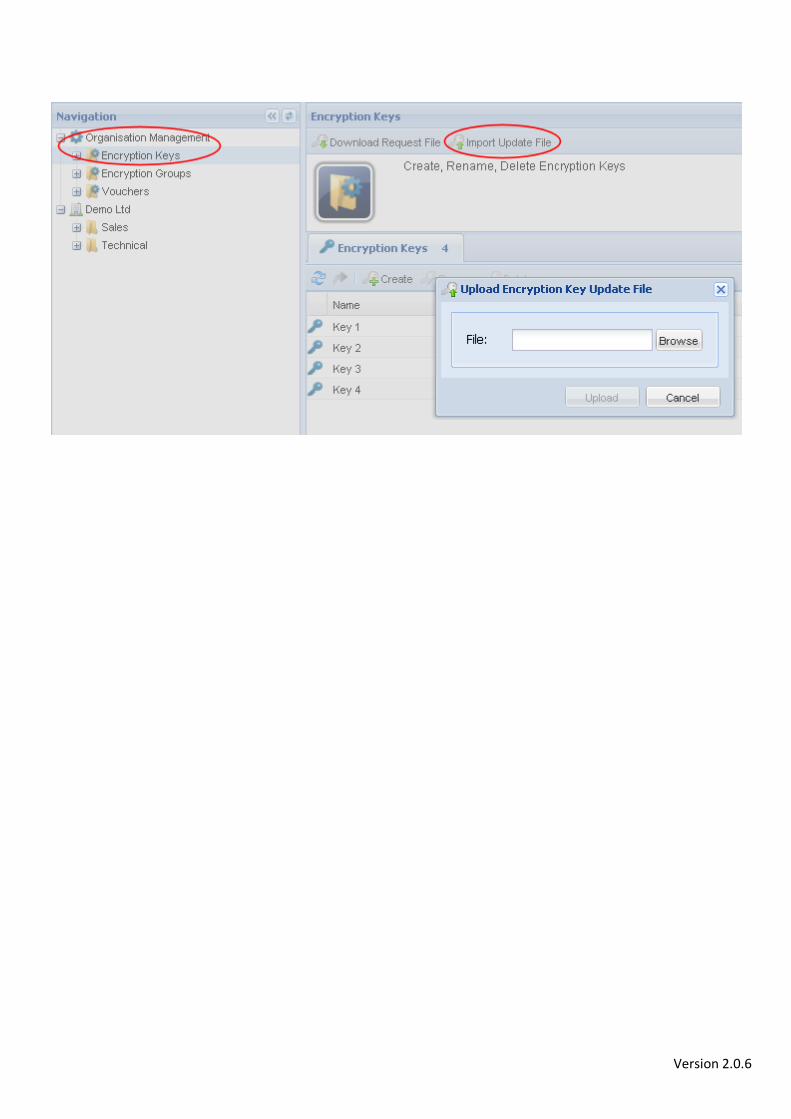
10. In the Enterprise Server, import the file by selecting Organisation Management, Encryption
Keys in the Navigation panel, then clicking Import Update file. Specify or browse to the location of the Update file (.DLU) and click upload. The Key transferred will be added to the Encryption Keys database.
Version 2.0.6
Version 2.0.6
Teams
Teams are used to al low a logical representation of the organisation to be def ined, which wil l simplify the al location of policies and keys. The Policy of each team generated is based upon the Policy of the preceding level.
Teams wil l of ten represent the physical function of the team members, or their location, or a combination. The purpose of the term is to provide an additional method of allocating and control l ing encryption keys, and hence access to data.
To define a Team.
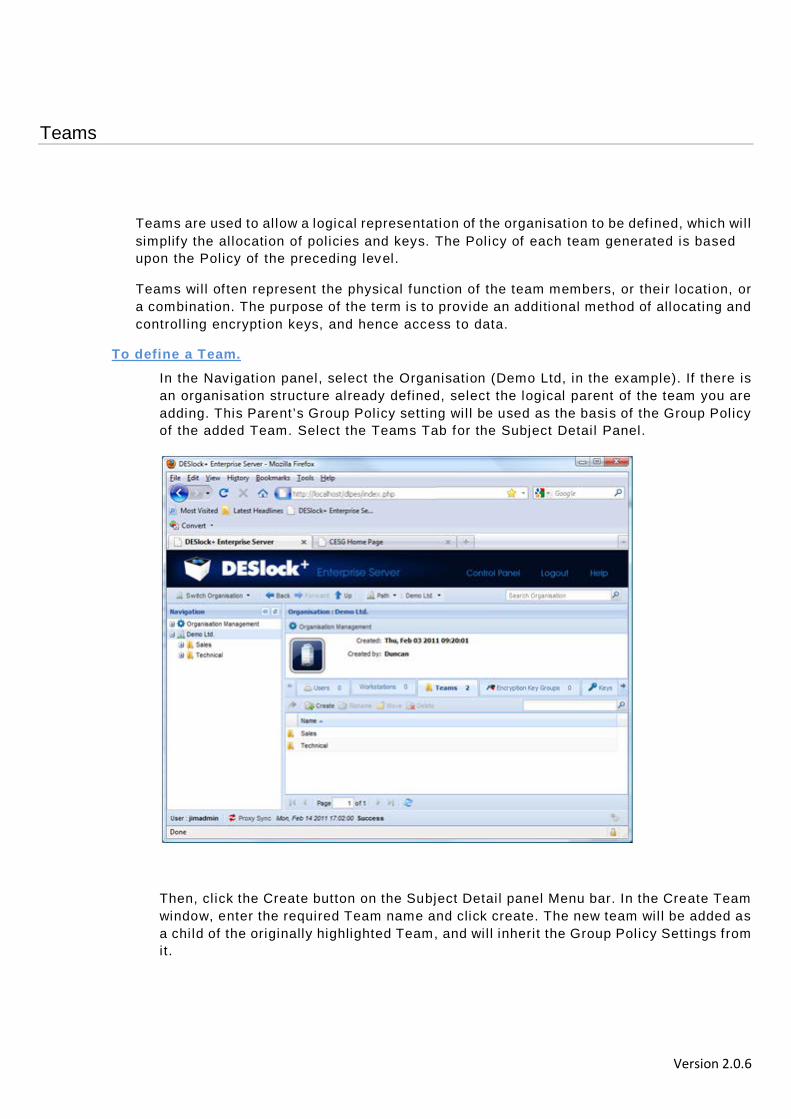
In the Navigation panel, select the Organisation (Demo Ltd, in the example). If there is an organisation structure already defined, select the logical parent of the team you are adding. This Parent’s Group Policy setting wil l be used as the basis of the Group Policy of the added Team. Select the Teams Tab for the Subject Detai l Panel.
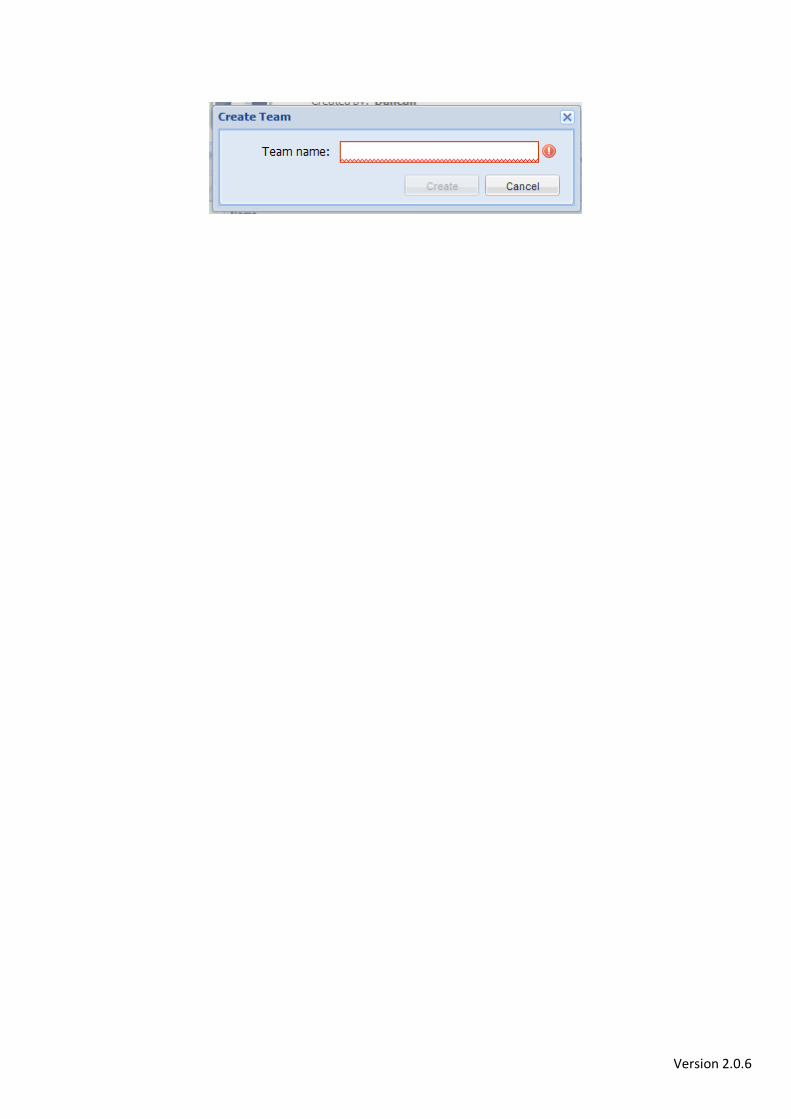
Then, cl ick the Create button on the Subject Detai l panel Menu bar. In the Create Team window, enter the required Team name and click create. The new team wil l be added as a child of the originally highlighted Team, and wil l inherit the Group Policy Settings f rom it.
Version 2.0.6
Version 2.0.6
Group Policy
If required you can then amend the Group Policy for that Team, fol lowing the same steps as noted before (See Policy Settings), but making sure you have the correct team selected in the Nav igation Panel. This wil l allow you to have different Policy settings for different groups, i f required. It is important to set the policy before you create or l icense any team users, as the Policy settings are distributed as part of the licensing package sent to the user.
You also need to be aware that any changes to the policy settings af ter the user has been activated wil l only be implemented if you refresh the user with the changed Policy detai ls. The Users status wil l change f rom "normal" (Green) to "Requires Update" (Red)
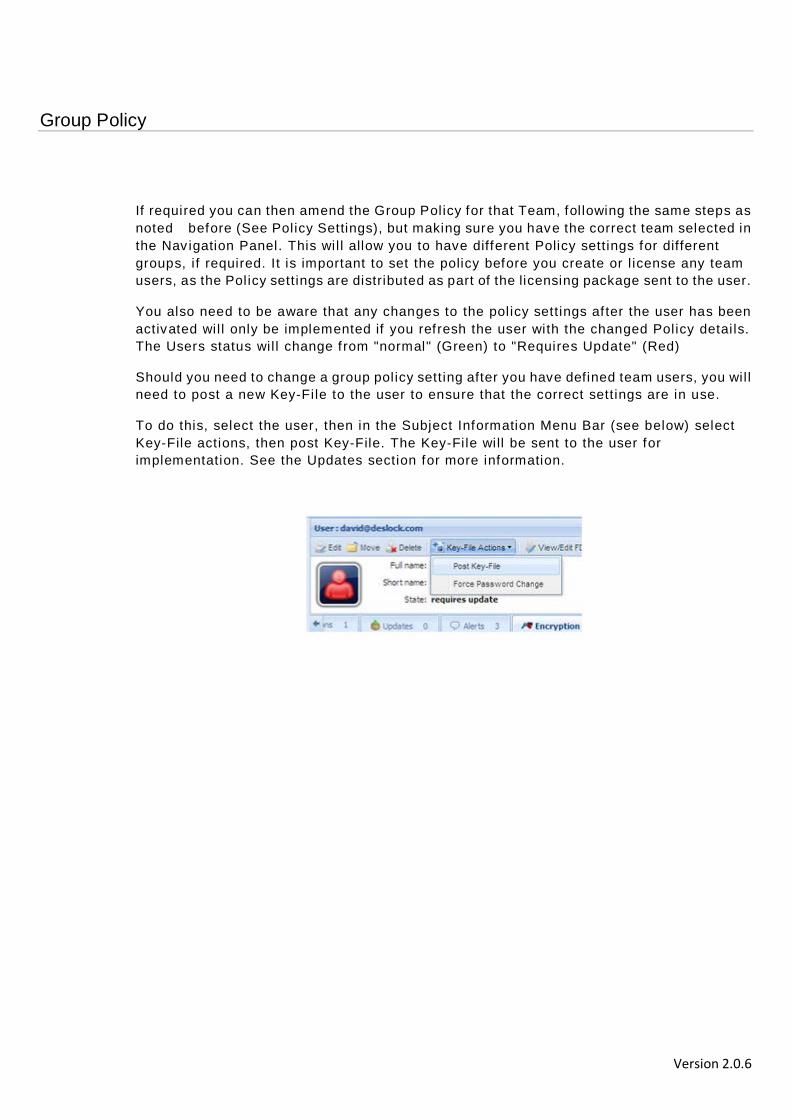
Should you need to change a group policy setting after you have defined team users, you wil l need to post a new Key-File to the user to ensure that the correct settings are in use.
To do this, select the user, then in the Subject Information Menu Bar (see below) select Key-File actions, then post Key-File. The Key-File will be sent to the user for implementation. See the Updates section for more information.
Version 2.0.6
Team Users
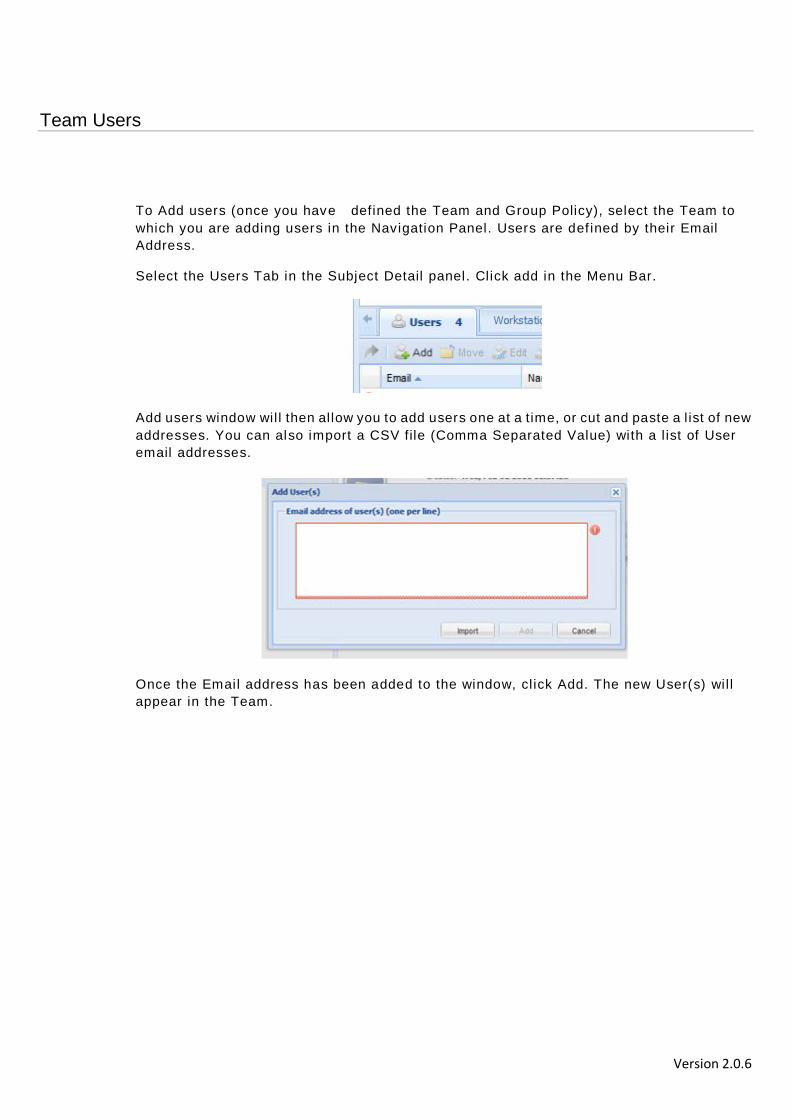
To Add users (once you have defined the Team and Group Policy), select the Team to which you are adding users in the Navigation Panel. Users are def ined by their Email Address.
Select the Users Tab in the Subject Detail panel. Click add in the Menu Bar.
Add users window wil l then al low you to add users one at a time, or cut and paste a l ist of new addresses. You can also import a CSV file (Comma Separated Value) with a l ist of User email addresses.
Once the Email address has been added to the window, cl ick Add. The new User(s) wil l appear in the Team.
Version 2.0.6
Moving Users
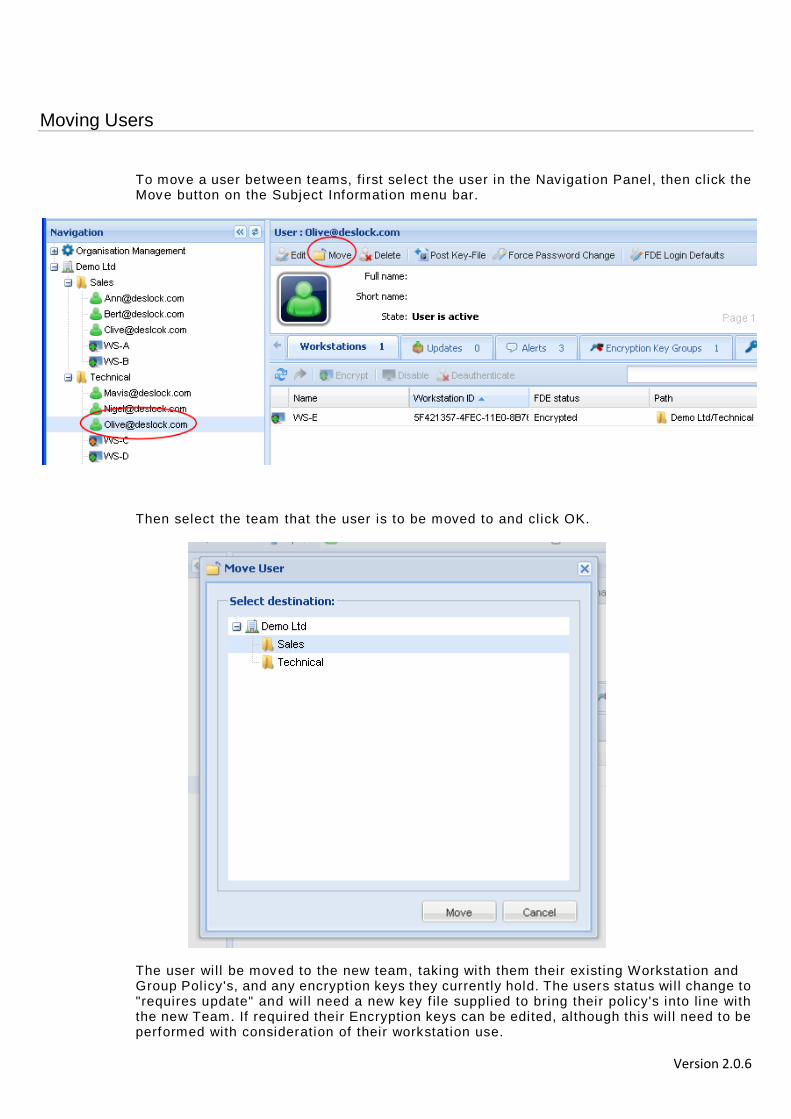
To move a user between teams, first select the user in the Navigation Panel, then cl ick the Move button on the Subject Information menu bar.
Then select the team that the user is to be moved to and cl ick OK.
The user wil l be moved to the new team, taking with them their existing Workstation and Group Policy's, and any encryption keys they currently hold. The users status wil l change to "requires update" and wil l need a new key f ile supplied to bring their policy's into line with the new Team. If required their Encryption keys can be edited, although this wil l need to be performed with consideration of their workstation use.

Version 2.0.6
For example, if keys are planned to be removed to bring them in line with their new team, this may leave existing data on their workstation (protected by those keys) unavailable to them. If they will be changing to a new workstation this wil l not cause any problems.
Version 2.0.6
User Specific Encryption Groups
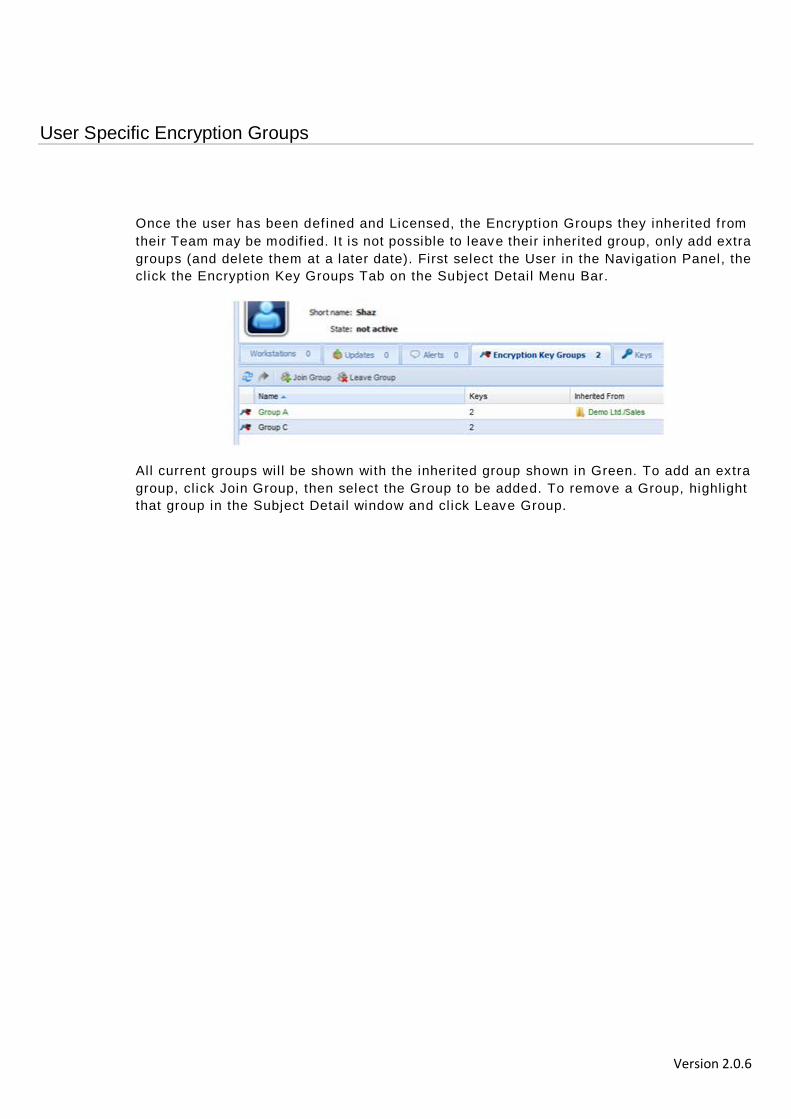
Once the user has been def ined and Licensed, the Encryption Groups they inherited f rom their Team may be modified. It is not possible to leave their inherited group, only add extra groups (and delete them at a later date). First select the User in the Navigation Panel, the cl ick the Encryption Key Groups Tab on the Subject Detai l Menu Bar.
Al l current groups wil l be shown with the inherited group shown in Green. To add an extra group, cl ick Join Group, then select the Group to be added. To remove a Group, highlight that group in the Subject Detai l window and cl ick Leave Group.
Version 2.0.6
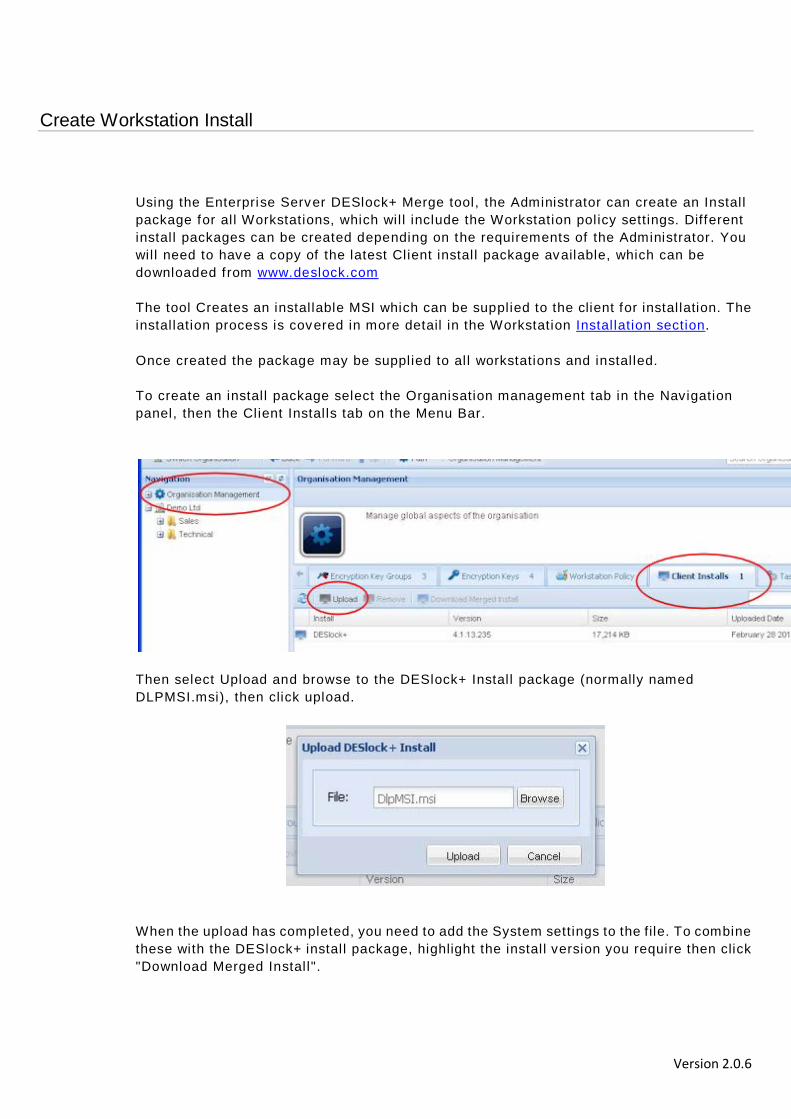
Create Workstation Install Using the Enterprise Server DESlock+ Merge tool, the Administrator can create an Instal l package for al l Workstations, which wil l include the Workstation policy settings. Different instal l packages can be created depending on the requirements of the Administrator. You wil l need to have a copy of the latest Client instal l package available, which can be downloaded f rom www.deslock.com The tool Creates an instal lable MSI which can be supplied to the client for instal lation. The instal lation process is covered in more detail in the Workstation Instal lation section. Once created the package may be supplied to al l workstations and instal led. To create an instal l package select the Organisation management tab in the Navigation panel, then the Client Instal ls tab on the Menu Bar.
Then select Upload and browse to the DESlock+ Instal l package (normally named DLPMSI.msi), then click upload.
When the upload has completed, you need to add the System settings to the file. To combine these with the DESlock+ instal l package, highlight the instal l version you require then click "Download Merged Instal l".

Version 2.0.6
You wil l then have to select the Workstation policy you require for this instal l.
And then you may change the instal l package name if desired. Once completed, click "download". The instal l package wil l be created including all the defined Workstation Policy Settings.
Depending on your Browser, you may then specify the location to save the f ile (if given the

Version 2.0.6
option, do not select to run it! ) Some Browsers wil l automatical ly save the f ile to their own downloads area, so to use the f i le you will have to Navigate to that folder.
Once saved, supply this file to the cl ient workstation for instal lation. See Workstation instal lation for more details. Note, During the instal lation, the Client Computer wil l report back their Computer Name, (My computer, properties, computer name), which is then displayed in the Navigation Panel. If you are using imaged workstations, they may all report the same name, although there wil l be a unique workstation ID displayed in the Subject Information Panel. If you need the workstations to be easily identif iable, the Computer name must be changed before the workstation instal lation is started.
Version 2.0.6
Workstation Installation
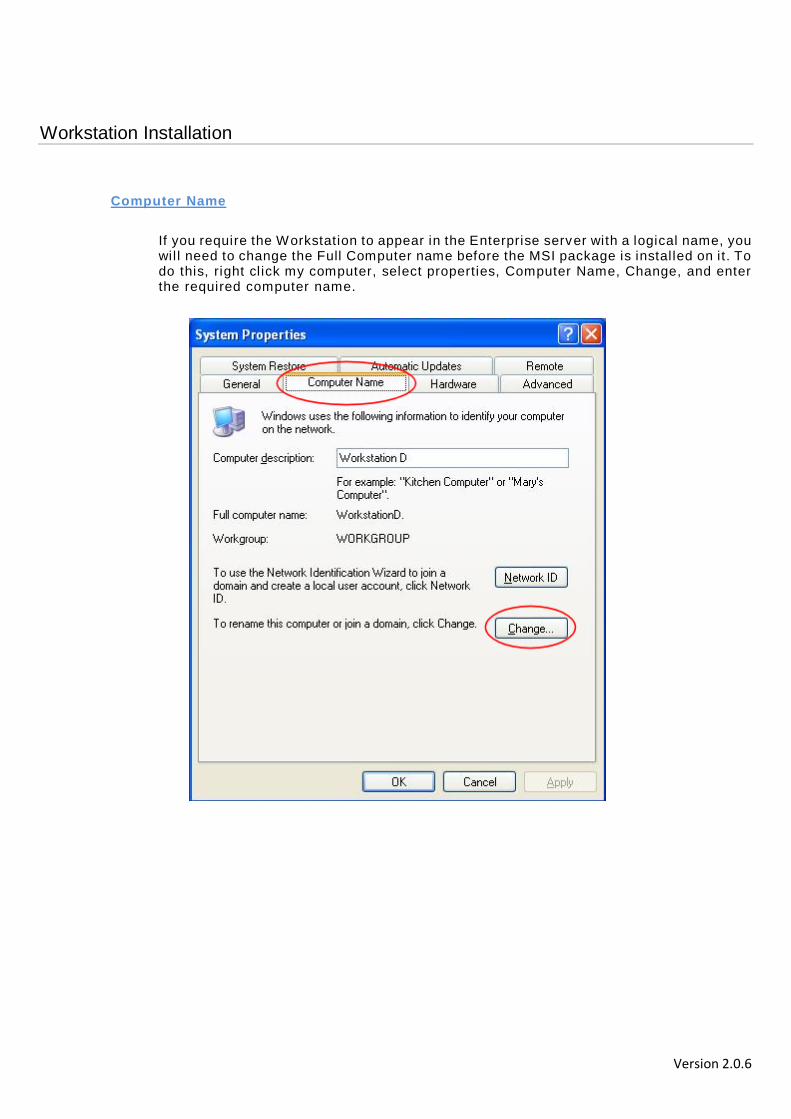
Computer Name
If you require the Workstation to appear in the Enterprise server with a logical name, you wil l need to change the Full Computer name before the MSI package is instal led on it. To do this, right cl ick my computer, select properties, Computer Name, Change, and enter the required computer name.

Version 2.0.6
Workstation Install
Important Note. To instal l sof tware you wil l require administration priv ileges, but make sure that activation is performed by the intended user. Af ter instal lation, each account holder on the workstation wil l be prompted to Activate when they log in. Each wil l require a separate DESlock+ activation code.
1. Locate the Instal l package and double cl ick to run the instal l .
2. Once the f ile opens (Click run in a window, or double cl icked the file i tself ), this then starts the DESlock+ instal lation. Click next.
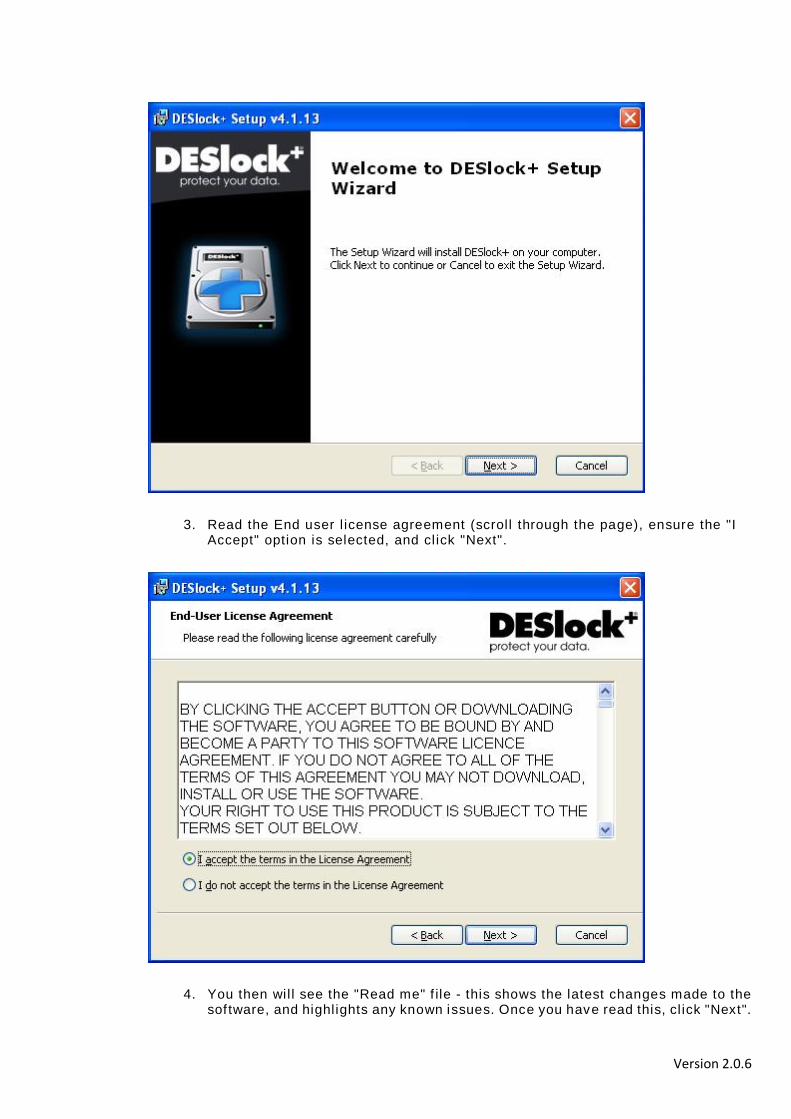
Version 2.0.6
3. Read the End user l icense agreement (scrol l through the page), ensure the "I Accept" option is selected, and cl ick "Next".
4. You then wil l see the "Read me" f ile - this shows the latest changes made to the sof tware, and highlights any known issues. Once you have read this, cl ick "Next".
Version 2.0.6
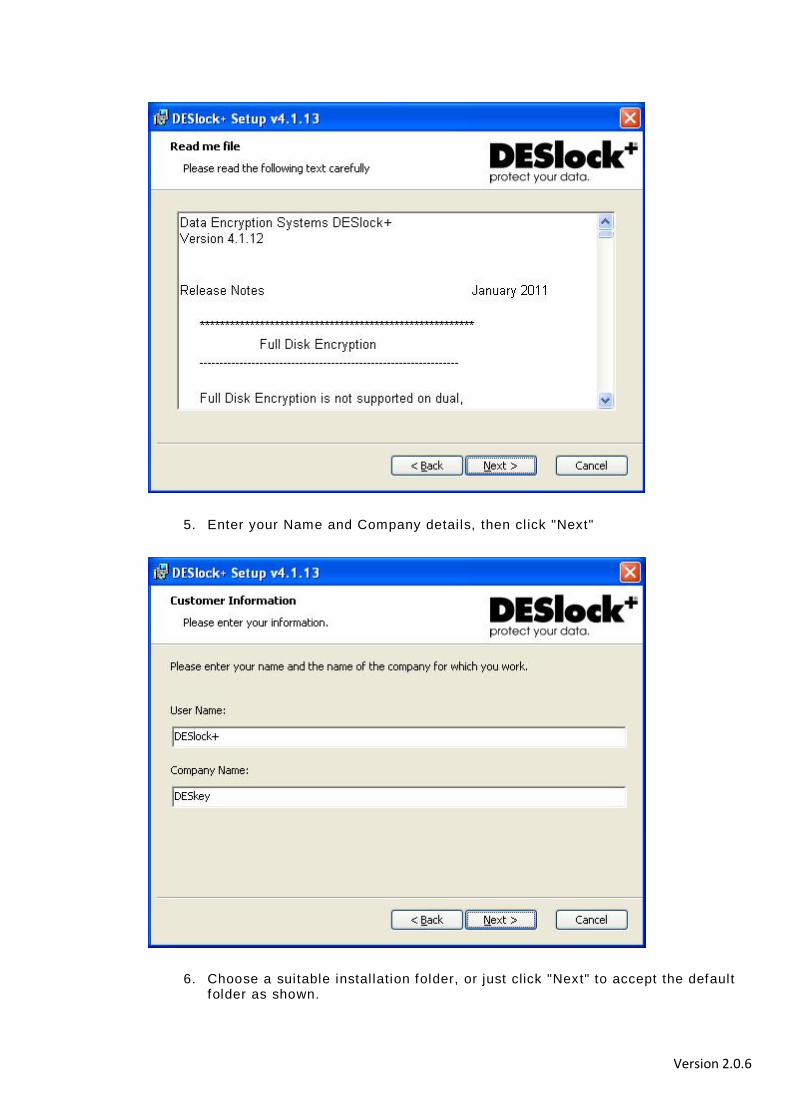
5. Enter your Name and Company detai ls, then cl ick "Next"
6. Choose a suitable instal lation folder, or just click "Next" to accept the default folder as shown.

Version 2.0.6
7. Click "Instal l" to instal l the sof tware, or back to change any of the settings selected in the previous few windows.
8. The DESlock+ software wil l then be instal led.
Version 2.0.6
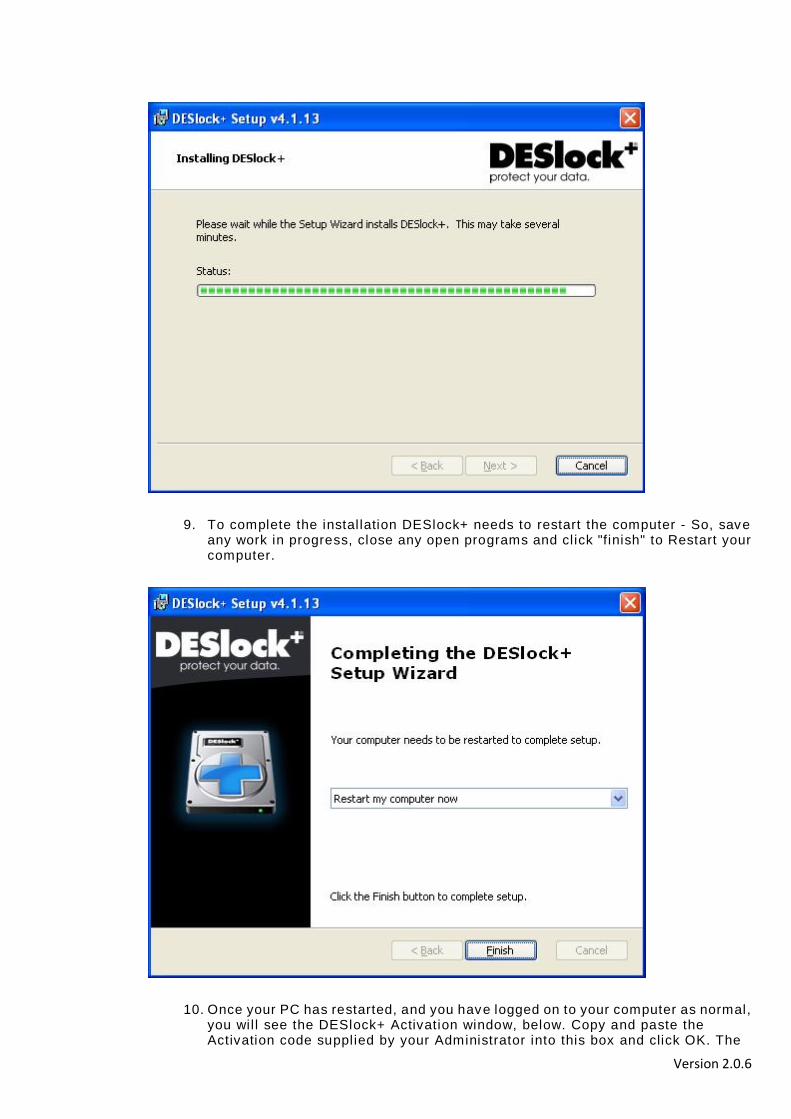
9. To complete the instal lation DESlock+ needs to restart the computer - So, save any work in progress, close any open programs and cl ick "finish" to Restart your computer.
10. Once your PC has restarted, and you have logged on to your computer as normal, you wil l see the DESlock+ Activation window, below. Copy and paste the Activation code supplied by your Administrator into this box and click OK. The

Version 2.0.6
Administration code wil l probably have been supplied by Email.
11. To complete the Workstation setup see the Chapter on Authentication.
Version 2.0.6
Activation Code
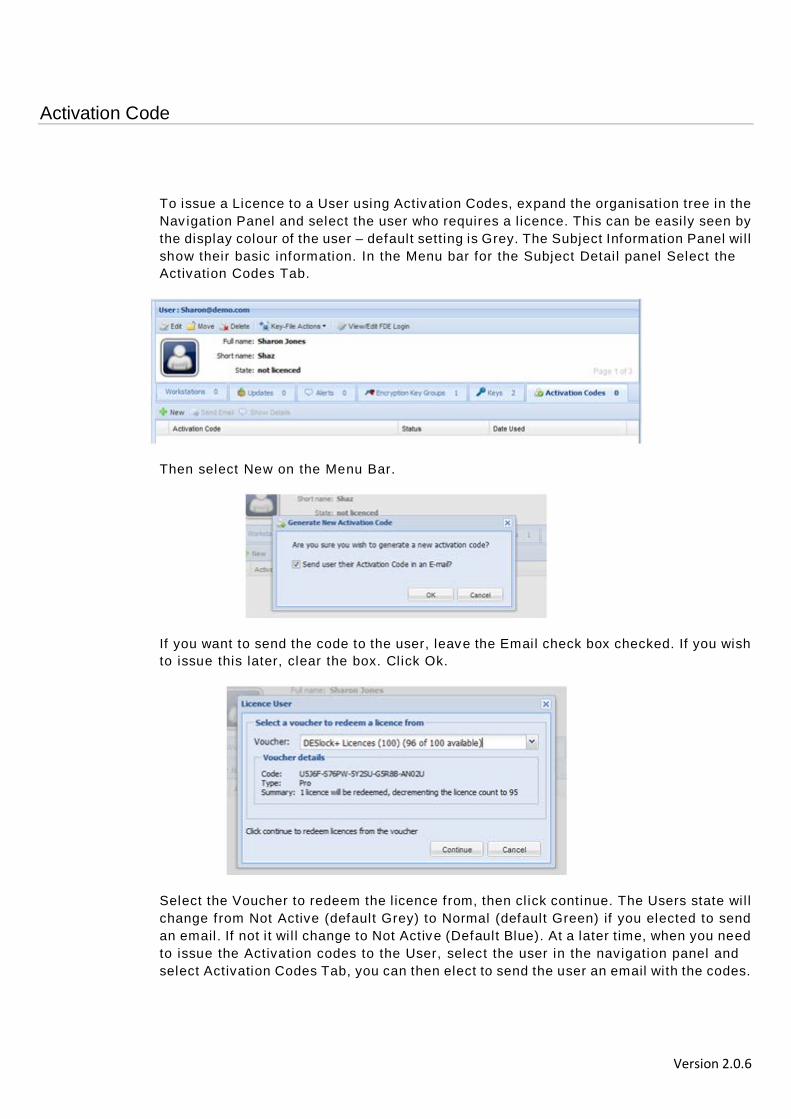
To issue a Licence to a User using Activation Codes, expand the organisation tree in the Nav igation Panel and select the user who requires a l icence. This can be easily seen by the display colour of the user – default setting is Grey. The Subject Information Panel wil l show their basic information. In the Menu bar for the Subject Detai l panel Select the Activation Codes Tab.
Then select New on the Menu Bar.
If you want to send the code to the user, leave the Email check box checked. If you wish to issue this later, clear the box. Click Ok.
Select the Voucher to redeem the l icence f rom, then cl ick continue. The Users state wil l change f rom Not Active (default Grey) to Normal (default Green) if you elected to send an email. If not i t wil l change to Not Active (Default Blue). At a later time, when you need to issue the Activation codes to the User, select the user in the navigation panel and select Activation Codes Tab, you can then elect to send the user an email with the codes.

Version 2.0.6
Authentication
Activation.
The user wil l have the DESlock+ Activation window showing each time they use their computer. To complete the instal lation they need to enter the Activation code, sent by email f rom the System Administrator, in the window below.
Enter the code and cl ick ok.
User Password.
The f irst action the user has to do is set their password. This is controlled by the Group policy’s for the users team, so may require the use of Upper case, lower case, numbers, symbols or be of a minimum character length. If the user hovers over the “strength meter” they will see the policy settings for this password. Once a password of the using the required characters has been def ined, the status bar wil l change to green.

Version 2.0.6
If the "use Auto-login feature" is selected the user wil l then be logged into DESlock + and can use the Encryption options as permitted by their Administrator. If this feature is not selected the user wil l have to log in to DESlock+ as described below. To log out right cl ick on the Blue cross Icon and select Deactivate.
Next time the user starts their PC they can log into DESlock+ by right cl icking the Grey Cross icon in the System Tray and select Activate.
Then enter the password they provided during registration.

Version 2.0.6
Once the user has logged into DESlock+ they can use the encryption options permitted by their Administrator.
Version 2.0.6
Workstation
The Workstation will now appear in the Enterprise Server. Once both the User and the workstation have appeared (this is dependent on the Workstation Policy “Background Update Check Period”) updates and changes can be made. If the workstation does not appear the Administrator can force a Synchronisation by cl icking the “Proxy Sync” button at the bottom lef t of the browser window.
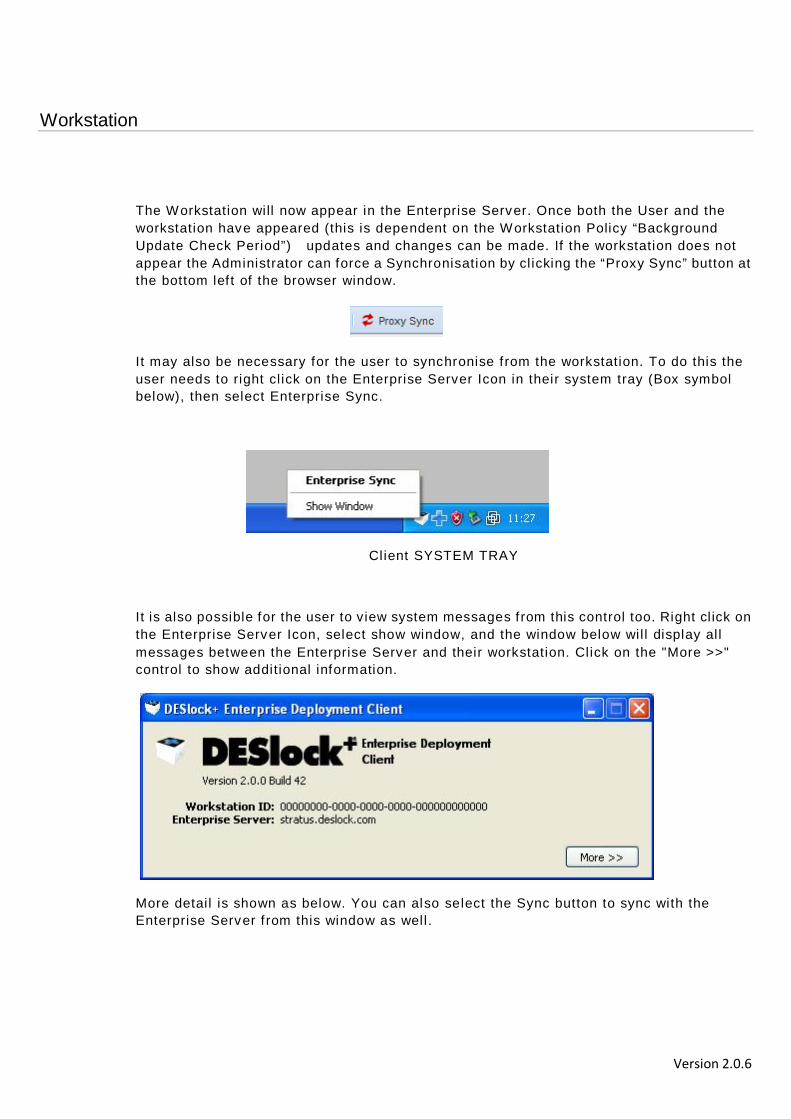
It may also be necessary for the user to synchronise f rom the workstation. To do this the user needs to right cl ick on the Enterprise Server Icon in their system tray (Box symbol below), then select Enterprise Sync.
Client SYSTEM TRAY
It is also possible for the user to view system messages f rom this control too. Right cl ick on the Enterprise Server Icon, select show window, and the window below wil l display al l messages between the Enterprise Server and their workstation. Click on the "More >>" control to show additional information.
More detai l is shown as below. You can also select the Sync button to sync with the Enterprise Server f rom this window as well.

Version 2.0.6
Once the Enterprise server and the workstation concerned are both in Sync, the new workstation wil l appear in the Enterprise Server, and the User status wil l change f rom "Not Active" (Blue) to "Normal" (Green)
Before Synchronisation After Synchronisation
Ann appears as Red as there is a update waiting to be supplied to her.
Version 2.0.6
Updates
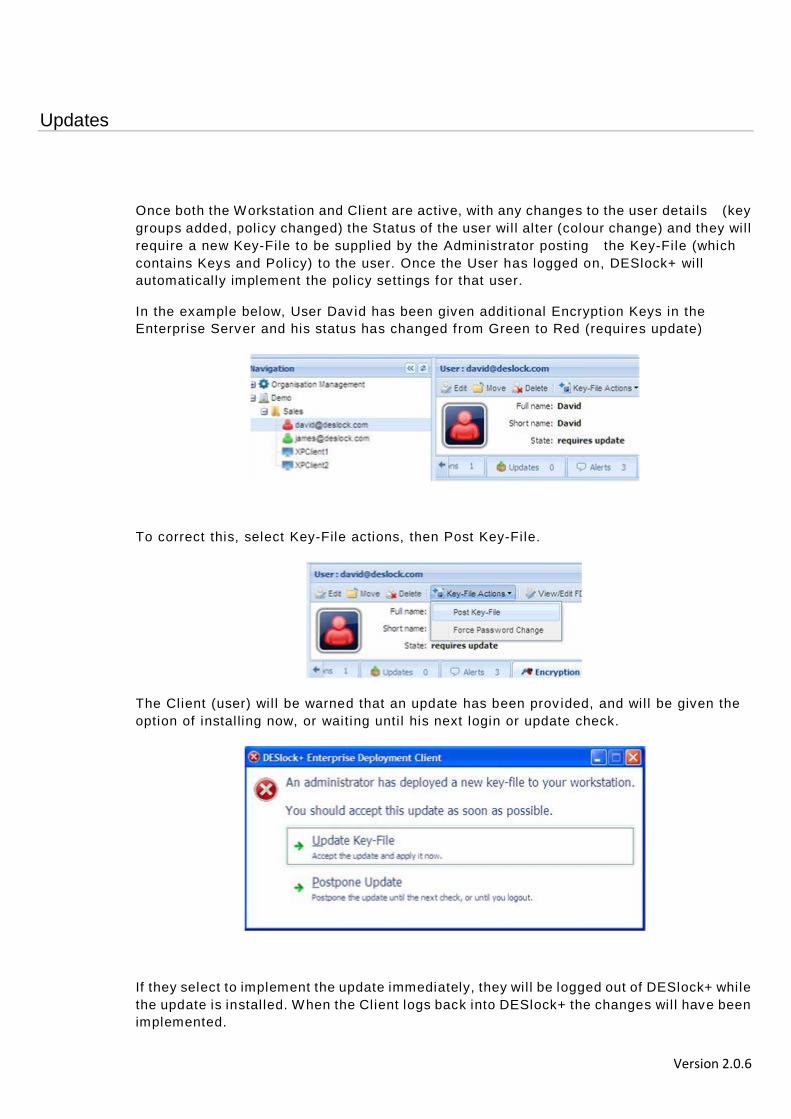
Once both the Workstation and Client are active, with any changes to the user detai ls (key groups added, policy changed) the Status of the user wil l alter (colour change) and they wil l require a new Key-File to be supplied by the Administrator posting the Key-File (which contains Keys and Policy) to the user. Once the User has logged on, DESlock+ will automatical ly implement the policy settings for that user.
In the example below, User Dav id has been given additional Encryption Keys in the Enterprise Server and his status has changed f rom Green to Red (requires update)
To correct this, select Key-File actions, then Post Key-File.
The Client (user) wil l be warned that an update has been prov ided, and wil l be given the option of instal ling now, or waiting unti l his next login or update check.
If they select to implement the update immediately, they wil l be logged out of DESlock+ while the update is instal led. When the Client logs back into DESlock+ the changes wil l have been implemented.
Version 2.0.6
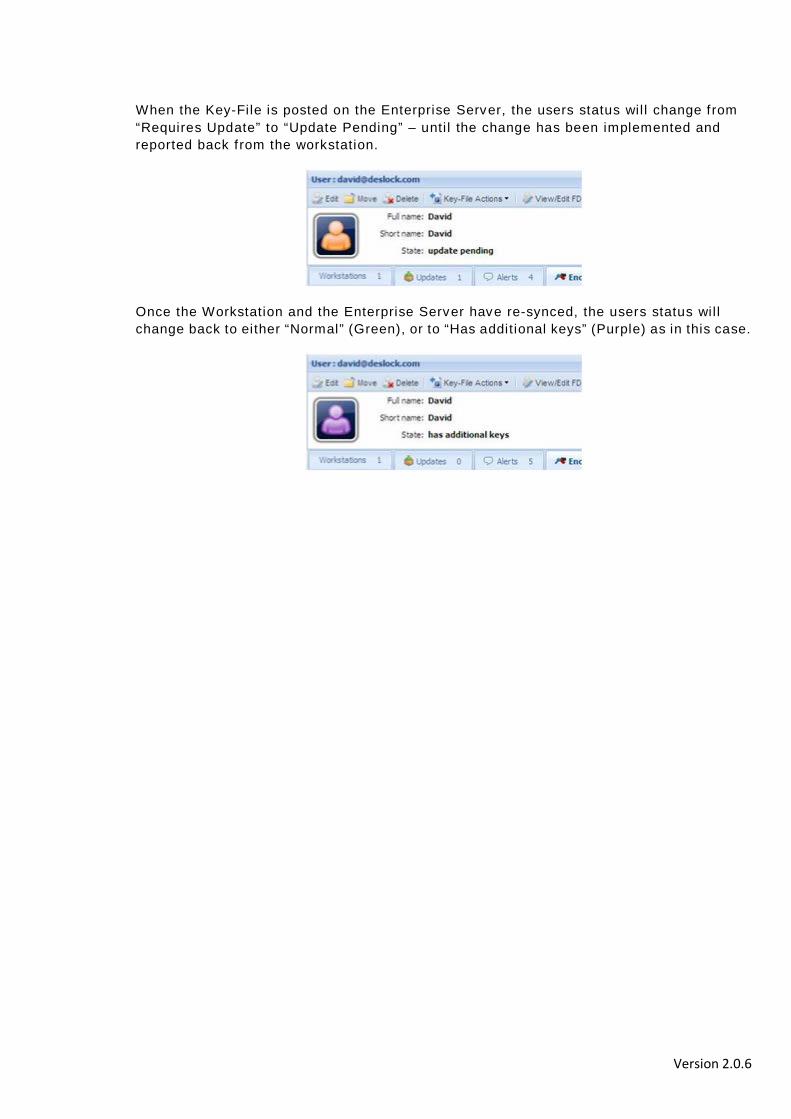
When the Key-File is posted on the Enterprise Server, the users status wil l change f rom “Requires Update” to “Update Pending” – unti l the change has been implemented and reported back f rom the workstation.
Once the Workstation and the Enterprise Server have re-synced, the users status wil l change back to either “Normal” (Green), or to “Has additional keys” (Purple) as in this case.

Version 2.0.6
Full Disk Encryption
With an activated Workstation displayed in the Enterprise Server the Administrator can remotely initiate Full Disk Encryption on that machine.
To do this:
Select the user in the navigation panel, then the Workstation Tab in the Subject Detail panel. Highlight the Workstation to be encrypted and click the Encrypt Button.
The Encrypt dialog will open.

Version 2.0.6
• Enter the Admin name and password - the password is not the Enterprise server Administrator login, this is unique to the Full Disk Encryption Process and is controlled by password policy settings, so may require the use of Upper and/or lower case letters, numbers and minimum password length.
• Enter the Username and password, this does not have to be the username as shown, it can be a generic name for the workstation.
• Define the number of password retries and recovery password login permitted - these control the workstation security and define the number of attempts permitted before user access is denied and an administrator has to intervene.
• Options.
o User can choose initial password - user can define their own password before the process will start.
o User must confirm password before encryption will start - user must provide a valid password (as defined by the administrator) before encryption commences. If this option is selected the number of system starts permitted without initiating Full Disk Encryption must be defined. Once that number is exceeded the encryption process will commence.
Version 2.0.6
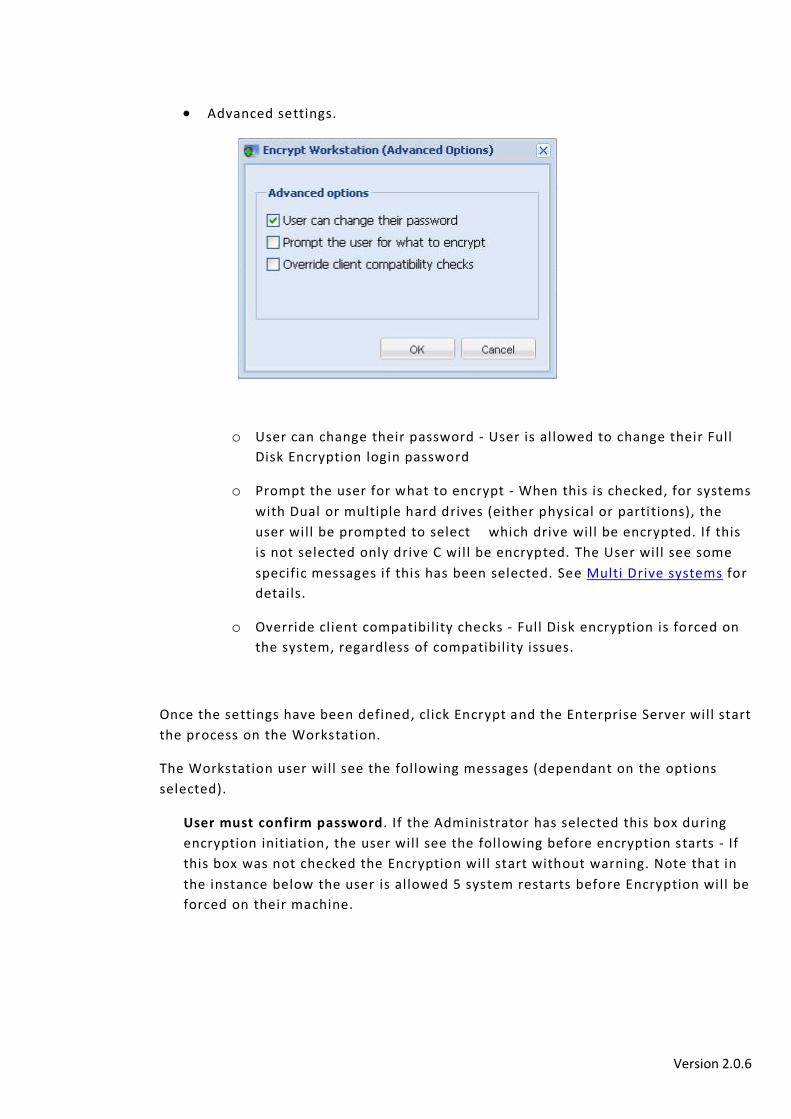
• Advanced settings.
o User can change their password - User is allowed to change their Full Disk Encryption login password
o Prompt the user for what to encrypt - When this is checked, for systems with Dual or multiple hard drives (either physical or parti tions), the user will be prompted to select which drive will be encrypted. If this is not selected only drive C will be encrypted. The User will see some specific messages if this has been selected. See Multi Drive systems for details.
o Override client compatibility checks - Full Disk encryption is forced on the system, regardless of compatibility issues.
Once the settings have been defined, click Encrypt and the Enterprise Server will start the process on the Workstation.
The Workstation user will see the following messages (dependant on the options selected).
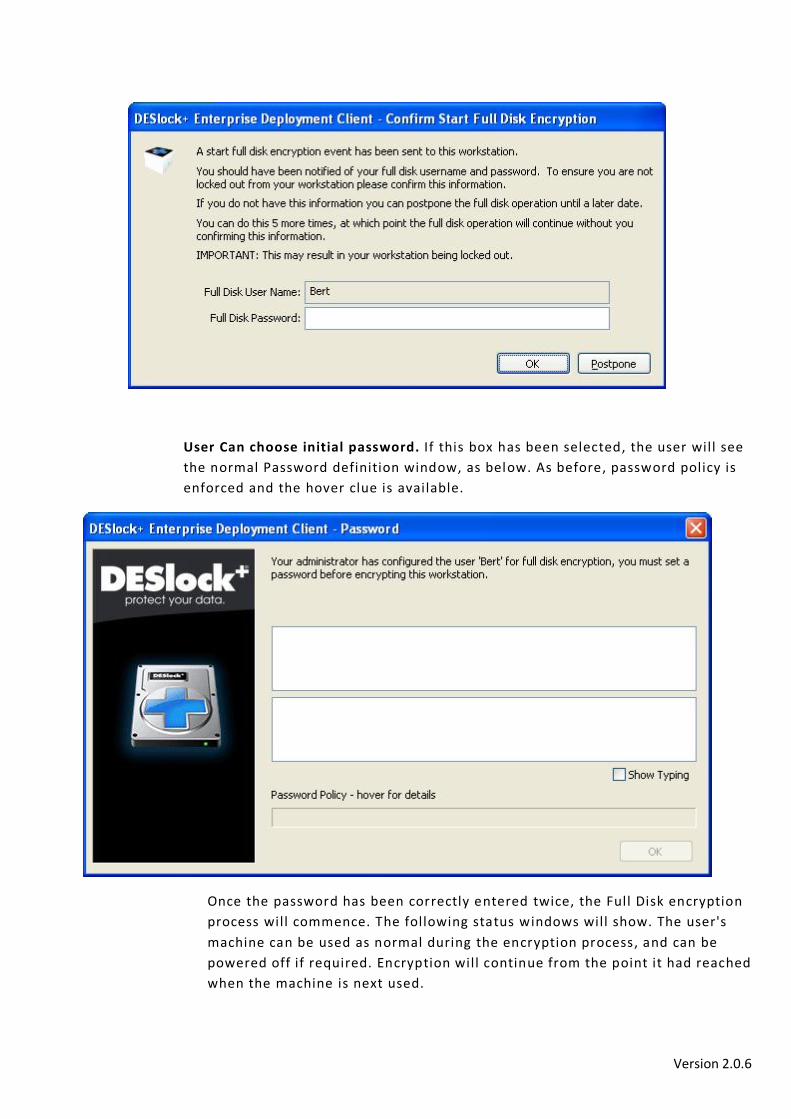
User must confirm password. If the Administrator has selected this box during encryption initiation, the user will see the following before encryption starts - If this box was not checked the Encryption will start without warning. Note that in the instance below the user is allowed 5 system restarts before Encryption will be forced on their machine.
Version 2.0.6
User Can choose initial password. If this box has been selected, the user will see the normal Password definition window, as below. As before, password policy is enforced and the hover clue is available.
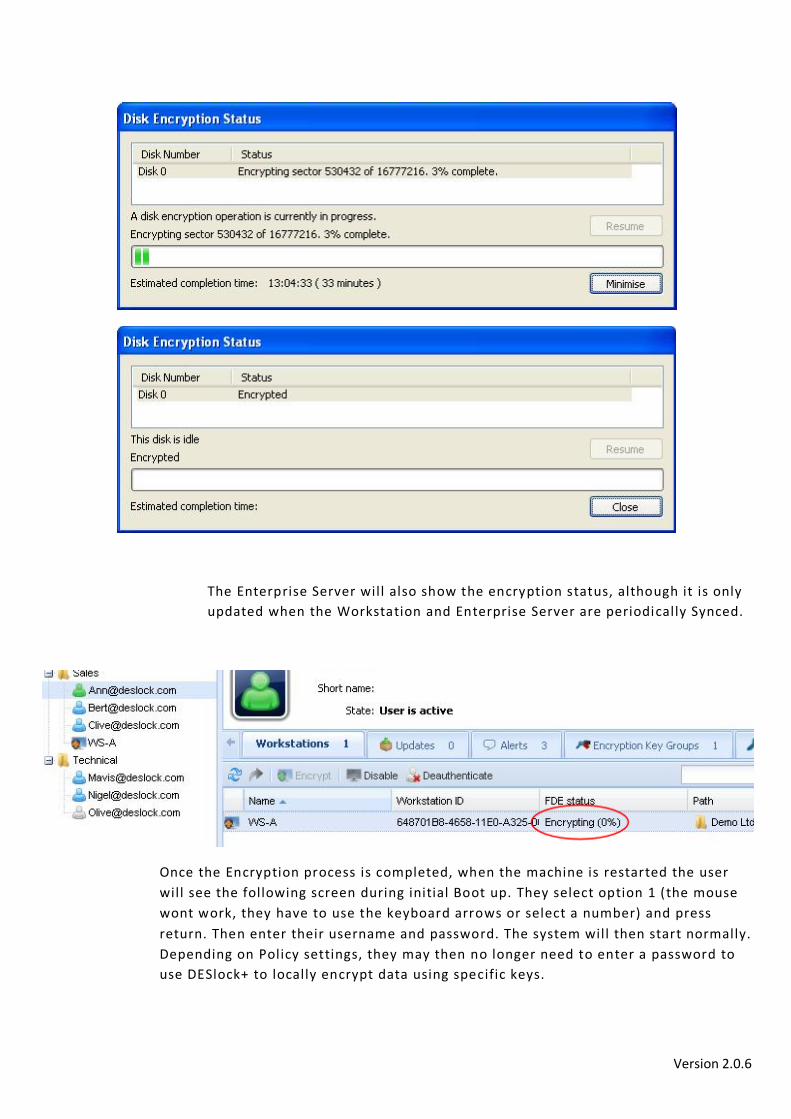
Once the password has been correctly entered twice, the Full Disk encryption process will commence. The following status windows will show. The user's machine can be used as normal during the encryption process, and can be powered off if required. Encryption will continue from the point it had reached when the machine is next used.
Version 2.0.6
The Enterprise Server will also show the encryption status, although it is only updated when the Workstation and Enterprise Server are periodically Synced.
Once the Encryption process is completed, when the machine is restarted the user will see the following screen during initial Boot up. They select option 1 (the mouse wont work, they have to use the keyboard arrows or select a number) and press return. Then enter their username and password. The system will then start normally. Depending on Policy settings, they may then no longer need to enter a password to use DESlock+ to locally encrypt data using specific keys.

Version 2.0.6
The Enterprise Server will also report that the encryption has completed, and display the current status of the user and workstation, as below. Note that the User and Workstation both are Green (depending on your colour definition during setup)

Version 2.0.6
Lost Details
To Recover Lost Passwords. If a user forgets their Full Disk Encryption password, they should select the "Lost detai ls" option at the Login screen. They should then:
• Enter their username, then press return. • Note the Index number and workstation ID (bottom right of Blue screen) • Report their username, Index No. and machine detai ls to their Network
Administrator.
To recover the user, the Administrator should select the Workstation in the Nav igation Panel, then the FDE Logins Tab, highlight the user concerned, then cl ick the actions button.
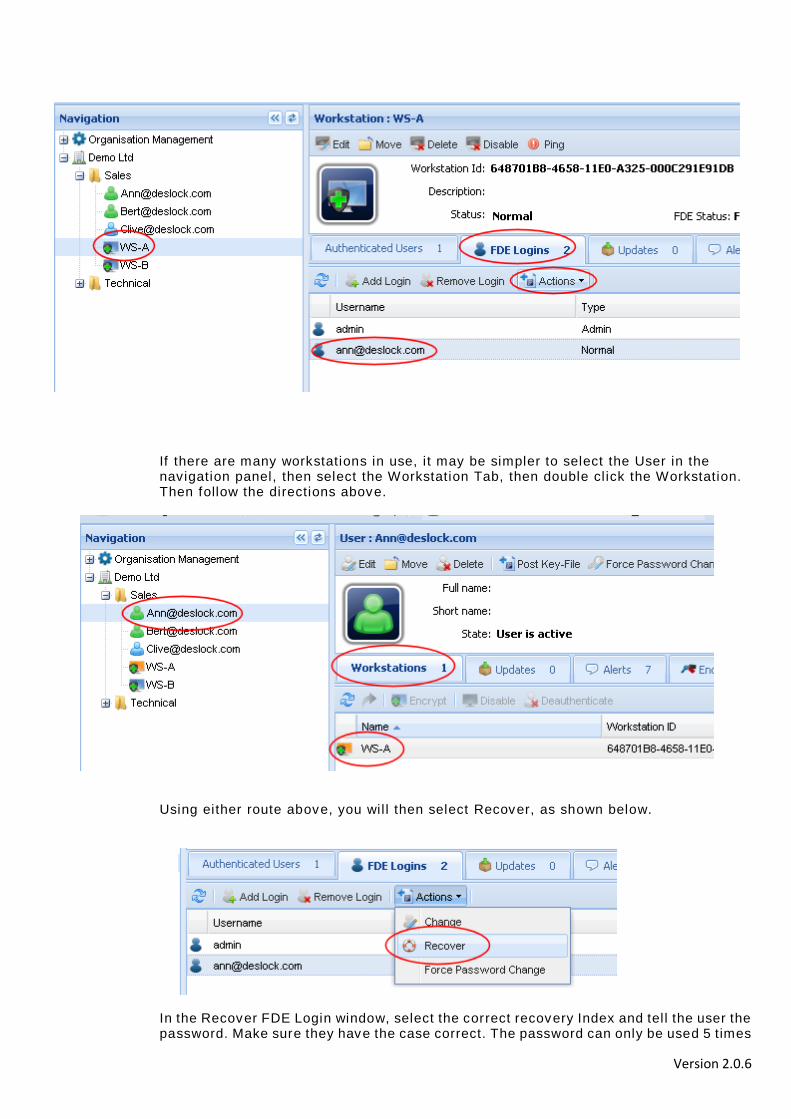
Version 2.0.6
If there are many workstations in use, i t may be simpler to select the User in the navigation panel, then select the Workstation Tab, then double cl ick the Workstation. Then follow the directions above.
Using either route above, you wil l then select Recover, as shown below.
In the Recover FDE Login window, select the correct recovery Index and tel l the user the password. Make sure they have the case correct. The password can only be used 5 times
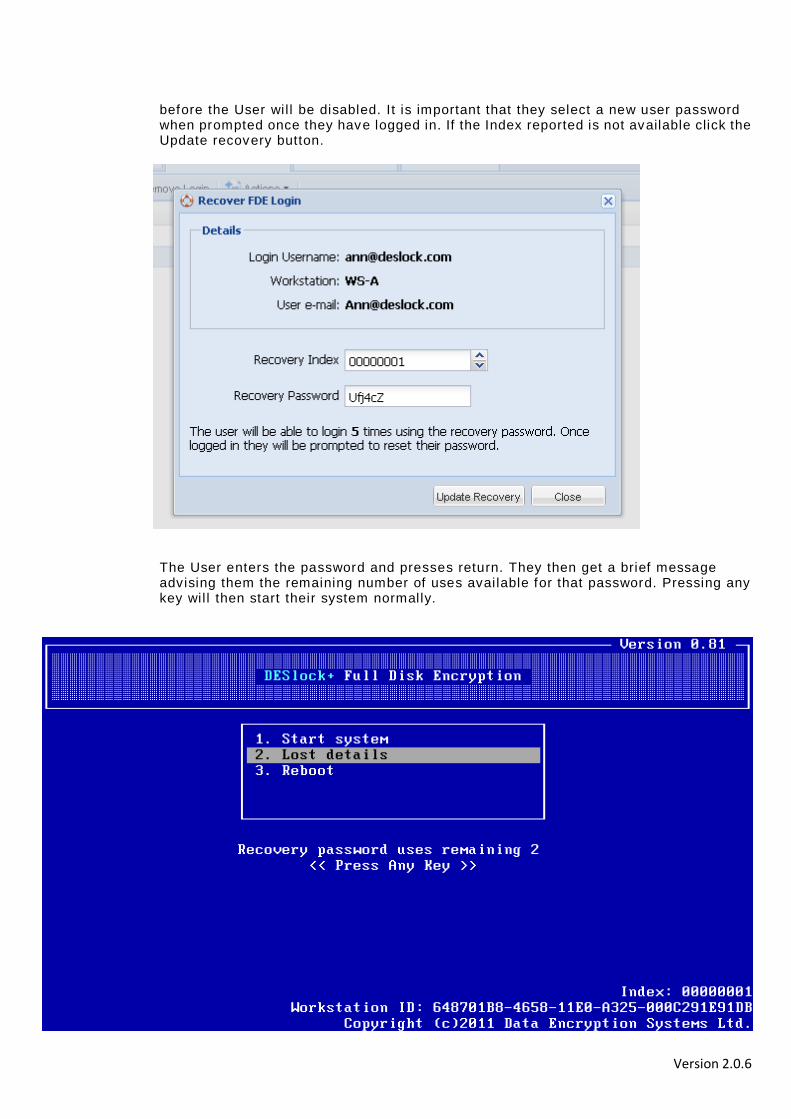
Version 2.0.6
before the User wil l be disabled. It is important that they select a new user password when prompted once they have logged in. If the Index reported is not available click the Update recovery button.
The User enters the password and presses return. They then get a brief message advising them the remaining number of uses available for that password. Pressing any key wil l then start their system normally.

Version 2.0.6
Once started, the user wil l get a message in their system tray, advising them the number of uses the recovery password has remaining. To reset their password the user should Click the message, as directed.
User cl icks the message and enters their new password in the Full Disk Recovery password window.
Once the password has been entered (twice) and accepted, the message below wil l conf irm the change. From that point on the new password must be used.

Version 2.0.6
Disabling Workstations
Disabling a workstation may be performed as fol lows. Note that once a user Full Disk Encryption login has been removed it cannot be re-instated. There are two ways a workstation may be disabled, either a normal workstation User login can be removed, or all Full Disk Encryption Logins can be removed. If only the user Login is removed the data on the HDD can sti l l be accessed by the Admin user. If all users are removed, all Data on the HDD wil l remain encrypted and secure. In this case the HDD wil l have to be reformatted and a new OS instal led before the drive may be used. All Data wil l be lost.
In the Nav igation Panel, select the User, then on the Subject Detai l menu bar select the Workstations Tab. Highlight the workstation, then select Disable.
Alternatively, select the Workstation in the Navigation panel, then Disable in the Subject Information menu bar, either route wil l result in the Disable Workstation window as below.

Version 2.0.6
Select the type of disable required.
• Remove only user FDE logins - this wil l remove the FDE logins f rom authorised users, except the Admin user.
• Remove all FDE logins - wil l remove all FDE logins, including the Admin user. The HDD wil l no longer be accessible and wil l remain encrypted.
You wil l be prompted to enter your administrator password before the task can be completed.

Version 2.0.6
The disable command wil l be sent to the workstation, and wil l be effected at the next login after the Enterprise server has next Sync'd with the Server Proxy. From that point on the workstation wil l no longer accept passwords for the user. The HDD wil l be available to the Admin user. If the second option has been selected, the workstation wil l not accept passwords for any user.The HDD wil l remain encrypted and inaccessible. Only a complete format and re-instal lation of the OS will recover the machine, but al l data will be lost.
Version 2.0.6
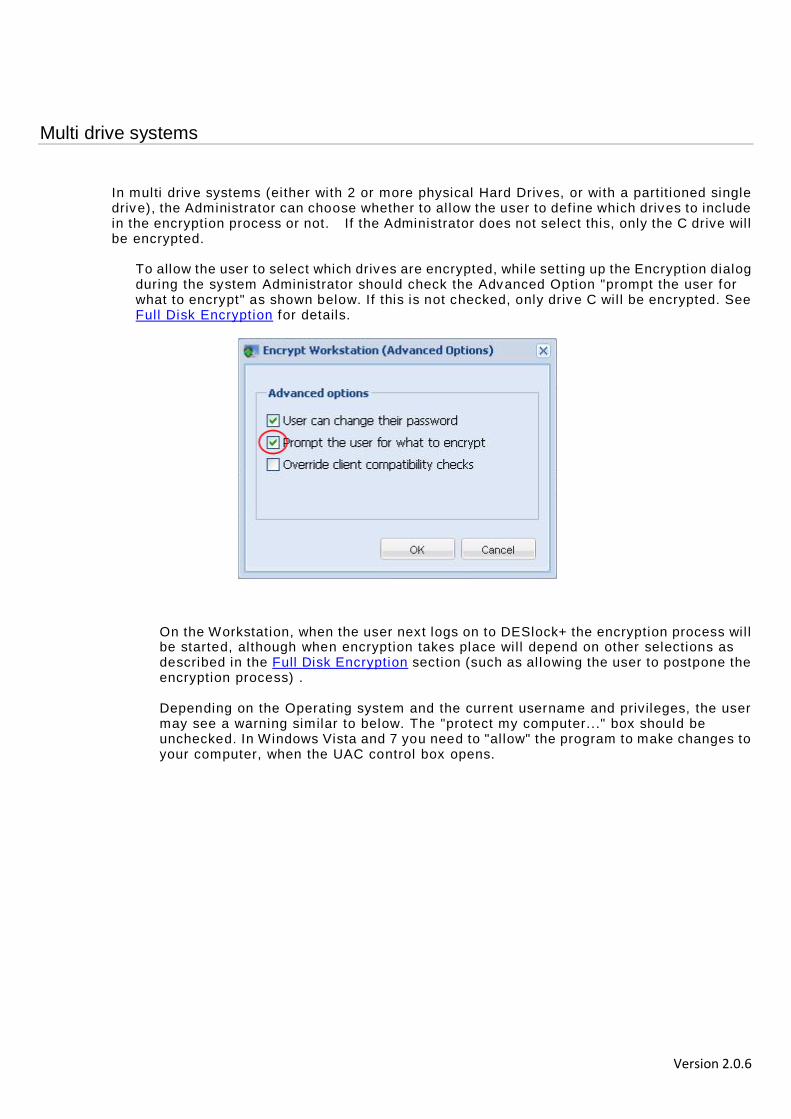
Multi drive systems
In multi drive systems (either with 2 or more physical Hard Drives, or with a partit ioned single drive), the Administrator can choose whether to al low the user to def ine which drives to include in the encryption process or not. If the Administrator does not select this, only the C drive wil l be encrypted.
To allow the user to select which drives are encrypted, while setting up the Encryption dialog during the system Administrator should check the Advanced Option "prompt the user for what to encrypt" as shown below. If this is not checked, only drive C wil l be encrypted. See Full Disk Encryption for details.
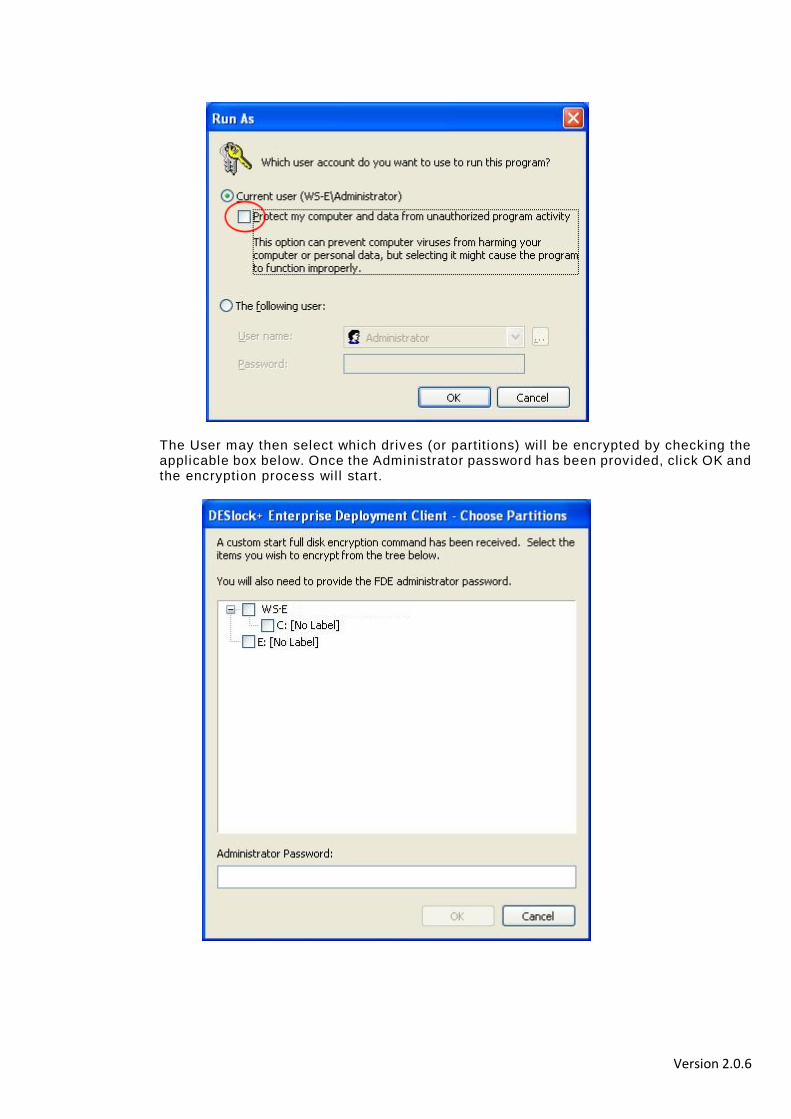
On the Workstation, when the user next logs on to DESlock+ the encryption process wil l be started, although when encryption takes place wil l depend on other selections as described in the Full Disk Encryption section (such as al lowing the user to postpone the encryption process) . Depending on the Operating system and the current username and priv ileges, the user may see a warning similar to below. The "protect my computer..." box should be unchecked. In Windows Vista and 7 you need to "al low" the program to make changes to your computer, when the UAC control box opens.
Version 2.0.6
The User may then select which drives (or partit ions) wil l be encrypted by checking the applicable box below. Once the Administrator password has been provided, click OK and the encryption process wil l start.