Designer Sneakers: Student Pages Short Versionpolymerambassadors.org/pdf/AkronStudentShort.pdfmodels...
25
Designer Sneakers: Student Pages Short Version Written By Three Polymer Ambassadors For The Akron Global Polymer Academy Mary E. Harris, John Burroughs School, 755 South Price Road, St. Louis, MO 63124 [email protected] Sandra Van Natta, 381 Cochran Road, Hamilton, OH 45013 [email protected] Suzanne E. Hall , 200 Pine Bluff Road, Stevens Point, WI 54481 [email protected]
Transcript of Designer Sneakers: Student Pages Short Versionpolymerambassadors.org/pdf/AkronStudentShort.pdfmodels...

Designer Sneakers: Student Pages Short Version
Written By Three Polymer Ambassadors For The Akron Global Polymer Academy
Mary E. Harris, John Burroughs School, 755 South Price Road, St. Louis, MO 63124
[email protected] Sandra Van Natta, 381 Cochran Road,
Hamilton, OH 45013 [email protected]
Suzanne E. Hall , 200 Pine Bluff Road, Stevens Point, WI 54481

Student Pages – Short Version
Table of Contents Page Introduction to Athletic Shoes and Study Guide Questions………………. 3 Engagement Phase of the Learning Cycle …………………….. 6 Exploration and Explanation of the Learning Cycle ……………………. 8
Fluidity Test ……………………………………………………. 10 Texture and Consistency Test ……………………………….…. 12 Strength Test ………………………………………………..….. 14 Impact and Elastic Recovery Test …………………………….. 16 Elasticity/Bounce Test ………………………………………… 18 Compounding with Latex for Insole……………………………. 20
Texture and Consistency Tests for Latex ……………………… 21 Elaboration of the Learning Cycle: ……………………………………… 22 Shoe Sole Outlines ………………………………………………………. 23 Scoring Rubric for Final Evaluation…………………………… ……... 24 Buying Shoes …………………………………………………………… 25
Copyright AGPA 2003
2

Student Pages – Short Version
Introduction to Athletic Shoes- Homework Activity What has 26 bones, 33 joints, 19 muscles, and a bunch of ligaments? A human foot! These parts work together in perfect precision when a person is unaware of any of the parts. What a wonderful machine! A foot may strike the ground 10,000 times a day and cover more than 115,000 miles in a lifetime. An average athlete will generate up to 700 pounds of pressure on a foot in a single leap or stride. There are three energy-storing mechanisms in a foot. As your Achilles tendon stretches when you step down, it is storing energy. The release of energy is when the tendon relaxes and you step off. The arch in your foot flattens when you step down thus storing energy. The arch releases its stored energy when you step off. The third mechanism is the cushion under the heel of the foot. This fatty cushion acts as a shock absorber or stores energy as it is compressed. In running, the foot follows a series of steps: the outer edge of the heel strikes the ground, then it rolls inward so that the weight is shifted to the inside edge of the forefoot, and the arch flattens during this roll to absorb the shock of the foot strike. In walking, the foot follows a different series of steps: the outer edge of the heel strikes the ground, then the foot rolls slowly onto the toes as the foot flattens since it is more relaxed and finally the sole also helps to rock the foot forward toward the toes.
How do your feet compare to the feet of your best friend? Have you ever done a comparison? Here are some simple experiments: • Wet your foot in a tub of water and then stand on a piece of colored paper. Look at the wet
print and notice the band that connects the forefoot with the heel. Draw a line around your footprint while the print is still damp. If the band is narrow, you have a high-arch. If the band is wide, you have a “flat foot”. Label your footprint with your name and kind of print.
• “Normal” feet will land on the outside of the heel and roll inward to absorb shock as you
walk. Flat feet land on the outside of the heel and roll inward excessively as you walk. High arch feel don’t roll inward enough as you walk. High arch feet do not have a built-in shock absorber.
• Examine the soles of a well-used pair of sneakers. If there is heavy wear around the heel and arch, you may overpronate or roll your foot inward too much as you walk. The inner side of the foot hits the ground first and the foot appears to roll outward. Heavy wear along the
Copyright AGPA 2003
3

Student Pages – Short Version
outside of the shoe indicates supination or rolling your foot to the outside as you walk. The outer side of the foot hits the ground first and the foot appears to roll inward. Patterns that are not symmetrical may reflect other problems such as an imbalance in muscle strength.
• Place the well-used shoes on a level surface and look at them from behind. If the shoes tilt
forward with the heel bulges to the inside, this is evidence that you pronate. An outward tilt is evidence that you underpronate. Try to diagnose your walking or wear on shoes. Write your diagnosis on the “foot print paper” which will be turned in to your teacher.
History: The modern athletic shoe did not come into existence until the 1970’s. Before that consumers wore “sneakers” or rubber-soled shoes with canvas tops. Keds were introduced in 1917. In 1925, Adolph and Rudolph Dassler (Germans) founded a company to make athletic shoes. Olympians were attracted to their products. Adolph later founded Adidas and Rudolph founded Puma. In 1951 Shigeki Tanaka won the Boston Marathon wearing a shoe called, Tiger, where the big toe was separated from the other toes. Credit is due to Phil Knight and Bill Bowerman from Oregon for the science and fashion found in current athletic shoes today. They formed a company in 1964 to market a lighter and more comfortable running shoe. In 1968 it became Nike, Inc. named after the Greek goddess of Victory. The invention of waffle soles in 1972, cushioned mid-sole and nylon uppers were unique for the time. The layer of padding in the midsole became a "marketing war zone". At first the midsole was made out of rubber but later engineers introduced a lighter material called ethylene vinyl acetate or EVA. EVA is a polymer material filled with gas bubbles and it makes a great shock absorber. Nike’s advertisements in the 1980’s and 1990’s have elevated sales around the world. The New Balance Shoe Company was founded in the 1960’s too and they developed an orthopedic running shoe with a rippled sole and wedge heel. The wedge was made out of rubber and it helped absorb shock during running and this new design quickly became standard in running shoes in the 1960's. An article in the Wall Street Journal (March 3, 1998, page B1 and B12) "Tripped Up by Too Many Shoes, Nike Regroups" by Bill Richards discusses the problem Nike Inc. is having in 1998. Nike Inc. has a team of 15 research staff members who introduce 350 new athletic shoe
Copyright AGPA 2003
4

Student Pages – Short Version
models each year. The head of the team, Mr. Mario Lafortune, says "But it is getting harder to come up with innovations that people can easily see." Since Nike lost sales in 1997, the new marketing strategy will be to market apparel, sporting goods and athletic shoes as one giant package. The program is called "Alpha" and is will be hitting the public the end of 1998. "Alpha Athletes" will include Tiger Woods and other top name professionals. According to Athlete's Foot director of research, Nike's last improvement in shoes was in 1978 with the concept of air bags in the soles. Athletic shoes have become lighter and more flexible over the years due to new polymeric materials. Reebok's pump sneaker was introduced in the late 1980's but disappeared about 1993. Reebok followed the lead of Nike by inserting see-through windows in the heels of shoes. Reebok is introducing the 3D Ultra-Lite foam shoe in 1998 with air cushions in the sole as well as see-through windows. Not to be out done, Nike has the Visible Zoom Air shoe for 1998 which has a nylon pillow in the air pocket. Study Guide Questions: 1. How many times will an average person’s foot strike the ground in a week? 2. What are the three energy-storing mechanisms in a foot? 3. Would running or walking have the foot roll toward the toes after the heel strikes the ground? 4. Before 1970, describe the typical athletic shoe. 5. What unique shoe design was developed in 1972? 6. Of the hundreds of new models of athletic shoes introduced each year, are the changes due to innovation and engineering or are they more due to color and gimmicks?
Copyright AGPA 2003
5
Student Pages – Short Version
Engagement Phase of the Learning Cycle
What Are The Parts Of An Athletic Shoe?
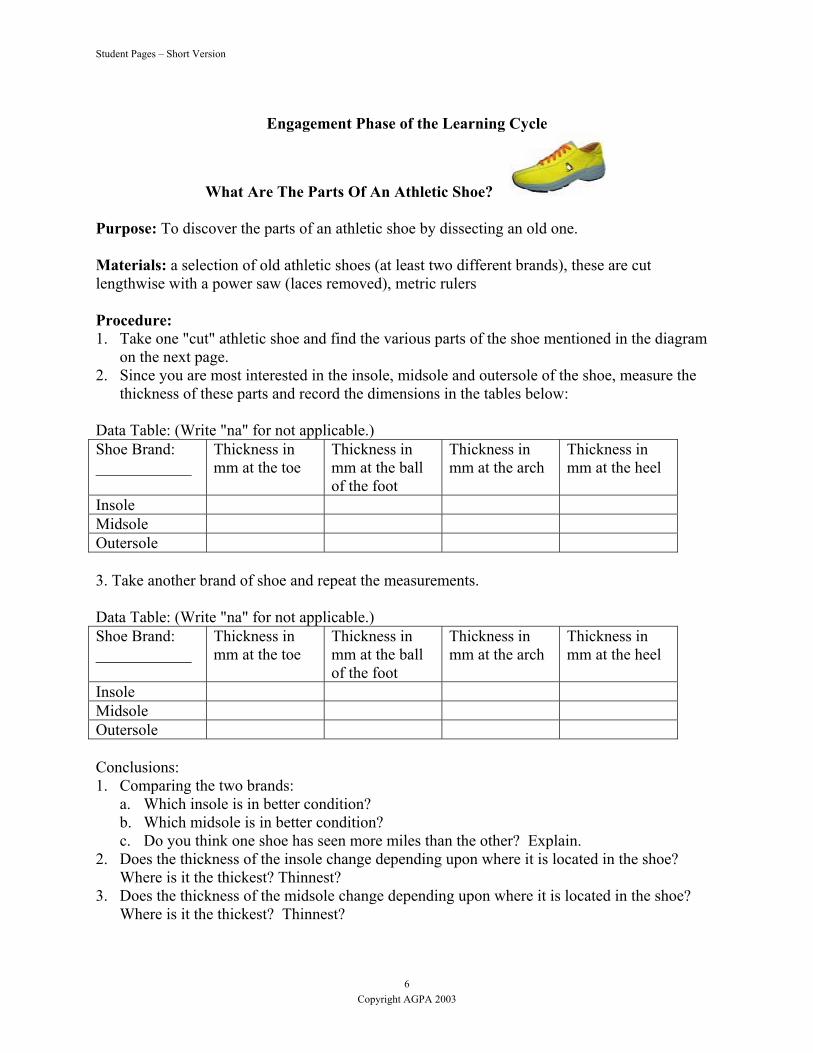
Purpose: To discover the parts of an athletic shoe by dissecting an old one. Materials: a selection of old athletic shoes (at least two different brands), these are cut lengthwise with a power saw (laces removed), metric rulers Procedure: 1. Take one "cut" athletic shoe and find the various parts of the shoe mentioned in the diagram
on the next page. 2. Since you are most interested in the insole, midsole and outersole of the shoe, measure the
thickness of these parts and record the dimensions in the tables below: Data Table: (Write "na" for not applicable.) Shoe Brand: ____________
Thickness in mm at the toe
Thickness in mm at the ball of the foot
Thickness in mm at the arch
Thickness in mm at the heel
Insole Midsole Outersole 3. Take another brand of shoe and repeat the measurements. Data Table: (Write "na" for not applicable.) Shoe Brand: ____________
Thickness in mm at the toe
Thickness in mm at the ball of the foot
Thickness in mm at the arch
Thickness in mm at the heel
Insole Midsole Outersole Conclusions: 1. Comparing the two brands:
a. Which insole is in better condition? b. Which midsole is in better condition? c. Do you think one shoe has seen more miles than the other? Explain.
2. Does the thickness of the insole change depending upon where it is located in the shoe? Where is it the thickest? Thinnest?
3. Does the thickness of the midsole change depending upon where it is located in the shoe? Where is it the thickest? Thinnest?
Copyright AGPA 2003
6

Student Pages – Short Version
4. Are there any "air pockets" present? What would be a reason for putting air pockets in shoes?
5. Does one brand have a special feature that the other does not have? What is it? What purpose does it serve in the wearing of the shoe?
6. Based on the construction of each shoe, classify each by the following categories: a. Running d. Basketball b. Walking e. Cross training c. Tennis f. Other
Parts of an Athletic Shoe
Heel counter - This stiffens the back of the shoe for stability. It is molded to encase the heal and surrounds the Achilles tendon. Insole – or sock liner – It cushions and is an arch support that should be removable. The foot rests upon the insole of the shoe. Last – The mold or form around which the shoe is shaped during manufacture. The shape of the shoe can be straight for low arches, semi-curved, or curved for high arches. Last construction comes in three basic designs: Board Last has a flat light-weight fiberboard glued to the midsole and provides a very supportive base, Combination Last has a cloth lining in the forefoot and a fiberboard in the rear foot for stability and support, and Slip Last has the upper and midsole stitched together and is the most flexible of the three constructions. Midsole – The cushioning material – (usually ethyl vinyl acetate (EVA) or polyurethane) – often surrounded by air cells or gel cells for shock-absorbing quality is the make-up of the midsole. This is found between the insole and the outsole. With long use, the EVA will compress and lose its ability to absorb shock. Polyurethane is firmer and more durable than EVA. Outsole – This part touches the ground and is made of durable carbon rubber or polyurethane. The carbon rubber has better traction. Toe box – The area for the toes of the foot. Ankle Collar – The padded area around the top of the shoe for added fit and comfort. Heel Tab – The area of the ankle collar that is usually notched and located above the heel. It reduces stress on the Achilles tendon.
Copyright AGPA 2003
7

Student Pages – Short Version
Exploration and Explanation of the Learning Cycle
Part A. Compounding Glue Polymers for the Midsole of Designer Sneaker Introduction: One type of additive is called a crosslinker. When a crosslinker is added to the strands in liquid solutions and suspensions, the mixtures begin to thicken and form slimes and putties. Borax is a crosslinker for slimes or Gak. It chemically “ties” chains together which limits their flow. In this activity, students will investigate the effects of compounding on the polymer poly(vinyl acetate) or more commonly known as Elmer’s Glue-All. Students will crosslink two glue/water mixtures with the cross linking agent, sodium tetraborate decahydrate (laundry borax dissolved in water). After determining the effects of crosslinking and the additives on the two dilutions of the glue with water, students will have a detailed data table to use for the assessment activity. Note: Water is not a compounding agent used in industry. It does noticeably alter the properties of the resulting glue-polymer. Purpose: To investigate the physical properties of two formulations of Elmer’s Glue-All with water. Materials: Elmer’s Glue-All, talc or talcum powder, calcium carbonate (powdered chalk (not dustless)), food coloring, 4% borax solution, small plastic cups (can be reused), stirring craft sticks or spoons (can be reused), sandwich-size zipper-type bags (10/team), graduated cylinders or marked plastic cups, felt-tip markers, 1 liter or 2 liter plastic bottles, pump-type nozzle to fit the bottle, goggles, aprons are optional Safety: Goggles must be worn at all times. Borax may cause allergic reactions in some students and those should avoid handling the chemical. Wash with soap and water to relieve the redness and itching. Time: Five laboratory days for Part A and two days for Part B. Procedure: Days 1&2&3 1. Students should be in teams of four. 2. Using a 75% glue and 25% water putty that is colored green, pour 30 mL of the mixture into
a cup. 3. Add 10 mL of 4% borax solution while stirring. Stir with a stick or spoon until the mass of
glue putty forms on the stick. 4. Take the mass of putty in your hands and form it into a ball. Continue to press it in your
hands until it forms a ball of even consistency.
Copyright AGPA 2003
8
Student Pages – Short Version
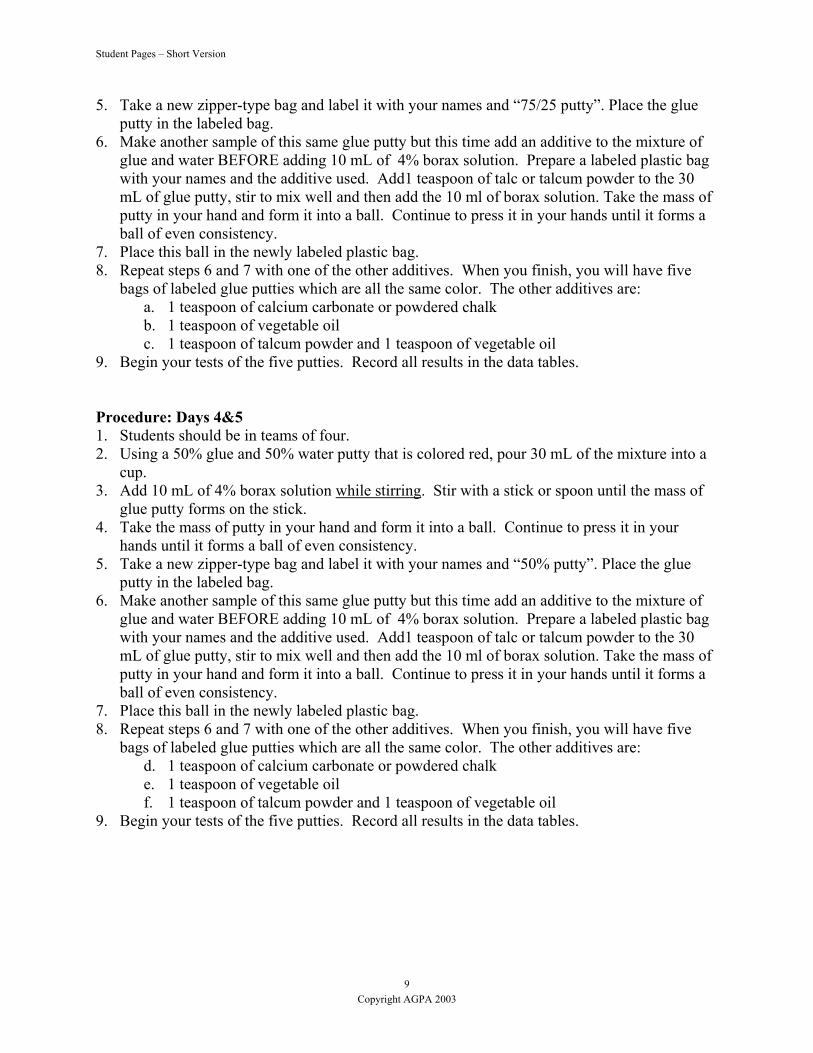
5. Take a new zipper-type bag and label it with your names and “75/25 putty”. Place the glue putty in the labeled bag.
6. Make another sample of this same glue putty but this time add an additive to the mixture of glue and water BEFORE adding 10 mL of 4% borax solution. Prepare a labeled plastic bag with your names and the additive used. Add1 teaspoon of talc or talcum powder to the 30 mL of glue putty, stir to mix well and then add the 10 ml of borax solution. Take the mass of putty in your hand and form it into a ball. Continue to press it in your hands until it forms a ball of even consistency.
7. Place this ball in the newly labeled plastic bag. 8. Repeat steps 6 and 7 with one of the other additives. When you finish, you will have five
bags of labeled glue putties which are all the same color. The other additives are: a. 1 teaspoon of calcium carbonate or powdered chalk b. 1 teaspoon of vegetable oil c. 1 teaspoon of talcum powder and 1 teaspoon of vegetable oil
9. Begin your tests of the five putties. Record all results in the data tables. Procedure: Days 4&5 1. Students should be in teams of four. 2. Using a 50% glue and 50% water putty that is colored red, pour 30 mL of the mixture into a
cup. 3. Add 10 mL of 4% borax solution while stirring. Stir with a stick or spoon until the mass of
glue putty forms on the stick. 4. Take the mass of putty in your hand and form it into a ball. Continue to press it in your
hands until it forms a ball of even consistency. 5. Take a new zipper-type bag and label it with your names and “50% putty”. Place the glue
putty in the labeled bag. 6. Make another sample of this same glue putty but this time add an additive to the mixture of
glue and water BEFORE adding 10 mL of 4% borax solution. Prepare a labeled plastic bag with your names and the additive used. Add1 teaspoon of talc or talcum powder to the 30 mL of glue putty, stir to mix well and then add the 10 ml of borax solution. Take the mass of putty in your hand and form it into a ball. Continue to press it in your hands until it forms a ball of even consistency.
7. Place this ball in the newly labeled plastic bag. 8. Repeat steps 6 and 7 with one of the other additives. When you finish, you will have five
bags of labeled glue putties which are all the same color. The other additives are: d. 1 teaspoon of calcium carbonate or powdered chalk e. 1 teaspoon of vegetable oil f. 1 teaspoon of talcum powder and 1 teaspoon of vegetable oil
9. Begin your tests of the five putties. Record all results in the data tables.
Copyright AGPA 2003
9

Student Pages – Short Version
Testing Procedures: Background: Industry conducts a variety of tests on plastics and rubber materials as a form of quality control. Testing for various properties yields information on the differences between compounds in terms of toughness, stiffness, and strength. Testing also is useful for screening to determine whether a particular material meets customer specifications. Since sales to the customer ultimately determine the financial success of a company, test must be performed that simulate the way a product will be used. The following tests mimic the way industrial processes test various polymer products. However, the tests have been designed to deal with the flowing or non-Newtonian glue putties used in this investigation. The tests yield information which will be helpful to students in the assessment phase.
Fluidity – Test #1
All of the glue putties produced can be classified as non-Newtonian fluids since they show both characteristics of solids and liquids. For example, they stretch and flow when pulled slowly. They break when pulled apart rapidly. Testing the fluidity of the putties can be correlated with surface recovery time as well as durability of the shoe components. Materials: (for each team) four plastic Petri dishes (60x15 mm) either the lid or bottom or the bottom of a yogurt cups (cut off the top leaving a 2 cm edge), samples of each glue putty, second hand on a wall clock or wrist watch Procedure: 1. Use a putty sample you made earlier. 2. Shape the sample into a ball. Place the ball in the center of a Petri dish (top or bottom of the
dish)or cut-off yogurt cup. Measure from the edge of the ball to the edge of the dish in mm. Record.
3. Allow the putty to flow to the edges of the dish. Using a clock or watch, time (in seconds and
minutes) how long it takes for the putty to come in contact with the side of the dish at all points. Record the time in the data table. After 5 minutes, if the sample has not reached the edge of the dish, sketch the outline shape of the putty in the circles provided in the data table. This will only serve as a general source of information on the fluidity of the sample.
4. Repeat the above procedure for each putty sample.
Copyright AGPA 2003
10
Student Pages – Short Version
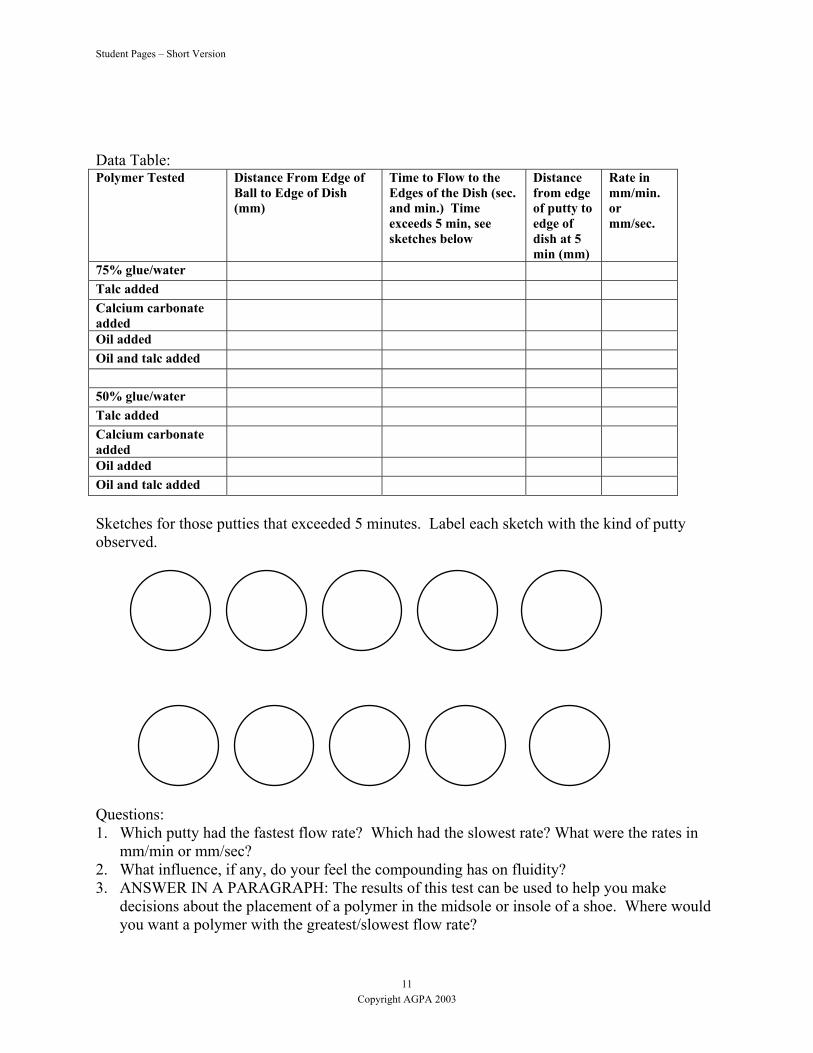
Data Table: Polymer Tested Distance From Edge of
Ball to Edge of Dish (mm)
Time to Flow to the Edges of the Dish (sec. and min.) Time exceeds 5 min, see sketches below
Distance from edge of putty to edge of dish at 5 min (mm)
Rate in mm/min. or mm/sec.
75% glue/water Talc added Calcium carbonate added
Oil added Oil and talc added 50% glue/water Talc added Calcium carbonate added
Oil added Oil and talc added Sketches for those putties that exceeded 5 minutes. Label each sketch with the kind of putty observed.
Questions: 1. at were the rates in
2. 3. ake
Which putty had the fastest flow rate? Which had the slowest rate? Whmm/min or mm/sec? What influence, if any, do your feel the compounding has on fluidity? ANSWER IN A PARAGRAPH: The results of this test can be used to help you mdecisions about the placement of a polymer in the midsole or insole of a shoe. Where would you want a polymer with the greatest/slowest flow rate?
Copyright AGPA 2003
11
Student Pages – Short Version
Texture and Consistency – Test #2 The texture or “feel” of a given material can influence a customer’s response to a given product. The following test is a very subjective test. An effort has been made to make this evaluation as consistent as possible by using data tables with specific parameters. Materials: samples of glue putty Procedure: Take a small sample of each polymer and knead it in your hands. Stretch it, bounce it, and squeeze it between two fingers. Describe its characteristics in the data tables below. Data Table for Texture: Polymer Tested Very
Smooth Smooth Slightly
Sandy 75% glue/water Talc added Calcium carbonate added
Oil added Oil and talc added 50% Glue/water Talc added Calcium carbonated added
Oil added Oil and talc added Data Table for Stretchiness: Polymer Tested Stiff Slightly
Runny Very Runny
75% glue/water Talc added Calcium carbonate added
Oil added Oil and talc added 50% Glue/water Talc added Calcium carbonated added
Oil added Oil and talc added
Copyright AGPA 2003
12

Student Pages – Short Version
Questions: 1. What is your favorite glue polymer recipe? Why have you chosen this product? 2. Will this glue putty you chose be suitable for any part of a shoe? Why or why not?
ter seeing and feeling the differences between the compounded glue polymers, how important do you feel compounding is in industry? Sup
3. ANSWER IN A PARAGRAPH: Af
port your answers with specific data or examples.
Copyright AGPA 2003
13
Student Pages – Short Version Student Pages – Short Version
Copyright AGPA 2003
14
Strength - Test #3
The strength of a plastic determines its use in such products as bottles, bags, storage ontainers, and even toys. The polymers used in shoes must be strong enough to withstand the
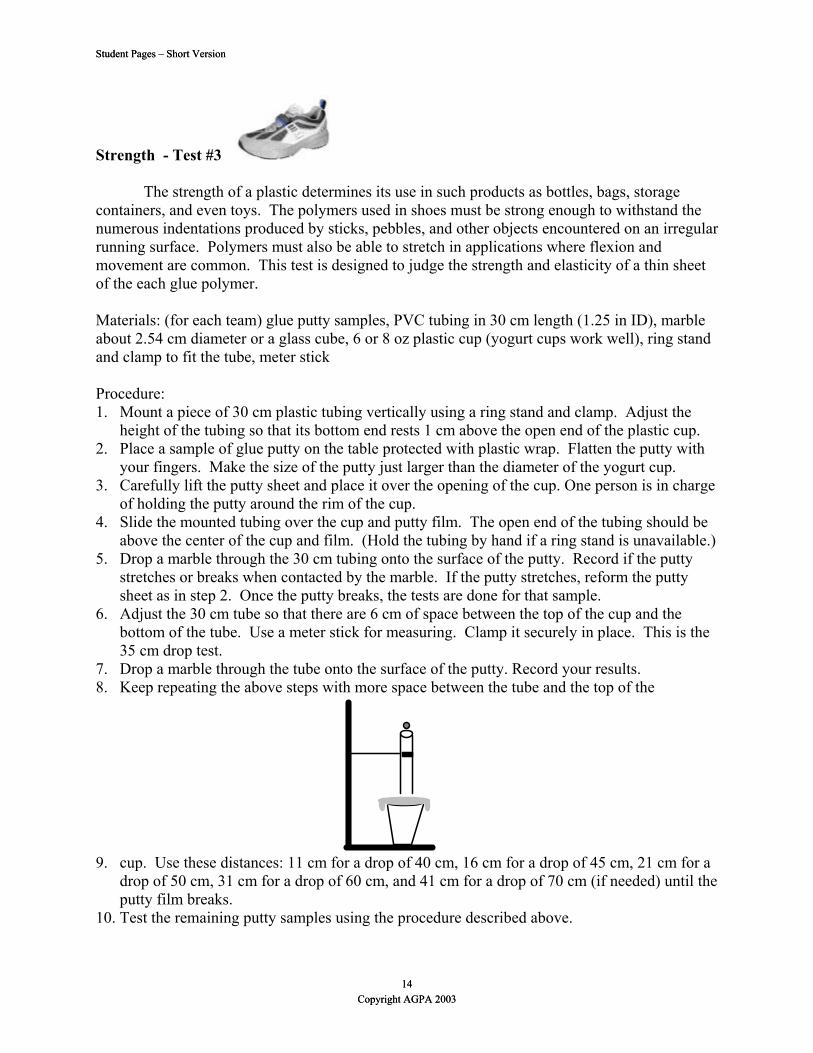
numerous indentations produced by sticks, pebbles, and other objects encountered on an irregular running surface. Polymers must also be able to stretch in applications where flexion and movement are common. This test is designed to judge the strength and elasticity of a thin sheet of the each glue polymer. Materials: (for each team) glue putty samples, PVC tubing in 30 cm length (1.25 in ID), marble about 2.54 cm diameter or a glass cube, 6 or 8 oz plastic cup (yogurt cups work well), ring stand and clamp to fit the tube, meter stick Procedure: 1. Mount a piece of 30 cm plastic tubing vertically using a ring stand and clamp. Adjust the
height of the tubing so that its bottom end rests 1 cm above the open end of the plastic cup. 2. Place a sample of glue putty on the table protected with plastic wrap. Flatten the putty with
your fingers. Make the size of the putty just larger than the diameter of the yogurt cup. 3. Carefully lift the putty sheet and place it over the opening of the cup. One person is in charge
of holding the putty around the rim of the cup. 4. Slide the mounted tubing over the cup and putty film. The open end of the tubing should be
above the center of the cup and film. (Hold the tubing by hand if a ring stand is unavailable.) 5. Drop a marble through the 30 cm tubing onto the surface of the putty. Record if the putty
stretches or breaks when contacted by the marble. If the putty stretches, reform the putty sheet as in step 2. Once the putty breaks, the tests are done for that sample.
6. Adjust the 30 cm tube so that there are 6 cm of space between the top of the cup and the bottom of the tube. Use a meter stick for measuring. Clamp it securely in place. This is the 35 cm drop test.
7. Drop a marble through the tube onto the surface of the putty. Record your results. 8. Keep repeating the above steps with more space between the tube and the top of the
9. cup. Use these distances: 11 cm for a drop of 40 cm, 16 cm for a drop of 45 cm, 21 cm for a drop of 50 cm, 31 cm for a drop of 60 cm, and 41 cm for a drop of 70 cm (if needed) until the putty film breaks.
10. Test the remaining putty samples using the procedure described above.
c
Copyright AGPA 2003
14

Student Pages – Short Version
Note: The polymer film will continue to stretch while placed across the mouth of the cup. To try and keep the tests consistent, conduct the marble test quickly after placing the film on the cup. If the film gets too thin, reform it before the next drop. Data Table for Strength: Drop Heights: S= Stretch and B=Break Polymer 30
cm 35 cm
40 cm
45 cm
50 cm
60 cm
70 cm
75% glue/water
Talc added Calcium carbonate dded
aOil added Oil and talc added
50% glue/water
c added Tal Calcium
bonate
caradded
added and talc
OilOiladded
e? 2. ANSWER IN A PARAGRAPH: What advantages would such a polymer(s) have in a shoe?
Questions: 1. Which polymer(s) has/have the greatest ability to withstand impact force of the marbl
Copyright AGPA 2003
15

Student Pages – Short Version
Impact and Elastic Recovery – Test #4 The human foot repeatedly hits the ground during any running or walking activity. In
t shock, the midsole of an oe mus ab ta ep d s” t the same time it must be able to
restore itself to its in ap b e t s . In the following test, a weight will pped on to e surface of each polym r. T e amount of indentation (deformation) will be
well s the me it takes for the surf the polymer to restore itself to its original ted) rface
or ea team sam tty, four yogurt cups that have been cut down eight, PVC tube that is 60 cm in length with a ID of 1.25 in, bolt (1/2” diameter ead, 3 long metric ruler, ring stand and clamp, clock or watch
e the glue utty mple in the cup. The surface needs to be smooth. pport the 60 cm tube vertically above the putty with your hand. Adjust the tubing so that
m of the tube sits directly above the surface of the putty in the cup. bolt, thread side pointing downward. The top of the bolt should be even with the tube hen ou h d th bolt ady r a drop test. Drop the bolt through the tube.
e time t whi the olt i ropp d.
the bolt in the surface of the polymer. Record in the data table. 5. Measure the time (in min.) needed for the surface of the polymer to return to its level or flat
surface. Record. If the surface has not recovered after 5 minutes, note the amount of recovery or indentation depth remaining.
Data Table for Impact and Elastic Recovery: Polymer Tested Depth of initial
indentation (mm)
Surface Recovery Time in min
Indentation remaining if any (mm)
Rate of Recovery in mm/min
order to provide comfort for the foot and relieve the joints of impacathletic sh t be
origle toal sh
ke re in
eateetwe
“pounn eac
dingh foo
. Atrike
be dromeasured as
tha
e hace ofti
flat (non-den
su .
Materials: (fto 2 cm in h
ch ) ples of each glue pu
hexagonal h ” ), Procedure:
. Plac1 p sa2. Su
the botto3. Hold the
top of the w y ol e re foNote th
a ch b s d e
4. Quickly remove the tube and bolt, measure the amount of indentation (in mm) produced by
Copyright AGPA 2003
16
75% glue/water Talc added Calcium carbonate added

Student Pages – Short Version
Oil added Oil and talc added 50% Glue/water Talc added Calcium carbonated
dded a
Oil added Oil and talc added Questions: 1. Which polymer seems to be the best at absorbing shock? On what data are you basing your
c
. ANSWER IN A PARAGRAPH: Which of your polymers seems to be the best at both g shock and returning to it pre-deformed shape? Explain why you picked this
decision? 2. Which polymer most rapidly returns to its “normal” flat state? (Shows the quickest elasti
recovery.) 3
absorbinpolymer. Where would you need they type of polymer in a shoe?
Copyright AGPA 2003
17
Student Pages – Short Version
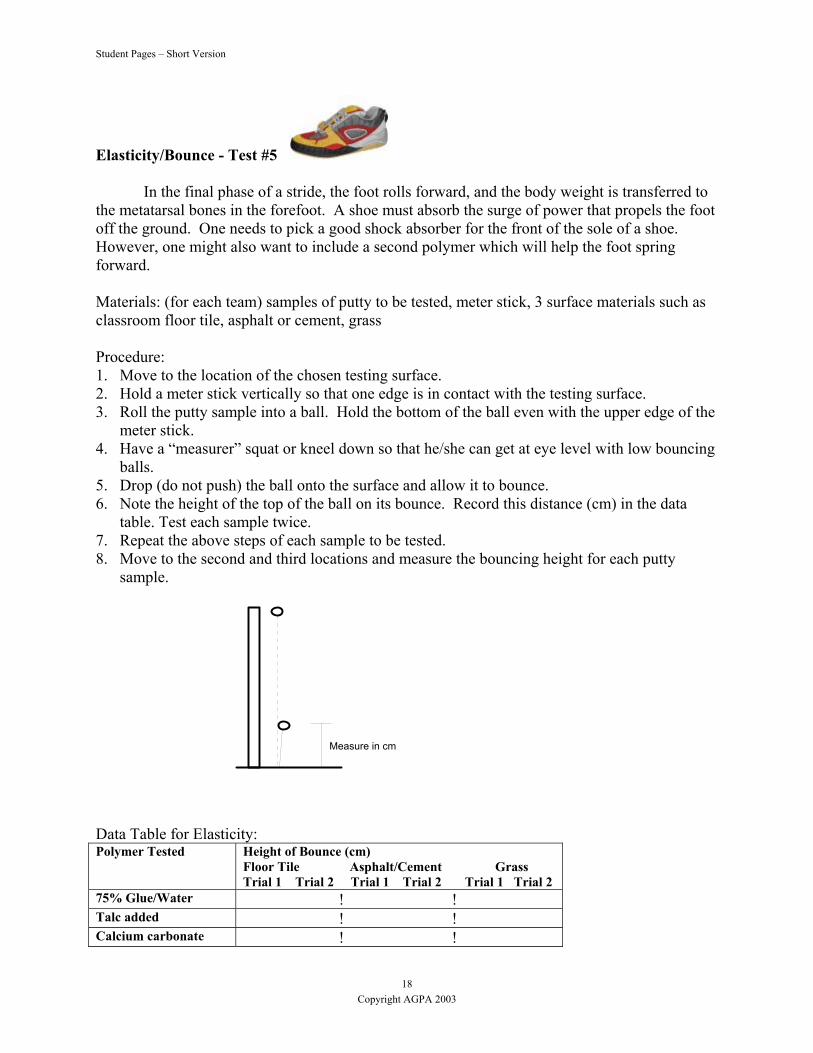
Elasticity/Bounce - T t #5 es In the final phase of a stride, the foot rolls forward, and the body weight is transferred to
rsal bones in he forefoot. A s oe must absorb the surge of power that propels the foot ne ne ds to pick a goo shock absorber for the front of the sole of a shoe.
owever, one might also want to include a second polymer which will help the foot spring rward.
or each team) samples of putty to be tested, meter stick, 3 surface materials such as
1. location of the chosen testing surface.
3. f the
4. Have a “measurer” squat or kneel down so th t he/she can get at eye level with low bouncing balls.
. Drop (do not push) the ball onto the surface and allow it to bounce.
. Note the height of the top of the ball on its bounce. Record this distance (cm) in the data table. Test each sample twice.
7. Repeat the above steps of each sample to be tested. 8. Move to the second and third locations and measure the bouncing height for each putty
sample.
Data Table for Elasticity: Polymer Tested Height of Bounce (cm)
Floor Tile Asphalt/Cement Grass Trial 1 Trial 2 Trial 1 Trial 2 Trial 1 Trial 2
the metata t hoff the ground. O e d
Hfo Materials: (fclassroom floor tile, asphalt or cement, grass
Procedure: Move to the
2. Hold a meter stick vertically so that one edge is in contact with the testing surface. Roll the putty sample into a ball. Hold the bottom of the ball even with the upper edge ometer stick.
a
56
Measure in cm
75% Glue/Water ! ! Talc added ! ! Calcium carbonate ! !
Copyright AGPA 2003
18

Student Pages – Short Version
added Oil added ! ! Oil and talc added ! ! 50% Glue/water ! ! Talc added ! ! C carbonate added
! ! ! !
alcium
Oil added ! ! Oil and talc added ! ! Questions: 1. Which type of putty bounced the highest on each surface type? Why do you think this
happened? 2. Is a good bouncer necessarily a good shock absorber? Explain your reasoning.
ould you place a material with good 3. ANSWER IN A PARAGRAPH: Where in a shoe welastic or bouncing characteristics? Explain your answer.
Copyright AGPA 2003
19

Student Pages – Short Version
Part B. Compoundin tic Shoe g Latex for the Insole of an Athle
Purpose: To inve
stiga onded to a fabric.
: liquid latex ric, vinegar in a spray bottle, talc or lcium table oil, plastic cups, spoons, 5
ogurt cups, teaspoon, old newspapers
in
Procedure: 1. Cut an old tee shirt into a rectangle of cloth about 10 cm by 15 cm. Write your names on the
edge of the cloth. Cover the table surface with old newspaper. Spray the back of the cloth with vinegar to moisten the cloth.
2. Pour about 5 mL (one teaspoon)of undiluted latex into a plastic cup. Using a spoon, smear some onto one rectangle of cloth. Spray the latex immediately
te the physical properties of latex b
Materials (25 mL per team), old tee-shirt fabtalcum powder, ca carbonate (powdered chalk), vege
y Safety: Goggles must be worn at all times. If you are allergic to latex, DO NOT participatethis activity. Time: Two laboratory days. One for preparing four samples and one for testing. The secondday may not take a whole laboratory period.
with vinegar to cause the latex to solidify. The cloth should be moist with vinegar.
3. Add another layer of latex with the spoon and spray with vinegar. 4. Add a third layer of latex and spray with vinegar. 5. Place the cloth over a yogurt cup to let dry over night. (Air should be able to circulate under
the cloth.) 7. Cut an old tee shirt into a rectangle of cloth about 10 cm by 15 cm. Write your names on the
edge of the cloth. Spray the back of the cloth with vinegar to moisten the cloth. 8. Pour about 5 mL of undiluted latex into a paper cup. Add one-half to one teaspoon of talc to
the latex. Stir with a spoon to make a homogeneous mixture. Using a spoon, smear some onto one rectangle of cloth. Spray the latex with vinegar immediately to cause the latex to solidify. The cloth should be moist with vinegar.
9. Add another layer of latex with the spoon and spray with vinegar. 10. Add a third layer of latex and spray with vinegar. 11. Place the cloth over a yogurt cup to let dry over night. (Air should be able to circulate under
the cloth.) 12. Repeat steps 7-11 to prepare a third, fourth and fifth samples with different additives:
calcium carbonate, oil, oil and talc. 13. Test your latex-coated fabric for physical properties. Each team of students has five samples
to test. Record your observations in the data table.
Copyright AGPA 2003
20

Student Pages – Short Version
Texture and Consistency Tests The texture or “feel” of a given material can influence a customer’s response to a given
een made to m ke this evaluation as consistent as possible by using data tables with specific parameters. Latex bonded
al properties needed r an insole as you do your testing. The insole is the part of the shoe where the foot rests.
rocedure:
on the surface, and run your hands over the surface of the polymer. Describe its haracteristics in the data tables below.
atex Tested Smooth Slightly Sandy Gritty
product. The following test is a very subjective test. An effort has b a
to a fabric is similar to the insole of an athletic shoe. Think about the physicfo Materials: five samples of latex PTake each latex sample and knead it in your hands. Stretch it, pinch it, dent it with a coin pressing downc Data Table for Texture: L100% Latex Latex with talc
x with calcium onate
LatecarbLatex with oil
x with oil and talc
Late
Very Elastic Data Table for Elasticity/Flexibility: Latex Tested Stiff Slightly Elastic
and Flexible % Latex 100
Latex with talc ex with calcium Lat
carbonate Latex with oil
ex with oil and talc Lat Data Table for Recovery Time:
Springs Back Latex Tested Extremely Slow to Erase Slow to Erase a Dent
a Dent Quickly From a Dent
% Latex 100 Latex with talc
ex with calcium Lat carbonate
ex with oil Lat Latex with oil and talc Question:
. Which latex or latex with additive is the best suitable for the insole of an athletic shoe? Give reasons for you answer.
1
Copyright AGPA 2003
21

Student Pages – Short Version
Elaboration of the Learning Cycle
ask: T Your group represents members of a product development team in a leading athletic shoe manufacturing corporation. You are to design a midsole and insole for one of the following types of athletic shoes: basketball, tennis, running, skateboard, or a cross trainer. Picking numbers or drawing straws in order to allow teams to choose a type of athletic shoe may be the best method
ute to
several tasks to be completed for this report: Select a name for your company that reflects your shoe design.
lunteer to do specific parts of the report. r and spelling radedorrect terminology is important.
ee tests that st reflect the putties you want to use in the midsole of your designer articular port. These putties will be placed in the diagram of the shoe sole on
ing page. For example: Will the same putty be in the heel as under the arch? Your the choice of your putties.
three tests by hand or use a computer. additive for the insole.
references (on nternet o ) to create an athletic shoe for your company. Quote specific text that supports the u alities of putties you picked
r the midsole. he cost of yo r new shoe based on the pricing structure given.
bles from the team work are available for study. These are secret files and only the ated the work s to see this i formation. Remember, this is a very competitive
micals from the same source. Here are the “wholesale” prices ing: (These p the
To keep everyone using ap th amount mixtures, all companies
to be fair to all. Objectives: Each team will form an “Athletic Shoe” company. All team members must contribthe final written report in paragraph form. A rubric on the next page shows the team how grading will be accomplished. There are•• Get organized and vo• Gramma will be g . • Use of c• Choose thr be
sneaker for a p sthe followreport must justify
• Graph these• Choose a plain latex or latex with• Find two the I r in the library to help you
se of the quto use fo
• Calculate t u All data tateam who cre i nbusiness! All shoe companies get their chefor the follow rices are ra
proximately r inflated!) e same of glue/water
must use 4 times the amount you used for your samples. That will mean you use 4x 30 mL = 120 mL mixturdecide on the addiWhite glue pLatex Talc 0
es. Latex will be 3 times the sample or 3 x 5 mL = 15 mL. Each team must tives they want to use.
$.50 er mL Oil $3.00 per teaspoon $1.00 per mL Borax solution $.25 per mL
$2.0 per teaspoon Water $.05 per mL alcium carbonate $1.00 per teaspoon
price to get the retail price for a pair of shoes.
C Calculate the cost of the designer sneaker you are creating for your report and then double the
Copyright AGPA 2003
22

Student Pages – Short Version
Outline of Shoe Sole fo
and latex in the insole. Type of SName of C
r placement of putties in the midsole
hoe ________________ ompany ____________________
Midsole Insole Place in each outline of shoe soles, the putties and latex formulations you are using in your new designer sneaker.
Copyright AGPA 2003
23
Student Pages – Short Version
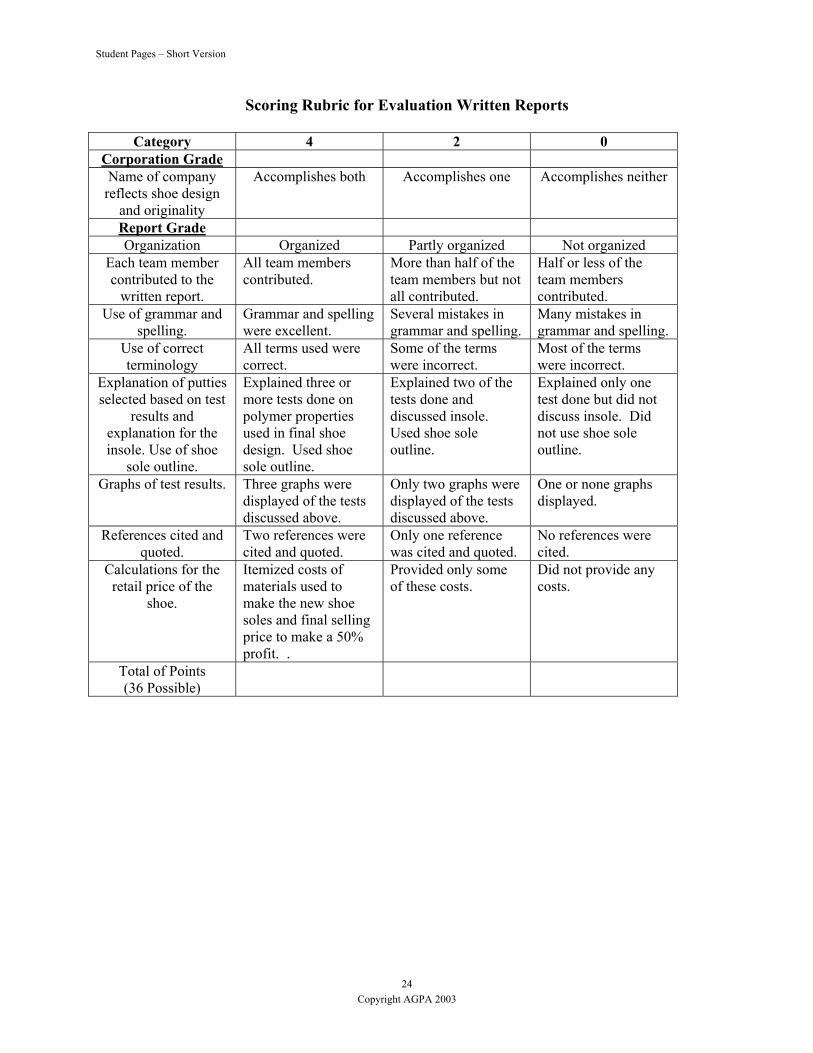
Scoring Rubric for Evaluation Written Reports
Category 4 2 0
Corporation Grade Name of company Accomplish
reflects shoe design and originality
es both Accomplishes one Accomplishes neither
Report Grade Organization Organized Partly organized Not organized
Each team member contributed to the
written report.
All team members contributed.
More than half of the team members but not all contributed.
Half or less of the team members contributed.
Use of grammar and spelling.
Grammar and spelling were excellent.
Several mistakes in grammar and spelling.
Many mistakes in grammar and spelling.
Use of correct terminology
All terms used were correct.
Some of the terms were incorrect.
Most of the terms were incorrect.
Explanation of putties selected based on test
results and explanation for the insole. Use of shoe
sole outline.
Explained three or more tests done on polymer properties used in final shoe design. Used shoe sole outline.
Explained two of the tests done and discussed insole. Used shoe sole outline.
Explained only one test done but did not discuss insole. Did not use shoe sole outline.
Graphs of test results. Three graphs were displayed of the tests discussed above.
Only two graphs were displayed of the tests discussed above.
One or none graphs displayed.
References cited and quoted.
Two references were cited and quoted.
Only one reference was cited and quoted.
No references were cited.
Calculations for the retail price of the
shoe.
Itemized costs of materials used to make the new shoe soles and final selling price to make a 50% profit. .
Provided only some of these costs.
Did not provide any costs.
Total of Points (36 Possible)
Copyright AGPA 2003
24
Student Pages – Short Version
A Short Reading Supplement on Buying Shoes Manufacturers cover a range of foot shapes in their styles and models. The molds for a certain set of shoes are set to a certain arch, size of toe box, heel width and more. Therefore, no o sho ryon neeknowledge before he/she puts down a lot of money for an athletic shoe. If you know of a pro feet such as pronation, you can find shoes with antipronation devices such as “rollbars” (wedges inserted in the midsole) and shock absorption in the rearfoot of new shoes. A flat foot needs a motion-control shoe or one that nd with nters. A h ds und g re some sh
s s thin t padding. Your foot needs an insole that can take a 0
• iff h yo ng w ry to press heel a hould not be a it from t the two
es. re too wi and risks strains from e th e too narrow, the foot gets numb
s ken to Before y e, stand nd he w rd to that
s nde s card o i tend
beyond the body o unnin he width to the top of the shoe. n ne een shoes
are too wide. Wig ee if y o. ot buy shoes to grow d
• el. mforta y. You ave to break -in athletic shoes!
• Walk, jog and jum stare at you! Ask yourself questions like: Are the heels snug? Is the hoe bend where your foot does at the toe joint?
ogy sed in the manufacture of athletic shoes is amazing. A person buys
oes for the sport they intend to play. The following are guidelines for buying shoes for specific sports: Tennis Shoes - wide stabilizer straps, deep heel cushions, midesole and forefoot cushioning, toe bumper with plenty of leather, foot frames, hard rubber outsoles Running Shoes - midsole beds of air chambers or gels for cushioning, hourglass-shape outsoles, shock absorption insoles, durable overlay materials, support features, deep waffle tread for traction, breathable mesh sides, raised heel to ease the foot into forward movement, heel support but little side-to-side support, light in weight Basketball or Court Shoes - ankle support, lots of eyelets for a custom fit, lots of cushioning and support in the arch and heel, herringbone or concentric circular tread patterns, sturdy foot frame, heel counter to cradle the heel All-Around Appeal is the Cross-Trainer - stable heel and cushioned, rubber outsole, instep laces for a better fit, mesh sides for air circulation, sturdy toe box or forefoot cushioning.
ne shoe or brand of
blem with your
e is going to fit eve e. The consumer ds to have a little
is rigid, rugged a deep heel couigh-arched foot neeopping tips:
cushion chambers er the heel and a spon y midsole. Here a
• Check inside the hoe for a removable in ole. Look for somepounding with those 1
g more than a fla,000 steps per day.
Check for a stdown on the
eel that will preventnd you s
ur heel from twistible to compress
ith each stride. T the side so tha
sides meet. • Width is very imp
or hurts. If shoebarefoot on an i
ortant is buying shoa foot slipping insidare too short, blacex card and mark t
When shoes ae shoe. If they arenails result. idth where it is the widest. Cut the ca
de, one gets blisters
ou go to the stor
width. Match thishould not extend
card width to the ubeyond the shoe by mf the shoe (as in r
rside of each shoe at itre an one-eighth of ang shoes), match t
widest point. The nch. If the soles ex
• Put the shoe on a d tie it. If less than ogle your toes to s
inch of tongue is sou have room to do s
under the laces, the Do n
into, this will leaFocus on the fe
to blisters! It should feel co
p around. Let peoplearch supported? Does the s
ble immediatel do not h
The technol ush
Copyright AGPA 2003
25