DESIGNER: JILL FINLEY OF JILLILY STUDIO
9
Project: Woodland Walk Pattern may be downloaded for personal use only. No electronic or printed reproduction permitted without the prior written consent of Meredith Corporation. ©Meredith Corporation 2017. All rights reserved. 1 American Patchwork & Quilting | Quilt Sampler | Quilts and More As the slush and ice of winter fade away and the fresh new buds of spring emerge, combine piecing and appliqué to make a nature-inspired quilt. DESIGNER: JILL FINLEY OF JILLILY STUDIO
Transcript of DESIGNER: JILL FINLEY OF JILLILY STUDIO

Project: Woodland Walk
Pattern may be downloaded for personal use only. No electronic or printed reproduction permitted without the prior written consent of Meredith Corporation. ©Meredith Corporation 2017. All rights reserved. 1
American Patchwork & Quilting | Quilt Sampler | Quilts and More
As the slush and ice of winter fade away and the fresh new buds of spring emerge, combine piecing and appliqué to make a nature-inspired quilt.
DESIGNER: JILL FINLEY OF JILLILY STUDIO

Project: Woodland Walk
Pattern may be downloaded for personal use only. No electronic or printed reproduction permitted without the prior written consent of Meredith Corporation. ©Meredith Corporation 2017. All rights reserved. 2
American Patchwork & Quilting | Quilt Sampler | Quilts and More
Materials• 5⁄8 yard total assorted green
prints (appliqués, triangle-squares)
• 1⁄2 yard total assorted brown prints (appliqués, triangle- squares)
• 1⁄2 yard total assorted yellow prints (appliqués, triangle squares)
• 11⁄4 yards mottled light green (appliqué foundations, border)
• 1 yard white tone-on-tone (appliqués, triangle-squares)
• 1⁄3 yard mottled green (vines)• 1⁄2 yard green dot (binding)• 3 yards backing fabric• 53" square batting• 8—1⁄4 “-diameter buttons: brown• Embroidery floss: green, brown• Freezer paper• Spray starch
Finished quilt: 461⁄2" squareFinished blocks: 8" square
Quantities are for 44⁄45"-wide, 100% cotton fabrics. Measurements include 1⁄4" seam allowances. Sew with right sides together unless otherwise stated.
Cut FabricsCut pieces in the following order. Patterns are on page 8. To make templates and prepare appliqué pieces, see Cut and Prepare Appliqués, right.
From assorted green prints, cut:• 38—27⁄8" squares• Enough 3⁄4"-wide bias strips to
total 31" for stems • 3 of Pattern A • 1 each of patterns A reversed
and B• 39 of Pattern F • 2 of Pattern G
From assorted brown prints, cut:• 37—27⁄8" squares• Enough 3⁄4"-wide bias strips to
total 26" for stems• 2 of Pattern DFrom assorted yellow prints, cut:• 38—27⁄8" squares• 14 of Pattern D• 2 of Pattern EFrom mottled light green, cut:• 4—9" squares• 5—61⁄2 ×42" strips for borderFrom white tone-on-tone, cut:• 113—27⁄8" squares• 4 of Pattern C• 18 of Pattern D• 5 of Pattern HFrom mottled green, cut:• Enough 3⁄4"-wide bias strips to
total 200" for vinesFrom green dot, cut:• 5—21⁄2 ×42" binding strips
Cut and Prepare AppliquésDesigner Jill Finley uses a freezer-paper-and-starch method for appliquéing. Instructions that follow are for this technique.
1. Lay freezer paper, shiny side down, over patterns. Trace each pattern the number of times indicated in cutting instructions. Cut out freezer-paper shapes on drawn lines.
2. Using a hot, dry iron, press freezer-paper shapes, shiny sides down, onto wrong sides of designated fabrics; let cool. Cut out each shape, adding a 1⁄4" seam allowance to all edges (Diagram 1).
3. Spray a small amount of starch into a dish. Place a template-topped appliqué piece, wrong side up, on a pressing surface
covered with a tea towel or muslin. Dip a cotton swab in starch and moisten seam allowance along edge of appliqué piece (Diagram 2).
4. Using tip of a hot, dry iron, turn seam allowance over curved edge of freezer-paper template and press until fabric is dry. Press entire seam allowance, adding starch as necessary and ensuring that fabric is pressed taut against template. Carefully peel off template to make appliqué.
5. Repeat steps 3 and 4 to prepare all appliqué shapes.
Prepare Stem and Vine Appliqués1. Turn under 1⁄4" along long edges
of each green and brown print and mottled green 3⁄4"-wide bias strip; press. (To speed up the process, Jill used a 1⁄4" bias-tape maker to prepare bias strips.)
2. Cut prepared green print bias
strips to make:• 1—1⁄4 ×101⁄2" stem appliqué• 1—1⁄4 ×91⁄2" stem appliqué• 1—1⁄4 ×9" stem appliqué
3. Cut prepared brown print bias strips to make:• 1—1⁄4 ×7" stem appliqué• 2—1⁄4 ×6" stem appliqués• 1—1⁄4 ×41⁄2" stem appliqué
4. Cut prepared mottled green bias strips to make:• 4—1⁄4 ×47" vine appliqués
Appliqué Blocks1. Fold each mottled light green
9" square in half diagonally twice. Lightly press folds to

Project: Woodland Walk
Pattern may be downloaded for personal use only. No electronic or printed reproduction permitted without the prior written consent of Meredith Corporation. ©Meredith Corporation 2017. All rights reserved. 3
American Patchwork & Quilting | Quilt Sampler | Quilts and More
create four foundation squares with appliqué placement guidelines; unfold.
2. Referring to Block A Placement Diagram, lay out the following shapes on a foundation square: one each of green print A and B leaves, four white tone-on-tone C petals, two brown print D circles, and green print 1⁄4 ×101⁄2" and 1⁄4 ×91⁄2" stems. Baste in place.
3. Using threads that match appliqué shapes and working from bottom layer to top, appliqué pieces to foundation square to make Block A. Trim block to 81⁄2" square.
4. Referring to Block B Placement Diagram, lay out the following shapes on a foundation square: six yellow print D circles, two yellow print E ovals, three green print F leaves, and brown print 1⁄4 ×6" and 1⁄4 ×41⁄2" stems. Baste in place.
5. Repeat Step 3 to make Block B.
6. Referring to Block C Placement Diagram, lay out the following shapes on a foundation square: eight yellow print D circles, two green print G leaves, and brown print 1⁄4 ×7" and 1⁄4 ×6" stems. Baste in place.
7. Repeat Step 3 to make Block C.
8. Referring to Block D Placement Diagram, lay out the following shapes on a foundation square: two green print A leaves, one green print A reversed leaf, five white tone-on-tone H flowers, and a green print 1⁄4 ×9" stem. Baste in place.
9. Repeat Step 3 to make Block D.
Embellish Blocks1. Referring to Block A Placement
Diagram, use three strands of green embroidery floss to backstitch details on each white tone-on-tone C petal.
To backstitch, pull the needle up at A (Backstitch Diagram). Insert it back into fabric at B, and bring it up at C. Push needle down again at D, and bring it up at E. Continue in the same manner.
2. Using three strands of brown
floss, stitch 11 small Xs on each yellow print E oval (Block B Placement Diagram).
3. Referring to Block C Placement Diagram, use yellow thread to hand-stitch a brown button to each yellow print D circle.
4. Using three strands of green
floss, backstitch to connect white tone-on-tone H flowers to stem appliqué (Block D Placement Diagram).
5. Stitch three French knots on each white tone-on-tone H flower. To make a French knot, pull needle up at A (French Knot Diagram). Wrap the floss around the tip of the needle twice. Insert floss-wrapped needle into fabric at B, 1⁄16" away from A. Gently push wraps down needle to meet fabric, then pull needle and floss through fabric smoothly.
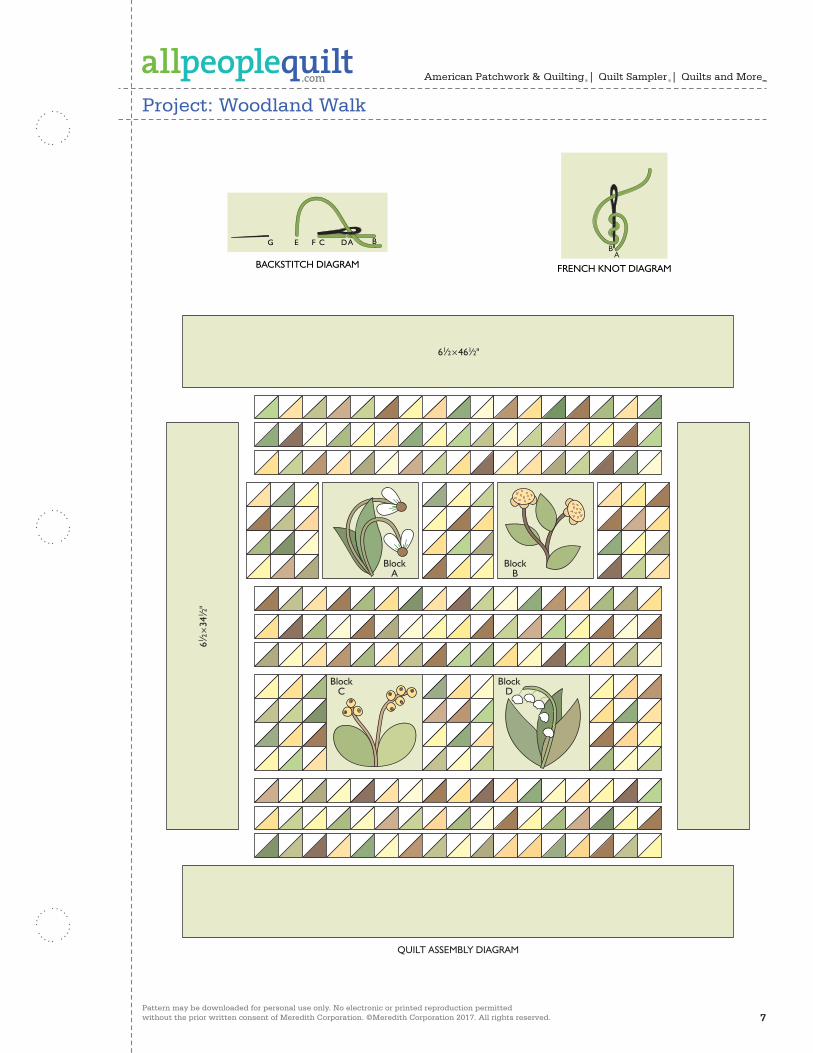
Assemble Quilt Top1. Use a pencil to mark a diagonal
line on wrong side of each white tone-on-tone 27⁄8" square.
2. Layer a marked 27⁄8" square atop an assorted green, brown, or yellow print 27⁄8" square. Sew together with two seams, stitching 1⁄4" on each side of drawn line (Diagram 3).
3. Cut apart on drawn line to make two triangle units (Diagram 4). Press each triangle unit open, pressing seam toward assorted print triangle to make two triangle-squares (Diagram 5). Each triangle-square should be 21⁄2" square including seam allowances.
4. Repeat steps 2 and 3 with remaining marked white tone-on-tone squares and green, brown, and yellow print squares to make 226 triangle-squares total (you will use 225).
5. Referring to Diagram 6, arrange 12 triangle-squares in four rows. Sew together pieces in each row. Press seams in one direction, alternating direction with each row. Join rows to make a triangle-square segment. Press seams in one direction. The triangle-square segment should be 61⁄2 ×81⁄2" including seam allowances. Repeat to make six triangle-square segments total.
6. Referring to Quilt Assembly Diagram, lay out triangle-square segments, appliquéd blocks, and remaining triangle-squares in rows. Sew together pieces in each row. Press seams in one direction, alternating direction

Project: Woodland Walk
Pattern may be downloaded for personal use only. No electronic or printed reproduction permitted without the prior written consent of Meredith Corporation. ©Meredith Corporation 2017. All rights reserved. 4
American Patchwork & Quilting | Quilt Sampler | Quilts and More
with each row. Join rows to make quilt center. Press seams in one direction. The quilt center should be 341⁄2" square including seam allowances.
Add and Embellish Border1. Cut and piece mottled light
green 61⁄2 ×42" strips to make:• 2—61⁄2 ×461⁄2" border strips• 2—61⁄2 ×341⁄2" border strips
2. Sew short border strips to opposite edges of quilt center. Add long border strips to remaining edges to complete quilt top. Press all seams toward border.
3. Referring to photo on page 5 and starting in a corner of the border, lay each mottled green vine appliqué in a rolling curve on quilt top; baste in place.
4. Using green thread and a small slip stitch, appliqué vines in place.
5. Arrange 36 green print F leaf appliqués on quilt top, making sure leaves cover ends of each mottled green vine appliqué. Baste in place.
6. Using green thread and a small slip stitch, appliqué leaves in place.
7. Place 18 white tone-on-tone D circle appliqués on quilt top. Baste in place.
8. Using white thread and a small slip stitch, appliqué D circles in place.
9. Using three strands of green floss, stitch an X in each D circle.
Finish Quilt1. Layer quilt top, batting, and
backing; baste.
2. Quilt as desired. Carefully avoiding the appliqués, Virginia Gore machine-quilted a swirling design across the quilt top.
3. Bind with green dot binding strips.

Project: Woodland Walk
Pattern may be downloaded for personal use only. No electronic or printed reproduction permitted without the prior written consent of Meredith Corporation. ©Meredith Corporation 2017. All rights reserved. 5
American Patchwork & Quilting | Quilt Sampler | Quilts and More

Project: Woodland Walk
Pattern may be downloaded for personal use only. No electronic or printed reproduction permitted without the prior written consent of Meredith Corporation. ©Meredith Corporation 2017. All rights reserved. 6
American Patchwork & Quilting | Quilt Sampler | Quilts and More
DIAGRAM 1
APQ Calendar 2010Woodland Spring (Woodland Walk)CMR 3356912Diagram 1C. Neubauer 1-7-09100573229
DIAGRAM 2
APQ Calendar 2010Woodland Spring (Woodland Walk)CMR 3356912Diagram 2C. Neubauer 1-7-09100573230
DIAGRAM 3
APQ Calendar 2010Woodland Spring (Woodland Walk)CMR 3356912Diagram 3C. Neubauer 1-7-09100573231
DIAGRAM 4
APQ Calendar 2010Woodland Spring (Woodland Walk)CMR 3356912Diagram 4C. Neubauer 1-7-09100573232
A
B
D
C
BLOCK APLACEMENT DIAGRAM
APQ Calendar 2010Woodland Spring (Woodland Walk)CMR 3356912Block A Placement DiagramC. Neubauer 1-7-09100573225
101⁄2"
91⁄2"
F
E
D
BLOCK BPLACEMENT DIAGRAM
APQ Calendar 2010Woodland Spring (Woodland Walk)CMR 3356912Block B Placement DiagramC. Neubauer 1-7-09100573226
6"
41⁄2"
DIAGRAM 5
APQ Calendar 2010Woodland Spring (Woodland Walk)CMR 3356912Diagram 5C. Neubauer 1-7-09100573233
DIAGRAM 6
APQ Calendar 2010Woodland Spring (Woodland Walk)CMR 3356912Diagram 6C. Neubauer 1-7-09100573234
G G
D
BLOCK CPLACEMENT DIAGRAM
APQ Calendar 2010Woodland Spring (Woodland Walk)CMR 3356912Block C Placement DiagramC. Neubauer 1-7-09100573227
7"6"
A
A
H
Ar
BLOCK DPLACEMENT DIAGRAM
APQ Calendar 2010Woodland Spring (Woodland Walk)CMR 3356912Block D Placement DiagramC. Neubauer 1-7-09100573228
9"
Project: Woodland Walk
Pattern may be downloaded for personal use only. No electronic or printed reproduction permitted without the prior written consent of Meredith Corporation. ©Meredith Corporation 2017. All rights reserved. 7
American Patchwork & Quilting | Quilt Sampler | Quilts and More
BACKSTITCH DIAGRAM
A BC DE FG
APQ Calendar 2010Woodland Spring (Woodland Walk)CMR 3356912BackstitchC. Neubauer 1-7-09100573235
FRENCH KNOT DIAGRAMA
B
APQ Calendar 2010Woodland Spring (Woodland Walk)CMR 3356912French KnotC. Neubauer 1-7-09100573236
61⁄2×461⁄2"
61 ⁄2×
341 ⁄2
"
BlockA
BlockB
BlockC
BlockD
QUILT ASSEMBLY DIAGRAM
APQ Calendar 2010Woodland Spring (Woodland Walk)CMR 3356912Quilt Assembly DiagramC. Neubauer 1-7-09100573235

Project: Woodland Walk
Pattern may be downloaded for personal use only. No electronic or printed reproduction permitted without the prior written consent of Meredith Corporation. ©Meredith Corporation 2017. All rights reserved. 8
American Patchwork & Quilting | Quilt Sampler | Quilts and More
When printing a downloadable pdf, set Page Scaling preference to NONE to print patterns at 100%. Do NOT "Shrink to Fit" or "Fit to Printable Area."
This box should measure 1".
Woodland WalkPattern A
Woodland WalkPattern E
Woodland WalkPattern F
Woodland WalkPattern G
Woodland WalkPattern B
Woodland WalkPattern C
WoodlandWalk
Pattern D
WoodlandWalk
Pattern H
APQ Calendar 2010Woodland Spring (Woodland Walk)CMR 3356912Full-Size PatternsC. Neubauer 1-7-09100573224
Woodland WalkPattern A
Woodland WalkPattern E
Woodland WalkPattern F
Woodland WalkPattern G
Woodland WalkPattern B
Woodland WalkPattern C
WoodlandWalk
Pattern D
WoodlandWalk
Pattern H
APQ Calendar 2010Woodland Spring (Woodland Walk)CMR 3356912Full-Size PatternsC. Neubauer 1-7-09100573224

9Pattern may be downloaded for personal use only. No electronic or printed reproduction permitted without the prior written consent of Meredith Corporation. ©Meredith Corporation 2016. All rights reserved.
Make TemplatesA template is a pattern made from extra-sturdy material so you can trace around it many times without wearing away the edges. Acrylic templates for many common shapes are available at quilt shops. Or you can make your own by duplicating printed patterns on template plastic. To make permanent templates, purchase easy-to-cut template plastic, available at quilt shops and crafts supply stores. Lay the plastic over a printed pattern. Trace the pattern onto the plastic using a ruler and a permanent marker to ensure straight lines, accurate corners, and permanency. For hand piecing and appliqué, make templates the exact size finished pieces will be (without seam allowances). For piecing, this means tracing the patterns’ dashed lines. For machine piecing, make templates that include seam allowances by tracing the patterns’ solid and dashed lines onto the template plastic. For easy reference, mark each template with its letter designation, grain line (if noted on the pattern), and block name. Cut out the traced shapes on their outside lines. Verify each template’s shape and size by placing it over its printed pattern. Templates must be accurate; errors, however small, will compound many times as you assemble a quilt. To check templates’ accuracy, make a test block before cutting the fabric pieces for an entire quilt.
Use TemplatesTo mark on fabric, use a pencil, white dressmaker’s pencil, chalk, or a special fabric marker that makes a thin, accurate line. Do not use a ballpoint or ink pen; it may bleed if washed. Test all marking tools on a fabric scrap before using them. To make pieces for hand piecing or appliqué, place a template facedown on the wrong side of the fabric and trace. Then reposition the template at least 1⁄2" away from the previous tracing (Diagram 1), trace again, and repeat. The lines you trace on the fabric are sewing lines. Mark cutting lines 1⁄4" away from the sewing lines, or estimate the distance by eye when cutting out the pieces with scissors. For hand piecing, add a 1⁄4" seam allowance; for hand appliqué, add a 3⁄16" seam allowance. Because templates used to make pieces for machine piecing have seam allowances included, you can use common tracing lines for efficient cutting. Place a template facedown on the wrong side of the fabric and trace. Then reposition the template without a space between it and the previous tracing (Diagram 2); trace again and repeat. Using a rotary cutter and ruler, cut pieces out, cutting precisely on the drawn lines.
A
DIAGRAM 1
B
DIAGRAM 2
Make and Use Templates
American Patchwork & Quilting | Quilt Sampler | Quilts and More
Make and Use Templates