Design of an Operational Amplifier for High …537042/FULLTEXT01.pdfDesign of an Operational...
105
Design of an Operational Amplifier for High Performance Pipelined ADCs in 65nm CMOS Master thesis performed in Electronic Devices Author: Sima Payami Report number: LiTH-ISY-EX--12/4571--SE Linköping, June 2012
Transcript of Design of an Operational Amplifier for High …537042/FULLTEXT01.pdfDesign of an Operational...

Design of an Operational Amplifier for High Performance
Pipelined ADCs in 65nm CMOS
Master thesis performed in Electronic Devices
Author: Sima Payami
Report number: LiTH-ISY-EX--12/4571--SE
Linköping, June 2012


Design of an Operational Amplifier for High Performance
Pipelined ADCs in 65nm CMOS
............................................................................
............................................................................
Master thesis Performed in Electronic Devices
at Linköping Institute of Technology
by Sima Payami
...........................................................
LiTH-ISY-EX--12/4571--SE
Supervisor: Professor Atila Alvandpour
Examiner: Professor Atila Alvandpour
Linköping, June 2012


Presentation Date
8th June 2012
Publishing Date (Electronic version)
25th
June 2012
Department and Division
Department of Electrical Engineering
Electronic Devices
URL, Electronic Version
http://urn.kb.se/resolve?urn= urn:nbn:se:liu:diva-78930
Publication Title
Design of an Operational Amplifier for High Performance Pipelined ADCs in 65nm CMOS
Author(s)
Sima Payami
Abstract
In this work, a fully differential Operational Amplifier (OpAmp) with high Gain-Bandwidth (GBW), high linearity and Signal-to-Noise ratio (SNR) has been designed in 65nm CMOS technology with 1.1v supply
voltage. The performance of the OpAmp is evaluated using Cadence and Matlab simulations and it satisfies the stringent requirements on the amplifier to be used in a 12-bit pipelined ADC. The open-loop DC-gain of
the OpAmp is 72.35 dB with unity-frequency of 4.077 GHz. Phase-Margin (PM) of the amplifier is equal to
76 degree. Applying maximum input swing to the amplifier, it settles within 0.5 LSB error of its final value
in less than 4.5 ns. SNR value of the OpAmp is calculated for different input frequencies and amplitudes
and it stays above 100 dB for frequencies up to 320MHz.
The main focus in this work is the OpAmp design to meet the requirements needed for the 12-bit pipelined
ADC. The OpAmp provides enough closed-loop bandwidth to accommodate a high speed ADC (around
300MSPS) with very low gain error to match the accuracy of the 12-bit resolution ADC. The amplifier is placed in a pipelined ADC with 2.5 bit-per-stage (bps) architecture to check for its functionality.
Considering only the errors introduced to the ADC by the OpAmp, the Effective Number of Bits (ENOB)
stays higher than 11 bit and the SNR is verified to be higher than 72 dB for sampling frequencies up to 320
MHz.
Keywords
Pipelined, ADC, OpAmp, Gain Boosting, CMFB, 2.5bps architecture, Flash, MDAC
Language
English
Other (specify below)
Number of Pages
87 pages
Type of Publication
Licentiate thesis
Degree thesis
Thesis C-level
Thesis D-level
Report
Other (specify below)
ISBN (Licentiate thesis)
ISRN: LiTH-ISY-EX--12/4571--SE
Title of series (Licentiate thesis)
Series number/ISSN (Licentiate thesis)


I
Abstract
In this work, a fully differential Operational Amplifier (OpAmp) with high Gain-
Bandwidth (GBW), high linearity and Signal-to-Noise ratio (SNR) has been
designed in 65nm CMOS technology with 1.1v supply voltage. The performance of
the OpAmp is evaluated using Cadence and Matlab simulations and it satisfies the
stringent requirements on the amplifier to be used in a 12-bit pipelined ADC. The
open-loop DC-gain of the OpAmp is 72.35 dB with unity-frequency of 4.077 GHz.
Phase-Margin (PM) of the amplifier is equal to 76 degree. Applying maximum
input swing to the amplifier, it settles within 0.5 LSB error of its final value in less
than 4.5 ns. SNR value of the OpAmp is calculated for different input frequencies
and amplitudes and it stays above 100 dB for frequencies up to 320MHz.
The main focus in this work is the OpAmp design to meet the requirements needed
for the 12-bit pipelined ADC. The OpAmp provides enough closed-loop bandwidth
to accommodate a high speed ADC (around 300MSPS) with very low gain error to
match the accuracy of the 12-bit resolution ADC. The amplifier is placed in a
pipelined ADC with 2.5 bit-per-stage (bps) architecture to check for its
functionality. Considering only the errors introduced to the ADC by the OpAmp,
the Effective Number of Bits (ENOB) stays higher than 11 bit and the SNR is
verified to be higher than 72 dB for sampling frequencies up to 320 MHz.
Keywords: Pipelined, ADC, OpAmp, Gain Boosting, CMFB, 2.5bps architecture,
Flash, MDAC

II

III
Acknowledgement
I would like to express my gratitude and appreciation to all the people who have
helped and supported me in the process of this thesis. Without their help and
support, I would not be able to reach this level of satisfaction with what I have
learnt and accomplished during my master thesis.
First of all I would like to thank my supervisor Professor Atila Alvandpour for his
guidance, valuable ideas and all the insightful discussions. Thank you for the
wonderful experience.
Secondly, I am thankful to Amin Ojani, Mostafa Savadi, Timmy Sundstrsom, Ali
Fazli, Ameya Bhide, and Daniel Svärd, former and current Ph.D. students in
Electronic Device division, for their help. I have benefited from all the useful
discussions with them. All the beneficial suggestions I have received from them
helped me to improve my work.
Furthermore, I would like to thank Associate Professor Jacob Wikner and Dr.
Christer Jansson for their help which was given most kindly whenever I needed.
At the end I want to thank my beloved family and friends for their support and
understanding during my studies. I am grateful to them who have enriched my life,
encouraged and helped me to overcome all difficulties.

IV

V
Table of Content
Abstract ...................................................................................................................................... I
Acknowledgement .................................................................................................................... III
Table of Content ........................................................................................................................ V
Table of Figures ....................................................................................................................... IX
Table of Tables ........................................................................................................................ XI
Introduction ................................................................................................................................1
Overview ................................................................................................................................1
Thesis Organisation .................................................................................................................2
List of Acronyms ....................................................................................................................3
Chapter1. Introduction to ADCs .............................................................................................5
1.1 Brief Review of ADC Architectures ..............................................................................5
1.1.1 Flash ADC .............................................................................................................5
1.1.2 Folding ADC .........................................................................................................6
1.1.3 Sub-Ranging ADC .................................................................................................8
1.1.4 SAR ADC ..............................................................................................................8
1.1.5 ∑-∆ ADC ...............................................................................................................9
1.2 ADC Error Sources and Performance Metrics ............................................................. 10
1.2.1 Static Performance Metrics .................................................................................. 11
1.2.2 Dynamic Performance Metrics ............................................................................. 12
Chapter2. Pipelined ADC ..................................................................................................... 13
2.1 Pipelined ADC’s Architecture ..................................................................................... 14
2.2 Flash Sub-ADC ........................................................................................................... 16
2.2.1 Thermometer Decoder ......................................................................................... 17
2.2.2 Comparator .......................................................................................................... 18
2.2.2.1 Kickback Noise............................................................................................. 20
2.2.2.2 HYSTERESIS .............................................................................................. 21
2.2.2.3 METASTABILITY ...................................................................................... 21
2.3 MDAC ........................................................................................................................ 21
2.3.1 Resistive Ladder DAC ......................................................................................... 23
2.4 Bootstrapping .............................................................................................................. 25
2.5 Clocking Scheme ........................................................................................................ 27
2.6 Digital Correction and Time Alignment ...................................................................... 27
2.7 Noise Budgeting ......................................................................................................... 28

VI
Chapter3. Introduction to the Fundamentals of OpAmps ...................................................... 31
3.1 Ideal OpAmp .............................................................................................................. 31
3.2 Real OpAmps ............................................................................................................. 32
3.2.1 Finite Gain ........................................................................................................... 33
3.2.2 Finite Input Impedance ........................................................................................ 33
3.2.3 Non-Zero Output Impedance ................................................................................ 33
3.2.4 Output Swing ....................................................................................................... 33
3.2.5 Input Current ....................................................................................................... 33
3.2.6 Input Offset Voltage ............................................................................................ 34
3.2.7 Common-Mode Gain ........................................................................................... 34
3.2.8 Power-Supply Rejection ....................................................................................... 34
3.2.9 Noise ................................................................................................................... 35
3.2.10 Finite Bandwidth ................................................................................................. 35
3.2.11 Nonlinearity ......................................................................................................... 36
3.2.12 Stability ............................................................................................................... 36
3.2.13 Temperature Effects ............................................................................................. 36
3.2.14 Drift ..................................................................................................................... 37
3.2.15 Slew Rate ............................................................................................................. 37
3.2.16 Power Considerations .......................................................................................... 38
3.3 Analogue Design Trade-offs ....................................................................................... 38
3.4 OpAmps’ Topologies .................................................................................................. 39
3.4.1 Telescopic Topology ............................................................................................ 39
3.4.2 Folded-Cascode Topology ................................................................................... 41
3.4.3 Gain-Boosting ...................................................................................................... 42
3.4.4 Two-Stage OpAmps ............................................................................................. 44
3.4.5 Comparison between Different Topologies of OpAmps ....................................... 44
Chapter4. Designed OpAmp ................................................................................................ 47
4.1 OpAmp Requirements ................................................................................................. 47
4.1.1 DC-Gain .............................................................................................................. 48
4.1.2 Gain-Bandwidth (GBW) ...................................................................................... 48
4.1.3 Slew-Rate (SR) .................................................................................................... 49
4.1.4 Noise ................................................................................................................... 50
4.1.5 Summary of OpAmp’s Requirements ................................................................... 50
4.2 Designed OpAmp........................................................................................................ 50

VII
4.2.1 Common-Mode Feedback (CMFB) ...................................................................... 51
4.2.2 Boosting Amplifiers ............................................................................................. 51
4.3 Test Bench .................................................................................................................. 55
4.4 Designed OpAmp’s Result .......................................................................................... 56
4.5 Comparison with other works...................................................................................... 59
Chapter5. Simulation Result of Pipelined ADC Incorporating Designed OpAmp ................. 61
5.1 Simulation Result for the High Level Pipelined ADC .................................................. 61
5.2 Simulation Result for the High Level Pipelined ADC with the OpAmp in Schematic .. 62
Future Work .............................................................................................................................. 69
References ................................................................................................................................ 71
Appendix A............................................................................................................................... 73
Simulation Result for the Pipelined ADC in Transistor Level ................................................ 73
Appendix B ............................................................................................................................... 75
VerilogA Codes..................................................................................................................... 75
VerilogA Code for 12-bit Digital Writer ............................................................................ 75
VerilogA Code for Differential Analogue Writer ............................................................... 76
VerilogA Code for Differential 16-bit Scalable DAC ......................................................... 78
Matlab Codes ........................................................................................................................ 83
Matlab Code for Reading Text File from Cadence for OpAmp .......................................... 83
Matlab Code for Reading Text File from Cadence for ADC .............................................. 83
Matlab DAC Code for Reconstructing Digital Outputs of the ADC ................................... 85
Matlab Code for Calculation of Performance Metrics of ADC and OpAmp ....................... 86
Matlab Code for Calculation of Performance Metrics of ADC and OpAmp ....................... 87

VIII

IX
Table of Figures
Figure 1-1: Speed and Resolution of Different ADCs [1] ......................................................................................... 5
Figure 1-2: (a) 2-bit Flash ADC (b) Thermo-Code to Digital-Code Table ................................................................ 6
Figure 1-3: (a) A Ramp Input Signal, (b) Residue from a Binary Stage, (c) Residue from a Folding Stage ................ 7
Figure 1-4: Concept of a Folding Stage ................................................................................................................... 7
Figure 1-5: 6-bit Sub-Ranging ADC ....................................................................................................................... 8
Figure 1-6: SAR ADC ............................................................................................................................................ 9
Figure 1-7: ∑-∆ ADC ........................................................................................................................................... 10 Figure 1-8: INL/DNL Concept .............................................................................................................................. 11
Figure 2-1: Error Caused by Reference Voltage Deviations from Ideal Value in (A) 3-bit Stage and (B) 2.5-bit Stage
................................................................................................................................................................... 14 Figure 2-2: 12-bit Pipelined ADC ......................................................................................................................... 14
Figure 2-3: Pipeline Stage ..................................................................................................................................... 15 Figure 2-4: Residue Signal of A 2.5b Stage ........................................................................................................... 15
Figure 2-5: One Segment of Comparing Circuitry in Sub-ADC ............................................................................. 16
Figure 2-6: (a) Sampling Phase in Flash Sub-ADC, (b) Comparing Phase in Flash Sub-ADC................................. 17
Figure 2-7: Thermometer to Binary Decoder Implemented by OR-Based ROM ..................................................... 18
Figure 2-8: Basic Concept of a Comparator ........................................................................................................... 18
Figure 2-9: Latch Circuitry of The Comparator ..................................................................................................... 19
Figure 2-10: Pre-Amplifier Circuit of The Comparators in Flash Sub-ADC ........................................................... 20
Figure 2-11: Kickback Noise Due to Discharging Pre-Charged Nodes ................................................................... 20 Figure 2-12: Sampling and Multiplication Part of The MDAC Circuit ................................................................... 21
Figure 2-13: MDAC in Sampling Mode ................................................................................................................ 22
Figure 2-14: MDAC in Amplification Mode ......................................................................................................... 23
Figure 2-15: Use of Dummy Switches to Compensate for Charge Injection ........................................................... 23
Figure 2-16: DAC’s Transfer Function.................................................................................................................. 24
Figure 2-17: Resistive Ladder DAC ...................................................................................................................... 25
Figure 2-18: Bootstrap Circuit .............................................................................................................................. 26
Figure 2-19: Stage Clock Phases ........................................................................................................................... 27 Figure 2-20: Time Alignment and Digital Correction Logic................................................................................... 28
Figure 2-21: Digital Correction Logic ................................................................................................................... 28
Figure 3-1 : A Single-Ended OpAmp Symbol ....................................................................................................... 31
Figure 3-2: Ideal OpAmp ...................................................................................................................................... 32
Figure 3-3: Gain versus Frequency ....................................................................................................................... 35
Figure 3-4: Slewing Concept ................................................................................................................................ 38
Figure 3-5: Analogue Design Octagon [11] ........................................................................................................... 39 Figure 3-6: Telescopic Amplifier Topology .......................................................................................................... 40
Figure 3-7: Folded-Cascode Implementation Using PMOS Input Devices ............................................................. 41
Figure 3-8: Folded-Cascode Implementation Using NMOS Input Devices ............................................................. 41
Figure 3-9: Gain Boosting Applied to Telescopic OpAmp Topology ..................................................................... 43
Figure 3-10: Two- Stage OpAmp .......................................................................................................................... 44
Figure 4-1: OpAmp Architecture .......................................................................................................................... 50
Figure 4-2: CMFB Circuit .................................................................................................................................... 51
Figure 4-3: Boosting Amplifiers Placed in The First Stage’s Output Branch .......................................................... 52 Figure 4-4: Boosting Amplifier ............................................................................................................................. 52

X
Figure 4-5: Boosting Amp1 Gain Plot ................................................................................................................... 53
Figure 4-6: Boosting Amp1 Phase Plot ................................................................................................................. 53
Figure 4-7: Boosting Amp2 Gain Plot ................................................................................................................... 54
Figure 4-8: Boosting Amp1 Phase Plot ................................................................................................................. 54 Figure 4-9: OpAmp Test Bench ............................................................................................................................ 56
Figure 4-10: Open-Loop Gain Plot of 2-stage, Gain Boosted OpAmp .................................................................... 56
Figure 4-11: Open-Loop Phase Plot of 2-stage, Gain Boosted OpAmp .................................................................. 57
Figure 4-12: OpAmp’s Input/output Pulses’ Rising Edge ...................................................................................... 58
Figure 5-1: SNR vs. Peak-to Peak Differential Input Voltage Plot for Ideal ADC ................................................... 61
Figure 5-2: SNDR vs. Peak-to Peak Differential Input Voltage Plot for Ideal ADC ................................................ 61
Figure 5-3: ENOB vs. Peak-to Peak Differential Input Voltage Plot for Ideal ADC ................................................ 62
Figure 5-4: SNR vs. Peak-to Peak Differential Input Voltage Plot for Ideal ADC with Transistor Level OpAmp .... 63 Figure 5-5: SNR vs. Sampling Frequency Plot for Ideal ADC with Transistor Level OpAmp ................................. 63
Figure 5-6: SFDR vs. Peak-to-Peak Differential Input Voltage Plot for Ideal ADC with Transistor Level OpAmp . 63
Figure 5-7: SFDR vs. Sampling Frequency Plot for Ideal ADC with Transistor Level OpAmp ............................... 64
Figure 5-8: SNDR vs. Peak-to-Peak Differential Input Voltage Plot for Ideal ADC with Transistor Level OpAmp . 64
Figure 5-9: SNDR vs. Sampling Frequency Plot for Ideal ADC with Transistor Level OpAmp .............................. 64
Figure 5-10: THD vs. Peak-to-Peak Differential Input Voltage Plot for Ideal ADC with Transistor Level OpAmp . 65
Figure 5-11: THD vs. Sampling Frequency Plot for Ideal ADC with Transistor Level OpAmp .............................. 65
Figure 5-12: ENOB vs. Peak-to-Peak Differential Input Voltage Plot for Ideal ADC with Transistor Level OpAmp
................................................................................................................................................................... 65 Figure 5-13: ENOB vs. Sampling Frequency Plot for Ideal ADC with Transistor Level OpAmp ............................ 66
Figure A-1: SNDR vs. Peak-to-Peak Differential Input Voltage Plot for Transistor Level Pipelined ADC .............. 73 Figure A-2: SNDR vs. Sampling Frequency Plot for Transistor Level Pipelined ADC ........................................... 73 Figure A-3: ENOB vs. Peak-to-Peak Differential Input Voltage Plot for Transistor Level Pipelined ADC .............. 73
Figure A-4: ENOB vs. Sampling Frequency Plot for Transistor Level Pipelined ADC ........................................... 74

XI
Table of Tables
Table 3-1: Comparison between Performance of Different OpAmp Topologies [11] .............................................. 45
Table 4-1: Summary of OpAmp’s Requirements ................................................................................................... 50
Table 4-2: Boosting Amplifier No.1 Results.......................................................................................................... 54
Table 4-3: Boosting Amplifier No.2 Results.......................................................................................................... 55
Table 4-4: OpAmp Simulated Performance Metrics .............................................................................................. 57
Table 4-5: Settling Time of The OpAmp for Being Placed in 12-bit ADC .............................................................. 58
Table 4-6: Settling Time of The OpAmp for Being Placed in 10-bit ADC .............................................................. 58 Table 4-7: Comparison between the OpAmp’s results and other works ................................................................. 59

XII

1
Introduction
Overview
Analogue to digital converters are the most important building blocks in lots of
applications. As electronics and telecommunication worlds are moving fast towards digitalization and there is an ever increasing demand on speed and accuracy of the
processed data, the need for high speed and high resolution ADCs has grown dramatically
over recent years. There are many types of ADCs that one can choose between them, but
based on the application specification and the requirements on speed, resolution, power and area the most suitable architecture can be chosen.
For high speed and medium resolution (10-12 bits), pipelined ADCs are the architecture of
choice in most cases. Pipelined ADC falls in the category of multi-stage ADCs which hire stages with lower resolution and resolve more bits by using several stages rather than by
incorporating one high resolution ADC. In this way the speed and accuracy requirements
on separate stages decrease. Each stage of the pipelined ADC includes a low resolution flash ADC and a Multiplying DAC (MDAC). The flash ADC resolves a few bits from an
input sample and the MDAC is responsible for reconstructing these bits into analogue
sample, comparing it to the input sample, generating an error signal and amplifying the
error signal to be applied to the next stage. The amplification in the MDAC is done using an Operational Amplifier (OpAmp) placed in a feedback system which provides closed-
loop feed-forward gain ofm2 , in which m is the stage resolution.
OpAmps are basic building blocks of a wide range of analogue and mixed signal systems.
Basically, OpAmps are voltage amplifiers being used for achieving high gain by applying
differential inputs. The gain is typically between 50 to 60 decibels. This means that even very small voltage difference between the input terminals drives the output voltage to the
supply voltage. In the case of using 65nm CMOS technology, this small voltage difference
can be around tens of milivolts. As new generations of CMOS technology tend to have shorter transistor channel length and scaled down supply voltage, the design of OpAmps
stays a challenge for designers.
For a 12-bit pipelined ADC with sampling rates higher than 50MS/s, the requirements on
the OpAmp are high. The OpAmp should be designed such that to provide high Gain –Bandwidth (GBW), fast settling, high linearity and good enough noise response to satisfy
those requirements. For example a GBW of around 2GHz is required for 12-bit pipelined
ADC with 3-bit resolution in each stage and sampling frequency of 300MHz. These high requirements are getting harder to achieve as new technologies are scaling down
continuously. Recently published works about ADCs employ more complex digital
correction circuitry and calibration techniques and focus on finding new solutions to avoid
the problems accompanying OpAmp-based designs. Nevertheless, design of the OpAmps, with the aim of making improvements to their performance metrics, is still a worthy field
of research.
In this work, an OpAmp with high gain-bandwidth, high linearity and SNR has been designed. The performance of the OpAmp is calculated using Cadence and Matlab simulations and they satisfy the requirements on the high performance amplifier needed in
a 12-bit pipelined ADC. The open-loop DC-gain of the OpAmp is 72.35 dB with unity-
frequency of 4.077 GHz. Phase-Margin (PM) of the amplifier is equal to 76 degree. Applying maximum input swing to the amplifier, it settles within 0.5 LSB error of its final
value in less than 4.5 ns. SNR value of the OpAmp is calculated for different input

2
frequencies and amplitudes and its value stays above 100 dB for frequencies up to
320MHz.
The amplifier is placed in a pipelined ADC which is also designed in transistor level to check for its functionality. The main focus in this work is the OpAmp design to meet the
stringent requirements needed for the 12-bit pipelined ADC. The OpAmp provides enough
closed-loop bandwidth to accommodate a high speed ADC (around 300MSPS) with very
low gain error to match the accuracy of the 12-bit resolution ADC.
Thesis Organisation
In Chapter1, different ADC architectures (SAR, folding, flash, sub-ranging and ∑-∆
ADCs) are briefly discussed. Afterwards, the ADCs’ error sources, the definition of their static and dynamic errors and the standard performance metrics to quantify these errors are
described.
In Chapter2, the pipelined ADC’s architecture is shown. Then the transistor level circuits
of its building blocks such as comparator, resistive ladder DAC, thermometer decoder,
switched capacitor sampling network, bootstrap circuit for sampling switches, etc. are
displayed and their design considerations are discussed.
In Chapter3, ideal and non-ideal OpAmps and their properties are shown and discussed.
Then, OpAmp’s different topologies are presented. These topologies are telescopic
topology, folded-cascode topology, two-stage OpAmps and gain boosted OpAmps. At the
end these topologies are compared against each other.
In Chapter4, necessary requirements for an OpAmp to be used in a 12-bit pipelined ADC,
with 2.5 bit-per-stage (bps) stage architecture, are calculated. Then the designed OpAmp is
presented and the OpAmp’s simulated performance is depicted.
In Chapter5, simulation results of the pipelined ADC are shown. Two models of pipelined
ADC are introduced and their simulation results are illustrated. First model is a completely
high level pipelined ADC with all blocks in VerilogA code. The high level model’s simulation result is a very convenient reference to be compared with the other model’s
performance. The second model is similar to the high level pipelined ADC except for the
inter-stage gain provider which is replaced with the designed OpAmp in a closed-loop configuration with feed-forward gain of 4. This model is used to verify the OpAmp’s
performance in the ADC’s circuit.
In Future Work section, some areas that are not covered in this thesis are recommended to
continue this work. Research areas that are proposed include power optimization, digital
calibration and time interleaving.
In Appendix A, the simulation result for the completely transistor level pipelined ADC
introduced in Chapter2 is illustrated. The performance metrics of this model are calculated
for different sampling frequencies and peak-to-peak differential voltage amplitudes of
input signal like the other two models in Chapter5.

3
In Appendix B, VerilogA and Matlab codes which are used in this thesis are presented.
VerilogA codes are responsible for sampling the output signal of the OpAmp and digital
output bits of the ADC and dump them into a text file which can be used by Matlab codes
to reconstruct the digital bits and calculate the performance metrics.
List of Acronyms
Bellow, acronyms used in this thesis are listed:
∑-∆ Sigma-Delta Analogue to Digital Converter
ADC Analogue to Digital Converter
bps bit per stage
CM Common Mode
CMFB Common Mode Feed Back
CMRR Common Mode Rejection Ratio
DAC Digital to Analogue Converter
DNL Differential Non Linearity
ENOB Effective Number of Bits
GBW Gain Bandwidth
INL Integral Non Linearity
LSB Least Significant Bit
MDAC Multiplying DAC
MSB Most Significant Bit
OpAmp Operational Amplifier
PM Phase-Margin
rms root mean square
SAR Successive Approximation Register
SFDR Spurious Free Dynamic Range
SNDR Signal to Noise and Distortion Ratio

4
SNR Signal to Noise Ratio
SR Slew Rate
THD Total Harmonic Distortion

5
Chapter1. Introduction to ADCs
Analogue to digital converters are the most important building blocks in lots of
applications. As electronics and telecommunication worlds are moving fast towards
digitalization and there is an ever increasing demand on speed and accuracy of the
processed data, the need for high speed and high resolution ADCs has grown dramatically over recent years.
1.1 Brief Review of ADC Architectures
Predominantly, ADC applications fall into four market categories [1]: 1) data acquisition,
2) precision industrial measurement, 3) voice band and audio and 4) high speed. Figure 1-1 shows the relation between these categories, resolution and speed with choice of ADC’s
architecture.
24
22
20
18
16
14
12
10
8
6
4
100 1K 10K 100K 1M 10M 100M 1G 10G10
2
1
Pipeline
/sub-ranging
SAR
Folding
Flash
Integrating
Resolution[bit]
Sampling Rate[Hz]
Industrial
Measurement
Voice Band
Audio
Data
Acquisition
High Speed
Figure 1-1: Speed and Resolution of Different ADCs [1]
Pipelined ADC is the architecture of choice in high speed and medium resolution
applications. Examples of these applications are instrumentation, communications and
consumer electronics.
The choice between different architectures can be made based on the speed, resolution, area and power consumption requirements in the target application. Knowing the
specification, one can choose between different architectures to achieve the needed
performance. Among available ADC architectures, flash, folding, sub-ranging and pipelined ADCs are fast enough to be considered as a high speed ADC. Bellow, ADC
architectures are briefly reviewed.
1.1.1 Flash ADC
Flash ADCs are used in high speed applications. They convert the sampled data to digital
output in one sample period, i.e. all bits are prepared in parallel and are available at the

6
output of the ADC at the same time. Due to inherent parallelism in flash architecture, the
time needed for the result to be ready is equal to comparator’s response time plus the time needed in decoder. The speed can be as high as tens of Giga hertz. Usually, the resolution
of the flash ADCs is less than 8 bits. The architecture of a 2-bit flash ADC is illustrated in
Figure 1-2 (a):
refV
iV
+
_
+
_
+
_
Th
erm
om
eter
Dec
od
er
1b
0b
R
R
R
R 0 1
012 CCC
0 0 0
1
1
0
1
11
0
1b 0b
0 1
0 0
01
11
(a) (b)
Figure 1-2: (a) 2-bit Flash ADC (b) Thermo-Code to Digital-Code Table
An N-bit flash ADC needs ( 12 N) reference voltages which are usually provided by a
resistor ladder with N2 identical resistors. Therefore, ( 12 N
) comparators are needed to
compare the input sample with the reference voltages in flash ADC. The result of this comparing is the generation of 3-bit thermometer codes as shown in the table of Figure 1-2
(b). A thermometer decoder is needed to convert these codes to binary. As can be seen,
adding one bit to the resolution doubles the number of comparators needed which almost doubles ADC’s power dissipation. An extra bit in resolution, also increases the accuracy
requirements on comparators, therefore, more accurate reference voltages are needed. As a
result, flash ADCs are not suitable for applications that need high resolution ADCs.
1.1.2 Folding ADC
Folding ADCs are categorised as multi-stage ADCs. The difference between a binary stage and a folding stage is that in folding ADC the output digital code is a Grey code and the
residue signal resulted in each stage is a little bit different. Suppose that the input is a ramp
between 0- refV as in Figure 1-3 (a), the residue signal for a binary stage is shown in Figure
1-3 (b). When input signal is less than ½ refV residue signal increases from 0- refV and when
input signal crosses ½ refV the residue signal experiences a discontinuity and starts from 0
again. But, in a folding stage (Figure 1-3 (c)) there is no discontinuity and the residue
signal starts to decrease from refV -0. The mitigation of these discontinuities allows the
converter to operate faster than binary implementation.

7
Vref
Vref
Vin
Residue
½ Vref
Vref
Vref
Vin
Residue
½ Vref
Vref
Vref
Vin
Residue
½ Vref
(a)
(b) (c)
Figure 1-3: (a) A Ramp Input Signal, (b) Residue from a Binary Stage, (c) Residue from a
Folding Stage
In Figure 1-4 the concept of the folding stage is illustrated [2]. The input signal is sampled
and compared against ½ refV . The result is one bit grey code as the digital output of the
stage. Based on the comparison, the switch position is decided. Pos1 is for inputs less than
½ refV and Pos2 for inputs larger than ½ refV . The residue signal is shown in Figure 1-3 (c).
SH
+
Vin
Residue
1b (Grey Code)
+
_
X(+2)
X(-2)
Vref
½ Vref
Pos1
Pos2
Figure 1-4: Concept of a Folding Stage
Using the folding stage in multi-stage architecture forms a folding ADC. Similar to other
multi-stage architectures, this ADC also needs time alignment and the digital output can be digitally corrected. It is trivial to remember that somewhere, after digital outputs were
aligned, there is a need for Grey code to binary code converter if the digital outputs are
going to be used in a binary system after ADC, which is usually the case.

8
Folding ADCs have high speed conversion rates. The sampling frequency can be as high as
a few hundred mega hertz. They can be used in applications that need medium resolution
ADCs.
1.1.3 Sub-Ranging ADC
The idea behind sub-ranging ADCs is to use low resolution high speed sub-ADCs in a
multi-stage design. Usually, sub-ranging ADCs are limited to 2 stages and they can be
resolve up to 8 bits without any kind of digital correction scheme [1]. Pipelined ADCs’ architecture stems from this architecture. A 6-bit two-stage sub-ranging ADC is illustrated
in Figure 1-5:
+
3-bit
Flash
ADC
SH3-bit
Flash
ADC
Vin
3-bit
DAC
5b
4b
3b
2b
1b
0b
G
Figure 1-5: 6-bit Sub-Ranging ADC
In this ADC input voltage is sampled and converted into digital by a low resolution Sub-
ADC (3 bits in this example) which resolves the upper three bits of the digital output. The
bits resolved are converted back to analogue by the 3-bit DAC. The analogue output of the DAC is subtracted from the sampled input and the result is a residue signal which is
amplified within the range of the next 3-bit Sub-ADC. The residue signal is converted to
digital to form the lower three bits of digital output. Two-stage architecture results in
latency in the time of data conversion completion, but the data conversion rate is one
conversion per sampling period.
Sub-ranging ADCs can be more than two stages and resolve more than 8 bits, but this
necessitates time alignment and digital correction. The concept of time alignment and
digital correction is explained Chapter2 for pipelined ADCs.
1.1.4 SAR ADC
SAR ADCs are suitable for applications with the need of medium to high resolution (8-16 bits) and sample rates less than 5MS/s. They also consume low power which makes them
right architecture for low-power applications. The principle behind a SAR ADC is shown
in Figure 1-6:

9
SH
M-bit
DAC
Vin
mb1b
+
_
M-b
it R
egis
ter
SAR
Control Logic
sf
compf
Figure 1-6: SAR ADC
Analogue input is sampled and held by the sample and hold circuitry. The sample is
compared with the DAC’s output and the decision is used in SAR control unit to set one bit
digital resolved per each comparison (from MSB to LSB) and set the register to initial next
digital to analogue conversion.
At the very beginning of conversion, register is set to digital value of ½ refV (which is 100
for a 3-bit ADC) and after digital to analogue conversion, this value is compared with
sampled data. If the comparison result would be a 1, the control unit keeps the MSB 1; else it forces the MSB to zero. Then the control logic sets next bit to one and the DAC function
and comparison take place afterwards. This repetitive action goes on until all of the bits in
register have been decided for. It is obvious that for an N-bit SAR ADC N comparison
period is needed and only after that a new sample can be enter the ADC to be converted to digital. Therefore, the SAR ADC’s speed is limited to setting time of DAC, comparator’s
speed and the logic overhead [3].
1.1.5 ∑-∆ ADC
∑-∆ ADC is mostly famous because of its noise shaping characteristics which results in
higher SNR [1]. The noise shaping characteristics plus digital filtering and decimation moves most of the quantization noise to the outside of the Nyquist bandwidth and removes
the out of band noise. As can be seen in the Figure 1-7, the input signal enters an ADC cell
with oversampling ratio of K. After data conversion and noise shaping, the noise is filtered by a digital filter and the output rate is reduced to the sampling rate by a decimator. For
each doubling of the oversampling ratio, the SNR within the Nyquist bandwidth ( 2sf ) is
improved by 3dB.

10
+
_
sKf
+Vin
1-bit
DAC
Digital
Filter &
DecimatorsKf
bit1
sf
bitN
Figure 1-7: ∑-∆ ADC
As the ADC’s resolution increases, noise shaping in ∑-∆ ADC becomes less effective. To increase the power of noise shaping, another level of integration can be added to the circuit
which results in more complex circuitry. Another solution is to use multi bit architecture
instead of 1-bit ∑-∆ modulator [1].
∑-∆ ADCs can have resolutions up to 24 bits but their speed is limited to a few hundred
hertz.
1.2 ADC Error Sources and Performance Metrics
Error in reference voltages due to manufacturing process will introduce error to the gain
and offset of the ADC’s transfer function. From the circuit implementation point of view,
the main error sources in a pipelined ADC are gain, offset and nonlinearity errors in the sub-ADC and MDAC. Gain, offset and nonlinearity errors of the sub-ADCs in all stages,
except for the last stage, can be corrected by the redundancy and digital error correction
logic [4]. Last stage’s errors are scaled down by the combined inter-stage gain of all preceding stages. Some of the offset error of the DAC can be corrected by digital
correction; some is referred to the input of the ADC as an extra offset that can be cancelled
by adding offset to the input. However, the requirement on the linearity of the DAC is
high, especially for early stages.
Another error in an ADC is the quantization error. Quantization error is due to quantizing a continuous signal into discrete values [5]. This error can be treated as a white noise,
especially when the resolution of the ADC is high (larger number of quantization steps in
the transfer function). Ideally, the quantization noise is less than one quantization step which is equal to one LSB. The power of this noise can be calculated as in Equation 1-1
[6]. Where Q stands for quantization step and for quantization error.
Equation 1-1: 12
1 22/
2/
22 Qd
QP
Q

11
The ratio between the full-scale input signal’s power and this noise power leads to the
famous formula 76.102.6 NSNR for an ideal ADC. Quantization noise increases the
noise floor of the ADC.
In order to verify ADC’s performance and be able to compare different ADCs, a number
of performance metrics are defined [5], [7], and [8]. These metrics are categorised into two
groups, static performance metrics and dynamic performance metrics.
1.2.1 Static Performance Metrics
As mentioned above as a result of limited manufacturing accuracy some of reference voltages may slightly differentiate from the exact designed value, introducing gain and
offset errors to the ADC’s transfer function. The metrics to quantify ADC’s static
performance are:
Integral non-linearity (INL): The maximum absolute value of differences between
the ideal and actual code transition levels after correcting for gain and offset
Differential non-linearity (DNL): The maximum absolute value of differences
between the actual code widths and ideal code width (1ₓLSB)
In an ideal ADC, INL error is at most ½ LSB and DNL error is 0ₓLSB, which is not the
case in actual ADCs. The concept of INL and DNL is shown in Figure 1-8.
000
001
010
011
100
101
110
Vin
Output Codes
111
INL
DNL=Code width-LSB=
½ LSB
ref1 ref2 ref3 ref4 ref5 ref6 ref7 ref8
Figure 1-8: INL/DNL Concept
As can be seen in figure above, voltage references 2, 4 and 5 have deviated from their ideal
value, producing non-linearity to the transfer function of a 3-bit ADC. The input voltage is
assumed to be a ramp signal.

12
1.2.2 Dynamic Performance Metrics
Dynamic performance of the ADC is its performance regarding input signal and sampling
frequency. To measure ADCs performance, a number of metrics are defined [7].
Signal to Noise ratio (SNR): The ratio of the root mean square (rms) value of the
signal power ( pS ) to the noise power ( pN ) at the output of the ADC, measured
when applying a sinusoid, typically expressed in dB:
dBN
SSNR
p
p),log(20
Spurious Free Dynamic Range (SFDR): The ratio of the rms value of the signal
power ( pS ) to the rms value of the largest spur power ( spurP ) at the output of the
ADC, measured when applying a sinusoid, typically expressed in dB:
dBP
SSFDR
spur
p),log(20
Total Harmonic Distortion (THD): The ratio of the rms value of the signal power (
pS ) to the mean value of the root-sum-square of all harmonics’ power ( pD ) at the
output of the ADC, measured when applying a sinusoid, typically expressed in dB:
dBD
STHD
p
p),log(20
Signal to Noise and Distortion ratio (SNDR/SINAD): The ratio of the rms value
of the signal power ( pS ) to the mean value of the root-sum-square of the all
harmonics’ power plus noise components ( pp DN ) within the Nyquist bandwidth
at the output of the ADC, measured when applying a sinusoid, typically expressed in
dB:
dBDN
SSNDR
pp
p),log(20
Effective Number of bits (ENOB): The actual resolution of the ADC in presence of
noise and distortion, when applying a full scale input signal, extracting N from SNR
equation for an N-bit ideal ADC ( 76.102.6 NSNR ) and substituting SNR
with SNDR:
06.6
76.1
SNDRENOB

13
Chapter2. Pipelined ADC
Pipelined ADC is built from several low resolution converters in a pipeline. The number of
stages and the number of bits resolved by each stage along with redundancy bit(s) should
be determined wisely considering power, speed and resolution of the ADC and accuracy
requirements on sub converters. Most of the time, in high speed ADCs lower resolution per stage is chosen to have lower inter-stage gain and settling time which results in higher
conversion rate. Low resolution per stage also relaxes the requirement on accuracy of
voltage references in Sub ADC and comparators. Drawbacks of having lower bits resolved in stages are higher number of stages that are needed and more noise and gain and offset
errors from latter stages brought back to the input due to lower inter-stage gain and will
lower the total ADC’s accuracy. Usually in high resolution ADCs, more bits are resolved in each stage. Higher resolution per stage gives the benefit of having higher inter-stage
gain which will reduce the later stages’ noise contribution to the overall noise of the ADC.
However, this increases the power dissipation of the ADC and also the area required for
the ADC. The noise and other errors of subsequent stages are reduced by former stages’ squared gain. Adding more bits to be resolved in early stages, especially stage1, will
relaxes the requirements on following stages’ accuracy and noise requirements and will
allow scaling to be applied to them. This technique helps with area and power limitations.
Stages can also have redundancy bit that can be shared between neighbouring stages by overlapping. This technique leaves room for error correction (does not produces 111) and
adds ½ LSB offset to prevent saturation of coming stages due to comparison errors
occurred in present stage. This offset helps to keep the residue signal within the 0-Vref
range of the ADC. In Figure 2-1, it can be seen that even very small deviations from the
ideal value in reference voltages produces a residue voltage larger than ddV or lower than
ssV . This out of bound voltage will saturate next stages. Another advantage of this
technique is the reduced inter-stage gain for higher number of resolved bits. For example in
a 2.5 b stage with 3 raw bits and 2 resolved bits (one redundant bit) from total bits of the
ADC, stage gain will be 22 instead of
32 . Reduced gain will relax the requirements on the OpAmp employed in the MDAC. Redundant bit can be added to any sub ADC with
different resolution.

14
Vref
Vref
000 001 010 011 100 101 110
Vin
Residue
111
Vref
Vref
000 001 010 011 100 101 110
Vin
ResidueReference error
Reference error
(A) (B)½ LSB ½ LSB
4
8
Figure 2-1: Error Caused by Reference Voltage Deviations from Ideal Value in (A) 3-bit
Stage and (B) 2.5-bit Stage
2.1 Pipelined ADC’s Architecture
A 12-bit pipelined ADC incorporating 2.5 b stages is shown in Figure 2-2:
S1 S2 S3 S4 S5 S6Vin
Digital Correction Logic
3 3 3 3 3 3
12
R1 R2 R3 R4 R5
Figure 2-2: 12-bit Pipelined ADC
The ADC incorporates 6 stages; each one (except for stage 6) consists of a sample and
hold, DAC, subtraction and amplification circuitry (all of which known as multiplying DAC or MDAC) and a low resolution but high speed flash ADC. Stage 6 is a 3-bit flash
ADC.
In Figure 2-3 one stage of pipelined ADC is represented:

15
SH + ₓ4
2.5-bit
Flash
ADC
2.5-bit
DAC
Vin Residue
3b1b
2b
Figure 2-3: Pipeline Stage
Inside each stage input voltage is converted to 3 raw bits by the high speed flash ADC and then reconstructed back to analogue by the DAC. The reconstructed signal is subtracted
from original sampled signal and the difference is multiplied by the amplification factor,
producing the residue signal. The residue signal is applied to the next stage to be processed
and the current stage starts sampling the incoming signal and processing on the sampled and held data. The pipelining operation produces latency to the digital data production but
after that there will be one conversion per clock cycle. As a result of this concurrency
conversion rate of the ADC is independent of the number of stages. The residue signal is
shown in Figure 2-4:
Vref
Vref
3Vref/4
Vref/4
3V
ref/
16
5V
ref/
16
9V
ref/
16
7V
ref/
16
11
Vre
f/1
6
13
Vre
f/1
6
000 001 010 011 100 101 110
Vin
Residue
LSB/2 LSB/2
Figure 2-4: Residue Signal of A 2.5b Stage
Reference voltages for 2.5b flash ADC to be used in comparators are refV163 , refV16
5 ,
refV167 , refV16
9 , refV1611 and refV16
13 . These references are applied to six comparators of the

16
flash ADC along with the sampled and held signal. The correction range of the ADC is
refV41 . In case gain and offset errors occur, as long as the error stays within this range, it
can be corrected by digital correction and coming stages will not be saturated.
2.2 Flash Sub-ADC
Designed pipelined ADC has fully differential architecture. Fully differential architecture
allows more dynamic range and reduces even harmonics’ effect on nonlinearity. One out of
six segment of the sub-ADC is presented in Figure 2-5 [10]:
CMV
iV
iV
irefV
sC
sC
irefV
1
2
2
1
e1
e1
Comp
2
2
CpiC
CpiC
1S
2S3S
4S
'
1S
'
2S'
3S
'
4S +
_+
_
Figure 2-5: One Segment of Comparing Circuitry in Sub-ADC
Each sub-ADC includes six segments shown in figure above. Input signal is sampled
during phase1 into sC when switches1S and
2S ('
1S and'
2S ) are closed (Figure 2-6 a). 2S (
'
2S ) turns off before 1S (
'
1S ), injecting charge into sC [11]. This charge (
)( 22222 thgsox VVCLWq ) appears as an offset voltage added to the sampling
capacitor’s voltage. Fully differential architecture mitigates this offset voltage and it will have no effect on the output voltage. The sampling period is determined by clock1e.
Switch 1S (
'
1S ) opens after 2S (
'
2S ) and switches 3S ('
3S ) and 4S (
'
4S ) turn on after 1S (
'
1S
) turned off. Since left plate of sampling capacitor ( sC ) was connected to 0iV at the
moment when 1S (
'
1S ) turned off and is connected to irefV when 3S (
'
3S ) turns on (two
constant voltages), the charge injection and charge absorption by switches 1S (
'
1S ) and 3S (
'
3S ) will not introduce an error to the final value.
Sampled voltage is held during phase2 (Figure 2-6 b):

17
Comp
CpC
CpC
3S
+
_+
_
CMV
iVsC
1
e1
1S
2S
sC
irefV2
3S
sC
2
irefV
2
2
4S
'
4S
(a) (b)
Figure 2-6: (a) Sampling Phase in Flash Sub-ADC, (b) Comparing Phase in Flash Sub-
ADC
The sampled data is compared against six reference voltages irefV ( refV16
3 , refV165 , refV16
7
, refV169 , refV16
11 and refV1613 ). The result from this comparison gives six differential pairs
of thermometer codes ( 6161 , cpcp CC ). After producing these codes, they have to be
converted to 3 bits binary codes.
Comparators clock is delayed version of clock2. In comparator’s circuit pre-amplification
is used to amplify small differences between input and reference voltage to increase the accuracy of the comparator. The pre-amp circuit needs time to settle and the delay allows
the output to reach its final value to be used in comparison.
2.2.1 Thermometer Decoder
The thermometer decoder can be implemented using lots of techniques, for example by
using pass-transistors, multiplexing, etc. In this design thermometer codes are used as address bits of an OR-based ROM. Figure 2-7 shows a 3-to-2 bit thermometer to binary
decoder (Figure 1-2-b), using the ROM implementation. The address decoder circuit is
OR-based designed as well. All address and data lines in the address decoder and ROM are
connected to ddV through PMOS devices which are always on. Whenever a line in the
ROM should be chosen, all transistors in that line should be turned on which means the
address line should be kept high. For an address line to be high, all transistors that are
connected to it should be off. For example, if 012 CCC is 000 ( 1refin VV ) then Add1 is ddV
and the transistors in the first line turn on, bringing data lines to 00 which is the binary
output expected for 1refin VV .

18
Vdd
Vss
Vdd
Vss
Vdd
Vss
Vdd
Vss
Vss
Vss
Vss
Vss
Vss
Vss
Vss
Vss
Vss
VddVddVssVss
Vss Vss
Vdd
Vss
Vss
Vdd
Vss
Vss
2C
2C
2C
1C 0C
0C
1C
1C
Vss
2C
Vss
1C
Vss
0C
0C
Add1
Add2
Add3
Add4
1b 0b
Figure 2-7: Thermometer to Binary Decoder Implemented by OR-Based ROM
In picture above, the last address line (dashed line) is not needed to be implemented, as it
does not drive any transistor in the ROM. It has been kept in the picture for the sake of more accuracy. The actual design is fully differential 6-to-3 bit decoder (2.5bit/s
implementation).
2.2.2 Comparator
Comparators are made of two basic building blocks, a preamplifier and a latch. The comparator is used to resolve small input signal and produce a digital 0 or 1 output.
Therefore, the amplifier does not have a linearity requirement. It should amplify the small
input signal enough to make the latch change its state if necessary. The basic concept of a
comparator is shown in Figure 2-8:
Pre-Amplifier
Vout1+
Vout1-
Vi+
Vi-Latch
Comp+
Comp-
Figure 2-8: Basic Concept of a Comparator
The comparator operates in two phase, reset and evaluation (latching). In reset phase, the
latch is pre-charged to ddV to reduce the power dissipation in this phase. In evaluation
phase, the amplified input signal causes the latch to change its state in either direction and
by the aid of positive feedback the output signal will clip to one of the supply sources,
producing the digital outputs. The latch circuitry is depicted in Figure 2-9 [10]:

19
Vdd
VddVdd VddVdd Vdd
VssVss
Vss Vss
Vss
clk clk
clk clk
clk
Vdd
Vout1+Vout1-
Comp+Comp-
Vss
Figure 2-9: Latch Circuitry of The Comparator
Pre-amplifier in the comparator helps with very small input signals, i.e. when the difference between the sampled input signal entering the comparing circuitry of the sub-
ADC and the reference voltages of the flash ADC is very small to cause a change in the
state of latch. Pre-amplifier also prevents the kickback noise from flowing into the driving
circuitry and suppresses noise and offset of the latch when referring to the input. The gain of the pre-amplifier is determined by the accuracy needed, but, it is usually between 4-10
dB. Choosing a gain more than 10 dB will reduce the speed of the comparator. Therefore,
in high speed applications, the gain should be chosen more carefully. The pre-amplifier circuit, shown in Figure 2-10, is scaled down one stage non-boosting amplifier designed
for the MDAC (studied in Chapter2).

20
bias2
VddVdd
VssVss
M5 M6
Vss Vss
M3 M4
Vi-
Vi+
Iss1
Vdd
Vdd
Vdd
Vdd
Vdd
VssVss
Vout1-
M7 M8
M2M1
VssVss
M9 M10
Vss
Vdd Vdd
bias2
bias3
CMFB1
bias2
bias3
CMFB1
M11
M13
M12
M14
Vout1+
Figure 2-10: Pre-Amplifier Circuit of The Comparators in Flash Sub-ADC
2.2.2.1 Kickback Noise
When the latch goes from reset mode into evaluation mode, there is a charge transfer either into or out of the inputs of the latch. The charge which transfers from input to the circuit is
the charge needed to turn on the transistors in positive feedback circuitry and the charge
which flows back to the inputs is the charge that is needed to be removed from pre-
charging transistors (Figure 2-9). Another charge that should be considered is the charge introduced to the circuit when discharging the pre-charged nodes of the circuit, nodes A
and B in Figure 2-11, at the drain of input differential transistors. This charge is transferred
to the input nodes by the gate-drain capacitor of input pairs. If node C, in figure below is pre-charged as well as nodes A and B, then the charge removed from this node also
contributes in kickback noise through gsC . As explained before, using pre-amplifier can
eliminate this noise.
Vss Vss
Vss
clk
Vss
Vout1+Vout1-
Cgd Cgd
A B
C
Cgs Cgs
Figure 2-11: Kickback Noise Due to Discharging Pre-Charged Nodes

21
2.2.2.2 HYSTERESIS
When comparator changes its state, it has a tendency to stay in that state [12]. This tendency is called hysteresis and can be eliminated by pre-charging differential nodes or
connecting or connecting differential nodes together, using switches, before entering
evaluation mode.
2.2.2.3 METASTABILITY
When the comparator’s output is neither a 1 nor a 0, the output is considered as meta-stable [13]. The problem can be reduced by allocating more time to latching process and/or using
Grey encoding (which allows one transition at a time) and then Grey to binary decoding. A meta-stable output can be translated into a 1 or a 0 by the following circuit; so, in order to
avoid detrimental errors, each comparator’s output should drive one circuit at a time.
2.3 MDAC
An MDAC performs sampling, digital to analogue conversion, subtraction and
amplification. The circuit shown in Figure 2-12 is responsible for sampling, subtraction
and amplification in an MDAC:
CMV
iV
iV
iDACV
sC
sC
iDACV
fC
fC
+
_+
_
OpAmp
e1
e1
1
1
Residue+
Residue-
Amp
Amp
1
2
2
1
1S
3S
'
1S
'
3S
2S
4S
'
2S
'
4S
5S
'
4S
Figure 2-12: Sampling and Multiplication Part of The MDAC Circuit
Amplifier’s clock is a delayed version of comparator’s clock. This delay is needed for thermometer decoder and DAC to complete the conversions from thermometer codes to
binary codes and from digital codes to analogue signal.
During phase1 input voltage is sampled into sC when switches1S and
2S ('
1S and'
2S ) are
on (Figure 2-13). Like sub-ADC, 2S (
'
2S ) turns off before 1S (
'
1S ), leaving node A (B)

22
float and introducing a constant offset to the sampled voltage (cancelled by differential
implementation). The OpAmp is place in the unity-gain feedback during this phase and
output voltage resets to its common mode voltage.
CMV
iVsC
1
e1
1S
2S
+
_+
_
OpAmp
Residue+
Residue-
CMV
iVsC
1
e1'
2S
'
1S
1
5S
1
'
5S
A
B
Figure 2-13: MDAC in Sampling Mode
The amplification mode is presented in Figure 2-14. As explained in sub-ADC section
charge injection by switch 1S (
'
1S ) or absorption by switch 3S ('
3S ) will not introduce an
error to the final value. Switch 5S ('
5S ) turns off before switch 4S (
'
4S ) adding a constant
charge to the input node of the amplifier. This charge equals )( 55555 thgsox VVCLWq
which produces an error into the output [11]. Half of this charge goes directly to the output node, causing temporarily glitch. Another half flows back to the Input node of the OpAmp
which is virtual ground, so, the charge is conserved at this node. Then, the charge resides
on the left plate of fC .This charge introduces an error equal to
fC
q
2
5 to the output
voltage. To compensate for this error dummy switches are used (Figure 2-15). If dummy
switch’s size is chosen such that 5LLd and 52
1 WWd then the charge injected by 5S
into the input node of amplifier (2
5q) will be absorbed by dS and vice versa. Use of
dummy switches also helps with clock feed through error.
Switch 4S (
'
4S ) produces some error when turning on or off. This error is constant and
independent of the input like the case explained for switch 5S ('
5S ) and can be
compensated for if necessary.

23
iDACVsC
sC
iDACV
fC
fC
+
_+
_
OpAmp
Residue+
Residue-
Amp
Amp
2
2
3S
'
3S
4S
'
4S
Figure 2-14: MDAC in Amplification Mode
1
5S ssV
ssV
1
Figure 2-15: Use of Dummy Switches to Compensate for Charge Injection
2.3.1 Resistive Ladder DAC
DAC’s transfer function versus input changes is shown in Figure 2-16. The DAC’s
reference voltages, for 2.5 bit architecture, are 0, ref61 V , ref6
2 V , ref63 V , ref6
4 V , ref65 V and
refV .

24
Vref
Vref
5Vref/6
2Vref/6
3V
ref/
16
5V
ref/
16
9V
ref/
16
7V
ref/
16
11
Vre
f/1
6
13
Vre
f/1
6
000 001 010 011 100 101 110Vin
Vref/6
3Vref/6
4Vref/6
DACV
Figure 2-16: DAC’s Transfer Function
A resistive ladder DAC is implemented and used in the stages. Switches involved with
transferring high voltages are PMOS devices because of their better conductivity of high
voltages. NMOS devices are used to conduct lower voltages.

25
0D 0D
0D 0D
0D 0D
0D 0D
0D 0D
0D 0D
0D 0D
0D 0D
1D
1D2D
1D
1D 2D
1D
1D
1D
1D
2D
2D
iDACViDACV
refV
refV
ddV
ssV
ddV
ddV ddV
ddV ddV
ddV ddV
ssV
ssV ssV
ssV ssV
ssV ssV
ddV ddV
ddV ddV ddVddV
ssV ssV
ssV ssV ssVssV
Figure 2-17: Resistive Ladder DAC
In implementation same ladder is used to provide flash sub-ADC and DAC reference voltages. In case of any mismatch and fabrication error, the reference voltages would have
same errors and this will suppress nonlinearity.
2.4 Bootstrapping
High linearity requirement of the 12-bit ADC necessitates linear operation of the switches in the sub-ADC and MDAC structure. For a switch to work with high linearity, it should
work with constant overdrive voltage. To serve this purpose some of the switches are
bootstrapped, especially front end switches whose overdrive voltage suffers from the changes of input voltage. The bootstrap circuit, designed in [10] and adapted for low-
voltage 65nm CMOS technology, is depicted in Figure 2-18:

26
VddM8M7
M9Vdd
M5
Vss
M6
VssM2
Vss
M1
VssM3
VssM4
2ddV
C
ddV
ssV
iV SWGV
Vdd
Vdd
Figure 2-18: Bootstrap Circuit
When a clock signal is going to drive a switch, it can be applied to a bootstrap circuit and be manipulated to be more suitable as a driving gate voltage. In Figure 2-18, clock signal
with phase Ф is applied to the bootstrap circuit and used to produce the signal SWGV which
is the new driving gate voltage of the switch. When clock is low, 43 MM bring SWGV to
ssV and keep 1M off and 5M and 8M on. Transistor 3M is always on (gate voltage is ddV )
and used to shield output voltage from the switch 4M ‘s clock feed through. During this
phase capacitor C will be charged to ½ ddV through switches 2M and 8M . Switch 7M is
also on during this phase and is responsible for keeping 9M off by bringing gate voltage
of 9M to ddV .
When the clock goes high, 2M , 4M and 7M turn off and 6M turns on. At the very moment,
as 5M is on ( SWGV is still zero), it conducts the bottom plate voltage of C (still zero as
1M is off) to the gate of 9M , turning it on and increasing SWGV to almost ½ ddV . This
voltage is enough to turn on 1M switch and turning off 5M and 8M switches. Switch 9M
is bootstrapped itself as its gate-source connection is placed in parallel with C when 6M is
on (so, ddgs VV2
19 ). With a high clock voltage and through switches 1M , 6M and 9M , the
output voltage becomes equal to ddin VV2
1 , which means that gate-source voltage of
bootstrapped switch is now constant and independent of input voltage. This increases the
linearity of the switch. Bootstrapping also helps with switches conducting constant high
voltages. It can provide a high enough overdrive voltage for those switches.

27
2.5 Clocking Scheme
Clock phases needed within the stage are depicted in Figure 2-19:
Clk1-S1
Clk1e-S1
Clk2-S1
Clk-comp-S1
Clk-amp-S1
clkT41
clkT43
grit sin
fallingt
clkT
1dt
2dt
edt 1
Clk1-S2
Figure 2-19: Stage Clock Phases
Clock1 is used to sample the input data by the sampling network in flash sub-ADC and MDAC simultaneously. Pulse width of this clock is almost ¼ of the sampling period.
Clock1e is similar to clock1 in regards to period and 25% pulse width, but it turns off
before clock1 to cancel charge injection problem from sampling switches. Allocating less time to sampling allows the circuit to spend more time on amplifying which gives
amplifier more time to settle, increasing maximum sampling frequency.
Clock2 is used for introducing reference voltages to the sampling network to be compared
to sampled data (in sub-ADC) or subtracted from it (in MDAC). The pulse width of clock2
is almost ¾ of sampling period. As explained before, in sub-ADC and MDAC sections, the comparators’ clock and amplifier’s are delayed version of clock2. All clocks’ pulse width
is lowered by rising and falling time to obtain non-overlapping clocks.
Sampling in each stage (except for stage1) starts at the last 25% of the amplification clock
of preceding stage. This way, as the OpAmp amplifies the residue signal and resides within the accepted error (½ LSB) of its final value, the sampling capacitance of succeeding stage
is charged with the residue signal to reach the final value simultaneously. Using this
scheme, conventional sampling period can be reduced by 25%.
2.6 Digital Correction and Time Alignment
The bits from each stage are not resolved at the same time. As a result the output bits from 6 different stages that correspond to the same input sample are ready at different point in

28
time and should be time aligned and then digitally corrected. In order to align the bits
related to the same sample shift registers are used (
Figure 2-20). The number of DFF in each shift register to pick the correct data is
determined by clocking scheme and verified by simulation.
DFF
DFF
DFF
DFF
ADDER
DFF
DFF
DFF
DFF
DFF
DFF
DFF
DFF
DFF
DFF
DFF
DFF
DFF
DFF
DFF
DFF
DFF
DFF
DFF
DFF
DFF
DFF
DFF
DFF
DFF
DFF
DFF
DFF
DFF
DFF
DFF
DFF
DFF
DFF
DFF
DFF DFF DFF DFF DFF DFF
ADDER ADDERADDERADDERADDER
Overflow Control Logic
B1-2
B1-1
B1-0
B2-2
B2-1
B2-0
B3-2
B3-1
B3-0
B4-2
B4-1
B4-0
B5-2
B5-1
B5-0
B6-2
B6-1
B6-0
Vss
b11 b10 b9 b8 b7 b6 b5 b4 b3 b2 b1 b0
C1C2C3C4C5
C6
Vss
Figure 2-20: Time Alignment and Digital Correction Logic
The output bits from 6 stages, after being aligned, enter digital correction process which
uses digital adders to overlap one bit from each stage with one bit from its neighbours. The
procedure is shown in Figure 2-21:
B1-2 B1-1 B1-0
B2-2 B2-1 B2-0
B3-2 B3-1 B3-0
B4-2 B4-1 B4-0
B5-2 B5-1 B5-0
B6-2 B6-1 B6-0
b11 b10 b9 b8 b7 b6 b5 b4 b3 b2 b1 b0
Figure 2-21: Digital Correction Logic
One bit redundant that was added to each stage allows the digital correction action which
will help to correct for errors due to comparators offset and amplifiers gain error.
2.7 Noise Budgeting
When designing an ADC the tolerable noise within the system should be determined
regarding the needed SNR and system’s accuracy requirements. Calculated noise power will set the requirements on capacitor sizing. The output node of stage one is a suitable
start point for this calculation [9]. The required SNR at this node can be calculated using
Equation 2-1:
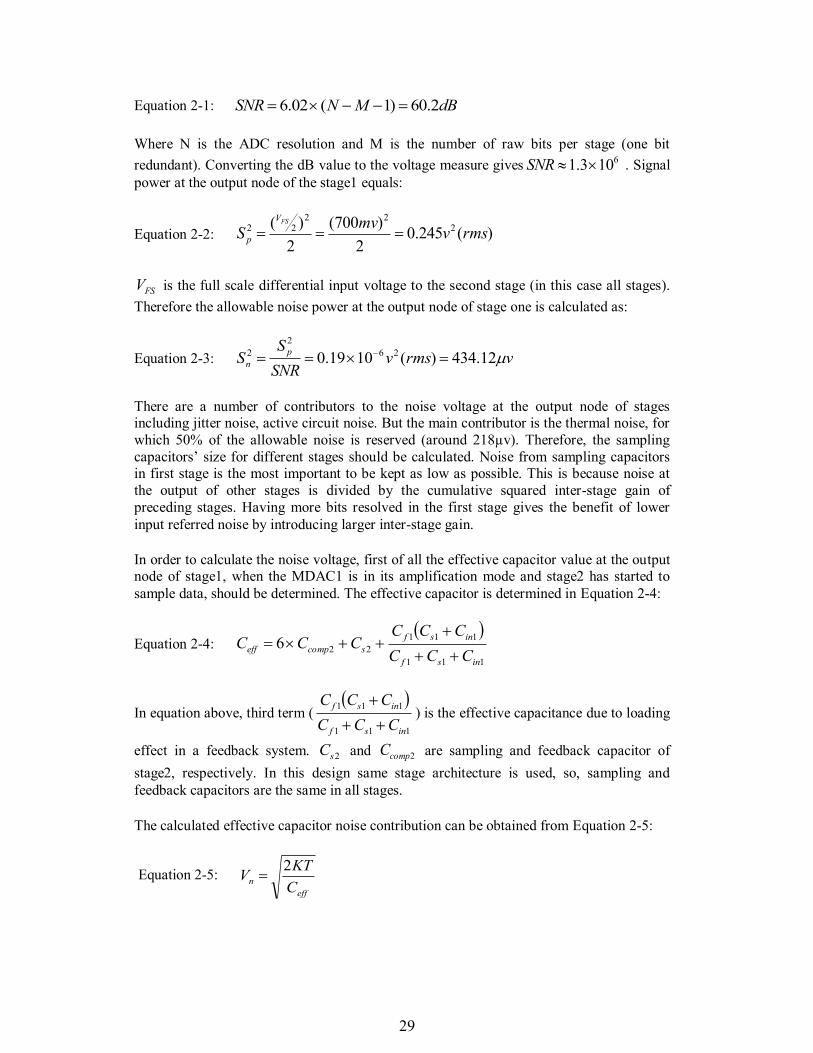
29
Equation 2-1: dBMNSNR 2.60)1(02.6
Where N is the ADC resolution and M is the number of raw bits per stage (one bit
redundant). Converting the dB value to the voltage measure gives6103.1 SNR . Signal
power at the output node of the stage1 equals:
Equation 2-2: )(245.02
)700(
2
)( 222
22 rmsvmv
SFSV
p
FSV is the full scale differential input voltage to the second stage (in this case all stages).
Therefore the allowable noise power at the output node of stage one is calculated as:
Equation 2-3: vrmsvSNR
SS
p
n 12.434)(1019.0 26
2
2
There are a number of contributors to the noise voltage at the output node of stages including jitter noise, active circuit noise. But the main contributor is the thermal noise, for
which 50% of the allowable noise is reserved (around 218µv). Therefore, the sampling
capacitors’ size for different stages should be calculated. Noise from sampling capacitors in first stage is the most important to be kept as low as possible. This is because noise at
the output of other stages is divided by the cumulative squared inter-stage gain of
preceding stages. Having more bits resolved in the first stage gives the benefit of lower
input referred noise by introducing larger inter-stage gain.
In order to calculate the noise voltage, first of all the effective capacitor value at the output node of stage1, when the MDAC1 is in its amplification mode and stage2 has started to
sample data, should be determined. The effective capacitor is determined in Equation 2-4:
Equation 2-4:
111
111
226insf
insf
scompeffCCC
CCCCCC
In equation above, third term (
111
111
insf
insf
CCC
CCC
) is the effective capacitance due to loading
effect in a feedback system. 2sC and 2compC are sampling and feedback capacitor of
stage2, respectively. In this design same stage architecture is used, so, sampling and
feedback capacitors are the same in all stages.
The calculated effective capacitor noise contribution can be obtained from Equation 2-5:
Equation 2-5: eff
nC
KTV
2

30
Where: ;1038.1 23k
JK
;300 kT The 2 factor in the noise voltage equation
stems from differential implementation and additive nature of thermal noise. Choosing
fCs 800 , gives thermal noise voltage less than ½ LSB (LSB of a 12-bit ADC with 1.4v
differential full-scale input amplitude), much less than allowable noise voltage at this node.

31
Chapter3. Introduction to the Fundamentals of OpAmps
Operational amplifiers (OpAmps) are basic building blocks of a wide range of analogue
and mixed signal systems. Basically, OpAmps are voltage amplifiers being used for
achieving high gain by applying differential inputs. The gain is typically between 50 to 60
decibels. This means that even very small voltage difference between the input terminals drives the output voltage to the supply voltage. In the case of using 65nm CMOS
technology, this small voltage difference can be around tens of milivolts. As new
generations of CMOS technology tend to have shorter transistor channel length and scaled
down supply voltage, the design of OpAmps stays a challenge for designers.
In this chapter, an ideal OpAmp will be introduced. Later the performance parameters of
OpAmp will be defined and then OpAmp's imperfections, which stems from the trade-offs
between the parameters, will be briefly discussed. Following a review of simple topologies of OpAmp and a comparison between them, two techniques for achieving higher gain and
output swing will be described. For the sake of simplicity, the OpAmp model used in this
chapter is a single-ended operational amplifier with differential inputs as pictured in Figure
3-1.
Vi+
Vi-
VoutOpAmp
Vdd
Vss
Aol
Figure 3-1 : A Single-Ended OpAmp Symbol
Where the notations on the symbol stand for:
olA : Open- loop Gain
iV : Non-inverting input
iV : Inverting input
ddV : Positive Supply Voltage
ssV : Negative supply voltage
outV : Output
3.1 Ideal OpAmp
In the past, most OpAmps were designed to be used in many applications. This means that
they have been designed as general purpose building blocks. This property leads to the idea
of an ideal OpAmp with very high gain, high input impedance and low output impedance

32
disregard for the signal applied to the input. The transparent symbol for an ideal OpAmp is
shown in the Figure 3-2.
Vi+
Vi-
Vout
OpAmp
Vdd
Vss
+-
RinRout
A[(V+)-(V-)]
Figure 3-2: Ideal OpAmp
The Ideal OpAmp’s properties:
Infinite open-loop gain, olA
Infinite input impedance, inR
Zero output impedance, 0outR
Zero input current
Zero input offset voltage (i.e., if 0 outii VVV )
Infinite slew rate
Zero noise.
Infinite bandwidth
Infinite Common-mode rejection ratio (CMRR)
Rail to rail voltage swing
Infinite Power supply rejection ratio
In practice, an OpAmp with zero and infinitive parameters cannot be realized. There are
always limitations (e.g., maximum output voltage swing) and trade-offs between the parameters (e.g. the trade-off between open-loop gain and speed) that should be considered
during the design process. As a result, there need to be an appropriate specification for
each application to device a compromise acceptable for all parameters.
3.2 Real OpAmps
As mentioned in previous section OpAmps cannot be perfect. Due to the circuitry
limitations and trade-offs that exist in analogue design there are a number of imperfections
in OpAmps which are going to be briefly discussed.
33
3.2.1 Finite Gain
Open-loop gain is finite in real operational amplifiers. Typically, OpAmps exhibit open-
loop DC gain between 50dB to over 60dB (OpAmps with 130db DC gain have been reported [14]). The loop gain of OpAmp placed in a negative feedback loop is large
enough, even with typical DC gains, that the circuit gain within the 3-dB bandwidth will be
independently determined by the gain of the negative feedback.
3.2.2 Finite Input Impedance
The assumption of infinite input impedance of the OpAmps stems from the assumption of zero input current for the MOSFETs. Typically, the input impedance of the operational
amplifier designed with MOSFETs is within the range of 100 to 1000 Mega Ohms.
3.2.3 Non-Zero Output Impedance
Coming to the output impedance, OpAmps can be thought of as voltage sources with internal resistance. The voltage drop across the output impedance of the OpAmp causes
power dissipation and delivers less power to the load. The situation is getting worse as the
load impedance of the amplifier decreases. However, the use of negative feedback
topologies in most applications comes to designer’s assistance. Negative feedback lowers
the output impedance and reduces output errors accordingly.
Typical output impedance for the open-loop operational amplifiers is in the range of 25-
100 Ohms which will be much lower when using the OpAmp in the negative feedback
topology (almost a few Ohms). So, the assumption of zero output impedance is quite fair.
3.2.4 Output Swing
Obviously output voltage of the operational amplifier cannot reach to the supply voltages level because of the transistors’ overdrive voltages. An amplifier with voltage swing that
allows output signal to go very close to supply voltages is called rail-to-rail amplifier.
The need for larger output swing for application like high resolution data converters stems
from the necessity of high SNDR and Dynamic Range for such circuits. The output swing limits the linearity of the circuits, especially in low voltage applications. One way to reach
high output swing is to use fully differential OpAmps.
3.2.5 Input Current
Input current of the OpAmps includes biasing current and leakage current of the input
transistors. Input current for the MOSFETs is much smaller than BJTs or JFETs and it is about a few Pico amperes. Assuming symmetric circuit and matched input current, error
will not be introduced to the differential output of the OpAmp but it shows itself as a DC
offset and limits the output swing. An OpAmp with a high CMRR can help reducing the
offset.
Unfortunately neither the circuit is symmetric nor are the input currents matched. In reality, the input currents could differ by 10 percent or more which produces error to the output

34
voltage that cannot be tolerated in some applications. The majority of the error could be
corrected by the aid of adding a DC path (Ex. through a resistor) to the ground.
3.2.6 Input Offset Voltage
One would expect zero output voltage when applying zero volts to the inputs of a differential amplifier, which is not the case in real amplifiers. The error voltage is caused
by some imperfection and mismatches in the internal transistors and resistors of the
OpAmp and can be summed up as a DC voltage source and applied in series to one of the inputs of the OpAmp. The input offset voltages can vary from microvolts to milivolts
depending on the circuit design and technology. CMOS technology has higher input offset
voltage than Bipolar.
In open-loop, due to very high voltage gain of the amplifier, input offset voltage brings the
output to its saturation, even though the input voltage is zero. In negative feedback configuration the offset voltage will be amplified along with the input signal, introducing
error to the output. This error can be problematic in applications with high precision DC
amplification such as high resolution ADCs with very small LSBs (683.6 microvolts for 10-bit ADC and 341.8 micro volts for 12-bit ADC with1.4 volt peak-to peak differential
input voltage).
A major problem regarding to offset voltage is the voltage drift due to temperature change.
This problem will be addressed under temperature effects headline.
3.2.7 Common-Mode Gain
In An ideal operational amplifier, common-mode gain is zero and the amplifier amplifies only the differential input signal. However, in real amplifiers the voltages that are common
to both inputs are amplified to some extent. This amplification is due to imperfections in
tail current sources and mismatches between the transistors and resistors of differential pair. The standard measurement factor created to be used when comparing differential
circuits is CMRR which can be calculated using this Equation 3-1:
Equation 3-1: DMCM
DM
A
ACMRR
In which the DMA stands for differential gain and DMCMA stands for common-mode to
differential gain. Higher CMRR is desired in OpAmp design.
3.2.8 Power-Supply Rejection
As opposed to the ideal case, supply noises play an important role in real amplifiers. Thus,
the performance of amplifier in presence of supply ripples is of concern to many
applications, especially mixed-signal applications that often deal with noisy digital supply lines. There is a factor called PSRR which stands for power supply rejection ratio that
determines the ability of OpAmps to reject the changes in the power supply.

35
3.2.9 Noise
Noise exists in amplifiers similar to all analogue circuits. The amount of noise puts a
specification for minimum input on the requirement list of the amplifier. If the input signal would be less than this minimum, then it cannot be processed safely. This noise mostly
consists of thermal noise and flicker noise of the devices in the circuit. Some of these
devices contribute more than others, for example input transistors of the OpAmp. Those
devices should be taken care of by widening and applying more bias current.
There is a trade-off between maximum output swing and noise. In order to have more
swing, with the same bias current, the overdrive of the transistors can be lowered to allow
more swing. As the overdrive voltage goes down, the transconductance of the Amplifier increases which causes more drain noise current. For application s with demands on higher
gain or bandwidth, noise becomes an important issue.
3.2.10 Finite Bandwidth
The OpAmp gain calculated at DC will not stay the same at higher frequencies. As the
operational frequency of the circuit increases the gain decreases. At first the gain drop is not significant to be considered as system failure, but after the 3-dB frequency the change
in DC gain cannot be ignored. In the Figure 3-3 the gain characteristic of an OpAmp is
plotted.
f3-dB fu
frequency
DC
gain
20log|Av|
Slope=-20 dB/dec
Figure 3-3: Gain versus Frequency
High frequency behaviour of the OpAmp is critical for many applications, especially for
those who need high precision gain like the OpAmp hired in a MDAC. The unity-gain
frequency of the operational amplifier, “ uf ” the frequency in which gain drops to zero dB,
is a good measure of small-signal bandwidth. Today, using CMOS technology, unity-gain
frequencies larger than 1GHz can be achieved.

36
3.2.11 Nonlinearity
Nonlinearity exists in all analogue circuits including OpAmps. There are several sources
that introduce nonlinearity to the circuit. Transistors of the circuit can be considered as one of the main sources as they are inherently nonlinear devices. This source’s impact on
nonlinearity can be controlled by choosing larger transistor or higher overdrive voltage,
especially for input transistors which play a significant role in this case. Considering power and area requirements for circuits, one should be cautious about using these approaches on
a large scale. Another source of nonlinearity is the output swing of OpAmps. The output
voltage is limited between a minimum and maximum value near the supply voltages. When the output voltage crosses these boundaries, mostly due to high voltage gain, saturation
occurs and causes output signal damage. Slewing can be considered as one of the other
sources of nonlinearity. Reaching the maximum changing rate, the OpAmp’s output
voltage will not follow further voltage increase of the input. Internal capacitances are responsible for this effect. The problem can be partly remedied using fully differential
circuits in order to suppress second-order harmonics. Furthermore, having higher open-
loop gain helps the circuit to have more linearity in closed-loop system.
3.2.12 Stability
The phase difference between input and output leads to oscillation if it becomes 180 degrees in a closed-loop configuration. This means that the amplifier is not stable. Even if
the amplifier is stable, it can suffer from ringing which will affect settling time of the
OpAmp. To measure stability of an amplifier, the concept of phase-margin comes to assist. PM is defined as the phase difference between 180˚ and the phase at the frequency in
which the loop-gain ( )(H ) of the amplifier drops below unity. For PMs above 60
degrees, the step response of the feedback system shows a negligible ringing which provides fast settling time. Higher values for PM, gives more stable systems but not
necessarily faster settling time.
For large signal operation, there are other effects that should be considered, such as
slewing, output swing and nonlinear behaviour of devices in the circuit in presence of large
changes in biasing voltages and currents in the circuit. Therefore, time domain simulations of closed-loop system are more efficient for measuring stability, bandwidth and settling
time behaviour of the system.
3.2.13 Temperature Effects
All parameters of MOSFET change with temperature, resulting in changes to the circuit
behaviour. Here, a few of those effects are briefly explained.
Temperature has an effect on the threshold voltage of a MOSFET by changing built-in
potential [15]
i
ATF
n
Nln ; Where
q
KTT is the thermal voltage, AN is the
substrate doping, inis the intrinsic doping parameter for the substrate, q is the charge of an
electron and K and T stands for Boltzmann’s constant and temperature respectively.

37
Therefore, the threshold voltage changes according to this Equation 3-2:
Equation 3-2: )2)2((0 FSBFTT VVV
Voltage variation due to temperature change is between −4 mV/°C and −2 mV/°C
depending on doping level [16].
Accordingly drain current and voltage of CMOS devices change with temperature, which
in turn will affect performance parameters of amplifier, like gain.
One of the most important temperature effects is drifting the input offset. Considering
voltage drift as ∆V and temperature change as ∆T, the error is calculated using Equation
3-3:
Equation 3-3: °C/;VT
Ve
It can be seen this error changes linearly with temperature change. Knowing the e for an
OpAmp, one can determine the voltage drift over a wanted temperature change, which
gives a good view of the amplifier to be suitable for target circuit specifications.
3.2.14 Drift
Parameters of semiconductor devices change due to time and temperature changes, resulting in a variation in OpAmp’s parameters like: input bias current, offset voltage, etc.
these variations are called drift.
3.2.15 Slew Rate
The maximum rate of change of the OpAmp’s output is called slew rate. It also means the
maximum available current to charge the load capacitor. Slew rate is specified in volts per microsecond (V/µs) and is measured applying a large step to the input and using Equation
3-4:
Equation 3-4: L
out
C
I
dt
dVSR max
When applying a step to the amplifier's input, the step response of the feedback system is proportional to the final output voltage of the system. Therefore, when applying larger
steps to the input the output change rate will increase, up to the point where the amplifier
enters slewing phase. In slewing phase the load capacitor will be charged by the maximum available current in output stage and the change rate will remain constant (SR).Figure 3-4
[11] explains the concept of slewing. It can be seen that increasing the input voltage level
wouldn’t increase the output change rate after a certain level.

38
Vin Vout
After real OpAmp
slope
Figure 3-4: Slewing Concept
If output voltage is a sinusoid tfVV mout 02sin , then:
Equation 3-5: tffVdt
dVm
out00 2cos...2
So, SR should be greater than the maximum of this derivative:
Equation 3-6: 0..2 fVSR m
3.2.16 Power Considerations
The output current of the OpAmp should be limited to a safe level so as not to damage the OpAmp and following circuitry. The output current also flows though the output
impedance, generating heat and increasing temperature. So, if the temperature rises beyond
the tolerance of CMOS device, it may cause thermal shutdown or even destroy the OpAmp
[17].
3.3 Analogue Design Trade-offs
As discussed, to design an amplifier, there are a lot of issues to be considered. Parameters
that can be named are gain, speed, power dissipation and supply voltage, linearity, noise, maximum swing and input and output impedances. These parameters interact with each
other and there are trade-offs when optimizing for each parameter. For example, designing
to have better noise performance needs the minimum size of transistors to be used which
obviously has a conflict of interest as linearity optimization include enlarging devices. Another way to lower nonlinearity is to increase overdrive voltages of MOSFETs which
will cause more power dissipation. Figure 3-5 [11] shows the tradeoffs between
performance parameters of amplifier.

39
Noise
Gain
Linearity
Supply
Voltage
Power
Dissipation
Voltage
Swing
Input/Output
Impedance
Speed
Figure 3-5: Analogue Design Octagon [11]
3.4 OpAmps’ Topologies
In this section two topologies of OpAmps are shown. First one is a telescopic topology and
the second one is folded-cascode topology. Advantages and disadvantages of each
topology are discussed. Then gain boosting and two-stage amplifiers are described. Adding a second stage and gain boosting of cascode devices help to achieve higher gain and also
higher voltage swing in second case. At the end a comparison of performance between
different topologies of amplifiers will be made.
3.4.1 Telescopic Topology
The first topology to be described here is a 1 stage telescopic amplifier. Telescopic topologies are used to achieve high gain. They increase the gain by boosting output
impedance of the amplifier. This structure is also called telescopic cascode configuration.
Figure 3-6 shows a fully differential implementation of a cascode OpAmp. To achieve
fully differential configuration current-source loads are used which at the same time will help with high gain requirement as well. It is informative to mention that diode-connected
loads are used in single-ended output Operational Amplifiers’ implementations and they
exhibit a mirror pole introduced to the transfer function.

40
bias3
bias2
bias1
Vi-
Vdd
Vi+
Vdd
Vdd
Vdd
Vdd
VssVss
VssVss
Iss
Vout- Vout+
M1 M2
M3 M4
M5 M6
M7 M8
Figure 3-6: Telescopic Amplifier Topology
The output impedance seen from each single output node is equal to:
Equation 3-7: ))(1(||))(1( 5755531333 ooombmooombm rrrggrrrggRout
As 1mm gG , then the gain can be calculated using Equation 3-8:
Equation 3-8: )(||)( 7551331 oomoommmv rrgrrggRoutGA
One of the drawbacks of this implementation is the limited output swing. Each transistor
cascaded on top of another one, adds an overdrive voltage to the headroom of output branch which will limit the output swing. Therefore, output swing of the fully differential
implementation shown in Figure 3-6 is obtained as:
Equation 3-9: Issovovovovdd VVVVVVSwingVoltage 75312
Where IssV is the voltage drop over current source and ovV is overdrive voltage of one
transistor in the cascaded branch.
Another drawback is that extra poles are added to the small-signal transfer function of the
OpAmp, exacerbating stability issue.
When using this topology, one should be careful about minimum allowable input CM level
and choosing bias voltages accordingly. For example, for bias1 we have:
Equation 3-10: SSSS IovgsIgs VVVbiasVVlevelCM 131min 1

41
3.4.2 Folded-Cascode Topology
We saw that telescopic cascode OpAmps suffer from limited output swing. Folded-cascode
OpAmps allow more swing at the output. Although, this topology consumes more power than telescopic topology due to its need for another current source (M3 and M4 act as a
current source). This topology can be implemented either employing PMOS input devices
or NMOS input devices. Each one has its advantages and disadvantages. In Figure 3-7 and
Figure 3-8 two implementation of folded-cascode topology are shown:
bias4
bias3
bias2
Vdd
Vdd
Vdd
Vdd
Vdd
VssVss
Vout- Vout+
M5 M6
M7 M8
M9 M10
Vi-
Vi+VddVdd
Iss
M1 M2
bias1VssVss
M3 M4
Vss
Figure 3-7: Folded-Cascode Implementation Using PMOS Input Devices
bias4
bias3
bias2
Vdd
Vdd
Vdd
Vdd
Vdd
VssVss
Vout- Vout+
M7 M8
M5 M6
M3 M4
Vi-
Vi+VssVss
Iss
M1 M2
bias1VssVss
M9 M10
Vss
Figure 3-8: Folded-Cascode Implementation Using NMOS Input Devices
It can be seen that voltage swing in folded-cascode topology is higher than telescopic
topology by one overdrive voltage across current source (SSIV ). So in the circuit of Figure
3-7:

42
Equation 3-11: 97532 ovovovovdd VVVVVSwingVoltage
Using the same approach as for telescopic OpAmp, the gain of folded-cascode topology
can be obtained as:
Equation 3-12:
))(1(||))||()(1( 79777513555 ooombmoooombm rrrggrrrrggRout
Equation 3-13: )(||)||(( 97731551 oomooommmv rrgrrrggRoutGA
This gain is about 2-3 times less the gain of telescopic OpAmps. One reason is the lower transconductance of PMOS input devices compared to NMOS input devices. Another
reason is appearing of 1or in parallel with 3or , which will reduce the output impedance of
amplifier.
Another issue that should be kept in mind is that the pole in the source of cascode devices
(M5 and M6 in Figure 3-7) is closer to the origin than that of telescopic OpAmp (M3 and M4 in Figure 3-6). In folded-cascode structure, capacitance in the mentioned node is made
of 5gsC , 5sbC , 3gdC , 3dbC , 1gdC and 1dbC , which has two more elements ( 3gdC and 3dbC ,
other elements are from input and cascode devices which exist in both structures) than that of telescopic structure. This issue is exacerbated when using NMOS input devices. The
reason lies within the need for larger PMOS transistors, as second current source, to carry
both currents of input and cascode devices and obviously larger devices contribute more
capacitance. Also lower transconductance of PMOS transistors, as cascode devices,
increases the impedance of the node (55
1
mbm
nodegg
R
in Figure 3-8), which will help
to bring pole to lower frequencies.
One of the important benefits of folded-cascode OpAmps is that their input CM level range is larger than that of telescopic OpAmps. Depending on the kind of input device, input CM
level can be very close to one of the supply sources. In case of PMOS input devices, input
CM level can be zero and having NMOS input device, OpAmp tolerate input CM level
equal to ddV . In general the choice of input device depends on the application. Whether
gain is the target or CM level dictates the input device.
3.4.3 Gain-Boosting
In telescopic and folded-cascode topologies, increasing output impedance has been used as
a means of increasing gain. In both, stacking more transistors in output branch as cascode
devices helps to do so. What if there is a need for higher gain and larger output swing at
the same time? Then, there would be no good outcome, inserting another level of transistors in the stack. The idea behind gain boosting is to increase the output impedance
further more to achieve higher gain without adding more transistors to the output branch
and reducing the swing as a result. In this approach, the cascode device is placed in a current- voltage feedback [11] using an amplifier. Assuming telescopic OpAmp, both
NMOS cascode devices in signal path and the PMOS cascode devices in the load current

43
source can be used for gain boosting. In Figure 3-9 cascode transistors M3-M6 are placed
in the feedback loop:
bias3
Vi-
Vdd
Vi+
Vdd
Vdd
Vdd
Vdd
VssVss
VssVss
Iss
Vout- Vout+
M1 M2
M3 M4
M5 M6
M6 M7
+
-
-
+
+
-
-
+
A1
A2
Amp1
Amp2
Figure 3-9: Gain Boosting Applied to Telescopic OpAmp Topology
The output impedance, using gain boosting technique, is obtained from parallel calculation of impedances seen by looking into drain of cascode devices, as before, but this time
multiplied by the gain of auxiliary amplifiers 1A and 2A :
Equation 3-14:
))(1(||))(1( 572555311333 ooombmooombm rrArggrrArggRout
As 1mm gG , then the gain can be calculated:
Equation 3-15: )(||)( 755213311 oomoommmv rrgArrgAgRoutGA
So, the gain is enhanced by increasing output impedance. The auxiliary amplifier can have
any topology from a simple CS amplifier to fully differential folded-cascode topology. The
sensing transistor at the input of these amplifiers should be chosen, such that they suit the CM level of the voltage being sensed (source of cascode devices). For example in Figure
3-9, if the Amp1 is a fully differential folded-cascode, the input devices should be PMOS
as they can tolerate almost zero input CM level and the source voltage of 43 MM will
become as low as SSIov VV 1 . Similarly, NMOS input devices are more suitable to be used
in Amp2 as they will sense input CM level close to ddV .

44
An important issue to remember is that, although the OpAmp is still a 1-stage amplifier,
the poles in auxiliary amplifier will affect the transfer function. The effect wouldn’t be very dramatic as the path is not the feed-forward path where most of the signal will flow
through it. Nevertheless, one should be careful with stability around the extra loops created
by gain boosting as well as stability around the main loop, placing the amplifier in closed
loop configuration, when designing the circuit.
3.4.4 Two-Stage OpAmps
Two-stage OpAmps are used for their ability to provide more gain and swing. Basically,
the second stage provides about 5-15 dB gain, which is not very high. But the higher
output swing provided by the second stage is crucial to some applications, especially with lower supply voltages in today’s technologies. So, the second stage is a simple amplifier
like a CS stage, as shown in Figure 3-10 bellow:
bias
Vi-
Vdd
Vi+
Vdd Vdd
VssVss
M1 M2
M3 M4
+
-
-+ A1
Amp1Vi+
Vi- Vout1+
Vout1-
Vss
Vout2+Vout2-
Figure 3-10: Two- Stage OpAmp
The second stage’s gain is multiplied by the gain of the first stage:
Equation 3-16: )||( 311121 oomvvvtotalv rrgAAAA
The second stage’s swing is much larger than say a telescopic output swing:
Equation 3-17: 312 ovovdd VVVSwingVoltage
The output stage’s current should be high for the sake of speed, but, not that high to damage MOSFET devices or produce too much thermal noise. Obviously power
dissipation should be kept under control too.
3.4.5 Comparison between Different Topologies of OpAmps
In this section, we sum up properties of different amplifier topologies that have been
discussed in previous sections.

45
Telescopic OpAmps have high speed as the input device’s current flows directly into
output impedance, but they suffer from limited output swing. This topology is simple and
there is only one current source in it, so they dissipate power less than other topologies.
Folded-cascode OpAmps stand next in the line. Compared to the telescopic topology they
have less gain and speed and dissipate more power. But they have found their place in a
wide range of applications due to their larger output swing and their extended input CM
level range.
Gain boosting and adding second stage is two powerful design schemes to obtain higher gain and in second case higher swing as well. As the level of the complexity of the circuit
goes up, power consumption increases.
Bellow in Table 3-1 [11] all properties of different topologies have been compared with
each other:
Table 3-1: Comparison between Performance of Different OpAmp Topologies [11]
Gain Output
Swing Speed
Power
Consumption Noise
Telescopic Medium Medium Highest Low Low
Folded-
Cascode Medium Medium High Medium Medium
Gain Boosted High Medium Medium High Medium
Two-Stage High Highest Low Medium Low
In this work, a two-stage gain boosted amplifier is designed to achieve high DC-gain and output swing. The price to be paid is high power consumption which is not avoidable when
a high performance amplifier is needed.

46

47
Chapter4. Designed OpAmp
In this chapter requirements of an OpAmp to be employed in a 12-bit pipelined ADC are
discussed and calculated. After that the designed OpAmp and its performance metrics are
shown. ADC structure and the use of designed OpAmp in the ADC will be described in
next chapter.
4.1 OpAmp Requirements
For an OpAmp-based design of a high resolution and high speed pipelined ADC, there are
high requirements for the OpAmp design to be satisfied. These two definition “high
resolution” and “high speed” for an ADC adds a great deal of challenge on the OpAmp design to achieve the required performance regarding DC-gain, Bandwidth, noise, stability,
speed and swing. All of which should be achieved under critical conditions of decreased
supply voltages and intrinsic gain of today’s CMOS technology. The down sized transistors of new coming technologies also have higher leakage and lower output
resistance. They are faster switches as a result of the reduced parasitic capacitances (due to
reduced transistor dimensions). Because of the higher number of transistors in smaller area,
heat production is another problem of scaling in new technologies which will cause slower operation and reduced reliability and lifetime of the transistors. These transistors are also
more prone to process variation. All of these characteristics of new scaled down
technologies add more error to the OpAmp’s transfer function, making it harder to satisfy
the stringent requirements on the OpAmp.
OpAmps are the basic building block of an ADC which determine the speed and accuracy
of the ADC. They introduce gain error and nonlinearity which should be minimized in
design process or compensated for by digital correction circuitry. They are also the most power hungry part of the ADC and dissipate almost 60-80% of the total power. There are a
few techniques to reduce OpAmps power consumption [18], like using class AB amplifiers
which only consumes dynamic current, OpAmp sharing and OpAmp current reuse.
As discussed in Chapter2, the OpAmp is used in the 2.5 b MDAC structure of the pipelined
ADC. The OpAmp is placed in a negative feedback with amplification factor of 4. Now it is time to see what the requirement specification for this OpAmp is. Here we discuss DC-
gain, Gain-Bandwidth (GBW), Slew-Rate (SR) and Noise.
Before extracting the requirements for an OpAmp, there are a few parameters from the
specification of the ADC that are needed in the calculations:
Equation 4-1: vDiffVmvV FSinADCref 4.1)(700
Equation 4-2: vv
LSBvDiffV FSin 3422
4.14.1)(
12
Equation 4-3: vLSB 1712
1

48
4.1.1 DC-Gain
OpAmps finite gain introduces error to the next stage in the pipelined ADC. For each
stage, this error should be less than LSB voltage of an ADC with the same reference voltage and resolution of remaining bits (total bits that the whole ADC resolves minus
resolved bits). To achieve the accuracy requirement for an N-bit pipelined ADC, the gain
error contributed by the first stage with M-bit resolution should satisfy the equation bellow:
Equation 4-4: MN
ref
M
ref VV
A
A
221
1
Where
1 is the inter-stage gain factor and equals to
12 M for 2.5 bps structure. Equation
4-4 can be simplified to:
Equation 4-5: 12 NA
For N=12, M=3 and
1=4, the minimum open-loop gain of 66.22dB is needed. To have
some margin open- loop larger than 66dB is considered to take care of process variation and mismatch errors. Some of the gain and offset errors of the OpAmp is corrected
employing digital correction logic.
4.1.2 Gain-Bandwidth (GBW)
The gain-bandwidth product of an amplifier is the product between its bandwidth and the
gain at which the bandwidth is measured. This means that at unity frequency ( uf ), at
which the gain of amplifier falls to unity ( 10 dBAufv ), the GBW product of the
amplifier equals unity frequency ( uu ffbandwidthgainGBW 1 ). This also
means that if the OpAmp is placed in a unity-gain feedback, the bandwidth at which the
gain remains one equals uf . With the same GBW product, the same amplifier if placed in a
negative feedback system to achieve a gain of 4 will have a bandwidth equal to (Equation
4-6):
Equation 4-6: 4
4GBW
bandwidthbandwidthbandwidthgainGBW
In the same manner the DC-gain of the OpAmp can be calculated at 1Hz bandwidth:
Equation 4-7: Hz
GBWgainDCHzgainDCbandwidthgainGBW
11
Having said all that, it is important to remember that these calculations will not give the
exact values for circuits with two poles or more. That is because the GBW product is

49
independent of gain, in which it is measured, only in one pole circuits. Nevertheless, GBW
product provides useful insights even into complex circuits. At the end all performance
metrics of the circuit should be verified by simulation.
To achieve high accuracy requirements for N-bit pipeline ADC, unity frequency should be
much larger than sampling frequency. Using same method for calculating minimum DC-
gain, the error produced by low bandwidth of the OpAmp should be less than 1 LSB of an
ADC with the same reference voltage and resolution of remaining bits (total bits that the
whole ADC resolves minus resolved bits):
Equation 4-8: MN
ref
M
reft VV
e
221
11
In Equation 4-8,
1 stands for inter-stage gain, refV is the reference voltage of ADC,
t
e
1 is the step response of feedback system withuf..2
1
. Equation 4-8 can be
simplified to:
Equation 4-9:
settling
uT
MNf
..2
2ln
Considering 300MHz sampling frequency ( nsTsampling 33.3 ) and according to clocking
scheme of the designed ADC, the time available for settling is:
Equation 4-10: nsTT samplingsettling 5.24
3
For N=12, M=3 and =1/4, the minimum gain-bandwidth required is 1.59 GHz.
4.1.3 Slew-Rate (SR)
Slew-rate is the maximum rate of output voltage changes and it is calculated using the
maximum available current to charge the load capacitance. It is one of the sources of
distortion when the output is near its maximum swing.
Equation 4-11: settling
Diffswing
T
Voltage
dt
dVSR
2max
For a voltage swing of 1.4v (full scale differential voltage range of ADC) and sampling
rate of 300 MHz (considering half of the sampling period for settling), SR should be
greater thans
kv
278.5 .

50
4.1.4 Noise
According to the noise budgeting in Chapter2 the maximum allowable noise power at the
output of the first stage of pipelined ADC is 435 µv. 50% of this voltage is reserved for thermal noise and this will leave 217µv for other noises including jitter noise, OpAmp
noise, etc. large portion of this noise is due to amplifiers noise, so, 150 µv of this power is
reserved for it. This amount of noise power equals -76.5dB, demanding for an SNR value
higher than 70.5dB.
4.1.5 Summary of OpAmp’s Requirements
In the Table 4-1, the needed requirements on the OpAmp to be used in the pipelined ADC
are summarised.
Table 4-1: Summary of OpAmp’s Requirements
Performance Metrics Required Values
uf 2.12 GHz
Slew Rate
skv
278.5
gainDC 67 dB
SNR 71dB
4.2 Designed OpAmp
The designed OpAmp is a two-stage, fully differential, Cascode current mirror topology
modified for low-voltage operation. It is an extended version of OpAmp used [19]. In
Figure 4-1 the architecture of the amplifier is shown:
bias2
VddVdd
VssVss
M5 M6
Vss Vss
M3 M4
Vi-
Vi+
Iss1
Vdd
Vdd
Vdd
Vdd
Vdd
VssVss
Vout1-Vout1+
M7 M8
M2M1
VssVss
M9 M10
Vss
Vdd Vdd
Vboost1
Vboost2
CMFB1
Vboost1
Vboost2
CMFB1
M11
M13
M12
M14
Vdd
Vss
M15
CMFB2
M17
Vdd
Iss2/2
Vdd
Vdd
Vss
M18
M16
CMFB2
Vout2-
Iss2/2
VddVdd
Vss
Vss
Cc Rc
CcRc
Vout2+
Figure 4-1: OpAmp Architecture
The OpAmp is a two-stage amplifier to achieve high gain and voltage swing. It is also uses gain boosted cascode devices. Input devices are chosen to be PMOSFETs because of their
lower flicker noise and more flexibility about the input CM level. Second stage
incorporates NMOS devices for their higher intrinsic gain. Second stage is a simple CS

51
stage to allow more output swing. 2pF load capacitor is considered to simulate next stage’s
input capacitance. The compensation scheme used here is Miller Compensation.
4.2.1 Common-Mode Feedback (CMFB)
Both stages CM levels are regulated by common-mode feedbacks. Figure bellow
represents CMFB circuit:
V-
V+VssVss
IssC
M1 M2
Vdd
VrefVss
M3
Vdd
M4
Vb
Vdd
CMFB
Figure 4-2: CMFB Circuit
Differential outputs of each stage are sensed by a differential pair and compared to a
voltage reference. In case of any differentiation, the CMFB brings back the output CM
mode level to its equilibrium.
4.2.2 Boosting Amplifiers
Boosting amplifiers are folded-cascode OpAmps. As explained in Chapter3, folded-cascode OpAmps have high voltage swing and moderate gains. They also allow more input
CM mode range. The 4 stacked transistors of first stage and the boosting amplifiers placed
in the main amplifiers circuit are shown in Figure 4-3.

52
bias4
Vdd
Vdd Vdd
M13 M14
bias1VssVss
M9 M10
Vss
Vdd Vdd
VssVss
Vout- Vout+
M7 M8
M11 M12
+
-
-
+
+
-
-
+
A1
A2
Amp1
Amp2
A B
C D
Figure 4-3: Boosting Amplifiers Placed in The First Stage’s Output Branch
Amp1 senses voltages of points A and B, regulates the cascode devices’ (M9-M10) gate-source voltages and amplifies the total gain by A1. Amp1 has PMOS input devices to deal
with low voltage CM levels in A and B. Amp2 incorporates NMOS input devices due to
same reasoning. The architecture of boosting amplifier number two is shown below:
CMFB3
Vdd
Vdd
Vdd
Vdd
Vdd
VssVss
Vout- Vout+
M5
M6
M7 M8
M9 M10
Vdd
Vdd
I2M1 M2
bias1
VssVss
Vss
Vdd
Vdd
Vdd
Vss
M3
Vss
M4
I2
Vdd
I1
I1
Vss Vss
Vss
VddVdd
Issb
Vi+
Vi-
M11
M12
M13 M14
Figure 4-4: Boosting Amplifier
Boosting amplifiers are gain boosted as well. The technique is called Nested-boosting [14].
Sometimes the second boosting amplifier is simple, like this case, but it also can be scaled

53
version of main boosting amplifier if more gain is needed. One should be cautious when
putting boosting amplifiers into the circuit as they introduce internal loops that can be unstable. To check for stability around internal loops, probes (to break the loop during
simulation) and stability simulation can be used. In Figure 4-5, Figure 4-6, Figure 4-7 and
Figure 4-8 gain and phase plots of both boosting amplifiers are shown.
Figure 4-5: Boosting Amp1 Gain Plot
Figure 4-6: Boosting Amp1 Phase Plot
-10
-5
0
5
10
15
20
25
30
35
0.0001 0.01 1 100
Gain
(d
B)
Frequency (MHz)
Boosting Amp1-Gain (dB)
-90
-70
-50
-30
-10
10
0.0001 0.001 0.01 0.1 1 10 100 1000
Ph
ase
(d
eg
)
Frequency (MHz)
Boosting Phase-Amp1 (deg)

54
Figure 4-7: Boosting Amp2 Gain Plot
Figure 4-8: Boosting Amp1 Phase Plot
Table 4-2 and Table 4-3 contains simulated parameters for boosting amplifiers:
Table 4-2: Boosting Amplifier No.1 Results
Performance Metrics Simulated Value
uf 393.4 MHz
dBBW3 11.45 MHz
gainDC 30.98 dB
PM 89.93 deg
ddVi 11.44 mA
-10
-5
0
5
10
15
20
25
30
35
0.000001 0.0001 0.01 1 100 10000
Gain
(d
B)
Frequency (MHz)
Boosting Amp2-Gain (dB)
-180
-160
-140
-120
-100
-80
-60
-40
-20
0
0.000001 0.0001 0.01 1 100 10000
Ph
ase
(d
eg
)
Frequency (MHz) Boosting Amp2-Phase (deg)

55
Table 4-3: Boosting Amplifier No.2 Results
Performance Metrics Simulated Value
uf 512.9 MHz
dBBW3 12 MHz
gainDC 32.48 dB
PM 94.25 deg
ddVi 15.5 mA
4.3 Test Bench
The OpAmp is placed in the test bench illustrated in Figure 4-9 to be simulated and its
parameters are calculated. Sampling capacitor is 4 times of feedback capacitor to provide
gain of 4 for the MDAC ( 4f
s
CC
). The noise voltage at the output of amplifier falls
below 0.2LSB by Choosing sC larger than 100fF for 10-bit ADC and 2pF for 12-bit ADC.
lC is chosen 2pF to simulate the load effect of next stage.
The probe module shown in the figure below is placed in the feedback to break the loop
when using the stability simulator (stb Analysis in Analog Design Environment) in
Cadence. The stability simulator calculates loop-gain and loop-phase and is used to
determine stability of the circuit around the loop.
The analogue writer module is responsible for sampling the output data and dumping the
sampled data into a text file. The text file can be read by Matlab and used for OpAmp’s
performance determination. The writer is written in VerilogA Code and the Code can be
found in Appendix B.

56
Vi+
Vi- Vout+
OpAmp
Vdd
Vss
Cf
Cf
Cs
Cs
Vout-
CL
CL
Vip
Vin
Bias
Circuit Pro
be
Vout+
Vout-
Analogue
Writer
fs
Vout+
Vout-
Figure 4-9: OpAmp Test Bench
4.4 Designed OpAmp’s Result
The OpAmp reaches 72dB DC-gain and the gain stays constant when the output swing
increases up to the point that the output voltage clips. In Figure 4-10 and Figure 4-11 the
open-loop gain and phase of the designed OpAmp is shown:
Figure 4-10: Open-Loop Gain Plot of 2-stage, Gain Boosted OpAmp
-2 6
14 22 30 38 46 54 62 70
1E-09 0.0000001 0.00001 0.001 0.1 10 Frequency(GHz)
Gain-s2 (dB)

57
Figure 4-11: Open-Loop Phase Plot of 2-stage, Gain Boosted OpAmp
Other performance metrics of the amplifier are simulated and summarized in Table 4-4:
Table 4-4: OpAmp Simulated Performance Metrics
Performance Metrics Simulated Value
uf 4.077 GHz
dBBW3 640.4 KHz
gainDC 72.35 dB
PM 76.01 deg
ddVi 123.3 mA
SNR( for fs up to 320 MHz) >100dB
Slew Rate 22.5kv/µs
Settling behaviour of the OpAmp, for being used in 12-bit or 10-bit pipelined ADC and placed in the 2.5 bps MDAC (amplification factor of 4) is verified. The simulation is done
applying low frequency (1MHz) pulse waves with different amplitudes to the input and recording the settling time of the amplifier, when the OpAmp settles to half of the
corresponding LSB. For example in Figure 4-12 an input signal’s rising edge with peak to
peak voltage of 200mv along with the output signal’s rising edge is shown.
-200 -180 -160 -140 -120 -100
-80 -60 -40 -20
0
1E-09 0.0000001 0.00001 0.001 0.1 10
Frequency(GHz)
Phase-s2 (deg)

58
Vin
Vout
Time(ns)
Voltage(mv)
100
-100
400
-400
2.2ns
Figure 4-12: OpAmp’s Input/output Pulses’ Rising Edge
LSB for 12-bit ADC with maximum 1.4v input voltage (differential peak to peak voltage)
is 342µv and settling between the 171µv (half LSB) error from final value is evaluated.
Table 4-5: Settling Time of The OpAmp for Being Placed in 12-bit ADC
)(mvV Diffppin )(mvV Diffppout )(nsTsettling )(max MHzfs
200 800 2.243 356.66
240 960 2.92 273.97
280 1120 3.27 244.65
320 1280 3.56 224.71
360 1440 3.86 207.25
LSB for 10-bit ADC with maximum 1.4v input voltage (differential peak to peak voltage)
is 1.37mv and settling between the 683.6µv (half LSB) error from final value is evaluated.
Table 4-6: Settling Time of The OpAmp for Being Placed in 10-bit ADC
)(mvV Diffppin )(mvV Diffppout )(nsTsettling )(max MHzfs
200 800 2 400
240 960 2.25 355.55
280 1120 2.57 311.28
320 1280 2.79 286.74
360 1440 2.84 281.7
In order to calculate signal and noise power and calculate SNR, an analogue writer is used to sample the OpAmp’s output sine and dump the sampled data into a text file. The text file can be read by a Matlab code and used to calculate SNR. If frequency of the output sine
wave is considered as if and analogue sampler’s clock frequency as sf then they should
relate to each other according to Equation 4-12 to satisfy coherent sampling:

59
Equation 4-12: cycle
samplie
isN
Mff
In the equation above, samplieM stands for number of samples or size of the FFT (here it is
equal to 4096=2^12) and cycleN stands for odd or prime number of the complete cycles of
output sine. SNR Value is calculated for different input frequencies and amplitudes and its
value stays above 100 dB for frequencies up to 320MHz.
The designed OpAmp is placed in an ideal model of the pipelined ADC, where every other block in the ADC is written in VerilogA. In Chapter5, the simulation result for an ideal
pipelined ADC incorporating the schematic OpAmp is shown.
4.5 Comparison with other works
In Table 4-7 the OpAmp designed in this thesis is compared with other works’ designed OpAmps. All these OpAmps are designed to be used in pipelined ADCs. In the table the
resolution and sampling frequency of the pipelined ADC, for which the OpAmps are
designed, are shown. As can be seen, OpAmps are designed in different CMOS technologies which will affect the achievable results as discussed earlier in this chapter.
The strongest aspect of this thesis is the high GBW (4.077 GHz) which is achieved in
65nm CMOS technology.
Table 4-7: Comparison between the OpAmp’s results and other works
This work [19] [10] [18] [22]
Technology 65nm
CMOS rad –tolerant
CMOS 90nm
CMOS 0.18um1P6M
CMOS 0.13um CMOS
ADC
Resolution 12 12 12 12 8
ADC Sample-
Rate
300MHz 40MHz 200MHz 50MHz 440MHz
DC Gain/
Feedback-Gain
72.35dB/4 90dB/4 28dB/1.71 74.2dB/4 60dB/2
GBW 4.077GHz 260MHz - - 3GHz
Power 135mW 3.9mW 192mW - -
PM 76.01deg - - - 60deg

60

61
Chapter5. Simulation Result of Pipelined ADC
Incorporating Designed OpAmp
In this chapter, three models of pipelined ADC are introduced (i.e. high level model, high
level model with the designed OpAmp inserted in the circuit and finally the pipelined ADC
in schematic), simulated and the result is shown. First of all, a completely high level model
based on the pipelined ADC architecture which is designed in schematic is introduced and simulated to obtain the performance metrics of an ideal pipelined ADC. These metrics are
used as reference values to be compared with the performance metrics of the later versions
of the ADC which incorporate blocks designed in schematic replacing their high level
counterparts.
5.1 Simulation Result for the High Level Pipelined ADC
High level model of the pipelined ADC is developed using VerilogA. SNR, SFDR, SNDR,
THD and ENOB are calculated by Matlab and the data used in Matlab is dumped in a text file by a writer in cadence. Coherent sampling is applied and 4096 (2^12) samples are
collected during simulation for different sampling frequencies and input amplitudes of a
sine wave. The simulation results are depicted below.
Figure 5-1: SNR vs. Peak-to Peak Differential Input Voltage Plot for Ideal ADC
Figure 5-2: SNDR vs. Peak-to Peak Differential Input Voltage Plot for Ideal ADC
60 65 70 75 80
0.2 0.3 0.4 0.5 0.6 0.7 0.8 0.9 1 1.1 1.2 1.3 1.4
SN
R (
dB
)
Peak-to-Peak Differential Input Voltage (v)
SNR vs. Input Voltage
fs500M
fs300M
fs100M
fs70M
fs50M
60
65
70
75
80
0.2 0.3 0.4 0.5 0.6 0.7 0.8 0.9 1 1.1 1.2 1.3 1.4
SN
DR
(dB
)
Peak-to-Peak DifferentialInput Frequency (v)
SNDR vs. Input Voltage
fs500M
fs300M
fs100M
fs70M
fs50M

62
Figure 5-3: ENOB vs. Peak-to Peak Differential Input Voltage Plot for Ideal ADC
The high level model’s simulation results are illustrated in figures above (from Figure 5-1
to Figure 5-3). Two sets of simulations are performed to study the effect of input voltage
amplitude and sampling frequency changes on ADC’s performance. First set of simulations are based on changes in input voltage amplitude where the sampling frequency is kept
constant and another set are based on changes in sampling frequency where the input
voltage amplitude is kept the same. Both sets of simulations are repeated for different
constant values. For example in Figure 5-1 the effect of input voltage amplitude changes (from 800mv to 1400mv) on SNR is studied where the sampling frequency is 100MHz and
this simulation set is repeated for other sampling frequencies. The results indicate that for
high level model of the pipelined ADC, the voltage amplitude of the input plays the most important role in determining the ADC’s performance. As the input signal’s Voltage
amplitude (signal power) increases, better performance values are obtained. In this Model,
sampling frequency does not affect ADC’s performance that much and it can be seen that all the curves related to different sampling frequencies in the SNR, SNDR and ENOB plots
for Ideal ADC are placed on top of each other. Obviously, the reason is that the ideal
blocks in the pipelined ADC’s architecture do not need a lot of time to settle or prepare the
result after the clock’s rising edge. It is worthwhile to say that the sampling frequency changes will affect the performance at higher frequencies. That would be because of the
delays, rising time and falling time which are assigned to the clocks and signals of the ideal
blocks in the ADC’s architecture in order to make the ideal model’s behaviour more
similar to real one.
5.2 Simulation Result for the High Level Pipelined ADC with the OpAmp in
Schematic
This model of the pipelined ADC is similar to the high level model except for the inter-
stage gain block which is replaced by the designed OpAmp in schematic. The OpAmp is
placed in a closed-loop configuration with a feed-forward gain of 4. Similar to the ideal model, SNR, SFDR, SNDR, THD and ENOB are calculated and the simulation results are
shown below.
10 10.5
11 11.5
12 12.5
13
0.2 0.3 0.4 0.5 0.6 0.7 0.8 0.9 1 1.1 1.2 1.3 1.4
EN
OB
Peak-to-Peak Differential input Voltage (v)
ENOB vs. Input Voltage
fs500M
fs300M
fs100M
fs70M
fs50M

63
Figure 5-4: SNR vs. Peak-to Peak Differential Input Voltage Plot for Ideal ADC with
Transistor Level OpAmp
Figure 5-5: SNR vs. Sampling Frequency Plot for Ideal ADC with Transistor Level
OpAmp
Figure 5-6: SFDR vs. Peak-to-Peak Differential Input Voltage Plot for Ideal ADC with
Transistor Level OpAmp
40 45 50 55 60 65 70 75 80
0.2 0.3 0.4 0.5 0.6 0.7 0.8 0.9 1 1.1 1.2 1.3 1.4
SN
R (
dB
)
Peak-to-Peak Differential Input Voltage (v)
SNR vs. Input Voltage
fs500M
fs300M
fs100M
fs70M
fs50M
55
60
65
70
75
80
25 75 125 175 225 275 325 375 425 475 525
SN
R (
dB
)
Sampling Frequency (MHz)
SNR vs. Sampling Frequency
Vpp1.28v
Vpp1.24v
Vpp1v
50 55 60 65 70 75 80 85
0.2 0.3 0.4 0.5 0.6 0.7 0.8 0.9 1 1.1 1.2 1.3 1.4
SF
DR
(dB
)
Peak-to-Peak Differential Input Voltage (v)
SFDR vs. Input Voltage
fs500M
fs300M
fs100M

64
Figure 5-7: SFDR vs. Sampling Frequency Plot for Ideal ADC with Transistor Level
OpAmp
Figure 5-8: SNDR vs. Peak-to-Peak Differential Input Voltage Plot for Ideal ADC with
Transistor Level OpAmp
Figure 5-9: SNDR vs. Sampling Frequency Plot for Ideal ADC with Transistor Level
OpAmp
45 50 55 60 65 70 75 80 85
25 75 125 175 225 275 325 375 425 475
SF
DR
(dB
)
Sampling frequency (MHz)
SFDR vs. Sampling Frequency
Vpp1.24v
Vpp0.8v
Vpp0.6v
40 45 50 55 60 65 70 75
0.2 0.3 0.4 0.5 0.6 0.7 0.8 0.9 1 1.1 1.2 1.3 1.4
SN
DR
(dB
)
Peak-to-Peak DifferentialInput Frequency (v)
SNDR vs. Input Voltage
fs500M
fs300M
fs100M
40 45 50 55 60 65 70 75
25 75 125 175 225 275 325 375 425 475
SN
DR
(dB
)
Sampling Frequency (MHz)
SNDR vs. Sampling Frequency
Vpp1.32v
Vpp1.28v
Vpp0.8v

65
Figure 5-10: THD vs. Peak-to-Peak Differential Input Voltage Plot for Ideal ADC with
Transistor Level OpAmp
Figure 5-11: THD vs. Sampling Frequency Plot for Ideal ADC with Transistor Level
OpAmp
Figure 5-12: ENOB vs. Peak-to-Peak Differential Input Voltage Plot for Ideal ADC with
Transistor Level OpAmp
45 50 55 60 65 70 75 80 85
0.2 0.3 0.4 0.5 0.6 0.7 0.8 0.9 1 1.1 1.2 1.3 1.4
TH
D (
dB
)
Peak-to-Peak Differential Input Voltage (v)
THD vs. Input Voltage
fs500M
fs300M
fs50M
45 50 55 60 65 70 75 80 85
25 75 125 175 225 275 325 375 425 475 525
TH
D (
dB
)
Sampling Frequency (MHz)
THD vs. Sampling Frequency
Vpp1.28v
Vpp0.8v
Vpp0.6v
6 7 8 9
10 11 12
0.2 0.3 0.4 0.5 0.6 0.7 0.8 0.9 1 1.1 1.2 1.3 1.4
EN
OB
Peak-to-Peak Differential input Voltage (v)
ENOB vs. Input Voltage
fs500M
fs300M
fs100M

66
Figure 5-13: ENOB vs. Sampling Frequency Plot for Ideal ADC with Transistor Level
OpAmp
The results show that the performance of the ADC improves by increasing the input voltage amplitude up to the point where the distortion in the circuit becomes an issue and
degrades the performance. The increase in the input voltage leads to stronger signal power
compared to noise and distortion power. This increase, also, leads to more distortion in the
circuit, but the increase in signal power is more influential compared to the increase in distortion power, up to the changing point (here 1.32v). Drain current of a CMOS transistor
which is biased in saturation can be calculated using this formula:
Equation 5-1: )1()( 2
21
DSTHGSoxnD vvvL
WCi
Where gsBgsGS vVv (dividing gate-source into its biasing voltage and small signal
voltage). Therefore, dDD iIi . Applying Taylor expansion to the current equation
around its DC operating point (Q) gives:
Equation 5-2: ....)()( 2
2
2
21
gs
QGS
Dgs
QGS
DDD v
v
iv
v
iIi
For very small-signal voltages, where the biasing point of the transistor is not perturbed,
the drain current can be approximated as:
Equation 5-3: )( gs
QGS
DDD v
v
iIi
Where the partial derivative
QGS
D
v
i
is called mg . With this linear behaviour of the
transistors, one can expect that by increasing the input signal the signal to noise and distortion ratio will increase which is the case for small signal operation. However, if the
6
7
8
9
10
11
12
20 70 120 170 220 270 320 370 420 470
EN
OB
Sampling Frequency (MHz)
ENOB vs. Sampling Frequency
Vpp1.32v
Vpp1.28v
Vpp0.8v

67
signal changes are not small then the linear behaviour of transistors is out of the picture
and higher order terms in Equation 5-2 cannot be neglected anymore. These terms are the source of the harmonic distortion components and the cause of, for example, SNDR drop
for larger input signals.
The results also show that the increase in the sampling frequency tends to degrade the
performance as there is less time dedicated to amplification process which means that there
is less time for OpAmp to settle within its final value.
In figures above from Figure 5-4 to Figure 5-13 , it can be seen that the ENOB stays around 11.5 bit for sampling frequencies up to 320 MHz. The ENOB drops by less than 1
bit when the OpAmp is placed in the ideal pipelined ADC’s circuit. The SNR value is
evaluated to be more than 73 dB for sf up to 320 MHz.
Therefore, the OpAmp can provide an inter-stage gain of 4, in 2.5bps architecture of 5
stages of the 12-bit pipelined ADC without introducing noise, distortion and gain error beyond the tolerance of a high resolution pipelined ADC. This means that the stringent
requirements for the OpAmp, to be employed in a 12-bit pipelined ADC, are satisfied in
the designed OpAmp.
For further studies all the blocks in the pipelined ADC are designed in the schematic. The
designed circuits are shown in Chapter2. The simulation result for the schematic pipelined ADC can be found in Appendix A. This part of the design is beyond the scope of this thesis
and obviously there is room for more improvements to be made to the designed blocks.
Nevertheless, the experience and knowledge that can be achieved by designing a complete
pipelined ADC in schematic is worth the time and the effort.

68
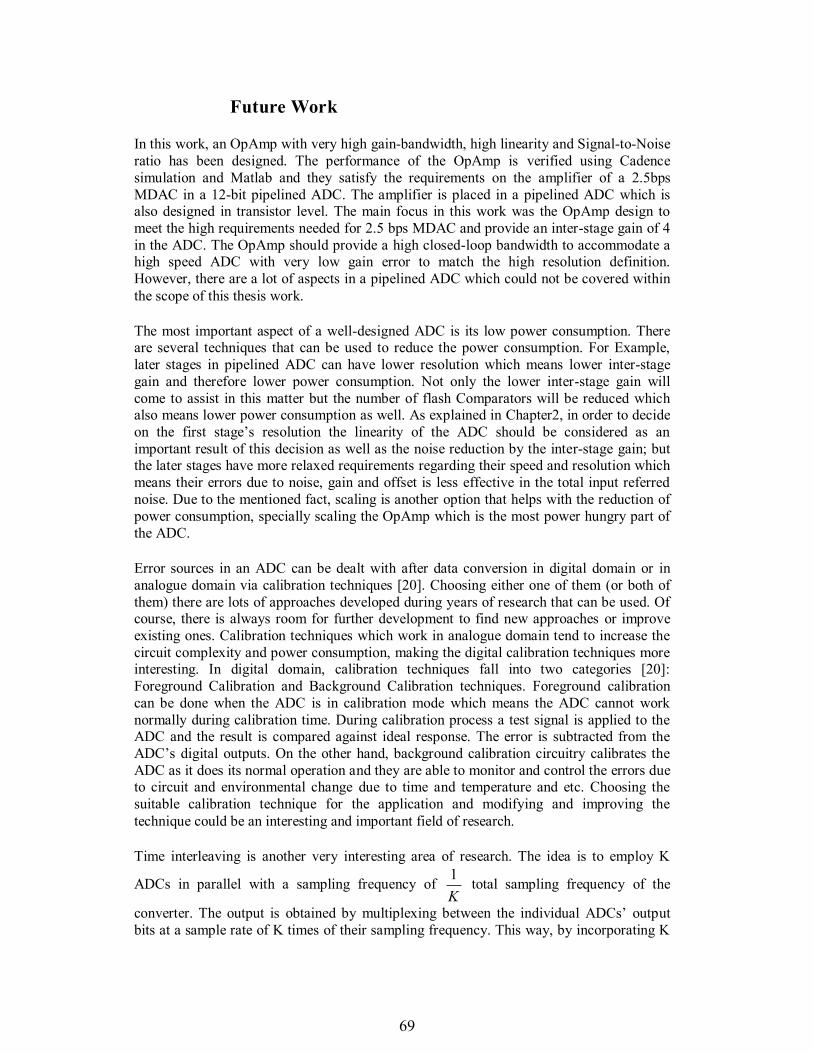
69
Future Work
In this work, an OpAmp with very high gain-bandwidth, high linearity and Signal-to-Noise
ratio has been designed. The performance of the OpAmp is verified using Cadence
simulation and Matlab and they satisfy the requirements on the amplifier of a 2.5bps
MDAC in a 12-bit pipelined ADC. The amplifier is placed in a pipelined ADC which is also designed in transistor level. The main focus in this work was the OpAmp design to
meet the high requirements needed for 2.5 bps MDAC and provide an inter-stage gain of 4
in the ADC. The OpAmp should provide a high closed-loop bandwidth to accommodate a high speed ADC with very low gain error to match the high resolution definition.
However, there are a lot of aspects in a pipelined ADC which could not be covered within
the scope of this thesis work.
The most important aspect of a well-designed ADC is its low power consumption. There are several techniques that can be used to reduce the power consumption. For Example,
later stages in pipelined ADC can have lower resolution which means lower inter-stage
gain and therefore lower power consumption. Not only the lower inter-stage gain will
come to assist in this matter but the number of flash Comparators will be reduced which also means lower power consumption as well. As explained in Chapter2, in order to decide
on the first stage’s resolution the linearity of the ADC should be considered as an
important result of this decision as well as the noise reduction by the inter-stage gain; but the later stages have more relaxed requirements regarding their speed and resolution which
means their errors due to noise, gain and offset is less effective in the total input referred
noise. Due to the mentioned fact, scaling is another option that helps with the reduction of
power consumption, specially scaling the OpAmp which is the most power hungry part of
the ADC.
Error sources in an ADC can be dealt with after data conversion in digital domain or in
analogue domain via calibration techniques [20]. Choosing either one of them (or both of
them) there are lots of approaches developed during years of research that can be used. Of course, there is always room for further development to find new approaches or improve
existing ones. Calibration techniques which work in analogue domain tend to increase the
circuit complexity and power consumption, making the digital calibration techniques more interesting. In digital domain, calibration techniques fall into two categories [20]:
Foreground Calibration and Background Calibration techniques. Foreground calibration
can be done when the ADC is in calibration mode which means the ADC cannot work
normally during calibration time. During calibration process a test signal is applied to the ADC and the result is compared against ideal response. The error is subtracted from the
ADC’s digital outputs. On the other hand, background calibration circuitry calibrates the
ADC as it does its normal operation and they are able to monitor and control the errors due to circuit and environmental change due to time and temperature and etc. Choosing the
suitable calibration technique for the application and modifying and improving the
technique could be an interesting and important field of research.
Time interleaving is another very interesting area of research. The idea is to employ K
ADCs in parallel with a sampling frequency of K
1 total sampling frequency of the
converter. The output is obtained by multiplexing between the individual ADCs’ output
bits at a sample rate of K times of their sampling frequency. This way, by incorporating K

70
individual ADCs with sampling frequency of sf , total sampling frequency would be K sf .
Although, very high sampling rates (tens of GS/s) can be achieved by this approach, the
resolution is mostly limited to 8 bits. The problem is that the matching requirements in K channels are very high and existing methods such as matching physical channel layouts,
using common ADC reference voltages, pre-screening devices, and active analogue
trimming can help with resolutions around 8 bits [21]. But for higher resolutions, stringent
matching requirements cannot be satisfied using these methods. Overcoming Matching
problem to achieve higher resolution ADCs is a new and wide area of research to explore.

71
References
[1]. Walter Kester, “Which ADC Architecture Is Right for Your Application?” Analog
Device Inc., http://www.analog.com/library/analogDialogue/archives/39-
06/architecture.html, June 2005.
[2]. Walt Kester, “ADC Architectures VI: Folding ADCs” Analog Devices Inc., Rev.A,
10/08, WK, MT-025 Tutorial, http://www.analog.com/en/index.html, 2009.
[3]. “Understanding SAR ADCs: their architecture and comparison with other ADCs”,
Maxim, http://www.maxim-ic.com/app-notes/index.mvp/id/1080, October 2001.
[4]. Stephen H. Lewis, “Optimization the Stage Resolution in Pipelined, Multistage, Analog-
to-Digital Converters for Video-Rate Applications”, in IEEE Transactions on Circuits and
Systems-II, Volume 39, Issue 8, pp. 516-523, August 1992.
[5]. Per Lowenborg, Mixed-Signal Processing Systems, Second Edition, UniTryck,
Linkoping 2006.
[6]. Timmy Sundstrom, “Design of High-Speed Analog-to-Digital Converters using Low-Accuracy Comparators”, Linkoping Studies in Science and Technology Dissertations, NO.
1367, 2011.
[7]. Walt Kester, “Understand SINAD, ENOB, SNR, THD, THD+N, and SFDR so You Don’t
Get Lost in the Noise Floor” Analog Devices Inc., Rev.A,10/08, WK, MT-003 Tutorial,
http://www.analog.com/en/index.html, 2009.
[8]. IEEE Standard for Terminology and Test Methods for Analog-to-Digital Converters,
IEEE Standard 1241-2000, 2000.
[9]. Charles Grant Myers, “Design of High-Performance Pipelined Analog-to-Digital
Converters in Low-Voltage Processes”, Oregon State University, June 2005.
[10]. Bibhu Datta Sahoo, Behzad Razavi, “A 12-bit 200-MHz CMOS ADC”, in IEEE Journal
of Solid-State Circuits, Volume 44, Issue 9, pp. 2366-2380, September 2009.
[11]. Behzad Razavi, Design of Analog CMOS Integrated Circuits, McGraw-Hill, 2000.
[12]. David A. Johns, Ken Martin, Analog Integrated Circuit Design, Wiley Inc., 1997.
[13]. “Understanding Flash ADCs”, Maxim, http://www.maxim-ic.com/app-
notes/index.mvp/id/810, September 2010.
[14]. Yun Chiu, Paul R. Gray, Borivoje Nikolc, “A 14-b 12-MS/s CMOS Pipeline ADC With
Over 100-dB SFDR”, in IEEE Journal of Solid-State Circuits, Volume 39, Issue 12, pp.
2139-2151, December 2004.
[15]. Jan M. Rabaey, Anantha Chandrakasan, Borivoje Nikolc, Digital Integrated Circuit,
Pearson Education Inc., 2003.

72
[16]. Weste, Eshraghian, Principles of CMOS VLSI Design: A Systems Perspective,
Addison-Wesley, Reading, Massachusetts, Second Edition, pp. 48, 1993.
[17]. “Operational Amplifier”, http://en.wikipedia.org/wiki/Operational_amplifier.
[18]. Young-Ju Kim, Hee-Cheol Choi, Gil-Cho Ahn, Seung-Hoon Lee, “A 12 bit 50 MS/S CMOS Nyquist A/D Converter With a Fully Differential Class-AB Switched Op-Amp”, in
IEE Journal of Solid-State Circuits, Volume 45, Issue 3, pp. 620-628, March 2010.
[19]. G. Minderico, C. Fachada, I-L Chan, K-M Chan, H-M Cheong, A. Lopes, P. Cardoso,
J. Vital, K. Kloukinas, A. Marchioro, “A CMOS low power, quad channel, 12 bit, 40MS/s
pipelined ADC for applications in particle physics calorimetry”, 9th Workshop on Electronics for LHC Experiments, Amsterdam, The Netherlands, pp. 88-91, 29 Sep - 3 Oct
2003.
[20]. Li Zhang, “The Calibration Technique for Pipelined ADC”, in International
Conference on MultiMedia and Information Technology, pp 809-812, December 2008.
[21]. Mark Looney, “Advanced Digital Post-Processing Techniques Enhance Performance
in Time-Interleaved ADC Systems”, Analog Devices Inc, Volume 37,
http://www.analog.com/library/analogDialogue/archives/37-08/post_processing.html,
August 2003.
[22]. Tero Nieminen and Kari Halonen,“Operational amplifier design for high-speed pipelined Analog-to-Digital Converters in deep-submicron CMOS processes“, Ph.D.
Research in Microelectronics and Electronics (PRIME), 2011 7th Conference

73
Appendix A
Simulation Result for the Pipelined ADC in Transistor Level
All Blocks in the 5 stages of the pipelined ADC plus the back-end flash ADC are designed
in transistor level. SNR, SFDR, SNDR, THD and ENOB are calculated and the simulation results can be seen and compared with each other in respect to sampling frequency and
input amplitude changes in coming figures.
Figure 0-1: SNDR vs. Peak-to-Peak Differential Input Voltage Plot for Transistor Level
Pipelined ADC
Figure A-2: SNDR vs. Sampling Frequency Plot for Transistor Level Pipelined ADC
Figure 0-3: ENOB vs. Peak-to-Peak Differential Input Voltage Plot for Transistor Level
Pipelined ADC
50
55
60
65
70
75
1 1.05 1.1 1.15 1.2 1.25 1.3 1.35 1.4
SN
DR
(dB
)
Peak-to-Peak Differential Input Voltage (v)
SNDR vs. Input Voltage
fs=70MHz
fs=50MHz
fs=40MHz
fs=30MHz
50
55
60
65
70
75
25 35 45 55 65 75
SN
DR
(dB
)
Sampling Frequency (MHz)
SNDR vs. Sampling Frequency
Vi-pp=1.4v
Vi-pp=1.32v
Vi-pp=1.28v
Vi-pp=1.24v
Vi-pp=1.2v
Vi-pp=1.16v
Vi-pp=1v
8
9
10
11
12
1 1.05 1.1 1.15 1.2 1.25 1.3 1.35 1.4
EN
OB
Peak-toPeak Differential Input Voltage (v)
ENOB vs. Input Voltage
fs=70MHz fs=50MHz fs=40MHz fs=30MHz
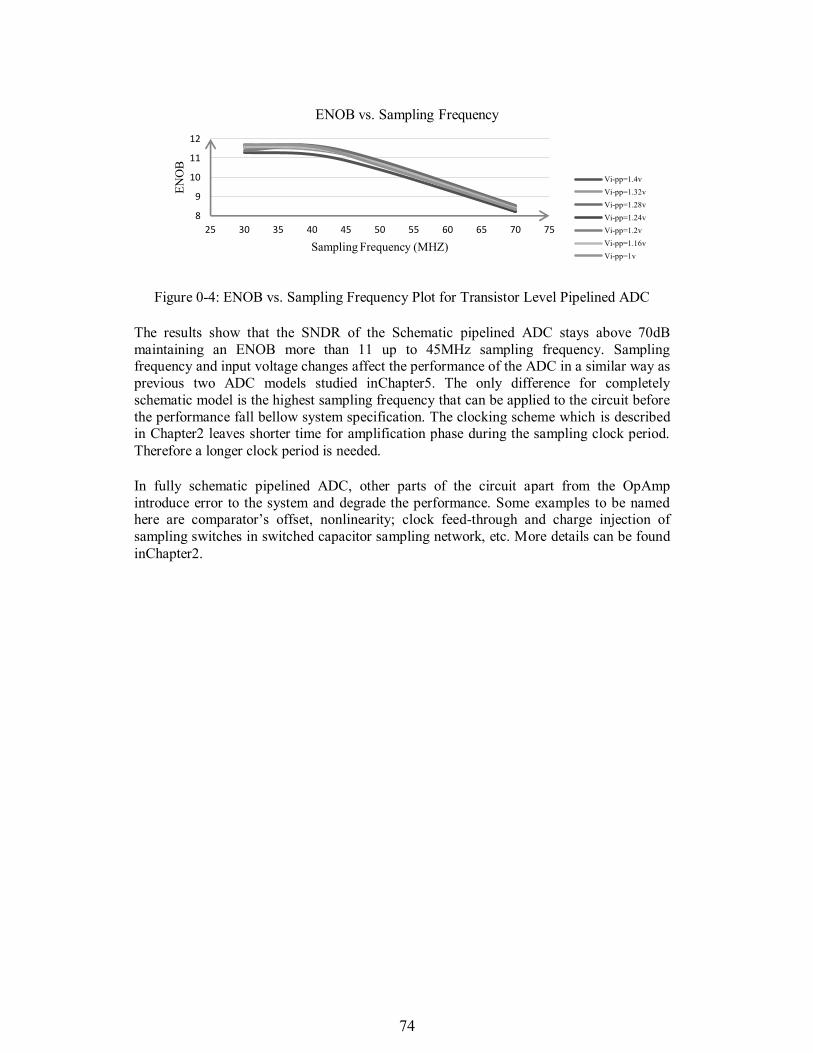
74
Figure 0-4: ENOB vs. Sampling Frequency Plot for Transistor Level Pipelined ADC
The results show that the SNDR of the Schematic pipelined ADC stays above 70dB
maintaining an ENOB more than 11 up to 45MHz sampling frequency. Sampling frequency and input voltage changes affect the performance of the ADC in a similar way as
previous two ADC models studied in Chapter5. The only difference for completely
schematic model is the highest sampling frequency that can be applied to the circuit before
the performance fall bellow system specification. The clocking scheme which is described in Chapter2 leaves shorter time for amplification phase during the sampling clock period.
Therefore a longer clock period is needed.
In fully schematic pipelined ADC, other parts of the circuit apart from the OpAmp
introduce error to the system and degrade the performance. Some examples to be named here are comparator’s offset, nonlinearity; clock feed-through and charge injection of
sampling switches in switched capacitor sampling network, etc. More details can be found
in Chapter2.
8
9
10
11
12
25 30 35 40 45 50 55 60 65 70 75
EN
OB
Sampling Frequency (MHZ)
ENOB vs. Sampling Frequency
Vi-pp=1.4v
Vi-pp=1.32v
Vi-pp=1.28v
Vi-pp=1.24v
Vi-pp=1.2v
Vi-pp=1.16v
Vi-pp=1v

75
Appendix B
VerilogA Codes
VerilogA Code for 12-bit Digital Writer
`include "constants.vams"
`include "disciplines.vams"
// log_time = if time should be dumped in the text file; 1=>yes, 0=>no
// Samples 12 input voltages every rising edge of the clk and writes the results to the file
//'filename'
/////////////////////////////////////////////////////////////////////////////////////////////////////////////////////////////////
module Writer_Digital(clk,Vin);
input clk;
electrical clk;
input [11:0] Vin;
electrical [11:0] Vin;
///////////////////////////////////////////////////////////////////Parameters
parameter real vtrans_clk = 0.55 ;
parameter integer log_time=1;
parameter string fileName = "/Address/File Name.txt";
//////////////////////////////////////////////////////////////////Variables
integer outputFileId;
//////////////////////////////////////////////////////////////////
analog begin
@(initial_step)
begin
outputFileId = $fopen(fileName);

76
end
@ (cross(V(clk) - vtrans_clk, 1)) begin
if (log_time == 1 ) begin
$fwrite(outputFileId, "%f %f %f %f %f %f %f %f %f %f %f %f %f\n", $abstime*1e9,
V(Vin[11]),V(Vin[10]),V(Vin[9]),V(Vin[8]),V(Vin[7]),V(Vin[6]),V(Vin[5]),V(Vin[4]),V(
Vin[3]),V(Vin[2]),V(Vin[1]),V(Vin[0]));
end
else begin
$fwrite(outputFileId, "%f\t%f\t%f\t%f\t%f\t%f\t%f\t%f\t%f\t%f\t%f\t%f\n", V(Vin[11]), V(Vin[10]),V(Vin[9]),V(Vin[8]),V(Vin[7]),V(Vin[6]),V(Vin[5]),V(Vin[4]),V(Vin[3]),V(
Vin[2]),V(Vin[1]),V(Vin[0]));
End end
@ ( final_step ) begin
$fclose(outputFileId);
End endmodule
VerilogA Code for Differential Analogue Writer
`include "constants.vams"
`include "disciplines.vams"
// log_time = if time should be dumped in the text file; 1=>yes, 0=>no
// Samples an Analogue input every rising edge of the clk and writes the results to the file
//'filename'
////////////////////////////////////////////////////////////////////
module Writer_Analogue(clk, Vip, Vin);
input clk;
electrical clk;
input Vip, Vin;
electrical Vip, Vin;

77
///////////////////////////////////////////////////////////////////Parameters
parameter real vtrans_clk = 0.55 ;
parameter integer log_time=1;
parameter string fileName = "/Address/File Name.txt";
//////////////////////////////////////////////////////////////////Variables
integer outputFileId;
real Sample;
integer i;
//////////////////////////////////////////////////////////////////
analog begin
@(initial_step)
begin
outputFileId = $fopen(fileName);
i=0;
end
@ (cross(V(clk) - vtrans_clk, 1))
begin
Sample= V(Vip)-V(Vin);
i=i+1;
if (log_time == 1 ) begin
$fwrite(outputFileId, "%d\t%-.10g\t%f\n",i,$abstime*1e9,Sample);
end
else begin
$fwrite(outputFileId, "%d\t%f\n" ,i,Sample);

78
end end
@ ( final_step ) begin
$fclose(outputFileId);
End end endmodule
VerilogA Code for Differential 16-bit Scalable DAC
`include "constants.vams"
`include "disciplines.vams"
module DAC_16bit_Scalable(DACout, DACoutp,DACoutn, DACin0p, DACin1p,
DACin2p, DACin3p, DACin4p, DACin5p, DACin6p, DACin7p, DACin8p, DACin9p, DACin10p, DACin11p, DACin12p, DACin13p, DACin14p, DACin15p, DACin0n,
DACin1n, DACin2n, DACin3n, DACin4n, DACin5n, DACin6n, DACin7n, DACin8n,
DACin9n, DACin10n, DACin11n, DACin12n, DACin13n, DACin14n, DACin15n,
DacCLK);
output DACout, DACoutp,DACoutn,
electrical DACout, DACoutp,DACoutn,
input DACin0p,DACin0n, DACin1p,DACin1n, DACin2p,DACin2n, DACin3p,DACin3n, DACin4p,DACin4n, DACin5p,DACin5n, DACin6p,DACin6n, DACin7p,DACin7n,
DACin8p,DACin8n, DACin9p,DACin9n, DACin10p,DACin10n, DACin11p,DACin11n,
DACin12p,DACin12n, DACin13p,DACin13n, DACin14p,DACin14n,
DACin15p,DACin15n;
electrical DACin0p,DACin0n, DACin1p,DACin1n, DACin2p,DACin2n, DACin3p,DACin3n, DACin4p,DACin4n, DACin5p,DACin5n, DACin6p,DACin6n,
DACin7p,DACin7n, DACin8p,DACin8n, DACin9p,DACin9n, DACin10p,DACin10n,
DACin11p,DACin11n, DACin12p,DACin12n, DACin13p,DACin13n,
DACin14p,DACin14n, DACin15p,DACin15n;
input DacCLK; electrical DacCLK;
///////////////////////////////////////////////////////////////////Parameters
parameter real tfall = 10p from [0:inf) ;
parameter real trise = 10p from [0:inf) ;
parameter real tdel = 1p from [0:inf) ;
parameter real Vrefp = 900m ;

79
parameter real Vrefn = 200m ;
parameter real vtrans = 0.55 ;
parameter real vtrans_clk = 0.55 ;
parameter real vlogic_low = 0.0 ;
parameter real vlogic_high = 1.1 ;
parameter real DAC_Res=16;
//////////////////////////////////////////////////////Variables
integer DigitalInMapp[15:0],integer DigitalInMapn[15:0],integer Step,integer i;
real AccumulatorDACp, AccumulatorDACn,real AnalogueDAC, AnalogueDACp,
AnalogueDACn,real weight;
/////////////////////////////////////////////////////////////////
analog begin
@(initial_step) begin
weight = (Vrefp-Vrefn)/(pow(2,DAC_Res)-1);
$strobe("ssssssssssssssssssssssssssssssssssssssssssssssss_weightDAC_Diff %e\n",weight);
i=0; Step=0; AccumulatorDACp=0; AccumulatorDACn=0;
AnalogueDAC =0; AnalogueDACp=0; AnalogueDACn=0;
end
@(cross( V(DacCLK) - vtrans_clk , +1 ))begin
if (V(DACin0p)>vtrans) DigitalInMapp[0]=1; else DigitalInMapp[0]=0;
if (V(DACin1p)>vtrans) DigitalInMapp[1]=1; else DigitalInMapp[1]=0;
if (V(DACin2p)>vtrans) DigitalInMapp[2]=1; else DigitalInMapp[2]=0;
if (V(DACin3p)>vtrans) DigitalInMapp[3]=1; else DigitalInMapp[3]=0;
if (V(DACin4p)>vtrans) DigitalInMapp[4]=1; else DigitalInMapp[4]=0;
if (V(DACin5p)>vtrans) DigitalInMapp[5]=1; else DigitalInMapp[5]=0;

80
if (V(DACin6p)>vtrans) DigitalInMapp[6]=1; else DigitalInMapp[6]=0;
if (V(DACin7p)>vtrans) DigitalInMapp[7]=1; else DigitalInMapp[7]=0;
if (V(DACin8p)>vtrans) DigitalInMapp[8]=1; else DigitalInMapp[8]=0;
if (V(DACin9p)>vtrans) DigitalInMapp[9]=1; else DigitalInMapp[9]=0;
if (V(DACin10p)>vtrans) DigitalInMapp[10]=1; else DigitalInMapp[10]=0;
if (V(DACin11p)>vtrans) DigitalInMapp[11]=1; else DigitalInMapp[11]=0;
if (V(DACin12p)>vtrans) DigitalInMapp[12]=1; else DigitalInMapp[12]=0;
if (V(DACin13p)>vtrans) DigitalInMapp[13]=1; else DigitalInMapp[13]=0;
if (V(DACin14p)>vtrans) DigitalInMapp[14]=1; else DigitalInMapp[14]=0;
if (V(DACin15p)>vtrans) DigitalInMapp[15]=1; else DigitalInMapp[15]=0;
///////////////////////////////////////////////////////////////////////////////////////////////////////////////////////////////////
////
if (V(DACin0n)>vtrans) DigitalInMapn[0]=1; else DigitalInMapn[0]=0;
if (V(DACin1n)>vtrans) DigitalInMapn[1]=1; else DigitalInMapn[1]=0;
if (V(DACin2n)>vtrans) DigitalInMapn[2]=1; else DigitalInMapn[2]=0;
if (V(DACin3n)>vtrans) DigitalInMapn[3]=1; else DigitalInMapn[3]=0;
if (V(DACin4n)>vtrans) DigitalInMapn[4]=1; else DigitalInMapn[4]=0;
if (V(DACin5n)>vtrans) DigitalInMapn[5]=1; else DigitalInMapn[5]=0;
if (V(DACin6n)>vtrans) DigitalInMapn[6]=1; else DigitalInMapn[6]=0;
if (V(DACin7n)>vtrans) DigitalInMapn[7]=1; else DigitalInMapn[7]=0;
if (V(DACin8n)>vtrans) DigitalInMapn[8]=1; else DigitalInMapn[8]=0;
if (V(DACin9n)>vtrans) DigitalInMapn[9]=1; else DigitalInMapn[9]=0;
if (V(DACin10n)>vtrans) DigitalInMapn[10]=1; else DigitalInMapn[10]=0;
if (V(DACin11n)>vtrans) DigitalInMapn[11]=1; else DigitalInMapn[11]=0;
if (V(DACin12n)>vtrans) DigitalInMapn[12]=1; else DigitalInMapn[12]=0;

81
if (V(DACin13n)>vtrans) DigitalInMapn[13]=1; else DigitalInMapn[13]=0;
if (V(DACin14n)>vtrans) DigitalInMapn[14]=1; else DigitalInMapn[14]=0;
if (V(DACin15n)>vtrans) DigitalInMapn[15]=1; else DigitalInMapn[15]=0;
///////////////////////////////////////////////////////////////////////////////////////////////////////////////////////////////////
/////
i=0; Step=0; AccumulatorDACp=0; AccumulatorDACn=0;
AnalogueDAC =0; AnalogueDACp=0; AnalogueDACn=0;
for (i=0; i<DAC_Res; i=i+1)begin
Step = pow(2,i);
if (DigitalInMapp[i]==1)begin
AccumulatorDACp = AccumulatorDACp + (DigitalInMapp[i] * Step);
end
if (DigitalInMapn[i]==1)begin
AccumulatorDACn = AccumulatorDACn + (DigitalInMapn[i] * Step);
end
end
AnalogueDACp = (AccumulatorDACp * weight )+ Vrefn;
AnalogueDACn = (AccumulatorDACn * weight )+ Vrefn;
AnalogueDAC = (AnalogueDACp - AnalogueDACn)+ vtrans;
end
V(DACoutp) <+ transition ( AnalogueDACp , tdel, trise, tfall);
V(DACoutn) <+ transition ( AnalogueDACn , tdel, trise, tfall);
V(DACout) <+ transition ( AnalogueDAC , tdel, trise, tfall);
end endmodule

82

83
Matlab Codes
Matlab Code for Reading Text File from Cadence for OpAmp
%% file reading from cadence& extracting sampled data from file for OpAmp
y= textread('Address\File Name.txt','%f');
A= size(y);
i=3:3:A(1);%row 3 of the input file Sample=y(i);
%% Initial conditions
fin = Input Freqyency; fs = Smpling Frequency;
Vmax = Peak voltage of single input signal;
Vpp = Output peal-to-peak Differential voltage; OSR = fs/(2*fin);
BW = fin+0.01e3;
Ms = 4096; %%2^12 sample = FFT’s Size,
Vtrans = 0.55; %% Common-Mode Voltage DAC_Res= 12;
%% Excluding initial samples in case of not settled signal
B=size(Sample); j=(B(1)-4095):1:B(1); %% 4096 last samples
Sample_LPfiltered = Sample (j);
fprintf('--------------------------------------------------------------------\n');
fprintf('fin = %1.3f (MHz),\t', fin/1e6); fprintf('fs = %1.3f (GHz),\t', fs/1e9);
fprintf('Vpp= %1.3f (mv)\n', Vpp*1e3);
fprintf('--------------------------------------------------------------------\n'); %% Function call to calculate performance metrics
SNDR(Sample_LPfiltered,Ms,fin,fs,OSR,Vpp);
SNDRsine(Sample_LPfiltered,fin,fs,Ms,BW);
Matlab Code for Reading Text File from Cadence for ADC
%file reading from cadence; Reading x-bit(ADC's digital outputs) digital value+ time for %each
% Word and calling DAC function to provide the analogue value for each word
% DAC_Res=12 ;==> DAC_Res+1 covers first column for time and other columns for %digital voltages.
% Remember to subtract the one if log_time in cadence is zero.
% A=size (yp);==>K = A(1)/(DAC_Res+1)
% X1 = reshape (yp, DAC_Res+1, K); reshape reads vertically and goes DAC_res times %down then comes back to the next column==> size=(DAC_Res+1,K)
% X2 gives X1 but in correct size (K, DAC_Res+1) ==>next line ignores first column
%(time). %% Dip and Din are digital data lines from ADC in the order (D11 D10 ...D0)
%==> For DAC function to operate correctly we have to rearrange columns to
% have this order (D0 D1 ... D11) in 2 other matrixes Dip1 and Din1 ==> the order can be % changed by changing the write order in cadence
%% From Pipelined_ADC ‘s outputs

84
yp = textread('Address/File Name.txt','%f');
yn = textread('Address/File Name.txt','%f'); %% Initial conditions
fin = Input Freqyency;
fs = Smpling Frequency;
Vmax = Peak voltage of single input signal; Vpp = Output peal-to-peak Differential voltage;
OSR = fs/(2*fin);
BW = fin+0.01e3; Ms = 4096; %%2^12 sample = FFT’s Size,
Vtrans = 0.55; %% Common-Mode Voltage
DAC_Res= 12; S1=size(yp);
k1=S1(1)/(DAC_Res+1);
X1 = reshape(yp,(DAC_Res+1),k1);
X2 = X1'; Dip = X2(2:k1,2:(DAC_Res+1));
Dip1 = [Dip(:,12),Dip(:,11),Dip(:,10),Dip(:,9),Dip(:,8),Dip(:,7),Dip(:,6),Dip(:,5),Dip(:,4),
Dip(:,3),Dip(:,2),Dip(:,1)]; S2=size(yn);
k2=S2(1)/(DAC_Res+1);
Y1 = reshape(yn,(DAC_Res+1),k2); Y2 = Y1';
Din = Y2(2:k2,2:(DAC_Res+1));
Din1 = [Din(:,12),Din(:,11),Din(:,10),Din(:,9),Din(:,8),Din(:,7),Din(:,6),Din(:,5),
Din(:,4),Din(:,3), Din(:,2),Din(:,1)]; %% Calling DAC function
AnalogueDAC_Diff=DAC(Dip1,Din1,Vtrans,Vmax,DAC_Res);
plot(AnalogueDAC_Diff,'--b'); %% excluding initial samples in case of not settled signal, considering only Ms last
samples
Sample = AnalogueDAC_Diff;
B=size(Sample); j=(B(1)-(Ms-1)):1:B(1);
Sample_LPfiltered=Sample(j);
figure(4);stem(Sample_LPfiltered) xlabel('N','fontsize',14,'fontweight','b')
ylabel('Sample_LPfiltered,amp(mv)','fontsize',14,'fontweight','b')
fprintf('--------------------------------------------------------------------\n'); fprintf('fin = %1.3f (MHz),\t', fin/1e6);
fprintf('fs = %1.3f (MHz),\t', fs/1e6);
fprintf('Vpp = %1.3f (mv)\n', Vpp*1e3);
fprintf('--------------------------------------------------------------------\n'); %% Function call to calculate performance metrics
SNDR(Sample_LPfiltered,Ms,fin,fs,OSR,Vpp);
SNDRsine(Sample_LPfiltered,fin,fs,Ms,BW);

85
Matlab DAC Code for Reconstructing Digital Outputs of the ADC
function AnalogueDAC_Diff = DAC(Dip,Din,Vtrans,Vmax,DAC_Res)
Vrefp = Vtrans+Vmax; Vrefn = Vtrans-Vmax;
weight = (Vrefp-Vrefn)/((2^DAC_Res)-1);
Sp = size(Dip); Sn = size(Din);
Stepp=0;
Stepn=0; AccumulatorDACp =zeros(1,Sp(1));
AccumulatorDACn =zeros(1,Sp(1));
AnalogueDAC_p =zeros(1,Sp(1));
AnalogueDAC_n =zeros(1,Sp(1)); Dp =zeros(Sp(1),DAC_Res);
Dn =zeros(Sp(1),DAC_Res);
%%%%%%%%%%%%%%%%%%%%%%%%%%%%%%%%%%%%%%% for i=1:1:Sp(1);
for j=0:1:DAC_Res-1
if (Dip(i,j+1)>Vtrans) Dp(i,j+1)=1;
else
Dp(i,j+1)=0;
end if (Dp(i,j+1)==1)
Stepp = 2^j;
AccumulatorDACp(i) = AccumulatorDACp(i) + (Dp(i,j+1) * Stepp); end
end
AnalogueDAC_p(i) = (AccumulatorDACp(i) * weight );
end %%%%%%%%%%%%%%%%%%%%%%%%%%%%%%%%%%%%%%%%
for m=1:1:Sn(1);
for n=0:1:DAC_Res-1 if (Din(m,n+1)>Vtrans)
Dn(m,n+1)=1;
else Dn(m,n+1)=0;
end
if (Dn(m,n+1)==1)
Stepn = 2^n; AccumulatorDACn(m) = AccumulatorDACn(m) + (Dn(m,n+1) * Stepn);
end
end AnalogueDAC_n(m) = (AccumulatorDACn(m) * weight );
End
%%%%%%%%%%%%%%%%%%%%%%%%%%%%%%%%%%%%%%%
Vcm=ones(Sp(1),1)*Vtrans; AnalogueDAC_p=reshape(AnalogueDAC_p,Sp(1),1);
AnalogueDAC_n=reshape(AnalogueDAC_n,Sn(1),1);
AnalogueDAC_Diff = AnalogueDAC_p - AnalogueDAC_n;

86
%%%%%%%%%%%%%%%%%%%%%%%%%%%%%%%%%%%%%%%%
t = 1:1:Sp(1); subplot(2,1,2);
figure(1);plot(t,AnalogueDAC_p,'-r')
xlabel('N','fontsize',14,'fontweight','b')
ylabel('DAC_amp(mv)','fontsize',14,'fontweight','b') hold on
plot(t,AnalogueDAC_n,'-.m')
plot(t,AnalogueDAC_Diff,'--b') hold off
end
Matlab Code for Calculation of Performance Metrics of ADC and OpAmp1
% N number of points in FFT
% fin input frequency % fs sampling frequency
% osr = fs/(2*BW); BW is fin in most cases
% Va signal amplitude for FFT normalisation %%%%%%%%%%%%%%%%%%%%%%%%%%%%%%%%%%%
function [SNR,SNDR] = SNDR(Vin,N,fin,fs,osr,Va)
%FFT plot of input signal
Vinfft=2*abs(fft(Vin))/(N*Va); plot((1:1:length(Vinfft)),20*log10(Vinfft))
Vinfft=Vinfft(1:N/2); % Dumping half of the Bandwidth to consider just Nyquist Band
Sp = 20 *log10(Vinfft(round(N*fin/fs+1))); %Signal Power Vinfft(round(N*fin/fs+1)) = 0; %%Neglecting input component in FFT to calculate noise
and distortion power
Vinfft(1) = 0; %%Neglecting the DC NDp = 10 *log10(sum(Vinfft.^2));%% Noise and Distortion Power
THD= Sp - (10
*log10((Vinfft(round(N*3*fin/fs+1)).^2)+(Vinfft(round(N*5*fin/fs+1)).^2)
+(Vinfft(round(N*7*fi/fs+1)).^2)+(Vinfft(round(N*9*fin/fs+1)).^2)+(Vinfft(round(N*11*fi/fs+1)).^2)+(vinfft(round(N*13*fin/fs+1)).^2)+(Vinfft(round(N*15*fin/fs+1)).^2)+(Vinff
t(round(N*17*fin/fs+1)).^2)));
SNDR = Sp - NDp; ENOB = (SNDR-1.76)/6.02;
%%SFDR
Max-Spur= abs(Vinfft(2));
for i=2:1:N/2 if (Max-Spur< abs(Vinfft(i)))
Max-Spur = abs(Vinfft(i));
end end
Max-Spur = 10 *log10(Max-Spur^2);
SFDR = Sp – Max-Spur; Vinfft(round(N*3*fin/fs+1)) = 0;
1 This code is written based on a code by Ameya Bhide, current Ph.D. student in Linkoping university

87
Vinfft(round(N*5*fin/fs+1)) = 0;
Vinfft(round(N*7*fin/fs+1)) = 0; Vinfft(round(N*9*fin/fs+1)) = 0;
Np = 10 *log10(sum(Vinfft.^2));%%Noise Power
SNR= Sp - Np;
fprintf('-----------------------\n'); fprintf('SignalPower = %1.3f dB\n', Sp);
fprintf('NoisePower = %1.3f dB\n', Np);
fprintf('N&DPower = %1.3f dB\n', NDp); fprintf('-----------------------\n');
fprintf('THD = %1.3f dB\n', THD);
fprintf('SNR = %1.3f dB\n', SNR); fprintf('SFDR = %1.3f dB\n', SFDR);
fprintf('SNDR = %1.3f dB\n', SNDR);
fprintf('-----------------------\n');
fprintf('ENOB = %1.3f \n', ENOB); fprintf('-----------------------\n');
Matlab Code for Calculation of Performance Metrics of ADC and OpAmp2
%% this function builds an ideal sine wave using input and sampling frequency and
%%subtracts the actual signal from ideal one to obtain an error signal which is assumed to
%%be due to noise and distortion. %% BW is chosen to be slightly larger than input signal to cover the fundamental signal.
%%%%%%%%%%%%%%%%%%%%%%%%%%%%%%%%%%%%%%%
function SINAD = SNDRsine(InData,fin,fs,N,BW) output_raw = InData';
output_size = size(output_raw);
%%% this depends on the input data, whether it is vertical matrix or horizontal, next 2 lines are not necessary here as their action has been taking care of in file read code
% out = output_raw(output_size(1)-(N-1):output_size(1)); % Use only the N last samples
out = output_raw(output_size(2)-(N-1):output_size(2)); % Use only the N last samples
Fc=fs/(2*bw); %%Constructing ideal sine wave according to fin and fs
w = 2*pi*fin/fs;
t = 1:1:length(out); D_null = [cos(w*t);sin(w*t);ones(size(t))]';
x_null = inv(D_null'*D_null)*D_null'*out';
out_fitted = (D_null*x_null)';
e = (out-out_fitted); %%% Error between input sine wave and ideal sine wave rms_signal = sqrt((x_null(1)^2+x_null(2)^2)/2);
rms_noise = sqrt(sum(e.*e)/N);
sinad = 20*log10(rms_signal/rms_noise); enob=(sinad-1.76)/6.02;
fprintf('Performance Estimation with Sine Extraction\n\n');
fprintf('SNDR(sine) = %1.3f dB\n', sinad); fprintf('ENOB = %1.3f \n', enob);
2 This code is a modified version of a code by Timmy Sundstrom, former Ph.D. student in Linkoping university, to
compare the result with frequency domain approach