Design and Development of a Desktop Computer Numeric...
24
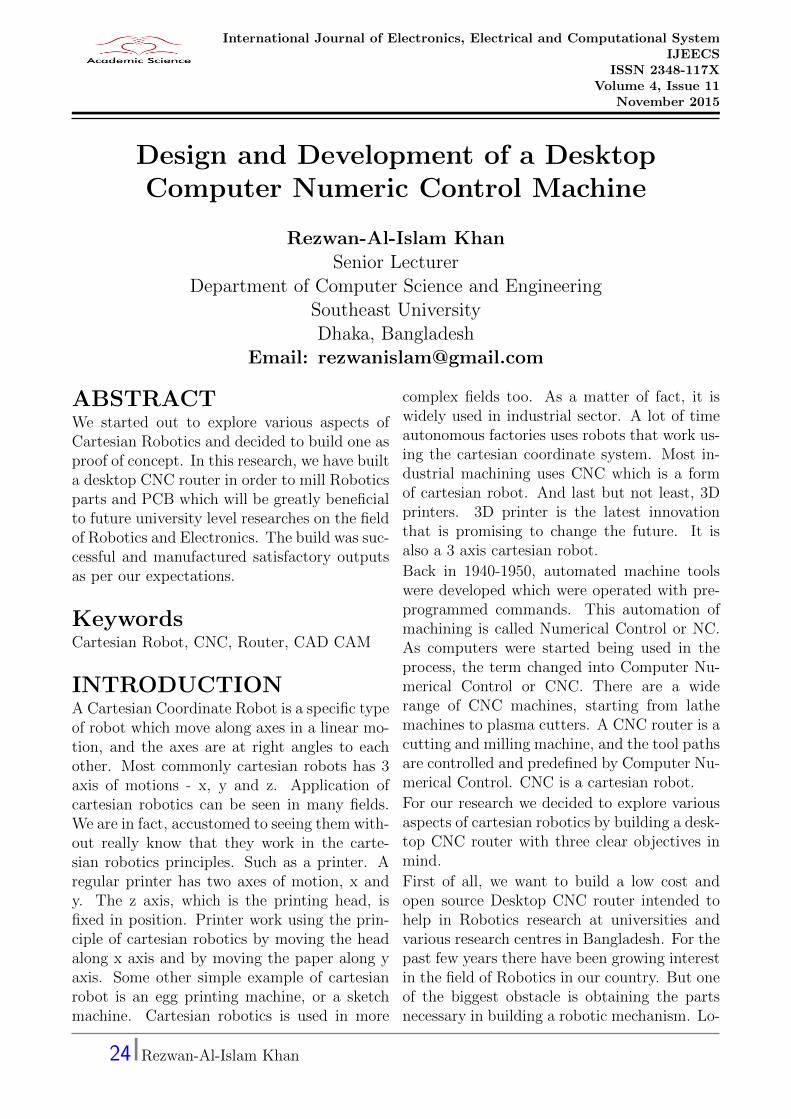
International Journal of Electronics, Electrical and Computational System IJEECS ISSN 2348-117X Volume 4, Issue 11 November 2015 Design and Development of a Desktop Computer Numeric Control Machine Rezwan-Al-Islam Khan Senior Lecturer Department of Computer Science and Engineering Southeast University Dhaka, Bangladesh Email: [email protected] ABSTRACT We started out to explore various aspects of Cartesian Robotics and decided to build one as proof of concept. In this research, we have built a desktop CNC router in order to mill Robotics parts and PCB which will be greatly beneficial to future university level researches on the field of Robotics and Electronics. The build was suc- cessful and manufactured satisfactory outputs as per our expectations. Keywords Cartesian Robot, CNC, Router, CAD CAM INTRODUCTION A Cartesian Coordinate Robot is a specific type of robot which move along axes in a linear mo- tion, and the axes are at right angles to each other. Most commonly cartesian robots has 3 axis of motions - x, y and z. Application of cartesian robotics can be seen in many fields. We are in fact, accustomed to seeing them with- out really know that they work in the carte- sian robotics principles. Such as a printer. A regular printer has two axes of motion, x and y. The z axis, which is the printing head, is fixed in position. Printer work using the prin- ciple of cartesian robotics by moving the head along x axis and by moving the paper along y axis. Some other simple example of cartesian robot is an egg printing machine, or a sketch machine. Cartesian robotics is used in more complex fields too. As a matter of fact, it is widely used in industrial sector. A lot of time autonomous factories uses robots that work us- ing the cartesian coordinate system. Most in- dustrial machining uses CNC which is a form of cartesian robot. And last but not least, 3D printers. 3D printer is the latest innovation that is promising to change the future. It is also a 3 axis cartesian robot. Back in 1940-1950, automated machine tools were developed which were operated with pre- programmed commands. This automation of machining is called Numerical Control or NC. As computers were started being used in the process, the term changed into Computer Nu- merical Control or CNC. There are a wide range of CNC machines, starting from lathe machines to plasma cutters. A CNC router is a cutting and milling machine, and the tool paths are controlled and predefined by Computer Nu- merical Control. CNC is a cartesian robot. For our research we decided to explore various aspects of cartesian robotics by building a desk- top CNC router with three clear objectives in mind. First of all, we want to build a low cost and open source Desktop CNC router intended to help in Robotics research at universities and various research centres in Bangladesh. For the past few years there have been growing interest in the field of Robotics in our country. But one of the biggest obstacle is obtaining the parts necessary in building a robotic mechanism. Lo- 24 Rezwan-Al-Islam Khan
Transcript of Design and Development of a Desktop Computer Numeric...
International Journal of Electronics, Electrical and Computational SystemIJEECS
ISSN 2348-117XVolume 4, Issue 11
November 2015
Design and Development of a DesktopComputer Numeric Control Machine
Rezwan-Al-Islam KhanSenior Lecturer
Department of Computer Science and EngineeringSoutheast UniversityDhaka, Bangladesh
Email: [email protected]
ABSTRACTWe started out to explore various aspects ofCartesian Robotics and decided to build one asproof of concept. In this research, we have builta desktop CNC router in order to mill Roboticsparts and PCB which will be greatly beneficialto future university level researches on the fieldof Robotics and Electronics. The build was suc-cessful and manufactured satisfactory outputsas per our expectations.
KeywordsCartesian Robot, CNC, Router, CAD CAM
INTRODUCTIONA Cartesian Coordinate Robot is a specific typeof robot which move along axes in a linear mo-tion, and the axes are at right angles to eachother. Most commonly cartesian robots has 3axis of motions - x, y and z. Application ofcartesian robotics can be seen in many fields.We are in fact, accustomed to seeing them with-out really know that they work in the carte-sian robotics principles. Such as a printer. Aregular printer has two axes of motion, x andy. The z axis, which is the printing head, isfixed in position. Printer work using the prin-ciple of cartesian robotics by moving the headalong x axis and by moving the paper along yaxis. Some other simple example of cartesianrobot is an egg printing machine, or a sketchmachine. Cartesian robotics is used in more
complex fields too. As a matter of fact, it iswidely used in industrial sector. A lot of timeautonomous factories uses robots that work us-ing the cartesian coordinate system. Most in-dustrial machining uses CNC which is a formof cartesian robot. And last but not least, 3Dprinters. 3D printer is the latest innovationthat is promising to change the future. It isalso a 3 axis cartesian robot.
Back in 1940-1950, automated machine toolswere developed which were operated with pre-programmed commands. This automation ofmachining is called Numerical Control or NC.As computers were started being used in theprocess, the term changed into Computer Nu-merical Control or CNC. There are a widerange of CNC machines, starting from lathemachines to plasma cutters. A CNC router is acutting and milling machine, and the tool pathsare controlled and predefined by Computer Nu-merical Control. CNC is a cartesian robot.
For our research we decided to explore variousaspects of cartesian robotics by building a desk-top CNC router with three clear objectives inmind.
First of all, we want to build a low cost andopen source Desktop CNC router intended tohelp in Robotics research at universities andvarious research centres in Bangladesh. For thepast few years there have been growing interestin the field of Robotics in our country. But oneof the biggest obstacle is obtaining the partsnecessary in building a robotic mechanism. Lo-
24 Rezwan-Al-Islam Khan

International Journal of Electronics, Electrical and Computational SystemIJEECS
ISSN 2348-117XVolume 4, Issue 11
November 2015
cal lathe workshops and die cast workshops canonly do so much to provide alternate solutions,which most of the times are nowhere near pre-cise and long lasting. With a low cost desktopCNC that can be easily build from the bill ofmaterials and places inside the lab, robotics en-gineers can mill most of the necessary machineparts with the much needed precision. More-over, as we intend to keep our work open source,the design can be easily reproduced and im-proved with minimal costing.Secondly, we want to use the CNC routerto mill Printed Circuit Boards (PCB). An-other big obstacle in Research and Develop-ment (R&D) in the field of Robotics and Elec-tronics in our country is that, we do nothave the proper means to manufacture circuitboards. There are some attempts to providesolutions to that, but without a proper manu-facturing factory, the PCBs often tend to be oflesser quality. Most of the times hobbyists, en-gineers and researchers have to resort to chem-ical etching using ferric chloride. Though it isa simple process of electroplating, it is not onlyinefficient, but also might be harmful for humanhealth. With a CNC router we can provide asolution to this problem with ease.And lastly, in the process of development on theCNC, we want to learn and gather experienceon interfacing between hardware and softwareand how to implement that knowledge in re-lated fields.
LITERATURE REVIEWThe working of a CNC can divided into fourmajor modules - Software, Communications,Electronics and Hardware.
Softwares are used to create 2D or 3D objects,map them and convert into code to send tothe electronics via communication module. Theuser also get visual feedback of the changes dueto the commands. Electronic module drives themotors in the hardware module according tothe signals received to move the spindle along
User
Software
Communication
Electronics
Hardware
Output
uses PC to run software and issue commands gets visual feedback
sends and recieve signals via Parallel/USB
signals to and from electronics
drives motors to move spindle along axes receives feedback via mechanical switches
cuts/drill/mills the workpiece
Figure 1: CNC working diagram.
the axes. The spindle cuts, drills or mills de-pending on the commands. Hardware modulesends back some feedback upon triggering me-chanical switches during movement, thus mak-ing it a closed loop system.
SoftwaresThe software Module can be divided into threesmaller modules - CAD, CAM and Controller.CAD or drawing softwares are used to createthe design files, CAM softwares convert thosefiles to codes, and Controller feeds those codesto the machine[1].
Computer Aided Design Software(CAD)CAD software are used to design 3D objectsand create vector or contour mapps for 2Ddrawings such as PCB designs.The 3D files areusually exported into .stl, .dxf or .svg format toallowe the CAM softs to read them. Some pop-ular CAD softwares are FreeCAD, OpenSCAD,Sketchup, Inkscape,Blender, Eagle CAD, Diptrace. Of these,Inkscape specializes in creating vector drawingsand creating contour maps from it. Eagle CADand Diptrace are PCB design suits.
Computer-aided Manufacturing (CAM)CAM software are used to convert 3D objectsand contours into G-Code. So in a way it act
25 Rezwan-Al-Islam Khan

International Journal of Electronics, Electrical and Computational SystemIJEECS
ISSN 2348-117XVolume 4, Issue 11
November 2015
as a G-Code converter. G-Code or G program-ming language is a Numerical Control (NC)language that gives instructions to a CNC ma-chine about where and how to move along theaxes. Examples: OpenSCAM, Pycam, HeeksCAM, Dolphin CAM, FreeMill.
CNC Controller
CNC controller can be described as the brainof a CNC machine. It reads the G-Codes andgives instructions to the machine via signalsabout what actions to take. AXIS, LinuxCNC(EMC2), MACH3, CNCPro are some popularCNC controllers.AXIS used to be graphical fronted for EMC. It’snext version EMC2 was renamed and albeit re-designed as LinuxCNC. It is a very lightweightand efficient opensource CNC controller that isavailable as a Linux Ubuntu distro. MACH3 ismost popular among windows users. It featuresa simple and easy to use interface for beginnersand features USB support to some degree.
CommunicationsThe communications system connects betweenthe electronics and software modules togetherand is the medium to exchange signals or data.There are three major types of communicationsystems:
1. Serial communication
2. Parallel communication
3. USB communication
Serial Communication
Serial communication protocol was the mostwidely used connection system until paralleland USB ports started being integrated intomost computers. However it is still used insome devices up to this day. Serial communica-tion protocol transmit or receive only one bit ofdata at a time, and thus has the name of ‘Serial’communication. It is bidirectional full-duplexcommunication and uses two separate pins for
transmit (TxD) and receive (RxD). There areseveral versions of serial ports available, butmajority of them uses RS-232 standard and areDE-9 connectors[2].
Serial port data rate in bit/s is equal to thesymbol rate in baud/s. The speed includes bitsfor framing (stop bits, parity, etc.) and so theeffective data rate is lower than the bit trans-mission rate. Bit rates commonly supportedinclude 75, 110, 300, 1200, 2400, 4800, 9600,19200, 38400, 57600 and 115200 bit/s.
Parallel Communication
Parallel communication was first developed in1981 to replace the slower Serial communica-tion protocol. Unlike Serial protocol, Parallelprotocol is not constricted into sending data 1bit at a time. An entire byte (8 bits) of datacan be sent at a time through a 8-bit Parallelport. The communication is also bi-directionaland allows data transfer speed from 150 kbpsto 2 Mbps [3].
Parallel ports, also known as LPT (LinePrinTer) ports use IEEE 1284 standard andgenerally 25 pin DB-25 connectors. It’s originalpurpose as a printer communication protocol isevident from the pin assignments.
USB Communication
USB or Universal Serial Bus communication ismost likely the simplest and the most widelyused communication system between comput-ers and devices or peripherals. Upon it’s intro-duction in 1996, USB protocol effectively re-placed older communication protocols aroundthe world. The USB cable connectors are oftwo types, A and B. According to the interna-tional standard, the computer end or the hostdevice uses connector ‘A’ and ‘B’ connector isused in the target device or peripheral end[4].
USB protocol provides Hi-Speed data commu-nication at a rate of 35 MB/s or 280 Mbit/sfor most commonly used USB 2.0. Introducedin November 2008, USB 3.0. provides a sig-naling speed of 5 Gbit/s and, due to encoding
26 Rezwan-Al-Islam Khan

International Journal of Electronics, Electrical and Computational SystemIJEECS
ISSN 2348-117XVolume 4, Issue 11
November 2015
overhead, usable data rate of up to 4 Gbit/s(500 MB/s)[5]. As well as data transfer, USBports also provide power (+5v) and GND pinsto power the device connected to it via the com-puter.
USB vs Parallel
Although USB protocol has established itselfas the preferred communication method aroundthe world, it does have some disadvantagescompared to the older Parallel protocol in thecase of Cartesian robotics. An USB port hasonly 2 data pins and needs an external step gen-erator or controller such as a microcontrollerto reduce latency. On the other hand, Parallelports have 17 dedicated data pins and almostvirtually instantaneous. In application, pop-ular CNC controller softwares such as Mach3or LinuxCNC (previously EMC2) works betterwith Parallel communication with minimum la-tency.
These days most motherboard manufacturersexclude parallel ports in favor of USB, butin most cases they still leave footprints for abreakout board. So Parallel protocol can stillbe used for a low cost using PCI cards or LPTbreakout boards. But in the case of USB proto-col, the cost rises higher as there is need for spe-cial breakout board and costly softwares thatare compatible with it. In CNC application,USB compatible controller softwares requiresspecific hardwares designed by that softwaremanufacturer to function, and none of these areopen source or free to use.
Electronics
The electronics module receive signals from thecomputer via parallel port and drives the mo-tors to move the axes accordingly. Stepper mo-tors are used in this Cartesian robot to con-trol each axis. The path between the stepperdrivers and the parallel port is usually opto-isolated with optocouplers to prevent any dam-age to the controlling computer.
Stepper Motor
A stepper motor is a DC electric motor thatdivides a full rotation into a number of equalsteps and upon receiving pulse, it rotates fromone step location to another. Stepper mo-tors are brushless motors. Unlike regular DCbrushed motors, stepper motors have multipletoothed electromagnets around a central gearshaped armature. The electromagnets are en-ergized by input pulses from the driver unit andwith each pulse the armature rotates a fixed an-gle. Each of these rotations are called a ‘Step’and the fixed rotation angle is known as the‘Step Angle’[6]. The operating principle can beeasily explained with figure 2.
Figure 2: Bipolar Stepper Motor Diagram
In the figure (2), there are four electromagnetsaround the shaft, and each of them are ener-gized in a clockwise sequence. When the firstelectromagnet is energized, it magnetically at-tracts the shaft’s teeth which aligns that teethwith that particular magnet. This also makeit so that the teeth is slightly offset from thenext electromagnet. So when the current elec-tromagnet is turned off and the next one isenergized, the shaft rotates slightly (the StepAngle). In the same manner the process is re-peated.
Stepper Types
Stepper motors can be divided into two cate-gories:
27 Rezwan-Al-Islam Khan

International Journal of Electronics, Electrical and Computational SystemIJEECS
ISSN 2348-117XVolume 4, Issue 11
November 2015
1. Unipolar Stepper motor
2. Bipolar Stepper motor
The difference between unipolar and bipolarstepper motors are in their internal windings.Unipolar motors have a center tap for each coil.The driving circuitry is much simpler and usu-ally have 5, 6, 8 or 10 wires leading out of themotor. Bipolar motors does not have a centertap and usually have 4 or 8 wire leads. Thedriving circuitry is more complex as the direc-tion of the current needs to be changed. In gen-eral bipolar motors provide higher torque thanunipolar motors.
Driving TechniquesStepper motors can be driven in 3 way:
1. Full step drive
2. Half step drive
3. Microstepping
In full step drive, the shaft rotates through it’sbasic Step Angle. There are two types of fullstep excitation modes. In single phase mode,the motor is operated with only one phase(group of windings) energized at a time. Indual phase mode, the motor is operated withboth phases energized at the same time. Assoon as one phase is turned off, another oneis turned on. Dual phase mode provides moretorque and speed than single phase, but alsorequires more power.In half step mode, the drive alternates betweentwo phases on and a single phase on. Thisdoubles the resolution by rotating half of theStep Angle. If a 1.8 ◦ Step Angle motor took200 Steps to rotate a full revolution in full stepmode, it’d take 400 Steps to rotate a full revo-lution in half step mode. This increase of res-olution comes at the expense of torque. How-ever, the loss of torque can be compensated byincreasing the current in drive circuit.Microstepping uses ‘sinusoidal waveform’ tosend Step signal or pulses to the coils. It can
increase resolution greatly by dividing the ba-sic step up to 256 times. But as with half stepdriving, it also comes with a loss of torque andspeed.[7]
Stepper Driver
There are different driver ICs and boards ava-iable from various manufacturers. Some of thewidely used choices are L297 - L298N, L297 -L6205N, L6208N, TB6560AHQ and A4988.
L297 The L297 Stepper Motor Controller isdeveloped by STMicroelectronics. It generatesfour phase drive signals for two phase bipolarand four phase unipolar step motors. It al-lows full, half and wave drive modes as wellas current chopping. A special feature of thisdevice is that it requires only clock, directionand mode input signals. Since the phase aregenerated internally, it can be combined withL298, L6205 or other H-Bridge drivers to actas a pulse generator[8].
L298N The L298 is widely used high voltage,high current dual full-bridge driver designedby STMicroelectronics. It accepts standardTTL logic levels. Maximum output currentis upto 2A, but requires the use of heatsinkto avoid damage. Drawbacks of using L298Nare it’s non-standard shape and low frequency(20khz)[9].
L6205The L6205 is a DMOS Dual Full Bridgedesigned by STMicroelectronics and used formotor control applications. It features thermalshutdown and voltage sensing[10].
L6208The L6208 is a DMOS Fully IntegratedStepper Motor Driver developed by STMi-croelectronics. It comes with non-dissipativeOvercurrent Protection. Unlike L6205, it con-tains all the circuitry needed to drive a twophase bipolar stepper motor, therefore so ex-ternal step generator such as L297 is notneeded[11].
28 Rezwan-Al-Islam Khan

International Journal of Electronics, Electrical and Computational SystemIJEECS
ISSN 2348-117XVolume 4, Issue 11
November 2015
TB6560AHQ The TB6560AHQ is a PWMchopper-type stepping motor driver IC de-signed by Toshiba for sinusoidal-input mi-crostep control of bipolar stepping motors. Itcan be used for Full step, Half step and Mi-crostepping driving of a two phase bipolar mo-tor. It’s an all in one chip that allows for driv-ing high torque stepper motors[12].
A4988The A4988 is a complete and easy to usemicrostepping motor driver. It is designed byAllegro Microsystems to operate bipolar step-per motors in full, half, quarter, eighth, andsixteenth-step modes. The A4988 includes acurrent regulator automatically selecting de-cay modes. Internal circuit protection in-cludes thermal shutdown, under-voltage lock-out (UVLO), and crossover-current protection.A4988 has a small size and requires simpler cir-cuitry and used in Pololu Stepper drivers[13].
HardwareCNC TypesCNC machine sizes various vastly depending onapplications. There are mini CNC machinesmade from floppy drives designed to act as ansketch machine and there are huge industrialCNC machines weighing a few tons for indus-trial machining. But there exists some gener-alized distinction between them based on somecharacteristics[14].
CNC LatheCNC lathe are two axis lathe ma-chines. The axes are x and z. A normal lathemachine can be retrofitted to incorporate nu-merical control.
CNC Milling Machine CNC Milling ma-chines can have 3 to 6 axes. They are suitablefor heavy machining and may have features likeautomatic tool changer and auto-feed mecha-nism.
CNC RouterCNC Router are the most com-mon type of CNC machines around, they arespecially popular among the DIY circles.They
can have 3 to 6 axes and most of the time de-signed to cut and mill complex shapes on wood,plastic or metal.
CNC Laser CutterCNC laser cutter uses afocused beam of laser to cut through plastic,wood or metal. Laser cutting is much moreprecise and clean than using router or millingbits. CNC laser cutters are usually 3 to 5 axis.
CNC Plasma CutterPlasma cutters use thesame principle as laser cutters, but they aremuch more stronger and destructive. In thissetup and plasma torch is used to cut 2D shapeson the material, the material being thick sheetsof metal most of the time.
3D Printer Although it might not look thesame, 3D printers work on the same principleof Numerical Control. Instead of a machininghead, spindle or laser, they use a extruder ormelt plastic and print on surface. As the namesuggests, 3D printers are 3 axis.
MaterialsCNC work material vary from styrofoam tothick metal sheets These materials can be di-vided into the following broad categories[15]:
• Soft Wood
• Hard Wood
• Particle Boards: Plywood, LaminatedBoard, Veneer Board, MDF.
• Soft Plastic: ABS, PVC.
• Hard Plastic: Acrylic, Plexiglass.
• PCB: Copper Board
• Soft Metal: Copper, Brass, Aluminium,Extruded Aluminium, Composite Alu-minium.
• Hard Metal: Iron, Cast Iron, Steel.
• Stone: Soap Stone, Slate, Marble.
29 Rezwan-Al-Islam Khan

International Journal of Electronics, Electrical and Computational SystemIJEECS
ISSN 2348-117XVolume 4, Issue 11
November 2015
Spindle TypesBrushed SpindlesCNC spindles can be madewith two types of motors - Brushed and Brush-less. Brushed motors have commutating car-bon brushes around the shaft that reverses thecurrent back and forth and causes the shaft tospin. They are much cheaper than their coun-terpart, but brushed motors generate a lot ofnoise and the brushes are likely to be decayedafter prolonged use because of the constant fric-tion.
Brushless SpindlesBrushless motor spindlesare also known as AC spindles. They are verycostly, but generate low noise, less mechanicaldecay and more precise in return[16].
Handheld Routers Apart from custombrushed or brushless spindles made specificallyfor CNC, some CNC makers use handheldrouters such as Dremel or RotoZip on desktopCNC, as they provide good accuracy and ro-bustness compared to the price[17].
Spindle PowerLike any motor, spindle power is measured byHP (Horse Power) rating. However there aresome other things that requires considerationwhile calculating power rating. The powershould be determined when the spindle is run-ning on it’s maximum RPM (Revolutions PerMinute). In case of AC brushless motors, theamount of duty cycles affects the power rating.Even if a spindle is rated for 100HP at 100%duty cycle, running at 100% duty cycle in ab-sence of specialized cooling system will causeoverheating and maybe burnout if continued.
Spindle CoolingMost common method cooling is using fans andaluminium heatsinks around the body of thespindle. The fan can be mounted on the shaftof the spindle or inside the body to blow outairs. They are cheap and effective to a point,but with this setup a spindle shouldnt be usedfor more that 60% duty cycle. Not to mention,
the shaft mounted fan increases the noise andvibration greatly[18]. Another method is to usecompressed air. In this setup compressed air isblown continuously inside the spindle. Usingcompressed air cooling allows using upto 90%duty cycle. Lastly, there is liquid cooling. Us-ing liquid coolant allows continuous operationof the spindle at maximum duty cycle. Liquidcooling is mandatory in industrial applicationof CNC where the machine needs to be run fora very long time period.
Router BitRouter bit is the cutting or machining head ofthe CNC. A more familiar term would ‘DrillBit’. There are different categories based onthe material they are made, cutting edges orflute types.[17]
Bit TypesBit MaterialRouter bits are made of mostlyhigh carbon steel and coats of other materialssuch as tungsten and carbide. HSS bits arehigh speed steel and suitable for drilling in themetal. Tungsten coated bits have sharper cut-ting edge than HSS and suitable for cutting intowood, plastic and aluminium. Carbide tippedbits work well with all kind of materials. Solidcarbide bits provide the best performance outof them on all types of materials.
Shapes and FlutesRouter Bits can have dif-ferent shapes and different number of flutes.There are different shapes such as cylindrical,toroidal, spheric, v-shaped etc. Shapes differin cutting edges too. There are sheer, diamondcut, spiral, compression etc. Flutes refer to thecutting edges of bits that cut into the mate-rial during each rotation. There are one, two,three and multi flute bits. Flute geometry canbe different too, for example - straight, upcut,downcut, compression etc.
Chip Load and Feed RateChip load is a measurement of the thickness ofmaterial removed by each cutting edge during
30 Rezwan-Al-Islam Khan

International Journal of Electronics, Electrical and Computational SystemIJEECS
ISSN 2348-117XVolume 4, Issue 11
November 2015
cutting or milling. Chip load varies depend-ing on the material used. Feed rate is the ve-locity at which the bit moves cutting againstthe workpiece. Feed rate is usually measuredwith SPF (Surface per Meter)[19]. The rela-tionship between chip load and feed rate canbe expressed with the following formula:Feed Rate = RPM × Number of Flutes × ChipLoad
DESIGN
Figure 3: Complete CNC
Mechanical DesignSince we decided to go for a 3 axis CNC, Thefirst thing to do was to fix our axes. In ourdesign Y axis would be the base, and the bedwill move along it. The gantry will house theX and Z axis, perpendicular to the Y axis. Xaxis will provide horizontal motion while Z axiswill provide vertical motion. Z axis itself willbe housed on the X axis and will move along
it’s motions path. The spindle will be fixed onthe Z axis.
DimensionsWe went through all the designs that alreadyexisted for 3 axis CNC. As we could not makesomething industrial scale due to short of fund-ing, materials and time, we settled for a Desk-top sized CNC. It was the perfect choice thatwould effectively serve our purpose and be sta-ble as well as mobile if the need arises in thefuture. As a desktop CNC it was more prac-tical to fix the dimension in such way so theframe would fit on top of a table. This will alsoallow us to have the option of bolting it withthe table itself to provide more stability. Aftermuch calculation we came up with a rough es-timation the CNC would be 450 mm, 600 mmand 750 mm with respect to width, length andheight.At the same time we were faced with the ques-tion whether we should have a fixed gantry de-sign or a moving gantry design. As the namessuggests, in fixed gantry design the gantry re-mains still while the bed moves, this providesbetter stability for the machine, but not theworkpiece. With moving gantry design, thegantry moves instead of the bed, this providesgreater stability for the workpiece and is ob-viously a better choice for a large workpiece.As our target design was a desktop CNC, wedecided for the fixed gantry design for greaterstructural stability. We came up with the fol-lowing design:
Figure 4: Concept design of CNC
31 Rezwan-Al-Islam Khan

International Journal of Electronics, Electrical and Computational SystemIJEECS
ISSN 2348-117XVolume 4, Issue 11
November 2015
Targeting 2D and 2.5DTaking a look at the figure 4, it would be clearthat our concept machine would be able to workwith 2D designs, but not full 3D. As the spin-dle moves along the Z axis, it will always beperpendicular to the surface, thus working ef-fectively on a 2D design, but not a 3D one.Instead it is able to mill something between 2Dand 3D, which is known as 2.5D. To put it sim-ply, 2.5D is an illusion of full 3D, or in termsof machining, a projection of a 2D object intothe 3D plane. Figure 5 explains the scenario inthe case of a cnc machine.
FrameWe choose MDF as the main building materialof the CNC frame. MDF is durable, easy to cutand work with, and offers a very flat and sturdysurface (fig 6). Although MDF is prone to wearif exposed to water, we decided to use coats ofvarnish to prevent damage from accidental wa-ter splashes. But only MDF was not enoughto make the structure solid and stable, so weadded extruded aluminium angle bars whichare locally available for a reasonable price (fig7).
BaseFor the base of the CNC we used a rectan-gular piece of MDF board of dimension 457 mmby 609 mm with respect to width and length(fig 8). We used aluminium bars at the sideson top of it to create a box shaped design. 6mmbolts along with T-Nut were used to completelybolt them together as a singe piece (fig 9). Thereason we went for a box shaped structure is be-cause not only it will give us a mounting pointfor fixing the gantry, but also so that we canturn it into a vacuum bed in the future (fig28).
BedThe bed was designed to be 406 mm by 406mm square and made of solid MDF (fig 10).
Gantry Gantry was made from two identicalpieces of MDF, two trapezoids. Upper width26 mm, lower width 457 mm and a length of
Figure 5: 2D vs 2.5D vs 3D
Figure 6: MDF board
Figure 7: Extruded aluminium angle bar
32 Rezwan-Al-Islam Khan

International Journal of Electronics, Electrical and Computational SystemIJEECS
ISSN 2348-117XVolume 4, Issue 11
November 2015
Figure 8: Base dimensions
Figure 9: Aluminum bar on sides
Figure 10: CNC Bed alignment testing
712 mm (fig 11). They were bolted with 6mmbolts, washer and regular nuts with aluminiumframe of the base (fig 13).
Figure 11: Gantry dimensions
Figure 12: Gantry
Motor MountWe used custom frames made of extruded alu-minium angles to mount the motors. We drilledthe frame, threaded the holes and screwed themotors with 0.5 inch 4 mm screws (fig 16).The mounts themselves were bolted to the alu-minium frame (fig 14), and in case of thegantry, to the MDF (fig 15).
Spindle MountMounting the spindle proved to be difficult.The spindle creates a lot of vibrations whenrunning and if not fixed properly, there would
33 Rezwan-Al-Islam Khan

International Journal of Electronics, Electrical and Computational SystemIJEECS
ISSN 2348-117XVolume 4, Issue 11
November 2015
Figure 13: Gantry mounted on base
be risks of accidents. We decided to use blocksof MDF to make a complete box around thespindle, while leaving enough spaces for airflowand manual control. The box was glued ontothe Z axis mount and the part of the box thatclamped the spindle was screwed with 2 inch 4mm screws. To reduce vibration and provide abetter grip on the spindle, we used rubber padsaround it (fig 17).
Linear MotionLinear motion along the axes is used using a to-tal of five components. We used linear bearings(fig 20) which can slide linearly on StainlessSteel (SS) rods (fig 18). We used two bearingsper rod and two rods per axes (fig 21). Thedimensions are 16 mm for X and Y axis and12 mm (fig 19) for Z axis. The bearings aremounted using aluminium frames and 4 mmscrews (fig 26). After the sliders are set, wethen use a 8 mm threaded SS rod (Leadscrew)(fig 22) attached with the motor shaft via cou-
Figure 14: X axis motor mount
Figure 15: Y axis motor mount
Figure 16: Z axis motor mount
34 Rezwan-Al-Islam Khan

International Journal of Electronics, Electrical and Computational SystemIJEECS
ISSN 2348-117XVolume 4, Issue 11
November 2015
Figure 17: Spindle mount
Figure 18: SS rod
Figure 19: 12 mm linear bearing
Figure 20: 16 mm linear bearing
Figure 21: Slider on Z axis
35 Rezwan-Al-Islam Khan

International Journal of Electronics, Electrical and Computational SystemIJEECS
ISSN 2348-117XVolume 4, Issue 11
November 2015
pler. There is a 20 mm long nut (fig 32) thatholds the axis mount. The long nut is attachedwith the shaft with a piece of MDF cut to rightsize to hold it firmly (fig 23). As the shaft ro-tates, so does the leadscrew, and the axis mountslides along the SS rods slowly because of thelong nut (fig 28).
Figure 22: Leadscrew
Spindle and BitsWe decided to go for a hand held router in-stead of a custom spindle or a brushless spin-dle. A brushless spindle was taken off the listbecause of the high costing. A custom spin-dle would have been better, however there werenone available locally, and importing one wouldhave added extra costs to bear. Therefore ahandheld router was the most suitable choice.They provide stability, compact size and goodperformance for the price. After going throughthe available brands, we settled for Dremel asthey have earned their fame in the handheldrouter field because of superior performance.As Dremel 300 was locally available, and hadbeen received positively by the users, we de-cided to go for it (fig 29). Dremel 300 has aspeed regulator, while having maximum RPMof 30000 (fig 29).
Figure 23: Long Nut holder
Figure 24: Linear motion in Y axis
Figure 25: Linear Motion in Z axis
36 Rezwan-Al-Islam Khan

International Journal of Electronics, Electrical and Computational SystemIJEECS
ISSN 2348-117XVolume 4, Issue 11
November 2015
Figure 26: Z axis Linear Bearing mount
Figure 27: Y axis Linear Bearing mount
Figure 28: Linear Motion with Bed on Y axis
Figure 29: Dremel 300 unboxed
For router bits, we used double flute tungstencoated bits with diamond-cut cutting edge (fig30). They were of various diameters rangingfrom 1.4 mm to 3 mm depending on the appli-cation (fig 31). As they were tungsten coated,they proved to be very effective for both metal,wood, and plastic materials.
Figure 30: Router bit - diamond cut, doubleflute
BacklashThe most troublesome problem that one has toface while building a CNC is backlash. Back-lash happens due to the misalignment of theaxis. Or when an axis is moving in one di-rection and all of a sudden starts moving inthe opposite direction, there might be a mo-mentary pause because of either too much ortoo less fraction between the leadscrew and thenut. This momentary pause is enough to cause
37 Rezwan-Al-Islam Khan

International Journal of Electronics, Electrical and Computational SystemIJEECS
ISSN 2348-117XVolume 4, Issue 11
November 2015
Figure 31: Router bit set
Figure 32: Long Nut
Figure 33: Y axis flexible bearing
errors in the calculations. To avoid that wewere careful not to misalign the axes from thevery start (fig 10). To prevent backlash we tookthree precautions.
NutWe used a 20 mm Long Nut to use with the 8mm diameter threaded SS rods (fig 32). Longnuts provide just enough friction to keep theaxis moving with a good velocity and torquewithout noticeable backlash. We used a singlelong nut for each axis as using two increases thefriction considerable and likely to cause back-lash.
Figure 34: X axis flexible bearing
Flexible BearingA flexible bearing is able to wooble within it’smounts. Using flexible bearings on the end ofleadscrew opposite of the motor, we made surethat if there is any misalignment, the bearingwill move slightly within it’s mount to compen-sate for it (fig 33).
38 Rezwan-Al-Islam Khan

International Journal of Electronics, Electrical and Computational SystemIJEECS
ISSN 2348-117XVolume 4, Issue 11
November 2015
Figure 35: Z axis flexible bearing
CouplerA more sure fire way to compensatefor misalignment is to use special couplers. Atthe beginning we decided to oldham couplers asthey are versatile and cheap (fig 37). But the3D printed parts we acquired, proved to be inef-ficient in the long run because of light material.Further attempt to die cast with aluminiumhad little success too (fig 36). On our next at-tempt we acquired some commercial grade flex-ible couplers that worked magnificently (fig 38).
Table TravelAfter the construction of the frame was com-plete, the maximum table travel was calculatedto be 300 mm for both X and Y axis and 160mm for Z axis.
Limit SwitchesTo ensure closed look control we added limitswitches on all axes. Limit switches are me-chanical momentary switches that send a elec-trical pulse upon contact (fig 39). With the ad-
Figure 36: Oldham coupler
Figure 37: Oldham coupler in action
Figure 38: Flexible coupler in action
39 Rezwan-Al-Islam Khan

International Journal of Electronics, Electrical and Computational SystemIJEECS
ISSN 2348-117XVolume 4, Issue 11
November 2015
Figure 39: Limit Switch
dition of limit switches, we can now know whenthe spindle hits the maximum limit on any ofthe axis. In addition, since we know the exacttable travel, we can calculate the home positionin linuxCNC. Limit switches are configured inX and Y axis as minimum limit, and maximumlimit in the Z axis. We have soldered a 0.1ufcapacitor between the signal and ground legsof the switches to filter out AC noises and toensure a clean pulse.
Electronics
Parallel Communication
To connect the driving circuit with the parallelport in PC, we used a parallel breakout board(BoB). The board has opto-isolated pinout, sothe PC is safe from damage due to reverse cur-rent flow. The BoB also has ports to attach anLCD panel with jog (rotary encoder) to provideon-site control over the CNC. There is a flashcard holder, so we can load up a design on aflash card and run it directly using the LCDpanel (fig 40).
Steppers
We chose bipolar stepper motors to utilize moretorque. All the motors is driven in microstep-ping mode to allow greater resolution in PCBmilling.
Figure 40: Parallel Breakout Board
Driver
For stepper driver we explored different avail-able means. At the very first, we decided touse the L297-L298 approach (fig 41). But af-ter an accidental burnout due to overcurrent,we opted for L297-L6205 (fig 43). But simi-larly it also had caused some problems. Nextwe were trying to use TB6560AHQ drivers (fig44). We used 3 separate driver board for eachaxis to keep it modular (fig 45). TB6560 hasmicrostepping and can provide upto 3A of cur-rent. Not to mention it comes with a very goodheatsink. However, it did not perform as wellas it should have, and made us search for anyalternate solutions. Finally, we had our handson some A4988, these tiny driver boards frompolulu are very small, simple and packs quitea punch in spite of it’s compact size (fig 46).It allows microstepping upto 1/16th step andgives upto 2A current. There is a built in regu-lator to allow current control and it selects de-
40 Rezwan-Al-Islam Khan

International Journal of Electronics, Electrical and Computational SystemIJEECS
ISSN 2348-117XVolume 4, Issue 11
November 2015
Figure 41: L297 prototype board
Figure 42: L298 prototype board
Figure 43: L6205 prototype board
cay mode automatically depending on the load.We added heatsinks to them to provide thermalprotection and used a fan to blow air constantly(fig 47). We designed a little driver board thathouses three A4988 drivers for all three motors.Due to the modular design they can be swappedor changed in a moment’s notice (fig 48).
Figure 44: TB6560AHQ single axis driverboard
Power SourceUsing a good power source is vital to any ma-chinery. with all three motors drawing the max-imum current, we would need a power supplyunit that could handle that load. We opted touse a regular 500W power supply for any desk-top PC. They are able to provide atleast 10Ain the 12 volt rail and 18A at the 5 volt rail.We did modify it to convert into a lab powersupply (fig 49).
SoftwareAs the only reliable and stable open sourceCNC controller, we choose to use LinuxCNC.LinuxCNC is available as a lightweight debianlinux distribution, so we allocated a separatecomputer (P4, 512 MB) to control the CNC.LinuxCNC maybe have a bit of sharp learn-ing curve for people unknown to linux, but itdoes not take long to get used to it. It pro-vides excellent control and has spindle control,bump mapping and a built in image-to-Gcode
41 Rezwan-Al-Islam Khan

International Journal of Electronics, Electrical and Computational SystemIJEECS
ISSN 2348-117XVolume 4, Issue 11
November 2015
Figure 45: TB6560AHQ driver board setup
Figure 46: A4988 single axis driver board
Figure 47: A4988 driver board setup
Figure 48: A4988 driver board with BoB
42 Rezwan-Al-Islam Khan

International Journal of Electronics, Electrical and Computational SystemIJEECS
ISSN 2348-117XVolume 4, Issue 11
November 2015
Figure 49: Modified power supply unit
converter. LinuxCNC has easy to understandwizards for new users (fig 50). For the linuxgeek who wants to have more control, there areplenty of options to tweak in the HAL (HarwareAbstraction Layer).
Figure 50: LinuxCNC
Figure 51: DipTraceFor our CAD software, we used DipTrace make
circuit diagrams and trace PCB (fig 51), andthen used Inkscape to convert to .svg contourmaps (fig 52). For 3D objects, we used blenderto create 3D models and export them in .stlformalt.
Figure 52: Inkscape
Figure 53: Pycam
After trying a few CAM softwares, we settledfor Pycam. It’s is simple to use and does thework (fig 53). We had some issues with thenewer features as they were taking a very longtime to generate codes. But after some exper-imenting, we fixed on a optimal setting thatgreatly increased work-flow.
RESULT and EVALUA-
TIONWe started off with the objective of being ableto mill PCB with a CNC, and we have suc-ceeded in doing so. Not only PCB, we havesucceeded in milling Soft Wood, MDF, Acrylicand Aluminium as well. Therefore, we haveachieved more than our initial objective.
43 Rezwan-Al-Islam Khan

International Journal of Electronics, Electrical and Computational SystemIJEECS
ISSN 2348-117XVolume 4, Issue 11
November 2015
OutputThe output we have produced through CNCmachining include milling and engraving onsoft wood, printed circuit board (fig54), MDF(fig 55, 56, 57 and 59), acrylic (fig58) and alu-minium (fig60). However an explanation of howG-Code instructs the machine to create theseoutputs is necessary before moving onto the listof outputs.
G-Code to Output
The following G-Code engraves a square geo-metric shape.
1G0 Z2.0000
2M3 (start spindle)
3G04 P3 (wait for 3 seconds)
4X1.0464 Y8.3147
5G1 Z1.0000
6X10 .9536
7Y1.0461
8X1.0464
9Y8.3147
10G0 Z2.0000
11M5 (stop spindle)
The first line instructs the CNC to move spin-dle along the Z axis to a position 2mm (safetydistance) above the homed position, which isthe surface of the workpiece. Next line turnson the spindle with the command M3. At thispoint the machine waits for 3 seconds to al-low any final adjustments to the workpiece.In line 4, the spindle moves into the start-ing position of (x,y)=(1.0464,8.3147) and low-ers the spindle 1mm along the Z axis in thenext line. At this point the spindle is alreadycutting into the workpiece. In line 6, spin-dle moves along the X axis x=10.9536 whilekeeping the y value constant. In next line, xvalue keeps unchanged while it goes down theY axis to y=1.0461. In line 8 and 9, the spin-dle moves to the points (x,y)=(1.0464,1.0461)and (x,y)=(1.0464,8.3147) thus completing thesquare. Upon completion, the next commandin line 10 instructs the spindle to go up to thesafety distance and stop the spindle on line 11.
Figure 54: PCB Board Milled with CNC
Problems and Solutions
The road to milling successfully with CNCwas not without bumps and hitches. Wefaced many problems and found solutions orworkarounds for them.
Electro-magnetic Interference
The first problem we faced was homing the axesaccurately. Because of electro-magnetic inter-ference, we could not receive clean signals fromthe limit switches. We received false positivesignals at times too. By using 0.1uf capaci-tors we managed to reduce noise greatly andthus getting a clean pulse from the momentaryswitches. Not only the limit switches, but themotors also created electro-magmatic interfer-ence because of the principle they are built in.We attached Ferric core around the motor wiresto minimize signal noise.
Overheating
As our machine was running for hours, we ex-perienced overheating issue for the drivers andmotors. To solve that we tweaked the cur-rent control setting in each of the three A4988drivers to an optimal setting so the motorswont overheat. We also added heatsinks to thedrivers and a high rpm 12 v electric fan blowingair into them to prevent thermal shutdown.
44 Rezwan-Al-Islam Khan

International Journal of Electronics, Electrical and Computational SystemIJEECS
ISSN 2348-117XVolume 4, Issue 11
November 2015
Figure 55: Small extruder gear for 3D printer
Figure 56: Milling MDF
Figure 57: Miling sloped shapes on MDF
Figure 58: Milling Acrylic
Figure 59: Big extruder gear for 3D printer
Figure 60: Surface milling on Aluminium
45 Rezwan-Al-Islam Khan

International Journal of Electronics, Electrical and Computational SystemIJEECS
ISSN 2348-117XVolume 4, Issue 11
November 2015
Spindle and Bit Maintenance
To keep the router bits from breaking, calcu-lating the chip load and feed rate was a must.Measuring the chip load of the different mate-rials and calculating the respective feed ratesfrom them took sever attempts through trialand error. But in the end we found that us-ing feed rates of 3000, 2000, 700 and 200 workswell for MDF, PCB, Acrylic and Aluminium.While milling on aluminium we had to use cut-ting oil to keep the workpiece from melting andclogging the edges of the router bit.
Dust Management
Dust is the enemy of any electric and mechani-cal machine. Due to the nature of CNC, a lot ofdusts and chips generate from the work pieces.If not taken care of they can easily get into thejoints, inside the bearings and inside the spin-dle. We used a makeshift dust managementsystem with vacuum cleaner intended for homeuse to keep the CNC bed clean from dusts.
Milling Time
The time it took to complete a single layer wasabout 20-30 minutes at first, which was a bigdrawback in terms of performance. To solvethis we recalculated the feed rate and optimalspindle rpm for each types of materials andtweaked the settings accordingly. Thus we wereable to reduce it to 7-10 minutes per layer.
PCB Milling
While attempting to mill PCB the greatest ob-stacle was to find the right design settings thatwould work perfectly with the router bits avail-able to us. And ideal bit for pcb milling shouldhave a v-shaped or ball end tip and should beless than 1 mm in diameter. As we were notable to find them in local markets we had toadjust the design to suit the available options.After trying out different settings and testingthem, we settled for 1.5 mm trace width and 2mm pad with for PCB milling.
Spherical Shapes and Slopes
While there were no issues milling rectangularshapes, it proved to be difficult to mill sphericalshapes and slopes to perfections. As the millingis done layer by layer, to provide a smooth sur-face for slopes and spherical shapes, we decidedto increase the layer count by reducing the max-imum layer depth to 0.2 mm. This solved theissue of jagged surfaces, although in exchangefor milling time.
CONCLUSIONWe have set out to accomplish three key objectsin this research and built a completely opensource desktop CNC router that have producedsatisfactory results in milling parts and circuitboards for other robotics projects. Completinga working desktop CNC does not mean thereis no scope for improvements. We would liketo enhance this design by adding touch probe,laser homing, LCD panel, jog, vacuum bed anddust collector features in the future.
REFERENCES[1] M. T. S.-E. GmbH, Teachware CNC Tech-
nology, 1st ed. MTS GmbH, 1999.
[2] “Serial programming, complete wiki-book,” August 2014. [Online]. Avail-able: http://en.wikibooks.org/wiki/Serial Programming/Complete Wikibook
[3] W. Stallings, Data and Computer Com-munications, 8th ed. Pearson Education,2007.
[4] “Universal serial bus specification,” July2012, version 2.0. [Online]. Avail-able: http://sdphca.ucsd.edu/Lab EquipManuals/usb 20.pdf
[5] “Universal serial bus 3.0 specification,”April 2009, version 1.0. [Online]. Avail-able: http://www.gaw.ru/pdf/interface/usb/USB%203%200 english.pdf
46 Rezwan-Al-Islam Khan

International Journal of Electronics, Electrical and Computational SystemIJEECS
ISSN 2348-117XVolume 4, Issue 11
November 2015
[6] P. E. Sandin, Robot Mechanism and Me-chanical Devices Illustraded. McGraw-Hill, 2003.
[7] V. V. Athani, Stepper Motors : Funda-mentals, Applications And Design, 1st ed.New Age International, 1997.
[8] L297 Stepper Motor Controller,December 2014, l297 Datasheet.[Online]. Available: http://www.st.com/web/catalog/sense power/FM142/CL851/SC1790/SS1160/PF63146
[9] L298 Dual Full-Bridge Driver, December2014, l298 Datasheet. [Online]. Available:http://www.st.com/web/en/catalog/sense power/FM142/CL851/SC1790/SS1555/PF63147
[10] L6205 Dual DMOS Full-Bridge Driver,December 2014, l6205 Datasheet. [On-line]. Available: http://www.st.com/web/catalog/sense power/FM142/CL851/SC1790/SS1555/LN1632/PF63232
[11] L6208 Fully Intregrated StepperMotor Driver, December 2014,l6208 Datasheet. [Online]. Avail-able: http://www.st.com/web/catalog/sense power/FM142/CL851/SC1794/SS1554/LN1721/PF63235?sc=internet/analog/product/63235.jsp
[12] TB6560 PWM Chopper-Type BipolarDriver IC for Stepping Motor Control,
December 2014, tB6560AHQ Datasheet.[Online]. Available: https://www.toshiba.com/taec/components2/Datasheet Sync/201103/DST TB6560-TDE EN 27885.pdf
[13] A4988 DMOS MicrosteppingDriver, December 2014, a4988Datasheet. [Online]. Available: http://www.allegromicro.com/en/Products/Motor-Driver-And-Interface-ICs/Bipolar-Stepper-Motor-Drivers/A4988.aspx
[14] “Cnc machine overview and com-puter numerical control history,” April2014. [Online]. Available: http://www.cnccookbook.com/CCCNCMachine.htm
[15] “Materials,” December 2014. [Online].Available: http://www.shapeoko.com/wiki/index.php/Materials
[16] “Spindles,” January 2014. [Online].Available: http://www.technocnc.com/technical-section/Spindles.htm
[17] Router Bit Basics for CNC, 2012, version3.5.
[18] A. Albert, Understanding CNC Routers,1st ed. FPInnovations, 2011.
[19] Router Tool Selector.
47 Rezwan-Al-Islam Khan