Deploying the BIG-IP LTM v11 with Citrix XenApp · Citrix XenApp. BIG-IP version 11.0 introduces...
20
Document Version 1.2 Deployment Guide Deploying the BIG-IP LTM v11 with Citrix XenApp Welcome to the F5 deployment guide for Citrix ® XenApp ® with BIG-IP v11. This guide shows how to configure the BIG-IP Local Traffic Manager (LTM) for directing traffic, ensuring application availability, improving performance and providing a flexible layer of security for Citrix XenApp. BIG-IP version 11.0 introduces iApp ™ Application templates, an extremely easy way to configure the BIG-IP system for Citrix XenApp. Citrix XenApp provides a run-time environment for applications to be hosted on the server and accessed over the network or by using web protocols, with just keyboard strokes, mouse movements and screen updates being exchanged between the client and the server. Why F5 The BIG-IP LTM provides mission critical availability, enhanced security, simple scalability and high operational resiliency to the Citrix XenApp deployment so users can access resources from any device in any location as easily and securely as from within the corporate LAN. In a Citrix XenApp environment, the BIG-IP LTM provides intelligent traffic management and high-availability by monitoring and managing connections to the Citrix Web Interface and the Citrix XML Broker components. In addition, the built-in performance optimization capabilities of the LTM provide faster operations to facilitate a better end-user experience. The LTM also keeps persistence records for certain connections to always be directed to the same server for a specified period of time, to ensure that the workflow in the XenApp environment is fully preserved. To provide feedback on this deployment guide or other F5 solution documents, contact us at [email protected]. Products and versions tested Product Version BIG-IP LTM 11, 11.0.1, 11.1 Citrix XenApp 5.0, 5.1, 6.0 What’s inside: 2 What is F5 iApp ™ ? 2 Prerequisites and configuration notes 3 Configuration example 4 Preparation Worksheets 5 Configuring the BIG-IP iApp for Citrix XenApp 9 Modifying the iApp configuration (required) 11 Modifying the Citrix XenApp Web Interface configuration 12 Next steps 14 Troubleshooting 15 Appendix: Manual configuration table 19 Document Revision History
Transcript of Deploying the BIG-IP LTM v11 with Citrix XenApp · Citrix XenApp. BIG-IP version 11.0 introduces...

Document Version 1.2
Deployment Guide
Deploying the BIG-IP LTM v11 with Citrix XenAppWelcome to the F5 deployment guide for Citrix® XenApp® with BIG-IP v11. This guide shows how to configure the BIG-IP Local Traffic Manager (LTM) for directing traffic, ensuring application availability, improving performance and providing a flexible layer of security for Citrix XenApp.
BIG-IP version 11.0 introduces iApp™ Application templates, an extremely easy way to configure the BIG-IP system for Citrix XenApp.
Citrix XenApp provides a run-time environment for applications to be hosted on the server and accessed over the network or by using web protocols, with just keyboard strokes, mouse movements and screen updates being exchanged between the client and the server.
Why F5
The BIG-IP LTM provides mission critical availability, enhanced security, simple scalability and high operational resiliency to the Citrix XenApp deployment so users can access resources from any device in any location as easily and securely as from within the corporate LAN.
In a Citrix XenApp environment, the BIG-IP LTM provides intelligent traffic management and high-availability by monitoring and managing connections to the Citrix Web Interface and the Citrix XML Broker components. In addition, the built-in performance optimization capabilities of the LTM provide faster operations to facilitate a better end-user experience. The LTM also keeps persistence records for certain connections to always be directed to the same server for a specified period of time, to ensure that the workflow in the XenApp environment is fully preserved.
To provide feedback on this deployment guide or other F5 solution documents, contact us at [email protected].
Products and versions tested
Product Version
BIG-IP LTM 11, 11.0.1, 11.1
Citrix XenApp 5.0, 5.1, 6.0
What’s inside:
2 What is F5 iApp™?
2 Prerequisites and configuration notes
3 Configuration example
4 Preparation Worksheets
5 Configuring the BIG-IP iApp for Citrix XenApp
9 Modifying the iApp configuration (required)
11 Modifying the Citrix XenApp Web Interface configuration
12 Next steps
14 Troubleshooting
15 Appendix: Manual configuration table
19 Document Revision History

DEPLOYMENT GUIDE
Citrix XenApp
2
Important: Make sure you are using the most recent version of this deployment guide, available at http://www.f5.com/pdf/deployment-guides/citrix-xenapp-iapp-dg.pdf
What is F5 iApp™?
New to BIG-IP version 11, F5 iApp is a powerful new set of features in the BIG-IP system that provides a new way to architect application delivery in the data center, and it includes a holistic, application-centric view of how applications are managed and delivered inside, outside, and beyond the data center. The iApp template for Citrix XenApp acts as the single-point interface for building, managing, and monitoring Citrix XenApp deployments.
For more information on iApp, see the F5 iApp: Moving Application Delivery Beyond the Network White Paper: http://www.f5.com/pdf/white-papers/f5-iapp-wp.pdf.
Prerequisites and configuration notes
The following are general prerequisites and configuration notes for this guide:
h For this guide, the Citrix XenApp installation must be running version 5.0, 5.1 or 6.0.
h This document is written with the assumption that you are familiar with both F5 devices and Citrix XenApp products. For more information on configuring these devices, consult the appropriate documentation.
h For this deployment guide, the BIG-IP LTM system must be running version 11.0 or later. If you are using a previous version of the BIG-IP LTM system, see the Deployment Guide index on F5.com. The configuration described in this guide does not apply to previous versions.
h This deployment guide provides guidance for using the iApp for Citrix XenApp found in version 11.0 and later. For users familiar with the BIG-IP, there is a manual configuration table at the end of this guide. However, we strongly recommend using the iApp template.
h After completing the iApp, you must modify the configuration produced by the template as described in Modifying the iApp configuration (required) on page 9.
h If you are using the BIG-IP system to offload SSL, we assume you have already obtained an SSL certificate and key, and it is installed on the BIG-IP LTM system.
h Citrix Session configuration must be set to Direct mode (see Figure 1). For specific information on configuring the Citrix Session mode, see the Citrix documentation.
Figure 1: Citrix Session configuration
DEPLOYMENT GUIDE
Citrix XenApp
3
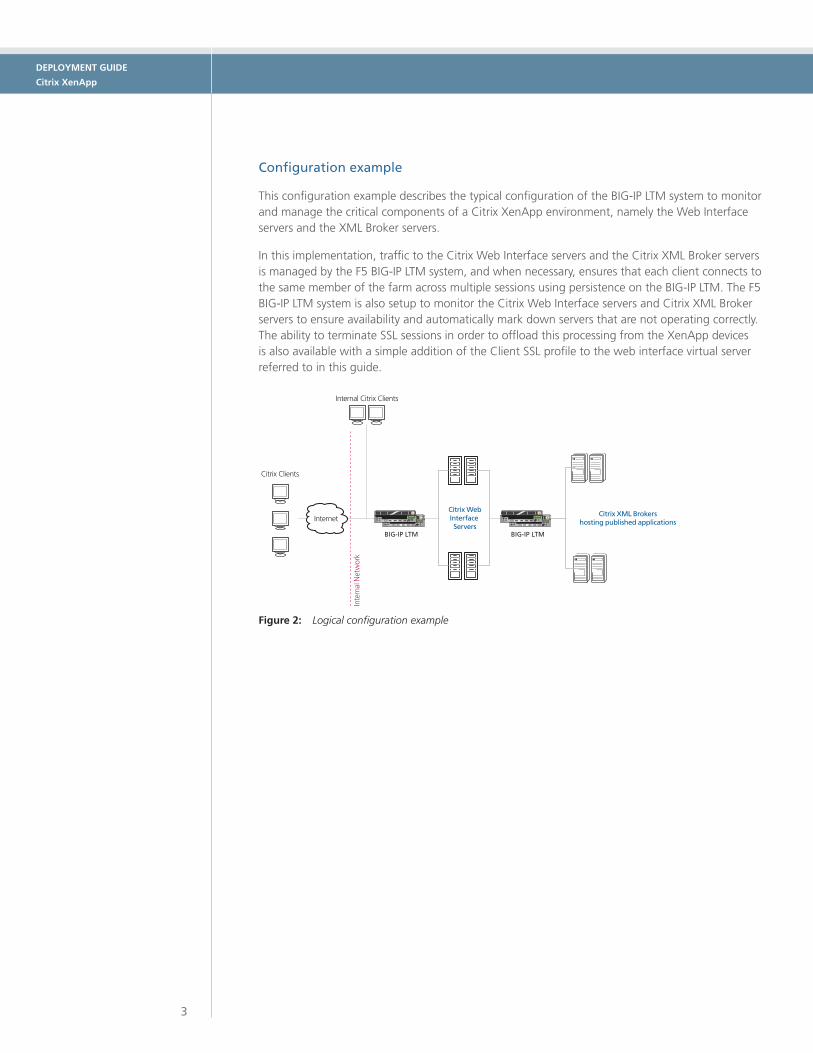
Configuration example
This configuration example describes the typical configuration of the BIG-IP LTM system to monitor and manage the critical components of a Citrix XenApp environment, namely the Web Interface servers and the XML Broker servers.
In this implementation, traffic to the Citrix Web Interface servers and the Citrix XML Broker servers is managed by the F5 BIG-IP LTM system, and when necessary, ensures that each client connects to the same member of the farm across multiple sessions using persistence on the BIG-IP LTM. The F5 BIG-IP LTM system is also setup to monitor the Citrix Web Interface servers and Citrix XML Broker servers to ensure availability and automatically mark down servers that are not operating correctly. The ability to terminate SSL sessions in order to offload this processing from the XenApp devices is also available with a simple addition of the Client SSL profile to the web interface virtual server referred to in this guide.
Internet
Citrix Clients
Citrix WebInterface Servers
Citrix XML Brokershosting published applications
Internal Citrix Clients
Inte
rnal
Net
wor
k
BIG-IP LTM BIG-IP LTM
Figure 2: Logical configuration example

DEPLOYMENT GUIDE
Citrix XenApp
4
Preparation Worksheets
In order to use the iApp for Citrix XenApp, you need to gather some information, such as server IP addresses and domain information. Use the following worksheets to gather the information you will need while running the template. The worksheets do not contain every question in the template, but rather include the information that is helpful to have in advance. More information on specific template questions can be found on the individual pages. You might find it useful to print these tables and then enter the information.
 Note: Although we show space for 7 pool members, you may have more or fewer members in each pool.
IP Addresses SSL Offload Pool Members
Front-end Web Interface virtual
Virtual server IP address:
FQDN that will resolve to the virtual server address:
Optional. Import a certificate and key into the BIG-IP LTM before running the template.
Certificate: Key:
Web Interface Server IPs: 1: 2: 3: 4: 5: 6: 7:
Back-end XML Broker virtual
Virtual server IP address: Not Applicable XML Broker Server IPs: 1: 2: 3: 4: 5: 6: 7:
Health monitor Sync/Failover Groups TCP request queuing WAN or LAN clients
DNS name clients use to access XenApp:
URI required for accessing XenApp:
XenApp user name with access to applications (we recommend creating a XenApp user account specifically for the monitor):
Associated password:
Domain for the user account:
Name of application XenApp user can retrieve:
If using the Advanced feature of Sync/Failover Groups, you must already have a Device Group and a Traffic Group Device Group name: Traffic Group name:
If using TCP request queuing, you should know the queue length and timeout, as well as the connection limit for the node. Request queue length:
Timeout:
Node Connection limit:
Most clients connecting through BIG-IP to Citrix XenApp are coming over a:
LAN
WAN
Optional Modules (you must have provisioned modules before running the template)
Application Visibility Reporting (AVR)
If using AVR, we strongly recommend you first create an custom Analytics profile before running the template.
Analytics profile name:

DEPLOYMENT GUIDE
Citrix XenApp
5
Configuring the BIG-IP iApp for Citrix XenApp
Use the following guidance to help you configure the BIG-IP system for XenApp using the BIG-IP iApp template.
Getting Started with the iApp for Citrix XenApp
To begin the XenApp iApp Template, use the following procedure.
1. Log on to the BIG-IP system.
2. On the Main tab, expand iApp, and then click Application Services.
3. Click Create. The Template Selection page opens.
4. In the Name box, type a name. In our example, we use Citrix-XenApp-.
5. From the Template list, select f5.citrix_XenApp. The Citrix XenApp template opens.
Advanced options
If you select Advanced from the Template Selection list, you see Sync and Failover options for the application. This feature, new to v11, is a part of the Device Management configuration. This functionality extends the existing High Availability infrastructure and allows for clustering, granular control of configuration synchronization and granular control of failover. For more information on Device Management, see the Online Help or product documentation.
If you plan on using Device and Traffic Groups with the iApp for Citrix XenApp, you must have configured the Device Group and Traffic Group before beginning the iApp. For more information on Device Management, see the Online help or product documentation.
1. Configure Device and Traffic Groups? If you want to configure the Application for Device and Traffic groups, select Advanced from the Template Selection list.
a. Device Group If you select Advanced from the list, the Device Group and Traffic Group options appear. If necessary, uncheck the Device Group box and then select the appropriate Device Group from the list.
a. Traffic Group If necessary, uncheck the Traffic Group box and then select the appropriate Traffic Group from the list.
Analytics
This section of the template asks questions about Analytics. The Application Visibility Reporting (AVR) module allows you to view statistics specific to your XenApp implementation. AVR is available on all BIG-IP systems v11 and later, however you must have the AVR provisioned for this option to appear. Note that these are only for application visibility reporting, you can view object-level statistics from the BIG-IP without provisioning AVR.
If you plan on using AVR for analytics, we recommend creating a custom Analytics profile before beginning the template. To create a new profile, from the Main tab, select profiles and then click Analytics. Click New and then configure the profile as applicable for your configuration. See the online help or product documentation for specific instructions.
Important
L Tip If using AVR, create a new Analytics profile before beginning the iApp for more specific reporting
DEPLOYMENT GUIDE
Citrix XenApp
6
1. Enable Analytics Choose whether you want to enable AVR for Analytics.
2. Analytics Profile You must decide whether to use the default Analytics profile, or create a new one. As mentioned previously, we recommend creating a new profile to get the most flexibility and functionality out of AVR. If you choose to create a new profile after starting the template, you must exit the template, create the profile, and then restart the template.
To use the default Analytics profile, choose Use Default Profile from the list.
To choose a custom profile, leave the list set to Select a Custom Profile, and then from the Analytics profile list, select the custom profile you created.
Virtual Server Questions
The next section of the template asks questions about the BIG-IP virtual server. A virtual server is a traffic-management object on the BIG-IP system that is represented by an IP address and a service. Clients can send application traffic to a virtual server, which then directs the traffic according to your configuration instructions.
1. IP address for the XenApp Web Interface virtual server This is the address clients use to access the XenApp Web Interface (or a FQDN will resolve to this address). You need an available IP address to use here.
2. IP address for the XenApp XML Broker virtual server This is the address the Web Interface servers will use to communicate with the back-end XML Brokers through the BIG-IP LTM.
3. Routes or secure network address translation If the XenApp servers do not have a route back for clients through the BIG-IP, (i.e. if they do not use the BIG-IP as the default gateway), the BIG-IP uses Secure Network Address Translation (SNAT) Automap (one exception, see #4) to translate the client’s source address to an address configured on the BIG-IP. The servers then use this new source address as the destination address.
If the XenApp servers do have a route back to the clients through the BIG-IP, the BIG-IP does not translate the client’s source address.
We recommend choosing No from the list because it is secure, does not require you to configure routing manually and helps avoid problems like Direct Server Return.
If you do select Yes from the list, the following question about 64,000 connections does not appear.
4. More than 64,000 simultaneous connections If you do not expect more than 64,000 simultaneous connections, leave this answer set to No and continue with #5.
If you have a very large deployment and expect more than 64,000 connections at one time, the iApp creates a SNAT Pool instead of using SNAT Automap. With a SNAT Pool, you need one IP address for each 64,000 connections you expect. Select Yes from the list. A new row appears with an IP address field. In the Address box, type an IP address and then click Add. Repeat for any additional IP addresses.
5. NTLM If you have configured the XenApp servers to use NTLM authentication, select Yes from the list. If the XenApp servers do not use NTLM, leave the list set to No.

DEPLOYMENT GUIDE
Citrix XenApp
7
SSL Encryption questions
Before running the template you should have already imported a certificate and key onto the BIG-IP system. While the BIG-IP system does include a self-signed SSL certificate that can be used internally or for testing, we strongly recommend importing a certificate and key issued from a trusted Certificate Authority.
For information on SSL certificates on the BIG-IP system, see the online help or the Managing SSL Certificates for Local Traffic chapter in the Configuration Guide for BIG-IP Local Traffic Manager available at http://support.f5.com/kb/en-us.html.
To configure the BIG-IP to offload SSL from the Web Interface servers, select Yes from the list.
1. Certificate Select the certificate for you imported for the XenApp Web Interface servers from the certificate list.
2. Key Select the associated key from the list.
Web Interface Server Pool and Load Balancing questions
In this section, you add the Web Interface servers and configure the load balancing pool.
1. New Pool Choose Create New Pool unless you have already made a pool on the LTM for the Web Interface devices.
2. Load balancing method While you can choose any of the load balancing methods from the list, we recommend the default, Least Connections (member).
3. Address/Port Type the IP Address and Port for each Web Interface server. You can optionally add a Connection Limit. Click Add to include additional servers to the pool.
You should use the default port of 80 for both the Web Interface and XML Broker sections, unless you have changed them in the XenApp configuration. The template creates an additional pool for XML Broker Enumeration on port 137 behind the scenes, using the addresses you enter for the XML Brokers. After completing the template, you must modify the pool to include a UDP monitor. See Modifying the iApp configuration (required) on page 9.
4. TCP Request Queuing TCP request queuing provides the ability to queue connection requests that exceed the capacity of connections for a pool, as determined by the connection limit. Consequently, instead of dropping connection requests that exceed the capacity of a pool, TCP request queuing enables those connection requests to reside within a queue according to defined conditions until capacity becomes available. For more information on TCP Request Queuing, see the Preventing TCP Connection Requests From Being Dropped chapter in the BIG-IP Local Traffic Manager: Implementations guide, available on Ask F5. TCP Request Queuing is an advanced feature and should be used only if you understand how it will affect your deployment, including application behavior and BIG-IP performance. If you enable TCP Request Queuing, you must have a Connection Limit set on at least one of the nodes when configuring the Address/Port for the Client Access Server nodes.
Note
Critical
Important
DEPLOYMENT GUIDE
Citrix XenApp
8
If you want the BIG-IP to queue TCP requests, select Yes from the list. Additional questions appear.
a. Maximum number of TCP requests to be queued Type the maximum number of requests you want to queue. We do not recommend using 0, which means unlimited and is only constrained by available memory.
b. How long before requests expire Type a number of milliseconds for the TCP request timeout value.
XML Broker Server Pool and Load Balancing questions
In this section, you add the Web Interface servers and configure the load balancing pool.
1. New Pool Choose Create New Pool unless you have already made a pool on the LTM for the XML Broker devices.
2. Load balancing method While you can choose any of the load balancing methods from the list, we recommend the default, Least Connections (member).
3. Address/Port Type the IP Address and Port for each XML Broker server. You can optionally add a Connection Limit. Click Add to include additional servers to the pool.
You should use the default port of 80 for both the Web Interface and XML Broker sections, unless you have changed them in the XenApp configuration. The template creates an additional pool for XML Broker Enumeration on port 137 behind the scenes, using the addresses you enter for the XML Brokers. After completing the template, you must modify the pool to include a UDP monitor. See Modifying the iApp configuration (required) on page 9.
4. TCP Request Queuing TCP request queuing provides the ability to queue connection requests that exceed the capacity of connections for a pool, as determined by the connection limit. Consequently, instead of dropping connection requests that exceed the capacity of a pool, TCP request queuing enables those connection requests to reside within a queue according to defined conditions until capacity becomes available. For more information on TCP Request Queuing, see the Preventing TCP Connection Requests From Being Dropped chapter in the BIG-IP Local Traffic Manager: Implementations guide, available on Ask F5. TCP Request Queuing is an advanced feature and should be used only if you understand how it will affect your deployment, including application behavior and BIG-IP performance. If you enable TCP Request Queuing, you must have a Connection Limit set on at least one of the nodes when configuring the Address/Port for the Client Access Server nodes.
If you want the BIG-IP to queue TCP requests, select Yes from the list. Additional questions appear.
a. Maximum number of TCP requests to be queued Type the maximum number of requests you want to queue. We do not recommend using 0, which means unlimited and is only constrained by available memory.
b. How long before requests expire Type a number of milliseconds for the TCP request timeout value.
Note
Critical
Important
DEPLOYMENT GUIDE
Citrix XenApp
9
Health monitor questions
The health monitor created by the template is one of the most powerful features of this deployment. The health monitors check the nodes (IP address and port they are listening on) by logging in to XenApp with appropriate credentials and attempting to retrieve a specific application. If the check succeeds, the LTM marks the node UP and forwards the traffic. If not, it marks it down so no new requests are sent to that device.
We recommend you create a XenApp user account specifically for use in this monitor. This user could be restricted to only the application specified in the monitor.
You must enter the following information very carefully. The template creates a complex monitor Send String that automatically calculates values such as Content Length. It is very difficult to manually change the monitor after the template has created it.
In this section, you need the following:
1. DNS Name This is the Fully Qualified DNS name users employ to access XenApp.
2. URI This is the URI or path representing the XenApp deployment. The default Citrix URI is /Citrix/XenApp.
3. User Name The user name that has access to the application specified below. Again, we recommend creating a user account specifically for the monitor.
4. Password The password associated with the user name.
5. Domain The domain for the user account above. The default is CITRIX.
6. Application The name of an application the monitor attempts to retrieve.
Protocol Optimization Questions
In this section, you configure protocol optimizations.
1. WAN or LAN Specify whether most clients are connecting over a WAN or LAN. Because most Citrix clients are likely to be coming over the WAN, we recommend selecting WAN (the default).
Finished
Review the answers to your questions. When you are satisfied, click the Finished button. The BIG-IP system creates the relevant objects.
Modifying the iApp configuration (required)
After completing the iApp template, you make a modification to the configuration produced by the template. Currently, the iApp template assigns a TCP health monitor to the XML Broker Enumeration pool; this should be a UDP monitor. You must modify the iApp configuration to assign a UDP health monitor to the Enumeration pool, and remove the TCP monitor. Future versions of the iApp will use the proper monitor.
Tip
Critical

DEPLOYMENT GUIDE
Citrix XenApp
10
Disabling the Strict Updates feature
Before modifying the configuration produced by the iApp, you must turn off the Strict Updates feature. By turning off Strict Updates, if you re-enter the iApp template and modify the configuration within the iApp, you will have to make all of the following changes again manually. A future version of the template will contain these modifications.
To turn off Strict Updates
1. On the Main tab, expand iApp and then click Application Services.
2. Click the name of your Citrix XenApp Application service from the list.
3. From the Application Service list, select Advanced.
4. In the Strict Updates row, clear the check from the box to disable Strict Updates.
5. Click the Update button.
6. You must restart bigd after making changes that require disabling Strict Updates. See Restarting bigd after making changes that require disabling Strict Updates on page 11.
Creating a new UDP monitor
While you can use the built-in UDP health monitor, we recommend creating a new monitor based on the UDP parent.
To create the UDP monitor
1. On the Main tab, expand Local Traffic, and then click Monitors.
2. Click the Create button.
3. In the Name box, give the monitor a unique name. In our example, we use xenapp-UDP-monitor.
4. From the Type list, select UDP.
5. Modify any of the settings as applicable for your configuration. We recommend leaving all the settings at their defaults.
6. Click Finished.
Modifying the Enumeration pool to use the new monitor
The final task is to modify the XML Broker Enumeration pool created by the iApp to use the monitor you just created.
To modify the pool to use the new monitor
1. On the Main tab, expand Local Traffic and then click Pools.
2. From the Pool list, click the name of the Pool created by the iApp for XML Broker Enumeration. The name of the pool is preceded by the name you gave the iApp, followed by _xmlb_server_enum_pool. For example, my-citrix-xenapp_xmlb_server_enum_pool.
3. In the Health Monitor section, from the Active box, select the name of the Enumeration monitor and then click the Remove (>>) button to disable it.
4. From the Available box, select the name of the new monitor you created, and then click the Add (<<) button to move it to the Active box.
5. Click the Update button.
DEPLOYMENT GUIDE
Citrix XenApp
11
Restarting bigd after making changes that require disabling Strict Updates
After performing any modification that requires disabling Strict Updates feature on the Application Service, you must restart the bigd daemon from the BIG-IP command line. We recommend restarting bigd during a maintenance window or other scheduled downtime.
To restart bigd
1. From the command line, log into the BIG-IP system.
2. From the prompt, run the following command:
bigstart restart bigd
3. Exit the command line interface.
This completes the modifications.
Re-enabling Strict Updates
The final task is to enable the Strict Updates feature. While this is not required, it ensures that the iApp configuration cannot be modified manually without reconfiguring the iApp.
Remember, if you re-enter the iApp in the future to make changes, you must repeat the procedures in this section, as these changes will be overwritten.
To turn on Strict Updates
1. On the Main tab, expand iApp and then click Application Services.
2. Click the name of your Citrix XenApp Application service from the list.
3. From the Application Service list, select Advanced.
4. In the Strict Updates row, check the box to enable Strict Updates.
5. Click the Update button.
This completes the modifications to the iApp configuration.
Important

DEPLOYMENT GUIDE
Citrix XenApp
12
Modifying the Citrix XenApp Web Interface configurationThe next task is to make important modifications to the Citrix servers.
Modifying the Web Interface servers to point at the BIG-IP virtual server
You must modify the Web Interface server configuration so the Web Interface devices send traffic to the BIG-IP XML Broker virtual server and not directly to the XML Brokers. You must also make sure “Use the server list for load balancing” is unchecked, as shown below.
To modify the Web Interface servers to point at the XML Broker virtual server
1. From a Web Interface server, open the Access Management Console.
2. In the Navigation pane, expand Citrix Resources, Configuration Tools, Web Interface and then your site name.
3. From the middle column, select Manage server farms.
4. From the list, select the appropriate farm, and then click Edit.
5. In the Server box, select each entry and then click the Remove button.
6. Click the Add button.
7. Type the IP address of the XML Broker virtual server (from step 2 on page 6).
8. Clear the check from the Use the server list for load balancing box.
9. Click the OK button. Repeat this procedure for any/all additional Web Interface servers.
Configuring Citrix to retrieve the correct client IP address
Citrix XenApp needs to be configured to look for the client IP address in the X-Forwarded-For HTTP header. Otherwise, every connection will appear to be coming from the BIG-IP LTM and not from its actual location. This can only be done by editing Java files.
To reconfigure the Citrix to Read X-Forwarded-For headers for the Client IP address
1. Open the file \Inetpub\wwwroot\Citrix\XenApp\app_code\PagesJava\com\citrix\wi\
pageutils\Include.java on the Web Interface server, and find the function named getClientAddress. In version 5.0, it looks like the following:
2. Edit this function so it looks like the following:
3. Repeat this change for each Web Interface server. Make sure to restart each Web Interface server for the changes to take effect.
public static String getClientAddress(WIContext wiContext) {
String ageClientAddress = AGEUtilities.getAGEClientIPAddress(wiContext);
return (ageClientAddress != null
? ageClientAddress
: wiContext.getWebAbstraction().getUserHostAddress());
}
public static String getClientAddress(WIContext wiContext) {
String ageClientAddress = AGEUtilities.getAGEClientIPAddress(wiContext);
String userIPAddress = wiContext.getWebAbstraction().getRequestHeader(“X-FORWARDED-FOR”);
if (userIPAddress == null) {
userIPAddress = wiContext.getWebAbstraction().getUserHostAddress();
}
return (ageClientAddress != null ? ageClientAddress : userIPAddress);
}
DEPLOYMENT GUIDE
Citrix XenApp
13
Next steps
After completing the Application Template, the BIG-IP system presents a list of all the configuration objects created to support XenApp. Once the objects have been created, you are ready to use the new deployment.
Modifying DNS settings to use the BIG-IP virtual server address
Before sending traffic to the BIG-IP system, your DNS administrator may need to modify any DNS entries for the XenApp implementation to point to the BIG-IP system’s Web Interface virtual server address.
Modifying the iApp configuration
The iApp application service you just created can be quickly and easily modified if you find it necessary to make changes to the configuration. The Strict Updates feature of the iApp prevents users from manually modifying the iApp configuration (Strict Updates can be disabled, but use extreme caution). iApp allows you to re-enter the template, make changes, and then update the template. The modifications are automatically made to any of the associated objects.
To modify the configuration
1. On the Main tab, expand iApp and then click Application Services.
2. Click the name of your XenApp Application service from the list.
3. On the Menu bar, click Reconfigure.
4. Make the necessary modifications to the template.
5. Click the Finished button.
Viewing statistics
You can easily view a number of different statistics on the BIG-IP system related to the XenApp configuration objects created by the iApp template. You can get statistics specific to the Application Service if you have provisioned AVR. Otherwise, you can always get object-level statistics.
AVR statisticsIf you have provisioned AVR, you can get application-level statistics for your XenApp application service.
To view AVR statistics
1. On the Main tab, expand iApp and then click Application Services.
2. From the Application Service List, click the Citrix XenApp service you just created.
3. On the Menu bar, click Analytics.
4. Use the tabs and the Menu bar to view different statistics for your XenApp iApp.
Object-level statisticsIf you haven’t provisioned AVR, or want to view object-level statistics, use the following procedure.
DEPLOYMENT GUIDE
Citrix XenApp
14
To view object-level statics
1. On the Main tab, expand Overview, and then click Statistics.
2. From the Statistics Type menu, you can select Virtual Servers to see statistics related to the virtual servers.
3. You can also choose Pools or Nodes to get a closer look at the traffic.
4. To see Networking statistics in a graphical format, click Dashboard.
For more information on viewing statistics on the BIG-IP system, see the online help or product documentation.

DEPLOYMENT GUIDE
Citrix XenApp
15
Troubleshooting
This section contains troubleshooting steps in case you are having issues with the configuration produced by the template.
h Users can’t connect to the Web Interface servers Make sure users are trying to connect using the BIG-IP virtual server address (or a FQDN that resolves to the virtual server address).
h Users can connect to the Web Interface servers, but there are connectivity problems to and from the XML Broker servers. This type of problem is usually a routing issue. If you chose Yes when asked if the XenApp servers have a route back to application clients via this BIG-IP system, you must manually configure the proper routes on the XenApp farm servers. If you mistakenly answered Yes to this question, you can re-run the template, leaving the route question at No (the default). Alternatively, you can open each virtual server created by the template, and then from the SNAT Pool list, select Automap.
h Users initially see an IIS page or a page other than the Citrix log on page This is typically a web server configuration issue. Make sure the proper Citrix URI is the default web site on your web server. Consult your web server documentation for more information. This may also be the case if all of your Web Interface servers are being marked DOWN as a result of the BIG-IP LTM health check. Check to make sure that at least one node is available. You can also use the procedure in the following section to temporarily disable the monitor itself.
h Citrix XML Broker servers are being incorrectly marked DOWN by the BIG-IP LTM If your XML Broker servers are being incorrectly marked down, you may have made an error in the template when answering the health monitor questions. The health monitor is very precise, calculating the Content Length header based on your responses in the template. One common error is that the domain for the specified user account was entered as a fully qualified domain name (FQDN). It should just be the domain name. For example, CITRIX, not citrix.example.com. If you need to check the health monitor configuration, the safest and easiest way is to re-enter the iApp template to make any necessary changes. To verify or make changes to the health monitor, use the procedure Modifying the iApp configuration on page 13 to re-enter the iApp template.
h XML Broker Enumeration pool members are being incorrectly marked DOWN after running the iApp If your XML Broker Enumeration pool members are being incorrectly marked down, make sure you followed the procedures in Modifying the iApp configuration (required) on page 9.
DEPLOYMENT GUIDE
Citrix XenApp
16
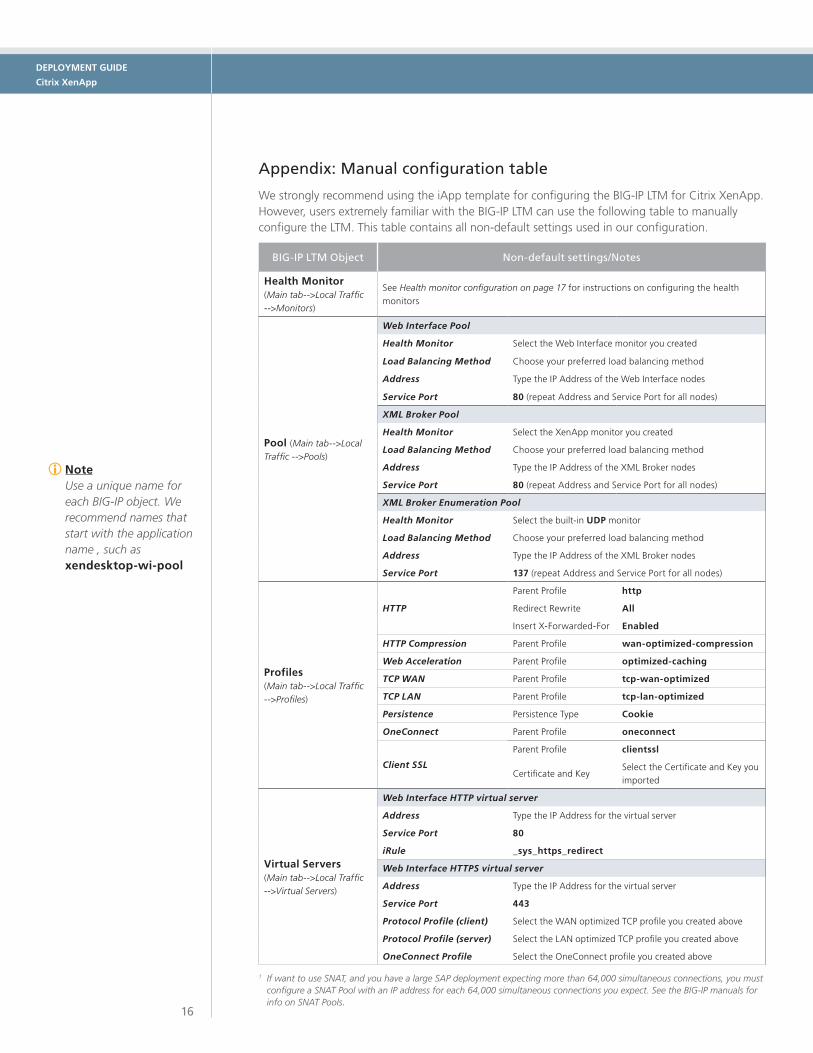
Appendix: Manual configuration table
We strongly recommend using the iApp template for configuring the BIG-IP LTM for Citrix XenApp. However, users extremely familiar with the BIG-IP LTM can use the following table to manually configure the LTM. This table contains all non-default settings used in our configuration.
BIG-IP LTM Object Non-default settings/Notes
Health Monitor (Main tab-->Local Traffic -->Monitors)
See Health monitor configuration on page 17 for instructions on configuring the health monitors
Pool (Main tab-->Local Traffic -->Pools)
Web Interface Pool
Health Monitor Select the Web Interface monitor you created
Load Balancing Method Choose your preferred load balancing method
Address Type the IP Address of the Web Interface nodes
Service Port 80 (repeat Address and Service Port for all nodes)
XML Broker Pool
Health Monitor Select the XenApp monitor you created
Load Balancing Method Choose your preferred load balancing method
Address Type the IP Address of the XML Broker nodes
Service Port 80 (repeat Address and Service Port for all nodes)
XML Broker Enumeration Pool
Health Monitor Select the built-in UDP monitor
Load Balancing Method Choose your preferred load balancing method
Address Type the IP Address of the XML Broker nodes
Service Port 137 (repeat Address and Service Port for all nodes)
Profiles (Main tab-->Local Traffic -->Profiles)
HTTP
Parent Profile http
Redirect Rewrite All
Insert X-Forwarded-For Enabled
HTTP Compression Parent Profile wan-optimized-compression
Web Acceleration Parent Profile optimized-caching
TCP WAN Parent Profile tcp-wan-optimized
TCP LAN Parent Profile tcp-lan-optimized
Persistence Persistence Type Cookie
OneConnect Parent Profile oneconnect
Client SSL
Parent Profile clientssl
Certificate and KeySelect the Certificate and Key you imported
Virtual Servers (Main tab-->Local Traffic -->Virtual Servers)
Web Interface HTTP virtual server
Address Type the IP Address for the virtual server
Service Port 80
iRule _sys_https_redirect
Web Interface HTTPS virtual server
Address Type the IP Address for the virtual server
Service Port 443
Protocol Profile (client) Select the WAN optimized TCP profile you created above
Protocol Profile (server) Select the LAN optimized TCP profile you created above
OneConnect Profile Select the OneConnect profile you created above
L Note Use a unique name for each BIG-IP object. We recommend names that start with the application name , such as xendesktop-wi-pool
1 If want to use SNAT, and you have a large SAP deployment expecting more than 64,000 simultaneous connections, you must configure a SNAT Pool with an IP address for each 64,000 simultaneous connections you expect. See the BIG-IP manuals for info on SNAT Pools.
DEPLOYMENT GUIDE
Citrix XenApp
17
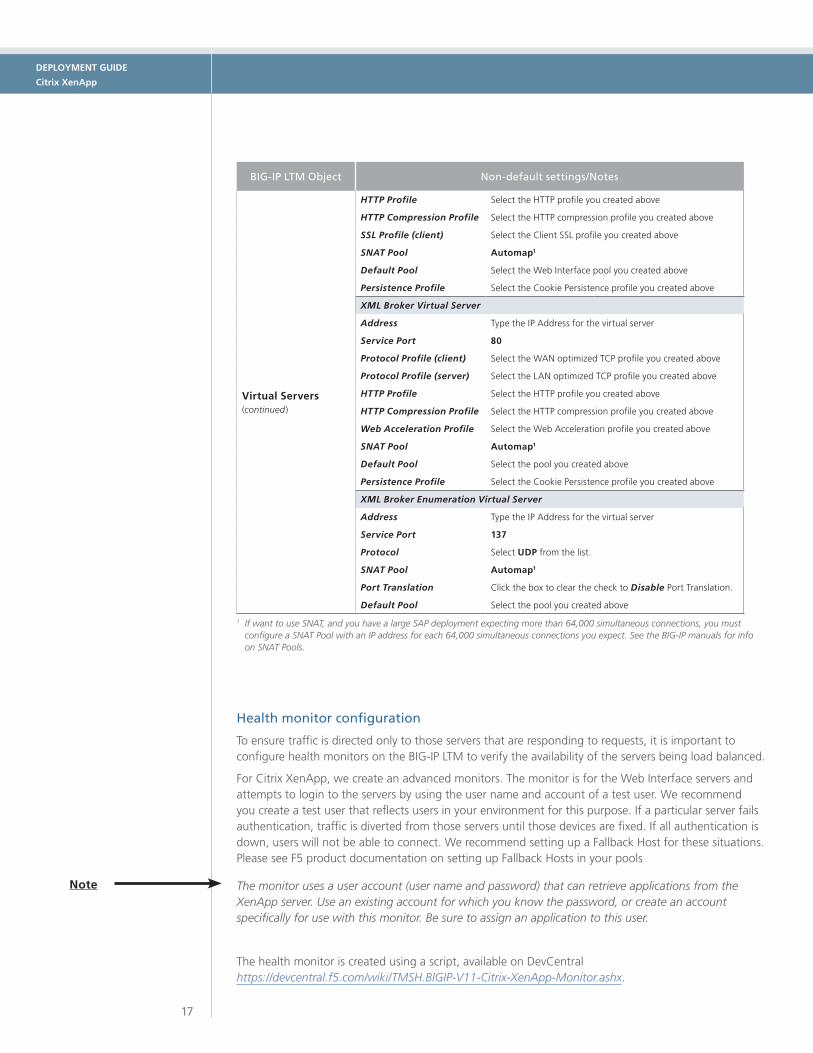
BIG-IP LTM Object Non-default settings/Notes
Virtual Servers (continued)
HTTP Profile Select the HTTP profile you created above
HTTP Compression Profile Select the HTTP compression profile you created above
SSL Profile (client) Select the Client SSL profile you created above
SNAT Pool Automap1
Default Pool Select the Web Interface pool you created above
Persistence Profile Select the Cookie Persistence profile you created above
XML Broker Virtual Server
Address Type the IP Address for the virtual server
Service Port 80
Protocol Profile (client) Select the WAN optimized TCP profile you created above
Protocol Profile (server) Select the LAN optimized TCP profile you created above
HTTP Profile Select the HTTP profile you created above
HTTP Compression Profile Select the HTTP compression profile you created above
Web Acceleration Profile Select the Web Acceleration profile you created above
SNAT Pool Automap1
Default Pool Select the pool you created above
Persistence Profile Select the Cookie Persistence profile you created above
XML Broker Enumeration Virtual Server
Address Type the IP Address for the virtual server
Service Port 137
Protocol Select UDP from the list.
SNAT Pool Automap1
Port Translation Click the box to clear the check to Disable Port Translation.
Default Pool Select the pool you created above
1 If want to use SNAT, and you have a large SAP deployment expecting more than 64,000 simultaneous connections, you must configure a SNAT Pool with an IP address for each 64,000 simultaneous connections you expect. See the BIG-IP manuals for info on SNAT Pools.
Health monitor configuration
To ensure traffic is directed only to those servers that are responding to requests, it is important to configure health monitors on the BIG-IP LTM to verify the availability of the servers being load balanced.
For Citrix XenApp, we create an advanced monitors. The monitor is for the Web Interface servers and attempts to login to the servers by using the user name and account of a test user. We recommend you create a test user that reflects users in your environment for this purpose. If a particular server fails authentication, traffic is diverted from those servers until those devices are fixed. If all authentication is down, users will not be able to connect. We recommend setting up a Fallback Host for these situations. Please see F5 product documentation on setting up Fallback Hosts in your pools
The monitor uses a user account (user name and password) that can retrieve applications from the XenApp server. Use an existing account for which you know the password, or create an account specifically for use with this monitor. Be sure to assign an application to this user.
The health monitor is created using a script, available on DevCentral https://devcentral.f5.com/wiki/TMSH.BIGIP-V11-Citrix-XenApp-Monitor.ashx.
Note
DEPLOYMENT GUIDE
Citrix XenApp
18
Download the script to a location accessible by the BIG-IP device. Optionally, you can cut and paste the script directly into the TMSH editor on the BIG-IP device. However, cutting and pasting is error-prone and therefore we provide instructions here on how to copy the file to the BIG-IP device using secure-copy (SCP).
To create the Web Interface Monitor using the script, you must first copy the script into the BIG-IP device. The following procedures show you how to copy the file both on a Windows platform using WinSCP, and on Linux, UNIX or MacOS system using SCP.
To import the script on a Windows platform using WinSCP
1. Download the script found on the following link to a computer that has access to the BIG-IP device: https://devcentral.f5.com/wiki/TMSH.BIGIP-V11-Citrix-XenApp-Monitor.ashx
2. Open a Windows compatible SCP client. We recommend WinSCP. It is available as a free download from http://winscp.net/. The login box opens.
3. In the Host name box, type the host name or IP address of your BIG-IP system.
4. In the User name and Password boxes, type the appropriate administrator log on information.
5. Click Login. The WinSCP client opens.
6. In the left pane, navigate to the location where you saved the script in step 1.
7. In the right pane, navigate to /shared/tmp/ (from the right pane drop-down list, select root, double-click shared, and then double-click tmp).
8. In the left pane, select the script and drag it to the right pane.
9. You can now safely close WinSCP.
To import the script using Linux/Unix/MacOS systems
1. Download the script: https://devcentral.f5.com/wiki/TMSH.BIGIP-V11-Citrix-XenApp-Monitor.ashx.
2. Open a terminal session.
3. Use your built in secure copy program from the command line to copy the file. Use the following syntax:
scp <source file> <username>@<hostname>:<Destination Directory and filename>
In our example, the command is:
scp create-citrix-monitor.tcl [email protected]:/shared/tmp/create-citrix-monitor
The next task is to import the script you just copied to create the monitor. The following tasks are performed in the BIG-IP Advanced Shell (see the BIG-IP manual on how to configure users for Advanced shell access).
To run the monitor creation script
1. On the BIG-IP system, start a console session.
2. Type a user name and password, and then press Enter.
DEPLOYMENT GUIDE
Citrix XenApp
19
3. Change to the directory containing the creation script. In our example, we type:
cd /shared/tmp/
If you copied the script to a different destination, Use the appropriate directory.
4. Change the permissions on the script to allow for execute permission using the following command:
chmod 755 create-citrix-monitor
You have now successfully imported the script. The next step is to run the script and provide the parameters to create the Citrix XenApp monitor for your environment.
To run the monitor script
1. At the system prompt, type tmsh and then press Enter. This opens the Traffic Management shell.
2. Typing cli script to enter CLI Script mode. The prompt changes to
root@bigip-hostname(Active)(tmos.cli.script)#
3. From the command prompt, use the following command syntax, where file path is the path to the script:
run file <file path>/<filename>
In our example, we type
run file /shared/tmp/create-citrix-monitor
The script starts, you are prompted for four arguments. You are automatically switched to interactive mode.
4. At the What is the User Name prompt, type the user name of the XenApp user.
5. At the What is the Password prompt, type the associated password.
6. At the What is the App name prompt, type the name of an available application for the XenApp user. In our example, we use Notepad.
7. At What is the domain name prompt, type the Windows domain used for authentication of users. In our example, we use corpdomain. Do not use the fully-qualified-domain-name from DNS here; this is referring to Windows Domain only.
The script creates the monitor. You can view the newly created monitor from the web-based Configuration utility from the Main Tab, by expanding Local Traffic and then clicking Monitors. The name of the monitors starts with the App name you configured in step 6.

DEPLOYMENT GUIDE Citrix XenApp
20
©2012 F5 Networks, Inc. All rights reserved. F5, F5 Networks, the F5 logo, and IT agility. Your way., are trademarks of F5 Networks, Inc. in the U.S. and in certain other countries. Other F5 trademarks are identified at f5.com. Any other products, services, or company names referenced herein may be trademarks of their respective owners with no endorsement or affiliation, express or implied, claimed by F5.
F5 Networks, Inc.Corporate Headquarters
F5 Networks, Inc. 401 Elliott Avenue West, Seattle, WA 98119 888-882-4447 www.f5.com
F5 NetworksAsia-Pacific
F5 Networks Ltd.Europe/Middle-East/Africa
F5 NetworksJapan K.K.
Document Revision History
Version Description Date
1.0 New Version N/A
1.1
- Added instructions for modifying the iApp configuration to add a UDP monitor for the XML Broker Enumeration pool, and remove the existing TCP monitor.
- Added the XML Broker Enumeration configuration to the manual configuration tables.
- Added support for BIG-IP versions 11.0.1 and 11.1.
03-27-2012
1.2
- Corrected links to the monitor script in the manual configuration section.
- Added Restarting bigd after making changes that require disabling Strict Updates on page 11.
07-23-2012