Deploying Red Hat OpenShift Container Platform 3 on … 2.2. VMware vCenter and ... Network...
87
Deploying Red Hat OpenShift Container Platform 3 on VMware vCenter 6 Davis Phillips, Christoph Görn Version 1.1.0, 2017-Jan-05
Transcript of Deploying Red Hat OpenShift Container Platform 3 on … 2.2. VMware vCenter and ... Network...
Deploying Red Hat OpenShift ContainerPlatform 3 on VMware vCenter 6
Davis Phillips, Christoph Görn
Version 1.1.0, 2017-Jan-05

Table of ContentsComments and Feedback . . . . . . . . . . . . . . . . . . . . . . . . . . . . . . . . . . . . . . . . . . . . . . . . . . . . . . . . . . . . . . . . . . . . . . . 2
1. Executive Summary. . . . . . . . . . . . . . . . . . . . . . . . . . . . . . . . . . . . . . . . . . . . . . . . . . . . . . . . . . . . . . . . . . . . . . . . . . 3
2. Components and Configuration . . . . . . . . . . . . . . . . . . . . . . . . . . . . . . . . . . . . . . . . . . . . . . . . . . . . . . . . . . . . . . . 4
2.1. Reference Implementation Hardware Configuration . . . . . . . . . . . . . . . . . . . . . . . . . . . . . . . . . . . . . . . . 6
2.2. VMware vCenter and vSphere Details . . . . . . . . . . . . . . . . . . . . . . . . . . . . . . . . . . . . . . . . . . . . . . . . . . . . . . 7
2.3. Virtual Machine Instance Details . . . . . . . . . . . . . . . . . . . . . . . . . . . . . . . . . . . . . . . . . . . . . . . . . . . . . . . . . . 7
2.4. HAproxy Load Balancer Details . . . . . . . . . . . . . . . . . . . . . . . . . . . . . . . . . . . . . . . . . . . . . . . . . . . . . . . . . . . 8
2.5. Software Version Details . . . . . . . . . . . . . . . . . . . . . . . . . . . . . . . . . . . . . . . . . . . . . . . . . . . . . . . . . . . . . . . . . . 9
2.6. Required Channels . . . . . . . . . . . . . . . . . . . . . . . . . . . . . . . . . . . . . . . . . . . . . . . . . . . . . . . . . . . . . . . . . . . . . . 10
2.7. Tooling Prerequisites . . . . . . . . . . . . . . . . . . . . . . . . . . . . . . . . . . . . . . . . . . . . . . . . . . . . . . . . . . . . . . . . . . . . 11
2.7.1. Git Repository . . . . . . . . . . . . . . . . . . . . . . . . . . . . . . . . . . . . . . . . . . . . . . . . . . . . . . . . . . . . . . . . . . . . . . 11
2.7.2. Ansible by Red Hat Setup . . . . . . . . . . . . . . . . . . . . . . . . . . . . . . . . . . . . . . . . . . . . . . . . . . . . . . . . . . . . 11
2.8. Network Components . . . . . . . . . . . . . . . . . . . . . . . . . . . . . . . . . . . . . . . . . . . . . . . . . . . . . . . . . . . . . . . . . . . 15
2.8.1. DNS (Domain Name Server) Configuration . . . . . . . . . . . . . . . . . . . . . . . . . . . . . . . . . . . . . . . . . . . . 15
2.8.2. Hosted Zone Setup . . . . . . . . . . . . . . . . . . . . . . . . . . . . . . . . . . . . . . . . . . . . . . . . . . . . . . . . . . . . . . . . . . 16
2.8.3. Authentication . . . . . . . . . . . . . . . . . . . . . . . . . . . . . . . . . . . . . . . . . . . . . . . . . . . . . . . . . . . . . . . . . . . . . . 17
2.8.4. NFS (Network File System) Server . . . . . . . . . . . . . . . . . . . . . . . . . . . . . . . . . . . . . . . . . . . . . . . . . . . . 18
2.8.5. Load Balancer . . . . . . . . . . . . . . . . . . . . . . . . . . . . . . . . . . . . . . . . . . . . . . . . . . . . . . . . . . . . . . . . . . . . . . 18
2.9. VMware vCenter Prerequisites . . . . . . . . . . . . . . . . . . . . . . . . . . . . . . . . . . . . . . . . . . . . . . . . . . . . . . . . . . . 20
2.9.1. Networking. . . . . . . . . . . . . . . . . . . . . . . . . . . . . . . . . . . . . . . . . . . . . . . . . . . . . . . . . . . . . . . . . . . . . . . . . 20
2.9.2. vCenter Shared Storage . . . . . . . . . . . . . . . . . . . . . . . . . . . . . . . . . . . . . . . . . . . . . . . . . . . . . . . . . . . . . . 20
2.9.3. Resource Pool, Cluster Name and Folder Location . . . . . . . . . . . . . . . . . . . . . . . . . . . . . . . . . . . . . . 21
2.9.4. VMware Template . . . . . . . . . . . . . . . . . . . . . . . . . . . . . . . . . . . . . . . . . . . . . . . . . . . . . . . . . . . . . . . . . . 21
2.9.5. Preparation Script . . . . . . . . . . . . . . . . . . . . . . . . . . . . . . . . . . . . . . . . . . . . . . . . . . . . . . . . . . . . . . . . . . 21
2.10. Dynamic Inventory . . . . . . . . . . . . . . . . . . . . . . . . . . . . . . . . . . . . . . . . . . . . . . . . . . . . . . . . . . . . . . . . . . . . 23
2.11. Nodes. . . . . . . . . . . . . . . . . . . . . . . . . . . . . . . . . . . . . . . . . . . . . . . . . . . . . . . . . . . . . . . . . . . . . . . . . . . . . . . . . 24
2.11.1. Master nodes . . . . . . . . . . . . . . . . . . . . . . . . . . . . . . . . . . . . . . . . . . . . . . . . . . . . . . . . . . . . . . . . . . . . . . 25
2.11.2. Infrastructure nodes . . . . . . . . . . . . . . . . . . . . . . . . . . . . . . . . . . . . . . . . . . . . . . . . . . . . . . . . . . . . . . . 25
2.11.3. Application nodes . . . . . . . . . . . . . . . . . . . . . . . . . . . . . . . . . . . . . . . . . . . . . . . . . . . . . . . . . . . . . . . . . . 25
2.11.4. Node labels . . . . . . . . . . . . . . . . . . . . . . . . . . . . . . . . . . . . . . . . . . . . . . . . . . . . . . . . . . . . . . . . . . . . . . . . 25
2.12. Red Hat OpenShift pods . . . . . . . . . . . . . . . . . . . . . . . . . . . . . . . . . . . . . . . . . . . . . . . . . . . . . . . . . . . . . . . . 26
2.13. Router . . . . . . . . . . . . . . . . . . . . . . . . . . . . . . . . . . . . . . . . . . . . . . . . . . . . . . . . . . . . . . . . . . . . . . . . . . . . . . . . 27
2.14. Registry . . . . . . . . . . . . . . . . . . . . . . . . . . . . . . . . . . . . . . . . . . . . . . . . . . . . . . . . . . . . . . . . . . . . . . . . . . . . . . . 28
3. Provisioning the Infrastructure . . . . . . . . . . . . . . . . . . . . . . . . . . . . . . . . . . . . . . . . . . . . . . . . . . . . . . . . . . . . . . 29
3.1. Provisioning the Infrastructure with Ansible by Red Hat . . . . . . . . . . . . . . . . . . . . . . . . . . . . . . . . . . . 29
3.1.1. Authentication Prerequisite . . . . . . . . . . . . . . . . . . . . . . . . . . . . . . . . . . . . . . . . . . . . . . . . . . . . . . . . . . 29
3.2. Red Hat OpenShift Install Variable module: ocp-on-vmware.py . . . . . . . . . . . . . . . . . . . . . . . . . . . . . 30
3.2.1. Sample Red Hat OpenShift Install Variables . . . . . . . . . . . . . . . . . . . . . . . . . . . . . . . . . . . . . . . . . . . 32
3.3. Red Hat OpenShift inventory module: ocp-on-vmware.py . . . . . . . . . . . . . . . . . . . . . . . . . . . . . . . . . . 34
3.3.1. Sample Red Hat OpenShift Inventory Variables . . . . . . . . . . . . . . . . . . . . . . . . . . . . . . . . . . . . . . . . 36
3.3.2. SSH (Secure Shell) Prerequisite . . . . . . . . . . . . . . . . . . . . . . . . . . . . . . . . . . . . . . . . . . . . . . . . . . . . . . . 39
3.3.3. VMware Configuration Variables . . . . . . . . . . . . . . . . . . . . . . . . . . . . . . . . . . . . . . . . . . . . . . . . . . . . . 40
3.3.4. Deploying the Environment . . . . . . . . . . . . . . . . . . . . . . . . . . . . . . . . . . . . . . . . . . . . . . . . . . . . . . . . . . 41
3.4. Post Provisioning Results . . . . . . . . . . . . . . . . . . . . . . . . . . . . . . . . . . . . . . . . . . . . . . . . . . . . . . . . . . . . . . . . 47
4. Operational Management . . . . . . . . . . . . . . . . . . . . . . . . . . . . . . . . . . . . . . . . . . . . . . . . . . . . . . . . . . . . . . . . . . . 49
4.1. Validate the Deployment . . . . . . . . . . . . . . . . . . . . . . . . . . . . . . . . . . . . . . . . . . . . . . . . . . . . . . . . . . . . . . . . 49
4.2. Gathering hostnames . . . . . . . . . . . . . . . . . . . . . . . . . . . . . . . . . . . . . . . . . . . . . . . . . . . . . . . . . . . . . . . . . . . 50
4.3. Running Diagnostics . . . . . . . . . . . . . . . . . . . . . . . . . . . . . . . . . . . . . . . . . . . . . . . . . . . . . . . . . . . . . . . . . . . . 50
4.4. Checking the Health of etcd . . . . . . . . . . . . . . . . . . . . . . . . . . . . . . . . . . . . . . . . . . . . . . . . . . . . . . . . . . . . . . 53
4.5. Default Node Selector . . . . . . . . . . . . . . . . . . . . . . . . . . . . . . . . . . . . . . . . . . . . . . . . . . . . . . . . . . . . . . . . . . . 53
4.6. Management of Maximum Pod Size . . . . . . . . . . . . . . . . . . . . . . . . . . . . . . . . . . . . . . . . . . . . . . . . . . . . . . 54
4.7. Yum Repositories . . . . . . . . . . . . . . . . . . . . . . . . . . . . . . . . . . . . . . . . . . . . . . . . . . . . . . . . . . . . . . . . . . . . . . . 55
4.8. Console Access. . . . . . . . . . . . . . . . . . . . . . . . . . . . . . . . . . . . . . . . . . . . . . . . . . . . . . . . . . . . . . . . . . . . . . . . . . 56
4.8.1. Log into GUI (Graphical User Interface) console and deploy an application . . . . . . . . . . . . . . . 56
4.8.2. Log into the CLI (Command-Line Interface) and Deploy an Application . . . . . . . . . . . . . . . . . . 56
4.9. Explore the Environment . . . . . . . . . . . . . . . . . . . . . . . . . . . . . . . . . . . . . . . . . . . . . . . . . . . . . . . . . . . . . . . . 59
4.9.1. List Nodes and Set Permissions . . . . . . . . . . . . . . . . . . . . . . . . . . . . . . . . . . . . . . . . . . . . . . . . . . . . . . . 59
4.9.2. List Router and Registry . . . . . . . . . . . . . . . . . . . . . . . . . . . . . . . . . . . . . . . . . . . . . . . . . . . . . . . . . . . . . 60
4.9.3. Explore the Docker Registry. . . . . . . . . . . . . . . . . . . . . . . . . . . . . . . . . . . . . . . . . . . . . . . . . . . . . . . . . . 62
4.9.4. Explore Docker Storage . . . . . . . . . . . . . . . . . . . . . . . . . . . . . . . . . . . . . . . . . . . . . . . . . . . . . . . . . . . . . . 65
4.9.5. Creating a Project for Persistent Volumes . . . . . . . . . . . . . . . . . . . . . . . . . . . . . . . . . . . . . . . . . . . . . 67
4.9.6. Creating a Persistent Volume . . . . . . . . . . . . . . . . . . . . . . . . . . . . . . . . . . . . . . . . . . . . . . . . . . . . . . . . . 67
4.9.7. Creating a Persistent Volumes Claim . . . . . . . . . . . . . . . . . . . . . . . . . . . . . . . . . . . . . . . . . . . . . . . . . . 68
4.10. Testing Failure . . . . . . . . . . . . . . . . . . . . . . . . . . . . . . . . . . . . . . . . . . . . . . . . . . . . . . . . . . . . . . . . . . . . . . . . 70
4.10.1. Generate a Master Outage . . . . . . . . . . . . . . . . . . . . . . . . . . . . . . . . . . . . . . . . . . . . . . . . . . . . . . . . . . 70
4.10.2. Observe the Behavior of etcd with a Failed Master Node . . . . . . . . . . . . . . . . . . . . . . . . . . . . . . 70
4.10.3. Generate an Infrastruture Node outage . . . . . . . . . . . . . . . . . . . . . . . . . . . . . . . . . . . . . . . . . . . . . . 70
4.11. Updating the OpenShift Deployment. . . . . . . . . . . . . . . . . . . . . . . . . . . . . . . . . . . . . . . . . . . . . . . . . . . . . 75
4.11.1. Performing the Upgrade . . . . . . . . . . . . . . . . . . . . . . . . . . . . . . . . . . . . . . . . . . . . . . . . . . . . . . . . . . . . 75
4.11.2. Upgrading and Restarting the OpenShift Environment (Opitonal) . . . . . . . . . . . . . . . . . . . . . . 75
4.11.3. Specifying the OpenShift Version when Upgrading . . . . . . . . . . . . . . . . . . . . . . . . . . . . . . . . . . . . 75
5. Conclusion . . . . . . . . . . . . . . . . . . . . . . . . . . . . . . . . . . . . . . . . . . . . . . . . . . . . . . . . . . . . . . . . . . . . . . . . . . . . . . . . . 76
Appendix A: Revision History . . . . . . . . . . . . . . . . . . . . . . . . . . . . . . . . . . . . . . . . . . . . . . . . . . . . . . . . . . . . . . . . . . 77
Appendix B: Contributors. . . . . . . . . . . . . . . . . . . . . . . . . . . . . . . . . . . . . . . . . . . . . . . . . . . . . . . . . . . . . . . . . . . . . . 78

Appendix C: Quick Steps: How to install Red Hat OpenShift Container Platform . . . . . . . . . . . . . . . . . . . . 79
Appendix D: Troubleshooting Ansible by Red Hat . . . . . . . . . . . . . . . . . . . . . . . . . . . . . . . . . . . . . . . . . . . . . . . . 80
Appendix E: Installation Failure . . . . . . . . . . . . . . . . . . . . . . . . . . . . . . . . . . . . . . . . . . . . . . . . . . . . . . . . . . . . . . . . 81
E.1. Inventory . . . . . . . . . . . . . . . . . . . . . . . . . . . . . . . . . . . . . . . . . . . . . . . . . . . . . . . . . . . . . . . . . . . . . . . . . . . . . . 81
E.2. Running the Uninstall Playbook . . . . . . . . . . . . . . . . . . . . . . . . . . . . . . . . . . . . . . . . . . . . . . . . . . . . . . . . . . 83
E.3. Manually Launching the Installation of Red Hat OpenShift . . . . . . . . . . . . . . . . . . . . . . . . . . . . . . . . . 83
E.4. Starting Completely Over . . . . . . . . . . . . . . . . . . . . . . . . . . . . . . . . . . . . . . . . . . . . . . . . . . . . . . . . . . . . . . . . 83
100 East Davie StreetRaleigh NC 27601 USAPhone: +1 919 754 3700Phone: 888 733 4281PO Box 13588Research Triangle Park NC 27709 USA
© 2017 by Red Hat, Inc. This material may be distributed only subject to the termsand conditions set forth in the Open Publication License, V1.0 or later (the latestversion is presently available at http://www.opencontent.org/openpub/).
The information contained herein is subject to change without notice. Red Hat, Inc.shall not be liable for technical or editorial errors or omissions contained herein.
Distribution of modified versions of this document is prohibited without theexplicit permission of Red Hat Inc.
Distribution of this work or derivative of this work in any standard (paper) bookform for commercial purposes is prohibited unless prior permission is obtainedfrom Red Hat Inc.
The GPG fingerprint of the [email protected] key is: CA 20 86 86 2B D6 9D FC 65F6 EC C4 21 91 80 CD DB 42 A6 0E
Send feedback to [email protected]
www.redhat.com 1 [email protected]

Comments and FeedbackIn the spirit of open source, we invite anyone to provide feedback and comments on any referencearchitecture. Although we review our papers internally, sometimes issues or typographical errors areencountered. Feedback allows us to not only improve the quality of the papers we produce, but allowsthe reader to provide their thoughts on potential improvements and topic expansion to the papers.Feedback on the papers can be provided by emailing [email protected]. Please refer to thetitle within the email.
[email protected] 2 www.redhat.com
1. Executive SummaryRed Hat® OpenShift Container Platform 3 is built around a core of application containers powered byDocker, with orchestration and management provided by Kubernetes, on a foundation of Red HatEnterprise Linux® Atomic Host. OpenShift Origin is the upstream community project that brings it alltogether along with extensions to accelerate application development and deployment.
This reference environment provides a comprehensive example demonstrating how OpenShiftContainer Platform 3 can be set up to take advantage of the native high availability capabilities ofKubernetes and VMware in order to create a highly available OpenShift Container Platform 3environment. The configuration consists of three OpenShift Container Platform masters, two OpenShiftContainer Platform infrastructure nodes, two OpenShift Container Platform application nodes, andnative VMware integration. In addition to the configuration, operational management tasks are shownto demonstrate functionality.
The target audience for this reference architecture would be a system administrator or systemarchitect with solid background with VMware. Some experience with Docker and OpenShift would bea positive, but it is not required. The subsequent chapters following the deployment will cover clusteradministration and validation topics.
If you have already read the paper and are looking for the steps to run for the installation scriptsplease see the Quick Steps: How to install Red Hat OpenShift Container Platform section.
www.redhat.com 3 [email protected]

2. Components and ConfigurationThis chapter provides an overview and description of the reference architecture for a highly availableRed Hat OpenShift Container Platform 3 environment deployed on a VMware private cloud.
The image, shown below in Figure 1, provides a high-level representation of the components withinthis reference architecture. Virtual machine (VM) resources are highly available using VMwaretechnologies; VMware HA (high availability), storage IO (input/output) control, and resource allocationvia hypervisor affinity and anti-affinity rules. The Ansible host is a virtual machine and acts as theentrypoint for access to the hosts and performs configuration of the internal servers by ensuring thatall Secure Shell (SSH) traffic passes through it.
The master instances host the OpenShift master components such as ETCD and the OpenShift API. Theapplication instances are for users to deploy their containers while the infrastructure instances areused for the OpenShift router and registry roles. Authentication is managed by Microsoft ActiveDirectory via lightweight directory access protocol (LDAP) authentication. OpenShift on VMware hastwo cloud native storage options; virtual machine persistent storage and network file system (NFS).
Virtual machine persistent storage is housed on virtual machine disk VMDKs on datastores located onexternal logical unit numbers (LUNs) or NFS shares.
The other storage utilized is NFS which is file based storage. NFS is used for the persistent storage ofthe OpenShift registry and used for persistent volume claims for containers. The network is configuredto leverage a single load balancer for access to the OpenShift API (443, 80), OpenShift console (8443),and the OpenShift routers. Finally, the image shows that domain name system (DNS) is handled by anexternal DNS source. This DNS source should be pre-configured with the proper entries prior todeployment. In this case the system engineering team is managing all DNS entries through a BINDserver and a conditional lookup zone in Microsoft DNS.
[email protected] 4 www.redhat.com
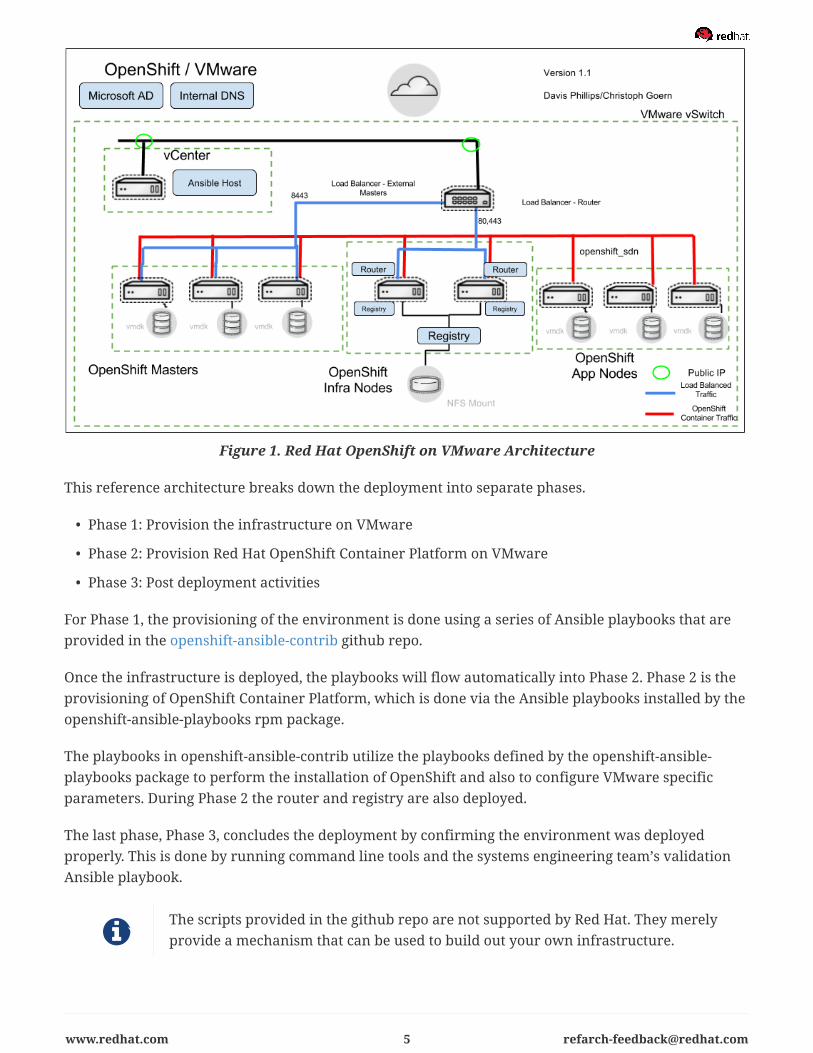
Figure 1. Red Hat OpenShift on VMware Architecture
This reference architecture breaks down the deployment into separate phases.
• Phase 1: Provision the infrastructure on VMware
• Phase 2: Provision Red Hat OpenShift Container Platform on VMware
• Phase 3: Post deployment activities
For Phase 1, the provisioning of the environment is done using a series of Ansible playbooks that areprovided in the openshift-ansible-contrib github repo.
Once the infrastructure is deployed, the playbooks will flow automatically into Phase 2. Phase 2 is theprovisioning of OpenShift Container Platform, which is done via the Ansible playbooks installed by theopenshift-ansible-playbooks rpm package.
The playbooks in openshift-ansible-contrib utilize the playbooks defined by the openshift-ansible-playbooks package to perform the installation of OpenShift and also to configure VMware specificparameters. During Phase 2 the router and registry are also deployed.
The last phase, Phase 3, concludes the deployment by confirming the environment was deployedproperly. This is done by running command line tools and the systems engineering team’s validationAnsible playbook.
The scripts provided in the github repo are not supported by Red Hat. They merelyprovide a mechanism that can be used to build out your own infrastructure.
www.redhat.com 5 [email protected]

2.1. Reference Implementation Hardware ConfigurationThis chapter describes the reference implementation environment that is deployed.
The reference architecture environment consists of a Dell m1000e chassis with a number of DellPowerEdge M520 blades configured as described in the Hardware Details table. By default, there arethree OpenShift masters, two OpenShift infrastructure nodes and three OpenShift app nodes.
To implement a highly available ETCD, each master will also be configured to run ETCD. Theinfrastructure nodes will host registry and router applications, while the application nodes will hostend user applications.
Storage for OpenShift will be provisioned via NFS.
Table 1. Hardware Details
Hardware Specifications
Dell PowerEdge M520 4 port Broadcom Gigabit Ethernet BCM5720
2 CPU, 8 Core, Intel Xeon CPU E5-2450, 2.10GHz
96GB of memory
2 x 136GB SAS internal disk drives
Table 2. iDRAC Connectivity
Hostname iDRAC IP Address
vsphere1 10.x.x.88
vsphere2 10.x.x.89
Shared storage for the environment has been provisioned on a Dell Equallogic PS4210 array. Storagewas presented to our VMware vSphere hosts via 2 iSCSI LUNs. SIOC Storage I/O Control was enabledand configured on these LUNs.
[email protected] 6 www.redhat.com

2.2. VMware vCenter and vSphere DetailsThis paper utilizes the following versions of VMware software:
Table 3. VMware Software versions
Software Version
vCenter Server via VCSA 6.5.0 Build 4602587
vSphere Server 6.5.0 Build 4564106
2.3. Virtual Machine Instance DetailsWithin this reference environment, the virtual machines are deployed via a single VMware cluster in asingle datacenter. The virtual machine template is based upon sizing requirements listed in the systemrequirements section of the docs
• 2 vCPU
• 8GB RAM
• 3 x 40GB drives (all thin provisioned)
All instances for the OpenShift environment are built from the same template. The master instancescontain two extra disks used for Docker storage and ETCD. The application node instances use theiradditional disks for Docker storage and OpenShift volumes.
www.redhat.com 7 [email protected]

2.4. HAproxy Load Balancer DetailsThe load balancers used in the reference environment use HAproxy. You can certainly use your ownload balancer should one exist on premise. The table below describes the load balancer DNS name, theinstances in which the haproxy load balancer is attached, and the port monitored by the load balancerto state whether an instance is in or out of service.
Table 4. Haproxy Load Balancers
HAproxy Assigned Instances Port
haproxy-0.vcenter.e2e.bos.redhat.com
master-0, master-1, master-2 8443
*.apps.vcenter.e2e.bos.redhat.com
infra-0, infra-1 80 and 443
The wildcard DNS *.apps uses the public subnets and maps to infrastructure nodes. The infrastructurenodes run the router pod which, then directs traffic directly from the outside world into OpenShiftpods with external routes defined.
[email protected] 8 www.redhat.com
2.5. Software Version DetailsTable 5 shows the installed software and versions installed on the servers in this Red Hat OpenShifthighly available reference environment.
Table 5. Red Hat OpenShift Container Platform 3 Details
Software Version
Red Hat Enterprise Linux 7.3 x86_64 kernel-3.10.0-514
Atomic-OpenShift{master/clients/node/sdn-ovs/utils}
3.4.x.x
Docker 1.12.x
Ansible by Red Hat 2.2.x
www.redhat.com 9 [email protected]

2.6. Required ChannelsA subscription to the following channels is required in order to deploy this reference environment’sconfiguration.
Table 6. Required Channels – Red Hat OpenShift Container Platform 3 Master and NodeInstances
Channel Repository Name
Red Hat Enterprise Linux 7 Server (RPMs) rhel-7-server-rpms
Red Hat OpenShift Container Platform 3.4 (RPMs) rhel-7-server-ose-3.4-rpms
Red Hat Enterprise Linux 7 Server - Extras (RPMs) rhel-7-server-extras-rpms
Red Hat Satellite Tools 6.2 (for Red Hat EnterpriseLinux 7 Server) (RPMs)
rhel-7-server-satellite-tools-6.2-rpms
[email protected] 10 www.redhat.com
2.7. Tooling PrerequisitesThe following section provides an example of how to install Ansible by Red Hat to deploy andconfigure our infrastructure.
2.7.1. Git Repository
GitHub Repositories
The code in the openshift-ansible-contrib repository referenced below handles the installation of RedHat OpenShift and the accompanying infrastructure. The openshift-ansible-contrib repository is notexplicitly supported by Red Hat.
The following task should be performed on the server that the Ansible playbookswill be launched from.
Directory Setup
$ mkdir ~/git$ cd ~/git$ git clone https://github.com/openshift/openshift-ansible-contrib.git
To verify the repository was cloned the tree command can be used to display all of the contents of thegit repository.
$ yum -y install tree$ tree ~/git/
... content abbreviated ...
|-- openshift-ansible-contrib
2.7.2. Ansible by Red Hat Setup
The following section provides an example of an Ansible by Red Hat source system and how to installAnsible by Red Hat on a virtual machine.
Install the following packages on the system performing the provisioning of VMware infrastructureand installation of Red Hat OpenShift.
The following task should be performed on the server that the Ansible playbookswill be launched from.
www.redhat.com 11 [email protected]
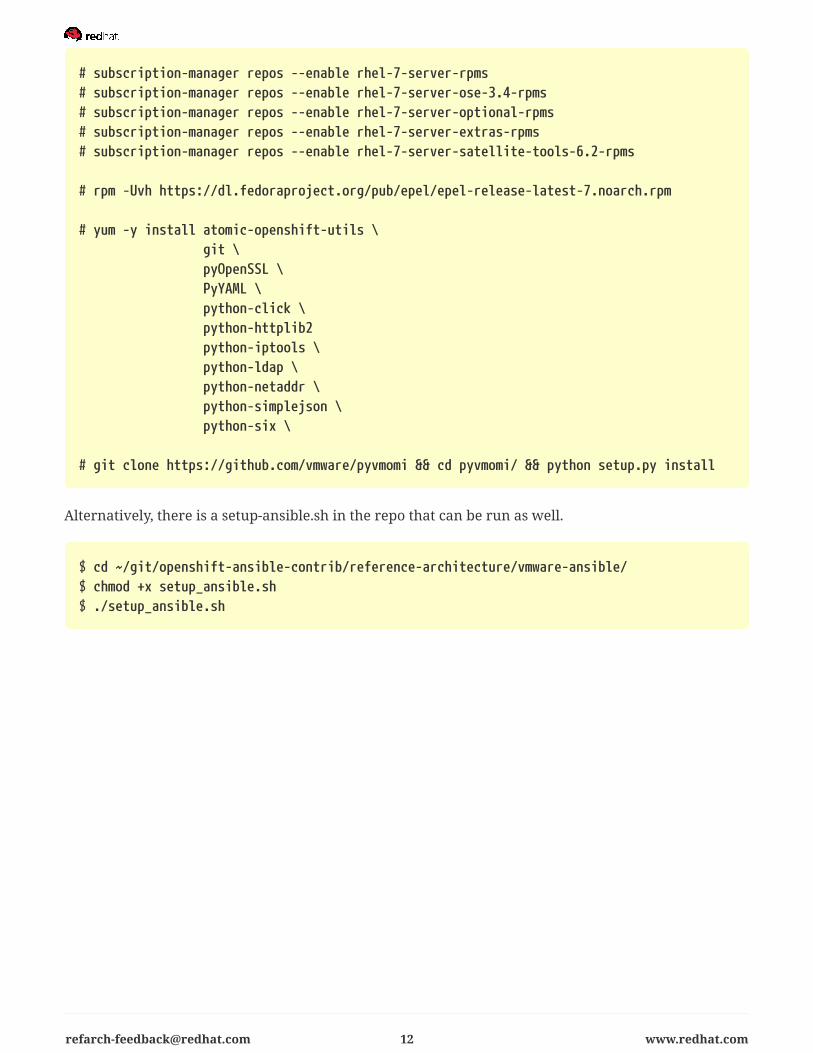
# subscription-manager repos --enable rhel-7-server-rpms# subscription-manager repos --enable rhel-7-server-ose-3.4-rpms# subscription-manager repos --enable rhel-7-server-optional-rpms# subscription-manager repos --enable rhel-7-server-extras-rpms# subscription-manager repos --enable rhel-7-server-satellite-tools-6.2-rpms
# rpm -Uvh https://dl.fedoraproject.org/pub/epel/epel-release-latest-7.noarch.rpm
# yum -y install atomic-openshift-utils \ git \ pyOpenSSL \ PyYAML \ python-click \ python-httplib2 python-iptools \ python-ldap \ python-netaddr \ python-simplejson \ python-six \
# git clone https://github.com/vmware/pyvmomi && cd pyvmomi/ && python setup.py install
Alternatively, there is a setup-ansible.sh in the repo that can be run as well.
$ cd ~/git/openshift-ansible-contrib/reference-architecture/vmware-ansible/$ chmod +x setup_ansible.sh$ ./setup_ansible.sh
[email protected] 12 www.redhat.com

Before getting started with Ansible, first open ocp-on-vmware.ini and populate the configuration filewith your environments information.
$ vim ~/git/openshift-ansible-contrib/reference-architecture/vmware-ansible/ocp-on-vmware.ini
[vmware]# console port and install type for OpenShiftconsole_port=8443deployment_type=openshift-enterprise
# vCenter host address/username and passwordvcenter_host=vcenter_username=administrator@vsphere.localvcenter_password=
# name of RHEL template to use for OpenShift installvcenter_template_name=ocp-server-template-2.0.2
# folder/cluster/resource pool in vCenter to organize VMsvcenter_folder=ocpvcenter_cluster=vcenter_datacenter=vcenter_resource_pool=OCP3
# DNS zone where everything will be hosted and app wildcard prefixpublic_hosted_zone=app_dns_prefix=apps
# DNS/gateway/interface name the OpenShift nodes should utilizevm_dns=vm_gw=vm_netmask=vm_network="VM Network"
# red hat subscription name and passwordrhsm_user=rhsm_password=
# activation key and org_id if using internal satellite 6 serverrhsm_activation_key=rhsm_org_id=
# pool with openshift repo accessrhsm_pool=OpenShift Enterprise, Premium*
# bringing your own load balancer?
www.redhat.com 13 [email protected]

byo_lb=nolb_host=haproxy-0
# bringing your own NFS server for registry?byo_nfs=nonfs_registry_host=nfs-0nfs_registry_mountpoint=/registry
#create_inventory vars# number of nodes of each typemaster_nodes=3infra_nodes=2app_nodes=3
# start node IP address *must be a contiguous spacevm_ipaddr_start=
# node hostname prefixocp_hostname_prefix=
# create_ocp_vars vars# ldap bind user/password and FQDN ldap domainldap_user=openshiftldap_user_password=ldap_fqdn=
The default values are pre-populated. But, the required values are:
public_hosted_zone, vcenter_host, vcenter_password, vcenter_datacenter, vm_ipaddr_start, ldap_fqdn,ldap_user_password, vm_dns, vm_gw, vm_netmask and either your satellite servers activation key oryour Red Hat Network Classic1 username and password for the installation of OpenShift.
[email protected] 14 www.redhat.com

2.8. Network Components
2.8.1. DNS (Domain Name Server) Configuration
DNS is an integral part of a successful Red Hat OpenShift Container Platform deployment/environment.
OpenShift Container Platform requires a properly configured wildcard DNS zone that resolves to the IPaddress of the OpenShift router. For more information, please refer to the OpenShift ContainerPlatform installation guide. In this reference architecture the --create_inventory parameter on the ocp-on-vmware.py script will help us to manage DNS records for the OpenShift Container Platformenvironment.
If applications will be hosted externally, a public zone will be required for the setup. However, if youhave an internal DNS zone, that can also be specified. This assumes you have already populated ocp-on-vmware.ini.
www.redhat.com 15 [email protected]

$ ./ocp-on-vmware.py --create_inventory
Configured inventory values: master_nodes: 3 infra_nodes: 3 app_nodes: 3 public_hosted_zone: vmware.example.com app_dns_prefix: apps ocp_hostname_prefix: ocp3- byo_nfs: no NFS VM name: nfs-0 byo_lb: no HAproxy LB VM name: haproxy-0 vm_ipaddr_start: 10.x.x.224
Continue using these values? [y/N]: y
# Here is what should go into your DNS records$ORIGIN apps.vmware.example.com.* A 10.x.x.235$ORIGIN vmware.example.com.nfs-0 A 10.x.x.224haproxy-0 A 10.x.x.235ocp3-master-0 A 10.x.x.225ocp3-master-1 A 10.x.x.226ocp3-master-2 A 10.x.x.227ocp3-app-0 A 10.x.x.228ocp3-app-1 A 10.x.x.229ocp3-app-2 A 10.x.x.230ocp3-infra-0 A 10.x.x.231ocp3-infra-1 A 10.x.x.232ocp3-infra-2 A 10.x.x.233
Please note, if you have chosen to bring your own loadbalancer and NFS Server you willneed to ensurethat these records are added to DNS and properly resolve.
2.8.2. Hosted Zone Setup
Some important things to note from the above configuration. We are creating an HAproxy server forload balancing. That HAproxy server is being assigned the final IP address in our IP range and it is alsothe same address as the wildcard, "apps.vmware.example.com." The entries above can be copied andpasted into your DNS server or you can use them as a guideline to create your records on the platformof your choosing.
[email protected] 16 www.redhat.com

$ORIGIN apps.vmware.example.com.* A 10.x.x.235$ORIGIN vmware.example.com.haproxy-0 A 10.x.x.235
A subdomain can also be used. The same steps listed above are applicable whenusing a subdomain.
2.8.3. Authentication
There are several options when it comes to authentication of users in Red Hat OpenShift ContainerPlatform. OpenShift can leverage an existing identity provider within an organization such as LDAP, orOpenShift can use external identity providers like GitHub, Google, and GitLab. The configuration ofidentity providers occurs on the OpenShift master instances. OpenShift allows for multiple identityproviders to be specified. This reference architecture document uses LDAP as the authenticationprovider but any of the other mechanisms would be an acceptable choice. Roles can be added to useraccounts to allow for extra privileges, such as the ability to list nodes or assign persistent storagevolumes to a project.
For more information on GitHub OAuth and other authentication methods see the Red Hat OpenShiftdocumentation.
The pertinent OpenShift variables for LDAP authentication are listed below:
openshift_master_identity_providers:- name: Active_Directory challenge: true login: true kind: LDAPPasswordIdentityProvider attributes: id: - dn email: - mail name: - cn preferredUsername: - uid insecure: true url: "ldap://example.com:389/cn=users,dc=example,dc=com?sAMAccountName" bindDN: "cn=openshift,cn=users,dc=example,dc=com" bindPassword: "password"
OpenShift needs the fully qualified domain name (FQDN) of the LDAP server in question. An OpenShift
www.redhat.com 17 [email protected]

user was created in the users’ organizational unit (OU) and assigned the password of password. To usea specific OU for users to authenticate against, create your BIND distinguished name in the desired OU.This provides a way to isolate logins to a specific group by adding an OU and restricting logins tomembers of that OU.
The LDAP server configuration can be tested (or validated) with the following query:
ldapsearch -x -w password -H ldap://dc1.example.com -b cn=users,dc=example,dc=com -Dcn=openshift,cn=users,dc=example,dc=com cn=openshift
2.8.4. NFS (Network File System) Server
NFS is used for persistent storage of container images. The NFS server will be created automatically inthe playbooks unless it isn’t needed. In that case use the byo_nfs=yes option as described below.
To leverage an existing on-premise NFS, define the following variables in the deployment script INIfile:
$ vim ~/git/openshift-ansible-contrib/reference-architecture/vmware-ansible/ocp-on-vmware.ini
... content abbreviated ...
# bringing your own NFS server for registry?byo_nfs=nonfs_registry_host=nfs-0nfs_registry_mountpoint=/registry
... content abbreviated ...
2.8.5. Load Balancer
This environment provides an HAproxy service which enables uniform distribution of network trafficacross the node instances deployed in VMware. The load balancer will distribute traffic across twodifferent groups
The infra nodes will be utilized to load balance traffic from 80 and 443. The master nodes will be usedto load balance our console port 8443. All three of these ports will be transmission control protocol(TCP) connections.
There are clear advantages to doing this:
• It keeps applications highly available.
• It is elastic, so resources can scale up or down to handle capacity.
[email protected] 18 www.redhat.com

In the event you would like to bring your own load balancer, the following options can be specified inthe INI file for the wrapper script for the Ansible playbooks.
$ *vim /home/<user>/git/openshift-ansible-contrib/reference-architecture/vmware-ansible/ocp-on-vmware.ini*
... content abbreviated ...
# bringing your own load balancer?byo_lb=nolb_host=haproxy-0
... content abbreviated ...
Ensure that the proper ports are configured on your existing load balancer and additionally make surethat your wildcard DNS record points to it as well.
www.redhat.com 19 [email protected]

2.9. VMware vCenter PrerequisitesFor simplicity sake, assume the vCenter environment is pre-existing and is configured with bestpractices for the infrastructure.
Technologies such as SIOC and VMware HA should already be configured. After the environment isprovisioned, some anti-affinity rules will be established to ensure maximum uptime and optimalperformance.
Table 7. Ansible by Red Hat vCenter settings
Parameter Description Defaults
vcenter_host IP or Hostname of vCenterServer
vcenter_username Username of vCenterAdministrator
vcenter_password Password of vCenteradministrator
vcenter_cluster Cluster to place VM in
vcenter_datacenter Datacenter to place VM in
vcenter_resource_pool Resource pool to be used fornewly created VMs
'OCP3'
vcenter_folder Folder to place newly createdVMs in
'ocp'
vcenter_template_name Template to clone new VM from 'ocp3-server-template-2.0.0'
vm_network Destination network for VMs.(vSwitch or VDS)
"VM Network"
2.9.1. Networking
An existing port group and virtual LAN (VLAN) are required for deployment. The initial configurationof the Red Hat OpenShift nodes in this reference architecture assumes you will be deploying VMs to aport group called "VM Network". This can be changed in the ocp-on-vmware.ini file under the variable:vm_network. Once deployed vmtoolsd is used to determine the static addresses.
The environment can utilize a virtual dedicated server (vDS) or vSwitch. The specifics of that areunimportant. However, should you wish to utilize network IO control and some of the quality ofservice (QoS) technologies that VMware employs, you would need to choose a vDS for the deployment.
2.9.2. vCenter Shared Storage
The vSphere hosts should ultimately have shared storage to house our VMware virtual machine disk
[email protected] 20 www.redhat.com

files (VMDKs) for our templates. A best practice recommendation would be to enable storage I/Ocontrol (SIOC) to address any latency issues caused by performance. The following article discusses indepth how to do this.
2.9.3. Resource Pool, Cluster Name and Folder Location
This reference architecture assumes some default names as per the ocp-on-vmware.py wrapper script.In particular, vcenter_resource_pool, vcenter_folder and vcenter_template_name, are all to haveexisting information. If you would like to use the defaults, please create the following as per the tableabove:
• Create a resource pool named: "OCP3"
• Create a folder for the Red Hat OpenShift VMs for logical organization named: "ocp"
◦ Ensure this folder exists under the datacenter and cluster you will use for deployment
This will allow you to use default names and not force you to customize outside of these entries. If youwould like customize the names feel free to but, remember to specify them later on during theProvisioning the Infrastructure with Ansible by Red Hat section.
2.9.4. VMware Template
A prepared VMware template is used to deploy the environment. In this guide, the Red Hat EnterpriseLinux 7 gold image is prepped by starting with an installation of open-vm-tools, perl, open-vm-tools-deploypkg and net-tools.
Any image that meets the prerequisites mentioned above should suffice. The Ansible playbooks willcopy over keys or you could prepare the the authorized_keys section ahead of time. The defaultvcenter_template_name is "ocp3-server-template-2.0.2". Obviously, this can be customized to yourenvironment at runtime.
Prepare the virtual machine to meet the specified requirements listed in the system requirementssection of the docs:
• 2 vCPU
• 8GB RAM
• 3 x 40GB drives (all thin provisioned)
2.9.5. Preparation Script
A sample script is listed below for preparing the vcenter_template_name:
www.redhat.com 21 [email protected]

#!/bin/bash## This file will prepare a RHEL7.3 instance for being converted to a VMware template# used as an OpenShift Enterprise host
yum install open-vm-tools perl open-vm-tools-deploypkg net-tools
systemctl enable vmtoolsd.service# Remove all let the ansible roles configuresubscription-manager remove --allsubscription-manager unregister
# deploy default ssh keymkdir /root/.sshchmod 750 /root/.sshecho "ssh-rsaAAAAB3NzaC1yc2EAAAADAQABAAABAQCuY6lBsj95cYTVmzqW2Xci37BJta+ZtNHIee8bFCDskKx/qiH/kbceQGDPpAjREBQBpabhxwd8eUktqdiUI1aQIs7I0Om8XMNUd00Phsz69i8PDzVQyGcLzdn4UPOpS89nFmyto0NJ1V5o4RoR3A7ENbzN7li34g5+zGSBXcVdHFFUErCfOnEtgXw5kltU1byv3+GGKAb+f0CL88BRowp35/NH9sRkP8fzWPS0hl+ofiay5H7xDDd6/nqx6OCd0YHfSEYSTMuRKcM55IFDLLgVNLIumYqwDP6WdCw9dv2aSHPX0bpuLwIEgaMEfGgvTTNi8rZ/rC9Y9OYewfHYOpr9 dphillip@dav1x-m" >> /root/.ssh/authorized_keyschmod 640 /root/.ssh/authorized_keys
# and run an updateyum update -y && yum clean all
# clean up the system to prepare for being a VMware templaterm -rf /etc/udev/rules.d/70* && rm -rf /etc/ssh/ssh_host_* && logrotate -f/etc/logrotate.conf && rm -rf /var/log/audit/audit.loginit 0
[email protected] 22 www.redhat.com
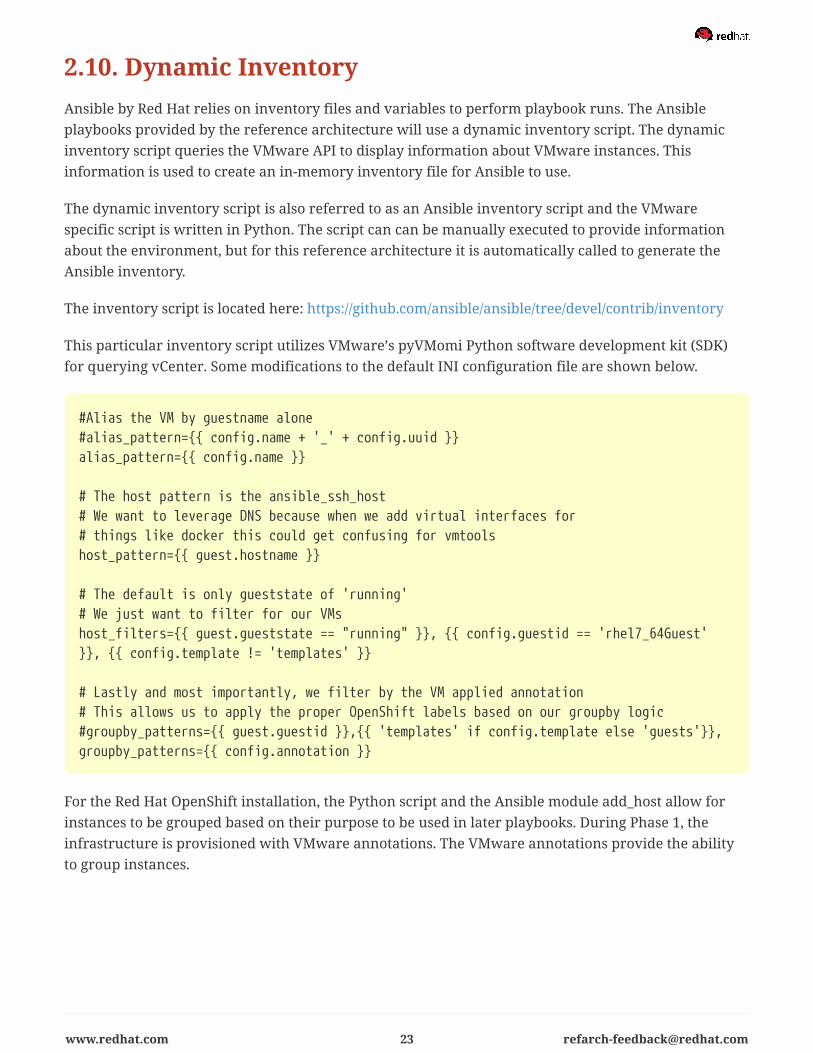
2.10. Dynamic InventoryAnsible by Red Hat relies on inventory files and variables to perform playbook runs. The Ansibleplaybooks provided by the reference architecture will use a dynamic inventory script. The dynamicinventory script queries the VMware API to display information about VMware instances. Thisinformation is used to create an in-memory inventory file for Ansible to use.
The dynamic inventory script is also referred to as an Ansible inventory script and the VMwarespecific script is written in Python. The script can can be manually executed to provide informationabout the environment, but for this reference architecture it is automatically called to generate theAnsible inventory.
The inventory script is located here: https://github.com/ansible/ansible/tree/devel/contrib/inventory
This particular inventory script utilizes VMware’s pyVMomi Python software development kit (SDK)for querying vCenter. Some modifications to the default INI configuration file are shown below.
#Alias the VM by guestname alone#alias_pattern={{ config.name + '_' + config.uuid }}alias_pattern={{ config.name }}
# The host pattern is the ansible_ssh_host# We want to leverage DNS because when we add virtual interfaces for# things like docker this could get confusing for vmtoolshost_pattern={{ guest.hostname }}
# The default is only gueststate of 'running'# We just want to filter for our VMshost_filters={{ guest.gueststate == "running" }}, {{ config.guestid == 'rhel7_64Guest'}}, {{ config.template != 'templates' }}
# Lastly and most importantly, we filter by the VM applied annotation# This allows us to apply the proper OpenShift labels based on our groupby logic#groupby_patterns={{ guest.guestid }},{{ 'templates' if config.template else 'guests'}},groupby_patterns={{ config.annotation }}
For the Red Hat OpenShift installation, the Python script and the Ansible module add_host allow forinstances to be grouped based on their purpose to be used in later playbooks. During Phase 1, theinfrastructure is provisioned with VMware annotations. The VMware annotations provide the abilityto group instances.
www.redhat.com 23 [email protected]

Figure 2. VMware VM annotations example
The masters were assigned the master tag, the infrastructure nodes were assigned the infra tag and theapplication nodes were assigned the app tag.
The interesting parts of output from our inventory script are shown below:
"app": { "hosts": [ "app-2", "app-1", "app-0" ]},"infra": { "hosts": [ "infra-0", "infra-1" ]},"master": { "hosts": [ "master-1", "master-0", "master-2"
For more information see: http://docs.ansible.com/ansible/intro_dynamic_inventory.html
2.11. NodesNodes are VMware virtual machines that serve a specific purpose for Red Hat OpenShift. OpenShiftmasters are also considered nodes. Nodes deployed on VMware can be horizontally scaled or scaledout before or after the OpenShift installation using the create_inventory flag in the deployment script.
There are three types of nodes as described below.
[email protected] 24 www.redhat.com

2.11.1. Master nodes
The master nodes contain the master components, including the API server, controller manager serverand ETCD. The master maintains the clusters configuration, manages nodes in its Red Hat OpenShiftcluster. The master assigns pods to nodes and synchronizes pod information with serviceconfiguration. The master is used to define routes, services, and volume claims for pods deployedwithin the OpenShift environment.
2.11.2. Infrastructure nodes
The infrastructure nodes are used for the router and registry pods. These nodes could be used if theoptional components Kibana and Hawkular metrics are required. The storage for the Docker registrythat is deployed on the infrastructure nodes is NFS which allows for multiple pods to use the samestorage. NFS storage is used because it largely prevalent in most VMware environments.
2.11.3. Application nodes
The Application nodes are the instances where non-infrastructure based containers run. Depending onthe application, VMware specific storage can be applied such as a VMDK which can be assigned using apersistent volume claim for application data that needs to persist between container restarts. Aconfiguration parameter is set on the master which ensures that Red Hat OpenShift Container Platformuser containers will be placed on the application nodes by default.
2.11.4. Node labels
All Red Hat OpenShift Container Platform nodes are assigned a label. This allows certain pods to bedeployed on specific nodes. For example, nodes labeled infra are infrastructure nodes. These nodesrun the router and registry pods. Nodes with the label app are nodes used for end user applicationpods.
The configuration parameter 'defaultNodeSelector: "role=app" in /etc/origin/master/master-config.yaml ensures all projects automatically are deployed on application nodes.
www.redhat.com 25 [email protected]

2.12. Red Hat OpenShift podsRed Hat OpenShift leverages the Kubernetes concept of a pod, which is one or more containersdeployed together on a single host. The container is the smallest compute unit that can be defined,deployed, and managed. For example, a pod could be just a single PHP application connecting to adatabase outside of the OpenShift environment or a pod could be a PHP application that’s connected toanother ephemeral database container.
Red Hat OpenShift pods have the ability to be scaled at runtime or at the time of launch using theOpenShift console or the oc CLI tool. Any container running in the environment is considered a pod.The pods containing the OpenShift router and registry are required to be deployed in the OpenShiftenvironment.
[email protected] 26 www.redhat.com
2.13. RouterPods inside of a Red Hat OpenShift cluster are only reachable via their IP addresses on the clusternetwork. An edge load balancer can be used to accept traffic from outside networks and proxy thetraffic to pods inside the OpenShift cluster.
An OpenShift administrator can deploy routers in an OpenShift cluster. These enable routes created bydevelopers to be used by external clients.
OpenShift routers provide external hostname mapping and load balancing to services over protocolsthat pass distinguishing information directly to the router; the hostname must be present in theprotocol in order for the router to determine where to send it. Routers support the following protocols:
• HTTP
• HTTPS (with SNI)
• WebSockets
• Transport layer security (TLS) with Server Name Indication (SNI)
The router utilizes the wildcard zone specified during the installation and configuration of OpenShift.This wildcard zone is used by the router to create routes for a service running within the OpenShiftenvironment to a publicly accessible URL. The wildcard zone itself is a wildcard entry in DNS which islinked using a Canonical Name record (CNAME) to a load balancer, which performs a health check andforwards traffic to router pods on port 80 and 443.
www.redhat.com 27 [email protected]

2.14. RegistryRed Hat OpenShift can build Docker images from your source code, deploy them, and manage their lifecycle. To enable this, OpenShift provides an internal, integrated Docker registry that can be deployedin your OpenShift environment to manage images.
The registry stores Docker images and metadata. For production environment, you should usepersistent storage for the registry, otherwise any images anyone has built or pushed into the registrywould disappear if the pod were to restart.
Using the installation methods described in this document the registry is deployed using an NFS share.The NFS share allows for multiple pods to be deployed at once for HA but also use the same persistentbackend storage. NFS is file based storage which does not get assigned to nodes in the same way thatVMDK volumes are attached and assigned to a node. The share does not mount as block-based storageto the node so commands like fdisk or lsblk will not show information in regards to the NFS share.
The configuration for the NFS share is completed via an Ansible playbook. Users of this referencearchitecture can also bring their own NFS server and share name should an existing resource existson-premise. The registry can be scaled to many pods and even have multiple instances of the registryrunning on the same host due to the use of NFS.
[email protected] 28 www.redhat.com
3. Provisioning the InfrastructureThis chapter focuses on Phase 1 of the process. The prerequisites defined below are required for asuccessful deployment of infrastructure and the installation of OpenShift.
3.1. Provisioning the Infrastructure with Ansible by RedHatThe script and playbooks provided within the git repository deploys infrastructure, installs andconfigures Red Hat OpenShift, and performs post installation tasks such as scaling the router andregistry. The playbooks create specific roles, policies, and users required for cloud providerconfiguration in OpenShift and management of a newly created NFS bucket to manage containerimages.
3.1.1. Authentication Prerequisite
As mentioned in the Authentication section, authentication for the reference architecture deploymentis handled by Microsoft’s Active Directory LDAP (lightweight directory access protocol). The stepsbelow describe how to connect your OpenShift deployment to an LDAP server.
Create a Red Hat OpenShift lightweight directory access protocol (LDAP) BIND user account
An existing user account can be utilized or a new account can be created. Below, we have created theuser openshift in our default users organizational unit or OU. The location does not matter as ourwrapper script will search LDAP for the distinguished name and return our full path to the useraccount.
www.redhat.com 29 [email protected]

Figure 3. Active Directory Users and Computers
In our example above, our important OpenShift authentication variables would be:
url: ldap://e2e.bos.redhat.com:389/CN=Users,DC=e2e,DC=bos,DC=redhat,DC=com?sAMAccountNamebindDN: CN=openshift,CN=Users,DC=e2e,DC=bos,DC=redhat,DC=combindPassword: password
3.2. Red Hat OpenShift Install Variable module: ocp-on-vmware.py
The following task should be performed on the server that the Ansible playbookswill be launched.
This will be our first hands on experience with ocp-on-vmware.py. Within the openshift-ansible-contrib git repository is a python script called ocp-on-vmware.py that launches VMware resources andinstalls Red Hat OpenShift on the new resources. The OpenShift install Ansible playbook requires a few
[email protected] 30 www.redhat.com
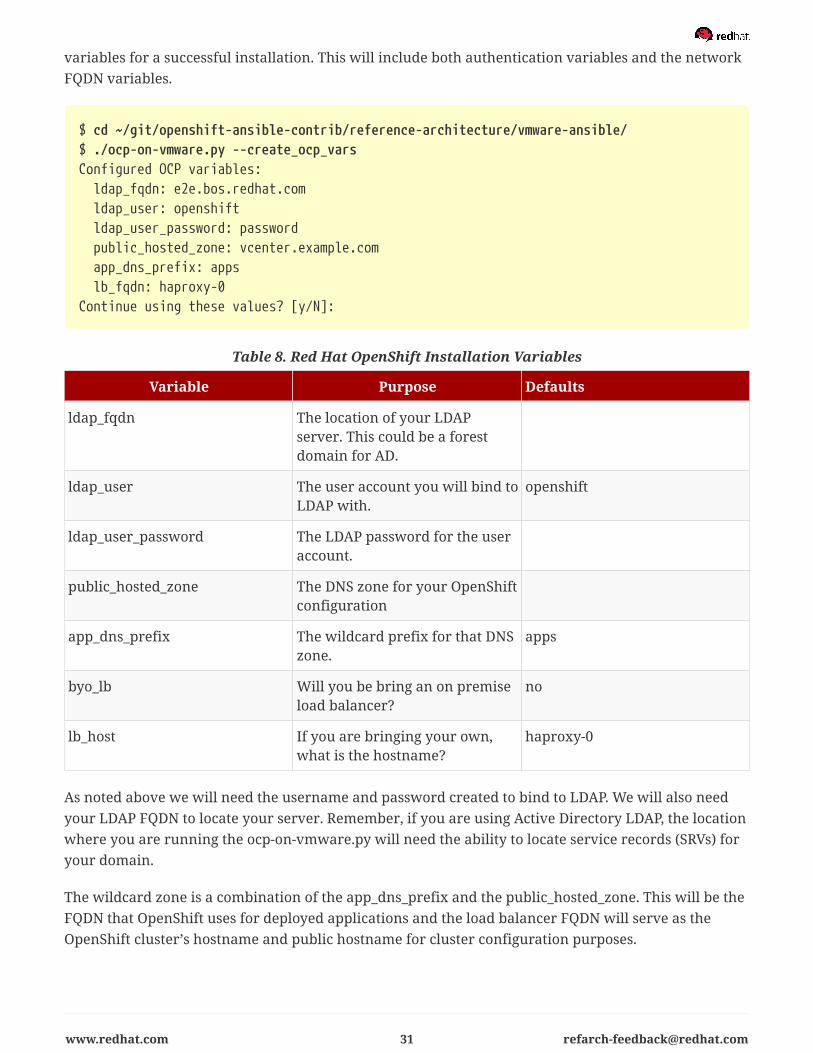
variables for a successful installation. This will include both authentication variables and the networkFQDN variables.
$ cd ~/git/openshift-ansible-contrib/reference-architecture/vmware-ansible/$ ./ocp-on-vmware.py --create_ocp_varsConfigured OCP variables: ldap_fqdn: e2e.bos.redhat.com ldap_user: openshift ldap_user_password: password public_hosted_zone: vcenter.example.com app_dns_prefix: apps lb_fqdn: haproxy-0Continue using these values? [y/N]:
Table 8. Red Hat OpenShift Installation Variables
Variable Purpose Defaults
ldap_fqdn The location of your LDAPserver. This could be a forestdomain for AD.
ldap_user The user account you will bind toLDAP with.
openshift
ldap_user_password The LDAP password for the useraccount.
public_hosted_zone The DNS zone for your OpenShiftconfiguration
app_dns_prefix The wildcard prefix for that DNSzone.
apps
byo_lb Will you be bring an on premiseload balancer?
no
lb_host If you are bringing your own,what is the hostname?
haproxy-0
As noted above we will need the username and password created to bind to LDAP. We will also needyour LDAP FQDN to locate your server. Remember, if you are using Active Directory LDAP, the locationwhere you are running the ocp-on-vmware.py will need the ability to locate service records (SRVs) foryour domain.
The wildcard zone is a combination of the app_dns_prefix and the public_hosted_zone. This will be theFQDN that OpenShift uses for deployed applications and the load balancer FQDN will serve as theOpenShift cluster’s hostname and public hostname for cluster configuration purposes.
www.redhat.com 31 [email protected]
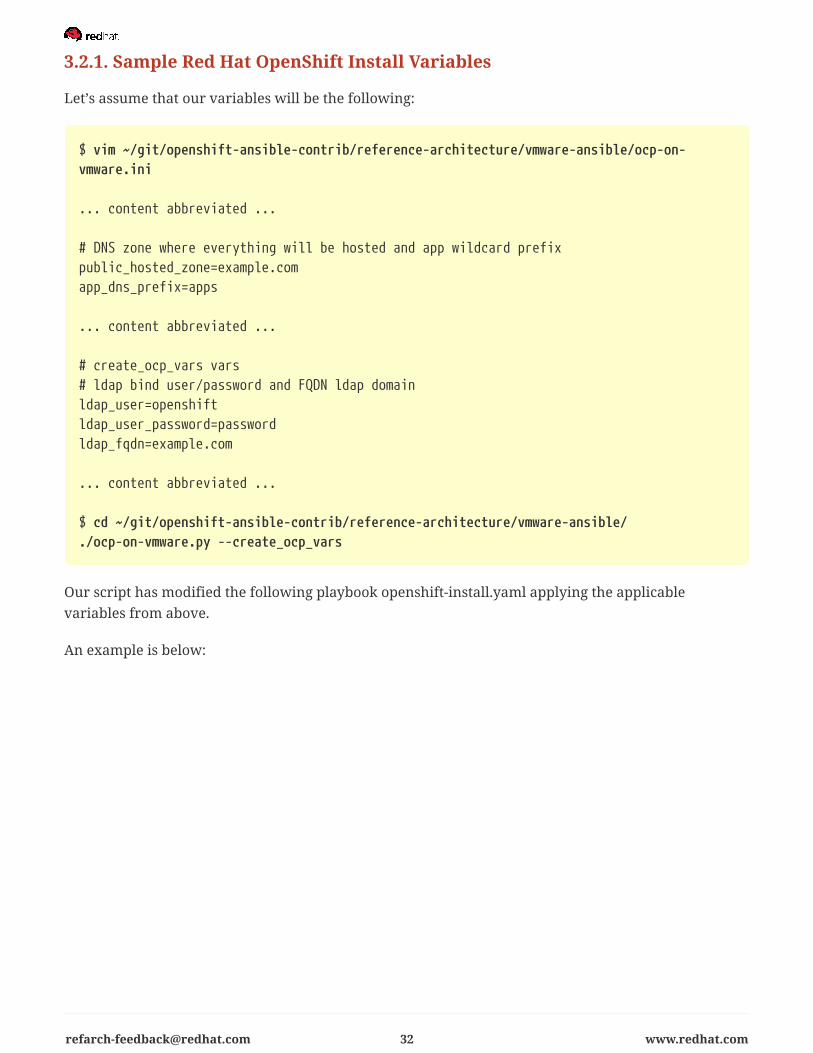
3.2.1. Sample Red Hat OpenShift Install Variables
Let’s assume that our variables will be the following:
$ vim ~/git/openshift-ansible-contrib/reference-architecture/vmware-ansible/ocp-on-vmware.ini
... content abbreviated ...
# DNS zone where everything will be hosted and app wildcard prefixpublic_hosted_zone=example.comapp_dns_prefix=apps
... content abbreviated ...
# create_ocp_vars vars# ldap bind user/password and FQDN ldap domainldap_user=openshiftldap_user_password=passwordldap_fqdn=example.com
... content abbreviated ...
$ cd ~/git/openshift-ansible-contrib/reference-architecture/vmware-ansible/./ocp-on-vmware.py --create_ocp_vars
Our script has modified the following playbook openshift-install.yaml applying the applicablevariables from above.
An example is below:
[email protected] 32 www.redhat.com
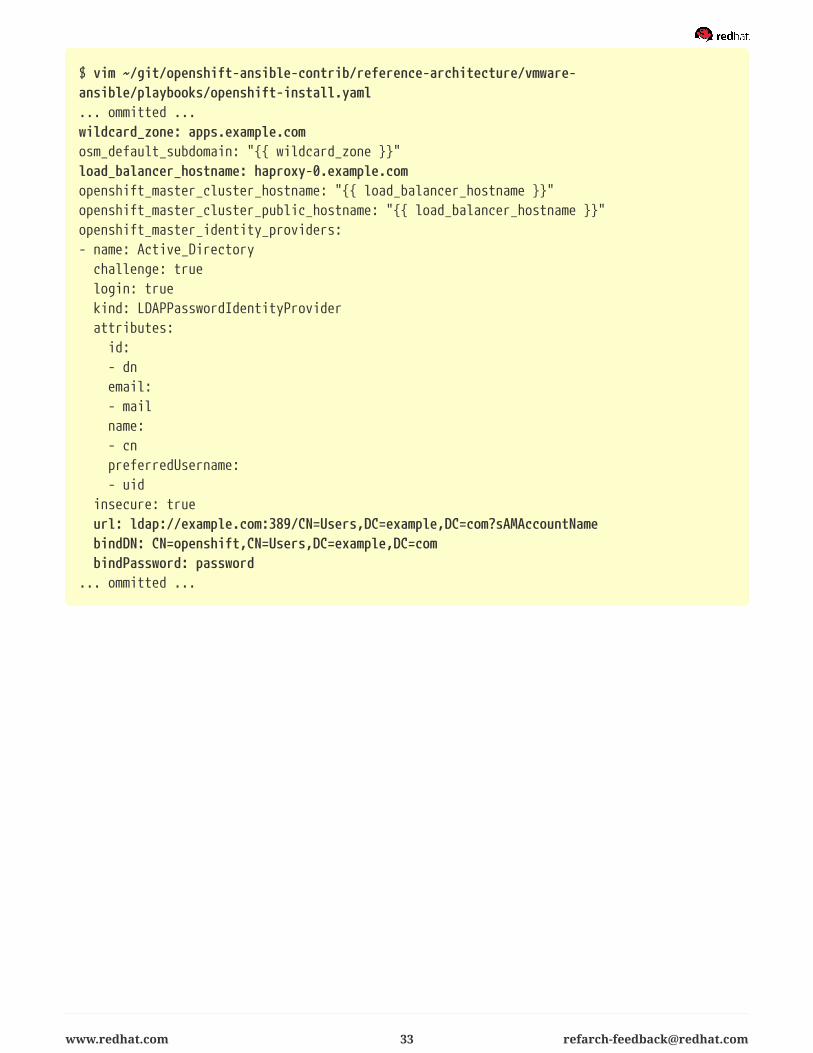
$ vim ~/git/openshift-ansible-contrib/reference-architecture/vmware-ansible/playbooks/openshift-install.yaml... ommitted ...wildcard_zone: apps.example.comosm_default_subdomain: "{{ wildcard_zone }}"load_balancer_hostname: haproxy-0.example.comopenshift_master_cluster_hostname: "{{ load_balancer_hostname }}"openshift_master_cluster_public_hostname: "{{ load_balancer_hostname }}"openshift_master_identity_providers:- name: Active_Directory challenge: true login: true kind: LDAPPasswordIdentityProvider attributes: id: - dn email: - mail name: - cn preferredUsername: - uid insecure: true url: ldap://example.com:389/CN=Users,DC=example,DC=com?sAMAccountName bindDN: CN=openshift,CN=Users,DC=example,DC=com bindPassword: password... ommitted ...
www.redhat.com 33 [email protected]
3.3. Red Hat OpenShift inventory module: ocp-on-vmware.py
The following task should be performed on the server where the Ansible playbookswill be launched.
Now that our installation variables are complete, let’s build our specific infrastructure requirements.Before deployment the VLAN we are using as a deploy target, should have a portgroup named "VMNetwork" available. Also in the VLAN should be a set of contiguous IP Addresses with enoughaddresses to cover our deployment components.
• Wildcard IP Address, this will also be the target for our load balancer
• The NFS Server
• The number of master nodes you wish to install
• The number of infra nodes you wish to install
• The number of app nodes you with to install
Provided we have these requirements for the installation, we can take a look at dynamically buildingour initial VMware guest inventory file.
[email protected] 34 www.redhat.com

$ vim ~/git/openshift-ansible-contrib/reference-architecture/vmware-ansible/ocp-on-vmware.ini
... content abbreviated ...
#create_inventory vars# number of nodes of each typemaster_nodes=3infra_nodes=2app_nodes=3
# start node IP address must be a contiguous spacevm_ipaddr_start=10.x.x.224
... content abbreviated ...
$ cd ~/git/openshift-ansible-contrib/reference-architecture/vmware-ansible/./ocp-on-vmware.py --create_inventoryConfigured inventory values: master_nodes: 3 infra_nodes: 2 app_nodes: 3 public_hosted_zone: example.com app_dns_prefix: apps ocp_hostname_prefix: None byo_nfs: no nfs_host: nfs-0 byo_lb: no lb_fqdn: haproxy-0 vm_ipaddr_start: 10.x.x.224
Table 9. Red Hat OpenShift Inventory Variables
Variable Purpose Defaults
master_nodes The number of master nodes tocreate.
3
infra_nodes The number of infra nodes tocreate.
2
app_nodes The number of app nodes tocreate.
3
public_hosted_zone The DNS zone for your OpenShiftconfiguration.
app_dns_prefix The wildcard prefix for that DNSzone.
apps
www.redhat.com 35 [email protected]

Variable Purpose Defaults
ocp_hostname_prefix Any prefix for the guestnameand hostname of your OpenShiftnodes.
None
byo_nfs Will you be bring an on-premiseNFS server?
no
nfs_host If you are bringing your own,what is the hostname?
nfs-0
byo_lb Will you be bring an on-premiseload balancer?
no
lb_host If you are bringing your own,what is the hostname?
haproxy-0
vm_ipaddr_start The starting IP address for yourrange of contiguous addresses.
A possibility for scaling against your environment could be to create an equal number of master nodesper the number of hypervisors. Remember that the ETCD cluster requires an odd number of nodes forcluster election This would allow us to create anti-affinity rules separating the master nodes andallowing for maximum uptime. However, you can customize the number of all your nodes for theenvironment by modifying the value of the app_nodes, master_nodes, and infra_nodes variables.
Our wrapper script basically takes the number of nodes you will be building and increments yourvm_ipaddr_start with that. Let’s build a sample configuration that matches our OpenShift installvariables above.
3.3.1. Sample Red Hat OpenShift Inventory Variables
Let’s assume that our variables will be the following:
[email protected] 36 www.redhat.com

$ vim ~/git/openshift-ansible-contrib/reference-architecture/vmware-ansible/ocp-on-vmware.ini
... content abbreviated ...public_hosted_zone=example.com
#create_inventory vars# number of nodes of each typemaster_nodes=3infra_nodes=3app_nodes=3
# start node IP address must be a contiguous spacevm_ipaddr_start=10.x.x.224
# node hostname prefixocp_hostname_prefix=ocp3-
... content abbreviated ...
$ cd ~/git/openshift-ansible-contrib/reference-architecture/vmware-ansible/./ocp-on-vmware.py --create_inventory
Here is the output from the command:
# Here is what should go into your DNS records$ORIGIN apps.example.com.* A 10.x.x.234$ORIGIN example.com.nfs-0 A 10.x.x.224haproxy-0 A 10.x.x.234ocp3-master-0 A 10.x.x.225ocp3-master-1 A 10.x.x.226ocp3-master-2 A 10.x.x.227ocp3-app-0 A 10.x.x.228ocp3-app-1 A 10.x.x.229ocp3-app-2 A 10.x.x.230ocp3-infra-0 A 10.x.x.231ocp3-infra-1 A 10.x.x.232ocp3-infra-2 A 10.x.x.233# Please note, if you have chosen to bring your own load balancer and NFS Server you willneed to ensure that# these records are added to DNS and properly resolve.
As you can see based on our input we have the guidelines for our DNS zone creation or modification.
www.redhat.com 37 [email protected]

Also, the wildcard_zone record is shown with our supplied public_hosted_zone and the defaultapp_dns_prefix of apps. Additionally, in that directory we have created a dynamic base inventory fileinfrastructure.json with the specifics to provisioning the environment.
Here is an interesting excerpt from infrastructure.json converted to YAML:
ocp3-master-0: guestname: ocp3-master-0 tag: master ip4addr: 10.19.114.225
Note the "tag: master" in the entry. This will be the annotation created on the virtual machine and ishow OpenShift labels are generated for the VMware virtual machines.
[email protected] 38 www.redhat.com

3.3.2. SSH (Secure Shell) Prerequisite
SSH Configuration
Before beginning the deployment of the VMware infrastructure and the deployment of Red HatOpenShift, a specific SSH configuration must be in place to ensure that the proper SSH keys are usedduring the provisioning process.
The following task should be performed on the server where the Ansible playbookswill be launched.
$ ssh-keygenGenerating public/private rsa key pair.Enter file in which to save the key (/home/user/.ssh/id_rsa):Created directory '/home/user/.ssh'.Enter passphrase (empty for no passphrase):Enter same passphrase again:Your identification has been saved in /home/user/.ssh/id_rsa.Your public key has been saved in /home/user/.ssh/id_rsa.pub.The key fingerprint is:SHA256:SpfGaSv23aDasVsIRPfTNsXaOAbfiuSJ1Pj+e5tN52Y [email protected] key's randomart image is:+---[RSA 2048]----+| . . .. ||. . ... .. || . ooo+* ||. o BoX.o ||o = @ B S. || = O X o. . || = = . o . || o . o.+ || . .ooE.. |+----[SHA256]-----+
$ cp ~/.ssh/id_rsa ~/git/openshift-ansible-contrib/reference-architecture/vmware-ansible/ssh_key/ocp3-installer
Please note, that you are encouraged to copy over your public key "/home/user/.ssh/id_rsa.pub" to thetemplate’s authorized_keys file ahead of time.
www.redhat.com 39 [email protected]

3.3.3. VMware Configuration Variables
Table 10. VMware vCenter Deployment Variables
Variable Purpose Defaults
vcenter_host vCenter IP Address
vcenter_username vCenter Username [email protected]
vcenter_password Password for connecting tovCenter
vcenter_template_name Pre-created VMware templatewith Red Hat Enterprise Linux
ocp3-server-template-2.0.2
vcenter_folder Logical target for VM creation ocp3
vcenter_cluster vCenter cluster for VMs
vcenter_resource_pool Resource Pool to use in vCenter OCP3
VMware Authentication Variables
To connect to our vCenter server and be able to provision VMs with our Ansible playbooks, we willneed three components:
• vcenter_host - vCenter IP Address
• vcenter_username - vCenter Username, this defaults to [email protected] but can beanything
• vcenter_password - Password for connecting to vCenter
Remaining VMware Deployment Variables
Once we have these three authentication variables, the remaining variables as described in VMwarevCenter Prerequisites are:
• vcenter_template_name
• vcenter_folder
• vcenter_cluster
• vcenter_resource_pool
• vcenter_datacenter
• vm_gw
• vm_dns
• vm_netmask
[email protected] 40 www.redhat.com
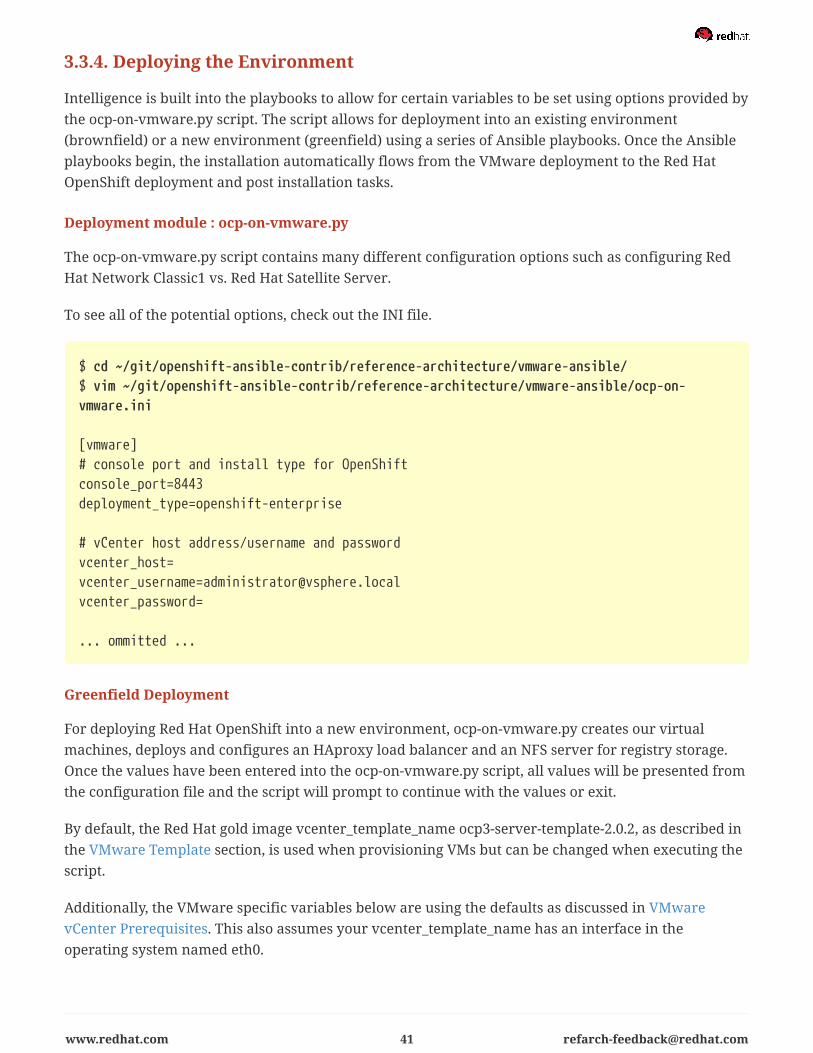
3.3.4. Deploying the Environment
Intelligence is built into the playbooks to allow for certain variables to be set using options provided bythe ocp-on-vmware.py script. The script allows for deployment into an existing environment(brownfield) or a new environment (greenfield) using a series of Ansible playbooks. Once the Ansibleplaybooks begin, the installation automatically flows from the VMware deployment to the Red HatOpenShift deployment and post installation tasks.
Deployment module : ocp-on-vmware.py
The ocp-on-vmware.py script contains many different configuration options such as configuring RedHat Network Classic1 vs. Red Hat Satellite Server.
To see all of the potential options, check out the INI file.
$ cd ~/git/openshift-ansible-contrib/reference-architecture/vmware-ansible/$ vim ~/git/openshift-ansible-contrib/reference-architecture/vmware-ansible/ocp-on-vmware.ini
[vmware]# console port and install type for OpenShiftconsole_port=8443deployment_type=openshift-enterprise
# vCenter host address/username and passwordvcenter_host=vcenter_username=administrator@vsphere.localvcenter_password=
... ommitted ...
Greenfield Deployment
For deploying Red Hat OpenShift into a new environment, ocp-on-vmware.py creates our virtualmachines, deploys and configures an HAproxy load balancer and an NFS server for registry storage.Once the values have been entered into the ocp-on-vmware.py script, all values will be presented fromthe configuration file and the script will prompt to continue with the values or exit.
By default, the Red Hat gold image vcenter_template_name ocp3-server-template-2.0.2, as described inthe VMware Template section, is used when provisioning VMs but can be changed when executing thescript.
Additionally, the VMware specific variables below are using the defaults as discussed in VMwarevCenter Prerequisites. This also assumes your vcenter_template_name has an interface in theoperating system named eth0.
www.redhat.com 41 [email protected]

Example of Greenfield Deployment values
$ cd ~/git/openshift-ansible-contrib/reference-architecture/vmware-ansible/$ ./ocp-on-vmware.py
Configured values:
console_port: 8443deployment_type: openshift-enterprisevcenter_host: 10.x.x.25vcenter_username: [email protected]_password:vcenter_template_name: ocp-server-template-2.0.2vcenter_folder: ocpvcenter_cluster: develvcenter_datacenter: Bostonvcenter_resource_pool: OCP3public_hosted_zone: vcenter.example.comapp_dns_prefix: appsvm_dns: 10.x.x.5vm_gw: 10.x.x.254vm_netmask: 255.255.255.0vm_network: VM Networkbyo_lb: nolb_host: haproxy-0.vcenter.example.combyo_nfs: nonfs_registry_host: nfs-0.vcenter.example.comnfs_registry_mountpoint: /registryapps_dns: apps.vcenter.example.comUsing values from: ./ocp-on-vmware.ini
Continue using these values? [y/N]:
[email protected] 42 www.redhat.com

Brownfield Deployment
The ocp-on-vmware.py script allows for deployments into an existing environment in which VMsalready exists and are subscribed to the proper Red Hat Enterprise Linux channels. The prerequisitepackages will be installed. The script expects the proper VM annotations are created on your VMs asdescribed in Dynamic Inventory. App nodes will be labeled "app", infra nodes labeled "infra" andmaster nodes labeled as "master."
Lastly, the prepared VMs must also have two additional hard disks as the OpenShift setup needs thosefor both docker storage and OpenShift volumes.
Let’s take a look at the tags in the last line below:
• nfs - This tag will install an NFS server using the playbooks and variables given
• HAproxy - This tag installs our load balancer service
• ocp-install - This will install OpenShift on your pre-existing environment
◦ The dynamic inventory script uses your pre-existing annotations to determine labels
• ocp-configure - The final tag listed will configure your persistent registry and scale
www.redhat.com 43 [email protected]
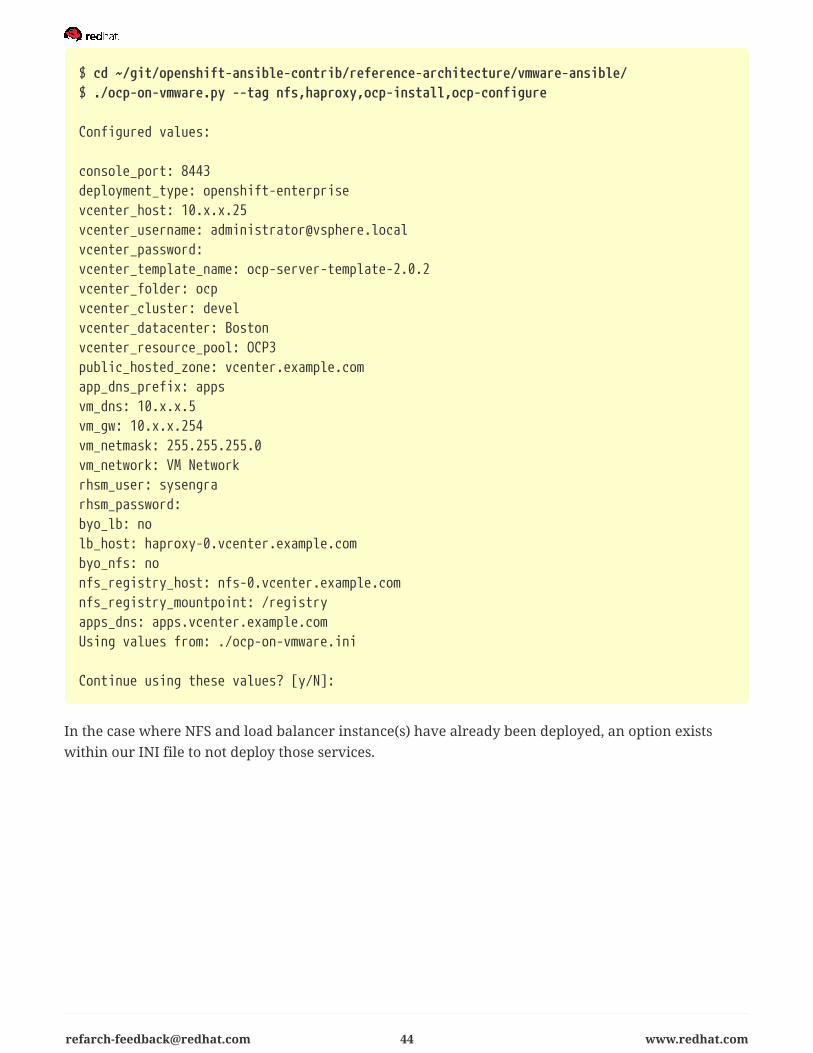
$ cd ~/git/openshift-ansible-contrib/reference-architecture/vmware-ansible/$ ./ocp-on-vmware.py --tag nfs,haproxy,ocp-install,ocp-configure
Configured values:
console_port: 8443deployment_type: openshift-enterprisevcenter_host: 10.x.x.25vcenter_username: [email protected]_password:vcenter_template_name: ocp-server-template-2.0.2vcenter_folder: ocpvcenter_cluster: develvcenter_datacenter: Bostonvcenter_resource_pool: OCP3public_hosted_zone: vcenter.example.comapp_dns_prefix: appsvm_dns: 10.x.x.5vm_gw: 10.x.x.254vm_netmask: 255.255.255.0vm_network: VM Networkrhsm_user: sysengrarhsm_password:byo_lb: nolb_host: haproxy-0.vcenter.example.combyo_nfs: nonfs_registry_host: nfs-0.vcenter.example.comnfs_registry_mountpoint: /registryapps_dns: apps.vcenter.example.comUsing values from: ./ocp-on-vmware.ini
Continue using these values? [y/N]:
In the case where NFS and load balancer instance(s) have already been deployed, an option existswithin our INI file to not deploy those services.
[email protected] 44 www.redhat.com

$ cd ~/git/openshift-ansible-contrib/reference-architecture/vmware-ansible/$ vim ~/git/openshift-ansible-contrib/reference-architecture/vmware-ansible/ocp-on-vmware.ini
... content abbreviated ...
# bringing your own load balancer?byo_lb=yeslb_host=my-load-balancer.lb.example.com
# bringing your own NFS server for registry?byo_nfs=yesnfs_registry_host=my-nfs-server.nfs.example.comnfs_registry_mountpoint=/my-registry
... content abbreviated ...
$ ./ocp-on-vmware.py --tag ocp-install,ocp-configure
Configured values:
console_port: 8443deployment_type: openshift-enterprisevcenter_host: 10.19.114.25vcenter_username: [email protected]_password:vcenter_template_name: ocp-server-template-2.0.2vcenter_folder: ocpvcenter_cluster: develvcenter_datacenter: Bostonvcenter_resource_pool: OCP3public_hosted_zone: vcenter.e2e.bos.redhat.comapp_dns_prefix: appsvm_dns: 10.19.114.5vm_gw: 10.19.115.254vm_netmask: 255.255.254.0vm_network: VM Networkbyo_lb: yeslb_host: my-load-balancer.lb.example.combyo_nfs: yesnfs_registry_host: my-nfs-server.nfs.example.comnfs_registry_mountpoint: /my-registryapps_dns: apps.vcenter.e2e.bos.redhat.comUsing values from: ./ocp-on-vmware.ini
Continue using these values? [y/N]:
www.redhat.com 45 [email protected]

Post Ansible Deployment
Prior to Operational Management, let’s create some DRS anti-affinity rules to ensure maximumavailability for our cluster.
1. Open the VMware vCenter web client, and under cluster, choose settings.
2. Under vSphere DRS, select DRS rules.
3. Click add, and create three rules to keep the master, infra and app nodes separate.
The following VMware documentation goes over creating and configuring anti-affinity rules in depth.
Once the playbooks have successfully completed, the next steps will be to perform the steps defined inOperational Management. In the event that OpenShift failed to install, follow the steps in Appendix C:Installation Failure to restart the installation of OpenShift.
Lastly, set all of the VMs created to High VM Latency to ensure some additional tuning recommendedby VMware for latency sensitive workloads as described here.
1. Open the VMware vCenter web client and under the virtual machines summary tab, in the 'VMHardware' box select 'Edit Settings'.
2. Under, 'VM Options', expand 'Advanced'.
3. Select the 'Latency Sensitivity' dropbox and select 'High'.
Figure 4. VMware High Latency
[email protected] 46 www.redhat.com
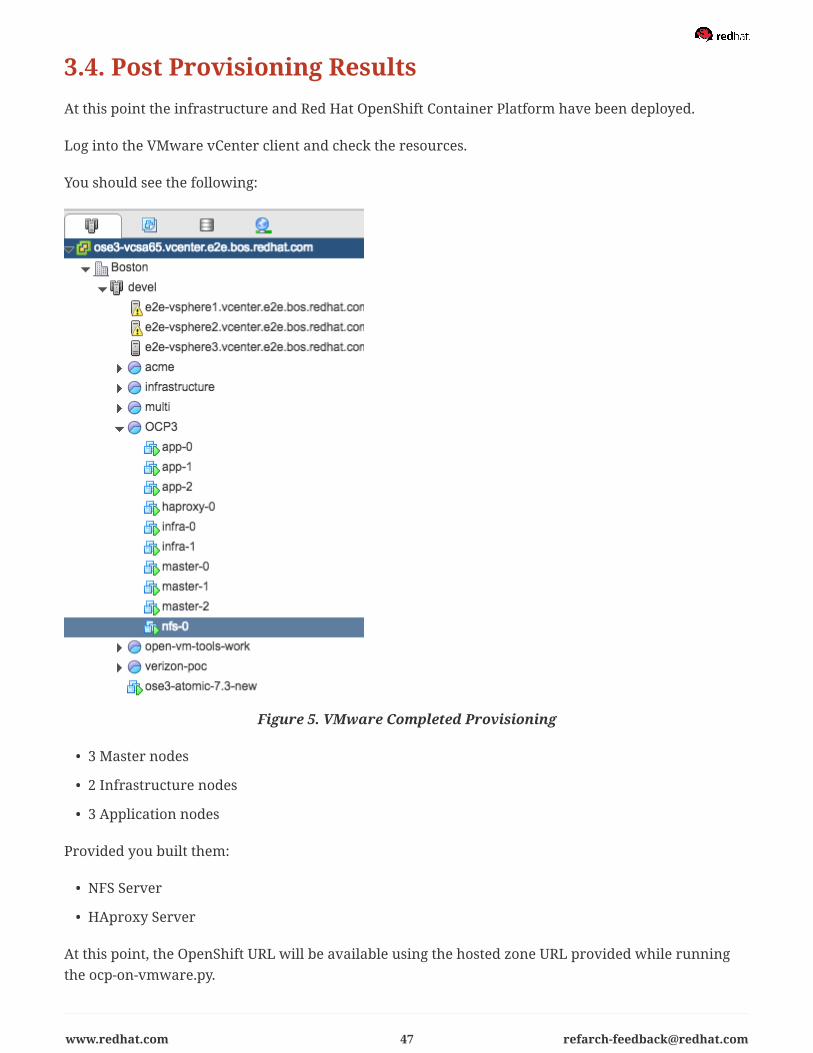
3.4. Post Provisioning ResultsAt this point the infrastructure and Red Hat OpenShift Container Platform have been deployed.
Log into the VMware vCenter client and check the resources.
You should see the following:
Figure 5. VMware Completed Provisioning
• 3 Master nodes
• 2 Infrastructure nodes
• 3 Application nodes
Provided you built them:
• NFS Server
• HAproxy Server
At this point, the OpenShift URL will be available using the hosted zone URL provided while runningthe ocp-on-vmware.py.
www.redhat.com 47 [email protected]

For example, https://ocp3-haproxy-0.example.com:8443
When installing using this method the browser certificate must be accepted threetimes. The certificate must be accepted three times due to the number of masters inthe cluster.
[email protected] 48 www.redhat.com

4. Operational ManagementWith the successful deployment of OpenShift, the following section demonstrates how to confirmproper functionality of Red Hat OpenShift Container Platform.
4.1. Validate the DeploymentNow that OpenShift has been successfully deployed the deployment must be validated to ensureproper operation and functionality. An Ansible script in the git repository will allow for an applicationto be deployed which will test the functionality of the master, nodes, registry, and router. The playbookwill test the deployment and clean up any projects and pods created during the validation run.
The playbook will perform the following steps:
Environment Validation
• Validate the public OpenShift load balancer address from the installation system
• Validate the public OpenShift load balancer address from the master nodes
• Validate the local master address
• Validate the health of the ETCD cluster to ensure all ETCD nodes are healthy
• Create a project in OpenShift called validate
• Create an OpenShift application
• Add a route for the application
• Validate the URL returns a status code of 200 or healthy
• Delete the validation project
Ensure the URLs below and the tag variables match the variables used duringdeployment.
$ * cd ~/git/openshift-ansible-contrib/reference-architecture/vmware-ansible/*$ ocp-on-vmware.py \--tag ocp-demo
www.redhat.com 49 [email protected]
4.2. Gathering hostnamesWith all of the steps that occur during the installation of Red Hat OpenShift, it is possible to lose trackof the names of the instances in the recently deployed environment.
One option to get these hostnames is to run the Dynamic Inventory script manually and look at ourinfra, app and master groups.
To help facilitate the Operational Management Chapter the following hostnames will be used.
• ocp3-master-0.example.com
• ocp3-master-1.example.com
• ocp3-master-2.example.com
• ocp3-infra-0.example.com
• ocp3-infra-1.example.com
• ocp3-infra-2.example.com
• ocp3-app-0.example.com
• ocp3-app-1.example.com
• ocp3-app-2.example.com
4.3. Running DiagnosticsPerform the following steps from the first master node.
To run diagnostics, SSH into the first master node (ocp3-master-0.example.com). Direct access isprovided to the first master node because of the configuration of the local "~/.ssh/config" file.
$ ssh [email protected]
[email protected] 50 www.redhat.com

Connectivity to the first master node (ocp3-master-0.example.com) as the root user should have beenestablished. Run the diagnostics that are included as part of the install.
www.redhat.com 51 [email protected]
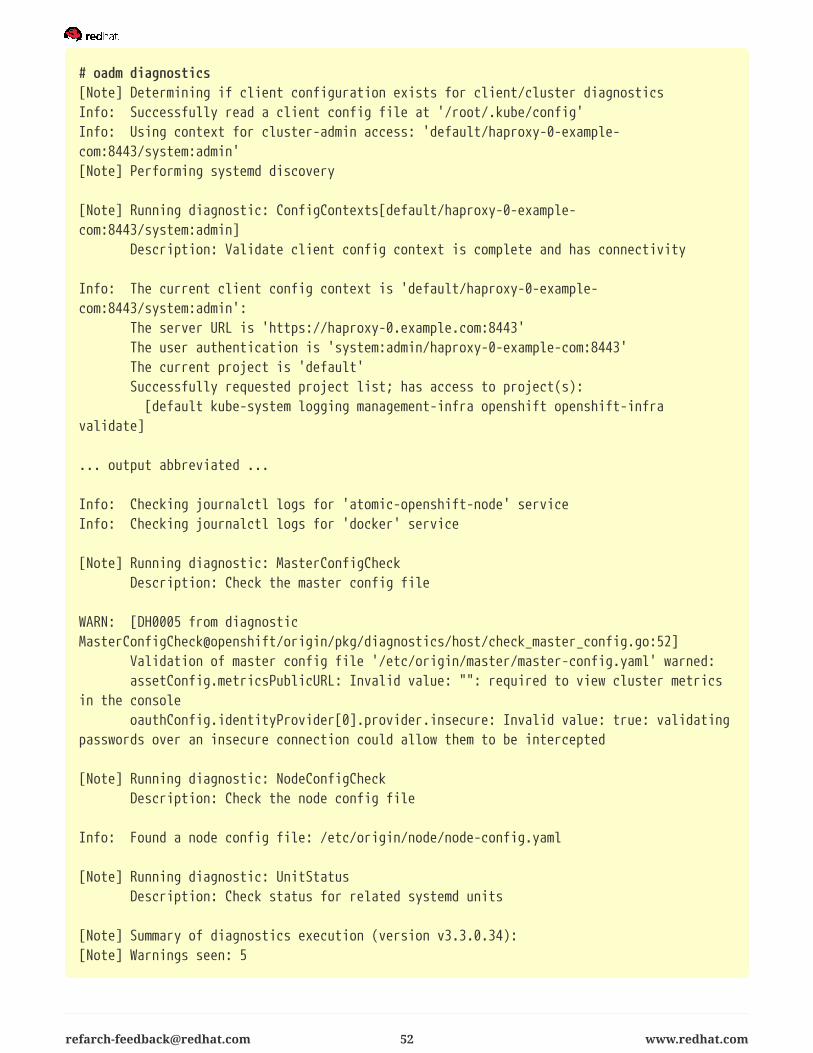
# oadm diagnostics[Note] Determining if client configuration exists for client/cluster diagnosticsInfo: Successfully read a client config file at '/root/.kube/config'Info: Using context for cluster-admin access: 'default/haproxy-0-example-com:8443/system:admin'[Note] Performing systemd discovery
[Note] Running diagnostic: ConfigContexts[default/haproxy-0-example-com:8443/system:admin] Description: Validate client config context is complete and has connectivity
Info: The current client config context is 'default/haproxy-0-example-com:8443/system:admin': The server URL is 'https://haproxy-0.example.com:8443' The user authentication is 'system:admin/haproxy-0-example-com:8443' The current project is 'default' Successfully requested project list; has access to project(s): [default kube-system logging management-infra openshift openshift-infravalidate]
... output abbreviated ...
Info: Checking journalctl logs for 'atomic-openshift-node' serviceInfo: Checking journalctl logs for 'docker' service
[Note] Running diagnostic: MasterConfigCheck Description: Check the master config file
WARN: [DH0005 from diagnosticMasterConfigCheck@openshift/origin/pkg/diagnostics/host/check_master_config.go:52] Validation of master config file '/etc/origin/master/master-config.yaml' warned: assetConfig.metricsPublicURL: Invalid value: "": required to view cluster metricsin the console oauthConfig.identityProvider[0].provider.insecure: Invalid value: true: validatingpasswords over an insecure connection could allow them to be intercepted
[Note] Running diagnostic: NodeConfigCheck Description: Check the node config file
Info: Found a node config file: /etc/origin/node/node-config.yaml
[Note] Running diagnostic: UnitStatus Description: Check status for related systemd units
[Note] Summary of diagnostics execution (version v3.3.0.34):[Note] Warnings seen: 5
[email protected] 52 www.redhat.com

The warnings will not cause issues in the environment
Based on the results of the diagnostics, actions can be taken to remediate any issues.
4.4. Checking the Health of etcdThis section focuses on the etcd cluster. It describes the different commands to ensure the cluster ishealthy.
The internal DNS names of the nodes running etcd must be used.
SSH into the first master node (ocp3-master-0.example.com). Using the output of the commandhostname, issue the etcdctl command to confirm that the cluster is healthy.
$ ssh [email protected]$ sudo -i
# hostnameocp3-master-0.example.com# etcdctl -C https://$(hostname):2379 --ca-file=/etc/origin/master/master.etcd-ca.crt \--cert-file=/etc/origin/master/master.etcd-client.crt \--key-file=/etc/origin/master/master.etcd-client.key cluster-healthmember d3525253178d331c is healthy: got healthy result from https://10.19.114.225:2379member edf71ee725ea87b6 is healthy: got healthy result from https://10.19.114.226:2379member f2e1170c11b5cea8 is healthy: got healthy result from https://10.19.114.227:2379
In this configuration the etcd services are distributed among the OpenShift masternodes.
4.5. Default Node SelectorAs explained in section 2.12.4 node labels are an important part of the Red Hat OpenShift environment.By default of the reference architecture installation, the default node selector is set to "role=apps" in"/etc/origin/master/master-config.yaml" on all of the master nodes. This configuration parameter is setby the Ansible role openshift-default-selector on all masters. The master API service must be restartedwhen making any changes to the master configuration.
SSH into the first master node (ocp-master-0.example.com) to verify the defaultNodeSelector isdefined.
www.redhat.com 53 [email protected]

# vi /etc/origin/master/master-config.yaml...omitted...projectConfig: defaultNodeSelector: "role=app" projectRequestMessage: "" projectRequestTemplate: ""...omitted...
If making any changes to the master configuration then the master API service mustbe restarted or the configuration change will not take place. Any changes and thesubsequent restart must be done on all masters.
4.6. Management of Maximum Pod SizeQuotas are set on ephemeral volumes within pods to prohibit a pod from becoming too large andimpacting the node. There are three places where sizing restrictions should be set. When persistentvolume claims are not set, a pod has the ability to grow as large as the underlying filesystem will allow.The required modifications are set by Ansible. The roles below will be a specific Ansible role thatdefines the parameters along with the locations on the nodes in which the parameters are set.
Red Hat OpenShift Volume Quota
At launch time, user-data creates an XFS partition on the /dev/sdc block device, adds an entry in fstab,and mounts the volume with the option of gquota. If gquota is not set the OpenShift node will not beable to start with the "perFSGroup" parameter defined below. This disk and configuration is done onthe infrastructure and application nodes. The configuration is not done on the masters due to themaster nodes being unschedulable.
SSH into the first infrastructure node (ocp-infra-0.example.com) to verify the entry exists within fstab.
# cat /etc/fstab/dev/sdc /var/lib/origin/openshift.local.volumes xfs gquota 0 0
Docker Storage Setup
The docker-storage-setup file is created at launch time by user-data. This file tells the Docker service touse /dev/sdb and create the volume group of docker-vol. The extra Docker storage options ensure that acontainer can grow no larger than 3G. Docker storage setup is performed on all master, infrastructure,and application nodes.
SSH into the first infrastructure node (ocp-infra-0.example.com) to verify "/etc/sysconfig/docker-storage-setup" matches the information below.
[email protected] 54 www.redhat.com
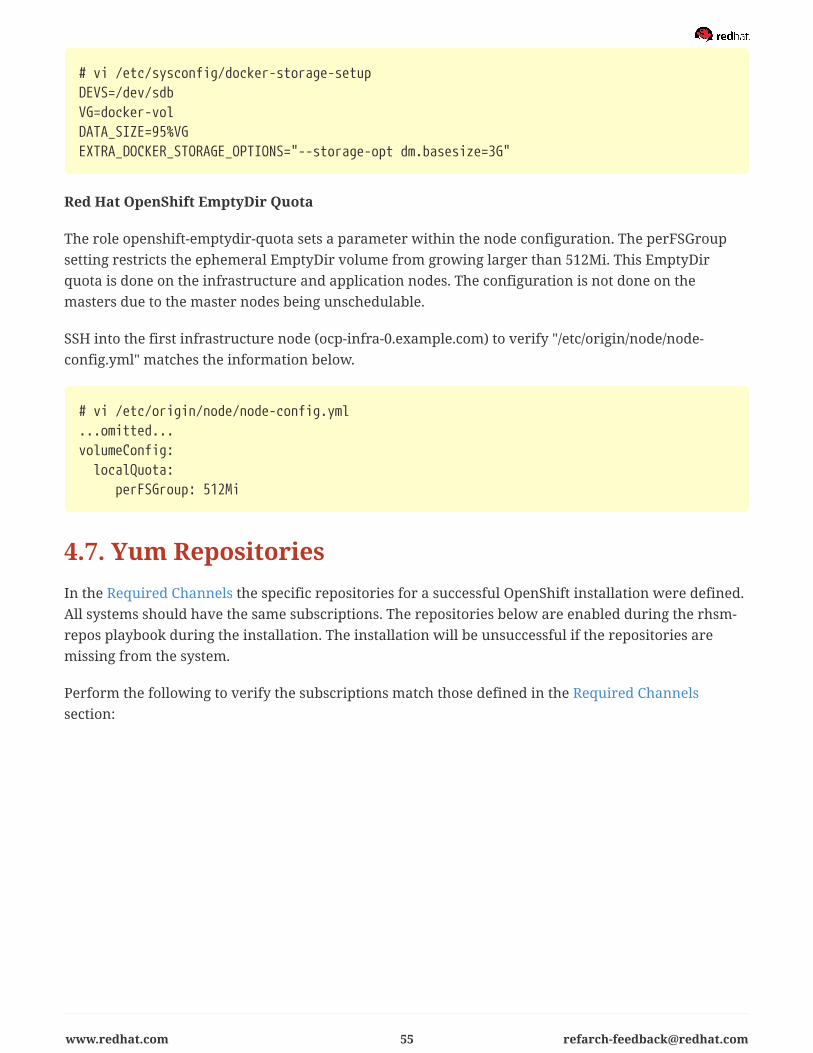
# vi /etc/sysconfig/docker-storage-setupDEVS=/dev/sdbVG=docker-volDATA_SIZE=95%VGEXTRA_DOCKER_STORAGE_OPTIONS="--storage-opt dm.basesize=3G"
Red Hat OpenShift EmptyDir Quota
The role openshift-emptydir-quota sets a parameter within the node configuration. The perFSGroupsetting restricts the ephemeral EmptyDir volume from growing larger than 512Mi. This EmptyDirquota is done on the infrastructure and application nodes. The configuration is not done on themasters due to the master nodes being unschedulable.
SSH into the first infrastructure node (ocp-infra-0.example.com) to verify "/etc/origin/node/node-config.yml" matches the information below.
# vi /etc/origin/node/node-config.yml...omitted...volumeConfig: localQuota: perFSGroup: 512Mi
4.7. Yum RepositoriesIn the Required Channels the specific repositories for a successful OpenShift installation were defined.All systems should have the same subscriptions. The repositories below are enabled during the rhsm-repos playbook during the installation. The installation will be unsuccessful if the repositories aremissing from the system.
Perform the following to verify the subscriptions match those defined in the Required Channelssection:
www.redhat.com 55 [email protected]
# yum repolistLoaded plugins: product-id, search-disabled-repos, subscription-managerrepo id repo namestatus!rhel-7-server-extras-rpms/x86_64 Red HatEnterprise Linux 7 Server - Extras (RPMs)297!rhel-7-server-ose-3.3-rpms/x86_64 Red HatOpenShift Container Platform 3.3 (RPMs)590!rhel-7-server-rpms/7Server/x86_64 Red HatEnterprise Linux 7 Server (RPMs)11,412repolist: 12,299
All other repositories are disabled and only those repositories defined in the Ansiblerole rhsm-repos are enabled. If you use Red Hat Satellite Server, you will have theadditional Satellite tools repo.
4.8. Console AccessThis section will cover logging into the Red Hat OpenShift Container Platform management console viathe GUI and the CLI. After logging in via one of these methods, applications can then be deployed andmanaged.
4.8.1. Log into GUI (Graphical User Interface) console and deploy anapplication
Perform the following steps from the local workstation.
Use the CNAME of the load balancer to access GUI console login.
Open a browser and access https://haproxy-0.example.com/console
To deploy an application, click on the new project button. Provide a name and click Create. Next,deploy the jenkins-ephemeral instant app by clicking the corresponding box. Accept the defaults andclick create. Instructions along with a URL will be provided for how to access the application on thenext screen. Click continue to overview and bring up the management page for the application. Clickon the link provided and access the application to confirm functionality. Wait for the application tofinish deployment.
4.8.2. Log into the CLI (Command-Line Interface) and Deploy an Application
Perform the following steps from your local workstation.
[email protected] 56 www.redhat.com

Install the oc client by visiting the public URL of the OpenShift deployment. For example,https://haproxy-0.example.com/console/command-line and click latest release. When directed tohttps://access.redhat.com, login with the valid Red Hat customer credentials and download the clientrelevant to the current workstation. Follow the instructions located on the production documentationsite for getting started with the cli.
A token is required to login using GitHub OAuth and OpenShift. The token is presented on thehttps://haproxy-0.example.com/console/command-line page. Click the click to show token hyperlinkand perform the following on the workstation in which the oc client was installed.
$ oc login https://haproxy-0.example.com --token=fEAjn7LnZE6v5SOocCSRVmUWGBNIIEKbjD9h-Fv7p09
www.redhat.com 57 [email protected]
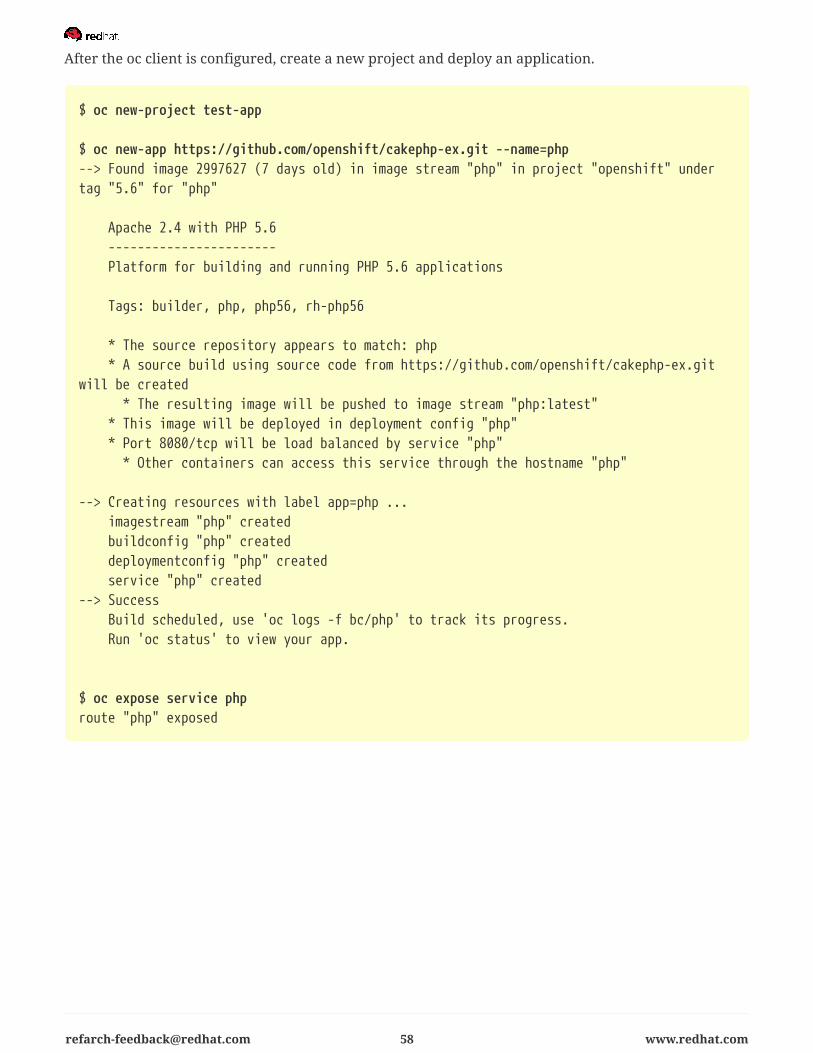
After the oc client is configured, create a new project and deploy an application.
$ oc new-project test-app
$ oc new-app https://github.com/openshift/cakephp-ex.git --name=php--> Found image 2997627 (7 days old) in image stream "php" in project "openshift" undertag "5.6" for "php"
Apache 2.4 with PHP 5.6 ----------------------- Platform for building and running PHP 5.6 applications
Tags: builder, php, php56, rh-php56
* The source repository appears to match: php * A source build using source code from https://github.com/openshift/cakephp-ex.gitwill be created * The resulting image will be pushed to image stream "php:latest" * This image will be deployed in deployment config "php" * Port 8080/tcp will be load balanced by service "php" * Other containers can access this service through the hostname "php"
--> Creating resources with label app=php ... imagestream "php" created buildconfig "php" created deploymentconfig "php" created service "php" created--> Success Build scheduled, use 'oc logs -f bc/php' to track its progress. Run 'oc status' to view your app.
$ oc expose service phproute "php" exposed
[email protected] 58 www.redhat.com

Display the status of the application.
$ oc statusIn project test-app on server https://haproxy-0.example.com
http://test-app.apps.example.com to pod port 8080-tcp (svc/php) dc/php deploys istag/php:latest <- bc/php builds https://github.com/openshift/cakephp-ex.git with openshift/php:5.6 deployment #1 deployed about a minute ago - 1 pod
1 warning identified, use 'oc status -v' to see details.
Access the application by accessing the URL provided by oc status. The CakePHP application should bevisible now.
4.9. Explore the Environment
4.9.1. List Nodes and Set Permissions
If you try to run the following command, it should fail.
# oc get nodes --show-labelsError from server: User "[email protected]" cannot list all nodes in the cluster
The reason it is failing is because the permissions for that user are incorrect. Get the username andconfigure the permissions.
$ oc whoami
Once the username has been established, log back into a master node and enable the appropriatepermissions for your user. Perform the following step from the first master (ocp3-master-0.example.com).
# oadm policy add-cluster-role-to-user cluster-admin [email protected]
www.redhat.com 59 [email protected]

Attempt to list the nodes again and show the labels.
# oc get nodes --show-labelsNAME STATUS AGE LABELSocp3-app-0.example.com Ready 2dbeta.kubernetes.io/arch=amd64,beta.kubernetes.io/os=linux,kubernetes.io/hostname=ocp3-app-0.example.com,role=appocp3-app-1.example.com Ready 2dbeta.kubernetes.io/arch=amd64,beta.kubernetes.io/os=linux,kubernetes.io/hostname=ocp3-app-1.example.com,role=appocp3-app-2.example.com Ready 2dbeta.kubernetes.io/arch=amd64,beta.kubernetes.io/os=linux,kubernetes.io/hostname=ocp3-app-2.example.com,role=appocp3-infra-0.example.com Ready 2dbeta.kubernetes.io/arch=amd64,beta.kubernetes.io/os=linux,kubernetes.io/hostname=ocp3-infra-0.example.com,role=infraocp3-infra-1.example.com Ready 2dbeta.kubernetes.io/arch=amd64,beta.kubernetes.io/os=linux,kubernetes.io/hostname=ocp3-infra-1.example.com,role=infraocp3-infra-2.example.com Ready 2dbeta.kubernetes.io/arch=amd64,beta.kubernetes.io/os=linux,kubernetes.io/hostname=ocp3-infra-2.example.com,role=infraocp3-master-0.example.com Ready,SchedulingDisabled 2dbeta.kubernetes.io/arch=amd64,beta.kubernetes.io/os=linux,kubernetes.io/hostname=ocp3-master-0.example.com,role=masterocp3-master-1.example.com Ready,SchedulingDisabled 2dbeta.kubernetes.io/arch=amd64,beta.kubernetes.io/os=linux,kubernetes.io/hostname=ocp3-master-1.example.com,role=masterocp3-master-2.example.com Ready,SchedulingDisabled 2dbeta.kubernetes.io/arch=amd64,beta.kubernetes.io/os=linux,kubernetes.io/hostname=ocp3-master-2.example.com,role=master
4.9.2. List Router and Registry
List the router and registry by changing to the default project.
Perform the following steps from your the workstation.
[email protected] 60 www.redhat.com
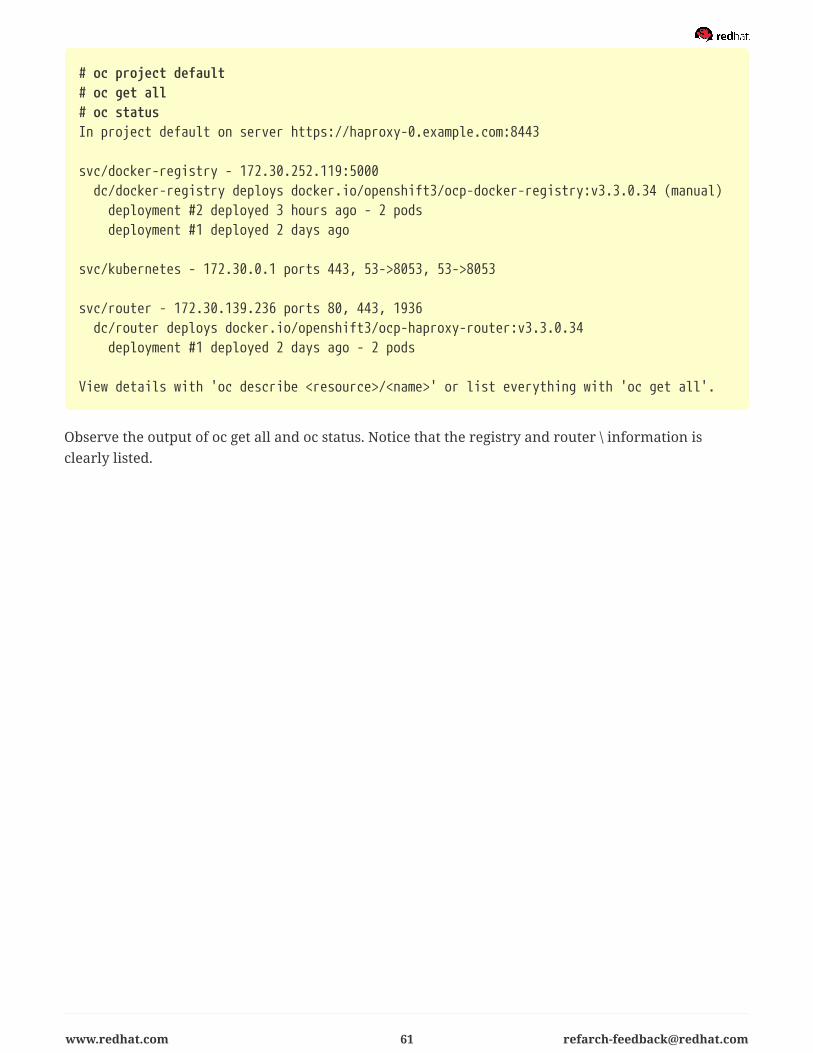
# oc project default# oc get all# oc statusIn project default on server https://haproxy-0.example.com:8443
svc/docker-registry - 172.30.252.119:5000 dc/docker-registry deploys docker.io/openshift3/ocp-docker-registry:v3.3.0.34 (manual) deployment #2 deployed 3 hours ago - 2 pods deployment #1 deployed 2 days ago
svc/kubernetes - 172.30.0.1 ports 443, 53->8053, 53->8053
svc/router - 172.30.139.236 ports 80, 443, 1936 dc/router deploys docker.io/openshift3/ocp-haproxy-router:v3.3.0.34 deployment #1 deployed 2 days ago - 2 pods
View details with 'oc describe <resource>/<name>' or list everything with 'oc get all'.
Observe the output of oc get all and oc status. Notice that the registry and router \ information isclearly listed.
www.redhat.com 61 [email protected]
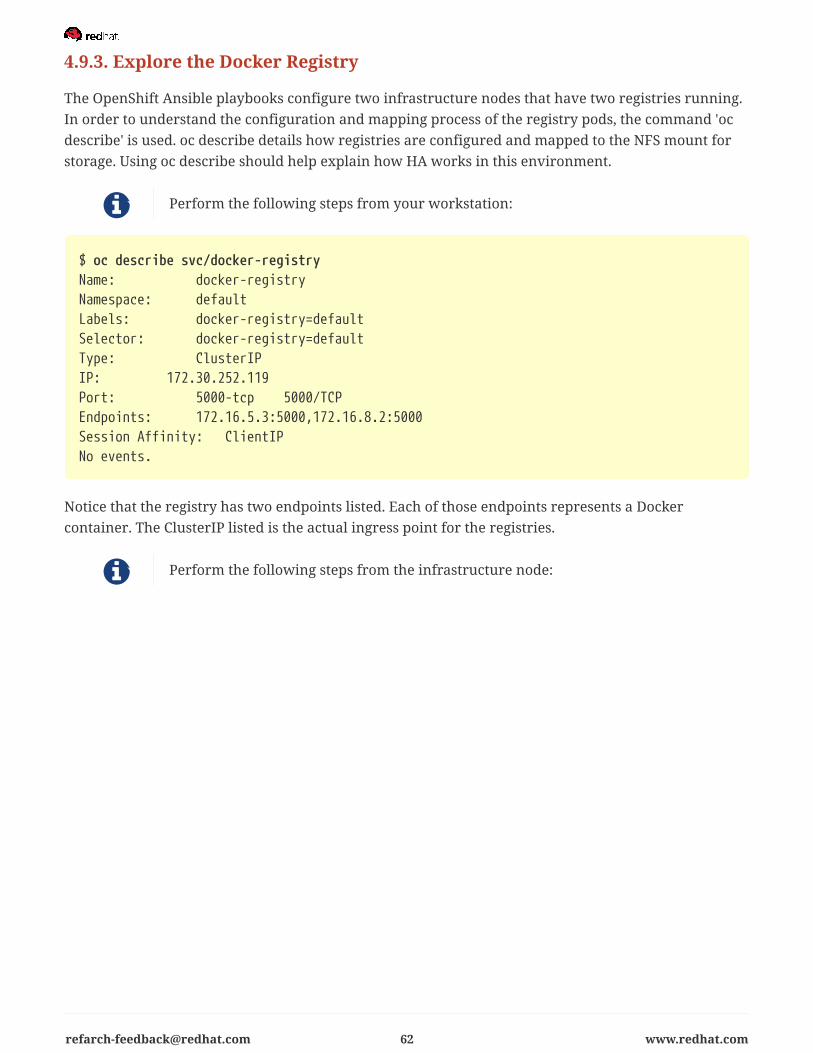
4.9.3. Explore the Docker Registry
The OpenShift Ansible playbooks configure two infrastructure nodes that have two registries running.In order to understand the configuration and mapping process of the registry pods, the command 'ocdescribe' is used. oc describe details how registries are configured and mapped to the NFS mount forstorage. Using oc describe should help explain how HA works in this environment.
Perform the following steps from your workstation:
$ oc describe svc/docker-registryName: docker-registryNamespace: defaultLabels: docker-registry=defaultSelector: docker-registry=defaultType: ClusterIPIP: 172.30.252.119Port: 5000-tcp 5000/TCPEndpoints: 172.16.5.3:5000,172.16.8.2:5000Session Affinity: ClientIPNo events.
Notice that the registry has two endpoints listed. Each of those endpoints represents a Dockercontainer. The ClusterIP listed is the actual ingress point for the registries.
Perform the following steps from the infrastructure node:
[email protected] 62 www.redhat.com

Once the endpoints are known, go to one of the infra nodes running a registry and grab someinformation about it. Capture the container UID in the leftmost column of the output.
# oc get podsNAME READY STATUS RESTARTS AGEdocker-registry-2-8b7c6 1/1 Running 0 2hdocker-registry-2-drhgz 1/1 Running 0 2hk8s_registry.90479e7d_docker-registry-2-jueep_default_d5882b1f-5595-11e6-a247-0eaf3ad438f1_ffc47696
www.redhat.com 63 [email protected]
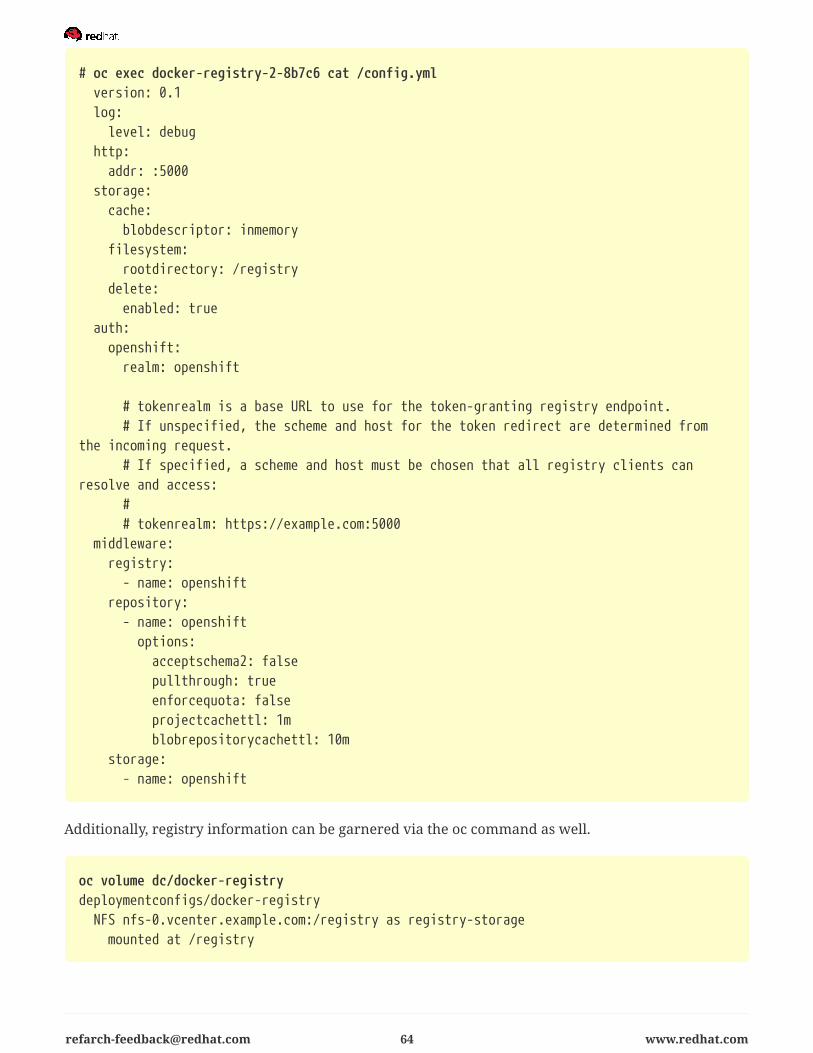
# oc exec docker-registry-2-8b7c6 cat /config.yml version: 0.1 log: level: debug http: addr: :5000 storage: cache: blobdescriptor: inmemory filesystem: rootdirectory: /registry delete: enabled: true auth: openshift: realm: openshift
# tokenrealm is a base URL to use for the token-granting registry endpoint. # If unspecified, the scheme and host for the token redirect are determined fromthe incoming request. # If specified, a scheme and host must be chosen that all registry clients canresolve and access: # # tokenrealm: https://example.com:5000 middleware: registry: - name: openshift repository: - name: openshift options: acceptschema2: false pullthrough: true enforcequota: false projectcachettl: 1m blobrepositorycachettl: 10m storage: - name: openshift
Additionally, registry information can be garnered via the oc command as well.
oc volume dc/docker-registrydeploymentconfigs/docker-registry NFS nfs-0.vcenter.example.com:/registry as registry-storage mounted at /registry
[email protected] 64 www.redhat.com

4.9.4. Explore Docker Storage
This section will explore the Docker storage on an infrastructure node.
The example below can be performed on any node, but for this example the infrastructure node(ocp-infra-0.example.com) is used.
The output below verifies Docker storage is not using a loop back device.
$ docker info...omitted... Pool Name: docker--vol-docker--pool Pool Blocksize: 524.3 kB Base Device Size: 3.221 GB Backing Filesystem: xfs Data file: Metadata file: Data Space Used: 1.302 GB Data Space Total: 40.8 GB Data Space Available: 39.5 GB Metadata Space Used: 315.4 kB Metadata Space Total: 46.14 MB Metadata Space Available: 45.82 MB Udev Sync Supported: true Deferred Removal Enabled: true Deferred Deletion Enabled: true Deferred Deleted Device Count: 0 Library Version: 1.02.107-RHEL7 (2015-10-14)Execution Driver: native-0.2...omitted...Registries: registry.access.redhat.com (secure), docker.io (secure)
Verify three disks are attached to the instance. The disk /dev/sda is used for the OS, /dev/sdb is used forDocker storage, and /dev/sdc is used for EmptyDir storage for containers that do not use a persistentvolume.
www.redhat.com 65 [email protected]

$ fdisk -l
Disk /dev/sdb: 42.9 GB, 42949672960 bytes, 83886080 sectorsUnits = sectors of 1 * 512 = 512 bytesSector size (logical/physical): 512 bytes / 512 bytesI/O size (minimum/optimal): 512 bytes / 512 bytesDisk label type: dosDisk identifier: 0x00000000
Device Boot Start End Blocks Id System/dev/sdb1 2048 83886079 41942016 8e Linux LVM
Disk /dev/sdc: 42.9 GB, 42949672960 bytes, 83886080 sectorsUnits = sectors of 1 * 512 = 512 bytesSector size (logical/physical): 512 bytes / 512 bytesI/O size (minimum/optimal): 512 bytes / 512 bytes
Disk /dev/sda: 42.9 GB, 42949672960 bytes, 83886080 sectorsUnits = sectors of 1 * 512 = 512 bytesSector size (logical/physical): 512 bytes / 512 bytesI/O size (minimum/optimal): 512 bytes / 512 bytesDisk label type: dos
[email protected] 66 www.redhat.com
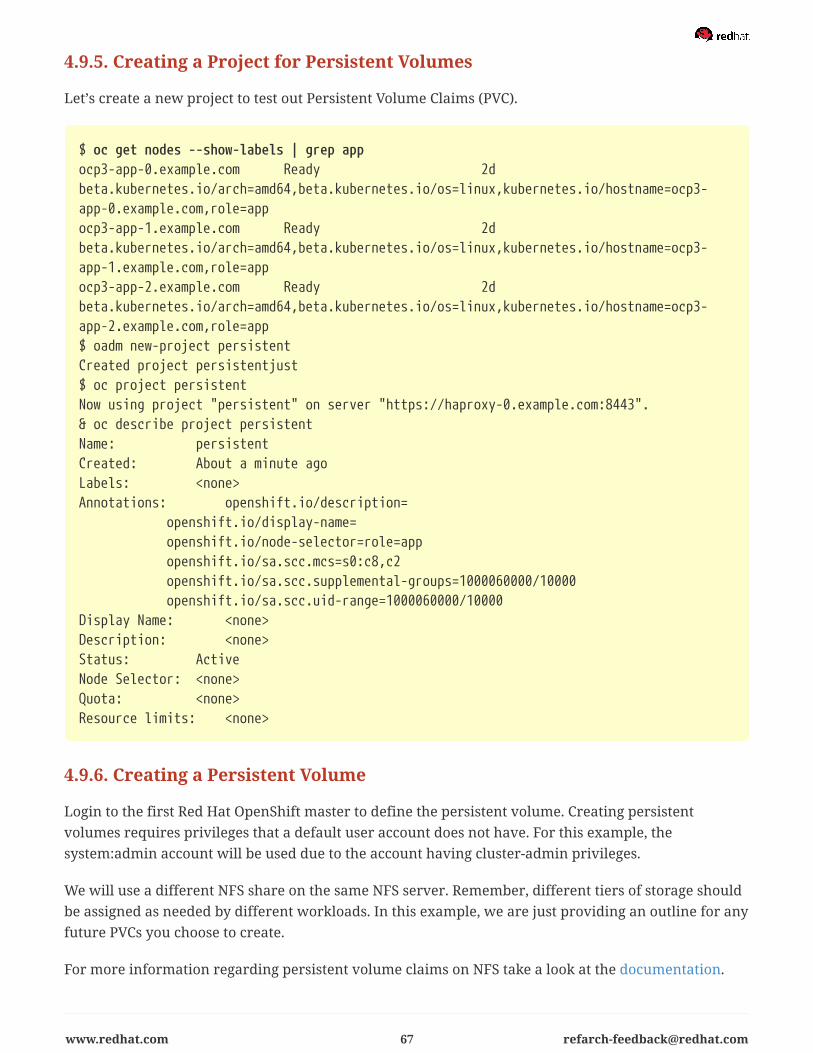
4.9.5. Creating a Project for Persistent Volumes
Let’s create a new project to test out Persistent Volume Claims (PVC).
$ oc get nodes --show-labels | grep appocp3-app-0.example.com Ready 2dbeta.kubernetes.io/arch=amd64,beta.kubernetes.io/os=linux,kubernetes.io/hostname=ocp3-app-0.example.com,role=appocp3-app-1.example.com Ready 2dbeta.kubernetes.io/arch=amd64,beta.kubernetes.io/os=linux,kubernetes.io/hostname=ocp3-app-1.example.com,role=appocp3-app-2.example.com Ready 2dbeta.kubernetes.io/arch=amd64,beta.kubernetes.io/os=linux,kubernetes.io/hostname=ocp3-app-2.example.com,role=app$ oadm new-project persistentCreated project persistentjust$ oc project persistentNow using project "persistent" on server "https://haproxy-0.example.com:8443".& oc describe project persistentName: persistentCreated: About a minute agoLabels: <none>Annotations: openshift.io/description= openshift.io/display-name= openshift.io/node-selector=role=app openshift.io/sa.scc.mcs=s0:c8,c2 openshift.io/sa.scc.supplemental-groups=1000060000/10000 openshift.io/sa.scc.uid-range=1000060000/10000Display Name: <none>Description: <none>Status: ActiveNode Selector: <none>Quota: <none>Resource limits: <none>
4.9.6. Creating a Persistent Volume
Login to the first Red Hat OpenShift master to define the persistent volume. Creating persistentvolumes requires privileges that a default user account does not have. For this example, thesystem:admin account will be used due to the account having cluster-admin privileges.
We will use a different NFS share on the same NFS server. Remember, different tiers of storage shouldbe assigned as needed by different workloads. In this example, we are just providing an outline for anyfuture PVCs you choose to create.
For more information regarding persistent volume claims on NFS take a look at the documentation.
www.redhat.com 67 [email protected]

# oc project persistent# vi nfs-pv.yamlapiVersion: v1kind: PersistentVolumemetadata: name: pv0001spec: capacity: storage: 5Gi accessModes: - ReadWriteOnce nfs: path: /pv1 server: nfs-0.example.com persistentVolumeReclaimPolicy: Recycle# oc create -f pv.yamlpersistentvolume "persistent" created# oc get pvNAME CAPACITY ACCESSMODES STATUS CLAIM REASON AGEpersistent 5Gi RWO Available 47s
4.9.7. Creating a Persistent Volumes Claim
The persistent volume claim will change the pod from using EmptyDir non-persistent storage tostorage backed by an NFS volume. To claim space from the persistent volume a database server will beused to demonstrate a persistent volume claim.
[email protected] 68 www.redhat.com
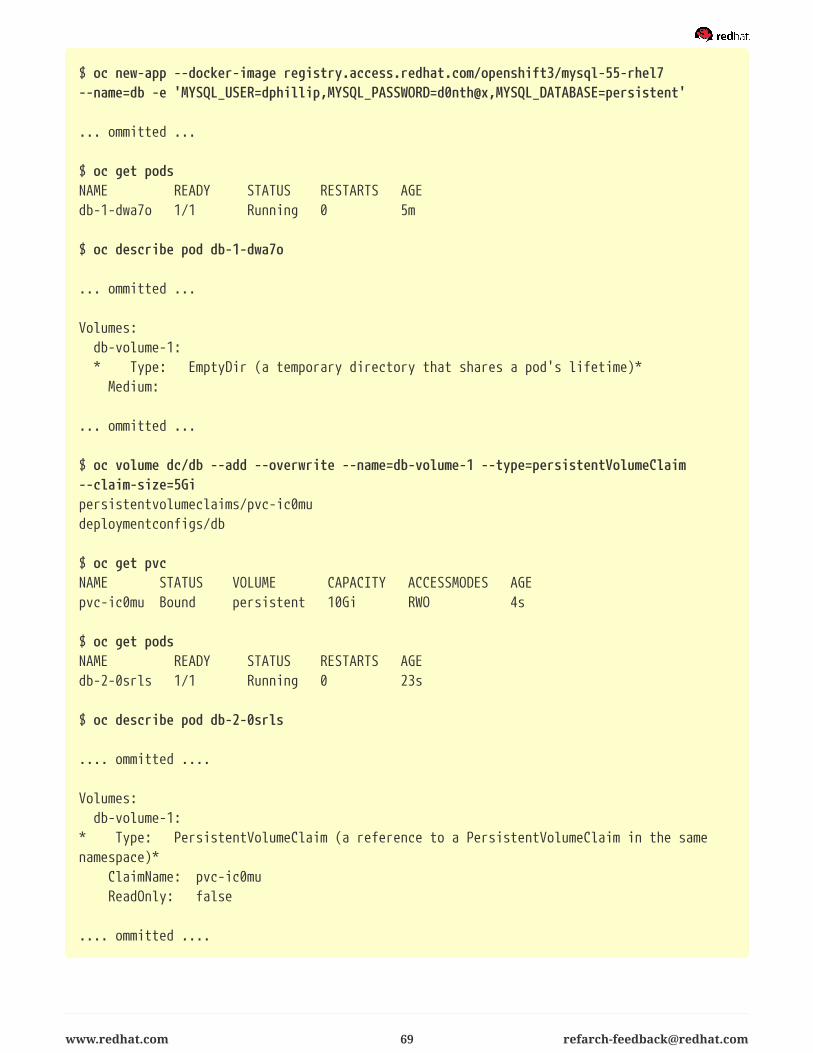
$ oc new-app --docker-image registry.access.redhat.com/openshift3/mysql-55-rhel7--name=db -e 'MYSQL_USER=dphillip,MYSQL_PASSWORD=d0nth@x,MYSQL_DATABASE=persistent'
... ommitted ...
$ oc get podsNAME READY STATUS RESTARTS AGEdb-1-dwa7o 1/1 Running 0 5m
$ oc describe pod db-1-dwa7o
... ommitted ...
Volumes: db-volume-1: * Type: EmptyDir (a temporary directory that shares a pod's lifetime)* Medium:
... ommitted ...
$ oc volume dc/db --add --overwrite --name=db-volume-1 --type=persistentVolumeClaim--claim-size=5Gipersistentvolumeclaims/pvc-ic0mudeploymentconfigs/db
$ oc get pvcNAME STATUS VOLUME CAPACITY ACCESSMODES AGEpvc-ic0mu Bound persistent 10Gi RWO 4s
$ oc get podsNAME READY STATUS RESTARTS AGEdb-2-0srls 1/1 Running 0 23s
$ oc describe pod db-2-0srls
.... ommitted ....
Volumes: db-volume-1:* Type: PersistentVolumeClaim (a reference to a PersistentVolumeClaim in the samenamespace)* ClaimName: pvc-ic0mu ReadOnly: false
.... ommitted ....
www.redhat.com 69 [email protected]

The above has created a database pod with a persistent volume claim named database and hasattached the claim to the previously EmptyDir volume.
4.10. Testing FailureIn this section, reactions to failure are explored. After a successful installation and completion of thesmoke tests nodes above, failure testing is executed.
4.10.1. Generate a Master Outage
Perform the following steps from the VMware vCenter client.
Log into the VMware vCenter client. Under VMs and Templates, locate your running ocp3-master-2.example.com VM, select it, right click and change the state to Power off.
Ensure the console can still be accessed by opening a browser and accessing haproxy-0.example.com.At this point, the cluster is in a degraded state because only two out of three master nodes are running.
4.10.2. Observe the Behavior of etcd with a Failed Master Node
SSH into the first master node (ocp3-master-0.example.com). Using the output of the commandhostname, issue the etcdctl command to confirm that the cluster is healthy.
$ ssh [email protected]
# hostnameip-10-20-1-106.ec2.internal# etcdctl -C https://$(hostname):2379 --ca-file=/etc/origin/master/master.etcd-ca.crt--cert-file=/etc/origin/master/master.etcd-client.crt --key-file=/etc/origin/master/master.etcd-client.key cluster-healthmember d3525253178d331c is healthy: got healthy result from https://10.19.114.225:2379failed to check the health of member edf71ee725ea87b6 on https://10.19.114.226:2379: Gethttps://10.19.114.226:2379/health: dial tcp 10.19.114.226:2379: i/o timeoutmember edf71ee725ea87b6 is unreachable: [https://10.19.114.226:2379] are all unreachablemember f2e1170c11b5cea8 is healthy: got healthy result from https://10.19.114.227:2379
Notice how one member of the etcd cluster is now unreachable.
Restart ocp3-master-2.example.com by following the same steps in the VMWare console as notedabove.
4.10.3. Generate an Infrastruture Node outage
This section shows what to expect when an infrastructure node fails or is brought down intentionally.
[email protected] 70 www.redhat.com

Confirm Application Accessibility
Perform the following steps from the browser on a local workstation.
Before bringing down an infrastructure node, check behavior and ensure things are working asexpected. The goal of testing an infrastructure node outage is to see how the OpenShift routers andregistries behave. Confirm the simple application deployed from before is still functional. If it is not,deploy a new version. Access the application to confirm connectivity. As a reminder, to find therequired information and ensure the application is still running, list the projects, change to the projectthat the application is deployed in, get the status of the application which includes the URL and accessthe application via that URL.
$ oc get projectsNAME DISPLAY NAME STATUSopenshift Activeopenshift-infra Activettester Activetest-app1 Activedefault Activemanagement-infra Active
$ oc project test-app1Now using project "test-app1" on server "https://haproxy-0.example.com".
$ oc statusIn project test-app1 on server https://haproxy-0.example.com
http://php-test-app1.apps.sysdeseng.com to pod port 8080-tcp (svc/php-prod) dc/php-prod deploys istag/php-prod:latest <- bc/php-prod builds https://github.com/openshift/cakephp-ex.git with openshift/php:5.6 deployment #1 deployed 27 minutes ago - 1 pod
1 warning identified, use 'oc status -v' to see details.
Open a browser and ensure the application is still accessible.
Confirm Registry Functionality
This section is another step to take before initiating the outage of the infrastructure node to ensure thatthe registry is functioning properly. The goal is to push to the Red Hat OpenShift registry.
Perform the following steps from a CLI on a local workstation and ensure that the occlient has been configured.
A token is needed so that the Docker registry can be logged into.
www.redhat.com 71 [email protected]

# oc whoami -tfeAeAgL139uFFF_72bcJlboTv7gi_bo373kf1byaAT8
Pull a new Docker image for the purposes of test pushing.
# docker pull fedora/apache# docker images
Capture the registry endpoint. The svc/docker-registry shows the endpoint.
# oc statusIn project default on server https://haproxy-0.example.com:8443
svc/docker-registry - 172.30.252.119:5000 dc/docker-registry deploys docker.io/openshift3/ocp-docker-registry:v3.3.0.34 (manual) deployment #2 deployed 5 hours ago - 2 pods deployment #1 deployed 2 days ago
svc/kubernetes - 172.30.0.1 ports 443, 53->8053, 53->8053
svc/router - 172.30.139.236 ports 80, 443, 1936 dc/router deploys docker.io/openshift3/ocp-haproxy-router:v3.3.0.34 deployment #1 deployed 2 days ago - 2 pods
View details with 'oc describe <resource>/<name>' or list everything with 'oc get all'.
Tag the Docker image with the endpoint from the previous step.
# docker tag docker.io/fedora/apache 172.30.252.119:5000/openshift/prodapache
Check the images and ensure the newly tagged image is available.
# docker images
[email protected] 72 www.redhat.com
Issue a Docker login.
# docker login -u [email protected] -e [email protected] -p_7yJcnXfeRtAbJVEaQwPwXreEhlV56TkgDwZ6UEUDWw 172.30.252.119:5000
# oadm policy add-role-to-user admin [email protected] -n openshift# oadm policy add-role-to-user system:registry [email protected]# oadm policy add-role-to-user system:image-builder [email protected]
Push the image to the OpenShift registry now.
# docker push 172.30.110.222:5000/openshift/prodapacheThe push refers to a repository [172.30.252.119:5000/openshift/prodapache]389eb3601e55: Layer already existsc56d9d429ea9: Layer already exists2a6c028a91ff: Layer already exists11284f349477: Layer already exists6c992a0e818a: Layer already existslatest: digest: sha256:ca66f8321243cce9c5dbab48dc79b7c31cf0e1d7e94984de61d37dfdac4e381fsize: 6186
www.redhat.com 73 [email protected]

Get Location of Router and Registry.
Perform the following steps from the CLI of a local workstation.
Change to the default OpenShift project and check the router and registry pod locations.
# oc project defaultNow using project "default" on server "https://haproxy-0.example.com".
# oc get podsNAME READY STATUS RESTARTS AGEdocker-registry-2-defwy 1/1 Running 0 5hdocker-registry-2-fswef 1/1 Running 0 5hrouter-1-253lh 1/1 Running 0 2drouter-1-lj1um 1/1 Running 0 2d
# oc describe pod docker-registry-2-fswef | grep -i nodeNode: ocp3-infra-1.example.com/10.19.114.232# oc describe pod docker-registry-2-defwy | grep -i nodeNode: ocp3-infra-2.example.com/10.19.114.233# oc describe pod router-1-253lh | grep -i nodeNode: ocp3-infra-0.example.com/10.19.114.231# oc describe pod router-1-lj1um | grep -i nodeNode: ocp3-infra-1.example.com/10.19.114.232
Initiate the Failure and Confirm Functionality
Perform the following steps from the VMware vCenter console
Log into the VMware console. Under VMs and Templates, locate your running ocp-infra-1.example.comVM, select it, right click and change the state to Power off. Wait a minute or two for the registry andpod to migrate over to ocp3-infra-0. Check the registry locations and confirm that they are on the samenode.
$ oc describe pod router-1-lj1um | grep -i nodeNode: ocp3-infra-0.example.com/10.19.114.231$ oc describe pod docker-registry-2-fswef | grep -i nodeNode: ocp3-infra-0.example.com/10.19.114.231
Follow the procedures above to ensure a Docker image can still be pushed to the registry now thatocp3-infra-1 is down.
[email protected] 74 www.redhat.com

4.11. Updating the OpenShift DeploymentPlaybooks are provided to upgrade the OpenShift deployment when minor releases occur.
4.11.1. Performing the Upgrade
From the workstation that was used to clone the openshift-ansible-contrib repo run the following toensure that the newest openshift-ansible playbooks and roles are available and to perform the minorupgrade against the deployed environment.
$ yum update atomic-openshift-utils ansible$ cd ~/git/openshift-ansible-contrib/reference-architecture/vmware-ansible/$ ocp-on-vmware.py \--tag ocp-update
4.11.2. Upgrading and Restarting the OpenShift Environment (Opitonal)
The openshift-minor-update.yaml playbook will not restart the instances after updating occurs.Restarting the nodes including the masters can be completed by adding the following line to the minor-update.yaml playbook.
$ cd ~/git/openshift-ansible-contrib/playbooks$ vi minor-update.yaml openshift_rolling_restart_mode: system
4.11.3. Specifying the OpenShift Version when Upgrading
The deployed OpenShift environment may not be the latest major version of OpenShift. The minor-update.yaml allows for a variable to be passed to perform an upgrade on previous versions. Below is anexample of performing the upgrade on a 3.3 environment.
$ yum update atomic-openshift-utils ansible$ cd ~/git/openshift-ansible-contrib/reference-architecture/vmware-ansible/$ vi ocp-on-vmware.ini# OpenShift Versionopenshift_vers: v3_3$ ocp-on-vmware.py \--create_ocp_vars$ ocp-on-vmware.py \--tag ocp-update
www.redhat.com 75 [email protected]

5. ConclusionRed Hat solutions involving Red Hat OpenShift Container Platform are created to deliver a production-ready foundation that simplifies the deployment process, shares the latest best practices, and providesa stable highly available environment on which to run your production applications.
This reference architecture covered the following topics:
• A completely provisioned Red Hat OpenShift Container Platform infrastructure in VMware
• OpenShift masters spread across multiple VMware cluster nodes utilizing anti-affinity pinningrules
• Infrastructure nodes spread across multiple VMware cluster nodes with router and registry podsscaled accordingly
• Native integration with existing services and the capacity to create those services if need be
◦ HAproxy load balancer for the master instances and for the infrastructure instances
◦ NFS storage for persistent storage of container images
• Native integration with VMware services like VMDK disks, HA, SIOC
◦ VMDK thin provisioned storage for persistent /var/lib/docker on each node
◦ VMware Storage IO Control SIOC to address latency workloads on nodes
◦ VMware native HA for high availability on nodes
• Creation of applications
• Validating the environment
• Testing failover
For any questions or concerns, please email [email protected] and ensure to visit the RedHat Reference Architecture page to find about all of our Red Hat solution offerings.
[email protected] 76 www.redhat.com

Appendix A: Revision HistoryRevision Release Date Author(s)
0.9 Tuesday September 28, 2016 Davis Phillips
1.0 Wednesday November 2, 2016 Davis Phillips
1.1 Friday Jaunary 5, 2017 Davis Phillips
PDF generated by Asciidoctor PDF
Reference Architecture Theme version 1.0
www.redhat.com 77 [email protected]

Appendix B: ContributorsChristoph Goern, content provider
Ken Bell, content reviewer
Erik Jacobs, content reviewer
Scott Collier, content reviewer
[email protected] 78 www.redhat.com

Appendix C: Quick Steps: How to install RedHat OpenShift Container Platform
• Make sure your template and SSH keys are copied over into the appropriate places.
• Clone the git repo and run the script in setup.
$ cd ~ && git clone https://github.com/openshift/openshift-ansible-contrib$ sh ~/openshift-ansible-contrib/reference-architecture/vmware-ansible/scripts/setup_ansible.sh
• Fill out the variables in the ocp-on-vmware.ini file.
$ vim ~/openshift-ansible-contrib/reference-architecture/vmware-ansible/ocp-on-vmware.ini
• Run ocp-on-vmware.py with --create_ocp_vars.
$ cd ~/openshift-ansible-contrib/reference-architecture/vmware-ansible/ && ./ocp-on-vmware.py --create_ocp_vars
• Run ocp-on-vmware.py with --create_inventory.
$ cd ~/openshift-ansible-contrib/reference-architecture/vmware-ansible/ && ./ocp-on-vmware.py --create_inventory
• Run ocp-on-vmware.py by itself.
$ cd ~/openshift-ansible-contrib/reference-architecture/vmware-ansible/ && ./ocp-on-vmware.py
• Test the install by running ocp-on-vmware.py --tag ocp-demo
$ cd ~/openshift-ansible-contrib/reference-architecture/vmware-ansible/ && ./ocp-on-vmware.py --tag ocp-demo
If you have installation failures during the ./ocp-on-vmware.py run by itself, you can simply rerun it.
www.redhat.com 79 [email protected]

Appendix D: Troubleshooting Ansible by RedHatIn the event of a deployment failure, there are a couple of options to use to troubleshoot Ansible.
• ocp-on-vmware.py -vvvvvv : the very verbose option gives obfuscated additional information aboutthe Ansible run.
◦ This can be helpful in determining connection issues or run book play errors.
TASK [rhn-subscription : Is the host already registered?] **********************task path: /opt/ansible/roles/rhn-subscription/tasks/main.yaml:16Using module file /usr/lib/python2.7/site-packages/ansible/modules/core/commands/command.py<10.19.114.224> ESTABLISH SSH CONNECTION FOR USER: root<10.19.114.224> SSH: ansible.cfg set ssh_args: (-C)(-o)(ControlMaster=auto)(-o)(ControlPersist=900s)(-o)(GSSAPIAuthentication=no)(-o)(PreferredAuthentications=publickey)<10.19.114.224> SSH: ANSIBLE_HOST_KEY_CHECKING/host_key_checking disabled: (-o)(StrictHostKeyChecking=no)<10.19.114.224> SSH:ANSIBLE_PRIVATE_KEY_FILE/private_key_file/ansible_ssh_private_key_file set: (-o)(IdentityFile="ssh_key/ocp3-installer")<10.19.114.224> SSH: ansible_password/ansible_ssh_pass not set: (-o)(KbdInteractiveAuthentication=no)(-o)(PreferredAuthentications=gssapi-with-mic,gssapi-keyex,hostbased,publickey)(-o)(PasswordAuthentication=no)<10.19.114.224> SSH: ANSIBLE_REMOTE_USER/remote_user/ansible_user/user/-u set: (-o)(User=root)<10.19.114.224> SSH: ANSIBLE_TIMEOUT/timeout set: (-o)(ConnectTimeout=10)<10.19.114.224> SSH: PlayContext set ssh_common_args: ()<10.19.114.224> SSH: PlayContext set ssh_extra_args: ()<10.19.114.224> SSH: found only ControlPersist; added ControlPath: (-o)(ControlPath=/var/run/%h-%r)<10.19.114.224> SSH: EXEC ssh -vvv -C -o ControlMaster=auto -o ControlPersist=900s -oGSSAPIAuthentication=no -o PreferredAuthentications=publickey -o StrictHostKeyChecking=no-o 'IdentityFile="ssh_key/ocp3-installer"' -o KbdInteractiveAuthentication=no -oPreferredAuthentications=gssapi-with-mic,gssapi-keyex,hostbased,publickey -oPasswordAuthentication=no -o User=root -o ConnectTimeout=10 -o ControlPath=/var/run/%h-%r10.19.114.224 '/bin/sh -c '"'"'/usr/bin/python && sleep 0'"'"''
• If there is a failure during the playbook, occasionally you may just need to rerun the playbookagain.
[email protected] 80 www.redhat.com

Appendix E: Installation FailureIn the event of an OpenShift installation failure, create an inventory file and run the uninstallplaybook.
E.1. InventoryThe manual inventory is used with the uninstall playbook to identify OpenShift nodes.
www.redhat.com 81 [email protected]

vi ~/inventory[OSEv3:children]mastersetcdnodes
[OSEv3:vars]openshift_master_cluster_hostname="internal-openshift-master.{{ public_hosted_zone }}"openshift_master_cluster_public_hostname="openshift-master.{{ public_hosted_zone }}"osm_default_subdomain="{{ wildcard_zone }}"deployment_type=openshift-enterpriseopenshift_debug_level="{{ debug_level }}"openshift_node_debug_level="{{ node_debug_level | default(debug_level, true) }}"openshift_master_debug_level="{{ master_debug_level | default(debug_level, true) }}"openshift_master_access_token_max_seconds=2419200openshift_master_api_port="{{ console_port }}"openshift_master_console_port="{{ console_port }}"osm_cluster_network_cidr=172.16.0.0/16osm_use_cockpit=falseopenshift_registry_selector="role=infra"openshift_router_selector="role=infra"openshift_master_cluster_method=nativeopenshift_cloudprovider_kind=vmware
[masters]master-0.vcenter.e2e.bos.redhat.com openshift_node_labels="{'role': 'master'}"master-1.vcenter.e2e.bos.redhat.com openshift_node_labels="{'role': 'master'}"master-2.vcenter.e2e.bos.redhat.com openshift_node_labels="{'role': 'master'}"
[etcd]master-0.vcenter.e2e.bos.redhat.commaster-1.vcenter.e2e.bos.redhat.commaster-2.vcenter.e2e.bos.redhat.com
[nodes]master-0.vcenter.e2e.bos.redhat.com openshift_node_labels="{'role': 'master'}"master-1.vcenter.e2e.bos.redhat.com openshift_node_labels="{'role': 'master'}"master-2.vcenter.e2e.bos.redhat.com openshift_node_labels="{'role': 'master'}"infra-0.vcenter.e2e.bos.redhat.com openshift_node_labels="{'role': 'infra'}"infra-1.vcenter.e2e.bos.redhat.com openshift_node_labels="{'role': 'infra'}"app-0.vcenter.e2e.bos.redhat.com openshift_node_labels="{'role': 'app'}"app-1.vcenter.e2e.bos.redhat.com openshift_node_labels="{'role': 'app'}"app-2.vcenter.e2e.bos.redhat.com openshift_node_labels="{'role': 'app'}"
[email protected] 82 www.redhat.com
E.2. Running the Uninstall PlaybookThe uninstall playbook removes Red Hat OpenShift related packages, etcd, and removes anycertificates that were created during the failed install.
ansible-playbook -i ~/inventory /usr/share/ansible/openshift-ansible/playbooks/adhoc/uninstall.yml
E.3. Manually Launching the Installation of Red HatOpenShiftThe playbook below is the same playbook that is ran once the deployment of VMware resources iscompleted. Replace the rhsm user and password, set the wildcard_zone and public_hosted_zonerelevant to the information in your DNS.
$ cd ~/git/openshift-ansible-contrib/reference-architecture/vmware-ansible/ && ./ocp-on-vmware.py --tag ocp-install
E.4. Starting Completely OverThe following options can be completed with the ocp-on-vmware.py script to remove all the VMs fromvCenter. This utilizes your infrastructure.json created during Red Hat OpenShift inventory module:ocp-on-vmware.py inventory:
$ cd ~/git/openshift-ansible-contrib/reference-architecture/vmware-ansible/ && ./ocp-on-vmware.py --clean
www.redhat.com 83 [email protected]