
Department of Veterans Affairs · The fundamental mission of Department of Veterans Affairs (VA),...
104
Department of Veterans Affairs Emergency Department Integration Software (EDIS) Version 2.1.1 Increment 3 User Guide July 2013 Document Version 3.7
Transcript of Department of Veterans Affairs · The fundamental mission of Department of Veterans Affairs (VA),...

Department of Veterans Affairs
Emergency Department Integration Software (EDIS)
Version 2.1.1 Increment 3
User Guide
July 2013
Document Version 3.7

EDIS v2.1.1
User Guide i July 2013
Revision History
Note: The revision-history cycle begins after the initial version of the user guide has
been completed and approved.
Date Version Description Author
11/07/11 0.1 Initial document review James Woodland
11/25/11 0.2 Reference place holders added to the document James Woodland
12/02/11 0.3 Table updates and additional content added to the
document
James Woodland
12/06/11 0.4 New content added to the document James Woodland
12/07/11 0.5 Document revisions James Woodland
01/06/12 0.6 Document review and edits Larry Smith
01/07/12 0.6 Technical Review Ric Rodriguez
01/11/12 0.7 Technical Edits Karla Hollingshed
01/12/12 0.7 Final Review prior to submission Rick Falls
02/29/12 0.8 Document content and figure updates James Woodland
05/08/12 0.9 Document revisions and history updates James Woodland
05/15/12 2.0 Document revisions and Table of Contents updates James Woodland
05/15/12 2.0 Review Bob Matus & Karla
Hollingshed
05/17/12 2.0 Final Review prior to submission Rick Falls
06/10/12 2.1 Document review and screenshot updates James Woodland
06/28/12 2.2 Document review, content and screenshot updates James Woodland
08/06/12 2.3 Peer review Larry Smith
08/22/12 2.4 Document review, content and screenshot updates James Woodland
09/04/12 2.5 Document review and revision updates James Woodland
09/04/12 2.5 Review & Edits Bob Matus & Karla
Hollingshed
09/06/12 2.5 Final review prior to submission Jeff Udell
09/21/12 2.6 Document review and revision updates James Woodland
09/24/12 2.6 Review and edits Bob Matus & Karla
Hollingshed
09/25/12 2.6 Final review prior to submission Jeff Udell
10/14/2012 2.7 Updated links within document Karla Hollingshed
10/22/2012 2.8 Made updates (incorporated edits from [T.S.]) Karla Hollingshed
11/29/2012 2.9 Updated footer Karla Hollingshed
11/30/2012 2.9 Final review prior to submission Jeff Udell
12/19/2012 3.0 Added verbiage for 1.7 Karla Hollingshed
12/19/2012 3.0 Final review prior to submission Jeff Udell
01/03/2013 3.1 Addressed Product Support Feedback EDIS Team
01/04/2013 3.1 Final review prior to submission Jeff Udell
01/08/2013 3.2 Addressed Product Support Feedback EDIS Team
01/08/2013 3.2 Final review prior to submission Jeff Udell

EDIS v2.1.1
User Guide ii July 2013
02/19/2013 3.3 Updated URLs Karla Hollingshed
05/06/2013 3.4 Document review, add content and update screen
shots for EDIS v2.1.1
Praveen Challagundla,
Pavani Sadu
05/09/2013 3.4 Review and edits Joseph Lemaire, Karla
Hollingshed & Ric
Rodriguez
05/13/2013 3.4 Final edits prior to submission Jeff Udell
06/17/2013 3.5 Document review and addition of delay definitions Joe Kuykendall
06/20/2013 3.6 Incorporate edits from Product Support Product Development
06/20/2013 3.6 Technical and Grammatical Review. Update of
Index and TOC
Joe Kuykendall
07/17/2013 3.7 Update to change to HWS ProdDev

EDIS v2.1.1
User Guide iii July 2013
Table of Contents
1. Product Description ........................................................................................................ 7 1.1. About this Guide ........................................................................................................................ 7 1.2. Section 508 of the Rehabilitation Act of 1973 ........................................................................... 8 1.3. Role-based Access to Views ..................................................................................................... 8 1.4. Document Conventions ............................................................................................................. 8
1.4.1. JAWS Workstation Requirements ....................................................................................... 8 1.5. Application Timeouts ................................................................................................................. 9 1.6. Preventing Accidental Application Sign-Outs .......................................................................... 10 1.7. Reporting EDIS Issues/Problems ............................................................................................ 12
2. Getting Started ...............................................................................................................13 2.1. Launch EDIS............................................................................................................................ 13 2.2. Log In ....................................................................................................................................... 13
2.2.1. Changing Your Verify Code .............................................................................................. 14 2.3. EDIS Views .............................................................................................................................. 14
2.3.1. Select a View .................................................................................................................... 17 2.4. Work with Data Grids ............................................................................................................... 17
2.4.1. Arrange Columns .............................................................................................................. 17 2.4.2. Resize Columns ................................................................................................................ 17 2.4.3. Sort Information within Columns ....................................................................................... 18
2.5. Access Help Files .................................................................................................................... 18 2.6. Understanding EDIS and CPRS Interactions .......................................................................... 19 2.7. Using EDIS with Appointment Manager .................................................................................. 19
2.7.1. Benefits of this Method ..................................................................................................... 19 2.7.2. Drawbacks of this Method ................................................................................................. 19 2.7.3. Best Practice for Using EDIS with Appointment Manager ................................................ 19 2.7.4. Unscheduled Appointments that cause Errors (in Appointment Manager)....................... 20
2.8. Using EDIS with PCE .............................................................................................................. 20 2.8.1. Benefits of this Method ..................................................................................................... 20 2.8.2. Drawbacks of this Method ................................................................................................. 21 2.8.3. PCE is Best Used with EDIS ............................................................................................. 21 2.8.4. Why this Is Best Practice .................................................................................................. 22 2.8.5. Processes with PCE that Lead to Errors .......................................................................... 22
3. Notifications ...................................................................................................................23 3.1. Patient-Selection Messages .................................................................................................... 23 3.2. Create a PCE encounter in CPRS .......................................................................................... 26 3.3. Add Patients to EDIS from the CPE View ............................................................................... 27
3.3.1. Adding Patients Using the Search for Patient in VistA Selection ..................................... 28 3.3.2. Adding Patients Using the Enter Name Selection ............................................................ 29 3.3.3. Adding Unidentified Patients ............................................................................................. 30 3.3.4. Adding Patients Using the Ambulance Is Arriving Selection ............................................ 31
3.4. Update Patient Information from the Display Board ................................................................ 31 3.4.1. Updating a Room or Bed from the Display Board ............................................................. 32 3.4.2. View or Update Patient Demographic Information ............................................................ 33
3.5. Change the Patient Status ....................................................................................................... 35 Change the ESI Acuity Level ......................................................................................................... 36 3.5.1. Assign or Change a Provider ............................................................................................ 36 3.5.2. Add or Change a Nurse .................................................................................................... 37 3.5.3. Entering Patient Complaint ............................................................................................... 38 3.5.4. Entering Comments .......................................................................................................... 38 3.5.5. Entering Disposition .......................................................................................................... 38 3.5.6. Add or change a Resident ................................................................................................ 39
3.6. Visit or Assess Worksheet View .............................................................................................. 40 3.6.1. Visit Worksheet View ........................................................................................................ 41

EDIS v2.1.1
User Guide iv July 2013
3.6.2. Assess Worksheet View ................................................................................................... 48 3.7. Enter ICD-9-CM Diagnoses ..................................................................................................... 49 3.8. Enter Free-Text Diagnoses ..................................................................................................... 50 3.9. Remove Patients ..................................................................................................................... 51 3.10. Remove Patients Entered in Error ........................................................................................... 51
4. Edit Closed View ............................................................................................................52 5. Display Board View ........................................................................................................54
5.1. Viewing the Display Board ....................................................................................................... 55 6. Assign Staff View ...........................................................................................................56
6.1. Add Providers, Residents, and Nurses ................................................................................... 57 6.2. Remove Providers, Residents, and Nurses ............................................................................ 57 6.3. Configure Colors for Providers, Residents, and Nurses ......................................................... 57
7. Reports View ..................................................................................................................59 7.1. Standard Reports .................................................................................................................... 59
7.1.1. Column Headings .............................................................................................................. 59 7.1.2. Standard Reports .............................................................................................................. 60
7.2. Run and View Reports ............................................................................................................. 74 7.3. Print Reports ............................................................................................................................ 76
7.3.1. Export Reports (locked with security key: EDPR EXPORT) ............................................. 76 8. Configure View ...............................................................................................................77
8.1. Room and Area Configurations ............................................................................................... 77 8.1.1. Add, Configure, and Edit Rooms and Areas ..................................................................... 78
8.2. Display Board Configurations .................................................................................................. 81 8.2.1. Add a New Display Board ................................................................................................. 81 8.2.2. Add Display Board Columns ............................................................................................. 83 8.2.3. Configure or Edit Display Board Columns ........................................................................ 85 8.2.4. Specify the Order of Display Board Columns ................................................................... 85 8.2.5. Resize Display Board Columns ........................................................................................ 85 8.2.6. Remove Display Board Columns ...................................................................................... 86 8.2.7. Save Display Board Configuration Changes .................................................................... 86
8.3. Configure Colors ...................................................................................................................... 87 8.3.1. Configure Colors (General Instructions) ........................................................................... 88 8.3.2. Configure Colors for Status and Acuity Values ................................................................. 88 8.3.3. Configure Colors for Urgency – Lab Values ..................................................................... 89 8.3.4. Configure Colors for Urgency – Radiology Values ........................................................... 90 8.3.5. Configure Colors for Total Elapsed Minutes ..................................................................... 91 8.3.6. Configure Colors for Minutes at Location ......................................................................... 93 8.3.7. Configure Colors for Minutes for Lab Order ...................................................................... 94 8.3.8. Configure Colors for Minutes for Imaging Order ............................................................... 95 8.3.9. Configure Colors for Minutes for Unverified Orders .......................................................... 96
8.4. Configure Parameters ............................................................................................................. 97 8.4.1. Include Residents on Entry Form ...................................................................................... 98 8.4.2. Require a Diagnosis .......................................................................................................... 98 8.4.3. Require ICD-9-CM or Free Text Diagnoses ..................................................................... 98 8.4.4. Require Disposition to Remove Patients .......................................................................... 99 8.4.5. Require a Reason for Delay .............................................................................................. 99 8.4.6. Configure Shift Parameters ............................................................................................... 99 8.4.7. Set a Default Room or Area for Patients Arriving by Ambulance ..................................... 99 8.4.8. Set a Default Room or Area .............................................................................................. 99 8.4.9. Save Parameter Selections ............................................................................................ 100
8.5. Add Choices to Selection Lists .............................................................................................. 100 8.5.1. Add Status, Disposition, Delay Reason, and Source Selections .................................... 102
9. Index ............................................................................................................................................. 103

EDIS v2.1.1
User Guide v July 2013
Table of Figures Figure 1: The EDIS timeout warning and countdown. ............................................................................... 10 Figure 2: The Internet Options Dialog, Advanced tab ............................................................................... 11 Figure 3: Warning Message for No Default Room/Area ............................................................................ 14 Figure 4: EDIS Home Page ......................................................................................................................... 15 Figure 5: The slider for resizing columns. .................................................................................................. 18 Figure 6: Sort information within columns by clicking on column headers. .............................................. 18 Figure 7: Location of the Help Icon ............................................................................................................ 18 Figure 8: Restricted Record warning (sensitive patient data). .................................................................... 23 Figure 9: The Active Flag window. ............................................................................................................ 24 Figure 10: Duplicate Selection .................................................................................................................... 25 Figure 11: Adding provider assignments in EDIS creates PCE encounters in CPRS. ............................... 27 Figure 12: The New Patient button. ............................................................................................................ 27 Figure 13: Search for Patient In VistA. ....................................................................................................... 29 Figure 14: The Enter Name, Patient Is Not in VistA button. ...................................................................... 30 Figure 15: The Ambulance Is Arriving, Patient Name Is Unknown button. .............................................. 31 Figure 16: CPE Display Board View .......................................................................................................... 32 Figure 17: Change Room/Bed View. .......................................................................................................... 33 Figure 18: Patient Demographics View ...................................................................................................... 34 Figure 19: Status View ................................................................................................................................ 35 Figure 20: ESI View ................................................................................................................................... 36 Figure 21: Change Provider View .............................................................................................................. 37 Figure 22: Change Nurse View ................................................................................................................... 37 Figure 23: Change Complaint ..................................................................................................................... 38 Figure 24: Change Comment ...................................................................................................................... 38 Figure 25: Change Disposition ................................................................................................................... 39 Figure 26: Change Resident View .............................................................................................................. 39 Figure 27: The Visit Worksheet view. ........................................................................................................ 41 Figure 28: The Assess Worksheet view. ..................................................................................................... 48 Figure 29: The Disposition view with free-text diagnoses enabled. ........................................................... 50 Figure 30: The Edit Closed View ............................................................................................................... 52 Figure 31: The Display Board view. ........................................................................................................... 54 Figure 32: The Assign Staff view. .............................................................................................................. 56 Figure 33: The Reports view list of standard reports. ................................................................................. 61 Figure 34: The Activity report. ................................................................................................................... 62 Figure 35: The Acuity report. ..................................................................................................................... 63 Figure 36: The Delay Report. ..................................................................................................................... 63 Figure 37: The Delay Summary Report. ..................................................................................................... 65 Figure 38: The ED Mental Health Patients Report. .................................................................................... 66 Figure 39: The Exposure Report. ................................................................................................................ 66 Figure 40: The Missed Opportunities Report. ............................................................................................ 67 Figure 41: The Orders by Acuity Report. ................................................................................................... 68 Figure 42: Patient Intake Report ................................................................................................................. 69 Figure 43: The Shift Report Summary ........................................................................................................ 70 Figure 44: The VA Admissions Report ...................................................................................................... 71 Figure 45: The Patient XRef Report (Key req'd: EDPR XREF) ................................................................. 72 Figure 46: The Provider Report (Key req'd: EDPR PROVIDER) .............................................................. 73 Figure 47: Report scroll bar ........................................................................................................................ 75 Figure 48: Exported Activity report ............................................................................................................ 76 Figure 49: Configure View - Room/Area subview ..................................................................................... 78

EDIS v2.1.1
User Guide vi July 2013
Figure 50: Configure View - Display Board subview ................................................................................ 81 Figure 51: Add Column List ....................................................................................................................... 84 Figure 52: Configure View - Colors subview (Status/Acuity) .................................................................... 87 Figure 53: Use Color checkbox .................................................................................................................. 88 Figure 54: Colors for Urgency - Labs ......................................................................................................... 89 Figure 55: Colors for Urgency - Imaging ................................................................................................... 90 Figure 56: Configure colors for Total Elapsed Time .................................................................................. 91 Figure 57: Emins and Mins columns .......................................................................................................... 92 Figure 58: Colors for Minutes at Location .................................................................................................. 93 Figure 59: Colors for Minutes for Lab Orders ............................................................................................ 94 Figure 60: Colors for Minutes for Imaging Orders ..................................................................................... 95 Figure 61: Colors for Minutes for Unverified orders .................................................................................. 96 Figure 62: Configure View - Parameters subview ...................................................................................... 97 Figure 63: Configure View - Selections subview ..................................................................................... 100

EDIS v2.1.1
User Guide
EDIS v2.1.1
User Guide 7 July 2013
1. Product Description
The fundamental mission of Department of Veterans Affairs (VA), Office of Information &
Technology (OI&T), Emergency Department Integration Software (EDIS) Program Services is to
provide Veterans the benefits they have earned throughout their military service to the United
States. OI&T accomplishes its mission by delivering high-quality, client-centered, effective and
efficient Information Technology (IT) services to those responsible for providing care to the
Veterans at the point-of-care as well as throughout all the points of the Veterans’ health care in an
effective, timely and compassionate manner. VA depends on Information
Management/Information Technology (IM/IT) systems to meet mission goals.
The VHA Health Workflow System (HWS). (HWS) Initiative is a single initiative whose mission
is to expand health care access for Veterans, including women and rural populations. Multiple
programs and projects have been assigned as part of the HWS Initiative, including EDIS.
The system is an extension to Veterans Health Information Systems and Technology Architecture /
Computerized Patient Record System (VistA/CPRS) for tracking and managing the delivery of care
to patients in an Emergency Department (ED). The system provides - Recording and tracking
Emergency Department patients during incidents of care - Display of the current state of care
delivery - Reports and data extracts on the delivery of care. The system can be configured to
specifics of different Veterans Health Administration (VHA) Emergency Departments.
1.1. About this Guide
This guide steps you through the process of performing the following tasks:
1. Launch Emergency Department Integration Software (EDIS).
2. Sign in patients to the emergency department (when you use the VistA Scheduling
package (also known as Appointment Manager) to make appointments for—or check
patients into—the emergency department, EDIS automatically adds the patients to its
Active Patients view.
3. Enter Emergency Severity Index (ESI) values for triaged patients.
4. Create emergency-department encounters in the Computerized Patient Record
System (CPRS) Patient Care Encounters (PCE) package (if not using Appointment
Manager).
5. Update patient information as patients progress through the emergency-care process
6. View the display board.
7. Enter patients’ dispositions in EDIS.
8. Enter patients’ discharge diagnoses in EDIS and CPRS.
9. Remove patients from the display board (this task incorporates disposing patients,
which supports discharge and admit processes).
10. Make site- and shift-relevant staff assignments.
11. Edit visit-related information, including vital signs.
12. Create reports.
13. Configure the application using its graphical user interface (GUI) tools. All patient
and provider information has been blocked with a blue window.

EDIS v2.1.1
User Guide
EDIS v2.1.1
User Guide 8 July 2013
1.2. Section 508 of the Rehabilitation Act of 1973
The Portable Document File (PDF) version of this guide supports assistive reading
devices such as Job Access with Speech (JAWS). Because the views that comprise
EDIS provide graphical user interface (GUI) access to underlying functionality, the
guide includes steps for accessing application functionality via mouse devices and
keyboard actions (when keyboard actions are available).
1.3. Role-based Access to Views
EDIS provides role-based access to the specific functionality sets that are available
through its views. If the application does not display in its main navigation page, one
or more of the views this guide describes, your current role may not be compatible
with functionality that the views include. Please contact your information resource
management (IRM) or clinical application coordinator (CAC) staff if you have
questions about your role. Please see Emergency Department Integration Software
Technical Manual—M Server for information about configuring role-based access to
application functionality.
1.4. Document Conventions
Bold type indicates application elements (views, panes, and links, buttons, and text boxes,
for example) and key names.
Key names appear in angle brackets <>.
Italicized text indicates special emphasis.
The warning icon ( ) indicates items of particular importance.
Within the confines of this user guide, the terms visit and encounter are synonymous.
1.4.1. JAWS Workstation Requirements
If you are a JAWS user, the IRM staff must download and install Adobe Flex
accessibility scripts. To download JAWS scripts for Flex 3, go to
http://www.adobe.com/macromedia/accessibility/features/fl ex/jaws.html. Click
the executable file to install the scripts on your machine. These scripts work for
JAWS 9 and 10; however, the EDIS project team recommends that you use JAWS
10 for the best results with EDIS.
Flex applications behave a bit differently than do regular Web applications—a
result of the way Flash and Flex interact with browsers and JAWS screen readers.
JAWS, Flex, and EDIS work together best with IE 7.0. Regardless of which
browser you use, you can expect a slight learning curve.
Note: JAWS 10 users must turn off Autoforms mode (use the JAWS
Verbosity settings).

EDIS v2.1.1
User Guide
EDIS v2.1.1
User Guide 9 July 2013
1.5. Application Timeouts
EDIS uses parameter settings for application timeouts and timeout countdowns:
namely, EDP APP TIMEOUT and EDP APP COUNTDOWN settings. IRM personnel
enter values for these parameters at the site level. Emergency -department managers
usually do not determine them. For many sites, EDIS is set to time out after 15
minutes of inactivity.
If the ORWOR TIMEOUT CHART parameter contains a value, this value determines
the amount of time that EDIS can sit idle before it displays a timeout warning and
begins its countdown. (The ORWOR TIMEOUT CHART parameter supports a
maximum timeout value of 2147483 seconds. Sites can determine local timeout values
that are smaller than or equal to this maximum value. )
If the ORWOR TIMEOUT CHART parameter contains no value, EDIS uses the value
of the Timed Read (DTIME) parameter, which is available through VistA’s user setup
menu. The value of the ORWOR TIMEOUT COUNTDOWN setting determines the
length of the application’s timeout countdown.
Routine EDPFAA was modified to use two new EDIS parameters to determine the timeout and
countdown values for the EDIS application.
The two new parameters have been created in the PARAMETER DEFINITION (#8989.51)
file. The two new parameters are:
NAME: EDP APP COUNTDOWN
DISPLAY TEXT: Countdown Seconds upon Timeout
VALUE TERM: Countdown Seconds VALUE DATA TYPE: numeric
VALUE DOMAIN: 0:999
VALUE HELP: Enter the number of seconds (0 to 999) for the countdown before closing
EDIS.
DESCRIPTION: This value is the number of seconds used for the countdown when the
timeout notification appears.
PRECEDENCE: 1 ENTITY FILE: USER
PRECEDENCE: 5 ENTITY FILE: SYSTEM
PRECEDENCE: 9 ENTITY FILE:PACKAGE
NAME: EDP APP TIMEOUT
DISPLAY TEXT: Timeout for EDIS application
MULTIPLE VALUED: No VALUE TERM: Timeout (EDIS)
VALUE DATA TYPE: numeric VALUE DOMAIN: 30:999999
VALUE HELP: Enter the number of seconds (30-999999) that should
pass before EDIS times out.
DESCRIPTION: This value overrides the user's DTIME only in the
case of the EDIS application.
PRECEDENCE: 1 ENTITY FILE: USER
PRECEDENCE: 3 ENTITY FILE: DIVISION
PRECEDENCE: 5 ENTITY FILE: SYSTEM

EDIS v2.1.1
User Guide
EDIS v2.1.1
User Guide 10 July 2013
EDIS displays its timeout message and countdown within the browser, at the bottom
of the current EDIS view. Because JAWS cannot read this message, EDIS also sounds
a chime as it begins its timeout countdown.
Figure 1: The EDIS timeout warning and countdown.
Note: If users are simultaneously running CPRS and EDIS, an active CPRS
window can obscure the EDIS timeout warning and countdown. In high -use
situations—in triage areas where several users share a single instance of
CPRS and EDIS, for example—facilities may want to consider using
separate screens for each application. This solution helps ensure that both
applications are fully visible.
1.6. Preventing Accidental Application Sign-Outs
EDIS may automatically sign you out when you launch other Web applications—such
as Up-to-date—while it is running. You can prevent this from happening by
cancelling the selection of Internet Explorer’s Reuse windows for launching
shortcuts setting. The following fix-it-yourself solution should be available to all
users (administrative access is not required).

EDIS v2.1.1
User Guide
EDIS v2.1.1
User Guide 11 July 2013
1. Select Internet Options.
2. Select the Advanced tab in the Internet Options dialog box.
3. In the Browsing list, find the Reuse windows for launching shortcuts or
(depending on the version of Internet Explorer you are using) Reuse windows for
launching shortcuts (when tabbed browsing is off) setting.
4. If this setting is selected, click the checkbox to cancel the selection.
Figure 2: The Internet Options Dialog, Advanced tab

EDIS v2.1.1
User Guide
EDIS v2.1.1
User Guide 12 July 2013
1.7. Reporting EDIS Issues/Problems
All Emergency Department Integrated Software (EDIS) problems should be reported to your
local site IT or regional IT department. The local IT or regional IT department will assess the
problem to verify status of the network and VistA issues. If the problem cannot be resolved by
the local or regional IT department, please contact the National Service Desk according to local
policies.
The National Service Desk can be called (888-596-4357) or e-mailed at [email protected] to
request a Remedy Ticket be created.
NOTE: The site can also enter its own Remedy ticket through the Remedy application.
The NSD will forward the Remedy Ticket to the appropriate EDIS support team for
resolution. If the issue involves all VA facilities, an announcement will be forwarded
via the EDIS User Alert Group. If the problem involves a Server issue, local or
national, the ticket will be referred to the Austin Information Technology Center/Austin
Automation Center (AITC) Service Desk. Once the AITC has resolved the issue/ticket,
the National Support Specialist will update the site’s Remedy ticket.

EDIS v2.1.1
User Guide
EDIS v2.1.1
User Guide 13 July 2013
2. Getting Started
2.1. Launch EDIS
If the IRM or CAC staff hasn’t provided a desktop shortcut or added an EDIS link to
your CPRS Tools menu, you can access EDIS by pointing your browser to
https://vaww.edis2.med.va.gov/main—the application’s Uniform Resource Locater
(URL).
If you want to access the application’s main electronic whiteboard (or big -board)
display, use the following URL: https://vaww.edis2.med.va.gov/main/board.html . If
you want to access a secondary big-board display, use this URL:
https://vaww.edis2.med.va.gov/main/board.html?board=[boardname ]. (Replace
[boardname] with the name of the display board you want to view.)
When you access these URLs, the application's security system automatically
redirects you to the login page. As it does this, the security system begins its
authentication process.
Adding EDIS to your Internet Explorer Favorites
If you bookmark the EDIS login page, the link you initially create will bypass the
application’s redirection-authentication process and the application’s security
system will deny you access. You can remedy this situation by editing your
bookmark link.
1. In Internet Explorer, right-click the EDIS login bookmark and select
Properties.
2. Edit the URL field to contain either https://vaww.edis2.med.va.gov/main or
https://vaww.edis2.med.va.gov/main/board.html .
3. Click OK.
You can also create desktop shortcuts using these URLs .
2.2. Log In
When you launch EDIS, the application displays a login view that uses credentials
stored in your local VistA system.
To log in:
1. Type your VistA access and verify codes in the Access Code and Verify Code
boxes, respectively.
2. Select your site in the Institution list. EDIS uses a persistent cookie to preselect
your site upon subsequent logins, but only on the specific machine you used when
you made this selection. You must select your site from the Institution list each time
you use a new computer. (Your site may have configured a desktop shortcut that
eliminates the need for this step by preselecting your institution.)
NOTE: Failure to select the correct institution is the most common cause of unsuccessful
login attempts.

EDIS v2.1.1
User Guide
EDIS v2.1.1
User Guide 14 July 2013
3. Click Login or press the <Enter> key.
2.2.1. Changing Your Verify Code
For user authentication, EDIS relies on Kernel Authentication and Authorization
for Java 2 Enterprise Edition (KAAJEE)—which is the only VA-approved login
security package. KAAJEE limitations prevent EDIS from offering functionality
that allows you to change your verify code within the EDIS application. When
your VistA verify code expires, you can change it in CPRS or another VistA
application. EDIS will then accept the change.
2.3. EDIS Views
Upon successfully logging in, the user will be presented with the EDIS Home Page
(Fig. 4).
NOTE: In the event that a Default Waiting Room has not been assigned to EDIS, you
will get the following warning popup message, indicating that new patients will be added
to an area called EDIS_DEFAULT:
Figure 3: Warning Message for No Default Room/Area
While you still will be able to log in and use EDIS normally, this situation should be
resolved by asking your CAC to assign a default room in the Configure ->Parameters
view within EDIS (see section 8.4.8).

EDIS v2.1.1
User Guide
EDIS v2.1.1
User Guide 15 July 2013
Figure 4: EDIS Home Page
Following is a list and brief explanation of each view.
NOTE: Not all views are available to all users. EDIS offers site-configurable, role-based
access to views. If you do not have access to a view that you need, speak with the IRM or
CAC staff responsible for role-based access at your site.
CPE
The Clinical Practice Environment CPE view contains each window or a
combination of these windows which enable you to perform the following
functions:
Display Board (CPE Active Patients) Window
Add patients to the display board
Assign a room/bed to a patient
View visit status that lets the user know that an encounter has been created
in PCE
View or update patient demographic information

EDIS v2.1.1
User Guide
EDIS v2.1.1
User Guide 16 July 2013
Change the status of a patient
Change the ESI (Acuity Level)
Assign or change a Provider
Assign or change a Nurse
Assign or change a Resident
View labs and imaging tallies
Enter complaints in free-form text
Enter comments in free-form text
Assign or update patient disposition
View the total number of hours: minutes in the Emergency Department
View the number of hours: minutes a patient has been in his Room/Bed
View new orders
View the clinic where the patient is assigned
Access the Visit and Assess Worksheets by clicking on the Patient button
or by clicking on the Pushpin to display the split screen worksheet views.
Visit Worksheet Window
View, add or change Complaint, Vitals, Status/Responsibility or
Disposition
Assess Worksheet Window
View and print lab results
View and Print Active Problems
View and Print Active Medications
Edit Closed
The Edit Closed view enables you to edit patients’ information after their
emergency-department visits have ended.
This view enables you to change a patient’s complaint, status /
responsibility elements, and the patients’ dispositions and diagnoses
(either International Classification of Diseases, Ninth Revision, Clinical
Modifications [ICD-9-CM] or free-text, if the EDIS parameter is set to
allow free-text entries for diagnosis. If patients’ stays have exceeded the
national emergency-department visit limit (currently six hours), the
application may require you to select a reason for delay. If it does, this
view will include a list of reasons from which you can choose. This view
also allows restoring a patient to the board that has been removed in error.
Display Board
The Display Board view is a PC-based version of your site’s main electronic
white-board—or big-board—display. You can configure multiple big-board
EDIS v2.1.1
User Guide
EDIS v2.1.1
User Guide 17 July 2013
displays for your site. However, you can view only your site’s main display board
using the PC-based Display Board view.
Assign Staff
The Assign Staff view enables you to create site-specific staff-selection lists. You
can also use this view to assign color indicators for individual staff members.
Reports
The Reports view enables you to select date ranges for, and run, standard reports.
EDIS also includes two restricted reports that require security-key access.
Configure
The Configure view enables you to localize the tracking application. It also
allows you to assign color codes and locally meaningful color codes through
available color maps (Select <Color>, then single Click on a map), populate pick
lists with the names of your site’s treatment areas and set up display boards that
contain only relevant information.
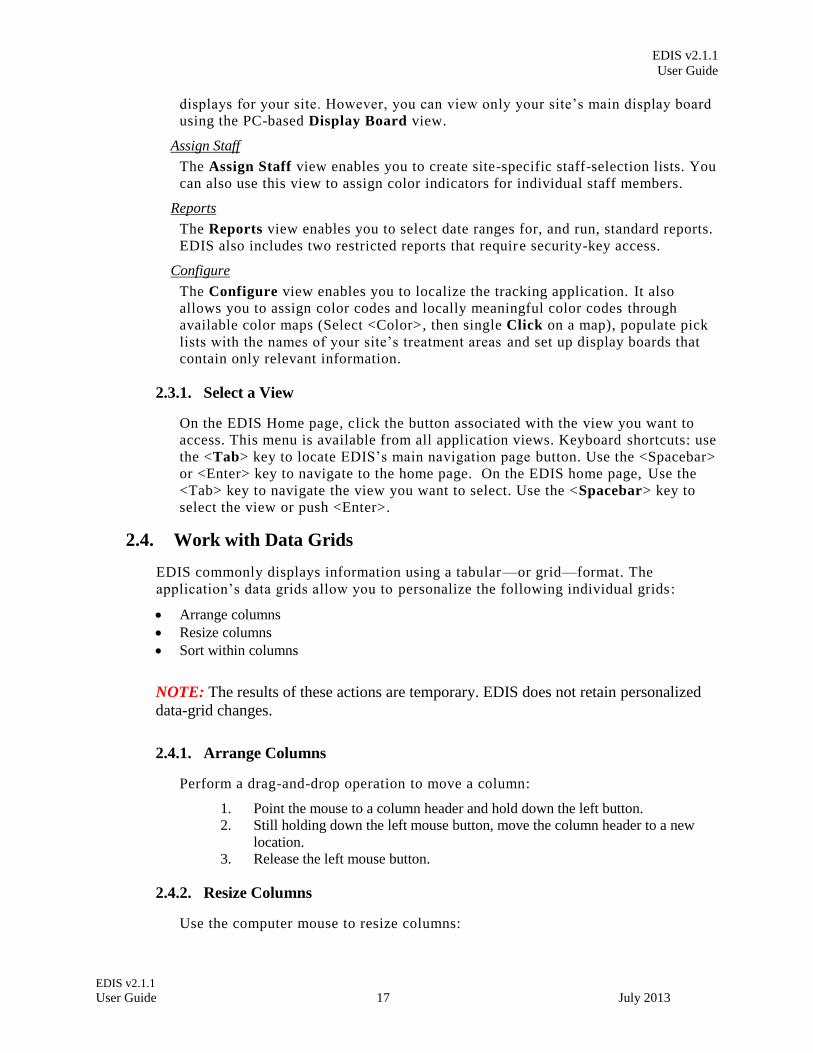
2.3.1. Select a View
On the EDIS Home page, click the button associated with the view you want to
access. This menu is available from all application views. Keyboard shortcuts: use
the <Tab> key to locate EDIS’s main navigation page button. Use the <Spacebar>
or <Enter> key to navigate to the home page. On the EDIS home page, Use the
<Tab> key to navigate the view you want to select. Use the <Spacebar> key to
select the view or push <Enter>.
2.4. Work with Data Grids
EDIS commonly displays information using a tabular—or grid—format. The
application’s data grids allow you to personalize the following individual grids:
Arrange columns
Resize columns
Sort within columns
NOTE: The results of these actions are temporary. EDIS does not retain personalized
data-grid changes.
2.4.1. Arrange Columns
Perform a drag-and-drop operation to move a column:
1. Point the mouse to a column header and hold down the left button.
2. Still holding down the left mouse button, move the column header to a new
location.
3. Release the left mouse button.
2.4.2. Resize Columns
Use the computer mouse to resize columns:

EDIS v2.1.1
User Guide
EDIS v2.1.1
User Guide 18 July 2013
1. Point your mouse to a column boarder in the header row. EDIS displays a
column slider in place of the pointer.
2. Hold down the left mouse button and move the boarder to a new location.
3. Release the left mouse button.
Figure 5: The slider for resizing columns.
2.4.3. Sort Information within Columns
You can sort the information within most columns.
Click a column header to sort the information within the column in descending
order.
Click the column header again to sort the column’s contents in ascending order.
Figure 6: Sort information within columns by clicking on column headers.
2.5. Access Help Files
Click the Help button to access the User Guide. Keyboard: use the <Tab> key to
locate the Help button and use the <Spacebar> key to select the button.
Figure 7: Location of the Help Icon
Column slider

EDIS v2.1.1
User Guide
EDIS v2.1.1
User Guide 19 July 2013
2.6. Understanding EDIS and CPRS Interactions
You can successfully integrate CPRS with EDIS in one of two ways:
Create an unscheduled appointment in Appointment Manager; when you create an
unscheduled appointment for a clinic location your site has specified in the EDPF
LOCATION parameter, EDIS adds the patient to the EDIS Active Patients list.
NOTE: Depending on their EDPF SCHEDULING TRIGGER parameter setting (Either
Make Appointment or CHECK IN) then the patient will appear.
Create an encounter through EDIS, using Patient Care Encounter (PCE).
Each method has strengths and weaknesses. As is the case for any patient-scheduling
system, less-than-optimal practices can lead to duplicated encounters. Sections 2.7
and 2.8 provide information that may help you choose the method that’s best for your
location. Please read these two sections carefully.
2.7. Using EDIS with Appointment Manager
2.7.1. Benefits of this Method
Your site maintains the advantage of having a selectable list of triaged
emergency-department patients available on the CPRS Patient Selection view.
This list of scheduled (that is, Appointment Manager-created) appointments is not
available via the PCE method.
2.7.2. Drawbacks of this Method
Successful CPRS and EDIS integration using this method requires intensive
(recommended twenty-four-hours a day, seven days a week—or 24x7) secretarial
and administrative support. For this method to work, your site must create an
appointment for each emergency-department patient before doing anything else–
which requires round-the-clock support of administrative staff who have access to
Appointment Management.
2.7.3. Best Practice for Using EDIS with Appointment Manager
Add Patients to Appointment Management First:
When a patient presents to the emergency department for evaluation, a member of
your site’s administrative staff immediately creates an appointment for the patient
in Appointment Manager (depending on their EDPF SCHEDULING TRIGGER
parameter setting (Either Make Appointment or CHECK IN) then the patient will
appear). This creates a selectable visit in CPRS and adds the patient t o EDIS. The
triage nurse must subsequently add additional data to EDIS.

EDIS v2.1.1
User Guide
EDIS v2.1.1
User Guide 20 July 2013
EXAMPLE:
Ms. Jones arrives at 11:30.
At 11:32, a member of the ED staff uses Appointment Manager to create an
appointment for Ms. Jones.
EDIS automatically displays Ms. Jones on the Active Patients list.
The triage nurse sees Ms. Jones at 11:35 and completes her EDIS triage
information; the nurse then opens CPRS and writes a triage note under the visit in
CPRS that corresponds to Ms. Jones’s emergency-department appointment.
The emergency-department provider selects this same encounter in CPRS when he
or she writes notes or orders related to Ms. Jones’s emergency-department care.
Why This Is Best Practice
CPRS was created long before EDIS. It has not been changed to recognize that
EDIS exists.
2.7.4. Unscheduled Appointments that cause Errors (in Appointment Manager)
NOTE: The following list contains things you should not do. We have included
this section to help you troubleshoot problems that can occur when your site uses
EDIS with unscheduled appointments in Appointment Manager.
1. Creating unscheduled appoints just before the midnight hour:
Appointments will disappear at midnight for patients who have unscheduled
appointments for times that precede the midnight hour and for whom
emergency-department personnel have completed neither documentation nor
orders before midnight. When this occurs, your site must reenter the vanished
appointments, thus creating both second appointments and duplicate PCE
encounters. This problem is the result of CPRS business logic which exists
outside of EDIS.
2. Failing to select the proper appointment when writing notes or ordering
tests:
Providers and nurses create duplicate PCE encounters if they fail to select the
proper appointment in CPRS when writing notes or ordering tests.
3. Writing notes or orders before creating unscheduled appointments:
Providers and nurses create duplicate PCE encounters when they write orders
or notes before ED staff have created unscheduled appointments for their
patients.
2.8. Using EDIS with PCE
2.8.1. Benefits of this Method
Integrating EDIS with CPRS via the Patient Care Encounter (PCE) does not
require intensive (recommended 24x7) support from personnel who have access to
Appointment Manager. (The Appointment Manager method requires sites to create
appointments for patients before doing anything else, which in turn requires
round-the-clock support from ED staff that have access to Appointment
Management.)

EDIS v2.1.1
User Guide
EDIS v2.1.1
User Guide 21 July 2013
2.8.2. Drawbacks of this Method
Sites that switch from using Appointment Manager to PCE, will impact their
users, because they no longer have a list on their Patient Selection (initial) view
of CPRS from which they can select patients who have emergency-department
appointments. This list of scheduled (that is, Appointment Manager-created)
appointments only appears when sites use the Appointment Manager method. As a
result of not having this list, looking up patients who were discharged in the past
(days or weeks ago) is a little more difficult in CPRS. However, authorized users
can easily look up these patients in the EDIS Edit Closed view.
2.8.3. PCE is Best Used with EDIS
Place Patient on EDIS First with Provider Name:
When a patient is sent to the emergency department for evaluation, someone
notifies the triage nurse and adds the patient to EDIS. The person who adds the
patient to EDIS must also add a provider name. Assigning a provider in EDIS
creates an unscheduled encounter in CPRS. Providers and nurses can subsequently
write notes and orders under this encounter.
Although assigning a nurse in EDIS can also generate an encounter in CPRS, it
doesn’t always. Nurse assignments generate selectable encounters in CPRS only if
your hospital configures nurses with an active person class in VistA’s New Person
file. Some sites do not allow this practice. In addition, using nursing assignments
to create PCE encounters makes nurses primary providers in EDIS-generated
encounters. Primary providers must change these placeholder assignments for
encounters other than nursing-only encounters. To do this, primary providers
should select Yes when CPRS prompts them to identify themselves as primary
providers for encounters they are signing.
EXAMPLE #1:
At 11:31, a member of the administrative staff or a triage nurse adds Mr. Jones to
EDIS and assigns Dr. Smith as Mr. Jones’s provider.
This creates an 11:31 encounter for Mr. Jones in CPRS.
The triage nurse opens CPRS, enters Mr. Jones’s chart, starts note, and selects the
emergency-department encounter that already appears in CPRS.
The triage nurse writes and signs the note.
Mr. Jones’s provider writes a note or orders, also selecting the encounter that EDIS
already created in CPRS.
In this example, if the initially assigned provider is not the primary provider
for the encounter, the primary provider must select himself or herself when he
or she signs the note. Someone (the provider, a clerk, or another emergency-
department staff member) must also update EDIS to reflect the correct primary
provider.
EXAMPLE #2:
At 11:31, an LPN adds Mr. Jones to EDIS.
Mr. Jones’s triage nurse has an active person class in VistA’s New Person file and
opens a PCE encounter for Mr. Jones’s visit in CPRS as a provider.

EDIS v2.1.1
User Guide
EDIS v2.1.1
User Guide 22 July 2013
A provider sees Mr. Jones; the provider (or a charge nurse or clerk) adds the
provider’s name in EDIS.
When he is signing the encounter in CPRS, the provider identifies himself as the
primary provider for the encounter.
If no primary provider had seen Mr. Jones (if he had left without being seen,
for example) the triage nurse would close the encounter as a disposition of:
"Nurse-only visit".
2.8.4. Why this Is Best Practice
CPRS was created long before EDIS and has not been updated to recognize EDIS.
The PCE system is limited—it cannot create encounters unless users enter primary
providers or diagnoses for the encounters. If users add patients to EDIS without
selecting their primary providers or diagnoses, EDIS cannot give to CPRS the
information that CPRS must supply to the PCE application, and PCE cannot create
the encounters. This is a limitation of the PCE application, not a limitation of
EDIS. The best practice is to select a provider when you add a patient to EDIS
because diagnoses are rarely available early in the patient -care process.
NOTE: When patients present before midnight but providers do not treat them
until after midnight, the providers must be certain to select the EDIS-created visit
from the preceding day, as opposed to opening new (duplicate) visits.
2.8.5. Processes with PCE that Lead to Errors
NOTE: The following list contains things you should not do. We have
included this section to help you troubleshoot problems that can occur when your
site uses EDIS with the PCE system.
1. Failing to select a provider when adding a patient to EDIS: When you fail to select a provider, EDIS cannot create an encounter in CPRS.
2. Failing to add a patient upon his or her arrival: Duplicate encounters will result if users fail to add patients to EDIS (and select
a provider) until after clinicians have started writing notes or orders.
3. Failing to select the EDIS-created visit when starting notes or writing
orders: Duplicate encounters will result if nurses and providers fail to select the
encounter EDIS creates when they start notes or create orders.
4. Continuing to use Appointment Manager for some patients:
Implementing two separate process flows can confuse staff and lead to errors.

EDIS v2.1.1
User Guide
EDIS v2.1.1
User Guide 23 July 2013
3. Notifications
3.1. Patient-Selection Messages
When you select patients who are already registered in your local VistA system, EDIS
may display one or more of the following messages:
Restricted Record Warning: This message appears when you select a patient whose
records contain sensitive information. Only authorized users may view these records.
Figure 8: Restricted Record warning (sensitive patient data).
Patient Record Flags: EDIS displays advisory messages when you add patients
whose records are flagged in VistA. You can view patient record flags after you’ve
added patients by clicking the Flag button, which appears on the Patient
Information bar when you select the CPE Visit or Assess Worksheets or Edit
Closed view.
When you click the Flag button, EDIS displays important information to help you and
other clinical staff better care for patients whose behavior or medical conditions

EDIS v2.1.1
User Guide
EDIS v2.1.1
User Guide 24 July 2013
warrant special attention. The application displays patient-record flags in the Active
Flag window.
Figure 9: The Active Flag window.
Duplicate Selection: EDIS displays an advisory when you attempt to add patients
who are already active in the application.

EDIS v2.1.1
User Guide
EDIS v2.1.1
User Guide 25 July 2013
Figure 10: Duplicate Selection
Multiple Patient icon: The application alerts you to the possibility of confusing
patients’ identities by displaying an icon ( ) when two or more patients share the
same last name or at least two consecutive ending digits of their social security
numbers.

EDIS v2.1.1
User Guide
EDIS v2.1.1
User Guide 26 July 2013
Figure 10: Multiple Patient Icon
CPE View
EDIS automatically adds patients when you use VistA’s Scheduling (Appointment
Manager) package to create an emergency department appointment for patients.
Utilizing the Scheduler software is the preferred way to enter new patients into EDIS.
The EDPF LOCATION parameter, which holds your site’s emergency department
location or locations, controls this functionality. Parameter settings ensure that only
emergency-department check-ins and appointments add patients to EDIS.
From the CPE view, you can create an encounter in CPRS; add patients to the
application from the Display Board, Worksheet (Visit or Assess) or combined
Display Board and Worksheet views.
3.2. Create a PCE encounter in CPRS
Adding a provider (or a nurse who has an active person class in the New Person file)
in EDIS automatically creates a PCE encounter in CPRS—unless EDIS has already
created an encounter for this particular emergency-department episode of care
(through Appointment Manager, for example) or the provider does not have an active
person class in VistA’s New Person file. To reduce the possibility of creating
duplicate PCE encounters in CPRS, EDIS checks back one hour for PCE encounter
entries associated with the emergency department location your site’s IT staff has
specified.
(EDPF LOCATION parameter settings and—if applicable—Clinic list selections
determine the location EDIS uses to create encounters.)
The application creates only one PCE encounter in CPRS for each emergency-
department episode of care (or encounter).You can avoid creating duplicate
encounters for the same episode of care by selecting the encounter that EDIS creates
when you complete patients’ emergency-department encounters in CPRS.

EDIS v2.1.1
User Guide
EDIS v2.1.1
User Guide 27 July 2013
Figure 11: Adding provider assignments in EDIS creates PCE encounters in CPRS.
3.3. Add Patients to EDIS from the CPE View
Figure 12: The New Patient button.

EDIS v2.1.1
User Guide
EDIS v2.1.1
User Guide 28 July 2013
Click New Patient in the upper right-hand corner of the CPE View. Keyboard: use the
<Tab> key to locate the New Patient button and press the <Spacebar> key to select it.
The application displays the Add Patient dialog box, which offers the following three
selections:
Search for Patient in VistA: Enables you to add patients who are already in your
local VistA system
Ambulance Is Arriving, Patient Name Is Unknown: Enables you to add information
for patients whose identities are unknown (EDIS does not create PCE encounters
for these patients until someone adds them using a VistA search)
Enter Name, Patient Is Not in VistA: Enables you to add patients who are not in
your local VistA system (EDIS does not create PCE encounters for these patients
until someone adds them using a VistA search)
3.3.1. Adding Patients Using the Search for Patient in VistA Selection
1. If necessary, select Search for Patient in VistA. (Search for Patient in VistA
is the application’s default selection; in most cases, you won’t need to
manually select this button.) Keyboard: if the Search for Patient in VistA
button isn’t already selected, use the <Tab> key to locate the selected button
(Enter Name, Patient Is Not in VistA or Ambulance Is Arriving, Patient
Name Is Unknown). Use the <Up Arrow> key to locate the Search for
Patient in VistA button and use the <Spacebar> key to select it.
2. Type all or part of the patient’s name in the Find Patient box using this
format: Surname, Firstname. For example, you can search using the patient’s
surname only, or the patient’s surname and the first initial of his or her first
name. You can also search using the initial letter of the patient’s surname
concatenated with the last four digits of his or her Social Security number
(X9999 format), the patient’s entire Social Security number (SSN), or the last
four digits of his or her SSN.
Note: Use an underscore to denote spaces in names. For example, if the
patient’s name is O Hara, type O_Hara.
3. Click Search or press the <Enter> key.
4. The Add Patient dialog box lists possible matches. Select the correct patient
and click Continue or press the <Enter> key. Keyboard: use the <Down
Arrow> and <Up Arrow> keys to locate the correct patient. Press the
<Enter> key to select the patient or use the <Tab> key to locate the Continue
button and then press the <Spacebar> key to select it.
The application displays the Patient Information pane.

EDIS v2.1.1
User Guide
EDIS v2.1.1
User Guide 29 July 2013
Figure 13: Search for Patient In VistA.
3.3.2. Adding Patients Using the Enter Name Selection
If the Find Patient search list does not contain a match, add the patient using the
Enter Name, Patient Is Not in VistA selection.
1. In the Add Patient dialog box, select Enter Name, Patient Is Not in VistA.
Keyboard: use the <Tab> key to locate the currently selected button and use
the <Down Arrow> or <Up Arrow> key to locate the Enter Name, Patient
Is Not in VistA button. Press the <Spacebar> key to select this button.
2. EDIS automatically populates the Patient Name box with the name you typed
to initiate the VistA search. If this name is incorrect or incomplete, type the
patient’s full name in the Patient Name box using this format: Lastname,
Firstname. Keyboard: use the <Tab> key to locate the Patient Name box.
3. Press the <Enter> key or click Continue.
The application displays the Patient Information pane.

EDIS v2.1.1
User Guide
EDIS v2.1.1
User Guide 30 July 2013
Figure 14: The Enter Name, Patient Is Not in VistA button.
3.3.3. Adding Unidentified Patients
When you must add unresponsive patients whose identities you do not know,
use the Enter Name, Patient Is Not in VistA selection and follow the naming
protocol defined in section 12 of VHA Directive 2006 -036: Data Quality
Requirements for Identity Management and Master Patient Index Functions .
(Use the name UU-UNRESPONSIVE, PATIENT for the first such patient, UU-
UNRESPONSIVE, PATIENT A for the second, UU-UNRESPONSIVE,
PATIENT B for the third, and so forth. You can find the full text of this
directive at
http://www1.va.gov/vhapublications/ViewPublication.asp?pub_ID=1434.)

EDIS v2.1.1
User Guide
EDIS v2.1.1
User Guide 31 July 2013
3.3.4. Adding Patients Using the Ambulance Is Arriving Selection
EDIS enables you to add unknown patients who are arriving by ambulance or
other types of emergency transportation, thereby allowing you to make room,
provider, and nurse assignments before these patients arrive.
1. Select Ambulance Is Arriving, Patient Name Is Unknown. Keyboard: use
the <Tab> key to locate the currently selected button, and use the <Down
Arrow> key to locate the Ambulance Is Arriving, Patient Name Is
Unknown button. Press the <Spacebar> key to select this button.
2. Click Continue. Keyboard: use the <Tab> key to locate the Continue button
and use the <Spacebar> key to select it.
The application displays the Patient Information pane.
EDIS reports do not reflect the number of patients whom users add to the application
via this method.
Also, EDIS creates its Time In timestamps when users identify patients in VistA or
create unscheduled appointments for them in Appointment Manage ment. As a result,
sites must correct EDIS’s Time In values to reflect the times these patients actually
arrived at the Emergency Department.
Figure 15: The Ambulance Is Arriving, Patient Name Is Unknown button.
3.4. Update Patient Information from the Display Board
From the main Display Board, select from one of the following column headers, if
available (columns are configurable and can be added/removed as desired) to perform
the following functions:
Room – to update or add a room or bed

EDIS v2.1.1
User Guide
EDIS v2.1.1
User Guide 32 July 2013
Patient – to view or update patient demographics information
Status – to change the status of a patient
ESI – to change the Acuity of a patient
PRV – to assign or change the provider
RN – to assign or change a nurse
Complaint – to view the complaint free-form text
Comments – to enter comments in free-form text
Dispo – to change the Disposition of a patient
Res – to assign or change the resident
Figure 16: CPE Display Board View
3.4.1. Updating a Room or Bed from the Display Board
In the Room column, select the patient whose information you want to view or
edit. Use the <Down Arrow> key to enter the list, and use the <Down Arrow>
and <Up Arrow> keys to select your Room.

EDIS v2.1.1
User Guide
EDIS v2.1.1
User Guide 33 July 2013
Figure 17: Change Room/Bed View.
3.4.2. View or Update Patient Demographic Information
In the Patient column, select the patient whose information you want to view or
edit. Select one of the fields to update the telephone number and click the OK
button to accept your changes.

EDIS v2.1.1
User Guide
EDIS v2.1.1
User Guide 34 July 2013
Figure 18: Patient Demographics View
666-66-6666

EDIS v2.1.1
User Guide
EDIS v2.1.1
User Guide 35 July 2013
3.5. Change the Patient Status
In the Status column, select the patient whose information you want to view or
edit. Use the <Down Arrow> key to enter the list, and use the <Down Arrow>
and <Up Arrow> keys to select your status.
Figure 19: Status View
You may select the status that is appropriate for the patient from your site’s Status
selection list.

EDIS v2.1.1
User Guide
EDIS v2.1.1
User Guide 36 July 2013
Change the ESI Acuity Level
In the ESI column, select to view or edit patient information. Use the <Down
Arrow> key to enter the list, and use the <Down Arrow> and <Up Arrow> keys
to select your Acuity level.
Figure 20: ESI View
3.5.1. Assign or Change a Provider
In the PRV column, select the patient to view or edit patient information. Use the
<Down Arrow> key to enter the list, and use the <Down Arrow> and <Up
Arrow> keys to select your Provider Name.
NOTE: Providers in this list, are defined in the Provider Configuration.

EDIS v2.1.1
User Guide
EDIS v2.1.1
User Guide 37 July 2013
Figure 21: Change Provider View
3.5.2. Add or Change a Nurse
In the Nurse column, select the patient whose information you want to view or
edit. Use the <Down Arrow> key to enter the list, and use the <Down Arrow>
and <Up Arrow> keys to select the name of the nurse triaging the patient. NOTE:
the Nurse Selection is defined by the "Nurse Configuration" .
Figure 22: Change Nurse View

EDIS v2.1.1
User Guide
EDIS v2.1.1
User Guide 38 July 2013
3.5.3. Entering Patient Complaint
In the Complaint column, select the patient whose information you want to view
or edit. A popup appears to allow editing of the patient complaint.
Figure 23: Change Complaint
3.5.4. Entering Comments
In the Comments column, select the patient whose information you want to view
or edit. A popup appears to allow editing of the comment.
Figure 24: Change Comment
3.5.5. Entering Disposition
In the Dispo column, select the patient whose information you want to view or
edit. A popup appears to allow selection of the disposition.

EDIS v2.1.1
User Guide
EDIS v2.1.1
User Guide 39 July 2013
Figure 25: Change Disposition
3.5.6. Add or change a Resident
In the Resident column, select the patient whose information you want to view or
edit. Use the <Down Arrow> key to enter the list, and use the <Down Arrow>
and <Up Arrow> keys to select the name of the resident attending the patient.
NOTE: the Resident Selection is defined by the "Resident Configuration".
Figure 26: Change Resident View

EDIS v2.1.1
User Guide
EDIS v2.1.1
User Guide 40 July 2013
3.6. Visit or Assess Worksheet View
Use the Worksheet (Visit and Assess) or combined view to edit or update
information that you gather as part of the patient care process. From this view, you
can:
update the patient’s display-board complaint;
include additional, not-for-display information about their complaints
(optional);
update their room or area assignments;
add information about their acuities;
make nursing, provider, and resident assignments;
update or add their sources (on-site clinics, nursing homes, and so forth);
specify a clinic location for the patient’s emergency -department visit.
add optional comments;
provide a disposition;
provide a Delay Reason, if applicable;
access vitals and active medications and problems

EDIS v2.1.1
User Guide
EDIS v2.1.1
User Guide 41 July 2013
Figure 27: The Visit Worksheet view.
3.6.1. Visit Worksheet View
In the EDIS CPE/Active Patients view, select the patient whose information you want to
enter. Keyboard: use the <Tab> key to locate the Active Patients list. Use the <Down
Arrow> key to enter the list, and use the <Down Arrow> and <Up Arrow> keys to locate
the patient you want to select. The Patient Information pane displays current information
for the selected patient.
Complaint
If necessary, expand the Complaint section.
Enter the complaint in the Complaint for Display Board box. The application will not
allow you to add the patient to EDIS if the Complaint for Display Board box is empty.
In the Long Complaint (optional) box, you may type supplemental information about
the patient’s condition.
If known, the patient’s arrival mode (Source) can also be selected.
Vitals
If necessary, expand the Vitals section and click the Load button. If the current patient
has data, it will be displayed in the table, with an associated timestamp. The data can also
be printed by clicking the Print button.

EDIS v2.1.1
User Guide
EDIS v2.1.1
User Guide 42 July 2013
Update Vitals
If necessary, expand the UpdateVitals section.
1. Where applicable, update the vital fields BP – Blood Pressure, T (F) –
Temperature, P- Pulse, RR – Respiratory Rate, Ht (in) – Height, Wt (lbs.) –
Weights and Pain Severity. NOTE: Currently, EDIS does not support the metric
system for vitals.
2. Save your changes by clicking Save or click Reset to zero out your changes.
Status/Responsibility
If necessary, expand the Status/Responsibility section.
1. Select a room/area from the Room list (room or area selection is mandatory).
Keyboard: Use the <Down Arrow> and <Up Arrow> keys to select a room or
area from the list.
2. Click an acuity value from the Acuity list. Acuity information is mandatory for this
view. If you do not select an acuity, the application will not allow you to save your
updates or edits. Keyboard: Use the <Down Arrow> and <Up Arrow> keys to
select an Acuity from the list.
3. EDIS supports the Emergency Severity Index (ESI) triage algorithm, which ranks
patients’ acuities using the numbers 1 (most urgent) through 5 (least urgent). Please
visit the Agency for Healthcare Research and Quality ESI Web site for more
information.
4. From the Status list, select the patient’s status. Keyboard: Use the <Down Arrow>
and <Up Arrow> keys to select a Status from the list.
5. Click a provider from the Provider list. Keyboard: Use the <Down Arrow> and
<Up Arrow> keys to select the patients’ provider assignment from the list. The
Provider list is also available on the Disposition view.
6. Click a nurse from the Nurse list. Keyboard: use the <Tab> key to locate the
Nurse list. Use the <Down Arrow> and <Up Arrow> keys to select the patients’
Nurse from the list.
7. If applicable, click a resident from the Resident list. Keyboard: use the <Tab> key
to locate the Resident list. Use the <Down Arrow> and <Up Arrow> keys to
select the patients’ Resident from the list.
8. If applicable, click a clinic from the Clinic list. Keyboard: use the <Tab> key to
locate the Clinic list. Use the <Down Arrow> and <Up Arrow> keys to select the
patients’ Clinic from the list.
When you make a provider assignment in EDIS, the application
automatically creates a Patient Care Encounter (PCE) visit in CPRS—if it
hasn’t already done so, or unless the provider does not have an active
person class in VistA.
EDIS does not create encounters for patients you’ve added using the Enter
Name, Patient Is Not in VistA and Ambulance Is Arriving, Patient
Name Is Unknown selections. It does not create encounters when you

EDIS v2.1.1
User Guide
EDIS v2.1.1
User Guide 43 July 2013
enter only resident or nurse assignments . However, EDIS does create
encounters if the nurse has an active person class in file 200.
NOTE: EDIS does not register patients.
Disposition
If necessary, expand the Disposition section.
1. Enter an optional Comment.
2. Click the Disposition list and select a disposition. Depending upon your site’s
configuration, the application may require a disposition before allowing you to
remove a patient from the display board. Keyboard: use the <Tab> key to locate
the Disposition list. Use the <Down Arrow> and <Up Arrow> keys to select a
disposition from the list.
3. Click Save to save your changes or click Cancel to close the Patient Information
pane without saving your changes. Keyboard: use the <Tab> key to locate the
Save or Cancel button. Use the <Spacebar> key to select the button.
NOTE: The Save button is available only after you’ve added or updated
information in the Disposition pane.
Definitions for National Dispositions
The EDIS Technical Work Group (TWG) offers the following definitions
for nationally released dispositions:
Admitted to VA Ward—the patient was admitted to an inpatient
location, not including an ICU, telemetry, or psychiatric unit.
AMA—the patient left against medical advice after signing a form; the
patient may or may not have been medically evaluated before leaving.
Sent to Urgent Care Clinic—the patient was discharged from the
emergency department and referred to another evaluation clinic at the
same site; some degree of triage is necessary to make this judgment.
Deceased—the patient is dead.
Eloped—the patient left the emergency department and his or her
disposition is unknown; a nurse or physician may have seen and
evaluated the patient.
Patient Name Entered in Error—the patient’s name was entered in
error; this disposition removes the patient from the board.
Home—the patient was discharged to his or her previous living
arrangement.
Admitted to ICU—the patient was admitted to an inpatient critical care
unit.
Left Without Being Treated/Seen—the patient left the emergency
department before receiving treatment and before signing the form; this

EDIS v2.1.1
User Guide
EDIS v2.1.1
User Guide 44 July 2013
is not the same as AMA, which assumes the patient signed a form before
leaving.
Sent to Nurse Eval / Drop-in Clinic—the patient was discharged from
the emergency department and referred to another on-campus same-day
evaluation clinic; some degree of triage is necessary to make this
judgment.
Admitted to Psychiatry—the patient was admitted to an inpatient
psychiatric unit.
Admitted to Telemetry—the patient was admitted to an inpatient
telemetry unit.
Transferred to a Non-VA Facility—the patient was discharged from the
emergency department and sent to another, non-VA, facility.
Transferred to VA Facility—the patient was discharged from the
emergency department and sent to another VA facility.
Sites can activate and inactivate these dispositions. The application
allows your site to configure additional, site-specific dispositions.
To capture admission-delay times for reporting, you must change patients’
statuses to Admitted and then immediately select Admitted to VA Ward as their
dispositions. Unless you intend to remove patients from the board, click Save. Do not
click Save & Remove from Board, which will prematurely remove your patients from
the EDIS tracking application.
Definitions for National Reason-for-Delay Sections
The EDIS TWG offers the following definitions for nationally released
reason-for-delay selections. Your site is not required to include all
selections in its pick list. EDIS test sites recommend limiting pick lists
to reasons that are relevant at your site because over -long lists affect
compliance.
Obtain Accepting Physician—the delay was caused by the inability to
find an accepting physician to admit the patient. This selection includes
the elapsed time between determining the patient’s need for admission
and obtaining an accepting physician.
Admit Physician Writing Dispo—the delay resulted from the
physician’s failure to write the patient’s admit or discharge order. This
selection includes the elapsed time between when the patient was ready
for his or her disposition and when the physician wrote the order to
admit or discharge the patient.
Admitting Physician Evaluation—the delay was related to the
admitting physician’s evaluation and confirmation of the patient’s
disposition. For this selection, delay time begins when the physician sees
the patient and ends when:
H&P is done
Ancillary studies that are necessary for disposing the patient are done
and resulted

EDIS v2.1.1
User Guide
EDIS v2.1.1
User Guide 45 July 2013
The patient is ready to be disposed
Patient Admitted to Observation—the delay resulted from the patient’s
admission to observation. This selection includes the elapsed time
between when the patient was ready to be disposed and the time the
physician wrote an order to admit the patient to 23 hours of emergency
department or floor observation.
Obtain Ambulance Services—the delay resulted from the time it took to
obtain ambulance services. This selection includes the elapsed time
between when emergency department staff requested ambulance services
and the time the ambulance arrived.
Obtain Consultant—the delay resulted from an ordered consultation’s
lack of completion. This selection includes the elapsed time from when a
physician ordered a consultation to the time the physician obtained the
consultation.
ED to Hospital Bed—the delay represents the difference between the
time the patient was assigned a hospital bed and the time the patient was
transported from the emergency department; for example, this delay
could represent the time emergency department staff spent waiting for an
escort, for a bed to be cleaned, for a nursing report, or for staffing.
Obtain Escort—the delay resulted from the time it took to obtain an
escort for the purpose of transporting the patient (not including transport
to a hospital bed—use ED to Hospital Bed for this reason). This
selection includes the time that elapsed between when the emergency
department called an escort and the time the escort arrived to transport
the patient to a clinic, radiology, or another ancillary department.
Patient Transport Home—the delay resulted from an inability to find
transportation for a discharged patient or the time it took the identified
source of transportation to arrive at the emergency department. This
selection includes the elapsed time between when the patient was ready
for discharge and the time the patient left the emergency department.
Obtain Imaging Results—the delay resulted from time spent waiting to
obtain imaging results. This selection includes the elapsed time between
when the imaging study was completed and the time the study was
resulted.
Obtain Imaging Studies—the delay resulted from time spent waiting for
imaging studies. This selection includes the elapsed time between when
the physician ordered the imaging study and the time the study was done
and ready for interpretation.
Obtain Inpatient Bed—the delay resulted from the time spent waiting
for an impatient bed assignment. This selection includes the elapsed time
between when the physician wrote the admission order and the time bed
control or the house supervisor assigned the patient to a bed—the time an
ICU patient waited for an ICU bed to open up, for example.
Interfacility Transfer—the delay was caused by an inability to transfer
the patient to another facility in a timely manner.

EDIS v2.1.1
User Guide
EDIS v2.1.1
User Guide 46 July 2013
Obtain Lab Results—the delay was caused by the lack of a timely
turnaround for laboratory tests. This selection includes the elapsed time
between when labs were drawn or obtained and the time the labs were
resulted.
Obtain Lab Studies—the delay was caused by an inability to get labs
drawn in a timely fashion. This selection includes the elapsed time
between when the physician wrote the lab order and the time the lab test
was drawn.
On-call Staff—the delay was caused by an inability to contact on-call
staff.
Overcrowding of ED—the delay resulted from waiting for an emergency
department bed to become available (includes hallway beds and beds that
were unavailable because of staffing issues); no beds were available for
inbound ambulances, including hallway beds.
Obtain Drugs/Pharmacology—the delay was caused by an inability to
get ordered drugs from the pharmacy. This selection includes the elapsed
time between when the physician ordered the medications and the time
the emergency department received the medications.
ED Physician Limits—the delay resulted from time the physician spent
seeing patients. This selection includes the elapsed time between when
the patient was placed in a bed and when the physician saw the patient.
For example, this reason for delay might apply if five patients presented
with chest pains, all within 10 minutes.
ED Staff Limits—the delay resulted from a failure to process the patient
(see the patient or accomplish orders, for example) in a timely manner
because of insufficient staffing. This selection includes the elapsed time
between when the physician wrote an order (to splint a broken ankle, for
example) and the time the order was accomplished.
Obtain Medical Supplies—the delay resulted from an inability to obtain
medical supplies (splints, crutches, and c-line kits, for example) in a
timely manner. This selection includes elapsed time from when
emergency department personnel ordered the supplies (or identified the
need for them) and the time the emergency department received the
supplies.
Arrange Emergency Surgery—the delay resulted from the time it took
to get the patient (who needed surgery) to the operating room.
Patient Transport Other—the delay resulted from the time it took to
find transportation for the patient to a location other than home. This
selection includes the elapsed time between when the patient was ready
for transport and the time the patient left the emergency department.

EDIS v2.1.1
User Guide
EDIS v2.1.1
User Guide 47 July 2013
4. Click Save to save your edits and updates or click Cancel to close the Patient
Information pane without saving your changes. The Save button is available only
after you’ve added or updated information in the Patient Information pane.
5. If the Delay Reason list is available, open it and select a reason for delay.
Depending upon your site’s configuration, the application may require a reason for
delay when patients’ emergency-department visits have exceeded a specified number
of minutes. Keyboard: use the <Tab> key to locate the Delay Reason list. Use the
<Down Arrow> and <Up Arrow> keys to select a delay reason from the list. The
Delay Reason list is available only under the following conditions:
Your site requires a delay reason and
The patient’s stay has exceeded the site-determined limit and
The patient is not in an observation ward
NOTE: If your site requires a reason for delay and the patient’s stay has exceeded
the maximum number of minutes your site has specified, the application
will require you to enter a delay reason before it allows you to remove the
patient from the display board.
6. Please refer to section 3.7 and 3.8 to see detailed explanations of how to enter
information about Patient Diagnosis.

EDIS v2.1.1
User Guide
EDIS v2.1.1
User Guide 48 July 2013
Figure 28: The Assess Worksheet view.
3.6.2. Assess Worksheet View
In the Active Patients view, click on the patient whose information you want to enter.
Keyboard shortcut: use the <Tab> key to locate the Active Patients list. Use the <Down
Arrow> key to enter the list, and use the <Down Arrow> and <Up Arrow> keys to locate
the patient you want to select. The Patient Information pane displays current information
for the selected patient.
Labs
If necessary, expand the Labs section. Click the Load button to view patient
lab data. Not that the labs will be returned up to 6 weeks prior to the current
date. Click the Print button to print the information in the table.
Active Problems
If necessary, expand the Active Problems section. Click the Load button to
view patient data. Click the Print button to print the information in the table.
Active Medications
If necessary, expand the Active Medications section. Click the Load button to
view patient data. Click the Print button to print the information in the table.
.

EDIS v2.1.1
User Guide
EDIS v2.1.1
User Guide 49 July 2013
3.7. Enter ICD-9-CM Diagnoses
1. Type a diagnosis in the Diagnosis search box and click Search or press the
<Enter> key. The application lists possible matches from VistA’s ICD-9-CM
code base. Keyboard: use the <Tab> key to locate the Diagnosis search box.
Type a diagnosis in the box and press the <Enter> key.
2. Click on an ICD-9-CM diagnosis from the Diagnosis search result list and
click Add or press the <Enter> key. The application adds this diagnosis to the
Selected Diagnoses list. Keyboard: use the <Down Arrow> and <Up Arrow>
keys to locate the diagnosis you want to select. Press the <Enter> key to select
the diagnosis. To select another diagnosis from the same search list, use the
<Tab> key to reenter the list. Use the <Down Arrow> and <Up Arrow> keys
to locate the additional diagnosis, and press the <Enter> key to select this
diagnosis. You can also select diagnoses by using the <Tab> key to locate the
Add button, then pressing the <Spacebar> key to select the button.
3. To remove a diagnosis from the Selected Diagnoses list, click the diagnosis
and click Remove or press the <Delete> key. Keyboard: use the <Tab> key to
locate the Selected Diagnoses list. Use the <Down Arrow> and <Up Arrow>
keys to locate the diagnosis you want to remove. Press the <Delete> key to
remove the diagnosis. You can also simultaneously press the <Shift> and
<Tab> keys to locate the Remove button, and then press the <Spacebar> key
to remove the selected diagnosis.
4. Repeat steps 1–3 as needed.
5. In the Selected Diagnoses list, click a primary diagnosis and click Set as
Primary Diagnosis. Keyboard: in the Selected Diagnoses list, use the <Down
Arrow> and <Up Arrow> keys to locate the primary diagnosis. Use the
<Tab> key to locate the Set as Primary Diagnosis button, and use the
<Spacebar> key to select this button.
6. Click Save to save your changes or Cancel to close the Patient Information
pane without saving your changes. Keyboard: use the <Tab> key to locate the
Save or Cancel button. Use the <Spacebar> key to select the button.
NOTE: Saving an ICD-9-CM diagnosis in EDIS adds the diagnosis to the
patient’s emergency-department encounter in CPRS. If EDIS hasn’t
already created a PCE encounter for this patient, it will also create an
encounter at this time. The application does not add free-text diagnoses to
the patient’s visit in CPRS.

EDIS v2.1.1
User Guide
EDIS v2.1.1
User Guide 50 July 2013
3.8. Enter Free-Text Diagnoses
You can type in free-text diagnoses only if your site has set the parameter that
enables you to do so.
1. Type a diagnosis or procedure in the Diagnosis box and click Add or press the <Enter>
key. Keyboard: Use the <Tab> key to locate the Diagnosis box. Type a diagnosis in the
box and press the <Enter> key. You can also press the <Tab> key to locate the Add
button and press the <Spacebar> key to select the button. The application displays your
diagnosis or procedure in the Selected Diagnoses list.
2. To remove an item from the Selected Diagnoses list, select the item and click Remove
or press the <Delete> key. Keyboard: Use the <Tab> key to locate the Selected
Diagnoses list and use the <Down Arrow> and <Up Arrow> keys to locate and select
the diagnosis you want to remove. Use the <Delete> key to remove the diagnosis. You
can also remove the diagnosis by simultaneously pressing the <Shift> and <Tab> keys
to locate the Remove button, then pressing the <Spacebar> key to select the button.
3. Repeat steps 1–2 as needed.
4. In the Selected Diagnoses list, choose a primary diagnosis, and then click Set as
Primary Diagnosis. Keyboard: Use the <Tab> key to enter the Selected Diagnoses list
and the <Down Arrow> and <Up Arrow> keys to locate the primary diagnosis. Use the
<Tab> key to locate the Set as Primary Diagnosis button and use the <Spacebar> key
to select it. NOTE: this diagnosis notes to save to the PCE Encounter in CPRS.
5. Click Save to save your changes or click Cancel to close the Patient Information pane
without saving your changes. Keyboard: Use the <Tab> key to locate the Save or
Cancel button. Use the <Spacebar> key to select the button.
Figure 29: The Disposition view with free-text diagnoses enabled.

EDIS v2.1.1
User Guide
EDIS v2.1.1
User Guide 51 July 2013
3.9. Remove Patients
Click the Save & Remove from Board button to save changes and remove patients
from the display board. Keyboard: use the <Tab> key to locate the Save & Remove
from Board button. Use the <Spacebar> key to select the button.
This button is available only after users have entered all of the disposition information your
site’s EDIS implementation requires. If you haven’t entered a provider or acuity, the
application alerts you to do these things before it allows you to save your changes and
remove your patient from the board—unless your patient’s disposition is Patient Name
Entered in Error, Left Without Being Treated / Seen, or Sent to Nurse Eval / Drop In
Clinic.
Clicking the Save & Remove from Board button removes patients from the display board
and saves previously unsaved changes. While the application retains information about the
visits of patients you’ve removed from the display board, only users who have access to the
Edit Closed view will have direct access to this information. Users who have access to the
Reports view will have indirect access to this information.
3.10. Remove Patients Entered in Error
1. Open the Disposition list. Keyboard: Use the <Tab> key to locate the Disposition
list.
2. Click Patient Name Entered in Error. Keyboard: Use the <Down Arrow> key to
select Patient Name Entered in Error.
Click Save & Remove from Board. Keyboard: Use the <Tab> key to locate the
Save & Remove from Board button and press the <Spacebar> key to select it.

EDIS v2.1.1
User Guide
EDIS v2.1.1
User Guide 52 July 2013
4. Edit Closed View
This view enables authorized users to edit the EDIS records of patients who are no longer
on the display board. This view also allows a user to restore a patient to the board who was
removed in error. EDIS logs all changes for subsequent reference (as it does with changes
users make while patients are still signed in to the emergency department). If your site uses
PCE instead of Appointment Management, the Edit Closed view provides a lookup tool;
you can use this view to search for specific patients who visited your emergency
department on a specific date.
NOTE: The following option is needed to access the Edit Closed View: (Option:
[EDPF TRACKING VIEW EDIT CLOSED]).
Figure 30: The Edit Closed View
1. Click Edit Closed on EDIS’s main navigation page.
2. Type a date (mm/dd/yy format) or all or part of the patient’s name (Surname, First name
format) in the Patient Name or Date box. For example, you can type the patient’s surname
initial, entire surname, or surname and first-name initial. You can also type the patient’s full
SSN, the initial letter of the patient’s surname concatenated with the last four digits of his or
her SSN (X9999 format), the word today (for a list of today’s visits), or t-n ( where t
represents today, and n represents the number of days prior to today). Keyboard: use the
<Tab> key to locate the Patient Name or Date box.
3. Click Search or press the <Enter> key. EDIS lists possible matches in the search-results list.

EDIS v2.1.1
User Guide
EDIS v2.1.1
User Guide 53 July 2013
4. Add or update other data-entry fields as necessary. You can add information to, or update the
following fields: Complaint for Display Board, Long Complaint (optional), Room / Area,
Acuity, Status/Responsibility, Room/Area, Acuity, Status, Provider, Nurse, Disposition,
Status, Comments, Disposition, Delay Reason, Time In, Time Out and Diagnosis. (Click
the Time In or Time Out spin-box arrows or use the <Up Arrow> and <Down Arrow>
keys to edit the patient’s time in or time out.)
5. Click Save to save your changes or click Cancel to discard them.
6. If this was a patient who was removed from the board in error, click the Restore button to
restore the patient’s record in EDIS and replace the patient’s name on the CPE Display
Board.
NOTE: If you attempt to change the time out value (or other value) for a patient
who left the emergency department before he or she was seen, EDIS will
not allow you to save your change until you add a provider name.
NOTE: The Save button is available only after you’ve added or updated
information in the Patient Information pane. The application allows you
to save your changes only if all required data fields contain valid entries.
NOTE: If you attempt to edit the record of the only one patient returned from the
query on the Edit Closed Visit page,EDIS will allow you to save the
changes to the patient.
NOTE: If you attempt to edit the disposition of a Closed record that does not
require a provider entry to another disposition which also does not
require a provider entry then you will be able to save the record without
entering a provider name.

EDIS v2.1.1
User Guide
EDIS v2.1.1
User Guide 54 July 2013
5. Display Board View
Your site can configure one or more display boards, depending on its needs. The Display
Board view offers a PC-or workstation-based preview of your site’s main electronic
whiteboard display configuration. If you have access to this view, you can customize it as
you would any other grid-based view:
Arrange columns
Resize columns
Sort within columns
See the “Work with Data Grids” section of this document for information about how to
arrange, resize, and sort within columns.
NOTE: Sorting information within columns in the PC-based Display Board view
does not cause EDIS to similarly sort information in large electronic
(LCD) whiteboard display columns. EDIS sorts large display columns
first in the order of the rooms and areas listed in the Room / Area
configuration subview and then in the order of patients’ acuities.
You cannot save layout changes you make from within this view. Further, the changes you
make appear only on your local machine (as opposed to the large display). To request
permanent changes in the display-board view, please contact the person who configures
EDIS for your site (usually an IRM or CAC staff member). NOTE : The following option
is needed to access the Display Board View : (Option: [EDPF TRACKING VIEW
BOARD])
Figure 31: The Display Board view.

EDIS v2.1.1
User Guide
EDIS v2.1.1
User Guide 55 July 2013
5.1. Viewing the Display Board
The PC-based Display Board view contains only the columns your site has selected
for its main display board. Following is a list of the columns from which your site can
choose:
Room / Bed: Patients’ locations
Patient Name: Patients’ display names
Complaint: Patients’ display-board complaints
Visit: A check mark lets the user know that a visit has been created in PCE
Status: Patients’ statuses
ESI: Patients’ acuities
Provider Initials: Providers’ initials
Nurse Initials: Nurses’ initials
Resident Initials: Residents’ initials
Lab Active/Complete: The total number of patients’ active laboratory orders relative
to the total number of their completed laboratory orders
Imaging Active/Complete: The total number of patients’ active imaging orde rs
relative to the total number of their completed imaging orders
New (Unverified) Orders: Patients’ unverified orders (values decrement when nurses
verify the orders in CPRS and when ancillary services [lab and imaging] complete the
orders)
Disposition: Patient disposition
Comment: Patient comments, if any
Elapsed Minutes: Total elapsed minutes patient has spent in the ED
Minutes at Location: The total number of minutes that patients have been in their
present locations
Clinic: Patient’s currently-assigned clinic
NOTE: EDIS displays information only for laboratory, imaging, and new orders
that are associated with patients’ current emergency-department visits.

EDIS v2.1.1
User Guide
EDIS v2.1.1
User Guide 56 July 2013
6. Assign Staff View
This view allows authorized users to add staff names to—and remove them from—pick lists
that are available in the Disposition, and Edit Closed views. You can also configure text
and background colors for staff assignments.
Figure 32: The Assign Staff view.

EDIS v2.1.1
User Guide
EDIS v2.1.1
User Guide 57 July 2013
6.1. Add Providers, Residents, and Nurses
1. Type the name of a physician, resident, or nurse in the view’s Providers, Residents,
or Nurses search box, respectively. EDIS displays a list of possible matches from
your local VistA system. (Nurse search lists are based on your site’s EDPF NURSE
STAFF SCREEN parameter setting.) Keyboard: Use the <Tab> key to locate the
Providers, Residents, or Nurses search box.
2. Click on the name of the physician, resident, or nurse you want to add and click Add
or press the <Enter> key. EDIS adds the name to the Provider, Resident, or Nurse
list, respectively. Keyboard: Use the <Down Arrow> key to enter the search list.
Use the <Down Arrow> and <Up Arrow> keys to locate the name of the physician,
resident, or nurse you want to add. Press the <Enter> key to add this name.
3. Click Save Staff Changes to save your additions. Keyboard: Use the <Tab> key to
locate Save Staff Changes and use the <Spacebar> key to select it.
NOTE: A nurse cannot be selected for both the Nurse Select and the Provider.
6.2. Remove Providers, Residents, and Nurses
1. In the Providers, Residents, or Nurses list, select the physician, resident, or nurse
whose name you want to remove. Keyboard: Use the <Tab> key to locate the
Providers, Residents, or Nurses list. Use the <Down Arrow> and <Up Arrow>
keys to locate the name of the provider, resident, or nurse you want to remove.
1. Click Remove or press the <Delete> key.
2. Click Save Staff Changes to save your changes. Keyboard: Use the <Tab> key to
locate the Save Staff Changes button and use the <Spacebar> key to select the
button.
6.3. Configure Colors for Providers, Residents, and Nurses
The application allows you to configure text and background colors for providers,
residents, and nurses.

EDIS v2.1.1
User Guide
EDIS v2.1.1
User Guide 58 July 2013
1. Select a physician, resident, or nurse in the Provider, Resident, or Nurse list. EDIS
displays the Use Color check box. Keyboard: Use the <Tab> key to locate the
Provider, Resident, or Nurse list. Use the <Down Arrow> and <Up Arrow> keys
to select a name from the list.
2. Select the Use Color check box. Keyboard: Use the <Tab> key to locate the Use
Color check box and use the <Spacebar> key to select it.
3. To configure a color for text, click the color-selection box labeled Text. EDIS
displays a color-selection grid ( ). Click a color in the grid to select a text
color. Keyboard actions are not available for this step.
4. To configure a background color, click the color-selection box labeled Back. EDIS
displays a color-selection grid. Click a color in the grid to select a background color.
Keyboard actions are not available for this step.
5. Click Save Staff Changes to save your color selections. Keyboard: Use the <Tab>
key to locate the Save Staff Changes button and use the <Spacebar> key to select
it.
NOTE: Colors you configure for staff assignments will not appear on the display
board unless colors (in general) are enabled for staff assignments in the
Configuration view’s Display Board subview.

EDIS v2.1.1
User Guide
EDIS v2.1.1
User Guide 59 July 2013
7. Reports View
EDIS can control access to the Reports view in several ways. For example, the application
can deny access (in which case you do not see the Reports selection on the application’s
left-hand menu). It can also enable you to run and view standard reports, and allow you to
print reports and export them for use in spreadsheet applications such as Microsoft Excel.
(Sites control user access to EDIS’s export feature via the EDPR EXPORT security key.
Sites also use security keys to control access to two other restricted reports:
EDPR PROVIDER - allows user to view the Provider Report.
EDPR XREF - allows user to view and run the EDIS Cross Reference report .)
NOTE: The following reports may, under certain circumstances, give erroneous
results; these reports should be used with caution:
Report Possible Error
Activity May display negative values for Wait, Triage, Admission
Delay, Admission Decision columns.
Acuity May display negative values.
Delay May display negative values for Admission Delay, Admission
Decision columns.
Missed
Opportunity
May display negative values for Wait, Triage, Admission
Delay, Admission Decision columns.
Shift Does not display correct values.
VA Admission
Report
May display negative values for Wait, Triage, Admission
Delay, Admission Decision columns.
7.1. Standard Reports
7.1.1. Column Headings
EDIS’s standard reports are data grids that include one or more of the following
columns:
IEN: The EDIS internal entry number (FILE: ED LOG (#230))
Time In: the time at which an EDIS user identified and added the patient, or the
time at which an Appointment Management user created an emergency-department
appointment for the patient
Time Out: The time at which an EDIS user closed the patient’s emergency
department visit
Complaint: The patient’s display-board complaint
MD: The initials of the patient’s physician
Acuity: The patient’s acuity level
Elapsed: Total elapsed time (from the patient’s time in to his or her time out, in
minutes; asterisks indicate stays that have exceeded the current nationally
recognized stay limit of 360 minutes)
Triage: The elapsed time between the patient’s time in and his or her initial acuity
assessment
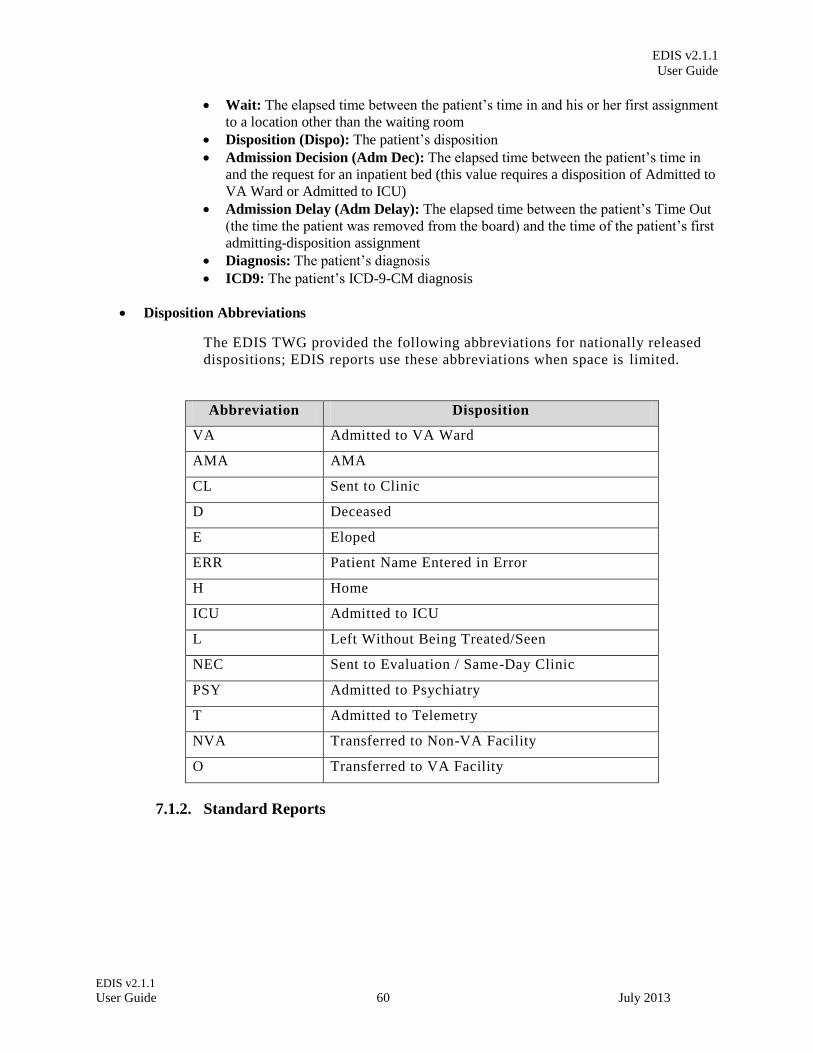
EDIS v2.1.1
User Guide
EDIS v2.1.1
User Guide 60 July 2013
Wait: The elapsed time between the patient’s time in and his or her first assignment
to a location other than the waiting room
Disposition (Dispo): The patient’s disposition
Admission Decision (Adm Dec): The elapsed time between the patient’s time in
and the request for an inpatient bed (this value requires a disposition of Admitted to
VA Ward or Admitted to ICU)
Admission Delay (Adm Delay): The elapsed time between the patient’s Time Out
(the time the patient was removed from the board) and the time of the patient’s first
admitting-disposition assignment
Diagnosis: The patient’s diagnosis
ICD9: The patient’s ICD-9-CM diagnosis
Disposition Abbreviations
The EDIS TWG provided the following abbreviations for nationally released
dispositions; EDIS reports use these abbreviations when space is limited.
Abbreviation Disposition
VA Admitted to VA Ward
AMA AMA
CL Sent to Clinic
D Deceased
E Eloped
ERR Patient Name Entered in Error
H Home
ICU Admitted to ICU
L Left Without Being Treated/Seen
NEC Sent to Evaluation / Same-Day Clinic
PSY Admitted to Psychiatry
T Admitted to Telemetry
NVA Transferred to Non-VA Facility
O Transferred to VA Facility
7.1.2. Standard Reports

EDIS v2.1.1
User Guide
EDIS v2.1.1
User Guide 61 July 2013
Figure 33: The Reports view list of standard reports.
Activity Report: Displays patient’s activity from the timeframe specified from the date range. The
Activity report lists the following information below:
IEN
Time In
Time Out
Complaint
MD
Acuity
Elapsed
Triage
Wait
Disposition (Dispo)
Admission Decision (Adm Dec)
Admission Delay (Adm Delay)
Diagnosis
ICD9
In addition, this report provides averages for several important time -based
measurements (Admission Decision, Admission Delay, Elapsed, Wait, and
Triage) in several patient categories:
All patients
All patients who were admitted
All patients who were not admitted
All patients in each of the following disposition categories: Deceased (D), Eloped
(E), Patient Name Entered in Error (ERR), Home (H), Admitted to ICU (ICU),
Left Without Being Treated/Seen (L), Sent to Nurse Eval / Drop In Clinic
(NEC), Transferred to non-VA Facility (NVA), Admitted to Psychiatry (PSY),
Admitted to Telemetry (T), and Admitted to VA Ward (VA).

EDIS v2.1.1
User Guide
EDIS v2.1.1
User Guide 62 July 2013
Figure 34: The Activity report.
Acuity Report: This report displays statistics that measure patient workload for
each acuity level. For the date-and-time range you select, statistics show the
number of patients who fell into each acuity category, the number of patients in
each category who were admitted, and the number in each category who were
admitted to a VA facility. The Acuity report also provides the following average
times for patients in each acuity category:
Admission Decision (all facilities)
Admission Decision (VA facilities)
Admission Delay (VA facilities)
NOTE: Test sites found that this report times out for date ranges that cover a
large number of visits (1,400 visits within a one-month range, for
example). They recommend clicking Continue and toggling between the
Display Board and Reports views to get data from extended time
ranges.
Also, if your site’s process results in a number of patients whom you’ve removed
from the board using the Patient Name Entered in Error selection, you should
correct the report’s total number of patients by subtracting the number of patients
who were entered in error.

EDIS v2.1.1
User Guide
EDIS v2.1.1
User Guide 63 July 2013
Figure 35: The Acuity report.
Delay Report: This report presents information about patients whose emergency
department stays exceeded the nationally recognized limit (six hours or 360
minutes). For each patient whose stay exceeded this limit, the Delay report
displays available information in the following columns:
IEN
Patient
Time In
Elapsed
Disposition
Delay Reason
MD
Admission Decision (Adm Dec)
Admission Delay (Adm Delay)
Acuity
Diagnosis
Figure 36: The Delay Report.

EDIS v2.1.1
User Guide
EDIS v2.1.1
User Guide 64 July 2013
NOTE: EDIS does not include in its Delay and Delay Summary reports patients
whose emergency-department visits are not yet closed—regardless of the
number of hours their visits have consumed.
Delay Summary Report: This report presents average visit and decision-to-admit
times (and other important information) for the following three visit categories:
All emergency department visits
All visits that resulted in VA-facility admissions
All visits that did not result in VA-facility admissions
This report also presents acuity-based tallies for each applicable reason for delay.
Again, if your site’s process results in a number of patients whom you’ve removed
from the board using the Patient Name Entered in Error selection, you should subtract
this number from the report’s total number of visits and from visits that didn’t result
in VA-facility admissions.

EDIS v2.1.1
User Guide
EDIS v2.1.1
User Guide 65 July 2013
Figure 37: The Delay Summary Report.
ED Mental Health Patients: The ED Mental Health Patients report captures the
following information for behavioral-health patients:
Time In
Time Out
Complaint
MD
Acuity
Elapsed
Triage
Disposition
Admission Decision (Adm Dec)
Admission Delay (Adm Delay)
Diagnosis
ICD9 (ICD-9-CM codes for this report are greater than 290 and less than 316)
This report also provides service-related information such as whether or not the
patient is a Vietnam veteran, has been exposed to Agent Orange, has a VA pension,
and so forth.

EDIS v2.1.1
User Guide
EDIS v2.1.1
User Guide 66 July 2013
Figure 38: The ED Mental Health Patients Report.
Exposure Report: This report identifies patients and staff who may have been in the
emergency department when a contagious patient was present for treatment. To run
the report, you enter the internal entry number (IEN) from the contagious patient’s
Visit file (ED LOG file (#230)). EDIS then uses information in this file to compile
lists of all patients and staff that were in the emergency department during the time of
the contagious patient’s visit.
Figure 39: The Exposure Report.

EDIS v2.1.1
User Guide
EDIS v2.1.1
User Guide 67 July 2013
Missed Opportunities Report: This report displays the following information about
patients whose dispositions are AMA (left against medical advice), L (left without
being treated or seen), or E (eloped):
IEN
Time In
Complaint
MD
Acuity
Elapsed
Triage
Wait
Disposition
Admission Decision (Adm Dec)
If your site assigns a nurse to left-without-being-seen (LWBS) callbacks, the nurse
must either have access to the Xref report or the application’s Edit Closed view (to
search for LWBS patients by Time In values).
Figure 40: The Missed Opportunities Report.
Orders by Acuity: For each acuity, this report tallies the number of medication,
laboratory, imaging, consultation, and other orders emergency-department personnel
placed during the date-and-time range you specify.

EDIS v2.1.1
User Guide
EDIS v2.1.1
User Guide 68 July 2013
Figure 41: The Orders by Acuity Report.
Patient Intake Report: The Patient Intake report provides time-of-day and day-of-
week statistics regarding the number of patients who visited the emergency
department during the date and time range you enter.
Columns contain day-of-week tallies cover the entire time-and-date range against
which you run the report. For example, if the date range you enter includes two
Tuesdays, the intersection of the Tue column and the 0700-0800 row displays the
total number of patients who visited the emergency department on both Tuesdays
between the hours of 7:00 a.m. and 8:00 a.m. The Total column contains a sum of all
day-based totals across each time-based row. For example, in the 0700-0800 row, the
Total column contains a sum of daily totals from the Sun through Sat columns.
For each time-based row, the Avg/Day column presents an average that is based on
the figure in the Total column and the total number of days in the date range you
select. For example, if your date range is January 1, 2009 through January 31, 2009,
the total number of days (the denominator) will be 31.
The report’s Avg/Hour row contains an average that is based on the total number of
visits in each day-based column divided by the total number of hours for each day in
the search range you select. For example, in the Sun column, the application
calculates the following average: the total number of Sunday visits (the value in the
Total row, Sun column) divided by 24 (the number of hours in a day) multiplied by
the number of Sundays in the date range you select.
NOTE: The Patient Intake report does not include maximum, minimum, and
mean calculations.

EDIS v2.1.1
User Guide
EDIS v2.1.1
User Guide 69 July 2013
Figure 42: Patient Intake Report
Shift Summary Report: This report is limited to one day of reporting and presents a
shift-based calculation of the following data categories:
Carried over at Report Start
Number of New Patients
Number of Patients Discharged
Number Dec (Decision) to Admit to VA
Number Dec (Decision) to Admit to Other
Number over Six Hours
Number Waiting for Triage
Number of Occupied Beds
Number of Missed Opportunities
Number Deceased
Number With No Disposition
Carry over to Next Shift

EDIS v2.1.1
User Guide
EDIS v2.1.1
User Guide 70 July 2013
Figure 43: The Shift Report Summary
VA Admissions Report: This report uses Disposition selections to identify patients
who were admitted to VA facilities (VA wards, intensive care units [ICUs], telemetry,
and observation wards, for example) during the time -and-date range you specify.
The report contains available information in the following columns:
IEN
Time Out
Complaint
MD
Acuity
Disposition
Adm Dec (Admission Decision)
Adm (Admission) Delay
Diagnoses
ICD9
The report also provides averages for patients who fall into each applicable VA -
admission category.

EDIS v2.1.1
User Guide
EDIS v2.1.1
User Guide 71 July 2013
Figure 44: The VA Admissions Report
Cross Reference and Provider Reports:
EDIS also provides two restricted-access reports: the Patient XRef (Cross
Reference) and Provider reports. Because these two reports contain personally
identifying information, you need special security keys (in VistA) to access and
run them. The Keys are: (EDPR XREF - for the Cross Reference Report, and the
EDPR PROVIDER - for the Provider Report)
XREF: This report provides a cross reference between the EDIS IEN and patient
identifiers (including patients’ surname initials concatenated with the last four
digits of their SSNs).

EDIS v2.1.1
User Guide
EDIS v2.1.1
User Guide 72 July 2013
Figure 45: The Patient XRef Report (Key req'd: EDPR XREF)
Provider Report: The Provider report lists the total number of patients each
provider saw during the date and time range you specify. It also provides a by-
shift and by-acuity count of patients, the time between each patient's emergency-
department time in and his or her diagnosis, and the time between each patient’s
provider assignment and his or her disposition.
NOTE: If the Provider report’s MD Assign to Dispo(sition) column contains
only zeros, your site probably doesn’t require providers to enter a
disposition before releasing patients.

EDIS v2.1.1
User Guide
EDIS v2.1.1
User Guide 73 July 2013
Figure 46: The Provider Report (Key req'd: EDPR PROVIDER)

EDIS v2.1.1
User Guide
EDIS v2.1.1
User Guide 74 July 2013
7.2. Run and View Reports
1. Click on Reports on the application’s left-hand menu bar. Keyboard: use the <Tab>
key to locate the left-hand menu bar. Use the <Up Arrow> or <Down Arrow> key
to locate Reports. Use the <Spacebar> key to select Reports.
2. Click a report from the Report list. Keyboard: use the <Tab> key to locate the
Report list. Use the <Down Arrow> and <Up Arrow> keys to select a report from
the list.
3. Click the Calendar icon ( ) and select a starting date for your report or type a
starting date in the Start Date box using this format: mm/dd/yyyy. (The application
automatically formats shorter dates. For example, if you type 8/8/09, the application
reformats the date as 08/08/2009.) Keyboard: use the <Tab> key to locate the Start
Date box.
4. Click on a starting time in the Start Time box ( ). Keyboard: use the
<Tab> key to locate the hour selector in the Start Time box. Select a start-time hour
using the <Down Arrow> and <Up Arrow> keys. Use the <Tab> key to locate the
minutes selector in the Start Time box. Use the <Down Arrow> and <Up Arrow>
keys to select start-time minutes.
5. If you are running the Exposure report, type the contagious patient’s IEN in the visit
IEN box. The Exposure report does not require a date range.
6. Click the Calendar icon in the Stop Date area and select a stop date for your report
or type a stop date in the Stop Date box. Keyboard: use the <Tab> key to locate the
Stop Date box. The Shift and Exposure reports do not require stop dates.
7. Select a stop time in the Stop Time box. Keyboard: use the <Tab> key to locate the
hour selector in the Stop Time box. Use the <Down Arrow> and <Up Arrow> keys
to select an hour. Use the <Tab> key to locate the minutes selector in the Stop Time
box. Use the <Down Arrow> and <Up Arrow> keys to select stop-time minutes.
8. Click Run Report. Keyboard: use the <Tab> key to locate the Run Report button
and use the <Spacebar> key to select the button.
NOTE: If your reports contain negative numbers, the problem could lie with logic
that EDIS’s reports functionality inherited from the class-three Syracuse
application. Syracuse reporting logic assumes that users will enter
information in a certain sequence. For example, the application assumes
that users will assign a provider before entering a patient’s disposition. To
calculate the time that elapsed between a patient’s provider assignment
and disposition, the application subtracts provider-entry time from
disposition-entry time. If users assign providers after they’ve entered
dispositions, reports such as the Provider report will contain negative
numbers.
Negative numbers can also be a result of not-so-careful data entry. For
example, suppose a patient’s stay began on July 10 at 11:00 p.m. and
ended on July 11 at 1:00 a.m. Further, suppose someone mistakenly
removed this patient from the board at 11:55 p.m. When correcting this
error, if the user corrects the patient’s time-out hour-and-minute value, but
neglects to update the date value, the patient’s time-out value will be

EDIS v2.1.1
User Guide
EDIS v2.1.1
User Guide 75 July 2013
chronologically before his or her time-in value, and EDIS will calculate
the patient’s stay at -22 hours.
When reports exceed your application window’s viewing capacity, the application
includes a scroll bar, as it does in the following screen capture:
Figure 47: Report scroll bar

EDIS v2.1.1
User Guide
EDIS v2.1.1
User Guide 76 July 2013
7.3. Print Reports
To print a report, click Print. The Print button is in the upper right-hand corner
of the Reports view. Keyboard: Use the <Tab> key to locate the Print button and
use the <Spacebar> key to select it. The application displays your operating
system’s print dialog.
7.3.1. Export Reports (locked with security key: EDPR EXPORT)
1. Click Export. If you are authorized by the KEY (EDPR EXPORT)to export
reports, you’ll find this link in the upper right-hand corner of the Reports view.
Keyboard: use the <Tab> key to locate Export and use the <Spacebar> key to
select it.
2. In the Select location for download by dialog box, select a location on the local
PC for your exported report. Keyboard: use the <Tab> key to locate the Save in
selector. Use the <Down Arrow> and <Up Arrow> keys to find a location on
your local PC for your exported report. Press the <Enter> key to select the
location.
3. In the File name box, type a name for your exported report. Keyboard: use the
<Tab> key to locate the File name box. If you want to export the report as an
Excel spreadsheet, append the .xls extension before saving.
4. Click Save. Keyboard: Use the <Tab> key to locate the Save button and use the
<Spacebar> key to select it.
The application displays a message informing you that your download is complete.
Click Close to dismiss the message. Keyboard: use the <Spacebar> key to select
the Close button.
Figure 48: Exported Activity report

EDIS v2.1.1
User Guide
EDIS v2.1.1
User Guide 77 July 2013
8. Configure View
This view allows authorized users to create customized big -board (usually large LED or
plasma) displays and configure the application to include locally meaningful pick lists.
Specifically, the view provides subviews that allow you to configure:
Room and area selections
Status, disposition, delay-reason, and source selections
Display-board options
Colors
Parameters
NOTE : Options Required : [EDPF TRACKING MENU ALL], OR [EDPF TRACKING VIEW
CONFIGURE]
8.1. Room and Area Configurations
The Room / Area subview enables you to:
Add or configure rooms and areas
Specify display names for rooms and areas
Determine when the display board displays rooms and areas
Select a default status for patients who occupy specific rooms or areas
Mark rooms or areas inactive
Select the occupancy category into which rooms and areas fall (multiple patient, single
patient, and so forth)
Indicate areas that contain two or more beds (for exposure reports)
Specify the electronic white-board display on which rooms and areas appear
Configure background and text colors for rooms and areas

EDIS v2.1.1
User Guide
EDIS v2.1.1
User Guide 78 July 2013
8.1.1. Add, Configure, and Edit Rooms and Areas
Figure 49: Configure View - Room/Area subview

EDIS v2.1.1
User Guide
EDIS v2.1.1
User Guide 79 July 2013
1. Click the Configure button and then the Room/Areasubview. Keyboard: Use
the <Tab> key to locate the left-hand view-selection menu. Use the <Down
Arrow> and <Up Arrow> keys to locate the Configure view. Use the
<Spacebar> key to select this view. Use the <Tab> key to locate the Room /
Area subview and use the <Spacebar> or <Enter> key to select it.
2. To edit an existing room or area, click the room or area in the Rooms / Areas
grid. Keyboard: Use the <Tab> key to locate the Rooms / Areas grid. Use the
<Down Arrow> key to enter the grid, and use the <Down Arrow> and <Up
Arrow> keys to select a room or area.
3. In the Name box (Edit pane), replace the application’s placeholder name
(new1) with the name of the room you want to add. The application does not
support duplicate room or area names. Keyboard: use the <Tab> key to locate
the Name box.
4. In the Display Name box, replace the placeholder name (new1) with the name
you want EDIS to display. Keyboard: use the <Tab> key to locate the Display
Name box. The application does not support duplicate display names for
rooms and areas.
5. Click on one of the following three options from the Display When list:
Occupied, Always, or Never. Your selection determines when EDIS displays
the room or area on the large electronic whiteboard display. Keyboard: use the
<Tab> key to locate the Display When list. Use the <Down Arrow> and <Up
Arrow> keys to select an option from this list.
6. To configure a default status for patients who are assigned to the new room
(optional), select a status from the Default Status list. (Sites can configure
their own selections for this list.) Keyboard: use the <Tab> key to locate the
Default Status list. Use the <Down Arrow> and <Up Arrow> keys to select
a default status from the list.
7. If the new room or area is currently inactive, select the Inactive? checkbox.
Keyboard: use the <Tab> key to locate the Inactive? checkbox. Use the
<Spacebar> key to select (or cancel the selection of) the Inactive? checkbox.
8. From the Category list, select the occupancy category into which the room or
area falls. Keyboard: Use the <Tab> key to locate the Category list. Use the
<Down Arrow> and <Up Arrow> keys to select an occupancy category from
the list.
9. If a room or area contains two or more beds, type in the Shared Name box a
name that associates the beds. For example, if area OBS contains two beds,
OBS-1 and OBS-2, configure a room or area for each bed and type OBS in the
Shared Name box for both OBS-1 and OBS-2. Keyboard: Use the <Tab> key
to locate the Shared Name box.
10. If your site uses more than one large electronic whiteboard display, type in the
Use Board box the name of the display board on which the room or area will
appear. All patients appear on the application’s main electronic whiteboard
display. Keyboard: Use the <Tab> key to locate the Use Board box.
11. Click on the Use Color check box to configure a text and/or background color
for the room or area. (Optional. See section 13.1.1.1, “Configuring Color for
Rooms and Areas.”)
12. To dismiss the Edit pane and view all columns in the Rooms / Areas grid,
click All Columns. Keyboard: use the <Tab> key to locate the All Columns
button and use the <Spacebar> key to select it.

EDIS v2.1.1
User Guide
EDIS v2.1.1
User Guide 80 July 2013
13. Click Save Room / Area Changes to save your changes. The application
displays a message that tells you it has successfully saved your changes. Click
Close to dismiss this message. Keyboard: use the <Tab> key to locate the
Save Room / Area Changes button. Use the <Spacebar> key to select the
Save Room / Area Changes button. Use the <Tab> key to locate the Close
button, use the <Spacebar> key to select the Close button.
Configuring Colors for Rooms and Areas
The application allows you to configure text and background colors for rooms
and areas.
1. Click on the Use Color checkbox. Keyboard: use the <Tab> key to
locate the Use Color check box. Use the <Spacebar> key to select (or
cancel the selection of) this check box.
2. To configure a color for text, click the color -selection box labeled Text.
EDIS displays a color-selection grid ( ). Click a color in the
grid to select it as a text color. General keyboard actions are not
available for this step; however, JAWS users can type hexadecimal color
codes for text.
3. To configure a background color, click the color -selection box labeled
Back. EDIS displays a color-selection grid. Click a color in the grid to
select it as a background color. General keyboard actions are not
available for this step; however, JAWS users can type hexadecimal color
codes for backgrounds.
4. Click Save Room / Area Changes to save your color selections.
Keyboard: use the <Tab> key to locate the Save Room / Area Changes
button and use the <Spacebar> key to select it.
NOTE: Colors you configure for room and area assignments will not
appear on the display board unless colors (in general) are enabled for
room and area selections in the Configuration view’s Display
Board subview.
Specifying the Order of Rooms and Areas
Use a drag and drop operation to change the order of rooms and areas in the
Rooms / Areas grid. EDIS bases the order of its Room / Area selection lists
on the order of rooms and areas in the Rooms / Areas grid. Keyboard actions
are not available for drag-and-drop operations.

EDIS v2.1.1
User Guide
EDIS v2.1.1
User Guide 81 July 2013
8.2. Display Board Configurations
Figure 50: Configure View - Display Board subview
The Display Board subview enables you to:
Add a new large electronic whiteboard display
Add or remove display-board columns
Edit column headers
Identify information upon which you want to base cell colors in display-board columns
Identify information upon which you want to base colors in display-board rows
Reposition and resize display-board columns
Select optimal display sizes
Configure the display’s font size and scroll-delay time
Compress (squish) all data rows into a single, no-scroll view (if possible)
EDIS enables you to configure each display board separately. Simply select the board
you want to configure in the Board Name list. The application displays editable
information about the board in the Board Properties pane.
8.2.1. Add a New Display Board
EDIS enables you to create multiple large electronic whiteboard displays.
However, be advised: you cannot delete display boards after you’ve saved them.

EDIS v2.1.1
User Guide
EDIS v2.1.1
User Guide 82 July 2013
1. From the Configure Option, click Add Board. EDIS adds a placeholder name
(new1) in the Board Name list and the Board Name box, which is located in
the Board Properties pane. Keyboard: use the <Tab > key to locate the Add
Board button and use the <Spacebar> key to select the button.
2. In the Board Name box, replace the placeholder name with the name you want
to use for this new display board. Each display board must have a unique
name. Keyboard: use the <Tab> key to locate the Board Name box.
3. (Optional) In the Row Color Based On list, select a display-board item upon
which you want to base row colors. Keyboard: Use the <Tab> key to locate
the Row Color Based On list. Use the <Down Arrow> and <Up Arrow>
keys to select an item from the list.
4. In the Display Size list, select the screen size of your display board. Display
sizes are site configurable. If the Display Size list does not contain your new
board’s screen size, ask your site’s CAC or IRM staff to add the size in VistA.
Keyboard: Use the <Tab> key to locate the Display Size list. Use the <Down
Arrow> and <Up Arrow> keys to select a display size from the list.
5. In the Font Size spin box, type or select a font size for your new display board.
Available font sizes range from six to 36 points. The Preview Display Board
pane dynamically displays your font choices. Keyboard: Use the <Tab> key to
locate the Font Size box. Type a font size, or use the <Down Arrow> and
<Up Arrow> keys to select a font size.
6. (Optional) Select the Squish Rows To Fit (if possible) check box. This
selection allows EDIS to compress all data rows to completely fit within your
site’s display screen, if this is possible. To ensure readability, the application
compresses data only down to a row size of 18 points and a font size of nine
points. If, after applying the maximum compression, your site’s data will still
not fit within a single display view, the application applies scrolling
functionality and restores the display board’s font size to the value in the Font
Size spin box. Keyboard: Use the <Tab> key to locate the Squish (if possible)
checkbox. Use the <Spacebar> key to select—or cancel the selection of—the
checkbox.
7. In the Scroll Delay spin box, type or click on a scroll-delay time (in seconds).
The application automatically activates scrolling when the screen’s real estate
is not sufficient to display all of the patients who are currently on the Active
Patients list. The delay-time setting determines how long screen contents
remain stationary. For example, suppose your display can accommodate only
20 patients and 25 patients are currently on the list. Further, suppose that the
EDIS scroll-delay time is set at five seconds. In this case, EDIS displays the
first 20 patients for five seconds, then scrolls to display the remaining five
patients for five seconds, and so forth. Keyboard: use the <Tab> key to locate
the Scroll Delay box. Type a delay time or use the <Up Arrow> and <Down
Arrow> keys to select a delay time.
NOTE: EDIS refreshes the display board every 30 seconds. Each refresh resets
the display-board view. Set scroll-delay intervals that allow the
application to display all patients within the span of a single refresh
cycle. (JAWS users can disable automatic refresh functionality and
manually refresh the display board by pressing the <F7> key. However,
automatic refresh is disabled only when JAWS is running.)

EDIS v2.1.1
User Guide
EDIS v2.1.1
User Guide 83 July 2013
8.2.2. Add Display Board Columns
Display boards can include any of the following columns:
Room / Bed: The rooms, beds, and areas associated with the display board
Patient Name: The patients’ surnames
Visit Created: Checkmarks that indicate EDIS has created visits for the patients in
CPRS or blank spaces that indicate EDIS has not created visits
Complaint: The patients’ display-board complaints
Comments: Comments users have entered via the CPE or Visit view
Provider Initials: The initials of the providers users have selected via the CPE or
Visit views
Resident Initials: The initials of the residents users have selected via the CPE or
Visit views
Nurse Initials: The initials of the nurses users have selected via the CPE or Visit
views
Acuity: The acuities users have entered via the CPE or Visit view
Status: The statuses users have entered via the CPE or Visit views
Lab Active/Complete: The number of active laboratory orders associated with the
patients’ emergency-department visits over the number of completed laboratory
orders
Imaging Active/Complete: The number of active imaging orders associated with
the patients’ emergency-department visits over the number of completed imaging
orders
New (Unverified) Orders: The number of unverified orders associated with the
patients’ emergency-department visits (for sites using CPRS 26, EDIS decrements
this number when unverified orders are completed; for sites using CPRS 27, EDIS
decrements this number when unverified orders are verified)
Total Minutes: The number of minutes from patients’ time-in values (the times
users added patients to—or identified them in—EDIS) to the present
Minutes at Location: The number of minutes patients have been assigned to their
present locations

EDIS v2.1.1
User Guide
EDIS v2.1.1
User Guide 84 July 2013
Figure 51: Add Column List
1. Click to open the Add Column list. Keyboard: Use the <Tab> key to locate
the Add Column list. Press the <Spacebar> key to open the list.
2. Click to select a column name from the Add Column list. The Preview
Display Board pane dynamically displays columns as you add them.
Keyboard: Use the <Down Arrow> and <Up Arrow> keys to locate the name
of the column you want to add. Use the <Spacebar> or <Enter> key to select
the column.
3. Repeat steps 1 and 2 as necessary. Keyboard: The application maintains its
focus on the Add Column list, so you won’t need to locate the Add Column
list again with each new column addition. Simply press the <Spacebar> key to
reopen the list.
NOTE: After you add columns, you can specify their order using a drag-and-drop
operation (see Section 8.2.4, “Specify the Order of Display Board
Columns”). Keyboard operations are not available for post-addition
column ordering. If you exclusively use keyboard actions, please add
columns in the order in which you want them to appear on your large
electronic whiteboard display.

EDIS v2.1.1
User Guide
EDIS v2.1.1
User Guide 85 July 2013
8.2.3. Configure or Edit Display Board Columns
1. In the Selected Columns list, click the column whose properties you want to
configure or edit. Keyboard: Use the <Tab> key to locate the Selected
Columns list. Use the <Down Arrow> key to enter the list. Use the <Down
Arrow> and <Up Arrow> keys to locate the column you want to configure.
2. In the Header box, which is located in the Column Properties pane, replace
the application’s default or current header (optional). Keyboard: Use the
<Tab> key to locate the Header box.
3. Click on an item in the Color Based On list (optional). Your selection here
determines the criteria the application uses to display color configurations in
big-board display columns. The application gives preference to colors you
configure for columns over colors you configure for rows. List items include:
Status / Acuity, Status, Acuity, Room / Bed, Provider, Resident, Nurse,
Urgency – Lab, Urgency – Radiology, Total Elapsed Minutes, Minutes at
Location, Minutes for Lab Order, Minutes for Imaging Order, and
Minutes for Unverified Order.
NOTE: Although you configure color selections in the Assign Staff view and the
Colors and Room / Area subviews, the Display Board subview of the
Configuration view is where you determine which of these colors the
board displays and where it displays them.
Your selection determines which color or colors appear on the display
board for the column you’ve selected. For example, suppose you select
the Status column. Then suppose you click this column’s Color Based
On list and select Acuity. In this case, the board will display in its
Status column colors you have configured for acuity.
8.2.4. Specify the Order of Display Board Columns
You can specify the order of large electronic whiteboard display columns by
using a drag-and-drop operation in either the Preview Display Board pane or the
Selected Columns list.
To perform a drag-and-drop operation, click a column header and, without
releasing your mouse button, move the header to its new location. Release the
mouse button. Keyboard actions are not available for drag -and-drop operations.
To reorder columns using your keyboard, remove columns in the Selected
Columns list and re-add them in the order in which you want them to appear on
the display.
8.2.5. Resize Display Board Columns
You resize columns in the Preview Display Board pane by using a drag-and-drop
operation (keyboard actions are not available):

EDIS v2.1.1
User Guide
EDIS v2.1.1
User Guide 86 July 2013
1. Point your mouse at the border of the column you want to resize.
2. When your mouse pointer becomes a slider ( ) hold down your right mouse
button and drag the boarder to resize the column.
3. Release your mouse button.
8.2.6. Remove Display Board Columns
You can remove columns from the Selected Columns list in any of the following
ways:
Remove a single column: click an individual column in the Selected Columns list
and press the <Delete> key. Keyboard: Use the <Tab> key to locate the Selected
Columns list. Use the <Down Arrow> and <Up Arrow> keys to select the column
you want to remove. Press the <Delete> key to remove the column.
Remove a group of columns: select a group of columns in the Selected Columns
list by clicking the first column in the group, then pressing and holding down the
<Ctrl> key as you click the remaining columns. Release the <Ctrl> key and press
the <Delete> key to remove the group. Keyboard: Use the <Tab> key to locate the
Selected Columns list. Use the <Down Arrow> and <Up Arrow> keys to select
the first column in the group. Press and hold down the <Ctrl> key while using the
<Down Arrow> and <Up Arrow> keys to locate additional columns in the group.
Press the <Spacebar> key to select each of these columns. Release the <Ctrl> key
and press the <Delete> key to delete the group.
Remove a range of columns: select a range of columns in the Selected Columns
list by clicking the first column in the range, then pressing and holding down the
<Shift> key as you click the last column. Release the <Shift> key and press the
<Delete> key to remove the range. Keyboard: Use the <Tab> key to locate the
Selected Columns list. Use the <Up Arrow> and <Down Arrow> keys to locate
the first column in the range. Press and hold down the <Shift> key while using the
<Up Arrow> or <Down Arrow> key to select the remaining columns in the range.
Release the <Shift> key and press the <Delete> key to remove the range.
8.2.7. Save Display Board Configuration Changes
Click Save Display Board Changes . EDIS displays an Alert message to confirm
that it has successfully saved your changes. Click Close to dismiss this message.
Keyboard: Use the <Tab> key to locate the Save Display Board Changes button.
Press the <Spacebar> key to select the button. Use the <Tab> key to locate the
Close button, and use the <Spacebar> key to select it.

EDIS v2.1.1
User Guide
EDIS v2.1.1
User Guide 87 July 2013
8.3. Configure Colors
Figure 52: Configure View - Colors subview (Status/Acuity)
The Colors subview enables you to configure colors for the following items:
Status / Acuity
Status
Acuity
Urgency – Lab
Urgency – Radiology
Total Elapsed Minutes
Minutes at Location
Minutes for Lab Order
Minutes for Imaging Order
Minutes for Unverified Order
You can configure colors for rooms and areas on the EDIS
Configuration/Configure/Room / Area subview. Configure colors for emergency-
department staff on the EDIS Configuration/Assign Staff view.
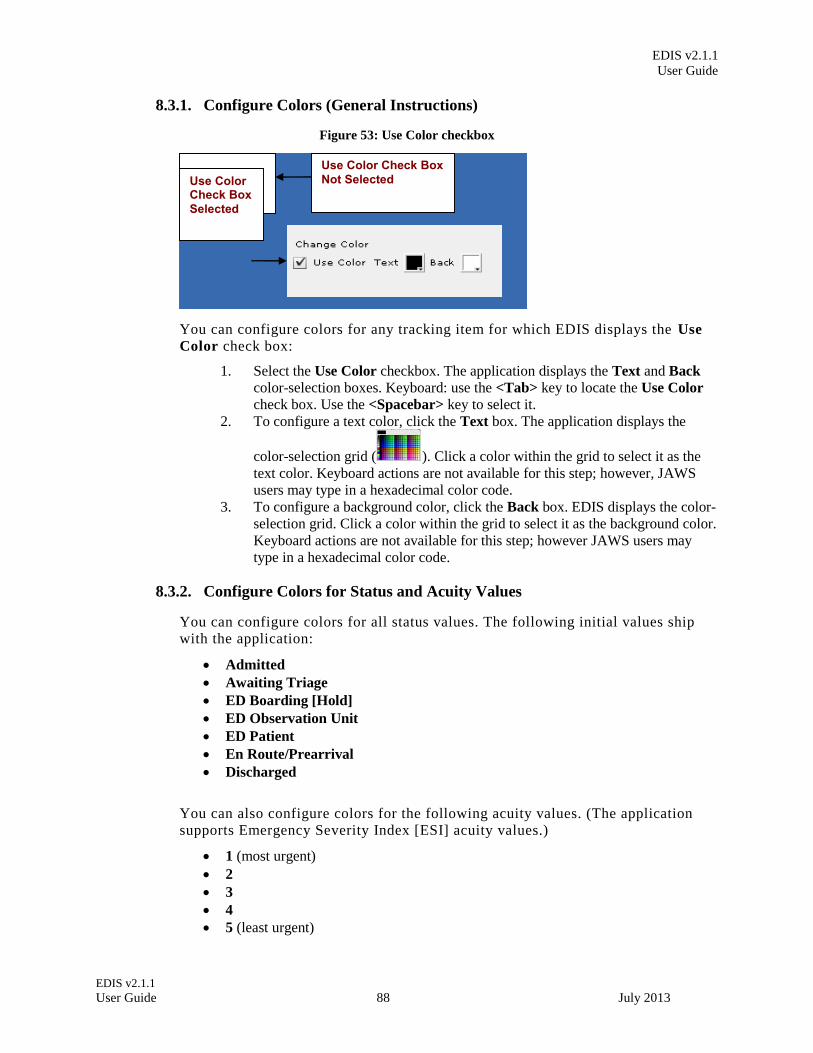
EDIS v2.1.1
User Guide
EDIS v2.1.1
User Guide 88 July 2013
8.3.1. Configure Colors (General Instructions)
Figure 53: Use Color checkbox
You can configure colors for any tracking item for which EDIS displays the Use
Color check box:
1. Select the Use Color checkbox. The application displays the Text and Back
color-selection boxes. Keyboard: use the <Tab> key to locate the Use Color
check box. Use the <Spacebar> key to select it.
2. To configure a text color, click the Text box. The application displays the
color-selection grid ( ). Click a color within the grid to select it as the
text color. Keyboard actions are not available for this step; however, JAWS
users may type in a hexadecimal color code.
3. To configure a background color, click the Back box. EDIS displays the color-
selection grid. Click a color within the grid to select it as the background color.
Keyboard actions are not available for this step; however JAWS users may
type in a hexadecimal color code.
8.3.2. Configure Colors for Status and Acuity Values
You can configure colors for all status values. The following initial values ship
with the application:
Admitted
Awaiting Triage
ED Boarding [Hold]
ED Observation Unit
ED Patient
En Route/Prearrival
Discharged
You can also configure colors for the following acuity values. (The application
supports Emergency Severity Index [ESI] acuity values.)
1 (most urgent)
2
3
4
5 (least urgent)
Use Color Check Box
Not Selected Use Color Check Box
Selected

EDIS v2.1.1
User Guide
EDIS v2.1.1
User Guide 89 July 2013
In addition, you can use the Status / Acuity selection to configure colors for the
combined set of these status and acuity values.
NOTE: Color-map selections in the Colors subview must match at least one color
selection in the Display Board subview. For example, if you configure
colors for the Status / Acuity selection in the Colors subview, select
Status / Acuity in the Colors Based On column or Row Color list in the
Display Board subview. Also note: if you configure colors for the
Status/Acuity selection and also for the Acuity and/or Status
selections, the application will display the colors you configured for
Status / Acuity.
1. In the Available Color Maps list, click on Status, Acuity, or Status / Acuity.
EDIS displays the Colors for Status, Colors for Acuity, or Colors for Status
/ Acuity grid, respectively. Keyboard: Use the <Tab> key to locate the
Available Color Maps list. Use the <Down Arrow> or <Up Arrow> keys to
select Status / Acuity, Status, or Acuity.
2. To configure colors for a value listed in the corresponding grid, click on the
Value. Keyboard: Use the <Tab> key to locate the grid. Use the <Down
Arrow> and <Up Arrow> keys to select a Value within the grid.
3. Click the Use Color checkbox and follow the instructions in Section 8.3.1
“Configure Colors (General Instructions).” Keyboard: use the <Tab> key to
locate the Use Color check box. Use the <Spacebar> key to select the check
box.
4. Repeat steps 1–3 to configure colors for additional values.
5. Click Save Color Changes to save your color configurations. The application
displays an Alert message to inform you that it has saved your color
selections. Click Close to dismiss this message. Keyboard: Use the <Tab> key
to locate Save Color Changes and use the <Spacebar> key to select it. Use
the <Tab> key to locate the Close button and use the <Spacebar> key to
select it.
8.3.3. Configure Colors for Urgency – Lab Values
Figure 54: Colors for Urgency - Labs
You can configure colors for the following values:

EDIS v2.1.1
User Guide
EDIS v2.1.1
User Guide 90 July 2013
No Orders
Active Orders
STAT Orders
1. In the Available Color Maps list, click on Urgency - Lab. EDIS displays the
Colors for Urgency - Lab grid. Keyboard: Use the <Tab> key to locate the
Available Color Maps list. Use the <Down Arrow> key to enter the list, and
use the <Down Arrow> or <Up Arrow> keys to locate Urgency – Lab.
2. To configure colors for a value listed in the grid, click on the Value, then
select the Use Color check box. Keyboard: Use the <Tab> key to locate the
Urgency – Lab grid. Use the <Down Arrow> and <Up Arrow> keys to
select a value in the grid. Use the <Tab> key to locate the Use Color
checkbox, and use the <Spacebar> key to select it.
3. Follow the steps in Section 8.3.1 “Configure Colors (General Instructions)” to
configure colors for the value.
4. Repeat steps 1–3 to configure colors for additional values.
5. Click Save Color Changes to save your color configurations. The application
displays an Alert message to inform you that it has saved your color
selections. Click Close to dismiss this message. Keyboard: Use the <Tab> key
to locate Save Color Changes and use the <Spacebar> key to select it. Use
the <Tab> key to locate the Close button and use the <Spacebar> key to
select it.
8.3.4. Configure Colors for Urgency – Radiology Values
You can configure colors for the following values:
No Orders
Active Orders
STAT Orders
Figure 55: Colors for Urgency - Imaging

EDIS v2.1.1
User Guide
EDIS v2.1.1
User Guide 91 July 2013
1. In the Available Color Maps list, click on Urgency - Radiology. EDIS
displays the Colors for Urgency – Radiology grid. Keyboard: Use the <Tab>
key to locate the Available Color Maps list. Use the <Down Arrow> and
<Up Arrow> keys to select Urgency – Radiology.
2. To configure colors for a value listed in the Colors for Urgency – Radiology
grid, click on the Value, then select the Use Color checkbox. Keyboard: Use
the <Tab> key to locate the Colors for Urgency – Radiology grid. Use the
<Down Arrow> and <Up Arrow> keys to select a value. Use the <Tab> key
to locate the Use Color checkbox and use the <Spacebar> key to select it.
3. Follow the steps in Section 8.3.1 “Configure Colors (General Instructions)” to
configure colors for the value.
4. Repeat steps 1–3 to configure colors for additional values.
5. Click Save Color Changes to save your color configurations. The application
displays an Alert message to inform you that it has saved your color
selections. Click Close to dismiss this message. Keyboard: Use the <Tab> key
to locate Save Color Changes and use the <Spacebar> key to select it. Use
the <Tab> key to locate the Close button and use the <Spacebar> key to
select it.
8.3.5. Configure Colors for Total Elapsed Minutes
The application measures total elapsed minutes from patients’ Time In values.
Figure 56: Configure colors for Total Elapsed Time

EDIS v2.1.1
User Guide
EDIS v2.1.1
User Guide 92 July 2013
1. Click on Total Elapsed Minutes in the Available Color Maps list. The
application displays the Colors for Total Elapsed Minutes grid. Keyboard:
Use the <Tab> key to locate the Available Color Maps list. Use the <Down
Arrow> and <Up Arrow> keys to select Total Elapsed Minutes in Hours:
Minutes. 2. To add a time value to the Starting at Elapsed Minute column, click Add.
The application displays the Starting at Elapsed Minute box. Keyboard: Use
the <Tab> key to locate the Add button and use the <Spacebar> key to select
it.
3. Type a starting value in the Starting at Elapsed Minute box. EDIS uses this
value to determine when to display your color configuration. Keyboard: Use
the <Tab> key to locate the Starting at Elapsed Minute box.
4. To associate a color with this value, click on the Use Color checkbox and
follow the steps in Section 8.3.1 “Configure Colors (General Instructions).”
5. Repeat steps 1 through 4 to configure colors for additional Starting at…
Hours: minutes as necessary.
6. Click Save Color Changes to save your color configurations. The application
displays an Alert message to inform you that it has saved your color
selections. Click Close to dismiss this message. Keyboard: Use the <Tab> key
to locate Save Color Changes and use the <Spacebar> key to select it. Use
the <Tab> key to locate the Close button and use the <Spacebar> key to
select it.
Note : The EMins and Mins column on the ‘CPE’ page displays the elapsed time in Hours:
Minutes format.
Figure 57: Emins and Mins columns

EDIS v2.1.1
User Guide
EDIS v2.1.1
User Guide 93 July 2013
8.3.6. Configure Colors for Minutes at Location
The application measures elapsed times from patients’ most recent room
assignments.
Figure 58: Colors for Minutes at Location

EDIS v2.1.1
User Guide
EDIS v2.1.1
User Guide 94 July 2013
1. Click on Minutes at Location in the Available Color Maps list. The
application displays the Colors for Minutes at Location grid. Keyboard: Use
the <Tab> key to locate the Available Color Maps list. Use the <Down
Arrow> and <Up Arrow> keys to select Minutes at Location.
2. To add a time value to the Starting at Elapsed Minute column, click Add.
The application displays the Starting at Elapsed Minute box. Keyboard: Use
the <Tab> key to locate the Add button.
3. Type a starting value in the Starting at Elapsed Minute box. Keyboard: Use
the <Tab> key to locate the Starting at Elapsed Minute box.
4. To associate a color with this value, click on the Use Color checkbox and
follow the steps in Section 8.3.1 “Configure Colors (General Instructions).”
5. Repeat steps 1 through 4 to configure colors for additional Starting at…
values as necessary.
6. Click Save Color Changes to save your color configurations. The application
displays an Alert message to inform you that it has saved your color
selections. Click Close to dismiss this message. Keyboard: Use the <Tab> key
to locate Save Color Changes and use the <Spacebar> key to select it. Use
the <Tab> key to locate the Close button and use the <Spacebar> key to
select it.
8.3.7. Configure Colors for Minutes for Lab Order
Values measure times from when orders were released to the laboratory.
Figure 59: Colors for Minutes for Lab Orders

EDIS v2.1.1
User Guide
EDIS v2.1.1
User Guide 95 July 2013
1. Click on Minutes for Lab Order in the Available Color Maps list. The
application displays the Colors for Minutes for Lab Order grid. Keyboard:
Use the <Tab> key to locate the Available Color Maps list. Use the <Down
Arrow> and <Up Arrow> keys to select Minutes for Lab Order.
2. To add a time value to the Starting at Elapsed Minute column, click Add.
The application displays the Starting at Elapsed Minute box. Keyboard: Use
the <Tab> key to locate the Add button.
3. Type a starting value in the Starting at Elapsed Minute box. Keyboard: use
the <Tab> key to locate the Starting at Elapsed Minute box.
4. To associate a color with this value, click on the Use Color checkbox and
follow the steps in Section 8.3.1 “Configure Colors (General Instructions).”
5. Repeat steps 1 through 4 to configure colors for additional starting-at minutes
as necessary.
6. Click Save Color Changes to save your color configurations. The application
displays an Alert message to inform you that it has saved your color
selections. Click Close to dismiss this message. Keyboard: Use the <Tab> key
to locate Save Color Changes and use the <Spacebar> key to select it. Use
the <Tab> key to locate the Close button and use the <Spacebar> key to
select it.
8.3.8. Configure Colors for Minutes for Imaging Order
Values measure time from when orders are released to radiology.
Figure 60: Colors for Minutes for Imaging Orders

EDIS v2.1.1
User Guide
EDIS v2.1.1
User Guide 96 July 2013
1. Click on Minutes for Imaging Order in the Available Color Maps list. The
application displays the Colors for Minutes for Imaging Order grid.
Keyboard: Use the <Tab> key to locate the Available Color Maps list. Use
the <Down Arrow> and <Up Arrow> keys to select Minutes for Imaging
Order. 2. To add a time value to the Starting at Elapsed Minute column, click Add.
The application displays the Starting at Elapsed Minute box. Keyboard: Use
the <Tab> key to locate the Add button and use the <Spacebar> key to select
the button.
3. Type a starting value in the Starting at Elapsed Minute box. Keyboard: Use
the <Tab> key to locate the Starting at Elapsed Minute box.
4. To associate a color with this value, click on the Use Color checkbox and
follow the steps in Section 8.3.1 “Configure Colors (General Instructions).”
5. Repeat steps 1 through 4 to configure colors for additional Starting at…
values as necessary.
6. Click Save Color Changes to save your color configurations. The application
displays an Alert message to inform you that it has saved your color
selections. Click Close to dismiss this message. Keyboard: Use the <Tab> key
to locate Save Color Changes and use the <Spacebar> key to select it. Use
the <Tab> key to locate the Close button and use the <Spacebar> key to
select it.
8.3.9. Configure Colors for Minutes for Unverified Orders
Values measure time from when orders are released.
Figure 61: Colors for Minutes for Unverified orders

EDIS v2.1.1
User Guide
EDIS v2.1.1
User Guide 97 July 2013
1. Click on Minutes for Unverified Order in the Available Color Maps list.
The application displays the Colors for Minutes for Unverified Orders grid.
Keyboard: Use the <Tab> key to locate the Available Color Maps list. Use
the <Down Arrow> and <Up Arrow> keys to select Minutes for Unverified
Order. 2. To add a time value to the Starting at Elapsed Minute column, click Add.
The application displays the Starting at Elapsed Minute box. Keyboard: Use
the <Tab> key to locate the Add button and press the <Spacebar> key to
select it.
3. Type a starting value in the Starting at Elapsed Minute box. Keyboard: Use
the <Tab> key to locate the Starting at Elapsed Minute box.
4. To associate a color with this value, click on the Use Color checkbox and
follow the steps in Section 8.3.1 “Configure Colors (General Instructions).”
5. Repeat steps 1 through 4 to configure colors for additional Starting at…
values as necessary.
6. Click Save Color Changes to save your color configurations. The application
displays an Alert message to inform you that it has saved your color
selections. Click Close to dismiss this message. Keyboard: Use the <Tab> key
to locate Save Color Changes and use the <Spacebar> key to select it. Use
the <Tab> key to locate the Close button and use the <Spacebar> key to
select it.
8.4. Configure Parameters
Figure 62: Configure View - Parameters subview
The Parameters subview allows you to set the following parameters :
Show residents on entry form—This parameter enables sites that have residents to
include them on the application’s data entry form. Fields for making and editing resident
selections are available in the Status/Responsibility section of the Visit view.

EDIS v2.1.1
User Guide
EDIS v2.1.1
User Guide 98 July 2013
Show clinics on entry form—This parameter enables sites that have clinics specified to
include them on the application’s data entry form. Fields for making and editing clinic
selections are available in the Status/Responsibility section of the Visit view..
Diagnosis is required before removing a patient—When sites select this parameter,
EDIS requires emergency-department personnel to enter diagnoses as a precondition to
removing patients from the display board—unless the patient’s disposition is one of the
following: Patient Name Entered in Error, Left Without Being Treated/Seen, or Sent
to Nurse Eval / Drop In Clinic.
Diagnosis must be coded as ICD—When sites select this parameter, the application uses
VistA’s ICD-9-CM search for all diagnosis entries. When sites do not select this parameter,
the application uses a free-text field to record diagnoses. NOTE: Free Text Diagnosis do
not pass to the PCE Encounter
Disposition is required before removing patient—When sites select this parameter, the
application requires emergency department personnel to enter dispositions before removing
patients from the display board.
Delay reason is required for visits exceeding [site-specified] minutes—When sites select
this parameter, the application does not allow users to remove patients whose stays have
exceeded a specific number of minutes without first entering a reason for delay—except
when the patient’s disposition indicates that he or she has been assigned to an observation
ward.
Arriving Ambulance Room/Area is—This parameter enables sites to select a default
room or area for patients who are arriving by ambulance or other emergency-transport
vehicles.
Default Room/Area is—This parameter enables sites to select a default room or area.
The Parameters subview also enables sites to specify shift start times and durations.
The application uses this information to pull data for shift reports.
8.4.1. Include Residents on Entry Form
Click on the Show residents on entry form checkbox. Keyboard: Use the <Tab>
key to locate the Show residents on entry form checkbox. Use the <Spacebar>
key to select the checkbox.
Clear the checkbox to remove the resident-selection list from the entry form.
Keyboard: Use the <Spacebar> key to clear the checkbox.
8.4.2. Require a Diagnosis
Click on the Diagnosis is required before removing patient checkbox. Keyboard:
Use the <Tab> key to locate the Diagnosis is required before removing patient
checkbox. Use the <Spacebar> key to select the checkbox.
Clear the checkbox to remove the requirement. Keyboard: use the <Spacebar> key
to clear the checkbox.
8.4.3. Require ICD-9-CM or Free Text Diagnoses
To require ICD-9-CM diagnoses, click on the Diagnosis must be coded as ICD
checkbox. Keyboard: Use the <Tab> key to locate the Diagnosis must be coded as
ICD checkbox. Use the <Spacebar> key to select the checkbox.

EDIS v2.1.1
User Guide
EDIS v2.1.1
User Guide 99 July 2013
To require free-text diagnoses, do not click on —or clear the selection of—the
Diagnosis must be coded as ICD checkbox. Keyboard: Use the <Spacebar> key
to clear the selection of the checkbox.
8.4.4. Require Disposition to Remove Patients
Click on the Disposition is required before removing patient checkbox.
Keyboard: Use the <Tab> key to locate the Disposition is required before
removing patient checkbox. Use the <Spacebar> key to select the checkbox.
To remove the requirement, clear the checkbox. Keyboard: Use the <Spacebar>
key to clear the checkbox.
8.4.5. Require a Reason for Delay
Click on the Delay reason is required for visits exceeding …minutes checkbox.
In the minutes box, type or click on a number of minutes after which the
application should require a reason for delay. Keyboard: Use the <Tab> key to
locate the Delay reason is required for visits exceeding…minutes checkbox. Use
the <Spacebar> key to select the checkbox. Use the <Tab> key to locate the
minutes box. Type a number of minutes or use the <Up Arrow> or <Down
Arrow> key to select a number of minutes.
NOTE: The national visit limit for emergency departments is currently six hours
(360 minutes).
Clear the checkbox to remove the requirement. Keyboard: Use the <Spacebar> key
to clear the checkbox.
8.4.6. Configure Shift Parameters
In the First shift begins at box, type the time (in hours and minutes—hh:mm) your
site’s first shift begins. Keyboard: Use the <Tab> key to locate the First shift
begins at box.
In the Shift duration is…hours and minutes boxes, type or click on the hours and
minutes that mark the duration of your site’s shifts. Keyboard: Use the <Tab> key
to locate the Shift duration is…hours and minutes boxes. Type hours and minutes
or use the <Up Arrow> or <Down Arrow> key to select hours and minutes.
8.4.7. Set a Default Room or Area for Patients Arriving by Ambulance
Click on a room or area from the Arriving Ambulance Room/Area is list.
Keyboard: Use the <Tab> key to locate the Arriving Ambulance Room/Area is
list. Use the <Up Arrow> or <Down Arrow> key to select a default room or area
from the list.
8.4.8. Set a Default Room or Area
Click on a room or area from the Default Room/Area is list. Keyboard: use the
<Tab> key to locate the Default Room/Area is list. Use the <Up Arrow> or
<Down Arrow> key to select a default room or area from the list.

EDIS v2.1.1
User Guide
EDIS v2.1.1
User Guide 100 July 2013
NOTE: If a default room is not selected, EDIS will warn users upon log in that a
default room needs to be set. Until a default room is selected, EDIS will
place new patients in an area designated as EDIS_DEFAULT. This will
ensure that new patients will function correctly within the EDIS
application.
8.4.9. Save Parameter Selections
Click Save Parameter Changes. The application displays an Alert message to
inform you that it has successfully saved your changes. Click Close to dismiss
this message. Keyboard: Use the <Tab> key to locate the Save Parameter
Changes button. Use the <Spacebar> key to select the button. Use the <Tab> key
to locate the Close button and use the <Spacebar> key to select it.
Some parameter settings require you to log out of the application and log back in.
For example, if you select the Diagnosis must be coded as ICD checkbox, you
must log out and log back in to see the change on the application’s Disposition
view. Likewise, after selecting the Show residents on entry form checkbox, you
must log out and log back in to see resident lists on the application’s Update
view.
8.5. Add Choices to Selection Lists
Figure 63: Configure View - Selections subview

EDIS v2.1.1
User Guide
EDIS v2.1.1
User Guide 101 July 2013
The Configure/Selections subview enables you to add locally meaningful choices to
selection lists that ship with EDIS. Specifically, you can add selections to the following
lists:
Status: The application ships with the following statuses:
o Admitted
o Awaiting Triage
o Discharged
o ED Boarding [Hold]
o ED Observation Unit
o ED Patient
o En Route/Prearrival
Disposition: The application ships with the following dispositions:
o Admitted to VA Ward
o Admitted to Telemetry
o Admitted to ICU
o Admitted to Psychiatry
o Home
o AMA (left against medical advice)
o Left Without Being Treated/Seen
o Eloped
o Transferred to VA Facility
o Transferred to non-VA Facility
o Deceased
o Sent to Nurse Eval / Drop In Clinic
o Sent to Urgent Care Clinic
o Patient Name Entered in Error
Delay Reason: The application ships with the following reasons for delay:
o Obtain Inpatient Bed
o ED to Hospital Bed
o Obtain Imaging Results
o Obtain Imaging Studies
o Obtain Drugs/Pharmacology
o Obtain Lab Results
o Obtain Lab Studies
o Obtain Medical Supplies
o Arrange Emergency Surgery
o Obtain Consultant
o On-call Staff
o Patient Transport Home
o Overcrowding of ED
o Patient Transport Other
o Obtain Accepting Physician
o Obtain Escort
o Admitting Physician Evaluation
o Admit Physician Writing Dispo
o Patient Admitted to Observation
o ED Staff Limits
o ED Physician Limits
o Interfacility Transfer
o Obtain Ambulance Services

EDIS v2.1.1
User Guide
EDIS v2.1.1
User Guide 102 July 2013
Source: The application ships with the following sources:
o Non-referred
o On-site Clinic
o On-site Nursing Home
o VA Clinic, Off-site
o VA Nursing Home, Off-site
o Non-VA Clinic/Office
o Non-VA Nursing Home
o Transfer, Other
The EDIS technical working group (TWG) and technical advisory group (TAG) have
vetted these default lists. When sites add selections, the application denotes them by
displaying the word local in the subview’s National Name column.
8.5.1. Add Status, Disposition, Delay Reason, and Source Selections
1. Select Status, Disposition, Delay Reason, or Source in the Selection List.
The application displays the Selections for Status, Selections for Disposition,
Selections for Delay Reason, or Selections for Source grid, respectively.
Keyboard: use the <Tab> key to locate the Selection List. Use the <Down
Arrow> and <Up Arrow> keys to select Status, Disposition, Delay Reason,
or Source.
2. Click Add. The application displays the Edit Selection Item pane. Keyboard:
use the <Tab> key to locate the Add button and use the <Spacebar> key to
select the button.
3. In the Name box (Edit Selection Item pane), type a name for the selection
you want to add. Keyboard: use the <Tab> key to locate the Name box.
4. In the Abbreviation box , type an abbreviation for the item you want to add.
EDIS uses this abbreviation for its large electronic whiteboard display.
Keyboard: use the <Tab> key to locate the Abbreviation box.
5. (Optional) If you want to inactivate the new item, select the Inactive check
box. The application does not include inactive items on its selection lists.
Keyboard: use the <Tab> key to locate the Inactive check box and use the
<Spacebar> key to select it.
6. (Optional) Change the order in which EDIS displays list selections in its data
views by using a drag-and-drop operation to reorder selections in the
Selections for Status, Selections for Disposition, Selections for Delay
Reason, or Selections for Source lists. Keyboard instructions are not available
for this step.
7. Click Save Selection List Changes to save your additions (or edits). EDIS
displays an Alert message to tell you it successfully saved your changes. Click
Close to dismiss this message. Keyboard: Use the <Tab> key to locate the
Save Selection List Changes button and use the <Spacebar> key to select the
button. Use the <Tab> key to locate the Close button and use the <Spacebar>
key to select it.

EDIS v2.1.1
User Guide
EDIS v2.1.1
User Guide 103 July 2013
9. Index
Activity report .................................................. 61
Acuity Report ................................................. 62
Add Patients to Appointment Management First:
..................................................................... 19
Adding EDIS to your Internet Explorer
Favorites ...................................................... 13
Application Timeouts ......................................... 9
Assign Staff ...................................................... 17
Configure ......................................................... 17
CPE .................................................................. 15
Create a Visit in CPRS ..................................... 26
Creating unscheduled appoints just before
the midnight hour ...................................... 20
Delay reason definitions
Admit Physician Writing Dispo .................. 44
Admitting Physician Evaluation .................. 44
Arrange Emergency Surgery ....................... 47
ED Physician Limits .................................... 46
ED Staff Limits ............................................ 46
ED to Hospital Bed ...................................... 45
Interfacility Transfer .................................... 46
Obtain Accepting Physician ........................ 44
Obtain Ambulance Services ........................ 45
Obtain Consultant ........................................ 45
Obtain Drugs/Pharmacology ....................... 46
Obtain Escort ............................................... 45
Obtain Imaging Results ............................... 45
Obtain Imaging Studies ............................... 45
Obtain Inpatient Bed .................................... 46
Obtain Lab Results ...................................... 46
Obtain Lab Studies ...................................... 46
Obtain Medical Supplies ............................. 46
On-call Staff ................................................ 46
Overcrowding of ED ................................... 46
Patient Admitted to Observation ................. 45
Patient Transport Home .............................. 45
Patient Transport Other ............................... 47
Display Board .................................................. 16
Document Conventions ..................................... 8
Duplicate Selection ........................................ 24
Edit Closed ...................................................... 16
Failing to select the proper appointment
when writing notes or ordering tests ....... 20
JAWS Workstation Requirements ..................... 8
Launch EDIS ................................................... 13
Log In .............................................................. 13
Missed Opportunities report ............................ 67
Multiple Patient icon ..................................... 25
Patient Record Flags ..................................... 23
Place Patient on EDIS First with Provider Name
..................................................................... 21
Preventing Accidental Application Sign-Outs . 10
Reports ............................................................. 17
Restricted Record Warning .......................... 23
Role-based Access to Views .............................. 8
Room / Area subview, Configure view ........... 77
Section 508 of the Rehabilitation Act of 1973 .. 8
Writing notes or orders before creating
unscheduled appointments ....................... 20