DENOISE projects 2 professional -...
85
www.franzis.de DENOISE projects 2 professional User manual
Transcript of DENOISE projects 2 professional -...
www.franzis.de
DENOISE projects 2 professional
User manual
2
Contents
1. Image Noise - What is it? ................................................................................... 5
2. Quick start with DENOISE projects 2 professional .................................................. 7
3. What´s new? .................................................................................................... 9
4. DENOISE projects 2 professional – start screen ................................................... 12
5. The work area ................................................................................................. 14
6. Menu bar ........................................................................................................ 15
6.1 File ........................................................................................................... 15
6.2 Edit ........................................................................................................... 17
6.3 View .......................................................................................................... 18
6.4 Extras ....................................................................................................... 19
6.5 Add-ons ..................................................................................................... 20
6.6 Information ................................................................................................ 21
7. The tool bar .................................................................................................... 22
7.1 Loading and saving files ............................................................................... 23
7.2 Stacking image sequences - Noise Stacking ................................................... 23
7.3 Projects ..................................................................................................... 24
7.4 RAW-module .............................................................................................. 25
7.5 External programms .................................................................................... 27
7.6 Undo & Timeline ......................................................................................... 27
7.7 Batch processing......................................................................................... 28
7.8 Adding grain ............................................................................................... 29
7.9 Local adaptation/selective drawing ................................................................ 30
8. Presets ........................................................................................................... 38
8.1 Favourite systems ....................................................................................... 38
8.2 Import & Export .......................................................................................... 38
8.3 The search area .......................................................................................... 39
8.4 Denoising area (noise properties) .................................................................... 39
8.5 ISO display ................................................................................................ 39
8.6 Measuring range of image noise .................................................................... 40
8.7 Automatic denoising/ optimisation ................................................................ 40
8.8 Denoising colour space ................................................................................ 41
8.9 Channel display .......................................................................................... 43
8.10 Restricting areas ....................................................................................... 48
8.11 Correction images ..................................................................................... 49
9. Astro photography ........................................................................................... 53
10. Erase scratches & sensor errors ....................................................................... 54
11. Expert mode ................................................................................................. 56
11.1 Magnifying glass ....................................................................................... 56
11.2 Post-Processing Effects .............................................................................. 56
11.3 Effects you have selected ........................................................................... 64
11.4 Setting the parameters for the desired effect – calculation method .................. 65
11.5 Setting the parameters for the desired effect – selective editing ..................... 66
11.6 Setting the parameters for the desired effect – adjusting values ..................... 68
12. Usage of the Plug-Ins ..................................................................................... 69
12.1 Installing Adobe Photoshop & Photoshop Elements ........................................... 69
12.2 Using Photoshop Plug-In in MAC OS X ............................................................ 72
12.3 Usage of Adobe Lightroom Plug-ins - Windows ................................................ 74
13. Keyboard short cuts ....................................................................................... 80
14. Integrated list of supporting camera RAW formats ............................................. 83
3
Legal details This work is copyright protected. All rights, including the translation, the reproductions and the duplications are reserved. No part is allowed, without written permission of the publishers, to be processed, reproduced or distributed in any form i.e. photocopy, microfilm or any other procedure. It is also not allowed to be used for the purpose of teaching, reproduction or any utilisation in connection with electronic systems i.e. processing, duplication or distribution.
Disclaimer: The producer will not accept any liability for the damage that is created through the usage of this software. In particular not for personal, property or financial damage, that stand in connection with the usage of this software through consequential damage. For any possible technical errors as well as the accuracy of the given details no liability will be accepted either.
Further details: Microsoft, MS and MS-DOS are incorporated trademarks and Windows is a label of the Microsoft cooperation in the United States of America as well as other countries.
© Franzis Publishers, Haar bei München Innovation, errors and typos are reserved.
System requirements: Windows 8/7 Vista, 32/64 Bit, Processor Core Duo, 2GB RAM, 2 GB HDD, display resolution 1.280 x 1.024 pixels, graphic board: DirectX-8-compatible, 128 MB, 32 bit colour depth Mac OS X from 10.7, 64 bit, Processor Intel/G5, 2 GB RAM, 2 GB HDD, display resolution 1.280 x 1.024 pixel You will need connection to the internet to use this software. Adobe Reader The display of a PDF document, as well as that of the manual, the hotline and the copyright information will require an additional program. On the CD, in the folder “Adobe” you will find the Adobe reader that has the ability to display PDF documents. Double-click on the file “AdbeRdr1000_de_DE.exe” to install Adobe Reader.

4
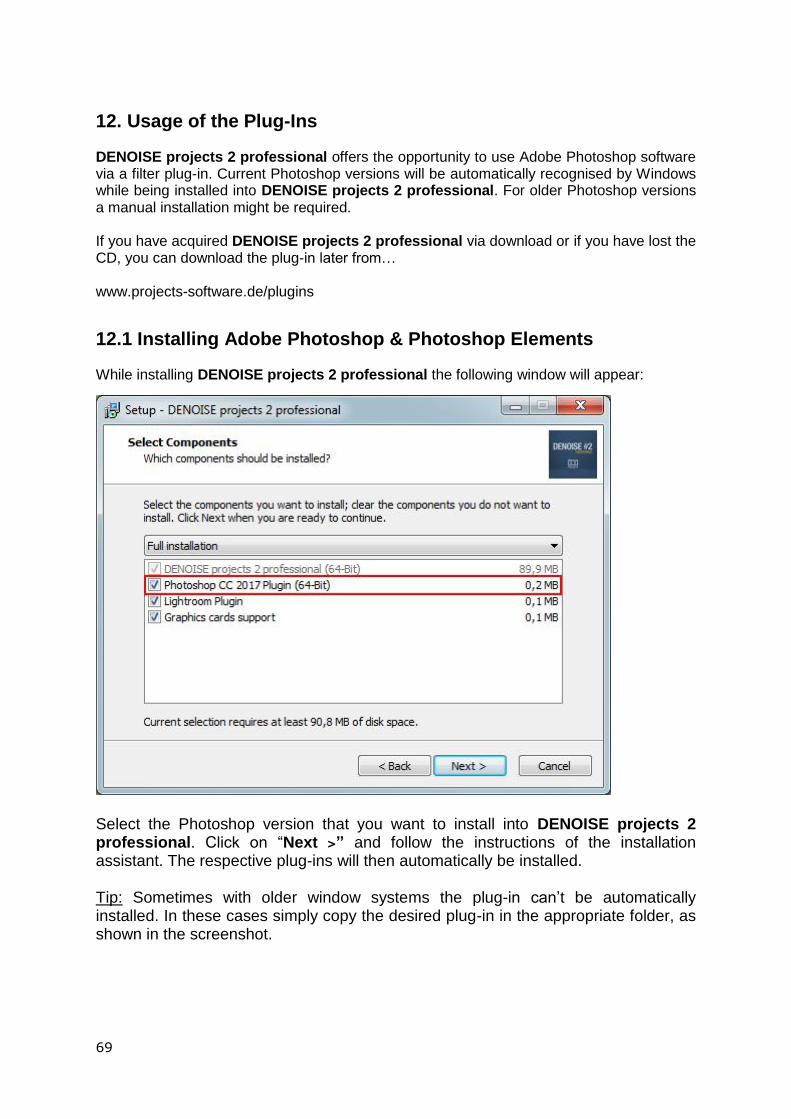
Installation on Windows The installation start screen will normally be displayed automatically. If the auto start function of your CD/ DVD drive is deactivated, open the start screen manually by going to My Computer, double clicking on the CD/DVD drive symbol and then on “Starter.exe” or “Starter”. Click on DENOISE projects 2 professional install, which you will find on the CD start screen, before following the instructions of the installation assistant. During the installation you will be asked, if you want to install the Plug-in for Adobe Photoshop as well. If you do install it, you will be able to use DENOISE projects 2 professional as a plug-in. Alternatively you can copy the Plug-In manually into the Plug-In folder in Adobe Photoshop. To achieve this, choose in addition the entry Display Adobe Photoshop Plug-ins in the CD start menu. Installation on Mac OS X Load your CD into your CD/DVD drive and open the installation menu through the desktop. Drag the DENOISE projects 2 professional file into the program link. To use the Adobe Photoshop plug-ins, open the Adobe Photoshop plug-ins folder and copy the appropriate plug-ins into your Photoshop plug-ins folder. You can now use DENOISE projects 2 professional to edit your photos.
5
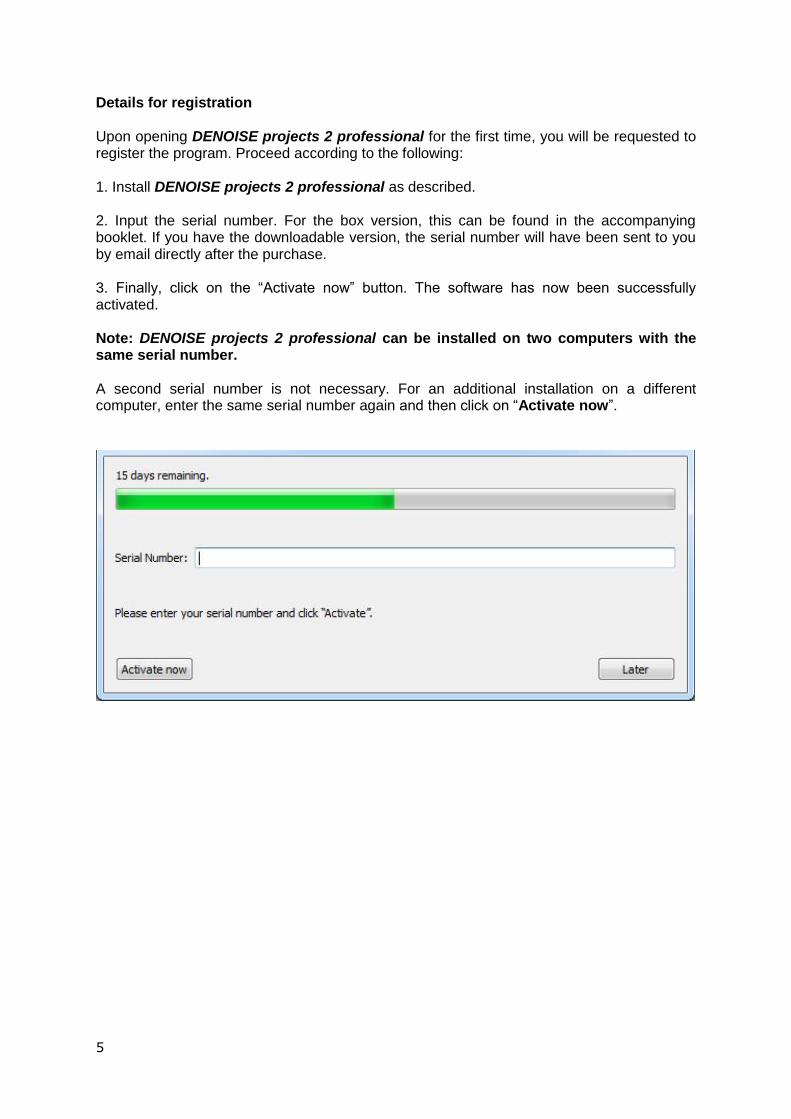
Details for registration Upon opening DENOISE projects 2 professional for the first time, you will be requested to register the program. Proceed according to the following: 1. Install DENOISE projects 2 professional as described. 2. Input the serial number. For the box version, this can be found in the accompanying booklet. If you have the downloadable version, the serial number will have been sent to you by email directly after the purchase. 3. Finally, click on the “Activate now” button. The software has now been successfully activated. Note: DENOISE projects 2 professional can be installed on two computers with the same serial number. A second serial number is not necessary. For an additional installation on a different computer, enter the same serial number again and then click on “Activate now”.
6
1. Image Noise - What is it? Image noise occurs in digital image production in many different ways. One example is the so-called low noise, a sensor-dependent noise caused by CDD and CMOS sensors. An additional multiplier is the reading strength in digital cameras, which produces read noise. Hot pixels can appear with increased age of the camera or through manufacturing errors to the image sensor. Hot pixels are individual pixel sensors that were incorrectly manufactured or have a significantly higher light sensitivity compared to the pixels around them. It is generally the case that the higher the ISO Number (the camera’s exposure setting), the more visible the noise will be. What types of image noise can be reduced or removed with DENOISE projects 2 professional?
Chroma Noise (colour noise) (Filter: Denoising - colour)
Luminance Noise (bright noise) (Filter: Denoising - HD)
Hot pixels (Filter: Hotpixel noise suppression)
Salt & Pepper (individual defective pixels) (Filter: Hotpixel noise suppression)
Gaps (Filter: Denoising - fill gaps)
Banding (Filter: Denoise - banding)
Colour Clouds (Filter: Denoising - colour clouds) In most cases, the different types of image noise do not appear individually, but rather in a mixed form. This is why it is important to remove noise in the correct order (as shown above) to obtain optimal results.
7
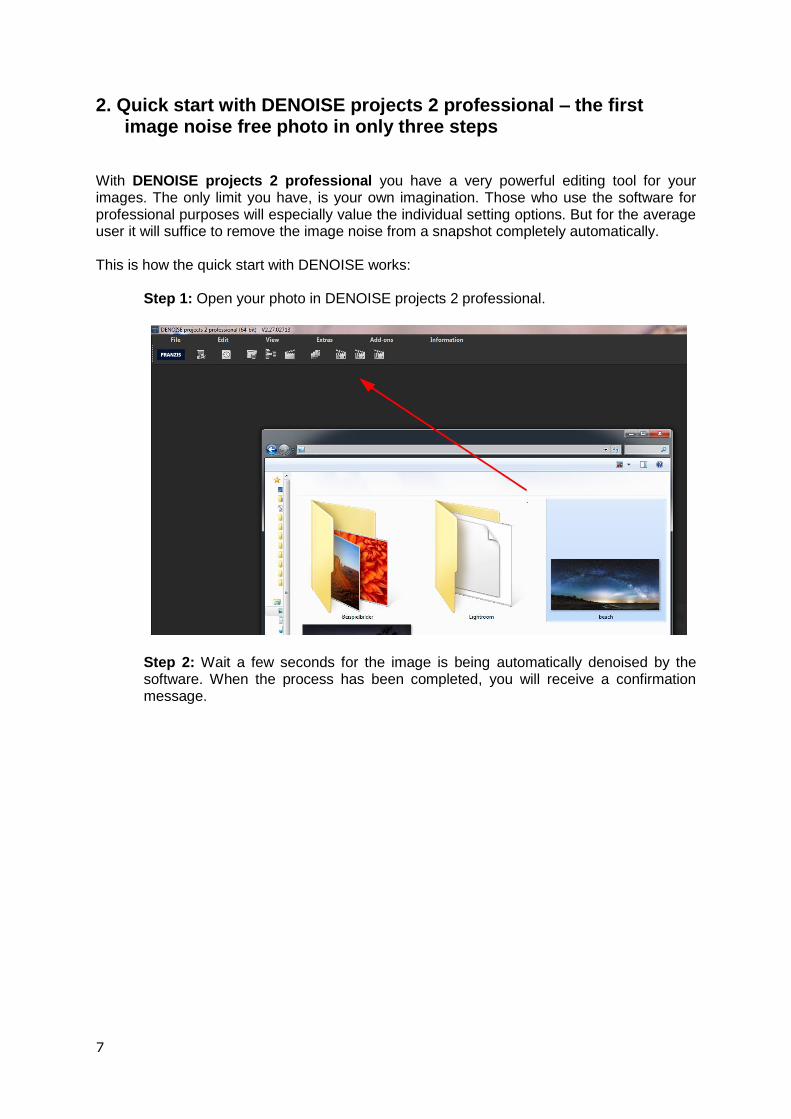
2. Quick start with DENOISE projects 2 professional – the first image noise free photo in only three steps
With DENOISE projects 2 professional you have a very powerful editing tool for your images. The only limit you have, is your own imagination. Those who use the software for professional purposes will especially value the individual setting options. But for the average user it will suffice to remove the image noise from a snapshot completely automatically. This is how the quick start with DENOISE works:
Step 1: Open your photo in DENOISE projects 2 professional.
Step 2: Wait a few seconds for the image is being automatically denoised by the software. When the process has been completed, you will receive a confirmation message.

8
Step 3: Save the finished result in a chosen folder.
9
3. What´s new?
Filter plug-ins for Adobe® Photoshop (from CS6) and Photoshop elements (from version 11)
Plug-in for Adobe Lightroom (from version 4)
The interface was visually completely revised
Up to 40% faster image denoising through “smart noise prediction”
Natural grain engine with automatic settings for the optimal denoise quality
Image orientation was extensively revised for noise – stacking (main focus: astrophotography)
Three different stages: fast, good, maximum
Two orientation types: Turning, Shifting
A new noise stacking mode “Lightframes + Dark/Flat” allows direct calculations of dark and flat frames with the individual exposures.
In noise stacking, flat frames and light frames will be automatically calculated with a
luminance corrector.
In noise stacking there are now two methods to remove disturbances: Sigma-clipping, non-linear adjustments
Denoising models up to ISO 4 000 000
Two new pre-set categories “night shot” and “astro” with 19 new pre-sets
4 additional pre-sets in the category “mobile”
New module “selective drawing” with intelligent paintbrush function for 9 different effects
o Blending in the original image, darken, brighten, intensify the colour, reduce the colour, strengthen the details, reduce the details, heighten the contrast, reduce the contrast
New category “FX” in RAW module
New filter in RAW module: dynamic brightness, trapezoid correction, chromatic light diffraction
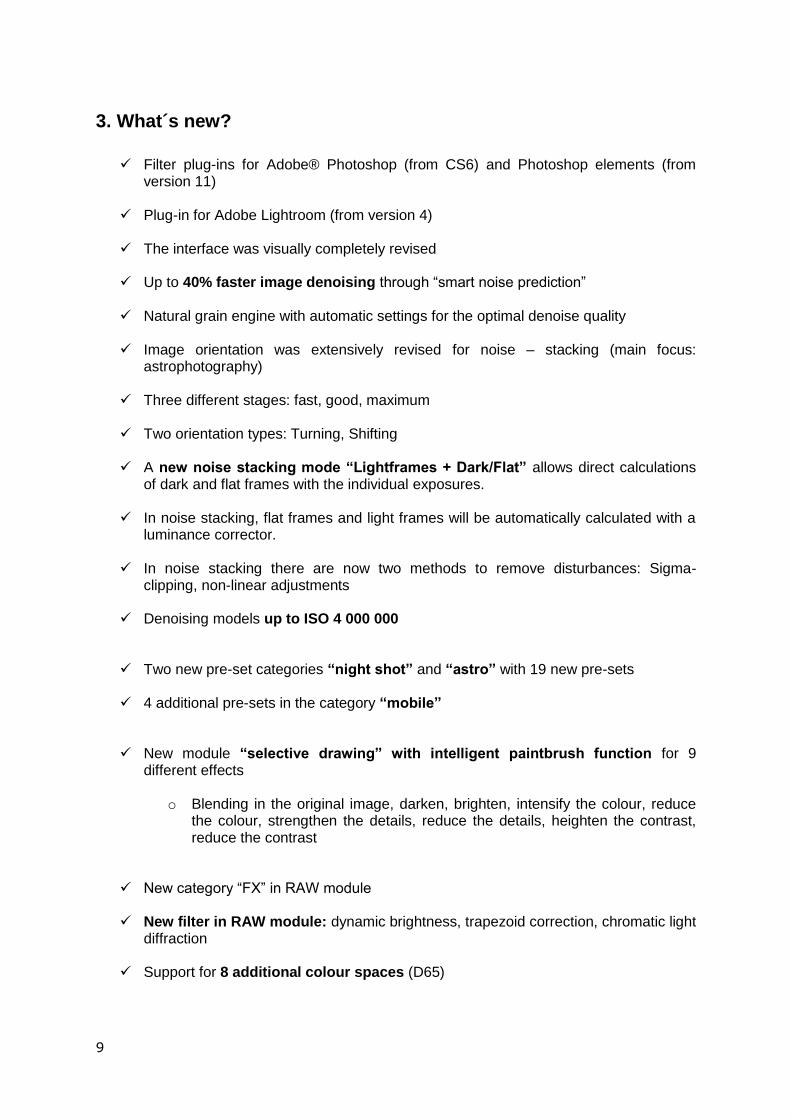
Support for 8 additional colour spaces (D65)
10
The selective editing of post processing effects has received 56 new gradients
New post processing effects
o Optimise denoising o Optimise sharpening o Smooth sky o Reduce haze and fog o Gradation (Log) o Colour channel gradiation (Log) o Film grain - analogue o Film grain - fractal o Level brightness o Luminance contrast o Restore highlights o Optimise structure o Chromatic correction o Colour dynamics o Calibrate colour value o Correct colour tone o RGB Transformation o RGB transformation (automatical)
Smart-mask-system: a new effect category for an intelligent and automatic masking
of post-processing effects o Details, colour tone, shade, light, Black/white point, gradation curve
Helpful functions:
Browser history
11
The magnifying glass has a second mode “compare”
Post processing effects give priority notification in 3 categories
Image cropping with 71 format models
New options in saving and automatic formats
Integrated shortcut list
Integrated list of the supporting camera RAW formats
Change the font size in menus and titles
Improving, optimising and bugfixes:
In the options the automatic denoising optimiser can be turned on or off
The active graphic card can only be turned off in settings
A new savings format portable pixmap 16-bit (*.ppm) is now available
Scratch and sensor errors have now a new method to locate optimal replacement areas
For the 4 paintbrush parameters in selective drawing, there are now shortcuts available (keys 1 – 8)
Modulator elements delete the focus (after putting in the value) so that short cuts are immediately accessible.
All loading and saving functions in selective drawing react now to the import path of
Lightroom plug-ins.
The detail effects in selective drawing were revised according to quality
When turning off the security query you will receive a safety notification
The starting of the program was accelerated considerably
The list of chosen effects in expert modus adapts itself now dynamically to the number of filters
The whole of colour space conversion was revised
The RAW module now includes in every section a “standard values added” button
The grid notification is now an ingrained part of the area “distortion” the RAW module
Complete revision of the effect colour temperature
The accuracy of all smoothing functions was highly increased
12
4. DENOISE projects 2 professional – start screen
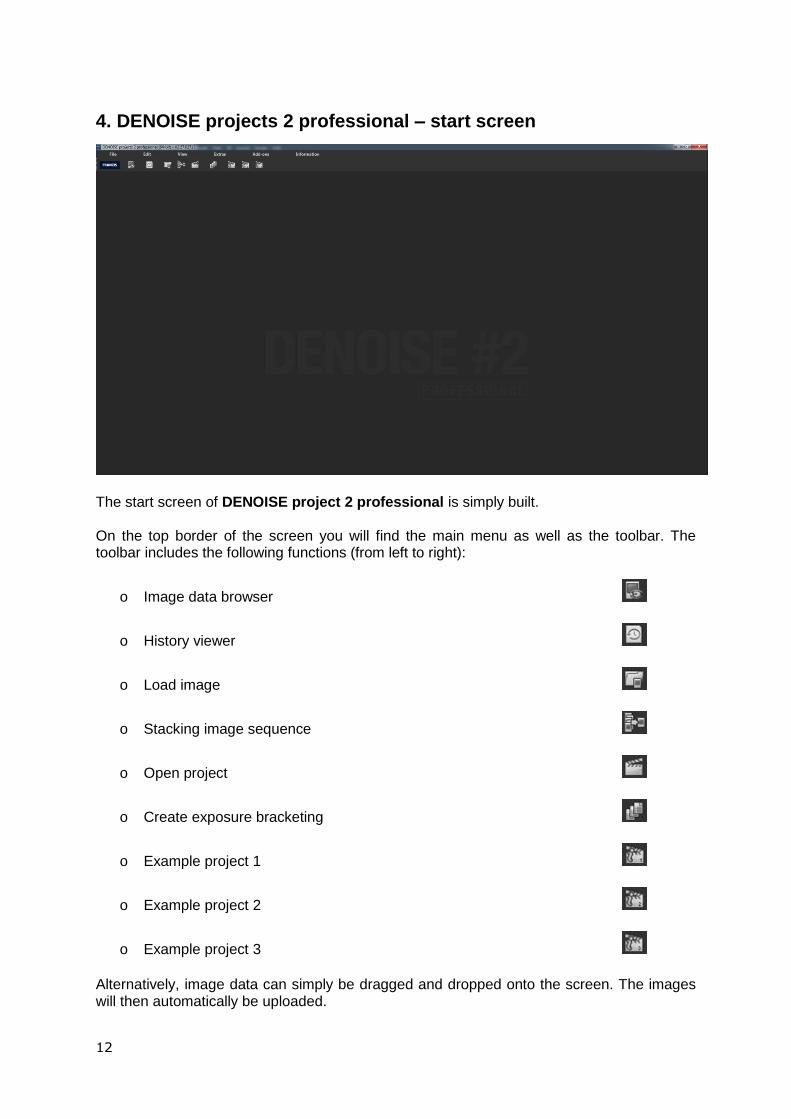
The start screen of DENOISE project 2 professional is simply built. On the top border of the screen you will find the main menu as well as the toolbar. The toolbar includes the following functions (from left to right):
o Image data browser
o History viewer
o Load image
o Stacking image sequence
o Open project
o Create exposure bracketing
o Example project 1
o Example project 2
o Example project 3 Alternatively, image data can simply be dragged and dropped onto the screen. The images will then automatically be uploaded.

13
14
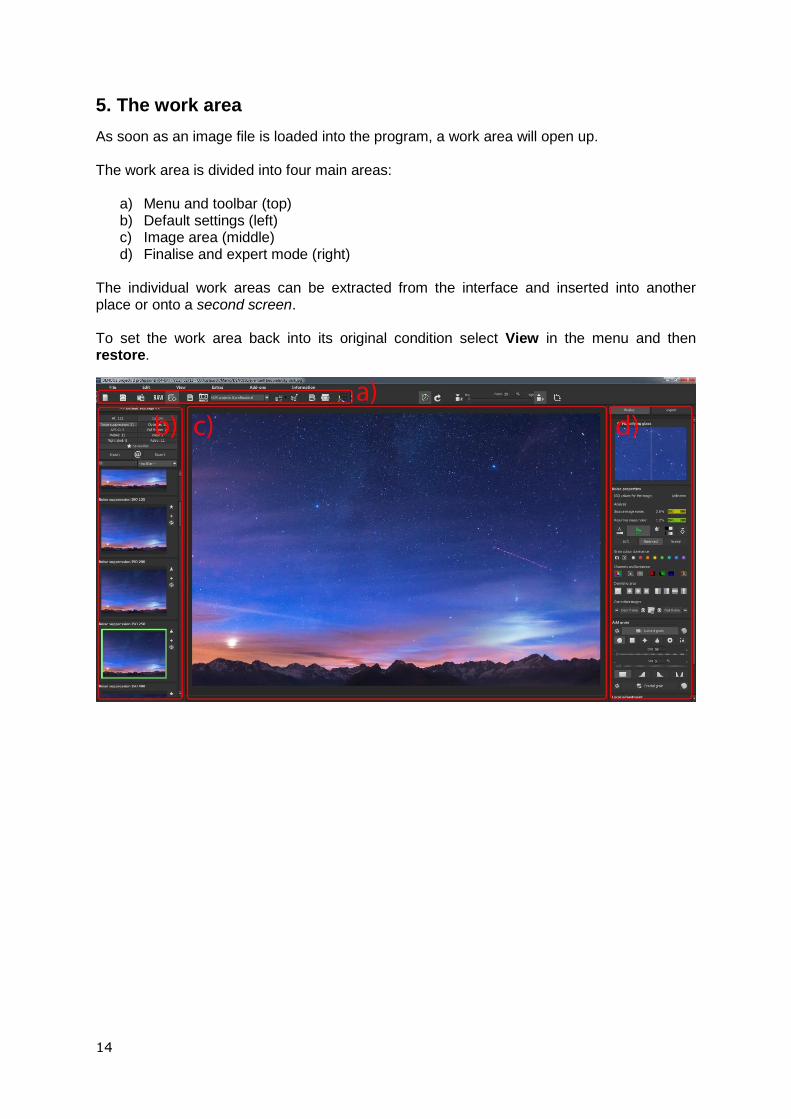
5. The work area
As soon as an image file is loaded into the program, a work area will open up. The work area is divided into four main areas:
a) Menu and toolbar (top) b) Default settings (left) c) Image area (middle) d) Finalise and expert mode (right)
The individual work areas can be extracted from the interface and inserted into another place or onto a second screen. To set the work area back into its original condition select View in the menu and then restore.
15
6. Menu bar
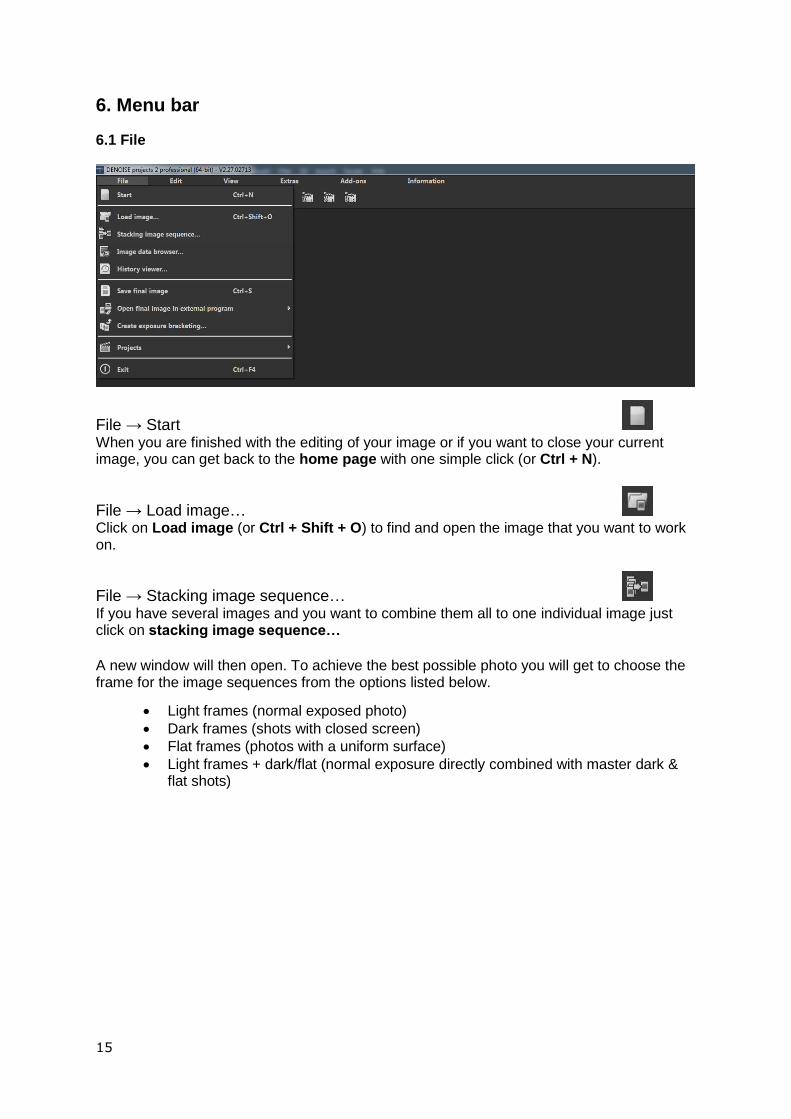
6.1 File
File → Start When you are finished with the editing of your image or if you want to close your current image, you can get back to the home page with one simple click (or Ctrl + N).
File → Load image… Click on Load image (or Ctrl + Shift + O) to find and open the image that you want to work on.
File → Stacking image sequence… If you have several images and you want to combine them all to one individual image just click on stacking image sequence…
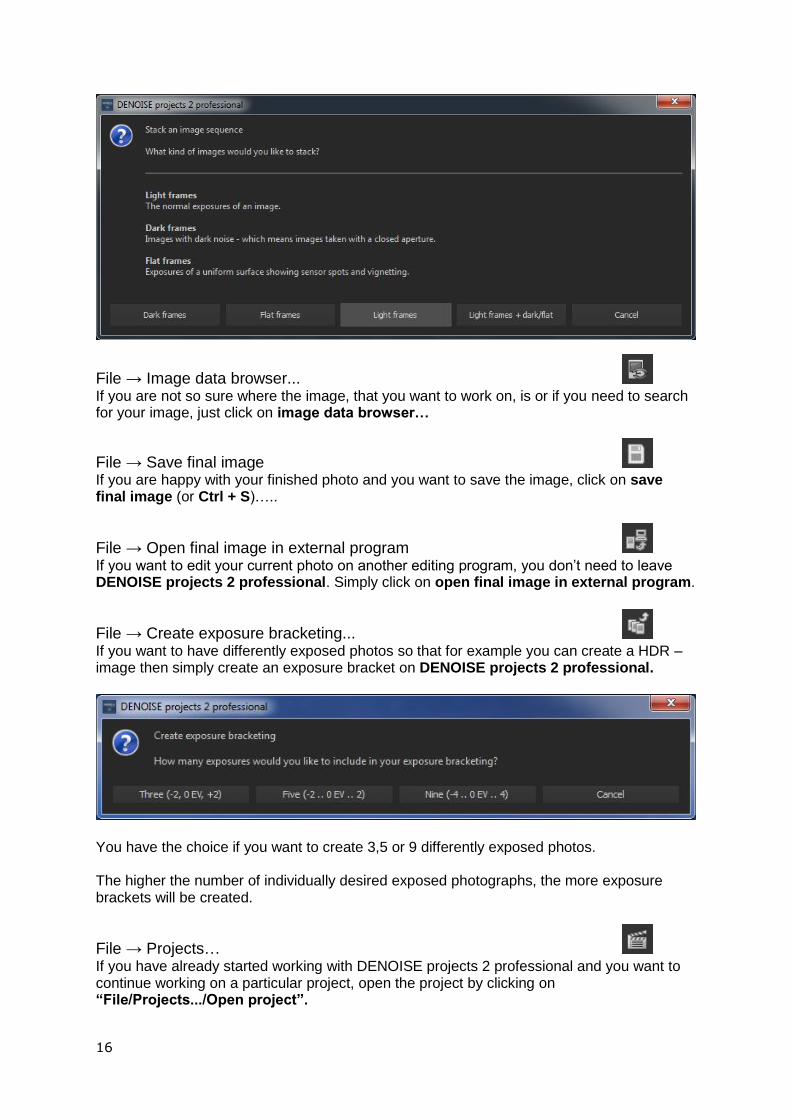
A new window will then open. To achieve the best possible photo you will get to choose the frame for the image sequences from the options listed below.
Light frames (normal exposed photo)
Dark frames (shots with closed screen)
Flat frames (photos with a uniform surface)
Light frames + dark/flat (normal exposure directly combined with master dark & flat shots)
16
File → Image data browser... If you are not so sure where the image, that you want to work on, is or if you need to search for your image, just click on image data browser…
File → Save final image If you are happy with your finished photo and you want to save the image, click on save final image (or Ctrl + S)…..
File → Open final image in external program If you want to edit your current photo on another editing program, you don’t need to leave DENOISE projects 2 professional. Simply click on open final image in external program.
File → Create exposure bracketing... If you want to have differently exposed photos so that for example you can create a HDR – image then simply create an exposure bracket on DENOISE projects 2 professional.
You have the choice if you want to create 3,5 or 9 differently exposed photos. The higher the number of individually desired exposed photographs, the more exposure brackets will be created.
File → Projects… If you have already started working with DENOISE projects 2 professional and you want to continue working on a particular project, open the project by clicking on “File/Projects.../Open project”.

17
File → Exit Click on Exit (or Ctrl + F4) to close DENOISE projects 2 professional.
6.2 Edit
Edit → RAW processing If you want to edit a photo, click on RAW processing to change colours or to distort the image (see 6.2.4 RAW module)
Edit → Post-processing As soon as you have edited or denoised an image, you will find yourself in the post-processing mode.
18
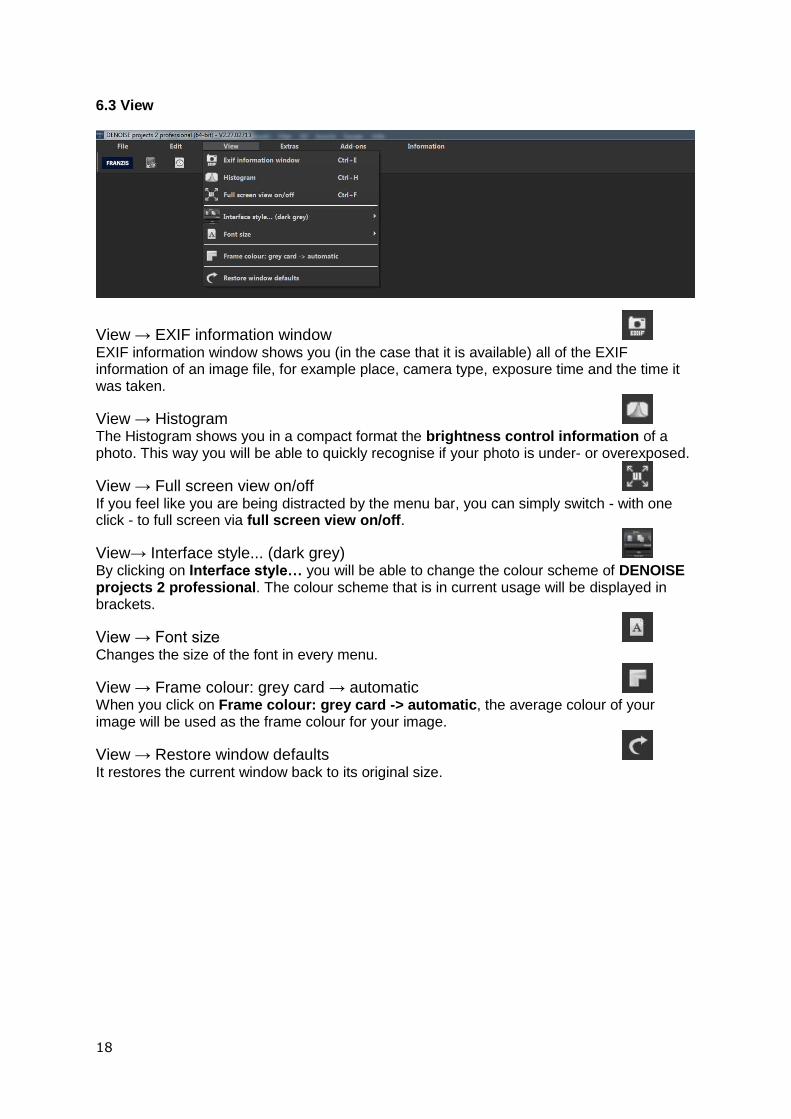
6.3 View
View → EXIF information window
EXIF information window shows you (in the case that it is available) all of the EXIF information of an image file, for example place, camera type, exposure time and the time it was taken.
View → Histogram The Histogram shows you in a compact format the brightness control information of a photo. This way you will be able to quickly recognise if your photo is under- or overexposed.
View → Full screen view on/off
If you feel like you are being distracted by the menu bar, you can simply switch - with one click - to full screen via full screen view on/off.
View→ Interface style... (dark grey) By clicking on Interface style… you will be able to change the colour scheme of DENOISE projects 2 professional. The colour scheme that is in current usage will be displayed in brackets.
View → Font size
Changes the size of the font in every menu.
View → Frame colour: grey card → automatic When you click on Frame colour: grey card -> automatic, the average colour of your image will be used as the frame colour for your image.
View → Restore window defaults
It restores the current window back to its original size.

19
6.4 Extras
Extras → Batch processing… (Ctrl + B) The batch processing of DENOISE projects 2 professional allows the automatic processing of multiple exposure brackets.
Extras → Preparing image…
a) White balance: With white balance you will be able to correct colour errors that are
created through warm room lighting for example.
b) Colour space conversion: Here, advanced users can determine the colour space of an image. Since most monitors can only depict sRGB colour spaces, one should only change the colour space, when it is absolutely necessary.
c) RAW options:
This area controls the usage of RAW image files.
d) Alignment: Here you can activate/ deactivate the automatic alignment of your images.
20
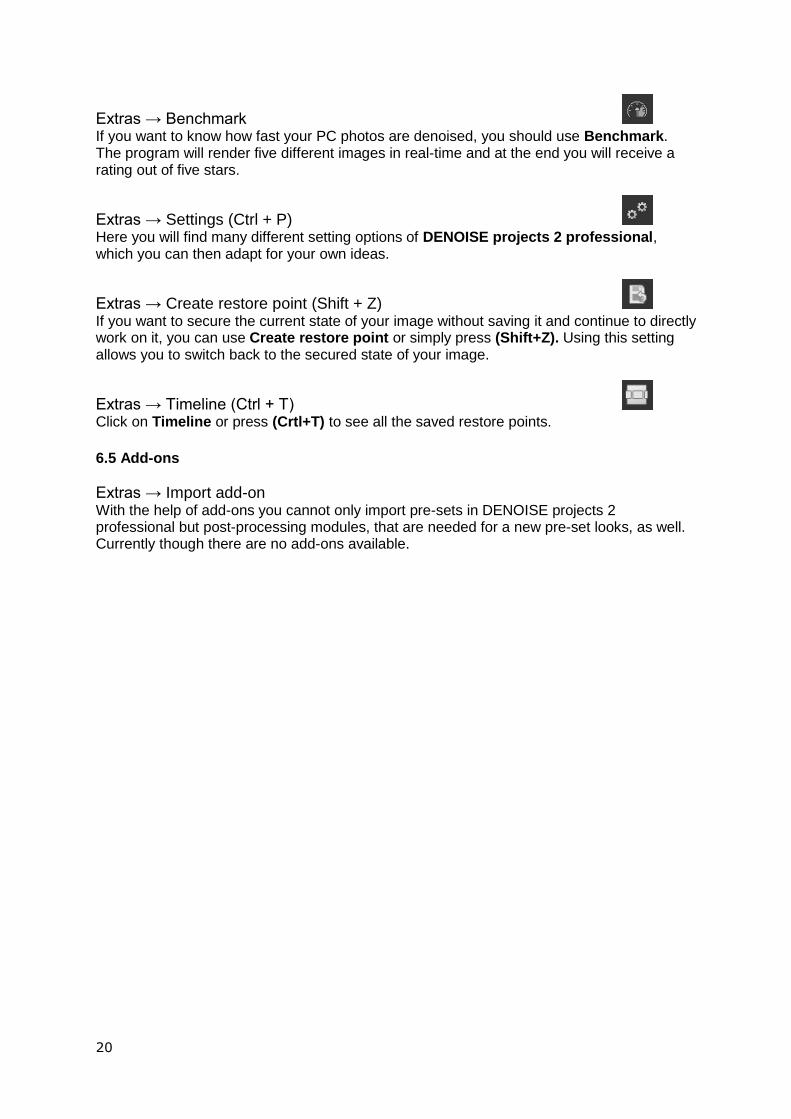
Extras → Benchmark If you want to know how fast your PC photos are denoised, you should use Benchmark. The program will render five different images in real-time and at the end you will receive a rating out of five stars.
Extras → Settings (Ctrl + P) Here you will find many different setting options of DENOISE projects 2 professional, which you can then adapt for your own ideas.
Extras → Create restore point (Shift + Z)
If you want to secure the current state of your image without saving it and continue to directly work on it, you can use Create restore point or simply press (Shift+Z). Using this setting allows you to switch back to the secured state of your image.
Extras → Timeline (Ctrl + T) Click on Timeline or press (Crtl+T) to see all the saved restore points.
6.5 Add-ons
Extras → Import add-on With the help of add-ons you cannot only import pre-sets in DENOISE projects 2 professional but post-processing modules, that are needed for a new pre-set looks, as well. Currently though there are no add-ons available.
21
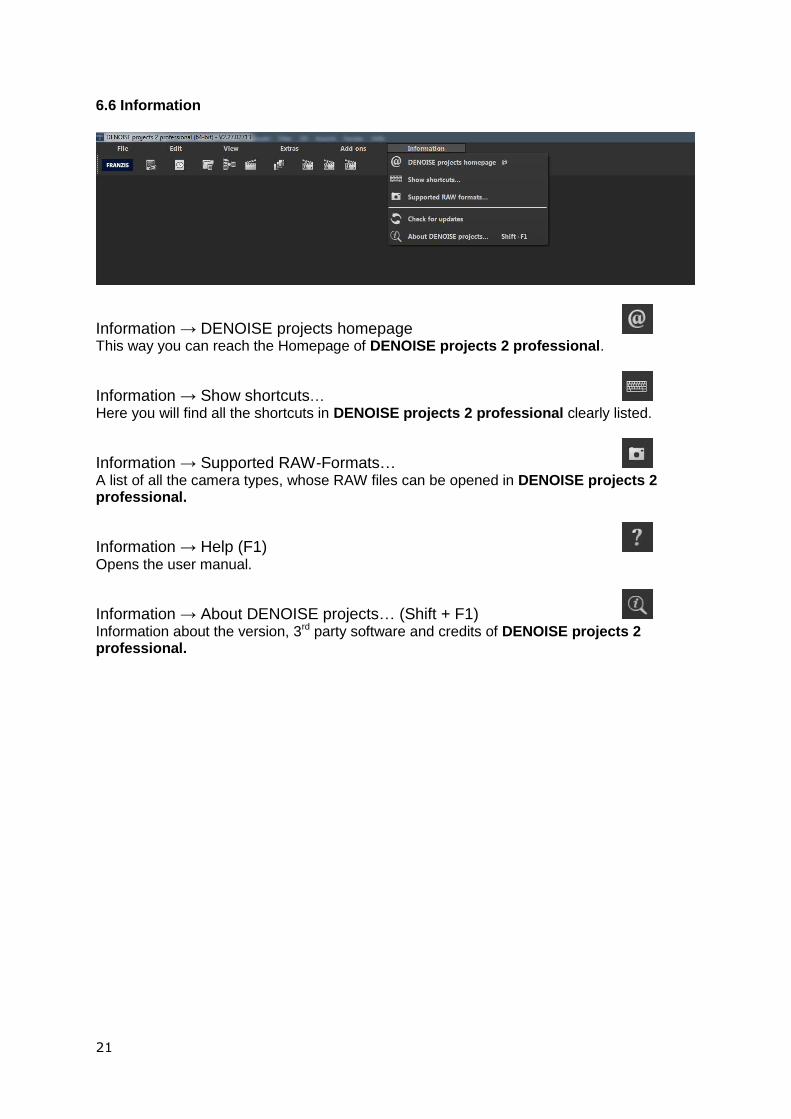
6.6 Information
Information → DENOISE projects homepage This way you can reach the Homepage of DENOISE projects 2 professional.
Information → Show shortcuts… Here you will find all the shortcuts in DENOISE projects 2 professional clearly listed.
Information → Supported RAW-Formats… A list of all the camera types, whose RAW files can be opened in DENOISE projects 2 professional.
Information → Help (F1)
Opens the user manual.
Information → About DENOISE projects… (Shift + F1) Information about the version, 3rd party software and credits of DENOISE projects 2 professional.
22
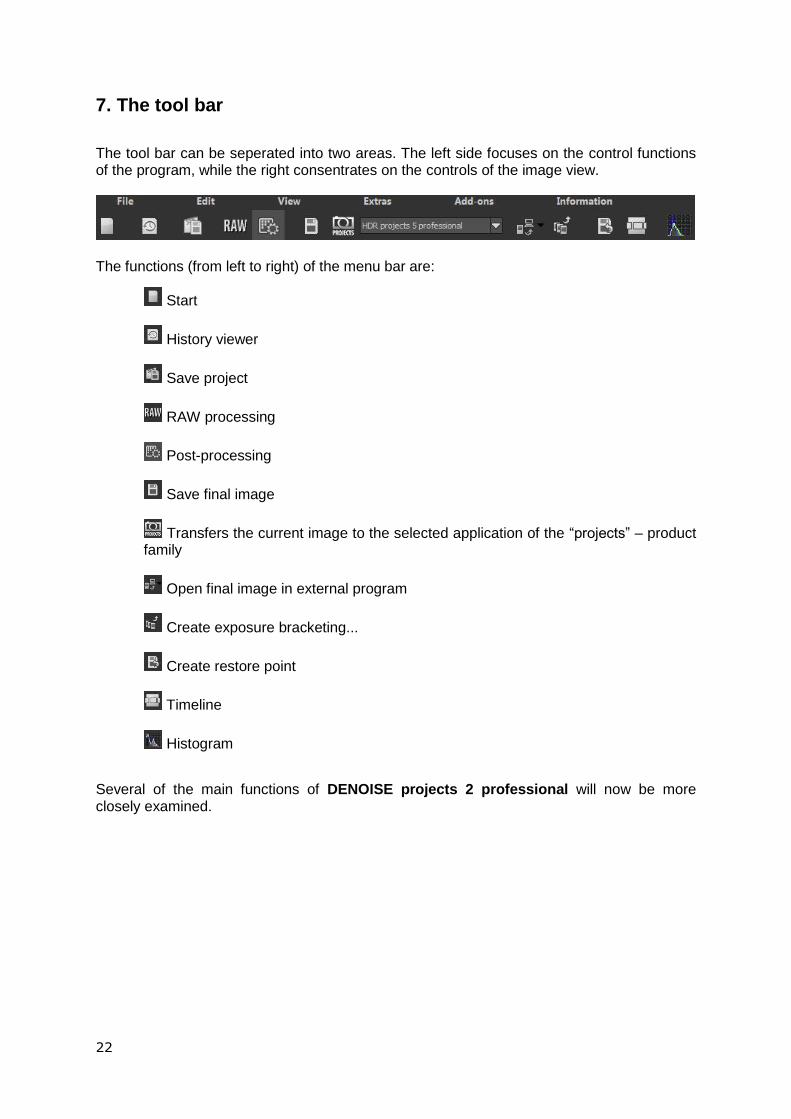
7. The tool bar
The tool bar can be seperated into two areas. The left side focuses on the control functions of the program, while the right consentrates on the controls of the image view.
The functions (from left to right) of the menu bar are:
Start
History viewer
Save project
RAW processing
Post-processing
Save final image
Transfers the current image to the selected application of the “projects” – product family
Open final image in external program
Create exposure bracketing...
Create restore point
Timeline
Histogram
Several of the main functions of DENOISE projects 2 professional will now be more closely examined.

23
7.1 Loading and saving files
To load images into the program simply drag and drop the chosen image into it. Another option would be to load the image by using the button in the tool bar (located on the start screen) or to load the image via file Load image… If you drag and drop a file onto the program an automatic image data browser will open, displaying the contents of the file with preview images. With a double click on the preview in the image data browser the image file will be directly uploaded.
Image format: In DENOISE projects 2 professional all of the current image formats can be used to load images into the program. This includes camera RAW images created by different producers. When RAW files are at your disposal you should always use them. For in those image formats there is a lot more information contained than for example in a jpeg file.
7.2 Stacking image sequences - Noise Stacking
The noise stacking procedure is based on the so-called signal to noise ratio (SNR). Here the image sequence of a motive (that was shot multiple times under similar conditions) will be calculated into an image will low image noise. The image noise will drop thereby by a proportion of 1: “root of the image number”. If you shoot for example a motive with ISO 12800, you will have to reckon with strong image noise. If you take the same photo of an unmoving object four times in a row and then drop them into the “stacking image sequence” you will receive an image at the end with 1: root out of 4 so 1:2, thereby halving the image noise. This image noise you can decrease even further with further photographs of the same motive. For example with 100 images the image noise of your ISO 12800 image would have been reduced to one tenth of its original.
24
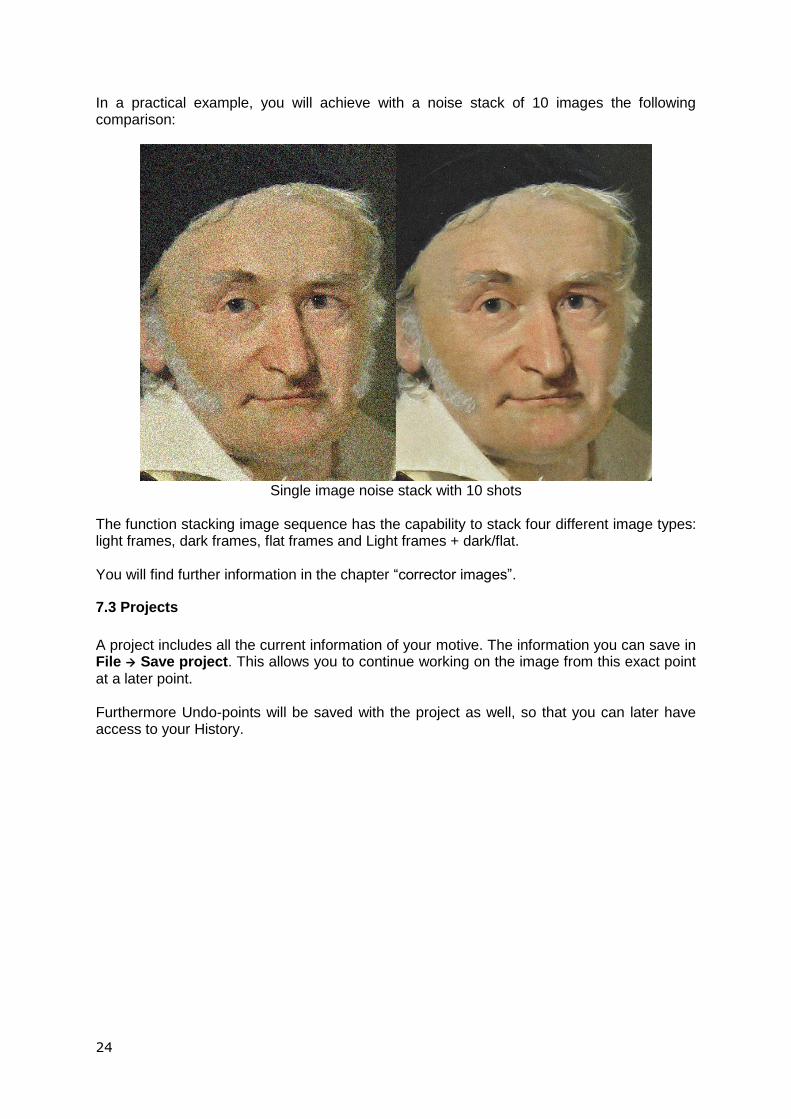
In a practical example, you will achieve with a noise stack of 10 images the following comparison:
Single image noise stack with 10 shots
The function stacking image sequence has the capability to stack four different image types: light frames, dark frames, flat frames and Light frames + dark/flat. You will find further information in the chapter “corrector images”.
7.3 Projects
A project includes all the current information of your motive. The information you can save in File Save project. This allows you to continue working on the image from this exact point at a later point. Furthermore Undo-points will be saved with the project as well, so that you can later have access to your History.
25
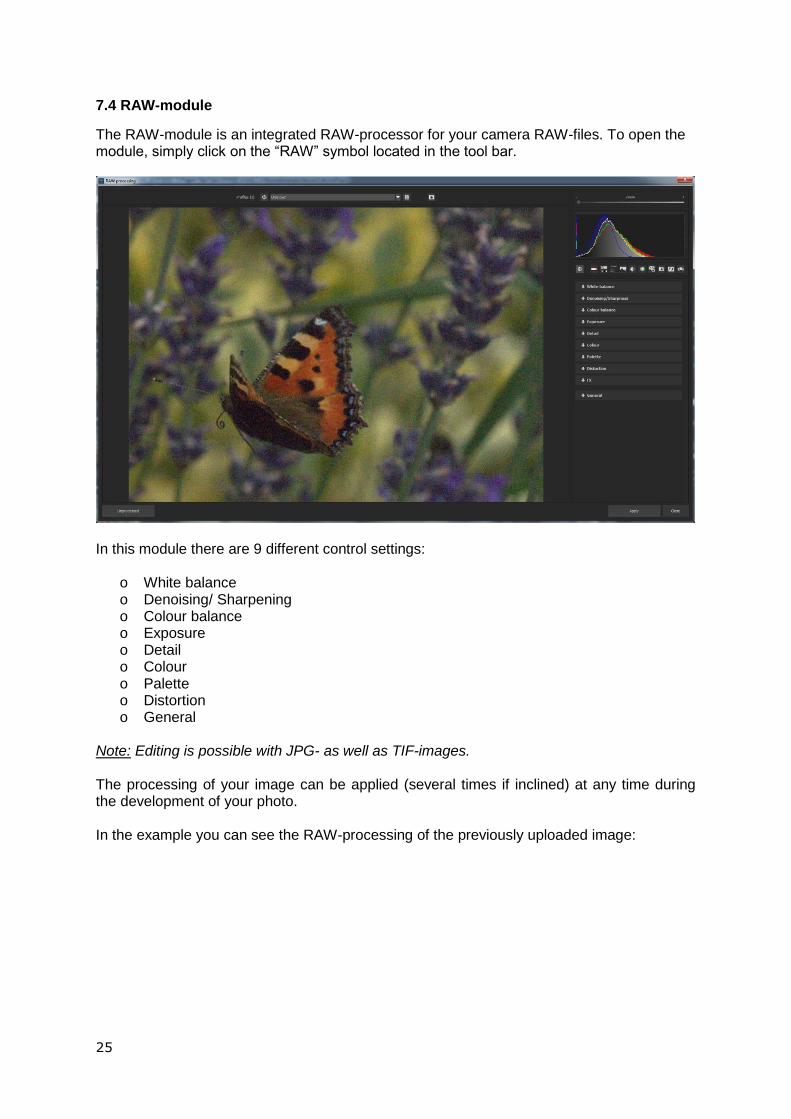
7.4 RAW-module
The RAW-module is an integrated RAW-processor for your camera RAW-files. To open the module, simply click on the “RAW” symbol located in the tool bar.
In this module there are 9 different control settings:
o White balance o Denoising/ Sharpening o Colour balance o Exposure o Detail o Colour o Palette o Distortion o General
Note: Editing is possible with JPG- as well as TIF-images. The processing of your image can be applied (several times if inclined) at any time during the development of your photo. In the example you can see the RAW-processing of the previously uploaded image:
26
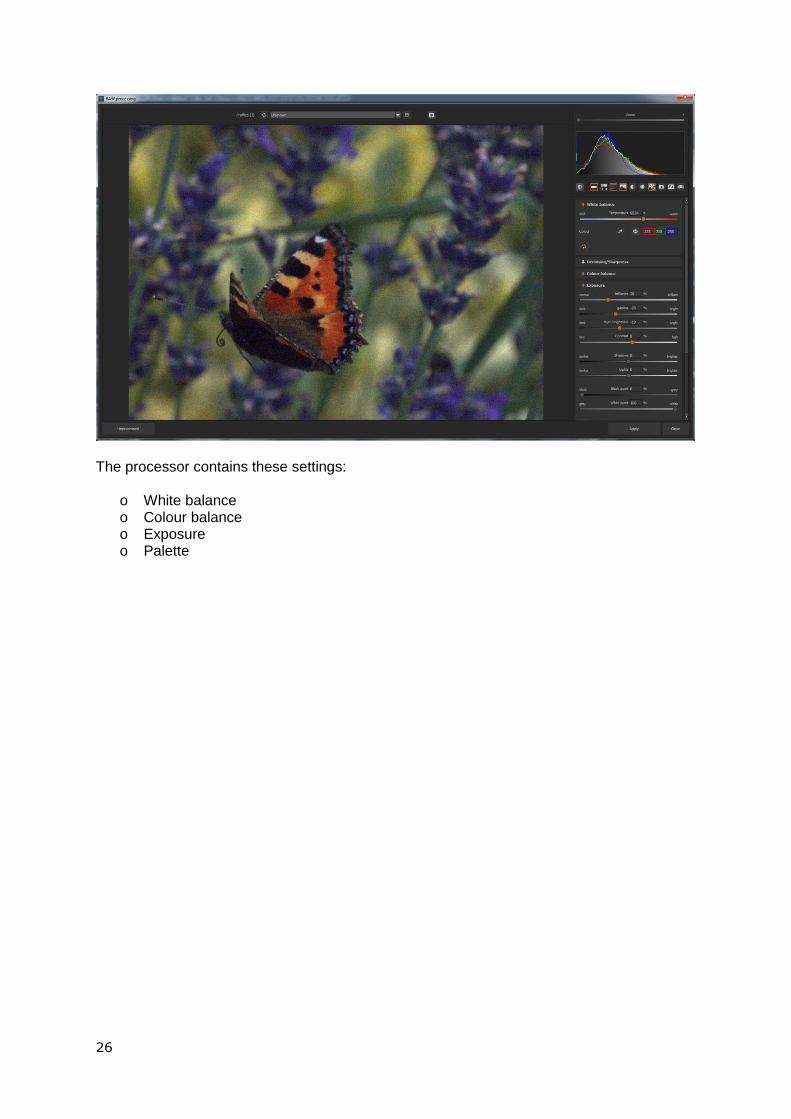
The processor contains these settings:
o White balance o Colour balance o Exposure o Palette
27
7.5 External programms For the transfer of an image to an external program there are only two interfaces available. The “projects” interface: Here all of the programs of the projects product family are automatically registered. Images can be transferred directly by selecting the desired program from the list via the controls.
In the example the transferred material has been sent to HDR projects 3 professional. The general interface: The general interface for external programs will be configured only once in the settings (Menu extras settings). Here the paths for four external editors (general, Photoshop CC, Lightroom, Photoshop Elements) can be configured. In the tool bar you will be able to transfer to one of these four external editors: Simply click on the arrow next to the transfer button and then click on one of the four programs to transfer the image.
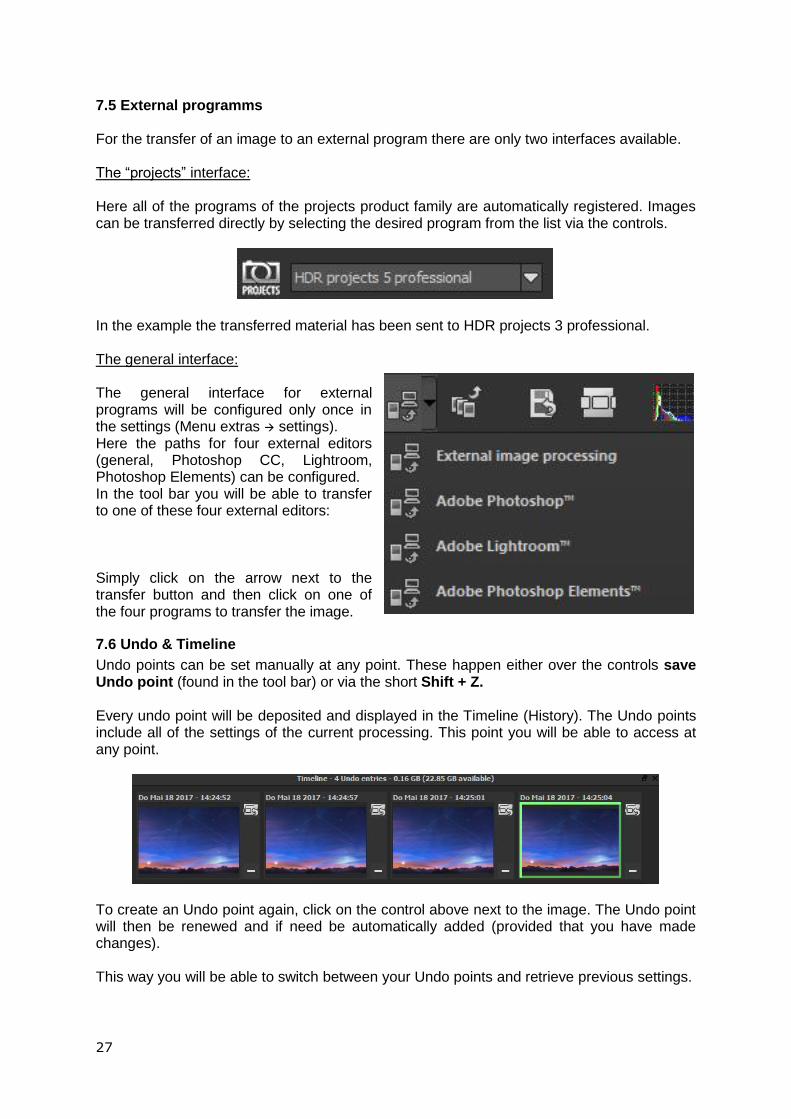
7.6 Undo & Timeline
Undo points can be set manually at any point. These happen either over the controls save Undo point (found in the tool bar) or via the short Shift + Z. Every undo point will be deposited and displayed in the Timeline (History). The Undo points include all of the settings of the current processing. This point you will be able to access at any point.
To create an Undo point again, click on the control above next to the image. The Undo point will then be renewed and if need be automatically added (provided that you have made changes). This way you will be able to switch between your Undo points and retrieve previous settings.
28
Additionally all Undo points will be recorded, when the file is saved, so that when you open the project once more, at a later date, all Undo points will once more be at your disposal.
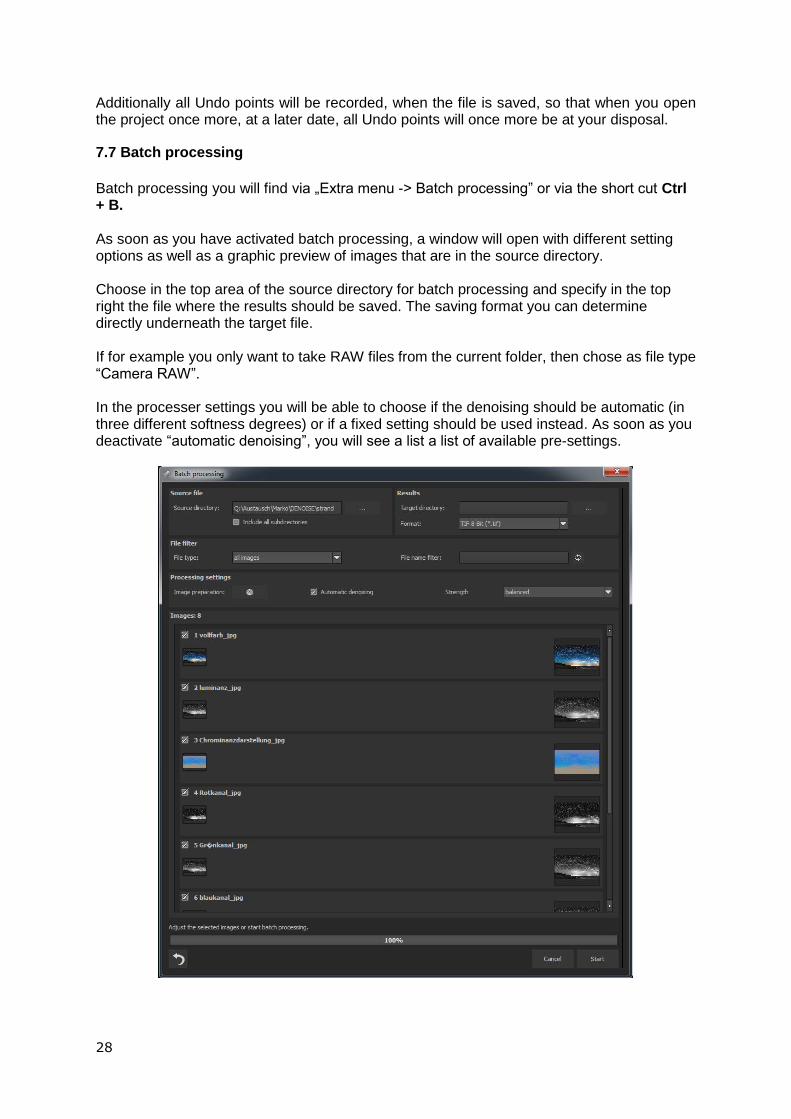
7.7 Batch processing
Batch processing you will find via „Extra menu -> Batch processing” or via the short cut Ctrl + B. As soon as you have activated batch processing, a window will open with different setting options as well as a graphic preview of images that are in the source directory. Choose in the top area of the source directory for batch processing and specify in the top right the file where the results should be saved. The saving format you can determine directly underneath the target file. If for example you only want to take RAW files from the current folder, then chose as file type “Camera RAW”. In the processer settings you will be able to choose if the denoising should be automatic (in three different softness degrees) or if a fixed setting should be used instead. As soon as you deactivate “automatic denoising”, you will see a list a list of available pre-settings.
29
After you have completed all of the settings, click on the button “Start” in the bottom right hand corner. All of the selected images will be denoised by the batch processor and then every image in the TIF format will be saved individually.
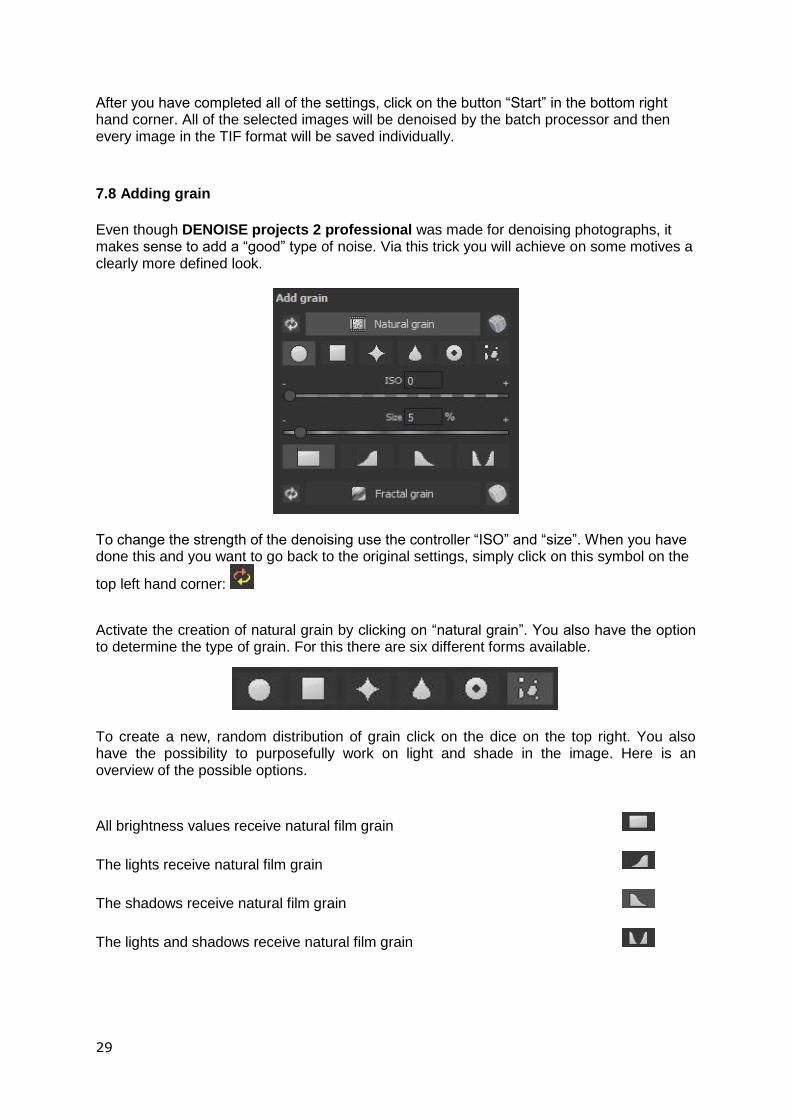
7.8 Adding grain
Even though DENOISE projects 2 professional was made for denoising photographs, it makes sense to add a “good” type of noise. Via this trick you will achieve on some motives a clearly more defined look.
To change the strength of the denoising use the controller “ISO” and “size”. When you have done this and you want to go back to the original settings, simply click on this symbol on the
top left hand corner:
Activate the creation of natural grain by clicking on “natural grain”. You also have the option to determine the type of grain. For this there are six different forms available.
To create a new, random distribution of grain click on the dice on the top right. You also have the possibility to purposefully work on light and shade in the image. Here is an overview of the possible options.
All brightness values receive natural film grain
The lights receive natural film grain
The shadows receive natural film grain
The lights and shadows receive natural film grain
30
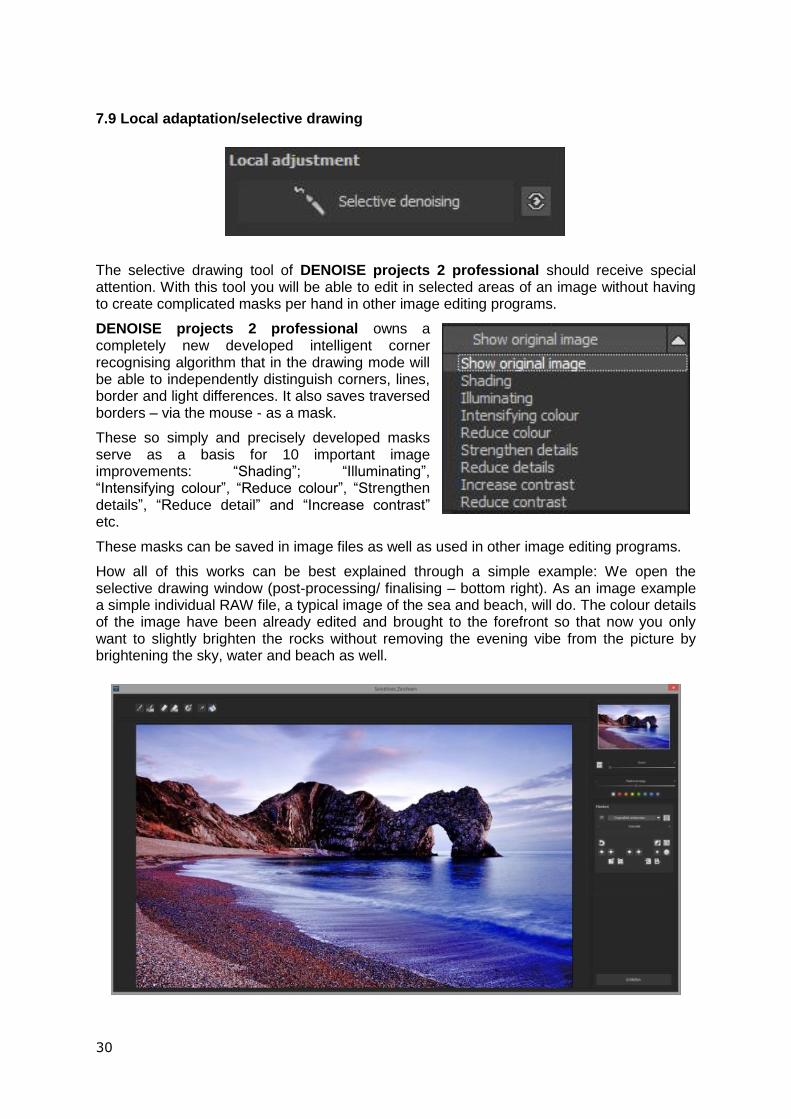
7.9 Local adaptation/selective drawing
The selective drawing tool of DENOISE projects 2 professional should receive special attention. With this tool you will be able to edit in selected areas of an image without having to create complicated masks per hand in other image editing programs.
DENOISE projects 2 professional owns a completely new developed intelligent corner recognising algorithm that in the drawing mode will be able to independently distinguish corners, lines, border and light differences. It also saves traversed borders – via the mouse - as a mask.
These so simply and precisely developed masks serve as a basis for 10 important image improvements: “Shading”; “Illuminating”, “Intensifying colour”, “Reduce colour”, “Strengthen details”, “Reduce detail” and “Increase contrast” etc.
These masks can be saved in image files as well as used in other image editing programs.
How all of this works can be best explained through a simple example: We open the selective drawing window (post-processing/ finalising – bottom right). As an image example a simple individual RAW file, a typical image of the sea and beach, will do. The colour details of the image have been already edited and brought to the forefront so that now you only want to slightly brighten the rocks without removing the evening vibe from the picture by brightening the sky, water and beach as well.
31
1. Choose editing target
In this case you choose “Illuminating“. Make sure that the chosen mask function is activated via the green check mark.
2. Activating drawing mode
3. Activates the filling mode for all paintbrush functions
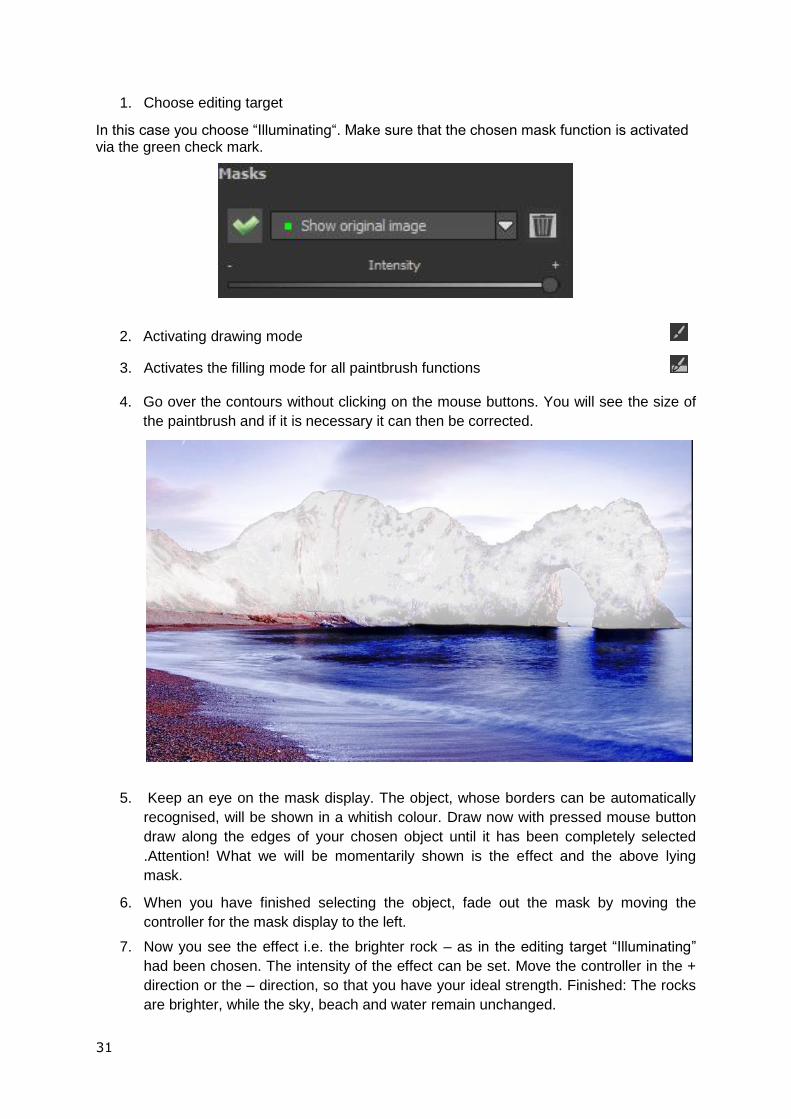
4. Go over the contours without clicking on the mouse buttons. You will see the size of
the paintbrush and if it is necessary it can then be corrected.
5. Keep an eye on the mask display. The object, whose borders can be automatically
recognised, will be shown in a whitish colour. Draw now with pressed mouse button
draw along the edges of your chosen object until it has been completely selected
.Attention! What we will be momentarily shown is the effect and the above lying
mask.
6. When you have finished selecting the object, fade out the mask by moving the
controller for the mask display to the left.
7. Now you see the effect i.e. the brighter rock – as in the editing target “Illuminating”
had been chosen. The intensity of the effect can be set. Move the controller in the +
direction or the – direction, so that you have your ideal strength. Finished: The rocks
are brighter, while the sky, beach and water remain unchanged.
32
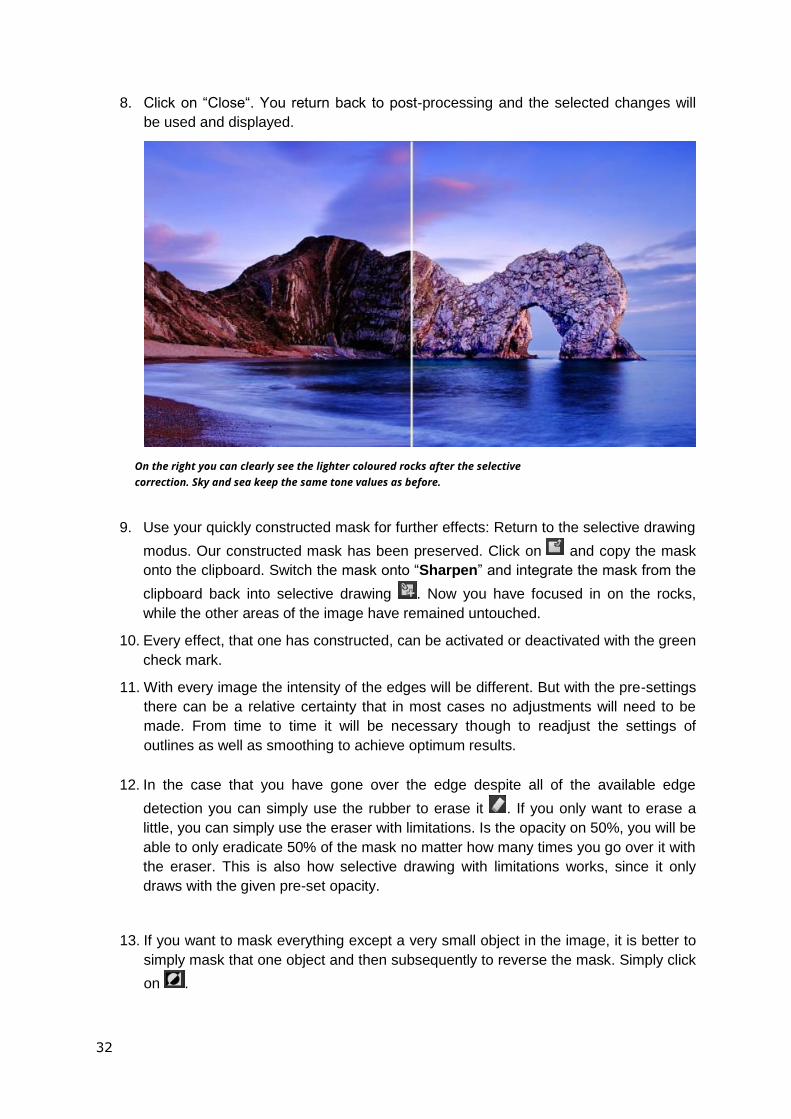
8. Click on “Close“. You return back to post-processing and the selected changes will
be used and displayed.
9. Use your quickly constructed mask for further effects: Return to the selective drawing
modus. Our constructed mask has been preserved. Click on and copy the mask
onto the clipboard. Switch the mask onto “Sharpen” and integrate the mask from the
clipboard back into selective drawing . Now you have focused in on the rocks,
while the other areas of the image have remained untouched.
10. Every effect, that one has constructed, can be activated or deactivated with the green
check mark.
11. With every image the intensity of the edges will be different. But with the pre-settings
there can be a relative certainty that in most cases no adjustments will need to be
made. From time to time it will be necessary though to readjust the settings of
outlines as well as smoothing to achieve optimum results.
12. In the case that you have gone over the edge despite all of the available edge
detection you can simply use the rubber to erase it . If you only want to erase a
little, you can simply use the eraser with limitations. Is the opacity on 50%, you will be
able to only eradicate 50% of the mask no matter how many times you go over it with
the eraser. This is also how selective drawing with limitations works, since it only
draws with the given pre-set opacity.
13. If you want to mask everything except a very small object in the image, it is better to
simply mask that one object and then subsequently to reverse the mask. Simply click
on .
On the right you can clearly see the lighter coloured rocks after the selective
correction. Sky and sea keep the same tone values as before.
33
Pro-tip: For the filling of the mask you have two filling modes to choose from. When do you choose which? The “normal” filling mode ( ) we have already used in our example for large-scale areas. This is the filling mode that one should use for sky and water areas.
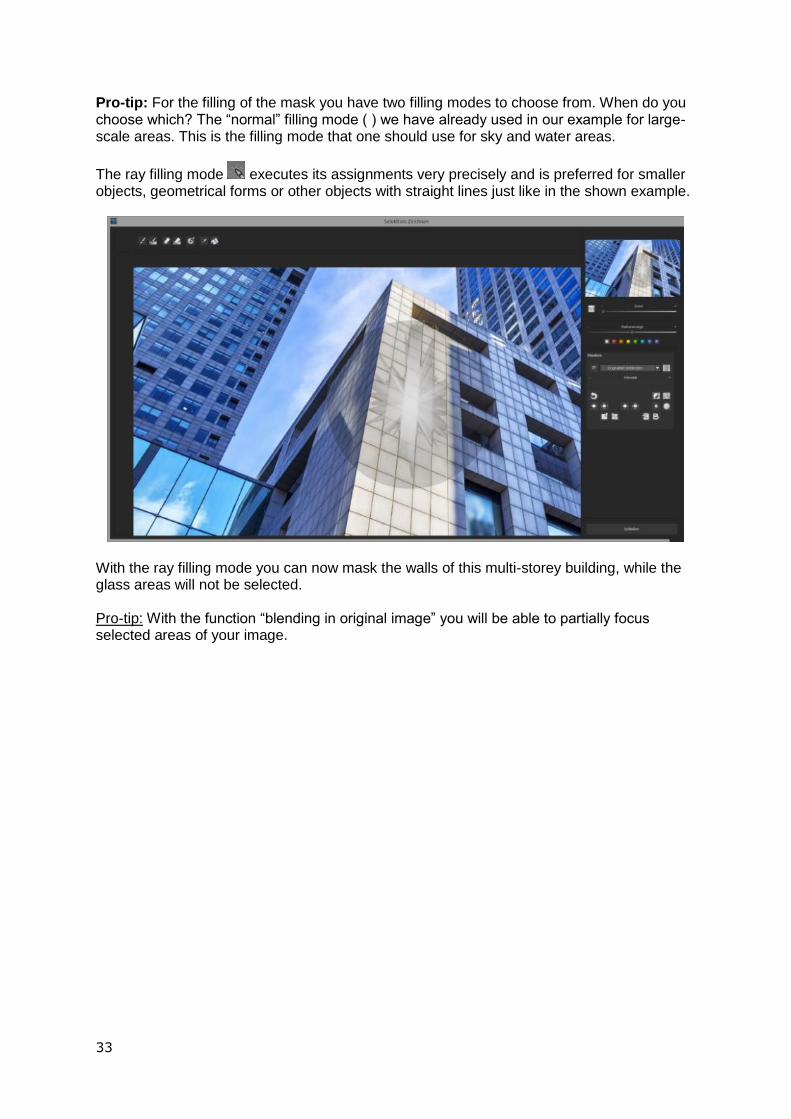
The ray filling mode executes its assignments very precisely and is preferred for smaller objects, geometrical forms or other objects with straight lines just like in the shown example.
With the ray filling mode you can now mask the walls of this multi-storey building, while the glass areas will not be selected. Pro-tip: With the function “blending in original image” you will be able to partially focus selected areas of your image.
34
NEW on DENOISE projects 2 professional
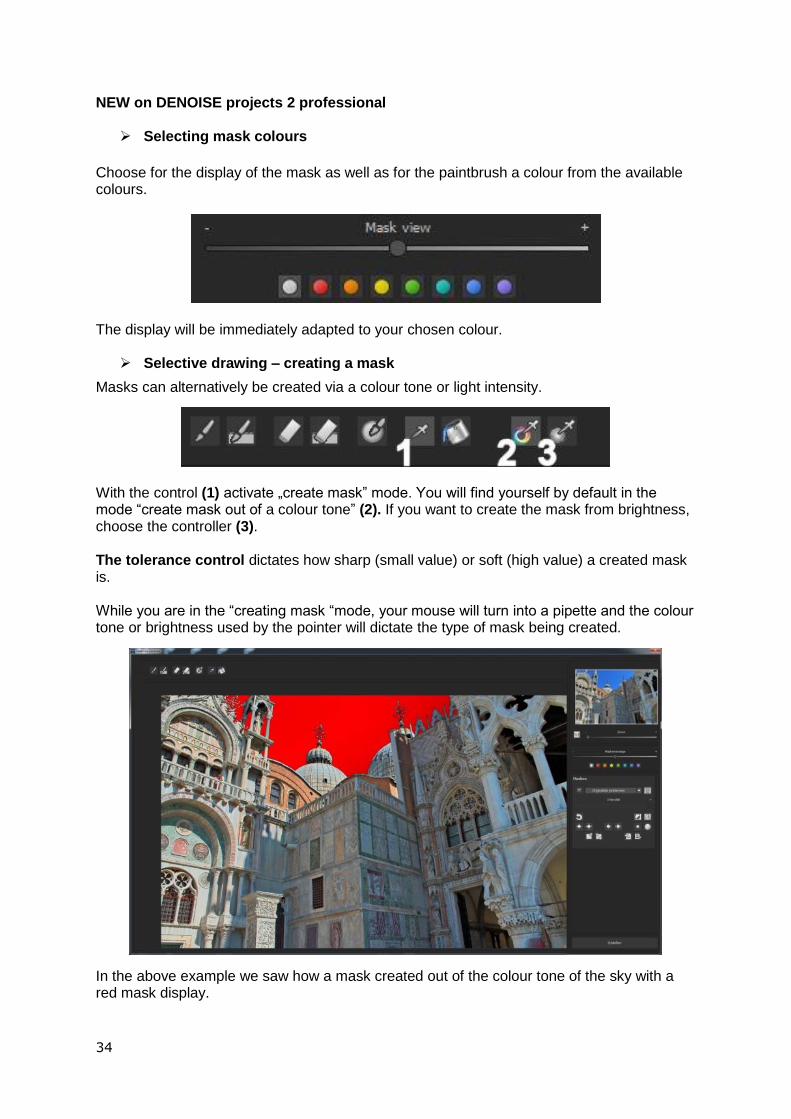
Selecting mask colours
Choose for the display of the mask as well as for the paintbrush a colour from the available colours.
The display will be immediately adapted to your chosen colour.
Selective drawing – creating a mask
Masks can alternatively be created via a colour tone or light intensity.
With the control (1) activate „create mask” mode. You will find yourself by default in the mode “create mask out of a colour tone” (2). If you want to create the mask from brightness, choose the controller (3). The tolerance control dictates how sharp (small value) or soft (high value) a created mask is. While you are in the “creating mask “mode, your mouse will turn into a pipette and the colour tone or brightness used by the pointer will dictate the type of mask being created.
In the above example we saw how a mask created out of the colour tone of the sky with a red mask display.

35
Tip: If you have several colour tones that you want to summarise into one singular mask, simply click on all of the desired colour tones with the pipette. The current colour tone will be added with each click to the current mask.
Selective drawing - Smoothing paintbrush
The smoothing paintbrush (1) gives the option to smooth selected areas of current mask.
To smooth an area even more, just go several times with the smoothing paintbrush over the same area.
Global mask functions
In the area of global mask functions there are several specialised modes available to enable direct processing.
Undo the last drawing change
Inverts the current mask
Deletes the current mask
Minimize the outline of the mask by about 1 pixel
Minimize the outline of the current mask by about 5 pixels
Enlarges the outline of the current mask by about 1 pixel
Enlarges the outline of the current mask by about 5 pixels
Slight smoothing of the whole mask
Strong smoothing of the whole mask
36
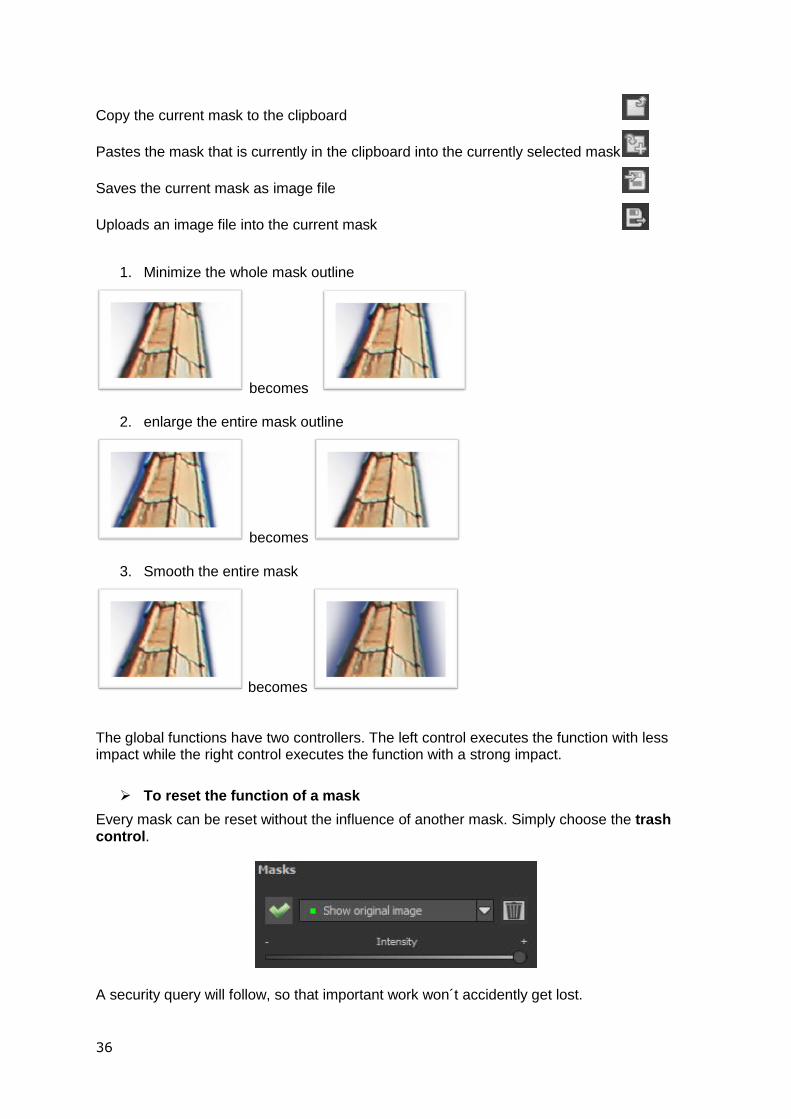
Copy the current mask to the clipboard
Pastes the mask that is currently in the clipboard into the currently selected mask
Saves the current mask as image file
Uploads an image file into the current mask
1. Minimize the whole mask outline
becomes
2. enlarge the entire mask outline
becomes
3. Smooth the entire mask
becomes
The global functions have two controllers. The left control executes the function with less impact while the right control executes the function with a strong impact.
To reset the function of a mask
Every mask can be reset without the influence of another mask. Simply choose the trash control.
A security query will follow, so that important work won´t accidently get lost.
37
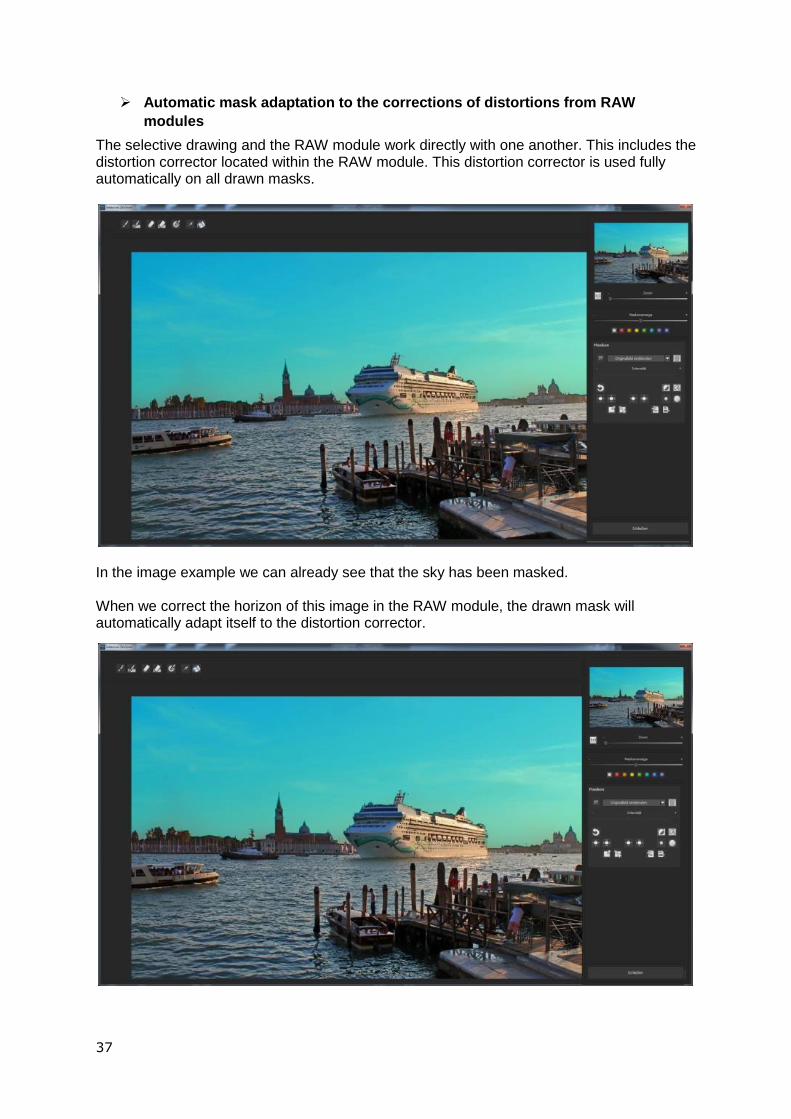
Automatic mask adaptation to the corrections of distortions from RAW
modules
The selective drawing and the RAW module work directly with one another. This includes the distortion corrector located within the RAW module. This distortion corrector is used fully automatically on all drawn masks.
In the image example we can already see that the sky has been masked. When we correct the horizon of this image in the RAW module, the drawn mask will automatically adapt itself to the distortion corrector.
38
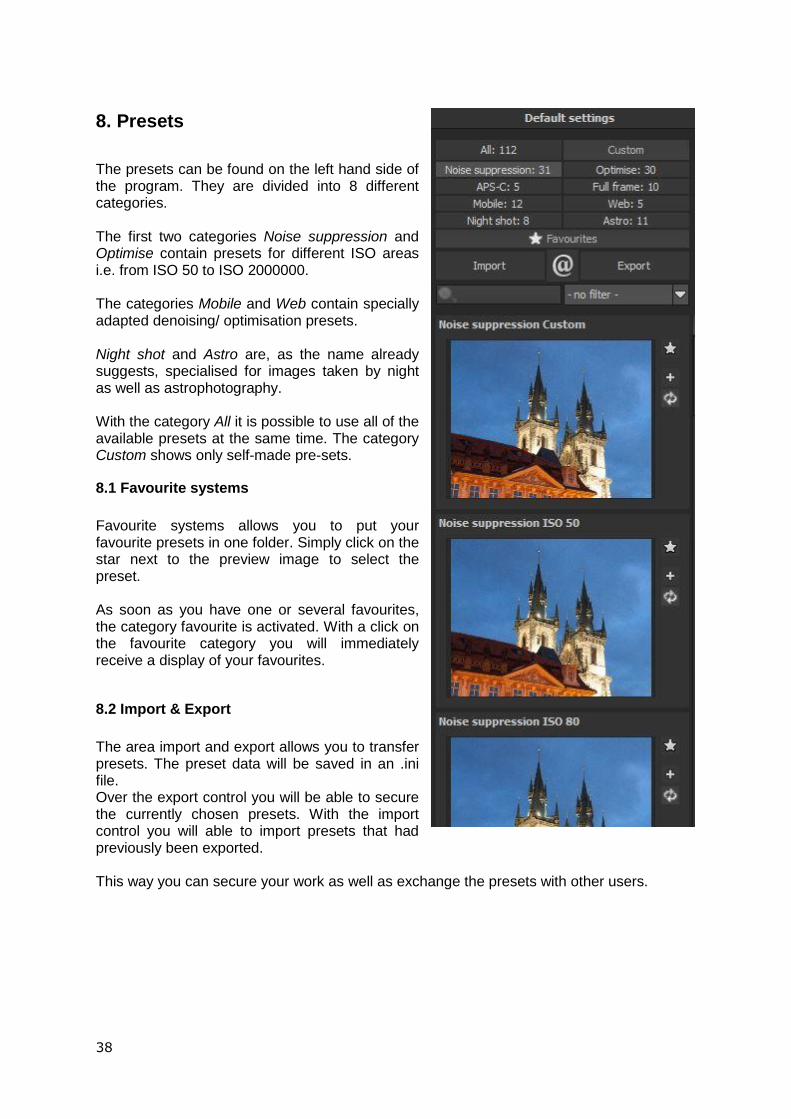
8. Presets
The presets can be found on the left hand side of the program. They are divided into 8 different categories. The first two categories Noise suppression and Optimise contain presets for different ISO areas i.e. from ISO 50 to ISO 2000000. The categories Mobile and Web contain specially adapted denoising/ optimisation presets. Night shot and Astro are, as the name already suggests, specialised for images taken by night as well as astrophotography. With the category All it is possible to use all of the available presets at the same time. The category Custom shows only self-made pre-sets.
8.1 Favourite systems
Favourite systems allows you to put your favourite presets in one folder. Simply click on the star next to the preview image to select the preset. As soon as you have one or several favourites, the category favourite is activated. With a click on the favourite category you will immediately receive a display of your favourites.
8.2 Import & Export
The area import and export allows you to transfer presets. The preset data will be saved in an .ini file. Over the export control you will be able to secure the currently chosen presets. With the import control you will able to import presets that had previously been exported. This way you can secure your work as well as exchange the presets with other users.
39
8.3 The search area
The search area helps you to find desired presets quicker. The search entry is located directly underneath the import control. There you can type in any given text. All presets will be searched via the name and then compared to the entered text, before being displayed in accordance to its relevance. If we are looking for example for a preset with a soft look, just type in soft in the search entry. Below you will find a list of pre-written search words.
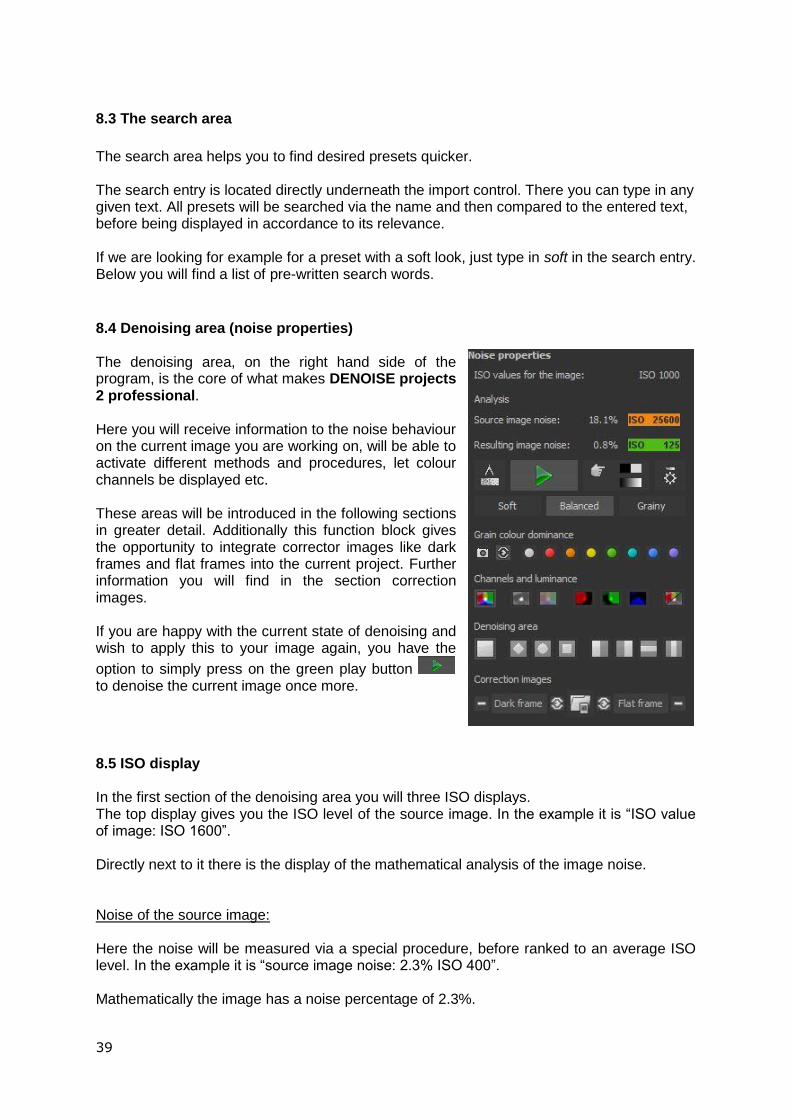
8.4 Denoising area (noise properties) The denoising area, on the right hand side of the program, is the core of what makes DENOISE projects 2 professional. Here you will receive information to the noise behaviour on the current image you are working on, will be able to activate different methods and procedures, let colour channels be displayed etc. These areas will be introduced in the following sections in greater detail. Additionally this function block gives the opportunity to integrate corrector images like dark frames and flat frames into the current project. Further information you will find in the section correction images. If you are happy with the current state of denoising and wish to apply this to your image again, you have the
option to simply press on the green play button to denoise the current image once more.
8.5 ISO display In the first section of the denoising area you will three ISO displays. The top display gives you the ISO level of the source image. In the example it is “ISO value of image: ISO 1600”. Directly next to it there is the display of the mathematical analysis of the image noise. Noise of the source image: Here the noise will be measured via a special procedure, before ranked to an average ISO level. In the example it is “source image noise: 2.3% ISO 400”. Mathematically the image has a noise percentage of 2.3%.
40
Tip: Don´t let yourself be irritated, when the ISO number from the noise analysis doesn’t correspond with the ISO number from the image. The sensors of the cameras react differently to the pre-set ISO level. This way the noise behaviour D810 differentiates from the EOS-7D Mark II. The image denoising must be based on the analytic ISO value that will be displayed to you there. Resulting image noise: Directly underneath the noise of the source image you will the analytical noise value of the result image. In this example it is “Image result noise 0.5% ISO 80”. Through denoising it was therefore possible to lower the analytic ISO number from ISO 400 to ISO 80. Tip: Pay attention to the fact that one shouldn’t denoise the images too strongly, for otherwise the natural look will get lost. The optimum result image noise is between 0.5 – 1%.
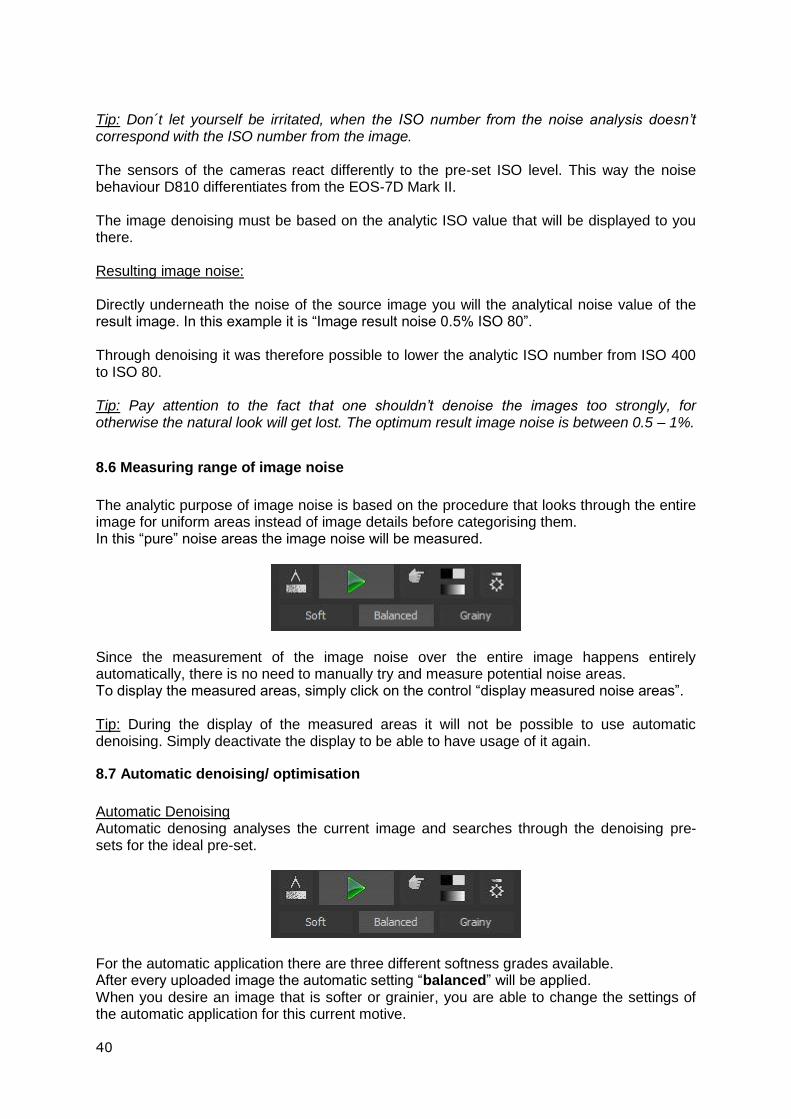
8.6 Measuring range of image noise
The analytic purpose of image noise is based on the procedure that looks through the entire image for uniform areas instead of image details before categorising them. In this “pure” noise areas the image noise will be measured.
Since the measurement of the image noise over the entire image happens entirely automatically, there is no need to manually try and measure potential noise areas. To display the measured areas, simply click on the control “display measured noise areas”. Tip: During the display of the measured areas it will not be possible to use automatic denoising. Simply deactivate the display to be able to have usage of it again.
8.7 Automatic denoising/ optimisation
Automatic Denoising Automatic denosing analyses the current image and searches through the denoising pre-sets for the ideal pre-set.
For the automatic application there are three different softness grades available. After every uploaded image the automatic setting “balanced” will be applied. When you desire an image that is softer or grainier, you are able to change the settings of the automatic application for this current motive.
41
It is advisable to look at the three different results, since denoising has a different effect on each motive. Some images seem better after they have been denoised softly, while others seem better when there is a little bit of granular left over. The choice depends entirely on your own taste. Automatic image optimisation: As soon as you have denoised an image (this happens automatically when you upload an image), you can select the control automatic denoising/optimisation.
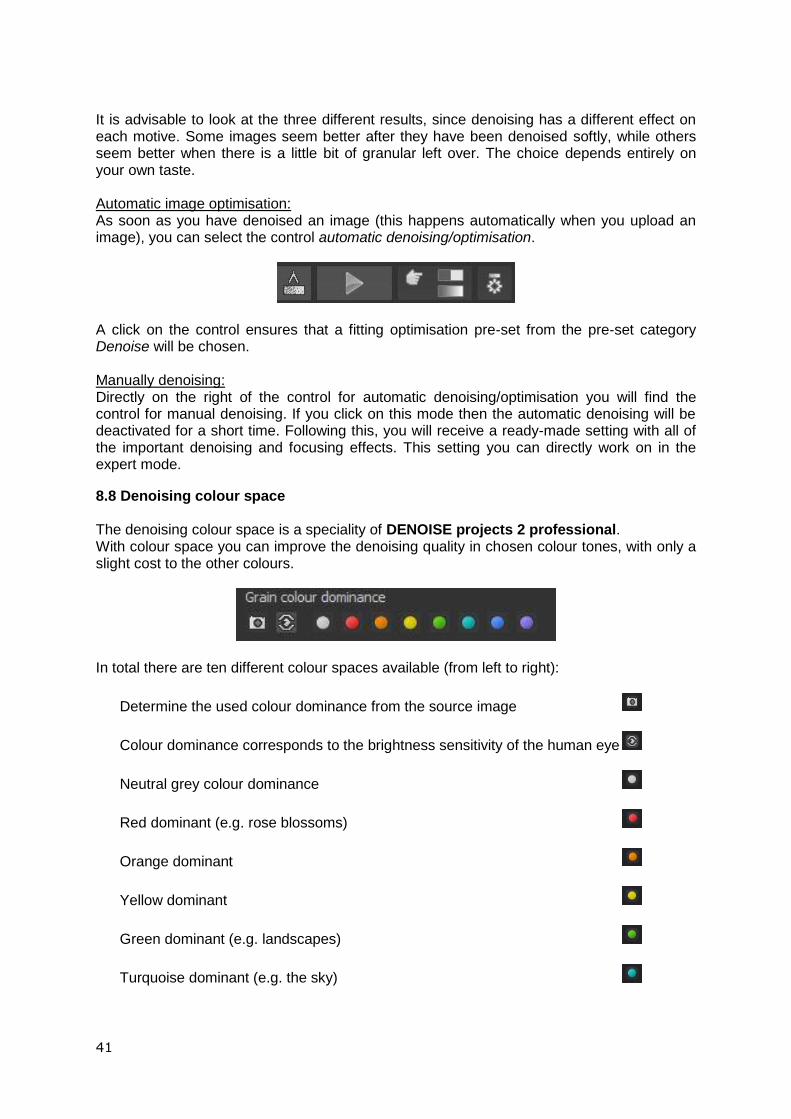
A click on the control ensures that a fitting optimisation pre-set from the pre-set category Denoise will be chosen. Manually denoising: Directly on the right of the control for automatic denoising/optimisation you will find the control for manual denoising. If you click on this mode then the automatic denoising will be deactivated for a short time. Following this, you will receive a ready-made setting with all of the important denoising and focusing effects. This setting you can directly work on in the expert mode.
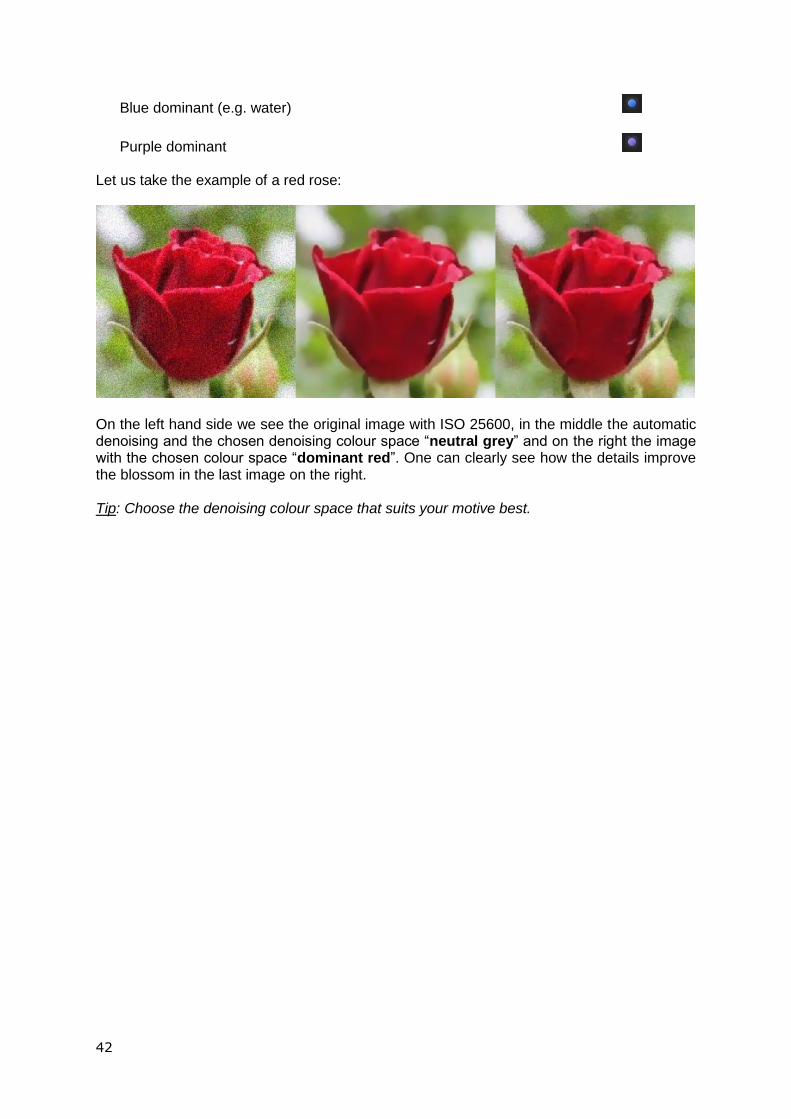
8.8 Denoising colour space The denoising colour space is a speciality of DENOISE projects 2 professional. With colour space you can improve the denoising quality in chosen colour tones, with only a slight cost to the other colours.
In total there are ten different colour spaces available (from left to right):
Determine the used colour dominance from the source image
Colour dominance corresponds to the brightness sensitivity of the human eye
Neutral grey colour dominance
Red dominant (e.g. rose blossoms)
Orange dominant
Yellow dominant
Green dominant (e.g. landscapes)
Turquoise dominant (e.g. the sky)
42
Blue dominant (e.g. water)
Purple dominant Let us take the example of a red rose:
On the left hand side we see the original image with ISO 25600, in the middle the automatic denoising and the chosen denoising colour space “neutral grey” and on the right the image with the chosen colour space “dominant red”. One can clearly see how the details improve the blossom in the last image on the right. Tip: Choose the denoising colour space that suits your motive best.
43
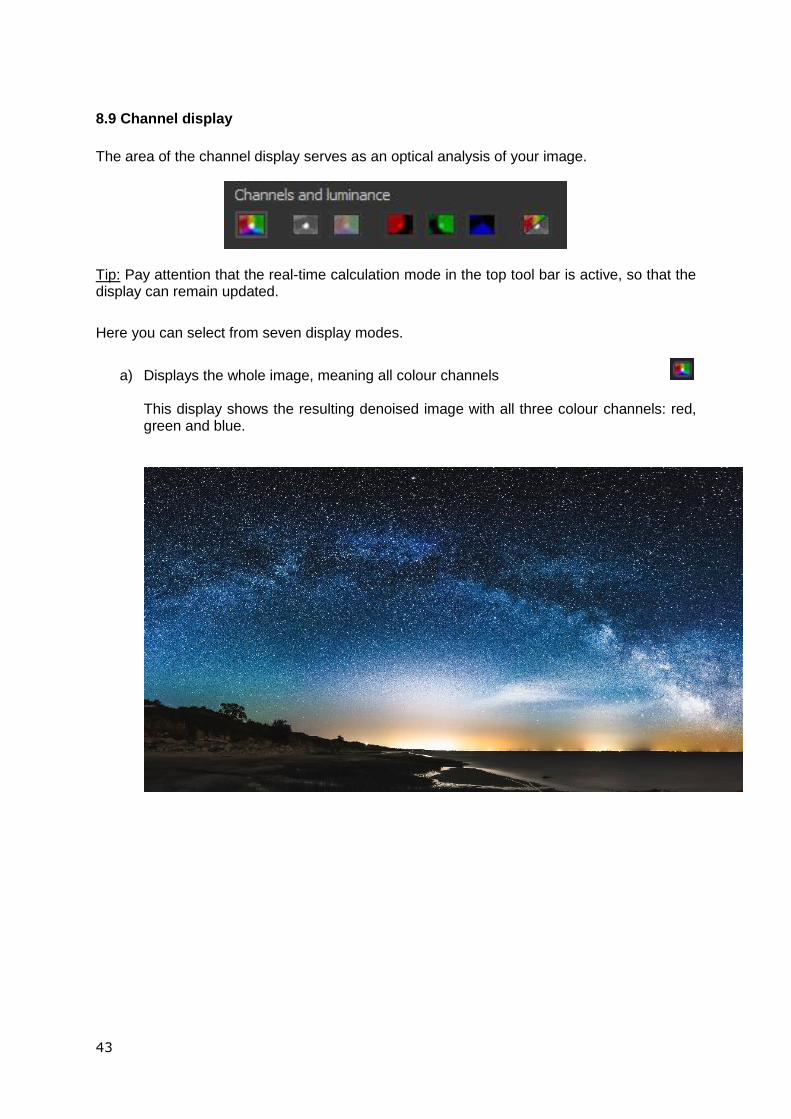
8.9 Channel display
The area of the channel display serves as an optical analysis of your image.
Tip: Pay attention that the real-time calculation mode in the top tool bar is active, so that the display can remain updated.
Here you can select from seven display modes.
a) Displays the whole image, meaning all colour channels This display shows the resulting denoised image with all three colour channels: red, green and blue.

44
b) Displays the brightness (luminance) The brightness of the image (depending on the selected denoising colour space)
c) Chrominance display (Displays the colour map)
In the chrominance display one can see very quickly, if there is colour noise in your motive or not. If the colours are “agitated” you should use the effect denoising–colour with a stronger intensity.
45
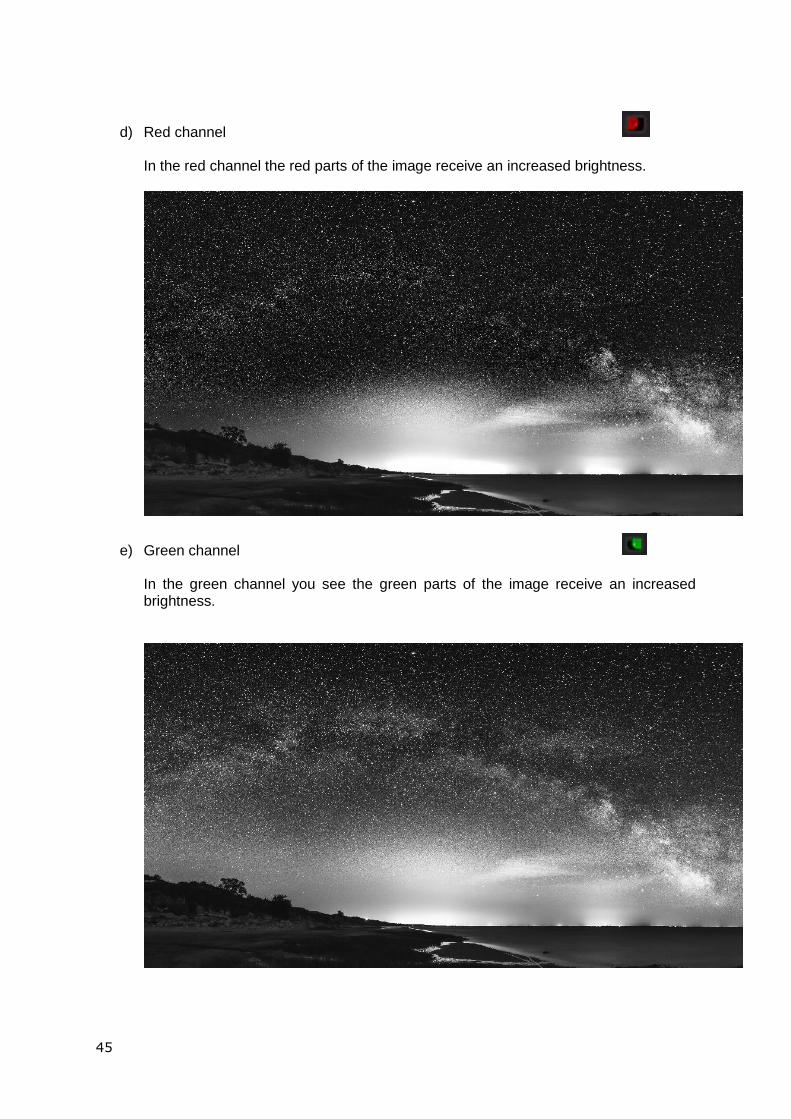
d) Red channel
In the red channel the red parts of the image receive an increased brightness.
e) Green channel In the green channel you see the green parts of the image receive an increased brightness.
46
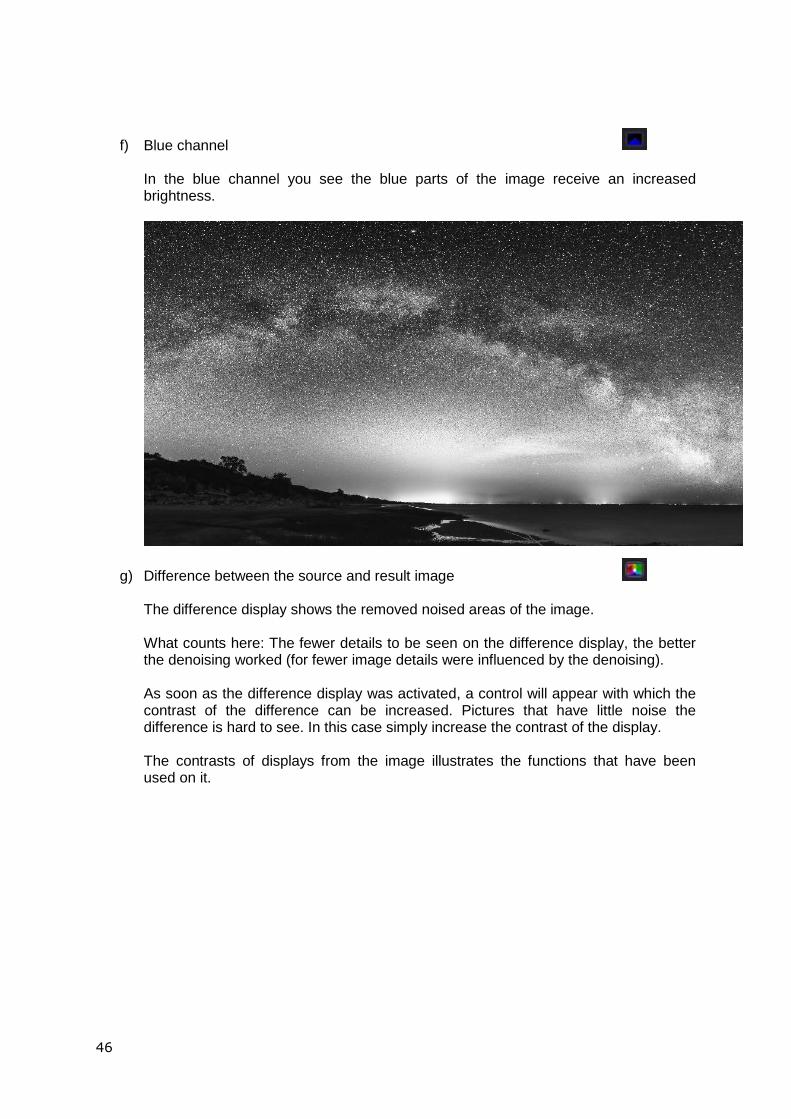
f) Blue channel In the blue channel you see the blue parts of the image receive an increased brightness.
g) Difference between the source and result image
The difference display shows the removed noised areas of the image. What counts here: The fewer details to be seen on the difference display, the better the denoising worked (for fewer image details were influenced by the denoising). As soon as the difference display was activated, a control will appear with which the contrast of the difference can be increased. Pictures that have little noise the difference is hard to see. In this case simply increase the contrast of the display. The contrasts of displays from the image illustrates the functions that have been used on it.
47
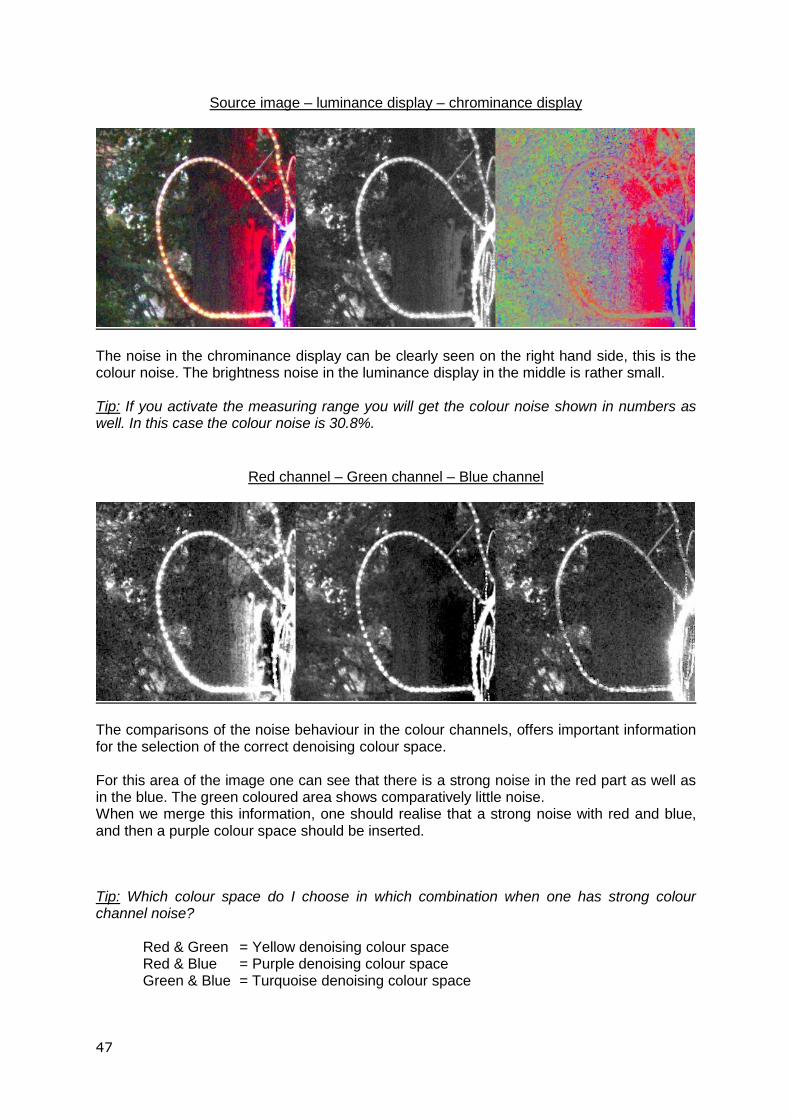
Source image – luminance display – chrominance display
The noise in the chrominance display can be clearly seen on the right hand side, this is the colour noise. The brightness noise in the luminance display in the middle is rather small. Tip: If you activate the measuring range you will get the colour noise shown in numbers as well. In this case the colour noise is 30.8%.
Red channel – Green channel – Blue channel
The comparisons of the noise behaviour in the colour channels, offers important information for the selection of the correct denoising colour space. For this area of the image one can see that there is a strong noise in the red part as well as in the blue. The green coloured area shows comparatively little noise. When we merge this information, one should realise that a strong noise with red and blue, and then a purple colour space should be inserted.
Tip: Which colour space do I choose in which combination when one has strong colour channel noise?
Red & Green = Yellow denoising colour space Red & Blue = Purple denoising colour space Green & Blue = Turquoise denoising colour space
48
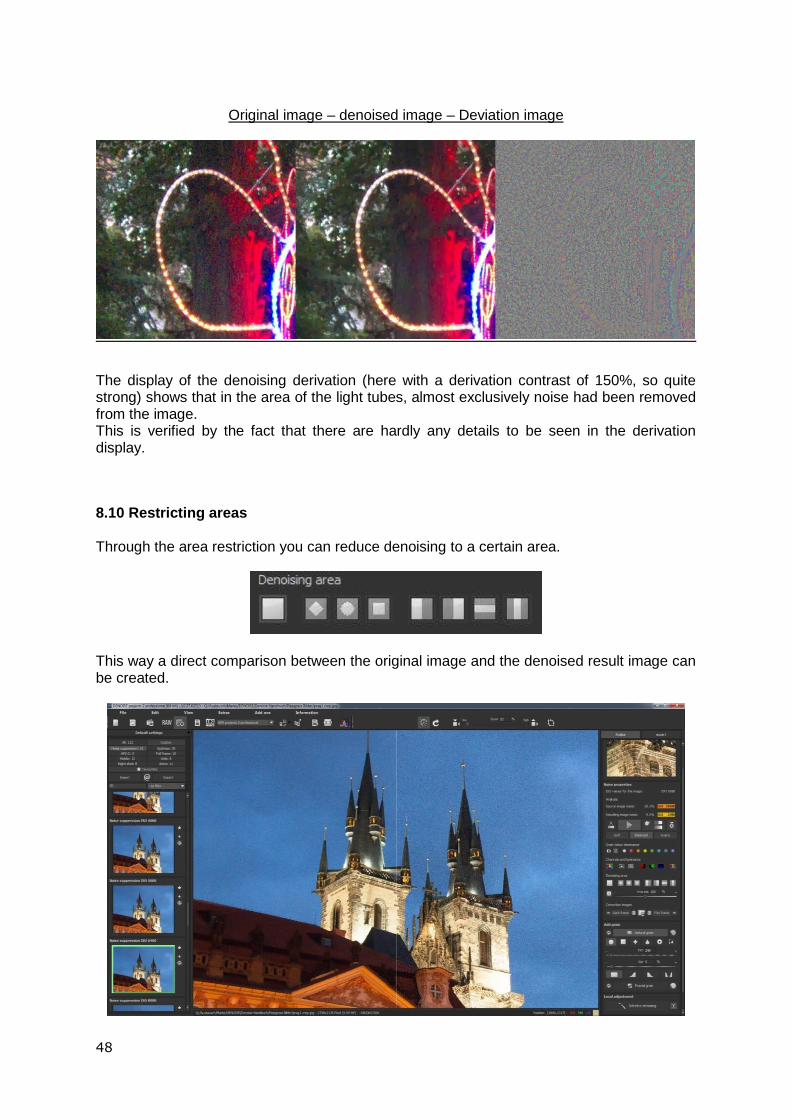
Original image – denoised image – Deviation image
The display of the denoising derivation (here with a derivation contrast of 150%, so quite strong) shows that in the area of the light tubes, almost exclusively noise had been removed from the image. This is verified by the fact that there are hardly any details to be seen in the derivation display.
8.10 Restricting areas Through the area restriction you can reduce denoising to a certain area.
This way a direct comparison between the original image and the denoised result image can be created.
49
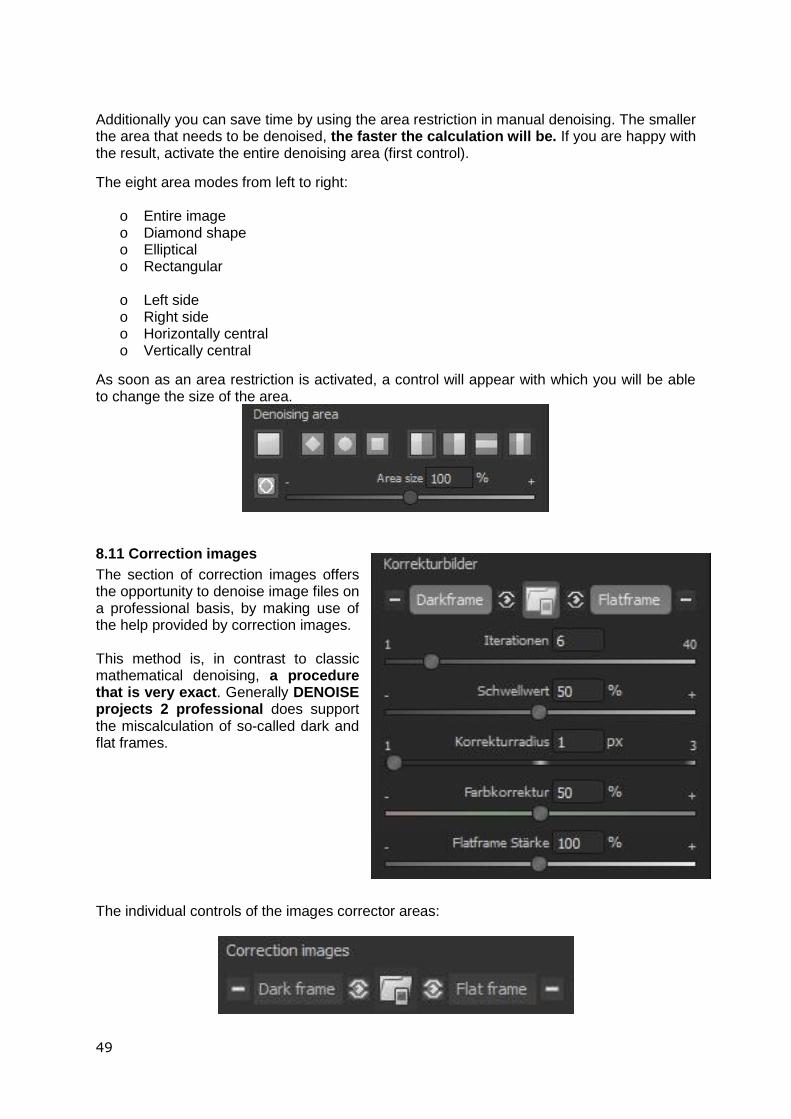
Additionally you can save time by using the area restriction in manual denoising. The smaller the area that needs to be denoised, the faster the calculation will be. If you are happy with the result, activate the entire denoising area (first control).
The eight area modes from left to right:
o Entire image o Diamond shape o Elliptical o Rectangular
o Left side o Right side o Horizontally central o Vertically central
As soon as an area restriction is activated, a control will appear with which you will be able to change the size of the area.
8.11 Correction images
The section of correction images offers the opportunity to denoise image files on a professional basis, by making use of the help provided by correction images. This method is, in contrast to classic mathematical denoising, a procedure that is very exact. Generally DENOISE projects 2 professional does support the miscalculation of so-called dark and flat frames. The individual controls of the images corrector areas:
50
One can divide the control areas into three sections. In the middle there is the “uploading of correction image” function. This control remains active until two corrector images have been uploaded. The software will automatically recognise if a flat or dark frame has been uploaded. On the left hand side are three controls for (from left to right):
o deleting the currently uploaded dark frame o activation/deactivation of the calibration with the dark frame o the display of the current dark frame
On the right hand side you will find the three same controls but in this case for the flat frames.
A dark frame – what is that? A dark frame (or dark image) is an image of sensor noise from a covered sensor. To take a dark frame, you need to use an impenetrable light objective lid. Alternatively, one can use a cover for the camera body. Following that you take an image of the dark noise. It is important that the same settings (exposure time and operating temperature) are used – ideally you take the normal exposed image directly after the dark frame image, so that the temperature of your camera doesn’t change too much.
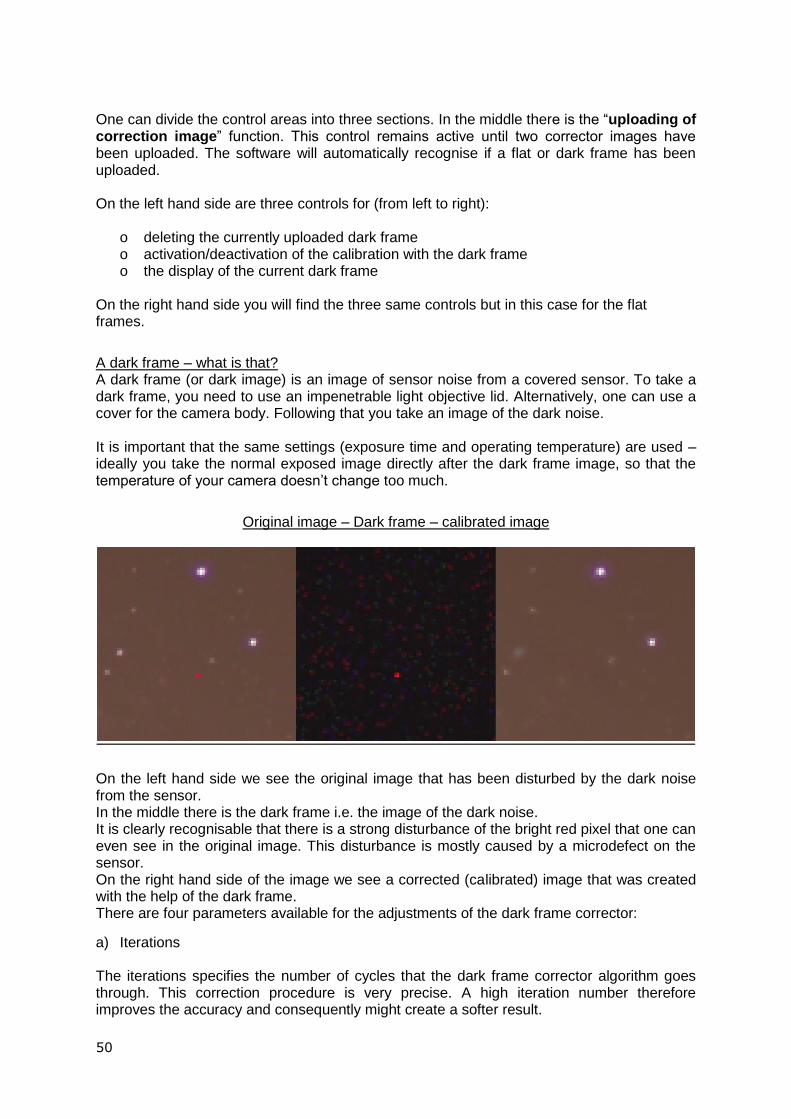
Original image – Dark frame – calibrated image
On the left hand side we see the original image that has been disturbed by the dark noise from the sensor. In the middle there is the dark frame i.e. the image of the dark noise. It is clearly recognisable that there is a strong disturbance of the bright red pixel that one can even see in the original image. This disturbance is mostly caused by a microdefect on the sensor. On the right hand side of the image we see a corrected (calibrated) image that was created with the help of the dark frame. There are four parameters available for the adjustments of the dark frame corrector:
a) Iterations The iterations specifies the number of cycles that the dark frame corrector algorithm goes through. This correction procedure is very precise. A high iteration number therefore improves the accuracy and consequently might create a softer result.
51
b) The threshold value
The threshold value determines the minimal brightness of a pixel in a dark frame, before the pixel can be corrected. c) Radius correction With the radius correction you will be able to determine, in which pixel environment the correction calculation will take place. A radius of 1 uses the environment of one pixel, so into total 3x3 pixel. The radius creates a corrector matrix of 7x7 pixel. d) Colour correction The colour correction has the capabilities to reduce the colour staining. Colour staining is a very soft and large colour noise. Tip: In practise there are a lot of dark frame images taken in astro-photography that are then eventually calculated together into a so-called master dark. This way 50 or more, dark frame images are calculated into a master dark. The rule of thumb is to take more dark frames in normal exposure, so that the noise in the master dark is smaller than that in master light. You can sort this out directly in DENOISE projects 2 professional with the function stacking image sequences.
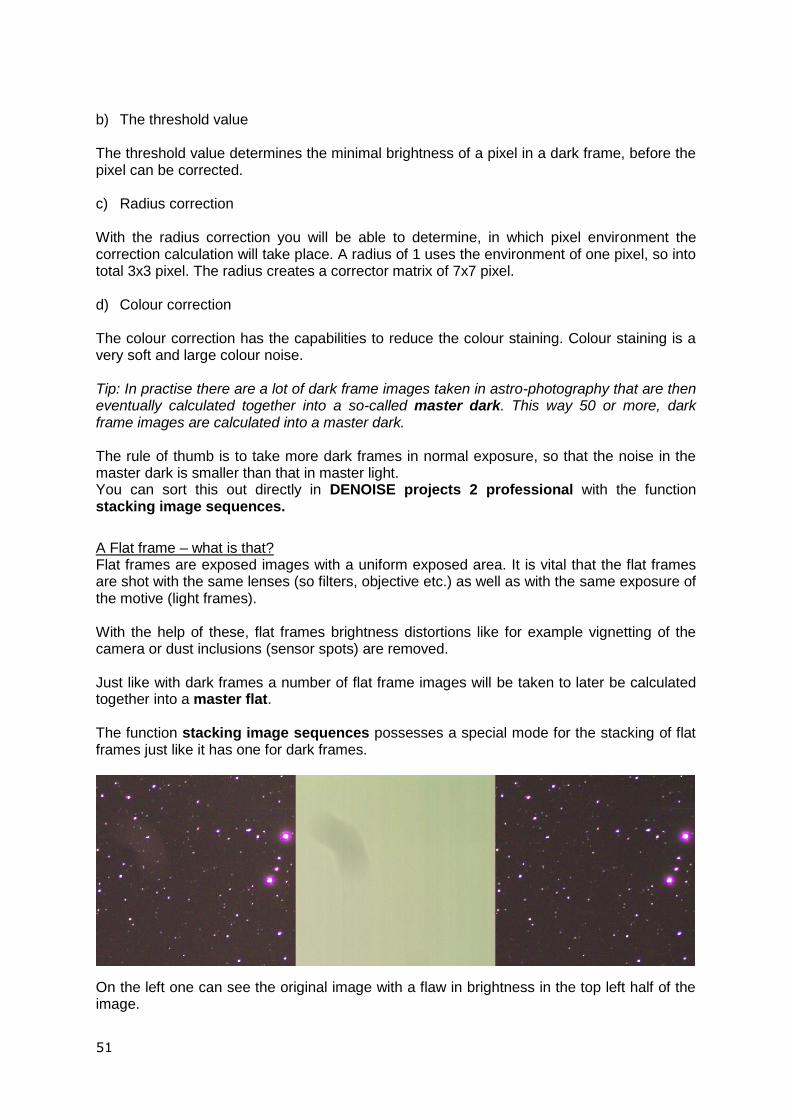
A Flat frame – what is that? Flat frames are exposed images with a uniform exposed area. It is vital that the flat frames are shot with the same lenses (so filters, objective etc.) as well as with the same exposure of the motive (light frames). With the help of these, flat frames brightness distortions like for example vignetting of the camera or dust inclusions (sensor spots) are removed. Just like with dark frames a number of flat frame images will be taken to later be calculated together into a master flat. The function stacking image sequences possesses a special mode for the stacking of flat frames just like it has one for dark frames.
On the left one can see the original image with a flaw in brightness in the top left half of the image.
52
The image in the middle is the shot flat frame (master flat). Here one can clearly see the flaw as a shadowing of the brightness. On the right side one can see the calibrated result image of the flat frame. The flaw was entirely removed here. This is the parameter for the setting of the flat frame correction:
Flat frame intensity
With the flat frame intensity one can adjust the intensity of the flat frame corrector, if there is the case of course that it turned out to be too weak. Tip: Also the flat frames need to be calculated together with the dark frames. DENOISE projects 2 professional does this for you automatically.
53
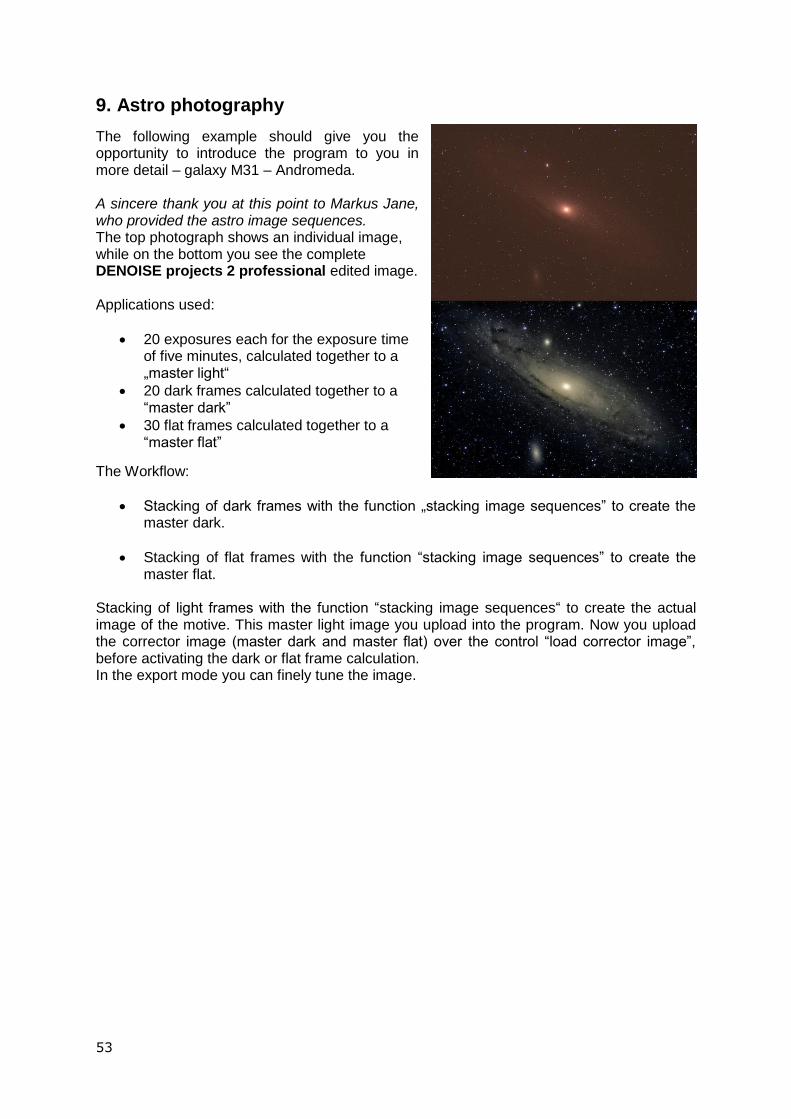
9. Astro photography
The following example should give you the opportunity to introduce the program to you in more detail – galaxy M31 – Andromeda. A sincere thank you at this point to Markus Jane, who provided the astro image sequences. The top photograph shows an individual image, while on the bottom you see the complete DENOISE projects 2 professional edited image. Applications used:
20 exposures each for the exposure time of five minutes, calculated together to a „master light“
20 dark frames calculated together to a “master dark”
30 flat frames calculated together to a “master flat”
The Workflow:
Stacking of dark frames with the function „stacking image sequences” to create the master dark.
Stacking of flat frames with the function “stacking image sequences” to create the master flat.
Stacking of light frames with the function “stacking image sequences“ to create the actual image of the motive. This master light image you upload into the program. Now you upload the corrector image (master dark and master flat) over the control “load corrector image”, before activating the dark or flat frame calculation. In the export mode you can finely tune the image.
54
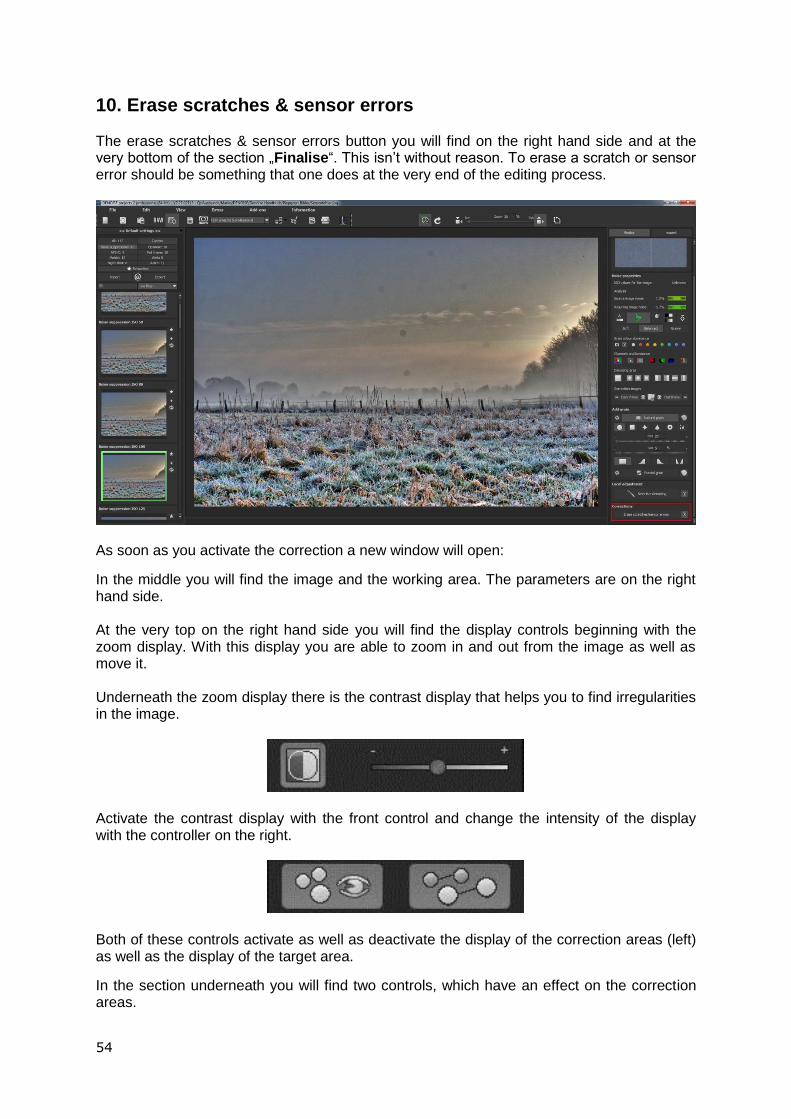
10. Erase scratches & sensor errors The erase scratches & sensor errors button you will find on the right hand side and at the very bottom of the section „Finalise“. This isn’t without reason. To erase a scratch or sensor error should be something that one does at the very end of the editing process.
As soon as you activate the correction a new window will open:
In the middle you will find the image and the working area. The parameters are on the right hand side. At the very top on the right hand side you will find the display controls beginning with the zoom display. With this display you are able to zoom in and out from the image as well as move it. Underneath the zoom display there is the contrast display that helps you to find irregularities in the image.
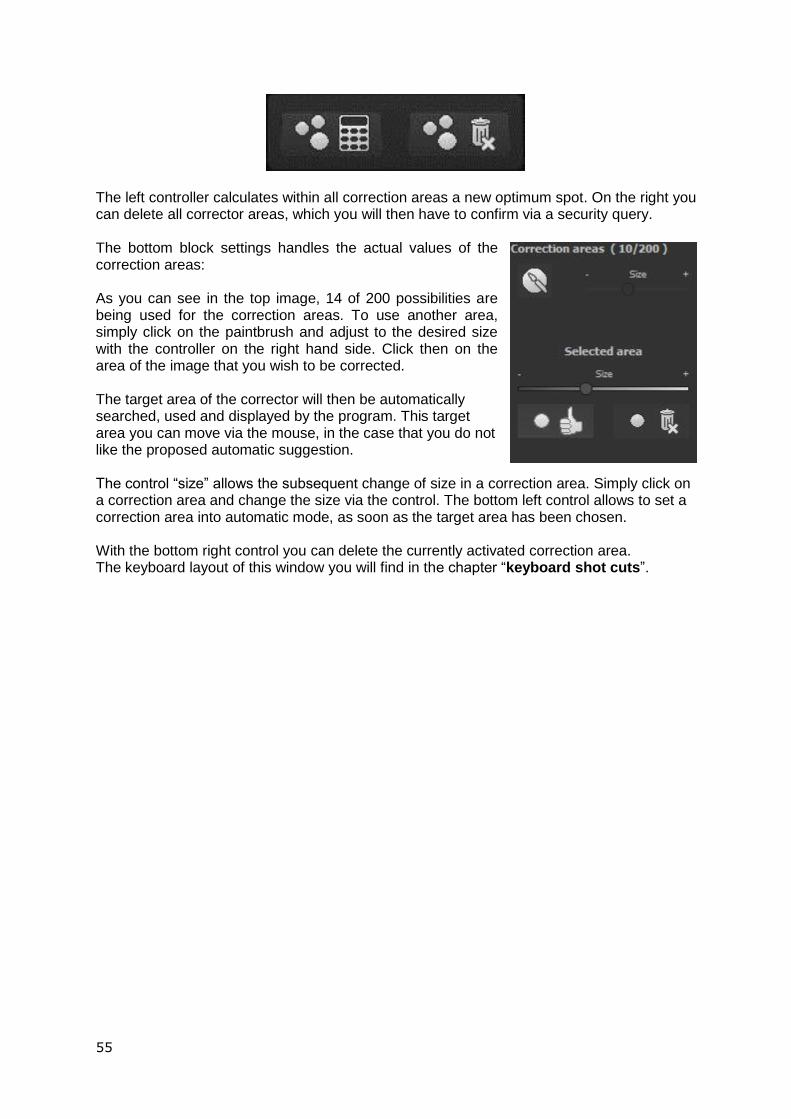
Activate the contrast display with the front control and change the intensity of the display with the controller on the right.
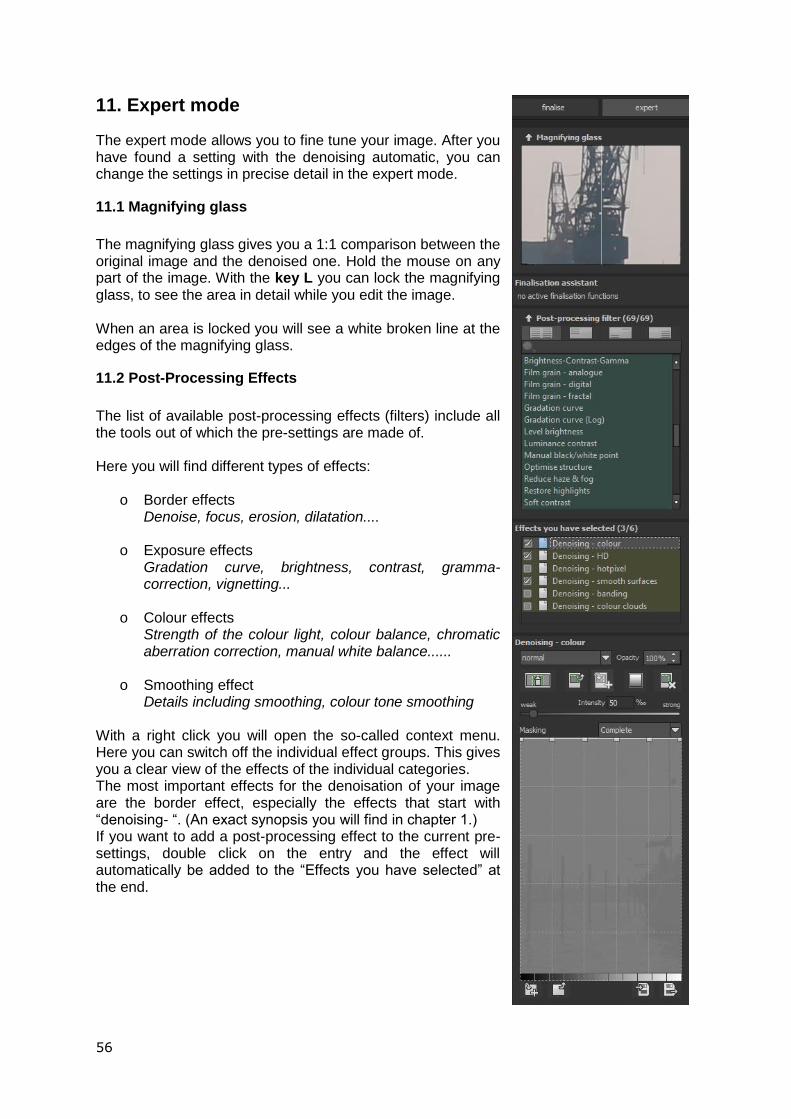
Both of these controls activate as well as deactivate the display of the correction areas (left) as well as the display of the target area.
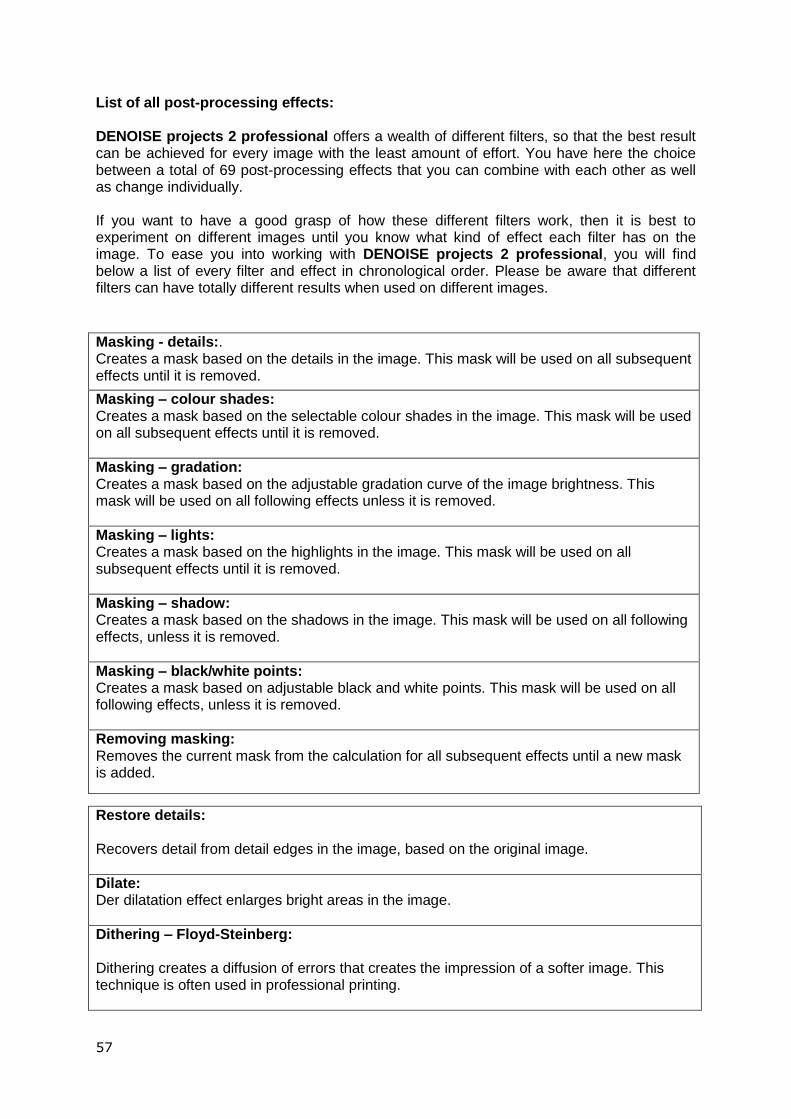
In the section underneath you will find two controls, which have an effect on the correction areas.
55
The left controller calculates within all correction areas a new optimum spot. On the right you can delete all corrector areas, which you will then have to confirm via a security query. The bottom block settings handles the actual values of the correction areas: As you can see in the top image, 14 of 200 possibilities are being used for the correction areas. To use another area, simply click on the paintbrush and adjust to the desired size with the controller on the right hand side. Click then on the area of the image that you wish to be corrected. The target area of the corrector will then be automatically searched, used and displayed by the program. This target area you can move via the mouse, in the case that you do not like the proposed automatic suggestion. The control “size” allows the subsequent change of size in a correction area. Simply click on a correction area and change the size via the control. The bottom left control allows to set a correction area into automatic mode, as soon as the target area has been chosen. With the bottom right control you can delete the currently activated correction area. The keyboard layout of this window you will find in the chapter “keyboard shot cuts”.
56
11. Expert mode
The expert mode allows you to fine tune your image. After you have found a setting with the denoising automatic, you can change the settings in precise detail in the expert mode.
11.1 Magnifying glass
The magnifying glass gives you a 1:1 comparison between the original image and the denoised one. Hold the mouse on any part of the image. With the key L you can lock the magnifying glass, to see the area in detail while you edit the image. When an area is locked you will see a white broken line at the edges of the magnifying glass.
11.2 Post-Processing Effects
The list of available post-processing effects (filters) include all the tools out of which the pre-settings are made of. Here you will find different types of effects:
o Border effects Denoise, focus, erosion, dilatation....
o Exposure effects Gradation curve, brightness, contrast, gramma-correction, vignetting...
o Colour effects
Strength of the colour light, colour balance, chromatic aberration correction, manual white balance......
o Smoothing effect Details including smoothing, colour tone smoothing
With a right click you will open the so-called context menu. Here you can switch off the individual effect groups. This gives you a clear view of the effects of the individual categories. The most important effects for the denoisation of your image are the border effect, especially the effects that start with “denoising- “. (An exact synopsis you will find in chapter 1.) If you want to add a post-processing effect to the current pre-settings, double click on the entry and the effect will automatically be added to the “Effects you have selected” at the end.
57
List of all post-processing effects: DENOISE projects 2 professional offers a wealth of different filters, so that the best result can be achieved for every image with the least amount of effort. You have here the choice between a total of 69 post-processing effects that you can combine with each other as well as change individually. If you want to have a good grasp of how these different filters work, then it is best to experiment on different images until you know what kind of effect each filter has on the image. To ease you into working with DENOISE projects 2 professional, you will find below a list of every filter and effect in chronological order. Please be aware that different filters can have totally different results when used on different images.
Masking - details:. Creates a mask based on the details in the image. This mask will be used on all subsequent effects until it is removed.
Masking – colour shades: Creates a mask based on the selectable colour shades in the image. This mask will be used on all subsequent effects until it is removed.
Masking – gradation: Creates a mask based on the adjustable gradation curve of the image brightness. This mask will be used on all following effects unless it is removed.
Masking – lights: Creates a mask based on the highlights in the image. This mask will be used on all subsequent effects until it is removed.
Masking – shadow: Creates a mask based on the shadows in the image. This mask will be used on all following effects, unless it is removed.
Masking – black/white points: Creates a mask based on adjustable black and white points. This mask will be used on all following effects, unless it is removed.
Removing masking: Removes the current mask from the calculation for all subsequent effects until a new mask is added.
Restore details: Recovers detail from detail edges in the image, based on the original image.
Dilate: Der dilatation effect enlarges bright areas in the image.
Dithering – Floyd-Steinberg: Dithering creates a diffusion of errors that creates the impression of a softer image. This technique is often used in professional printing.

58
Denoising – Banding: Banding denoising deletes vertical and horizontal streaks that might be caused by the camera sensor. Detail losses that might occur will be stronger the higher the intensity of this effect is.
Denoising – Colour: Deletes colour noise within the image depending on the selected strength.
Denoising – colour clouds: This effect deletes the colour clouds that come from colour noise.
Denoising – smooth surfaces: Smooths surfaces in your image and creates a homogenous image effect.
Denoising– smoothing: The Denoising – smoothing method is a special method of soft drawing used for smoothing certain areas of the image. This leads to a preservation of the contours, and the details, within the image.
Denoising – HD: Luminance noise suppression (HD) is a precise but calculation-heavy effect that reduces luminance noise or eliminates it completely.
Denoising– HD iterative: Brightness denoising (HD iterative) is a multiple used method for image denoising.
Denoising – HD ultra: Brightness denoising (HD ultra) is a very calculation-heavy but also very precise effect that lets you reduce, and sometimes delete completely any image noise based on brightness.
Denoising – hotpixel: Hotpixel noise suppression is suited to shots with a small number of strong pixels which are disturbing the overall photo; it denoises these pixels very heavily. Tip: Apply it several times to remove disturbances across multipixel areas.
59
Denoising – fill gaps: This effect fills gaps in the image. The pixel data for these gaps is created based on the areas surrounding the gaps. Please note: Do not use this effect if the gaps appeared after denoising an image. You should also always use the Denoising HD effect before trying to fill gaps with this effect.
Optimise denoising: Optimise denoising with the help of a detail mask, which is created right from the picture.
Erode:. The erode effect enlarges the dark areas within the image.
Smooth sky: The sky smoothing function allows you to reduce noise in one single shade of colour.
Optimising sharpness: Optimise image sharpness with the help of a detail mask, which is created right from the picture.
Sharpen– HD: Image sharpness (HD) is a precise but calculation-heavy effect that maximises the sharpness of an image.
Sharpen – HD contours: This method of sharpness puts an emphasis on the details (contours) within the image and sharpens them.
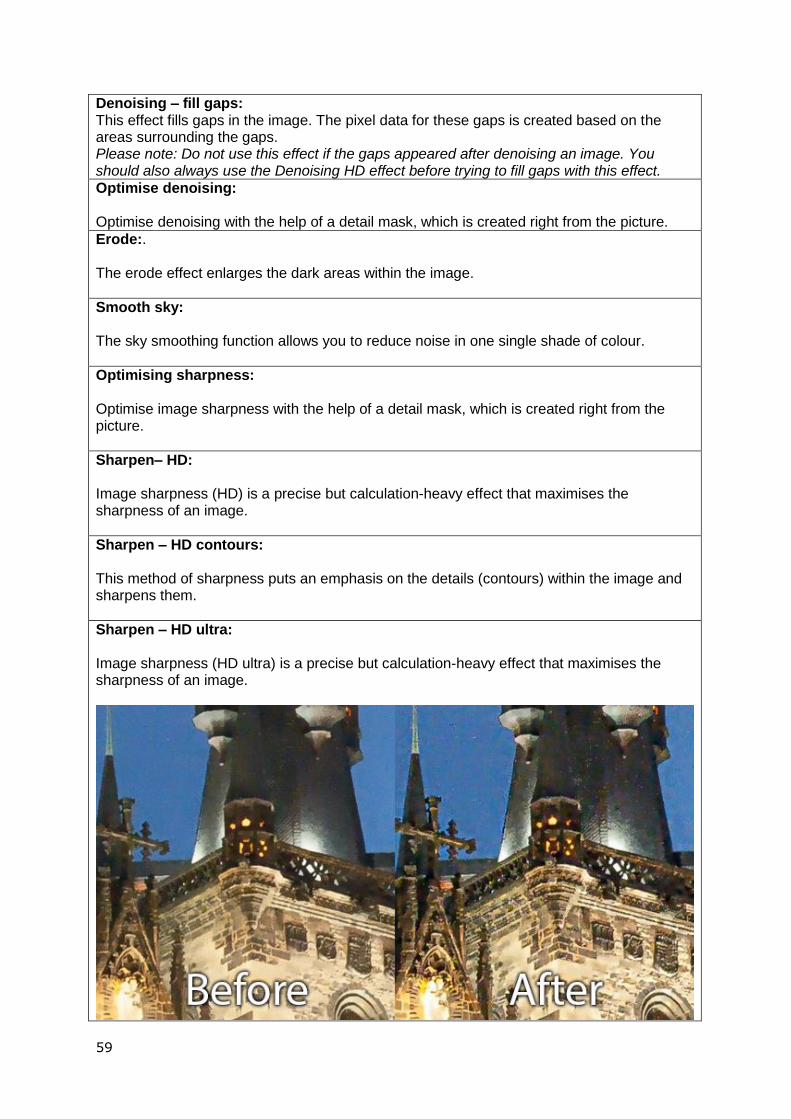
Sharpen – HD ultra: Image sharpness (HD ultra) is a precise but calculation-heavy effect that maximises the sharpness of an image.
60
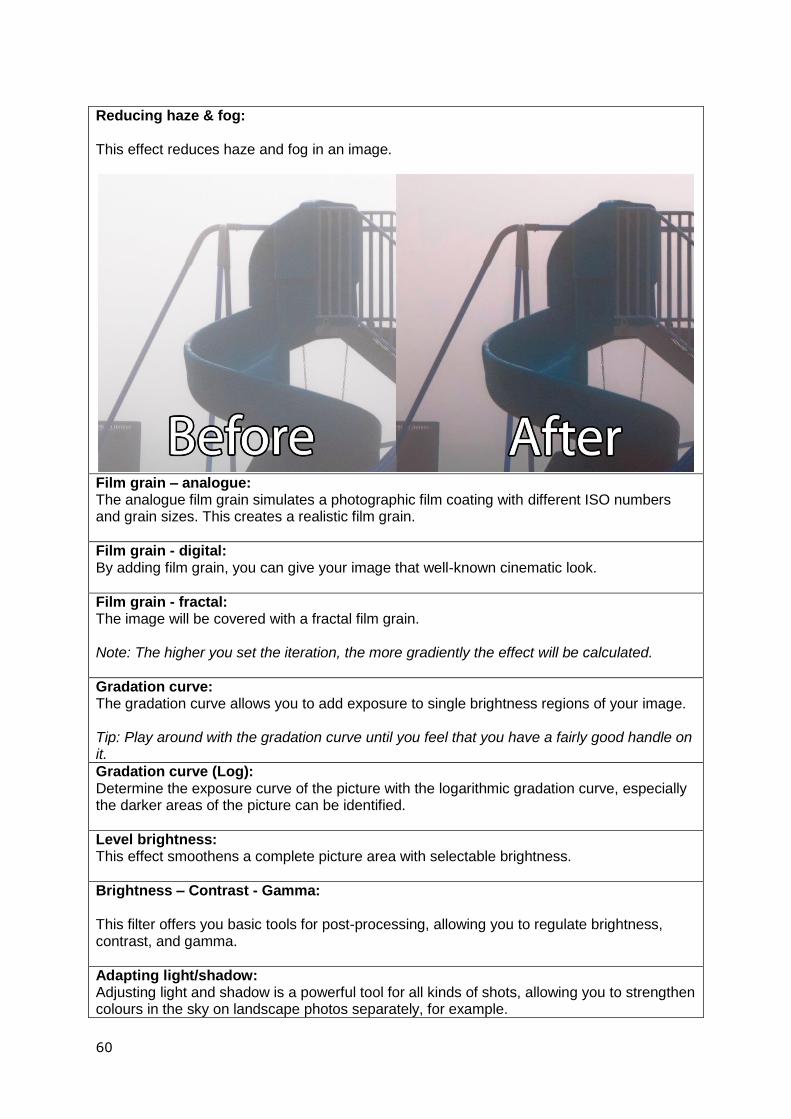
Reducing haze & fog: This effect reduces haze and fog in an image.
Film grain – analogue: The analogue film grain simulates a photographic film coating with different ISO numbers and grain sizes. This creates a realistic film grain.
Film grain - digital: By adding film grain, you can give your image that well-known cinematic look.
Film grain - fractal: The image will be covered with a fractal film grain. Note: The higher you set the iteration, the more gradiently the effect will be calculated.
Gradation curve: The gradation curve allows you to add exposure to single brightness regions of your image. Tip: Play around with the gradation curve until you feel that you have a fairly good handle on it.
Gradation curve (Log): Determine the exposure curve of the picture with the logarithmic gradation curve, especially the darker areas of the picture can be identified.
Level brightness: This effect smoothens a complete picture area with selectable brightness.
Brightness – Contrast - Gamma: This filter offers you basic tools for post-processing, allowing you to regulate brightness, contrast, and gamma.
Adapting light/shadow: Adjusting light and shadow is a powerful tool for all kinds of shots, allowing you to strengthen colours in the sky on landscape photos separately, for example.
61
Balance local contrast: The local contrast balance increases or reduces the local contrasts within the image. Increase local contrast to increase depth in your image, for example.
Luminance contrast: This effect sharpens contrasts within the picture by using a luminance mask.
Manual black/white point: By manually defining black and white points, you can manipulate the brightest and darkest point of your picture in post-processing.
Restore highlights: This effect brings out more the details in the highlights.
Optimise structure: Optimising the effect structure intensifies the structure in the picture, without increasing potential existing image noise. If the structure is toned down, the picture details will be kept.
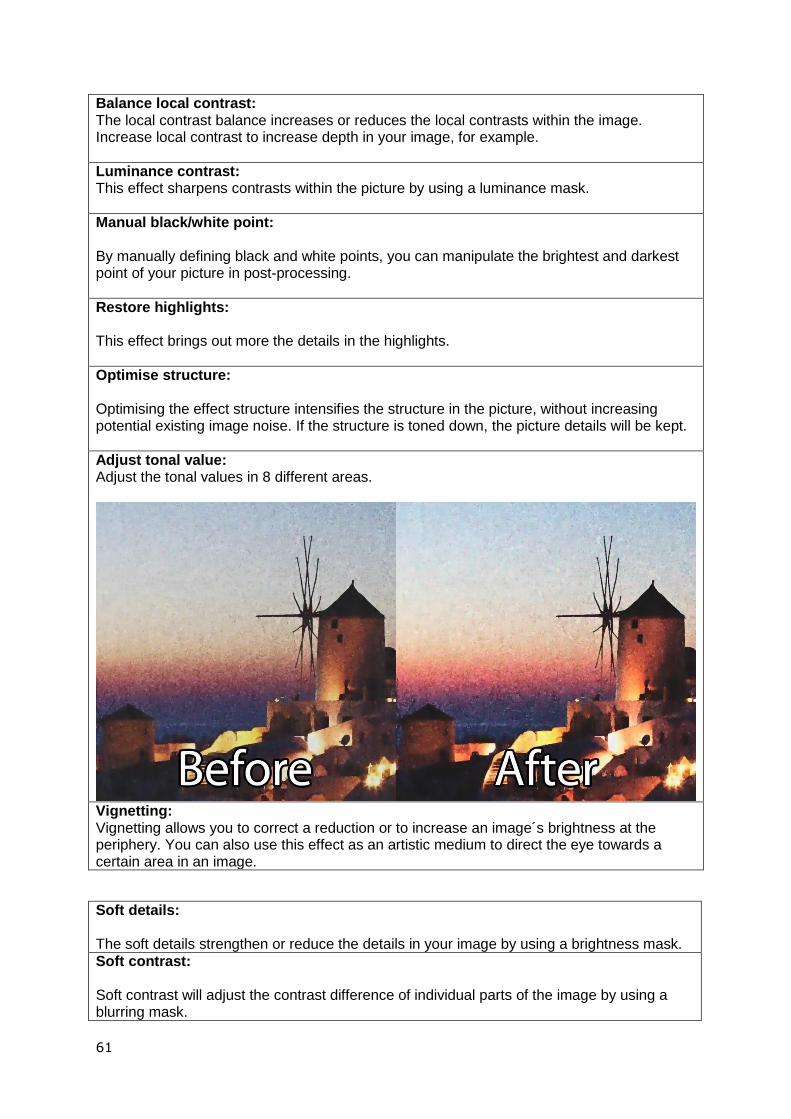
Adjust tonal value: Adjust the tonal values in 8 different areas.
Vignetting: Vignetting allows you to correct a reduction or to increase an image´s brightness at the periphery. You can also use this effect as an artistic medium to direct the eye towards a certain area in an image.
Soft details: The soft details strengthen or reduce the details in your image by using a brightness mask.
Soft contrast: Soft contrast will adjust the contrast difference of individual parts of the image by using a blurring mask.
62
Reducing chromatic aberrations: Reducing chromatic aberrations (errors caused by optical lenses) removes the colour seams between bright and dark areas occurring due to light shining towards the lens (colour source errors).
Chromatic correction (CA): Chromatic correction enables the correction of diffraction, separately for each other channel.
Balance chrominance: Balancing the chrominance reduces the colour spots that might be created by colour noise. The colours will be changed in such a way to generate a neutral image effect.
Colour balance: Use the colour balance to produce a targeted colour tone correction in your image by selecting red, green or blue and weighting it against its counterpart.
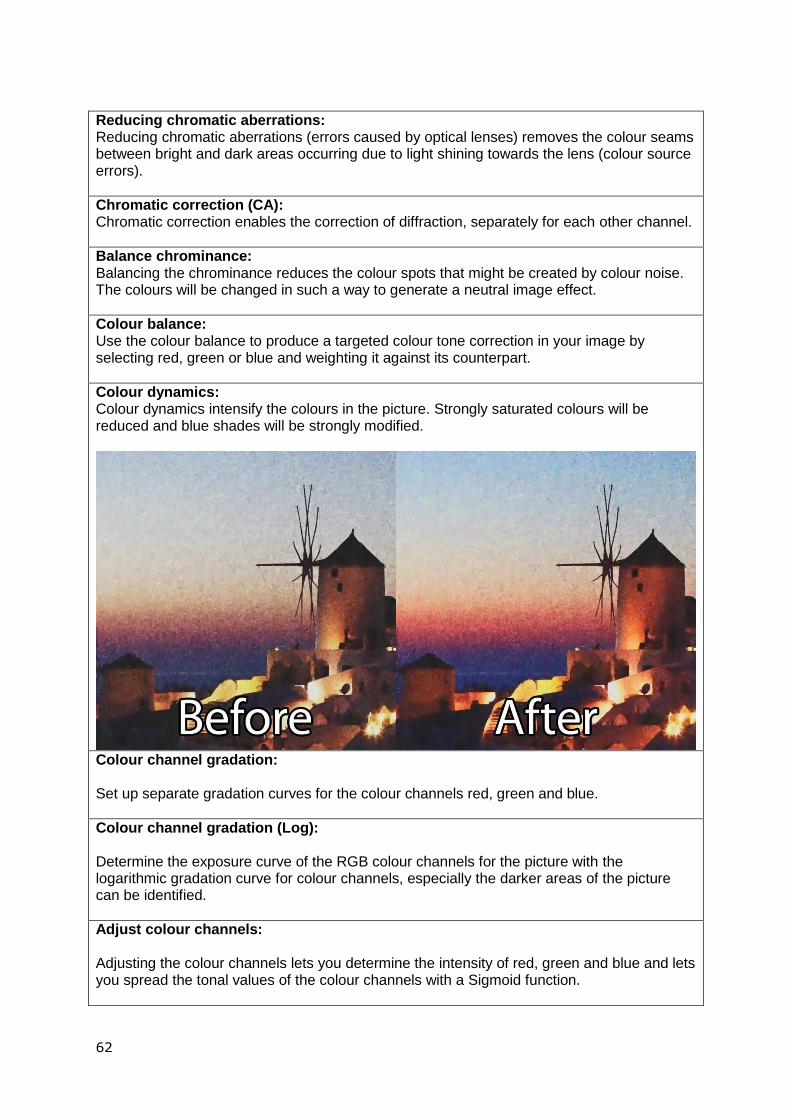
Colour dynamics: Colour dynamics intensify the colours in the picture. Strongly saturated colours will be reduced and blue shades will be strongly modified.
Colour channel gradation: Set up separate gradation curves for the colour channels red, green and blue.
Colour channel gradation (Log): Determine the exposure curve of the RGB colour channels for the picture with the logarithmic gradation curve for colour channels, especially the darker areas of the picture can be identified.
Adjust colour channels: Adjusting the colour channels lets you determine the intensity of red, green and blue and lets you spread the tonal values of the colour channels with a Sigmoid function.
63
Mix colour channels: This effect mixes the RGB channels depending on your settings. You can for example exchange the red for the blue channel.
Colour intensity: Colour intensity is a filter which mixes colour temperature and saturation. The intensity of the pixel colour is strengthened to match the nearest pure colour or weakened to differ from it.
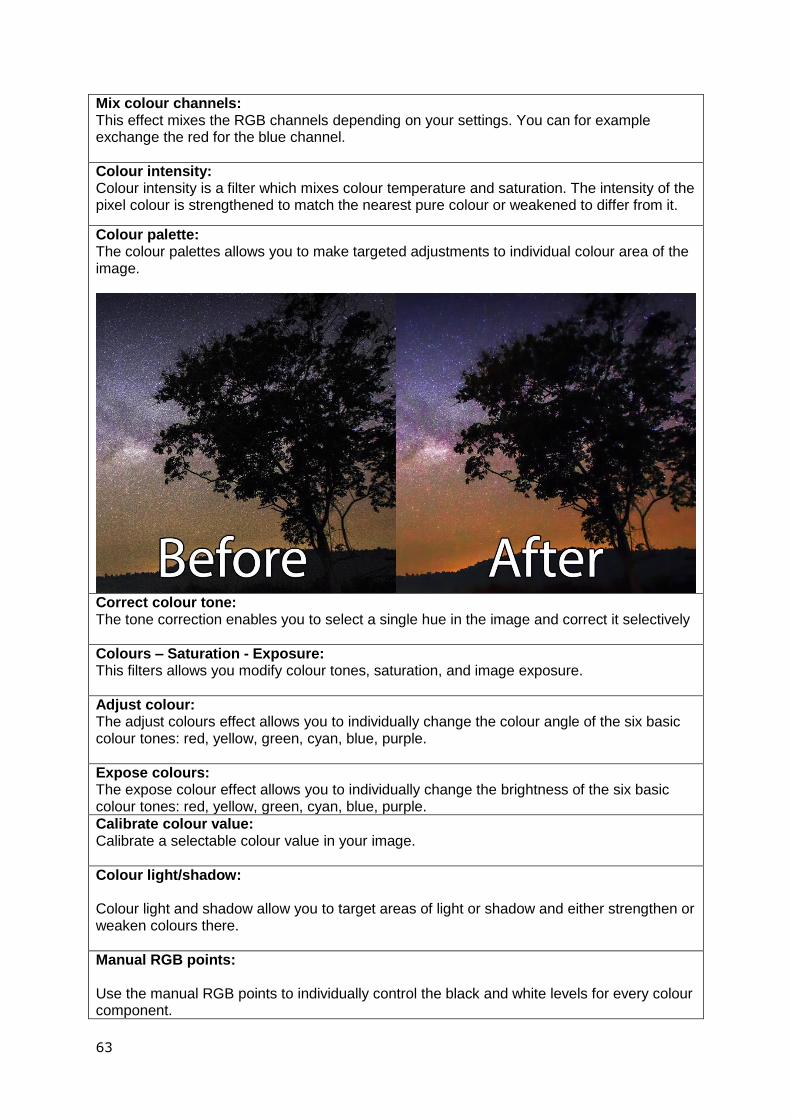
Colour palette: The colour palettes allows you to make targeted adjustments to individual colour area of the image.
Correct colour tone: The tone correction enables you to select a single hue in the image and correct it selectively
Colours – Saturation - Exposure: This filters allows you modify colour tones, saturation, and image exposure.
Adjust colour: The adjust colours effect allows you to individually change the colour angle of the six basic colour tones: red, yellow, green, cyan, blue, purple.
Expose colours: The expose colour effect allows you to individually change the brightness of the six basic colour tones: red, yellow, green, cyan, blue, purple.
Calibrate colour value: Calibrate a selectable colour value in your image.
Colour light/shadow: Colour light and shadow allow you to target areas of light or shadow and either strengthen or weaken colours there.
Manual RGB points: Use the manual RGB points to individually control the black and white levels for every colour component.
64
Manual white balance: Manual white balance is used to calculate a white balance with a single colour.
RGB Transformation: Transform your image individually for each colour channel.
RGB transformation (automatical): Transforms your picture automatically with an iterative process onto optimal basic settings for the black points and for the Gamma values of the RGB channels.
Soft focus – keep detail: Soft focus keeping details is a strong blurring filter which nevertheless retains existing detail in the image.
Smooth colour tone: The colour tone smoother allows you to put only one shade of colour in the image into softer focus, meaning that you can select the skin colour of a portrait, for example, and alter the focus here without affecting the rest of the picture.
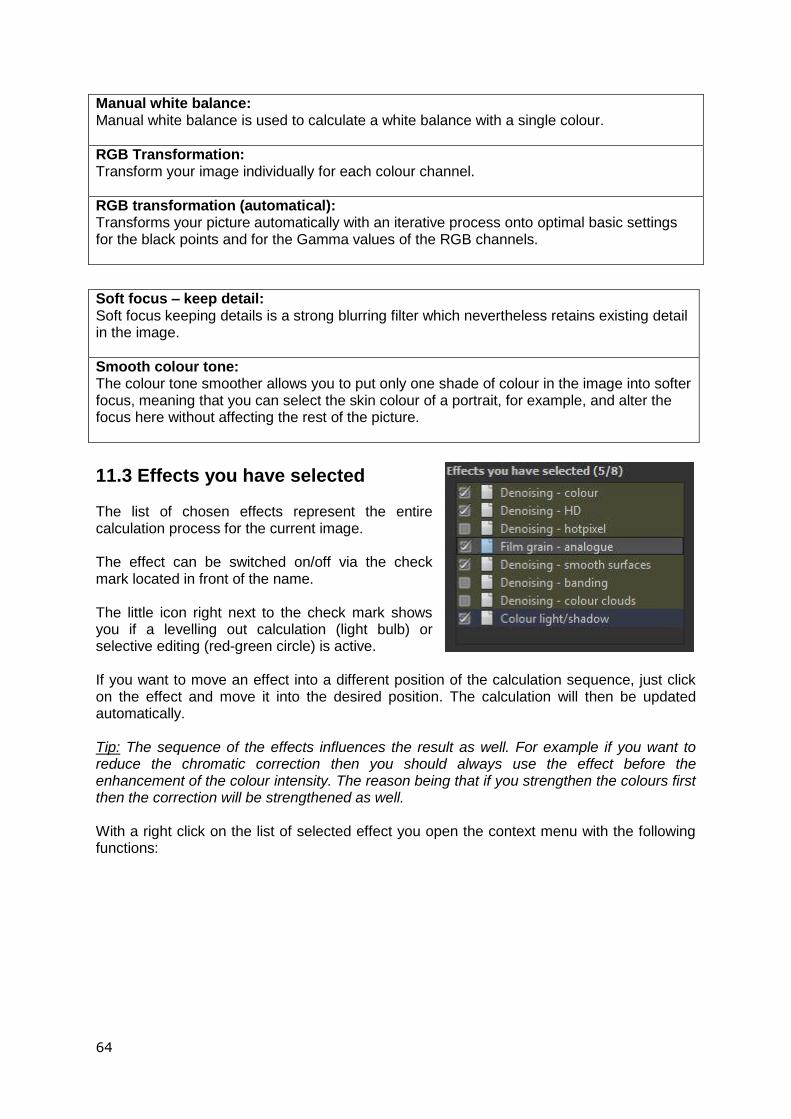
11.3 Effects you have selected The list of chosen effects represent the entire calculation process for the current image. The effect can be switched on/off via the check mark located in front of the name. The little icon right next to the check mark shows you if a levelling out calculation (light bulb) or selective editing (red-green circle) is active. If you want to move an effect into a different position of the calculation sequence, just click on the effect and move it into the desired position. The calculation will then be updated automatically. Tip: The sequence of the effects influences the result as well. For example if you want to reduce the chromatic correction then you should always use the effect before the enhancement of the colour intensity. The reason being that if you strengthen the colours first then the correction will be strengthened as well. With a right click on the list of selected effect you open the context menu with the following functions:

65
o Deactivating effect
o Activate all effects o Activate all other effects o Activate this effect only(deactivate all others) o Deactivate all effects
o Duplicating effect (attach underneath) o Restore effect
o Send to beginning of list o Send to end of list o Delete effect o Remove all effects
As soon as you have selected an effect, available parameters will appear for the effect directly underneath.
11.4 Setting the parameters for the desired effect – calculation method
Directly at the top of the parameter area for the selected effect (here – denoising colour) you will find the levelling calculation method.
In the first list you can select the calculation method for the levelling effect. There are numerous variants on offer from brightening and darken until after brightening and colour dodging.
66
Tip: Try out this method. When you restore the calculation method back to normal, you deactivate the levelling calculation. On the right side you will also be to change the setting for the opacity of the current effect level. If an effect is too strong, reduce the opacity a little until you are happy with the result.
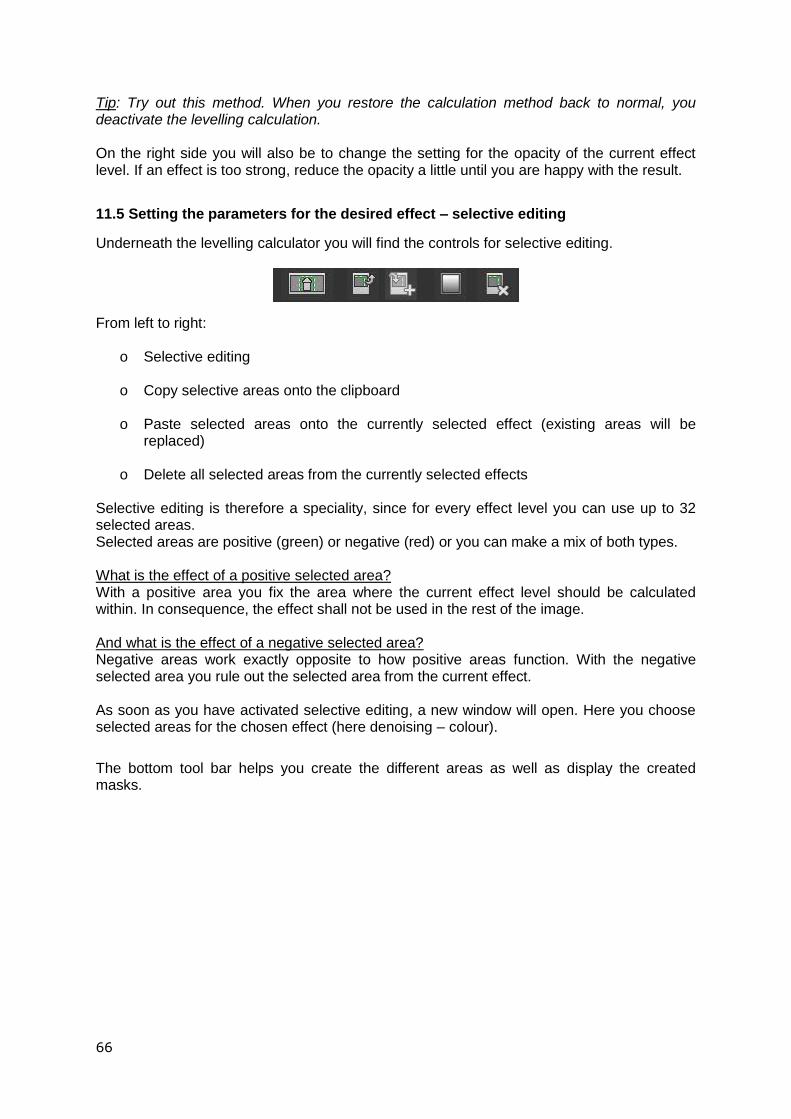
11.5 Setting the parameters for the desired effect – selective editing
Underneath the levelling calculator you will find the controls for selective editing.
From left to right:
o Selective editing
o Copy selective areas onto the clipboard
o Paste selected areas onto the currently selected effect (existing areas will be replaced)
o Delete all selected areas from the currently selected effects Selective editing is therefore a speciality, since for every effect level you can use up to 32 selected areas. Selected areas are positive (green) or negative (red) or you can make a mix of both types. What is the effect of a positive selected area? With a positive area you fix the area where the current effect level should be calculated within. In consequence, the effect shall not be used in the rest of the image. And what is the effect of a negative selected area? Negative areas work exactly opposite to how positive areas function. With the negative selected area you rule out the selected area from the current effect. As soon as you have activated selective editing, a new window will open. Here you choose selected areas for the chosen effect (here denoising – colour).
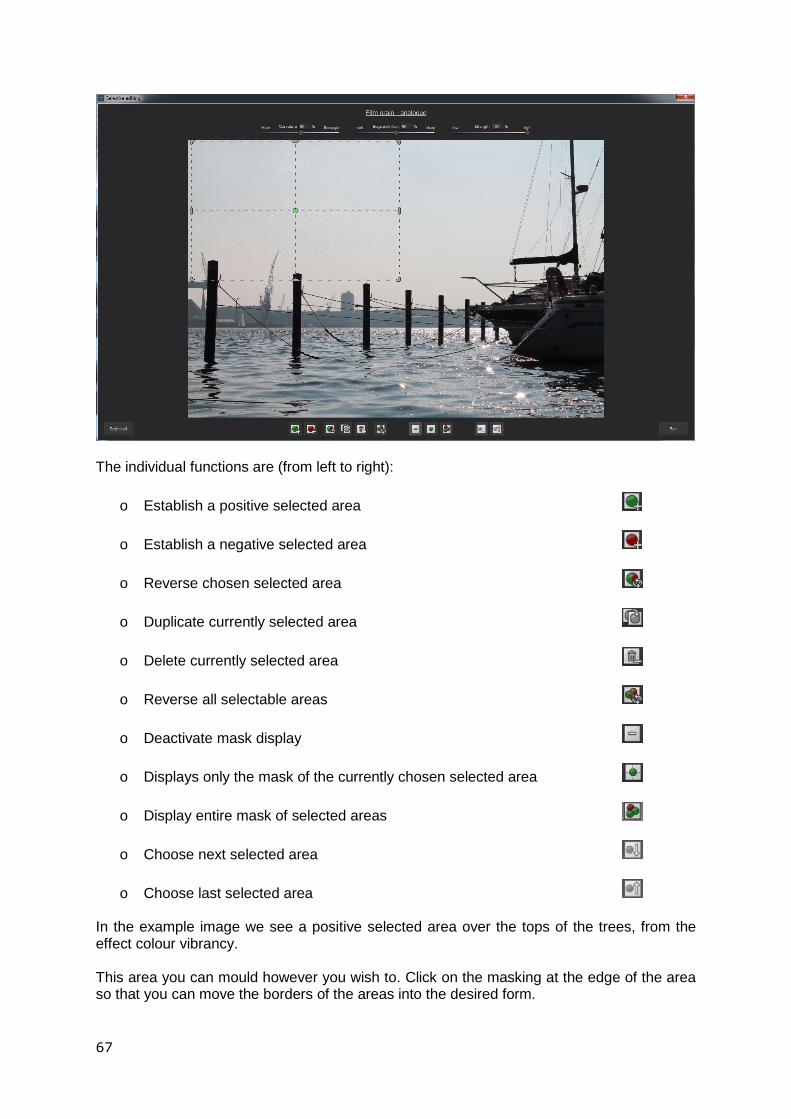
The bottom tool bar helps you create the different areas as well as display the created masks.
67
The individual functions are (from left to right):
o Establish a positive selected area
o Establish a negative selected area
o Reverse chosen selected area
o Duplicate currently selected area
o Delete currently selected area
o Reverse all selectable areas
o Deactivate mask display
o Displays only the mask of the currently chosen selected area
o Display entire mask of selected areas
o Choose next selected area
o Choose last selected area
In the example image we see a positive selected area over the tops of the trees, from the effect colour vibrancy. This area you can mould however you wish to. Click on the masking at the edge of the area so that you can move the borders of the areas into the desired form.
68
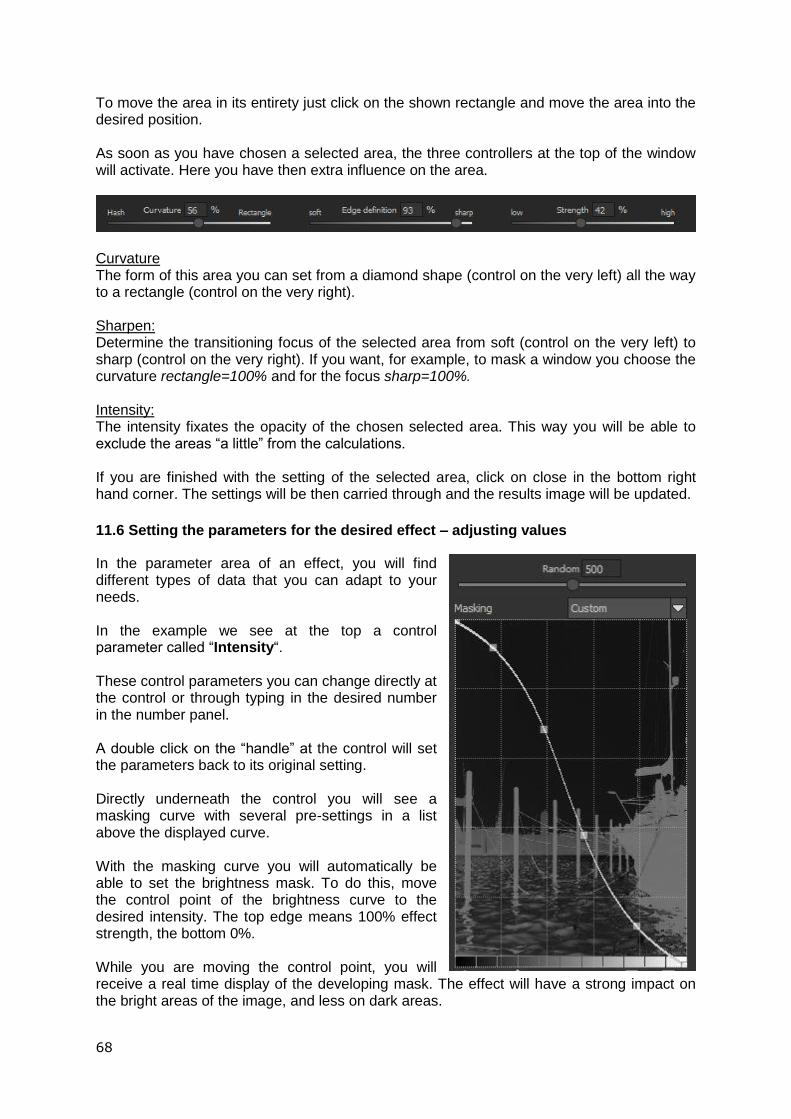
To move the area in its entirety just click on the shown rectangle and move the area into the desired position. As soon as you have chosen a selected area, the three controllers at the top of the window will activate. Here you have then extra influence on the area.
Curvature The form of this area you can set from a diamond shape (control on the very left) all the way to a rectangle (control on the very right). Sharpen: Determine the transitioning focus of the selected area from soft (control on the very left) to sharp (control on the very right). If you want, for example, to mask a window you choose the curvature rectangle=100% and for the focus sharp=100%. Intensity: The intensity fixates the opacity of the chosen selected area. This way you will be able to exclude the areas “a little” from the calculations. If you are finished with the setting of the selected area, click on close in the bottom right hand corner. The settings will be then carried through and the results image will be updated.
11.6 Setting the parameters for the desired effect – adjusting values
In the parameter area of an effect, you will find different types of data that you can adapt to your needs. In the example we see at the top a control parameter called “Intensity“. These control parameters you can change directly at the control or through typing in the desired number in the number panel. A double click on the “handle” at the control will set the parameters back to its original setting. Directly underneath the control you will see a masking curve with several pre-settings in a list above the displayed curve. With the masking curve you will automatically be able to set the brightness mask. To do this, move the control point of the brightness curve to the desired intensity. The top edge means 100% effect strength, the bottom 0%. While you are moving the control point, you will receive a real time display of the developing mask. The effect will have a strong impact on the bright areas of the image, and less on dark areas.
69
12. Usage of the Plug-Ins DENOISE projects 2 professional offers the opportunity to use Adobe Photoshop software via a filter plug-in. Current Photoshop versions will be automatically recognised by Windows while being installed into DENOISE projects 2 professional. For older Photoshop versions a manual installation might be required. If you have acquired DENOISE projects 2 professional via download or if you have lost the CD, you can download the plug-in later from… www.projects-software.de/plugins
12.1 Installing Adobe Photoshop & Photoshop Elements While installing DENOISE projects 2 professional the following window will appear:
Select the Photoshop version that you want to install into DENOISE projects 2 professional. Click on “Next >” and follow the instructions of the installation assistant. The respective plug-ins will then automatically be installed. Tip: Sometimes with older window systems the plug-in can’t be automatically installed. In these cases simply copy the desired plug-in in the appropriate folder, as shown in the screenshot.
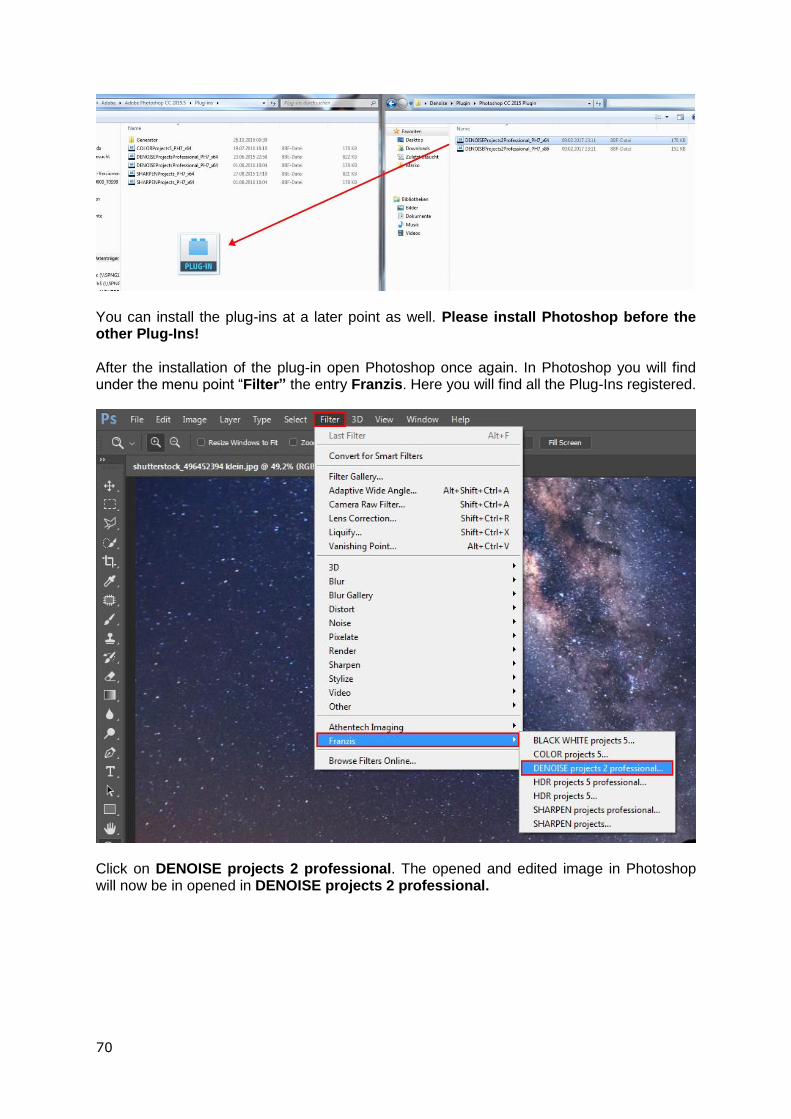
70
You can install the plug-ins at a later point as well. Please install Photoshop before the other Plug-Ins! After the installation of the plug-in open Photoshop once again. In Photoshop you will find under the menu point “Filter” the entry Franzis. Here you will find all the Plug-Ins registered.
Click on DENOISE projects 2 professional. The opened and edited image in Photoshop will now be in opened in DENOISE projects 2 professional.
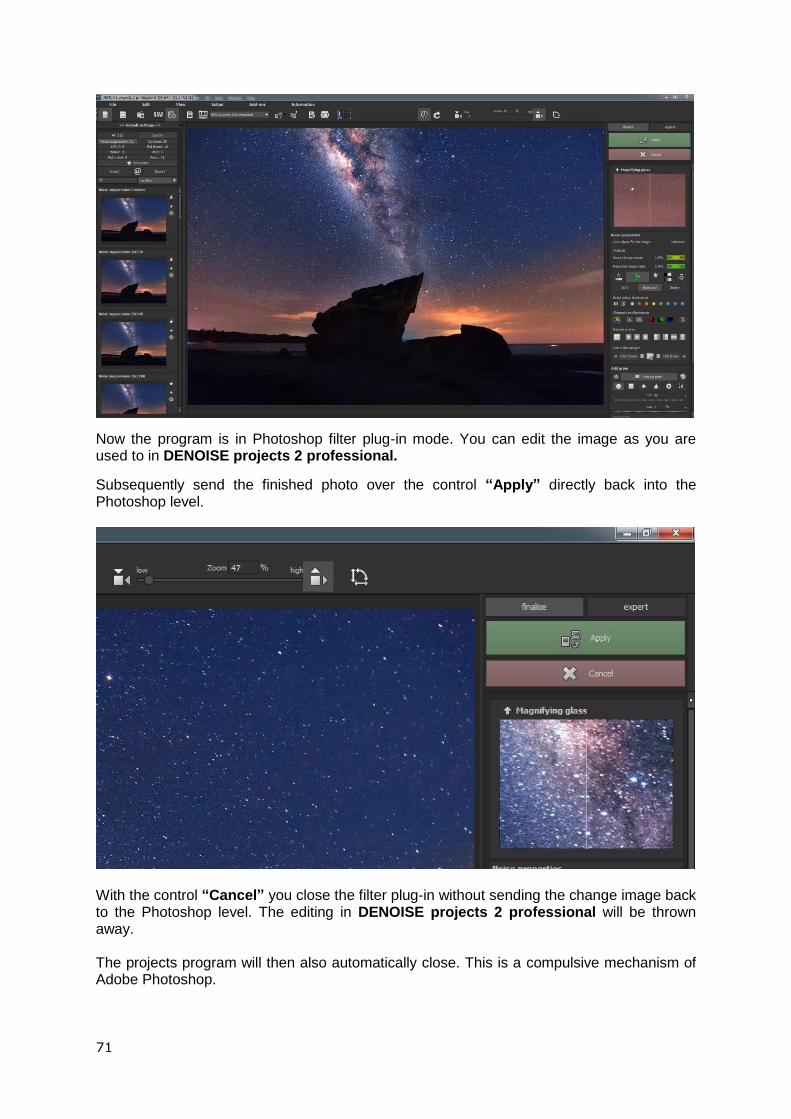
71
Now the program is in Photoshop filter plug-in mode. You can edit the image as you are used to in DENOISE projects 2 professional.
Subsequently send the finished photo over the control “Apply” directly back into the Photoshop level.
With the control “Cancel” you close the filter plug-in without sending the change image back to the Photoshop level. The editing in DENOISE projects 2 professional will be thrown away. The projects program will then also automatically close. This is a compulsive mechanism of Adobe Photoshop.
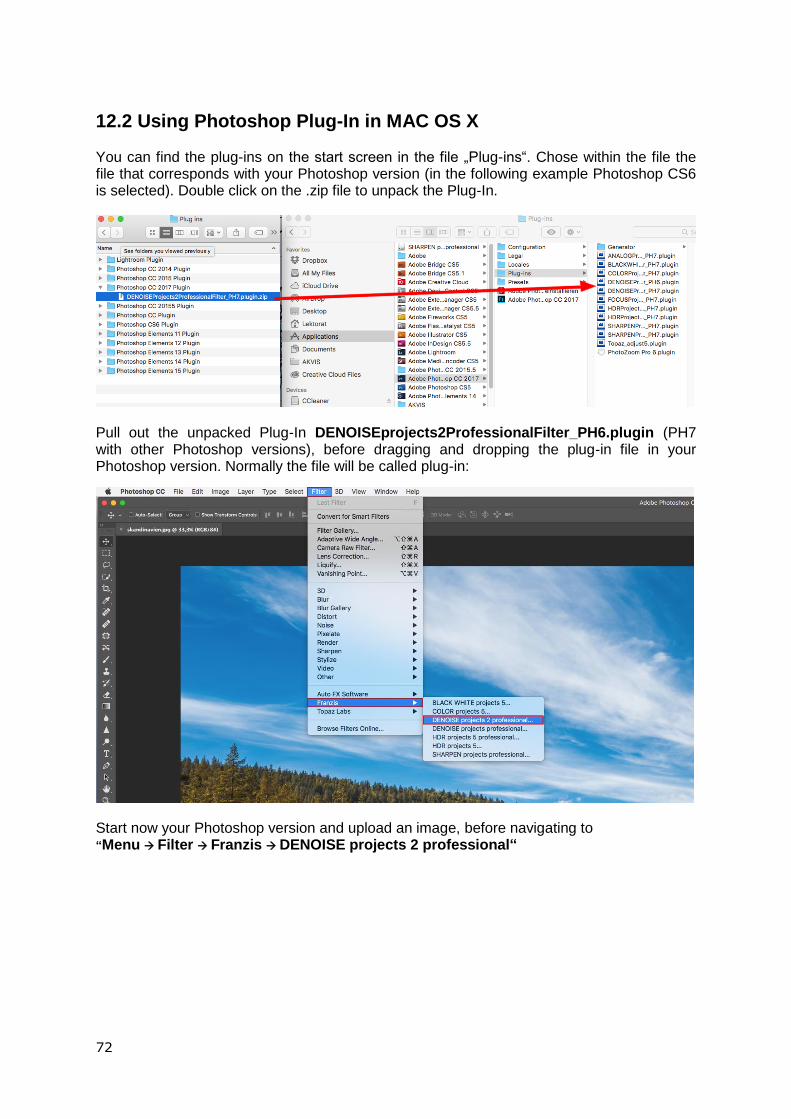
72
12.2 Using Photoshop Plug-In in MAC OS X You can find the plug-ins on the start screen in the file „Plug-ins“. Chose within the file the file that corresponds with your Photoshop version (in the following example Photoshop CS6 is selected). Double click on the .zip file to unpack the Plug-In.
Pull out the unpacked Plug-In DENOISEprojects2ProfessionalFilter_PH6.plugin (PH7 with other Photoshop versions), before dragging and dropping the plug-in file in your Photoshop version. Normally the file will be called plug-in:
Start now your Photoshop version and upload an image, before navigating to “Menu Filter Franzis DENOISE projects 2 professional“
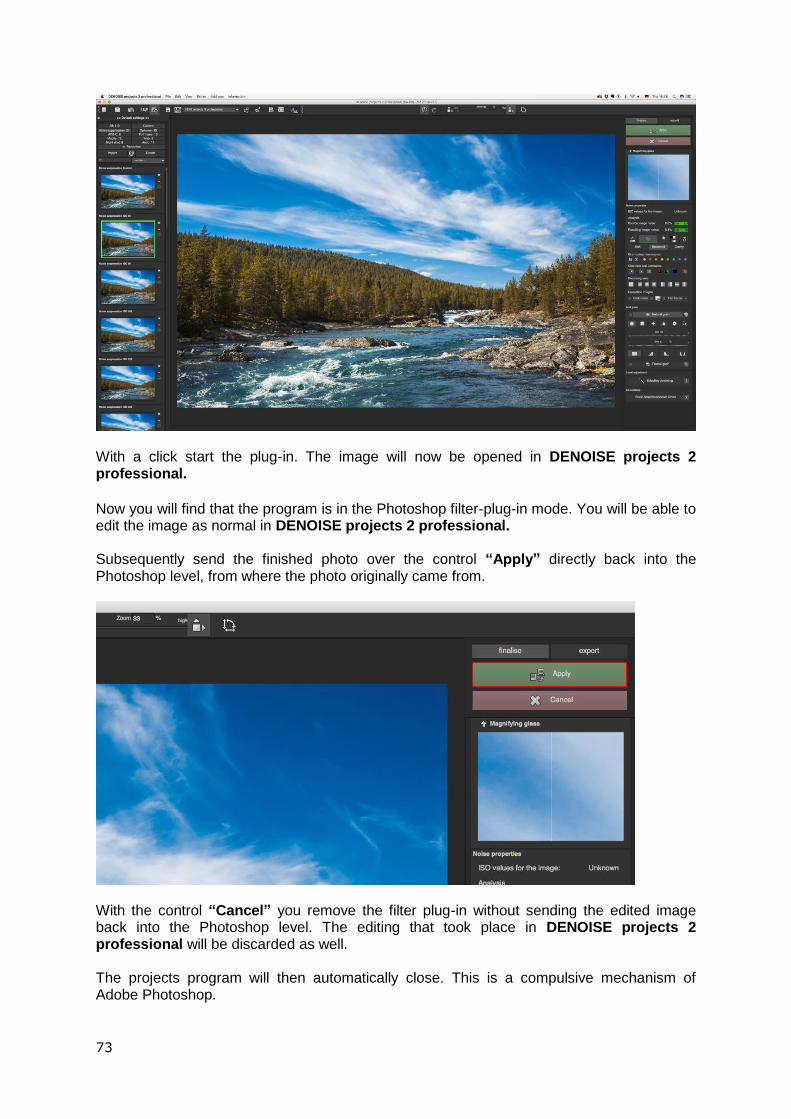
73
With a click start the plug-in. The image will now be opened in DENOISE projects 2 professional.
Now you will find that the program is in the Photoshop filter-plug-in mode. You will be able to edit the image as normal in DENOISE projects 2 professional. Subsequently send the finished photo over the control “Apply” directly back into the Photoshop level, from where the photo originally came from.
With the control “Cancel” you remove the filter plug-in without sending the edited image back into the Photoshop level. The editing that took place in DENOISE projects 2 professional will be discarded as well. The projects program will then automatically close. This is a compulsive mechanism of Adobe Photoshop.

74
12.3 Usage of Adobe Lightroom Plug-ins - Windows
Start the installation program and check if the component “Lightroom Plugin” has been selected. If you don’t have a CD then download the Plug-in from www.projects-software.de/plugins. Afterwards, open the Lightroom version. Start Lightroom and navigate to “File Plug-in manager” to check if the plug-in is activated.
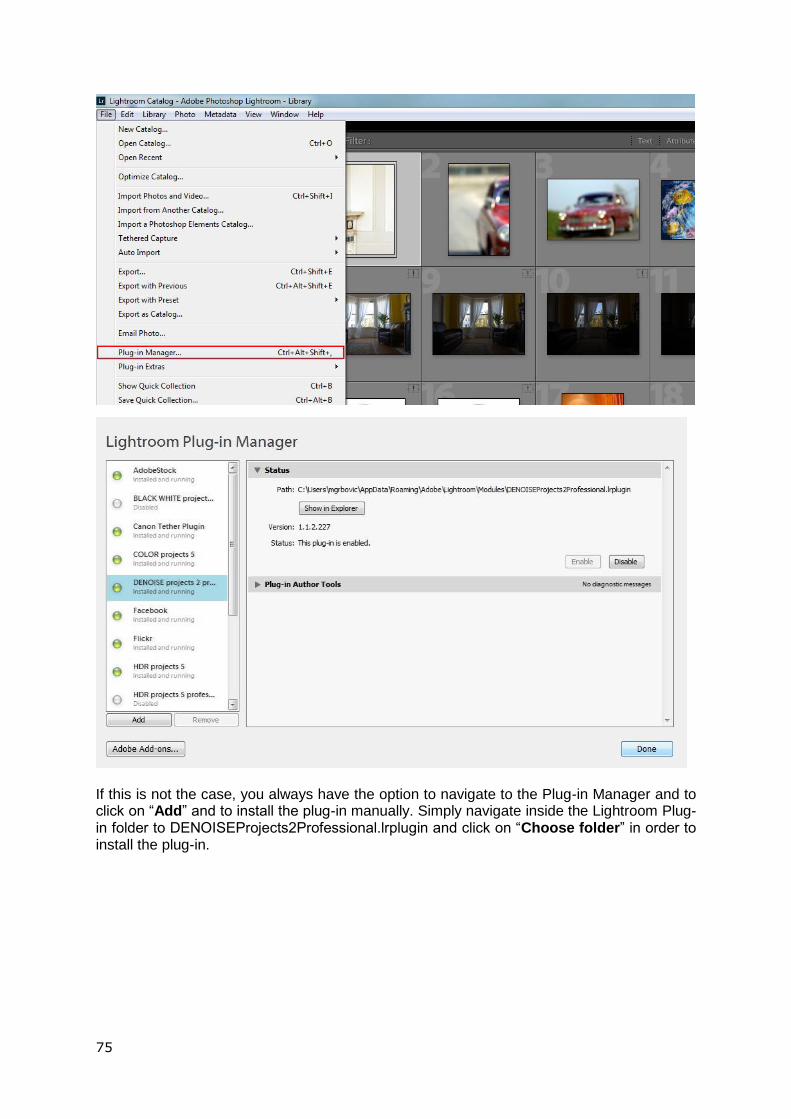
75
If this is not the case, you always have the option to navigate to the Plug-in Manager and to click on “Add” and to install the plug-in manually. Simply navigate inside the Lightroom Plug-in folder to DENOISEProjects2Professional.lrplugin and click on “Choose folder” in order to install the plug-in.
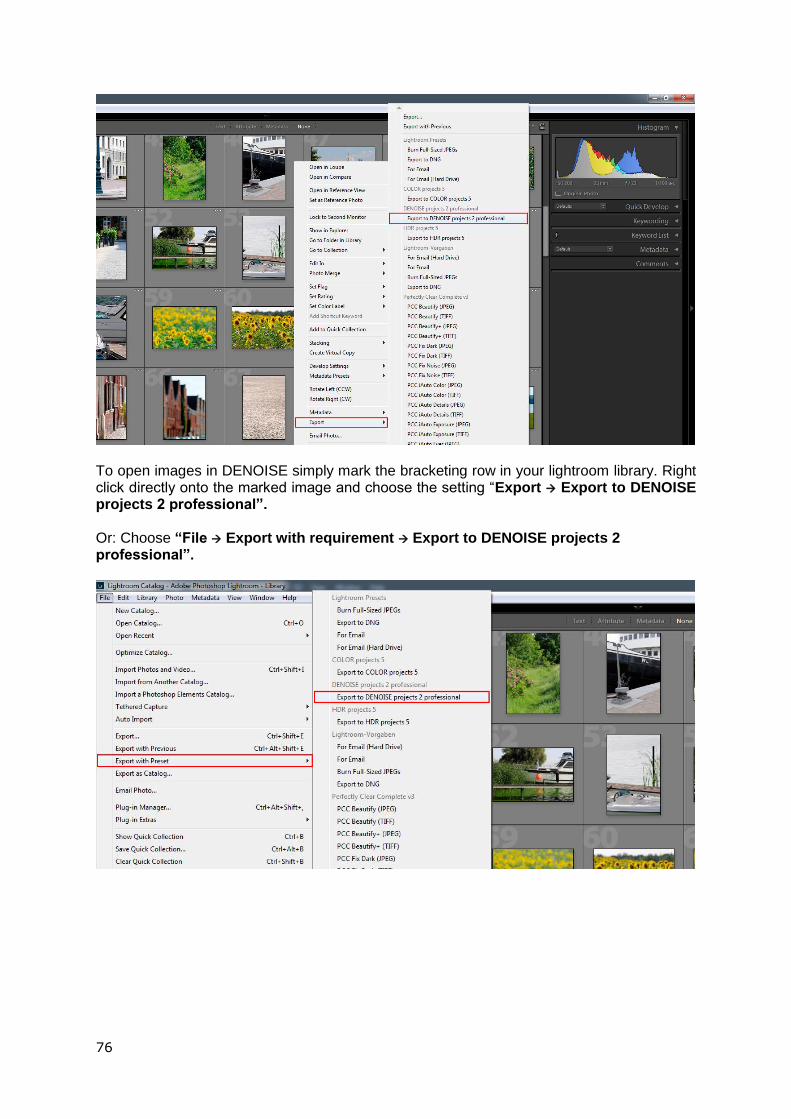
76
To open images in DENOISE simply mark the bracketing row in your lightroom library. Right click directly onto the marked image and choose the setting “Export Export to DENOISE projects 2 professional”. Or: Choose “File Export with requirement Export to DENOISE projects 2 professional”.
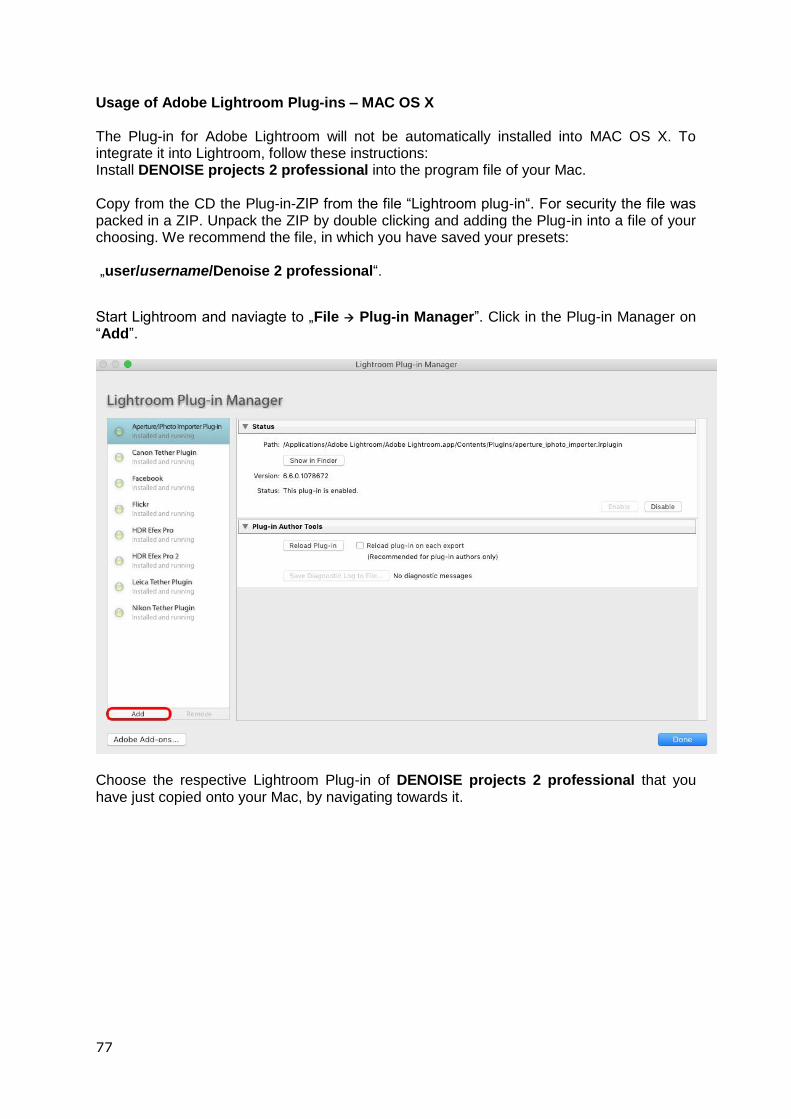
77
Usage of Adobe Lightroom Plug-ins – MAC OS X The Plug-in for Adobe Lightroom will not be automatically installed into MAC OS X. To integrate it into Lightroom, follow these instructions: Install DENOISE projects 2 professional into the program file of your Mac. Copy from the CD the Plug-in-ZIP from the file “Lightroom plug-in“. For security the file was packed in a ZIP. Unpack the ZIP by double clicking and adding the Plug-in into a file of your choosing. We recommend the file, in which you have saved your presets: „user/username/Denoise 2 professional“.
Start Lightroom and naviagte to „File Plug-in Manager”. Click in the Plug-in Manager on “Add”.
Choose the respective Lightroom Plug-in of DENOISE projects 2 professional that you have just copied onto your Mac, by navigating towards it.
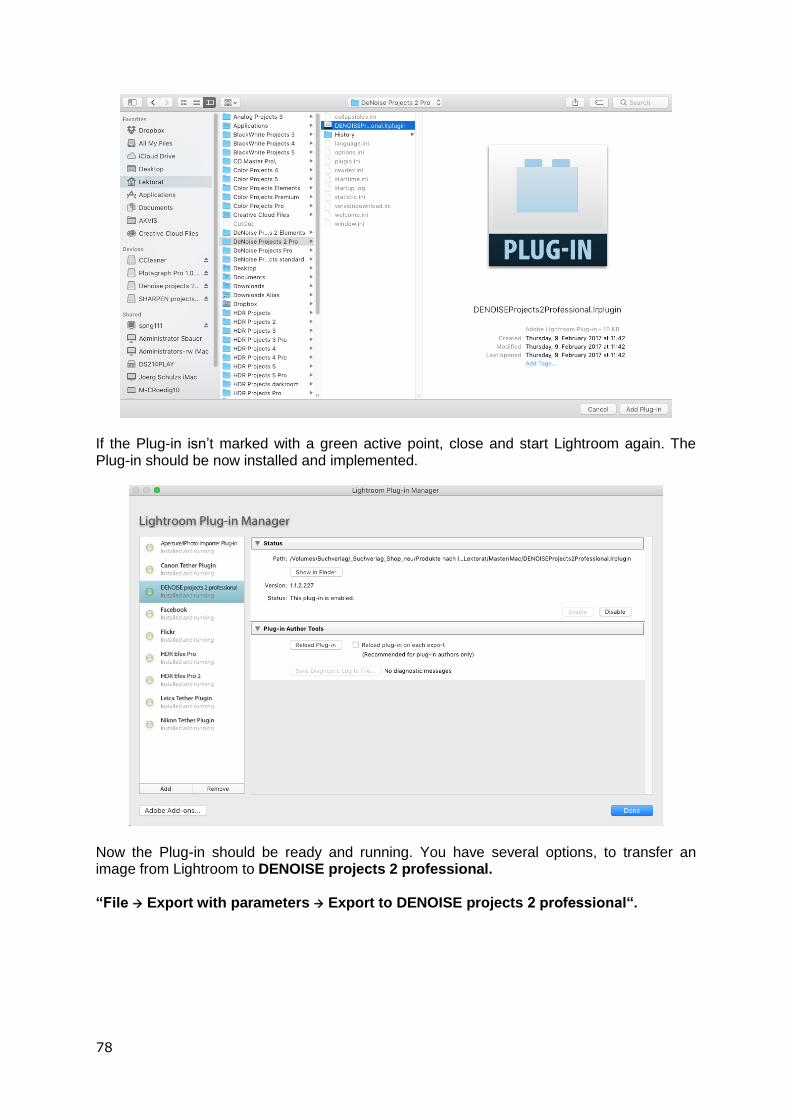
78
If the Plug-in isn’t marked with a green active point, close and start Lightroom again. The Plug-in should be now installed and implemented.
Now the Plug-in should be ready and running. You have several options, to transfer an image from Lightroom to DENOISE projects 2 professional. “File Export with parameters Export to DENOISE projects 2 professional“.
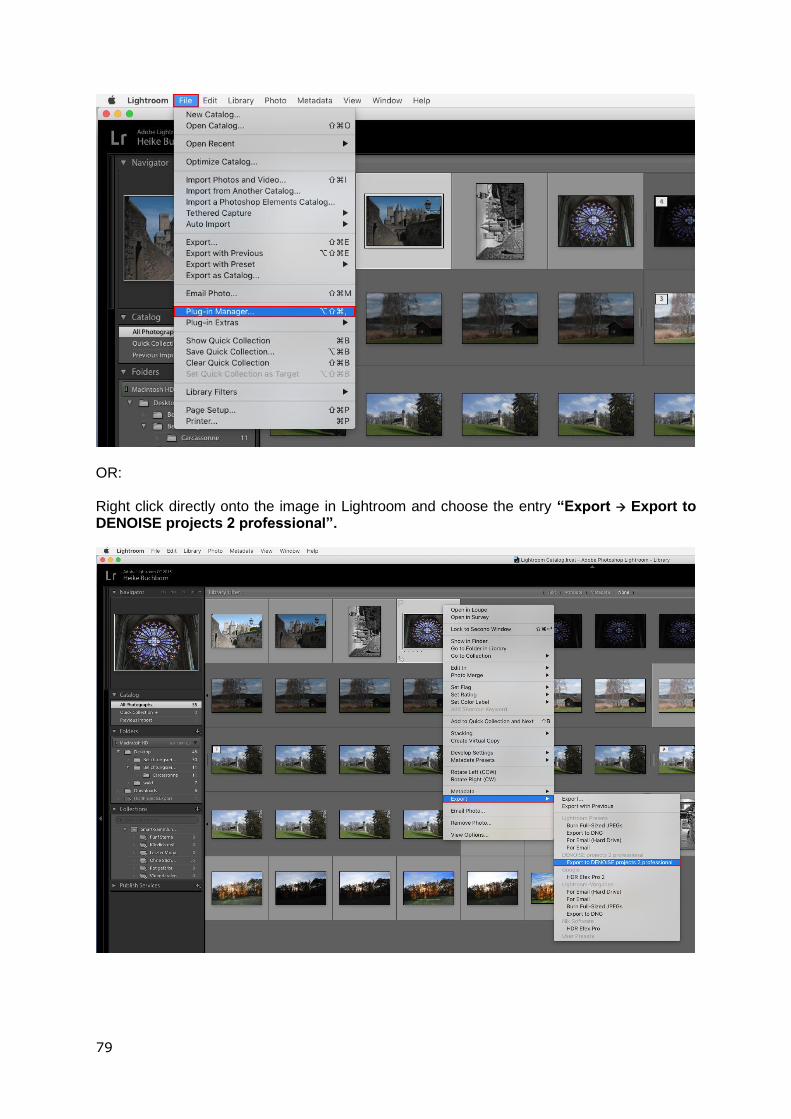
79
OR: Right click directly onto the image in Lightroom and choose the entry “Export Export to DENOISE projects 2 professional”.
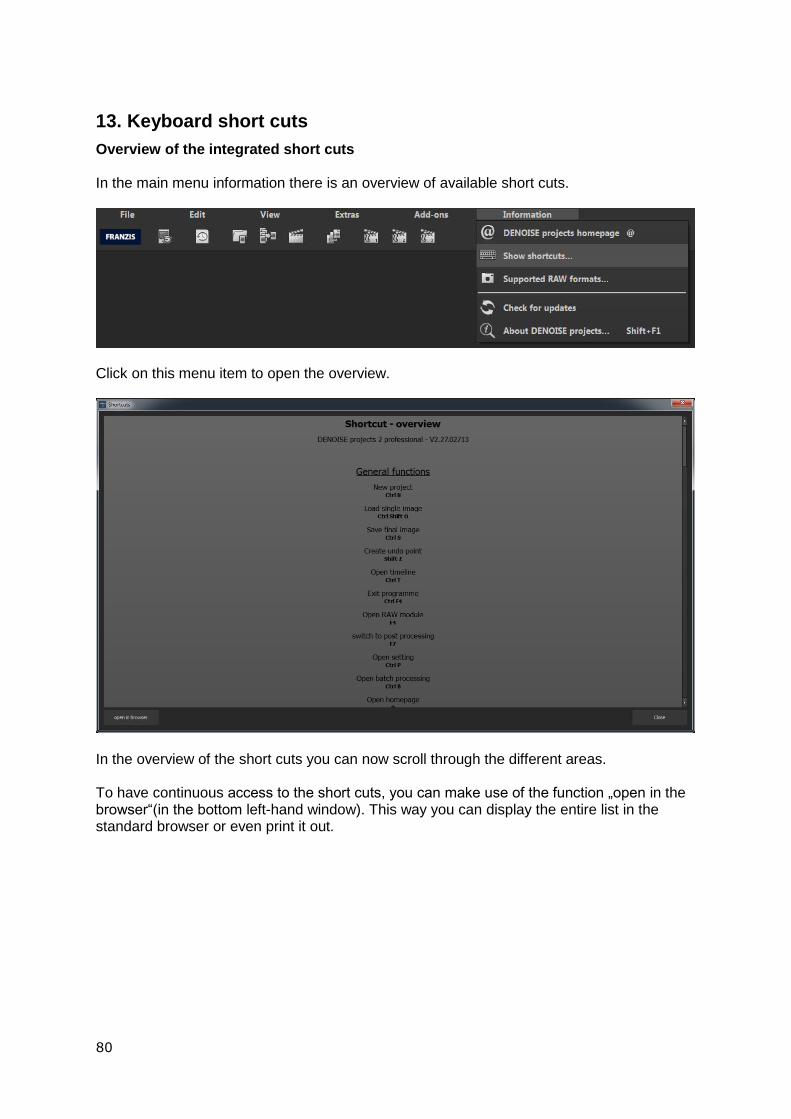
80
13. Keyboard short cuts
Overview of the integrated short cuts In the main menu information there is an overview of available short cuts.
Click on this menu item to open the overview.
In the overview of the short cuts you can now scroll through the different areas. To have continuous access to the short cuts, you can make use of the function „open in the browser“(in the bottom left-hand window). This way you can display the entire list in the standard browser or even print it out.
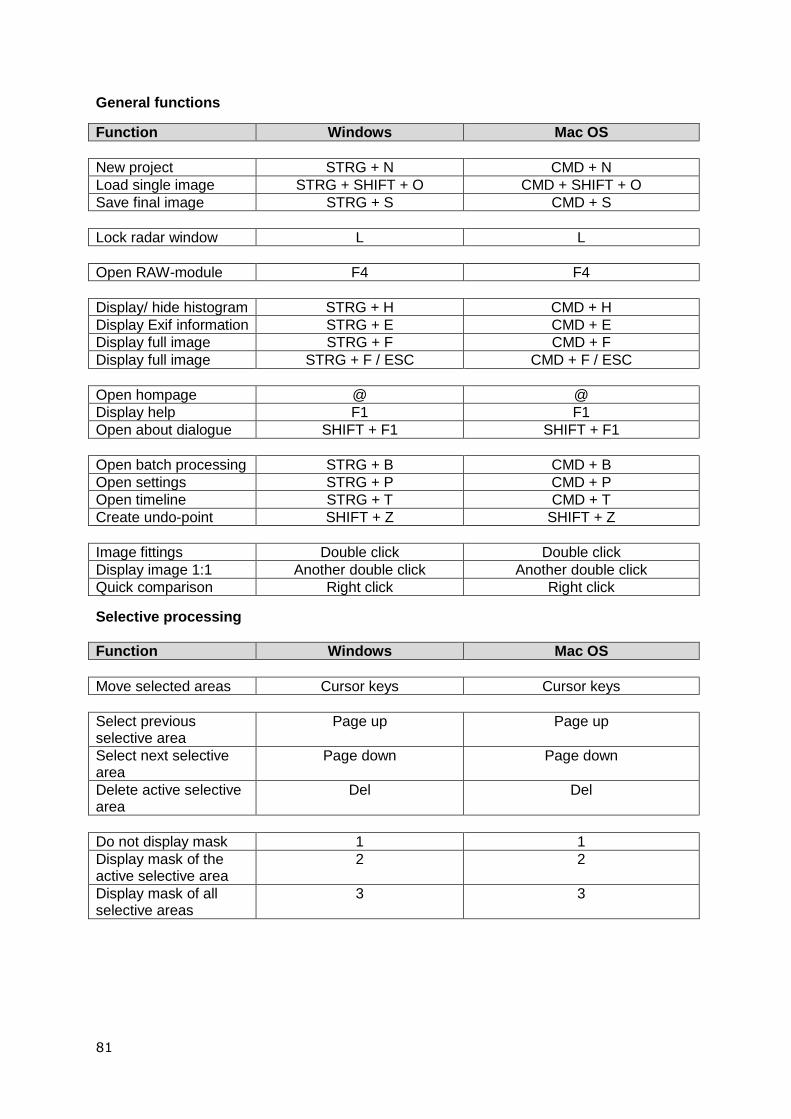
81
General functions
Function Windows Mac OS
New project STRG + N CMD + N
Load single image STRG + SHIFT + O CMD + SHIFT + O
Save final image STRG + S CMD + S
Lock radar window L L
Open RAW-module F4 F4
Display/ hide histogram STRG + H CMD + H
Display Exif information STRG + E CMD + E
Display full image STRG + F CMD + F
Display full image STRG + F / ESC CMD + F / ESC
Open hompage @ @
Display help F1 F1
Open about dialogue SHIFT + F1 SHIFT + F1
Open batch processing STRG + B CMD + B
Open settings STRG + P CMD + P
Open timeline STRG + T CMD + T
Create undo-point SHIFT + Z SHIFT + Z
Image fittings Double click Double click
Display image 1:1 Another double click Another double click
Quick comparison Right click Right click
Selective processing
Function Windows Mac OS
Move selected areas Cursor keys Cursor keys
Select previous selective area
Page up Page up
Select next selective area
Page down Page down
Delete active selective area
Del Del
Do not display mask 1 1
Display mask of the active selective area
2 2
Display mask of all selective areas
3 3
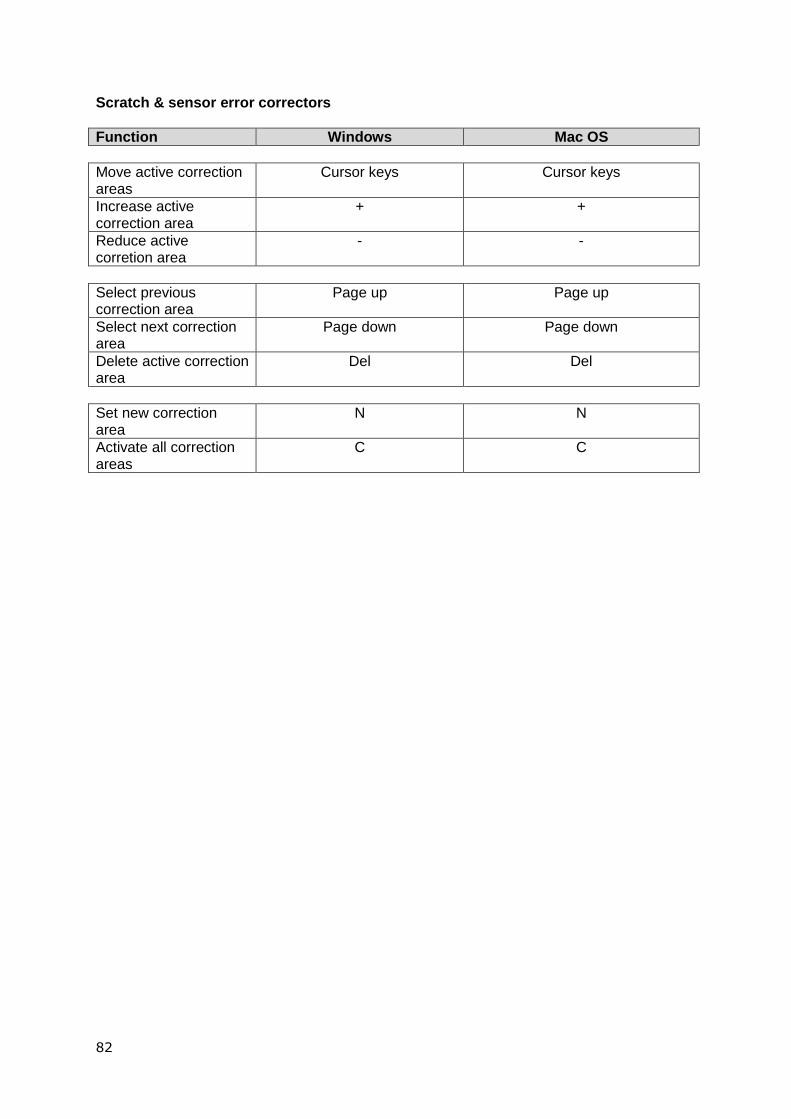
82
Scratch & sensor error correctors
Function Windows Mac OS
Move active correction areas
Cursor keys Cursor keys
Increase active correction area
+ +
Reduce active corretion area
- -
Select previous correction area
Page up Page up
Select next correction area
Page down Page down
Delete active correction area
Del Del
Set new correction area
N N
Activate all correction areas
C C
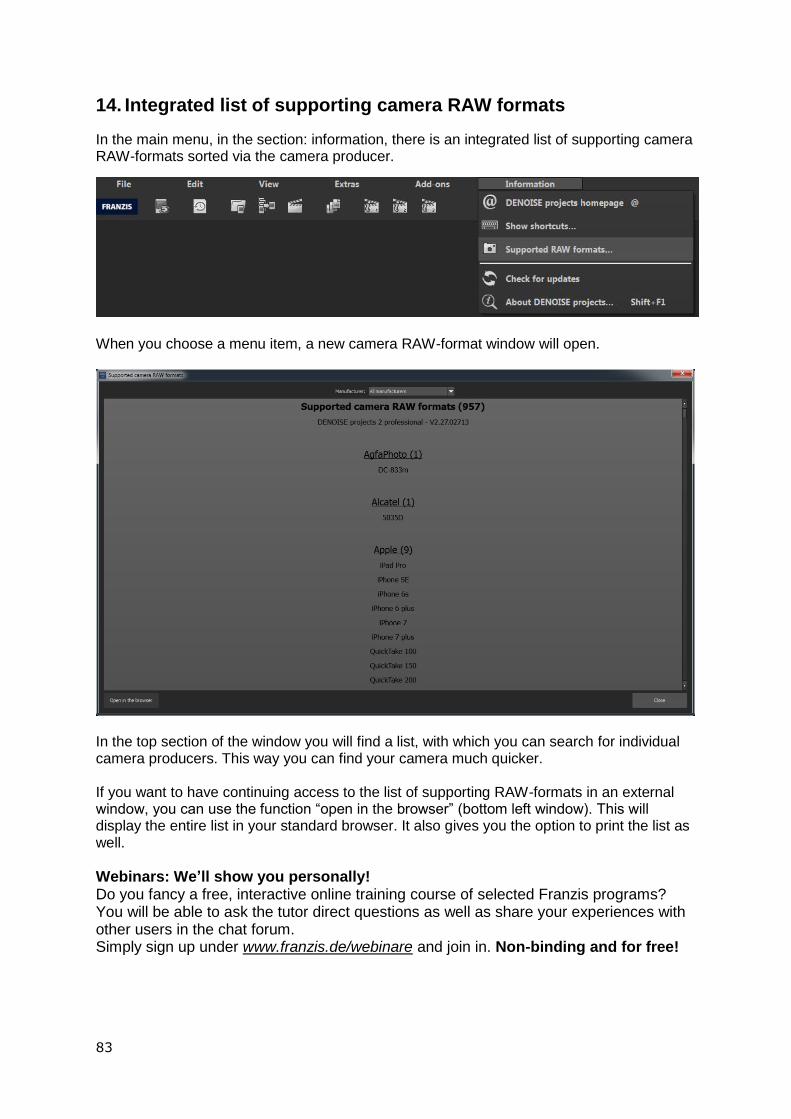
83
14. Integrated list of supporting camera RAW formats
In the main menu, in the section: information, there is an integrated list of supporting camera RAW-formats sorted via the camera producer.
When you choose a menu item, a new camera RAW-format window will open.
In the top section of the window you will find a list, with which you can search for individual camera producers. This way you can find your camera much quicker. If you want to have continuing access to the list of supporting RAW-formats in an external window, you can use the function “open in the browser” (bottom left window). This will display the entire list in your standard browser. It also gives you the option to print the list as well.
Webinars: We’ll show you personally! Do you fancy a free, interactive online training course of selected Franzis programs? You will be able to ask the tutor direct questions as well as share your experiences with other users in the chat forum. Simply sign up under www.franzis.de/webinare and join in. Non-binding and for free!

84
Hotline/Support If you have questions regarding the installation, problems or errors of the software, please contact the FRANZIS customer support team. E-Mail: [email protected] Telephone (Monday to Friday 12 to 6 o’clock): +49-(0)180-30 02 644 (0,09 € per Minute from the fixed German network, mobile max. 0,42 € per Minute, overseas can possible derivation) Telefax: +49-(0)180 300 26 45 (0,09 € per Minute for the fixed German network, mobile possible deviation)
For requests from Austria and Switzerland, these are the following telephone numbers available: Telephone: 0900 45 46 46 (1,56 per minute for callers from Austria). Telephone: 0900 47 03 70 (1,00 SFr per minute for callers from Switzerland) Please understand that your requests can only be taken by the FRANZIS customer support team. This way we can improve our service and your questions can be answered quicker and with higher competence.
This is how our customer support works best: Please have the most important details of your computer and our product at hand when you call our customer support. These include: • Name of the product • Product ISBN (which you can find on the back of the packaging. The barcode is easy to spot). • Operating system of your computer • Technical details of your computer including all your peripheral devices
85
Copyright Franzis Verlag GmbH has prepared this product with the greatest possible care. Please read the following conditions: All the programs, routines, controls, etc., contained on this CD are protected by their respective authors or distributors as mentioned in the respective programs. The purchaser of this CD is authorised to use those programs, data or data groups that are not marked as shareware or public domain for his/her own purposes within the provisions of their designated use. He/she is authorised to use programs or parts of programs that are marked as shareware, freeware or public domain within the restrictions given by the respective programs or parts of programs.
A reproduction of programs with the intent of distributing data media containing programs is forbidden. Franzis Verlag GmbH holds the copyright for the selection, arrangement and disposition of the programs and data on this CD.
The data and the programs on this CD has been checked with the greatest possible care. Considering the large quantity of data and programs, Franzis assumes no warranty for the correctness of the data and a flawless functioning of the programs. Franzis Verlag GmbH and the respective distributors do not undertake neither warrant nor legal responsibility for the use of individual files and information with respect to their economic viability or their fault-free operation for a particular purpose. Additionally, there is no guarantee that all the included data, programs, icons, sounds and other files are free to use. Therefore the publisher cannot be held liable for a possible breach of third party copyrights or other rights. Most product names of hard- and software and company names and labels mentioned in this product are registered trademarks and should be treated as such. The product name used by the publisher are as the manufacturer describes them. © 2017 Franzis Verlag GmbH, Richard-Reitzner-Allee 2, 85540 Haar bei München