Roma wood tile producer TOE wood tile, engineering tile promotion
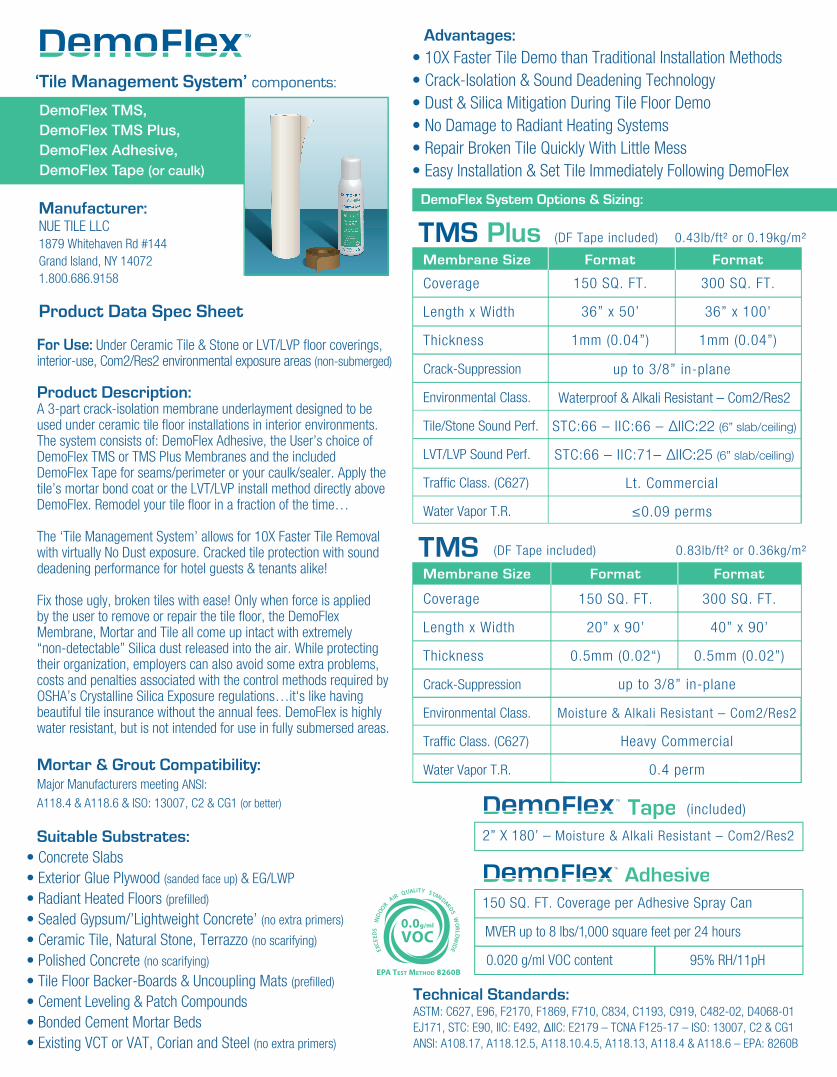
For Use: Under Ceramic Tile & Stone or LVT/LVP floor coverings, interior-use, Com2/Res2 environmental exposure areas (non-submerged)
Product Description:A 3-part crack-isolation membrane underlayment designed to be used under ceramic tile floor installations in interior environments. The system consists of: DemoFlex Adhesive, the User’s choice of DemoFlex TMS or TMS Plus Membranes and the included DemoFlex Tape for seams/perimeter or your caulk/sealer. Apply the tile’s mortar bond coat or the LVT/LVP install method directly above DemoFlex. Remodel your tile floor in a fraction of the time…
The ‘Tile Management System’ allows for 10X Faster Tile Removal with virtually No Dust exposure. Cracked tile protection with sound deadening performance for hotel guests & tenants alike!
Fix those ugly, broken tiles with ease! Only when force is applied by the user to remove or repair the tile floor, the DemoFlex Membrane, Mortar and Tile all come up intact with extremely “non-detectable” Silica dust released into the air. While protecting their organization, employers can also avoid some extra problems, costs and penalties associated with the control methods required by OSHA’s Crystalline Silica Exposure regulations…it‘s like having beautiful tile insurance without the annual fees. DemoFlex is highly water resistant, but is not intended for use in fully submersed areas.
Mortar & Grout Compatibility:Major Manufacturers meeting ANSI:
A118.4 & A118.6 & ISO: 13007, C2 & CG1 (or better)
Suitable Substrates:• Concrete Slabs• Exterior Glue Plywood (sanded face up) & EG/LWP• Radiant Heated Floors (prefilled)
• Sealed Gypsum/’Lightweight Concrete’ (no extra primers)
• Ceramic Tile, Natural Stone, Terrazzo (no scarifying)
• Polished Concrete (no scarifying)
• Tile Floor Backer-Boards & Uncoupling Mats (prefilled)
• Cement Leveling & Patch Compounds• Bonded Cement Mortar Beds• Existing VCT or VAT, Corian and Steel (no extra primers)
Manufacturer:NUE TILE LLC1879 Whitehaven Rd #144Grand Island, NY 140721.800.686.9158
‘Tile Management System’ components:
DemoFlex TMS,DemoFlex TMS Plus,DemoFlex Adhesive,DemoFlex Tape (or caulk)
Technical Standards:ASTM: C627, E96, F2170, F1869, F710, C834, C1193, C919, C482-02, D4068-01EJ171, STC: E90, IIC: E492, ∆IIC: E2179 – TCNA F125-17 – ISO: 13007, C2 & CG1ANSI: A108.17, A118.12.5, A118.10.4.5, A118.13, A118.4 & A118.6 – EPA: 8260B
150 SQ. FT. Coverage per Adhesive Spray Can
MVER up to 8 lbs/1,000 square feet per 24 hours
0.020 g/ml VOC content 95% RH/11pH
Product Data Spec Sheet
DemoFlex System Options & Sizing:
Advantages:• 10X Faster Tile Demo than Traditional Installation Methods• Crack-Isolation & Sound Deadening Technology• Dust & Silica Mitigation During Tile Floor Demo• No Damage to Radiant Heating Systems• Repair Broken Tile Quickly With Little Mess• Easy Installation & Set Tile Immediately Following DemoFlex
2” X 180’ – Moisture & Alkali Resistant – Com2/Res2
(included)
Coverage
Length x Width
Thickness
Crack-Suppression
Environmental Class.
Tile/Stone Sound Perf.
LVT/LVP Sound Perf.
Traffic Class. (C627)
Water Vapor T.R.
300 SQ. FT.
36” x 100’
1mm (0.04”)
Membrane Size Format Format
150 SQ. FT.
36” x 50’
1mm (0.04”)
up to 3/8” in-plane
Waterproof & Alkali Resistant – Com2/Res2
STC:66 – IIC:66 – ∆IIC:22 (6” slab/ceiling)
STC:66 – IIC:71– ∆IIC:25 (6” slab/ceiling)
Lt. Commercial
≤0.09 perms
(DF Tape included) 0.43lb/ft² or 0.19kg/m²
Coverage
Length x Width
Thickness
Crack-Suppression
Environmental Class.
Traffic Class. (C627)
Water Vapor T.R.
150 SQ. FT.
20” x 90’
0.5mm (0.02“)
300 SQ. FT.
40” x 90’
0.5mm (0.02”)
Membrane Size Format Format
up to 3/8” in-plane
Moisture & Alkali Resistant – Com2/Res2
Heavy Commercial
0.4 perm
(DF Tape included) 0.83lb/ft² or 0.36kg/m²

Product Data Spec Sheet
Membrane & Seam Tape – Construction:The TMS & TMS Plus multi-layer membranes were designed for optimal: tensile, shear & compressive strength with strong bonding characteristics to mortar. Acid-free fiber production with advanced polyolefin & scrim combina-tions provide the proper alkali, moisture & sound resistant characteristics to withstand mortar alkali & Com2 environmental exposure for many years of use.
Permanent mortar bond to the tile and membrane – Smarter membrane bond to the floor… DemoFlex was designed to compliment & enhance the other technologies & methods that make tile/stone the best floor covering option. Achieving a stable bond to the tile with proper support while accounting for slight undulations in the floor’s surface are part of what makes mortar so critical to the installation. NUE TILE has pioneered a smarter bonding configuration that allows the mortar‘s bond to the floor to provide only what the user has in mind.
Adhesive – Formulation:NUE TILE developed this optimal adhesive formulation specifically based on existing adhesive technology and production methods successfully in use in similar industry applications for many years. Achieving the proper bonding strength for long-lasting performance while providing the ability to Unlock the tile assembly during demo is something no other tile floor can offer. Outstanding moisture & alkali (pH) resistance with quick & easy spray application in an inexpensive, recyclable package that provides a safe user experience even in sensitive environments is important to its design. However, temperature and humidity can affect floor leveling & patch compounds’ curing time which may require 5-72 hours of drying prior to applications of materials above them and therefore, floor leveling & patch compound manufacturer’s curing time specifications for “moisture sensitive floor coverings” prior to application of DemoFlex should be followed to ensure DemoFlex Adhesive a properly dry surface to achieve a stable bond.
Description:
mortar bond to tile
mortar bond to membrane
membrane/tile installation bond to floor substrate
DemoFlex TMS/Plus
NOT unlockable
NOT unlockable
UNLOCKABLE
the alternative method
NOT unlockable
NOT unlockable
NOT unlockable
Product Data Spec Sheet
Description:
mortar bond to tile
mortar bond to membrane
membrane/tile installation bond to floor substrate
DemoFlex TMS/Plus
NOT unlockable
NOT unlockable
UNLOCKABLE
the alternative method
NOT unlockable
NOT unlockable
NOT unlockable
Performance Test Results:
ASTM C627 ‘Robinson’ (TCNA performed):
DemoFlex TMS – Over Concrete
DemoFlex TMS Plus – Over Concrete
DemoFlex TMS – Over Existing Polished Tile (without filing grout joints)
DemoFlex TMS – Over Electric Radiant Heat
DemoFlex TMS – Over Exterior Plywood Underlayment (plywood/OSB subfloor)
DemoFlex TMS – Over Typical Backer-Boards & Uncoupling Mats
Results
Extra Heavy
Lt. Commercial
Heavy
No Compromise
No Compromise
No Compromise
System Crack Resistance (TCNA performed):
DemoFlex TMS – Standard ANSI 118.12.5.4.1
DemoFlex TMS – Modified ANSI 118.12.5.4.1 (start w/ existing 1/16” crack)
DemoFlex TMS Plus – Standard ANSI 118.12.5.4.1
Results
High Performance
High Performance
High Performance
Moisture Resistance (TCNA performed):
TMS & TMS Plus – Waterproofness 118.10.4.5 / ASTM D4068-01
DemoFlex TMS Plus: E96 Moisture Vapor Transmission Rate
DemoFlex TMS: E96 Moisture Vapor Transmission Rate
Results
No moisture penetration
≤0.09 perms
0.35 perms
Sound Isolation Performance (TMS Plus)
STC (sound transmission)
IIC (impact insulation)
∆IIC (delta IIC)
Tile/Stone on6” Concrete
66
66
22
LVT/LVP on6” Concrete
66
71
25
Tile/Stone onPlywood/Gypcrete
59
52
–
for the process

• Complete all standard surface preparation procedures prior to DemoFlex.• Allow for proper curing/drying of all substrates; leveling & patch compounds.• Applying SCP-327 to new concrete at time of concrete placement can allow for install of
DF & Tile as early as 14 days after the placement of new concrete (consult manufacturer).
All substrates must be structurally sound, dry, clean & free of dirt, oil, grease, curing compounds, paint, laitance or efflorescence. Refer to TCNA Handbook for product selection, installation methods & testing standards; following manufacturer’s specs prior to application of DemoFlex. Maintain specified movement joints. See ‘Radiant Heat’ & ‘Sound Deadening’ sections to follow. Make rough or uneven surfaces (e.g. deeply textured ‘Tile Over Tile’ applications) to obtain an ‘ICRI’ Concrete Surface Profile: a CSP–2 using preferred method or self-leveling underlayment. Prior to DemoFlex: apply Floor Leveling & Patch Compounds allowing for curing time of patch and leveler based on manufacturer’s “moisture sensitive floor covering” curing time specs. If using plywood as tile underlayment: Use sanded face up, exterior glue panels to achieve the tile/stone’s TCNA deflection resistance & APA (Q225G) load capacity. Check & adjust subfloor for flatness within ANSI A118 standards & clear debris. Protect & aclimate plywood prior to installation. Do not use adhesive below plywood underlayment. Run panel strength/grain axis perpendicular to joists leaving 1/8“ panel gaps (not filled), w/ ≥12” panel offset to subfloor panel joints and no less than a 1/4” gap around perimeter. Apply corrosion resistant fasteners to APA schedules (E30): using fastener length to equal the combined thickness of subfloor and underlayment; NOT penetrating into joists. Apply DemoFlex (see below). If fastening through DemoFlex, drive to slightly counter-sunk to panel height and seal holes to desired class. If sanding plywood joints after DF, replace & seal affected DemoFlex. Apply Leveling/Patch compound over DemoFlex w/ plywood underlayment.
1. 68 degrees F (20 C) is the ideal temperature for DemoFlex to be applied and should not be applied below 61 degrees F (16 C) or above 95 degrees F (35 C). Use of fans is recommended.2. Substrate must be structurally appropriate to accept ceramic tile and prepared in accordance with ASTM & TCNA standards. Ensure a CSP–2 or smoother surface profile & allow floor leveler/patch to be fully cured (fast setting if suitable). The substrate must be clean, dry and free of dust/debris. Remove or neutralize any residues by scratch coating with patch/leveling.3. Lightly damp-mop the substrate if dust is present after sweeping/vacuuming. Wipe hand across surface; if dust transfers, the substrate is not clean enough.4. HVAC must be continuously operated for a minimum of 72 hours no less than 68 degrees F (20 C) prior and the TMS must be stored at 68 degrees F (20 C) for 24 hours prior to application.5. Protect walls and perimeter from over-spray with a spray shield, drop cloths, paper or masking.6. Shake DemoFlex aerosol spray adhesive can vigorously. Remove cap and test spray pattern.7. From an upright, standing position: aim the Adhesive can downward at the floor approx. 20-30” (50-70cm) up from the substrate and press the side of the applicator tip. Adhesive should spray out in a wide, thick mist and fall similar to snow. Apply the Adhesive around the perimeter of the installation area first then go to the farthest point of the room filling in the field of the floor, working your way out of the room. Achieving adhesive spray coverage of 20-40% onto the entire surface of the floor substrate is ideal. See sample image on DF Adhesive can. Excessive Adhesive coverage percentage beyond 40% will not increase bonding strength.8. If the Adhesive does not achieve a wide mist spray pattern, shake can vigorously again, but changing to the provided replacement applicator tip may be required by pointing the DF Adhesive can in a safe area then pulling off the clogged tip and pushing the new tip into place. If the DF Adhesive can is stored for an extended period of time, remove adhesive build up from the spray tip. Inserting a pin into the tip can help to prevent clogging during extended storage times.9. If over-spray occurs, quickly remove it with a damp cloth while the adhesive is still wet.10. Allow DemoFlex Adhesive to become tacky until there is no adhesive transfer when lightly touched with your fingers (approximately 20-30 minutes). Humidity and temperature can affect the activation time of the Adhesive, but a fan can be used to effectively reduce the tacking/activation time of the DemoFlex Adhesive.11. Pre-cut easily manageable length pieces off the roll of DemoFlex Membrane (and proceed to securely press the Membrane into the DemoFlex Adhesive within 3 hours of adhesive becoming fully tacky, preventing dust/debris contamination to the adhesive). Start at the doorway as you lay the pre-cut pieces into the DemoFlex Adhesive, leaving 1⁄ 8” to 1⁄4” gap between the sheets or overlap the sheets slightly and cut off the overlap portion. Place large pieces along the walls, placing smaller fill pieces in the center/field. It is acceptable to walk on the Membrane as soon as it is placed into the Adhesive. Thoroughly press the entire surface of the membrane into the adhesive by any means; using a hand roller or weighted roller, by hand/foot or a grout float within 1 hour after installation to complete the bonding process.12. Bridge the seams of the TMS/TMS Plus Membranes and around the perimeter of the installation areas using DemoFlex Tape or DemoFlex Caulk; spanning approximately 1” onto each sheet/surface. Seal/waterproof further if desired. The installation is ready for mortar/tile…
Brief Installation Overview: Installation & Substrate Preparation Techniques forDemoFlex Adhesive, TMS Membranes & Seam Treatment
see also: ANSI 108, ISO 13007, TCNA F125A, EJ171 & other applicable Installation Methods:
E. Spread Mortar onto DemoFlex Immediately
C. Press DF Underlayment into DF Adhesive
D. Tape or Caulk Seams & Perimeter of DF
F. Set Tile & Grout per industry standards
A. Clean Substrate B. Spray DF Adhesive
allowing adhesive to activate

Tile Repair, Removal or Replacement of FloorDemoFlex TMS allows for 10X faster removal of the entire tile floor or individual, broken tiles with no damage to the substrate below with virtually no dust exposure. Be careful to protect surrounding areas or unaffected tiles from tools and debris. To repair small amounts of tiles that are chipped or broken, start by removing one grout line by hand, carefully wedge a prybar or the like under the tile, mortar and TMS Membrane at as shallow an angle as possible by applying force at the leading edge of the tile then lift vertically to unlock the tile assembly from the substrate. Avoid breaking tiles during removal. If removing the entire tile floor, start as rapidly as preferred, using the most effective/powerful demo tools available.
Cleaning & Re-Application of TMS During Replacement:DemoFlex Adhesive can be cleaned with a damp cloth or damp sponge within initial 3 hour working time. Shield the walls/perimeter from over-spray. If small amounts of water is spilled onto the TMS/TMS Plus prior to tile installation, blot it up with a towel or sponge. If Membrane is damaged or if significant water is spilled onto the DemoFlex TMS prior to mortar/tile installation, remove membrane in the affected area, clear debris, dry area and replace with new membrane (see step 2). During repair/removal of the tile-mortar-DemoFlex TMS floor system; after removing debris with a floor scraper, DemoFlex Adhesive will bond to leftover, cured DemoFlex Adhesive. Replacing DemoFlex TMS/TMS Plus Membrane requires re-application of DF adhesive (see step 2).
Movement – Expansion Joints (see EJ171 for guidance):Maintain specified movement joints; not less than 1/4” perimeter joints. Do not install DemoFlex over movement joints. Use Class 25 Sealant of ASTM C920 to ASTM C1193 standards. Frequency of Interior Joints: No more than 25’ in each direction. Above grade concrete substrate OR interior tilework exposed to direct sunlight or moisture: no more than 12’.
Storage & Shelf-Life:DemoFlex Adhesive must be stored at minimum 50°F and maximum 120°F. Adhesive can must not be allowed to freeze. Adhesive must be maintained at a minimum temperature of 68°F for a period of 24 hours prior to use. The product may be stored for up to 3 years from date of manufacture prior to use.
Limitations (see full warranty for details):• Finished plank hardwood floor covering, particle board, luan, sheet vinyl or linoleum, OSB and masonite are not suitable substrates for Ceramic Tile or Stone Floor Installations and therefore not for use with DemoFlex.• Installation must not exceed 95% Relative Humidity or 12 pH.• Moisture vapor emissions (MVER) do not exceed 8 lbs/1,000 square feet per 24 hours in accordance with the most current ASTM F1869.• Cracks must not exceed 3/8” (3mm) in-plane. Any cracks vertical/struc-tural in nature are not warranted (must be repaired prior to DemoFlex install).• DemoFlex is not intended for use in fully submersed “wet” areas of Com3/Res3 or greater exposure (only adjacent to Com3 is acceptable).• Do not apply DemoFlex without perimeter & field expansion/movement joints (see EJ171) resulting in shear forces transferring to the tile/stone.• Failure to allow concrete slabs, floor leveling & patch compounds to properly dry/cure prior to installation of DemoFlex shall void the warranty.• Do not fasten ply‘ underlay’ into joists through subfloor. Do not glue ply’ underlay’ to subfloor. Must have offset, gapped 2 layers: subfloor & underlay’.• DemoFlex is not a wear surface and can be damaged prior to the installation of the mortar and tile above (repair/replace prior to tiling).• Insufficient mortar bond to the ceramic tile or stone (ASTM C482-02) may result in inconsistent tile/stone demolition performance.• NUE TILE covers labor & materials used in replacement or repair of the affected areas only, up to amount not exceeding price paid by customer.
Sound Deadening/Isolating with TMS Plus (per C919): To isolate wall vibrations from floor installation; seal gaps (C834) or wrap TMS Plus up wall 2-3” & adhere. Treat substrate cracks, perimeter of floor and gaps between (covered) pipes that run through floor using sealant and/or TMS Plus. Do not screw/nail through TMS Plus, if so, drive to substrate height & seal over fastener holes with C834 sealant flush with TMS Plus.
Installing Over Existing Cracks (F125/F125A–Full/Partial):DemoFlex is optimal if applied to the entire surface, but can be applied only over existing cracks. Be sure to follow TCNA F125. Repair all structural, vertical cracks prior to installation of TMS & Tile/Stone. For use over existing cracks; not greater than 3/8” wide, cover both sides of the crack with 3X the width of the tile in DF TMS. Use sealant on grout joints spanning the crack. Installing Over Radiant/Electric Heat (RH110-RH117):A. Install the heat system as instructed by the manufacturer's specifications.B. Apply approved fill coat over the heat system with a smooth mortar or a self-leveling compound to manufacturer’s specs so the surface is flat w/ out deep textures, large gaps or cavities to a CSP–2 or smoother surface profile.C. Allow the fill coat or self-leveler to cure (up to 72 hours).D. Due to shrinkage potential of some fill coat materials upon curing, an additional, thin scratch coat of the same material may be necessary to ensure the surface is smooth and flat along with scraping any burrs.E. After the additional scratch coat is thoroughly dry, apply the DemoFlex Adhesive and install the DemoFlex Membrane & seam/perimeter treatment, then proceed installing the mortar, tile & grout per the TCNA Handbook. F. After proper installation of DemoFlex & Tile; repair or replacement of the Membrane & Tile with NO damage to the heat system is possible; carefully remove grout/tile maintaining shallow angles of removal tools (continued).
Heavier Mositure Exposure Areas (greater than Com2):If Com3 level waterproofing is desired, it must be clearly specified. Refer to TCNA Standards for material selection and installation methods for Com3 or higher environmental exposure areas like fully submerged showers or ones with extended exposure to standing water. In areas adjacent to Com3 or in Com2 environments with a heightened concern for moisture resistance during maintenance for example; TMS Plus is recommended. Be sure to coat all seams & perimeter of DF Membrane sheets with sealant of C834 or higher following Guide C1193 or liquid waterproofing based on manufactur-er’s specifications. Leave the Membrane 6-12" away from the perimeter walls and doorway entrances. Repair any damaged membrane prior to tile.
Tile Installation Recommendations (see TCNA Handbook):DemoFlex can be walked on immediately, but is not a wear surface and can be damaged prior to the installation of the mortar and tile. It is recommended to only install as much DemoFlex TMS as will be immediately followed by mortar & tile installation. Proceed to install ceramic tile or stone immediately according to industry standards. For the mortar bond coat, high quality mortars are recommended to set tile, but anythin, medium or LFT mortars meeting ANSI 118.4 or ISO C2S1 or better are acceptable. Mix mortar according to manufacturer specifications. Clean the backs of the tiles so they are free from dust/debris. Use the proper notched trowel to maximize coverage of mortar bond coat under the tiles and along all edges and corners. Use flat side of the trowel to key the mortar into the DemoFlex Membrane. Back-butter/scratch-coat the back of the tiles with mortar. Comb the mortar with the trowel marks all in the same direction, perpendic-ualr to the leading edge of rectangular tiles. Perpendicular to the ridges of the mortar; thoroughly press the tile back/forth into the mortar to force air bubbles out achieving proper coverage and support of the tile. Check below tiles for TCNA recommended coverage percentage based on the application. The use of tile leveling/spacer system can aid in minimizing ‘lippage’ along the edges of the tile. Remove excess mortar off of the TMS before the mortar dries. Be sure to clean the mortar out of the grout lines so the proper amount of grout can be installed between the tiles. Larger tiles may have extended mortar curing times; adjust traffic & furniture use accordingly.
Product Data Spec Sheetby