DEMIS Daily Summary Tutorial - University of Kansas
14
DEMIS Daily Summary Tutorial 1 October, 2012 OIRP recommends and supports Internet Explorer (IE). https://demisweb2.ku.edu/SASLogon Log in using your KU Online ID (the same as your KU Outlook Email) 1) Your DEMIS Portal will default to displaying the General tab. The information on this tab provides a variety of user documentation, user agreement information, and links to other helpful websites. There is also a Help link at the top-right corner of the browser window that goes into more in-depth detail about the SAS system. 1
Transcript of DEMIS Daily Summary Tutorial - University of Kansas

DEMIS Daily Summary Tutorial
1
October, 2012
OIRP recommends and supports Internet Explorer (IE).
https://demisweb2.ku.edu/SASLogon
Log in using your KU Online ID (the same as your KU Outlook Email)
1) Your DEMIS Portal will default to displaying the General tab. The information on this tab
provides a variety of user documentation, user agreement information, and links to other
helpful websites. There is also a Help link at the top-right corner of the browser window that
goes into more in-depth detail about the SAS system.
1

DEMIS Daily Summary Tutorial
2
Next to the General tab, you will see other tabs for which you have been given access to view and/or
download information.
2) Click on the Student Admin tab to locate the SIS Daily Summary Report by Plans and the SIS
Census Summary Report by Semester and Plans reports. They are located under the heading
Student Records. You can access each report by clicking on the title of the report you choose to
review.
The system will begin generating up-to-date reports. It may take a minute for each table to populate.
The data is based on the previous day’s Enroll & Pay information.
2

DEMIS Daily Summary Tutorial
3
3) You can see that the system is continuing to process even after the ‘Please Wait’ message has
been replaced by a window displaying some data. Wait for the animated ‘Processing’ icon at the
top-right of your browser window to disappear.
4) If you try to select data from the table before it the system is finished processing, you may get
the following error.
Often times you can simply return to the previous page and regenerate the same request (clicking the
same link). Again, remember to allow the system to finish processing before trying to access data.
3
4

DEMIS Daily Summary Tutorial
4
Once you are in the report, you will see a navigation bar, small windows down the left hand side of the
largest browser window, and a larger window displaying the information you are attempting to access.
5) ‘<<’ - Collapses or expands the Data Sections or Table of Contents when more room is needed
to view data requested. You can allow more browser window space by collapsing the panel.
5
DEMIS Daily Summary Tutorial
5
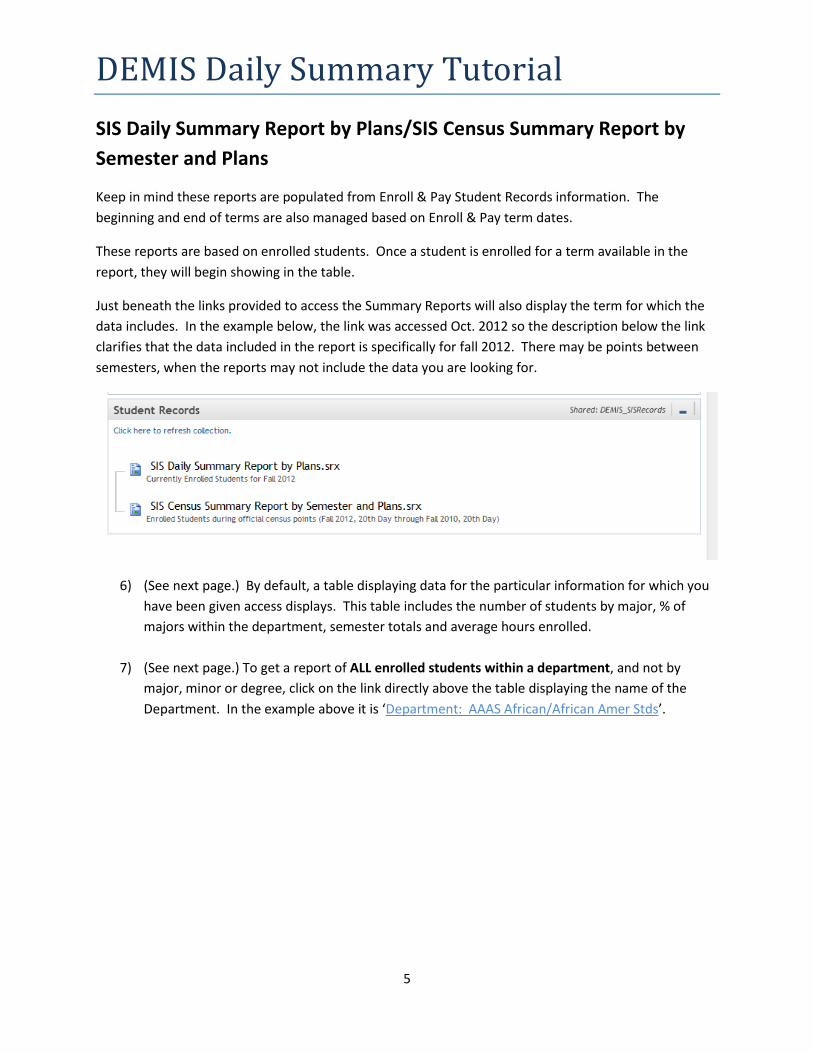
SIS Daily Summary Report by Plans/SIS Census Summary Report by
Semester and Plans
Keep in mind these reports are populated from Enroll & Pay Student Records information. The
beginning and end of terms are also managed based on Enroll & Pay term dates.
These reports are based on enrolled students. Once a student is enrolled for a term available in the
report, they will begin showing in the table.
Just beneath the links provided to access the Summary Reports will also display the term for which the
data includes. In the example below, the link was accessed Oct. 2012 so the description below the link
clarifies that the data included in the report is specifically for fall 2012. There may be points between
semesters, when the reports may not include the data you are looking for.
6) (See next page.) By default, a table displaying data for the particular information for which you
have been given access displays. This table includes the number of students by major, % of
majors within the department, semester totals and average hours enrolled.
7) (See next page.) To get a report of ALL enrolled students within a department, and not by
major, minor or degree, click on the link directly above the table displaying the name of the
Department. In the example above it is ‘Department: AAAS African/African Amer Stds’.

DEMIS Daily Summary Tutorial
6
8) If you click on any number within the Department report, you will get specific information
regarding the students included in the count.
8
7 6
DEMIS Daily Summary Tutorial
7
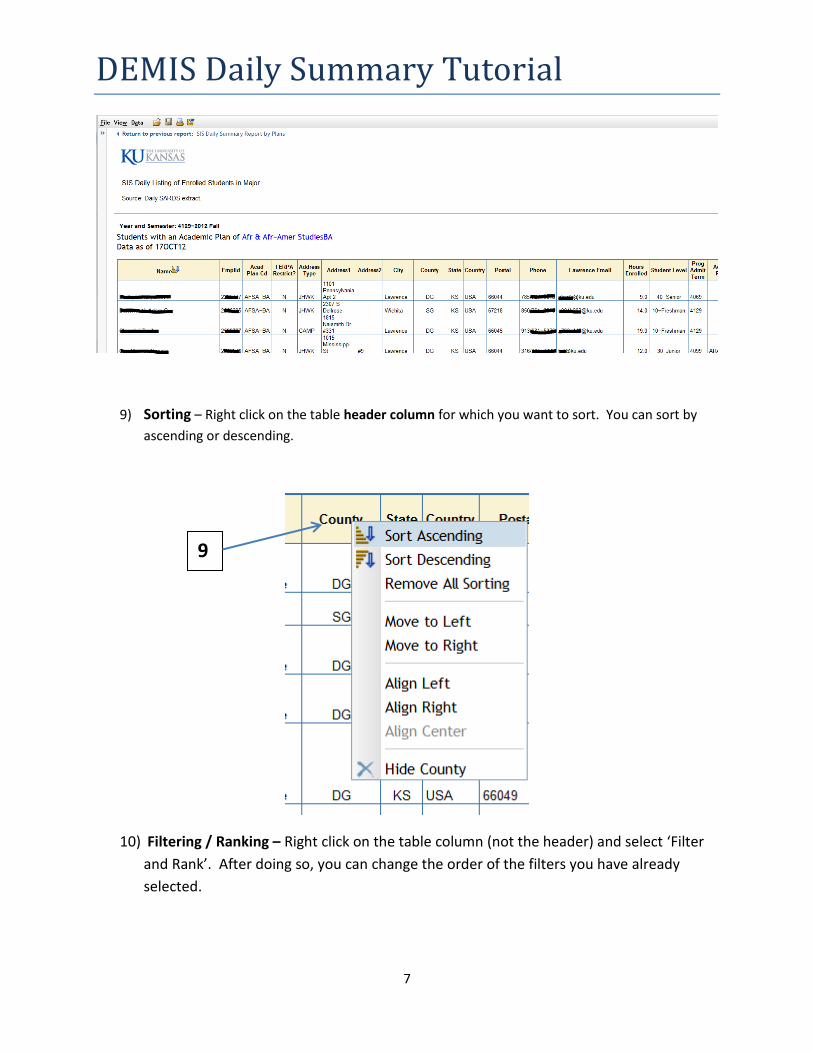
9) Sorting – Right click on the table header column for which you want to sort. You can sort by
ascending or descending.
10) Filtering / Ranking – Right click on the table column (not the header) and select ‘Filter
and Rank’. After doing so, you can change the order of the filters you have already
selected.
9

DEMIS Daily Summary Tutorial
8
a) In the example below, you select the Data Item you wish to filter on, click the Filter
option under Type and type in the exact value you wish to filter on down under Type a
value to add. We used AFSA-BA. Be sure to click the arrow button to move the value
you’ve chosen over to the Selected Values box. After selecting your values, click OK.
10

DEMIS Daily Summary Tutorial
9
b) You can remove your filter(s) by returning to the Filter and Rank menu. You will see that the
date items you’ve chosen to filter on now show a blue funnel icon next to them. By selecting
the Data Item you wish to remove and changing the Type from ‘Filter’ to ‘No filter’ and pushing
the OK button, your data will no longer reflect this filter.

DEMIS Daily Summary Tutorial
10
11) You can return to the default table displaying your original data by clicking on the link just below
the tool bar.
Printing:
We recommend downloading the data to Excel and then printing it out.
12) However, printing to a PDF is another option. You can print to a PDF by going to File in the tool
bar and clicking the Print menu item. Click on the Print to PDF button.
11

DEMIS Daily Summary Tutorial
11

DEMIS Daily Summary Tutorial
12
IMPORTANT!!
13) Do NOT click on the following Export icon located in the same tool bar as File.
14) Do NOT choose to the Export menu item under the File menu.
Export to Excel:
15) DO right click on your data table (not in the header) and click on Export Table as seen in
image below (see next page). This will allow you to export the data within the report to an Excel
spreadsheet.

DEMIS Daily Summary Tutorial
13
Select Save as and rename the file to a name of your choice while also saving it to a secure drive. Do
not save FERPA protected data to your hard drive. Please see more specific procedures laid out by that
policy at this website:
https://documents.ku.edu/policies/IT/DataClassificationandHandlingProceduresGuide.htm

DEMIS Daily Summary Tutorial
14
Groups/SIS/Training/DEMIS training for Advising Users