Demand Planning System (DPS) Manual - AstenJohnson · PDF fileD E M A N D P L A N N I N G S Y...
54
June 23, 2014 Demand Planning System (DPS) Manual Field Sales and Service Documentation 4399 Corporate Road Charleston, SC 29405 Phone 800.529.7990 (US) 800.225.5594 (CA) • Fax 843.202.6278 Volume 1
-
Upload
trinhkhuong -
Category
Documents
-
view
220 -
download
4
Transcript of Demand Planning System (DPS) Manual - AstenJohnson · PDF fileD E M A N D P L A N N I N G S Y...

June 23, 2014
Demand Planning System (DPS) Manual
Field Sales and Service Documentation
4399 Corporate Road Charleston, SC 29405
Phone 800.529.7990 (US) 800.225.5594 (CA) • Fax 843.202.6278
Volume 1

June 23, 2014 Page 1
Table of Contents
GlobalLink Demand Planning (DPS) .................................................................... 2 Logging into DPS................................................................................................. 3
Logging in the First Time .......................................................................... 3 Email Address and Password .................................................................. 4 Need a User Profile/Account for DPS ....................................................... 5 Forgot Password ...................................................................................... 5
My Profile Page ................................................................................................... 6 Change Password .................................................................................... 6 Edit Profile ............................................................................................... 7
My Business View ............................................................................................... 8 Landing Page ........................................................................................... 8 Watch List ................................................................................................ 8 Late Fabrics ............................................................................................. 8 Orders Needed ........................................................................................ 9
Cleaning Up Orders Needed ........................................................ 9 Installation Schedule .............................................................................. 10
My Machines ..................................................................................................... 10 Mill Drop Down ....................................................................................... 11 Machine Drop Down .............................................................................. 11 Find a Fabric Number ............................................................................ 12 Next AJ Install Date ............................................................................... 12 Inventory ................................................................................................ 13 Fabric Details ......................................................................................... 14
How to Release a Piece from the Warehouse ............................ 15 How to Retrieve an Invoice/Data Sheet for a Boxed Fabric .................... 16 How to Install a Fabric on the Machine .................................................. 17 Machine Documents .............................................................................. 18
Position View ..................................................................................................... 20 Header Functionality .............................................................................. 21 Drivers ................................................................................................... 22 Inventory ................................................................................................ 24
Run Sequence ............................................................................ 24 In Watch ..................................................................................... 24 Not Used .................................................................................... 25
Run History ............................................................................................ 25 Projected Installations and Orders ......................................................... 26
AJ Internal & External Fabric Statuses .............................................................. 27 Competitor Fabrics ............................................................................................ 28
How to Add a Competitor Fabric ............................................................ 28 Competitor Fabric Visibility ..................................................................... 29 Competitor Supplier Codes .................................................................... 29
AJ Mobile Internet Interface for use on Smart Phones ....................................... 30 Glossary of Terms ............................................................................................. 42 Troubleshooting Guide ...................................................................................... 48 Table of Figures and Page Numbers ................................................................. 49 Index ................................................................................................................. 52

D E M A N D P L A N N I N G S Y S T E M
June 23, 2014 Page 2
GlobalLink Demand Planning
(DPS)
he GlobalLink Demand Planning System (DPS) is AstenJohnson’s internet based inventory management system and is a component of the GlobalLink Inventory Management System used by PMC customers.
The GlobalLink System is the tool that AstenJohnson will utilize for Inventory Management and Continuous Forecasting. This system will also maintain run history, projected orders and sales for the next 18 months. For the remainder of this manual, please refer to the GlobalLink Demand Planning System as DPS. This manual will cover how a Field Based Sales and Service Representative will use DPS to manage inventory, maintain position drivers, track run history and project business for each assigned business team on a mill by mill’s, position by position basis for the next 18 months. Some screens will be similar to what our customers see while others will only be available to internal AstenJohnson users. DPS can also be used to access Data Sheets, Status Letters, Cap Reports and Accounts Receivables information. The New DPS is internet based and will require an internet connection or a smart phone with a data plan in order to gain access. DPS will have live data and will NOT require synchronization in order to show entries into the system. We will no longer have an offline client. Instead, we will make use of smart phone technology to allow you to manage your inventory when you don’t have internet access, but do have data access through your smart phone. DPS will be linked directly to the same data warehouse that is used by Inside Sales via our JD Edwards/Customer Solutions Systems. This means that information will only exist in one table, which will make reporting and data retrieval easier and faster.
Sections of this manual are broken down based on the Screen Name. Functionalities for each screen will be explained along with how entries can be made or changed. If you are viewing this manual electronically, you can use the Table of Contents page to access the section you need by holding down the “Ctrl” key and then clicking on any entry within the Table of Contents and it will take you directly to that section of the manual.
Let’s get started with How to Log into the GlobalLink Demand Planning System (DPS).
T

D E M A N D P L A N N I N G S Y S T E M
June 23, 2014 Page 3
Logging into DPS
You must have an internet connection in order to log into the New GlobalLink Demand Planning System (DPS). A connection to the VPN is NOT REQUIRED, just an internet signal (a Hotspot connection via your smartphone will also work, provided you are in an area that has data coverage by your cell phone provider).
The internet address needed to access DPS is: https://ajgloballink.astenjohnson.com
Or open Internet Explorer Application and under Favorites go to the AstenJohnson Folder and click on the “GlobalLink DPS”
Logging in the First Time
If you are viewing this manual electronically, click on the link above. If you are not viewing electronically, please type the above internet address into the address box of your Internet Explorer window.
For easy access once you have the DPS login page open on the screen, please add it to your Internet Explorer Favorites Bar. To add the Log In page to your Favorites Bar (while on the Log in page), click on the “Add to Favorites Bar” icon next to the word Favorites in the Internet Explorer window. (See Figure 1)
Figure 1 – Icon to add site to your Favorites Bar in Internet Explorer.
Once you have clicked on the “Add to Favorites Bar” icon, it will be inserted right beside the Add To Favorites icon as “Log On.” (See Figure 2)
Figure 2 – Once added your short-cut will look like this.
If you wish to change the name of the short cut, right click on the “Log On” name and select “Rename” from the drop down menu. (See Figure 3)

D E M A N D P L A N N I N G S Y S T E M
June 23, 2014 Page 4
Figure 3 – Right click on Icon to find Rename option.
When the “Rename” box pops up, type in a new name for this icon. “GlobalLink” or “DPS” are two suggestions that would make it clear what this Favorites Bar item is a shortcut to. (See Figure 4)
Figure 4 – Type in new name for your internet short-cut.
When you wish to access DPS, you will open Internet Explorer and click on the shortcut in your Favorites Bar to get to the Log On page quickly. (See Figure 5)
Figure 5 – Short-cut icon with the New Name.
Email Address and Password
Your log on information consists of your AstenJohnson email address and your GlobalLink password. If you do not remember your password, please see, “Forgot Password” section below.
Enter your AstenJohnson email address and password into the appropriate fields and click on “Log On” or click on the “Enter” key on the keyboard once both fields are populated. (See Figure 6)

D E M A N D P L A N N I N G S Y S T E M
June 23, 2014 Page 5
Figure 6 – View of DPS Log-on Sign In Page.
Need a User Profile/Account for DPS
If you don’t have a user profile, please click on the Register option at the top of the Log On Page. Fill out the information and then click on the “Register Button” at the bottom of the page. The Register Page can also be used by Customers to register for access to our external version of GlobalLink. (See Figure 7)
Figure 7 – Information Needed to create a New Log In for External Users.
Forgot Password
If you have forgotten your password, please click on the “Forgot your password?” option on the log on screen. This will send a computer generated password to your email account. Once you receive this password, highlight the new password, (“CTL”+”C”) and paste it into the password field. The system will force you to change the password from the temporary password upon login. (See Figure 8)

D E M A N D P L A N N I N G S Y S T E M
June 23, 2014 Page 6
Figure 8 – “Forgot your Password” option on Log On Screen.
My Profile Page
The “My Profile” page allows you to update your key profile information and change your password. From the Edit Profile option you will also be able to change your account from an Internal User to an External User. This option will be beneficial when you meet with a customer and only want to display the data available in the customer version of GlobalLink. (See Figure 9)
Figure 9 – View of the “My Profile” Page.
Change Password
Click on the “My Profile” option on the right hand side of the screen by My Machines. Click on the “Change password” option to proceed. To change your password you must enter your current password, enter your new password twice, and then click on “Change Password.” (See Figure 10)
Figure 10 – “Change Password” Screen from “My Profile” page.
D E M A N D P L A N N I N G S Y S T E M
June 23, 2014 Page 7
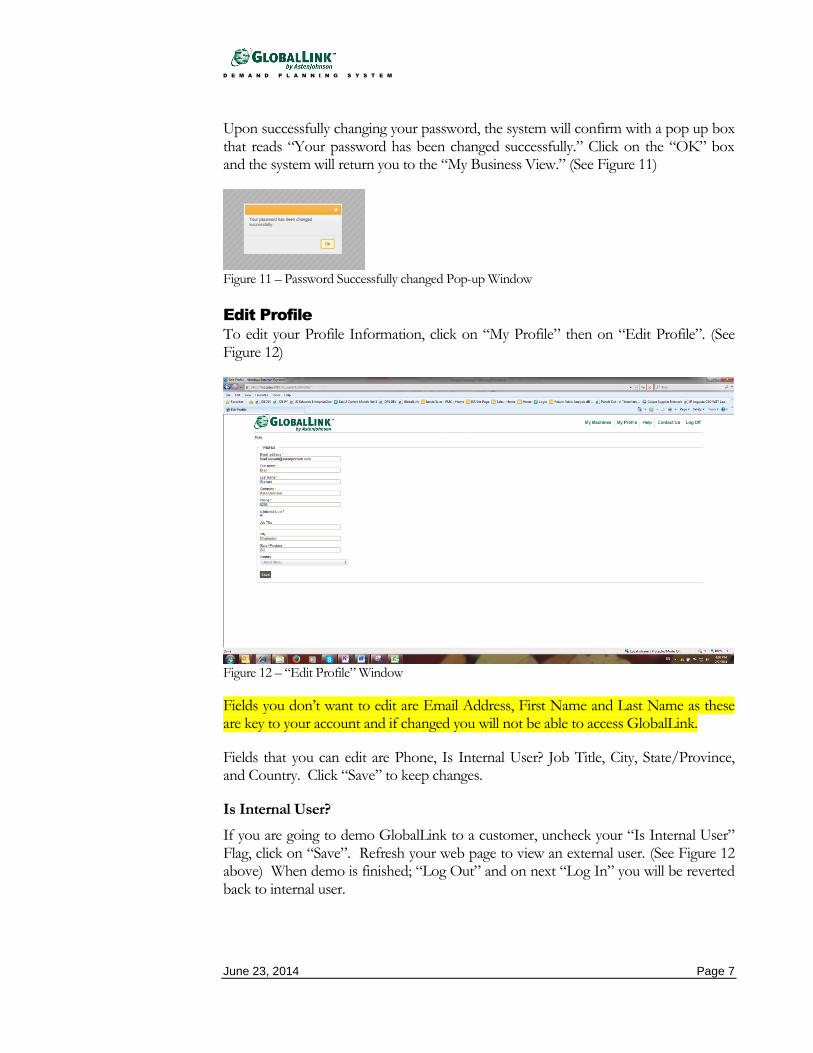
Upon successfully changing your password, the system will confirm with a pop up box that reads “Your password has been changed successfully.” Click on the “OK” box and the system will return you to the “My Business View.” (See Figure 11)
Figure 11 – Password Successfully changed Pop-up Window
Edit Profile
To edit your Profile Information, click on “My Profile” then on “Edit Profile”. (See Figure 12)
Figure 12 – “Edit Profile” Window
Fields you don’t want to edit are Email Address, First Name and Last Name as these are key to your account and if changed you will not be able to access GlobalLink.
Fields that you can edit are Phone, Is Internal User? Job Title, City, State/Province, and Country. Click “Save” to keep changes.
Is Internal User?
If you are going to demo GlobalLink to a customer, uncheck your “Is Internal User” Flag, click on “Save”. Refresh your web page to view an external user. (See Figure 12 above) When demo is finished; “Log Out” and on next “Log In” you will be reverted back to internal user.

D E M A N D P L A N N I N G S Y S T E M
June 23, 2014 Page 8
My Business View
The My Business View will allow you to view your “Watch List”, “Late Fabrics”, “Orders Needed”, and the “Installation Schedule” for 16 weeks. The default view on this screen will be the “My Mills” view. These are the mills that the logged in user has sales responsibilities for within JD Edwards.
Landing Page
The default view when you first login is: “My Business View.” If you are an associate with any Sales Responsibilities, you will be shown “My Mills,” or those mills where you have been assigned Forming, Press or Dryer Responsibility for in JD Edwards. If any of these responsibilities need to be changed, contact your ISR. The remaining views in the mill drop down window are “All Mills” or each individual mill you have access to via DPS.
Watch List
You can add Fabrics to your own personal Watch List from the Position View Page by clicking on the “In Watch” box in the Inventory Section (Please refer to the Inventory section for further details). This section of the My Business View page allows you to select the fabrics that are critical to watch for either inventory or installation needs. Please note that fabrics will stay on your watch list until they have been removed from the machine. Blind orders added to your watch list will appear in orange. To add fabric comments, click on the Comments box at the far right hand side and save your changes. (See Figures 13 and 14 below)
Figure 13 – Sample of “Watch List” on “My Business View” page.
Figure 14 – “Add Fabric Comment” box for in “Watch List” Fabrics
Late Fabrics
If any fabric in your mill list has a schedule date that is past the RPD, it is late. These late fabrics will be shown directly under the Watch List in the Business View. (See Figure 15)

D E M A N D P L A N N I N G S Y S T E M
June 23, 2014 Page 9
Figure 15 – “Late Fabrics” list on “My Business View”.
Orders Needed
The Orders Needed Section lists all orders that are needed for completion within the next 16 weeks in order to maintain the required inventory levels. The goal each month is to get a real order, enter a DPS order, or fix the data. Positions needing an order are listed under your Business View. (See Figure 16)
Figure 16 – Sample of “Orders Needed” list on “My Business Page”.
Cleaning Up Orders Needed
The “Date Needed” is the date we need a fabric to pack in order to maintain box requirements. Any position with a negative number in the “Week” column on your Orders Needed list is where an order is needed and if it was received today the required pack date would be in the past. If the week number is “0,” this means we need an order to pack in the current week to maintain box requirements.
If the Next AstenJohnson Install (NAJI) date has changed for a position on this list, you can click the position and update the NAJI date from the position view. This will in turn remove that position from being on your Orders Needed list or will move it within the list if the new NAJI date is within the next 16 weeks.

D E M A N D P L A N N I N G S Y S T E M
June 23, 2014 Page 10
Installation Schedule
Based on the Next AJ Install Date, the fabrics in this list are projected for installation within the next 16 weeks. (See Figure 17)
Figure 17 – Sample of “Installation Schedule” from “My Business View” page.
My Machines
The mills you are assigned are listed alphabetically. This view is a snapshot by Mill and Machine of the inventory pipeline. Positions run from left to right (Forming, Press, and Dryer) across the top of the screen and the status of the fabrics run from top to bottom. The Next AJ Install is listed below each position name for a quick view of what is currently scheduled for each position. This makes it easy to see what is accurate or what needs to be updated. (See Figure 18) This view is identical to the Machine View that the customer sees in GlobalLink. However, not every screen will be the same for an external user, so it is key that you know the differences. Please refer to the section called “My Profile Page” on how to change your profile from an internal user to an external user if necessary.

D E M A N D P L A N N I N G S Y S T E M
June 23, 2014 Page 11
Figure 18 – Sample of a “My Machine” actual page.
Mill Drop Down
This drop down menu allows you to select the mill you need to view. (See Figure 19)
Figure 19 – Mill Drop Down list
Machine Drop Down
Once the mill has been selected, select the machine to be viewed. Once you have made this selection, the screen will update to show the entire inventory pipeline (Forming, Press & Dryer) for that machine.
Based on your screen resolution and the number of actual positions on the machine, you may not be able to see all of the positions at once. If you cannot view them all, click on the arrow to see the remaining positions. (See Figure 20)

D E M A N D P L A N N I N G S Y S T E M
June 23, 2014 Page 12
Figure 20 – Sample of more positions than will fit on the screen
Find a Fabric Number
Regardless of what mill is currently on your screen, you can search any mill’s fabric number by typing the number in the “Fabric No.” box. After you’ve entered a fabric number, click on “Find”, and the system will locate the mill that corresponds to that fabric number.
Figure 21 – Fabric No. Look-up box
Next AJ Install Date
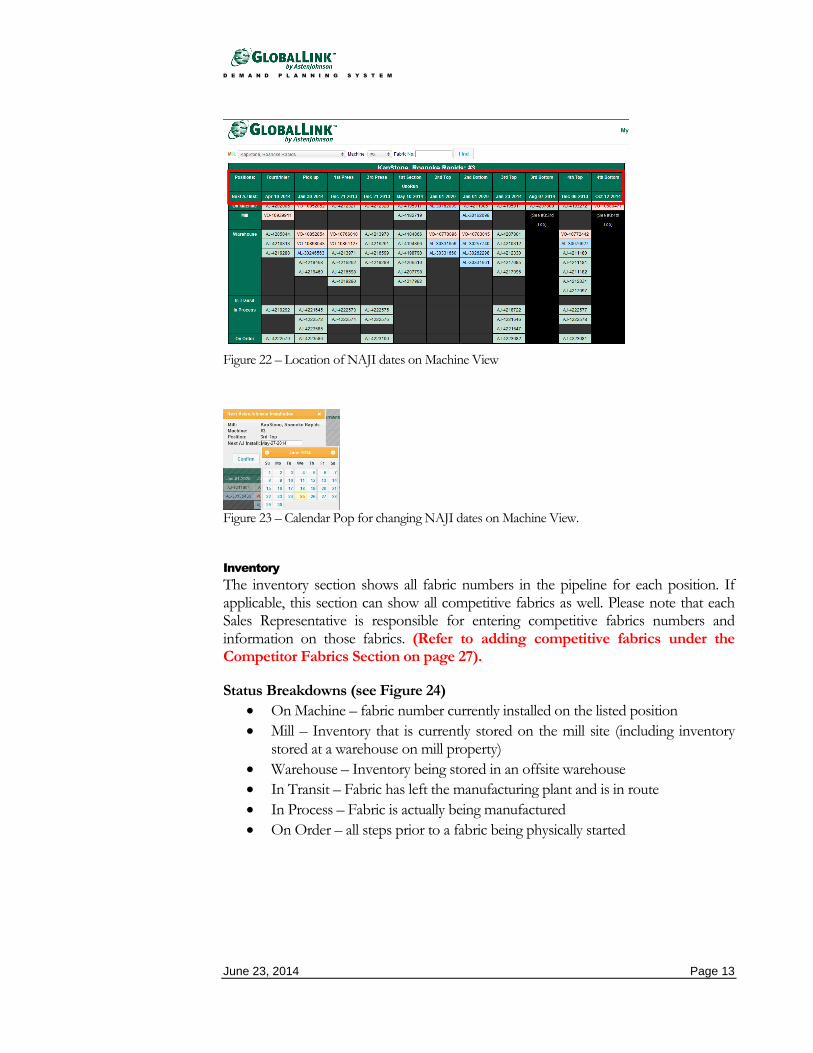
For each position on the My Machines View, you will see the Next AJ Install Date for that position based on the Projections. To modify the Next AJ Install date, click on the date, make necessary changes, and click confirm. (See Figures 22 & 23)
D E M A N D P L A N N I N G S Y S T E M
June 23, 2014 Page 13
Figure 22 – Location of NAJI dates on Machine View
Figure 23 – Calendar Pop for changing NAJI dates on Machine View.
Inventory
The inventory section shows all fabric numbers in the pipeline for each position. If applicable, this section can show all competitive fabrics as well. Please note that each Sales Representative is responsible for entering competitive fabrics numbers and information on those fabrics. (Refer to adding competitive fabrics under the Competitor Fabrics Section on page 27).
Status Breakdowns (see Figure 24)
On Machine – fabric number currently installed on the listed position
Mill – Inventory that is currently stored on the mill site (including inventory stored at a warehouse on mill property)
Warehouse – Inventory being stored in an offsite warehouse
In Transit – Fabric has left the manufacturing plant and is in route
In Process – Fabric is actually being manufactured
On Order – all steps prior to a fabric being physically started

D E M A N D P L A N N I N G S Y S T E M
June 23, 2014 Page 14
Figure 24 – Machine View Status Breakdowns.
All in process fabrics will get an estimated pack date (denoted by the two asterisks in front of the pack date). If an in process fabric has a schedule date, the estimated pack date will be the same as the schedule date, if schedule date is blank (1/1/2050 in JDE) the estimated pack date will equal the Requested Date (RPD). (See Figure 25)
Figure 25 – Inventory Section – ** asterisks denote the dates as estimated dates.
Fabric Details
When you click on a fabric number in DPS from the machine or position view, you will see the details of that fabric. The details will be based on the current status of the fabric and the default view will be the Manufacturing Specs. If the fabric is “On Order” (Customer Service/Specification Required), you will see the specs of the order. If the fabric has moved to “In Process” (Scheduling to Packing statuses), you will see the manufacturing specifications of how they plan to make the fabric. Note that this information is also available from the Position View. If a fabric is “In Transit”, a data sheet will be available. Once completed fabrics have had their manufacturing results approved, you will be able to click on the tab below to access them. (See Figure 26)

D E M A N D P L A N N I N G S Y S T E M
June 23, 2014 Page 15
Figure 26 – Location of Manufacturing Results when clicking on a fabric number.
How to Release a Piece from the Warehouse
Fabrics that are currently at the warehouse will be listed under each position’s “Warehouse” section as shown below. (See Figure 27)
Figure 27 – Fabrics located in a warehouse from machine view.
From the Machine or Position View you have the ability to release a piece from the warehouse to the mill by clicking on the fabric number to see the details and then click on the “Release” button. Once clicking “Release,” a confirmation box will come up that requires you to give a requested delivery date and the option to make any special notes about the delivery. Release requests will be sent to your Inside Sales Representative via email. (See Figures 28 & 29) Please note that if a fabric has not yet been released to the mill or has not reached its cap expiration date, an invoice will not be available.

D E M A N D P L A N N I N G S Y S T E M
June 23, 2014 Page 16
Figure 28 – location of Release button on Fabric Detail Screen.
Figure 29 – Fields to enter when releasing a fabric from the warehouse.
How to Retrieve an Invoice/Data Sheet for a Boxed Fabric
To acquire an invoice for a boxed fabric, click on the fabric and once the box pops up (see Figure 30) click on the “Invoice” button and either open or save the file. Clicking on the “Data Sheet” button will have the data sheet emailed to you. If the fabric has not been invoiced yet, the only available buttons will be Data Sheet and Install.
Figure 30 – Location of Invoice Button if fabric has been invoiced.

D E M A N D P L A N N I N G S Y S T E M
June 23, 2014 Page 17
From this box, you also have the option to install a fabric on the machine. Please see section below for further details.
How to Install a Fabric on the Machine
Installs can be made by clicking on any completed fabric in the Machine View, Inventory section of the Position View or from the Mobile App. When installing a piece on the machine, a popup notification (as shown below in Figure 31) will require you to click “OK.”
If you need to edit the on or off dates of a fabric already installed, click on the fabric and then click in the box you need to change and edit the date. Removal Reason will default to “Removed – Schedule” please use drop down box to change. A Removal Reason Note can also be added at this time (Caution: Customers with Active GlobalLink accounts see both the Removal Reason and the Note).
Figure 31 – Install Fabric box

D E M A N D P L A N N I N G S Y S T E M
June 23, 2014 Page 18
Upon clicking “OK,” the “Install Processing” box will appear and will disappear when install is complete. (see Figure 32)
Figure 32 – Install Processing box.
Important: If the wrong piece number was installed after clicking “OK”, the only person that can put the piece back into inventory is your ISR. For fabrics in run history that have previously been taken off the machine, you may edit the on/off dates (as shown below in Figure 33) in the “Change On Off Date” box once clicking on a fabric.
Figure 33 – Editing On/Off Dates of fabrics.
Machine Documents
By clicking on the Mill and Machine Name shown on top of the position grid, this will take you to the Machine Documents. You will find documents that were approved for publication via GlobalLink for customer access. This will be an easy access point for you to retrieve Return Fabric Analyses and to see if it has been approved for the customers to access. If you cannot find the document in this area, then it was not approved for publication to GlobalLink and you will need to locate the document in SharePoint. (See Figures 34 & 35)

D E M A N D P L A N N I N G S Y S T E M
June 23, 2014 Page 19
Figure 34 – Click on Mill Name to get to Machine Documents section.
Figure 35 – Machine Detail will provide access to reports.
Additional functions from this page include the ability to request an updated Status of Orders or Cap Expiration Report for the next 30 calendar days. To receive the Status of Orders or Cap Report, click on these buttons and you will receive them via email.
You can also access the AR Summary to view the current and past due Accounts Receivables for the selected mill. To view the current AR Summary, click on the button and you will be able to view this on a separate screen. (See Figure 36)
Figure 36 – AR Summary Report
If you would like to Export the entire machine’s run history and current inventory to Excel, click on the “Export” box. This export feature replaces the Position Summary feature from the old TechEdge System. Each position will be exported to its own tab within the Excel document. This will also be accessible in the customer version of GlobalLink. (See Figure 37)

D E M A N D P L A N N I N G S Y S T E M
June 23, 2014 Page 20
Figure 37 – Machine Export to Excel (all positions on a separate tab).
How to Print the Entire Export: Format and Print all tabs:
1. Hold down “Shift” Key, click on first tab, continue to hold the Shift key down, scroll over and click on the last tab, all the tabs are now active.
2. “Ctrl+P” to print, make these changes in the print window before printing:
Change Portrait layout to Landscape
Change margins to 0 or .25 for Top, Bottom, Left & Right margins
Change “No Scaling” to “Fit all Columns to One Page”
Click on “Print” icon
Position View
The Position View will vary greatly between an internal GlobalLink user and an external GlobalLink user (customer). As an internal user you will have the ability to make your screen look like the customer’s by changing your profile (see section on editing “My Profile Page”). This section will cover the Position View for an Internal User.
There are five sections to each Position View:
Header
Drivers
Inventory
Run History
Projections
The details of how each of these sections function and how changes can be made and updated are below. *Please note that all the sections function together but are being broken down in this documentation for ease of training purposes and future reference.

D E M A N D P L A N N I N G S Y S T E M
June 23, 2014 Page 21
Header Functionality
This section allows you to switch between Mills, Machines, and Positions easily by making use of the drop down menus for the Mill, Machine, and Position. You must select something for all three drop downs for DPS to update to the location of your selection. (See Figure 38)
Figure 38 – Position View Header information
There is an option to look up a Fabric Number if you don’t know the Mill, Machine, and Position. Enter the Fabric Number and click on Find. (See Figure 39)
Figure 39 – Fabric a Fabric Box
The other pieces of information in this section are Sales Responsibility and Inside Sales Representative (ISR) assigned to the position. This information is still maintained in JD Edwards. If changes to this information are required, please contact the ISR for the account and advise what changes need to be made.
Two other functions within the header are the ability to add Competitor Fabrics to the inventory for this position (which will be covered in detail in the Inventory Section) and the ability to export this single position’s Inventory and Run History into an Excel Document. By clicking on the Export Button the system will automatically start the Exporting.
The File Download window will pop up when it is ready to Open or Save into Excel. (See Figure 40)
Figure 40 – Excel Download pop up window (open or save export).
Click on “Open” to view the file. (See Figure 41)

D E M A N D P L A N N I N G S Y S T E M
June 23, 2014 Page 22
Figure 41 – Single position Excel Export.
Drivers
The Driver Section will list the Invoice Type, the Target Box, Actual Box, Target In Process and Actual In Process levels for this position. In the new version, the Account Manager, ISR, or Sales Rep for the assigned product line will have the ability to change the following information in the Driver Section: Target Box, Target FIP, Next AJ Install, Forecasted MktShare, Replenishment Offset, Expected Life and Primary Competitor. It’s important to note that you must click the save button to keep your changes. If changes are made to these drivers, an auto attendant will be emailed to the Sales Rep, ISR, and Supply Chain Managers. (See Figure 42)
Figure 42 – Sample of Email message when drivers are changed on a position.
You can edit the Target FIP and the Target AJ Owned or Mill Owned by clicking in the corresponding box. (See Figure 43)
Figure 43 – Area of position view where Box and FIP requirements can be edited.
Invoice Type Definitions:

D E M A N D P L A N N I N G S Y S T E M
June 23, 2014 Page 23
Invoice on Ship – Fabric invoices upon shipment from AJ plant
Invoice on Release – Fabric invoices upon release from external warehouse or pack cap expiration date; whichever occurs first
Invoice on Install – Fabric invoices upon installation or pack cap expiration date; whichever occurs first
The Standard for the Position specifies the Standard Design, Units, Price and Currency. This information will be used in the projections section. If this information is incorrect, you will need to work with your ISR to get the Standard Position (SP) corrected in JD Edwards, as you will not be able to edit this in DPS. (See Figure 44)
Figure 44 – Standard for the Position information comes from JD Edwards.
Average Life Section lists the average life on the position for All Fabrics, both AJ and Competitor fabrics. This information is not editable; it is a calculation (Forming & Press = last 2 years; Dryer = last 5 runs). (See Figure 45)
Figure 45 – Average Life Calcualations
DPS Drivers are used to maintain the Next AJ Install Date, Forecasted MktShare for the next 18 months, Replenishment Offset, Expected Life and Primary Competitor for the position currently being viewed. (See Figure 46)
Figure 46 – DPS Drivers (NAJI, Forecasted MktShare, Repl. Offset, Expected Life & Primary Comp.)
If the position is part of a Common Size Grouping, you will see the parent position in the header. FIP and Box Targets must only reside on the Parent Position, making it important that you know you when you are on a child position. The red text under the mill drop down is the indicator that you are on a Child Position. Please note that the Parent will always be listed first in the Common Positions list. (See Figure 47)

D E M A N D P L A N N I N G S Y S T E M
June 23, 2014 Page 24
Figure 47 – Common Positions showen in Driver Section on Position.
Inventory
Figure 48 – Run Sequence, In Watch & Not Used boxes
The Inventory Section shows AstenJohnson fabrics and competitor fabrics where applicable. This section allows you to sequence fabrics in the order of which they’ll run, add fabrics to the “In Watch” list, and mark pieces as “Not Used.” (See Figure 48 above)
Run Sequence
When visiting any Position View, the run sequence boxes will be blank unless you have already assigned them numbers and saved. If the boxes are left blank, the fabrics will be shown as going on the machine in numerical order. To make changes to this sequence, click in the box under “Run Seq.” 1=the next fabric to run on the machine and so forth. Be sure to click save once you have made changes. It is important to note that you cannot skip numbers. If, for example, you have two PrintStars in inventory and you want them to be installed next (Run Seq.: 1) and then again two runs later (Run Seq.: 3), you must mark whichever fabric will be installed in between these two pieces as (Run Seq.: 2). (See Figure 49)
Figure 49 – Run Sequcence boxes with entries.
In Watch
To place a fabric on your “In Watch” list in the Position View, click the box under “In Watch.” By selecting this box, the system will add the selected piece to the top

D E M A N D P L A N N I N G S Y S T E M
June 23, 2014 Page 25
of your “My Business View” page. The default view for “In Watch” will be for those mills that you have Sales Responsibility. If you are not the Sales Representative and want to see all “In Watch” fabrics you will need to select your Business Team from the “Team” drop down. The Inside Sales Representatives will also see things all the “In Watch” fabrics. To remove a fabric from being “In Watch,” you either have to unselect the box or the fabric will be removed when comes off the machine.
Not Used
If a fabric should not be included in box levels, click on the “Not Used” button and click save. By marking a fabric “Not Used,” it will be excluded from the box levels, removed from the customer’s inventory view, and will not be included in projections.
Run History
In order to see Run History for a position, click on the position name from the Machine View. For each position, you will see the last five runs on the machine. In order to see the position’s entire run history, click on the plus sign in the upper left hand corner of the box to expand. (See Figure 50)
Figure 50 – Run History defaults to collapsed (last 5 runs), click on “+” to expand
Under the Removal Reason column, you will see a short abbreviation of why the fabric was taken off the machine. Any removal reason shown with two asterisks next to it, as seen in Figure 51 - 4196876, has additional removal information added. If you hover over the Removal Reason, you will see the additional comments. These additional removal comments are made only during the Installation Process but are shown on the fabric being removed. When installing a new piece onto the machine, the option to add a removal note will be at the bottom of the screen. (See Figure 51)

D E M A N D P L A N N I N G S Y S T E M
June 23, 2014 Page 26
Figure 51 – Adding Removal Reason and Removal Reason Notes, visable when you hover
Projected Installations and Orders
To project business, you must have an expected life entered for the position. Projections look out 24 months for Forming, Press, and Dryer sections. All projected fabrics are marked with a “P”, as shown below, under the fabric column and with “Projected” under the status column. (See Figure 52)
Figure 52 – Projected Installations and Orders
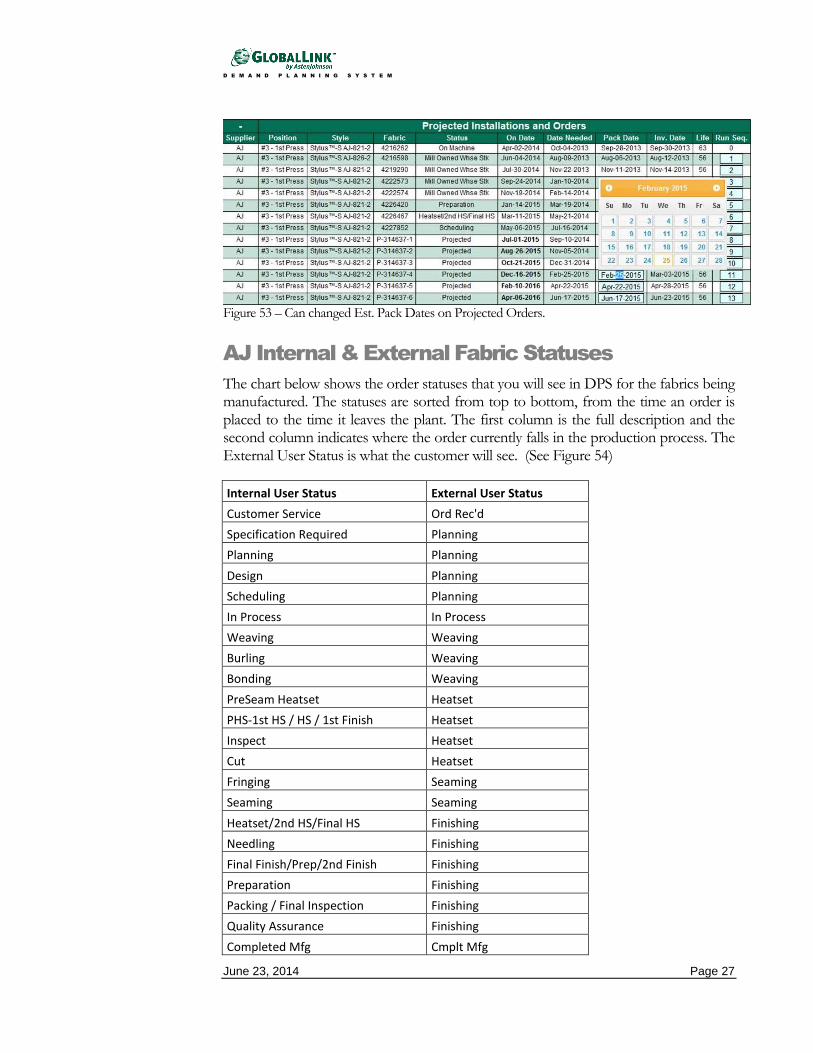
When hovering over the pack date for projected fabrics, you will find that the estimated pack dates can be modified. If a driver is changed, all projected orders will be recalculated upon clicking save. (See Figure 53)
D E M A N D P L A N N I N G S Y S T E M
June 23, 2014 Page 27
Figure 53 – Can changed Est. Pack Dates on Projected Orders.
AJ Internal & External Fabric Statuses
The chart below shows the order statuses that you will see in DPS for the fabrics being manufactured. The statuses are sorted from top to bottom, from the time an order is placed to the time it leaves the plant. The first column is the full description and the second column indicates where the order currently falls in the production process. The External User Status is what the customer will see. (See Figure 54)
Internal User Status External User Status
Customer Service Ord Rec'd
Specification Required Planning
Planning Planning
Design Planning
Scheduling Planning
In Process In Process
Weaving Weaving
Burling Weaving
Bonding Weaving
PreSeam Heatset Heatset
PHS-1st HS / HS / 1st Finish Heatset
Inspect Heatset
Cut Heatset
Fringing Seaming
Seaming Seaming
Heatset/2nd HS/Final HS Finishing
Needling Finishing
Final Finish/Prep/2nd Finish Finishing
Preparation Finishing
Packing / Final Inspection Finishing
Quality Assurance Finishing
Completed Mfg Cmplt Mfg

D E M A N D P L A N N I N G S Y S T E M
June 23, 2014 Page 28
Completed Mfg Cmplt Mfg
Out of Region Transit Transit
Transit Transit Figure 54 – Internal Fabric Statuses
Competitor Fabrics
How to Add a Competitor Fabric
To add a competitor fabric, click on the “Add Comp. Fabric” button. This option is only available from the Position View. (See Figure 55)
Figure 55 – Add Competitor Fabric Button
Once you see the below box pop up, you will be able to fill in the fabric details. Please enter as much information as you have. The Supplier, Style, and Fabric No. are all required fields. Please note that fabric numbers all have to be unique. If a fabric number is duplicated, it will not allow you to add the piece to inventory. (See Figure 56)
Figure 56 - ** Required Fields when adding Competitor Fabrics.
Once a competitor fabric is added to inventory, the below actions (Install/Delete) will become available. (See Figure 57)

D E M A N D P L A N N I N G S Y S T E M
June 23, 2014 Page 29
Figure 57 – Competitor Install and Delete Buttons
Competitor Fabric Visibility
Competitor fabrics will be visible from the Machine View as well as from the Position View. On the Machine View, they will be labeled accordingly and colored differently than AJ fabrics. (See Figure 58)
Figure 58 – Competitor Fabrics visible on Machine View
Competitor Supplier Codes
Below is a list of all competitor supplier code abbreviations and full descriptions. (See Figure 59)
Code Description
AF Advanced Fabrics
AL Albany
BA Bare
CR Cristini
HE Heimbach
IC Ichikawa
KU Andritz-Kufferath
NI Nippon Filcon

D E M A N D P L A N N I N G S Y S T E M
June 23, 2014 Page 30
OR Orr
VO Voith
VA Valmet Fabrics**
XE Xerium**
YA Yamauchi Figure 59 – Competitor Supplier Codes
**Please note that Metso-Tamfelt has been converted to Valmet Fabrics and Weavexx has been converted to Xerium (Run History records have been converted as well to maintain consistency).
AJ Mobile Internet Interface for use on Smart
Phones
This mobile application is a limited version of the web application. You will be able to review your inventory, install/remove AJ fabrics and add/install/remove competitor fabrics. Using your phone’s internet application you will need to bookmark the following site https://ajglmobile.astenjohnson.com
Your login information is the same as what you use on your computer for logging into GlobalLink/DPS. Your email address along with your password can be typed in and if you click on the Remember Me, each time you come back to this page you will only have to click on the “Log In” button. (See Figure 60)
Figure 60 – Phone App Log in Screen
The Main Menu for the Phone Application is broken down into the 4 areas: Inventory Analysis, Install/Remove Fabric, Competitor Maintenance and Log Off. (See Figure 61)

D E M A N D P L A N N I N G S Y S T E M
June 23, 2014 Page 31
Figure 61 – Phone App Main Menu
Inventory Analysis – Click on Inventory Analysis and the screen will default to the first mill alphabetically that you have been given access to via DPS. Tap on the mill name and the drop down window will all your mills will become visible, scroll until you find the mill you need and click on that mill. Do the same for the machine and position you want to view. (See Figure 62)
Figure 62 – Phone App Customer Drop Down List
Once you have selected the Machine and Position, you see the fabric currently on the machine and the date it was installed. The completed inventory and in process fabric numbers are listed as well. (See Figure 63)
Figure 63 – Phone app – position page
D E M A N D P L A N N I N G S Y S T E M
June 23, 2014 Page 32
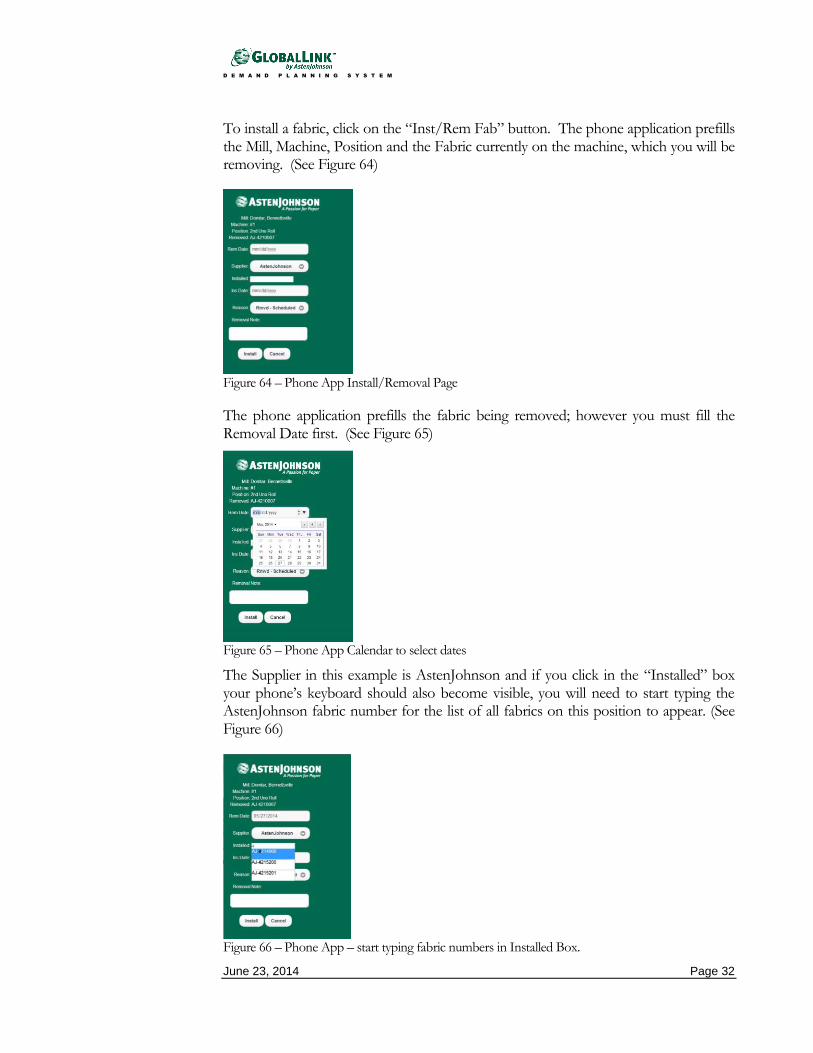
To install a fabric, click on the “Inst/Rem Fab” button. The phone application prefills the Mill, Machine, Position and the Fabric currently on the machine, which you will be removing. (See Figure 64)
Figure 64 – Phone App Install/Removal Page
The phone application prefills the fabric being removed; however you must fill the Removal Date first. (See Figure 65)
Figure 65 – Phone App Calendar to select dates
The Supplier in this example is AstenJohnson and if you click in the “Installed” box your phone’s keyboard should also become visible, you will need to start typing the AstenJohnson fabric number for the list of all fabrics on this position to appear. (See Figure 66)
Figure 66 – Phone App – start typing fabric numbers in Installed Box.

D E M A N D P L A N N I N G S Y S T E M
June 23, 2014 Page 33
Give the newly installed fabric an “Ins Date”. Note there are times when the Removal and Installation Date are different, therefore we have not programed this date to default. The “Reason” removed defaults to “Rmvd – Scheduled”, but clicking on this field you can view the entire drop down list of removal reasons. You can also add a removal note when necessary to further detail the reason removed. (See Figure 67)
Figure 67 – Phone App – Completed Installation Window
Click on the “Install” button and the following confirmation screen will appear, this gives you one last chance to cancel before the installation will be written back to the server. (See Figure 68)
Figure 68 – Phone App – Confirm Installation information is correct.
This screen will confirm that you have successfully installed the new fabric and removed the old one, click on OK (see Figure 69) to return to the position. (see Figure 70)
Figure 69 – Phone app – Confirmation window that fabric has installed and status has been changed.

D E M A N D P L A N N I N G S Y S T E M
June 23, 2014 Page 34
Returns you to the position where you started, you can navigate to another Mill, Machine or Position or return to the “Main Menu”. (See Figure 70)
Figure 70 – Phone App – returns you to position page after installing fabric.
Add Competitor Fabric from position page
Click on “Comp Maint” button on the position page. (See Figure 71)
Figure 71 – Phone App – Add competitor fabric from position page.
Select the Supplier, Location and Style from the drop down menus, as these are required fields to enter a Competitor Fabric. The only other required field will be a unique fabric number (you will not be able to enter the same fabric number twice for the Supplier Code that was selected, please make every effort possible to get the correct fabric number for competitor fabrics.) (See Figure 72)

D E M A N D P L A N N I N G S Y S T E M
June 23, 2014 Page 35
Figure 72 – Phone app – Competitor information page and actual fields that can be completed.
The remaining fields are not required, but the more information you can supply the better. These fields vary from Forming, Press and Dryer to match the normal actual results fields that are available to you in DPS. Once a competitor fabric has been removed from the machine, these fields will become un-editable. (See Figure 73)
Figure 73 – Phone App – Once you have completed as much information as possible click on “Save”.
Once you have all the required fields and any others filled in, scroll to the bottom of this window and click on “Save” (see Figure 74). Once the Save has occurred the screen will come back with the all the fields cleared, this allows you to enter another competitor fabric if desired, if not click Main Menu to move to another Mill, Machine or Position or Log Out.

D E M A N D P L A N N I N G S Y S T E M
June 23, 2014 Page 36
Figure 74 – Phone app – once it saves competitor info, the screen comes back blank so you can add more or Click on Main Menu.
Install/Remove Fabric from the Main Menu.
To install or remove a fabric from the main menu of the phone application, select the “Install/Remove Fabric” option from the Main Menu. (see Figure 75). This option assumes you know the number of the fabric being removed, enter that number into the “Fabric to remove” field and click “OK”. (See Figure 76)
(The remaining steps are the same as installing a fabric from the position page as detailed on Page 33.)
Figure 75 – Phone App – Install/Remove Fabric Main Menu option.
Figure 76 – Phone App – Fabric to remove
Don’t Know the Fabric Number being removed
If you don't know the fabric number being removed click on the blue question mark to search by Mill, Machine and Position. (See Figure 77)
D E M A N D P L A N N I N G S Y S T E M
June 23, 2014 Page 37
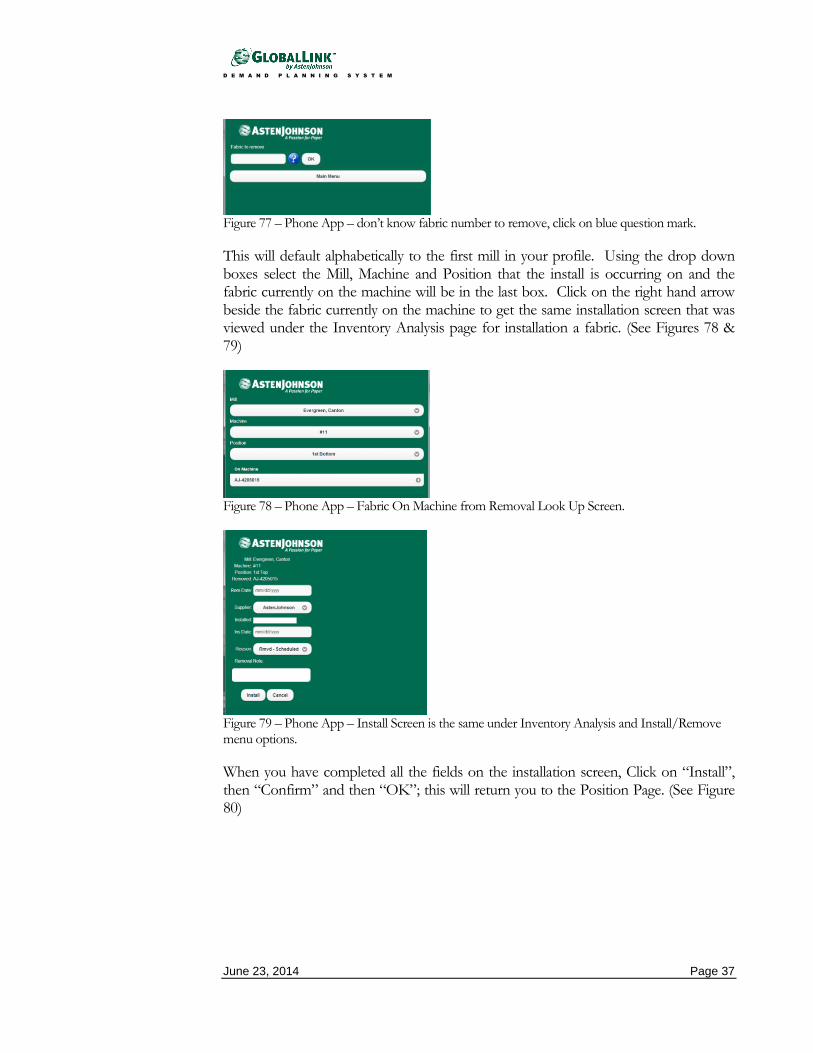
Figure 77 – Phone App – don’t know fabric number to remove, click on blue question mark.
This will default alphabetically to the first mill in your profile. Using the drop down boxes select the Mill, Machine and Position that the install is occurring on and the fabric currently on the machine will be in the last box. Click on the right hand arrow beside the fabric currently on the machine to get the same installation screen that was viewed under the Inventory Analysis page for installation a fabric. (See Figures 78 & 79)
Figure 78 – Phone App – Fabric On Machine from Removal Look Up Screen.
Figure 79 – Phone App – Install Screen is the same under Inventory Analysis and Install/Remove menu options.
When you have completed all the fields on the installation screen, Click on “Install”, then “Confirm” and then “OK”; this will return you to the Position Page. (See Figure 80)

D E M A N D P L A N N I N G S Y S T E M
June 23, 2014 Page 38
Figure 80 – Phone App – Clicking Install will return you to the Position Page from Install/Removal page.
Click on Main Menu or navigate to another position using the drop down boxes.
Competitor Maintenance from the Main Menu
To add Competitor Fabrics from the Main Menu option, click on the “Competitor Maintenance” option. (See Figure 81)
Figure 81 – Phone App – Competitor fabrics can be added from the Main Menu
The list will default to the first Mill, Machine & Position in your profile; use the drop down menus to navigate to the correct Mill, Machine and Position.
Using the drop down windows continue to complete the fields for Supplier, Location and Style. You will also be required to enter a unique fabric number for this entry. The system will not let you duplicate a fabric number, as a unique identification number is required. (See Figure 82)

D E M A N D P L A N N I N G S Y S T E M
June 23, 2014 Page 39
Figure 82 – Phone App – Add as much information as you can about Competitor Fabrics.
Complete as much of the remaining actual information that you have access to and click on “Save” at the bottom of the screen. (See Figure 83)
Figure 83 – Phone App – Click Save to Add Competitor Fabric and Details
You can continue adding more competitor fabrics for this position or navigate to a different Position. You can also click on Main Menu to get to the Log Out option.

D E M A N D P L A N N I N G S Y S T E M
June 23, 2014 Page 40
Log Off from the Main Menu
Once you have completed all of your necessary changes and additions via the Phone Application, please return to the Main Menu and select Log Off. (See Figure 84)
If you do not have password protection on your phone, it is recommended that you do add it as there is not time out feature on the GlobalLink phone app and if you forget to log out, the password protection will help prevent unauthorized changes to GlobalLink.
Figure 84 – Phone App – Always “Log Off” when finished.
Bookmark and place GlobalLink icon on Home Screen for iPhones: Note: Screen shots in this section were taken via an iPhone 5c, if you are using an Android based smartphone; the screen views could be slightly different. Once you create your Bookmark and Name it AJ GlobalLink, you can also put an icon on your Home Screen by using the Action Button at the bottom of your page by Clicking on “Add to Home Screen”. The AJ GlobalLink Icon will now be on your Home Screen for quick access. (See Figure 85)
Figure 85 – Action Button on iPhone 5c, Add to Home Screen, Icon on Home Screen

D E M A N D P L A N N I N G S Y S T E M
June 23, 2014 Page 41
Bookmark and place GlobalLink icon on Home Screen for Android phones
1. Bookmark the page you want to add to a Home Screen 2. Open the browser “bookmarks” screen 3. Long-press the bookmark you want 4. Select “Add to Home screen” 5. Icon will be on your Home Page Screen

D E M A N D P L A N N I N G S Y S T E M
June 23, 2014 Page 42
Glossary of Terms
Term Definition
AJ Mobile Phone App. Using your smartphone with a data plan you access this phone application through your phone’s internet application. See page 29 for full instructions.
AR Summary Summary of mill’s open invoices (current and past due).
AstenJohnson Fabrics Any fabric that has been entered into JD Edwards.
Average Life Forming and Press = last 2 years; Dryer = last 5 runs. (Not used in any calculations is for reference). Competitor average contains all competitors on the position. (Not used in any DPS Calculations, is for reference only.
Box Level The level of AJ Owned + Mill Owned fabrics that we are targeting to keep completed at all times.
Cap Days A predetermined number of days that AJ will hold a fabric in AJ Owned Inventory for a customer.
Cap Report Located under the Machine Documents section, when you click on this button the system will run a Cap Report of fabrics that will cap expire in the next 30 days for the machine you are on and will send the pdf file to your email address. (This will run if the machine’s invoice type is Invoice on Install or Invoice on Release).
Common Position (Parent/Child Positions)
Common Positions are when a single fabric can be installed and used on more than one machine and/or position inside a single paper mill. This relationship is often referred to as a Parent/Child relationship.
Parent position – is used to establish all the inventory requirements for the common positions. All of the inventory will also reside on the parent position until it is installed on the machine.
Child position – is the reference for all other positions in this relationship where the inventory can be installed. The only Drivers that should reside on a child position are NAJI, Forecasted MktShare, Repl. Offset, Expected Life, and Primary Comp.
Competitive Fabrics Any fabric that is being made and supplied by one of our competitors. Competitor fabrics are added via the “Add Comp. Fab” button at the top of the “Position Page”.
Customer Solutions/JD Edwards (JDE)
Order management application used by Inside Sales, Manufacturing and Accounting.
Data Sheet The report shows a fabric’s actual MFG results. This option is located under the Fabric Details and when you click on this button the system will run the Data Sheet report and send a pdf file to your email address. (This will only be

D E M A N D P L A N N I N G S Y S T E M
June 23, 2014 Page 43
Term Definition
visible if the fabric is completed and the results have been approved by MFG).
Date Needed Based on the drivers for a position this date is the day a fabric needs to be packed in order to maintain the box level for the position.
Demand Planning System (DPS)
The name for AstenJohnson’s Continuous Forecasting/Inventory Management System (aka: GlobalLink)
Design This field will contain the manufacturing design code used to manufacture the style selected. (example: Forming H Code)
Drivers Key Variables needed for each position in order to determine when fabrics will be installed, ordered and/or completed. Those variables are Target FIP, Target AJ Owned, Target Mill Owned, Forecasted MktShare, Replenishment Offset, and Expected Life and are located at the top of each Position Page.
Email Address Your username for access to the DPS system.
Estimated Delivery Date
Pack Date + Transit Time (Table in JDE).
Estimated On Date Based on the DPS Drivers the date the fabric being viewed is projected to be installed on the paper machine. This date is located under the Business View’s “Installation Schedule” and position’s “Inventory” section.
Estimated Pack Date If in process fabric has a schedule date, the estimated pack date will be the same as the schedule date, if schedule date is blank (1/1/2050 in JDE) the estimated pack date will equal the Requested Date (RPD).
Expected Life This is the number of days we anticipate each fabric will run on the position. This is not the mill’s target or goal.
Export When this button is visible, the user has the ability to export data into an Excel based document.
External User AstenJohnson Customers with active GlobalLink accounts.
Fabric Details Order, Manufacturing Specifications and Results can be seen on any fabric in the DPS system simply by clicking on the fabric number (exception is on the My Business View, clicking on the fabric number here will take you to the position).
Fabric Type (Press) In the list of Press MFG specifications there is also a Fabric Type field. This field in Press is used to designate if the fabric is a seamed or endless construction.
Fabric Types Classification of the type of order (examples: CRO, Regular, Trial Design, Trial Variation, New Position). This is entered in JDE.
Find a Fabric Number For Internal Users the option to simply enter a fabric

D E M A N D P L A N N I N G S Y S T E M
June 23, 2014 Page 44
Term Definition
number and click “Find” within the DPS system will take you to the position where the fabric currently resides.
Finish Plant The plant where the fabric was finished and shipped from; this information can be found by clicking on the fabric number and will be in the Order Details section of the pop up window.
FIP Level Fabrics In Process.
Forecasted MKT Share
The percent supplier AJ will be on any position for the next 18 months.
Forgot Password If you have forgotten your password, you can use the “Forgot Password” option from the “Log On” page to set a new one.
GlobalLink AstenJohnson Inventory Management System. (aka: Demand Planning System/DPS)
Install Commonly used term for when a fabric has been installed on the paper machine.
Installation Schedule Schedule of Projected Installation dates for next 16 weeks for the Business Team or Account Owner Record currently being viewed on the “My Business View” page.
Internal User Any associate who has an astenjohnson.com email address.
Internal User Flag All AstenJohnson Users default as internal users, but if you want to show a customer GlobalLink, you need to uncheck this box in your “My Profile” Page so that the screens mirror what an external user sees in GlobalLink.
Inventory Packed or completed Forming, Press or Dryer Fabrics.
Invoice Date The date the fabric was invoiced in JDE.
Invoice Type Terms by which the customer will be invoiced. There are 3 Invoice Types currently being used they are as follows:
Invoice on Ship – Fabric invoices upon shipment from AJ plant. Invoice on Release – Fabric invoices upon release from external warehouse or pack cap expiration date; whichever occurs first. Invoice on Install – Fabric is invoices upon installation or pack cap expiration date, whichever occurs first.
Landing Page The initial page the system starts from upon successful log in to DPS.
Late Fabrics Section within the “My Business View” page that lists fabrics
Log On Page The web page where your email address and password are entered in order to gain access to the Demand Planning System.
Machine Documents Area within GlobalLink that external customer reports are

D E M A N D P L A N N I N G S Y S T E M
June 23, 2014 Page 45
Term Definition
stored or can be retrieved. (Examples: Return Fabric Analyses, Status of Orders or AR Summary).
Machine Drop Down Once a Mill has been selected from the “Mill Drop Down” the list of running machines for that mill will be displayed.
Machine Grade This information will be listed on every Fabric Order Detail Screen; this grade information is maintained in JDE on the machine level.
Manufacturing (MFG) Results
The key actual result metrics for the selected fabric.
Manufacturing (MFG) Specifications
The specifics that have been entered for the selected fabrics (how manufacturing made or will make the fabric).
Mill Drop Down This drop down list will be those mills that the user has been given access to within the GlobalLink/DPS system. If you require access to a mill that is not in the drop down list, please contact your Inside Sales Representative.
Mnfg Plant The plant where the fabric was initially started; this information can be found by clicking on the fabric number and will be in the Order Details section of the pop up window.
My Business View This view will give you the Watch List, Late Fabrics, Orders Needed and Installation Schedule for your assigned mills or your business team’s mills.
My Machines This view gives you a complete view (including competitive fabrics that you have entered) of the inventory pipeline for the mill and machine selected in your header information.
My Mills On the “My Business View” screen, the default view will be “My Mills” – this means the mills where the current DPS user has sales responsibility assignments within JD Edwards.
My Profile Key information required by the system. Also the location to toggle between Internal user vs External user.
Next AJ Install (NAJI) Date
The date that the next AstenJohnson Fabric is projected to install on the paper machine for a position.
Not Used Any fabric in inventory that the mill does not plan to run. It is excluded from the box requirements, projections and customer view of inventory.
On Date This field can be found in two places and means two different things. When in the “Run History” Section on the Position Page it means the date that the fabric actually went on the machine. On Date in the “Projected Installations and Orders” Section of the Position Page, On Date for the fabrics in inventory and the projected orders will be the “Estimated On Date” of those fabrics based on the drivers on the position.
Order Date Date the order was entered into JDE.

D E M A N D P L A N N I N G S Y S T E M
June 23, 2014 Page 46
Term Definition
Order Details Order Specifications that were entered by Inside Sales.
Orders Needed This can be found on your “My Business View” page. It is a list of orders that need to pack within the next 16 weeks in order to maintain your current inventory requirements for those positions.
Pack Date The date that manufacturing completed the fabric.
Position Drop Down The list of positions once an active Mill and Machine have been selected from the other drop down lists on the active page.
Position View (external/internal users)
This view is extremely different based on whether the user is an internal user or an external user. Differences are as follows:
External User (Customers) will only see the Run History for the position selected.
Internal User (a user with AJ email address) will see the position drivers, inventory, run history and projected installations and orders for the selected position.
Primary Competitor AstenJohnson’s main competitor for the business on the selected position.
Priority Inside Sales has the ability to set a priority code on each order. Those codes are Install, Zero/1 Box, Contract Date, Low Inv (>1; <Box), Make & Ship, New Position, Trial, Rebuild, Blind/Mfg Extra, Obsolete, Used Mill Stock.
Projected Installation Based on the expected life and market share on a position, projected installations will be forecasted as follows: Forming and Press – 2 years, Dryer -4 year. Calculations behind the scenes for reports and tables are 4 years.
Projected Invoice Date
Based on the drivers on the position, the Invoice Type, and projected installs, the system will project when a real order or projected order will be invoiced; this is used to produce the sales projections.
Projected Order Based on the number of fabrics to keep boxed, in process, and the projected installs and market share on a position, projected orders will be forecasted for a 16 month time period for each position where AJ has business.
Removal Reason When removing a fabric from the machine you can select a reason it was removed from the list of reasons (examples: Rmvd-Scheduled or Rmvd-Damaged). Please note that any comment you make will be visible to the customer.
Replenishment Offset The number of days before or after a targeted installation date to offset the Date Needed of the next fabric in line for completion. Negative means prior to the install and positive means after the install.

D E M A N D P L A N N I N G S Y S T E M
June 23, 2014 Page 47
Term Definition
Required Pack Date (RPD)
Date that Sales has requested that MFG has the order completed and packed. The goal is to get the RPD as close to the date needed as possible.
Run History This section lists the current fabric on the machine and fabrics that have been removed for the following time frames (Forming – 2 years, Press – 2 years, Dryer – 5 years).
Run Sequence The order in which the fabrics in inventory will go on the machine. The default is numerical by fabric number.
Schedule Date The date that manufacturing is targeting completion of the fabric.
Ship Date The date the fabric actually shipped from the finish plant.
Status This field can indicate the fabric’s current manufacturing step (ie: Weaving, Finishing) or the fabric’s physical location (ie: Warehouse Stock, Mill Stock). (See page 26 & 27 for complete list of statuses)
Status of Orders Located under the Machine Documents section, when you click on this button the system will run a status of orders for the machine you are on and send the pdf file to your email address.
Style This field contains the commercial style name that the customer sees on all documents.
Supplier In the Inventory, Run History list, and projected installations/orders, the supplier field will indicate who the manufacturer is for the listed fabric.
Watch List The Watch List will appear on your “My Business View” page. To make fabrics appear in this list, you must check the box “In Watch” in the inventory section on the Position View.
D E M A N D P L A N N I N G S Y S T E M
June 23, 2014 Page 48
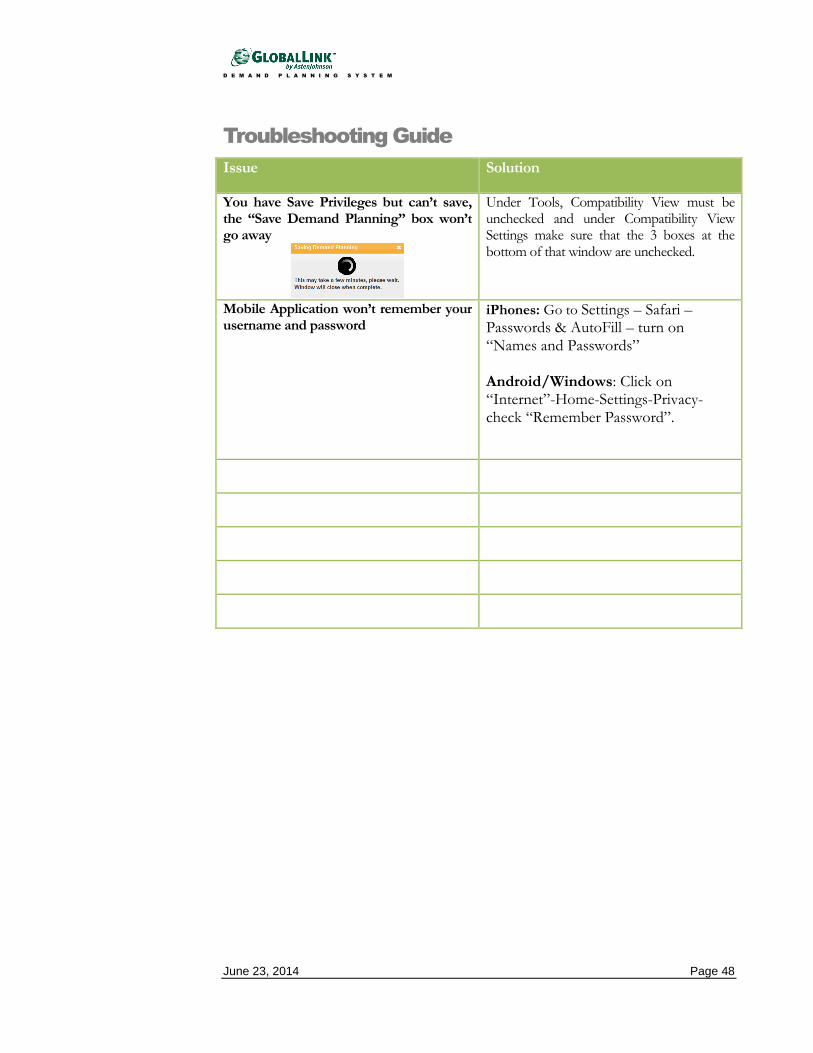
Troubleshooting Guide
Issue Solution
You have Save Privileges but can’t save, the “Save Demand Planning” box won’t go away
Under Tools, Compatibility View must be unchecked and under Compatibility View Settings make sure that the 3 boxes at the bottom of that window are unchecked.
Mobile Application won’t remember your username and password
iPhones: Go to Settings – Safari – Passwords & AutoFill – turn on “Names and Passwords” Android/Windows: Click on “Internet”-Home-Settings-Privacy-check “Remember Password”.

D E M A N D P L A N N I N G S Y S T E M
June 23, 2014 Page 49
Table of Figures and Page Numbers
Figure 1 – Icon to add site to your Favorites Bar in Internet Explorer. ................... 3 Figure 2 – Once added your short-cut will look like this. ........................................... 3 Figure 3 – Right click on Icon to find Rename option. ............................................... 4 Figure 4 – Type in new name for your internet short-cut. .......................................... 4 Figure 5 – Short-cut icon with the New Name. ............................................................ 4 Figure 6 – View of DPS Log-on Sign In Page. ............................................................. 5 Figure 7 – Information Needed to create a New Log In for External Users. .......... 5 Figure 8 – “Forgot your Password” option on Log On Screen. ................................ 6 Figure 9 – View of the “My Profile” Page. .................................................................... 6 Figure 10 – “Change Password” Screen from “My Profile” page.............................. 6 Figure 11 – Password Successfully changed Pop-up Window .................................... 7 Figure 12 – “Edit Profile” Window ................................................................................ 7 Figure 13 – Sample of “Watch List” on “My Business View” page. ......................... 8 Figure 14 – “Add Fabric Comment” box for in “Watch List” Fabrics ..................... 8 Figure 15 – “Late Fabrics” list on “My Business View”. ............................................. 9 Figure 16 – Sample of “Orders Needed” list on “My Business Page”. ..................... 9 Figure 17 – Sample of “Installation Schedule” from “My Business View”
page. ............................................................................................................. 10 Figure 18 – Sample of a “My Machine” actual page. ................................................. 11 Figure 19 – Mill Drop Down list ................................................................................... 11 Figure 20 – Sample of more positions than will fit on the screen ............................ 12 Figure 21 – Fabric No. Look-up box ........................................................................... 12 Figure 22 – Location of NAJI dates on Machine View ............................................. 13 Figure 23 – Calendar Pop for changing NAJI dates on Machine View. ................. 13 Figure 24 – Machine View Status Breakdowns. .......................................................... 14 Figure 25 – Inventory Section – ** asterisks denote the dates as estimated
dates. ............................................................................................................ 14 Figure 26 – Location of Manufacturing Results when clicking on a fabric
number. ....................................................................................................... 15 Figure 27 – Fabrics located in a warehouse from machine view. ............................. 15 Figure 28 – location of Release button on Fabric Detail Screen. ............................. 16 Figure 29 – Fields to enter when releasing a fabric from the warehouse. ............... 16 Figure 30 – Location of Invoice Button if fabric has been invoiced. ...................... 16 Figure 31 – Install Fabric box ........................................................................................ 17 Figure 32 – Install confirmation box. ........................................................................... 18 Figure 33 – Editing On/Off Dates of fabrics. ............................................................ 18 Figure 34 – Click on Mill Name to get to Machine Documents section. ............... 19 Figure 35 – Machine Detail will provide access to reports........................................ 19 Figure 36 – AR Summary Report .................................................................................. 19 Figure 37 – Machine Export to Excel (all positions on a separate tab)................... 20 Figure 38 – Position View Header information .......................................................... 21 Figure 39 – Fabric a Fabric Box .................................................................................... 21 Figure 40 – Excel Download pop up window (open or save export). .................... 21 Figure 41 – Single position Excel Export. ................................................................... 22

D E M A N D P L A N N I N G S Y S T E M
June 23, 2014 Page 50
Figure 42 – Sample of Email message when drivers are changed on a position. ...................................................................................................... 22
Figure 43 – Area of position view where Box and FIP requirements can be edited. .......................................................................................................... 22
Figure 44 – Standard for the Position information comes from JD Edwards. ..................................................................................................... 23
Figure 45 – Average Life Calcualations ........................................................................ 23 Figure 46 – DPS Drivers (NAJI, Forecasted MktShare, Repl. Offset,
Expected Life & Primary Comp.) ........................................................... 23 Figure 47 – Common Positions showen in Driver Section on Position. ................ 24 Figure 48 – Run Sequence, In Watch & Not Used boxes ......................................... 24 Figure 49 – Run Sequcence boxes with entries. .......................................................... 24 Figure 50 – Run History defaults to collapsed (last 5 runs) ...................................... 25 Figure 51 – click on the “+” sign to expand to last 25 runs ..................................... 26 Figure 52 – Projected Installations and Orders .......................................................... 26 Figure 53 – Can changed Est. Pack Dates on Projected Orders. ............................. 27 Figure 54 – Internal Fabric Statuses ............................................................................. 28 Figure 55 – Add Competitor Fabric Button ................................................................ 28 Figure 56 - ** Required Fields when adding Competitor Fabrics. ........................... 28 Figure 57 – Competitor Install and Delete Buttons ................................................... 29 Figure 58 – Competitor Fabrics visible on Machine View ........................................ 29 Figure 59 – Competitor Supplier Codes ...................................................................... 30 Figure 60 – Phone App Log in Screen ......................................................................... 30 Figure 61 – Phone App Main Menu ............................................................................. 31 Figure 62 – Phone App Customer Drop Down List ................................................. 31 Figure 63 – Phone app – position page ........................................................................ 31 Figure 64 – Phone App Install/Removal Page ........................................................... 32 Figure 65 – Phone App Calendar to select dates ........................................................ 32 Figure 66 – Phone App – start typing fabric numbers in Installed Box. ................ 32 Figure 67 – Phone App – Completed Installation Window...................................... 33 Figure 68 – Phone App – Confirm Installation information is correct. .................. 33 Figure 69 – Phone app – Confirmation window that fabric has installed
and status has been changed. ................................................................... 33 Figure 70 – Phone App – returns you to position page after installing
fabric. ........................................................................................................... 34 Figure 71 – Phone App – Add competitor fabric from position page. ................... 34 Figure 72 – Phone app – Competitor information page and actual fields
that can be completed. .............................................................................. 35 Figure 73 – Phone App – Once you have completed as much information
as possible click on “Save”. ...................................................................... 35 Figure 74 – Phone app – once it saves competitor info, the screen comes
back blank so you can add more or Click on Main Menu. .................. 36 Figure 75 – Phone App – Install/Remove Fabric Main Menu option. ................... 36 Figure 76 – Phone App – Fabric to remove ................................................................ 36 Figure 77 – Phone App – don’t know fabric number to remove, click on
blue question mark. ................................................................................... 37

D E M A N D P L A N N I N G S Y S T E M
June 23, 2014 Page 51
Figure 78 – Phone App – Fabric On Machine from Removal Look Up Screen. ......................................................................................................... 37
Figure 79 – Phone App – Install Screen is the same under Inventory Analysis and Install/Remove menu options. ........................................ 37
Figure 80 – Phone App – Clicking Install will return you to the Position Page from Install/Removal page. ........................................................... 38
Figure 81 – Phone App – Competitor fabrics can be added from the Main Menu ............................................................................................................ 38
Figure 82 – Phone App – Add as much information as you can about Competitor Fabrics. .................................................................................. 39
Figure 83 – Phone App – Click Save to Add Competitor Fabric and Details ....... 39 Figure 84 – Phone App – Always “Log Off” when finished. ................................... 40 Figure 85 – Action Button on iPhone 5c, Add to Home Screen, Icon on
Home Screen .............................................................................................. 40

D E M A N D P L A N N I N G S Y S T E M
June 23, 2014 Page 52
Index
Accounts Receivables, 3, 20
Add to Favorites Bar, 4
AJ Internal & External Fabric Statuses, 28
AJ Mobile App, 31, 43
AR Summary, 20, 43
Average Life, 24, 43
Box Level, 43
Cap Days, 43
Cap Expiration Report, 20
Cap Report, 43
Cap Reports, 3
Change Password, 7
Cleaning Up Orders Needed, 10
Common Position, 43
Common Size, 24
competitive fabrics, 14
Competitive Fabrics, 43
Competitor Fabric Visibility, 30
Competitor Fabrics, 29
Competitor Supplier Codes, 30
Customer Solutions, 43
Data Sheet, 44
Data Sheets, 3
Date Needed, 10, 44
Demand Planning, 0, 3, 44
Design, 44
DPS, 3
DPS Drivers, 24, 44
Drivers, 21, 23
Email Address, 44
Email Address and Password, 6
Estimated Delivery Date, 44
Estimated On Date, 44
Estimated Pack Date, 44
Expected Life, 24, 44
Export, 20, 22, 44
External User, 44
Fabric Details, 15, 44
Fabric Number, 13
Fabric Type (Press), 45
Fabric Types, 45
Find a Fabric Number, 45
Finish Plant, 45
FIP Level, 45
Forecasted MKT Share, 45
Forgot Password, 6, 45
GlobalLink, 3, 5, 6, 19, 20, 21, 45, 46
Glossary of Terms, 43
Header, 21, 22
How to Add a Competitor Fabric, 29
How to Install a Fabric on the Machine, 18
How to Release a Piece from the
Warehouse, 16
How to Retrieve an Invoice/Data Sheet for
a Boxed Fabric, 17
In Watch, 26
Install, 45
Installation Schedule, 9, 11, 45, 46
Internal User, 45
Internal User Flag, 45
Inventory, 9, 14, 21, 22, 25, 43, 45, 49
Inventory Analysis, 32
Invoice Date, 45
Invoice on Install, 24
Invoice on Release, 24
Invoice on Ship, 24
Invoice Type, 23, 45
iPhones, 41
Is Internal User?, 8
JD Edwards (JDE), 43
Landing Page, 9, 46
Late Fabrics, 9, 46
Log On Page, 46
Logging in the First Time, 4
Logging into DPS, 4
Machine Documents, 19, 43, 46, 48
Machine Drop Down, 12, 46
Machine Grade, 46
Manufacturing (MFG) Results, 46
Manufacturing (MFG) Specifications, 46
Mill Drop Down, 12, 46
Mnfg Plant, 46
mobile application, 31
My Business View, 9, 46
My Machines, 7, 11, 13, 46
My Profile, 7, 8, 11, 21, 47
Next AJ Install (NAJI), 47
Next AJ Install Date, 11, 13, 24
Not Used, 26, 47
On Date, 47
Order Date, 47
Order Details, 45, 46, 47
Orders Needed, 9, 10, 46, 47
Pack Date, 47, 48
Phone Application, 31
Position Drop Down, 47
Position Run, 21
Position View, 47
Primary Competitor, 24, 48
Priority, 48

D E M A N D P L A N N I N G S Y S T E M
June 23, 2014 Page 53
Projected Installation, 45, 48
Projected Installations and Orders, 27
Projected Invoice Date, 48
Projected Order, 48
Projections, 21
Reason Removal, 48
Replenishment Offset, 24, 48
Run History, 21, 22, 26, 48, 49
Run Sequence, 25, 48
Sales Responsibility, 22
Schedule Date, 48
Ship Date, 48
Standard for the Position, 24
Status, 3, 14, 46, 48
Style, 49
Supplier, 49
Troubleshooting Guide, 50
User Profile, 6
Watch List, 9, 46, 49