Deltek Costpoint® 6.1, SP2 - tbs-llc.com · PDF fileThere are slight format changes to the...
69
Deltek Costpoint® 6.1, SP2 Year-End Guide November 30, 2012
Transcript of Deltek Costpoint® 6.1, SP2 - tbs-llc.com · PDF fileThere are slight format changes to the...

Deltek Costpoint® 6.1, SP2 Year-End Guide
November 30, 2012

Year-End Guide ii
While Deltek has attempted to verify that the information in this document is accurate and complete, some typographical or technical errors may exist. The recipient of this document is solely responsible for all decisions relating to or use of the information provided herein.
The information contained in this publication is effective as of the publication date below and is subject to change without notice.
This publication contains proprietary information that is protected by copyright. All rights are reserved. No part of this document may be reproduced or transmitted in any form or by any means, electronic or mechanical, or translated into another language, without the prior written consent of Deltek, Inc.
This edition published November 2012.
© 2012 Deltek, Inc.
Deltek’s software is also protected by copyright law and constitutes valuable confidential and proprietary information of Deltek, Inc. and its licensors. The Deltek software, and all related documentation, is provided for use only in accordance with the terms of the license agreement. Unauthorized reproduction or distribution of the program or any portion thereof could result in severe civil or criminal penalties.
All trademarks are the property of their respective owners.

Year-End Guide iii
Contents Overview .......................................................................................................................................... 1
Adding Custom Notes to This Guide ........................................................................................... 1
Customer Care Connect Site ...................................................................................................... 1
Chapter 1: What’s New .................................................................................................................... 2
1099 Changes ............................................................................................................................. 2
W-2s ............................................................................................................................................ 2
USERRA Codes .......................................................................................................................... 2
EFW2 Filing (Electronic Filing of W-2 Forms) ............................................................................. 3
Maintain Mag Media Reporting screen ....................................................................................... 3
Medicare/Social Security Tax Updates for 2013 ......................................................................... 3
Deductions screen ....................................................................................................................... 3
Federal Regulatory Updates ....................................................................................................... 3
Product Changes ......................................................................................................................... 3
Chapter 2: Ordering Forms .............................................................................................................. 4
Chapter 3: Accounts Payable Processing ....................................................................................... 5
1099 Tracking and Posting Checklist .......................................................................................... 5
Maintain Vendors Screen ............................................................................................................ 6
1099s Subtask of Maintain Vendors ........................................................................................... 7
Accounts Payable: Enter A/P Vouchers ...................................................................................... 9
Travel: Vendor Expense Report Processing, Enter Expense Reports ..................................... 10
Accounts Payable: Utilities, Maintain Vendor History ............................................................... 11
1099-MISC Processing ............................................................................................................. 12
Print 1099 Edit Report ............................................................................................................... 14
Edit 1099 Information ................................................................................................................ 16
Check Detail Subtask of Edit 1099 Information ........................................................................ 17
Print 1099s/Create Magnetic Media .......................................................................................... 18
Create Magnetic Media ............................................................................................................. 19
Sample 2012 IRS 1099 Form .................................................................................................... 20
Chapter 4: Closing the Leave Year ............................................................................................... 21
Closing the Leave Year Checklist ............................................................................................. 21
Accessing the Leave Application .............................................................................................. 21
Before You Close the Leave Year ............................................................................................. 22
Close Leave Year ...................................................................................................................... 23
After You Close the Leave Year ................................................................................................ 24
Timing Considerations: Example .............................................................................................. 24

Year-End Guide iv
Chapter 5: Payroll Processing ....................................................................................................... 26
Closing the Payroll Year Checklist ............................................................................................ 26
Accessing Tax Reporting .......................................................................................................... 26
Before You Close the Payroll Year ........................................................................................... 27
Close Payroll Year ..................................................................................................................... 28
W-2 Processing ......................................................................................................................... 30
Local Taxes ............................................................................................................................... 31
Deductions Screen .................................................................................................................... 33
New this year: ............................................................................................................................ 33
Recompute Taxable Wages ...................................................................................................... 33
Create W-2 Table ...................................................................................................................... 35
Edit W-2s ................................................................................................................................... 37
New This Year ........................................................................................................................... 38
Print W-2s .................................................................................................................................. 39
Print W-2 Summary Report ....................................................................................................... 41
Maintain Mag Media Reporting ................................................................................................. 43
Create Federal Mag Media ....................................................................................................... 43
Create State Mag Media ........................................................................................................... 44
Common Roadblocks/Reconciliation Issues ............................................................................. 45
Troubleshooting Tips ................................................................................................................. 45
W-2 Format ............................................................................................................................... 47
Section 401(K) Deferred Compensation Plan ........................................................................... 48
Section 408(K) 6 ........................................................................................................................ 49
Chapter 6 – Closing the General Ledger ....................................................................................... 54
G/L Settings ............................................................................................................................... 54
Update G/L Beginning Balances ............................................................................................... 55
Maintain Non-Project Beginning Balances ................................................................................ 56
Chapter 7 – ‘Closing’/Preparing the Projects Side ........................................................................ 57
Update Prior Year History ......................................................................................................... 57
Copy Pools ................................................................................................................................ 58
Cost Pools ................................................................................................................................. 59
Build Rate Application Table ..................................................................................................... 60
Project Burden Cost Ceilings .................................................................................................... 60
Maintain Burden Fee Overrides ................................................................................................ 61
Appendix A: Sample IRS 1099 Form ............................................................................................ 62
Appendix B: Sample IRS W-2 Form .............................................................................................. 63

Year-End Guide v

Overview
Year-End Guide 1
Overview This guide presents year-end processing guidelines for Deltek Costpoint.
See the Deltek Costpoint Frequently Asked Questions document for related information.
Adding Custom Notes to This Guide If you would like to add custom notes to this guide that are specific to your company, Adobe® Reader® X provides this ability. If you do not already use Adobe Reader X, you can download it here free from Adobe.
To add a custom note using Adobe Reader X, complete the following steps: 1. On the Reader toolbar, click Comment at far right.
2. In the Annotations pane that displays, click Sticky Note. The cursor changes to match the button.
3. Position the cursor at the location in the guide where you want the note to appear, and click. A note icon is inserted at the location and a text box pops up.
4. Enter your information in the text box.
5. Continue adding notes as needed.
6. Save the document.
Deltek recommends that you save the document to a slightly different filename so as to keep the original from being overwritten.
When reading the document, cursor over a note icon to see the information. Double-click a note icon to edit the information.
Customer Care Connect Site To expedite our responses to your questions at year end, we encourage you to use the Customer Care Connect site http://support.deltek.com, where you can enter incidents on the Ask Support page or start a live chat with one of our analysts.
Chat will be dedicated to year-end questions only between December 1, 2012 and January 31, 2013.
Click the link below to view the Year End Info Center, located on the Customer Care Connect site home page. This site will be updated continuously through February and will contain information such as Year-End Bulletins, FAQs, links to the product releases, additional services that are offered for year-end, and up-to-date tax changes.
You need a valid Customer Care Connect login to access this site:
https://deltek.custhelp.com/cgi-bin/deltek.cfg/php/enduser/EndOfYear.php
Alternatively, you can contact Deltek Customer Care by calling 1.877.457.7765.

Chapter 1: What’s New
Year-End Guide 2
Chapter 1: What’s New
1099 Changes There are slight format changes to the 1099 for 2012, which will require that you apply the Calendar Year-End Updates before you print your final copies of 1099s.
Misc-1099 Type GATT payments of $600 or more must be reported to the IRS. Payments totaling below the threshold of $600 do not need to be reported.
Costpoint no longer supports the printing of 1099s on impact printers, even if the option for impact printers still exists.
W-2s There are no format changes to the W-2 for 2012.
Costpoint no longer supports impact printers for printing W-2s.
The Federal Government no longer accepts W-2 files sent on any type of disk or tape (magnetic media) format. Firms that previously used magnetic reporting must now use Electronic Filing to submit W-2s. See http://www.irs.gov and http://www.ssa.gov for details.
USERRA Codes The following USERRA codes have been added to the Edit W-2 Information/Box 12 Lookup field:
D 11 – USERRA 2011 make up elective deferrals to a section 401(k) cash or deferred arrangement.
E 11 – USERRA 2011 make up elective deferrals to a section 403(b) salary reduction agreement.
F 11 – USERRA 2011 make up elective deferrals to a section 408(k)(6) salary reduction agreement.
G 11 – USERRA 2011 make up elective deferrals and employer contributions (including nonelective deferrals) to a section 457(b) deferred comp plan.
H 11 – USERRA 2011 make up elective deferrals under a section 501(c)(18)(D) tax-exempt organization plan.
S 11 – USERRA 2011 make up employee salary reduction contributions under a section 408(p) SIMPLE.
Y 11 – USERRA 2011 make up deferrals under section 409A nonqualified deferred compensation plan.
AA 11 – USERRA 2011 make up designated Roth contributions to a section 401(k) plan.
BB 11 – USERRA 2011 make up designated Roth contributions under a section 403(b) salary reduction agreement.
EE 11 – USERRA 2011 make up designated Roth contributions under a section 457(b) plan.

Chapter 1: What’s New
Year-End Guide 3
EFW2 Filing (Electronic Filing of W-2 Forms) The federal W-2 electronic filing application contains the following record changes:
Section 4.5 RA Record – Submitter Record: The Preferred Method of Problem Notification Code field (position 499) has been removed and is now shown as filler.
Section 4.7 RW Record – Employee Wage Record: The Military Employee Basic Quarters, Subsistence and Combat Pay field (positions 342-352) has been removed and is now shown as filler.
Section 4.10 RT Record – Total Record: The Military Employee Basic Quarters, Subsistence and Combat Pay field (positions 220-234) has been removed and is now shown as filler.
Section 4.5 RA Record – Submitter Record: The Contact E-Mail/Internet field (positions 446 – 485) is now a required field.
Maintain Mag Media Reporting screen Email is now a required field.
The Notification Method field has been removed.
The Total 1099s field has been added to the Idaho section.
Medicare/Social Security Tax Updates for 2013 Beginning in 2013, an additional .9% must be withheld from an employee whose wages exceed the threshold amount for his/her filing status. The additional tax only applies once the employee reaches that threshold and will only be withheld based on the wages that exceed the threshold amount.
To accommodate this, the Federal Filing Status “Married” will be separated into “Married Filing Jointly” and “Married Filing Separately.” Those employees whose current status is “Married” will convert to “Married Filing Jointly” automatically.
Deductions screen The Employer-Sponsored Health Coverage check box has been added. If checked, the sum of all employer-sponsored health coverage deductions and/or contributions of the employee from the Employee Earnings screen will be added to the W-2 in Box 12 as Code DD.
Federal Regulatory Updates Please see the Release Notes for a full recap of all changes.
Product Changes There are no product changes in this release.

Chapter 2: Ordering Forms
Year-End Guide 4
Chapter 2: Ordering Forms For information about vendors that work with Deltek, please follow the steps below to view the vendor page on the Deltek Web site.
1. Go to http://www.deltek.com.
2. From the main menu, click Partners » Find a Partner.
3. In the Partner Category drop-down list, select Channel/Forms Vendor.
4. Click the Search button.

Chapter 3: Accounts Payable Processing
Year-End Guide 5
Chapter 3: Accounts Payable Processing
1099 Tracking and Posting Checklist Use the following checklist as you complete your year-end steps for 1099 tracking and posting.
Step Action Done?
1. During vendor setup, designate vendors as 1099 Reportable on the Vendor Info screen.
2. Enter vouchers and/or travel expenses (voucher lines or expense lines flagged as 1099 with 1099 type).
3. Post vouchers.
4. Print checks and post cash disbursements.
5. In December 2012: Install the Costpoint Year-End Update.
6. Order 1099-MISC forms.
7. Create 1099 information for calendar year 2012.
8. Print the 1099 Edit Report.
9. Review the 1099 Edit Report to check the vendors’ Social Security numbers.
10. Make necessary corrections in Costpoint, on the Maintain Vendor History screen.
11. Create 1099 information.
12. Print the 1099 Edit Report again to check your corrections.
13. Optional: Print 1099s on blank paper, to review vendor addresses.
14. Print 1099s.
15. Create the Magnetic Media File (to be transmitted electronically), if required for your company.

Chapter 3: Accounts Payable Processing
Year-End Guide 6
Maintain Vendors Screen To define the 1099-MISC type, go to the Maintain Vendors screen and click the 1099s button to display the 1099s subtask.
The 1099-MISC type selected on the Maintain Vendors screen defaults on every voucher line for that vendor.
You can edit the 1099-MISC type:
At the voucher line level on the Enter A/P and Enter PO screens
At the voucher line level on the Enter Expense Report screen in the Travel Module
On the Maintain Vendor History screen
On the Edit 1099 Information Screen
If you select the Print 1099-MISC form check box, then the 1099 check box on the Enter A/P Vouchers, Enter PO Vouchers, and Enter Expense Reports (Travel Module) screens defaults to selected on each expense line.
The Vendor 1099 Name prints on the 1099 and appears in the file created by the Create Magnetic Media screen.
The Payer Address Lines and Recipient Address Lines print in all uppercase letters.
Costpoint totals each 1099-MISC type for the selected calendar year and places totals in the appropriate box on the 1099-MISC form (when printed).
The 1099-MISC report totals the 1099-MISC types by vendor.

Chapter 3: Accounts Payable Processing
Year-End Guide 7
The 1099-MISC types supported in Costpoint and their limits are summarized in the following table.
1099 Box Number Description Limit Amount
Costpoint Code
Box 1 Rents $600 or more RENT
Box 2 Royalties $10 or more ROYAL
Box 3 Other Income $600 or more OTHER
Box 4 Federal Income Tax Withheld All amounts FED
Box 5 Fishing Boat Proceeds All amounts FISH
Box 6 Medical and health care payments $600 or more MED
Box 7 Non-employee compensation $600 or more NONEMP
Box 8 Substitute Payments in lieu of Dividends or interest
$10 or more DIVD
Box 9* Payer made direct sales of 5000 or more of consumer products to a buyer (recipient)
$5000 or more SALE
Box 10 Crop Insurance proceeds $600 or more CROP
Box 14 Gross proceeds paid to an attorney $600 or more GATT
* If amounts recorded exceed 4,999.99, Costpoint prints an X in the box.
1099s Subtask of Maintain Vendors To maintain 1099 information, complete the following steps:
1. On the Maintain Vendors screen, click the 1099s button to display the 1099s subtask.

Chapter 3: Accounts Payable Processing
Year-End Guide 8
2. In the Vendor 1099 Name field, enter the Vendor’s Tax ID name if it is different from the Sole Proprietor in the Long Name field on the Maintain Vendors screen.
3. Select the Print 1099-MISC Form check box to track, create, and print 1099-MISC information for this vendor. If you do not select this check box, a 1099 will not print for this vendor.
Selecting this check box affects the creation and printing of 1099s for this vendor and serves as a default for the 1099 column and 1099-MISC Type column on the voucher line on the Enter A/P Vouchers, Enter PO Vouchers, and Enter Expense Reports screens, for the Travel module.
4. Select the type of 1099 payments made to this vendor. This selection determines the type of 1099-MISC income that is the default for this vendor. The Type drop-down list on the subtask includes some 1099 types that do not print on the 1099-MISC form:
A — Acquisition/Abandonment
B — Broker and Barter
DIV — Dividends and Proceeds
G — Certain Government Payments
INT — Interest Income
OID — Original Issue Discount
PATR — Taxable Distribution from Coop
R — Retirement Distributions
You can flag the line with any of the 1099 types listed, but Costpoint does not support these 1099 types on a printed form.

Chapter 3: Accounts Payable Processing
Year-End Guide 9
Accounts Payable: Enter A/P Vouchers
After the vendor has 1099 information on the 1099s subtask, the voucher lines for the vendor default to selected in the 1099 column and the default 1099 type displays in the Type column.
Clear the 1099 column if that particular voucher line is not a 1099 reportable amount.
When you pay the voucher, Costpoint uses the lines designated as 1099 reportable in calculating the 1099 payments for this vendor.
Costpoint uses the check date when calculating 1099 amounts, which are based on the calendar year (January 1 through December 31). If you posted a 1099 amount for a vendor in December 2012, but paid the vendor in January 2013 (and the check is dated 2012), the 1099 amount is reported in the calendar year 2012.

Chapter 3: Accounts Payable Processing
Year-End Guide 10
Travel: Vendor Expense Report Processing, Enter Expense Reports
The travel expense lines for the vendor default to selected in the 1099 column. The default 1099 type displays in the 1099 Type column.
Clear the 1099 column if that particular travel expense line is not a 1099 reportable amount.
When you pay the expense report (via the Accounts Payable module), Costpoint uses travel expense lines designated as 1099 reportable in calculating the 1099 payments for this vendor.

Chapter 3: Accounts Payable Processing
Year-End Guide 11
Accounts Payable: Utilities, Maintain Vendor History
Posted voucher information displays on the Maintain Vendor History screen.
You can edit the 1099 check box and the 1099 Type column on this screen if you selected the Print 1099-MISC Form check box on the Maintain Vendors screen.
You cannot edit voucher 1099 information on this screen if you have not set up the vendor to be a 1099 vendor on the Maintain Vendor Info screen.
If you need to update the total 1099 amount for a vendor after making changes or corrections on this screen, go to the Create 1099 Information screen and run it again for that vendor.
Costpoint calculates the 1099 amounts by calendar year, based on the check date (month, day, and year) and the check amount.

Chapter 3: Accounts Payable Processing
Year-End Guide 12
1099-MISC Processing
Create 1099 Information
The Create 1099 Information screen calculates 1099 information used to print 1099-MISC income amounts. When you use this screen, the process creates 1099 information for all vendors designated as 1099 vendors, regardless of how much 1099 income has been paid to them.
To create 1099 information, Costpoint must access check data for vouchers that contain 1099 amounts. Before you create and print 1099s for these vendors, you must record the checks against the vouchers and post the checks.
Costpoint uses the following process to calculate 1099 income:
Vendor Check History Table — Identifies all pay vendors in the range that had payments in the current year. Eliminates non-1099 vendors. Identifies which checks were paid to these pay vendors in current and prior years, then totals the amounts of these checks by voucher.
Voucher Line Account History — Costpoint totals the 1099 amount of each voucher by 1099 Type.
Cash Organizations — After the voucher line 1099 amounts are totaled, the process identifies the cash organizations from which the 1099 vendors were paid and uses these cash organizations to map the pay vendors back to the proper company.
Calculate 1099 Amount — The following examples illustrate 1099 amount calculations.
If you have more than one company set up, you must complete the following steps: 1. Map organizations to specific companies via the Maintain Org Elements screen.
2. Enter information about your company on the Set Up Company Info screen.

Chapter 3: Accounts Payable Processing
Year-End Guide 13
Example A
Description Amount
Voucher: 1099 Amount
Non-Taxable Amount
Total
$ 100.00 (a)
80.00
180.00
Total Prior Year Payments
Total Current Year Payments
Total
$ 70.00 (b)
110.00
180.00
Voucher: 1099 Amount
Total Prior Year Payments
Current Year 1099 Amount
$ 100.00 (a)
70.00 (b)
30.00
Reportable 1099 amount = Total Current Year Payments or (1099 Income (a) - Total Prior Year Payments (b))
Total Current Year Payments = $110.00
(1099 Income (a) - Total Prior Year Payments (b)) = ($100) - $70 = $30
Since $30 is less than $110, Costpoint uses $30 as the 1099 income. After prior year payments, only $30 of 1099 income remained to be paid off in the current year. The other portion of current year payments was made on non-1099 amounts.
Example B
Description Amount
Voucher: 1099 Amount
Non-Taxable Amount
Total
$ 100.00 (a)
80.00
180.00
Total Prior Year Payments
Total Current Year Payments
Total
$ 20.00 (b)
60.00 (c)
80.00
Voucher: 1099 Amount
Total Prior Year Payments
Current Year 1099 Amount
Remainder for future year 1099
$ 100.00 (a)
20.00 (b)
60.00 (c)
20.00

Chapter 3: Accounts Payable Processing
Year-End Guide 14
Reportable 1099 Amount = Total Current Year Payments (c) or (1099 Amount (a) - Total Prior Year Payments (b))
Total Current Year Payments (c) = $60
(1099 Amount (a) - Total Prior Year Payments (b)) = ($100 - $20) = $80
Since $60 is less than $80, Costpoint uses $60 as the 1099 Amount. While the voucher included $80 of 1099 income after prior year payments, the vendor only received $60 of that in the current year. The vendor can only be taxed on 1099 income actually received in a calendar year.
Print 1099 Edit Report
Use the 1099 Edit Report to review your 1099 information for discrepancies before printing 1099s. To run this report, you must have already created 1099 Information using the Create 1099 Information screen.
This report prints the pay vendor’s ID, the vendor 1099 name and tax ID, the 1099 type and amount, and the taxable entity’s ID and tax ID. The address codes and addresses for vendors do not print on this report.
Select the Include Vendors where payments are below the reportable amount check box to include vendors with payment amounts below the reportable amount. Leave the check box cleared to exclude them.
If you sort the report by company, the total amount of 1099 income prints as a subtotal for each company. The total number of records for each company also prints on the report.
If you sort the report by pay vendor, a grand total of all 1099 income prints on the report as well as the number of 1099 records.
For the Range Option in the Select Pay Vendor group box, you can use Lookup in the From and To fields to select a Pay Vendor ID. Your choices are limited to those pay vendors flagged for 1099 creation on the 1099 subtask of the Maintain Vendors screen.

Chapter 3: Accounts Payable Processing
Year-End Guide 15
Tips for Printing the 1099 Edit Report
To save your sort options and selection criteria for this report (with or without printing), complete the following steps:
1. After making your selections, click the Save icon in the toolbar or click File » Save.
2. Enter an alphanumeric identifying code and a short description for this set of print parameters.
3. Click OK.
Later you can use Find or Query from this screen to access the print parameters you created and run the same report without having to enter all the information again.
If you want to keep these parameters but run a slightly different report, use Clone to copy the parameters and make minor changes to them without changing your saved parameters.
To clone the parameters, complete the following steps:
1. Click File » Clone (or press F4) to display the Clone screen.
2. Enter the parameter ID you want to clone or click Execute to display and select from a list of parameter IDs.
3. Click the Select button. Costpoint makes a copy of the parameters, which you can edit as necessary.
Sample 1099 Edit Report

Chapter 3: Accounts Payable Processing
Year-End Guide 16
Edit 1099 Information
Use the Edit 1099 Information screen to view, edit, and add 1099 income information for pay vendors, by company. To use this screen, run Query or Find to select a company and calendar year. You can edit the 1099 amount and address code or delete lines of information for existing vendors if you have already run the Create 1099 Information screen. However, if you run the Create 1099 Information screen again, you will lose any edits that you have made.
The difference between the Total 1099 Amount and the Total Taxable Amount is any payment that is less than the Reportable Amount. The 1099 does not print any amounts that are below the reportable amount. For example, if a 1099-MISC for NONEMP totals to $500.00, it does not print because it is less than the limit of $600.00; it is included in the Total 1099 Amount but is not included in the Total Taxable Amount.
Click the Check Detail button to display the Check Detail subtask (see page 17). Use the Check Detail subtask to view payment data for each pay vendor by cash organization to help you reconcile discrepancies in 1099 income.
After you use the Create 1099 Information application to create 1099s, you can use the Edit 1099 Information screen to add a 1099 line and/or delete an existing line.
To add a 1099 line, complete the following steps:
1. Click the toolbar function LINE.
2. Click New or press CTRL+N).
3. Enter the required information on the line and save. After the line is saved, you cannot edit the new line you just created, though you can delete it.

Chapter 3: Accounts Payable Processing
Year-End Guide 17
To delete an existing line, complete the following steps:
1. Highlight an existing line.
2. Click the toolbar function LINE.
3. Click Delete.
If you make edits to this screen, you will lose them if you execute the Create 1099 Information application again.
Check Detail Subtask of Edit 1099 Information
To display the Check Detail subtask, highlight a row on the Edit 1099 Information screen and click the Check Detail button.
Use this subtask to view data for each pay vendor. The information displayed on this subtask comes from the Vendor Check History, Vendor Check History Voucher Detail, and Voucher Header History tables. All fields on this screen are non-editable. If you are using this subtask from a new line, you must enter the pay vendor and cash organization before Costpoint can access any information.
The Check Detail subtask's Total Paid Amount field reflects checks that have been issued to this vendor; however, it does not reflect any checks that have been voided. Voided checks are not included in the 1099 amount on the main screen.

Chapter 3: Accounts Payable Processing
Year-End Guide 18
Print 1099s/Create Magnetic Media
The Federal Government no longer accepts 1099 files sent on any type of disk or tape (magnetic media) format. Firms that previously used magnetic reporting must now use Electronic Filing to submit 1099s. See http://www.irs.gov and http://www.ssa.gov for details.
Use this screen to print 1099s or create a file of 1099-MISC information. See the table on page 7 for a summary of the boxes, descriptions, limit amounts, and Costpoint codes.
You can create 1099 information for past or future years. Costpoint prints them using the current year’s 1099-MISC format.
The Print 1099s program prints 1099-MISC information on pre-printed, official IRS forms for laser printers. Costpoint no longer supports the printing of 1099s on impact printers, even if the option for impact printers exists. Self-Mailers are available if you select Laser as the printer.
Costpoint supports printing standard 1099-MISC forms and 1099-MISC Self-Mailers.
After printing 1099s, Costpoint displays the number of 1099s printed and the total amounts for each type of 1099-MISC income. If you miss the message, print 1099s again using the same parameters, this time to a text file. At the end of the run, note the final count and amount, and then delete the file.
To ensure that your 1099 information is correct, print 1099s on blank paper before printing them on the forms and before you create the file. After you create the file, you will not be able to correct any errors without recreating the entire file.

Chapter 3: Accounts Payable Processing
Year-End Guide 19
Create Magnetic Media
You can only create a file for electronic filing for one company at a time. You must use a separate file for each company or you will have to copy the file to a different directory before creating the next electronic file.
Screen Contents
Magnetic Media Info Group Box This group box contains data fields that hold information that you can include on the file to transmit electronically. Select the Create Magnetic Media option to enable this group box.
Test — Select this check box if you want to send a test file to the IRS. To show that the file is a test file, Costpoint marks it with a test indicator T in the Field Position 28 of the T record. A test file is sent to the IRS if this is your company’s first Tax Year (TY) to file 1099 information.
Magnetic Media File Name — Enter the alphanumeric name in this required field; for example: IRSTAX. You must also specify a path for the file named entered.
Contact Name — Enter the name of the person to contact if the IRS/MCC encounters problems with the file or transmission. This alphanumeric field is required. The name that you enter here is inserted in Position 304-343 of the T record.
Phone Number/Ext — Enter the telephone number of the person to contact about electronic filings, with area code and extension, in this numeric field. This field is required. You do not need to enter hyphens. For example, you could enter 304.263.8700 extension 5234 as 30426387005234. The phone number is inserted into Position 344-358 of the T record.
Email Address – Enter the email address of the person the IRS should contact if there are any questions.

Chapter 3: Accounts Payable Processing
Year-End Guide 20
Transmitter Info Group Box
This group box contains IRS Transmitter information that will be included in the file.
TIN — Enter the transmitter’s nine digit Tax Identification Number; this may be an EIN or SSN. If you leave this field blank, the TIN for the Company ID selected on this screen will be used. This is not a required field. This number is inserted into Position 7-15 of the T record.
Control Code — Enter the five-character alphanumeric Transmitter Control Code (TCC) assigned by the IRS/MCC. You must obtain a TCC to file data within this program. This code is issued after you file the application for Filing Information Returns Magnetically/Electronically (IRS FORM 4419). This is a required field.
Name — If the Transmitter name is different from the Company name, enter the Transmitter Name here. If the Transmitter name is the same as the Company name, then you can leave this field blank. The Transmitter Name is inserted as the Company Name in Position 30-69 in the T record. This is not a required field.
Forms Group Box
This group box is enabled if you select the Print 1099s option.
Select Impact to print your 1099-MISC forms on an impact printer.
Select Laser to print your 1099_MISC forms on a laser printer and enable the Format group box.
Format Group Box 1099-MISC Standard — This setting is enabled for both laser and impact printers. All copies
of the 1099 have the same format this calendar year.
1099-MISC Self- Mailers — This selection is available for laser printers. See Chapter 2: Ordering Forms for instructions on how to order forms, including Self-Mailers.
Select Calendar Year Group Box
Calendar Year — Use the drop-down list to select the calendar year for which you are reporting to the IRS.
Prior Year — Select this check box if the year you specified in Calendar Year is a prior calendar year filing. If you select this setting, a P is inserted in Field Position 6 of the T record. By default, this check box is cleared and is enabled, if creating the file to send electronically.
Please contact Deltek Customer Care if you need to print 1099s for a prior calendar year.
Sample 2012 IRS 1099 Form See Appendix A for a sample of the 2012 IRS 1099 form and links to the IRS web site.

Chapter 4: Closing the Leave Year
Year-End Guide 21
Chapter 4: Closing the Leave Year
Closing the Leave Year Checklist Use the following checklist as you close the leave year.
Step Action Done?
1. Make sure that the Leave Period Schedule for the new year has been added for all leave cycles.
2. Make sure that Timesheets with dates equal to or less than the last leave period date for the year have been entered and posted to labor.
3. Make sure that Leave Accruals for the last leave period of the year have been processed and posted to the General Ledger.
4. Print the current leave year’s Accrued Leave Report (keep the header page) and review for accuracy.
5. Verify that Leave Year Ceilings established on the Leave Tables screen are accurate.
6. Verify that the Year-End Update is installed before closing the leave year.
7. Close the leave year.
8. Print the new leave year’s Accrued Leave Report (keep the header page) and review for accuracy.
9. Create a manual journal entry in the General Ledger module to true up the accrued leave liability.
Accessing the Leave Application To access Leave, click People » Leave » Leave Processing.

Chapter 4: Closing the Leave Year
Year-End Guide 22
Before You Close the Leave Year
Before you close the leave year, complete the following steps:
1. Verify that Leave Year Ceilings established on the Leave Tables screen are accurate.
2. Decide if Costpoint should bring negative balances in the leave year forward into the new leave year. If so, select the Include Negative Balances in Leave Year Carryover check box on the Leave Tables screen.
3. Verify that the Leave Period Schedule for the new leave year has been added for all leave cycles on the Leave Period screen.
4. Verify that timesheets with dates equal to or less than the last leave period date for the current leave year have been entered and posted to labor.
5. Verify that leave accruals for the last leave period of the year have been processed and posted to the General Ledger.
6. Print the Accrued Leave Report for the Current Year (Keep Header Page) and review for accuracy.

Chapter 4: Closing the Leave Year
Year-End Guide 23
Close Leave Year
To close the leave year, complete the following steps:
1. Check the dates in the Leave Period Data group box:
Make sure that the Current Start Date and Current End Date are for the last period of your Current Leave Year.
Make sure that the Next Start Date and Next End Date are for the first period in your New Leave Year.
2. Select the Include Inactive Employees check box if you want employees marked as inactive to appear on the report.
3. Select the Base beginning balances on new leave year hourly rate check box if you want the beginning balances of your new leave year to be based on the hourly rate that corresponds with your new leave year. If not checked, Costpoint will use the hourly rate associated with your old leave year for the beginning balance in your new leave year.
When you execute the Close Leave Year screen, Costpoint:
Closes the last Leave Cycle and opens the New Leave Cycle on the Leave Periods screen.
Recognizes the Leave Year ceilings.
Generates the new leave balance for review prior to closing. The Close Leave Year Report shows the leave to be lost.
Updates the beginning balances on the Maintain Leave Beginning Balances screen with a new line for each Leave Type assigned to the employee.
The ending balance on the Employee Leave screen displays as the beginning balance.
Used Leave from Timesheets dated in the New Leave Year that was posted prior to Close Leave Year display as YTD Used on the Employee Leave screen.

Chapter 4: Closing the Leave Year
Year-End Guide 24
After You Close the Leave Year
After you close the leave year, complete the following steps: 1. Print the Accrued Leave Report for the New Leave Year (Keep Header Page) and review
for accuracy.
2. Compare the Prior Leave Year Accrued Report to New Leave Year Accrued Report. The difference should be Leave Lost due to the Leave Year Ceilings.
3. If the New Leave Year Beginning Balances do not equal the expected balances, make corrections on the Maintain Leave Beginning Balances screen.
4. Enter a manual journal entry in the General Ledger module to true up the accrued leave liability.
Timing Considerations: Example For this example, assume the following:
Payroll and Leave periods are bi-weekly.
The last period of the year is December 9 through December 22.
The first period of the new year is December 23 through January 5.
You enter timesheets weekly for the bi-weekly payroll cycle.
The last payroll of the year will include timesheets dated December 9 through December 15
,
The first payroll of the year will include timesheets dated December 23 through December 29 and December 30 through January 5.
and December 16 through December 22.
The fiscal year is January 1 through December 31.

Chapter 4: Closing the Leave Year
Year-End Guide 25
How will cost be recognized for fiscal year accounting?
Payroll — For the pay period December 23 through January 5, payroll would normally be posted in the new fiscal year. An estimated accrual may be done based on the accrued salary amount for 14 days. The total accrual will be divided by 14 to get an estimated daily figure and multiplied by 9 to receive the estimated December 23 through 31 accrual amount. A reversing journal entry will be done in the General Ledger Module to record the estimated December 23 through 31 accrual amount in the current fiscal year and the reversing journal entry in the next fiscal year will reduce the payroll posting.
Labor Costs — If using Time Collection, your Timesheet Schedule in the Time Collection database must be adjusted so that December 30 through 31 is an individual cycle. Likewise, the period of January 1 through January 5 must be recognized as an individual cycle. Nothing needs to be done in Costpoint. When uploading timesheets from Time Collection, or when entering timesheets directly into Costpoint, you need to enter the time for December 30 through 31 separately, using a December 31 date. If you have salaried employees and auto-adjust timesheets, you need to change the percentage for this input as well as prorating the total of 100% across both timesheets.
Leave Accruals — Leave accruals must be computed for the full leave period December 23 through January 5 and should be posted to the new fiscal year in the General Ledger of 2013, which also matches the leave year associated with that leave period. Create a journal entry to move the portion that belongs to the 2012 fiscal year (December 23
When dealing with used leave and leave years, keep the following points in mind:
through 31) and post it in 2012 Create another journal entry to remove the 2012 portion from the 2013 year and post it to the 2013 fiscal year.
The Timesheet Date determines the Leave Period to which the used leave will post.
The Leave Year associated with the Leave Period determines the leave year to which the used leave will be posted.

Chapter 5: Payroll Processing
Year-End Guide 26
Chapter 5: Payroll Processing
Closing the Payroll Year Checklist Use the following checklist as you complete your year-end steps for payroll processing.
Step Action Done?
1. Make sure that the Pay Period Schedule for the new year has been added to all Pay Cycles.
2. Print the Social Security and Medicare Reconciliation Report from Payroll Utilities and verify that the correct amount of Social Security and Medicare has been withheld or accrued.
3. Make any needed corrections on the last payroll of the year.
4. Process (enter) all paychecks to be dated December 31 or earlier and post to the General Ledger.
5. Make any adjustments on the current paycheck for taxes owed from the results of the Print Social Security and Medicare Reconciliation Report or other transactions you know must be accounted for at this time.
6. Perform the steps for Closing the Payroll Year.
7. Verify that any Pay Types that should be reported in Box 11 (Non-qualified Plans Distribution) have been linked in the Payroll Controls/ Pay Type Taxability screen.
8. Verify that any Deductions that should be reported in Box 12 have been linked with the correct Deduction Type in Payroll Controls/Deductions screen.
9. Verify that any Deductions which you want to report in Box 14 have been linked in Payroll Controls/Deductions/Federal subtask.
10. Verify that appropriate Deductions are designated as Employer-Sponsored Health Coverage by checking the box on the Deductions screen.
11. Verify that the Retirement Plan Covered check box is selected on the Employee Payroll Setup/Employee Taxes screen for each employee who participates in a qualified pension plan.
Accessing Tax Reporting To access Tax Reporting, click People » Payroll » Tax Reporting.

Chapter 5: Payroll Processing
Year-End Guide 27
Before You Close the Payroll Year
Before you close the payroll year, complete the following steps: 1. Print the Social Security and Medicare Reconciliation Report and verify that the correct
amount of Social Security and Medicare has been withheld or accrued.
2. Make any adjustment on the current paycheck for taxes owed from the results of the Print Social Security and Medicare Reconciliation Report or other transactions you know that must be accounted for at this time.
3. Enter (process) all paychecks to be dated December 31 or earlier and post to the General Ledger.
4. Add the Pay Period Schedule for the new year to all Pay Cycles.
5. Check the Ceiling Method option on the Deductions screen and make changes if needed:

Chapter 5: Payroll Processing
Year-End Guide 28
6. Select one of the following actions:
If there are deductions with a Ceiling Method of One Time, you must use the Close Payroll Year screen to close the Payroll year. (If you select this option, back up the EMPL_DED table.)
Use the One Time ceiling method for items such as 401(k) loans that span more than one payroll year. The Close Payroll Year program calculates the unpaid balance of the deduction and replaces the ceiling amount on the Employee Deductions screen with the unpaid balance.
If necessary, add the One Time ceiling method to the Deduction screen prior to closing the payroll year.
If there are no deductions with the One Time ceiling method, use either the Close Payroll Year screen or the Close Pay Periods screen to close the Payroll year.
If necessary, you can re-open the last pay cycle in the Payroll Year to enter additional payroll records as long as they do not affect One Time ceiling method deductions.
Close Payroll Year
You must use this screen if you have deductions with a ceiling method of One Time.
Verify that the Pay Cycle Data is correct for both the Current and Next Lines. Make sure that the Current Payroll Year reads 2012 and the Next Payroll Year reads 2013.
If you run this screen and receive a message saying No rows found that meet selection criteria, it means that you have no deductions with a ceiling method of One Time. You must still close the payroll year.
If you do have deduction methods of One Time and employees who are actively using them, you will receive a report listing the employee name, deduction code, current limit, total deduction, and new limit. After you review the report for accuracy, you should close your Payroll Year.
After You Close the Payroll Year
After you close the payroll year, complete the following steps: 1. Insert a new line under Payroll Tax Controls/Federal Taxes with the new Payroll Year
information. This will not be updated in the Calendar Year End Update.

Chapter 5: Payroll Processing
Year-End Guide 29
2. In Payroll Controls/Deductions, update any deductions or contributions that have had an increase/decrease for the next payroll year. You can use the Employee/Mass Updates/Update Employee Deductions/Contributions screen to update the changes before the first payroll of the new year for each employee.
You should use the tax information below to process payroll for 2013. This is the most current information available at this time (November 2012).
After you post your final payroll of 2012 and close the payroll year, you should manually update the Payroll Tax Controls/Federal Taxes screen. Add a new line for Payroll Year 2013 with the following information:

Chapter 5: Payroll Processing
Year-End Guide 30
Field Enter this:
Social Security Limit $113,700**
Medicare Limit (no ceiling) $9,999,999*
Federal Exemption Amount $3,800^
401(k) Deferral Limit $17,500**
401(k)Catch Up for Age 50 or over $5,500
401(k) Wage Limit $255,000**
FUTA Limit $7,000
FUTA Percent .6%
Nonresident Alien Additional Amount $2,150.00^
* All wages subject to Medicare Tax
** New amount for 2013
^ 2013 amounts not known at time of printing
2013 state tax information that Deltek receives on or before January 15, 2013 will be shipped with the Costpoint Tax Table Update in the first quarter of 2013.
W-2 Processing Before You Create W-2s Before you create W-2s, complete the following steps:
1. Perform the steps for closing the Payroll year.
2. Verify that any Pay Types that should be reported in Box 11 (Non-qualified Plans Distribution) have been linked on the Payroll Controls/Pay Type Taxability screen.
3. Verify that any Deductions that should be reported in Box 12 have been linked with the correct Deduction Type on the Payroll Controls/Deductions screen.
4. Verify that any Deductions that should be reported in Box 14 have been linked on the Payroll Controls/Deductions/Federal subtask (for informational purposes only; this is not required).
5. Verify that appropriate deductions are designated as Employer-Sponsored Health Coverage by checking the box on the Deductions screen.
6. Verify that the Retirement Plan Covered check box is selected on the Employee Payroll Setup/Employee Taxes screen for each employee who participates in a qualified pension plan.

Chapter 5: Payroll Processing
Year-End Guide 31
Local Taxes
The Disability Insurance Type group box is available if you select State Disability
Insurance from the drop-down list for the Tax Type field.
The Family Leave Insurance Type group box is available if you select Family Leave Insurance from the drop-down list for the Tax Type field.
State-specific notes are summarized in the following table.
State Field and Description
Indiana County/School/Political Subdivision Code
If you are creating State Magnetic Media (an electronic file) for Indiana, you must enter County Codes in Local Taxes for Indiana County Taxes. Report County Codes in the electronic file only. Do not report County Codes on the printed W-2.
Costpoint does not provide the Indiana County Codes. For a list of the codes, see: http://www.IN.gov/dor/taxforms/pdfs/w-2book.pdf.
Pennsylvania County/School/Political Subdivision Code
Be sure to enter the correct Pennsylvania political subdivision code.
Ohio County/School/Political Subdivision Code
If you are creating W-2s for the state of Ohio, you must enter School District Numbers in Local Taxes for Ohio School District Taxes. The four-digit Ohio School District Codes are required on both the printed W-2 and the electronic file.

Chapter 5: Payroll Processing
Year-End Guide 32
State Field and Description
New York New York W-2 Reporting group box
This group box is available when you set the State field to NY.
If the employee’s state is NY the amount in State wages, tips, etc. should equal the Federal wages in box 1, Wages, tips and other compensation. Part-year New York State residents should be treated the same as full-time residents and the employee will allocate the part of his or her federal wages that are attributable to services performed in New York State when filing the New York State part-year resident income tax return.
New York City If the employee is a full-year resident of New York City, the amount in Local wages, tips, etc. should be the same as the federal wages reported in Box 1. If the employee is a part-year resident of New York City, then the amount reported in Local wages, tips, etc. should be only the amount of federal wages for the period the employee was a New York City resident.
Yonkers If the employee is a full-year resident of Yonkers, the amount in Local wages, tips, etc. should be the same as the federal wages reported in Box 1. If the employee was a part-year resident of Yonkers, he or she should be treated the same as full-time residents and the employee will allocate the part of their federal wages that are attributable to services performed in New York State when they file their New York State part-year resident income tax return.
Yonkers Special Programming For Yonkers special programming to take effect, you must use the following settings on the Local Taxes screen:
Set the State field to NY.
In the New York W-2 Reporting group box, select Yonkers.
From the drop-down list for the Tax Type option, select City Income Tax (Residence Only).
The special Yonkers formula multiplies the result of the local tax calculation by 10% as required by New York state. We also increased the size of the Supplemental Tax Rate field to accommodate four digits to the right of the decimal point (for example, 1.0000%).
New Jersey Costpoint has three tax types that are specific to New Jersey:
Supplemental Workforce Fund
Unemployment/Health Care
Workforce Development Partnership Fund
Verify that the correct Tax Type is selected for New Jersey local taxes.

Chapter 5: Payroll Processing
Year-End Guide 33
Deductions Screen
Verify that the correct Deduction Type is associated with each deduction code before creating W-2s. The drop-down list for the Deduction Types option includes the following settings:
Employee HSA Contr (Caf Plan) — Employee HSA Contributions through a Cafeteria Plan. This is a pre-tax deduction and will be reported in Box 12 with a Code W.
Employee HSA Contr (Non Caf Plan) — Employee HSA Contribution not through a Cafeteria Plan. This is the post-tax deduction; it will not be included in Box 12.
UI/Hlth Care/Workforce Dev — This option is for employers who track the NJ UI/Hlth Care/Workforce Dev through deductions and report them in Box 14. This Deduction Type must be used if you will be reporting UI/Health Care/Workforce Development information through Box 14 and have Costpoint add the NJ SUTA (UI) dollar amount (from the Maintain Employee Earnings records) to Box 14.
New this year: The Employer-Sponsored Health Coverage check box has been added. If checked, the
sum of all employer-sponsored health coverage deductions and/or contributions of the employee from the Employee Earnings screen are added to the W-2 in Box 12 as Code DD.
Recompute Taxable Wages
The Recompute Taxable Wages utility recomputes taxable wages in the Employee Earnings Table. This may cause a discrepancy in previously reported wages to government agencies.

Chapter 5: Payroll Processing
Year-End Guide 34
Possible reasons for using this screen include the following:
A Deduction’s taxability was set incorrectly. Therefore, taxable wages are wrong.
A Pay Type’s taxability was set incorrectly. Therefore, taxable wages are wrong.
An Employee was set up with the wrong tax status.
Run this utility before creating W-2s, then print W-2s.
The results of using this utility are as follows:
Taxable wages will be recomputed in the Employee Earning table with the current tax status on the Employee Payroll Setup/Employee Taxes screen. If an employee’s status has changed during the year, you may use the date range and employee range logic to specify the appropriate parameters. In this case, run the utility for one employee/date range at a time.
If a check range is selected that contains records for prior quarters, a correction may need to be made with the government agency.

Chapter 5: Payroll Processing
Year-End Guide 35
Create W-2 Table
Guidelines for Creating W-2 Tables Create W-2s by Employee.
Use the select range options in List Mode for non-contiguous selections.
W-2s are created by Taxable Entity. The Taxable Entity is determined by the Taxable Entity field in Employee Earnings.
All taxable wage information is taken from the taxable wage data fields in Employee Earnings.
Example Use this screen to identify the optional deductions that you want to report in Box 14. For example, you can use this screen for health insurance. Suppose you have one provider with three options:
Employee A = single
Employee B = family
Employee C = single plus one dependent
On your deduction screen you have three separate deduction codes set up. You can link each deduction to Box 14 on the Deduction screen. Here you would enter a description, such as HLTH. No matter which health deduction the employee has, it will be reported on Box 14. You have three lines for this purpose.

Chapter 5: Payroll Processing
Year-End Guide 36
New Jersey Reporting Specify the NJ-SDI PP Number before creating your W-2s. The NJ-SDI PP Number prints on the W-2 only if the Local Taxes Disability Insurance Type field is set to Private Plan. (NJ does not want to see the plan number if it is a State Plan). The NJ-SDI PP Number prints in Box 15 (State), under the Employer's state ID number.
The settings in the drop-down list for the UI/HC/WD reporting option are specific to New Jersey (NJ):
Box 14 Deductions – If this option is selected, Costpoint will not add the NJ SUTA dollar amount to the total amount. Select this option if you want to use the current functionality for Box 14; only amounts associated with a Deduction Code that has a Box 14 line designated on the Federal subtask of the Deduction will be created. The NJ SUTA (UI) amount will not be added to the total amount, even if the Deduction Type is set to UI/Hlth Care/ Workforce Dev.
Box 14 Deductions with system adding UI – Select this option if you want Costpoint to add the NJ SUTA (UI) amount to the Box 14 Deduction amount. Costpoint adds the NJ SUTA dollar amount to the Deduction Code that has the Deduction Type set to UI/Hlth Care/Workforce Dev and that has a Box 14 line designated in the Federal subtask. Costpoint retrieves the NJ SUTA information directly from the Maintain Employee Earnings records.
Local Taxes – Select this option if you track Health Care, Workforce Dev Fund, and Supplemental Workforce Fund through Local Taxes. All three types will be summed together and reported in the boxes where local taxes information should be on the W-2.
Local Taxes with system adding UI – Select this option if you want Costpoint to add the NJ SUTA (UI) dollar amount to the sum of the three Tax Types:
Supplemental Workforce Fund
Unemployment/Health Care
Workforce Development Partnership Fund
Costpoint retrieves the NJ SUTA information directly from the Maintain Employee Earnings records. W-2s may be created as many times as necessary; however, any prior edits will be lost at the time of creation.
Possible Error Message No Records Found: There is no information in the Maintain Employee Earnings screen for the pay cycle and/or payroll year you have entered on this screen.

Chapter 5: Payroll Processing
Year-End Guide 37
Edit W-2s
After you create W-2s, this table contains the information from Employee Earnings that will be on the W-2. You can view and edit the data here. If an employee has more than one withholding state, he or she will receive multiple W-2s. All federal information will be reported on the first W-2, with additional W-2s for each state or locality.
The box numbers on this screen correspond to the box numbers on the W-2 forms.
You can edit W-2s. However, you should make any edits to taxable wages, withholdings, or Box 12 on the Employee Earnings screen for easier reconciliation of quarterly reports and for audit tracking requirements. If you choose to re-create W-2s, any edits made here will be lost.
Information Sources The sources of the information on the screen are as follows:
Company information (boxes b-c) is taken from General Ledger/Organizations/Set up Company Info.
Employee information (box e) is taken from Basic Employee Setup/Basic Employee Info.
Boxes 1 through 11 come directly from the Maintain Employee Earnings table.
Box 12 is a combination from Employee Earnings, as well as deduction type on the Deductions screen.
State and Local information come from the Employee Earnings table.
Tax Reporting information also comes from the Employee Earnings table. Thus, the total of the W-2s should reconcile with the combination of the four quarters of tax filings by the company.

Chapter 5: Payroll Processing
Year-End Guide 38
Edit W-2s: Box 12
Box 12 contains dollar amounts to be reported by IRS Codes. The proper reporting of these codes is determined by the deduction type you selected in Payroll Controls/Deductions.
If you reported non-taxable moving expenses as a pay type for an employee, you must complete the following steps for Costpoint to report this as Code P in Box 12:
1. Set up a deduction in Payroll Controls/Deductions and link it to the deduction type of Non-Taxable Moving Expenses.
2. Add a Z record to Employee Earnings/Maintain Employee Earnings with a negative to the pay type and a positive to the deduction.
If the employer made a contribution to a Medical Savings Account that needs to be reported as Code R in Box 12, link this Deduction/Contribution Code to the deduction type of Employer Medical Savings Account in Payroll Controls/Deductions.
New This Year The following USERRA codes have been added to the Edit W-2 Information/Box 12 Lookup field:
D 11 – USERRA 2011 make up elective deferrals to a section 401(k) cash or deferred arrangement.
E 11 – USERRA 2011 make up elective deferrals to a section 403(b) salary reduction agreement.
F 11 – USERRA 2011 make up elective deferrals to a section 408(k)(6) salary reduction agreement.
G 11 – USERRA 2011 make up elective deferrals and employer contributions (including nonelective deferrals) to a section 457(b) deferred comp plan.
H 11 – USERRA 2011 make up elective deferrals under a section 501(c)(18)(D) tax-exempt organization plan.
S 11 – USERRA 2011 make up employee salary reduction contributions under a section 408(p) SIMPLE.

Chapter 5: Payroll Processing
Year-End Guide 39
Y 11 – USERRA 2011 make up deferrals under section 409A nonqualified deferred compensation plan.
AA 11 – USERRA 2011 make up designated Roth contributions to a section 401(k) plan.
BB 11 – USERRA 2011 make up designated Roth contributions under a section 403(b) salary reduction agreement.
EE 11 – USERRA 2011 make up designated Roth contributions under a section 457(b) plan.
Edit W-2s: State and Local
Taxable wages and withholdings for states and tax localities display on these screens.
State Disability Insurance for the employee’s portion displays in Boxes 18, 19 and 20 and should have been processed as a local tax.
Print W-2s Printing W-2s on blank paper enables reconciliation with tax filings before you need to submit the W-2s to employees and taxing agencies. Deltek recommends that you print W-2s on blank paper and reconcile them before printing on forms.
Then you can add some ‘dummy records’ to the Edit W-2 table and print a test run on the form you are using. Five records serve as a good guide to test the alignment. You may have to try a different printer driver for the alignment to be acceptable.
You can test alignment at any time after you receive the year-end software and before you need to print W-2s on the official forms.

Chapter 5: Payroll Processing
Year-End Guide 40
To print W-2s, complete the following steps:
1. Set the Select Range for Primary Sort option to List Mode to allow non-contiguous selections to print.
2. Use the Starting Control No option to enter a starting control number for W-2s.
3. Print W-2s on blank paper and review them carefully before printing them on forms.
You can sort the W-2s by Employee Name, Social Security Number, Employee ID, or Postal Code.
You can print the W-2s for a single state. When printing the state copies of the W-2s, select the primary sort of State.
4. If you need to make any adjustments, follow the recommendations in the “Edit W-2s” section, starting on page 37. Reprint the W-2s on blank paper as many times as needed.
5. Reconcile your quarterly reports with the W-2 Summary Report.
6. When finalized, print the W-2s on the forms and deliver to employees by January 31. If your firm has a bulk mailing rate, you can print employee copies by postal code.
7. Maintain Employer copies of the W-2 forms.
8. Create the file for Federal filing (using the Create Federal Mag Media screen), if applicable, and file electronically with the Federal Government by February 28.
9. Create the file for State filing (using the Create State Mag Media screen), if applicable, and file electronically with the appropriate State Government agency. If you are printing W-2s for multiple states, you can print the employer copies by state.

Chapter 5: Payroll Processing
Year-End Guide 41
Print W-2 Summary Report
Use this screen to print the W-2 Summary Report, which summarizes the amounts found on each box of the W-2s for the entire company.

Chapter 5: Payroll Processing
Year-End Guide 42
Sample W-2 Summary Report

Chapter 5: Payroll Processing
Year-End Guide 43
Maintain Mag Media Reporting
You must set up the Maintain Mag Media Reporting screen in Payroll/Year End Processing for each taxable entity in order to create the W-2 file to be transmitted electronically.
Create Federal Mag Media The 2012 Year-End Update reflects the federal filing requirements as of October 2012. Any future requirements will be incorporated in the Costpoint software and released in early January 2013.

Chapter 5: Payroll Processing
Year-End Guide 44
Use this screen to create the Federal file for electronic filing after your W-2s are finalized.
This screen creates the data file W2RPTFED.YY where YY represents the payroll year for which the report is created. You need to rename this data file to the IRS required file name W2REPORT (no extension).
The Magnetic Media Report prints automatically each time that you create the W2RPTED.YY file. After running this program and reviewing the printed report, copy the file exactly as named above (W2REPORT with no file extension). This is the file that you must send to the Social Security Administration.
Make sure that the path you enter is in a directory to which you have been granted rights. If you receive an error message such as “file not found,” the file might have been created in a directory to which you do not have access.
Create State Mag Media The 2012 Year-End Update reflects the state filing requirements as of September 2012. Some states do not publish their filing changes until mid-November. Any future requirements will be incorporated in the Costpoint software and released in early January 2013.
Puerto Rico The RS record file layout for Puerto Rico is no longer supported on the Create State Mag Media screen.
Some states require employers to report their W-2 data on magnetic tape or diskette, depending on the number of employees. If you think this may apply to you, obtain and read the current year’s state publication regarding magnetic media requirements. This screen creates the data file required, which you may then file electronically.
Some states require the state ID to be in a certain format. Please review the manner in which you have entered the state taxing ID in State Taxes to be sure that you will comply.

Chapter 5: Payroll Processing
Year-End Guide 45
The State Magnetic Media Report prints automatically each time that you create the W2RPTST.YY file, where ST represents the two-character state abbreviation code, and YY represents the payroll year for which you are reporting in this screen. You must rename this data file to the file name required by the state, such as W2REPORT (no extension), which you can then copy to a diskette. The information included in the file is identical to the printed W-2s.
Common Roadblocks/Reconciliation Issues
Dollar amounts on the Earnings Report (or Tax Report) are not balancing with W-2s. An edit has been made to the Edit W-2 table and has not been recognized on the Maintain Employee Earnings screen. Employee Earnings is the source for W-2s and Tax Reporting. Make any adjustments on the Maintain Earnings screen and re-create W-2s.
I have adjustments that I have to make for such things as Relocation Expenses (non-cash fringe), but I won’t get the information until the 2nd week of January. You can still create your W-2s and print them to do your reconciliation with your taxes for the information you currently have. Once that is reconciled, you should be able to identify any adjustments made (Z records) and not have to start the whole reconciliation process over.
What can I do if I have under- or over-withheld an employee’s Social Security, Medicare, or withholding and I have already started the payroll for the next year? Run the Print Soc Sec and Medicare Report after each payroll. This report identifies any mistakes in taxable wages and withholdings during the year and allows your quarterly reports to be correct during the year, thus avoiding amended returns.
If an employee is under-withheld, take one of the following actions:
Make an agreement with the employee that you will adjust the record (Z record) and have the employee pay you the dollar amount back as a “loan” in his or her next paycheck. Z records give you an audit trail that a manual adjustment was done in a given year.
Adjust the withholding by taking out of federal and putting in Social Security/Medicare. Deltek does not recommend this approach.
Have your company pay the taxes for the employee as a “gross-up” benefit.
If an employee is over-withheld, reimburse the employee with a negative “loan” deduction.
Troubleshooting Tips
Taxable wages on W-2 are incorrect for an employee. Print the YTD Employee Earnings Record for the employee and review it to see why taxable wages are incorrect and what type of adjustment you need to make. Also, determine if the adjustment involves a journal entry to be made to the General Ledger to recognize expense. In addition, if you do an adjustment record with a check date prior to the fourth quarter, you must re-file your quarterly reports.

Chapter 5: Payroll Processing
Year-End Guide 46
The Retirement Plan Covered check box is cleared on W-2 and needs to be selected. The Retirement Plan Covered check box was not selected in Employee Info/Payroll Taxes. You should select that check box and re-create W-2s or select the check box on the Edit W-2 screen.
I’ve done my last payroll of the year, ran my Reconciliation Soc. Sec. and Medicare Report, and found an employee who owes taxes. My employer decides he will pay the taxes for the employee. (The tax the employer pays now becomes taxable wages to the employee.) Enter a Z record on the Maintain Employee Earnings screen, with a check date of December 31, check number of 999999, the dollar amount, and the Social Security and Medicare amounts to withhold, resulting in a net 0.00 check.
Example
An employee owes $17.20 for Social Security and $3.40 for Medicare.
Gross up Calculation: 100 - 7.65 = 92.35% (6.2% S.S. and 1.45% Med.)
$20.60/92.35% = $22.30 (Gross pay amount)
$17.20 + $1.38 = $ 18.58 (Social Security)*
$ 3.40 + $0.32 = $ 3.72 (Medicare)**
Net Pay now = 0.00
* $22.30 x 6.2% = $1.38
**$22.30 x 1.45% = 0.32
You can use this calculation for “grossing-up” any amounts an employer may be paying for an employee. The tax percentage to subtract from 100 will always be equal to the percentage of taxes to be withheld. You must make a manual journal entry to recognize these transactions.
The same scenario as above occurs, however the employer does not want to pay the taxes. (Deltek does not recommend this solution.) If the payroll year is closed, add a Z record to Employee Earnings that moves the amount out
of federal withholding and places the amount in Social Security and Medicare withholding. You must make a manual journal entry to recognize this transaction.
If the payroll year is open, add an X or Y record to Main Payroll Edit that removes the amount from federal withholding and places the amount in Social Security and Medicare withholding. Enter the check number and a date before December 31 and then post the payroll journal.
Any changes made in employee earnings that affect General Ledger also require a journal entry in the General Ledger module, if you are not posting an X or Y record.
A deduction for an employee is not showing up in Box 12. Select the deduction in Payroll Controls/Deduction and link it to the correct Deduction Type. Then, re-create the W-2.
W-2 information is not aligning correctly on the form. See the Costpoint online help system for printing hints and to verify that your printer set up is correctly. If not, contact Costpoint Technical Customer Care.

Chapter 5: Payroll Processing
Year-End Guide 47
W-2 Format
Box Name Description
a. Employee's Social Security Number
For security reasons, the Social Security number has been moved out of the area that is visible when a window envelope is used to mail the W-2s.
b. Employer Federal ID Number This field defaults from the Set Up Company Info screen in General Ledger.
c. Employer's Name, Address, and Zip Code
These fields default from the Set Up Company Info screen in General Ledger.
d. Control Number This box identifies the individual Form W-2.
e. Employee's Name These fields default from the Basic Employee Info screen.
f. Employee's Address and ZIP Code
These fields default from the Basic Employee Info screen.
1. Wages, Tips, and Other Compensation
The amount displayed here is the sum of all Federal Taxable amounts from the Maintain Employee Earnings screen. All deferred compensation amounts (Codes D-H in Box 12) and other Federal exempt pay types and/or deductions are subtracted from gross wages to arrive at this amount. Employer contributions to 401(k) are not part of the calculation.
2. Federal Income Tax Withheld The amount displayed here is the sum of all Federal Withheld amounts from the Taxes Withheld subtask of the Maintain Employee Earnings screen.
3. Social Security Wages The amount displayed here is the sum of all Social Security Taxable amounts from the Maintain Employee Earnings screen. All Social Security exempt pay types and/or deductions are subtracted from gross wages to arrive at this amount.
4. Social Security Tax Withheld The amount displayed here is the sum of all Social Security Withheld amounts from the Taxes Withheld subtask of the Maintain Employee Earnings screen.
5. Medicare Wages and Tips The amount displayed here is the sum of all Medicare Taxable amounts from the Maintain Employee Earnings screen.
6. Medicare Tax Withheld The amount displayed here is the sum of all Medicare Withheld amounts from the Taxes Withheld subtask of the Maintain Employee Earnings screen.
7. Social Security Tips You must enter an amount here, if applicable.

Chapter 5: Payroll Processing
Year-End Guide 48
Box Name Description
8. Allocated Tips You must enter an amount here, if applicable. This amount is not included in boxes 1, 3, 5, or 7.
9. This box is no longer printed on the W-2, since the Advance EIC payment was eliminated for tax years beginning after December 31, 2010.
10. Dependent Care Benefits The amount displayed here is the total amount of withholding, from the Deductions subtask of the Maintain Employee Earnings screen, for the deduction code that you identified as a Dependent Care deduction on the Deductions screen.
11. Nonqualified Plans The amount displayed here is the total amount, from the Pay Types subtask of the Maintain Employee Earnings screen, for the pay type that you associated with this box on the Pay Type Taxability screen. This amount is:
Reported in box 1, if it is a distribution made to the employee from a nonqualified deferred compensation or section 457 plan, or
Included in box 3 and/or 5 if it is a prior year deferral under a nonqualified or section 457 plan that became taxable for Social Security and Medicare taxes this year because there is no longer a substantial risk of forfeiture of the employee's right to the deferred amount.
12a-12d
A Uncollected Social Security Tax on employee's tips
The amount displayed here is the amount of uncollected Social Security or RRTA tax on tips.
B Uncollected Medicare Tax on employee's tips
The amount displayed here is the amount of uncollected Medicare tax on tips.
C Excess Life Insurance The amount displayed here is the cost of group-term life insurance over $50,000 included in boxes 1, 3—up to the Social Security wage base—and 5.
D Section 401(K) Deferred Compensation Plan
The amount displayed here is the amount of elective deferrals to section 401(k) cash or deferred arrangement. Also includes deferrals under a SIMPLE retirement account that is part of a section 401(k) arrangement. The amount shown here is the total amount of withholding from the Deductions subtask of the Maintain Employee Earnings screen, for the deduction code that you identified as 401(k) Deferred Compensation on the Deductions screen.

Chapter 5: Payroll Processing
Year-End Guide 49
Box Name Description
D 09, 11
USERRA (2009, 2011) make up elective deferrals to a section 401(k) cash or deferred arrangement.
USERRA (2009, 2011) make up elective deferrals to a section 401(k) cash or deferred arrangement.
E Section 403 (B)
Salary Reduction Agreement Deferred Compensation Plan
The amount displayed here is the total amount of withholding from the Deduction subtask of the Maintain Employee Earnings screen, for the deduction code that you identified as 403(b) Deferred Compensation on the Deductions screen.
E 09, 11
USERRA (2009, 2011) make up elective deferrals to a section 403(b) salary reduction agreement.
USERRA (2009, 2011) make up elective deferrals to a section 403(b) salary reduction agreement.
F Section 408(K) 6
Salary Reduction SEP
The amount displayed here is the total amount of withholding, from the Deductions subtask of the Maintain Employee Earnings screen, for the deduction code that you identified as 408(k) 6 Deferred Compensation on the Deductions screen.
F 09, 11
USERRA (2009, 2011) make up elective deferrals to a section 408(k)(6) salary reduction agreement.
USERRA (2009, 2011) make up elective deferrals to a section 408(k)(6) salary reduction agreement.
G Section 457(b) or 457(f) The amount displayed here is the total amount of withholding from the Deductions subtask of the Maintain Employee Earnings screen, for the deduction code that you identified as 457 Deferred Compensation the Deduction screen.
G 09, 11
USERRA (2009, 2011) make up elective deferrals and employer contributions (including nonelective deferrals) to a section 457(b) deferred compensation plan
USERRA (2009, 2011) make up elective deferrals and employer contributions (including nonelective deferrals) to a section 457(b) deferred compensation plan
H Section 501(C)18(D)
Tax Exempt Organization Plan
The amount displayed here is the total amount of withholding, from the Deductions subtask of the Maintain Employee Earnings screen, for the deduction code that you identified as 501(c) 18(D) Deferred Compensation on the Deduction screen.

Chapter 5: Payroll Processing
Year-End Guide 50
Box Name Description
H 09, 11
USERRA (2009, 2011) make up elective deferrals under a section 501(c)(18)(D) tax-exempt organization plan.
USERRA (2009, 2011) make up elective deferrals under a section 501(c)(18)(D) tax-exempt organization plan.
J Nontaxable Sick Pay The amount displayed here is the total amount of nontaxable sick pay not included in boxes 1, 3, or 5.
K % Excise Tax on excess Golden Parachute Payments
The amount displayed here is the total amount of withholding from the Deductions subtask of the Maintain Employee Earnings screen, for the deduction code identified as Golden Parachute on the Deduction screen.
L Non-taxable Employee Business Expenses
The amount displayed here is the total amount of non-taxable Employee Business Expenses (if taxable Employee Business Expenses are included in Box 1).
M Uncollected Social Security Tax for Former Employees
The amount displayed here is the total amount of uncollected Social Security or RRTA tax on cost of group-term life insurance over $50,000 (former employees only).
N Uncollected Medicare Tax for Former Employees
The amount displayed here is the total amount of uncollected Medicare tax on cost of group-term life insurance over $50,000 (former employees only).
P Moving Expenses The amount displayed here is the total amount of excludable moving expense reimbursements paid directly to employee (not included in boxes 1, 3, or 5).
Q Non-taxable Combat Pay
R Employer Contributions The amount displayed here is the total amount of employer contribution to the employee’s medical savings account (MSA).
S Section 408(P) Plan The amount displayed here is the total amount of employee salary reduction contributions under a section 408(p) SIMPLE (not included in box 1).
S 09, 11
USERRA (2009, 2011) make up employee salary reduction contributions under a section 408(p) SIMPLE.
USERRA (2009, 2011) make up employee salary reduction contributions under a section 408(p) SIMPLE.
T Adoption Benefits The amount displayed here is the total amount of adoption benefits not included in box 1.

Chapter 5: Payroll Processing
Year-End Guide 51
Box Name Description
V Income for exercise of non-statutory stock option(s)
The amount displayed here is the total amount of income from exercise of non-statutory stock option(s) included in boxes 1, 3 (up to Social Security wage base) or 5.
W Health Savings Account The amount displayed here is the total amount of employer and employee contributions to a Health Savings Account (HSA).
Y Section 409(A) Deferrals The amount displayed here is the total amount of deferrals under a section 409A nonqualified deferred compensation.
Y 09, 11
USERRA (2009, 2011) make up deferrals under section 409A nonqualified deferred compensation plan.
USERRA (2009, 2011) make up deferrals under section 409A nonqualified deferred compensation plan.
Z Section 409(A) Income The amount displayed here is the total amount of income under a section 409A nonqualified deferred compensation.
AA Roth 401(K) Contribution Plan
The amount displayed here is the total amount of designated Roth plan contributions under a section 401(k) plan.
AA 09, 11
USERRA (2009, 2011) make up designated Roth contributions to a section 401(k) plan
USERRA (2009, 2011) make up elective deferrals to a section 401(k) cash or deferred arrangement.
BB Roth 401(B) Contribution Plan
The amount displayed here is the total amount of designated Roth plan contributions under a section 403(b) plan.
BB 09, 11
USERRA (2009, 2011) make up designated Roth contributions under section 403(b) salary reduction agreement
USERRA (2009, 2011) make up designated Roth contributions under a section 403(b) salary reduction agreement.
CC HIRE Exempt Wages and Tips
The amount of HIRE exempt wages and tips paid to qualified employees. Amount must be manually entered.

Chapter 5: Payroll Processing
Year-End Guide 52
Box Name Description
DD
Cost of employer-sponsored health coverage
The amount displayed here is the cost of employer-sponsored health coverage taken from the Deductions and Contriubtions subtasks of the Manage Employee Earnings and History screen for Deductions/Contributions marked as Employer-Sponsored Health Coverage in the Manage Deductions screen.
EE
EE 11
Designated Roth contributions under a governmental section 457(b) plan
USERRA 2011 make up designated Roth contributions under a section 457(b) plan.
Designated Roth contributions under a governmental section 457(b) plan
USERRA 2011 make up designated Roth contributions under a section 457(b) plan.
13 Retirement Plan Special limits may apply to the amount of traditional IRA contributions you may deduct. Also, the elective deferrals in box 12 (codes D, E, F, G, H, and S), for all employers, and for all such plans to which you belong, are generally limited to $17,500. Elective deferrals for section 403(b) contracts are limited to $17,500 ($22,500 in some cases). The limit for section 457(b) plans is $17,500. Amounts over the limits must be included in income.
14 Other
15 State This box displays the two-character abbreviation from the Maintain Employee Earnings screen. Employer's State ID no - The State ID Number as entered on the State Taxes screen.
16 State Wages, Tips The amount displayed here is the sum of all State Taxable amounts from the Maintain Employee Earnings screen. All deferred compensation amounts (Codes D-H in Box 12) and other State exempt pay types and/or deductions are subtracted from Gross Wages to arrive at this amount.
17 State Income Tax The amount displayed here is the sum of all State Withheld amounts from the Taxes Withheld subtask of the Maintain Employee Earnings screen.

Chapter 5: Payroll Processing
Year-End Guide 53
Box Name Description
18 Local Wages, Tips The amount displayed here is the sum of all Local Taxable amounts from the Taxes Withheld subtask of the Maintain Employee Earnings screen. Any SDI information also prints in this box, if setup as a Local Tax.
19 Local Income Tax The amount displayed here is the sum of all Locality Withheld amounts from the Taxes Withheld subtask of the Maintain Employee Earnings screen.
20 Name of Locality This box displays the six-character codes from the Taxes Withheld subtask of the Maintain Employee Earnings screen.
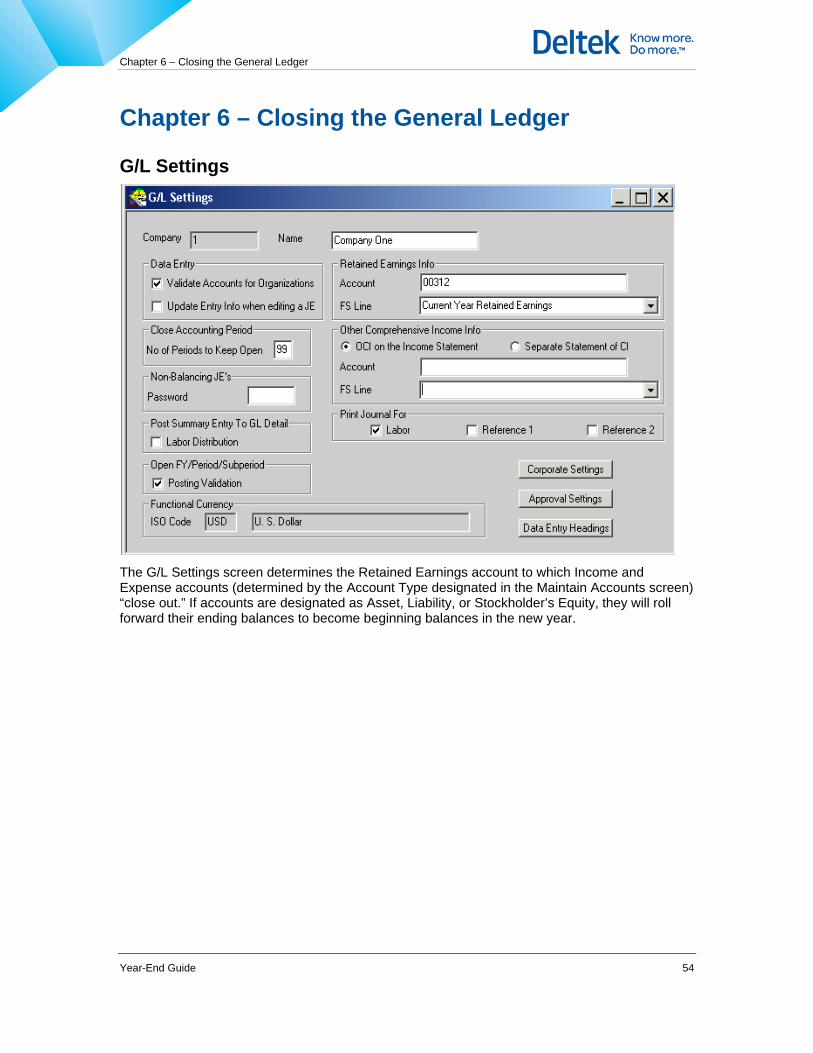
Chapter 6 – Closing the General Ledger
Year-End Guide 54
Chapter 6 – Closing the General Ledger
G/L Settings
The G/L Settings screen determines the Retained Earnings account to which Income and Expense accounts (determined by the Account Type designated in the Maintain Accounts screen) “close out.” If accounts are designated as Asset, Liability, or Stockholder’s Equity, they will roll forward their ending balances to become beginning balances in the new year.

Chapter 6 – Closing the General Ledger
Year-End Guide 55
Update G/L Beginning Balances
Use the Update G/L Beginning Balances screen:
To roll forward ending balances of entered year and create beginning balances in the new year.
All accounts designated with an Account Type of Asset, Liability or Stockholder’s Equity will have beginning balances created in the new fiscal year by this process.
To close the fiscal year.
The Fiscal Year status is changed to Closed only if you select the Set Fiscal Year Status to Closed check box and set the Closing Rate Type option to Actual or Target.
You can only close the fiscal year if all accounting periods and subperiods in the fiscal year are set to a Closed status (if the Close Periods screen was used to close all accounting periods in the fiscal year).
You can run this process multiple times, without closing the fiscal year.

Chapter 6 – Closing the General Ledger
Year-End Guide 56
Maintain Non-Project Beginning Balances
If the Retained Earnings are separated into two accounts, one for current year and one for prior year, then you must make a manual entry on the Maintain Non-Project Beginning Balances screen for your new fiscal year (2013).
To make the manual entry, complete the following steps: 1. Add the Current Year Retained Earnings Beginning Amount to the Prior Year Retained
Earnings Beginning Amount.
2. Zero out the Current Year’s Retained Earnings Beginning Amount.
After you complete these steps, your financial statement will appear correctly for the new fiscal year.

Chapter 7 – ‘Closing’/Preparing the Projects Side
Year-End Guide 57
Chapter 7 – ‘Closing’/Preparing the Projects Side
Update Prior Year History
Update Prior Year History creates prior year data for project reporting. You must run Update Prior Year History before computing revenue for the new fiscal year; otherwise, revenue may not appear correctly. You can run Update Prior Year History multiple times.
To run complete the Update Prior Year History screen, complete the following steps:
1. Enter the Fiscal Year for which you are closing.
2. Select the Update options for the data you wish to make prior year.
At the least, select Project Ledger and Labor History.
Select Units, Billing Value, and/or Cobra History, if any apply.
3. In the Update Prior Year History Using group box, select the rates to be used when updating the prior year history:
Actual Burden Rates
Target Burden Rates
Actual Burden Rates/Target Revenue

Chapter 7 – ‘Closing’/Preparing the Projects Side
Year-End Guide 58
Copy Pools
Guidelines for the Copy Pools screen:
Pools must be created every year.
Use the Copy Pools utility to copy pools from year to the next.
All pools and their data must be copied at the same time when using this utility.
In the Source field, enter the allocation group and fiscal year from which the pools will be copied.
In the Destination field, enter the allocation group and fiscal year to which the pool will be copied.

Chapter 7 – ‘Closing’/Preparing the Projects Side
Year-End Guide 59
Cost Pools
Before computing pools for the new fiscal year, use the Cost Pools/Pool Rate subtask to complete the following steps:
1. Zero out the Pd Act and YTD Act columns for all periods.
2. Enter/verify all other columns’ rates.
3. Add lines for all periods in fiscal year.
4. Make any changes to the pool’s cost and/or base setup.
Provisional rates are used for billing and Target rates are used for projects.

Chapter 7 – ‘Closing’/Preparing the Projects Side
Year-End Guide 60
Build Rate Application Table
.
The Build Rate Application Table populates the table used to allocate indirect costs to projects. You must run this process before calculating bills and computing burden in the new fiscal year. Always run this application after:
Creating/changing pools for the new fiscal year
Changing pool base data
Changing pool sequence numbers
Project Burden Cost Ceilings

Chapter 7 – ‘Closing’/Preparing the Projects Side
Year-End Guide 61
If your company uses Project Burden Cost Ceilings, you must set them up every year because the ceilings are maintained by a fiscal year/project basis.
Maintain Burden Fee Overrides
If your company uses the Maintain Burden Fee Overrides screen, you must update it yearly because it is maintained by project, based on the fiscal year of the pool.

Appendix A: Sample IRS 1099 Form
Year-End Guide 62
Appendix A: Sample IRS 1099 Form IRS instructions: http://www.irs.gov/pub/irs-pdf/i1099msc.pdf
IRS sample form: http://www.irs.gov/pub/irs-pdf/f1099msc.pdf

Appendix B: Sample IRS W-2 Form
Year-End Guide 63
Appendix B: Sample IRS W-2 Form IRS instructions: http://www.irs.gov/pub/irs-pdf/iw2w3.pdf
IRS sample form: http://www.irs.gov/pub/irs-pdf/fw2.pdf

Deltek is the leading global provider of enterprise software and information solutions for professional services firms, government contractors, and government agencies. For decades, we have delivered actionable insight that empowers our customers to unlock their business potential. Over 14,000 organizations and 1.8 million users in approximately 80 countries around the world rely on Deltek to research and identify opportunities, win new business, optimize resource, streamline operations, and deliver more profitable projects. Deltek – Know more. Do more.®
deltek.com