Delphi H - teamalkaviva.com · 10/11/2018 · Delphi H˜ Series Manual Alkaline Water Ionizer And...
23
Delphi H 2 Owner’s Manual Infusion TECHNOLOGY H 2 Warning! Incorrect installation and/or operation could void your valuable warranty. Please protect your investment! READ THIS MANUAL CAREFULLY! Delphi H2 Series | V. 10.11.18
Transcript of Delphi H - teamalkaviva.com · 10/11/2018 · Delphi H˜ Series Manual Alkaline Water Ionizer And...

Delphi H2Owner’s Manual
InfusionTECHNOLOGY
H2
Warning! Incorrect installation and/or operation could void your valuable warranty. Please protect your investment! READ THIS MANUAL CAREFULLY!
Delphi H2 Series | V. 10.11.18
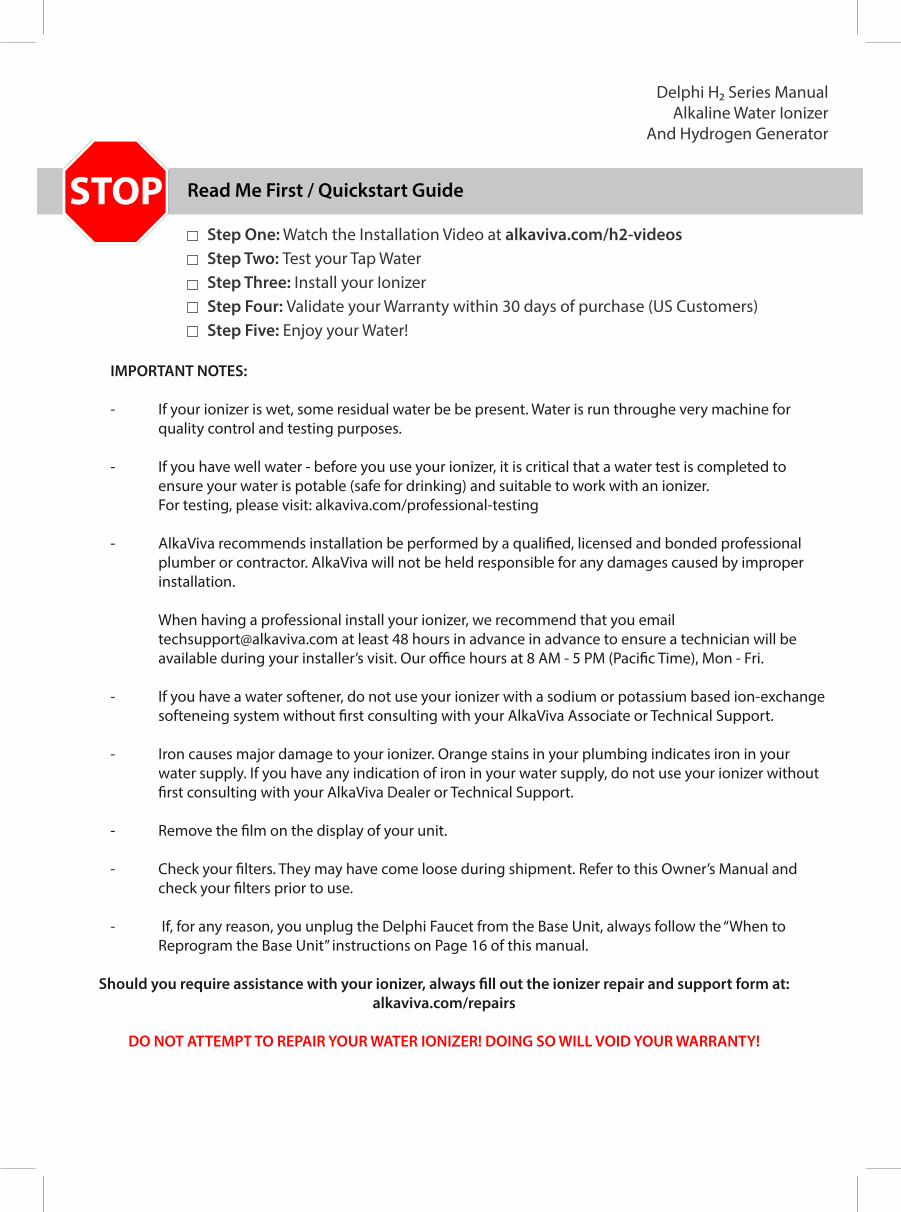
IMPORTANT NOTES:
- If your ionizer is wet, some residual water be be present. Water is run throughe very machine for quality control and testing purposes.
- If you have well water - before you use your ionizer, it is critical that a water test is completed to ensure your water is potable (safe for drinking) and suitable to work with an ionizer. For testing, please visit: alkaviva.com/professional-testing
- AlkaViva recommends installation be performed by a quali�ed, licensed and bonded professional plumber or contractor. AlkaViva will not be held responsible for any damages caused by improper installation.
When having a professional install your ionizer, we recommend that you email [email protected] at least 48 hours in advance in advance to ensure a technician will be available during your installer’s visit. Our o�ce hours at 8 AM - 5 PM (Paci�c Time), Mon - Fri.
- If you have a water softener, do not use your ionizer with a sodium or potassium based ion-exchange softeneing system without �rst consulting with your AlkaViva Associate or Technical Support.
- Iron causes major damage to your ionizer. Orange stains in your plumbing indicates iron in your water supply. If you have any indication of iron in your water supply, do not use your ionizer without �rst consulting with your AlkaViva Dealer or Technical Support.
- Remove the �lm on the display of your unit.
- Check your �lters. They may have come loose during shipment. Refer to this Owner’s Manual and check your �lters prior to use.
- If, for any reason, you unplug the Delphi Faucet from the Base Unit, always follow the “When to Reprogram the Base Unit” instructions on Page 16 of this manual.
Should you require assistance with your ionizer, always �ll out the ionizer repair and support form at: alkaviva.com/repairs
DO NOT ATTEMPT TO REPAIR YOUR WATER IONIZER! DOING SO WILL VOID YOUR WARRANTY!
Read Me First / Quickstart GuideSTOPStep One: Watch the Installation Video at alkaviva.com/h2-videosStep Two: Test your Tap WaterStep Three: Install your IonizerStep Four: Validate your Warranty within 30 days of purchase (US Customers)Step Five: Enjoy your Water!
Delphi H2 Series ManualAlkaline Water Ionizer
And Hydrogen Generator
Delphi H2 Series ManualAlkaline Water Ionizer
And Hydrogen Generator
Table of Contents
Congratulations on Your New Purchase & Register your Warranty........................Important Safety Warnings and Precautions.................................................................How to Protect Your Investment & Warranty..................................................................Installing your Delphi H2 Ionizer - At a Glance...............................................................Installing your Delphi H2........................................................................................................Operating your Ionizer...........................................................................................................Using Ionized Water................................................................................................................Replacing the H2 Series Smart Filter..................................................................................Adding Optional Calcium or Scale Guard Inserts.........................................................How to Install Optional In-Line Sediment Filter............................................................How to Operate your Quick Connect Fitting..................................................................When to Reprogram the Base Unit....................................................................................Troubleshooting Guide..........................................................................................................
123581013141414151618
Delphi H2 Series ManualAlkaline Water Ionizer
And Hydrogen Generator
Congratulations on Your New Purchase!
Your new H2 Series ionizer is designed to provide you with many years of the cleanest, healthiest and most functional water available. There are many speci�c uses and bene�ts of this amazing water, so read this manual carefully to learn how to install, maintain, protect and get optimum performance out of your investment.
Your new H2 Series Ionizer produces �ltered alkaline, ionized, and hydrogen-rich water. Just exactly what is that? Your ionizer employs computer accurate and selectable magnetic energy to perform electrolysis through platinum titanium electrodes inside a water cell. Inside this advanced cell, the magnetic energy separates the water into alkaline (high pH) and acid (low pH) stream and enriches the water with dissolved molecular hydrogen without using any chemicals.
Ionizing the water also binds extra oxygen molecules, and concentrates ionized, absorbable and bene�cial minerals like calcium, magnesium and potassium.
Your new H2 series ionizer also produces acidic water. This type of water has a low pH (less than pH 6) and has many excellent uses. You now have the convenience and bene�ts of ionized water that functions in many ways that ordinary tap, �ltered or bottled water simply cannot.
Make sure you register your ionizer warranty within 30-days of purchase. To activate your Limited Lifetime Warranty, go to www.alkaviva.com/warranty
Enjoy your H2 Series water ionizer!
Page 1
Delphi H2 Series ManualAlkaline Water Ionizer
And Hydrogen Generator
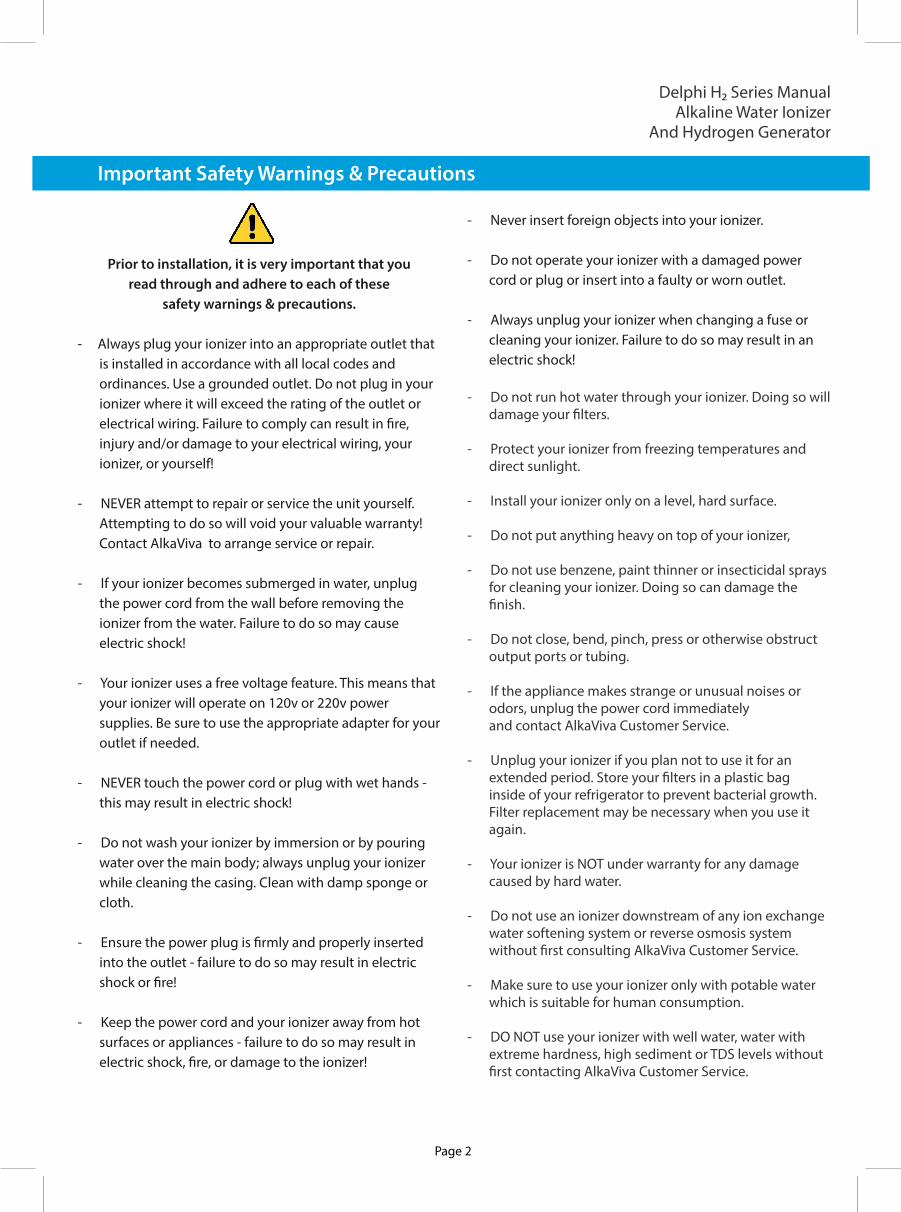
Important Safety Warnings & Precautions
Prior to installation, it is very important that you read through and adhere to each of these
safety warnings & precautions.
- Always plug your ionizer into an appropriate outlet that is installed in accordance with all local codes and ordinances. Use a grounded outlet. Do not plug in your ionizer where it will exceed the rating of the outlet or electrical wiring. Failure to comply can result in �re, injury and/or damage to your electrical wiring, your ionizer, or yourself!
- NEVER attempt to repair or service the unit yourself. Attempting to do so will void your valuable warranty! Contact AlkaViva to arrange service or repair.
- If your ionizer becomes submerged in water, unplug the power cord from the wall before removing the ionizer from the water. Failure to do so may cause electric shock!
- Your ionizer uses a free voltage feature. This means that your ionizer will operate on 120v or 220v power supplies. Be sure to use the appropriate adapter for your outlet if needed.
- NEVER touch the power cord or plug with wet hands - this may result in electric shock!
- Do not wash your ionizer by immersion or by pouring water over the main body; always unplug your ionizer while cleaning the casing. Clean with damp sponge or cloth.
- Ensure the power plug is �rmly and properly inserted into the outlet - failure to do so may result in electric shock or �re!
- Keep the power cord and your ionizer away from hot surfaces or appliances - failure to do so may result in electric shock, �re, or damage to the ionizer!
- Never insert foreign objects into your ionizer.
- Do not operate your ionizer with a damaged power cord or plug or insert into a faulty or worn outlet.
- Always unplug your ionizer when changing a fuse or cleaning your ionizer. Failure to do so may result in an electric shock!
- Do not run hot water through your ionizer. Doing so will damage your �lters.
- Protect your ionizer from freezing temperatures and direct sunlight.
- Install your ionizer only on a level, hard surface.
- Do not put anything heavy on top of your ionizer,
- Do not use benzene, paint thinner or insecticidal sprays for cleaning your ionizer. Doing so can damage the �nish.
- Do not close, bend, pinch, press or otherwise obstruct output ports or tubing.
- If the appliance makes strange or unusual noises or odors, unplug the power cord immediately and contact AlkaViva Customer Service.
- Unplug your ionizer if you plan not to use it for an extended period. Store your �lters in a plastic bag inside of your refrigerator to prevent bacterial growth. Filter replacement may be necessary when you use it again.
- Your ionizer is NOT under warranty for any damage caused by hard water.
- Do not use an ionizer downstream of any ion exchange water softening system or reverse osmosis system without �rst consulting AlkaViva Customer Service.
- Make sure to use your ionizer only with potable water which is suitable for human consumption.
- DO NOT use your ionizer with well water, water with extreme hardness, high sediment or TDS levels without �rst contacting AlkaViva Customer Service.
Page 2
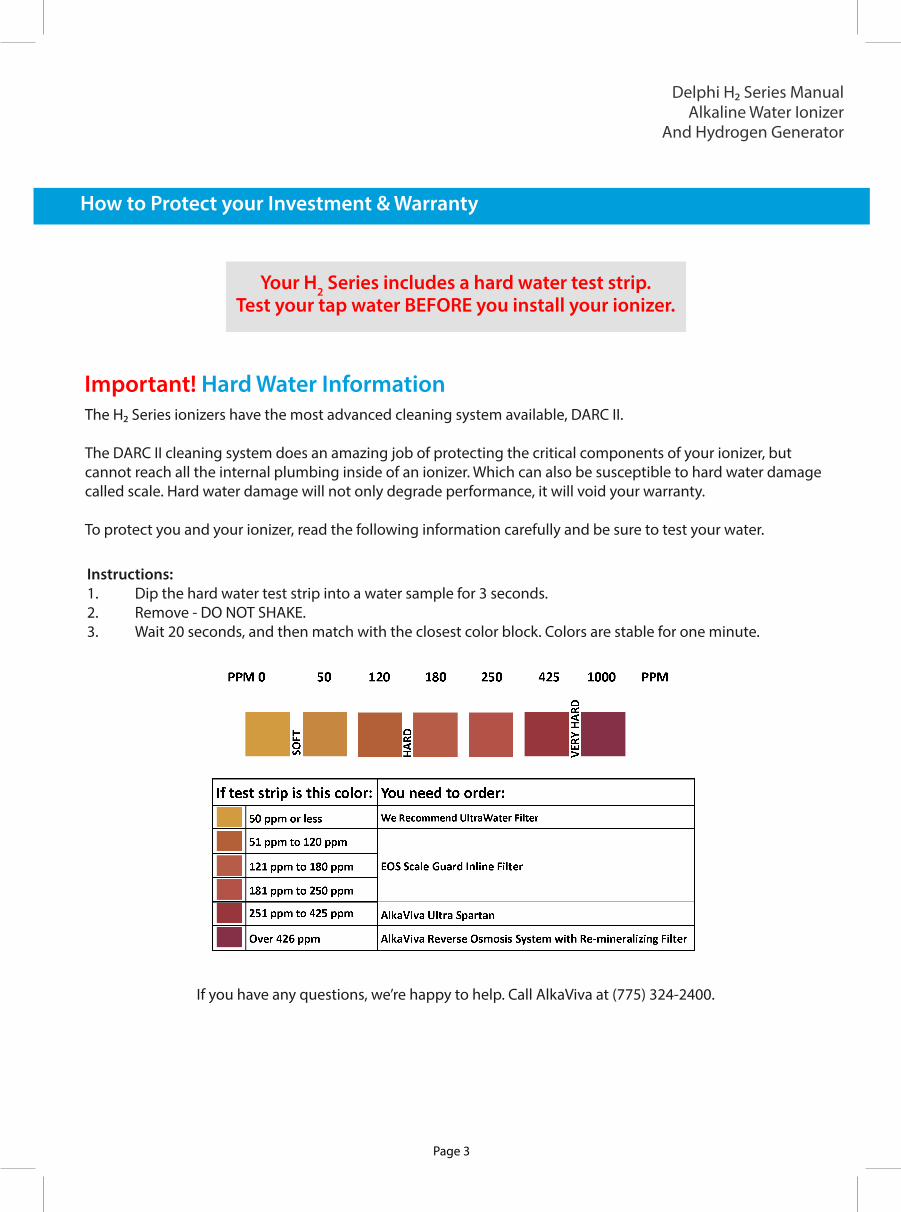
How to Protect your Investment & Warranty
The H2 Series ionizers have the most advanced cleaning system available, DARC II. The DARC II cleaning system does an amazing job of protecting the critical components of your ionizer, but cannot reach all the internal plumbing inside of an ionizer. Which can also be susceptible to hard water damage called scale. Hard water damage will not only degrade performance, it will void your warranty.
To protect you and your ionizer, read the following information carefully and be sure to test your water.
Your H2 Series includes a hard water test strip. Test your tap water BEFORE you install your ionizer.
Instructions:1. Dip the hard water test strip into a water sample for 3 seconds. 2. Remove - DO NOT SHAKE. 3. Wait 20 seconds, and then match with the closest color block. Colors are stable for one minute.
Important! Hard Water Information
If you have any questions, we’re happy to help. Call AlkaViva at (775) 324-2400.
Delphi H2 Series ManualAlkaline Water Ionizer
And Hydrogen Generator
Page 3

Installing your Delphi H2- At a Glance
Delphi H2 Series ManualAlkaline Water Ionizer
And Hydrogen Generator
Installation Diagram
Note: We recommend using a licensed professional for the installation of the Delphi H2
Page 4
(pre-installed)
(pre-installed)
If you have installation questions, please call AlkaViva Customer Service.
(775) 324-2400
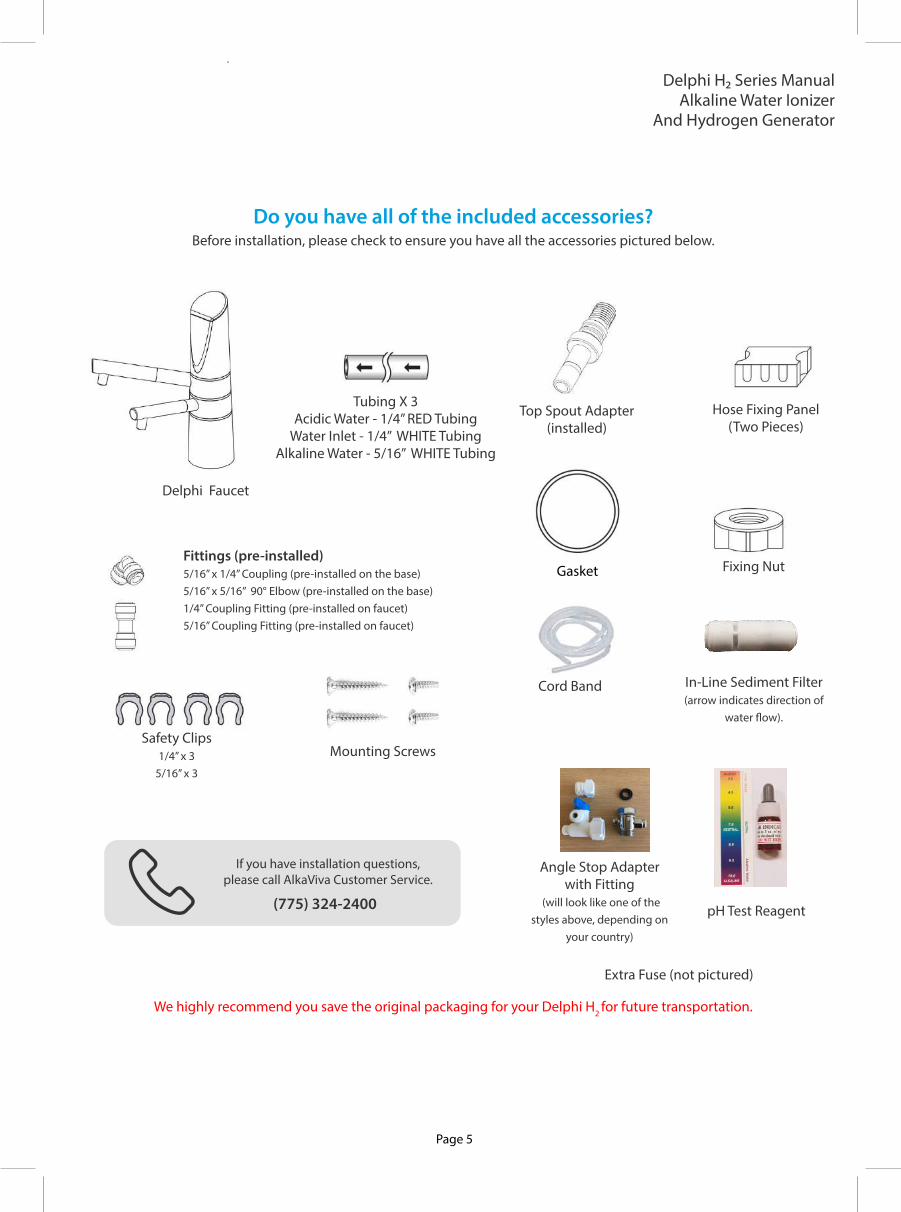
Before installation, please check to ensure you have all the accessories pictured below.
Delphi Faucet
Tubing X 3Acidic Water - 1/4” RED Tubing
Water Inlet - 1/4” WHITE TubingAlkaline Water - 5/16” WHITE Tubing
Cord Band
Gasket Fixing Nut
Top Spout Adapter (installed)
Mounting Screws
In-Line Sediment Filter (arrow indicates direction of
water �ow).
Angle Stop Adapter with Fitting
(will look like one of the styles above, depending on
your country)
pH Test Reagent
Safety Clips1/4” x 3
5/16” x 3
Hose Fixing Panel (Two Pieces)
Do you have all of the included accessories?
Page 5
We highly recommend you save the original packaging for your Delphi H2 for future transportation.
Fittings (pre-installed)5/16” x 1/4” Coupling (pre-installed on the base)5/16” x 5/16” 90° Elbow (pre-installed on the base)1/4” Coupling Fitting (pre-installed on faucet)5/16” Coupling Fitting (pre-installed on faucet)
Delphi H2 Series ManualAlkaline Water Ionizer
And Hydrogen Generator
Extra Fuse (not pictured)
Installing your Delphi H2
The installation instructions must be followed in a speci�c order. If the steps are not successfully followed, or if the tubing is installed improperly, you will need to deprogram the base unit and restart the programming sequence. You will need a power outlet underneath your sink where the Delphi Base Unit will be plugged in.
After your installation is completed when you �rst use your ionizer, ALWAYS check for leaks.
Step One: Installing the Delphi Faucet at your sink.
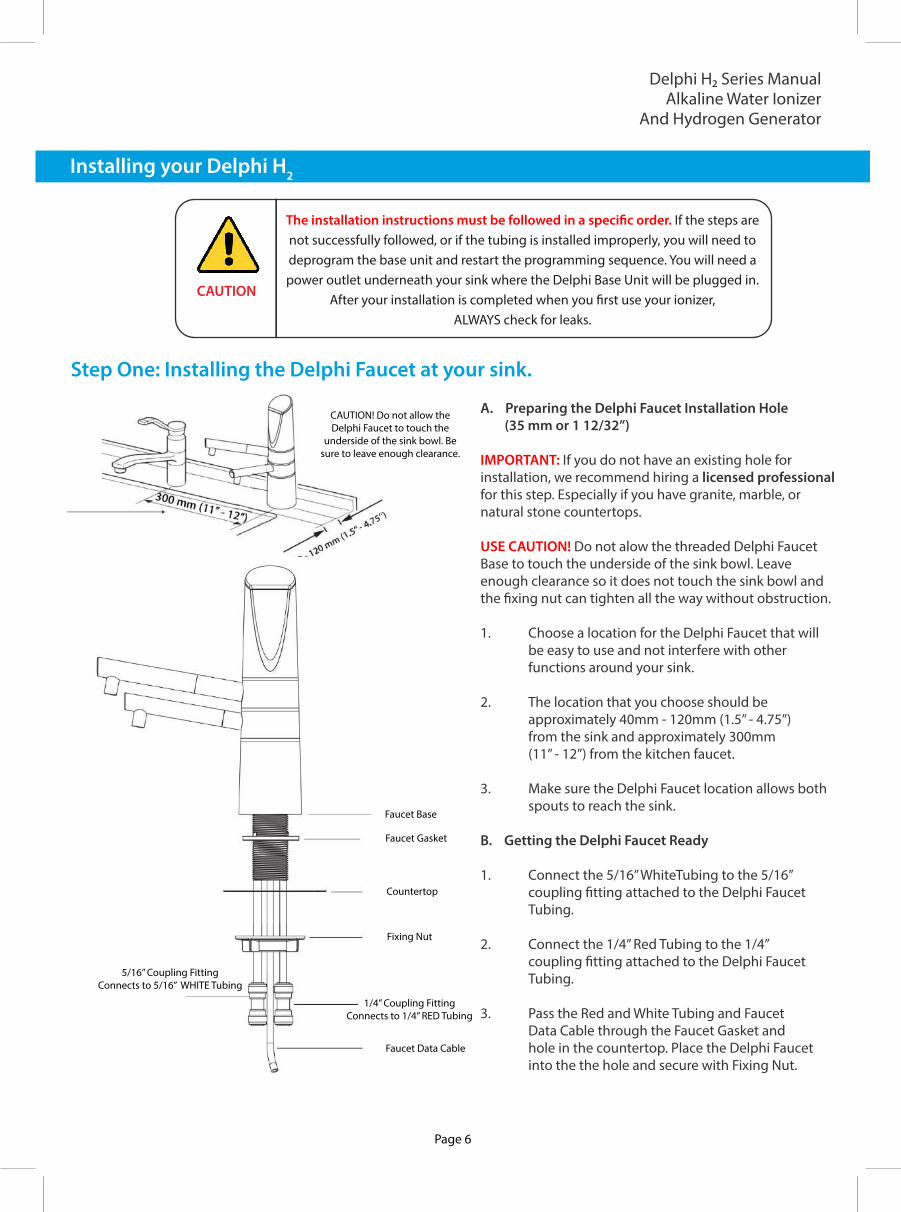
A. Preparing the Delphi Faucet Installation Hole (35 mm or 1 12/32”)
IMPORTANT: If you do not have an existing hole for installation, we recommend hiring a licensed professional for this step. Especially if you have granite, marble, or natural stone countertops. USE CAUTION! Do not alow the threaded Delphi Faucet Base to touch the underside of the sink bowl. Leave enough clearance so it does not touch the sink bowl and the �xing nut can tighten all the way without obstruction. 1. Choose a location for the Delphi Faucet that will be easy to use and not interfere with other functions around your sink. 2. The location that you choose should be approximately 40mm - 120mm (1.5” - 4.75”) from the sink and approximately 300mm (11” - 12”) from the kitchen faucet.
3. Make sure the Delphi Faucet location allows both spouts to reach the sink.
B. Getting the Delphi Faucet Ready
1. Connect the 5/16” WhiteTubing to the 5/16” coupling �tting attached to the Delphi Faucet Tubing. 2. Connect the 1/4” Red Tubing to the 1/4” coupling �tting attached to the Delphi Faucet Tubing. 3. Pass the Red and White Tubing and Faucet Data Cable through the Faucet Gasket and hole in the countertop. Place the Delphi Faucet into the the hole and secure with Fixing Nut.
CAUTION
Faucet Gasket
Countertop
Fixing Nut
Faucet Data Cable
5/16” Coupling Fitting Connects to 5/16” WHITE Tubing
Page 6
CAUTION! Do not allow the Delphi Faucet to touch the
underside of the sink bowl. Be sure to leave enough clearance.
Delphi H2 Series ManualAlkaline Water Ionizer
And Hydrogen Generator
1/4” Coupling Fitting Connects to 1/4” RED Tubing
Faucet Base
Step Two: Installing the Angle Stop Adapter.
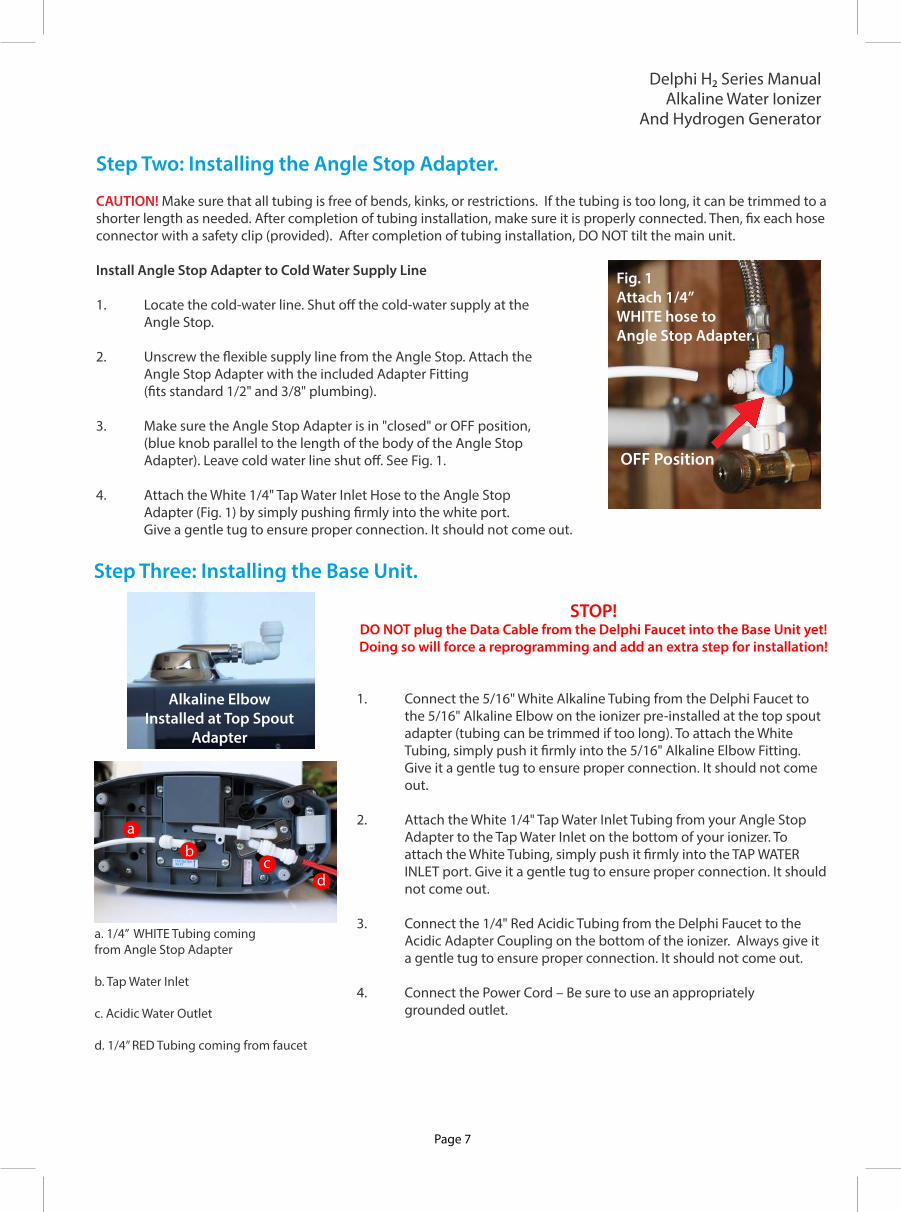
CAUTION! Make sure that all tubing is free of bends, kinks, or restrictions. If the tubing is too long, it can be trimmed to a shorter length as needed. After completion of tubing installation, make sure it is properly connected. Then, �x each hose connector with a safety clip (provided). After completion of tubing installation, DO NOT tilt the main unit.
Install Angle Stop Adapter to Cold Water Supply Line
1. Locate the cold-water line. Shut o� the cold-water supply at the Angle Stop. 2. Unscrew the �exible supply line from the Angle Stop. Attach the Angle Stop Adapter with the included Adapter Fitting (�ts standard 1/2" and 3/8" plumbing).
3. Make sure the Angle Stop Adapter is in "closed" or OFF position, (blue knob parallel to the length of the body of the Angle Stop Adapter). Leave cold water line shut o�. See Fig. 1.
4. Attach the White 1/4" Tap Water Inlet Hose to the Angle Stop Adapter (Fig. 1) by simply pushing �rmly into the white port. Give a gentle tug to ensure proper connection. It should not come out.
STOP!DO NOT plug the Data Cable from the Delphi Faucet into the Base Unit yet! Doing so will force a reprogramming and add an extra step for installation!
1. Connect the 5/16" White Alkaline Tubing from the Delphi Faucet to the 5/16" Alkaline Elbow on the ionizer pre-installed at the top spout adapter (tubing can be trimmed if too long). To attach the White Tubing, simply push it �rmly into the 5/16" Alkaline Elbow Fitting. Give it a gentle tug to ensure proper connection. It should not come out.
2. Attach the White 1/4" Tap Water Inlet Tubing from your Angle Stop Adapter to the Tap Water Inlet on the bottom of your ionizer. To attach the White Tubing, simply push it �rmly into the TAP WATER INLET port. Give it a gentle tug to ensure proper connection. It should not come out.
3. Connect the 1/4" Red Acidic Tubing from the Delphi Faucet to the Acidic Adapter Coupling on the bottom of the ionizer. Always give it a gentle tug to ensure proper connection. It should not come out.
4. Connect the Power Cord – Be sure to use an appropriately grounded outlet.
Step Three: Installing the Base Unit.
OFF Position
Alkaline Elbow Installed at Top Spout
Adapter
ab
c
a. 1/4” WHITE Tubing coming from Angle Stop Adapter
b. Tap Water Inlet
c. Acidic Water Outlet
d. 1/4” RED Tubing coming from faucet
d
Page 7
Fig. 1Attach 1/4” WHITE hose to Angle Stop Adapter.
Delphi H2 Series ManualAlkaline Water Ionizer
And Hydrogen Generator
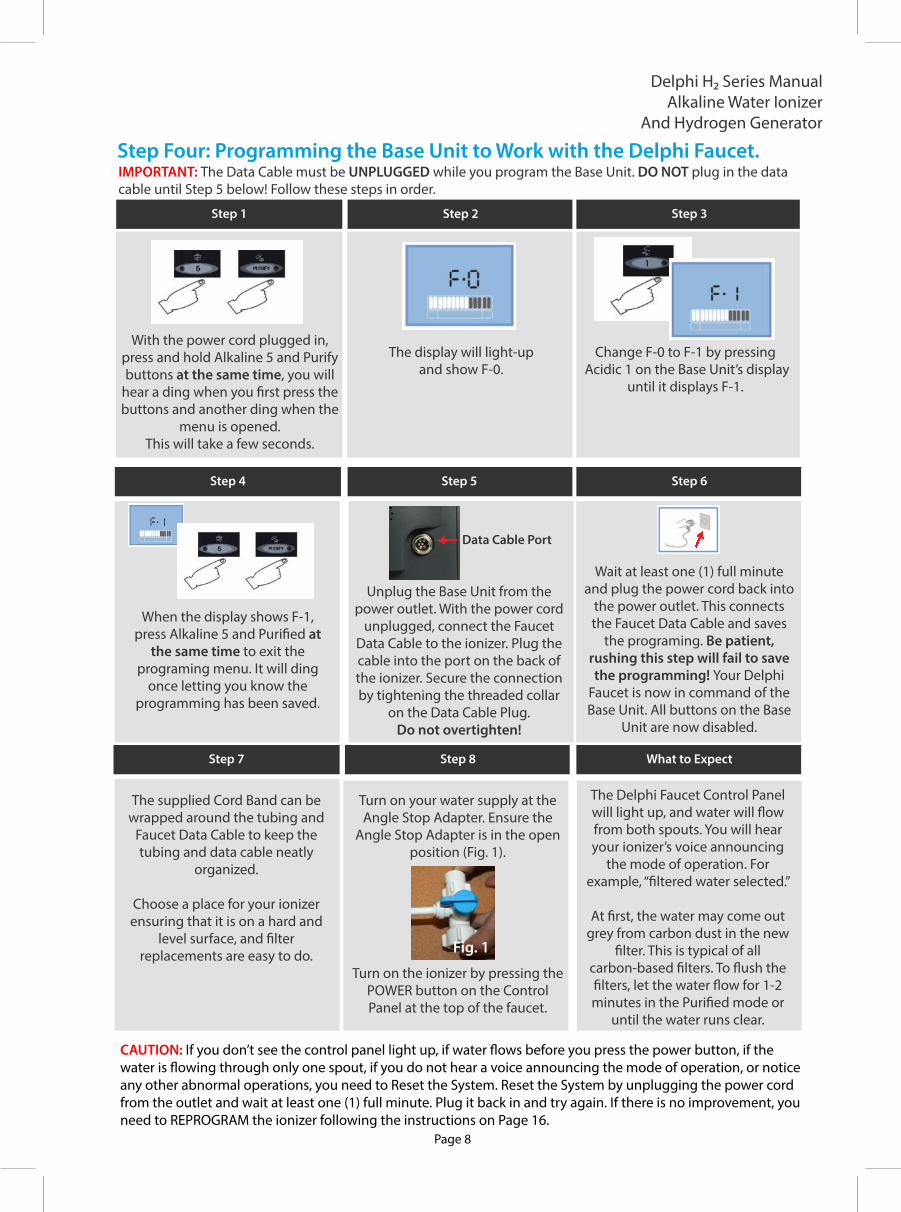
Step Four: Programming the Base Unit to Work with the Delphi Faucet.
Delphi H2 Series ManualAlkaline Water Ionizer
And Hydrogen Generator
- Never insert foreign objects into your ionizer.
- Do not operate your ionizer with a damaged power cord or plug or insert into a faulty or worn outlet.
- Always unplug your ionizer when changing a fuse or cleaning your ionizer. Failure to do so may result in an electric shock!
- Do not run hot water through your ionizer. Doing so will damage your �lters.
- Protect your ionizer from freezing temperatures and direct sunlight.
- Install your ionizer only on a level, hard surface.
- Do not put anything heavy on top of your ionizer,
- Do not use benzene, paint thinner or insecticidal sprays for cleaning your ionizer. Doing so can damage the �nish.
- Do not close, bend, pinch, press or otherwise obstruct output ports or tubing.
- If the appliance makes strange or unusual noises or odors, unplug the power cord immediately and contact AlkaViva Customer Service.
- Unplug your ionizer if you plan not to use it for an extended period. Store your �lters in a plastic bag inside of your refrigerator to prevent bacterial growth. Filter replacement may be necessary when you use it again.
- Your ionizer is NOT under warranty for any damage caused by hard water.
- Do not use an ionizer downstream of any ion exchange water softening system or reverse osmosis system without �rst consulting AlkaViva Customer Service.
- Make sure to use your ionizer only with potable water which is suitable for human consumption.
- DO NOT use your ionizer with well water, water with extreme hardness, high sediment or TDS levels without �rst contacting AlkaViva Customer Service.
With the power cord plugged in, press and hold Alkaline 5 and Purify buttons at the same time, you will
hear a ding when you �rst press the buttons and another ding when the
menu is opened. This will take a few seconds.
Change F-0 to F-1 by pressing Acidic 1 on the Base Unit’s display
until it displays F-1.
When the display shows F-1, press Alkaline 5 and Puri�ed at
the same time to exit the programing menu. It will ding
once letting you know the programming has been saved.
Unplug the Base Unit from the power outlet. With the power cord
unplugged, connect the Faucet Data Cable to the ionizer. Plug the cable into the port on the back of the ionizer. Secure the connection by tightening the threaded collar
on the Data Cable Plug. Do not overtighten!
IMPORTANT: The Data Cable must be UNPLUGGED while you program the Base Unit. DO NOT plug in the data cable until Step 5 below! Follow these steps in order.
The display will light-up and show F-0.
Step 1 Step 2 Step 3
Step 4 Step 5
Page 8
Wait at least one (1) full minute and plug the power cord back into
the power outlet. This connects the Faucet Data Cable and saves
the programing. Be patient, rushing this step will fail to save the programming! Your Delphi
Faucet is now in command of the Base Unit. All buttons on the Base
Unit are now disabled.
Step 6
Step 7 Step 8
The supplied Cord Band can be wrapped around the tubing and
Faucet Data Cable to keep the tubing and data cable neatly
organized.
Choose a place for your ionizer ensuring that it is on a hard and
level surface, and �lter replacements are easy to do.
Turn on your water supply at the Angle Stop Adapter. Ensure the
Angle Stop Adapter is in the open position (Fig. 1).
Turn on the ionizer by pressing the POWER button on the Control Panel at the top of the faucet.
What to Expect
The Delphi Faucet Control Panel will light up, and water will �ow from both spouts. You will hear your ionizer’s voice announcing
the mode of operation. For example, “�ltered water selected.”
At �rst, the water may come out grey from carbon dust in the new
�lter. This is typical of all carbon-based �lters. To �ush the �lters, let the water �ow for 1-2 minutes in the Puri�ed mode or
until the water runs clear.
CAUTION: If you don’t see the control panel light up, if water �ows before you press the power button, if the water is �owing through only one spout, if you do not hear a voice announcing the mode of operation, or notice any other abnormal operations, you need to Reset the System. Reset the System by unplugging the power cord from the outlet and wait at least one (1) full minute. Plug it back in and try again. If there is no improvement, you need to REPROGRAM the ionizer following the instructions on Page 16.
Data Cable Port
Fig. 1
Operating Your Ionizer
Page 9
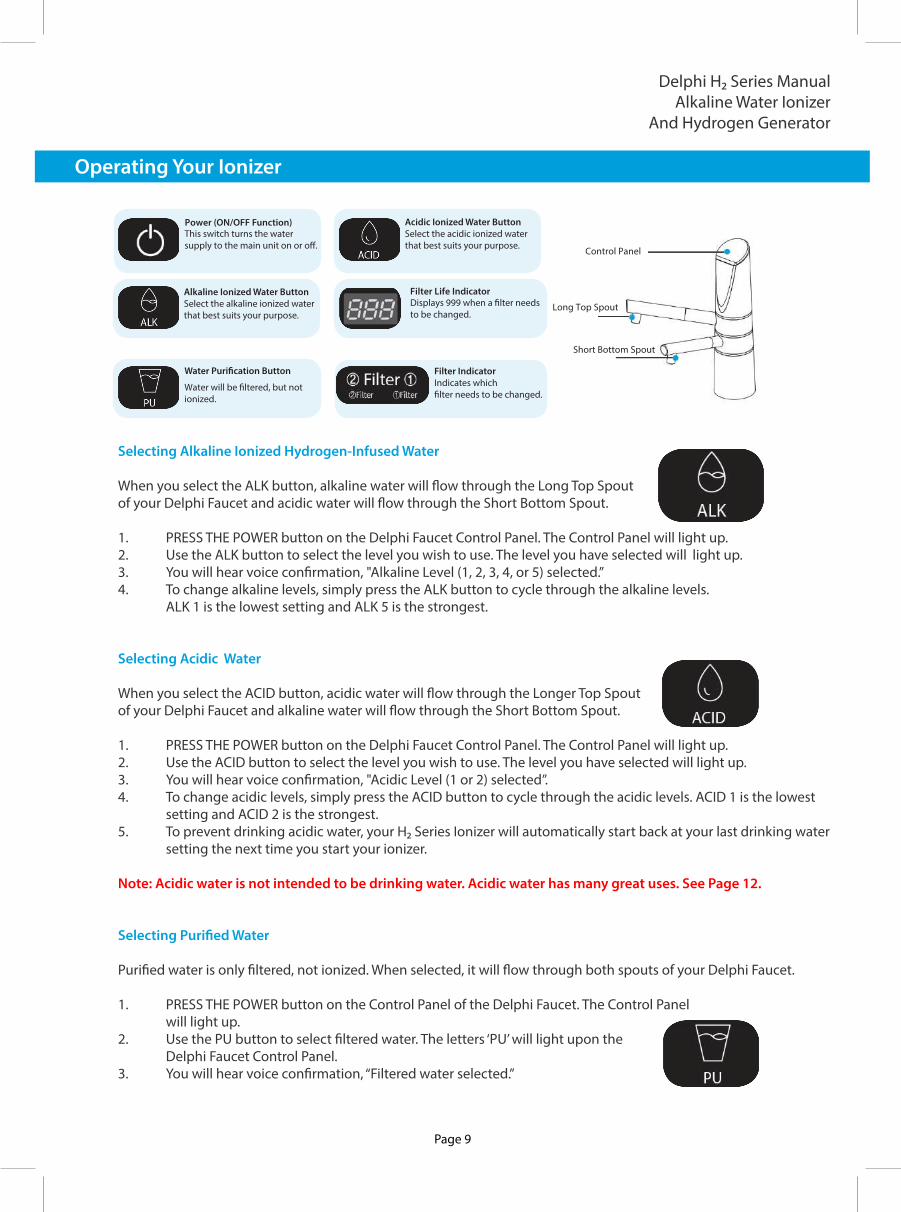
Power (ON/OFF Function)
Alkaline Ionized Water ButtonSelect the alkaline ionized water that best suits your purpose.
Water will be �ltered, but not ionized.
Acidic Ionized Water Button Select the acidic ionized water that best suits your purpose.
Filter Life IndicatorDisplays 999 when a �lter needs to be changed.
Filter IndicatorIndicates which �lter needs to be changed.
This switch turns the watersupply to the main unit on or o�. Control Panel
Long Top Spout
Short Bottom Spout
Selecting Alkaline Ionized Hydrogen-Infused Water
When you select the ALK button, alkaline water will �ow through the Long Top Spout of your Delphi Faucet and acidic water will �ow through the Short Bottom Spout.
1. PRESS THE POWER button on the Delphi Faucet Control Panel. The Control Panel will light up.2. Use the ALK button to select the level you wish to use. The level you have selected will light up.3. You will hear voice con�rmation, "Alkaline Level (1, 2, 3, 4, or 5) selected.”4. To change alkaline levels, simply press the ALK button to cycle through the alkaline levels. ALK 1 is the lowest setting and ALK 5 is the strongest.
Selecting Acidic Water
When you select the ACID button, acidic water will �ow through the Longer Top Spout of your Delphi Faucet and alkaline water will �ow through the Short Bottom Spout.
1. PRESS THE POWER button on the Delphi Faucet Control Panel. The Control Panel will light up.2. Use the ACID button to select the level you wish to use. The level you have selected will light up.3. You will hear voice con�rmation, "Acidic Level (1 or 2) selected”.4. To change acidic levels, simply press the ACID button to cycle through the acidic levels. ACID 1 is the lowest setting and ACID 2 is the strongest.5. To prevent drinking acidic water, your H2 Series Ionizer will automatically start back at your last drinking water setting the next time you start your ionizer.
Note: Acidic water is not intended to be drinking water. Acidic water has many great uses. See Page 12.
Selecting Puri�ed Water
Puri�ed water is only �ltered, not ionized. When selected, it will �ow through both spouts of your Delphi Faucet.
1. PRESS THE POWER button on the Control Panel of the Delphi Faucet. The Control Panel will light up. 2. Use the PU button to select �ltered water. The letters ‘PU’ will light upon the Delphi Faucet Control Panel. 3. You will hear voice con�rmation, “Filtered water selected.”
Delphi H2 Series ManualAlkaline Water Ionizer
And Hydrogen Generator
Page 10
Manually Adjusting Power
While Auto Adjust automatically provides very �ne real-time adjustments to the electrical pulse, you can also manually adjust the power to best suit your unique water quality and desired performance requirements.
By manually adjusting power settings for each Alkaline and Acidic Level, you can make bigger and more impactful changes in performance.
To manually adjust the power setting for each Akaline and Acidic Level, select the Alkaline or Acidic Level you'd like to adjust - just as you would for changing levels under normal operation.
In this example, we will use Alkaline Level 5 with a desired power setting of 2.
Instructions:
1. Start by pressing the Power button on the Delphi Faucet Control Panel. The current setting will appear on the display.
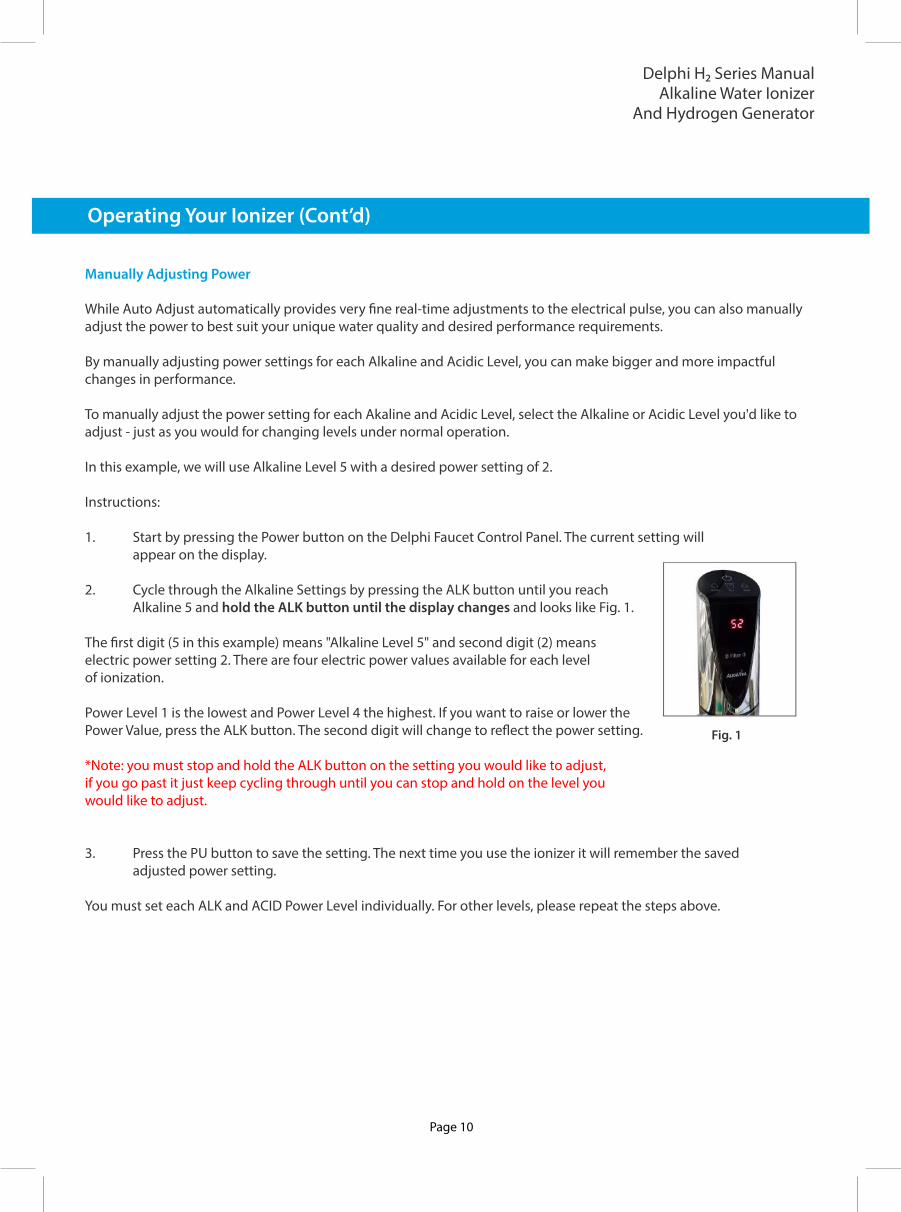
2. Cycle through the Alkaline Settings by pressing the ALK button until you reach Alkaline 5 and hold the ALK button until the display changes and looks like Fig. 1.
The �rst digit (5 in this example) means "Alkaline Level 5" and second digit (2) means electric power setting 2. There are four electric power values available for each level of ionization.
Power Level 1 is the lowest and Power Level 4 the highest. If you want to raise or lower the Power Value, press the ALK button. The second digit will change to re�ect the power setting.
*Note: you must stop and hold the ALK button on the setting you would like to adjust, if you go past it just keep cycling through until you can stop and hold on the level you would like to adjust.
3. Press the PU button to save the setting. The next time you use the ionizer it will remember the saved adjusted power setting.
You must set each ALK and ACID Power Level individually. For other levels, please repeat the steps above.
Operating Your Ionizer (Cont’d)
Delphi H2 Series ManualAlkaline Water Ionizer
And Hydrogen Generator
Fig. 1
Using Ionized Water
Caution! Don’t Develop a ‘Drinking’ Problem!
If you’ve never used hydrogen-infused ionized water, do not use an Alkaline Setting higher than 1 to begin with. Let your body adjust slowly and naturally for 2-3 days. After this initial adjustment period, gradually increase the alkalinity of the water by increasing the setting you use.
Do not take medications with ionized water. Take medications only with puri�ed, �ltered water.
Consult with a physician before drinking ionized water if you are currently under medical treatment, have a chronic disease, or have achlorhydria.
Consult a physician before using acidic water externally if you have sensitive skin or allergies.
Do not drink acidic water.
Only use potable drinking water in your ionizer. Poor water quality may have negative e�ects on your health and your ionizer! Most municipal water sources will be �ne in your ionizer. Well water and water from smaller systems should be checked and may require pre-�ltering.
Do not drink the following types of water:• Acidic water.• Water tested with the pH reagent, or pH reagent by itself.
Additional Cautions• Do not use the water in an aquarium.• Ionized water loses its e�ectiveness if stored for more than a day or two.
Suggested Alkaline Water Levels5 – Cooking vegetables4 – Making co�ee / tea3 – Cooking rice, grains, beans and pasta2 – Drinking 1 – Drinking – start drinking at level 1 for 2-3 days. After this initial adjustment period, gradually increase the alkalinity of the water by increasing the setting you use.
Puri�ed Water SettingUse this setting when taking medication.
Suggested Acidic Water Levels1 – Washing face, hair, and mouth rinse2 – Cleaning counters, cutting boards, etc.
Helpful Hint: Ionized hydrogen-infused water is always best fresh out of the ionizer and ideal if consumed on a day-to-day basis. Carry it with you in glass, ceramic or high quality BPA-free plastic bottles. Always keep your stored water cool and away from direct sunlight to preserve optimal water quality.
Page 11
Delphi H2 Series ManualAlkaline Water Ionizer
And Hydrogen Generator
Other Uses for Hydrogen-Infused Alkaline Water
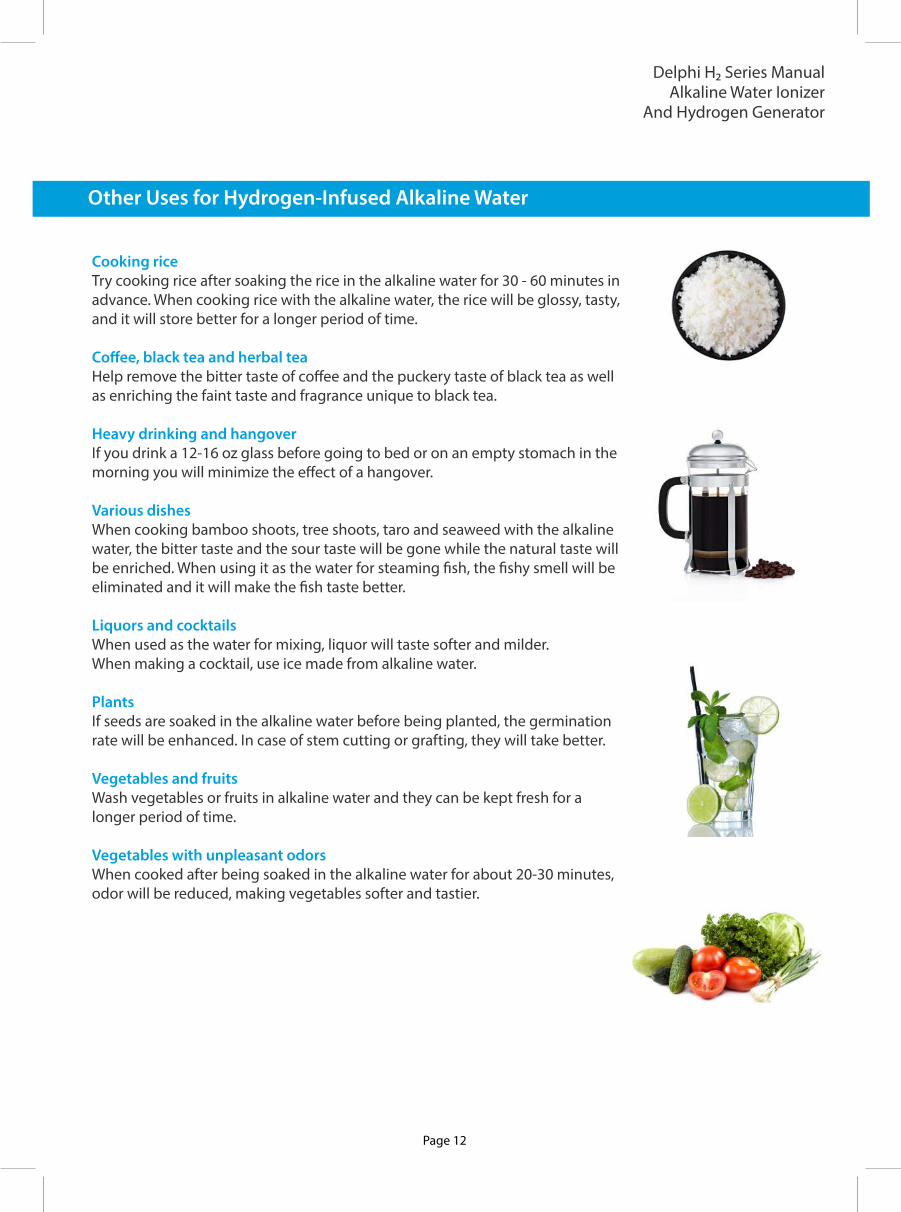
Cooking riceTry cooking rice after soaking the rice in the alkaline water for 30 - 60 minutes in advance. When cooking rice with the alkaline water, the rice will be glossy, tasty, and it will store better for a longer period of time.
Co�ee, black tea and herbal teaHelp remove the bitter taste of co�ee and the puckery taste of black tea as well as enriching the faint taste and fragrance unique to black tea.
Heavy drinking and hangoverIf you drink a 12-16 oz glass before going to bed or on an empty stomach in the morning you will minimize the e�ect of a hangover.
Various dishesWhen cooking bamboo shoots, tree shoots, taro and seaweed with the alkaline water, the bitter taste and the sour taste will be gone while the natural taste will be enriched. When using it as the water for steaming �sh, the �shy smell will be eliminated and it will make the �sh taste better.
Liquors and cocktailsWhen used as the water for mixing, liquor will taste softer and milder. When making a cocktail, use ice made from alkaline water.
PlantsIf seeds are soaked in the alkaline water before being planted, the germination rate will be enhanced. In case of stem cutting or grafting, they will take better.
Vegetables and fruitsWash vegetables or fruits in alkaline water and they can be kept fresh for a longer period of time.
Vegetables with unpleasant odorsWhen cooked after being soaked in the alkaline water for about 20-30 minutes, odor will be reduced, making vegetables softer and tastier.
A. Preparing the Delphi Faucet Installation Hole (35 mm or 1 12/32”)
IMPORTANT: If you do not have an existing hole for installation, we recommend hiring a licensed professional for this step. Especially if you have granite, marble, or natural stone countertops. USE CAUTION! Do not alow the threaded Delphi Faucet Base to touch the underside of the sink bowl. Leave enough clearance so it does not touch the sink bowl and the �xing nut can tighten all the way without obstruction. 1. Choose a location for the Delphi Faucet that will be easy to use and not interfere with other functions around your sink. 2. The location that you choose should be approximately 40mm - 120mm (1.5” - 4.75”) from the sink and approximately 300mm (11” - 12”) from the kitchen faucet.
3. Make sure the Delphi Faucet location allows both spouts to reach the sink.
B. Getting the Delphi Faucet Ready
1. Connect the 5/16” WhiteTubing to the 5/16” coupling �tting attached to the Delphi Faucet Tubing. 2. Connect the 1/4” Red Tubing to the 1/4” coupling �tting attached to the Delphi Faucet Tubing. 3. Pass the Red and White Tubing and Faucet Data Cable through the Faucet Gasket and hole in the countertop. Place the Delphi Faucet into the the hole and secure with Fixing Nut.
Page 12
Delphi H2 Series ManualAlkaline Water Ionizer
And Hydrogen Generator
Uses for Acidic Water
Skin CareAcidic water can be a beauty solution for your skin. It acts as an astringent and helps make the skin soft and elastic. (Skin is mildly acidic.)
Hair CareUse acidic water as a hair rinse after shampooing to neutralize the alkalinity of the shampoo, and help retain the hair's natural gloss.
ShavingUse acidic water after shaving; it can replace skin toner or after shave.
Floral arrangementUse acidic water for cut �owers. It will keep the �owers fresh for a longer period of time.
Boiling eggsWhen the acidic ionized water is used for boiling eggs, the shell is less likely to crack while cooking and the eggs will peel easily.
Water for parboiling noodlesWhen the acidic ionized water is used for parboiling noodles, it will make them chewy and tastier.
Washing or processing deep colored fruits and vegetablesWashing peaches, grapes, strawberries, red cabbages, beans and asparagus etc. with acidic water will retain their natural colors and they will stay bright and vibrant.
When preparing fried dishesUse acidic ionized water to prepare batter for fried dishes to make the foods crispy and tastier.
General cleaningWhen the acidic ionized water is used for cleaning �oors, dirt and grime can be easily removed and it dries quickly.
Cleaning glassWhen glass, mirrors and glasses are washed with acidic ionized water, dirt and grime is easily removed and glass is shiny without streaks.
Encrusted pots and pansSoak pots and pans in the acidic ionized water overnight to remove encrusted or burnt food.
Cleaning the cutting board or countersUse acidic ionized water to naturally clean and sanitize your cutting board and counters.
Cleaning dishes and silverwareUse acidic water for cleaning dishes and silverware. It will not leave spots.
Page 13
Delphi H2 Series ManualAlkaline Water Ionizer
And Hydrogen Generator
Replacing the H2 Series Smart FilterIMPORTANT NOTE: The Smart Filter will run for approximately 200 gallons beyond the end of the �lter life. After that, the ionization will be disabled unless new Smart Filters are installed. Make sure you order your replacement �lters in advance!
You can access the Filter Life Indicator by pressing the Puri�ed Button on the Faucet when the unit is not running any water. Both �lters need to be changed when the Filter Counter reaches 999. The Filter Life Indicator will also show on the Display when the Power button on the Faucet is pushed to Power o�. Considering that �lter life span can di�er based on water quality in individual areas, we recommend replacing the �lter before the end of the life span is reached if the water smells or the water �ow rate decreases.
Possible situations where �lter life can be shortened:- If there is sediment or impurities in the water- If you have very low water pressure- If you have untreated water, such as a private well
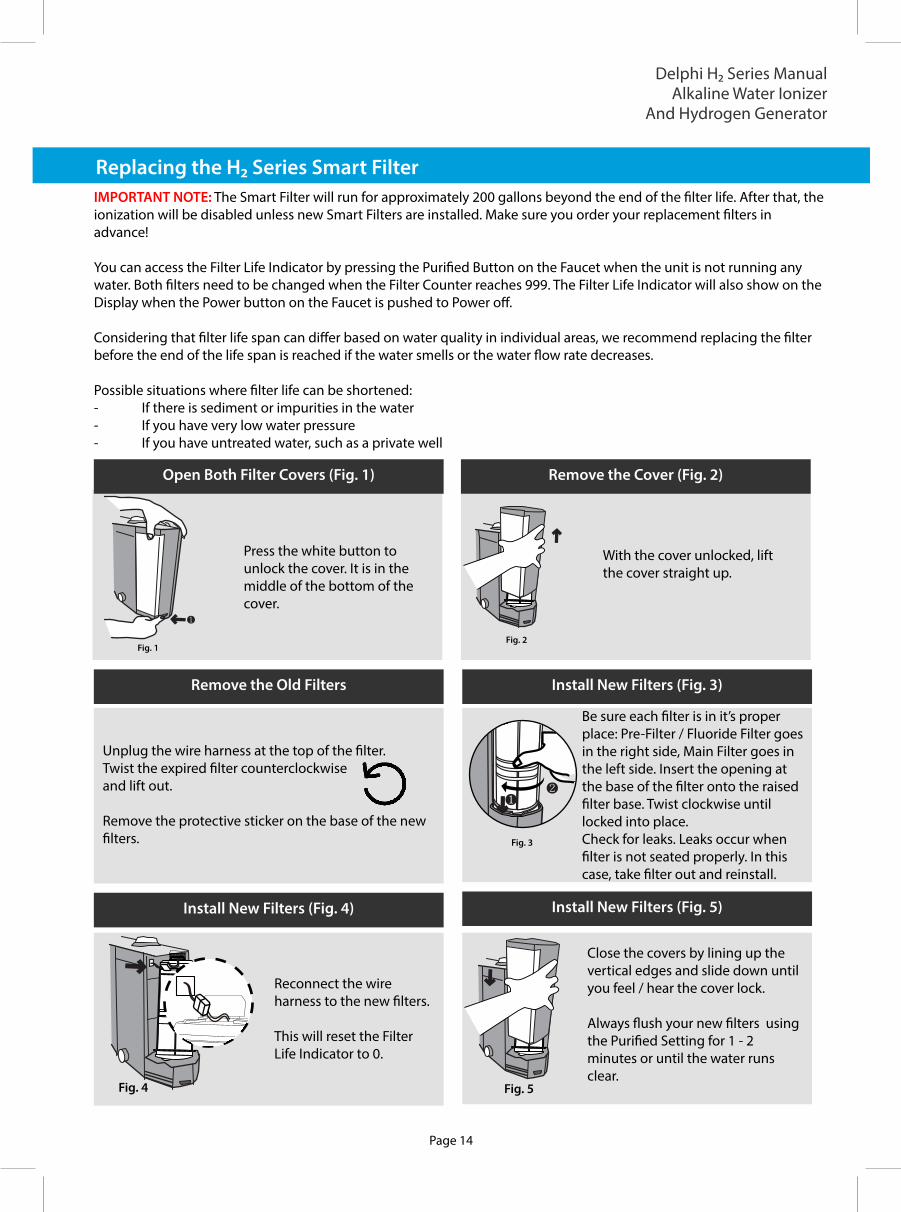
Press the white button to unlock the cover. It is in the middle of the bottom of the cover.
With the cover unlocked, lift the cover straight up.
Unplug the wire harness at the top of the �lter. Twist the expired �lter counterclockwise and lift out.
Remove the protective sticker on the base of the new �lters.
Be sure each �lter is in it’s proper place: Pre-Filter / Fluoride Filter goes in the right side, Main Filter goes in the left side. Insert the opening at the base of the �lter onto the raised �lter base. Twist clockwise until locked into place. Check for leaks. Leaks occur when �lter is not seated properly. In this case, take �lter out and reinstall.
Open Both Filter Covers (Fig. 1) Remove the Cover (Fig. 2)
Remove the Old Filters Install New Filters (Fig. 3)
Fig. 3
Fig. 2Fig. 1
Install New Filters (Fig. 4)
Fig. 4
Reconnect the wire harness to the new �lters.
This will reset the Filter Life Indicator to 0.
Install New Filters (Fig. 5)
Fig. 5
Close the covers by lining up the vertical edges and slide down until you feel / hear the cover lock.
Always �ush your new �lters using the Puri�ed Setting for 1 - 2 minutes or until the water runs clear.
Page 14
Delphi H2 Series ManualAlkaline Water Ionizer
And Hydrogen Generator
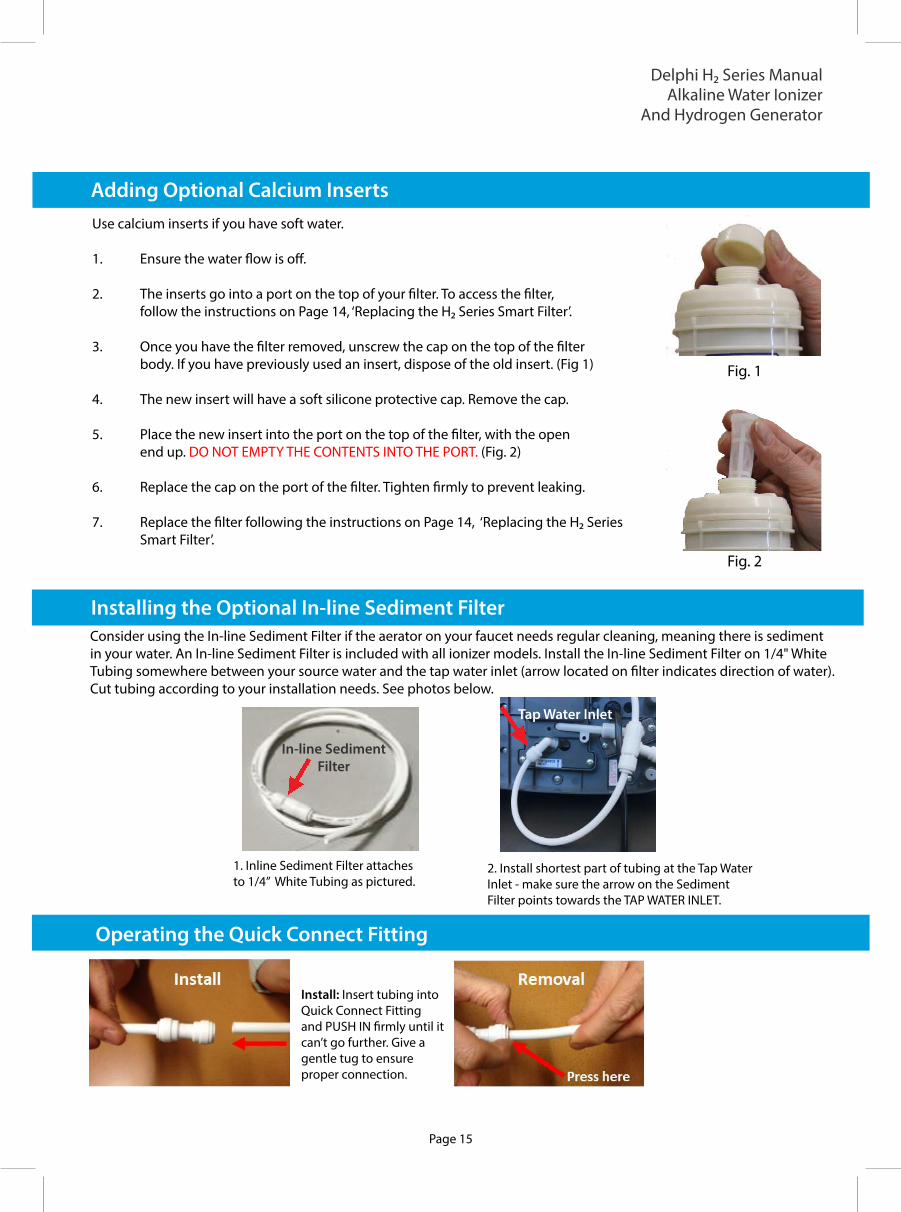
Adding Optional Calcium InsertsUse calcium inserts if you have soft water.
1. Ensure the water �ow is o�.
2. The inserts go into a port on the top of your �lter. To access the �lter, follow the instructions on Page 14, ‘Replacing the H2 Series Smart Filter’. 3. Once you have the �lter removed, unscrew the cap on the top of the �lter body. If you have previously used an insert, dispose of the old insert. (Fig 1)
4. The new insert will have a soft silicone protective cap. Remove the cap.
5. Place the new insert into the port on the top of the �lter, with the open end up. DO NOT EMPTY THE CONTENTS INTO THE PORT. (Fig. 2)
6. Replace the cap on the port of the �lter. Tighten �rmly to prevent leaking.
7. Replace the �lter following the instructions on Page 14, ‘Replacing the H2 Series Smart Filter’.
Fig. 1
Fig. 2
Consider using the In-line Sediment Filter if the aerator on your faucet needs regular cleaning, meaning there is sediment in your water. An In-line Sediment Filter is included with all ionizer models. Install the In-line Sediment Filter on 1/4" White Tubing somewhere between your source water and the tap water inlet (arrow located on �lter indicates direction of water). Cut tubing according to your installation needs. See photos below.
1. Inline Sediment Filter attaches to 1/4” White Tubing as pictured.
2. Install shortest part of tubing at the Tap Water Inlet - make sure the arrow on the Sediment Filter points towards the TAP WATER INLET.
Installing the Optional In-line Sediment Filter
Operating the Quick Connect Fitting
Install: Insert tubing into Quick Connect Fitting and PUSH IN �rmly until it can’t go further. Give a gentle tug to ensure proper connection.
Page 15
Tap Water Inlet
In-line Sediment Filter
Selecting Alkaline Ionized Hydrogen-Infused Water
When you select the ALK button, alkaline water will �ow through the Long Top Spout of your Delphi Faucet and acidic water will �ow through the Short Bottom Spout.
1. PRESS THE POWER button on the Delphi Faucet Control Panel. The Control Panel will light up.2. Use the ALK button to select the level you wish to use. The level you have selected will light up.3. You will hear voice con�rmation, "Alkaline Level (1, 2, 3, 4, or 5) selected.”4. To change alkaline levels, simply press the ALK button to cycle through the alkaline levels. ALK 1 is the lowest setting and ALK 5 is the strongest.
Selecting Acidic Water
When you select the ACID button, acidic water will �ow through the Longer Top Spout of your Delphi Faucet and alkaline water will �ow through the Short Bottom Spout.
1. PRESS THE POWER button on the Delphi Faucet Control Panel. The Control Panel will light up.2. Use the ACID button to select the level you wish to use. The level you have selected will light up.3. You will hear voice con�rmation, "Acidic Level (1 or 2) selected”.4. To change acidic levels, simply press the ACID button to cycle through the acidic levels. ACID 1 is the lowest setting and ACID 2 is the strongest.5. To prevent drinking acidic water, your H2 Series Ionizer will automatically start back at your last drinking water setting the next time you start your ionizer.
Note: Acidic water is not intended to be drinking water. Acidic water has many great uses. See Page 12.
Selecting Puri�ed Water
Puri�ed water is only �ltered, not ionized. When selected, it will �ow through both spouts of your Delphi Faucet.
1. PRESS THE POWER button on the Control Panel of the Delphi Faucet. The Control Panel will light up. 2. Use the PU button to select �ltered water. The letters ‘PU’ will light upon the Delphi Faucet Control Panel. 3. You will hear voice con�rmation, “Filtered water selected.”
Delphi H2 Series ManualAlkaline Water Ionizer
And Hydrogen Generator
Page 16
Follow these steps ONLY if: - The programing at installation is not successful- The tubing is installed improperly- Anytime you unplug the faucet from the base unit
a. At the back of the Base Unit, unplug the Data Cable that comes from the Delphi Faucet. b. Unplug the Base Unit from the power outlet, and wait 1 minute.c. Plug the power cord back into the outlet.
This will reset the Base Unit to its original programming as a counter top ionizer, working independently of the Delphi Faucet.
You can now program the Base Unit to work with the Delphi Faucet according to the steps below.
When to Reprogram the Base Unit
2. Programming the Base Unit to Work with the Delphi H2 Faucet
1. Resetting the Base Unit to Original Programming
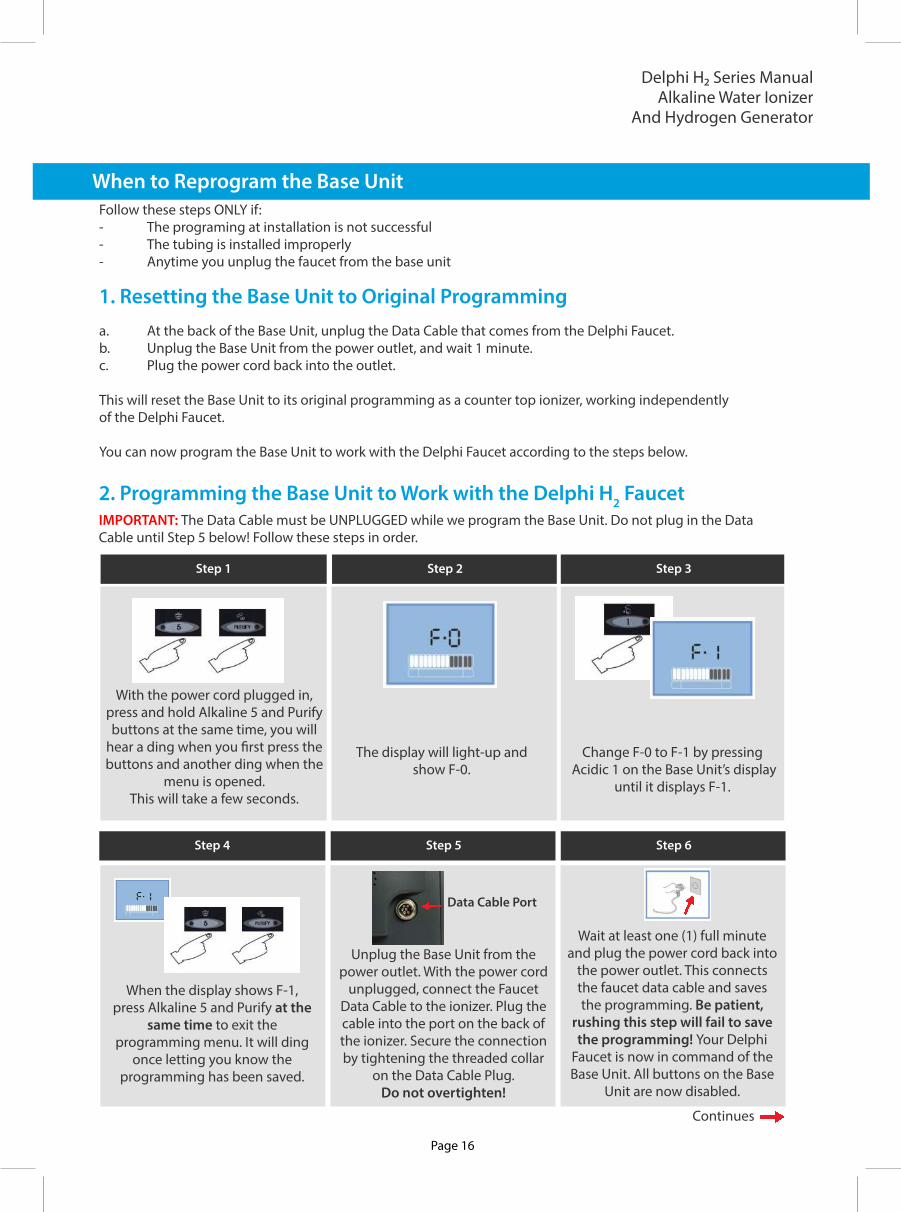
With the power cord plugged in, press and hold Alkaline 5 and Purify buttons at the same time, you will
hear a ding when you �rst press the buttons and another ding when the
menu is opened. This will take a few seconds.
Change F-0 to F-1 by pressing Acidic 1 on the Base Unit’s display
until it displays F-1.
When the display shows F-1, press Alkaline 5 and Purify at the
same time to exit the programming menu. It will ding
once letting you know the programming has been saved.
Unplug the Base Unit from the power outlet. With the power cord
unplugged, connect the Faucet Data Cable to the ionizer. Plug the cable into the port on the back of the ionizer. Secure the connection by tightening the threaded collar
on the Data Cable Plug. Do not overtighten!
IMPORTANT: The Data Cable must be UNPLUGGED while we program the Base Unit. Do not plug in the Data Cable until Step 5 below! Follow these steps in order.
The display will light-up and show F-0.
Step 1 Step 2 Step 3
Step 4 Step 5
Wait at least one (1) full minute and plug the power cord back into
the power outlet. This connects the faucet data cable and saves the programming. Be patient,
rushing this step will fail to save the programming! Your Delphi
Faucet is now in command of the Base Unit. All buttons on the Base
Unit are now disabled.
Step 6
Step 7 Step 9
Delphi H2 Series ManualAlkaline Water Ionizer
And Hydrogen Generator
Data Cable Port
Continues
When to Reprogram the Base Unit (Cont’d)
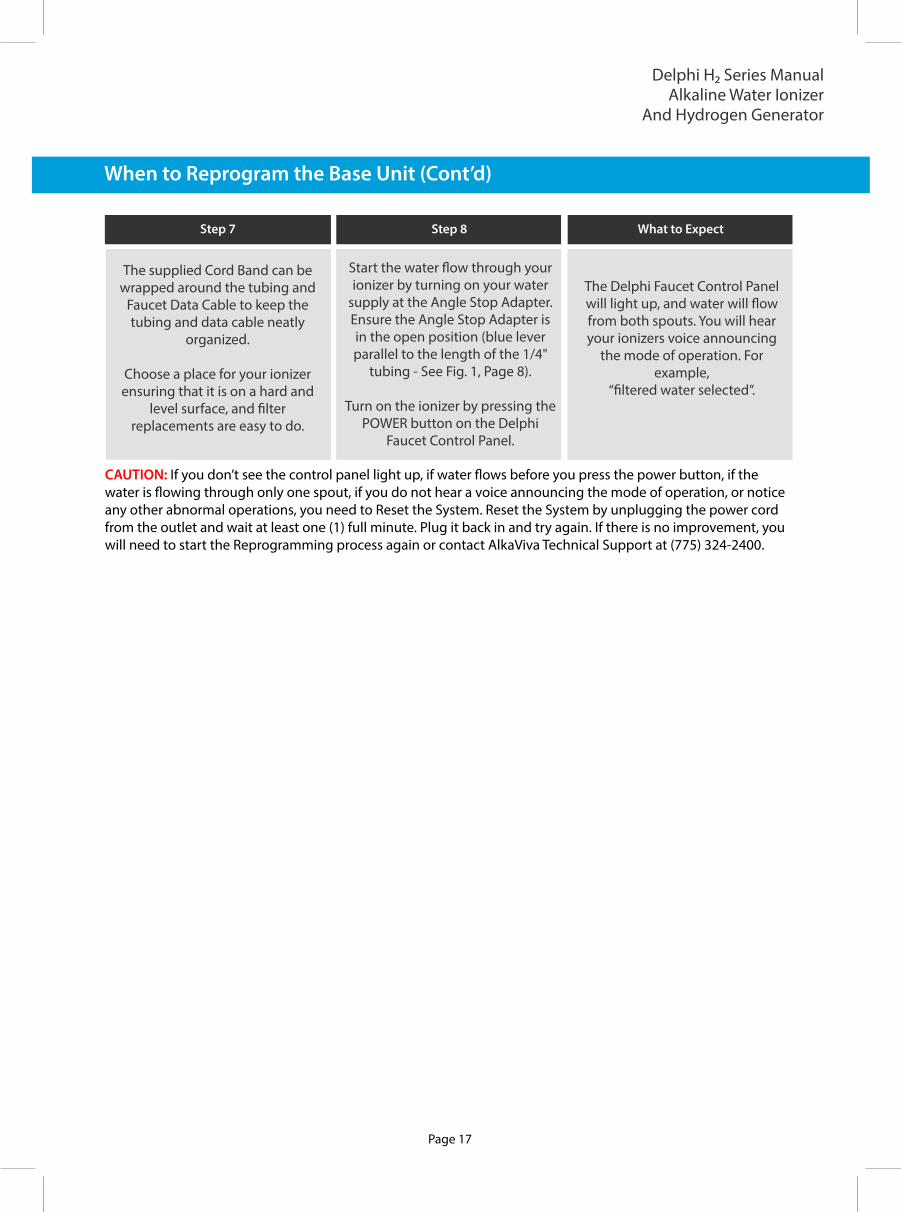
Step 7 Step 8
The supplied Cord Band can be wrapped around the tubing and
Faucet Data Cable to keep the tubing and data cable neatly
organized.
Choose a place for your ionizer ensuring that it is on a hard and
level surface, and �lter replacements are easy to do.
Start the water �ow through your ionizer by turning on your water
supply at the Angle Stop Adapter. Ensure the Angle Stop Adapter is in the open position (blue lever parallel to the length of the 1/4"
tubing - See Fig. 1, Page 8).
Turn on the ionizer by pressing the POWER button on the Delphi
Faucet Control Panel.
What to Expect
The Delphi Faucet Control Panel will light up, and water will �ow from both spouts. You will hear your ionizers voice announcing
the mode of operation. For example,
“�ltered water selected”.
CAUTION: If you don’t see the control panel light up, if water �ows before you press the power button, if the water is �owing through only one spout, if you do not hear a voice announcing the mode of operation, or notice any other abnormal operations, you need to Reset the System. Reset the System by unplugging the power cord from the outlet and wait at least one (1) full minute. Plug it back in and try again. If there is no improvement, you will need to start the Reprogramming process again or contact AlkaViva Technical Support at (775) 324-2400.
Delphi H2 Series ManualAlkaline Water Ionizer
And Hydrogen Generator
Page 17
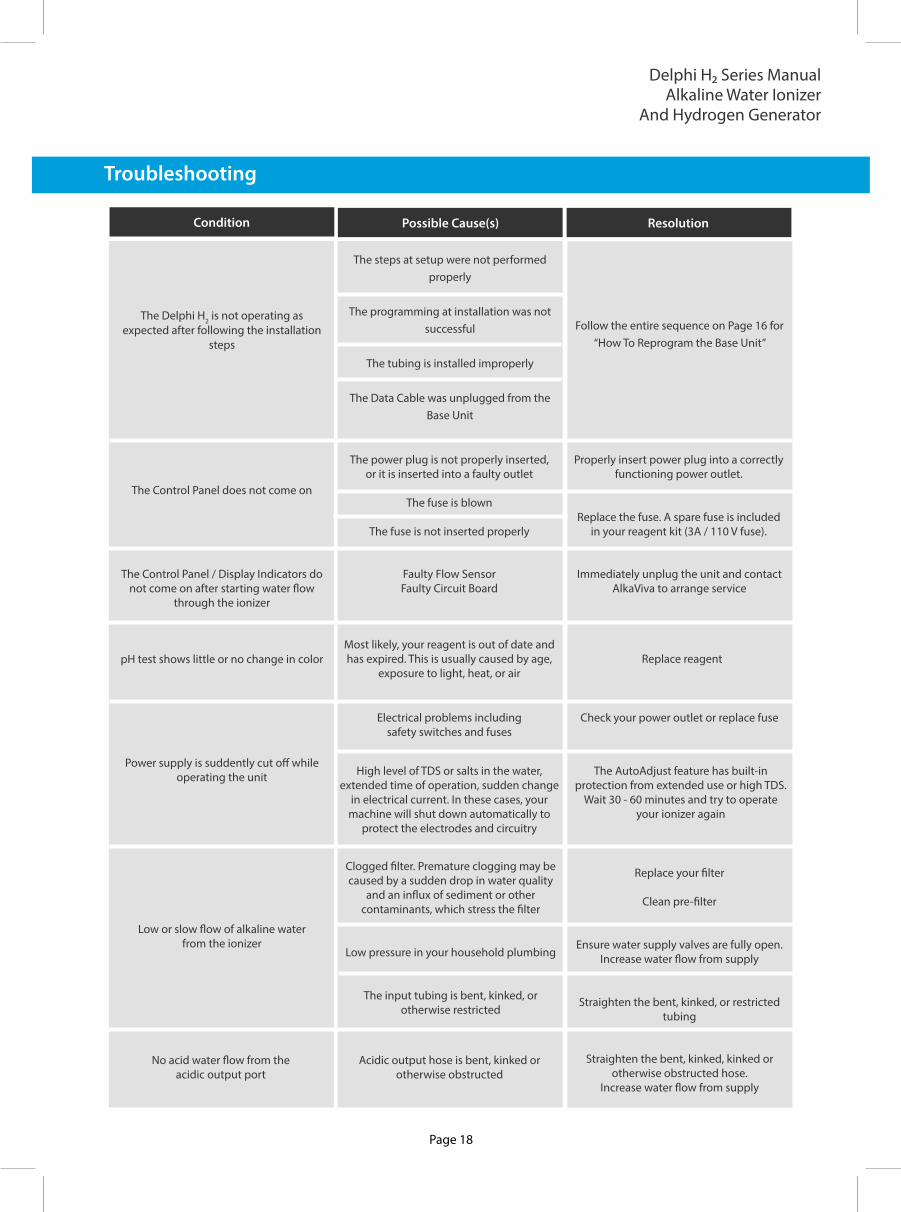
The Control Panel does not come on
The power plug is not properly inserted, or it is inserted into a faulty outlet
The fuse is blown
The fuse is not inserted properly
Properly insert power plug into a correctly functioning power outlet.
Replace the fuse. A spare fuse is included in your reagent kit (3A / 110 V fuse).
The Control Panel / Display Indicators do not come on after starting water �ow
through the ionizer
Faulty Flow SensorFaulty Circuit Board
Immediately unplug the unit and contact AlkaViva to arrange service
pH test shows little or no change in colorMost likely, your reagent is out of date and has expired. This is usually caused by age,
exposure to light, heat, or airReplace reagent
Power supply is suddently cut o� while operating the unit High level of TDS or salts in the water,
extended time of operation, sudden change in electrical current. In these cases, your machine will shut down automatically to
protect the electrodes and circuitry
The AutoAdjust feature has built-in protection from extended use or high TDS.
Wait 30 - 60 minutes and try to operate your ionizer again
Low or slow �ow of alkaline water from the ionizer
Clogged �lter. Premature clogging may be caused by a sudden drop in water quality
and an in�ux of sediment or other contaminants, which stress the �lter
Low pressure in your household plumbing
The input tubing is bent, kinked, or otherwise restricted
Replace your �lter
Clean pre-�lter
Ensure water supply valves are fully open. Increase water �ow from supply
Straighten the bent, kinked, or restricted tubing
Electrical problems including safety switches and fuses
Check your power outlet or replace fuse
Page 18
Delphi H2 Series ManualAlkaline Water Ionizer
And Hydrogen Generator
Condition
Troubleshooting
The Delphi H2 is not operating as expected after following the installation
steps
The steps at setup were not performed properly
The programming at installation was not
successful
The tubing is installed improperly
The Data Cable was unplugged from the Base Unit
Follow the entire sequence on Page 16 for “How To Reprogram the Base Unit”
Condition Possible Cause(s) Resolution
No acid water �ow from the acidic output port
Acidic output hose is bent, kinked or otherwise obstructed
Straighten the bent, kinked, kinked or otherwise obstructed hose.
Increase water �ow from supply
Skin CareAcidic water can be a beauty solution for your skin. It acts as an astringent and helps make the skin soft and elastic. (Skin is mildly acidic.)
Hair CareUse acidic water as a hair rinse after shampooing to neutralize the alkalinity of the shampoo, and help retain the hair's natural gloss.
ShavingUse acidic water after shaving; it can replace skin toner or after shave.
Floral arrangementUse acidic water for cut �owers. It will keep the �owers fresh for a longer period of time.
Boiling eggsWhen the acidic ionized water is used for boiling eggs, the shell is less likely to crack while cooking and the eggs will peel easily.
Water for parboiling noodlesWhen the acidic ionized water is used for parboiling noodles, it will make them chewy and tastier.
Washing or processing deep colored fruits and vegetablesWashing peaches, grapes, strawberries, red cabbages, beans and asparagus etc. with acidic water will retain their natural colors and they will stay bright and vibrant.
When preparing fried dishesUse acidic ionized water to prepare batter for fried dishes to make the foods crispy and tastier.
General cleaningWhen the acidic ionized water is used for cleaning �oors, dirt and grime can be easily removed and it dries quickly.
Cleaning glassWhen glass, mirrors and glasses are washed with acidic ionized water, dirt and grime is easily removed and glass is shiny without streaks.
Encrusted pots and pansSoak pots and pans in the acidic ionized water overnight to remove encrusted or burnt food.
Cleaning the cutting board or countersUse acidic ionized water to naturally clean and sanitize your cutting board and counters.
Cleaning dishes and silverwareUse acidic water for cleaning dishes and silverware. It will not leave spots.
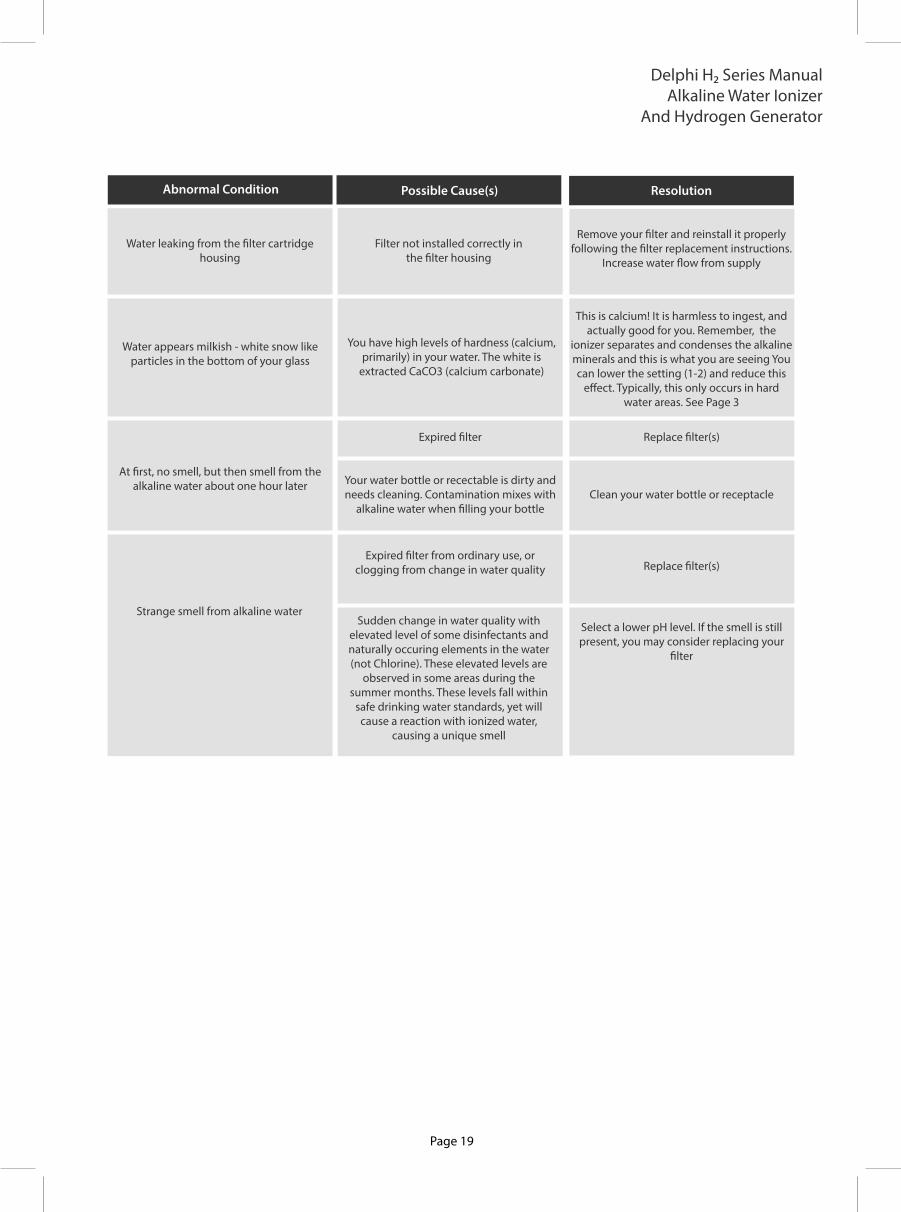
Abnormal Condition Possible Cause(s) Resolution
Water appears milkish - white snow like particles in the bottom of your glass
You have high levels of hardness (calcium, primarily) in your water. The white is
extracted CaCO3 (calcium carbonate)
This is calcium! It is harmless to ingest, and actually good for you. Remember, the
ionizer separates and condenses the alkaline minerals and this is what you are seeing You can lower the setting (1-2) and reduce this
e�ect. Typically, this only occurs in hard water areas. See Page 3
At �rst, no smell, but then smell from the alkaline water about one hour later
Expired �lter
Your water bottle or recectable is dirty and needs cleaning. Contamination mixes with
alkaline water when �lling your bottle
Page 19
Water leaking from the �lter cartridge housing
Filter not installed correctly in the �lter housing
Remove your �lter and reinstall it properly following the �lter replacement instructions.
Increase water �ow from supply
Replace �lter(s)
Clean your water bottle or receptacle
Delphi H2 Series ManualAlkaline Water Ionizer
And Hydrogen Generator
Strange smell from alkaline water
Expired �lter from ordinary use, or clogging from change in water quality
Sudden change in water quality with elevated level of some disinfectants and naturally occuring elements in the water (not Chlorine). These elevated levels are
observed in some areas during the summer months. These levels fall within
safe drinking water standards, yet will cause a reaction with ionized water,
causing a unique smell
Replace �lter(s)
Select a lower pH level. If the smell is still present, you may consider replacing your
�lter