Dell SonicWALL SRA 7.0 Application Offloading and...
36
Document Scope | 1 Dell SonicWALL SRA 7.0 Application Offloading and HTTP(S) Bookmarks Document Scope This document describes the implementation of HTTP(S) reverse proxy to provide access to offloaded Web-based applications and HTTP/HTTPS bookmark access to Microsoft Sharepoint, Microsoft Outlook Web Access (OWA) Premium, and IBM Lotus Domino Web Access 8.0.1, 8.5.1, and 8.5.2 on Dell SonicWALL SRA appliances running 7.0 firmware. This document contains the following sections: • Overview on page 2 – What are HTTP(S) Bookmarks and Application Offloading? on page 2 – Benefits of HTTP(S) Bookmarks on page 3 – Benefits of Application Offloading on page 3 – How Does Application Offloading Work? on page 3 – Supported Platforms on page 4 – Software Prerequisites on page 6 – Supported Application Configuration and Considerations on page 6 • Configuring and Using Offloaded Applications on page 16 – Application Offloading Portal Settings on page 17 – Configuring an Offloaded Application on page 17 – Configuring Application Offloading for ActiveSync Support on page 23 • Configuring and Using HTTP(S) User Bookmarks on page 28 – Configuring a HTTP(S) User Bookmark on page 28 – Using HTTP and HTTPS Bookmarks on page 30 • Configuring Single Sign-On and Cross Domain Sign-On on page 30 – Configuring Single Sign-On on page 31 – Configuring Cross Domain Single Sign-On on page 33 • Creating User/Group/Global Policies for URL Objects on page 33 • Glossary on page 35
Transcript of Dell SonicWALL SRA 7.0 Application Offloading and...
Document Scope | 1
Dell SonicWALL SRA 7.0Application Offloading and
HTTP(S) Bookmarks
Document ScopeThis document describes the implementation of HTTP(S) reverse proxy to provide access to offloaded Web-based applications and HTTP/HTTPS bookmark access to Microsoft Sharepoint, Microsoft Outlook Web Access (OWA) Premium, and IBM Lotus Domino Web Access 8.0.1, 8.5.1, and 8.5.2 on Dell SonicWALL SRA appliances running 7.0 firmware.
This document contains the following sections:
• Overview on page 2
– What are HTTP(S) Bookmarks and Application Offloading? on page 2
– Benefits of HTTP(S) Bookmarks on page 3
– Benefits of Application Offloading on page 3
– How Does Application Offloading Work? on page 3
– Supported Platforms on page 4
– Software Prerequisites on page 6
– Supported Application Configuration and Considerations on page 6
• Configuring and Using Offloaded Applications on page 16
– Application Offloading Portal Settings on page 17
– Configuring an Offloaded Application on page 17
– Configuring Application Offloading for ActiveSync Support on page 23
• Configuring and Using HTTP(S) User Bookmarks on page 28
– Configuring a HTTP(S) User Bookmark on page 28
– Using HTTP and HTTPS Bookmarks on page 30
• Configuring Single Sign-On and Cross Domain Sign-On on page 30
– Configuring Single Sign-On on page 31
– Configuring Cross Domain Single Sign-On on page 33
• Creating User/Group/Global Policies for URL Objects on page 33
• Glossary on page 35

2 | SRA 7.0 Application Offloading and HTTP(S) Bookmarks
OverviewThis section provides an introduction to application offloading and HTTP(S) bookmarks. This section contains the following subsections:
• What are HTTP(S) Bookmarks and Application Offloading? on page 2
• Benefits of HTTP(S) Bookmarks on page 3
• Benefits of Application Offloading on page 3
• How Does Application Offloading Work? on page 3
• Supported Platforms on page 4
• Software Prerequisites on page 6
• Supported Application Configuration and Considerations on page 6
What are HTTP(S) Bookmarks and Application Offloading?
Dell SonicWALL uses HTTP(S) bookmarks and application offloading on SRA appliances to provide access to Web-based applications running on servers within the intranet. This includes Sharepoint 2007, Sharepoint 2010, and the enhanced versions of commonly used Web mail interfaces, such as Microsoft OWA Premium and Lotus Domino Web Access. Sharepoint 2010 is supported with application offloading, but not with HTTP(S) bookmarks.
Both application offloading and HTTP(S) bookmarks use an HTTP(S) reverse proxy. A reverse proxy is a proxy server that is deployed between a remote user outside an intranet and a target Web server within the intranet. The reverse proxy intercepts and forwards packets that originate from outside the intranet. An HTTP(S) reverse proxy specifically intercepts HTTP(S) requests and responses.
Application Offloading provides secure access to both internal and publicly hosted Web applications. An application offloading host is created as a special-purpose portal with an associated virtual host acting as a proxy for the backend Web application.
Unlike HTTP(S) bookmarks, access to offloaded applications is not limited to remote users. The administrator can enforce strong authentication and access policies for specific users or groups. For instance, in an organization certain guest users may need Two-factor or Client Certificate authentication to access Outlook Web Access (OWA), but are not allowed to access OWA public folders. If authentication is enabled, multiple layers of Dell SonicWALL advanced authentication features such as One Time Password, Two-factor Authentication, Client Certificate Authentication and Single Sign-On can be applied on top of each other for the offloaded host.
The offloaded application portal must be configured as a virtual host with a suitable SRA domain. It is possible to disable authentication and access policy enforcement for such an offloaded host.
Web transactions can be centrally monitored by viewing the logs. In addition, Web Application Firewall can protect offloaded application hosts from any unexpected intrusion, such as Cross-site scripting or SQL Injection.
Access to offloaded Web applications happens seamlessly as URLs in the proxied page are not rewritten in the manner used by HTTP or HTTPS bookmarks.
Overview | 3
Benefits of HTTP(S) Bookmarks
By using HTTP(S) bookmarks, users can access the full-featured versions of Sharepoint 2007, Sharepoint 2010, Microsoft OWA Premium, and Domino Web Access 8.0.1, 8.5.1, and 8.5.2 Web mail interfaces. These interfaces are easier to use and provide more enhanced features than their basic counterparts. For a full description of the application features supported using application offloading and HTTP(S) bookmarks, refer to the following sections:
• Sharepoint Server 2007 on page 7
• Sharepoint Server 2010 on page 10
• Microsoft Outlook Web Access Premium on page 10
• Lotus Domino Web Access Support on page 14
Benefits of Application Offloading
An offloaded Web application has the following advantages over the Web application as an HTTP(S) bookmark in the SRA appliance:
• No URL rewriting is necessary, thereby improving throughput significantly.
• The functionality of the original Web application is retained almost completely, while an HTTP(S) bookmark is a best-effort solution.
• Application offloading extends the SRA appliance security features to publicly hosted Web sites.
Application offloading can be used in any of the following scenarios:
• To function as an SSL offloader to offload encryption operations for Web servers and add HTTPS support to the offloaded Web application, using the integrated SSL accelerator hardware of the SRA appliance.
• In conjunction with the Web Application Firewall subscription service to provide the offloaded Web application continuous protection from malicious Web attacks.
• To add strong or stacked authentication to the offloaded Web application, including Two-factor authentication, One Time Passwords and Client Certificate authentication.
• To control granular access to the offloaded Web application using global, group or user based access policies.
• To control access to internal Web sites using host, URL, or port based access policies
• As an SSL accelerator to enhance throughput over the Internet using caching, compression, connection persistence and multiplexing
• To support Web applications not currently supported by HTTP/HTTPS bookmarks. Application Offloading does not require URL rewriting, thereby delivering complete application functionality without compromising throughput.
How Does Application Offloading Work?
For example, Application Offloading portals can be used for Web applications and sites that already exist and could be accessed directly, such as an internal Web application, a resource on the internal network, or a public site. When using Application Offloading portals, remote access to these sites or applications is controlled by the SRA appliance and mapped to Application Offloading portals that are protected by other functions of the SRA appliance, such as SSL encryption and Web Application Firewall.

4 | SRA 7.0 Application Offloading and HTTP(S) Bookmarks
The diagram below provides a high level view of these Application Offloading portal use cases.
Figure 1 Application Offloading Portal Use Cases
Supported Platforms
Appliance Platforms
Starting in Dell SonicWALL SRA 5.5, Application Offloading and HTTP(S) bookmarks are supported on the following Dell SonicWALL SRA appliances:
• SRA 4600
• SRA 4200
• SRA 1600
• SRA 1200
• SRA Virtual Appliance
HTTP Versions
HTTP(S) bookmarks and application offloading portals support both HTTP/1.0 and HTTP/1.1.
Certain performance optimization features, such as caching, compression, SSL hardware acceleration, HTTP connection persistence, TCP connection multiplexing and transfer-chunk encoding for proxies are automatically enabled depending on the usage.
Secure Remote Access
X1 X0
1200SRAPWR TEST ALARM
CONSOLE
GET /exchange/Host: webmail.company.com
GET /orders/Billing.aspxHost: www.company.com
GET /view_employee.asp?id=123Host: intranet.company.com
GET /exchange/Host: 192.168.2.4
GET /orders/Billing.aspxHost: 10.50.50.12
GET /view_employee?id=123Host: 192.168.2.5
ExchangeServer
CompanyNetwork/Servers
E-CommerceServer
Mapped IP’s ofActual Servers
Virtual Hostnamesfor ApplicationOffloading Portals
ExternalUser
EmployeeEmailUser
SonicWALL SRA Appliance
ewtr
em68
/ow
er50
/exw
ha.1

Overview | 5
Applications
Starting in Dell SonicWALL SRA 5.5, Sharepoint 2010 is supported with application offloading, but not with HTTP(S) bookmarks. The following features have been tested and verified as working well on the indicated browsers:
The following Web applications have been tested and verified to work with HTTP(S) bookmarks and as offloaded applications on all SRA platforms unless otherwise noted:
• Microsoft Outlook Web Access 2010Microsoft Outlook Web Access 2007Microsoft Outlook Web Access 2003
• Windows Sharepoint 2010Windows Sharepoint 2007Windows Sharepoint Services 3.0Windows Sharepoint Services 2.0
The integrated client features of Sharepoint are not supported.
• Lotus Domino Web Access 8.0.1, 8.5.1, and 8.5.2
• Novell Groupwise Web Access 7.0
• ActiveSync with Microsoft Exchange 2010ActiveSync with Microsoft Exchange 2007ActiveSync with Microsoft Exchange 2003
Exchange ActiveSync is supported on the following:
– Apple iPhone
– Apple iPad
– Android 2.3 (Gingerbread) based phones
– Windows Mobile 8.0 based phones
– Windows Mobile 7.5 based phones
Authentication Schemes
The following authentication schemes are supported for use with application offloading and HTTP(S) bookmarks:
• Basic – Collects credentials in the form of a username and password.
• NTLM (Microsoft NT LAN Manager) – Provides automatic authentication between Active Directory aware applications.
• Forms-based authentication – Uses a Web form to collect credentials.
Sharepoint Features Browsers
Add Announcement
Delete Announcement
Download Document
Add Document
Delete Document
Add New Item
Delete Item
Internet Explorer 8/9
Firefox 16
Chrome 22

6 | SRA 7.0 Application Offloading and HTTP(S) Bookmarks
Software Prerequisites
The following end-user requirements must be met in order to access the complete set of application offloading and HTTP(S) bookmarks features:
• Internet Explorer 7.0 or later
• Windows 7, Windows XP, or Windows Server 2003 or later
Supported Application Configuration and Considerations
When using application offloading or HTTP(S) bookmarks to access applications for Web-based clients, full feature sets are accessible to users. Beginning with the Dell SonicWALL SRA 5.5, application offloading and HTTP(S) bookmarks provide enhanced application support for the following software applications:
• Sharepoint Server 2007 on page 7
• Sharepoint Server 2010 on page 10
• Microsoft Outlook Web Access Premium on page 10
• Lotus Domino Web Access Support on page 14
Note The maximum number of users supported is limited by the number of applications being accessed and the volume of application traffic being sent.
Note Feature support varies based on your hardware and installation, see the respective sections for more detailed information about specific application support.
Tip If you are using the correct Web browser and operating system, and a supported application
does not work, delete the browser session cookies, close and reopen all instances of your
browser, clear the browser cache, and then try again.
Supported Application Deployment Considerations
Be aware of these installation and general considerations when using application offloading and HTTP(S) bookmarks with the following software applications:
• Sharepoint
– For features that rely on Windows Sharepoint Services-compatible client programs, the Dell SonicWALL SRA appliance 7.0 application offloading and HTTP(S) bookmarks do not support client integration capabilities on Internet Explorer.
– Only forms-based authentication and basic authentication schemes are supported.
– Single Sign-On is supported only for basic authentication.
– Sharepoint 2010 is supported with application offloading, but not with HTTP(S) bookmarks.

Overview | 7
• Microsoft OWA
– S/MIME support and bi-directional layout support for Arabic and Hebrew in Microsoft OWA Premium are only available using Internet Explorer 6 SP1 and later. Gzip compression supported by Microsoft OWA Premium is not supported through the reverse proxy.
• Domino Web Access
– This technology uses ActiveX controls for access using Internet Explorer 6.0 and later. Single Sign-On is not supported for Domino Web Access 8.0.1, 8.5.1, and 8.5.2 through the reverse proxy.
Sharepoint Server 2007
Sharepoint is a Web portal management tool that lets users share information including spreadsheets, presentations, photographs, and more. Sharepoint facilitates creating a site for each project and managing the relevant data, allowing management with nothing more than a browser.
Figure 2 Sharepoint Web User Interface
Sharepoint utilizes distributed authoring to make additions and edits easy. Users can collaboratively create Wiki-style entries including events, contact information, documents, and news groups. Customized views can also be set up for diverse teams requiring multiple views and secured access to information.
This section contains the following sub-sections:
– Supported Sharepoint Features on page 8
– Enabling Basic Authentication for Sharepoint Server on page 9
– Enabling Basic Authentication for a Web Application Zone on page 9
– Disabling Client Integration on a Web Application Zone on page 10

8 | SRA 7.0 Application Offloading and HTTP(S) Bookmarks
Supported Sharepoint Features
The following features are supported in the Dell SonicWALL SRA appliance 7.0 reverse proxy feature:
• Using Site Templates to Collaborate or Manage Meetings - The site templates in the Collaboration group are designed to help teams within an organization work on projects and collaborate on documents. The templates in this group support everything from basic meetings to decision-focused meetings or even social events.
• Sharing Documents, Contacts, Tasks, and Calendars - Synchronize your Office SharePoint Server 2007 calendar with Office Outlook 2007, enter all-day events and specify more types of repeating, or recurring events. Track team projects more effectively with visual day and month views.
• Brainstorm Easily with Wiki Sites - Collaborate on a team design, build an encyclopedia of knowledge, or just gather routine information in a format that is easy to create and modify. Your team members can contribute to wikis from their browsers — they don't need a word processor or special technical knowledge.
• Share Ideas with Blogs - With just a few clicks, easily publish customized short posts that are displayed in order, starting with the most recent post.
• Receive updates to lists and libraries with RSS - Automatically update members of your workgroup about changes to content using Really Simple Syndication (RSS) technology.
• Manage Projects - Create a Project Tasks list, which includes a Gantt chart for a visual overview of project tasks to monitor dates and progress of team tasks.
• Get Mobile Access to Content - View portals, team sites, and lists on a mobile device to help you stay current on team projects and tasks when you are travelling.
• Store and Share Information on Your Own “My Site” - Each user can store content, links, and contacts on their personal My Site. Your My Site also serves as a point of contact for others to find information about you such as your skills and roles, your colleagues and managers, the groups and distribution lists that you belong to, and the documents that you are working on. Each site contains stringent privacy control and security mechanisms so that you can choose how much information to present and to whom.
• Search from the Search Center - A central location for initiating queries and browsing search results to locate users with specific skill sets, documents, information about projects, and even data in enterprise applications such as SAP and Siebel.
• Manage Documents in the Document Center - Create large-scale document management sites that support highly structured document management scenarios with strong content control: Check-out, major and minor version control, multiple content types, and auditing to track content changes over time.
• Manage Document Translation - Create, store, and manage translated documents to facilitate the manual document translation process.
• Web Content Management - Office SharePoint Server 2007 includes many features that are useful for designing, deploying, and managing enterprise intranet portals, corporate Internet presence Web sites, and divisional portal sites.
• Streamline Processes with Workflows - Collaborate on documents and manage project tasks by implementing specific business processes on documents and items on an Office SharePoint Server 2007 site.
• Store Reports in a Report Center - Link to business applications such as SAP, Siebel, and Microsoft SQL Server 2005 to easily publish reports, lists, and key performance indicators (KPIs). The Report Center site provides a central location for storing reports that are common to a group.

Overview | 9
Enabling Basic Authentication for Sharepoint Server
To enable basic authentication for Web application zone:
1. Navigate to Administrative Tools panel, open the SharePoint Central Administration Web site application. The Central Administration home page displays.
2. Navigate to Application Management > Authentication Providers. The Authentication Providers page displays.
3. On the Authentication Providers page in the Site Actions section, select the application you want to configure by choosing Change Web Application from the Web Application drop-down list.
4. In the Select Web Application dialog box, choose the Web application that you want to configure.
5. On the Authentication Providers page, click the zone of the Web application on which you want to enable authentication. The zones that are configured for the selected Web application are listed on the Authentication Providers page.
6. On the Edit Authentication page, in the IIS Authentication section, clear the Integrated Windows authentication and Digest authentication check boxes.
7. Click Save to commit your changes.
Note The reverse proxy supports only forms-based authentication and basic authentication. Single-Sign-On is supported only for basic authentication.
Enabling Basic Authentication for a Web Application Zone
Follow the steps below to enable basic authentication on the Sharepoint server.
To enable authentication for a zone of a Web application:
Step 1 From Administrative Tools, open the SharePoint Central Administration Web site application.
Step 2 On the Central Administration home page, click Application Management.
Step 3 On the Application Management page, in the Application Security section, click Authentication Providers.
Step 4 On the Authentication Providers page, make sure the Web application that is listed in the Web Application box (under Site Actions) is the one that you want to configure. If the listed Web application is not the one that you want to configure, click the drop-down arrow to the right of the Web Application drop-down list box and select Change Web Application.
Step 5 In the Select Web Application dialog box, click the Web application that you want to configure.
Step 6 On the Authentication Providers page, click the zone of the Web application on which you want to enable authentication. The zones that are configured for the selected Web application are listed on this page.
Step 7 On the Edit Authentication page, in the IIS Authentication section, clear the Integrated Windows authentication and Digest authentication check boxes, and then click Save.
The reverse proxy does not support client integration capability on Internet Explorer. These are a set of features built into Sharepoint that work exclusively on IE and not on other browsers.
10 | SRA 7.0 Application Offloading and HTTP(S) Bookmarks
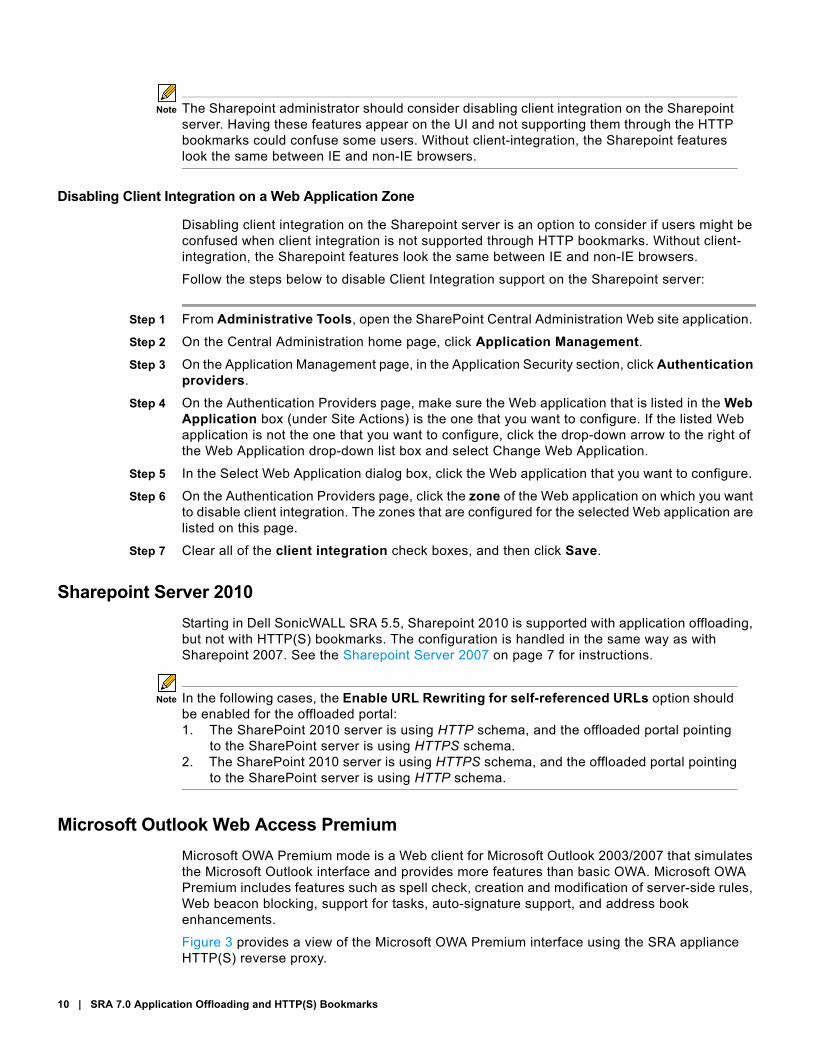
Note The Sharepoint administrator should consider disabling client integration on the Sharepoint server. Having these features appear on the UI and not supporting them through the HTTP bookmarks could confuse some users. Without client-integration, the Sharepoint features look the same between IE and non-IE browsers.
Disabling Client Integration on a Web Application Zone
Disabling client integration on the Sharepoint server is an option to consider if users might be confused when client integration is not supported through HTTP bookmarks. Without client-integration, the Sharepoint features look the same between IE and non-IE browsers.
Follow the steps below to disable Client Integration support on the Sharepoint server:
Step 1 From Administrative Tools, open the SharePoint Central Administration Web site application.
Step 2 On the Central Administration home page, click Application Management.
Step 3 On the Application Management page, in the Application Security section, click Authentication providers.
Step 4 On the Authentication Providers page, make sure the Web application that is listed in the Web Application box (under Site Actions) is the one that you want to configure. If the listed Web application is not the one that you want to configure, click the drop-down arrow to the right of the Web Application drop-down list box and select Change Web Application.
Step 5 In the Select Web Application dialog box, click the Web application that you want to configure.
Step 6 On the Authentication Providers page, click the zone of the Web application on which you want to disable client integration. The zones that are configured for the selected Web application are listed on this page.
Step 7 Clear all of the client integration check boxes, and then click Save.
Sharepoint Server 2010
Starting in Dell SonicWALL SRA 5.5, Sharepoint 2010 is supported with application offloading, but not with HTTP(S) bookmarks. The configuration is handled in the same way as with Sharepoint 2007. See the Sharepoint Server 2007 on page 7 for instructions.
Note In the following cases, the Enable URL Rewriting for self-referenced URLs option should be enabled for the offloaded portal:1. The SharePoint 2010 server is using HTTP schema, and the offloaded portal pointing
to the SharePoint server is using HTTPS schema.2. The SharePoint 2010 server is using HTTPS schema, and the offloaded portal pointing
to the SharePoint server is using HTTP schema.
Microsoft Outlook Web Access Premium
Microsoft OWA Premium mode is a Web client for Microsoft Outlook 2003/2007 that simulates the Microsoft Outlook interface and provides more features than basic OWA. Microsoft OWA Premium includes features such as spell check, creation and modification of server-side rules, Web beacon blocking, support for tasks, auto-signature support, and address book enhancements.
Figure 3 provides a view of the Microsoft OWA Premium interface using the SRA appliance HTTP(S) reverse proxy.

Overview | 11
Figure 3 Microsoft OWA Premium
This section contains the following sub-sections:
– Application and Feature Support on page 11
– Premium and Basic Modes on page 12
Application and Feature Support
The SRA appliance HTTP(S) reverse proxy application support for Microsoft OWA Premium, using Internet Explorer 6.0 or higher, provides users with full functionality of the following features:
• Access to email, calendar, and tasks
• New Outlook look-and-feel, including right-click functionality
• Ability to mark an email as unread
• Server-side spelling checker (limited to six languages)
• Forms-based authentication (session time-out)
• S/MIME support
Note S/MIME support for Microsoft OWA Premium is only available on Internet Explorer 6 SP1.
• Two-line view
• Context menus
• Improved keyboard shortcuts
• Ability to forward meeting requests
• Notifications on navigation pane
• Ability to add to contacts
• Ability to pick names from address book
• Ability to set maximum number of messages displayed in views
• Support for bi-directional layout for Arabic and Hebrew
12 | SRA 7.0 Application Offloading and HTTP(S) Bookmarks
Note Bi-directional layout support for Arabic and Hebrew for Microsoft OWA Premium is only available on Internet Explorer 6 SP1.
• Option to set message status “mark as read” when using the reading pane
• Public folders display in their own browser window
• Access to GAL property sheets within an email message or meeting request
• Message sensitivity settings on information bar
• Attendee reminder option for meeting request
• Ability to launch the calendar in its own window
• User interface to set common server-side rules
• Outlook style Quick Flags
• Support for message signatures
• Search folders (must be created in Outlook online mode)
• Deferred search for new messages after delete
• Attachment blocking
• Web beacon blocking to make it more difficult for senders of spam to confirm email addresses
• Protection of private information when a user clicks a hyperlink in the body of an email message
Tip For better performance, it is recommended that the Exchange administrator configure OWA
to list at the most 40 items in any page. This can be done in the Outlook Web Access
Administration Web-based utility provided part of the Exchange installation. Navigate to
Server Settings > Administration > View Settings. On the View Settings page, the
Maximum View Rows attribute defines the maximum row count of items visible in any view.
From the drop-down menu, select 40 or less and click OK.
Note GZip compression supported by Microsoft OWA Premium is not supported through the reverse proxy.
Premium and Basic Modes
Microsoft Internet Explorer defaults to loading OWA Premium, but in some cases clients may prefer to run Microsoft OWA in Basic mode for speed and accessibility reasons. There are two solutions for users wishing to use OWA Basic:
1. Use a browser that is not Microsoft Internet Explorer. All browsers that are HTML 3.2 compliant (Mozilla Firefox, Apple Safari, etc...) are compatible with OWA, although they are forced to load in Basic mode.
2. Give your clients the option of loading Basic or Premium mode at the OWA login screen shown in Figure 4. Accomplish this by setting the Microsoft Exchange server to use forms-based Authentication (FBA).

Overview | 13
Figure 4 OWA login screen with Forms-Based Authentication enabled
Configuring Forms-Based Authentication in Exchange
To use the Exchange Management Console to configure forms-based authentication for Outlook Web Access, perform the following steps:
Step 1 In the Exchange Management Console, locate the virtual directory that you want to configure to use forms-based authentication by using the information in step 2 or step 3.
Step 2 If you are running the Mailbox server role on the computer that is running the Client Access server role, do one of the following:
a. To modify an Exchange 2007 virtual directory, select Server Configuration, select Client Access, and then click the Outlook Web Access tab. The default Exchange 2007 virtual directory is /owa.
b. To modify a legacy virtual directory, select Server Configuration, select Mailbox, and then click the WebDAV tab. The default legacy virtual directories are as follows: /Public, /Exchweb, /Exchange, and /Exadmin.
Step 3 If you are not running the Mailbox server role on the computer that is running the Client Access server role, select Server Configuration, select Client Access, and then click the Outlook Web Access tab.
Step 4 In the work pane, select the virtual directory that you want to configure to use forms-based authentication, and then click Properties.
Step 5 Click the Authentication tab.
Step 6 Select Use forms-based authentication.
Step 7 Select the logon format that you want to use.
Note For more information about configuring FBA for Microsoft Exchange Server, visit the Microsoft TechNet Library at http://technet.microsoft.com/en-us/library/ and perform a search for “forms-based authentication”.
14 | SRA 7.0 Application Offloading and HTTP(S) Bookmarks
Lotus Domino Web Access Support
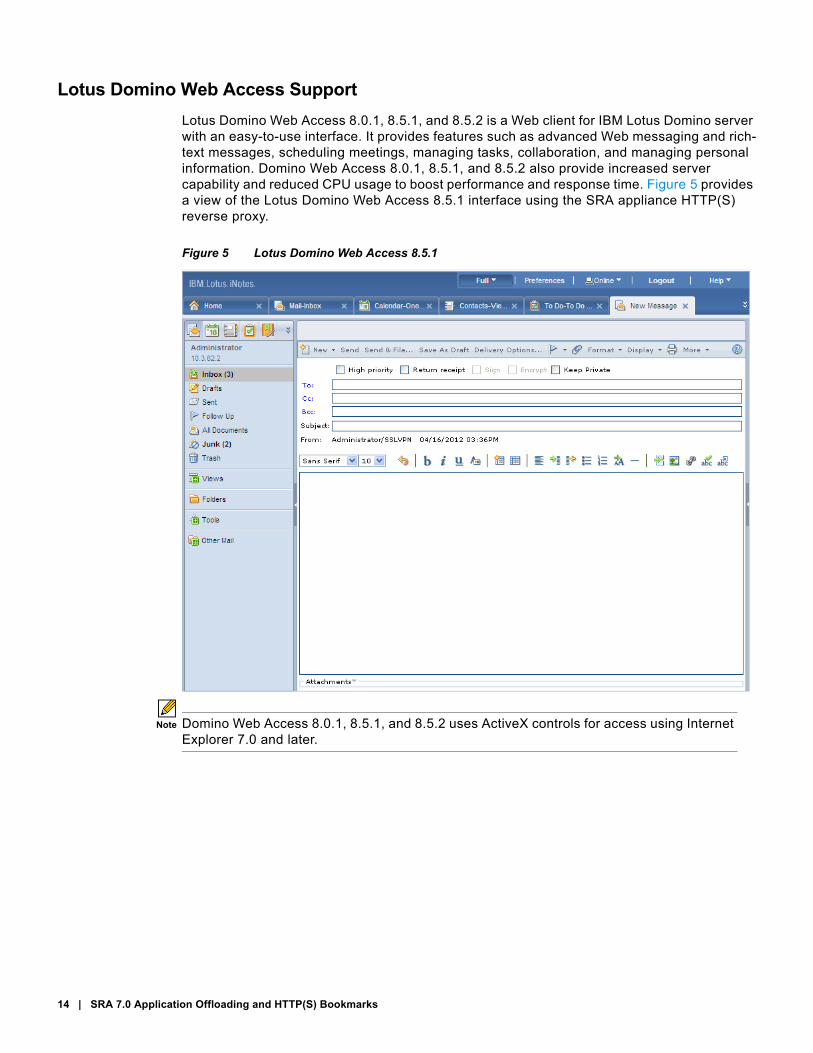
Lotus Domino Web Access 8.0.1, 8.5.1, and 8.5.2 is a Web client for IBM Lotus Domino server with an easy-to-use interface. It provides features such as advanced Web messaging and rich-text messages, scheduling meetings, managing tasks, collaboration, and managing personal information. Domino Web Access 8.0.1, 8.5.1, and 8.5.2 also provide increased server capability and reduced CPU usage to boost performance and response time. Figure 5 provides a view of the Lotus Domino Web Access 8.5.1 interface using the SRA appliance HTTP(S) reverse proxy.
Figure 5 Lotus Domino Web Access 8.5.1
Note Domino Web Access 8.0.1, 8.5.1, and 8.5.2 uses ActiveX controls for access using Internet Explorer 7.0 and later.

Overview | 15
The Dell SonicWALL SRA appliance HTTP(S) reverse proxy application support for Domino Web Access 8.0.1, 8.5.1, and 8.5.2, using Internet Explorer 6.0 or higher, provides users with full functionality of the following features:
– Send and receive email
– Send and receive attachments
– Delete messages
– Open attachment from reading and preview panes
– Spell check
– Quick Flags and message flags
– Set message importance
– Send and receive HTML mail
– Mark messages as read or unread
• Navigation
– Navigate folder hierarchy in navigation pane
– Sort message list by standard fields
– Search capabilities
– Logout
• Calendar
– Calendar views of different time periods
– Create a meeting
– Check schedule
– Use address book to pick attendees
– Search for resource
– Change invitee list
– Delete meeting
8.5.1 and 8.5.2 8.0.1Full Mode Email Full Mode Email
Calendar Calendar
Contacts Contacts
To Do To Do
Notebook Notebook
Lite Mode Email Lite Mode Email
Calendar Calendar
Contacts
Ultra Lite Mode Inbox
Sent
All Docs
Day At a Glance
Contacts
Trash
16 | SRA 7.0 Application Offloading and HTTP(S) Bookmarks
• Folders and Storage
– Create a folder
– Move messages using drag and drop
– Recover from trash
– Empty trash
• Contacts
– View by options
– Add and edit contacts
– Delete contact
• Tasks and Options
– Create a to-do list
– View to-do list
– Use notebook to create a new note.
– Delegation
– Change password
– Display options
– Change notes ID
– Out of office settings
• Rules
– Create new mail and quick rules
– Delete rules
– Test created rules
Note Single sign-on is not supported for Domino Web Access 8.0.1, 8.5.1, and 8.5.2.
Configuring and Using Offloaded ApplicationsThe SRA administrator can configure Web (HTTP) or Secure Web (HTTPS) offloaded applications or bookmarks to allow user access to Web-based resources and applications such as Sharepoint 2007, Microsoft OWA Premium, or Domino Web Access. When user or group bookmarks are defined, the user or group member will see the defined bookmarks on the SRA appliance Virtual Office home page.
This section contains the following subsections:
– Application Offloading Portal Settings on page 17
– Configuring an Offloaded Application on page 17
– Configuring Application Offloading for ActiveSync Support on page 23

Configuring and Using Offloaded Applications | 17
Application Offloading Portal Settings
The table below shows appropriate Application Offloading portal settings when the portal is providing Web Application Firewall protection to remotely accessed internal sites and to public sites:
Dell SonicWALL recommends using the same FQDN for the Virtual Host Name and the application server site to avoid the need for URL rewriting.
Configuring an Offloaded Application
This section contains the following subsections:
– Configuring Offloading Settings on page 18
– Configuring General Portal Settings on page 21
– Configuring Virtual Host Settings on page 22
Note The Application Offloading feature will not work well if the application refers to resources within the same host using absolute URLs. In this case, you may need to convert an absolute URL reference to its relative form.
Application Offloading Portal Settings
For Remote Access to an Internal Site For a Public Site
DNS Configuration Split DNS Public DNS
Authentication Enabled Disabled (likely)
Access Policies User/Group/Global Global
SSL VPN Domains Enabled None
Login Customization Optional None
Custom Logo Optional None

18 | SRA 7.0 Application Offloading and HTTP(S) Bookmarks
Configuring Offloading Settings
To configure an offloaded Web application, log in as an administrator and perform the following steps:
Step 1 Navigate to Portals > Portals and click the Offload Web Application button. The Add Portal screen opens.
Step 2 Configure the fields on the General tab. See Configuring General Portal Settings on page 21 for information about the settings on the General tab.
Step 3 On the Offloading tab, select the Enable Load Balancing check box if you want to distribute the workload across multiple resources.
Step 4 Select the Enable URL Rewriting for self-referenced URLs check box if you want to rewrite absolute URLs that refer to this application server in HTML, Javascript, or CSS content. Depending on how the Web application has been developed, all the URLs may not be rewritten. (This limitation is usually the same for other WAF/SRA vendors employing reverse proxy mode.)
Configuring and Using Offloaded Applications | 19
Step 5 Select one of the following from the Scheme drop-down list:
• Web (HTTP) – access the Web application using HTTP
• Secure Web (HTTPS) – access the Web application using HTTPS
• Auto (HTTP/HTTPS) – allows the user to determine the actual scheme used to talk to the backend server when accessing an offloading portal. Access is still under the control of the access policy.
When using the Auto scheme, users can type http://www.example.virtual.host.com or https://www.example.virtual.host.com in a browser’s address bar to test this feature. Even when the scheme is set to Auto, it’s still under the control of the access policy.
Caution It is the Administrator’s responsibility to configure the correct scheme used to talk to the backend server. Auto (HTTP/HTTPS) Scheme can operate only if HTTP access is enabled for the Virtual Host (under the Virtual Host tab) and authentication is disabled (under the Offloading tab), which may be insecure. Therefore, you will be prompted to click OK to enable HTTP for Virtual Host and enable Anonymous access.
• Generic (SSL Offloading) – access the Web application using SSL Offloading
Step 6 Enter the host name or private IP address of the backend host into the Application Server Host field.
Step 7 Optionally enter the IPv6 address of the backend host into the Application Server IPv6 Address field.
Step 8 In the Port Number (optional) field, optionally enter a custom port number to use for accessing the application.
Step 9 In the Homepage URI (optional) field, optionally enter a URI to a specific resource on the Web server to which the user will be forwarded the first time the user tries to access the Application Offloading Portal. This is a string in the form of:/exch/test.cgi?key1=value1&key2=value2
When this field is configured, it redirects the user to the Web site’s home page the first time the user accesses the portal. This happens only when the user is accessing the site with no URL path (that is, when accessing the root folder, for example: https://www.google.com/). This is not an alias for the root folder. The user can edit the URL to go back to the root folder.
The key=value pairs allow you to specify URL query parameters in the URL. You can use these for any Web site that does not have a default redirect from the root folder to the home page URL. Outlook Web Access is one example, but note that most public sites do have a default redirect.
Step 10 Under Security Settings, select the Disable Access Policies check box if you do not need access policies. This is useful for publicly hosted Web sites.
Step 11 Check the Disable Authentication Controls check box if you do not need authentication controls. Authentication controls are useful for publicly hosted Web sites. Otherwise, clear the Disable Authentication Controls check box and select the Enable ActiveSync authentication check box, and Default Domain Name field to configure ActiveSync Authentication. Configuring an offloading portal for ActiveSync support is explained in Configuring Application Offloading for ActiveSync Support on page 23.
Note The Disable Authentication Controls check box must be cleared to select the Enable ActiveSync Authentication check box.
20 | SRA 7.0 Application Offloading and HTTP(S) Bookmarks
Step 12 Select the Automatically Login check box to use Single Sign-On or Cross Domain Single Sign-On. See Configuring Single Sign-On and Cross Domain Sign-On on page 30 and Configuring Cross Domain Single Sign-On on page 33 for information about configuring SSO options for an offloaded application.
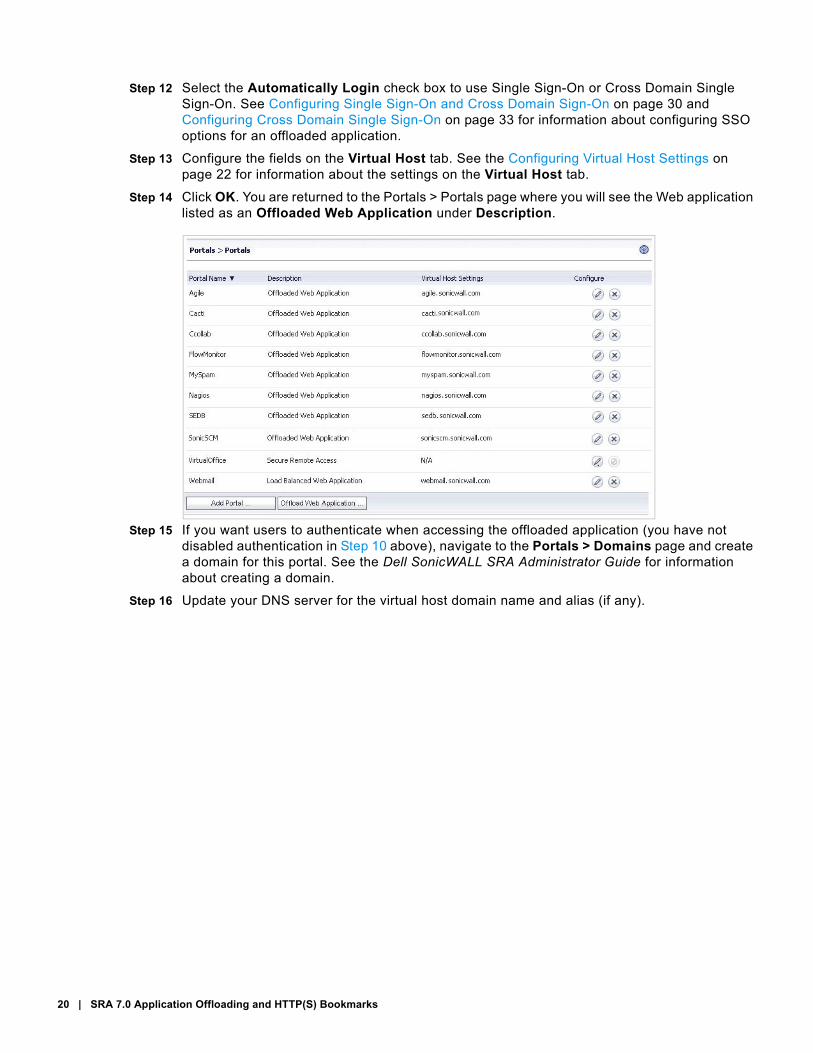
Step 13 Configure the fields on the Virtual Host tab. See the Configuring Virtual Host Settings on page 22 for information about the settings on the Virtual Host tab.
Step 14 Click OK. You are returned to the Portals > Portals page where you will see the Web application listed as an Offloaded Web Application under Description.
Step 15 If you want users to authenticate when accessing the offloaded application (you have not disabled authentication in Step 10 above), navigate to the Portals > Domains page and create a domain for this portal. See the Dell SonicWALL SRA Administrator Guide for information about creating a domain.
Step 16 Update your DNS server for the virtual host domain name and alias (if any).

Configuring and Using Offloaded Applications | 21
Configuring General Portal Settings
To configure the settings on the General tab for an offloaded application portal, perform the following steps:
Step 1 On the General tab, enter a descriptive name for the portal in the Portal Name field. This name will be part of the path in the portal URL. For example, if your Dell SonicWALL SRA portal is hosted at https://vpn.company.com, and you created a portal named “sales”, then users will be able to access the sub-site at https://vpn.company.com/portal/sales.
Note Only alphanumeric characters, hyphen (-), and underscore (_) are accepted in the Portal Name field. If other types of characters or spaces are entered, the portal name will be truncated before the first non-alphanumeric character.
Step 2 Enter the title for the Web browser window in the Portal Site Title field.
Step 3 To display a banner message to users before they login to the portal, enter the banner title text in the Portal Banner Title field.
Step 4 Enter an HTML compliant message, or edit the default message in the Login Message field. This message is shown to users on the custom login page.
Step 5 The Portal URL field is automatically populated with your SRA network address and Portal Name.
Step 6 To enable visibility of your custom logo, message, and title information on the login page, select the Display custom login page check box.
Note Custom logos can only be added to existing portals. To add a custom logo to a new portal, first complete general portal configuration, then add a logo.

22 | SRA 7.0 Application Offloading and HTTP(S) Bookmarks
Step 7 Select the Display login message on custom login page check box to display the login message (from the Login Message field) when users log into the custom login page.
Step 8 Select the Enable HTTP meta tags for cache control check box to apply HTTP meta tag cache control directives to the portal. Cache control directives include:
<meta http-equiv="pragma" content="no-cache"> <meta http-equiv="cache-control" content="no-cache"><meta http-equiv="cache-control" content="must-revalidate">
These directives help prevent client browsers from caching the SRA appliance portal pages and other Web content.
Note Enabling HTTP meta tags is strongly recommended for security reasons and to prevent out-of-date Web pages and data being stored in a user Web browser cache.
Step 9 Select the Enable ActiveX Web cache cleaner check box to load an ActiveX cache control when users log in to the SRA appliance. The Web cache cleaner will prompt the user to delete all session temporary Internet files, cookies and browser history when the user logs out or closes the Web browser window. The ActiveX Web cache control is ignored by Web browsers that don’t support ActiveX.
Step 10 Select the Enforce login uniqueness check box to restrict each account to a single session at a time. When login uniqueness is not enforced, each account can have multiple, simultaneous sessions.
Step 11 Select the Enforce client source uniqueness check box to prevent multiple connections by a user with the same client source address when connecting with a Dell SonicWALL client (NetExtender, Mobile Connect, Virtual Assist etc.). This prevents a user from consuming multiple licenses when a user reconnects after an unexpected network interruption.
For example, a user on an unreliable network is disconnected due to a network issue. If login uniqueness is NOT enabled, the user session on the appliance stays active for this type of disconnect until the timeout value is reached. The user reconnects and consumes a second license with the potential of consuming more licenses before the original connection timeout disconnects them.
Configuring Virtual Host Settings
Creating a virtual host allows users to access the application using a different host name than your default URL. For example, sales members can access https://sales.company.com instead of the default domain, https://vpn.company.com that you use for administration. The portal URL (for example, https://vpn.company.com/portal/sales) will still exist even if you define a virtual host name. Virtual host names enable administrators to give separate and distinct login URLs to different groups of users. URL rewriting should be enabled in this case.
To avoid the need for URL rewriting, use the same FQDN for the Virtual Host Name and the application server site.
To configure the settings on the Virtual Host tab for an offloaded application portal, perform the following steps:
Step 1 Enter a host name in the Virtual Host Domain Name field, for example, sales.company.com.
Only alphanumeric characters, hyphen (-) and underscore (_) are accepted in the Virtual Host Domain Name field.
Step 2 Optionally enter a descriptive alias in the Virtual Host Alias field.

Configuring and Using Offloaded Applications | 23
Step 3 If you are using IP based virtual hosting, select a specific Virtual Host Interface for this portal. If using name based virtual hosts — where more than one hostname resides behind a single IP address — choose All Interfaces.
When selecting All Interfaces, you can import a wildcard certificate for all virtual hosts on the SRA appliance. See Step 6.
Step 4 If you selected a specific interface for this portal in the previous step, enter the desired Virtual Host IP Address in the field provided. This is the IP address users will access in order to access the portal.
Note For external access, be sure to add an entry in your external DNS server to resolve the virtual hostname and domain name to the external IP address of your SRA appliance.
Step 5 If you selected a specific interface for this portal, you can specify an IPv6 address in the Virtual Host IPv6 Address field. You can use this address to access the virtual host. Enter the IPv6 address using decimal or hexadecimal numbers in the form:
2001::A987:2:3:4321
Step 6 If you plan to use a unique security certificate for this sub-domain, select the corresponding port interface address from the Virtual Host Certificate list.
If you need to associate a certificate to this host, first import the relevant SSL certificate into the SRA appliance:
• For name-based virtual hosting, you can import a wildcard certificate to use for all virtual hosts on the SRA.
• For IP-based virtual hosting, import a regular SSL certificate. This type of certificate includes the hostname of the server.
Note Unless you have a certificate for each virtual host domain name, or if you have purchased a *.domain SSL certificate, your users may see a Certificate host name mismatch warning when they log into the portal. The certificate hostname mismatch only affects the login page; the SRA appliance client applications will not be affected by a hostname mismatch.
Note Some ActiveSync clients do not work well with servers that have invalid SSL certificates.
Step 7 Select the Enable Virtual Host Domain SSO check box to allow users logged into this portal to automatically log into other portals or Web sites that share the same Virtual Host Domain.
Configuring Application Offloading for ActiveSync Support
Application Offloading supports authentication for ActiveSync. ActiveSync is a protocol used by a mobile phone’s email client to synchronize with an Exchange server. Most mobile systems (iPhone, Android, Windows Mobile, etc.) support ActiveSync.
The Administrator can create an offloading portal and set the application server host to the backend Exchange server. Then, a user can use the new virtual host name in a mobile phone’s email client, and synchronize with the backend Exchange server through the SRA appliance. Before SRA 7.0, users had to disable authentication for ActiveSync offloading portals, because ActiveSync requests are different from requests sent from the browser.
24 | SRA 7.0 Application Offloading and HTTP(S) Bookmarks
Note The Application Offloading feature will not work well if the application refers to resources within the same host using absolute URLs. In this case, you may need to convert an absolute URL reference to its relative form.
This section contains the following subsections:
– Configuring the SRA Appliance on page 24
– Configuring an Android on page 25
– ActiveSync Log Entries on page 27
Configuring the SRA Appliance
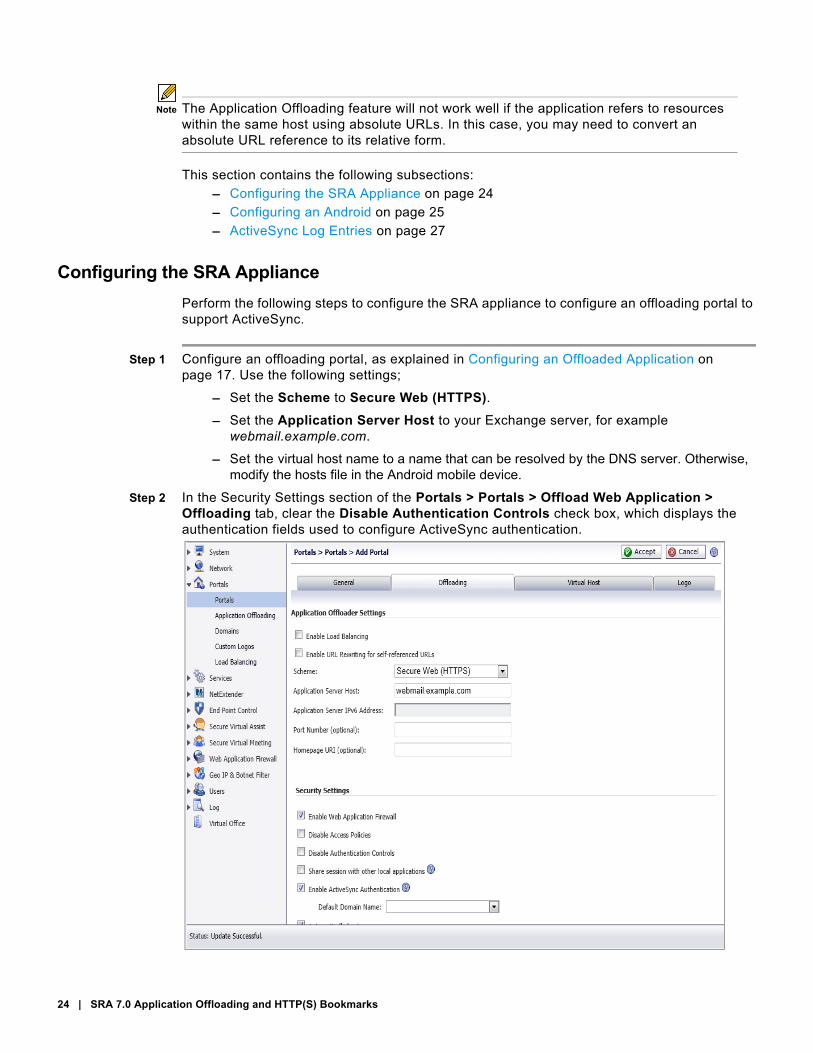
Perform the following steps to configure the SRA appliance to configure an offloading portal to support ActiveSync.
Step 1 Configure an offloading portal, as explained in Configuring an Offloaded Application on page 17. Use the following settings;
– Set the Scheme to Secure Web (HTTPS).
– Set the Application Server Host to your Exchange server, for example webmail.example.com.
– Set the virtual host name to a name that can be resolved by the DNS server. Otherwise, modify the hosts file in the Android mobile device.
Step 2 In the Security Settings section of the Portals > Portals > Offload Web Application > Offloading tab, clear the Disable Authentication Controls check box, which displays the authentication fields used to configure ActiveSync authentication.

Configuring and Using Offloaded Applications | 25
Step 3 Select the Enable ActiveSync authentication check box, which displays the Default Domain Name field. When ActiveSync Authentication is enabled, authentication is handled by the Exchange server and smart phones will be able to use ActiveSync to check their email.
Note The Disable Authentication Controls check box must be cleared to select the Enable ActiveSync Authentication check box.
Step 4 In the Default Domain Name field, type the name of the domain that will be used when a domain name is not included in the email client’s setting.
Configuring an Android
The following example shows how to set up ActiveSync to check Dell SonicWALL emails with an Android. Be sure to replace entries shown in this example with entries for your environment, and be careful to input the correct password. Otherwise, the account will be blocked.
Step 1 If the virtual host name cannot be resolved by the DNS server, modify the hosts file in the Android.
Step 2 Turn on the Android phone, open the Email application, and type your email address and password. Click Next.
Step 3 Choose Exchange.
Step 4 Input your Domain\Username, Password, and Server. No domain name is displayed, so use the default domain name specified in the offloading portal’s setting. Select Accept all SSL certificates and click Next.

26 | SRA 7.0 Application Offloading and HTTP(S) Bookmarks
Step 5 If the AD authentication times out, the Setup could not finish message is displayed. Wait about 20 seconds and try again. You can also check the SRA log described in ActiveSync Log Entries on page 27 to see if the user logged in successfully. You may not encounter this problem if the AD authentication is fast.
Step 6 When the authentication finishes, a security warning appears. Click OK to continue, modify your account settings, and click Next.
Step 7 Try to send and receive emails, and ensure that ActiveSync entries are included in the SRA log, as shown in ActiveSync Log Entries on page 27.

Configuring and Using Offloaded Applications | 27
ActiveSync Log Entries
Use the Log > View page to confirm that ActiveSync is working properly.
The SRA log contains two ActiveSync entries (Android and Windows Mobile), each identifying when the client began to use ActiveSync through the offloading portal. The ActiveSync message identifies the device ID (ActiveSync: Device Id is…) for an ActiveSync request unless a client sets up the account and the request does not contain a device ID.
Note The ActiveSync label is not used in log entries for anonymous users who use ActiveSync.
Using Offloaded Applications
An offloaded application has its own portal page on the SRA appliance. The portal can be accessed directly by entering the URL in a Web browser. You can also create an External Web site Bookmark on the SRA Virtual Office portal that takes you to the offloaded application portal. To use an offloaded application, perform the following steps:
Step 1 For direct access, point your Web browser to the URL of the offloaded application portal.
Step 2 For access via an External Web site Bookmark, log into the Dell SonicWALL Virtual Office and then click on the bookmark.
A new window is launched in your default browser that connects to the offloaded application portal specified in the bookmark.
Step 3 On the portal page, enter your login credentials to access the application if authentication is required.

28 | SRA 7.0 Application Offloading and HTTP(S) Bookmarks
Configuring and Using HTTP(S) User BookmarksDell SonicWALL uses HTTP(S) bookmarks on SRA appliances to provide access to Web-based applications running on Sharepoint 2007servers within the intranet. This includes enhanced versions of commonly used Web mail interfaces, such as:
• Microsoft Outlook Web Access 2010, 2007, and 2003
• Windows Sharepoint 2007, Windows Sharepoint Services 3.0 and 2.0
• Lotus Domino Web Access 8.5.2, 8.5.1, and 8.0.1
This section contains the following subsections:
– Configuring a HTTP(S) User Bookmark on page 28
– Using HTTP and HTTPS Bookmarks on page 30
Configuring a HTTP(S) User Bookmark
To create HTTP or HTTPS user bookmarks, perform the following steps:
Step 1 Log into your SRA appliance.
Step 2 From the Users tab, select either Local Users or Local Groups.
Step 3 Click the Configure icon next to the user or group for which you want to create the bookmark.
Step 4 Select the Bookmarks tab.

Configuring and Using HTTP(S) User Bookmarks | 29
Step 5 Click Add Bookmark. The Add Bookmark dialog box displays.
Step 6 Type the name of the bookmark in the Bookmark Name field.
Step 7 Enter the HTTP or HTTP(S) address of your Web mail server in the Name or IP Address field. For example, webmail.company.com or company.notes.net/example/mail.
Note For HTTP and HTTPS bookmarks you can specify custom ports and paths, for example www.mycompany.com:8080.
Step 8 Optionally, type a brief description that will be used to identify the bookmark.
Step 9 Optionally, in the Tabs field, identify a comma-separated list of tabs where the bookmark should appear. Standard tabs (Desktop, Web, Files, Terminal) include the bookmark by default and do not need to be specified.
Step 10 If you are creating the bookmark for a Local User, you have the option to allow or deny users the ability to edit or delete this bookmark.
– Select Allow from the Allow user to edit/delete drop-down menu to allow them to edit or delete the bookmark.
– To prevent users from editing or deleting the bookmark, select Deny.
– To allow or deny based on the individual user policy, select Use user policy.
30 | SRA 7.0 Application Offloading and HTTP(S) Bookmarks
Note Only Local Users bookmarks have the option of allowing users edit/delete privileges. Bookmarks created in the Local Groups tab are permanently displayed on portals for all users in the group and can only be removed or edited by the administrator.
Step 11 Select Web (HTTP) or Secure Web (HTTPS) the service type in the Service pull-down menu.
Step 12 Select the Automatically Login check box to use Single Sign-On. See Configuring Single Sign-On and Cross Domain Sign-On on page 30 for information about configuring SSO options for a bookmark.
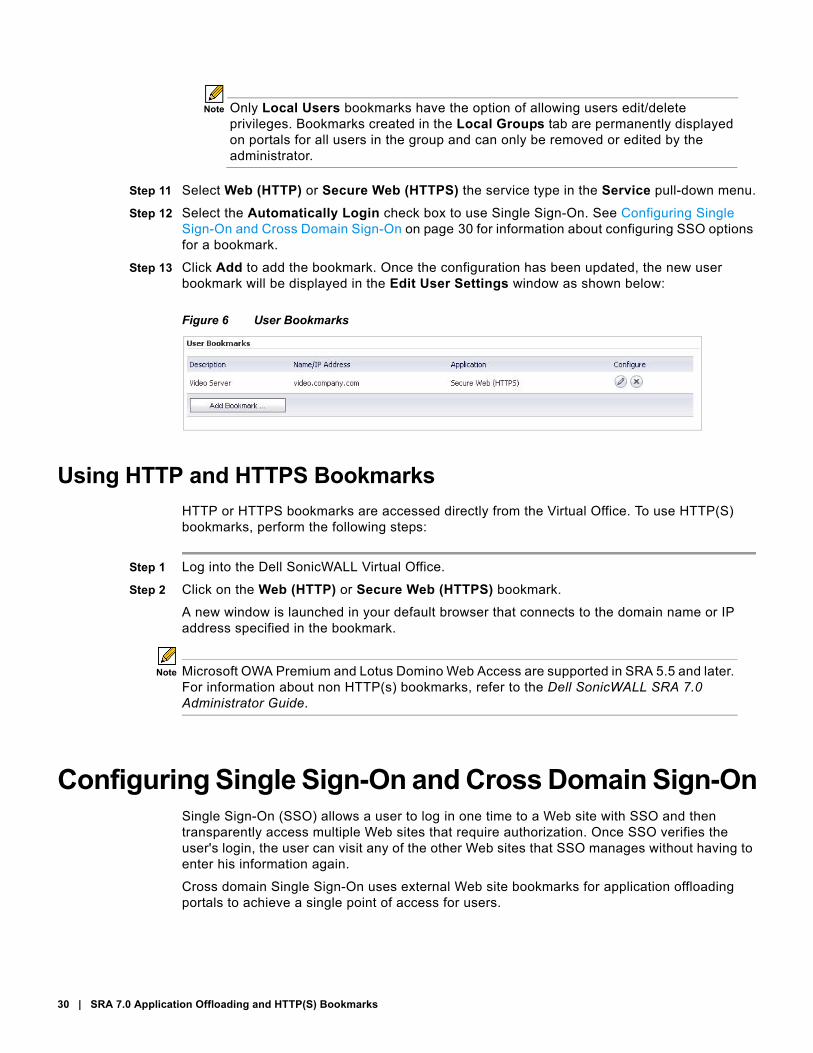
Step 13 Click Add to add the bookmark. Once the configuration has been updated, the new user bookmark will be displayed in the Edit User Settings window as shown below:
Figure 6 User Bookmarks
Using HTTP and HTTPS Bookmarks
HTTP or HTTPS bookmarks are accessed directly from the Virtual Office. To use HTTP(S) bookmarks, perform the following steps:
Step 1 Log into the Dell SonicWALL Virtual Office.
Step 2 Click on the Web (HTTP) or Secure Web (HTTPS) bookmark.
A new window is launched in your default browser that connects to the domain name or IP address specified in the bookmark.
Note Microsoft OWA Premium and Lotus Domino Web Access are supported in SRA 5.5 and later. For information about non HTTP(s) bookmarks, refer to the Dell SonicWALL SRA 7.0 Administrator Guide.
Configuring Single Sign-On and Cross Domain Sign-OnSingle Sign-On (SSO) allows a user to log in one time to a Web site with SSO and then transparently access multiple Web sites that require authorization. Once SSO verifies the user's login, the user can visit any of the other Web sites that SSO manages without having to enter his information again.
Cross domain Single Sign-On uses external Web site bookmarks for application offloading portals to achieve a single point of access for users.

Configuring Single Sign-On and Cross Domain Sign-On | 31
This section contains the following subsections:
– Configuring Single Sign-On on page 31
– Configuring Cross Domain Single Sign-On on page 33
Configuring Single Sign-On
The administrator can configure SSO for each user, each group, or globally for offloaded applications and HTTP or HTTPS bookmarks. Either straight textual parameters or variables may be used for login credentials.
You can configure SSO with the Use SSL-VPN account credentials option to use account information from the local SRA appliance, or with the Use custom credentials option to enter the credentials here while configuring the offloaded application or bookmark. You can also select Forms-based Authentication to configure the appliance to display an HTML-based Web form to prompt the user for login credentials.
Note When using forms-based authentication, application support may be limited based on the complexity of the login page.
To configure Single Sign-On options, perform the following steps:
Step 1 Create or edit an offloaded application or a bookmark as described in Configuring an Offloaded Application on page 17 and Configuring a HTTP(S) User Bookmark on page 28.
Step 2 Select the Automatically Login check box to configure Single Sign-On settings. The SSO settings appear on the Offloading tab when configuring an offloaded application or on the Add Bookmark page when configuring an HTTP(S) bookmark.
Step 3 Select one of the following radio buttons:
• Use SSL-VPN account credentials – allow login to the offloaded application or bookmark using the local user credentials configured on the SRA appliance
• Use custom credentials – allow login to the offloaded application or bookmark using the credentials you enter here; when selected, this option displays Username, Password, and Domain fields:
32 | SRA 7.0 Application Offloading and HTTP(S) Bookmarks
You can enter the custom credentials as text or use dynamic variables such as those shown below:
For the Password, either type in the custom password to pass to the offloaded application or bookmark, or leave the field blank to pass the current user’s password.
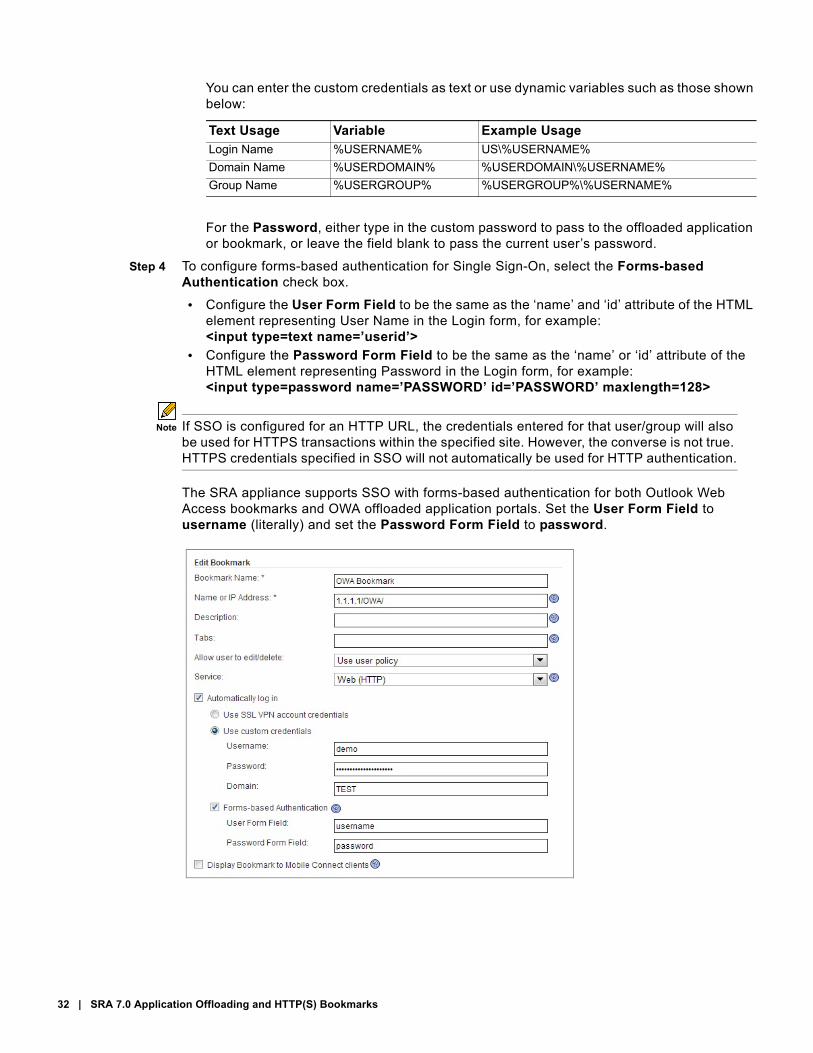
Step 4 To configure forms-based authentication for Single Sign-On, select the Forms-based Authentication check box.
• Configure the User Form Field to be the same as the ‘name’ and ‘id’ attribute of the HTML element representing User Name in the Login form, for example:<input type=text name=’userid’>
• Configure the Password Form Field to be the same as the ‘name’ or ‘id’ attribute of the HTML element representing Password in the Login form, for example:<input type=password name=’PASSWORD’ id=’PASSWORD’ maxlength=128>
Note If SSO is configured for an HTTP URL, the credentials entered for that user/group will also be used for HTTPS transactions within the specified site. However, the converse is not true. HTTPS credentials specified in SSO will not automatically be used for HTTP authentication.
The SRA appliance supports SSO with forms-based authentication for both Outlook Web Access bookmarks and OWA offloaded application portals. Set the User Form Field to username (literally) and set the Password Form Field to password.
Text Usage Variable Example UsageLogin Name %USERNAME% US\%USERNAME%
Domain Name %USERDOMAIN% %USERDOMAIN\%USERNAME%
Group Name %USERGROUP% %USERGROUP%\%USERNAME%
Creating User/Group/Global Policies for URL Objects | 33
Configuring Cross Domain Single Sign-On
External Web site Bookmarks can be created for application offloading portals to achieve a single point of access for users. This allows users to automatically log into application offloading portals after logging into the main portal.
To use Cross Domain Single Sign-on (SSO), perform the following steps:
Step 1 Create two or more portals that need authentication and have the same shared domain (from virtual host domain name). One portal should be a regular portal. These portals must be in the same SRA appliance’s domain so that users can log in to both of them with the same credentials. Instructions to create a portal are provided in Application Offloading Portal Settings on page 17.
The shared domain names do not need to be identical; a sub-domain also works. For example, one portal is a regular portal whose virtual host domain name is “www.example.com” and its shared domain name is “.example.com”. The other portal’s virtual host domain name is “intranet.eng.example.com” and the shared domain name is “.eng.example.com”. If a bookmark to xyz.eng.example.com is created in the www.example.com portal, Cross Domain SSO works because “.eng.example.com” is a sub-domain of “.example.com”.
Step 2 Log into the portal and create a bookmark with the service set to External Web Site, as explained in Configuring a HTTP(S) User Bookmark on page 28.
Step 3 Enable Automatically log in for the bookmark to enable Cross Domain SSO for this bookmark.
Step 4 Specify a Host, which is a portal with the same shared domain name.
Step 5 Save the bookmark and launch it. The user is logged into the new portal automatically using credentials rom the first portal.
Creating User/Group/Global Policies for URL ObjectsUser policies control access to Web resources available at a specific location defined in a URL object. Policies apply to HTTP/HTTPS bookmarks and to offloaded application portals.
When an External Web site Bookmark is configured for an offloaded application portal, access to the bookmark is not controlled by policies. However, once the portal is reached through the bookmark, policies control further access. If the policy denies access, the user will be denied access after attempting to log in.
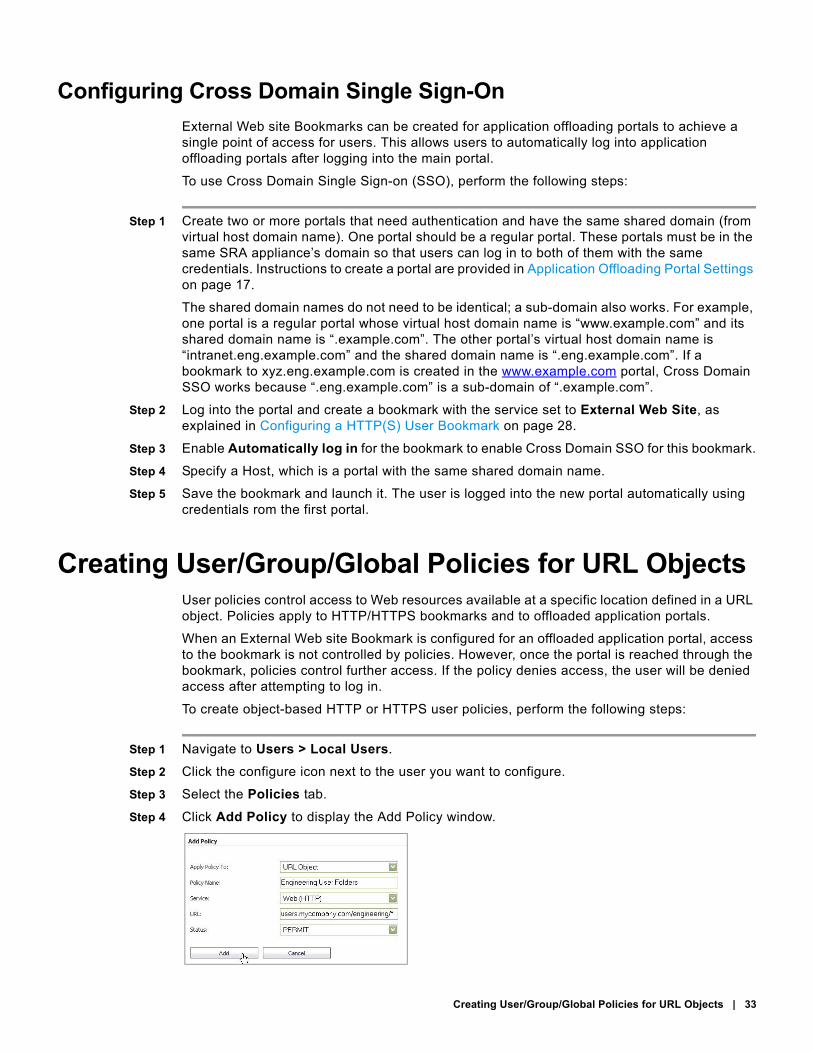
To create object-based HTTP or HTTPS user policies, perform the following steps:
Step 1 Navigate to Users > Local Users.
Step 2 Click the configure icon next to the user you want to configure.
Step 3 Select the Policies tab.
Step 4 Click Add Policy to display the Add Policy window.
34 | SRA 7.0 Application Offloading and HTTP(S) Bookmarks
Step 5 In the Apply Policy To drop-down menu, select the URL Object option.
Step 6 Type in a descriptive name for the policy in the Policy Name field.
Step 7 In the Service drop-down menu, choose either Web (HTTP) or Web (HTTPS), or select the backend Web server for the offloaded application portal.
Step 8 In the URL field, add the URL string to be enforced in this policy.
Note In addition to standard URL elements, the administrator may enter port, path and wildcard elements to the URL field.
If a path is specified, the URL policy is recursive and applies to all subdirectories. If, for example “www.mycompany.com/users/*” is specified, the user is permitted access to any folder or file under the “www.mycompany.com/users/” folder.
For more information on using these additional elements, refer to Policy URL Object Field Elements on page 34.
Step 9 In the Status pull-down menu, click on an access action, either PERMIT or DENY.
Step 10 Click Add.
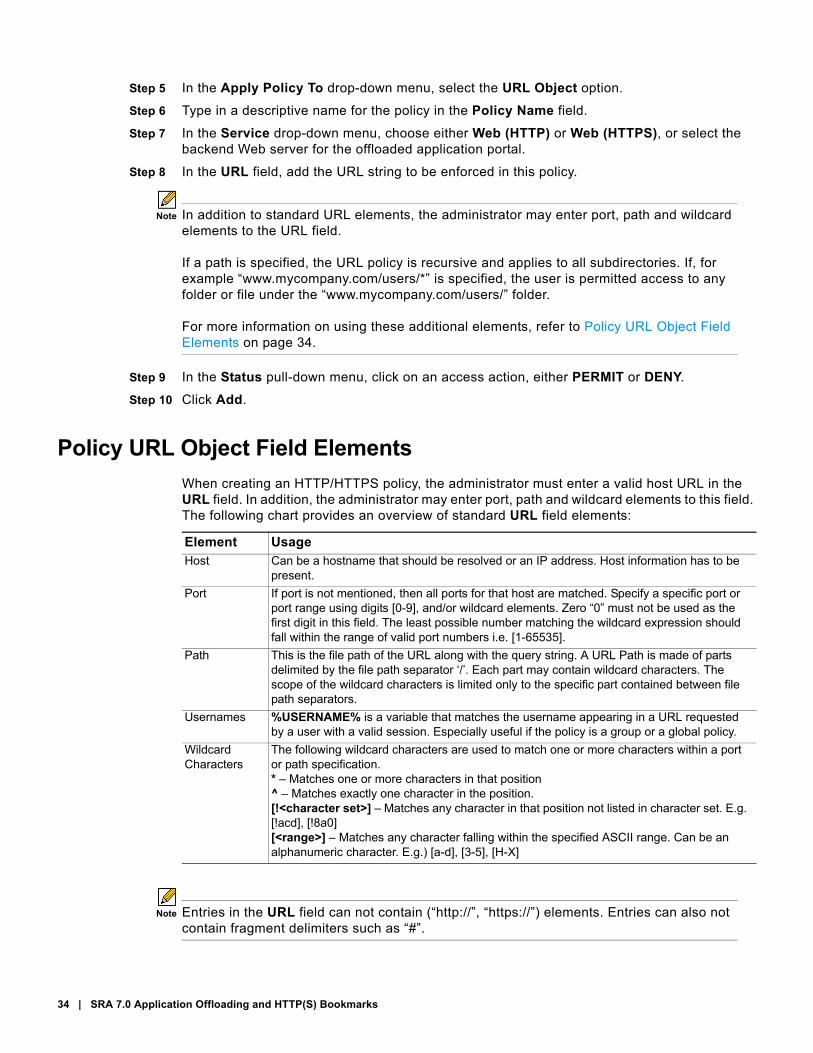
Policy URL Object Field Elements
When creating an HTTP/HTTPS policy, the administrator must enter a valid host URL in the URL field. In addition, the administrator may enter port, path and wildcard elements to this field. The following chart provides an overview of standard URL field elements:
Note Entries in the URL field can not contain (“http://”, “https://”) elements. Entries can also not contain fragment delimiters such as “#”.
Element UsageHost Can be a hostname that should be resolved or an IP address. Host information has to be
present.
Port If port is not mentioned, then all ports for that host are matched. Specify a specific port or port range using digits [0-9], and/or wildcard elements. Zero “0” must not be used as the first digit in this field. The least possible number matching the wildcard expression should fall within the range of valid port numbers i.e. [1-65535].
Path This is the file path of the URL along with the query string. A URL Path is made of parts delimited by the file path separator ‘/’. Each part may contain wildcard characters. The scope of the wildcard characters is limited only to the specific part contained between file path separators.
Usernames %USERNAME% is a variable that matches the username appearing in a URL requested by a user with a valid session. Especially useful if the policy is a group or a global policy.
Wildcard Characters
The following wildcard characters are used to match one or more characters within a port or path specification.* – Matches one or more characters in that position^ – Matches exactly one character in the position.[!<character set>] – Matches any character in that position not listed in character set. E.g. [!acd], [!8a0][<range>] – Matches any character falling within the specified ASCII range. Can be an alphanumeric character. E.g.) [a-d], [3-5], [H-X]

Glossary | 35
GlossaryGAL: Global Address List maintained by MS Exchange server.
HTTP(S) Reverse Proxy: A reverse proxy that intercepts HTTP(S) requests and responses.
Reverse Proxy: A reverse proxy is a proxy server that is deployed between a remote user outside an intranet and a target Web server within the intranet. The reverse proxy intercepts and forwards packets that originate from outside the intranet.
Web beacon: A Web beacon is an often-transparent graphic image that is used to monitor the behavior of the user visiting the Web site or sending the email. It is used to send back information such as the IP address of the client, the browser type and any cookies that may have been set before.
© 2013 Dell Inc.
Trademarks: Dell™, the DELL logo, SonicWALL™, and all other SonicWALL product and service names and slogans are trademarks of Dell Inc. Microsoft Windows 7™, Windows Vista™, Windows XP™, Internet Explorer™, and Active Directory™ are trademarks or registered trademarks of Microsoft Corporation. Firefox™ is a trademark of Mozilla
Other product and company names mentioned herein may be trademarks and/or registered trademarks of their respective companies and are the sole property of their respective manufacturers.
P/N 232-002182-00 Rev A5/2013

36 | SRA 7.0 Application Offloading and HTTP(S) Bookmarks