Decorative Box with Easel Card Set & Side Waterfall … sheets... · 1 ea Botanical Tea Deluxe...
9
Humming Bird Box & Easel Card Set Botanical Butterflies Waterfall Album •Decorative Box & Easel Card Set Directions: 1. Cut four strips of blue stripe paper 5” x 1” each. Miter the corners by placing two strips together as shown and make one clean snip from outer corner to inner corner. Repeat for all four strips, keeping track of the pieces by laying them in a square frame in front of you as you go. www.g45papers.com | [email protected] pg 1 of 9 Decorative Box with Easel Card Set & Side Waterfall Album Club G45 Vol. 4 – Featuring : Botanical Tea Designed by ~ Annette Green Graphic 45® Supplies: 1 ea Botanical Tea Deluxe Collector's Edition (4501684) 1 ea Kraft 5 x 5 Mixed Media Box (4500984) 1 pk G45 Staples Metal Door Pulls (4500548 or 4500842) 1 pd Precious Pink Decades Ink (41007) Additional Supplies: 60” Natural Twine (or any thin ribbon or cording) 90” Natural Twine – *for use with the Side Waterfall Album Tools, Adhesives & Ink: Paper trimmer, scissors, scoring tool, bone folder, ruler, corner rounder punch, wet adhesive, double sided adhesive, foam tape, metal glue Notes: • Ink edges with Precious Pink Decades ink by ColorBox® • Use the accompanying PDF file to create coordinating custom envelopes for your cards when you're finished • Keep the DCE cover to use with the Side Waterfall album
Transcript of Decorative Box with Easel Card Set & Side Waterfall … sheets... · 1 ea Botanical Tea Deluxe...

Humming Bird Box & Easel Card Set
Botanical Butterflies Waterfall Album
•Decorative Box & Easel Card Set Directions: 1. Cut four strips of blue stripe paper 5” x 1” each.
Miter the corners by placing two strips together as shown and make one clean snip from outer corner to inner corner. Repeat for all four strips, keeping track of the pieces by laying them in a square frame in front of you as you go.
www.g45papers.com | [email protected] pg 1 of 9
Decorative Box with Easel Card Set & Side Waterfall Album
Club G45 Vol. 4 – Featuring : Botanical Tea
Designed by ~ Annette Green Graphic 45® Supplies:1 ea Botanical Tea Deluxe Collector's Edition (4501684) 1 ea Kraft 5 x 5 Mixed Media Box (4500984) 1 pk G45 Staples Metal Door Pulls (4500548 or 4500842) 1 pd Precious Pink Decades Ink (41007)
Additional Supplies: 60” Natural Twine (or any thin ribbon or cording) 90” Natural Twine – *for use with the Side Waterfall Album
Tools, Adhesives & Ink: Paper trimmer, scissors, scoring tool, bone folder, ruler, corner rounder punch, wet adhesive, double sided adhesive, foam tape, metal glue
Notes: • Ink edges with Precious Pink Decades ink by ColorBox®
• Use the accompanying PDF file to create coordinating custom envelopes for your cards when you're finished
• Keep the DCE cover to use with the Side Waterfall album

2. Lay the mixed media box flat with the side flap on the right and adhere the striped papers as shown. Cut the long green border sticker into four pieces: Start one at 3¼” and continue to cut pieces as needed
to go around the opening of the box. (You may come up short at one corner. This is okay.)
3. Adhere a 4¾” x 4¾”
square of the blue “toile”
into the box, a 1⅞” x 4⅞” piece to the inner spine, and a 4⅞” x 4⅞” square to the inner
lid, applying adhesive to only the outer
area of this last piece.
4. Cut two 4⅞” x 1¾” rose papers and two at 1¾” x
4⅞”. Adhere around sides of the inner box. Cut a 1”
x 4⅞” piece and adhere to lid flap. Adhere a 2” x 4⅞”
piece to the outer box spine.
5. Adhere four 4¾” x 1⅞” strips of blue diamond papers to the inner four walls of the box.
6. Select the chipboard
pieces shown. Tie a 10”
length of twine or ribbon into
a bow through the butterfly
piece, two lengths of 10”
through the hummingbird piece and adhere it with foam adhesive to the large chipboard frame. Adhere
small circles to each of the “buttons.” Set aside to dry.
7. Cut two ¾” squares from pink polkadot paper, then snip each in half diagonally. Snip away a small triangle from each piece to create four faux photo corners.
8. Adhere faux photo corners to outer corners of
box, then pink photo corner
stickers to inner frame of box as
shown. Adhere the layered chipboard
unit over the opening of box.
9. Fussy cut a butterfly. Adhere two chipboard squares as shown to the back of the butterfly tag from Step 6.
www.g45papers.com | [email protected] pg 2 of 9
Decorative Box with Easel Card Set & Side Waterfall Album
Club G45 Vol. 4 – Featuring : Botanical Tea

10. To give the butterfly realistic dimension, lay it face down on a soft mat and gently “stir” with a large ball stylus (or something similar).
11. Flip butterfly face up and press the center firmly.
12. Fussy cut three blue flowers and two leaves. Lay face down on a soft mat and “stir”.
13. Adhere flowers and leaves to box front with foam adhesive, then add butterfly. Insert the two brads into each Shabby Chic Door Pull and fold the prongs under and out of view. Adhere to box with metal glue. Place adhesive on the squares on the back of the butterfly chipboard tag and adhere to the lid flap as shown.
14. Adhere three “button” stickers to the box’s spine,
then adhere the layered chipboard pieces. Adhere a 5” x 5” square from the
Botanical Tea signature page to the back of the
box.
15. Cut a 8⅝” x 2½” strip of blue diamond paper. Turn sideways and score at ½” down the long side.
16. Turn horizontal and score at 1⅞” and 6¾”. This will be a pocket. Fold on score lines and check the fit of your box’s inside before going on to the next step.
Make any necessary adjustments in the folds.
17. Snip angles on the bottom scored tabs as shown.
www.g45papers.com | [email protected] pg 3 of 9
Decorative Box with Easel Card Set & Side Waterfall Album
Club G45 Vol. 4 – Featuring : Botanical Tea

18. Fold tabs toward the “toile” side and adhere adjoining two corners.
19. Snip the “Tea Party” pink border
sticker approximately 4¾” long and adhere to top edge of pocket
paper, then adhere the pocket into place
inside the box.
20. Cut three 4¼” x 4¼’ squares of paper, and three 4¼” x 8½”. Round all four corners of all papers.
21. Turn larger papers sideways and score at 2⅛” and 4¼”.
22. Onto one kraft cardstock
insert, adhere the square
paper. On the other, adhere
the larger piece as shown.
23. Fold the larger paper in and place
adhesive on the lower 2⅛” area
only and adhere the first insert to it as shown. (The top
insert should line up with the bottom one when stacked.)
24. Cut closely around the frame of the journaling cut-apart and adhere to lower insert as shown. Tie a 10” length of twine into a bow on the “Herbal” chipboard tag and adhere with foam adhesive to create a stopper for the easel card.
25. Adhere a 4½” strip of bird postage stamps
across the card, then embellish the
remainder with the Celebrations sticker,
rose chipboard tag and chipboard circle.
26. If desired, use stickers to adorn the inner portion of the easel card.
www.g45papers.com | [email protected] pg 4 of 9
Decorative Box with Easel Card Set & Side Waterfall Album
Club G45 Vol. 4 – Featuring : Botanical Tea
27. Repeat the card-making process (Steps 21 - 26) to create two more easel cards.
28. To create an envelope, we’ve provided a PDF template. Pre-cut coordinating paper to 8½” x 11” and either feed through your printer or trace the template by hand. Cut out inside the lines (shown below left).
29. Score straight lines from the four corners and fold in as shown above and adhere.
30. Repeat with more papers to create two more coordinating envelopes.
31. Place the envelopes and cards into the pocket of your decorative box.
• Side Waterfall Album Directions: 1. Cut pink/rose paper 8½” x 5” and score at ½” and 4½”. Turn sideways a quarter turn to the right, and score down the long edge at ½”. (Note: Most prints have a “direction” so be sure to score carefully.)
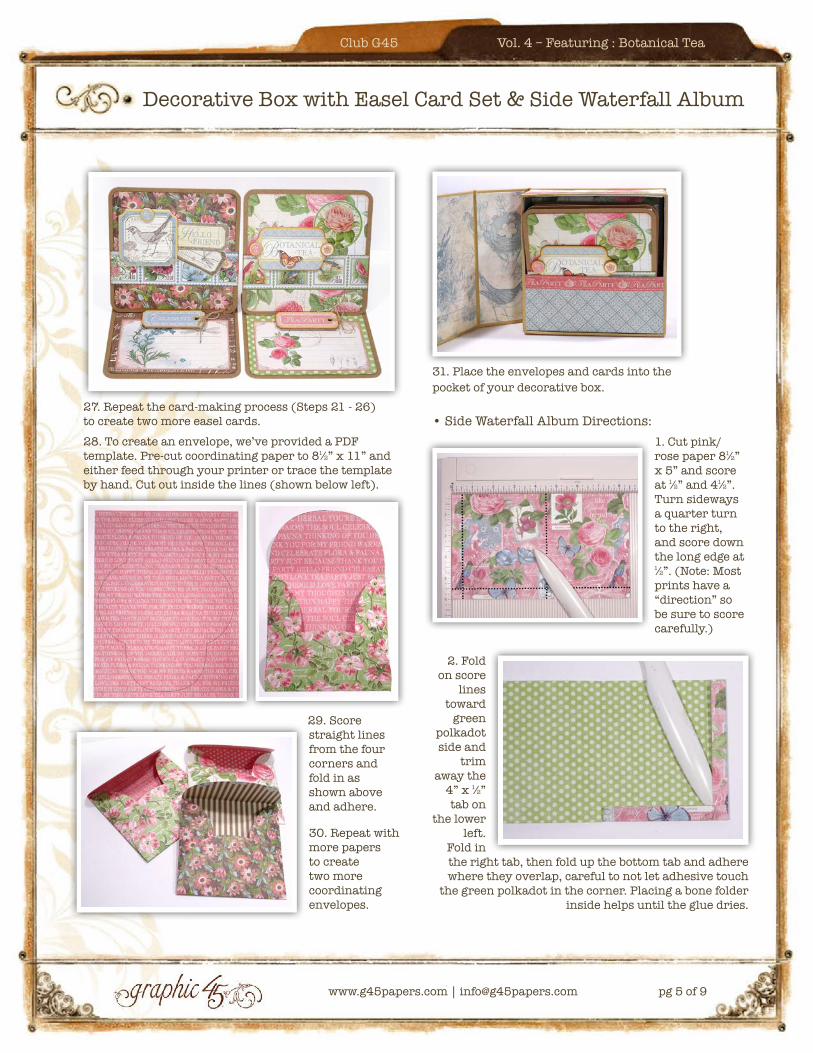
2. Fold on score
lines toward
green polkadot side and
trim away the
4” x ½” tab on
the lower left.
Fold in the right tab, then fold up the bottom tab and adhere where they overlap, careful to not let adhesive touch
the green polkadot in the corner. Placing a bone folder inside helps until the glue dries.
www.g45papers.com | [email protected] pg 5 of 9
Decorative Box with Easel Card Set & Side Waterfall Album
Club G45 Vol. 4 – Featuring : Botanical Tea
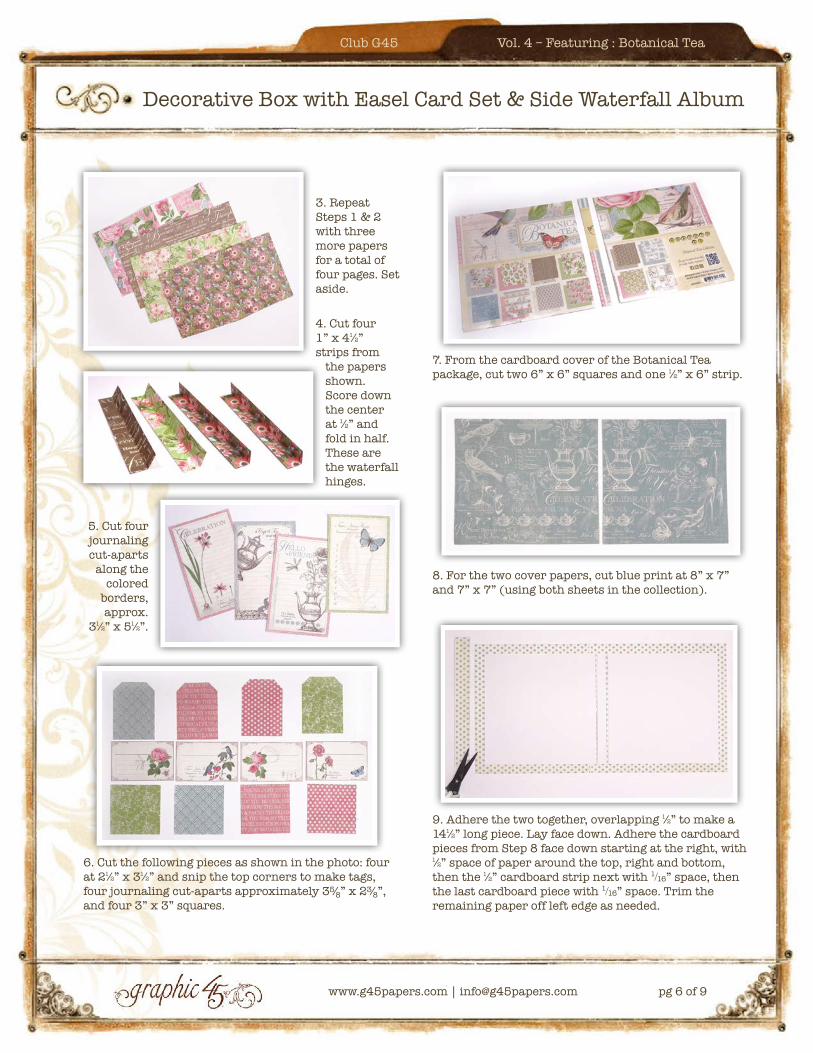
3. Repeat Steps 1 & 2 with three more papers for a total of four pages. Set aside.
4. Cut four 1” x 4½” strips from
the papers shown. Score down the center at ½” and fold in half. These are the waterfall hinges.
5. Cut four journaling cut-aparts
along the colored
borders, approx.
3½” x 5½”.
6. Cut the following pieces as shown in the photo: four at 2½” x 3½” and snip the top corners to make tags, four journaling cut-aparts approximately 3⅝” x 2⅜”, and four 3” x 3” squares.
7. From the cardboard cover of the Botanical Tea package, cut two 6” x 6” squares and one ½” x 6” strip.
8. For the two cover papers, cut blue print at 8” x 7” and 7” x 7” (using both sheets in the collection).
9. Adhere the two together, overlapping ½” to make a 14½” long piece. Lay face down. Adhere the cardboard pieces from Step 8 face down starting at the right, with ½” space of paper around the top, right and bottom, then the ½” cardboard strip next with 1 ⁄16” space, then the last cardboard piece with 1 ⁄16” space. Trim the remaining paper off left edge as needed.
www.g45papers.com | [email protected] pg 6 of 9
Decorative Box with Easel Card Set & Side Waterfall Album
Club G45 Vol. 4 – Featuring : Botanical Tea

10. Snip the four corners as shown, then score with a bone folder around all cardboard pieces,
including the spaces between the ½” spine strip.
11. Fold on all
scored lines then
adhere down as
shown. Cut a
2¼” x 7” blue polkadot piece for the outer spine, adhere in place,
then score on the spaces between the ½” spine strip.
12. Adhere a 12” x 5½” floral piece and score firmly on the spaces between the ½ spine
strip. Fold on score lines to form your album front and back covers.
13. Cut a 4¾” x 5½” piece
from the Signature Page, ink
edges generously and adhere
to cover.
14. Assemble
the pocket pages from
Step 2 by adhering
a waterfall hinge to the left
end and applying adhesive
to the right-hand
tabs as shown. (Note: the waterfall hinge should match the paper of the following pocket page.)
15. Adhere the page closed, then add adhesive to the other side of the waterfall hinge.
16. Place the journaling cut-apart into the first pocket
page, then adhere the page into the album as shown.
Adhere the 3” x 3” photo mat.
17. Turn the pocket page to the left and adhere the smaller journaling cut-apart on three sides to make a pocket. Insert tag.
www.g45papers.com | [email protected] pg 7 of 9
Decorative Box with Easel Card Set & Side Waterfall Album
Club G45 Vol. 4 – Featuring : Botanical Tea

18. At this point, you can add stickers to the inside front cover. Or as an additional idea, you can leave this area blank and make another set of waterfall pocket pages with your extra papers later.
19. Follow the same
steps (14 - 17) to add the remaining pocket pages. Each time you add a new page, butt
the page up to the seam of the previous
waterfall hinge.
20. To dress up the tags, use stickers on both sides to serve as pull tabs.
21. Photo of the first completed spread.
22. Photo of the second completed spread.
23. Photo of the third completed spread.
www.g45papers.com | [email protected] pg 8 of 9
Decorative Box with Easel Card Set & Side Waterfall Album
Club G45 Vol. 4 – Featuring : Botanical Tea

24. Photo of the fourth completed spread. Add chipboard tag and twine, plus blue border sticker.
25. To decorate the front cover, fussy cut and shape a butterfly and rose and small pink flower. Adhere the flower to the chipboard tag. Add two layers of foam adhesive to the center of the rose.
26. Adhere elements to cover.
27. Wrap two 36” pieces of twine around album and insert through chipboard tags as shown. Adhere the layered tags to the cover. On the back cover, use a sticker to secure the twine as desired. Last, tie the twine into a bow to complete your album.
www.g45papers.com | [email protected] pg 9 of 9
Decorative Box with Easel Card Set & Side Waterfall Album
Club G45 Vol. 4 – Featuring : Botanical Tea
• Complete Box, Cards & Album•