Decoration Panel › content › assets › DOC › BYC125K-W1.pdf · svenska english espaÑol...
6
SVENSKA ENGLISH ESPAÑOL Decoration Panel MODELS BYC125K-W1 BYC125K-W1C BYC125K-W2 BYC125K-W2C BYC125K-W1S READ THESE INSTRUCTIONS CAREFULLY BEFORE INSTALLATION. KEEP THIS MANUAL IN A HANDY PLACE FOR FUTURE REFERENCE. LEA CUIDADOSAMENTE ESTAS INSTRUCCIONES ANTES DE INSTALAR. GUARDE ESTE MANUAL EN UN LUGAR A MANO PARA LEER EN CASO DE TENER ALGUNA DUDA. En. Sp. CONTENTS BEFORE INSTALLATION .......................................................................... 1 PREPARATION OF DECORATION PANEL ............................................... 1 INSTALLATION OF THE DECORATION PANEL TO THE INDOOR UNIT BODY ........................................................................................................ 2 INSTALLATION OF SUCTION GRILLE AND SERVICE COVER ............... 3 INDICE ANTES DE INSTALAR .............................................................................. 4 PREPARACION DEL PANEL DE DECORACION ...................................... 4 INSTALACION DEL PANEL DE DECORACION EN EL CUERPO DE LA UNIDAD INTGERIOR ................................................................................ 5 INSTALACION DE LA REJILLA DE SUCCION Y DE LA CUBIERTA PARA EL SERVICIO ............................................................................................ 6 ....................................................................................................... 7 ......................................................................................... 7 ........................................................................... 8 .............................................................................. 9 Ch(T). ..................................................................................................... 10 ..................................................................................... 10 ...................................................................... 11 .......................................................................... 12 Ch(S). 13 ............................................................................................. 13 ....................................................................................... 14 ....................................................... 15 .......................................................... Ar. ...................................................................................... 16 ................................................................................. 16 ............................................ 17 ......................................................... 18 Ta. INSTALLATION MANUAL
Transcript of Decoration Panel › content › assets › DOC › BYC125K-W1.pdf · svenska english espaÑol...
SVEN
SKA
EN
GL
ISH
ES
PAÑ
OL
Decoration Panel
MODELS
BYC125K-W1 BYC125K-W1CBYC125K-W2 BYC125K-W2C
BYC125K-W1S
READ THESE INSTRUCTIONS CAREFULLY BEFOREINSTALLATION.KEEP THIS MANUAL IN A HANDY PLACE FOR FUTUREREFERENCE.
LEA CUIDADOSAMENTE ESTAS INSTRUCCIONESANTES DE INSTALAR.GUARDE ESTE MANUAL EN UN LUGAR A MANO PARALEER EN CASO DE TENER ALGUNA DUDA.
En.
Sp.
CONTENTSBEFORE INSTALLATION .......................................................................... 1PREPARATION OF DECORATION PANEL ............................................... 1INSTALLATION OF THE DECORATION PANEL TO THE INDOOR UNITBODY ........................................................................................................ 2INSTALLATION OF SUCTION GRILLE AND SERVICE COVER ............... 3
INDICEANTES DE INSTALAR .............................................................................. 4PREPARACION DEL PANEL DE DECORACION ...................................... 4INSTALACION DEL PANEL DE DECORACION EN EL CUERPO DE LAUNIDAD INTGERIOR ................................................................................ 5INSTALACION DE LA REJILLA DE SUCCION Y DE LA CUBIERTA PARAEL SERVICIO ............................................................................................ 6
....................................................................................................... 7......................................................................................... 7
........................................................................... 8
.............................................................................. 9
Ch(T).
..................................................................................................... 10..................................................................................... 10
...................................................................... 11
.......................................................................... 12
Ch(S).
13 .............................................................................................13 .......................................................................................14 .......................................................15 ..........................................................
Ar.
...................................................................................... 16................................................................................. 16
............................................ 17
......................................................... 18
Ta.
INSTALLATION MANUAL


1
BEFORE INSTALLATION
PRECAUTIONS● Refer also to the installation manual attached to the indoor unit.
ACCESSORIES● Installation manual.
NOTE TO INSTALLERBe sure to instruct the customer how to properly operate the system showing him/her the attached operation manual.
PREPARATION OF DECORATION PANEL ⟨ ⟨For this unit, you are able to select air flow directions. To discharge air in 2 or 3 directions, it is necessary to purchase optional
blocking pad kit.⟩⟩
HANDLING OF DECORATION PANELS
● Never place the panel facing down nor lean it against a wall nor leave it on a projecting object.
● Never touch or put pressure on the swing flap.
(The swing flap may malfunction)
(1) Remove the suction grille from the decoration panel.
1) Push the suction grille lever inward and lift up the lever side.
(Refer to Fig. 1)
(2) Remove the service cover on the corner.
Slide the service cover outward to remove. (Refer to Fig. 3)
2) Detach the suction grille from the decoration panel by lifting the grille
up approximately 45 degrees. (Refer to Fig. 2)
45°
Fig. 2
Fig. 3
Lever
Fig. 1
2
EN
GL
ISH
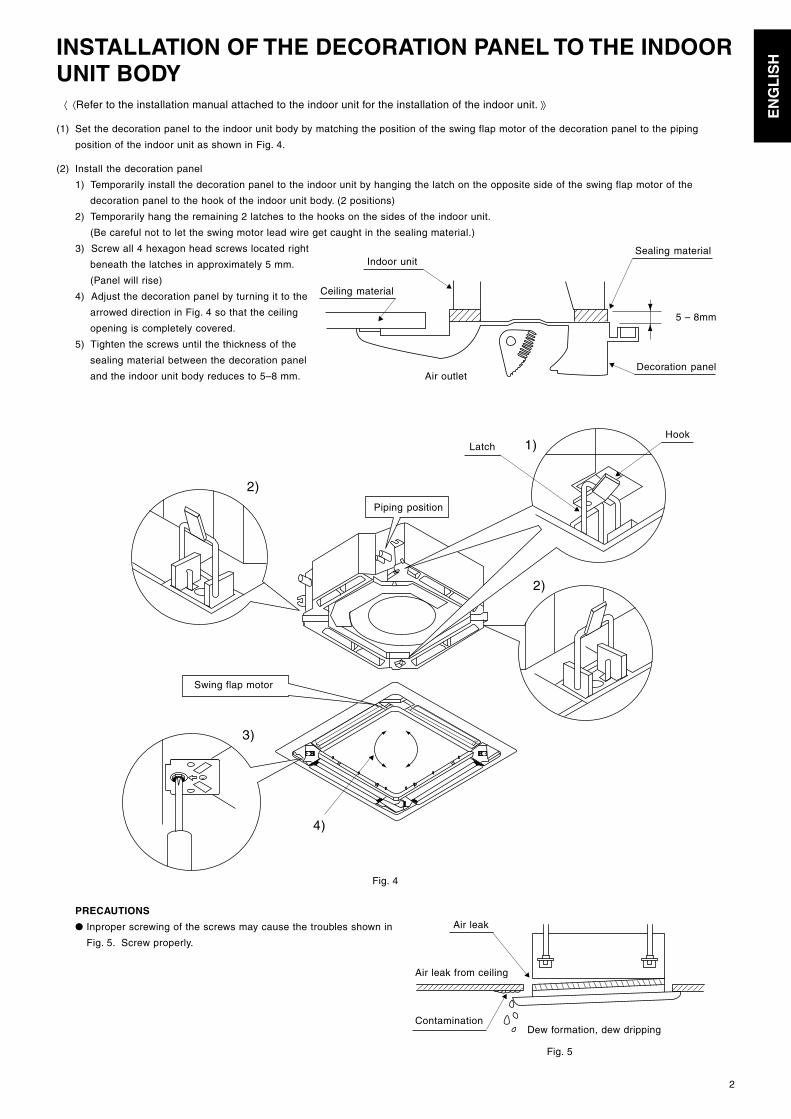
INSTALLATION OF THE DECORATION PANEL TO THE INDOORUNIT BODY ⟨ ⟨Refer to the installation manual attached to the indoor unit for the installation of the indoor unit. ⟩⟩
(1) Set the decoration panel to the indoor unit body by matching the position of the swing flap motor of the decoration panel to the piping
position of the indoor unit as shown in Fig. 4.
(2) Install the decoration panel
1) Temporarily install the decoration panel to the indoor unit by hanging the latch on the opposite side of the swing flap motor of the
decoration panel to the hook of the indoor unit body. (2 positions)
2) Temporarily hang the remaining 2 latches to the hooks on the sides of the indoor unit.
(Be careful not to let the swing motor lead wire get caught in the sealing material.)
3) Screw all 4 hexagon head screws located right
beneath the latches in approximately 5 mm.
(Panel will rise)
4) Adjust the decoration panel by turning it to the
arrowed direction in Fig. 4 so that the ceiling
opening is completely covered.
5) Tighten the screws until the thickness of the
sealing material between the decoration panel
and the indoor unit body reduces to 5–8 mm.
PRECAUTIONS
● Inproper screwing of the screws may cause the troubles shown in
Fig. 5. Screw properly.
Decoration panel
5 – 8mm
Indoor unit
Ceiling material
Air outlet
Sealing material
Fig. 4
HookLatch 1)
2)
2)
3)
4)
Piping position
Fig. 5
ContaminationDew formation, dew dripping
Air leak
Air leak from ceiling
▲
▲
▲
▲
▲
▲
▲
▲
▲
Swing flap motor

3
● If gap is still left between the ceiling and the decoration panel
after screwing the screws, readjust the indoor unit body height.
(Refer to Fig. 6)
(3) Wiring of the decoration panel (Refer to Fig. 7)
6) Connect the connectors for swing flap motor lead
wire installed on the decoration panel.
If connectors are not connected, the malfunction
display (A7) appears on the remote controller.
Connect the connectors properly.
Make sure that the swing flap motor lead wire is not
caught between the indoor unit and the decoration
panel.
INSTALLATION OF SUCTION GRILLE AND SERVICE COVER(1) Install the suction grille
Install by reversing the procedure shown in “PREPARATION OF DECORATION PANEL”.
It is possible to install the suction grille in 4 directions by turning the suction grille.
Change the direction when adjusting the direction of the suction grille of multiple units or in meeting customers’ demands.
NOTE)
Be careful not to get swing flap motor lead wire get caught when installing the suction grille.
(2) Install the service cover on the corner.
1) Attach the string of the service cover to the pin of the
decoration panel as in Fig. 8.
Adjustment of the indoor unit body height from the holesin the corner of the decoration panel is possible if theindoor unit is kept leveled and the drain piping, etc. isunaffected.
No gap is allowed
Fig. 6
⟨ Wiring Instruction Diagram ⟩(It differs from the actual state)
Fig. 7
6)
Pin
Fig. 8
Install the service coverby sliding 4 latches to fitinto the holes on thedecoration panel.
2) Install the service cover over the decoration panel.
▲
▲
▲
Indoor unitside
Decorationpanel side

3PA64319-9L EM01A055 (0108) HT
Daikin US Corporation375 Park Avenue, Suite 3308New York, NY 10152��[email protected] ��
![WHITEHALL - Isprava€¦ · BATH ROOM -2 W1 W1 W1 W1 W1 W1 D1 D1 D1 D1 5093 [16'-9"] DN. 6' W 2450 [8'] 2761 [9'-1"] 3714 [12'-2"] 10800 [35'-5"] 7679 [25'-2"] 1800 [5'-11"] 5316](https://static.fdocuments.in/doc/165x107/5f78627116e891416e53a754/whitehall-isprava-bath-room-2-w1-w1-w1-w1-w1-w1-d1-d1-d1-d1-5093-16-9.jpg)