
DECONSTRUCTING PURISM: UNCONSCIOUS DRIVES AND META
82
USER GUIDE MVFBC ETERNUS DX Page 1 of 82 http://.solutions.us.fujitsu.com WHITE PAPER MY VERY FIRST BUSINESS CONTINUITY FOR WINDOWS ETERNUS DX STORAGE SYSTEM
Transcript of DECONSTRUCTING PURISM: UNCONSCIOUS DRIVES AND META

USER GUIDE MVFBC ETERNUS DX
Page 1 of 82 http://.solutions.us.fujitsu.com
WHITE PAPER
MY VERY FIRST BUSINESS CONTINUITY FOR WINDOWS
ETERNUS DX STORAGE SYSTEM

WHITE PAPER MVFBC ETERNUS DX
Page 2 of 82 http://solutions.us.fujitsu.com/

USER GUIDE MVFBC ETERNUS DX
Page 3 of 82 http://.solutions.us.fujitsu.com
This page intentionally left blank

WHITE PAPER MVFBC ETERNUS DX
Page 4 of 82 http://solutions.us.fujitsu.com/
Copyrights My Very First Business Continuity User’s Guide Copyright © 2009 Fujitsu America Inc ETERNUS Copyright © 2006 - 2007 Fujitsu Ltd NetVault: Replicator Software Copyright © 2008 BakBone Software This documentation and its associated software product are copyrighted and all rights are reserved. The distribution and sale of this product are intended for the use of the original purchaser only per the terms of the License Agreement. All other product trademarks are the property of their respective owners. Trademarks
Fujitsu, the Fujitsu logo and ETERNUS are trademarks or registered trademarks of Fujitsu America Inc in the United States and other countries. BakBone Software, the BakBone logo, and NetVault:Replicator trademarks or registered trademarks of BakBone Software in the United States and other countries. Microsoft, Windows and Internet Explorer are trademarks or registered trademarks of Microsoft Corporation in the US and other countries. For the Microsoft End User License Agreement (EULA), see the CD provided in the distribution package. All other trademarks mentioned herein are the property of their respective owners. Product description data represents Fujitsu design objectives and is provided for comparative purposes; actual results may vary based on a variety of factors. Specifications are subject to change without notice. Product description data represents Fujitsu design objectives and is provided for comparative purposes; actual results may vary based on a variety of factors. Specifications are subject to change without notice.

WHITE PAPER MVFBC ETERNUS DX
Page 5 of 82 http://solutions.us.fujitsu.com/
1 About this Guide This guide provides information for installation/upgrade, initializing, and administering NetVault: Replicator. All functionality available with the current version of NetVault: Replicator for Microsoft Windows is described in this guide, and where applicable, step-by-step examples of this functionality are provided. Copyright 2001 - 2009 FUJITSU LIMITED. All rights reserved. This document along with all attachments constitutes the Proprietary Information of Fujitsu Limited. The right to technical modification is reserved. The contents of this manual may be updated without notice. While the contents of this manual are the product of all due care and diligence, no responsibility can be accepted for operational problems arising from any errors or missing information, or other use of the information contained in this manual. All hardware and software names used are trade names and/or trademarks of their respective manufacturers. Fujitsu America, Inc assumes no liability for damages to third

WHITE PAPER MVFBC ETERNUS DX
Page 6 of 82 http://solutions.us.fujitsu.com/
party copyrights or other rights arising from the use of any information in this manual. No part of this document or publication may be reproduced, stored in a retrieval system, or transmitted in any form or by any means, electronic, mechanical, photocopying, recording or otherwise, without the prior written consent of Fujitsu Limited, requests for which should be sent in care of Fujitsu America, Inc., Attn: Legal Dept., 1250 E. Arques Ave, Sunnyvale, California 94085. For questions regarding My Very First Business Continuity, please contact our Global Service Center (GSC) Division. The GSC is staffed 7 days a week, 24 hours a day. To speak to the GSC Enterprise Support Desk, call 1-800-638-1764.
1.1 Organization This manual is organized as follows: Chapters 5 and 6 Overview These chapters provide the overview of My Very First Business Continuity. Chapters 7 and 8 Installation and Upgrade instructions The installation/upgrade instructions are provided here. Complete details on NetVault: Replicator installation can be found in the NetVault®: Replicator Installation/Upgrade Guide which can be downloaded from the NetVault: Replicator link on BakBone Software’s product documentation web site: http://www.bakbone.com/support/product_documentation Chapter 9 Product Licensing instructions This chapter provides instructions on obtaining and licensing the product. Chapter 10 NetVault: Replicator GUI Functional Description This chapter provides an overview of the graphical user interface available for configuring and administering NetVault: Replicator. Chapter 11 Replicator Configuration Using the GUI This chapter provides the instructions for using graphical user interface to configure and administer data migration. Chapter 12 Completion of the Initial Synchronization of Data This chapter discusses what happens after the initial operations to configure and administer data migration.

WHITE PAPER MVFBC ETERNUS DX
Page 7 of 82 http://solutions.us.fujitsu.com/
1.2 Latest Information The information in this document is subject to change without notice. The latest version of this document is released at the following web site address: https://download.computers.us.fujitsu.com/portal/fts/login.jsp
1.2.1 Related Manuals The following manuals are related to the operation and administration of My Very First Business Continuity. Please refer to these manuals if further information is needed.
MANUAL DESCRIPTION NetVault: Replicator Installation/Upgrade Guide Basic information on the overall installation of
NetVault: Replicator NetVault: Replicator Administrator’s Guide Describes how to configure and administer NetVault:
Replicator. ETERNUS2000 Models 100 and 200, ETERNUS DX60/80 Storage System User Guide
Describes how to setup, install, and operate the ETERNUS2000 and ETERNUS DX Storage Systems
1.2.2 Related Web Sites For service information on My Very First Business Continuity and ETERNUS2000 and ETERNUS DX60/80 Storage Systems refer to: https://download.computers.us.fujitsu.com/portal/fts/login.jsp For general information on My Very First Business Continuity, PRIMERGY servers, the ETERNUS2000, and ETERNUS DX60/DX80 Storage Systems and other products refer to: http://www.computers.us.fujitsu.com/index.php5/17/2010 For information on general BakBone Software products refer to: http://bakbone.com/ For information on general Microsoft products refer to: http://www.microsoft.com/en/us/default.aspx

WHITE PAPER MVFBC ETERNUS DX
Page 8 of 82 http://solutions.us.fujitsu.com/
2 TABLE OF CONTENTS
1 ABOUT THIS GUIDE ------------------------------------------------------------------------------------------------------- 5
1.1 Organization -------------------------------------------------------------------------------------------------------------------------------------- 6
1.2 Latest Information ------------------------------------------------------------------------------------------------------------------------------- 7 1.2.1 Related Manuals -------------------------------------------------------------------------------------------------------------------- 7 1.2.2 Related Web Sites ------------------------------------------------------------------------------------------------------------------ 7
2 TABLE OF CONTENTS --------------------------------------------------------------------------------------------------- 8
3 TABLE OF FIGURES ----------------------------------------------------------------------------------------------------- 11
4 TABLE OF TABLES ------------------------------------------------------------------------------------------------------ 12
5 OVERVIEW ------------------------------------------------------------------------------------------------------------------ 13
5.1 NetVault: Replicator Features --------------------------------------------------------------------------------------------------------------- 13
6 QUICK START OVERVIEW --------------------------------------------------------------------------------------------- 16
7 INSTALLATION ------------------------------------------------------------------------------------------------------------ 17
7.1 Pre-installation Planning --------------------------------------------------------------------------------------------------------------------- 17 7.1.1 Software Requirements ----------------------------------------------------------------------------------------------------------- 17 7.1.2 Storage Requirements ------------------------------------------------------------------------------------------------------------- 17 7.1.3 Network Requirements ----------------------------------------------------------------------------------------------------------- 17 7.1.4 Server Resources Requirements -------------------------------------------------------------------------------------------------- 17
8 INSTALLING ON MICROSOFT WINDOWS ------------------------------------------------------------------------ 19
8.1 Step 1: Prerequisites --------------------------------------------------------------------------------------------------------------------------- 19
8.2 Step 2: Installation Procedure ---------------------------------------------------------------------------------------------------------------- 20
8.3 Step 3: Post-Installation Procedure --------------------------------------------------------------------------------------------------------- 26
9 LICENSING NETVAULT: REPLICATOR ---------------------------------------------------------------------------- 27
9.1 Obtaining the License Key -------------------------------------------------------------------------------------------------------------------- 27
9.2 Obtaining the Evaluation License Key ------------------------------------------------------------------------------------------------------ 28
9.3 Obtaining a Permanent License Key -------------------------------------------------------------------------------------------------------- 28
9.4 Installing Permanent License Keys ---------------------------------------------------------------------------------------------------------- 30
10 NETVAULT: REPLICATOR GUI FUNCTIONAL DESCRIPTION ------------------------------------------ 32

WHITE PAPER MVFBC ETERNUS DX
Page 9 of 82 http://solutions.us.fujitsu.com/
10.1 GUI Controls and Options ------------------------------------------------------------------------------------------------------------------- 33
10.2 Accessing the GUI ------------------------------------------------------------------------------------------------------------------------------ 34
10.3 The Menu Bar ----------------------------------------------------------------------------------------------------------------------------------- 34
10.4 Menu Items – Options, Help ----------------------------------------------------------------------------------------------------------------- 35
10.5 Keyboard Shortcuts ---------------------------------------------------------------------------------------------------------------------------- 36
10.6 The Replicator GUI Toolbar ----------------------------------------------------------------------------------------------------------------- 37
10.7 The Filter Area Frame ------------------------------------------------------------------------------------------------------------------------- 38 10.7.1 The Repset Filter Panel ---------------------------------------------------------------------------------------------------------- 38 10.7.2 The Repset Filter Panel – Group by Droplist ---------------------------------------------------------------------------------- 39 10.7.3 The Repset Filter Panel – Show options ---------------------------------------------------------------------------------------- 39 10.7.4 The Repset Filter Panel – Repset Group options ------------------------------------------------------------------------------- 41
10.8 The Details Panel ------------------------------------------------------------------------------------------------------------------------------- 42 10.8.1 The Details Panel columns ------------------------------------------------------------------------------------------------------- 43 10.8.2 Customizing Columns in the Details Panel -------------------------------------------------------------------------------------- 44 10.8.3 Repset Status Indicator Icons in the Details Panel ------------------------------------------------------------------------------- 45 10.8.4 Pop-up Menu Commands in the Details Panel ---------------------------------------------------------------------------------- 46
10.9 The Detailed Information Frame ------------------------------------------------------------------------------------------------------------ 50 10.9.1 The General Tab ------------------------------------------------------------------------------------------------------------------- 51 10.9.2 The Network Usage Tab ---------------------------------------------------------------------------------------------------------- 52 10.9.3 The Events Tab -------------------------------------------------------------------------------------------------------------------- 53
10.10 The Replicator GUI Sub-Windows ------------------------------------------------------------------------------------------------------- 54 10.10.1 The Create New Host Dialog ----------------------------------------------------------------------------------------------------- 55 10.10.2 The Create Replication Set Dialog ------------------------------------------------------------------------------------------------ 56 10.10.3 The Edit Replication Set Dialog -------------------------------------------------------------------------------------------------- 57 10.10.4 The Manage Hosts Dialog -------------------------------------------------------------------------------------------------------- 59 10.10.5 The Preferences Dialog ----------------------------------------------------------------------------------------------------------- 60
11 REPLICATOR CONFIGURATION USING THE GUI ---------------------------------------------------------- 62
11.1 Phase 1: Adding Hosts ------------------------------------------------------------------------------------------------------------------------- 63
11.2 Phase 2: Creating a Repset -------------------------------------------------------------------------------------------------------------------- 66 11.2.1 Phase 2: Creating a Repset – Step 1 ----------------------------------------------------------------------------------------------- 66 11.2.2 Phase 2: Creating a Repset – Step 2 ----------------------------------------------------------------------------------------------- 66 11.2.3 Phase 2: Creating a Repset – Step 3 ----------------------------------------------------------------------------------------------- 70 11.2.4 Phase 2: Creating a Repset – Step 4 ----------------------------------------------------------------------------------------------- 72
11.3 Phase 3: Starting Replication ----------------------------------------------------------------------------------------------------------------- 73 11.3.1 Phase 3: Starting Replication – Step 1 ------------------------------------------------------------------------------------------ 73
12 COMPLETION OF THE INITIAL SYNCHRONIZATION OF DATA ---------------------------------------- 77

WHITE PAPER MVFBC ETERNUS DX
Page 10 of 82 http://solutions.us.fujitsu.com/
13 INDEX ----------------------------------------------------------------------------------------------------------------------- 79
14 COLOPHON --------------------------------------------------------------------------------------------------------------- 81

WHITE PAPER MVFBC ETERNUS DX
Page 11 of 82 http://solutions.us.fujitsu.com/
3 TABLE OF FIGURES Figure 1: NetVault: Replicator Initial Full Copy ........................................................................................................................................................... 14Figure 2: Continuous Data Replication .......................................................................................................................................................................... 15Figure 3: Welcome to NetVault: Replicator CD Screen ............................................................................................................................................... 20Figure 4: Replicator Installation Files ............................................................................................................................................................................. 21Figure 5: Files Currently on the CD ................................................................................................................................................................................ 22Figure 6: Replicator Software Use License .................................................................................................................................................................... 23Figure 7: Installation Options .......................................................................................................................................................................................... 23Figure 8: Setup: Completed .............................................................................................................................................................................................. 25Figure 9: Replicator GUI Components .......................................................................................................................................................................... 33Figure 10: Replicator GUI Filter Area Frame ................................................................................................................................................................ 38Figure 11: Replicator Group by Droplist ....................................................................................................................................................................... 39Figure 12: The Repset Filter Panel -Show Options ....................................................................................................................................................... 40Figure 13: The Repset Filter Panel – Repset Group Options ...................................................................................................................................... 41Figure 14: The Details Panel ............................................................................................................................................................................................ 42Figure 15: The Details Panel Columns ........................................................................................................................................................................... 43Figure 16: Columns Displayed in the Details Panel ..................................................................................................................................................... 44Figure 17: The Status Indicator, Green Icon, in the Details Panel ............................................................................................................................. 46Figure 18: Commands in the Standard Repset Pop-up Menu .................................................................................................................................... 47Figure 19: The Status Indicator Pop-up Menu .............................................................................................................................................................. 49Figure 20: The Detailed Information Frame ................................................................................................................................................................. 50Figure 21: The General Tab in the Detailed Information Frame ............................................................................................................................... 51Figure 22: The Network Usage Tab ................................................................................................................................................................................ 52Figure 23: The Events Tab ................................................................................................................................................................................................ 53Figure 24: The Create New Host Dialog ........................................................................................................................................................................ 55Figure 25: The Create Replication Set Dialog ............................................................................................................................................................... 56Figure 26: The Edit Replication Set Dialog Revealed by Double-Clicking Any Text in the Detail Panel ............................................................. 57Figure 27: The Edit Replication Set Dialog Revealed by Right-Clicking any Text in the Detail Panel ............................................... 58Figure 28: The Manage Hosts Dialog ............................................................................................................................................................................. 59Figure 29: The Preferences Dialog .................................................................................................................................................................................. 60Figure 30: The Groups Tab of the Preferences Dialog ...................................................................................................................................... 61Figure 31: The Host Tab of the Create New Host Dialog ............................................................................................................................................ 63Figure 32: The Globals Tab of the Create New Host Dialog ....................................................................................................................................... 64Figure 33: Phase 2 - Step 2: Using the Create Replication Set ..................................................................................................................................... 67Figure 34: The Bandwidth Limit and Replication Streams Options of the Network Settings Tab ........................................................................ 70Figure 35: Compression Option of the Network Settings Tab .................................................................................................................................... 71Figure 36: Save Button of the Create Replication Set Menu ........................................................................................................................................ 72Figure 37: Apply Configuration Button in the GUI Toolbar ...................................................................................................................................... 73Figure 38: Windows Start->Run Dialog ......................................................................................................................................................................... 74Figure 39: "nvr_sync -d" in a Windows Command Prompt ....................................................................................................................................... 75

WHITE PAPER MVFBC ETERNUS DX
Page 12 of 82 http://solutions.us.fujitsu.com/
Figure 40: Monitoring the Progress of the Initial Synchronization ........................................................................................................................... 77Figure 41: The Replicator GUI Showing that the Initial Synchronization of Data is Completed .......................................................................... 78
4 TABLE OF TABLES Table 1: Replicator GUI Menu Bar ................................................................................................................................................................................. 34Table 2: Menu Items - Options, Help ............................................................................................................................................................................. 35Table 3: Keyboard Shortcuts ............................................................................................................................................................................................ 36Table 4: Replicator GUI Toolbar ..................................................................................................................................................................................... 37Table 5: The Icons for the Current State of the Source and Destination Hosts Named in a Repset .................................................. 45Table 6: List of commands in the Standard Repset Pop-up Menu ............................................................................................................................. 47

WHITE PAPER MVFBC ETERNUS DX
Page 13 of 82 http://solutions.us.fujitsu.com/
5 Overview My Very First Business Continuity (MVFBC) is a real-time hybrid replication solution based on BakBone Software’s NetVault: Replicator (hereinafter referred to as “Replicator”). Replicator combines the security of synchronous mirroring with the reliability of journaling. Replicator provides fast, automatic, real-time mirroring of mission-critical data in heterogeneous environments over standard IP networks. It can be installed on an existing system with little to no down-time and is independent of file systems, volume managers, applications, and storage hardware. This manual provides a quick overview of the Replicator. For detailed questions, the user should refer to the BakBone Software NetVault: Replicator documents and/or BakBone Software Professional Services for complex installations.
5.1 NetVault: Replicator Features
The core components of My Very First Business Continuity real-time hybrid replication solution are two (2) Intel-based servers, such as Fujitsu PRIMERGY servers running Microsoft Windows software, a storage array from any vendor at the source and an ETERNUS2000 or ETERNUS DX60/80 storage array at the destination site. The two Intel-based servers, e.g. PRIMERGY servers, are interconnected via LAN IP network(s), such as, 10/100Mb Ethernet, Gigabit Ethernet, Gigabit Ethernet Fibre Channel, or ATM, and configured as the source and destination systems, respectively. Local Data is available on partitions created on storage devices from any Storage vendor on the source server. The destination system has the same or greater storage capacity as the source on an ETERNUS storage subsystem(s). Within this configuration, NetVault: Replicator employs a semi-synchronous technology that combines the continuous protection of real-time replication with the long-distance and performance benefits of asynchronous solutions. Using this “hybrid” technology, the changes on the source host are written to a local journal, and then replicated to a remote node (or destination host) as quickly as possible. The data is held in the local journal until it is reliably replicated on all the remote nodes. This approach guarantees the transactional integrity of data on the remote replica, and at the same time does not slow down the overall system performance to the speed of the network connecting the source and destination nodes.

WHITE PAPER MVFBC ETERNUS DX
Page 14 of 82 http://solutions.us.fujitsu.com/
The NetVault: Replicator Data Migration configuration consists of:
1) Initial Full Copy of any storage from Source to Destination site 2) Standalone Continuous Data Migration
NetVault: Replicator provides a command to initiate the transfer of every data block on the source local device(s) to the destination.
Figure 1: NetVault: Replicator Initial Full Copy
11
Destination
Initial Full Copy
Source

WHITE PAPER MVFBC ETERNUS DX
Page 15 of 82 http://solutions.us.fujitsu.com/
Once the initial synchronization has been performed, data between source and destination host will be concurrent. The source host will now be in a constant state of replicating its data to the destination host(s)).
NetVault: Replicator provides the mechanisms to synchronize all storage devices by transferring every updated data block on the source local device(s) to the destination after the Initial Full Copy.
Figure 2: Continuous Data Replication
22
Destination
Data Changes Are Copied Continuously after Initial Full Copy
Source

WHITE PAPER MVFBC ETERNUS DX
Page 16 of 82 http://solutions.us.fujitsu.com/
6 Quick Start Overview
The sections that follow the Quick Start Overview on page 16 will present detail steps for getting Replicator up and running.
Please click on each section for a detailed description of how to perform the operations with the Replicator:
Section 7.1: Pre-Installation Planning on page 17
Section 8: Steps for Installing on Microsoft Windows on page 19
Step 1: Prerequisites on page 19
Step 2: Installation Procedure on page 20
Step 3: Post-Installation Procedure on page 26
Section 9: Licensing NetVault: Replicator on page 19
Section 11: Replicator Configuration Using the GUI on page 62
Phase 1: Adding Hosts on page 63
Phase 2: Creating a Repset on page 66
Phase 3: Starting Replication on page 73
Section 12: Completion of the Initial Synchronization of Data on page 77

WHITE PAPER MVFBC ETERNUS DX
Page 17 of 82 http://solutions.us.fujitsu.com/
7 Installation
7.1 Pre-installation Planning Before installing and operating Replicator, verify that the following conditions or requirements on all the resources at the source and the destination are met:
7.1.1 Software Requirements
1) Microsoft Windows Operating System (server class) running on the source system – the source system is the machine that runs user’s application and data
2) Microsoft Windows Operating System (same server class) running on the destination system – the destination system is the machine that stores a copy of the source system’s local data
7.1.2 Storage Requirements
1) Local data is available on partitions created on storage devices from any storage vendor on the source. 2) The destination system has the same or greater storage capacity as the source on ETERNUS storage subsystem(s) 3) Journal File directory on the source system
7.1.3 Network Requirements
1) LAN IP network(s), such as, 10/100Mb Ethernet, Gigabit Ethernet, Gigabit Ethernet Fibre Channel or ATM, are installed and configured between the source and destination systems. The IP addresses are static or non-expiring DHCP leases and respond without any errors to the Ping command.
2) The host names associated with the source and destination systems are resolvable via DNS servers that are part of the LAN IP network(s). Ensure that Forward as well as Reverse DNS Lookup is working for the source and destination systems.
3) The network must have sufficient bandwidth to support peak update rates on the source system 4) Best practices for unreliable networks, large servers with unpredictable I/O loads, or an environment where creating large files is
infrequent: a. Identify and isolate volumes that contain only temporary data that do not need to be replicated or migrated b. Create multiple Replication Groups and schedule multiple “Initial Full Copy” phases. c. Use Compression on slow network
7.1.4 Server Resources Requirements

WHITE PAPER MVFBC ETERNUS DX
Page 18 of 82 http://solutions.us.fujitsu.com/
1) At least 15% of CPU resources of Fujitsu PRIMERGY-class server(s) are available 2) A minimum of 512 MB of RAM is required on a Windows system (1 GB is recommended on Windows systems running
Microsoft SQL Server or Microsoft Exchange) 3) Sufficient disk space to install and use the software
On a Windows-based source system NetVault: Replicator requires approximately 250 MB of free disk space in the installation directory. C:\Program Files (x86)\BakBone Software\NetVault Replicator. On the Windows-based secondary system NetVault: Replicator requires approximately 50 MB of free disk space in the installation directory.

WHITE PAPER MVFBC ETERNUS DX
Page 19 of 82 http://solutions.us.fujitsu.com/
8 Installing on Microsoft Windows Follow these instructions to install Replicator on a system running a Microsoft Windows operating system. The same instructions are used on both the source and the destination servers.
8.1 Step 1: Prerequisites
One of the following prerequisites must be met on a Windows-based system before attempting an ETERNUS MVFBC NetVault: Replicator installation:
A. Windows 2000 Server family requires Update Rollup 1 for Windows 2000 Service Pack 4 For more information, see the following link: http://support.microsoft.com/kb/891861
B. Windows Server 2003 and Windows Storage Server 2003 (including R2 versions) require Service Pack 1 For more information, see the following link:
http://support.microsoft.com/kb/824721

WHITE PAPER MVFBC ETERNUS DX
Page 20 of 82 http://solutions.us.fujitsu.com/
8.2 Step 2: Installation Procedure
1. Log in as an Administrator-level user (i.e., as the standard Administrator account or an account with this same level of access).
2. Insert the BakBone NetVault: Replicator CD into a CD-ROM drive to automatically launch the installation program.
3. The “Welcome to NetVault: Replicator CD” window will first appear as shown in Figure 3: Welcome to NetVault: Replicator CD Screen on page 20.
Figure 3: Welcome to NetVault: Replicator CD Screen

WHITE PAPER MVFBC ETERNUS DX
Page 21 of 82 http://solutions.us.fujitsu.com/
4. Please select a language to begin the installation 5. The next screen displays the CD contents as follows:
• NetVault: Replicator Kits • Documentation • Languages
6. Click on the “NetVault: Replicator Kits” to display a list of NetVault: Replicator Installation Files.
Figure 4: Replicator Installation Files

WHITE PAPER MVFBC ETERNUS DX
Page 22 of 82 http://solutions.us.fujitsu.com/
7. The next screen shows “Files Currently on the CD” as:
• NetVault: Replicator Release Notes • nvr_cr_5.6.81-NVR Application
Figure 5: Files Currently on the CD

WHITE PAPER MVFBC ETERNUS DX
Page 23 of 82 http://solutions.us.fujitsu.com/
8. The next screen shows the License Agreement. Scroll through and read this information thoroughly and click “I Agree” to continue.
Figure 6: Replicator Software Use License
9. The “Installation Options” window will appear next. Click to select the components to be included in the installation:
Figure 7: Installation Options

WHITE PAPER MVFBC ETERNUS DX
Page 24 of 82 http://solutions.us.fujitsu.com/
• NetVault: Replicator GUI
Select this option to include the NetVault: Replicator Availability Manager GUI in the installation. This will allow you to manage Replicator operations from a user interface.
• NetVault: Replicator Services
This consists of the core of NetVault: Replicator regardless of the desired mode of use (i.e., GUI vs. terminal session commands), this item must remain selected.
• Start Menu Shortcuts Select this item to have various shortcuts included in the Start menu for Replicator, including the following:
o NetVault: Replicator Availability Manager GUI –
This shortcut will launch the GUI, if it was included in the installation
o Uninstall –
This shortcut is used to remove Replicator from the system
10. With the desired items selected, click Install and the installation process will begin.
Important:
NetVault: Replicator is automatically installed to the “Program Files” directory on the operating system partition for Windows machines. It is not possible to manually select an installation destination NetVault: Replicator will be installed to: “...\BakBone Software\NetVault Replicator\” The environment variable, “%CDI_BASE_DIR%”, will be mapped to this directory
11. With the installation running, click on Show Details... to display details pertaining to the installation in this window.

WHITE PAPER MVFBC ETERNUS DX
Page 25 of 82 http://solutions.us.fujitsu.com/
12. When the installation completes, the dialog will be updated with the title, Setup: Completed. Click Close to close the installation
wizard and return to the desktop.
Figure 8: Setup: Completed

WHITE PAPER MVFBC ETERNUS DX
Page 26 of 82 http://solutions.us.fujitsu.com/
8.3 Step 3: Post-Installation Procedure After the installation wizard completes, you must reboot the machine in order for system environment variables to be initialized and NetVault: Replicator modules to be recognized.
Important: After installation completes on a Windows system, the Replicator application’s home directory (“%CDI_BASE_DIR%”) is fully accessible to all users, and various critical files are left unprotected. Therefore, it is strongly recommended that permissions be set that limit access to this directory to Administrator-level users only. See the appropriate Microsoft Windows documentation for instructions on setting directory permissions and restricting user access.

WHITE PAPER MVFBC ETERNUS DX
Page 27 of 82 http://solutions.us.fujitsu.com/
9 Licensing NetVault: Replicator
Important:
A permanent license key is not automatically installed with Replicator. One must be obtained and installed. Without a license key, Replicator will not function.
The sections that follow discuss the types of Replicator license keys and how to obtain them, as well as how they are installed.
9.1 Obtaining the License Key A valid license key is required to run NetVault: Replicator. Two types of license key are available for use:
A. Evaluation License Key – This form of license key allows you to install and evaluate Replicator for a period of 45 days. Once this
time has elapsed, a permanent license key will be required to continue use.
B. Permanent License Key – With this form of license key installed, Replicator will be fully usable with no preset end to its usage period.
This type of key is supplied when the product order fulfillment package is received, or when the electronic equivalent of the same is processed.
To obtain this form of key, you must formally purchase Replicator from Fujitsu or BakBone Software.

WHITE PAPER MVFBC ETERNUS DX
Page 28 of 82 http://solutions.us.fujitsu.com/
9.2 Obtaining the Evaluation License Key With version 5.6.x of NetVault: Replicator, an evaluation license is automatically included with an installation. No separate operation is required for this form of license.
9.3 Obtaining a Permanent License Key Please follow the steps outlined below to obtain a permanent license key.
Important:
This process requires that Replicator be installed on the target system(s). If
you have not yet installed Replicator, do so before proceeding. You must obtain the Host Name, Host ID and software version for all systems
that exist in the Replication scheme (i.e., all applicable machines in your Replication environment).
1. Log on to the machine and initiate a terminal session/command prompt.
2. At the prompt, issue the following command:
nvr_gethostid
3. From the information revealed, make note of the “hostname”, “hostid” and “version”

WHITE PAPER MVFBC ETERNUS DX
Page 29 of 82 http://solutions.us.fujitsu.com/
Example:
C:\>nvr_gethostid
----------------------------------------------------------------------- To activate your software please contact BakBone or your BakBone partner for a permanent license -----------------------------------------------------------------------
hostname = rx800-s2-nvr1 hostid = 001b2107e823 version = 5.6.1
------------------------------------------------------------------------
Note: Save a list of your hostnames and hostids for reference. Otherwise, you will have to perform “nvr_gethostid” again when you receive the keys to match each key to the appropriate machine.
4. Repeat Steps 1–3 for each machine with an installation of NetVault: Replicator 5. Draft an email and provide the following information:
– NetVault: Replicator product version – All hostnames and hostids for each NetVault: Replicator source host – All hostnames and hostids for each NetVault: Replicator destination host – Microsoft Windows Operating System(s) – Contact Information – Business and Contact Name – Address – Email and Phone Number(s) – NetVault: Replicator Serial Number (if applicable)
6. Put “Replicator Permanent Key Request” in the subject line and send it to the following address:

WHITE PAPER MVFBC ETERNUS DX
Page 30 of 82 http://solutions.us.fujitsu.com/
9.4 Installing Permanent License Keys The sections that follow illustrate how to install a license key, based on Microsoft Windows operating systems. Each license key is delivered as an email attachment. Before continuing, save the license file that is attached to the email from “[email protected]” to a machine running NetVault: Replicator.
[datareplicator] version = 5.6.1 issuedate = 20090701 expiredate = permanent hostid = 000e0cea2db4 feature1 = replicator feature2 = undef feature3 = largefile feature4 = undef feature5 = undef feature6 = cdp license = b56fd4be46862zf3f74a508aca4a4604fb555102b8f
1. Log on using an Administrator-level account and navigate to the directory in which the NetVault: Replicator license file resides.
2. Rename the license file, “license.conf”, and copy it (Ctrl+C).
3. Navigate to the following directory:
%CDI_BASE_DIR%\etc
4. If a file entitled “license.conf” exists in this directory, delete it.
5. Paste the “license.conf” file (Ctrl+V).

WHITE PAPER MVFBC ETERNUS DX
Page 31 of 82 http://solutions.us.fujitsu.com/
6. Verify the license set up by running the “nvr_verifylic” command.
Example:
C:\> nvr_verifylic NetVault: Replicator software version = 5.6.1 Customer license is VALID. License will expire = permanent license key
WHITE PAPER MVFBC ETERNUS DX
Page 32 of 82 http://solutions.us.fujitsu.com/
10 NetVault: Replicator GUI Functional Description
On Windows-based installations of NetVault: Replicator, a graphical user interface is available for configuring and administering Replicator. This GUI is referred to as the NetVault Availability Manager (hereinafter referred to as simply the “Replicator GUI”).
Important:
1. There are two distinct methods of setting up replication: a. via the Replicator GUI b. via the Replicator Configuration File (RCF)
2. In this document, the Replicator GUI is used for administration 3. If you use the Replicator GUI to establish a Replicator configuration, it is
strongly recommended that you do not attempt to manually edit the RCF that is created.

WHITE PAPER MVFBC ETERNUS DX
Page 33 of 82 http://solutions.us.fujitsu.com/
10.1 GUI Controls and Options
This section describes all of the controls and options available in the Replicator GUI.
The GUI is comprised of the following components:
The Menu Bar
The Tool Bar
The Filter Area Frame
The Detailed Information Frame
Sub-Windows (This refers to various windows accessed from the main window of the GUI).
Figure 9: Replicator GUI Components

WHITE PAPER MVFBC ETERNUS DX
Page 34 of 82 http://solutions.us.fujitsu.com/
10.2 Accessing the GUI
To access the Replicator GUI, perform the following steps:
1. Access the Windows Start menu
2. From the Programs group, access the NetVault: Replicator application group and select NetVault Availability
10.3 The Menu Bar
The Replicator GUI Menu Bar provides access to various functions and operations.
The table below briefly illustrates the commands found under each specific menu:
Table 1: Replicator GUI Menu Bar

WHITE PAPER MVFBC ETERNUS DX
Page 35 of 82 http://solutions.us.fujitsu.com/
10.4 Menu Items – Options, Help
Table 2: Menu Items - Options, Help
NOTE: The page numbers referenced (in blue) are from NetVault: Replicator Administrator’s Guide, P/N RPG-101-5.6-EN-03, dated 06/23/08
WHITE PAPER MVFBC ETERNUS DX
Page 36 of 82 http://solutions.us.fujitsu.com/
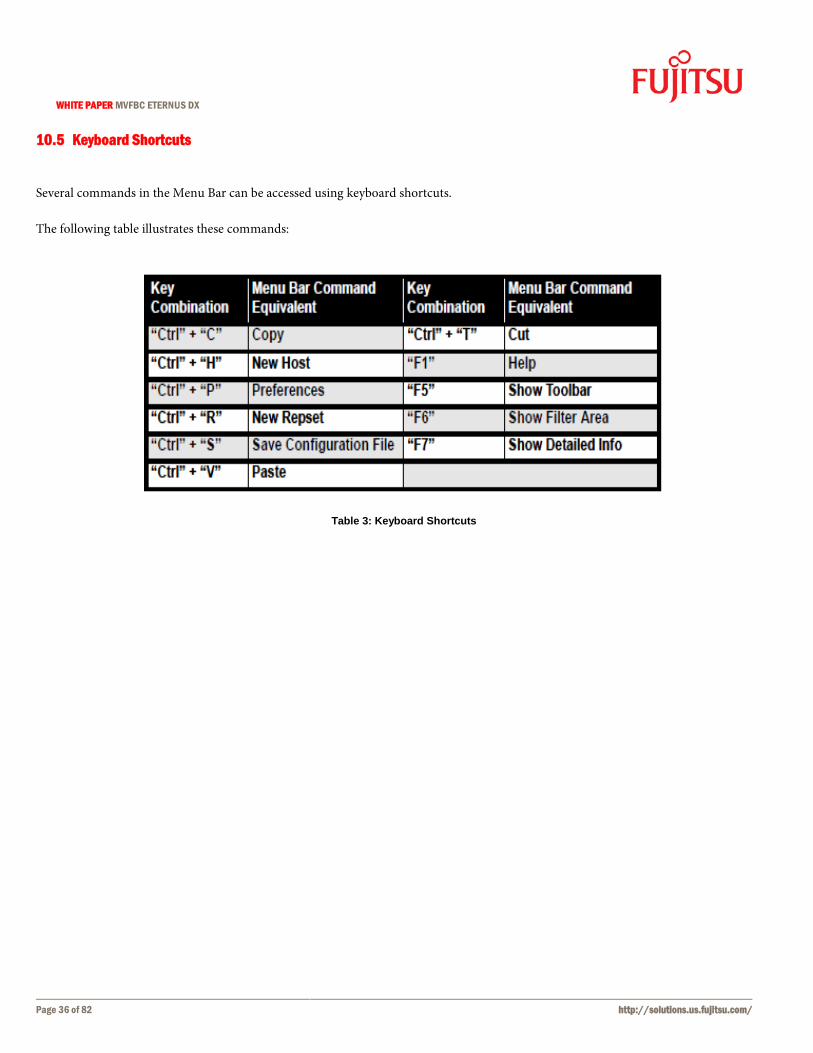
10.5 Keyboard Shortcuts
Several commands in the Menu Bar can be accessed using keyboard shortcuts. The following table illustrates these commands:
Table 3: Keyboard Shortcuts

WHITE PAPER MVFBC ETERNUS DX
Page 37 of 82 http://solutions.us.fujitsu.com/
10.6 The Replicator GUI Toolbar The Toolbar constitutes the series of buttons that appear beneath the Menu Bar. The following table briefly outlines these buttons and their function:
Table 4: Replicator GUI Toolbar

WHITE PAPER MVFBC ETERNUS DX
Page 38 of 82 http://solutions.us.fujitsu.com/
10.7 The Filter Area Frame
The Filter Area Frame consists of two panels, each of which is discussed in this section. The panels are:
1. The Repset Panel (left-hand panel)
2. The Details Panel (right-hand panel)
Figure 10: Replicator GUI Filter Area Frame
10.7.1 The Repset Filter Panel The left panel of the Filter Area frame (see Figure 10: Replicator GUI Filter Area Frame on page 38) is referred to as the Repset Filter panel. It allows the user to select how repsets are revealed in the Details panel. This Repset Filter panel consists of the following three options:
1. The Group by droplist 2. The Show options 3. The Repset Group options
The three options are described in the sections that follow.

WHITE PAPER MVFBC ETERNUS DX
Page 39 of 82 http://solutions.us.fujitsu.com/
10.7.2 The Repset Filter Panel – Group by Droplist This droplist allows the user to group repsets displayed in the Details panel.
Figure 11: Replicator Group by Droplist
The Group by Droplist menu, shown in Replicator Group by Droplist on page 39, offers the following selections:
a) None (default) – With this method selected, all repsets will be displayed, but not grouped in any specific manner.
b) Repset Name – Select this method to have all created repsets listed in alphabetic order.
Each repset will be prefaced with a collapsible header containing the name of the repset that can be opened/closed to reveal details specific to the repset.
c) Repset Status – Select this method to have all current repsets grouped in the Details panel based on their current status (e.g. Online/Offline).
A collapsible header will be revealed, containing the status type that can be opened/closed to reveal details specific to each
d) Source Machine – Select this method to group all current repsets based on their specified source host, beneath a collapsible header labeled with the source host.
For example, if three repsets were created using the source host “Data1”, and this group method was selected, a collapsible header titled “Data1” would be displayed, and the three repsets that specify “Data1” as a source host would be revealed beneath it.
e) Destination Machine – Similar to the Source Machine option, once selected, repsets will be grouped by the destination host that is established in the repset
10.7.3 The Repset Filter Panel – Show options

WHITE PAPER MVFBC ETERNUS DX
Page 40 of 82 http://solutions.us.fujitsu.com/
Below the “Show” heading in this panel, the user can select from five different options which allow you to reveal/hide repsets based on their current status. Below the “Show” heading in this panel, the user can select from five (5) different options which allow the user to reveal/hide repsets based on their current status.
Figure 12: The Repset Filter Panel -Show Options The five (5) different options are:
1. All Repsets (default) – With this selected, all created repsets will be revealed, regardless of current status. 2. Active Repsets – Click on this option to only reveal repsets in the Details panel that are actively replicating data. 3. Paused Repsets – Click on this option to reveal only those repsets that are currently in a paused state (e.g., they have been paused
using the Pause Replication button). 4. Inactive Repsets – Click on this option to reveal only those repsets that are currently inactive (e.g., no replication is currently
taking place, or replication has been stopped using the Stop Replication command). 5. Offline Hosts – Click on this option to reveal only those repsets that specify source/destination hosts that are currently offline
and unavailable (e.g., a repset whose source host is down).
Important:
Each of these options will be accompanied by a number value enclosed in parenthesis that refers to the number of repsets that are currently at this status.

WHITE PAPER MVFBC ETERNUS DX
Page 41 of 82 http://solutions.us.fujitsu.com/
10.7.4 The Repset Filter Panel – Repset Group options
The Replicator GUI allows you set up “Groups” of repsets to organize them as desired.
Figure 13: The Repset Filter Panel – Repset Group Options
By default, after the installation of the GUI, no Groups exist, and the only available option below the Repset Groups heading is “All Groups”. By default, this option is selected and all repsets are revealed. As Groups are created, they are revealed here and they can be clicked on to reveal the repsets that comprise that Group.

WHITE PAPER MVFBC ETERNUS DX
Page 42 of 82 http://solutions.us.fujitsu.com/
10.8 The Details Panel The right-hand panel of the Filter Area frame, as shown in Figure 10: Replicator GUI Filter Area Frame on page 41 is referred to as the Details panel.
Figure 14: The Details Panel
This panel reveals specific information pertaining to existing repsets, as well as allowing the user to interact with a specific repset through pop-up menu commands.

WHITE PAPER MVFBC ETERNUS DX
Page 43 of 82 http://solutions.us.fujitsu.com/
10.8.1 The Details Panel columns The Details panel is broken down into various columns that display information for each revealed repset:
Figure 15: The Details Panel Columns
The following columns are available:
a) Source Host – The name/IP address of the source host in the repset (i.e., the machine serving as the source of data to be replicated).
b) Destination Host – The name/IP address of a destination host in the repset (i.e., a machine serving as a destination for
replicated data).
c) Repset Name – The name given to the repset.
d) Status – The current status of the source/destination host(s) named in the repset.
e) Pending – The total number of records that are pending replication from source to destination (i.e., if the repset is being actively replicated).
f) Progress – The total number of records that are being processed for replication.
g) Total Files – The total number of files that have been replicated for this repset. This only applies to repsets that are currently
replicating data (i.e., this is not a grand total of the number of files that have been replicated throughout the life of the replication scheme).

WHITE PAPER MVFBC ETERNUS DX
Page 44 of 82 http://solutions.us.fujitsu.com/
10.8.2 Customizing Columns in the Details Panel
In the Details panel, individual columns can be shown or hidden as desired. By default, all columns will be displayed:
Figure 16: Columns Displayed in the Details Panel To customize which columns will be displayed, follow the procedure detailed in below:
1. Right-click on the title bar of any column in this frame. 2. From the pop-up menu that appears, deselect an item by clicking on it.
The menu will close and the selected column will be removed from the display. 3. Right-clicking on any item in the title bar will again reveal the pop-up menu.
Note that the previously selected item is now un-checked. To add it back, click on the item again and it will be returned to the display.
4. Access the pop-up menu as necessary to remove (or replace) more items from the display

WHITE PAPER MVFBC ETERNUS DX
Page 45 of 82 http://solutions.us.fujitsu.com/
10.8.3 Repset Status Indicator Icons in the Details Panel
Once a repset has been created and its entry appears in the Details panel, each repset will be accompanied by a color-coded icon. This icon reflects the current state of the source and destination hosts named in the repset:
Table 5: The Icons for the Current State of the Source and Destination Hosts Named in a Repset
Important: These individual icons can also be right-clicked to access a pop-up menu of commands.

WHITE PAPER MVFBC ETERNUS DX
Page 46 of 82 http://solutions.us.fujitsu.com/
10.8.4 Pop-up Menu Commands in the Details Panel By right-clicking on a repset entry in the Details panel, one of two pop-up menus can be accessed (based on what is clicked in the entry: Repset or Status Indicator). The subsections that follow, an outline of the commands available in these pop-up menus as well as how each is accessed, is presented:
Figure 17: The Status Indicator, Green Icon, in the Details Panel In Figure 17: The Status Indicator, Green Icon, in the Details Panel on page 46, the Status Indicator with a Green Icon, is followed by Source Host, “srchost”

WHITE PAPER MVFBC ETERNUS DX
Page 47 of 82 http://solutions.us.fujitsu.com/
10.8.4.1 The Standard Repset Pop-up Menu in the Details Panel The Standard Repset Pop-up Menu is accessed by clicking on any text revealed in a repset entry, and it is composed of the following commands listed in “Table 6: List of commands in the Standard Repset Pop-up Menu” on page 47:
Figure 18: Commands in the Standard Repset Pop-up Menu Table 6: List of commands in the Standard Repset Pop-up Menu
a) Edit Repset – Select this command to launch the Edit Replication Set window, with all of the settings for the selected repset loaded for editing.
b) Copy Repset – Select this command to copy the currently selected repset to system memory. c) Paste Repset – Select this command to paste a copy of a repset that was saved to system memory using the Copy Repset
command. An exact copy of the repset will be pasted into the Details panel, named “copy_<original repset name>”. You can then use the repset as desired. This command will appears as grayed-out an unavailable unless a repset has been copied using the Copy Repset command.
d) Delete Repset – Select this command to delete the selected repset. e) Start Replication for Host <Host Name/IP> – Select this command to start replication for the selected host. f) Stop Replication for Host <Host Name/IP> – Select this command to stop replication for the selected host. g) This is equivalent to running "net stop nvr_srv" on Windows. When stopped, no data changes are logged. h) Apply Configuration for Host <Host Name/IP> – Select this command to apply the configuration to all source and destination
hosts named in the selected repset. i) Pause Replication – Select this command to pause the replication associated with selected repset. Once Replication has been
paused, changes to data that is targeted by the repset will be maintained in a log file. Once replication is resumed, the logged changes will be applied to all destination hosts in the repset.
j) Resume Replication – Select this command to resume all replication for the repset that has been paused. Once replication is resumed, the logged changes that were maintained on the source host will be applied to the relevant data items on all destination hosts named in the repset.
k) Activate Replication – This command can be used to activate a repset for which replication has been stopped using the Inactivate Replication command.
l) Inactivate Replication – This command can be used to stop replication for a repset. To restart replication, the Activate Replication command must be used. Any data change that occurs while a repset is inactive will be lost.

WHITE PAPER MVFBC ETERNUS DX
Page 48 of 82 http://solutions.us.fujitsu.com/
m) Add to Repset Group – This command allows you to add a selected repset to a predefined Repset Group. When selected, a sub-menu will appear consisting of a list of previously created Repset Groups to which the selected repset can be added.
n) Create New Group - This command is available in this sub-menu and it is used to create a new Repset Group. o) Remove from Repset Group – Use this command to remove a selected repset from a Repset Group.
When selected, a sub-menu composed of a list of Repset Groups to which the repset belongs will be revealed. Select the Group from the list that the repset is to be removed from.
For complete details on Repset Groups and their creation, see the section, Replication Set Groups on page 63 of the “NetVault: Replicator Administrator’s Guide”.

WHITE PAPER MVFBC ETERNUS DX
Page 49 of 82 http://solutions.us.fujitsu.com/
10.8.4.2 The Status Indicator Pop-up Menu In addition to clicking on the text for a repset entry to access a pop-up menu the user can also click on the Status Indicator icon for an entry to access a specific pop-up menu.
Figure 19: The Status Indicator Pop-up Menu This menu is comprised of the following commands:
a) Change Status to Active – Select this command to activate the selected repset. Once in an “active” state, replication of the data specified in that repset will begin. This command is identical to “Activate Replication” Pop-up Command.
b) Change Status to Inactive – Select this command to stop the replication of data specified in the selected repset. Once “inactive”, no replication will take place for the selected repset. This command is identical to “Inactivate Replication” Pop-up Command.
c) Change Status to Paused – Select this command to pause all replication of data defined by the selected repset. Once “paused”, changes that occur to data that is targeted by the repset will be maintained in a log file on the source host. This command is identical to “Pause Replication” Pop-up Command.
d) Change Status to Resumed – Select this command to resume all replication for a repset that has been paused. Once replication is resumed, the logged changes that were maintained on the source host will be applied to the relevant data items on all destination hosts named in the repset. This command is identical to “Resume Replication” Pop-up Command.

WHITE PAPER MVFBC ETERNUS DX
Page 50 of 82 http://solutions.us.fujitsu.com/
10.9 The Detailed Information Frame Below the Filter Area frame of the GUI, you will find the Detailed Information frame. This frame is comprised of three tabs, all of which offer detailed information pertaining to a repset that is currently selected in the Details panel:
Figure 20: The Detailed Information Frame
Important: Each of these tabs will only display their specific information if a repset is selected from the Details panel of the Filter Area frame. Otherwise, each tab will reveal the statement “<no repset has been selected>” in its header.

WHITE PAPER MVFBC ETERNUS DX
Page 51 of 82 http://solutions.us.fujitsu.com/
10.9.1 The General Tab The General tab is the default tab revealed in the Detailed Information frame. This tab consists of a header that contains the name of the selected repset and a parenthetical statement that contains the host name/IP address of the source host and destination host. In addition, two frames of information pertaining to the selected repset and any current replication operations are revealed:
Figure 21: The General Tab in the Detailed Information Frame

WHITE PAPER MVFBC ETERNUS DX
Page 52 of 82 http://solutions.us.fujitsu.com/
10.9.2 The Network Usage Tab
The Network Usage tab is broken down into three (3) panels: The left-most portion of this tab consists of two (2) panels that contain line graphs that:
1) plot the amount of data transferred 2) the average speed of transfer (in kilobytes per second)
The panel on the right side of this tab is comprised of:
3) specific transfer information regarding the selected repset
Figure 22: The Network Usage Tab
Important: The Number of Filesystem Objects Modified information item offered in the left panel of the Network Usage tab corresponds to the total number of files that have been scheduled for replication, not necessarily files that have replicated successfully. If files have failed to replicate, this number will rise without bound, and is probably indicative of some kind of configuration problem.

WHITE PAPER MVFBC ETERNUS DX
Page 53 of 82 http://solutions.us.fujitsu.com/
10.9.3 The Events Tab The Events tab contains a columned window that consists of all log events that have occurred for the local installation of Replicator. The System Events header contains the Clear Log button which can be used to clear all of the log entries that currently exist in this window:
Figure 23: The Events Tab
Important: This tab does not require that you select a repset from the Details panel to reveal log information.

WHITE PAPER MVFBC ETERNUS DX
Page 54 of 82 http://solutions.us.fujitsu.com/
10.10 The Replicator GUI Sub-Windows
A “sub-window” is a window or dialog that is revealed when a command is used from the main window of the Replicator GUI in order to perform a specific process in NetVault: Replicator. The sections that follow outline these windows and describe how they are accessed from the GUI.

WHITE PAPER MVFBC ETERNUS DX
Page 55 of 82 http://solutions.us.fujitsu.com/
10.10.1 The Create New Host Dialog
The Create New Host dialog is used to add a machine to Replicator that is to serve as either a source host or a destination host. This is accomplished by providing either the IP address or the resolvable network name for the desired machine in the Host Name/IP field and clicking Add Host:
Figure 24: The Create New Host Dialog
How this Dialog is Accessed This dialog can be accessed using either of the following methods:
1. The “New Host...” Command in the “File” Menu 2. The Keyboard Shortcut, “Ctrl” + “H”

WHITE PAPER MVFBC ETERNUS DX
Page 56 of 82 http://solutions.us.fujitsu.com/
10.10.2 The Create Replication Set Dialog The Create Replication Set dialog is used to create a Replication Set (“repset”). A repset is created to define all of the specifics required for replication. This includes specifying the source and destination for replication, the specific data that is to be replicated, and where the data is to be stored on the destination. The Create Replication Set dialog offers a variety of configuration options that can be established in a repset:
Figure 25: The Create Replication Set Dialog
How this Dialog is Accessed
This dialog can be accessed using either of the following methods
1. The “New Repset...” Command in the “File” Menu
2. The Keyboard Shortcut, “Ctrl” + “R”

WHITE PAPER MVFBC ETERNUS DX
Page 57 of 82 http://solutions.us.fujitsu.com/
10.10.3 The Edit Replication Set Dialog
The Edit Replication Set dialog is used to modify a Replication Set (“repset”). This dialog is similar to the Create Replication Set dialog shown in “Figure 25: The Create Replication Set Dialog” on page 56. How this Dialog is Accessed This dialog can be accessed using either of the following methods illustrated in Figure 26 on page 57 and Figure 27 on page 58, respectively:
a) By double-clicking on any text revealed in the Details panel. b) By right-clicking on an entry in the Details panel, then selecting the Edit Repset command from the pop-up menu that is
revealed.
Figure 26: The Edit Replication Set Dialog Revealed by Double-Clicking Any Text in the Detail Panel

WHITE PAPER MVFBC ETERNUS DX
Page 58 of 82 http://solutions.us.fujitsu.com/
Figure 27: The Edit Replication Set Dialog Revealed by Right-Clicking any Text in the Detail Panel

WHITE PAPER MVFBC ETERNUS DX
Page 59 of 82 http://solutions.us.fujitsu.com/
10.10.4 The Manage Hosts Dialog The Manage Hosts dialog allows you perform various operations in regards to hosts that have been added to exist as a replication source and/or destination. This dialog can be used to add new hosts, and view, edit or remove existing ones. How this Dialog is Accessed This dialog can be accessed as follows:
a) The “Manage Hosts” Command in the “Options” Menu as shown in “Table 2: Menu Items - Options, Help” on page 35.
Figure 28: The Manage Hosts Dialog
Important: Once you have added a host using the Create New Host dialog, it will be revealed in the Manage Hosts dialog. This is the only way to view an added host.
WHITE PAPER MVFBC ETERNUS DX
Page 60 of 82 http://solutions.us.fujitsu.com/
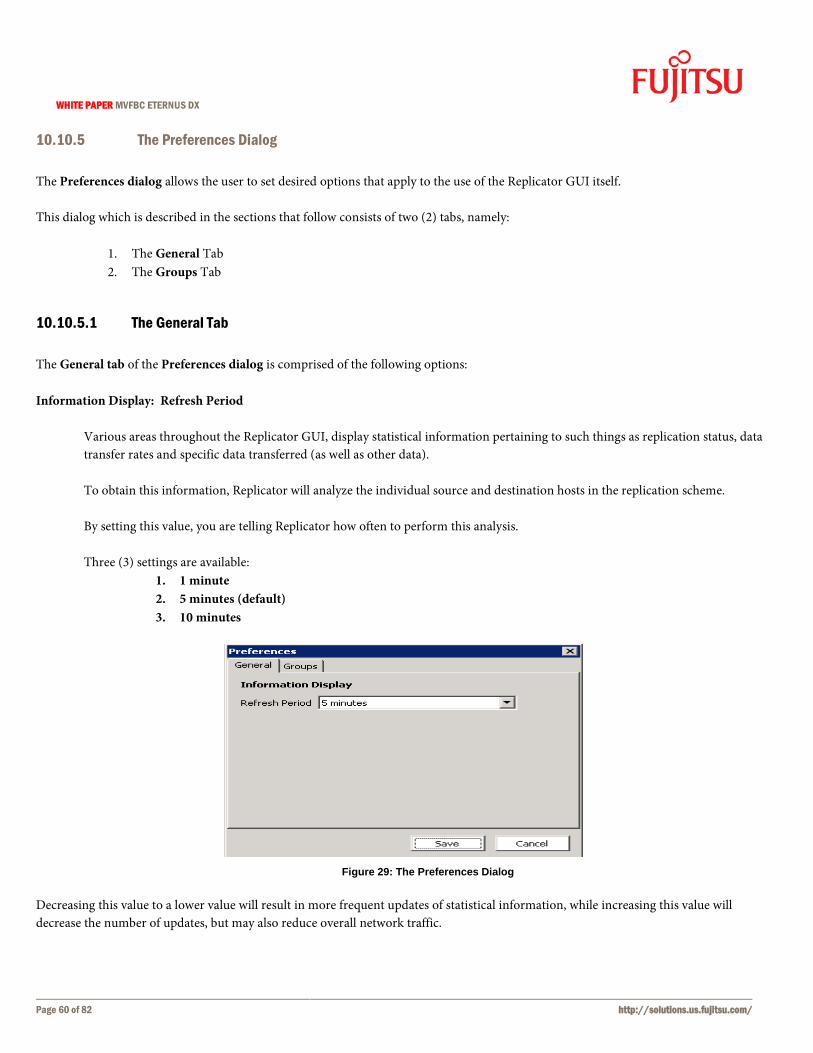
10.10.5 The Preferences Dialog The Preferences dialog allows the user to set desired options that apply to the use of the Replicator GUI itself. This dialog which is described in the sections that follow consists of two (2) tabs, namely:
1. The General Tab 2. The Groups Tab
10.10.5.1 The General Tab The General tab of the Preferences dialog is comprised of the following options: Information Display: Refresh Period
Various areas throughout the Replicator GUI, display statistical information pertaining to such things as replication status, data transfer rates and specific data transferred (as well as other data). To obtain this information, Replicator will analyze the individual source and destination hosts in the replication scheme.
By setting this value, you are telling Replicator how often to perform this analysis. Three (3) settings are available:
1. 1 minute 2. 5 minutes (default) 3. 10 minutes
Figure 29: The Preferences Dialog
Decreasing this value to a lower value will result in more frequent updates of statistical information, while increasing this value will decrease the number of updates, but may also reduce overall network traffic.

WHITE PAPER MVFBC ETERNUS DX
Page 61 of 82 http://solutions.us.fujitsu.com/
10.10.5.2 The Groups Tab The Groups tab of the Preferences dialog allows you to manage repset groups. New groups can be created or existing ones can be renamed or deleted:
Figure 30: The Groups Tab of the Preferences Dialog
Important: The Create New Group button in this tab only allows you to create a new group. It does not allow you to add repsets to that group.
How this Dialog is Accessed This dialog can be accessed using either of the following methods:
1. The “Preferences” Command in the “Options” Menu 2. The Keyboard Shortcut, “Ctrl” + “P”

WHITE PAPER MVFBC ETERNUS DX
Page 62 of 82 http://solutions.us.fujitsu.com/
11 Replicator Configuration Using the GUI While the Replicator GUI offers some administration utilities, its primary function is the initial configuration of Replicator. The process used to configure Replicator with the GUI can be broken down into three (3) basic phases: Phase 1: Add Hosts Phase 2: Create a Replication Set Phase 3: Start Replication

WHITE PAPER MVFBC ETERNUS DX
Page 63 of 82 http://solutions.us.fujitsu.com/
11.1 Phase 1: Adding Hosts
The first phase in the configuration process involves accessing the Replicator GUI and adding the hosts that will serve as source and destination for the replication scheme. Use the steps 1-6 below to launch the GUI and perform this process:
1. From any machine that is to exist in the replication scheme (i.e., any machine with the Windows version of Replicator installed) launch the Replicator GUI.
Start > Programs > NetVault Replicator > NetVault Availability Manager
2. From the File menu and select New Host (or use the keyboard shortcut — Ctrl + H). 3. In the Create New Host dialog that appears, two tabs are revealed
The first tab, “Host”, is used to name a desired host, input either of the following values in the Host Name/IP field:
a) The Resolvable Network Name for the Target System – If the name is recognized, the machine will be added as a host. b) The IP Address for the Target – Replicator will verify the address and add the machine as a host, if it is recognized.
Figure 31: The Host Tab of the Create New Host Dialog

WHITE PAPER MVFBC ETERNUS DX
Page 64 of 82 http://solutions.us.fujitsu.com/
If the host you are adding is to be part of a bidirectional replication scheme (i.e., one in which data is to be mirrored between two hosts to maintain data consistency), select the Globals tab to access this functionality:
Figure 32: The Globals Tab of the Create New Host Dialog
Bidirectional – Check this box to label the potential host as part of a bidirectional replication scheme.
Multiwrite – This option allows you to specify certain files that should have their actual data passed to a system write call that is saved aside for later replication.
■ Under normal conditions, subsequent writes of data to the same location, in a single file are combined for
performance reasons. ■ There are, however, some conditions where files may have material dependencies between files. ■ In these instances, it is important to not combine multiple write events. ■ In the normal case, if a user application writes “12345” at offset 10 in a given file, and then writes “54321” at the
same offset before replication occurs, the two writes will be combined, and only the bytes “54321” will actually be replicated.
■ By including the file in question in this field, two replication events will occur, the first replicating the bytes “12345”, and the second “54321”.
■ Individual files named in this field must include full path names, and if multiple items are input, each must be separated by a semicolon.
Password – Use this field to establish a password for use by the Replicator configuration API to encrypt data sent to
and from this machine.
Since all API communication will be encrypted using the set password, the same password must also be set for all other NetVault: Replicator Hosts that attempt to communicate with this host. Therefore, when configuring a bi-directional replication scheme, ensure that the same password is used for both systems in the scheme (if password protection is desired).

WHITE PAPER MVFBC ETERNUS DX
Page 65 of 82 http://solutions.us.fujitsu.com/
5. Click Add Host to add this host. Replicator will scan the network looking for this host and add it to Replicator as a potential source/destination host.
Important:
1. Once a host is added, it will not be revealed in the main window of the Replicator GUI. To view added hosts, access the Manage Hosts dialog (Options > Manage Hosts).
2. Added hosts are displayed in the Replicator GUI based on how they were identified in the Host Name/IP field of the Create New Host dialog (i.e., a host identified via its IP address will be displayed in the GUI under that IP address).
6. Repeat Steps 3–5 for each additional host to be added. When finished adding hosts, click Done to close the dialog.

WHITE PAPER MVFBC ETERNUS DX
Page 66 of 82 http://solutions.us.fujitsu.com/
11.2 Phase 2: Creating a Repset With all desired hosts added, the next step in the process is to generate a Replication Set (“repset”). Repset – This defines the relationship between hosts and data sets for replication. A repset requires a minimum of one host as a Source and one host as a Destination. Additionally, it can have other configuration options which dictate the behavior and function of that repset. Creating a repset involves four (4) steps that will be explained in this section.
11.2.1 Phase 2: Creating a Repset – Step 1 To create a repset using the Replicator GUI, follow the steps outlined below:
1. From the File menu, select New Repset (or click on the New Repset button on the toolbar or use the keyboard shortcut: Ctrl + R).
11.2.2 Phase 2: Creating a Repset – Step 2
2. The Create Replication Set dialog appears, with the General tab revealed. This tab is composed of various options used in the creation of a repset.
The following list of points outlines the use of each of these options, and each is marked as either “(Required)” or “(Optional)”, based on its necessity in the configuration:
Basic Information
Repset Name (Required) – Input a desired name for the repset in this field. This name is how the overall configuration will recognize this repset as well as how it will be displayed in the Replicator GUI.
Encryption Key (Optional) – Enter a clear-text password in the Encryption Key field if encryption of replication data over the network is desired. Leave the field empty if encryption is not required.

WHITE PAPER MVFBC ETERNUS DX
Page 67 of 82 http://solutions.us.fujitsu.com/
Figure 33: Phase 2 - Step 2: Using the Create Replication Set
Important: 1. The software uses an RC4 stream cipher with a key length of 128 bits for
encryption. 2. With Encryption enabled, a slight impact on overall host performance may
occur.
Source Settings – These options apply to the machine that is to serve as the “Source” of the replication (i.e., the “Source Host”).
Host (Required) – Use this droplist to select a desired source host from the list of machines that have been added as
hosts.
You can also select the Add Host... option from the droplist to add a new host to serve as a source.
The same process described in the section, Phase 1: Adding Hosts on page 63 applies to the use of this command.
Include Expressions – The Include Expressions field allows you to choose the data to be replicated.
Typically, this field contains one or more directory paths separated by spaces, but it can also contain a filetype (e.g.,
“*.txt”) or a template (e.g., “tmp*”). The (‘*’) wildcard is supported for simple expressions.
Exclude Expressions – The Exclude Expressions field allows you to choose the data to be omitted from replication.

WHITE PAPER MVFBC ETERNUS DX
Page 68 of 82 http://solutions.us.fujitsu.com/
Typically, this field contains one or more directory paths separated by spaces, but it can also contain a filetype (e.g., “*.txt”) or a template (e.g., “tmp*”). The (‘*’) wildcard is supported for simple expressions. The advanced user can specify more complex Regular Expressions (regexp) by enclosing the entire expression within parentheses. If enclosed in parentheses, the expression will be interpreted as a regular expression and it must follow regular expression syntax. For more information on the Include Expressions field and Exclude Expressions field, see Include Expressions and Exclude Expressions on 54 in the NetVault: Replicator Administrator’s Guide.
Destination Settings – This field is used to add a host that is to serve as a “Destination” for replicated data (i.e., the
“Destination Host”).
To begin the process, click Add Destination button. The Destination Settings field will be updated to reveal two options:
Host – Use this droplist to select the host that will serve as the destination host, or add a new host using the Add Host... option on the droplist.
Directory – Input a complete path to the desired directory on the destination host to which data is to be replicated. This field is also accompanied by a “Del” button that can be used to clear the field of its contents.
Note: The Destination Settings options allow you to add multiple destination hosts while creating a single repset. However, this functionality is not supported for use in a single repset. Replicator requires that each source/destination combination be associated through its own repset (i.e., you must establish a different repset name for each instance of a specific source host that is to replicate to a specific destination host).
The following rules or points apply to data values input in the Directory field:
If the target directory on the destination host contains any spaces in its name, the entire path must be input, enclosed in quotes, for example, “C:\Files\New Files”.
Wildcards (e.g., “*”, “?”) cannot be used when naming a directory. The complete name of the desired directory must be
input.
To mirror the directory structure from the source host, input only the root directory letter (e.g., “C:\”).
Replicator will analyze the directory paths named for the files to be included and replicate data to that same path on the
destination host.

WHITE PAPER MVFBC ETERNUS DX
Page 69 of 82 http://solutions.us.fujitsu.com/
For example, if a selection of file system data was targeted from the directory “C:\saved\text_files” on the source host,
simply input “C:\” in the Directory field.
When replication begins, data will be taken from the “C:\saved\text_files” directory on the source host and replicate it to
this same path on the destination host.
Be cautious when specifying a directory as a destination.
If the data synchronization process is performed using its default method (Initial Synchronization of Data - nvr_sync),
any files that currently exist in the named destination directory that do not exist in the named source directory will be deleted.
For example, if you are replicating a full volume from a source host, and you have selected the operating system volume
as the destination (e.g., the whole of “D:\” on the source is to be replicated to “C:\” on the destination), it is possible that critical operating system application files will be deleted during synchronization (unless specific steps are taken during the synchronization phase).
For information on the data synchronization process, see the section 11.3, “Phase 3: Starting Replication" on page 73.
Replicated directories maintain their original path structure when copied to a destination host.
Therefore, if a specific directory is named in the Directory field, directory paths will be added to that directory (e.g., If
the directory “C:\simple\files” was named for replication, and the directory “C:\new” was set in the Directory field, files would be replicated to the path, “C:\new\simple\files” on the destination host).
If replicating data to a mapped network share, the destination (“destdir”) must use the pathname starting with the drive
letter in the destdir, rather than the UNC name.
For example, “N:\” rather than “\\\\winhostt\\share\\” when “\\winhost\share” is mapped to “N:\” drive letter.
If replicating data to a mapped network share, the network drive defined as the target must be configured in Windows
with the Reconnect at logon option enabled.
If a drive is mapped as a replication destination, the NetVault: Replicator Transport Daemon service must run as the
same user that mapped the drive.

WHITE PAPER MVFBC ETERNUS DX
Page 70 of 82 http://solutions.us.fujitsu.com/
11.2.3 Phase 2: Creating a Repset – Step 3 3a. Select the Network Settings tab. All of the options on this tab are optional. A description of each is offered below:
Figure 34: The Bandwidth Limit and Replication Streams Options of the Network Settings Tab
Bandwidth Limit – Input a value in this field (in kilobytes per second) that will represent the maximum amount of bandwidth used by the replication process.
By default, this option is set to zero (“0”), which indicates that the replication process will use as much bandwidth as it requires.
For environments where this is not appropriate (e.g., replication between remote offices with a single internet connection) bandwidth may be restricted by setting a value in this field.
Replication Streams – The number of replication streams can be configured to specify the number of parallel lines of
communication used between the source and destination hosts. By default a single replication stream is used.

WHITE PAPER MVFBC ETERNUS DX
Page 71 of 82 http://solutions.us.fujitsu.com/
Important:
1. For configurations not using transactional mode (e.g., file servers) a higher value can be set in this field to take advantage of parallelism.
2. For configurations using transactional mode or in the replication of databases, this value must not be changed (i.e., it should be set to one (“1”)).
3. The Bandwidth Limit option works in tandem with the Replication Streams option.
Defining a Bandwidth Limit will apply this limit to each stream established using the Replication Streams option, and not to the entire repset (e.g., If the Bandwidth Limit is set to “512” and the Replication Streams option is set to two (“2”), both replication streams will be weighted with a limit of 512 KB/s).
3b. Select the Network Settings tab – Compression option
Figure 35: Compression Option of the Network Settings Tab
Compression (Optional) – With this option set, data will be compressed on the source host prior to transfer, and then decompressed once it has been replicated on the destination host. As an end result, overall network traffic is reduced. This option is enabled by default.

WHITE PAPER MVFBC ETERNUS DX
Page 72 of 82 http://solutions.us.fujitsu.com/
Important
1. The compression level is adaptive, and is determined by measuring the available bandwidth and latency between each host.
2. Higher latency and lower bandwidth will result in higher degrees of compression.
3. If the set of data being replicated is not compressible (e.g., jpeg data), and the network connection between source and destination hosts is of high latency or low bandwidth (or both), compression should be disabled, as the gain is small.
11.2.4 Phase 2: Creating a Repset – Step 4
4. With all of the desired options configured, click on the Save button at the bottom of the Create Replication Set window:
Figure 36: Save Button of the Create Replication Set Menu
This will save the configuration as an XML-based file in the Replicator installation’s “...\etc” sub-directory, in the following format:
nvr_source_host _name/IP_address.xml

WHITE PAPER MVFBC ETERNUS DX
Page 73 of 82 http://solutions.us.fujitsu.com/
11.3 Phase 3: Starting Replication
This phase of the operation can be broken down into two basic steps, each of which is covered in this section: Step 1: Apply the Configuration Step 2: Initial Synchronization of Data
11.3.1 Phase 3: Starting Replication – Step 1 After completing the repset configuration described in Chapter 11 “Replicator Configuration Using the GUI”, the repset must be applied on the source host to create the required configuration files.
11.3.1.1 Step 1: Applying the Configuration To apply a repset, click on the Apply Configuration button in the toolbar:
Figure 37: Apply Configuration Button in the GUI Toolbar NetVault: Replicator will create a configuration file on the source host — referred to as the “Replicator Configuration File” — and “push out” a copy of this file to the destination host(s) included in the repset. This is an automatic process, and manually applying the configuration on the destination host(s) is not required.
Important: As the configuration is pushed out to the various hosts in the repset, information pertaining to each host’s current status, as well as other replication statistics can be viewed in the General and Network Usage tabs of the Detailed Information frame.
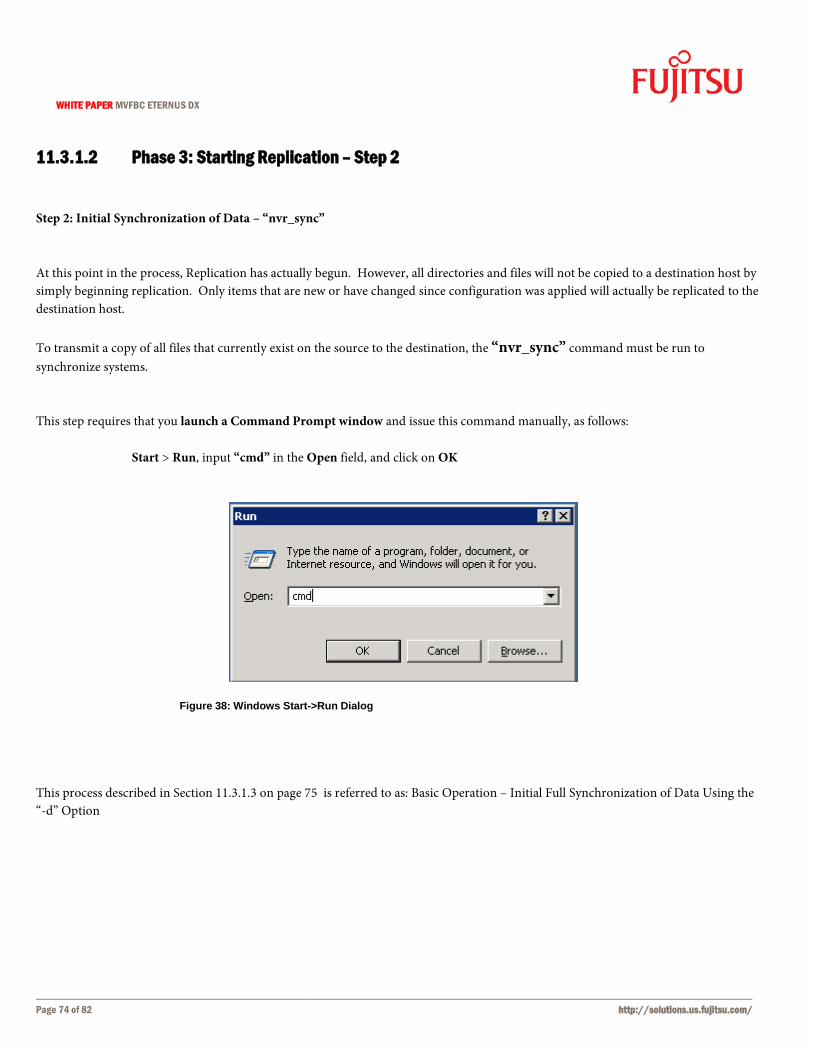
WHITE PAPER MVFBC ETERNUS DX
Page 74 of 82 http://solutions.us.fujitsu.com/
11.3.1.2 Phase 3: Starting Replication – Step 2 Step 2: Initial Synchronization of Data – “nvr_sync” At this point in the process, Replication has actually begun. However, all directories and files will not be copied to a destination host by simply beginning replication. Only items that are new or have changed since configuration was applied will actually be replicated to the destination host. To transmit a copy of all files that currently exist on the source to the destination, the “nvr_sync” command must be run to synchronize systems. This step requires that you launch a Command Prompt window and issue this command manually, as follows:
Start > Run, input “cmd” in the Open field, and click on OK
Figure 38: Windows Start->Run Dialog This process described in Section 11.3.1.3 on page 75 is referred to as: Basic Operation – Initial Full Synchronization of Data Using the “-d” Option

WHITE PAPER MVFBC ETERNUS DX
Page 75 of 82 http://solutions.us.fujitsu.com/
11.3.1.3 Basic Operation – Initial Full Synchronization of Data Using the “-d” Option The basic operation of this command is to issue it at the command prompt, as follows: nvr_sync -d dir where dir indicates the path to the directory to be replicated. Example : C:\> nvr_sync -t -d H:\Replicate.128m.1 The option, “-t” is used to display transfer time: The “-d” option, followed by the path(s) named in the GUI’s Include Expressions field will alert Replicator to synchronize all data targeted for replication between the source and destination host(s).
Figure 39: "nvr_sync -d" in a Windows Command Prompt
When a repset is created and saved in the GUI, Replicator creates a file called the Replicator Configuration File (RCF). When you execute “nvr_sync -d”, Replicator reads from this file to determine which directories/files are named for replication and then compares the source host and the destination host.

WHITE PAPER MVFBC ETERNUS DX
Page 76 of 82 http://solutions.us.fujitsu.com/
Important:
1. This “Basic Method” will delete any files on the destination that do not exist on the source. If you have targeted a full volume on the source for replication and have selected the operating system volume on the destination as the destination directory, using this basic method may delete critical operating system and application files. For this case, additional options should be applied to protect existing data (e.g., the “-l” option), or the repset should be edited to change the destination directory (e.g., to a sub-directory of the operating system volume — “C:\replicated”).
2. This “Basic Method” does not restrict you from applying any additional tags available for use with the nvr_sync command. It is provided to outline the most basic method of synchronizing all data between source and destination. Some of the additional tags have no bearing on the data transferred (e.g., “-t” could be included because it is used to display transfer time — “nvr_sync -t -d dir” ), while others can be used in conjunction with the basic method to manipulate the transfer of all data items (e.g., the “-l” tag can be applied to the basic method syntax to have all file items on the source copied to the destination, but tell Replicator not to delete any existing files on the destination — “nvr_sync -l -d dir” ).
3. For complete details on nvr_sync and all available options, see nvr_sync on page 135 of the NetVault: Replicator Administrator's Guide.

WHITE PAPER MVFBC ETERNUS DX
Page 77 of 82 http://solutions.us.fujitsu.com/
12 Completion of the Initial Synchronization of Data Once the Initial Full Copy or the Initial Synchronization has been initiated with “nvr_sync –d” command, the user may monitor the progress of the synchronization from the Replicator GUI, as shown in Figure 40: Monitoring the Progress of the Initial Synchronization on page 77.
Figure 40: Monitoring the Progress of the Initial Synchronization In Figure 40, the non-zero record counters for PENDING and PROGRESS indicate that the Initial Synchronization of Data is in progress and has not completed. Once the initial synchronization has been performed, data between source and destination host will be concurrent.

WHITE PAPER MVFBC ETERNUS DX
Page 78 of 82 http://solutions.us.fujitsu.com/
In Figure 41, the record counters for PENDING and PROGRESS are zero to indicate that the Initial Synchronization of Data is in progress and had completed:
Figure 41: The Replicator GUI Showing that the Initial Synchronization of Data is Completed With replication services running, new or changed data on the source host will be replicated to the destination (i.e., the source host will now be in a constant state of replicating its data to the destination host(s)).

WHITE PAPER MVFBC ETERNUS DX
Page 79 of 82 http://solutions.us.fujitsu.com/
13 INDEX
asynchronous ................................................................. 13 Basic Method ................................................................. 76 concurrent .............................................................. 15, 77 configuration13, 14, 32, 47, 52, 56, 62, 63, 64, 66, 72, 73, 74 Continuous .............................................................. 14, 15 Data Migration .............................................................. 14 Destination Host ................................................... 43, 68 Detailed Information Frame ........................... 33, 50, 51 dialog .......... 25, 54, 55, 56, 57, 59, 60, 61, 63, 64, 65, 66 Dialog .................................. 55, 56, 57, 58, 59, 60, 61, 74 droplist ......................................................... 38, 39, 67, 68 DX60 ........................................................................... 7, 13 DX80 ................................................................................. 7 ETERNUS2000 .......................................................... 7, 13 Features ........................................................................... 13 Filter Area Frame ................................................... 33, 38 Global Service Center ....................................................... 6 graphical user interface ................................................... 6 GSC .................................................................................... 6 GUI .................................................................................... 6 hostid ........................................................................ 28, 29 hostids ............................................................................. 29 hostname ................................................................. 28, 29 hostnames ....................................................................... 29 Initial Full Copy ................................................ 14, 15, 17 installation ............................................ 5, 6, 7, 16, 17, 18 journaling ....................................................................... 13 license key ............................................................... 27, 28 License Key .............................................................. 27, 28 Licensing .............................................................. 6, 16, 27 Menu Bar ..................................................... 33, 34, 36, 37 MFBC ........................................................... 4, 6, 7, 13, 81 My First Business Continuity ...................................... 13
net stop nvr_srv ............................................................. 47 Network Requirements ................................................ 17 nvr_gethostid ................................................................. 28 nvr_sync ...................................................... 69, 74, 75, 76 nvr_verifylic .................................................................. 31 options . 33, 38, 39, 40, 41, 56, 60, 66, 67, 68, 70, 72, 76 Pop-up ................................................................46, 47, 49 PRIMERGY ................................................................ 7, 13 RCF ........................................................................... 32, 75 real-time ......................................................................... 13 Release Notes ................................................................. 22 Replicator ........................4, 5, 6, 7, 13, 14, 15, 17, 18, 19 Replicator Configuration File .......................32, 73, 75 Replicator GUI6, 24, 32, 33, 34, 37, 38, 41, 42, 54, 60, 62, 63, 65,
66 Repset Filter Panel .................................... 38, 39, 40, 41 Repsets ........................................................................... 40 semi-synchronous ......................................................... 13 Service Pack.................................................................... 19 shortcut ........................................................................... 24 shortcuts ......................................................................... 24 Software Requirements ................................................ 17 Source Host ............................................................. 43, 67 Status Indicator .................................................45, 46, 49 Storage Requirements ................................................... 17 synchronization................................................15, 69, 77 Synchronization .............................................................. 6 synchronize .................................................................... 15 Tool Bar .......................................................................... 33 upgrade ....................................................................... 5, 6 version ..............................................................5, 7, 28, 29

WHITE PAPER MVFBC ETERNUS DX
Page 80 of 82 http://solutions.us.fujitsu.com/
Reader Suggestion/Feedback Form
Send to: Fujitsu America Inc Engineering Documentation 1250 East Arques Avenue Sunnyvale, CA 94085 USA Fax: (408) 746-8016 My Very First Business Continuity for Windows ETERNUS DX White Paper PN AZ-360179-001 Submitted by: Submit entry below:

WHITE PAPER MVFBC ETERNUS DX
Page 81 of 82 http://solutions.us.fujitsu.com/
14 Colophon
My Very First Business Continuity
ETERNUS DX Storage System for Windows White Paper
AZ-360179-001
Date of Issuance: August 2009 Issuance Responsibility: Fujitsu America Inc.
• The contents of this manual may be updated without notice • While the contents of this manual are the product of all good care and due diligence, no responsibility can
be taken for operational problems arising from any errors or missing information or other use of the information contained in this manual.
• Fujitsu America Inc assumes no liability for damages to third party copyrights or other rights arising from the use of any information in this manual.
• Contents from this manual are not to be reproduced without permission from Fujitsu America, Inc.

WHITE PAPER MVFBC ETERNUS DX
Page 82 of 82 http://solutions.us.fujitsu.com/
F ujits u America, Inc. 1250 East Arques Avenue Sunnyvale, CA 94085-3470, U.S.A. Telephone: 800 831 3183 or 408 746 6000 Fax: 408 764 5060 Web: us.fujitsu.com/solutions Email: [email protected] Fujitsu, the Fujitsu logo and ETERNUS are trademarks or registered trademarks of Fujitsu America Inc in the United States and other countries. BakBone Software, the BakBone logo, and NetVault:Replicator trademarks or registered trademarks of BakBone Software in the United States and other countries. Microsoft, Windows and Internet Explorer are trademarks or registered trademarks of Microsoft Corporation in the US and other countries. For the Microsoft End User License Agreement (EULA), see the CD provided in the distribution package. All other trademarks mentioned herein are the property of their respective owners. Product description data represents Fujitsu design objectives and is provided for comparative purposes; actual results may vary based on a variety of factors. Specifications are subject to change without notice. Product description data represents Fujitsu design objectives and is provided for comparative purposes; actual results may vary based on a variety of factors. Specifications are subject to change without notice. © 2010Fujitsu America, Inc. All rights reserved. FPC58-2654-01 05/10. FCI_09.1147