Super Barcode Training Camp - Zebra Barcode Printer Presentation
dcGlu Administrator Manual 1
dcGLU®
System Administration Manual
Rev. 10/21/2004 (revised August 2006 - GA001.PDF)

dcGlu Administrator Manual 2
Copyright © 2006 All rights reserved. No part of this document may be reproduced, transmitted, or stored in a retrieval system in any form or by any means, electronic, mechanical, photocopied, or otherwise, without the express prior written consent of Nutech Systems.

dcGlu Administrator Manual 3
dcGlu Administrator Manual 4
Table of Contents
INTRODUCTION ................................................................................................................ 7 OVERVIEW ....................................................................................................................... 7 SYSTEM REQUIREMENTS.................................................................................................. 8 INSTALLING DCGLU® IN A PROGRESS ENVIRONMENT .................................................... 9
Installing the dcGLU® System Controller.................................................................. 9 Setting Environment Variables ................................................................................... 9 Defining Services for dcGLU® client/server communication and ODBC Progress. 9 Assigning Hosts on the dcGLU® Server.................................................................. 10 Creating dcGLU® transaction database in Progress. ............................................... 10 Creating startup and shutdown batch files ................................................................ 10 using Notepad to start and shutdown the SymTrans database. ................................. 10 Setting ODBC Connections to Progress databases using SQL-89 ODBC Driver.... 11 Installing the dcGLU®Barcode Reader Client ......................................................... 11 Installing the "dcgConfig" database.......................................................................... 12
CONFIGURING DCGLU ................................................................................................ 13 STARTING THE DCGLU® CONFIGURATION EDITOR....................................................... 14
DB Parms .................................................................................................................. 16 Terminals .................................................................................................................. 20 Transactions .............................................................................................................. 21 Users and Functions.................................................................................................. 30 Miscellaneous ........................................................................................................... 32
TOOLS MENU................................................................................................................. 35 System Monitor......................................................................................................... 35 Database (DB) Monitor............................................................................................. 37
WHEN BAD THINGS HAPPEN TO GOOD PEOPLE ............................................................. 38 APPENDIX A – DCGLU® INSTALLATION INFORMATION CHECKLIST ............................. 39 APPENDIX B – DCGLU® INSTALLING DCGLU® IN A SQL SERVER ENVIRONMENT...... 41
1. Installing the dcGLU® System Controller – Task List/Summary .................... 41 2. Installing the dcGLU® System Controller........................................................ 41 3. Creating dcGLU® transaction database in SQL Server. .................................. 42 4. Setting ODBC Connections to SQL Server using SQL Server ODBC Driver. 46 5. Installing the dcGLU®Barcode Reader Client ................................................. 49 6. Installing the "dcgConfig" database.................................................................. 49 7. Configuring dcGLU....................................................................................... 50
APPENDIX C – DCGLU® SQL SERVER INSTALLATION INFORMATION CHECKLIST........ 51

dcGlu Administrator Manual 5

dcGlu Administrator Manual 6

dcGlu Administrator Manual 7
dcGLU® Administration Handbook
Introduction Thank you for purchasing dcGLU®, the state-of-the-art software system that empowers an enterprise to utilize data collection technology. With dcGLU®, an enterprise is not limited in the sorts of business functions that can be implemented. Your business can leverage every penny spent on data collection hardware. Overview dcGLU® is more than a software program. It is a software SYSTEM that includes:
1. The dcGLU® barcode reader client program. This program is a standard program that is the same for all of your Intermec barcode readers, regardless of the functions that they perform.
2. The dcGLU® System Controller program. This program is at the center and heart of dcGLU®. It performs two important tasks. First, it provides the user interface for the administration of dcGLU®. Second, it monitors and controls the network connection and disconnection of barcode readers.
3. Standard and custom applications that perform the data collection functions that your business requires.
4. Various behind-the-scene support files used by these applications.
5. dcgConfig, the configuration database for dcGLU®. This database contains important information such as which users may log into dcGLU®, what functions each one may perform, and what applications are launched for which barcode readers.
Ethernet Backbone
Access Points
dcGLU Data Collection Server
Custom DCBusiness
ApplicationsdcGLU System
Controller
AdministrationCommunicationDc Config
Database
dcGLU ClientSoftware
dcGLU ClientSoftware
dcGLU ClientSoftware
dcGLU ClientSoftware
Server Software Components

dcGlu Administrator Manual 8
Barcode readers communicate to dcGLU® by means of TCP/IP Sockets. When a reader connects to dcGLU®, an application is launched that communicates to that device that will read information from and write data collection transactions to the SyteLinedatabase by means of ODBC (Open DataBase Connectivity). System Requirements
The dcGLU® system typically resides on a dedicated data collection server. This server communicates with barcode readers and with the SyteLine database server via an Ethernet network. In order to install and run dcGLU® correctly, you must have the following hardware and software installed on an Intel x86-based computer identified as the data collection server. This is the machine on which you will install and run dcGLU®:
• Windows NT Server 4.0, Windows 2000 Server or Windows XP Server.
• Windows 32-bit ODBC installed.
• DataDirect (Merant) ODBC client software for Progress.
• Progress Version 8.2c Client Networking or above
• A network card using TCP/IP protocol. The SyteLine database Server must have have the following:
• Progress Version 7.3c Server Networking or above
• A network card using TCP/IP protocol.
• SyteLine Data Collection module The RF (radio frequency) terminals must be properly installed on the network with and one or more Access Points.
Ethernet Backbone
Symix DBServer
dcGLUNT Server
RF Scanner
RFAccessPoint
RF Scanner

dcGlu Administrator Manual 9
Installing dcGLU® in a Progress Environment
Installation of dcGLU® consists of the following steps:
1. Complete the dcGLU Installation Information Checklist found in Appendix A.
2. Install the dcGLU® System Controller onto your data collection server.
3. Set Environment Variables for ODBC Progress database connections.
4. Define Services for the client/server communications and ODBC Progress database connections in the dcGLU® server and Symix/SyteLine server.
5. Put entries into the hosts file on the dcGLU® server defining servers dcGLU® will be connecting to.
6. Create the dcGLU® transaction database.
7. Create the startup and shutdown processes for dcGLU® transaction database if Progress is the database choice.
8. Set ODBC Connections to the databases dcGLU® will be communicating with.
9. Install the dcGLU® barcode reader client into each Trakker device.
10. Install the dcGLU® PC Client software onto PC’s to be used as dcGLU® terminals.
Installing the dcGLU® System Controller To install the dcGLU® on your data collection server, follow these instructions:
1. Login to your data collection server as “administrator.”
2. Insert the dcGLU® CD-ROM into the CD-ROM drive in your computer.
3. Using the "Start" menu button in the bottom-left corner of the screen, select "Run."
4. Type: "D:\Setup". (If your CD-ROM is not drive D, replace "D" with the letter of your CD-ROM drive.)
5. Follow the directions on your screen.
6. Report any system errors encountered during setup.
Setting Environment Variables 1. Add the environment variables found in the Appendix A – dcGLU® Installation
Information Checklist to System variables.
Defining Services for dcGLU® client/server communication and ODBC Progress. 1. Open C:\WINNT\SYSTEM32\DRIVERS\ETC\SERVICES with Notepad.
2. Add the new services entries defined in the completed dcGLU® Installation Information Checklist.
3. Save and exit the file.

dcGlu Administrator Manual 10
Assigning Hosts on the dcGLU® Server. 1. Open C:\WINNT\SYSTEM32\DRIVERS\ETC\HOSTS with Notepad.
2. Add the IP address and server name of the servers dcGLU® will be connecting to using ODBC connections.
3. Save and exit the file.
Creating dcGLU® transaction database in Progress. 1. If the dcGLU® transaction database is being installed on the dcGLU® server,
Progress “Client Networking” and “4GL and Development” database software must be installed on the dcGLU® server.
2. Create a folder for dcGLU® transaction database.
3. Create the dcGLU® transaction database in Progess.
1. Select <Start>, <Programs>, <Progress>, <Desktop>.
2. Select <Data Administration>.
3. Create the database placing it in the folder created above.
4. Select <Admin>, <Load Data and Definitions>.
5. Select. ([drive]:\Program Files\dcGLU\db\SymTransN.df. “N” is the latest version of the transaction database definition.
If necessary, shutdown and restart the dcGLU® Server.
Creating startup and shutdown batch files
using Notepad to start and shutdown the SymTrans database. Note: In order to establish ODBC connections to a Progress database, oib brokers must be started on the server the database resides on.
1. Create the DCGSTARTUP.BAT file.
a. Type “%DLC%\bin\_mprosrv [drive letter where transaction database resides]:\[folder where dcGLU transaction database resides]\SymTrans.db”.
This line assumes “SymTrans” is the database name for the dcGLU® transaction database.
b. Type “%PROOIBRK% -SV -S dcgoib -N TCP”. This line assumes dcgoib is the service name selected for the dcGLU® transaction database.
c. Save the file as dcgStartUp.bat. Saving the file in “Desktop” will show on screen as Icon.
2. Create the DCGSHUTDOWN.BAT file Type “%DLC%\bin\_mprshut -SV -S dcgoib”. This line assumes dcgoib is the service name selected for the dcGLU® transaction database. %DLC%\bin\_mprshut [drive letter where transaction database
dcGlu Administrator Manual 11
resides]:\[folder where dcGLU® transaction database resides]\SymTrans.db –by This line assumes “SymTrans” is the database name for the dcGLU® transaction database.
3. Run the dcgStartup.bat to start the dcGLU® transaction database.
Setting ODBC Connections to Progress databases using SQL-89 ODBC Driver. An ODBC connection must be setup for the dcGLU® transaction database and each SyteLine database. See Appendix A – dcGLU® Installation Information Checklist for information needed to add the ODBC connection.
1. Using the "Start" menu button in the bottom-left corner of the screen, select "Settings", “Control Panel.”
2. Select the icon titled “ODBC Data Sources (32 bit) or Data Sources (ODBC).” (This title may vary). In Windows 2000 it is found by selecting the “Administrative Tools” icon.
3. Select the tab titled “System DSN.”
4. Select the button titled “Add.”
5. Select the ODBC driver installed by the dcGLU® System Controller installation.
6. Select the “General” tab. Fill in Data Source Name, Description, and Database Name.
7. Select the “OID/OIB Options: tab. Fill in Protocol, Service Name and Host Name.
8. Select the “Database Options” tab. Define Database Access Mode as “Direct:, fill in Database Path and define database as “Windows” or “Unix”.
9. Select “Apply”.
10. Select “Test Connect”. If “Connection Established” message appears, the ODBC connection is properly setup. If an error appears, correct the problem, then “Test Connect” until the “Connection Established” message appears.
Installing the dcGLU®Barcode Reader Client To install the dcGLU® barcode reader client, follow the steps provided to you by Intermec with regards to transferring a file to the Trakker. (Intermec provides several mechanisms to accomplish this.) dcGLU® has provided access to the Intermec file copy utility in the dcGLU® System Controller. To open it from the dcGLU® System Controller, select “Tools”, “Copy File To Reader”, “Intermec Trakker Antares”. Download the file "DCGxxxxx.bin" commonly found in c:\Program Files\dcGLU\bin onto drive C of each Trakker device. Enter the TRAKKER Antares filename as “C:DCGxxxxx.BIN”. Do not include a backslash (\). (xxxxx will vary depending upon the version of the barcode client used.) Follow the Intermec's instructions to execute that program on the Trakker.

dcGlu Administrator Manual 12
Installing the "dcgConfig" database This section is now done automatically in the dcGLU® software installation procedure and is included in this manual for your information. “dcgConfigxxx” is the database that contains configuration information for dcGLU®. It resides in the “db” folder . When it is first copied onto your hard disk during installation, it is named “dcgConfigxxxMT.mdb.” (xxx will vary depending upon the version of the database used.) The “MT” signifies that it is an empty database. IMPORTANT: COPY “dcgConfigxxxMT.mdb” TO A NEW DATABASE WITH ANOTHER NAME. We suggest dcgConfigxxx.mdb. This newly copied database will be your “live” database. This will prevent unintentional over-writing of the data in case dcGLU® must be re-installed. Next, you must create an ODBC Data Source for this database:
1. Using the "Start" menu button in the bottom-left corner of the screen, select "Settings", “Control Panel.”
2. Select the icon titled “ODBC Data Sources (32 bit) or Data Sources (ODBC).” (This title may vary). In Windows 2000 it is found by selecting the “Administrative Tools” icon.
3. Select the tab titled “System DSN.”
4. Select the button titled “Add.”
5. Select the “Microsoft Access Driver (*.mdb).”
6. Select
7. Enter “dcgConfig” as the Data Source Name.
8. Use the “Select” button to select your “live” dcgConfig database file.

dcGlu Administrator Manual 13
Configuring dcGLU
Configuring dcGLU® involves the following steps:
1. Start the dcGLU® Configuration Editor.
2. Define DB Connections.
3. Set up Environments.
4. Define DB Aliases.
5. Set up Terminals.
6. Set up Users.
7. Define Custom Transactions, if any.
8. Give users permissions to transactions.
9. Configure Screen and Field Defaults.
10. Configure Field Validations.

dcGlu Administrator Manual 14
Starting the dcGLU® Configuration Editor Using the "Start" menu button in the bottom-left corner of the screen, select “Programs”, “dcGLU”, “dcGLU”. The dcGLU® System Controller screen (Figure 1) appears.
Figure 1
Make the menu selection “Tools”, “Configuration Editor”. Figure 2 will appear.

dcGlu Administrator Manual 15
Figure 2
Upon entering most configuration screens, one or two key fields are open for input. You may select a previously entered record by populating these key fields. In order to view Click on the “Update” button before creating any new configuration records. After a record is selected (or created), you may update it by using the “Update” button. Cancel the update by using the “Cancel” button, or save the update by using the “Save” button. You may exit any screen by pressing the “Exit” button.

dcGlu Administrator Manual 16
DB Parms
Progress DB Utilities
Figure 3
Figure 3 allows the user to do various functions concerning Progress Databases. Add DB: This function allows the user to add a Progress database to dcGLU. It will set up an ODBC DSN, and a dcGLU connection. (It assumes you are use DataDirect SQL-89 ODBC drivers.) Connection ID: The name will to used for the ODBC DSN and the dcGLU connection (e.g. “Symix-Live”). Description: The description of the connection.
Host Name: The name of the host on which the database resides. If it is a local database, enter “localhost”. Operating System: The operating system on the host machine – either “Windows” or “Unix”. DB FileSpec: The file specification of the database file. This is the path and filename as you would enter it on the host machine (e.g. “/symix/db/syteline.db”). OIB Service: The service to use for the Progress Open Interface Broker. ODBC Driver: The name of the ODBC driver to use. If you have more than one Progress ODBC driver, you will have a choice. After you have entered all of the information, select “Save DB”. You will be prompted for any missing information. For example, if you have entered a host name that does not

dcGlu Administrator Manual 17
exist in your system “Hosts” file, you will be asked to provide an IP address for the host. Then, your system “Hosts” file will be updated. Also, if your Environment variables are not correct for a Progress connection, they will be created for you. After the Progress connection has been created, you will receive instructions (Figure 4) on activating it:
Figure 4
Create Envt Vars: This function will create the environment variables necessary to create Progress ODBC connections. Update Conn Str: This function will update all the connection strings for all Progress database connections in dcGLU.Create Batch Files: This function will create startup and shutdown “.bat” files for all Progress databases that have ODBC connections. Check All: This function checks the consistency of ODBC connections, dcGLU
connections, and dcGLU Aliases. DB Map: This function will create a file, “C:\DBMap.txt,” that shows the relationship between all Environment/Alias pairs, their ODBC connections, and their connection strings.
DB Connections
Figure 5

dcGlu Administrator Manual 18
The DB Connections screen (Figure 5) defines physical ODBC connections to databases. An entry should be made for each physical database used. The “Connections” table has the following fields: Connection ID: The name that dcGLU® will use for the physical database connection. Connection String: The connection string used to connect to the database. This string
differs based upon the type of ODBC driver used. The ‘Generate Conn String’ button assists you in creating/modifying the ‘Connection String’.
ODBC Driver: The name of the ODBC Driver used. (See the “ODBC Drivers” table.) MAX Conns: The maximum number of connections to the database. If this number is 0,
then each dcGLU® application which uses that database will open a new connection. This is the fastest mode. However, if a database has a limited amount of licenses available, specify a non-zero number to limit the amount of connections to it. Note: This may cause one or more applications to share a connection, and an application may be required to wait while another is querying the database
Environments
Figure 6
The Environments screen (Figure 6) identifies the Symix/SyteLine environments you employ. You should define an environment for each site in your Symix/SyteLine ERP system. If you use a test database in Symix/SyteLine, setup another environment to define it. The Environments table has the following fields: Environment: A short name to identify a specific SyteLine database environment, or site Description: A brief description of the environment.
Formatted: Bullets and Numbering

dcGlu Administrator Manual 19
DB Aliases
Figure 7
The DB Aliases screen (Figure 7) links database aliases used in dcGLU® application programs to physical database connections defined in the “DB Connections” table. Standard dcGLU® uses the aliases, SYMIX, SYMDC, and SYMDCMSTR to attach the application to the user’s SyteLine database. SYMIX, SYMDC and SYMDCMSTR must be setup for each environment dcGLU® will be used in. It also allows the same database to be used for multiple functions. The “DB Aliases” table has the following fields: Environment ID: The name of the environment as defined in the Environments
configuration. Alias ID: The name of the alias. This is the name that will be referred to in dcGLU®
Application Programs. Entries will be made in this screen for the Alias ID’s “SYMIX”, “SYMDCMSTR” and “SYMDC” for each environment that you intend to operate in. Other Alias ID’s may be added depending upon your custom requirements.
Connection ID: The name that dcGLU® will use for the database connection. It must match an entry in the “DB Connections” table.

dcGlu Administrator Manual 20
Terminals
Terminals
Figure 8
The Terminals screen (Figure 8) defines all of the RF (radio frequency) terminals, hard wired terminal and PC’s using dcGLU®. Each terminal must have a record in this screen to operate dcGLU®. The “Terminals” table has the following fields: Terminal Name: The name of the terminal. This can be any value. However, when
SyteLine transactions are generated by dcGLU®, the name of the terminal is inserted as the terminal identifier. (SyteLine calls this field “termid.”). Because this field is only three characters in Syteline, you should limit terminal names to this length.
Terminal Description: A brief description of the resource. This is a good place to store the device’s serial number.
Device Type: Choose the device assigned to this terminal from the available options. IP Addr: The network IP Address for this terminal. Program Name: The fully-qualified path/filename of the program to launch when this
terminal opens a socket connection. This program is normally dcgExecShell.exe located in the dcGLU® folder.

dcGlu Administrator Manual 21
Transactions
Screen and Field Defaults
Figure 9
The Screen and Field Defaults screen (Figure 9) personalizes the transaction screen that is presented to the user. By configuring fields globally, by transaction, by user, and/or terminal you are able to make SyteLine’s data collection transaction fit your process. The “Screen and Field Defaults” table screen has the following fields: In order to view previously entered configurations, do not hit the update key and populate the Transaction, Field, User, Environment and Terminal fields. Function: Hitting the down arrow button before hitting the update button will show all
functions that have a configuration defined. Hitting the down arrow button after

dcGlu Administrator Manual 22
selecting the “Update” button will display all of the transactions. Select “*” to affect all transactions.
Field: Select the field which you would to have a default attached to it. User ID: Select a dcGLU® user. Select “*” for all users. User Name: The name of the selected User ID is displayed. Environment: Select the dcGLU® Environment to be configured. Select “*” for all
environments. Terminal ID: Select a terminal previously entered into the “Terminal” database. Select
“*” for all terminals. Terminal Name: The name of the selected Terminal ID is displayed. Terminal IP Addr: The IP address of the selected Terminal ID is displayed. In order to view previously entered configurations, do not hit the update key and populate the Transaction, Field, User, Environment and Terminal fields. Prefix: Generally used in conjunction to AIAG compliant labels. Enter the leading
character or characters that are to be stripped when a label bar code is scanned. Suffix: Generally used in conjunction to AIAG compliant labels. Enter the trailing
character or characters that are to be stripped when a label bar code is scanned. Label: Used to redefine a transaction field description. For example, if you would rather
call the field “Itm” “Part”, then enter “Part” into this field and “Part” will display in the transaction.
Default Value Constant String: Enter a constant value for a transaction field. See “Constant Default Value” section below. Default Value SQL Query: Enter an SQL statement to retrieve a value for a transaction
field. See “Retrieve the Default Value From a Database” section below. Default Value DB Alias: Enter the DB Alias dcGLU® should use to in conjunction with the defined SQL Query. A default value for a field may be constant or it may be retrieved from a database.
Constant Default Value You may set the default value of a field to some constant value. If, for example, you always want to receive purchase orders into location “DOCK,” then configure the “Default Value” of the “Location” field of the “PO Receipt” transaction like this:
Constant String: DOCK SQL Query: (blank) DB Alias: (blank)
Retrieve the Default Value From a Database If you need to retrieve the default value of a field from a database, put the SQL query to use for that lookup in the “SQL Query” field, and the alias of the database to use for the lookup in the “DB Alias” field. You can still put a constant value in the “Constant String” field. This will be used if no records are found for the query you specified. Let’s say you always want to receive purchase orders into the first location in the SyteLine database where the description is “PO RECEIPT LOCATION.” If none exist, you want to use “DOCK.” Configure the “Default Value” of the “Location” field of the “PO Receipt” transaction like this:
Constant String: DOCK
dcGlu Administrator Manual 23
SQL Query: SELECT loc FROM location WHERE description = ‘PO RECEIPT LOCATION’ DB Alias: SYMIX
Field Substitutions Now, let’s say you want to receive purchase orders into the lowest rank location for the any item that you enter. Somehow, you need to get the item number into the SQL statement. Here’s where you need to use a Field Substitution. In order to use field substitution, you will need to know the name of the field that represents the field you want to substitute for. In this case, you want to substitute for the item, and its field name is tbxTxnItem. (See “Field List.”) Next, write the SQL statement using the field name. You need to start the field name with “%FS” and end it with “%FE.” So, instead of using
“WHERE item = '12345'”, you will use “WHERE item = '%FStbxTxnItem%FE'”.
Configure the “Default Value” of the “Location” field of the “PO Receipt” transaction like this:
Constant String: DOCK SQL Query: SELECT loc FROM itemloc WHERE item = '%FStbxTxnItem%FE' ORDER BY rank ASC DB Alias: SYMIX Field List
Following is a list of the various Field Names used by the transactions: Checking Employee tbxTxnEmpChk Counting Employee tbxTxnEmpCnt Indirect Code tbxTxnIndCode Item Number tbxTxnItem Job Number tbxTxnJob Job Suffix tbxTxnSuf Location (for Move, From Location) tbxTxnLoc Lot Number (for Move, From Lot) tbxTxnLot Machine Number tbxTxnMach MultiJob tbxTxnMultiJob Operation Complete tbxTxnOperCmplt Operation Number tbxTxnOper Order Line (PO Line, CO Line, Transfer Line) tbxTxnLine Order Number (PO Number, CO Number, Transfer Number, Phys Inventory Sheet/Tag Number, PS Number)
tbxTxnOrd
Order Release (CO Release) tbxTxnRelease Posted Date tbxTxnPostDate Posted Time tbxTxnPostTime Quantity tbxTxnQty Quantity Moved tbxTxnQtyMov Quantity Rejected tbxTxnQtyReject Quantity Scrapped tbxTxnQtyScrap Reason Code tbxTxnReason Serial Number tbxTxnSerNo Shift tbxTxnShift To Location Number tbxTxnToLoc To Lot Number tbxTxnToLot To Warehouse tbxTxnToWhse Unit of Measure tbxTxnUM User's Default Company Name tbxTxnCompany

dcGlu Administrator Manual 24
User's Default Environment tbxTxnEnviron Warehouse (for Move, From Warehouse) tbxTxnWhse Work Center tbxTxnWC F5 Lookup Query Lookup Query: Enter an SQL statement to return a list to assist the user with the transaction field. See “Retrieve the Default Value From a Database” section above. F5 Lookup Query DB Alias: Enter the DB Alias dcGLU® should use to in conjunction with the defined Lookup Query. Visible?: Select this if you want the field to show up in the transaction. Updatable?: Turning this option on allows the user to update the field, leaving it off
makes the field read only. Refresh Just Before Update?: Select this to update the default value of the field just
before the user is presented the transaction field. This should be checked when configuring a field with an SQL Query.
Clear Value?: Checking this box will cause the initial transaction value of this field to be blank. Clearing the check box will leave the last transaction’s value in the field.
Password Char?: Checking this box will cause all characters to appear as asterisks to mask the actual field entry.
Input Required?: Checking this box will force the user to enter data into the configured field. Leaving the checkbox blank will allow the user to continue the transaction leaving the configured field blank.
Row: Configures the row the field will be displayed in the transaction. Column: Configures the column the field will begin displaying in the transaction. Width: Configures the display number of characters or digits. MaxLength: Configures the maximum number of digits or characters that may be
entered into the selected field.

dcGlu Administrator Manual 25
Transaction Control
Figure 10
The Transaction Control screen (Figure 10) controls the display of the two trailer screens in the dcGLU® transaction. In order to view previously entered configurations, do not hit the update key and populate the Transaction, User, Environment and Terminal fields. Transaction: Hitting the down arrow button before hitting the update button will show all transactions that have a configuration defined. Hitting the down arrow button after selecting the “Update” button will display all of the transactions. Select “*” to affect all transactions. User ID: Select User to have validation performed. Select “*” for all users. User Name: Displays User Name from User table. Environment: Select the dcGLU® Environment to be configured. Select “*” for all
environments. Terminal ID: Select Terminal to be configured. Select “*” for all terminals. Terminal Desc: Displays the Terminal Description from the Terminals database. Terminal IP Addr: Displays the Terminal IP Address from the Terminals database. In order to view previously entered configurations, do not hit the update key and populate the Transaction, User, Environment and Terminal fields. Verify Txn Write?: Select this field to display Figure 11 in the transaction. Bypass this screen by deselecting the box.

dcGlu Administrator Manual 26
Figure 11 Report Txn Success?: Select this field to display Figure 12 in the transaction. Bypass this screen by
deselecting the box.
Figure 12 Report Txn Fail?: Select this field to display Figure 13 in the transaction. Bypass this screen by
deselecting the box.
Post Transaction?
Yes Abort Review
!!! INFO !!!{transaction name}transactionposted:

dcGlu Administrator Manual 27
Figure 13 Report Txn Abort?: Select this field to display Figure 14 in the transaction. Bypass this screen by deselecting the box.
Figure 14
!!! INFO !!!{transaction name}transactionfailed:
!!! INFO !!!{transaction name}transactionaborted:

dcGlu Administrator Manual 28
Field Validations
Figure 15
The Field Validations screen (Figure 15) contains the validation functions on fields in a transaction being performed. Validations in standard dcGLU® are set to be most restrictive. Use this table to “loosen” and/or customize restrictions for each desired field in a transaction. In order to view previously entered configurations, populate the Validation, Function, Field, User, Environment and Terminal fields. Do not hit update before populating these fields. Validation: Select Update key for list of validations that can be performed in SyteLine
during a data collection transaction. Function: Select Transaction to have validation performed. Select “*” to affect all
transactions. Field: Select Field of transaction to have validation performed. User ID: Select User to have validation performed. Select “*” for all users. User Name: Displays User Name from User table. Environment: Select the dcGLU® Environment to have validation performed, or * for all
environments. Terminal ID: Select Terminal to have validation performed, or * for all terminals. Terminal Desc: Displays the Terminal Description from the Terminals database. Terminal IP Addr: Displays the Terminal IP Address from the Terminals database.

dcGlu Administrator Manual 29
In order to view previously entered configurations, populate the Validation, Function, Field, User, Environment and Terminal fields. Do not hit update before populating these fields. Master Controls Perform Test: Check this box to perform the validation. Master Controls Report Errors: Check this box to report the error to the user. Master Controls Fix Errors: This box is available for certain validations such as “Item
exist in this location?” or “Lot exist for this item?” Checking this box will enable dcGLU® to create the item-location record or lot record in Symix/SyteLine.
Message Type Warning: Select this box to make the error message heading display “Warning”.
Message Type Error: Select this box to make the error message heading display “Error”. Action if Fail Continue: Select this box to allow the user to continue the transaction. The
field entry is not used in the transaction. Action if Fail Accept Entry: Select this box to accept the user’s entry and continue the
transaction. The field entry is used in the transaction. Action if Fail Try Again: Select this box to allow the user to enter the proper information
into the field. The transaction will not continue until the user enters valid information.
Action if Fail Ask “Continue or Try Again”: Select this box to give the user the choice whether to continue with the transaction or enter the proper information in the field.
Action if Fail Ask “Accept Entry or Try Again”: Select this box to give the use the choice whether to accept the entry or enter the proper information in the field.
Action if Fail Ask “Continue, Accept, or Try Again”: Select this box to give the use the choice whether to continue the transaction, accept the entry or enter the proper information in the field.
Action if Fail Set Override Bit: Selecting this will cause the transaction to pass through SyteLine data collection into SyteLine with the configured failure.

dcGlu Administrator Manual 30
Users and Functions
Users
Figure 16
The User screen (Figure 16) allows entry of the users permitted to login to dcGLU®. The “Users” table contains the following fields: UserID: The login for this user. Password: The login password for this user. User Name: The name of this user. Default Environ ID: The environment that this user operates in. Default Company: The name of the company this user belongs to. This will typically be
used in transaction headings. Default Whse: The warehouse this user typically operates in.

dcGlu Administrator Manual 31
Functions
Figure 17
The Functions screen (Figure 17) lists all of the custom functions that a user may perform. The “Functions” table has the following fields: Function ID: The short name that dcGLU® will use for the function. Description: A short description for the function. This field will show up on a user’s
menu. Function Type: “Custom”.
Permissions
Figure 18
This database allows you to manage the access of transactions by users and terminals. A user may have multiple entries depending on what transactions they need in order to perform their function. UserID: Select a user from the list. The list of users come from the Users database. UserName: Displays the User Name from the Users database. Function ID: Select a transaction the user should have access to. Terminal: Limits the user/transaction to a specific terminal.
dcGlu Administrator Manual 32
Miscellaneous
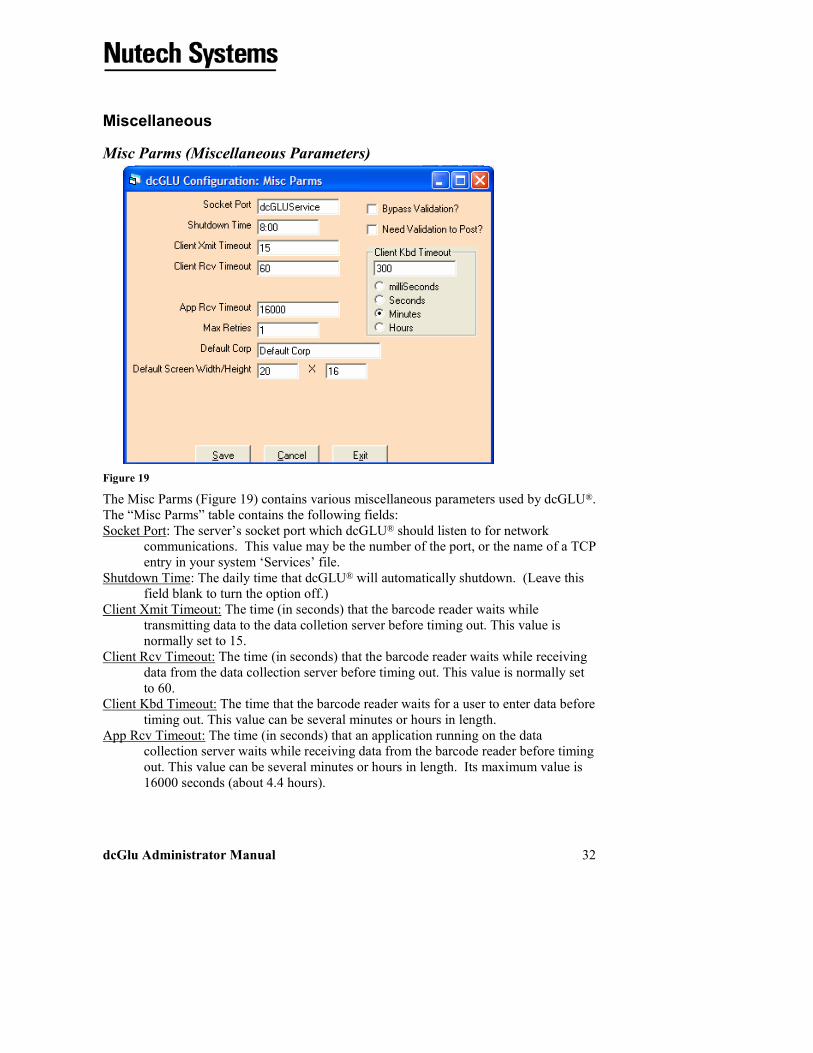
Misc Parms (Miscellaneous Parameters)
Figure 19
The Misc Parms (Figure 19) contains various miscellaneous parameters used by dcGLU®.The “Misc Parms” table contains the following fields: Socket Port: The server’s socket port which dcGLU® should listen to for network
communications. This value may be the number of the port, or the name of a TCP entry in your system ‘Services’ file.
Shutdown Time: The daily time that dcGLU® will automatically shutdown. (Leave this field blank to turn the option off.)
Client Xmit Timeout: The time (in seconds) that the barcode reader waits while transmitting data to the data colletion server before timing out. This value is normally set to 15.
Client Rcv Timeout: The time (in seconds) that the barcode reader waits while receiving data from the data collection server before timing out. This value is normally set to 60.
Client Kbd Timeout: The time that the barcode reader waits for a user to enter data before timing out. This value can be several minutes or hours in length.
App Rcv Timeout: The time (in seconds) that an application running on the data collection server waits while receiving data from the barcode reader before timing out. This value can be several minutes or hours in length. Its maximum value is 16000 seconds (about 4.4 hours).

dcGlu Administrator Manual 33
Max Retries: Number of times an application running on the data collection server will time out while waiting to receive data from the barcode reader before it reports a failure. (This parameter is not used in all applications. The programmer must explicitly load and use this parameter. It is, however, used in all standard transaction applications.) This value is normally set to 1.
Default Corp: Before a user logs in, the default company name. Default Screen Width/Height: The default dimensions of the screen (in characters).
These values are superceded automatically by data provided by the barcode reader. (Used while running applications in the local text-window mode, which does not use a barcode reader.)
BypassValidation?: Should dcGLU® bypass validation as fields are entered? Need Validation To Post?: Must the Symix API have valid data before posting?
Sites
Figure 20
The Sites screen (Figure 20) links SyteLine sites with dcGLU® defined environments. Site: Site identification in SyteLine system. Default EnvironID: Environment defined in dcGLU® Environments database.
Next Transaction No.
Figure 21

dcGlu Administrator Manual 34
The Next Transaction screen (Figure 21) holds the transaction number of the next SyteLine transaction to be generated by dcGLU. The “Next Transaction” table contains the following fields: Next No. Type: The name of this “Next Number” record. There should be a record for
each dcGLU® transaction table. Next Number: The numeric value of this Next Number record. Next No. Prefix: A prefix to add to the Next Number. This value is currently unused. Next No. Length: The length of the Next Number. This value is currently unused.
dcGLU® License
Figure 22
The dcGLU® License Manager (Figure 22) allows the user to change the license used for dcGLU®. This may be necessary if the number of seats changes.
Aux Licenses
Figure 23

dcGlu Administrator Manual 35
The Auxiliary Licenses screen (Figure 23) lists all of the licenses for standard transactions and Add-ons purchased. The “Aux Licenses” table has the following fields: License Key: The license number are provided. Description: A description of the license. Tools Menu
System Monitor
Figure 24
The System Monitor (Figure 24) tells the administrator which dcGLU® programs and processes are currently active. The following information is shown for each process: Process: The name of the processes. ProcType: The type of process, either “Server,” “Component,” or “Client”. SID: A sequential process number assigned by dcGLU®.PID: The operating system’s Process-Id for this process. Status: The status of the process. Will either be the date and time of the last time this process was checked an responded, or “*Didn’t Respond.” The following processes should always be displayed:
DCGLU \ dcGLU System dcgConnSvr dcgRscServer
If these processes are not displayed, you should shutdown and restart dcGLU®. You will also see a process entry for each dcGLU® application which is running and

dcGlu Administrator Manual 36
communicating with barcode readers. The “Process” entry for these will be “RESOURCE:” plus the name of the resource associated with the barcode reader. The following buttons are available: Shutdown All: Shuts-down all processes. Equivalent to exiting through the menu
system, but allow the administrator to select a shutdown time. Shutdown Process: shuts-down the selected process. Refresh: refreshes the list of processes. Check Status: checks the status of all processes.

dcGlu Administrator Manual 37
Database (DB) Monitor
Figure 25
The Database Connections Monitor screen (Figure 25) shows which databases are active, their Data Source Names (DSN’s), and their status (Up/Down).
Figure 26
The Database Aliases Monitor screen (Figure 26) shows the database aliases which the administrator has set up in the DB Alias screen.

dcGlu Administrator Manual 38
When Bad Things Happen to Good People Occasionally, there may be a problem launching an application or, when it launches, registering it with dcGLU®. This may happen, for example, if a barcode reader wanders in an area of questionable radio coverage. This may cause garbled messages to the barcode reader and to dcGLU®. If problems occur, two buttons will appear on the dcGLU® System Controller screen. Use the “Read Error File” button to see error messages. To clear the buttons from the dcGLU® System Controller screen, press the “Reset” button. You can read the error messages file at any time by selecting “Read LogFile” on the Tools menu.

dcGlu Administrator Manual 39
Appendix A – dcGLU® Installation Information Checklist
1. dcGLU server Administrator name _________________Password ____________________
2. dcGLU server drive letter to install dcGLU software ________
3. dcGLU server license number_________________________
4. dcGLU server IP address__________________ dcGLU server name __________________
5. SyteLine server host name ________________ IP address__________________________
6. IP addresses assigned to RF devices and PC’s running dcGLU PC Client (attach list)
7. Services port name and number for RF devices dcGLUService ________________
8. Subnet Mask for RF devices_______________ Default Router for RF devices___________
ODBC Information to: Live SyteLine Database SymTrans Database Other Connections 1. Data Source name_____________________ _SymTrans______
_________________
2. SyteLine database name _________________ _SymTrans______ _________________
3. SyteLine host name _____________________ _localhost_______ _________________
4. Path of SyteLine database ________________ ________________ _________________
5. Service name of oib ____________________ __dcgoib________ _________________
Environment Variables (Drive letter depends on Progress installation) Variable Name Value DLC c:\dlc IDLC c:\dlc PROCFG c:\dlc\progress.cfg IPROCFG c:\dlc\progress.cfg PROMSGS c:\dlc\promsgs IPROMSGS c:\dlc\promsgs PROOIBRK c:\dlc\bin\oibrkr32.exe PROOIDRV c:\dlc\bin\oidrvr32.exe

dcGlu Administrator Manual 40
dcGLU® DB Aliases Environment ID Alias ID Connection ID Environment ID Alias ID Connection ID Live Symix ___________ ____________ _________ ___________ Live SymDC ___________ ____________ _________ ___________ Live SymDCMstr ___________ ____________ _________ ___________

dcGlu Administrator Manual 41
Appendix B – dcGLU® Installing dcGLU® in a SQL Server Environment
1. Installing the dcGLU® System Controller – Task List/Summary 1.1. Installation of dcGLU® consists of the following steps:
1.1.1. Complete the dcGLU Installation Information Checklist found in Appendix C.
1.1.2. Install the dcGLU® System Controller onto your data collection server (see #2 below).
1.1.3. Create the dcGLU® transaction database (see #3 below).
1.1.4. Set ODBC Connections to the databases dcGLU® will be communicating with (see #4 below).
1.1.5. Install the dcGLU® barcode reader client into each Trakker device (see #5 below).
1.1.6. Install the dcGLU® Telnet Client software onto PC’s to be used as dcGLU® terminals (see #5 below).
2. Installing the dcGLU® System Controller 2.1. To install the dcGLU® on your data collection server, follow these instructions:
2.1.1. Login to your data collection server as “administrator.”
2.1.2. Insert the dcGLU® CD-ROM into the CD-ROM drive in your computer.
2.1.3. Using the "Start" menu button in the bottom-left corner of the screen, select "Run."
2.1.4. Type: "D:\Setup". (If your CD-ROM is not drive D, replace "D" with the letter of your CD-ROM drive.)
2.1.5. Follow the directions on your screen.
2.1.6. Report any system errors to LLC encountered during setup.

dcGlu Administrator Manual 42
3. Creating dcGLU® transaction database in SQL Server. 3.1. Create a new SQL Server Database called SymTrans_SL7.
3.1.1. Open Enterprise Manager (Start\Programs\Microsoft SQL Server\Enterprise Manager)
3.1.2. Register SQL Server
3.1.2.1.Main Menu: Tools\Wizards, select “Register Server Wizard”
3.1.2.2.Toolbar: Select the “Register Server” toolbar button.
3.1.2.3.Select the “Next >” button
3.1.2.4.Find the Available server, select the “Add >” button, and then select the “Next >” button.
Register Server

dcGlu Administrator Manual 43
3.1.2.5.Select the appropriate Authentication Mode then select the “Next >” button.
3.1.2.6. If you elect to use SQL Server Authentication then you will need to enter connection parameters to connect to SQL Server.
3.1.2.7. Select the SQL Server Group.
3.1.2.8. Add the SQL Server to an existing SQL Server Group or create a new SQL Server Group.
3.1.2.9. If you elect to create a new SQL Server Group, we recommend using a name that is self documenting (i.e. DataCollection)
3.1.2.10. Select the “Next >” button.
3.1.2.11. Select the “Finish” button.

dcGlu Administrator Manual 44
3.1.3. Add the SymTrans_SL7 database.
3.1.3.1. Expand the SQL Server Group to where the Databases Folder is in view. Open the Databases Folder.
3.1.3.2. Menu: Select Action the New Database
3.1.3.3. Toolbar: Select the “New Database” toolbar button.
3.1.3.4. In the Database Properties Screen, enter Symtrans_SL7 for the database name.
3.1.3.5. Select the “OK” button.
3.1.3.6. The Symtrans_SL7 database should appear (refer to screen shot under 3.1.3.3 above)
New Database
Symtrans_SL7 Database will appear here after it is created.

dcGlu Administrator Manual 45
3.2. Run the script SymTrans.sql, which is located in the Service Pack under …\Databases\SQL\, to create the necessary database tables.
3.2.1. From the bottom left hand of your screen, select Start, Programs, Microsoft SQL Server, Query Analyzer.
3.2.2. Connect to the SQL Server. Enter the correct parameters then select “OK”.
3.2.3. The Query window should open.
3.2.4. From the Menu, select File then open. The standard windows open dialog box will appear. Locate the SymTrans.sql file located in the Service Pack under …\Databases\SQL\ and select “Open”. The script should be imported into the Query Window.
3.2.5. Execute the Query by selecting “F5” or the “Execute Query” toolbar button.
Execute Query will appear in green after script is opened.
dcGlu Administrator Manual 46
4. Setting ODBC Connections to SQL Server using SQL Server ODBC Driver. 4.1. An ODBC connection must be setup for the dcGLU® transaction database and
each SyteLine database. See Appendix C – dcGLU® Installation Information Checklist for information needed to add the ODBC connection.
4.2. Using the "Start" menu button in the bottom-left corner of the screen, select "Settings", “Control Panel.”
4.3. Select the icon titled “ODBC Data Sources (32 bit) or Data Sources (ODBC).” (This title may vary). In Windows 2000 it is found by selecting the “Administrative Tools” icon.
4.4. Select the tab titled “System DSN.”
4.5. Select the button titled “Add.”
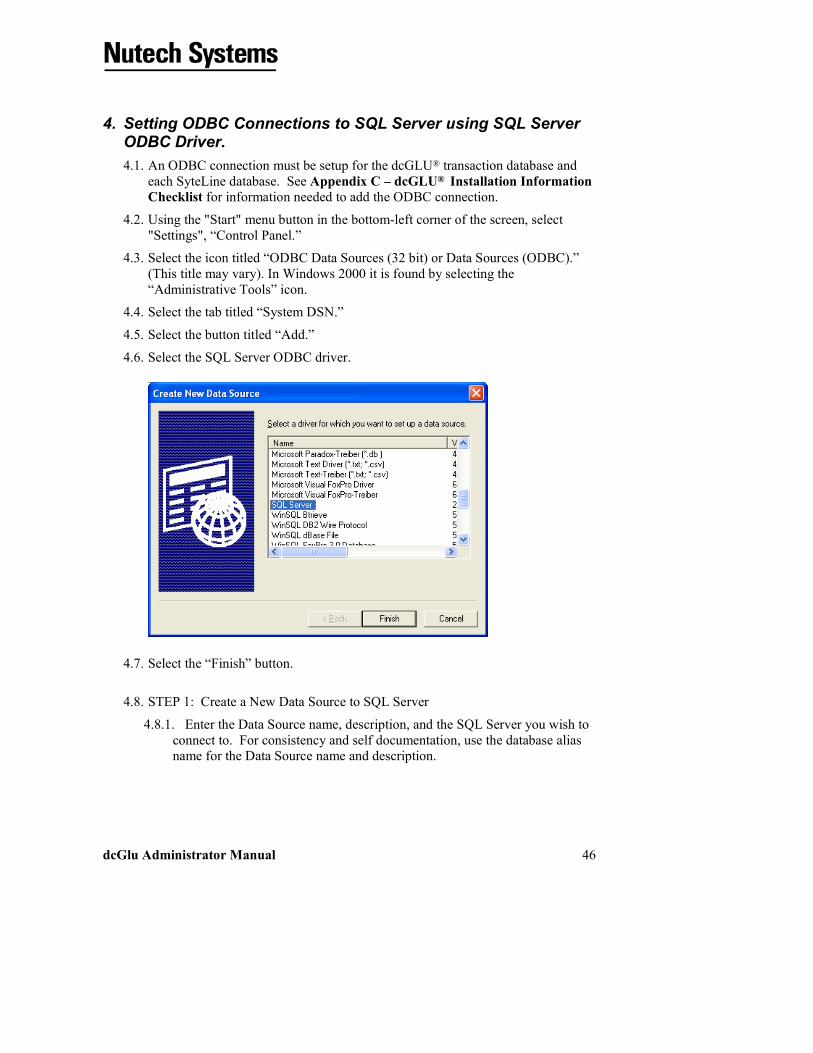
4.6. Select the SQL Server ODBC driver.
4.7. Select the “Finish” button.
4.8. STEP 1: Create a New Data Source to SQL Server
4.8.1. Enter the Data Source name, description, and the SQL Server you wish to connect to. For consistency and self documentation, use the database alias name for the Data Source name and description.

dcGlu Administrator Manual 47
4.8.2. Select the “Next >” button.
4.9. STEP 2: Create a New Data Source to SQL Server
4.9.1. In response to “How should SQL Server verify the authenticity of the login ID?” select the option that states “With SQL Server authentication using a login ID and password entered by the user.
4.9.2. Check “Connect to SQL Server to obtain default settings for the additional configuration options.
4.9.3. Enter the Login ID and Password given to you by your System Administrator.
4.9.4. Select “Next >” button when enabled.
Find your SQL Server in the drop down list.

dcGlu Administrator Manual 48
4.10. STEP 3: Create a New Data Source to SQL Server
4.10.1. Make sure the following information is set then select the “Next >” button.
4.11. STEP 4: Create a New Data Source to SQL Server
4.11.1. Change the language of SQL Server system messages if applicable.
4.11.2. “Perform translation for character data” should be checked.
4.11.3. Select the “Finish” button.
4.12. Select “Test Data Source…”. If “Connection Established” message appears, the ODBC connection is properly setup. If an error appears, correct the

dcGlu Administrator Manual 49
problem, then “Test Data Source…” until the “Connection Established” message appears.
5. Installing the dcGLU®Barcode Reader Client 5.1. To install the dcGLU® barcode reader client, follow the steps provided to you by
Intermec with regards to transferring a file to the Trakker. (Intermec provides several mechanisms to accomplish this.)
5.2. dcGLU® has provided access to the Intermec file copy utility in the dcGLU®
System Controller. To open it from the dcGLU® System Controller, select “Tools”, “Copy File To Reader”, “Intermec Trakker Antares”.
5.3. Download the file "DCGxxxxx.bin" commonly found in c:\Program Files\dcGLU\bin onto drive C of each Trakker device. Enter the TRAKKER Antares filename as “C:DCGxxxxx.BIN”. Do not include a backslash (\). (xxxxx will vary depending upon the version of the barcode client used.) Follow the Intermec's instructions to execute that program on the Trakker.
6. Installing the "dcgConfig" database 6.1. This section is now done automatically in the dcGLU® software
installation procedure and is included in this manual for your information.
6.2. “dcgConfigxxx” is the database that contains configuration information for dcGLU®. It resides in the “db” folder . When it is first copied onto your hard disk during installation, it is named “dcgConfigxxxMT.mdb.” (xxx will vary depending upon the version of the database used.) The “MT” signifies that it is an empty database. IMPORTANT: COPY “dcgConfigxxxMT.mdb” TO A NEW DATABASE WITH ANOTHER NAME. We suggest dcgConfigxxx.mdb. This newly copied database will be your “live” database.

dcGlu Administrator Manual 50
This will prevent unintentional over-writing of the data in case dcGLU® must be re-installed.
6.3. Next, you must create an ODBC Data Source for this database:
6.4. Using the "Start" menu button in the bottom-left corner of the screen, select "Settings", “Control Panel.”
6.5. Select the icon titled “ODBC Data Sources (32 bit) or Data Sources (ODBC).” (This title may vary). In Windows 2000 it is found by selecting the “Administrative Tools” icon.
6.6. Select the tab titled “System DSN.”
6.7. Select the button titled “Add.”
6.8. Select the “Microsoft Access Driver (*.mdb).”
6.9. Select
6.10. Enter “dcgConfig” as the Data Source Name.
6.11. Use the “Select” button to select your “live” dcgConfig database file.
7. Configuring dcGLU7.1. Configuring dcGLU® involves the following steps:
7.2. Start the dcGLU® Configuration Editor.
7.3. Define DB Connections.
7.4. Set up Environments.
7.5. Define DB Aliases.
7.6. Set up Terminals.
7.7. Set up Users.
7.8. Define Custom Transactions, if any.
7.9. Give users permissions to transactions.
7.10. Configure Screen and Field Defaults.
7.11. Configure Field Validations.

dcGlu Administrator Manual 51
Appendix C – dcGLU® SQL Server Installation Information Checklist 1. dcGLU server Administrator name _________________Password
____________________
2. dcGLU server drive letter to install dcGLU software ________
3. dcGLU server license number_________________________
4. dcGLU server IP address__________________ dcGLU server name __________________
5. SyteLine server host name ________________ IP address__________________________
6. IP addresses assigned to RF devices and PC’s running dcGLU PC Client (attach list)
7. Services port name and number for RF devices dcGLUService ________________
8. Subnet Mask for RF devices_______________ Default Router for RF devices___________
dcGLU® DB Aliases
Environment ID Alias ID Data Source
Name Data Source Description
SQL Server Name Login Password
Live Symix Symix Symix
Live SymDC SymTrans SymTrans
Live SymDCMstr Symix Symix