DB-100 band saw - Inland Craft · 2000-08-31 · 4 TABLE OF CONTENTS SAFETY INSTRUCTIONS 2 WARRANTY...
16
INSTRUCTION MANUAL DB-100 band saw
Transcript of DB-100 band saw - Inland Craft · 2000-08-31 · 4 TABLE OF CONTENTS SAFETY INSTRUCTIONS 2 WARRANTY...

INSTRUCTION MANUAL
DB-100 band saw

2
SAFETY INSTRUCTIONS
SetupIntended for indoor use only.
Avoid dangerous environments. Do not use this machine near gasoline or other flammable liquids.
Make sure machine is securely placed on a sturdy, level surface with ample working area and away from open electrical outlets.
Check for damaged parts. Before use, always check for any damaged parts to determine that it will operate properly and perform its intended function. Check for proper alignment of moving parts, binding of moving parts, breakage of parts, mounting, and any other conditions that may affect its operation. A part that is damaged must be properly replaced through the manufacturer of this machine to avoid risk of injury.
Use only Inland Craft DB-100 parts for replacement parts. Use of any other parts not originally intended for the DB-100 may create a hazard or cause product damage.
Know your power tool. Read this instruction manual carefully. Learn the correct applications and limitations as well as specific warnings and hazards related to this machine.
UsageAlways wear proper eye protection to protect you from any debris that may fly out while sawing. We recommend wearing safety goggles or safety glasses with side shields. Everyday glasses are not safety glasses. If anyone is around the machine while it’s in use, they must also wear safety glasses.
IMPORTANT! READ FIRST
For your own safety be sure to read, understand and follow all warnings, safety rules and instructions in this instruction manual before using this machine. Failure to do so can result in serious
personal injury. This instruction manual is intended for all models of the DB-100. SAVE THESE INSTRUCTIONS.
WARNING: This machine includes a product that can expose you to chemicals including nickel, which is known to the State of California to cause cancer. For more information, go to www.P65Warnings.ca.gov.
This warning applies to the diamond band saw blade.

3
SAFETY INSTRUCTIONS
Always wear proper apparel. Do not wear any loose clothing, gloves, neckties or jewelry that can get caught in the machine’s moving parts. Secure long hair with a rubber band or hair tie.
Keep work area well lit and clean. Make sure your work area is not cluttered.
Do not operate unattended. Adult supervision is required at all times. Never leave the machine running unattended.
Do not operate this machine while under the influence of drugs, alcohol or any medication.
Never run diamond band saw blades dry. Diamond band saw blades are designed to be used with a lubricant, such as water, and will be ruined immediately if used dry. Always make sure you are using adequate water while sawing so that the material’s dust doesn’t form. This dust contains chemicals that can be hazardous to your lungs if inhaled and is known to cause cancer, birth defects or other reproductive harm. To reduce your exposure to these chemicals, work in a well ventilated area and wear a face or dust mask.
Never cut more than one workpiece at a time.
Some materials contain poisonous elements. Avoid sawing materials that contain uranium, mercury, lead, arsenic, etc. Make sure you know the material you are sawing.
Allow your band saw to cool. By ignoring this warning, the DB-100 can overheat and deform the saw housing. We recommend cutting on the DB-100 for 30 minutes on, then allow 30 minutes off so the machine can cool down.
Do not force the tool or attachment to do a job it is not designed to do.
Avoid awkward operations and handpositions. Make sure you have good balance while working on this machine. A sudden slip could cause your hand to move into the blade.
Always stay alert. You must be focused while working on this machine. Your sawing material can catch on the saw blade and eject out of the sawing area.
MaintenanceAlways disconnect from power before servicing. Disconnect machine from power source before making any adjustments and when not in use.
Do not abuse the power cord. Never carry the machine by the cord or yank it to disconnect from receptacle. Keep cord away from heat, oil and sharp edges.
Do not open the motor housing. There are no user serviceable parts inside.
Clean and dry machine after use.

4
TABLE OF CONTENTS
SAFETY INSTRUCTIONS 2
WARRANTY INFORMATION 5
MACHINE DETAILS 6
ASSEMBLY 7
BAND SAW BLADES 12
MAINTENANCE 14
ACCESSORIES 15
Register your productSo that we can offer you the highest level of service possible, please take a moment to register your band saw at inlandcraft.com/product-registration. You can also register by mailing us the enclosed registration form. Complimentary mailing envelope is included for your convenience. Registration of your band saw also helps facilitate any warranty-related requests.

5
WARRANTY INFORMATION
What does this warranty cover?If your Inland machine fails under appropriate use during the warranty period, Inland Craft will repair or replace it at our discretion. Inland Craft guarantees to replace (after receipt and inspection) your included cutting tool, if the diamond cutting surface peels off due to any manufacturing defect.
What does this warranty not cover?This warranty does not cover problems resulting from abuse, misuse, intentional damage, incorrect usage, failure to adequately take care of the machine or improperly following the instructions. This warranty also excludes all Inland Craft accessories. Consumable items such as band saw blades and bladeserts will not receive our warranty service.
Who is covered under this warranty?This warranty covers the original purchaser of the equipment and is non-transferable.
Whom should I contact if I need a warranty service?Contact Inland Craft directly by phone at (248) 583-7150 or by email at [email protected] and we will assist you through our warranty service. You must prove that you are under warranty by providing us with the original invoice of your machine or by registering your product in order to receive our warranty service.
We stand by the quality of this product. The Inland Craft DB-100 band saw machine is covered by a 90-day warranty for salt-water use
and a 1-year warranty for all other uses from the date of purchase. Registering your product helps facilitate warranty requests.

6
MACHINE DETAILSThe image below shows parts included with your DB-100 band saw
1
2
3
4
6
5
8 9 10
1. Water reservoir with drip tube and water control valve
2. Band saw blade drip guide
3. Band saw blade (type and quantity vary by model)
4. Band saw work table
5. 10-24 x 1/2" band saw work table mounting nylon screws
6. Clear drain tube
7. BladeSerts (2)
8. 5/64" Allen wrench
9. Leather blade wiper
10. 10-24 x 3/4" nylon screws
11. Extra fuse
117

7
ASSEMBLY
Installing the blade
1 A band saw blade has been factory-mounted to set the wheel alignment.
The blade must be re-mounted and properly aligned before use. To do this, open the front cover. Position blade around the lower wheel and into the right and left guide channels, with the cutting surface facing the front of the saw. DO NOT bend or twist the blade at any time during installation or use.
2 Use one hand to grasp the bottom of the upper wheel between two
spokes and gently pull the bottom of the wheel towards you, approximately 3/8" (Fig. A). You should feel it move easily initially, then “hit” and not want to go further without force, then pull the wheel down enough to place the blade around the upper wheel using your other hand.
3 Slowly release the wheel, making sure the blade remains on both
wheels and passes through the right and left channels (Fig. B).
4 Tracking (which we refer to as the position of the blade on the wheels)
is controlled by adjusting the tilt of the upper wheel. Check the tracking by rotating the lower drive wheel several revolutions by hand while watching the position of the blade on the wheels. The blade should remain centered on both wheels. If the blade isn’t centered or comes off either wheel, you will need to adjust the tracking and alignment as outlined in the next section on page 8. If the blade rides centered on the wheels, skip to “Blade tension” on page 9.Fig. A
Fig. B

8
ASSEMBLYAdjusting blade tracking and alignmentThe upper and lower wheels are factory-aligned, and the position of the blade is controlled by adjusting the upper wheel tilt. On the back of the upper saw housing is the tension block and springs, with a nylon tilt adjustment screw in the middle (Fig. C). Follow the troubleshooting below to properly adjust and align your blade tracking. *IMPORTANT: Be aware that any changes made to the blade position on the upper wheel will have the opposite effect on the blade’s position on the lower wheel. Make all adjustments in small increments.
If the blade “walks” off the front of the upper wheel: Tilt the top of the upper wheel backward by turning the nylon tilt adjustment screw to the right (clockwise). Make half-turn adjustments and test the effect on tracking by hand turning the lower wheel. Repeat as necessary until the blade remains in the correct position.
If the blade “walks” to the back of the upper wheel: Tilt the top of the upper wheel forward by turning the nylon tilt adjustment screw to the left (counter-clockwise). Make half-turn adjustments and test the effect on tracking by hand turning the lower wheel. Repeat as necessary until the blade remains in the correct position.
If the blade “walks” off the lower wheel: This indicates that the upper and lower wheels are not in alignment with each other. The lower (fixed) wheel is closer to the back of the frame than the upper (adjustable) wheel. The lower wheel should be ½" from the inside of the frame. Measure with a ruler or scale. The lower wheel can be moved in or out by inserting the included 5/64" Allen wrench through the hole in the lower left side of the saw frame (Fig. D). Loosen the set screw located in the brass arbor on the lower wheel. Adjust wheel to the correct position, re-measure, then secure the set screw.
Fig. C
Fig. D
Nylon tilt adjustment screw
Tension block
Set screw
Allen wrench access
9
ASSEMBLYBlade tensionProper blade tension is important for cutting ease and obtaining maximum blade life. The tension springs lessen the stress that twists and pulls put on the blade to maximize blade life. All Inland saws have tension springs preset for a blade 37.7" in circumference (+ or - .005”)—the exact dimension of Inland-brand blades. If you use an Inland blade, you should never have problems with tension. Some competitors make blades that are only 37.2" and so will have too much tension on them, which could shorten blade life. We highly recommend the use of Inland-brand blades for all Inland-brand saws.
Installing the work surface
1 Place the included band saw work surface onto the table supports, with
the split facing the front of the saw.
2 Use a flat head screwdriver to attach and secure the work surface using
the included four 10-24 x ½" nylon screws. *IMPORTANT: DO NOT over tighten the nylon screws or you risk stripping the screws.
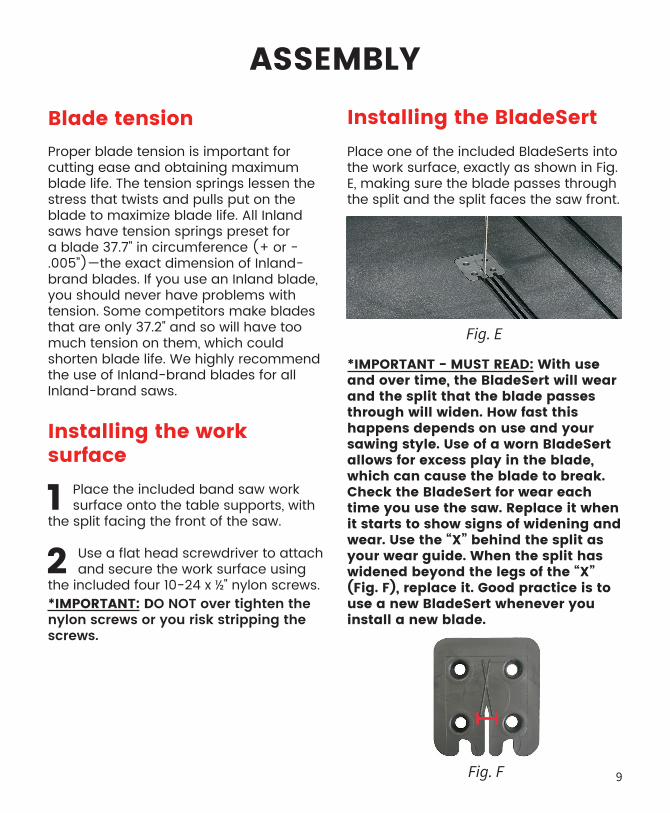
Installing the BladeSertPlace one of the included BladeSerts into the work surface, exactly as shown in Fig. E, making sure the blade passes through the split and the split faces the saw front.
*IMPORTANT - MUST READ: With use and over time, the BladeSert will wear and the split that the blade passes through will widen. How fast this happens depends on use and your sawing style. Use of a worn BladeSert allows for excess play in the blade, which can cause the blade to break.Check the BladeSert for wear each time you use the saw. Replace it when it starts to show signs of widening and wear. Use the “X” behind the split as your wear guide. When the split has widened beyond the legs of the “X” (Fig. F), replace it. Good practice is to use a new BladeSert whenever you install a new blade.
Fig. E
Fig. F

10
ASSEMBLY
1 Slide the coolant reservoir onto the supports located on the back of
the saw, just above the tension unit. Fill with clean water, then put the coolant reservoir cover back in place.
2 Install the blade drip guide by placing it against the upper back
of the frame, with the blade passing through the slot in the holder front. Secure in place using two of the included 10-24 x ¾" nylon thumb screws. The guide is adjusted by loosening the screws and sliding the guide up or down as needed.
3 Control the water flow with the water control valve that is installed onto
the drain tube.
If you’re fragging corals, corrosion brought on by salt is the #1 threat to your band saw. Use clean RO/DI water in the saw for coolant. Use clean fresh water on your saw for clean up. The amount of water present and the amount of time that it makes contact with the coral will not harm the animal. In fact, casual evidence suggests that fresh water may even be an advantage as it will help osmotically to destroy bacteria and other microorganisms.
Installing the coolant reservoir and blade drip guideThe coolant reservoir and blade drip guide must be installed when using adiamond saw blade to supply coolant to the blade. Using coolant with a diamond blade is required to maintain the cutting ability and life of the blade. We recommend using clean water. See Fig. G for final setup.
Fig. G
Blade drip guide
Coolant reservoir
Nylon screws

11
ASSEMBLYOptional leather wiperThe included leather wiper helps reduce the amount of over spray that might be carried from the blade to the upper wheel chamber. Follow the instructions below to properly install the leather wiper.
1 Open the front cover. There is a slot located on the upper left side of the
lower wheel chamber. This is where the leather wiper is installed.
2 Using a pair of pliers, compress one end of the leather. Clamp down hard.
3 Apply a small amount of dry soap or wax to the crimped end.
4 Using your pliers, push the crimped end into the slot so that the edge
of the leather just brushes against the blade. (Fig. I). *IMPORTANT NOTE: Make sure the leather wiper does not push the blade out of its normal path. Fig. J shows correct installation.
Installing the drain tubeThe drain tube must be installed when using a diamond band saw blade. This drains the dirty, used water so you don’t use recycled water.
1 Take the included plastic drain tube and straighten the tube by soaking it
in warm water for a few minutes. Pull it to remove any kinks.
2 Slide the drain tube onto the large stem located at the bottom front of
the saw (Fig. H).
3 Place the opposite end of the drain tube into a bucket or collection
container(not included).
4 Position the saw to the front edge of your work bench, with the drain
tube lying flat and extending straight out and down into the collection container. *NOTE: Periodically remove the drain tube and flush out any cutting residue with clean water to prevent clogs.
Fig. H
Fig. I
Fig. J

12
BAND SAW BLADES
Using the diamond bladeA coolant, such as water, is required with use of the diamond band saw blade. All water parts listed on pages 10 and 11 must be in use with this diamond blade.
1 Fill reservoir with clean water, put on safety goggles (not included),
then plug the DB-100 into a grounded electrical outlet.
2 Turn on water coolant using the water control valve. Adjust the
coolant flow using the water control valve as needed. Coolant flow rate should be about one drop of coolant every 4-5 seconds. Water should not flow excessively. Increase the water flow rate ONLY if a dry powder forms on the material you are sawing.
3 Turn on the saw using the power knob located on the left side of
the saw. The DB-100 is variable speed, delivering speeds up to 3,400 rpm. Turn the power knob slowly until you reach your desired sawing speed. It is not necessary to run your saw at full speed to achieve maximum cutting ability. Running at full speed on a continual basis adds extra stress on the blade and does not increase its cutting ability.
4 With the saw running, place your cutting material on the work table
in front of the blade. Using light pressure, guide the piece into the blade. DO NOT force anything into the diamond blade. Once you have the right feel, the blade will seem like it is pulling material into it. Forcefully pushing into the blade will not increase cutting speed and will bog it down. Use the power knob to adjust sawing speed to the material being cut and intricacy involved. The tighter the cut, the slower the speed needed to maintain control and not twist the blade.
5 The blade lasts longer if you do not run the motor idly. The continuous
bending and unbending of the metal as it moves over the wheels causes the blade to work harden and becomes brittle over time. A properly used blade will often fail from this work hardening before the diamonds wear out. To maximize the value of your blade, make sure to use the diamonds every time you make that metal bend and unbend.
6 Shut off the coolant flow after use. Frequently check the reservoir level
while sawing and fill as needed.Maintenance to your saw is minimal but important to prolonging the life and performance of the machine.
The DB-100 band saw is available with three different types of band saw blades; the diamond band saw blade, band saw blade for wood, and band saw blade for metal. Depending on the DB-100 model you purchased, you should have received at least one of these band saw blades, or all three. Follow the instructions below and on page 13 for proper use of these blades and final assembly of the DB-100.

13
Material and blade useThe table below lists material that can be cut wet, dry, or both, depending on the blade
BAND SAW BLADESUsing the wood and metal bladesWater coolant is not required with use of these blades for all material. Optionally remove all DB-100 water parts if using dry.
1 Install the blade with the teeth pointing downward. Refer to blade installation
on page 7. Put on safety goggles (not included), then plug the DB-100 into a grounded electrical outlet.
2 Turn on saw using the power knob located on the left side of the saw. The
DB-100 is variable speed. Turn the knob slowly until you reach your desired sawing speed. It is not necessary to run your saw at full speed to achieve maximum cutting ability. Running at full speed on
a continual basis adds extra stress on the blade and does not increase its cutting ability.
3 With the saw running, place your cutting material on the work table
in front of the blade. Using light pressure, guide the piece into the blade. DO NOT force anything into the blade. Once you have the right feel, the blade will seem like it is pulling material into it. Forcefully pushing into the blade will not increase cutting speed and will bog it down. The tighter the cut, the slower the speed needed to maintain control and not twist the blade.
4 If the blade seems limp, loose, or slips on the wheels while you saw, adjust the
blade tracking and tension as explained on pages 8 and 9.
Material Diamond blade
Wood blade
Metal blade
Glass WET
Semiprecious gemstones WET
Ceramics WET
Cement WET
Marble WET
Granite WET
Coral WET
Material Diamond blade
Wood blade
Metal blade
Silicon WET
Thin metals WET DRY
Hard plastics WET WET/DRY
Other plastics WET WET/DRY WET/DRY
Fiberglass WET WET/DRY
Wood DRY
Leather WET DRY DRY
14
MAINTENANCE
Saw housingAfter each use, rinse the interior of the saw with clean water. Wood and metal shavings can be vacuumed out.
MotorThe motor is sealed and requires no internal maintenance. Make sure to keep the unit clean and dry after use.
Upper drive wheelGreasing the upper wheel bearings with petroleum jelly at least every 5 hours of use will help keep debris out of the needle bearings. Do this by fi rst emptying the coolant reservoir (if wet sawing), then tilt the saw backward at a 45° angle. Apply a generous amount of petroleum jelly to the bearing area.
BladeSert blade guideThe BladeSert wears with saw use. The slot that the blade passes through will widen over time. Check the BladeSert for wear each time you use the saw and immediately replace when it begins to show signs of widening and wear. Use the “X” behind the slot as a wear guide. Refer to the BladeSert section on page 9.
Leather wiperAs the end wears, reposition it, referring to the leather wiper installment instructions on page 11.
Work tableAfter each use, rinse the work table with clean water to remove cutting residue.
Drain tubePeriodically remove and rinse the drain tube and large stem with clean water. This will ensure the drain tube fl ows freely and prevents blockage.
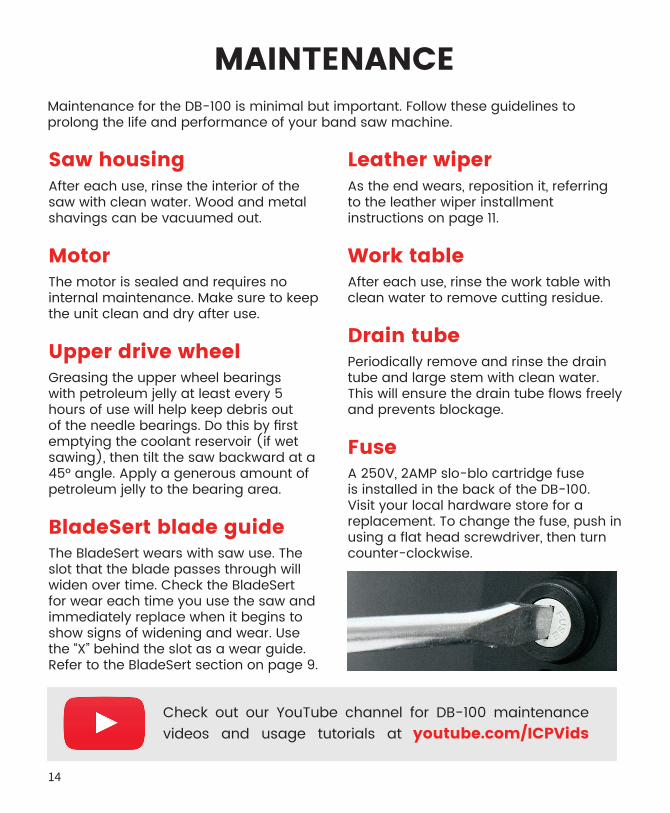
FuseA 250V, 2AMP slo-blo cartridge fuse is installed in the back of the DB-100. Visit your local hardware store for a replacement. To change the fuse, push in using a fl at head screwdriver, then turn counter-clockwise.
Maintenance for the DB-100 is minimal but important. Follow these guidelines to prolong the life and performance of your band saw machine.
Check out our YouTube channel for DB-100 maintenance videos and usage tutorials at youtube.com/ICPVids

15
ACCESSORIESFor a complete list of DB-100 parts and accessories, visit inlandcraft.com
Band saw blade for woodSKU: 90001
Band saw blade for metalSKU: 90003
Band saw BladeSert blade guideSKU: 90022
Diamond band saw blade SKU: 90007

Manufactured byReentel International Inc.
808 Burr Oak DriveWestmont, IL 60559
U.S.A.
Phone(248) 583-7150
Websiteinlandcraft.com
Facebookfacebook.com/inlandcraft
Twittertwitter.com/inlandcraft
YouTubeyoutube.com/ICPVids