Database Installation Guide - NP - 3.2
266
-
Upload
ricardo-kaligari-marulanda -
Category
Documents
-
view
251 -
download
6
Transcript of Database Installation Guide - NP - 3.2

��������������� ���������
����������
���������


Information in this document is subject to change without notice and does not represent a commitment on the part of NICE Systems Ltd. The systems described in this document are furnished under a license agreement or nondisclosure agreement.
All information included in this document, such as text, graphics, photos, logos and images, is the exclusive property of NICE Systems Ltd. and protected by United States and international copyright laws.
Permission is granted to view and photocopy (or print) materials from this document for personal, non-commercial use only. Any other copying, distribution, retransmission or modification of the information in this document, whether in electronic or hard copy form, without the express prior written permission of NICE Systems Ltd., is strictly prohibited. In the event of any permitted copying, redistribution or publication of copyrighted material, no changes in, or deletion of, author attribution, trademark legend or copyright notice shall be made.
All contents of this document are: Copyright © 2010 NICE Systems Ltd. All rights reserved.This product is covered by one or more of the following US patents:
360o View, ACTIMIZE, Actimize logo, Alpha, Customer Feedback, Dispatcher Assessment, Encorder, eNiceLink, Executive Connect, Executive Insight, FAST, FAST alpha Blue, FAST alpha Silver, FAST Video Security, Freedom, Freedom Connect, IEX, Interaction Capture Unit, Insight from Interactions, Investigator, Last Message Replay, Mirra, My Universe, NICE, NICE logo, NICE Analyzer, NiceCall, NiceCall Focus, NiceCLS, NICE Inform, NICE Learning, NiceLog, NICE Perform, NiceScreen, NICE SmartCenter, NICE Storage Center, NiceTrack, NiceUniverse, NiceUniverse Compact, NiceVision, NiceVision Alto, NiceVision Analytics, NiceVision ControlCenter, NiceVision Digital, NiceVision Harmony, NiceVision Mobile, NiceVision Net, NiceVision NVSAT, NiceVision Pro, Performix, Playback Organizer, Renaissance, Scenario Replay, ScreenSense, Tienna, TotalNet, TotalView, Universe, Wordnet are trademarks and registered trademarks of NICE Systems Ltd. All other registered and unregistered trademarks are the property of their respective owners.
Applications to register certain of these marks have been filed in certain countries, including Australia, Brazil, the European Union, Israel, Japan, Mexico, Argentina and the United States. Some of such registrations have matured to registrations.
385A0647-03 Rev. A4
5,185,780
5,446,603
6,192,346
6,542,602
6,856,343
6,970,829
7,240,328
7,436,887
7,581,001
7,683,929
7,738,459
5,216,744
5,457,782
6,246,752
6,615,193
6,865,604
7,010,106
7,305,082
7,474,633
7,587,454
7,705,880
7,751,590
5,274,738
5,911,134
6,249,570
6,694,374
6,871,229
7,010,109
7,333,445
7,532,744
7,599,475
7,714,878
7,761,544
5,289,368
5,937,029
6,252,946
6,728,345
6,880,004
7,058,589
7,346,186
7,545,803
7,631,046
7,716,048
7,770,221
5,325,292
6,044,355
6,252,947
6,775,372
6,937,706
7,085,728
7,383,199
7,546,173
7,660,297
7,720,706
7,788,095
5,339,203
6,115,746
6,311,194
6,785,369
6,959,079
7,152,018
7,386,105
7,573,421
7,664,794
7,725,318
7,801,288
5,396,371
6,122,665
6,330,025
6,785,370
6,965,886
7,203,655
7,392,160
7,577,246
7,665,114
7,728,870
RE41,292

For assistance contact your local supplier or nearest NICE Systems Customer Service Center:
EMEA Region: (Europe, Middle East, Africa)Tel: +972-9-775-3800Fax: +972-9-775-3000email: [email protected]
APAC Region: (Asia/Pacific)Tel: +852-8338-9818Fax: +852-2802-1800email: [email protected]
The Americas Region: (North, Central, South America)Tel: 1-800-NICE-611Fax: +720-264-4012email: [email protected]
Israel:Tel: 09-775-3333Fax: 09-775-3000email: [email protected]
All queries, comments, and suggestions are welcome! Please email: [email protected] more information about NICE, visit www.nice.com
International Headquarters-IsraelTel: +972-9-775-3100Fax: +972-9-775-3070email: [email protected]
North AmericaTel: 1-800-663-5601Fax: +201-356-2197email: [email protected]
United KingdomTel: +44-8707-22-4000Fax: +44-8707-22-4500
GermanyTel: +49-(0)-69-97177-0Fax: +49-(0)-69-97177-200
FranceTel: +33-(0)1-41-38-5000Fax: +33-(0)1-41-38-5001
Hong-KongTel: +852-2598-3838Fax: +852-2802-1800
NICE invites you to join the NICE User Group (NUG).
Visit the NUG Website at www.niceusergroup.org, and follow the online instructions.

Revision HistoryDatabases Installation Guide
Revision Modification Date Description
A0 May 2009 • Added Quick Start (see Quick Start on page 27)
• Updated Installation procedures.
• Updated Uninstall procedures.
• Added nice_as_kpi to all references to multidimensional databases.
• Added System Admin configuration procedures.
• Updated System Admin configuration procedures.
• Added Data Mart Troubleshooting chapter.
• Added Multi Data Hub Troubleshooting chapter.
• Updated Appendices B and D.
• Added references to SQL 2008.
A1 December 2009 • Updated list of mandatory requirements.
• Updated database installation procedures.
• Added updates to troubleshooting
• Updated graphics wherever applicable.
A2 February 2010 • Updated to reflect policy of installing all relational databases.
• Updated the Quick Start.
A3 August 2010 • Updated DBSetup installation procedures.
• Updated database uninstall procedures.
• Updated the Quick Start.
• Added support for Windows 2008 R2 operating systems.
• Updated Kerberos Delegation procedures.
• Added and updated database configuration procedures.
• Updated the Summary Page appendix.
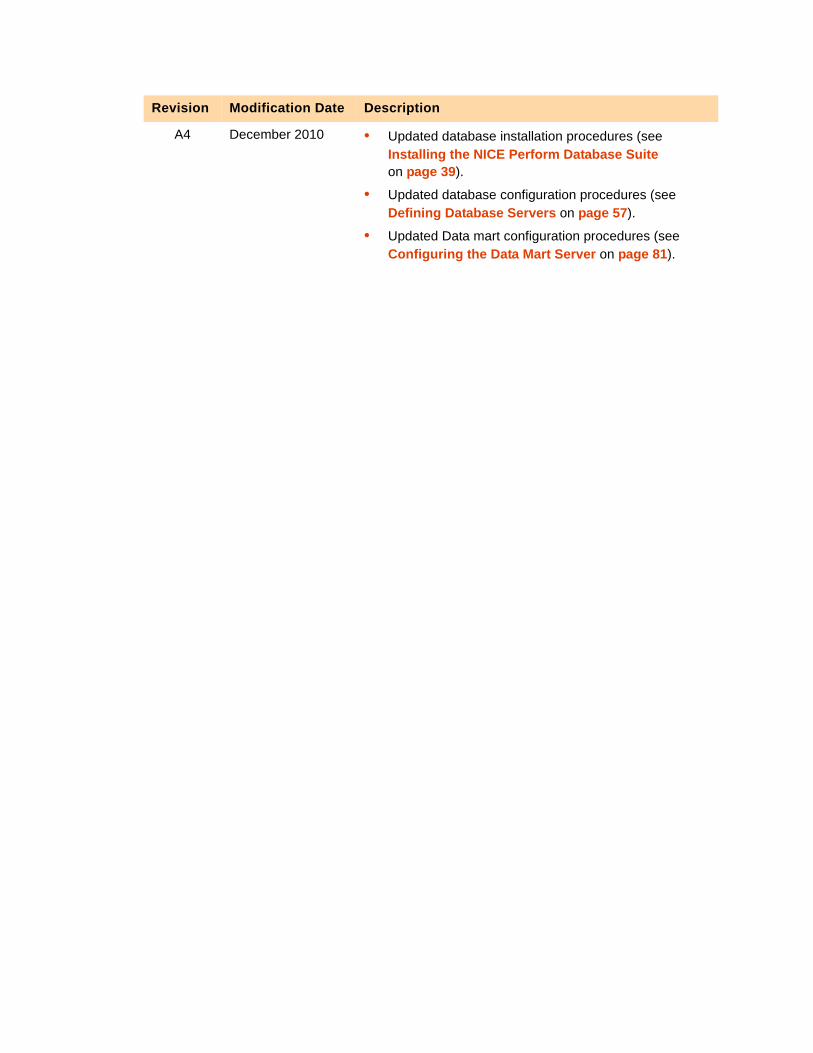
A4 December 2010 • Updated database installation procedures (see Installing the NICE Perform Database Suite on page 39).
• Updated database configuration procedures (see Defining Database Servers on page 57).
• Updated Data mart configuration procedures (see Configuring the Data Mart Server on page 81).
Revision Modification Date Description

Contents
NICE Perform® Release 3.2: Databases Installation Guide (Rev A4)
7
Contents
1Introduction 15
NICE Perform Site Installation Overview . . . . . . . . . . . . . . . . . . . . . . . . . . . . 16Database Names and Descriptions . . . . . . . . . . . . . . . . . . . . . . . . . . . . . . . . 17Running Database Recovery Practice Sessions . . . . . . . . . . . . . . . . . . . . . . 18Hardware and Software Requirements. . . . . . . . . . . . . . . . . . . . . . . . . . . . . . 18
Guidelines for Installing Components on Windows Server 2008/Windows Server 2008 R2 . . . . . . . . . . . . . . . . . . . . . . . . . . . . . . . . . . . . . . . . . . . . . . 18Kerberos Delegation . . . . . . . . . . . . . . . . . . . . . . . . . . . . . . . . . . . . . . . . . . 19
Setting up the Servers . . . . . . . . . . . . . . . . . . . . . . . . . . . . . . . . . . . . . . . . . . 19About Windows (NT) Authentication . . . . . . . . . . . . . . . . . . . . . . . . . . . . . . 19
Domain User Account for NICE Services . . . . . . . . . . . . . . . . . . . . . . . . 21Domain User Account for SQL Services . . . . . . . . . . . . . . . . . . . . . . . . 22
Setting up the Microsoft SQL Server . . . . . . . . . . . . . . . . . . . . . . . . . . . . . . 23
Reindex Job. . . . . . . . . . . . . . . . . . . . . . . . . . . . . . . . . . . . . . . . . . . . . . . . . . . 23Calculating Database Size . . . . . . . . . . . . . . . . . . . . . . . . . . . . . . . . . . . . . . . 23Language Settings . . . . . . . . . . . . . . . . . . . . . . . . . . . . . . . . . . . . . . . . . . . . . 24Microsoft SQL Server Analysis Services . . . . . . . . . . . . . . . . . . . . . . . . . . . . 24
Multidimensional Databases . . . . . . . . . . . . . . . . . . . . . . . . . . . . . . . . . . . . 24Data Mart Server . . . . . . . . . . . . . . . . . . . . . . . . . . . . . . . . . . . . . . . . . . . . 25
Enabling Display of NICE System Information in System Administrator . . . 25
2Quick Start 27

8 Contents
NICE Perform® Release 3.2: Databases Installation Guide (Rev A4)
3Installing the NICE Perform Database Suite 39
About the NICE Perform Database Suite . . . . . . . . . . . . . . . . . . . . . . . . . . . . 40Installing the NICE Perform Database Suite Software . . . . . . . . . . . . . . . . . 41Defining Kerberos Delegation . . . . . . . . . . . . . . . . . . . . . . . . . . . . . . . . . . . . 55
4Defining Database Servers 57
What is Database Server Configuration?. . . . . . . . . . . . . . . . . . . . . . . . . . . . 58Which method of SQL Server Authentication is in use?. . . . . . . . . . . . . . . . 60Defining a Database Server . . . . . . . . . . . . . . . . . . . . . . . . . . . . . . . . . . . . . . 61Managing Databases . . . . . . . . . . . . . . . . . . . . . . . . . . . . . . . . . . . . . . . . . . . . 65
Indexing Reserved Columns . . . . . . . . . . . . . . . . . . . . . . . . . . . . . . . . . . . . 66Changing Column Names - Using Aliases . . . . . . . . . . . . . . . . . . . . . . . . . . 67Activating/Deactivating Data Columns . . . . . . . . . . . . . . . . . . . . . . . . . . . . 69Added Security for SQL Server Authentication - Changing Passwords . . . . 70
Changing the nice sa Login Password . . . . . . . . . . . . . . . . . . . . . . . . . . 70Changing a NICE Login Password for an Individual SQL Server . . . . . . 71Removing Subscribers from Replication . . . . . . . . . . . . . . . . . . . . . . . . 73
Modifying a Database Server Definition . . . . . . . . . . . . . . . . . . . . . . . . . . . 75Deleting a Database Server Definition . . . . . . . . . . . . . . . . . . . . . . . . . . . . 75
Scheduling Database Backup. . . . . . . . . . . . . . . . . . . . . . . . . . . . . . . . . . . . . 76Guidelines for Restoring a Database . . . . . . . . . . . . . . . . . . . . . . . . . . . . . . 78Running or Stopping a Database Backup Job . . . . . . . . . . . . . . . . . . . . . . . 79
5Configuring the Data Mart Server 81
What is the Data Mart? . . . . . . . . . . . . . . . . . . . . . . . . . . . . . . . . . . . . . . . . . . 82Data Mart Installation Guidelines . . . . . . . . . . . . . . . . . . . . . . . . . . . . . . . . 84Single Data Hub Architecture . . . . . . . . . . . . . . . . . . . . . . . . . . . . . . . . . . . 84Architecture for Multi Data Hubs . . . . . . . . . . . . . . . . . . . . . . . . . . . . . . . . . 85
Building the Data Mart . . . . . . . . . . . . . . . . . . . . . . . . . . . . . . . . . . . . . . . . . . 87Verify the Data Mart Installation . . . . . . . . . . . . . . . . . . . . . . . . . . . . . . . . . 87

9 Contents
NICE Perform® Release 3.2: Databases Installation Guide (Rev A4)
Define the Data Mart . . . . . . . . . . . . . . . . . . . . . . . . . . . . . . . . . . . . . . . . . . 88Install the NICE Domains . . . . . . . . . . . . . . . . . . . . . . . . . . . . . . . . . . . . . . 90Link the Databases to the NICE Domains . . . . . . . . . . . . . . . . . . . . . . . . . . 92Define Data Mart Properties . . . . . . . . . . . . . . . . . . . . . . . . . . . . . . . . . . . . 94
Customizing Schedules . . . . . . . . . . . . . . . . . . . . . . . . . . . . . . . . . . . . . . . . . 96Modifying a Data Mart Schedule . . . . . . . . . . . . . . . . . . . . . . . . . . . . . . . . . 97Creating a Customized Schedule . . . . . . . . . . . . . . . . . . . . . . . . . . . . . . . . 99Selecting Schedules for a Domain . . . . . . . . . . . . . . . . . . . . . . . . . . . . . . 100
Monitoring SQL Jobs . . . . . . . . . . . . . . . . . . . . . . . . . . . . . . . . . . . . . . . . . . 102Viewing Synchronization Details . . . . . . . . . . . . . . . . . . . . . . . . . . . . . . . . . 104What are the Data Mart Domains? . . . . . . . . . . . . . . . . . . . . . . . . . . . . . . . . 106
6Configuring the Multidimensional Databases 109
Configuring the Multidimensional Databases in the System Administrator. . . . . . . . . . . . . . . . . . . . . . . . . . . . . . . . . . . . . . . . . . . . . . . . . 110
Defining Schedules for SQL Jobs . . . . . . . . . . . . . . . . . . . . . . . . . . . . . . . 114
Verifying Connection to the Multidimensional Databases . . . . . . . . . . . . . 116
7Uninstalling Databases from the Database Suite 117
8Troubleshooting: Databases 125
General Databases Troubleshooting Flow. . . . . . . . . . . . . . . . . . . . . . . . . . 127General Considerations . . . . . . . . . . . . . . . . . . . . . . . . . . . . . . . . . . . . . . . . 128Checking the Windows Event Viewer. . . . . . . . . . . . . . . . . . . . . . . . . . . . . . 128Checking the SQL Server Error Logs and Events . . . . . . . . . . . . . . . . . . . . 128Checking SQL Jobs. . . . . . . . . . . . . . . . . . . . . . . . . . . . . . . . . . . . . . . . . . . . 129Checking the Connection to the NICE Perform Database Server . . . . . . . . 129Checking the Database Connections . . . . . . . . . . . . . . . . . . . . . . . . . . . . . . 129Checking for Missing Databases . . . . . . . . . . . . . . . . . . . . . . . . . . . . . . . . . 130Checking Free Space in the Database . . . . . . . . . . . . . . . . . . . . . . . . . . . . . 131

10 Contents
NICE Perform® Release 3.2: Databases Installation Guide (Rev A4)
Verifying the Log on as a Service User Rights Assignment . . . . . . . . . . . . 132Verifying the Service Account . . . . . . . . . . . . . . . . . . . . . . . . . . . . . . . . . . 132Verifying Domain Users Assigned to the User Rights Assignments . . . . . . 133
Checking the SQL Server Installation Folder . . . . . . . . . . . . . . . . . . . . . . . 135Monitoring Performance Objects and Counters . . . . . . . . . . . . . . . . . . . . . 136Checking for Performance Problems . . . . . . . . . . . . . . . . . . . . . . . . . . . . . . 137Scanning the Disk for Errors . . . . . . . . . . . . . . . . . . . . . . . . . . . . . . . . . . . . 139Changing the Database Passwords in SQL Authentication . . . . . . . . . . . . 139
Changing the nice sa Login Password . . . . . . . . . . . . . . . . . . . . . . . . . . . 140Changing the nice Login Password . . . . . . . . . . . . . . . . . . . . . . . . . . . . . . 141
Checking the Database Backup . . . . . . . . . . . . . . . . . . . . . . . . . . . . . . . . . . 142Increasing the Size of a Database . . . . . . . . . . . . . . . . . . . . . . . . . . . . . . . . 143Checking Performance Using the NICE Performance Collector . . . . . . . . . 144Defining Autogrowth . . . . . . . . . . . . . . . . . . . . . . . . . . . . . . . . . . . . . . . . . . . 146Verifying Database Space Using the NICE DBSpace Utility . . . . . . . . . . . . 148
9Troubleshooting: Data Mart Server 155
General Data Mart Troubleshooting Flow . . . . . . . . . . . . . . . . . . . . . . . . . . 156Checking Free Space in the Database . . . . . . . . . . . . . . . . . . . . . . . . . . . . . 157Recreating Links . . . . . . . . . . . . . . . . . . . . . . . . . . . . . . . . . . . . . . . . . . . . . . 158Checking the Data Mart Database Version . . . . . . . . . . . . . . . . . . . . . . . . . 159Checking Connectivity Between the Database and Data Mart Servers . . . 160Checking a Data Mart Job Failure . . . . . . . . . . . . . . . . . . . . . . . . . . . . . . . . 160
10Troubleshooting: Multi Data Hub 163
General Considerations . . . . . . . . . . . . . . . . . . . . . . . . . . . . . . . . . . . . . . . . 164Multi Data Hub Implications . . . . . . . . . . . . . . . . . . . . . . . . . . . . . . . . . . . . . 164
Database . . . . . . . . . . . . . . . . . . . . . . . . . . . . . . . . . . . . . . . . . . . . . . . . . 164System Administrator . . . . . . . . . . . . . . . . . . . . . . . . . . . . . . . . . . . . . . . . 164Rule Engine . . . . . . . . . . . . . . . . . . . . . . . . . . . . . . . . . . . . . . . . . . . . . . . 164Business Analyzer . . . . . . . . . . . . . . . . . . . . . . . . . . . . . . . . . . . . . . . . . . 165Playback . . . . . . . . . . . . . . . . . . . . . . . . . . . . . . . . . . . . . . . . . . . . . . . . . . 165
11 Contents
NICE Perform® Release 3.2: Databases Installation Guide (Rev A4)
Monitor . . . . . . . . . . . . . . . . . . . . . . . . . . . . . . . . . . . . . . . . . . . . . . . . . . . 165Quality Management . . . . . . . . . . . . . . . . . . . . . . . . . . . . . . . . . . . . . . . . . 165My Universe . . . . . . . . . . . . . . . . . . . . . . . . . . . . . . . . . . . . . . . . . . . . . . . 165Interactions Center . . . . . . . . . . . . . . . . . . . . . . . . . . . . . . . . . . . . . . . . . . 165Storage Center . . . . . . . . . . . . . . . . . . . . . . . . . . . . . . . . . . . . . . . . . . . . . 165
Checking Connectivity . . . . . . . . . . . . . . . . . . . . . . . . . . . . . . . . . . . . . . . . . 166Checking Replication in Multi Data-Hub Environments . . . . . . . . . . . . . . . 166Troubleshooting Communication Problems between Primary and Secondary Data Hubs . . . . . . . . . . . . . . . . . . . . . . . . . . . . . . . . . . . . . . . . . . 167Troubleshooting Database Structure Differences . . . . . . . . . . . . . . . . . . . . 168Stopping Replication when Upgrading all Data Hubs . . . . . . . . . . . . . . . . . 168Changing Passwords . . . . . . . . . . . . . . . . . . . . . . . . . . . . . . . . . . . . . . . . . . 168Enabling MSDTC to Function in Multi Site Environments. . . . . . . . . . . . . . 169Tips for Troubleshooting Replication . . . . . . . . . . . . . . . . . . . . . . . . . . . . . 169
AVerifying Windows Authentication Security Settings 171
BEstablishing Access to the Multidimensional Databases 175
Verifying Connection to the Multidimensional Databases . . . . . . . . . . . . . 176Defining Domain Users for the nice_as_kpi Database . . . . . . . . . . . . . . . . 179
Adding a Domain User to the Process Role . . . . . . . . . . . . . . . . . . . . . . . 179Adding a Domain User to the View Role . . . . . . . . . . . . . . . . . . . . . . . . . . 184
Defining Domain Users for the nice_as_my_universe Database . . . . . . . . 185Adding a Domain User to the Process Role . . . . . . . . . . . . . . . . . . . . . . . 185Adding a Domain User to the View Role . . . . . . . . . . . . . . . . . . . . . . . . . . 186
Defining Domain Users for the nice_as_text_analysis . . . . . . . . . . . . . . . . 187Adding a Domain User to the Process Role . . . . . . . . . . . . . . . . . . . . . . . 187Adding a Domain User to the View Role . . . . . . . . . . . . . . . . . . . . . . . . . . 188

12 Contents
NICE Perform® Release 3.2: Databases Installation Guide (Rev A4)
CConfiguring Kerberos Delegation 189
Overview . . . . . . . . . . . . . . . . . . . . . . . . . . . . . . . . . . . . . . . . . . . . . . . . . . . . 190Requirements . . . . . . . . . . . . . . . . . . . . . . . . . . . . . . . . . . . . . . . . . . . . . . 190Verifying the SQL Server Protocol . . . . . . . . . . . . . . . . . . . . . . . . . . . . . . 191Verifying the SQL Port Number . . . . . . . . . . . . . . . . . . . . . . . . . . . . . . . . . 192
Configuring Kerberos . . . . . . . . . . . . . . . . . . . . . . . . . . . . . . . . . . . . . . . . . . 193Configuring the Service Principal Name on the Active Directory . . . . . . . . 193Disabling the Named Pipes Protocol on the SQL Server . . . . . . . . . . . . . . 195
Configuring Delegations . . . . . . . . . . . . . . . . . . . . . . . . . . . . . . . . . . . . . . . . 197
DRunning the NICE DBSpace Utility 201
EEnabling Microsoft SQL Server 2008/2008 R2 Analysis Services 207
Enabling the SQL Server Analysis Services Service . . . . . . . . . . . . . . . . . 208Defining the Local System Account in the nice_dw Database . . . . . . . . . . 211
FCreating Domain Users and Updating Privileges 213
Setting up a Domain User Account on the Active Directory . . . . . . . . . . . . 214Creating a Domain User Account on the Active Directory . . . . . . . . . . . . . 214Assigning User Rights Assignments for the Domain User Account on the Active Directory . . . . . . . . . . . . . . . . . . . . . . . . . . . . . . . . . . . . . . . . . . . . 217
Setting up the Domain User on the Domain Client . . . . . . . . . . . . . . . . . . . 221Updating Privileges of the Domain User on the Domain Client . . . . . . . . . 224
13 Contents
NICE Perform® Release 3.2: Databases Installation Guide (Rev A4)
GScheduling the ReIndex Job 227
HEnabling Summary Page Display of NICE System Information 231
Overview . . . . . . . . . . . . . . . . . . . . . . . . . . . . . . . . . . . . . . . . . . . . . . . . . . . . 232Common Terms . . . . . . . . . . . . . . . . . . . . . . . . . . . . . . . . . . . . . . . . . . . . . . . 233Windows 2008 / Windows 2008 R2: Enabling Summary Page Display . . . 234
Adding the System Administrator User to Computers not in an Active Directory Environment . . . . . . . . . . . . . . . . . . . . . . . . . . . . . . . . . . . . . . . 234Editing DCOM Permissions . . . . . . . . . . . . . . . . . . . . . . . . . . . . . . . . . . . . 237
Windows 2003: Enabling Summary Page Display . . . . . . . . . . . . . . . . . . . . 244Verifying the System Administrator User . . . . . . . . . . . . . . . . . . . . . . . . . . 244Adding the System Administrator User to Computers not in an Active Directory Environment . . . . . . . . . . . . . . . . . . . . . . . . . . . . . . . . . . . . . . . 246Installing WMI Windows Management Instrumentation . . . . . . . . . . . . . . . 249Editing DCOM Permissions . . . . . . . . . . . . . . . . . . . . . . . . . . . . . . . . . . . . 251Setting Security Permissions through the WMI Control . . . . . . . . . . . . . . . 257
Index 263

Blank page for double-sided printing.
Chapter 1: Introduction
NICE Perform® Release 3.2: Databases Installation Guide (Rev A4)
15
1
Introduction
This manual describes the procedures for installing and configuring all NICE Perform databases on their respective servers.
Contents
NICE Perform Site Installation Overview......................................................................16
Database Names and Descriptions...............................................................................17
Running Database Recovery Practice Sessions .........................................................18
Hardware and Software Requirements.........................................................................18
Setting up the Servers ...................................................................................................19
Reindex Job ....................................................................................................................23
Calculating Database Size .............................................................................................23
Language Settings .........................................................................................................24
Microsoft SQL Server Analysis Services .....................................................................24
Enabling Display of NICE System Information in System Administrator..................25
16 Chapter 1: Introduction
NICE Perform® Release 3.2: Databases Installation Guide (Rev A4)
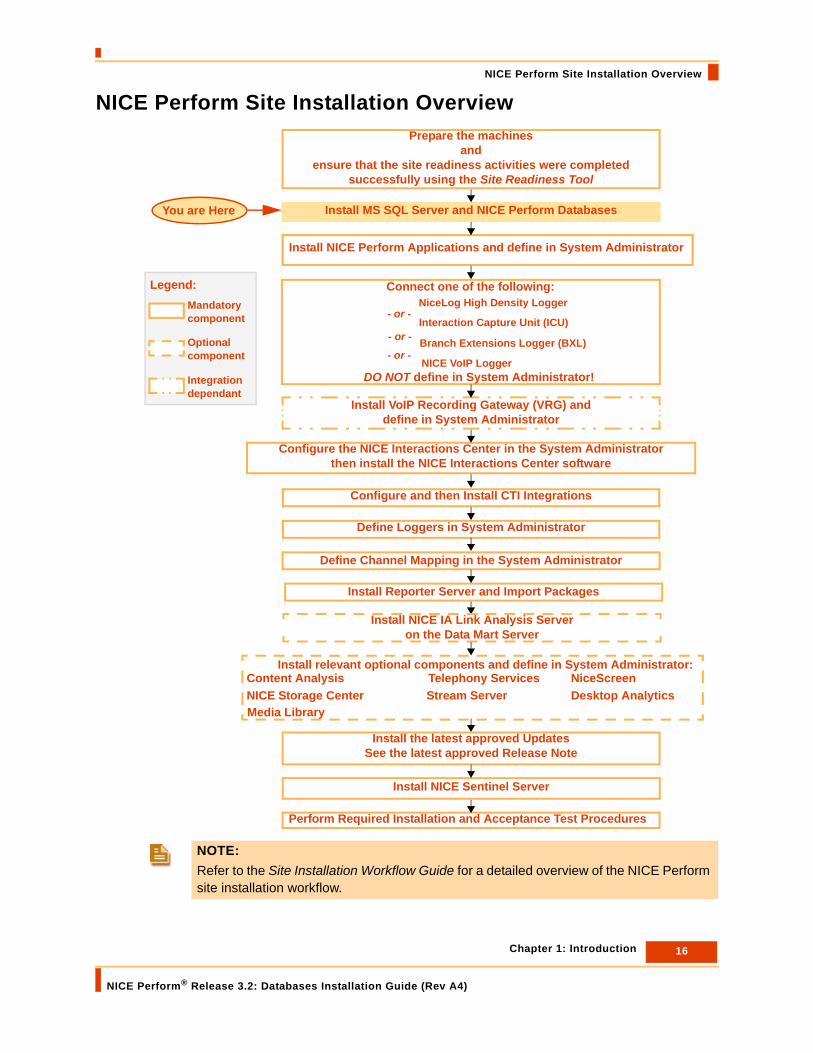
NICE Perform Site Installation Overview
NICE Perform Site Installation Overview
NOTE: Refer to the Site Installation Workflow Guide for a detailed overview of the NICE Perform site installation workflow.
Install MS SQL Server and NICE Perform Databases
NiceLog High Density Logger
Interaction Capture Unit (ICU)
Legend: Connect one of the following:
NICE VoIP Logger
Install NICE Perform Applications and define in System Administrator
Configure and then Install CTI Integrations
Configure the NICE Interactions Center in the System Administratorthen install the NICE Interactions Center software
Install VoIP Recording Gateway (VRG) and define in System Administrator
NiceScreenDesktop AnalyticsNICE Storage Center
Media Library
Telephony ServicesContent Analysis
Define Channel Mapping in the System Administrator
Stream Server
DO NOT define in System Administrator!
- or -
Integration dependant
Install relevant optional components and define in System Administrator:
Mandatorycomponent
Optional component
Install NICE IA Link Analysis Serveron the Data Mart Server
- or -
- or - Branch Extensions Logger (BXL)
Define Loggers in System Administrator
Install Reporter Server and Import Packages
Install NICE Sentinel Server
Prepare the machinesand
ensure that the site readiness activities were completed successfully using the Site Readiness Tool
Perform Required Installation and Acceptance Test Procedures
Install the latest approved UpdatesSee the latest approved Release Note
You are Here

17 Chapter 1: Introduction
NICE Perform® Release 3.2: Databases Installation Guide (Rev A4)
Database Names and Descriptions
Database Names and Descriptions
The following tables list all the databases included in the NICE Perform Database Suite:
Table 1-1: Relational Databases
Database Description
nice_admin The Administration database. Contains information such as all user/agent details, administrative settings, and privileges. Information from the Users Administrator and System Administrator are stored in this database.
nice_audit Contains a record of actions in the system for use by the Audit Trail in Business Analyzer. For example, agent login and report requests.
nice_ca Contains Audio Analysis information. Required for use with Business Analyzer.
nice_crypto Serves as a repository for encryption keys for the NICE Key Storage Manager (KSM) application.
nice_cti_analysis Contains information from your switch used by Business Analyzer and not included in the nice_interactions database.
nice_dw Required for use with Data Mart.
nice_ib Required for use with Playback Organizer.
nice_interactions The Interactions database. Stores identifying information about each interaction. For example, Start time and agent ID. The actual recordings are stored on the Loggers. This database must link to all the other databases for Query searches.
nice_pbs_data Required for use with the Playback Server.
nice_qa Required for use with Coaching and Clips in the Business Analyzer.
nice_reporter Contains information for the Reporter.
nice_rule Contains information from the Rules Manager.
nice_screen_sense Required for use with ScreenSense.
nice_storage_center Required for use with Storage Center.
Table 1-2: Multidimensional Databases
Database Description
nice_as_kpi Optional database for use with My Universe.
nice_as_my_universe Required for use with My Universe.
nice_as_text_analysis Required for use with ClearSight.

18 Chapter 1: Introduction
NICE Perform® Release 3.2: Databases Installation Guide (Rev A4)
Running Database Recovery Practice Sessions
Running Database Recovery Practice SessionsIt is most highly recommended to make provision for backing up and restoring the nice databases in case of system failure and/or natural disasters. Since the requirements vary from site to site, the backup and restore methods likewise vary from site to site. Should a full system database recovery be necessary, in many cases the procedures may be long and complicated.
In order to be prepared for such an event, and in order to facilitate the recovery procedures while greatly increasing the likelihood that the recovery will be successful, it is therefore recommended to run a full system database recovery practice session at least once every three months.
For assistance, contact NICE Systems Customer Service.
Hardware and Software RequirementsFor the software and hardware requirements of the NICE Perform Database Server, and of all other NICE Perform servers, refer to the NICE Perform Certified Servers Guide.
Guidelines for Installing Components on Windows Server 2008/Windows Server 2008 R2
The Certified Servers Guide provides all Operating System support information. If the NICE Perform component you are installing is supported on a Windows Server 2008 or Windows Server 2008 R2 Operating System, refer to the following manuals before installation:
• Microsoft Windows Server 2008 Configuration Guide
• Microsoft Windows Server 2008 R2 Configuration Guide
In a UAC On environment, special attention is required:
• Some components can be installed with UAC On, however specific security options will need to be disabled temporarily.
• Some components cannot be installed with UAC On. For these components, UAC must be turned off. When installation is complete, turn UAC back on.
The above manuals provide the following information per operating system:
• List of components itemizing which components require turning off UAC.
• Instructions for turning UAC off and turning it back on.
NOTE: The nice_as_my_universe, nice_as_text_analysis, and nice_as_kpi databases are multidimensional databases, and therefore run on the SQL Server Analysis Services.
NOTE: The NICE Perform System Administrator includes a summary page that displays the NICE product version and the installed Updates. For details see Appendix H, Enabling Summary Page Display of NICE System Information on page 231.

19 Chapter 1: Introduction
NICE Perform® Release 3.2: Databases Installation Guide (Rev A4)
Setting up the Servers
• Instructions for disabling and re-enabling security options when working with UAC on.
Kerberos Delegation
When using Windows Authentication in a Multi Data Hub environment, or in a Distributed environment in which there are two or more NICE Perform databases, evaluations are replicated through Linked Servers. For replication of Evaluations data to succeed, you must define Delegation for the Kerberos protocol.
For full details, see Appendix C, Configuring Kerberos Delegation on page 189.
Setting up the ServersThe relational databases included in the NICE Perform Database Suite are usually installed on the NICE Perform Database Server. However, if your site includes the Data Mart Server, you install the nice_dw and nice_reporter relational databases and the nice_as_text_analysis, nice_as_my_universe, and nice_as_kpi multidimensional databases on the Data Mart Server.
The following sections apply to all servers used for NICE Perform databases:
• About Windows (NT) Authentication (see page 19)
• Setting up the Microsoft SQL Server (see page 23)
About Windows (NT) Authentication
The NICE Perform Database Suite supports both SQL Authentication and Windows (NT) Authentication. However, due to its superior security features, it is highly recommended to use Windows Authentication.
NOTE: To successfully install the NICE Perform system, it is critical that you set up Windows Authentication properly. For full details, see the Windows Authentication for NICE Perform guide. You will come across Windows Authentication configurations and definitions throughout the entire NICE Perform installation. It is therefore recommended that you are familiar with the procedures and contents of that guide before beginning to install the databases.
IMPORTANT If your site includes any of the multidimensional databases, you must use Windows Authentication for all servers.

20 Chapter 1: Introduction
NICE Perform® Release 3.2: Databases Installation Guide (Rev A4)
Setting up the Servers
When using Windows Authentication, you must first create domain user accounts for the following domain users (also called NT Users or Operating System Users):
• Domain user account for NICE services
• Domain user account for SQL services
IMPORTANT • Both domain user accounts must belong to the same domain.
• You must create these domain user accounts and assign all necessary configurations before you install Microsoft SQL Server 2005/2008 or the NICE Perform databases.
• To create the domain users and/or assign the privileges required by NICE Systems, refer to Appendix F, Creating Domain Users and Updating Privileges on page 213.
• The domain users must have full local administrator privileges.

21 Chapter 1: Introduction
NICE Perform® Release 3.2: Databases Installation Guide (Rev A4)
Setting up the Servers
Domain User Account for NICE Services
The domain user account for NICE Services is used to run all NICE services on the NICE Perform Applications Server. It allows the NICE services to log on to the operating system and also to allow the NICE services to interact with the NICE Perform Database Server.
To be sure the domain user for NICE Services is configured correctly, after installing the NICE Applications, verify that the name of the domain and the domain user appear in the Log On As column for each NICE service (see Figure 1-1).Figure 1-1 Services Window - Applications Server
NICE Services
Domain and Domain User Account
Log On As Column

22 Chapter 1: Introduction
NICE Perform® Release 3.2: Databases Installation Guide (Rev A4)
Setting up the Servers
Domain User Account for SQL Services
The domain user account for SQL Services is used to run the relevant SQL services and the SQL Server Agent on the NICE Perform Database Server. It allows these services to log on to the operating system, to access operating system resources, and in some configurations to access remote resources.
To be sure the domain user for SQL Services is configured correctly, after installing the NICE Database Suite, verify that the name of the domain and the domain user appear in the Log On As column for the relevant SQL services (see Figure 1-2).Figure 1-2 Services Window - Database Server
SQL Services
Domain and Domain User Account
Log On As Column

23 Chapter 1: Introduction
NICE Perform® Release 3.2: Databases Installation Guide (Rev A4)
Reindex Job
Setting up the Microsoft SQL Server
Although the default database for NICE Perform is Microsoft SQL Server 2008, all NICE Perform databases run on both Microsoft SQL Server 2005 and SQL Server 2008; SQL Server 2000 is not supported. You must, of course, install (or upgrade) the SQL Server before you can install the NICE Perform databases.
For detailed SQL Server installation and configuration procedures, as well as other related information, refer to the Microsoft SQL 2005 for NICE Perform or the Microsoft SQL 2008 for NICE Perform guide.
Reindex Job
The NICE Perform Database installation program automatically creates an SQL Server Agent job called Reindex. This job is critical for maintaining proper system performance.
Since the NICE Perform Database Suite does not archive calls while the Reindex job is running, the job is defined by default to run every Sunday morning at 02:00 (2 am), when activity at most sites is quiet. If the default time is not suitable for the needs of your site, you must define a different, more convenient time.
To change the time the Reindex Table job is scheduled to run, see Appendix G, Scheduling the ReIndex Job on page 227.
Calculating Database SizeNICE Systems provides an Excel spreadsheet named DatabaseSizeCalculator.xls that enables you to determine the space required for each database in the NICE Perform Database Suite.
IMPORTANTWhile the Reindex Table job is running, the NICE Perform Database Suite does not archive new calls. Read the following section carefully.
IMPORTANTIt is recommended to run the Reindex Table job once every week. To run the job less often will have adverse effects on your system’s performance; you should not define the job to run less than once a month.
If your site is in continuous use with no opportunity to run the Reindex Table job, contact NICE Systems Customer Services.
NOTE: The running time of the Reindex Table job depends on both the size and amount of activity on the site, and therefore varies from site to site.
24 Chapter 1: Introduction
NICE Perform® Release 3.2: Databases Installation Guide (Rev A4)
Language Settings
Language SettingsAll NICE Perform servers must run on an English-language operating system. Workstations (clients) may run on an English-language operating system or on any localized language approved by NICE Systems.
Microsoft SQL Server Analysis ServicesBefore installing the NICE Perform multidimensional databases, you must first enable the SQL Server 2005/2008 Analysis Services.
The NICE Perform multidimensional databases are required for the NICE Perform’s Interactions Analytics feature as well as for the My Universe application.
You enable the SQL Analysis Services while installing SQL Server 2005/2008 using either the NICE SQL Auto Setup or the standard manual installation. For full details refer to the Microsoft SQL 2005 for NICE Perform or the Microsoft SQL 2008 for NICE Perform Guide.
In addition, you can also enable the SQL Analysis Services by defining the Start Mode of the SQL Server Analysis Services service as Automatic (see Appendix E, Enabling Microsoft SQL Server 2008/2008 R2 Analysis Services on page 207).
Only after enabling the SQL Analysis Services can you install the nice_as_kpi, nice_as_text_analysis, and nice_as_my_universe databases on the SQL Analysis Services.
Multidimensional Databases
The nice_as_kpi, nice_as_text_analysis, and nice_as_my_universe databases are installed on the SQL Server Analysis Services and are used in conjunction with the NICE Perform ClearSight and My Universe applications. The multidimensional database cubes provides analytic capabilities.
The multidimensional databases are the only databases that run on the SQL Server Analysis Services
NOTE: You can install only one SQL Server 2005/2008 Analysis Services database on one Server.
NOTE: The nice_as_kpi, nice_as_text_analysis and nice_as_my_universe databases are the only databases in the NICE Perform Database Suite that are multidimensional; all other databases are relational databases.

25 Chapter 1: Introduction
NICE Perform® Release 3.2: Databases Installation Guide (Rev A4)
Enabling Display of NICE System Information in System Administrator
Data Mart Server
To improve system performance, especially in systems with very large databases, you install the multidimensional databases together with the nice_as_kpi, nice_as_text_analysis, and nice_as_my_universe databases on a dedicated server, called the Data Mart Server.
Therefore, in sites that include both the Database Server and the Data Mart Server, you must run the NICE SQL Auto Setup twice, once on the Database Server, and once on the Data Mart Server. However, you enable Analysis Services only on the Data Mart Server.
The installation of the nice_as_text_analysis database includes cubes for use with the following languages:
• English
• French
• Spanish
Enabling Display of NICE System Information in System Administrator
The NICE Perform System Administrator includes a summary page that displays system information for each NICE Perform component. In order to display the information pertaining to the NICE databases, you must change the DCOM and WMI security settings for each computer on which NICE databases are installed. For details, see Appendix H, Enabling Summary Page Display of NICE System Information on page 231.
IMPORTANT You must install NICE Reporter and the Data Mart Server on the same computer. You also enable SQL Analysis Services and install the multidimensional databases on the this computer.

Blank page for double-sided printing.

Chapter 2: Quick Start
NICE Perform® Release 3.2: Databases Installation Guide (Rev A4)
27
2
Quick Start
Before beginning the procedures listed below, review the Introduction.
NOTE: The quick start workflow is intended to give a comprehensive overall picture of the entire database installation and to enable you to keep track of your progress. However, it is not a substitute for using this manual. The procedures in this manual give not only detailed instructions, but also contain important information, notes, and warnings. Failure to adhere to these instructions may cause the entire installation to fail!
No Procedure Comments Refer to...
1 If necessary, set up the Domain User Accounts required for using Windows Authentication.
Recommended for all Release 3.2 installations; required if you install the SQL Analysis Services.
Windows Authentication for NICE Perform Guide
2 Install Microsoft SQL Server 2008 or SQL Server 2005.
Recommended to use the NICE Auto Setup. Must use Analysis Services if installing multidimensional databases.
Microsoft SQL 2008 for NICE Perform Guide - or -Microsoft SQL 2005 for NICE Perform Guide

28 Chapter 2: Quick Start
NICE Perform® Release 3.2: Databases Installation Guide (Rev A4)
Install the NICE Perform Release 3.2 Database Suite according to one of the following scenarios:
• Distributed Deployment with Multidimensional Databases (for Interaction Analytics) - see step 3A on page 28.
• Distributed Deployment with Relational Databases only - (Windows Authentication) - see step 3B on page 30.
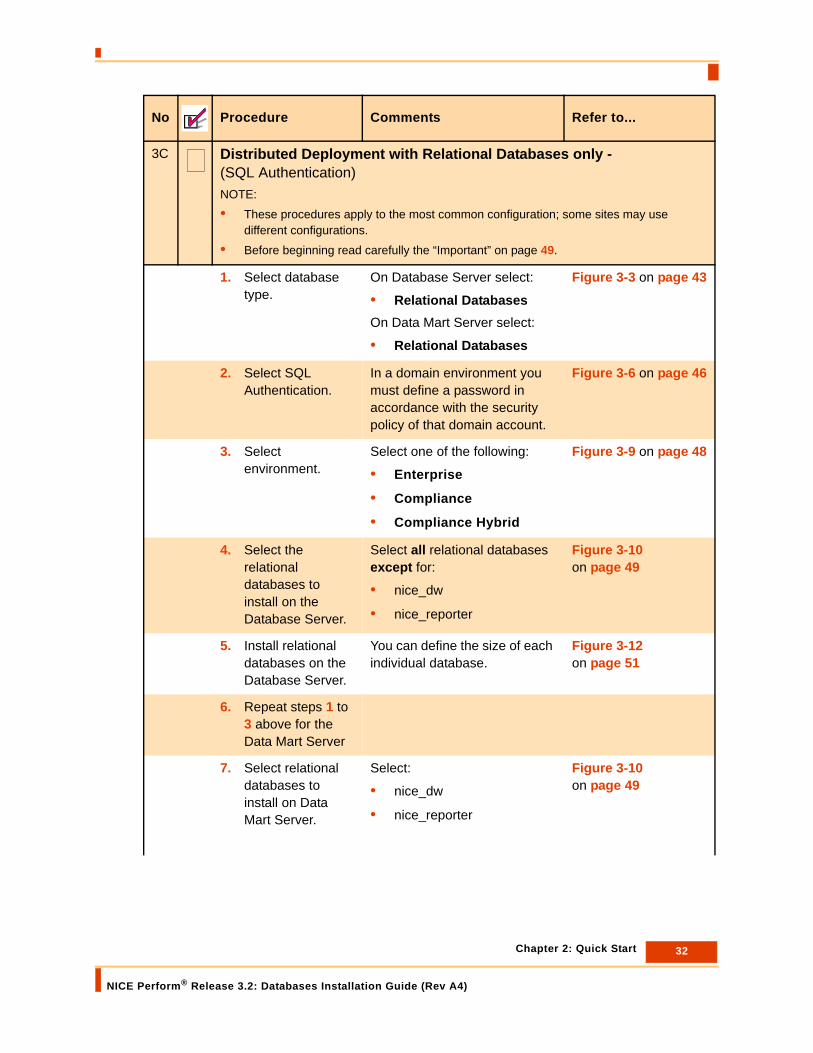
• Distributed Deployment with Relational Databases only - (SQL Authentication) - see step 3C on page 32.
• Unified Server Deployment with Multidimensional Databases (for Interaction Analytics) - see step 3D on page 34.
• Unified Server Deployment with Relational Databases only - (Windows Authentication) - see step 3E on page 35.
• Unified Server Deployment with Relational Databases only - (SQL Authentication) - see step 3F on page 36.
3A Distributed Deployment with Multidimensional Databases (for Interaction Analytics)NOTE:
• These procedures apply to the most common configuration; some sites may use different configurations.
• Before beginning read carefully the “Important” on page 49.
1. Select database type.
On Database Server select:
• Relational DatabasesOn Data Mart Server select:
• Relational Databases
• Multidimensional Databases
Figure 3-3 on page 43
2. Select Windows Authentication.
Required for Interaction Analytics.
Figure 3-4 on page 44
3. Enter the Domain User Account for the NICE Services and for the SQL Services.
Use syntax:Domain Account\User Account
Figure 3-5 on page 45
4. Select environment.
Select one of the following:
• Enterprise
• Compliance
• Compliance Hybrid
Figure 3-9 on page 48
No Procedure Comments Refer to...

29 Chapter 2: Quick Start
NICE Perform® Release 3.2: Databases Installation Guide (Rev A4)
5. Select the relational databases you install on the Database Server.
Select all relational databases except for:
• nice_dw
• nice_reporter
Figure 3-10 on page 49
6. Install relational databases on the Database Server.
You can define the size of each individual database.
Figure 3-12 on page 51
7. Repeat steps 1 to 4 above for the Data Mart Server.
8. Select the relational databases you install on the Data Mart Server.
Select:
• nice_dw
• nice_reporter
Figure 3-14 on page 52
9. Install relational databases on the Data Mart Server.
You can define the size of each individual database.
Figure 3-15 on page 53
10. Select the multidimensional databases you install on the Data Mart Server.
Install on Data Mart Server:
• nice_as_kpi
• nice_as_my_universe
• nice_as_text_analysis
11. Install the multidimensional databases on the Data Mart Server.
You can define the size of each individual database.
12. Continue with step 4 on page 37.
No Procedure Comments Refer to...

30 Chapter 2: Quick Start
NICE Perform® Release 3.2: Databases Installation Guide (Rev A4)
3B Distributed Deployment with Relational Databases only -(Windows Authentication)NOTE:
• These procedures apply to the most common configuration; some sites may use different configurations.
• Before beginning read carefully the “Important” on page 49.
1. Select database type.
On Database Server select:
• Relational DatabasesOn Data Mart Server select:
• Relational Databases
Figure 3-3 on page 43
2. Select Windows Authentication.
Figure 3-4 on page 44
3. Enter the Domain User Account for the NICE Services and for the SQL Services.
Use syntax:Domain Account\User Account
Figure 3-5 on page 45
4. Select environment.
Select one of the following:
• Enterprise
• Compliance
• Compliance Hybrid
Figure 3-9 on page 48
5. Select the relational databases you install on Database Server.
Select all relational databases except for:
• nice_dw
• nice_reporter
Figure 3-10 on page 49
6. Install relational databases on the Database Server.
You can define the size of each individual database.
Figure 3-12 on page 51
7. Repeat steps 1 to 4 above for the Data Mart Server.
8. Select the relational databases to install on Data Mart Server.
Select:
• nice_dw
• nice_reporter
Figure 3-10 on page 49
No Procedure Comments Refer to...

31 Chapter 2: Quick Start
NICE Perform® Release 3.2: Databases Installation Guide (Rev A4)
9. Install relational databases on Data Mart Server.
You can define the size of each individual database.
Figure 3-12 on page 51
10. Continue with step 4 on page 37.
No Procedure Comments Refer to...
32 Chapter 2: Quick Start
NICE Perform® Release 3.2: Databases Installation Guide (Rev A4)
3C Distributed Deployment with Relational Databases only -(SQL Authentication)NOTE:
• These procedures apply to the most common configuration; some sites may use different configurations.
• Before beginning read carefully the “Important” on page 49.
1. Select database type.
On Database Server select:
• Relational DatabasesOn Data Mart Server select:
• Relational Databases
Figure 3-3 on page 43
2. Select SQL Authentication.
In a domain environment you must define a password in accordance with the security policy of that domain account.
Figure 3-6 on page 46
3. Select environment.
Select one of the following:
• Enterprise
• Compliance
• Compliance Hybrid
Figure 3-9 on page 48
4. Select the relational databases to install on the Database Server.
Select all relational databases except for:
• nice_dw
• nice_reporter
Figure 3-10 on page 49
5. Install relational databases on the Database Server.
You can define the size of each individual database.
Figure 3-12 on page 51
6. Repeat steps 1 to 3 above for the Data Mart Server
7. Select relational databases to install on Data Mart Server.
Select:
• nice_dw
• nice_reporter
Figure 3-10 on page 49
No Procedure Comments Refer to...

33 Chapter 2: Quick Start
NICE Perform® Release 3.2: Databases Installation Guide (Rev A4)
8. Install relational databases on Data Mart Server.
You can define the size of each individual database.
Figure 3-12 on page 51
9. Continue with step 4 on page 37.
No Procedure Comments Refer to...
34 Chapter 2: Quick Start
NICE Perform® Release 3.2: Databases Installation Guide (Rev A4)
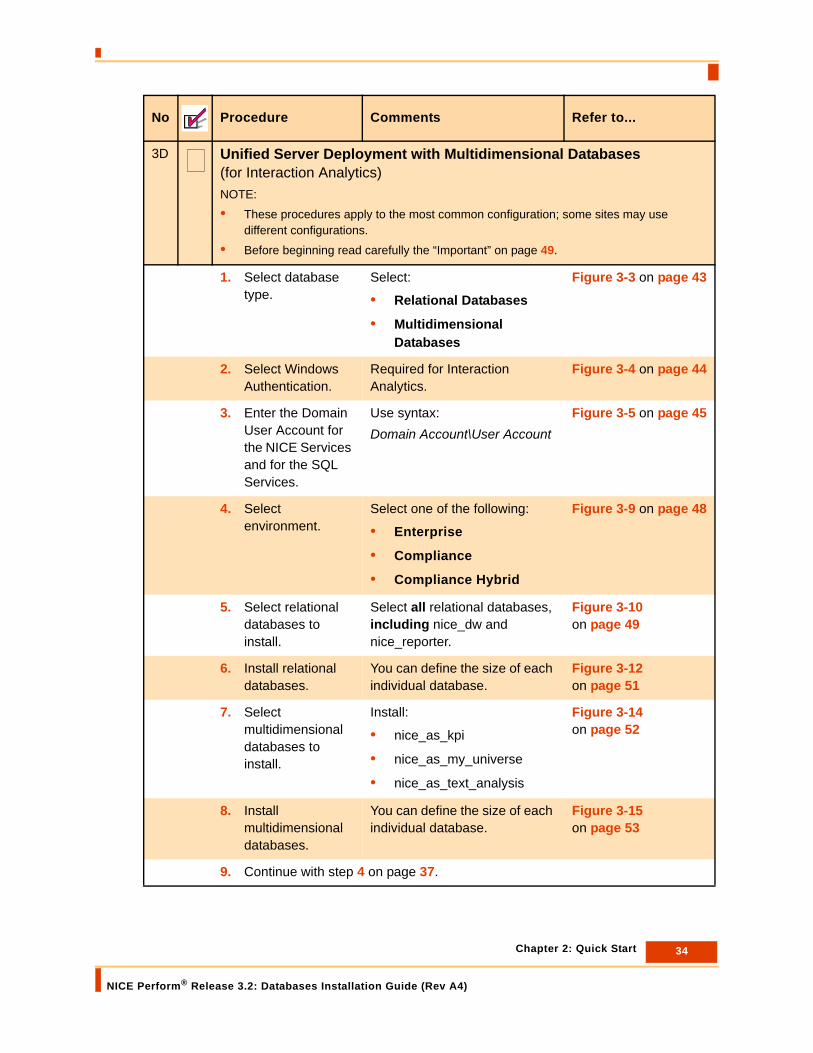
3D Unified Server Deployment with Multidimensional Databases (for Interaction Analytics)NOTE:
• These procedures apply to the most common configuration; some sites may use different configurations.
• Before beginning read carefully the “Important” on page 49.
1. Select database type.
Select:
• Relational Databases
• Multidimensional Databases
Figure 3-3 on page 43
2. Select Windows Authentication.
Required for Interaction Analytics.
Figure 3-4 on page 44
3. Enter the Domain User Account for the NICE Services and for the SQL Services.
Use syntax:Domain Account\User Account
Figure 3-5 on page 45
4. Select environment.
Select one of the following:
• Enterprise
• Compliance
• Compliance Hybrid
Figure 3-9 on page 48
5. Select relational databases to install.
Select all relational databases, including nice_dw and nice_reporter.
Figure 3-10 on page 49
6. Install relational databases.
You can define the size of each individual database.
Figure 3-12 on page 51
7. Select multidimensional databases to install.
Install:
• nice_as_kpi
• nice_as_my_universe
• nice_as_text_analysis
Figure 3-14 on page 52
8. Install multidimensional databases.
You can define the size of each individual database.
Figure 3-15 on page 53
9. Continue with step 4 on page 37.
No Procedure Comments Refer to...

35 Chapter 2: Quick Start
NICE Perform® Release 3.2: Databases Installation Guide (Rev A4)
3E Unified Server Deployment with Relational Databases only -(Windows Authentication)NOTE:
• These procedures apply to the most common configuration; some sites may use different configurations.
• Before beginning read carefully the “Important” on page 49.
1. Select database type.
Select:
• Relational Databases
Figure 3-3 on page 43
2. Select Windows Authentication.
Figure 3-4 on page 44
3. Enter the Domain User Account for the NICE Services and for the SQL Services.
Use syntax:Domain Account\User Account
Figure 3-5 on page 45
4. Select environment.
Select one of the following:
• Enterprise
• Compliance
• Compliance Hybrid
Figure 3-9 on page 48
5. Select relational databases to install.
Select all relational databases. Figure 3-10 on page 49
6. Install relational databases.
You can define the size of each individual database.
Figure 3-12 on page 51
7. Continue with step 4 on page 37.
No Procedure Comments Refer to...

36 Chapter 2: Quick Start
NICE Perform® Release 3.2: Databases Installation Guide (Rev A4)
3F Unified Server Deployment with Relational Databases only -(SQL Authentication)NOTE:
• These procedures apply to the most common configuration; some sites may use different configurations.
• Before beginning read carefully the “Important” on page 49.
1. Select database type.
Select:
• Relational Databases
Figure 3-3 on page 43
2. Select SQL Authentication.
In a domain environment you must define a password in accordance with the security policy of that domain account.
Figure 3-6 on page 46
3. Select environment.
Select one of the following:
• Enterprise
• Compliance
• Compliance Hybrid
Figure 3-9 on page 48
4. Select relational databases to install.
Select all relational databases. Figure 3-10 on page 49
5. Install relational databases.
You can define the size of each individual database.
Figure 3-12 on page 51
6. Continue with step 4 on page 37.
No Procedure Comments Refer to...
37 Chapter 2: Quick Start
NICE Perform® Release 3.2: Databases Installation Guide (Rev A4)
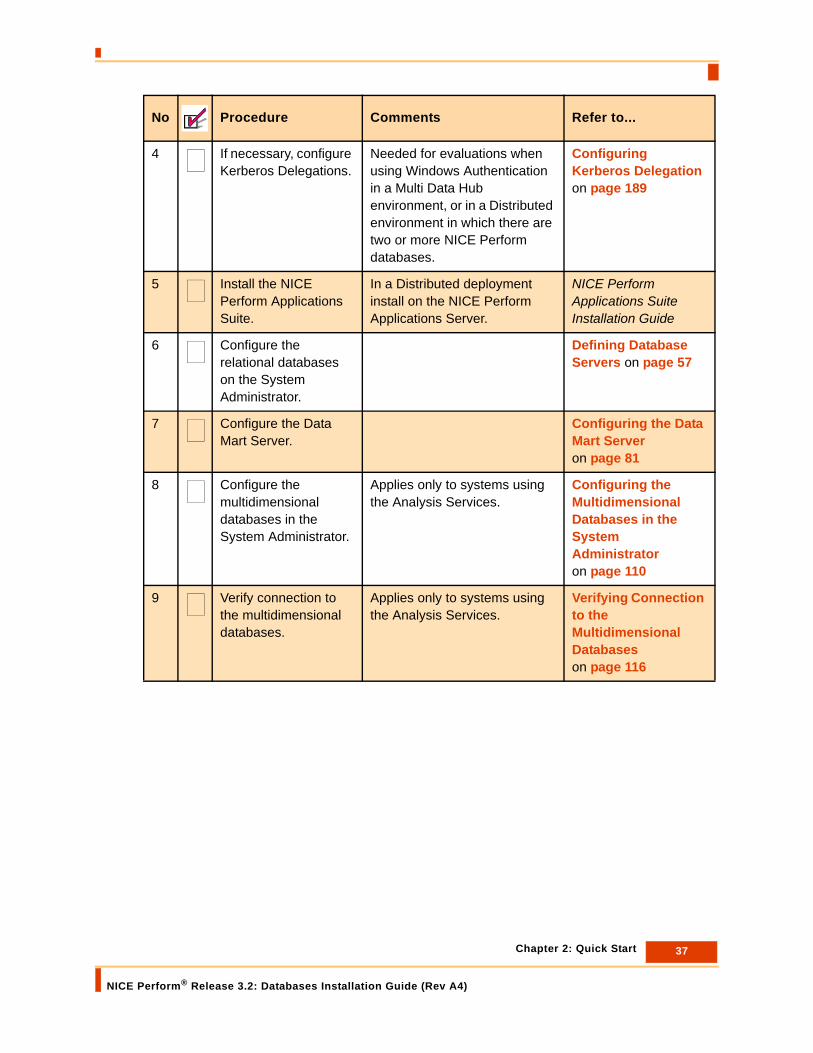
4 If necessary, configure Kerberos Delegations.
Needed for evaluations when using Windows Authentication in a Multi Data Hub environment, or in a Distributed environment in which there are two or more NICE Perform databases.
Configuring Kerberos Delegation on page 189
5 Install the NICE Perform Applications Suite.
In a Distributed deployment install on the NICE Perform Applications Server.
NICE Perform Applications Suite Installation Guide
6 Configure the relational databases on the System Administrator.
Defining Database Servers on page 57
7 Configure the Data Mart Server.
Configuring the Data Mart Server on page 81
8 Configure the multidimensional databases in the System Administrator.
Applies only to systems using the Analysis Services.
Configuring the Multidimensional Databases in the System Administrator on page 110
9 Verify connection to the multidimensional databases.
Applies only to systems using the Analysis Services.
Verifying Connection to the Multidimensional Databases on page 116
No Procedure Comments Refer to...

Blank page for double-sided printing.
Chapter 3: Installing the NICE Perform Database Suite
NICE Perform® Release 3.2: Databases Installation Guide (Rev A4)
39
3
Installing the NICE Perform Database Suite
This chapter describes the procedures for installing the NICE Perform Database Suite on the NICE Perform Database Server.
Contents
About the NICE Perform Database Suite......................................................................40
Installing the NICE Perform Database Suite Software ................................................41
Defining Kerberos Delegation .......................................................................................55
40 Chapter 3: Installing the NICE Perform Database Suite
NICE Perform® Release 3.2: Databases Installation Guide (Rev A4)
About the NICE Perform Database Suite
About the NICE Perform Database SuiteThe NICE Perform Database Suite installation program installs the databases required in all configurations of NICE Perform Release 3.2.
The NICE Perform Database Suite installation program installs the following relational databases:
• nice_admin
• nice_audit
• nice_ca
• nice-crypto
• nice_cti_analysis
• nice_dw
• nice_ib
• nice_interactions
• nice_pbs_data
• nice_qa
• nice_reporter
• nice_rule
• nice_screen_sense
• nice_storage_center
In addition, the NICE Perform Database Suite installation program installs the following multidimensional databases:
• nice_as_kpi
• nice_as_text_analysis
• nice_as_my_universe
NOTE: For a description of each of the above databases, see Database Names and Descriptions on page 17.
41 Chapter 3: Installing the NICE Perform Database Suite
NICE Perform® Release 3.2: Databases Installation Guide (Rev A4)
Installing the NICE Perform Database Suite Software
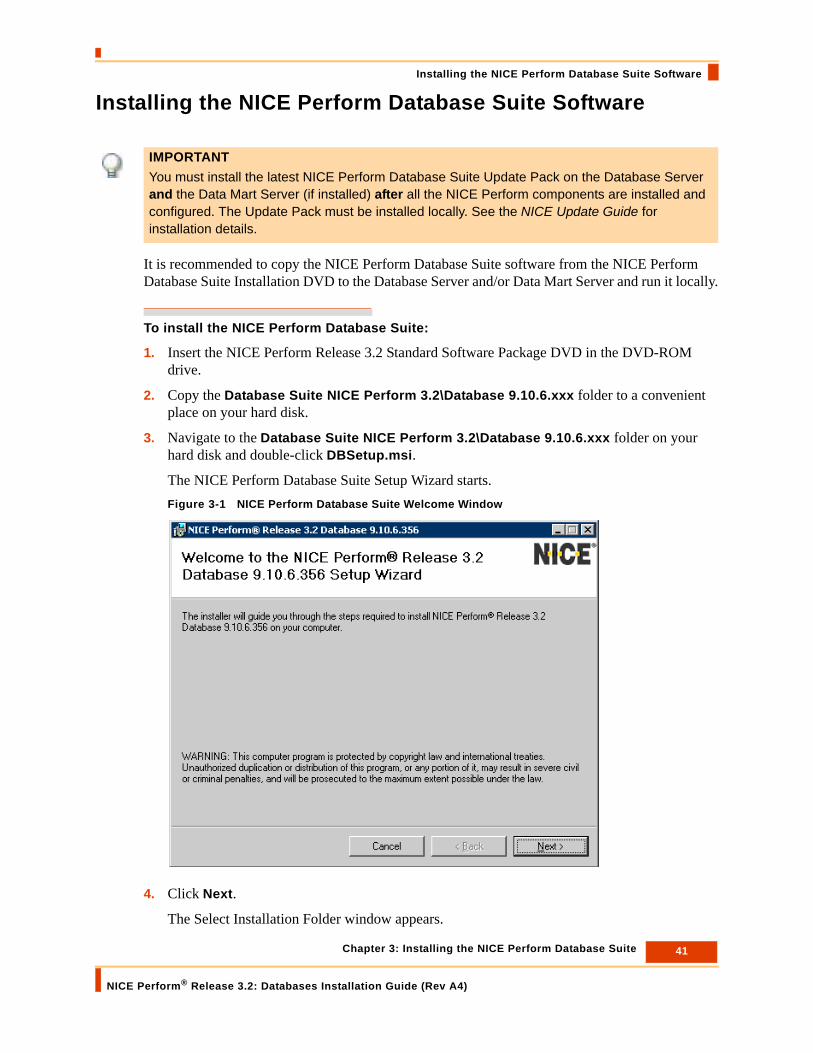
Installing the NICE Perform Database Suite Software
It is recommended to copy the NICE Perform Database Suite software from the NICE Perform Database Suite Installation DVD to the Database Server and/or Data Mart Server and run it locally.
To install the NICE Perform Database Suite:
1. Insert the NICE Perform Release 3.2 Standard Software Package DVD in the DVD-ROM drive.
2. Copy the Database Suite NICE Perform 3.2\Database 9.10.6.xxx folder to a convenient place on your hard disk.
3. Navigate to the Database Suite NICE Perform 3.2\Database 9.10.6.xxx folder on your hard disk and double-click DBSetup.msi.
The NICE Perform Database Suite Setup Wizard starts.Figure 3-1 NICE Perform Database Suite Welcome Window
4. Click Next.
The Select Installation Folder window appears.
IMPORTANT You must install the latest NICE Perform Database Suite Update Pack on the Database Server and the Data Mart Server (if installed) after all the NICE Perform components are installed and configured. The Update Pack must be installed locally. See the NICE Update Guide for installation details.
42 Chapter 3: Installing the NICE Perform Database Suite
NICE Perform® Release 3.2: Databases Installation Guide (Rev A4)
Installing the NICE Perform Database Suite Software
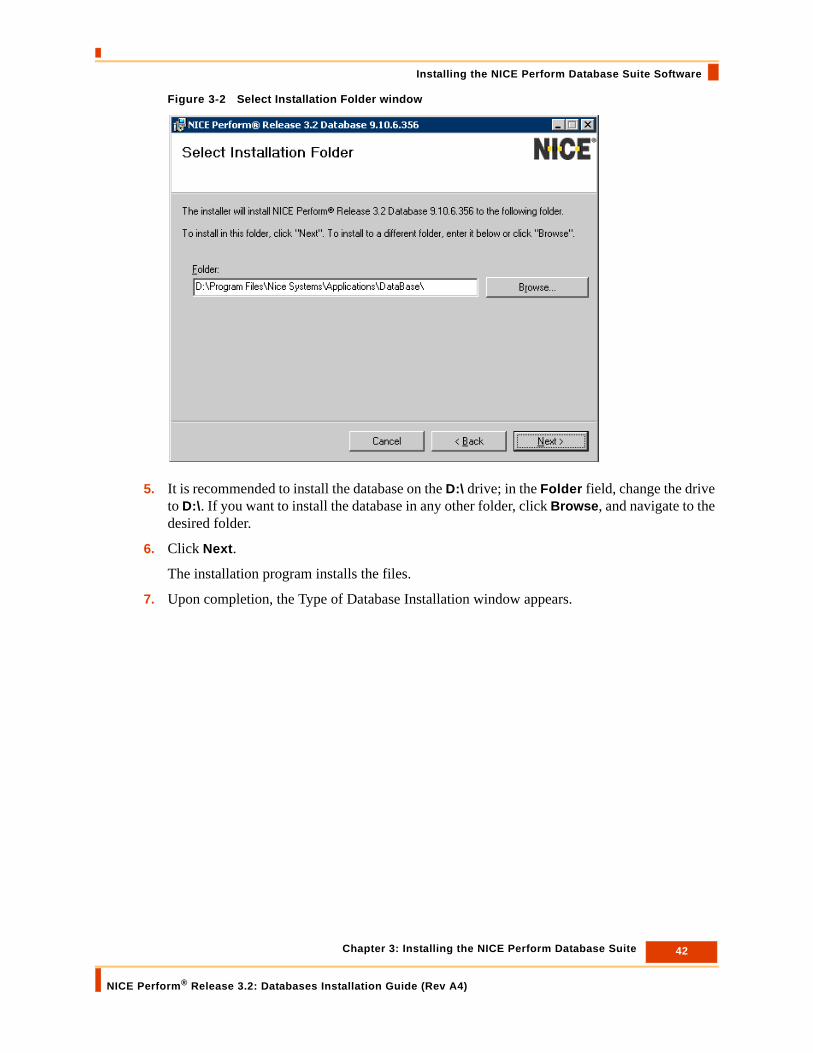
Figure 3-2 Select Installation Folder window
5. It is recommended to install the database on the D:\ drive; in the Folder field, change the drive to D:\. If you want to install the database in any other folder, click Browse, and navigate to the desired folder.
6. Click Next.
The installation program installs the files.
7. Upon completion, the Type of Database Installation window appears.

43 Chapter 3: Installing the NICE Perform Database Suite
NICE Perform® Release 3.2: Databases Installation Guide (Rev A4)
Installing the NICE Perform Database Suite Software
Figure 3-3 Type of Database Installation Window
8. To install both the relational and multidimensional databases on this server, select both SQL Relational Databases and Multidimensional Databases and click Next.
-or-
• To install only relational databases on this server, select SQL Relational Databases and click Next.
• To install only multidimensional databases on this server, select Multidimensional Databases and continue with step 24 on page 51.
9. Click Next.
The SQL Server Connection Properties window appears.
IMPORTANT The SQL Server Analysis Services must be enabled in order to install the multidimensional databases. For details, see Microsoft SQL Server 2005 for NICE Perform. or the Microsoft SQL Server 2008 for NICE Perform Guide.

44 Chapter 3: Installing the NICE Perform Database Suite
NICE Perform® Release 3.2: Databases Installation Guide (Rev A4)
Installing the NICE Perform Database Suite Software
Figure 3-4 SQL Server Connection Properties Window
10. In the Hostname/IP address field, enter the computer name or the IP address.
11. If you are using Windows Authentication, select Windows (NT) Authentication and continue with step 12.
If you are using SQL Authentication, select SQL Server Authentication and continue with step 13.
12. For Windows Authentication:
a. When you select Windows (NT) Authentication, your system uses domain users to access the SQL Server. Therefore the Connect Using fields are disabled. Click Next.
The SQL Server Connection Properties window appears.
NOTE: If your site uses multi SQL instances, DO NOT use the (local) that appears by default.
IMPORTANT In order to use NICE Perform interaction Analytics, you must use Windows Authentication.
45 Chapter 3: Installing the NICE Perform Database Suite
NICE Perform® Release 3.2: Databases Installation Guide (Rev A4)
Installing the NICE Perform Database Suite Software
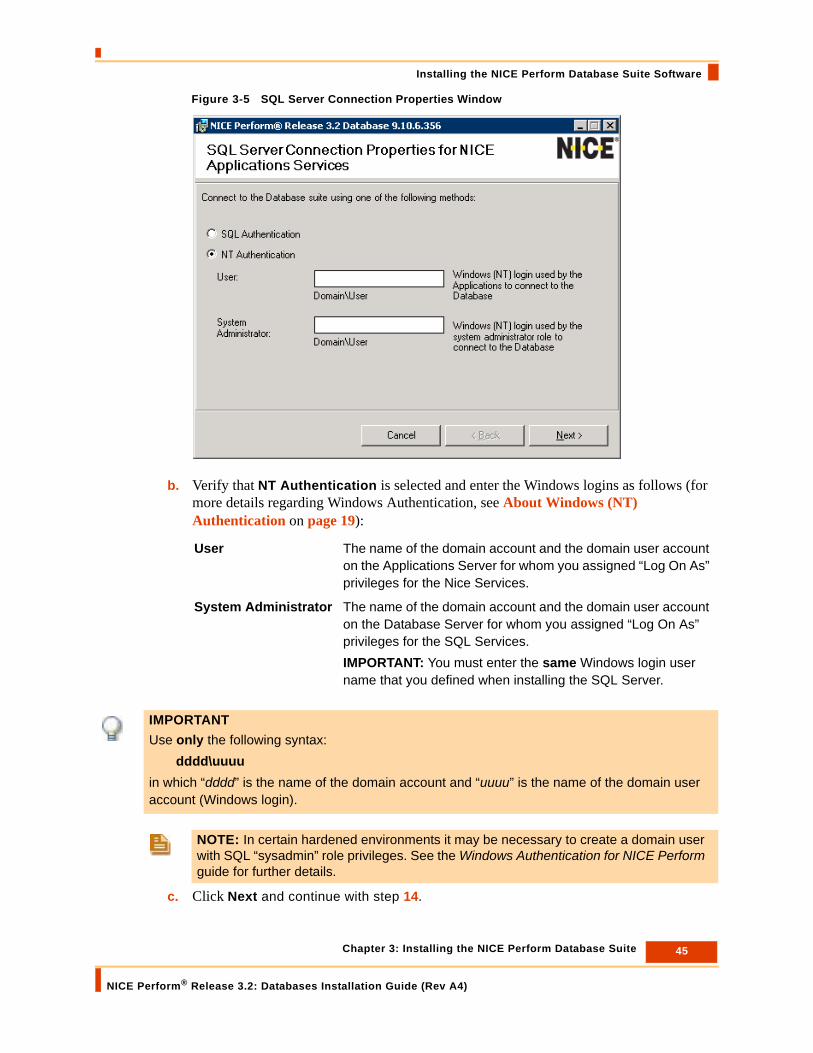
Figure 3-5 SQL Server Connection Properties Window
b. Verify that NT Authentication is selected and enter the Windows logins as follows (for more details regarding Windows Authentication, see About Windows (NT) Authentication on page 19):
c. Click Next and continue with step 14.
User The name of the domain account and the domain user account on the Applications Server for whom you assigned “Log On As” privileges for the Nice Services.
System Administrator The name of the domain account and the domain user account on the Database Server for whom you assigned “Log On As” privileges for the SQL Services.IMPORTANT: You must enter the same Windows login user name that you defined when installing the SQL Server.
IMPORTANT Use only the following syntax:
dddd\uuuuin which “dddd” is the name of the domain account and “uuuu” is the name of the domain user account (Windows login).
NOTE: In certain hardened environments it may be necessary to create a domain user with SQL “sysadmin” role privileges. See the Windows Authentication for NICE Perform guide for further details.
46 Chapter 3: Installing the NICE Perform Database Suite
NICE Perform® Release 3.2: Databases Installation Guide (Rev A4)
Installing the NICE Perform Database Suite Software
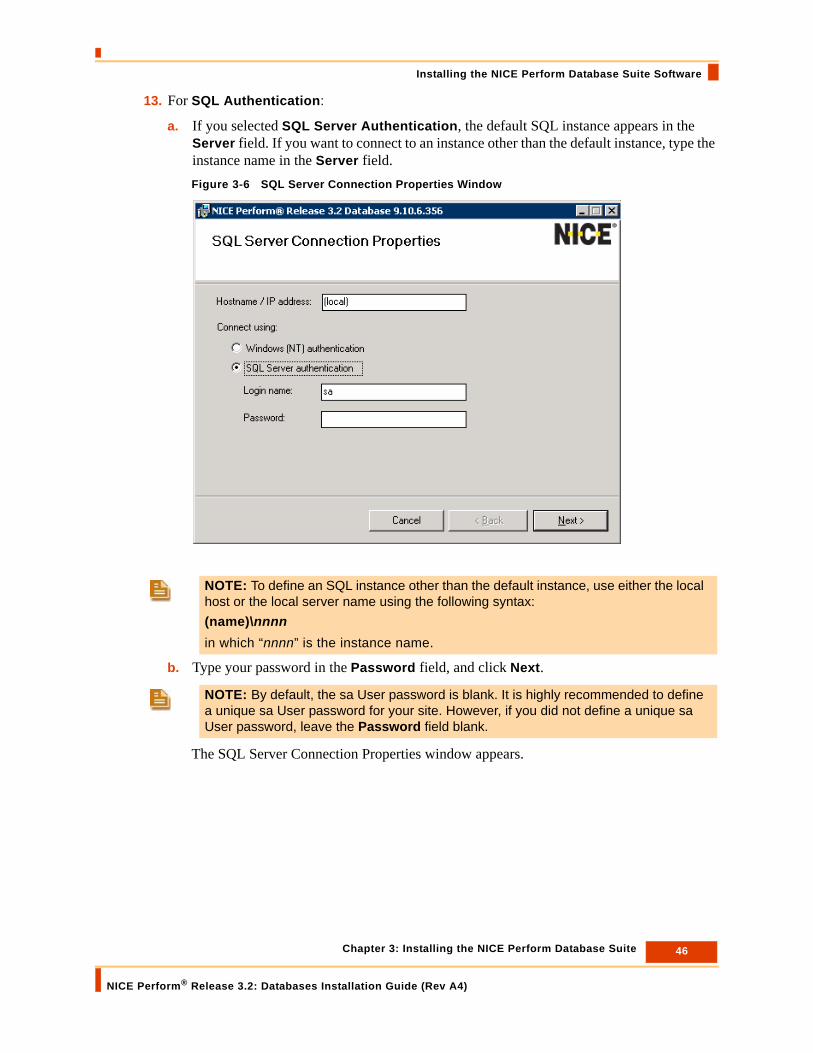
13. For SQL Authentication:
a. If you selected SQL Server Authentication, the default SQL instance appears in the Server field. If you want to connect to an instance other than the default instance, type the instance name in the Server field.Figure 3-6 SQL Server Connection Properties Window
b. Type your password in the Password field, and click Next.
The SQL Server Connection Properties window appears.
NOTE: To define an SQL instance other than the default instance, use either the local host or the local server name using the following syntax:(name)\nnnnin which “nnnn” is the instance name.
NOTE: By default, the sa User password is blank. It is highly recommended to define a unique sa User password for your site. However, if you did not define a unique sa User password, leave the Password field blank.

47 Chapter 3: Installing the NICE Perform Database Suite
NICE Perform® Release 3.2: Databases Installation Guide (Rev A4)
Installing the NICE Perform Database Suite Software
Figure 3-7 SQL Server Connection Properties Window
c. Select SQL Authentication.
The User and System Administrator fields are disabled.
d. Click Next.
You are prompted to confirm that you indeed want to use SQL Authentication.Figure 3-8 Prompt Window
e. To continue the database installation using SQL Authentication, click Yes.
14. The NICE Applications Suite window appears.

48 Chapter 3: Installing the NICE Perform Database Suite
NICE Perform® Release 3.2: Databases Installation Guide (Rev A4)
Installing the NICE Perform Database Suite Software
Figure 3-9 NICE Applications Suite Window
15. From Choose the Applications Suite drop-down list, select one of the following:
16. Click OK.
The Database Properties window appears.
Enterprise Configures the relevant databases to be compatible with Enterprise (Contact Center) environments.
Compliance Configures the relevant databases to be compatible with Compliance Suite (Financial Trading Floor) environments.
Compliance Hybrid This environment is installed as a Version 8.x upgrade. The Version 8.x database scheme is retained and the database runs side by side with the NICE Perform database. The Applications Suite is compatible to the Compliance Suite environment.

49 Chapter 3: Installing the NICE Perform Database Suite
NICE Perform® Release 3.2: Databases Installation Guide (Rev A4)
Installing the NICE Perform Database Suite Software
Figure 3-10 Database Properties Window
IMPORTANTIf the Data Mart is installed on a dedicated server, you must make sure that the nice_dw and nice_reporter relational databases are installed together with the nice_as_text_analysis, nice_as_kpi, and nice_as_my_universe multidimensional databases on that dedicated Data Mart Server. When the Data Mart is installed on a dedicated server, you therefore run the installation procedures twice:
• You run them once on the Database Server to install the relational databases.
• You then run them on the dedicated Data Mart Server to install the nice_dw and nice_reporter relational databases and the nice_as_text_analysis, nice_as_kpi, and nice_as_my_universe multidimensional databases.
In a unified server (“all in one”) deployment, in which all the databases are located on the database server, or whenever the Data Mart Server resides on the Database Server, you run the installation procedures only once.
50 Chapter 3: Installing the NICE Perform Database Suite
NICE Perform® Release 3.2: Databases Installation Guide (Rev A4)
Installing the NICE Perform Database Suite Software
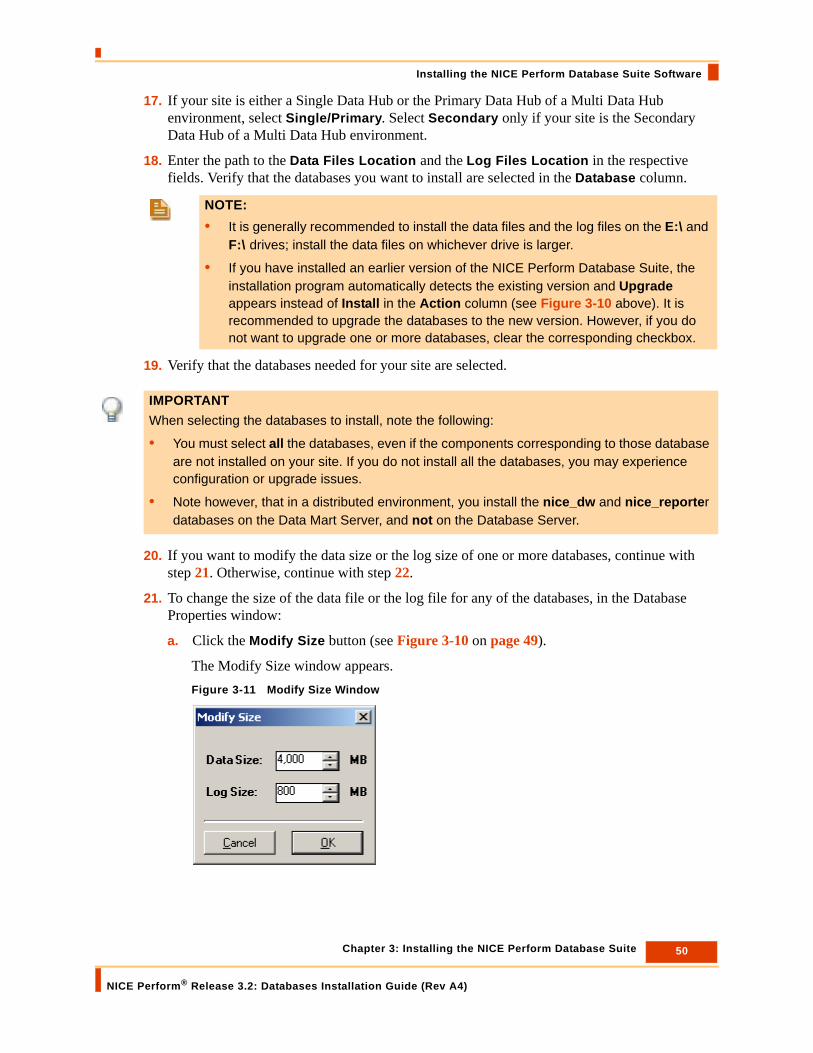
17. If your site is either a Single Data Hub or the Primary Data Hub of a Multi Data Hub environment, select Single/Primary. Select Secondary only if your site is the Secondary Data Hub of a Multi Data Hub environment.
18. Enter the path to the Data Files Location and the Log Files Location in the respective fields. Verify that the databases you want to install are selected in the Database column.
19. Verify that the databases needed for your site are selected.
20. If you want to modify the data size or the log size of one or more databases, continue with step 21. Otherwise, continue with step 22.
21. To change the size of the data file or the log file for any of the databases, in the Database Properties window:
a. Click the Modify Size button (see Figure 3-10 on page 49).
The Modify Size window appears.Figure 3-11 Modify Size Window
NOTE: • It is generally recommended to install the data files and the log files on the E:\ and
F:\ drives; install the data files on whichever drive is larger.
• If you have installed an earlier version of the NICE Perform Database Suite, the installation program automatically detects the existing version and Upgrade appears instead of Install in the Action column (see Figure 3-10 above). It is recommended to upgrade the databases to the new version. However, if you do not want to upgrade one or more databases, clear the corresponding checkbox.
IMPORTANT When selecting the databases to install, note the following:
• You must select all the databases, even if the components corresponding to those database are not installed on your site. If you do not install all the databases, you may experience configuration or upgrade issues.
• Note however, that in a distributed environment, you install the nice_dw and nice_reporter databases on the Data Mart Server, and not on the Database Server.

51 Chapter 3: Installing the NICE Perform Database Suite
NICE Perform® Release 3.2: Databases Installation Guide (Rev A4)
Installing the NICE Perform Database Suite Software
b. Enter the desired data and/or log size for the selected database.
c. Click OK.
The Database Properties window reappears.
22. Click Next.
The Installation Progress window appears.Figure 3-12 Installation Progress Window
23. Click Install.
The installation program installs the selected databases on the Database Server.
24. If you only selected SQL Relational Databases in the Type of Databases window above (see Figure 3-3 on page 43), continue with step 26.
If you selected Multidimensional Databases, continue with step 25.
25. If you selected Multidimensional Databases, the Analysis Services Connection window appears immediately after the relational databases have been fully installed.
NOTE: NICE Systems strongly recommends that you define the size of the SQL log file at least as 20% of the size of the SQL data file.
NOTE: Small databases usually take 10 to 15 minutes to install; large databases could take several hours.

52 Chapter 3: Installing the NICE Perform Database Suite
NICE Perform® Release 3.2: Databases Installation Guide (Rev A4)
Installing the NICE Perform Database Suite Software
Figure 3-13 Analysis Services Connection Window
a. Enter the computer name or the IP address of the server on which the SQL Analysis Services is installed and click Next.
The Multidimensional Databases Details window appears.Figure 3-14 Multidimensional Databases Details Window

53 Chapter 3: Installing the NICE Perform Database Suite
NICE Perform® Release 3.2: Databases Installation Guide (Rev A4)
Installing the NICE Perform Database Suite Software
b. In the Account field, enter the name of domain account and the domain account user used by the NICE services for whom you assigned “Log On As” privileges to access the SQL Analysis Services.
In the DM Name field, enter the computer name or the IP address of the Data Mart Server.
c. Select the databases you want to install on the Analysis Services, and click Next.
The Installation Progress window appears a second time.Figure 3-15 Installation Progress Window
d. Click Install.
The installation program installs the selected databases on the SQL Analysis Services.
26. Upon completion, the Installation Complete window appears.
IMPORTANT Use only the following syntax:
dddd\uuuuin which “dddd” is the name of the domain account and “uuuu” is the name of the domain user account (Windows login).

54 Chapter 3: Installing the NICE Perform Database Suite
NICE Perform® Release 3.2: Databases Installation Guide (Rev A4)
Installing the NICE Perform Database Suite Software
Figure 3-16 Installation Complete Window
27. Click Close to complete the database installation.
28. After installing the NICE Perform databases, restart the SQL Server.
IMPORTANT • After completing the database installation, you must restart the SQL Server.
• Remember to install the latest NICE Perform Database Suite Update Pack on the Database Server and the Data Mart Server (if installed) after all the NICE Perform components are installed and configured. The Update Pack must be installed locally. See the NICE Update Guide for installation details.
• If, for any reason, it should be necessary to uninstall any or all of the databases in the NICE Perform Database Suite from the Database Server, use only the uninstall procedures described in Chapter 7, Uninstalling Databases from the Database Suite on page 117.
TIP: After completing the installation, it is recommended to verify that all the databases you selected in the Databases Properties window (see Figure 3-10 on page 49) appear in the database list in the SQL Server Management Studio.

55 Chapter 3: Installing the NICE Perform Database Suite
NICE Perform® Release 3.2: Databases Installation Guide (Rev A4)
Defining Kerberos Delegation
Defining Kerberos DelegationWhen using Windows Authentication in a Multi Data Hub environment, or in a Distributed environment in which there are two or more NICE Perform databases, evaluations are replicated through Linked Servers. For replication of Evaluations data to succeed, you must define Delegation for the Kerberos protocol.
For details, see Appendix C, Configuring Kerberos Delegation on page 189.

Blank page for double-sided printing.

Chapter 4: Defining Database Servers
NICE Perform® Release 3.2: Databases Installation Guide (Rev A4)
57
4
Defining Database Servers
The first step to configure your system is to define the Database Servers. You must install each database on an SQL Server prior to defining it in the System Administrator. After all the databases are defined, create links between the interaction database and the databases that reside on other servers.
NICE Perform supports the following types of SQL security authentication:
• Windows Authentication - The SQL Server is authenticated using the Windows Login.
• SQL Authentication - The user defines a password when installing the SQL Database Server.
Contents
What is Database Server Configuration? .....................................................................58
Which method of SQL Server Authentication is in use? ............................................60
Defining a Database Server ...........................................................................................61
Managing Databases ......................................................................................................65Indexing Reserved Columns ......................................................................................66Changing Column Names - Using Aliases .................................................................67Activating/Deactivating Data Columns .......................................................................69Added Security for SQL Server Authentication - Changing Passwords.....................70Modifying a Database Server Definition.....................................................................75Deleting a Database Server Definition .......................................................................75
Scheduling Database Backup .......................................................................................76
58 Chapter 4: Defining Database Servers
NICE Perform® Release 3.2: Databases Installation Guide (Rev A4)
What is Database Server Configuration?
What is Database Server Configuration?Your system has several databases. Each database must be configured using the System Administrator to be identified in the system.
The following is a list of databases that can be part of your system. Some databases are mandatory and some are acquired as part of different available features.
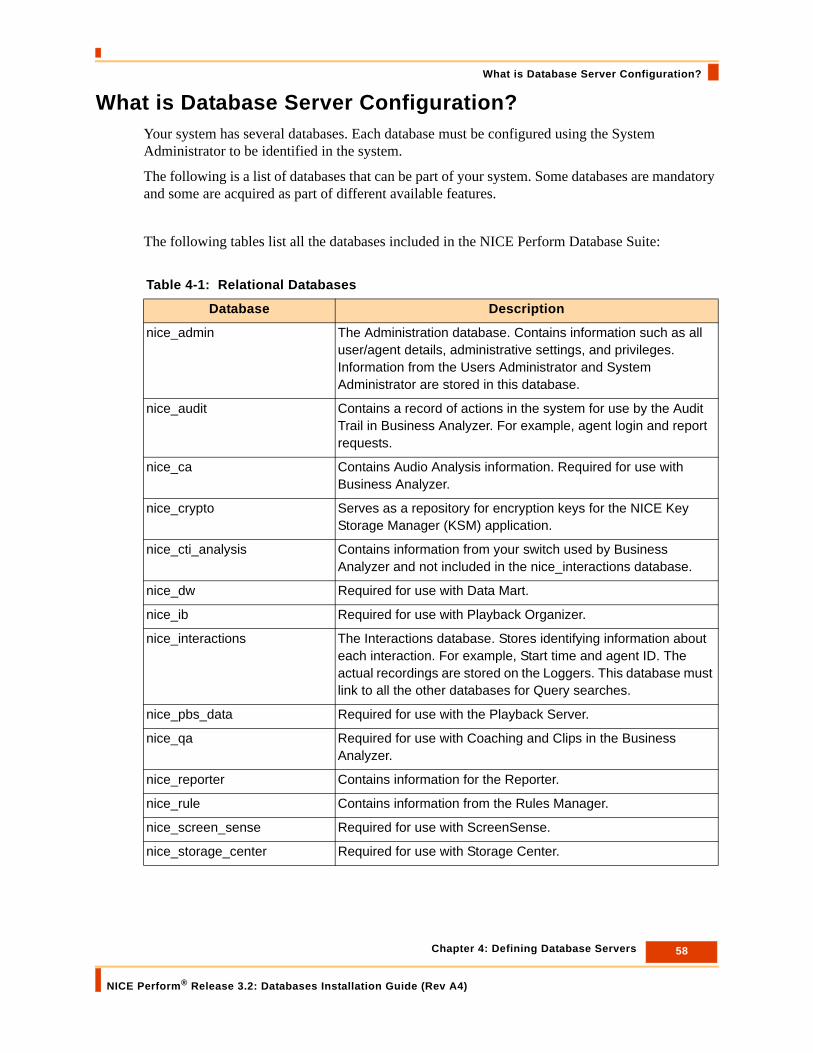
The following tables list all the databases included in the NICE Perform Database Suite:
Table 4-1: Relational Databases
Database Description
nice_admin The Administration database. Contains information such as all user/agent details, administrative settings, and privileges. Information from the Users Administrator and System Administrator are stored in this database.
nice_audit Contains a record of actions in the system for use by the Audit Trail in Business Analyzer. For example, agent login and report requests.
nice_ca Contains Audio Analysis information. Required for use with Business Analyzer.
nice_crypto Serves as a repository for encryption keys for the NICE Key Storage Manager (KSM) application.
nice_cti_analysis Contains information from your switch used by Business Analyzer and not included in the nice_interactions database.
nice_dw Required for use with Data Mart.
nice_ib Required for use with Playback Organizer.
nice_interactions The Interactions database. Stores identifying information about each interaction. For example, Start time and agent ID. The actual recordings are stored on the Loggers. This database must link to all the other databases for Query searches.
nice_pbs_data Required for use with the Playback Server.
nice_qa Required for use with Coaching and Clips in the Business Analyzer.
nice_reporter Contains information for the Reporter.
nice_rule Contains information from the Rules Manager.
nice_screen_sense Required for use with ScreenSense.
nice_storage_center Required for use with Storage Center.
59 Chapter 4: Defining Database Servers
NICE Perform® Release 3.2: Databases Installation Guide (Rev A4)
What is Database Server Configuration?
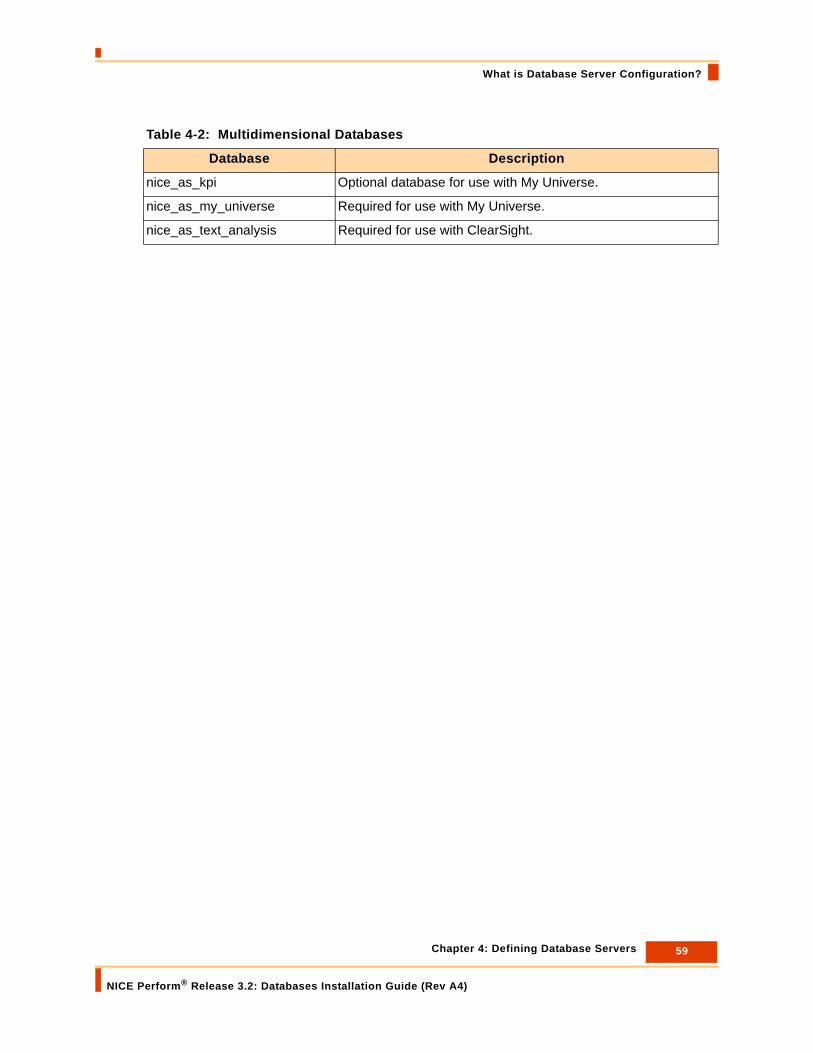
Table 4-2: Multidimensional Databases
Database Description
nice_as_kpi Optional database for use with My Universe.
nice_as_my_universe Required for use with My Universe.
nice_as_text_analysis Required for use with ClearSight.

60 Chapter 4: Defining Database Servers
NICE Perform® Release 3.2: Databases Installation Guide (Rev A4)
Which method of SQL Server Authentication is in use?
Which method of SQL Server Authentication is in use?Before you being defining a Database server, determine with which method of SQL security authentication is used in your system.
NICE Perform supports the following types of SQL security authentication:
• Windows Authentication - The SQL Server is authenticated using the Windows Login.
• SQL Authentication - The user defines a password when installing the SQL Database Server.
To determine which authentication method is in use:
• In the Organization tree, select the Database Servers branch.
The Authentication Mode is displayed above the Database Server Name. It is disabled and is for informative purposes only. The authentication method is determined during SQL Server setup. However, the SQL Management Studio enables you to switch between SQL and Windows Authentication even after installing the SQL Server. For details see the SQL Server for NICE Perform Guide.
61 Chapter 4: Defining Database Servers
NICE Perform® Release 3.2: Databases Installation Guide (Rev A4)
Defining a Database Server
Defining a Database Server
To define the Database Server:
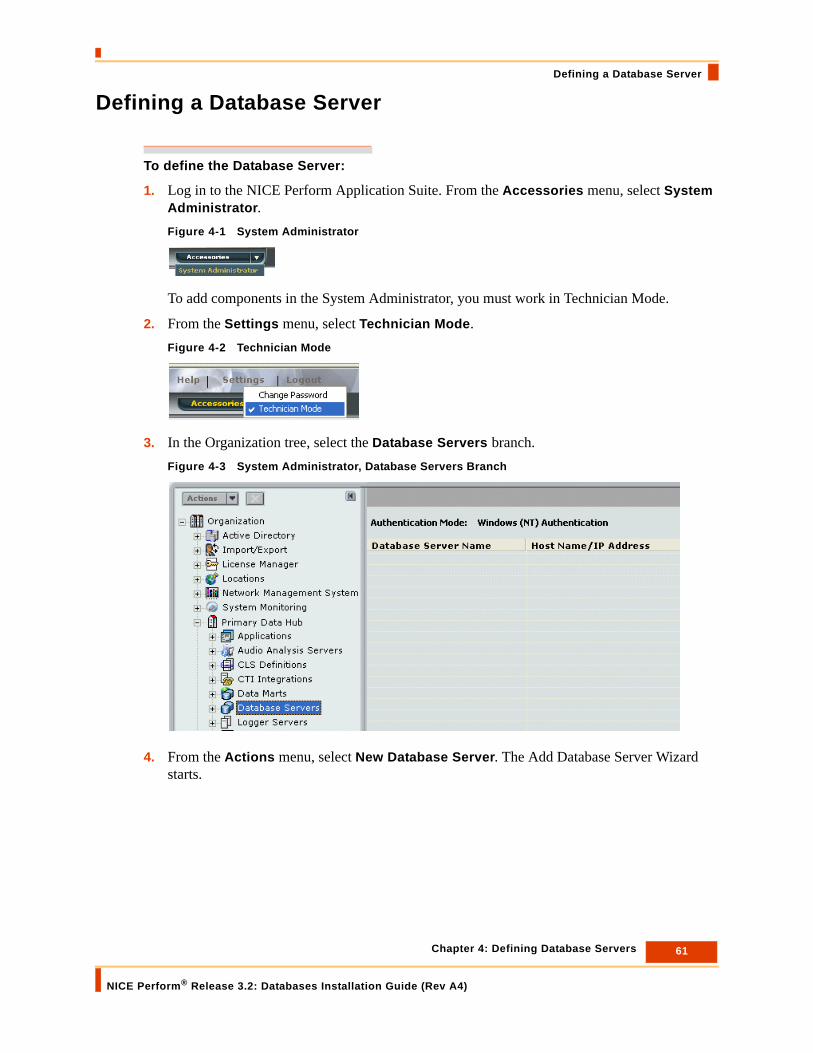
1. Log in to the NICE Perform Application Suite. From the Accessories menu, select System Administrator.Figure 4-1 System Administrator
To add components in the System Administrator, you must work in Technician Mode.
2. From the Settings menu, select Technician Mode.Figure 4-2 Technician Mode
3. In the Organization tree, select the Database Servers branch. Figure 4-3 System Administrator, Database Servers Branch
4. From the Actions menu, select New Database Server. The Add Database Server Wizard starts.

62 Chapter 4: Defining Database Servers
NICE Perform® Release 3.2: Databases Installation Guide (Rev A4)
Defining a Database Server
Figure 4-4 SQL Server Add Wizard
5. Enter the Database Server Name and the Host Name of the computer on which the database is installed. In a multi-instance environment, enter also the SQL instance name using the following syntax:
<host name>\<instance name>
6. For environments with Windows (NT) authentication, the Windows Login ID is used. You do not have to supply a password.
-or-
For environments with SQL authentication, in the Security Settings area, enter the nicesa password and the nice password of the SQL server.
7. Click OK.
The General tab of the Database Server details appears.
For SQL authentication,the Security Settings areais enabled

63 Chapter 4: Defining Database Servers
NICE Perform® Release 3.2: Databases Installation Guide (Rev A4)
Defining a Database Server
Figure 4-5 Database Server - General Tab
8. Select the databases that reside on this server.
9. Click Save .
The database sizes are shown.

64 Chapter 4: Defining Database Servers
NICE Perform® Release 3.2: Databases Installation Guide (Rev A4)
Defining a Database Server
Figure 4-6 Database Server - General Tab
10. For additional Database customization options, see Managing Databases on page 65.
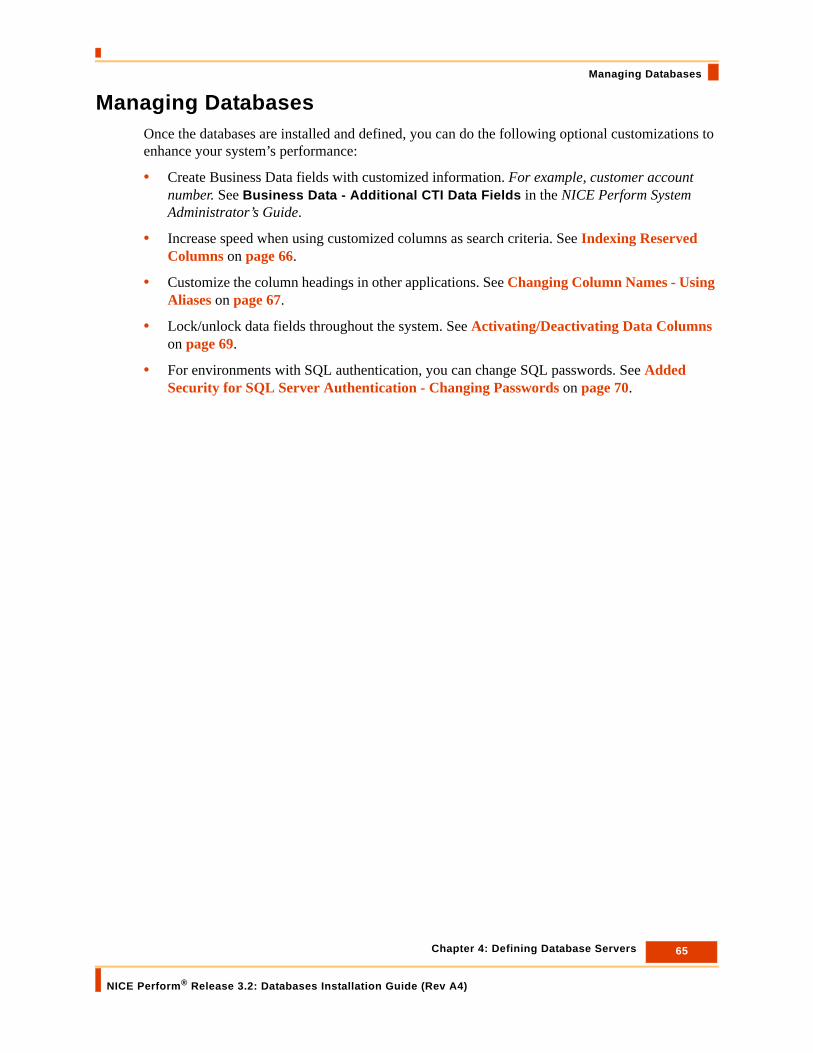
65 Chapter 4: Defining Database Servers
NICE Perform® Release 3.2: Databases Installation Guide (Rev A4)
Managing Databases
Managing DatabasesOnce the databases are installed and defined, you can do the following optional customizations to enhance your system’s performance:
• Create Business Data fields with customized information. For example, customer account number. See Business Data - Additional CTI Data Fields in the NICE Perform System Administrator’s Guide.
• Increase speed when using customized columns as search criteria. See Indexing Reserved Columns on page 66.
• Customize the column headings in other applications. See Changing Column Names - Using Aliases on page 67.
• Lock/unlock data fields throughout the system. See Activating/Deactivating Data Columns on page 69.
• For environments with SQL authentication, you can change SQL passwords. See Added Security for SQL Server Authentication - Changing Passwords on page 70.

66 Chapter 4: Defining Database Servers
NICE Perform® Release 3.2: Databases Installation Guide (Rev A4)
Managing Databases
Indexing Reserved Columns
Columns that are queried frequently can be given index values to increase query speed. You can index any reserved column (both those that you created manually and those provided by the system).
To index a reserved column:
1. In the Organization tree, select the Database Server on which the nice_interactions database is installed and click the Reserved tab.
2. Select the required column and click Indexes. The Index Wizard starts.
NOTE: The system is installed with the indexes ready-for-use. Use this procedure only when further customization is necessary.

67 Chapter 4: Defining Database Servers
NICE Perform® Release 3.2: Databases Installation Guide (Rev A4)
Managing Databases
a. Click New. The New Index area is enabled.
b. Enter an Index Name and select the desired columns for that index.
c. To save this index entry and create another one, click Save and repeat Step b.
-or-
To save this index and close this window, click OK.
3. In the Database Details area, click Save .
Changing Column Names - Using Aliases
All documentation refers to the predefined column names. You can change the names of any column as needed.
Each column can be identified by two different names:
• A user-friendly column name that is predefined in the system. It is called the Alias Column Name. You can customize this name as needed.
• An internal column name which is a combination of the table name and data name. This name cannot be changed.
TIP: The order of the columns affects the efficiency of the index. Use the Down and Up buttons to prioritize selected columns.
NOTE: The system is installed with Alias Column Names ready-for-use. Use this procedure only when further customization is necessary.

68 Chapter 4: Defining Database Servers
NICE Perform® Release 3.2: Databases Installation Guide (Rev A4)
Managing Databases
Each database contains several tables with numerous fields (columns). To identify a column in other applications such as the Business Analyzer or Playback Organizer, Rules Manager, and Users Administrator, you would need to know the combination of its database, table name, and internal column name. Internal column names are often duplicated between tables to unite bits of information. The System Administrator comes with user-friendly column names for each field. These user-friendly column names are known as Alias Column Names. Alias Column Names appear as column headings in the Business Analyzer or Playback Organizer and wherever data must be accessed directly by the user. You can customize the Alias Column Names by accessing the Administrator database. The Columns tab is active for the Administration database only.
To rename a Column:
1. In the Organization tree, select the Database Server on which the nice_admin database is installed and click the Columns tab.
The Column Details appear.
2. Click a heading to sort the table and locate a column.
3. Enter your new, custom Alias Column Name over the previous one. Spaces and special symbols are allowed. This field cannot be named “name” (the Alias “name” is already in use by the system).
4. Click Save .
The new Alias Column Name will appear in other applications such as in the column headings of the Business Analyzer, Monitor, and Playback Organizer.
EXAMPLE: Locate iAgentId in the Column Name column and define its Alias Column Name as Agent ID. You will now see Agent ID wherever this field appears, such as in the Business Analyzer or Playback Organizer and the Rules Manager.
NOTE: In order for the columns to appear in the Business Analyzer, Monitor, and Playback Organizer, they must also be selected in the relevant places in each application.

69 Chapter 4: Defining Database Servers
NICE Perform® Release 3.2: Databases Installation Guide (Rev A4)
Managing Databases
Activating/Deactivating Data Columns
Each data field can be activated or deactivated separately for viewing, editing, and querying ability. Activating and deactivating data columns is done by accessing the Administrator database. The Columns tab is only accessible for the Administration database.
To view/edit/query a data column in other applications,
• The user must be given privileges to view/edit/query the data via the Users Administrator.
• The column must be appropriately selected in the application. For example, in the Business Analyzer and Playback Organizer, you display columns using the Preferences window.
To activate/deactivate data columns:
1. In the Organization tree, select the database server that includes the Administration database and click the Columns tab.
2. Use the horizontal scroll bar to display the Viewable, Editable, and Queriable columns:
3. To allow view, edit, and query privileges to be granted for a column, select the appropriate Viewable, Editable, and Queriable checkboxes.
4. Click Save .
NOTE: The system is installed with the data fields ready-for-use. Use this procedure only when further customization is necessary.

70 Chapter 4: Defining Database Servers
NICE Perform® Release 3.2: Databases Installation Guide (Rev A4)
Managing Databases
Added Security for SQL Server Authentication - Changing Passwords
As a measure of added security, NICE Perform provides you with the ability to change the passwords for your SQL server. There are two different levels of passwords.
nice sa login password - this password is of very high level and is for all SQL servers, at all sites. In a Multi Data Hub environment, changing this password at one site automatically changes it for all sites, provided that the System Administrator is running at the master site and at each secondary site.
nice login password - this password can be changed separately for each SQL server. It is used to access SQL database information.
These passwords are used internally. Changing them from time to time adds security to your system. Both passwords are saved in each SQL server.
To change the nice sa login password, continue with Changing the nice sa Login Password on page 70.
To change a nice login password for an individual SQL server, continue with Changing a NICE Login Password for an Individual SQL Server on page 71.
Changing the nice sa Login Password
Use this procedure for sites using SQL Server authentication. See Which method of SQL Server Authentication is in use? on page 60.
The nice sa login password is used internally to access all SQL servers. The nice sa login password is stored on each SQL server. The nice sa login password must be identical for all SQL servers defined at your site. In a Multi Data Hub environment, the nice sa login password must be identical for all SQL servers at all sites.
Changing the nice sa login password requires only one procedure. In a Multi Data Hub environment, changing this password at one site automatically changes it across all sites.
To change the nice sa login password:
1. In a Multi Data Hub environment, remove all subscribers from replication. See Removing Subscribers from Replication on page 73. Then return to this procedure.
IMPORTANT This section is relevant only for systems using SQL authentication. See Which method of SQL Server Authentication is in use? on page 60.
IMPORTANT• The nice sa password is identical for all SQL servers defined at your site. In a Multi Data
Hub environment, the nice sa login password is identical for all SQL servers at all sites.
• If you change the nice sa login password, save it in a safe place. If you add additional SQL servers, or define another site, you will need to use this same nice sa login password.
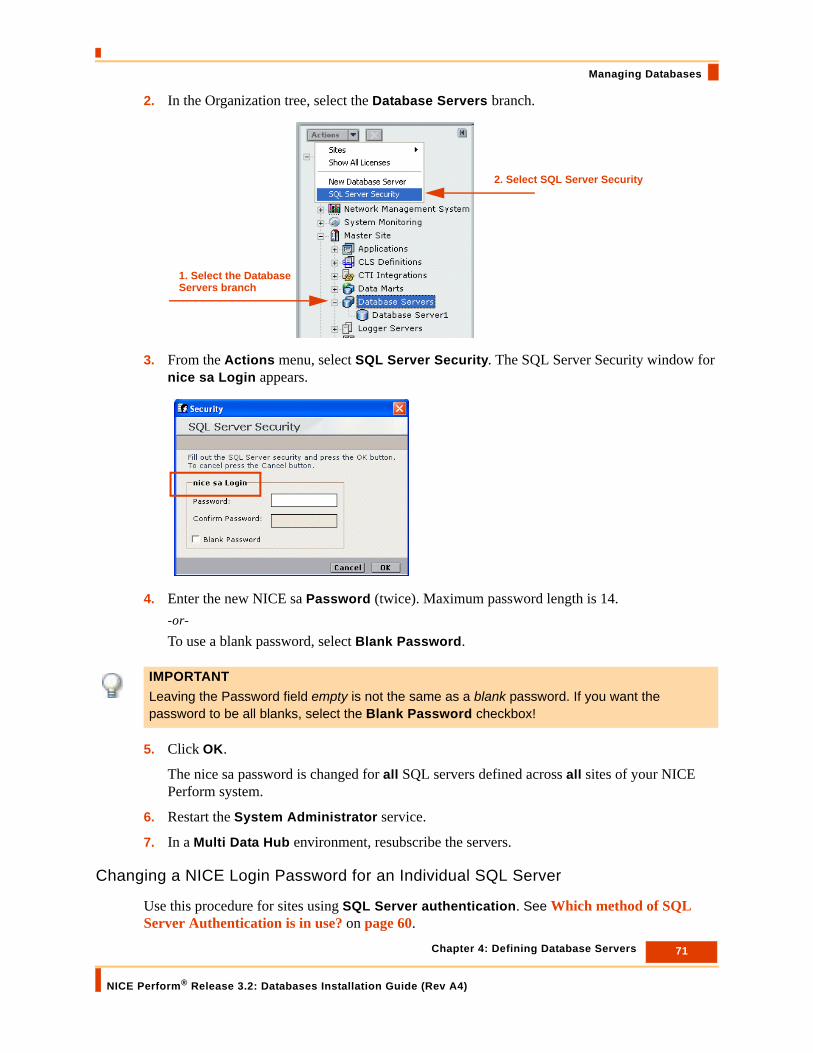
71 Chapter 4: Defining Database Servers
NICE Perform® Release 3.2: Databases Installation Guide (Rev A4)
Managing Databases
2. In the Organization tree, select the Database Servers branch.
3. From the Actions menu, select SQL Server Security. The SQL Server Security window for nice sa Login appears.
4. Enter the new NICE sa Password (twice). Maximum password length is 14.-or-To use a blank password, select Blank Password.
5. Click OK.
The nice sa password is changed for all SQL servers defined across all sites of your NICE Perform system.
6. Restart the System Administrator service.
7. In a Multi Data Hub environment, resubscribe the servers.
Changing a NICE Login Password for an Individual SQL Server
Use this procedure for sites using SQL Server authentication. See Which method of SQL Server Authentication is in use? on page 60.
1. Select the DatabaseServers branch
2. Select SQL Server Security
IMPORTANTLeaving the Password field empty is not the same as a blank password. If you want the password to be all blanks, select the Blank Password checkbox!

72 Chapter 4: Defining Database Servers
NICE Perform® Release 3.2: Databases Installation Guide (Rev A4)
Managing Databases
Each SQL server has its own nice login password. This is in addition to the nice sa login password. It is used internally to access the SQL server. Changing the passwords of SQL servers where your databases reside provides additional security to your system and data.
To change an SQL server password:
1. In the Organization tree, select the Database Servers branch and then select a Server.
2. From the Actions menu, select SQL Server Security. The SQL Server Security window for Nice Login appears.
IMPORTANT At the end of this procedure, you will be instructed to recreate the links between the sites in the Data Mart! This is relevant for both single-site and for Multi Data Hub environments.
1. Select a Server
2. Select SQL Server Security

73 Chapter 4: Defining Database Servers
NICE Perform® Release 3.2: Databases Installation Guide (Rev A4)
Managing Databases
3. Enter the new NICE Password (twice). Maximum password length is 14.
-or-
To use a blank password, select Blank Password.
4. Click OK.
5. In the Organization tree, expand the Data Mart branch, select the Data Mart and then click the Sites tab. In a Multi Data Hub environment, do this on the Master Site only.
6. One at a time, select a site and click Recreate Links.
7. Restart the System Administrator service.
8. If Content Analysis or Screen Content Analysis services are installed, restart them now.
Removing Subscribers from Replication
Use this procedure for a Multi Data Hub environment with SQL Server authentication. When changing the nice sa password for SQL server security, it is necessary to remove the Subscribers from Replication.
IMPORTANTLeaving the Password field empty is not the same as a blank password. If you want the password to be all blanks, select the Blank Password checkbox!
NOTE: The Replication tab accessed in this procedure is active only on the Master site and only for the Administrative database.

74 Chapter 4: Defining Database Servers
NICE Perform® Release 3.2: Databases Installation Guide (Rev A4)
Managing Databases
To remove Subscribers from Replication:
1. On the Master site, expand the Master site branch and select the database server where the Administrative database (nice_admin) is installed. Click the Replication tab.
2. Click . The Replication Remove Wizard appears.
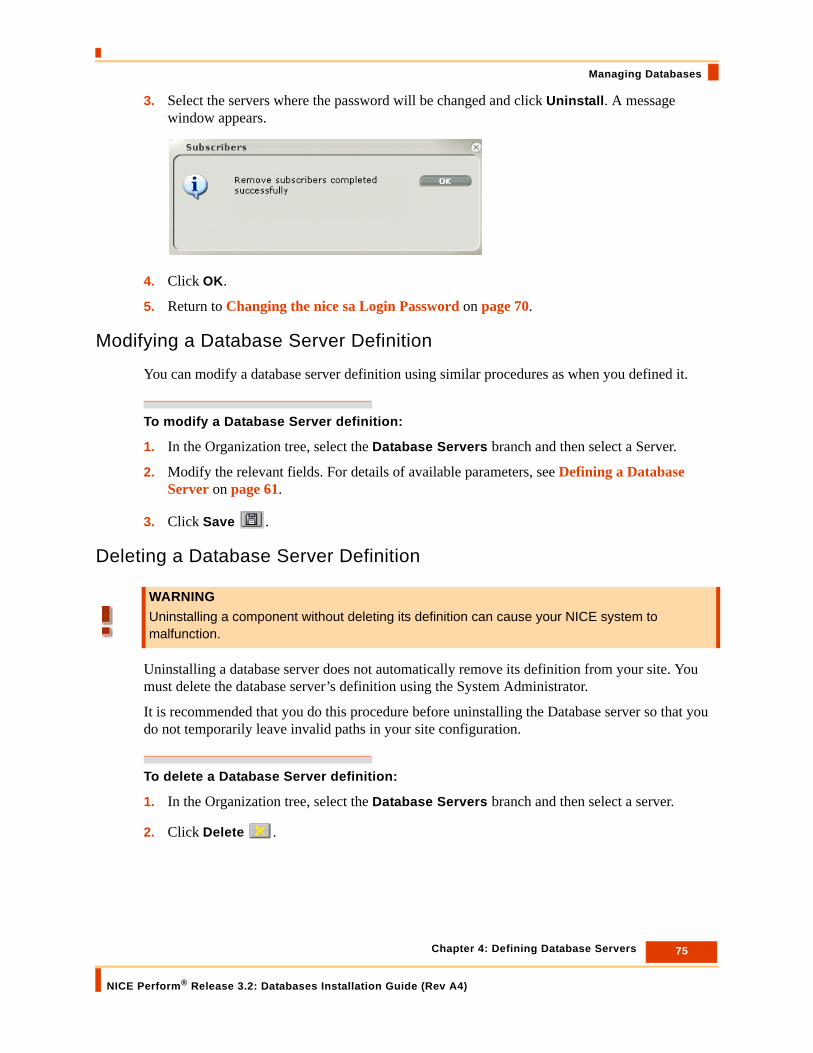
75 Chapter 4: Defining Database Servers
NICE Perform® Release 3.2: Databases Installation Guide (Rev A4)
Managing Databases
3. Select the servers where the password will be changed and click Uninstall. A message window appears.
4. Click OK.
5. Return to Changing the nice sa Login Password on page 70.
Modifying a Database Server Definition
You can modify a database server definition using similar procedures as when you defined it.
To modify a Database Server definition:
1. In the Organization tree, select the Database Servers branch and then select a Server.
2. Modify the relevant fields. For details of available parameters, see Defining a Database Server on page 61.
3. Click Save .
Deleting a Database Server Definition
Uninstalling a database server does not automatically remove its definition from your site. You must delete the database server’s definition using the System Administrator.
It is recommended that you do this procedure before uninstalling the Database server so that you do not temporarily leave invalid paths in your site configuration.
To delete a Database Server definition:
1. In the Organization tree, select the Database Servers branch and then select a server.
2. Click Delete .
WARNINGUninstalling a component without deleting its definition can cause your NICE system to malfunction.

76 Chapter 4: Defining Database Servers
NICE Perform® Release 3.2: Databases Installation Guide (Rev A4)
Scheduling Database Backup
Scheduling Database BackupAs part of the database installation process, SQL backup jobs are created and scheduled to run on a regular basis. All files are backed up to an external tape (this is the default) or to a location on your network. The backup jobs run as follows:
• NICE Full Backup - Backs up the complete database to a backup file. By default, this job is scheduled to run every Saturday at 12:00 PM.
• NICE Differential Backup - Backs up the delta since the last Full backup. By default, this job is scheduled to run every day, except Saturday, at 12:00 PM. Every time the job runs, the delta from the last Full backup is appended to the backup file.
• NICE Log Backup (site specific): If your site includes Key Storage Management, data is stored in the nice_crypto database. The nice_crypto database is set to full recovery mode with a transaction log. The NICE Log Backup job backs up the nice_crypto database’s transaction log. By default, this job is scheduled to run every hour.
You can modify the backup schedules or change the backup location to your network.
Guidelines for Changing a Backup Location
If you want to change the backup location to a remote destination on the network, follow these guidelines:
• The location can be a local drive, however if the server fails, the backup file will be lost and the database cannot be restored. Therefore we recommend choosing a remote destination on the network.
• When defining a remote destination on the network, the location path must follow UNC conventions. Type the full path to the location. Do not use a mapped drive.
• The SQL Server and the SQL Server Agent Service must have read/write privileges to the remote destination. In a domain environment, the SQL Server service must run under a domain user account with proper access privileges to the remote destination. To verify that the SQL Server has proper access privileges, run the test in the Backup Destination window.
To modify backup schedules or location:
1. In the Database Servers branch, select a database. Then click the Backup tab. The Database Backup Jobs appear.
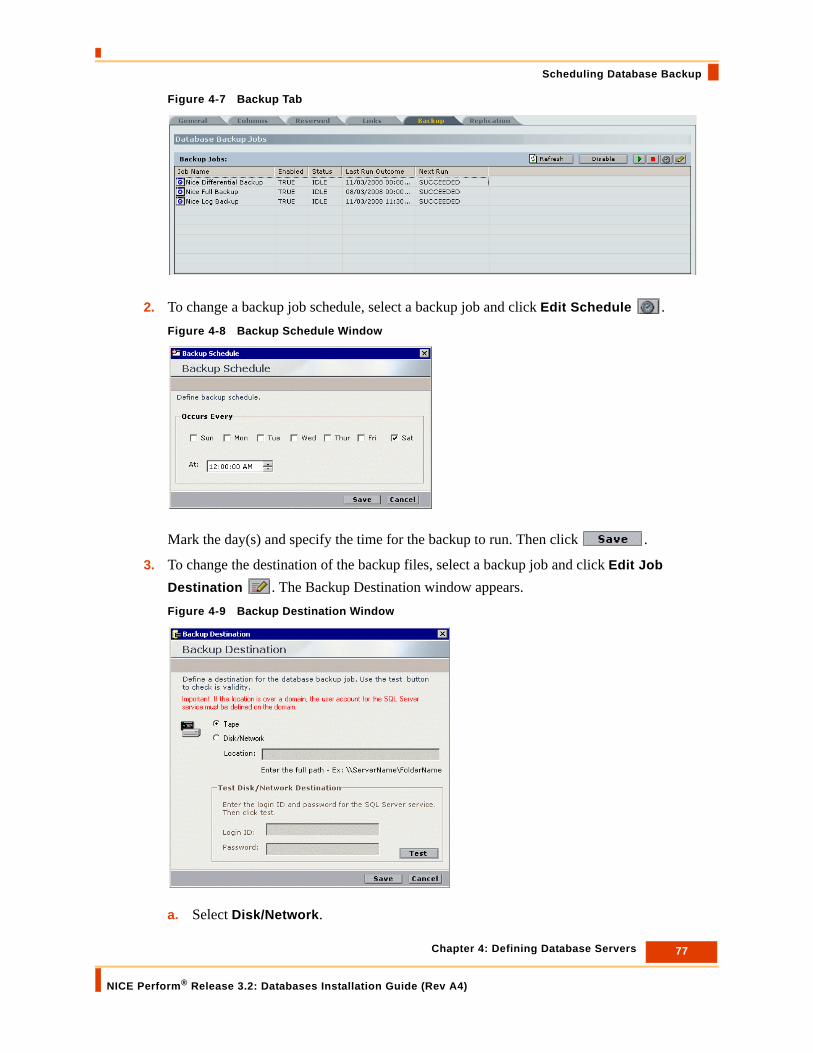
77 Chapter 4: Defining Database Servers
NICE Perform® Release 3.2: Databases Installation Guide (Rev A4)
Scheduling Database Backup
Figure 4-7 Backup Tab
2. To change a backup job schedule, select a backup job and click Edit Schedule . Figure 4-8 Backup Schedule Window
Mark the day(s) and specify the time for the backup to run. Then click .
3. To change the destination of the backup files, select a backup job and click Edit Job Destination . The Backup Destination window appears. Figure 4-9 Backup Destination Window
a. Select Disk/Network.

78 Chapter 4: Defining Database Servers
NICE Perform® Release 3.2: Databases Installation Guide (Rev A4)
Scheduling Database Backup
b. In the Location area, type the full path for the backup files. The location must be accessible by the user running the SQL Server service.
c. If you are backing up to a remote destination, test the path: In the Test area, type the Login ID and Password for the SQL server and click .
d. Click .
4. Click Save .
Guidelines for Restoring a Database
When restoring a database, follow these guidelines:
• Restore two jobs from the backup file - the Full Backup job and the last Differential Backup job.
• The Full Backup job must be restored first.
EXAMPLE:You want to restore the nice_admin database. One Full Backup and two Differential Backup jobs ran. 1. In the Enterprise Manager, open the Restore database window. 2. Mark the Full Backup job and the last Differential Backup job.3. In the First backup to restore field, choose the Full Backup job.
Full Backup job
Last Differential Backup job
Restore the Full Backup first

79 Chapter 4: Defining Database Servers
NICE Perform® Release 3.2: Databases Installation Guide (Rev A4)
Scheduling Database Backup
Running or Stopping a Database Backup Job
Database backup jobs are prescheduled to run at set intervals. You can run a backup job on a one-time basis at any time, or you can cancel a backup job that is currently running.
You can also disable a schedule to prevent the backup job from running at its prescheduled time.
To run or disable a database backup job:
1. In the Database Servers branch, select a database. Then click the Backup tab. The Database Backup Jobs appear. Figure 4-10 Backup Tab
2. To run a backup job, select a backup job and click Start Job . The backup job begins running. When the job is complete, its final status appears in the Last Run Outcome column.
3. To stop a backup job that is currently running, select the backup job and click Stop Job . To disable a backup job’s schedule, select a backup job and click . The backup job will not run again until it is enabled.
4. To enable a backup job’s schedule, select a backup job and click . The backup job will run according to its next scheduled time.

Blank page for double-sided printing.

Chapter 5: Configuring the Data Mart Server
NICE Perform® Release 3.2: Databases Installation Guide (Rev A4)
81
5
Configuring the Data Mart Server
The NICE Perform Data Mart provides a robust, open access interface to information contained in the NICE Perform system without any concern over potential impacts on real-time performance.
The NICE Perform system enables organizations to capture, analyze and act on insights gained from the full range of customer interactions. The NICE Perform Data Mart serves as a centralized repository for this information, providing a single, unified data source for reporting and data access.
In an environment with more than one Data Hub (a Multi Data Hub environment), one Data Mart is configured on the Primary Data Hub for the entire organization. It consolidates data from the individual Data Hubs’ local databases. Since data from all the Data Hubs are stored in one central database, users can run queries and reports that span all the Data Hubs. This provides users with valuable information as they can analyze and compare data across the organization. This approach allows a unified view of information across the entire operation from any NICE Perform workstation, and it allows personnel from one Data Hub to see what is going on at another.
Data Mart is required wherever My Universe or Reporter are installed.
Since the Data Mart is a central repository of NICE database tables, see the Databases Installation Guide for troubleshooting procedures.
Contents
What is the Data Mart? ...................................................................................................82
Building the Data Mart....................................................................................................87
Customizing Schedules .................................................................................................96
Monitoring SQL Jobs ...................................................................................................102
Viewing Synchronization Details ................................................................................104
What are the Data Mart Domains? ..............................................................................106
IMPORTANT In a Multi Data Hub environment, the Data Mart must be installed at the Primary Data Hub, and never on the Secondary Data Hub.

82 Chapter 5: Configuring the Data Mart Server
NICE Perform® Release 3.2: Databases Installation Guide (Rev A4)
What is the Data Mart?
What is the Data Mart?The Data Mart is a central repository of NICE database tables. It is a read-only database which is populated with data from specific NICE databases.
The Data Mart is a central repository of NICE database tables. It is a read-only database which is populated with data from specific NICE databases.
The NICE Perform Data Mart automatically retrieves information from individual Data Hubs. Data is structured into ‘domains’ corresponding to the various localized data sources in the NICE Perform system. Once information is transferred into a data mart domain it is available for reporting and retrieval by other systems.
When you build the Data Mart, you create domains to correspond with the databases that will store their data in the Data Mart. Then you create links between the databases and their corresponding domains. When an SQL job runs, the domains are populated with data from the corresponding databases.
The Data Mart does not require a software installation. Building a Data Mart requires configuration procedures in the System Administrator application to specific databases. The Data Mart is built on the same host as all the NICE databases, or a separate, dedicated server. Instructions for building the Data Mart are provided in this guide.
In a Multi Data Hub environment, you must select which databases in each Data Hub should be linked to the corresponding domains in the Data Mart. See Architecture for Multi Data Hubs on page 85.
The Data Mart has three default schedules, as follows:
• Population Schedule: Determines when the domains in the Data Mart are populated with data from the NICE databases. The default is every hour between 5:00 AM and 11:00 PM.
• Retention schedule: Determines when data which passed the Retention period is deleted. The default is once a day at 1:00 AM.
The value for the Retention period states how long the data must remain in the Data Mart. The default is 18 months.
• Reindex Schedule: Determines when the Data Mart rebuilds indexes for each domain. The default is every Saturday at 2:00 AM.
You can modify a default schedule or create a new schedule for a specific domain via the System Administrator application. See Customizing Schedules on page 96.
TIP: To avoid unnecessary workload on the Data Mart, we recommend that you install only the domains that are required for the Applications or Reporter packages at the Data Hub. The Administration domain must always be installed.See Install the NICE Domains on page 90 for details.

83 Chapter 5: Configuring the Data Mart Server
NICE Perform® Release 3.2: Databases Installation Guide (Rev A4)
What is the Data Mart?
Workflow
When you build the Data Mart, you must follow these steps:
1. Verify that the nice_dw database resides on one SQL Server. See Verify the Data Mart Installation on page 87.
2. Define a name for the Data Mart and select the SQL Server where the nice_dw database resides. See Define the Data Mart on page 88.
3. Install NICE domains in the Data Mart. This builds the structure of the Data Mart. See Install the NICE Domains on page 90.
4. Determine which databases will be linked to domains in the Data Mart. In a Multi Data Hub environment, this step must be repeated per Data Hub. Link the Databases to the NICE Domains on page 92.
5. (optional) To use NICE Perform’s Interaction Analytics feature, My Universe, or KPI, see Multidimensional Database Configuration for Interactions Analytics and My Universe on page 264.
Customization Options
After you build the Data Mart, you can customize it as follows:
• Modify SQL job properties. See Define Data Mart Properties on page 94.
• Modify the number of days the Transfer Log is retained. See Define Data Mart Properties on page 94.
• Determine the displayed user name formats. See Define Data Mart Properties on page 94.
• Determine the SNMP thresholds. See Define Data Mart Properties on page 94.
• Modify a default schedule. See Modifying a Data Mart Schedule on page 97.
• Create a new schedule. See Creating a Customized Schedule on page 99.

84 Chapter 5: Configuring the Data Mart Server
NICE Perform® Release 3.2: Databases Installation Guide (Rev A4)
What is the Data Mart?
Data Mart Installation Guidelines
The Data Mart database (nice_dw) must be installed on an SQL server. For details on installing databases, see the Database Server Installation Guide.
How much space does the Data Mart require on the SQL server?
NICE provides an Excel spreadsheet named DatabaseSizeCalculator.xls. This file lists the space requirement for databases at one Data Hub. To determine the required space required for the Data Mart, multiply the Data Mart value defined in the file by the number of Data Hubs.
Single Data Hub Architecture
In a single Data Hub environment, one Data Mart is configured.
The Data Mart can reside on its own server or on the Database server.
In Data Hubs that include the Reporter, the Reporter database and the Data Mart must be installed on the same server.
During the configuration of the Data Mart, you must link the databases to their corresponding domains.
The following schematic displays a representation of Single Data Hub architecture.Figure 5-1 Single Data Hub Architecture
How is Information Transferred?
In a single Data Hub environment, information is transferred as follows:
• When a user runs a report, the Applications Server retrieves information directly from the Data Mart. This enables the Reporter/My Universe to return results quickly and efficiently.
• When a user runs a Business Analyzer query, the Applications Server queries the NICE databases - not the Data Mart.
• When a user runs a customized OLAP query (Online Analytic Processing), the system queries the Data Mart directly.
The Applications Server writes information to the NICE databases.
The Data Mart is populated with data from the NICE databases at defined schedules (based on the Population Schedule SQL jobs).
Applications Server
NICE Databases Data MartReporter Database
1
2
1
2

85 Chapter 5: Configuring the Data Mart Server
NICE Perform® Release 3.2: Databases Installation Guide (Rev A4)
What is the Data Mart?
Architecture for Multi Data Hubs
In an environment consisting of several Data Hubs, only one Data Mart should be installed for the entire organization. The Data Mart must be installed at the Primary Data Hub.
The Data Mart can reside on its own server or on the Database server.
In Data Hubs that include the Reporter, the Reporter database (for the local Data Hub) and the Data Mart must be installed on the same server.
In Data Hubs that include Multidimensional databases, the Multidimensional databases and the Data Mart must be installed on the same server.
The following schematic displays a representation of Multi Data Hubs.Figure 5-2 Multi Data Hub Architecture
In each Data Hub, the Applications Server writes information to the NICE databases.
The Data Mart is populated with data from the NICE databases from each Data Hub at defined schedules (based on the Population Schedule SQL jobs).
Applications Server
NICE Databases Data MartReporter
1
2
1
ApplicationsServer
NICE Databases
1
ApplicationsServer
NICE Databases
2
2
Database
1
2

86 Chapter 5: Configuring the Data Mart Server
NICE Perform® Release 3.2: Databases Installation Guide (Rev A4)
What is the Data Mart?
How is Information Transferred?
When a user generates a report, the Applications Server retrieves information directly from the Data Mart. This enables the Reporter to return results from all the Data Hubs so that users can compare information between Data Hubs. Since all the information is stored in the Data Mart, the Reporter is not dependent on the network and is not overloading network resources each time a report runs.
The information in the Data Mart is updated each time the Population Schedule SQL job runs. Therefore, when a user generates a report, the results display the information reflecting the last time the Data Mart was updated - not real-time information.

87 Chapter 5: Configuring the Data Mart Server
NICE Perform® Release 3.2: Databases Installation Guide (Rev A4)
Building the Data Mart
Building the Data MartIn the Data Hub, build one Data Mart to store data from the NICE databases in one central database. When defining the Data Mart, you must perform the following steps:
• Verify the Data Mart Installation: Verify that the nice_dw database resides on one SQL Server.
• Define the Data Mart: Name the Data Mart and select the SQL Server where the nice_dw database resides.
• Install the NICE Domains: Build the domains in the Data Mart.
• Link the Databases to the NICE Domains: Define which databases in each Data Hub will be linked to the corresponding domains in the Data Mart.
• Define Data Mart Properties: Define SQL job properties, transfer log properties, SNMP alert properties and the displayed format of all user names.
Verify the Data Mart Installation
Verify that the nice_dw database resides on the SQL Server.
If the Data Mart is was not installed with the other databases, it will be necessary to run the Database Setup. For details, see the Database Server Installation Guide.
To verify the Data Mart installation:
1. Log in to the NICE Perform Application Suite. From the Accessories menu, select System Administrator.
To add or edit components in the System Administrator, you must work in Technician Mode.
2. From the Settings menu, select Technician Mode.
3. In the Organization tree, expand the Database Servers branch.
4. Select the SQL Server where the Data Mart was installed and verify that the nice_dw database is selected for that server.Figure 5-3 Database Servers - Databases in this SQL Server
NOTE: In a Financial Trading Floor environment, the nice_IB database may also be installed.

88 Chapter 5: Configuring the Data Mart Server
NICE Perform® Release 3.2: Databases Installation Guide (Rev A4)
Building the Data Mart
Define the Data Mart
Define one instance of the Data Mart in your Data Hub. The Data Mart must be defined on the same SQL server where the nice_dw database resides.
In a Multi Data Hub environment, the Data Mart must be defined in the Primary Data Hub.
To define the Data Mart:
1. Log in to the NICE Perform Application Suite. From the Accessories menu, select System Administrator.
To add or edit components in the System Administrator, you must work in Technician Mode.
2. From the Settings menu, select Technician Mode.
3. In the Organization tree, expand the Primary Data Hub branch and select the Data Marts branch.
4. From the Actions menu, select New Data Mart. The Add Data Mart Wizard starts.Figure 5-4 Data Mart Add Wizard
5. Enter a name for the Data Mart.
6. From the Database Server drop-down list, select the Database (SQL) server where the Data Mart resides.
7. Click OK. The Data Mart name appears below the Data Marts branch in the Organization tree. The General tab of the Data Mart appears in the Details pane.
IMPORTANTAfter the Data Mart is defined and the domains are installed (see Install the NICE Domains on page 90), it is strongly recommended that you do not delete the Data Mart database or the Data Mart definition in System Administrator.
IMPORTANT In a Multi Data Hub organization, this procedure must be completed using the Primary Data Hub, not one of the Secondary Data Hubs!
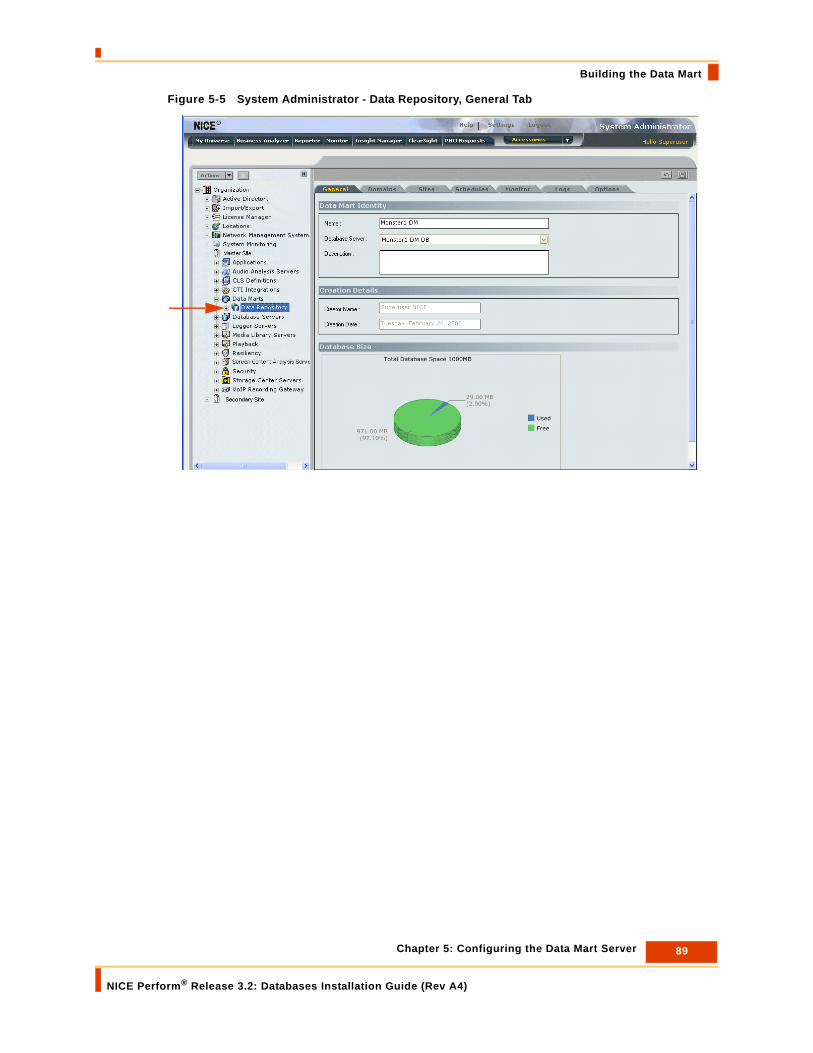
89 Chapter 5: Configuring the Data Mart Server
NICE Perform® Release 3.2: Databases Installation Guide (Rev A4)
Building the Data Mart
Figure 5-5 System Administrator - Data Repository, General Tab

90 Chapter 5: Configuring the Data Mart Server
NICE Perform® Release 3.2: Databases Installation Guide (Rev A4)
Building the Data Mart
Install the NICE Domains
Determine which NICE domains will be installed in the Data Mart. The Administration domain must be installed. All other domains are optional.
Install those domains that are required for My Universe and for specific Reporter packages, as follows:
After the domains are installed, you can:
• Modify their job schedules as needed. See Customizing Schedules on page 96.
• View the complete lists of tables and columns.
To install the domains:
1. From the Data Marts branch, select the defined Data Mart.
2. Click the Domains tab.Figure 5-6 System Administrator - Data Repository, Domains Tab
3. Click New > NICE Domains. The Install NICE Domains window appears.
Application/Package Name Required Domain
My Universe Administration, Interaction, NIF, QM
Quality Optimization Audio Analysis
Reporter: User Admin Package AdministrationThis domain must always be installed!
Reporter: QM Package QM
Reporter: Coaching Reports QM
Reporter: Feedback (NIF) Package Interaction, NIF, QM
Reporter: Audio Analysis Package Interaction, Audio Analysis
Reporter: ScreenSense Package Interaction, ScreenSense, QM, NIF, CTI
Reporter: CTI Package Interaction, QM, NIF, CTI
Reporter: Interactions Classification Package Interaction, Rule
Reporter: Interaction Playback Requests Package
IB

91 Chapter 5: Configuring the Data Mart Server
NICE Perform® Release 3.2: Databases Installation Guide (Rev A4)
Building the Data Mart
Figure 5-7 Install NICE Domains
4. Select the checkboxes for each domain that will be installed in the Data Mart. You must select the Administration domain.
5. Click Install. The domains are installed one by one and the progress bar displays the installation process.
6. Click Close when the installation is completed. The installed domains appear in the Domains tab.Figure 5-8 Installed Domains
NOTE: In a Financial Trading Floor environment, the IB domain may also be installed.
IMPORTANTAfter the Data Mart is defined and the domains are installed (see Install the NICE Domains on page 90), it is strongly recommended that you do not delete the Data Mart database or the Data Mart definition in System Administrator.

92 Chapter 5: Configuring the Data Mart Server
NICE Perform® Release 3.2: Databases Installation Guide (Rev A4)
Building the Data Mart
Link the Databases to the NICE Domains
Determine which domains should be populated with data from the corresponding databases.
Linking Domains in a Multi Data Hub Environment
In a Multi Data Hub environment, link the databases to their corresponding domains, one Data Hub at a time.The Administration and Rules domains can be linked to corresponding databases from one Data Hub only (usually the Primary Data Hub). After you link these domains to databases in one Data Hub, the system does not allow you to link the domains to databases in other Data Hubs.
All other domains can be linked to databases from all Data Hubs.
To link the domains to the databases at a Data Hub:
1. From the Data Marts branch, select the defined Data Mart.
2. Click the Sites tab.Figure 5-9 System Administrator - Data Repository, Sites Tab
3. In the Organization Site Domains area, select a Data Hub.
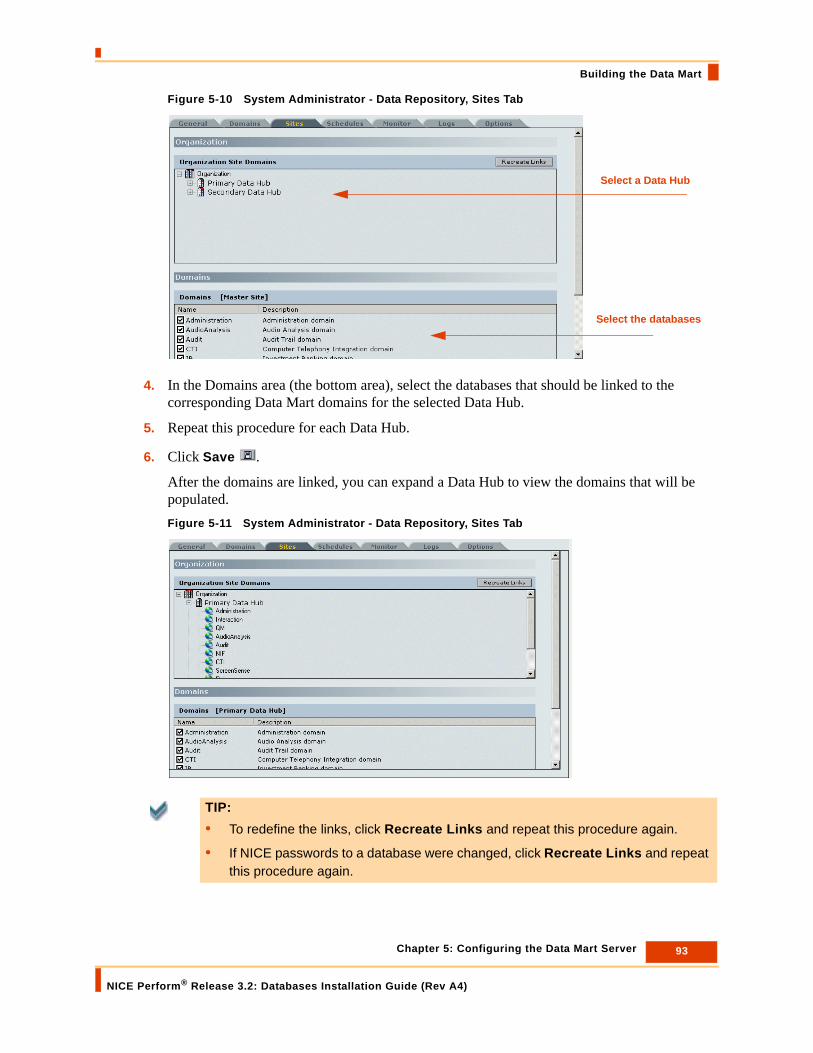
93 Chapter 5: Configuring the Data Mart Server
NICE Perform® Release 3.2: Databases Installation Guide (Rev A4)
Building the Data Mart
Figure 5-10 System Administrator - Data Repository, Sites Tab
4. In the Domains area (the bottom area), select the databases that should be linked to the corresponding Data Mart domains for the selected Data Hub.
5. Repeat this procedure for each Data Hub.
6. Click Save .
After the domains are linked, you can expand a Data Hub to view the domains that will be populated. Figure 5-11 System Administrator - Data Repository, Sites Tab
TIP: • To redefine the links, click Recreate Links and repeat this procedure again.
• If NICE passwords to a database were changed, click Recreate Links and repeat this procedure again.
Select the databases
Select a Data Hub

94 Chapter 5: Configuring the Data Mart Server
NICE Perform® Release 3.2: Databases Installation Guide (Rev A4)
Building the Data Mart
Define Data Mart Properties
The Data Mart has default properties which can be customized for your Data Hub, as follows:
To define Data Mart properties:
1. In the Data Marts branch, select the defined Data Mart.
2. Click the Options tab.Figure 5-12 System Administrator - Data Repository, Options Tab
3. In the SQL Job Properties area, define the following:
In the Max Retry Attempts field, enter the number of times a job will retry to run after a failure occurs.
In the Retry Interval field, enter the number of minutes that the system will wait before retrying to run a job.
Properties You can define:
SQL Job The number of times a job will retry to run after a failureThe retry intervalThe path to the job’s log file
Transfer Log Maximum number of days the data is retained. After this value passes, the data is deleted.
SNMP Alerts Determine thresholds for the following alerts:
• Database Free Space Warning alert
• Database Free Space Error alert
• Database Log Space Error alert

95 Chapter 5: Configuring the Data Mart Server
NICE Perform® Release 3.2: Databases Installation Guide (Rev A4)
Building the Data Mart
In the Job Log File Path field, browse to the folder where the log file will be stored.
4. In the Transfer Log Properties area, enter the maximum number of days that the Transfer Log will be retained. After this number of days pass, the data is deleted from the log.
5. In the SNMP Alert Properties area, enter the threshold for each alert. After this threshold is exceeded, and your site has an NMS installed, a trap is sent to the NMS.
6. Click Save .
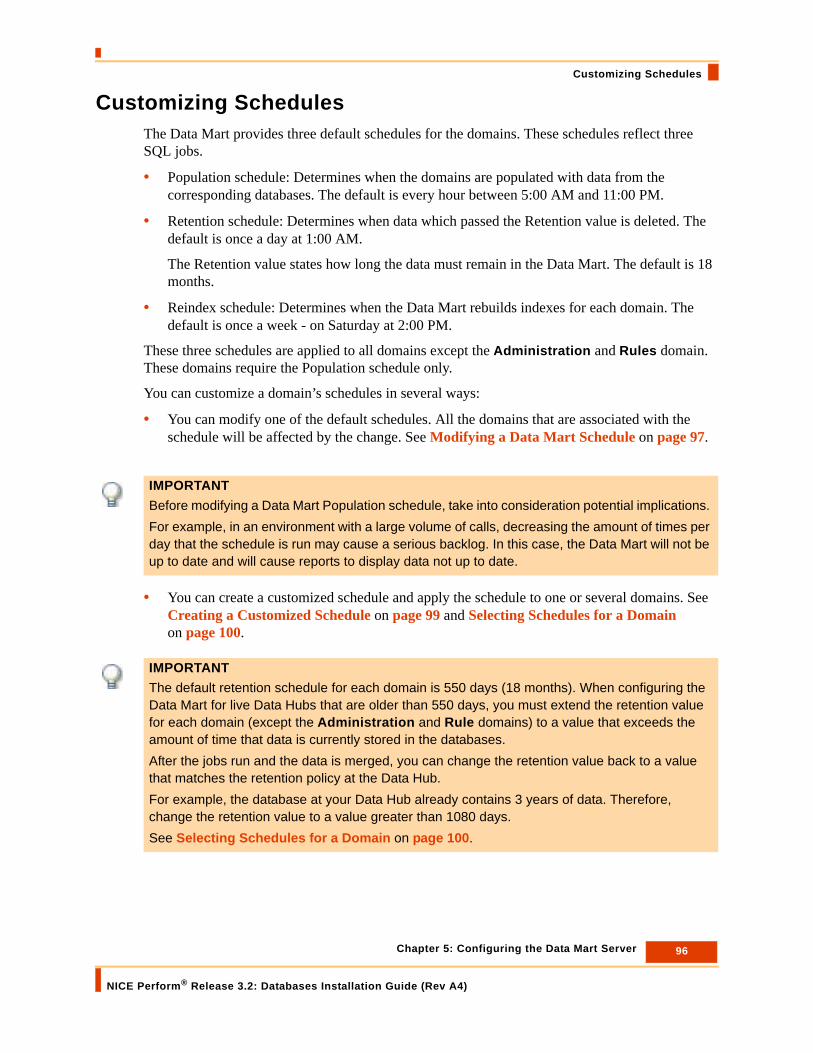
96 Chapter 5: Configuring the Data Mart Server
NICE Perform® Release 3.2: Databases Installation Guide (Rev A4)
Customizing Schedules
Customizing SchedulesThe Data Mart provides three default schedules for the domains. These schedules reflect three SQL jobs.
• Population schedule: Determines when the domains are populated with data from the corresponding databases. The default is every hour between 5:00 AM and 11:00 PM.
• Retention schedule: Determines when data which passed the Retention value is deleted. The default is once a day at 1:00 AM.
The Retention value states how long the data must remain in the Data Mart. The default is 18 months.
• Reindex schedule: Determines when the Data Mart rebuilds indexes for each domain. The default is once a week - on Saturday at 2:00 PM.
These three schedules are applied to all domains except the Administration and Rules domain. These domains require the Population schedule only.
You can customize a domain’s schedules in several ways:
• You can modify one of the default schedules. All the domains that are associated with the schedule will be affected by the change. See Modifying a Data Mart Schedule on page 97.
• You can create a customized schedule and apply the schedule to one or several domains. See Creating a Customized Schedule on page 99 and Selecting Schedules for a Domain on page 100.
IMPORTANT Before modifying a Data Mart Population schedule, take into consideration potential implications. For example, in an environment with a large volume of calls, decreasing the amount of times per day that the schedule is run may cause a serious backlog. In this case, the Data Mart will not be up to date and will cause reports to display data not up to date.
IMPORTANTThe default retention schedule for each domain is 550 days (18 months). When configuring the Data Mart for live Data Hubs that are older than 550 days, you must extend the retention value for each domain (except the Administration and Rule domains) to a value that exceeds the amount of time that data is currently stored in the databases.After the jobs run and the data is merged, you can change the retention value back to a value that matches the retention policy at the Data Hub.For example, the database at your Data Hub already contains 3 years of data. Therefore, change the retention value to a value greater than 1080 days.See Selecting Schedules for a Domain on page 100.

97 Chapter 5: Configuring the Data Mart Server
NICE Perform® Release 3.2: Databases Installation Guide (Rev A4)
Customizing Schedules
Modifying a Data Mart Schedule
When you modify the properties of a schedule, all domains associated with the schedule are affected by this change.
To modify a schedule:
1. In the Data Marts branch, select the defined Data Mart.
2. Click the Schedules tab.Figure 5-13 System Administrator - Data Repository, Schedules Tab
3. Double-click a schedule (or select a schedule and click Edit ). The Schedule Details window appears.Figure 5-14 Schedule Details
4. In the Recurring Details area, define how often the action occurs.
If you select Daily: Define how often the action occurs.
If you select Weekly: Define how often the action occurs and the days of the week on which it will occur.
If you select Monthly: Define how often the action occurs and on which days it will occur.
5. In the Daily Frequency area, define how often within a day the action occurs.

98 Chapter 5: Configuring the Data Mart Server
NICE Perform® Release 3.2: Databases Installation Guide (Rev A4)
Customizing Schedules
6. In the Duration area, define the start date and end date. You can select No end date to keep the action open-ended.
7. Click OK.

99 Chapter 5: Configuring the Data Mart Server
NICE Perform® Release 3.2: Databases Installation Guide (Rev A4)
Customizing Schedules
Creating a Customized Schedule
In addition to the three default schedules, you can create new, customized schedules. Later, you can apply a new schedule to a domain. See Selecting Schedules for a Domain on page 100.
To create a customized schedule:
1. In the Data Marts branch, select the defined Data Mart.
2. In the Schedules tab, click Add.
-or-
In the Domains tab, double-click a domain. In the Domain Wizard, click New Schedule.
3. The Schedule Details window appears.Figure 5-15 Schedule Details
Define as follows:
a. Name the schedule.
b. Define schedule properties. See Modifying a Data Mart Schedule on page 97.
c. Click OK.
4. To apply the schedule to a domain, see Selecting Schedules for a Domain on page 100.

100 Chapter 5: Configuring the Data Mart Server
NICE Perform® Release 3.2: Databases Installation Guide (Rev A4)
Customizing Schedules
Selecting Schedules for a Domain
All domains (except the Administration and Rules domains have three default schedules - Population, Retention and Reindex. (The Administration and Rules domains require a Population schedule only.) If you created additional, customized schedules, you can apply different schedules to a specific domain.
To create a customized schedule for a domain:
1. In the Data Marts branch, select the defined Data Mart.
2. In the Domains tab, double-click a domain (or select a domain and click Edit ). The Domain Wizard window appears.Figure 5-16 Domain Wizard
IMPORTANTWhen defining a Retention value for a domain, keep in mind:
• The Administration and Rules domain do not require a retention value. Enter 0 in the Retention field.
• For all other domains, define a retention value greater than 0. If you enter 0 in the Retention field, data is not retained in the domain at all!
• When configuring the Data Mart for live Data Hubs that are older than 550 days, you must extend the retention value for each domain (except the Administration and Rule domains) to a value that exceeds the amount of time that data is currently stored in the databases. After the jobs run a sufficient number of times for the Data Mart to be up to date, you can then change the retention value back to a value that matches the retention policy at the Data Hub. See Viewing Synchronization Details on page 104 for further instructions.

101 Chapter 5: Configuring the Data Mart Server
NICE Perform® Release 3.2: Databases Installation Guide (Rev A4)
Customizing Schedules
3. To create a new customized schedule, click New Schedule and create a new schedule. See Creating a Customized Schedule on page 99.
4. In the Commands area, select a schedule from the drop-down list of schedules. This list includes all new schedules.
5. To define a new Retention value, change the number of days in the field. This means that each time the Retention job runs, it will delete data that is older than the Retention value.
For all domains other than Administration and Rules, define a retention value greater than 0. If you enter 0 in the Retention field, data is not retained in the domain at all!
6. Click OK.

102 Chapter 5: Configuring the Data Mart Server
NICE Perform® Release 3.2: Databases Installation Guide (Rev A4)
Monitoring SQL Jobs
Monitoring SQL JobsYou can view details about each SQL job in the Monitor tab. In addition, you can start/stop a job or enable/disable a job.
To view the SQL jobs:
1. In the Data Marts branch, select the Data Mart.
2. Click the Monitor tab.Figure 5-17 System Administrator - Data Repository, Monitor Tab
3. To view the job history of one SQL job, select the job. The job step details appear in the History area.Figure 5-18 System Administrator - Data Repository, Monitor Tab, History
TIP: Click Refresh to update the history information.

103 Chapter 5: Configuring the Data Mart Server
NICE Perform® Release 3.2: Databases Installation Guide (Rev A4)
Monitoring SQL Jobs
To start/stop a job
• Select a job in the SQL Jobs area and click Start Job or Stop Job.
To enable/disable a job
• Select a job in the SQL Jobs area and click Enable or Disable.
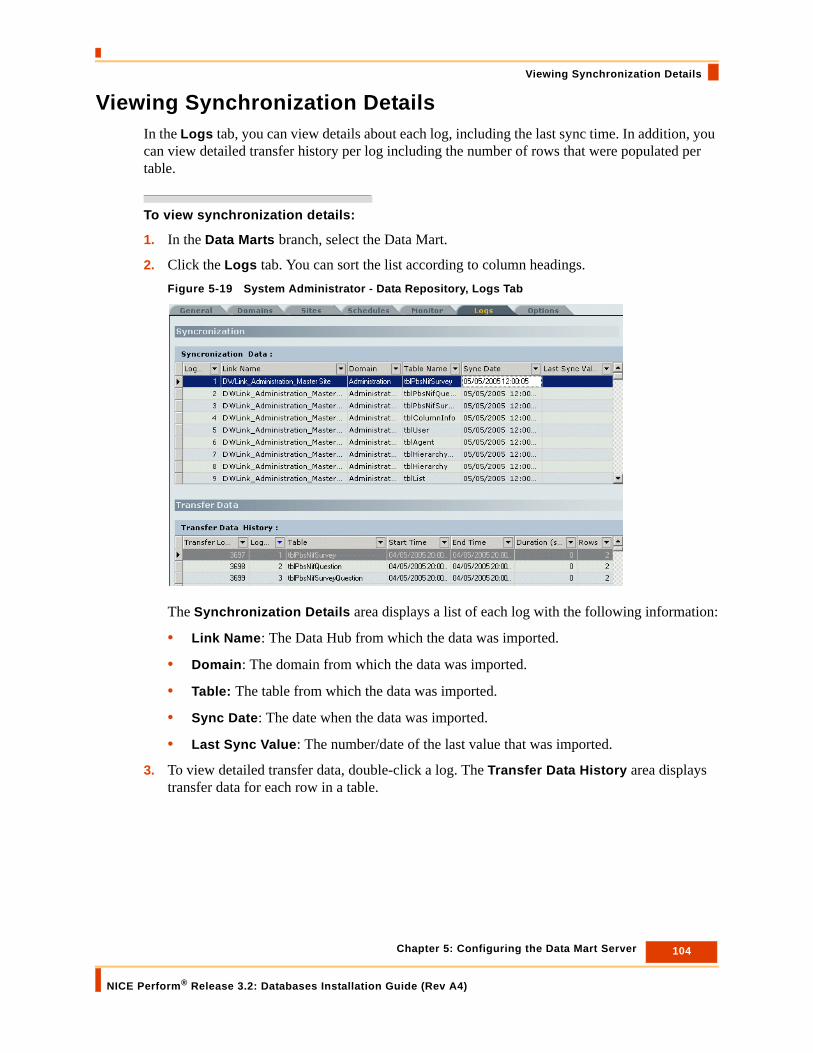
104 Chapter 5: Configuring the Data Mart Server
NICE Perform® Release 3.2: Databases Installation Guide (Rev A4)
Viewing Synchronization Details
Viewing Synchronization DetailsIn the Logs tab, you can view details about each log, including the last sync time. In addition, you can view detailed transfer history per log including the number of rows that were populated per table.
To view synchronization details:
1. In the Data Marts branch, select the Data Mart.
2. Click the Logs tab. You can sort the list according to column headings.Figure 5-19 System Administrator - Data Repository, Logs Tab
The Synchronization Details area displays a list of each log with the following information:
• Link Name: The Data Hub from which the data was imported.
• Domain: The domain from which the data was imported.
• Table: The table from which the data was imported.
• Sync Date: The date when the data was imported.
• Last Sync Value: The number/date of the last value that was imported.
3. To view detailed transfer data, double-click a log. The Transfer Data History area displays transfer data for each row in a table.

105 Chapter 5: Configuring the Data Mart Server
NICE Perform® Release 3.2: Databases Installation Guide (Rev A4)
Viewing Synchronization Details
Figure 5-20 System Administrator - Data Repository, Logs Tab

106 Chapter 5: Configuring the Data Mart Server
NICE Perform® Release 3.2: Databases Installation Guide (Rev A4)
What are the Data Mart Domains?
What are the Data Mart Domains?The NICE Perform Data Mart consists of nine data domains. Domains associated with optional NICE Perform solutions are only created in the Data Mart when that solution is installed. Domains containing information that is not required for reporting or export to other systems may optionally be removed from the Data Mart to reduce data storage requirements.
The following table provides information on the content of the NICE Data Mart domains and their associated remote NICE databases:
NOTE: Mandatory domains are indicated by an asterisk (*).
Name Description Remote Data Source
* Administration Contains system administrative information on users, agents, groups, profiles and access privileges.
nice_admin
* Audio Analysis Contains results of interactions analyzed for word spotting, emotion levels and talk-overs, and transcriptions of interactions.
nice_ca
Audit Contains audit trail information on user activities indicating what actions were performed, who performed them and when.
nice_audit
* CTI Contains information on CTI events for interactions such as hold time, transfer count, duration, etc.
nice_cti_analysis
IB Contains data pertaining to Playback Organizer
nice_ib
* Interaction Contains information on captured interactions including participants, related interactions, exceptions, recording details and custom rules.
nice_interactions
NIF Contains customer feedback surveys and responses.
nice_pbs_data
Quality Management (QM)
Contains evaluation scores, forms and coaching packages.
nice_qa
* Rule Contains the scoring, storage, analysis and classification rules used by the system.
nice_interactions

107 Chapter 5: Configuring the Data Mart Server
NICE Perform® Release 3.2: Databases Installation Guide (Rev A4)
What are the Data Mart Domains?
ScreenSense Contains information on captured screen events including event description, time, source and value.
nice_screen_sense
Storage Center Contains data pertaining to archived voice interactions.
nice_storage_center
Name Description Remote Data Source

Blank page for double-sided printing.

Chapter 6: Configuring the Multidimensional Databases
NICE Perform® Release 3.2: Databases Installation Guide (Rev A4)
109
6
Configuring the Multidimensional Databases
After installing the nice_as_text_analysis, nice_as_my_universe, and the nice_as_kpi multidimensional databases, you must configure them in the NICE Perform System Administrator.
Contents
Configuring the Multidimensional Databases in the System Administrator........... 110
Verifying Connection to the Multidimensional Databases........................................ 116
NOTE: Before configuring the nice_as_text_analysis, nice_as_my_universe, and nice_as_kpi databases, you must first set up and configure the Data Mart in the NICE Perform System Administrator. For full details see Chapter 5, Configuring the Data Mart Server on page 81.

110 Chapter 6: Configuring the Multidimensional Databases
NICE Perform® Release 3.2: Databases Installation Guide (Rev A4)
Configuring the Multidimensional Databases in the System Administrator
Configuring the Multidimensional Databases in the System Administrator
If you want to use NICE Perform’s Interactions Analytics feature, you must first do the following:
• Enable the SQL Analysis Services. You enable the SQL Analysis Services when you install SQL Server 2005 or SQL Server 2008 using either the NICE SQL Auto Setup or the standard Microsoft manual installation. You can also enable SQL Analysis Services after installing the SQL Server by defining the SQL Analysis Services as a service. For details, see the Microsoft SQL Server 2005 for NICE Perform or Microsoft SQL Server 2008 for NICE Perform Guide.
• Install the multidimensional databases. NICE uses the nice_as_text_analysis, the nice_as_my_universe, and the nice_as_kpi multidimensional databases. These databases are installed on the SQL Server 2005 or SQL Server 2008 Analysis Services and are used in conjunction with the NICE Perform ClearSight and My Universe applications respectively. Multidimensional databases use cubes to provide analytic capabilities. You install the nice_as_text_analysis, nice_as_my_universe, and nice_as_kpi databases on the Data Mart Server.
To configure the multidimensional databases in the System Administrator:
1. Log in to the NICE Perform Application Suite. From the Accessories menu, select System Administrator.Figure 6-1 System Administrator
To add components in the System Administrator, you must work in Technician Mode.
2. From the Settings menu, select Technician Mode.Figure 6-2 Technician Mode
3. In the Organization Tree, navigate to Master Site > Data Marts.
NOTE: • You can install only one Analysis Services database on one Data Mart Server.
• The nice_as_text_analysis, nice_as_my_universe, and nice_as_kpi databases are the only databases in the NICE Perform Database Suite that are multidimensional databases; all other databases are relational databases.

111 Chapter 6: Configuring the Multidimensional Databases
NICE Perform® Release 3.2: Databases Installation Guide (Rev A4)
Configuring the Multidimensional Databases in the System Administrator
Figure 6-3 System Administrator - Organization Tree
4. Select your Data Mart Server. From the right-click menu select Add Analysis Server.Figure 6-4 Right-click Menu
The New Analysis Server Wizard appears.Figure 6-5 New Analysis Server Wizard
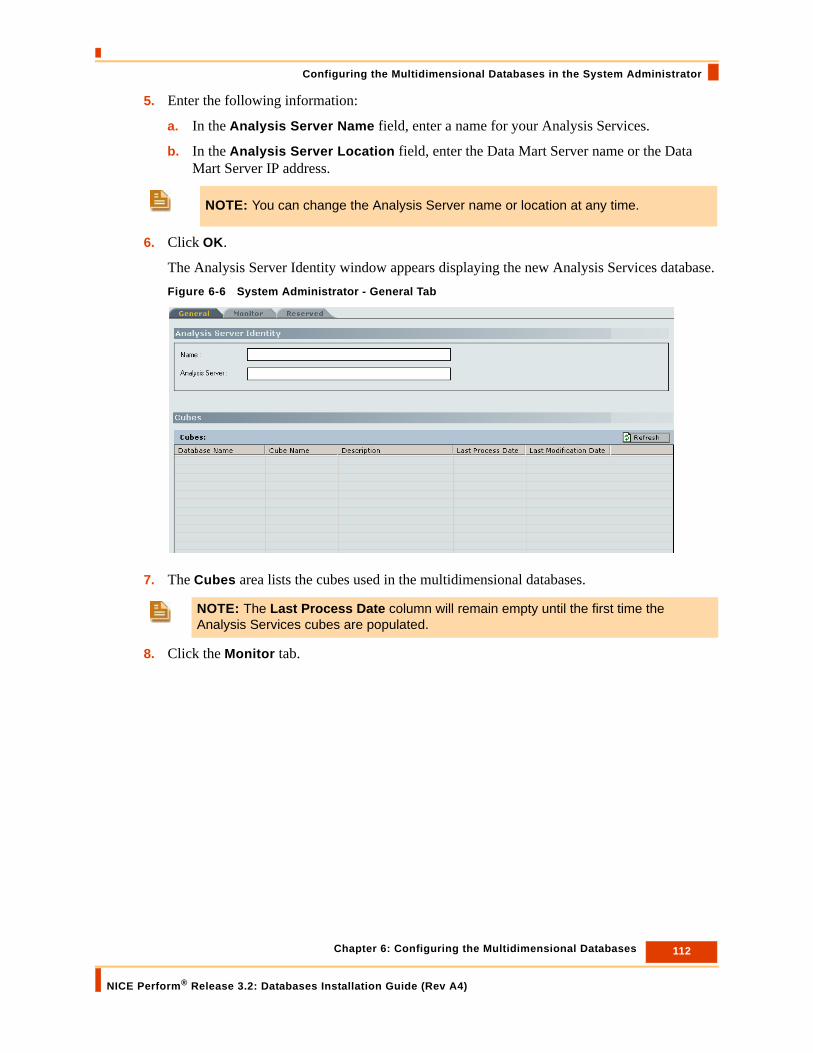
112 Chapter 6: Configuring the Multidimensional Databases
NICE Perform® Release 3.2: Databases Installation Guide (Rev A4)
Configuring the Multidimensional Databases in the System Administrator
5. Enter the following information:
a. In the Analysis Server Name field, enter a name for your Analysis Services.
b. In the Analysis Server Location field, enter the Data Mart Server name or the Data Mart Server IP address.
6. Click OK.
The Analysis Server Identity window appears displaying the new Analysis Services database.Figure 6-6 System Administrator - General Tab
7. The Cubes area lists the cubes used in the multidimensional databases.
8. Click the Monitor tab.
NOTE: You can change the Analysis Server name or location at any time.
NOTE: The Last Process Date column will remain empty until the first time the Analysis Services cubes are populated.

113 Chapter 6: Configuring the Multidimensional Databases
NICE Perform® Release 3.2: Databases Installation Guide (Rev A4)
Configuring the Multidimensional Databases in the System Administrator
Figure 6-7 System Administrator - Monitor Tab
9. The SQL Jobs area lists the name(s) of the SQL job(s) that populate/repopulate the Analysis Services cubes.
The functions of the buttons located in the SQL Jobs area are as follows:
The SQL Job History area displays a list of the jobs that were previously run.
Button Name Function
Refresh button Refreshes the display of the Monitor window.
Disable button Disables/enables the selected SQL job.
Run button Starts the selected SQL job.
Stop button Stops the selected SQL job.
Schedule button Enables you to define schedules for the selected SQL job (see Defining Schedules for SQL Jobs below).

114 Chapter 6: Configuring the Multidimensional Databases
NICE Perform® Release 3.2: Databases Installation Guide (Rev A4)
Configuring the Multidimensional Databases in the System Administrator
Defining Schedules for SQL Jobs
To define schedules for SQL jobs:
1. In the Organization Tree, navigate to Master Site > Data Marts, and select the server on which the Analysis Service is located.
2. Click the Monitor tab.Figure 6-8 System Administrator - Monitor Tab
3. Click the Schedule button.
The Edit Schedule window appears.Figure 6-9 Edit Schedule Window
ScheduleButton

115 Chapter 6: Configuring the Multidimensional Databases
NICE Perform® Release 3.2: Databases Installation Guide (Rev A4)
Configuring the Multidimensional Databases in the System Administrator
4. Make the desired changes and click OK.
NOTE: The default settings for the SQL jobs are as follows:• Process KPI Daily schedule - every day at 22:00 (10:00 PM).
• Process KPI Hourly schedule - every hour beginning at 06:30.
• Nice AS Process My Universe - every four hours beginning at 05:30 AM.
• Nice AS Process Text Analysis - every day at 02:00 AM.

116 Chapter 6: Configuring the Multidimensional Databases
NICE Perform® Release 3.2: Databases Installation Guide (Rev A4)
Verifying Connection to the Multidimensional Databases
Verifying Connection to the Multidimensional Databases
If you installed any of the NICE Perform multidimensional databases, it is highly recommended to verify that the NICE Perform Applications are able to connect to the multidimensional databases, even though the Database Installation program was completed successfully, and even if they are both installed on the same server.
Therefore, after installing and configuring the NICE Perform Applications, try to establish connection between the NICE Perform Applications and the multidimensional databases. If you are unable to establish connection, you must define the domain user roles in the Analysis Services Management Studio.
Detailed procedures for verify connection and for defining domain user roles are described in Appendix B, Establishing Access to the Multidimensional Databases on page 175.
IMPORTANT You can only verify connection between the multidimensional databases and the NICE Perform Applications after you have installed and configured the NICE Perform Applications.

Chapter 7: Uninstalling Databases from the Database Suite
NICE Perform® Release 3.2: Databases Installation Guide (Rev A4)
117
7
Uninstalling Databases from the Database Suite
This chapter describes the procedures for uninstalling one or more of the databases in the NICE Perform Database Suite databases.
For installation procedures, see Chapter 3, Installing the NICE Perform Database Suite on page 39.
IMPORTANT• Relational Databases - when uninstalling the NICE Perform relational databases, use only
the procedures described in this chapter; DO NOT uninstall the relational databases via the SQL Server Management Studio.
• Multidimensional Databases - you can uninstall the NICE Perform multidimensional databases directly from the SQL Management Studio by selecting the database and selecting Delete from the right-click menu, or use the uninstall procedures described in this chapter.
• The uninstall program allows you to uninstall one or more NICE Perform databases. However, in order to maintain database integrity, it is highly recommended to always uninstall all NICE Perform databases.
WARNINGWhen you uninstall one or more of the databases, you lose all data archived in that database (see detailed Warning on page 119).

118 Chapter 7: Uninstalling Databases from the Database Suite
NICE Perform® Release 3.2: Databases Installation Guide (Rev A4)
To uninstall NICE Perform Database Suite database(s):
1. In the Start menu, select Settings > Control Panel > Add/Remove Programs.
The Add/Remove Programs window appears.Figure 7-1 Add/Remove Programs Window
2. Select NICE Database Suite, and click the Remove button.
The Add/Remove Programs - Confirmation window appears.Figure 7-2 Add/Remove Programs - Confirmation Window
3. Click Yes.
The NICE Database Suite - Uninstall Type window appears.

119 Chapter 7: Uninstalling Databases from the Database Suite
NICE Perform® Release 3.2: Databases Installation Guide (Rev A4)
Figure 7-3 NICE Database Suite - Uninstall Type Window
4. If you want to remove the contents of the database and the database itself, select Complete removal of NICE Databases.
If you want to uninstall only the DBSetup software but not the database itself, select non-removal of NICE Databases.
5. Click Next.
The Type of Database window appears.
NOTE: The option you select in the above window will affect only the database(s) you select to uninstall in the Database Properties window (see Figure 7-6 and step 9 on page 122).
WARNINGWhen you select Complete removal of NICE Databases, the uninstall program deletes the contents of the selected database and the actual database itself. If you want to uninstall only the DBSetup software but leave the database itself intact, you must select non-removal of NICE Databases.
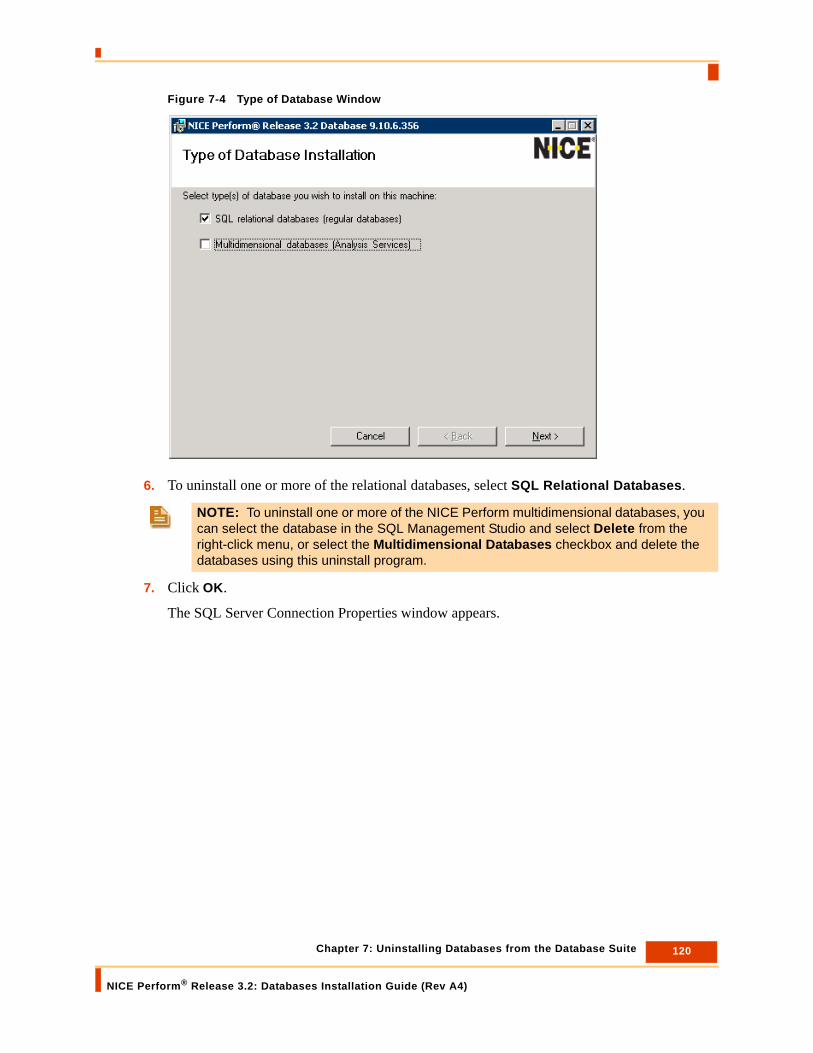
120 Chapter 7: Uninstalling Databases from the Database Suite
NICE Perform® Release 3.2: Databases Installation Guide (Rev A4)
Figure 7-4 Type of Database Window
6. To uninstall one or more of the relational databases, select SQL Relational Databases.
7. Click OK.
The SQL Server Connection Properties window appears.
NOTE: To uninstall one or more of the NICE Perform multidimensional databases, you can select the database in the SQL Management Studio and select Delete from the right-click menu, or select the Multidimensional Databases checkbox and delete the databases using this uninstall program.

121 Chapter 7: Uninstalling Databases from the Database Suite
NICE Perform® Release 3.2: Databases Installation Guide (Rev A4)
Figure 7-5 SQL Server Connection Properties Window
8. Select either Windows (NT) Authentication or SQL Server Authentication.
a. If you selected Windows (NT) Authentication, the Connect Using fields are disabled. Click Next.
b. If you selected SQL Server Authentication, the default SQL instance appears in the Server field. If you want to connect to an instance other than the default instance, type the instance name in the Server field.
Type your password in the Password field, and click Next.
The Databases Properties window appears.
NOTE: If you did not define a unique sa User password, leave the Password field blank.

122 Chapter 7: Uninstalling Databases from the Database Suite
NICE Perform® Release 3.2: Databases Installation Guide (Rev A4)
Figure 7-6 Databases Properties Window
9. Select the database(s) you want to uninstall and click Next.
If any of the processes connected to the database(s) you selected to uninstall are running, the Running Processes window appears (see Figure 7-7 and step 10). If there are no running processes, the uninstall program continues with step 12.
IMPORTANT In order to maintain database integrity, it is highly recommended to always uninstall all NICE Perform databases.

123 Chapter 7: Uninstalling Databases from the Database Suite
NICE Perform® Release 3.2: Databases Installation Guide (Rev A4)
Figure 7-7 Running Processes Window
10. The Running Processes window lists applications currently connected to the selected database, as in Figure 7-7 above. You must disconnect all applications that appear in the Running Processes window before running the uninstall program.
To disconnect a connected application, select the application and click the Kill Connection button.
11. Click Next.
12. The Uninstall Progress window appears.
List of Applications Currently Connected to the Selected Database
WARNINGIf you run the uninstall program while an application is connected to the selected database(s), the uninstall program will not completely uninstall the database(s); you must then find and delete the remaining components manually.

124 Chapter 7: Uninstalling Databases from the Database Suite
NICE Perform® Release 3.2: Databases Installation Guide (Rev A4)
Figure 7-8 Uninstall Progress Window
13. Click Uninstall.
You are prompted to confirm uninstalling the databases.
14. Click Yes.
The uninstall program deletes the selected database(s).
15. Upon completion, the Successfully Completed window appears. Click OK.
NOTE: It is recommended to verify that all the NICE Perform databases were deleted from the SQL Server. If any databases were not deleted, remove them manually.

Chapter 8: Troubleshooting: Databases
NICE Perform® Release 3.2: Databases Installation Guide (Rev A4)
125
8
Troubleshooting: Databases
This chapter describes some of the most common problems that may arise during and after installing the NICE Perform databases, and offers probable solutions.
Contents
General Databases Troubleshooting Flow .................................................................127
General Considerations ...............................................................................................128
Checking the Windows Event Viewer .........................................................................128
Checking the SQL Server Error Logs and Events .....................................................128
Checking SQL Jobs......................................................................................................129
Checking the Connection to the NICE Perform Database Server ............................129
Checking the Database Connections .........................................................................129
Checking for Missing Databases ................................................................................130
Checking Free Space in the Database ........................................................................131
Verifying the Log on as a Service User Rights Assignment.....................................132
Checking the SQL Server Installation Folder.............................................................135
Monitoring Performance Objects and Counters........................................................136
Checking for Performance Problems .........................................................................137
Scanning the Disk for Errors.......................................................................................139
Changing the Database Passwords in SQL Authentication .....................................139
IMPORTANT These procedures must be perform only by authorized personnel. For full assistance, contact NICE Systems Customer Services.

126 Chapter 8: Troubleshooting: Databases
NICE Perform® Release 3.2: Databases Installation Guide (Rev A4)
Checking the Database Backup ..................................................................................142
Increasing the Size of a Database...............................................................................143
Checking Performance Using the NICE Performance Collector ..............................144
Defining Autogrowth ....................................................................................................146
Verifying Database Space Using the NICE DBSpace Utility......................................148
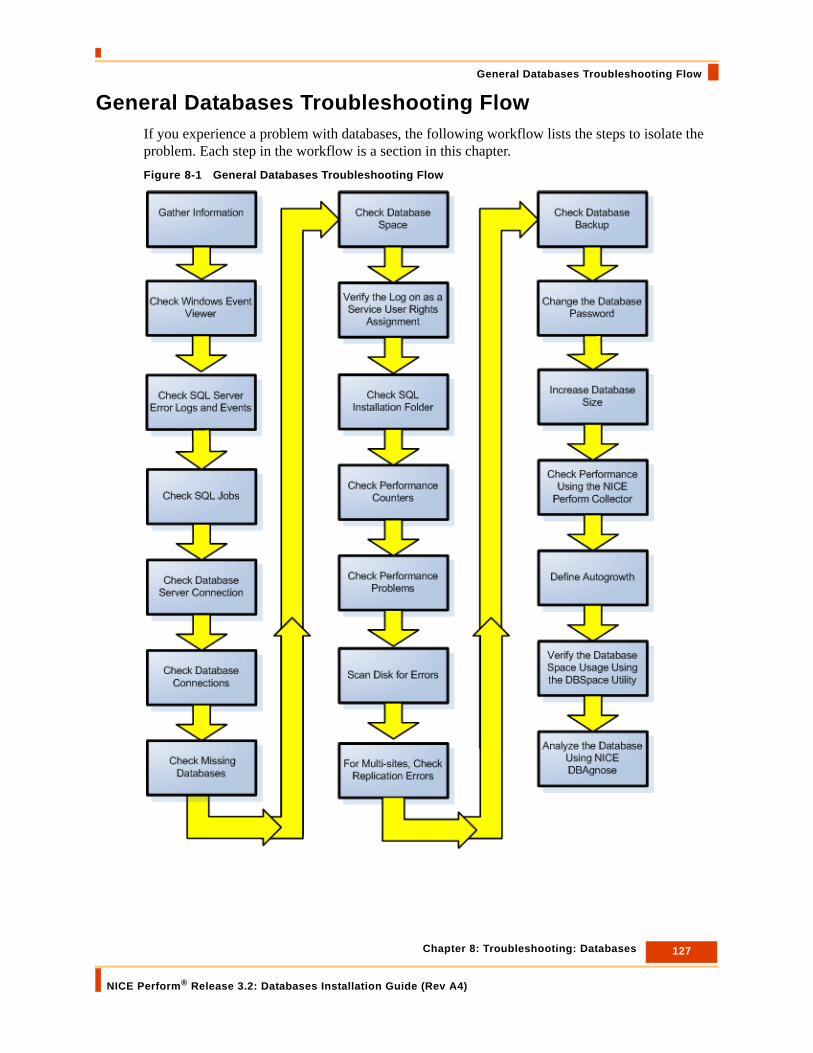
127 Chapter 8: Troubleshooting: Databases
NICE Perform® Release 3.2: Databases Installation Guide (Rev A4)
General Databases Troubleshooting Flow
General Databases Troubleshooting FlowIf you experience a problem with databases, the following workflow lists the steps to isolate the problem. Each step in the workflow is a section in this chapter.Figure 8-1 General Databases Troubleshooting Flow
128 Chapter 8: Troubleshooting: Databases
NICE Perform® Release 3.2: Databases Installation Guide (Rev A4)
General Considerations
General ConsiderationsBefore attempting to troubleshoot any database problems, it is advisable to consider the issues listed below. These will better enable you to analyze your problems and determine if the issues are indeed related to the database.
• Is this a new installation or an upgrade of an existing system?
• For new installations, when was the installation performed? How long after the installation did the problems appear?
• For upgrades, when was the upgrade performed? Did the problems arise before or after the upgrade?
• Were there any changes to the environment that might have influenced the system? If yes, check these changes first.
• How often does the problem occur? Are the circumstances similar?
• Is the problem reproducible? If yes, what were the steps?
• Were the Servers restarted? If yes, did this resolve the problem?
Checking the Windows Event ViewerIn is often recommended to look for errors in the Windows Event Viewer. I/O errors are the most common when dealing with read/write errors to and from the database.
Checking the SQL Server Error Logs and EventsYou can use the Log File Viewer to check the SQL Server Agent logs, SQL Server error logs and Windows event logs.
To check the SQL Server Error Logs and Events:
1. Connect to the SQL Server Management Studio.
2. Navigate to your SQL Server 2005/2008 instance.
3. Navigate to Management > SQL Server Logs.
4. Double click on any of the log files.
5. Use the Export, Search, and Filter options as required.
NOTE: These error messages are also displayed in the SQL Server Log files, as described in the next section.

129 Chapter 8: Troubleshooting: Databases
NICE Perform® Release 3.2: Databases Installation Guide (Rev A4)
Checking SQL Jobs
Checking SQL JobsUse the SQL Server to check that jobs are configured correctly and that they run properly.
To check SQL jobs:
1. In the SQL Server Management Studio, navigate to SQL Server Agent > Jobs.
2. Verify that the job durations are reasonable (may vary from job to job).
3. Verify that numerous jobs have not been configured to run at the same time. This is especially relevant for sites in which numerous jobs run during off-hours.
4. Verify the job outcome, as a job may be successful even if internal steps have failed.
5. Check the job history to verify if all previous jobs have run successfully. Failed jobs are
identified by an error icon .
Checking the Connection to the NICE Perform Database Server
Check the connection to the Database Server making sure you use the name configured on the NICE Applications Server.
To check the connection to the NICE Database Server:
1. On the Applications Server, ping the Database Server using the host name and IP address.
-or-
2. On the Applications Server:
a. Navigate to D:\Program Files\NiceSystems\Applications\ServerBin.
b. In the NiceApplications.SystemAdministrator.Host.exe.config file, search for SystemFramework.DataAccess.ConnectionString value=<DB Server Name>. This is the Database Server name defined in the application.
c. Ping the Database Server using this name.
Checking the Database ConnectionsUse the SQL Server to check the database connections listed below.
To check the database connections:
1. In the SQL Server Management Studio navigate to Management > Activity Monitor.
2. In the right-click menu select View Process.

130 Chapter 8: Troubleshooting: Databases
NICE Perform® Release 3.2: Databases Installation Guide (Rev A4)
Checking for Missing Databases
3. Check the Activity Monitor as follows:
a. Scroll to the Blocked By and Blocking columns. Any non-zero value in these two columns indicates an error (a deadlock).
b. Each row in this list represents a database connection. Verify that no database has excessive connections.
4. Filter the Activity Monitor for blocked processes as follows:
a. Click the Filter button.
b. Specify a filter with Blocking Type = Blocked.
c. Click Apply filter, and then click OK.
Checking for Missing DatabasesYou can check for missing databases using either the System Administrator or the SQL Server.
To check for missing databases using the System Administrator:
1. In the System Administrator, navigate to Master Site > Database Servers > Databases and verify that all five mandatory databases are selected:
• nice_admin
• nice_audit
• nice_ca
• nice_interactions
• nice_rule
2. In addition, verify that all the optional databases that are supposed to be installed at your site are also selected.
To check for missing databases using the SQL Server:
1. Connect to the SQL Management Studio.
2. In the Object Explorer, navigate to Databases and verify that the mandatory and optional databases are listed and that the tables for each one contains data.
NOTE: It is recommended not to work in Technical Mode in order to prevent making unintentional changes to the database configuration.
131 Chapter 8: Troubleshooting: Databases
NICE Perform® Release 3.2: Databases Installation Guide (Rev A4)
Checking Free Space in the Database
Checking Free Space in the DatabaseCheck to see if the size of the database is sufficient. There are several ways to check the free space in the NICE Perform databases.
To check free database space:
1. Check the NMS alarms.
-or-
2. Connect to the SQL Server Management Studio.
a. Navigate to Databases and select the relevant database.
b. From the right-click menu select Properties.
c. In the General page check Space available.
-or-
3. Right-click the database and select Reports > Standard reports > Disk usage. The usage is displayed graphically and indicates both the Data files and the Log files separately.
-or-
4. Use the Nice DBSpace utility to check the database space (see Verifying Database Space Using the NICE DBSpace Utility on page 148).
-or-
5. In the NICE System Administrator, navigate to Master Site > Database Servers > Databases and select each database to see the used and free space percentages.
NOTE: The space available relates to the free space of the entire database, and does not distinguish between the sizes of the Data files and the Log files.
NOTE: It is recommended not to work in Technical Mode in order to prevent making unintentional changes to the database configuration.

132 Chapter 8: Troubleshooting: Databases
NICE Perform® Release 3.2: Databases Installation Guide (Rev A4)
Verifying the Log on as a Service User Rights Assignment
Figure 8-2 NICE System Administrator
-or-
6. Use Nice DBSpace to check the database space.
Verifying the Log on as a Service User Rights AssignmentIf a service does not start, make sure your user has the Log on as a service User Right Assignment.
There are two steps:
• Verifying the Service Account (see page 132)
• Verifying Domain Users Assigned to the User Rights Assignments (see page 133)
Verifying the Service Account
To verify the service account:
1. In the Computer Management window, open the Services window, and select the service that you cannot access.
2. From the right-click menu select Properties.
The Properties window appears.
3. Click the Log On tab.

133 Chapter 8: Troubleshooting: Databases
NICE Perform® Release 3.2: Databases Installation Guide (Rev A4)
Verifying the Log on as a Service User Rights Assignment
Figure 8-3 MSSQLSERVER Properties Window
4. The domain account and the domain user appear in the This Account field.
Verifying Domain Users Assigned to the User Rights Assignments
To verify domain users assigned to the User Rights Assignments:
1. In the Control Panel navigate to Administrative Tools > Local Security Policy > User Right Assignments, and select Log on as a service.

134 Chapter 8: Troubleshooting: Databases
NICE Perform® Release 3.2: Databases Installation Guide (Rev A4)
Verifying the Log on as a Service User Rights Assignment
Figure 8-4 Local Security Settings Window
2. From the right-click menu select Properties.
The Log on as a service Properties window appears.
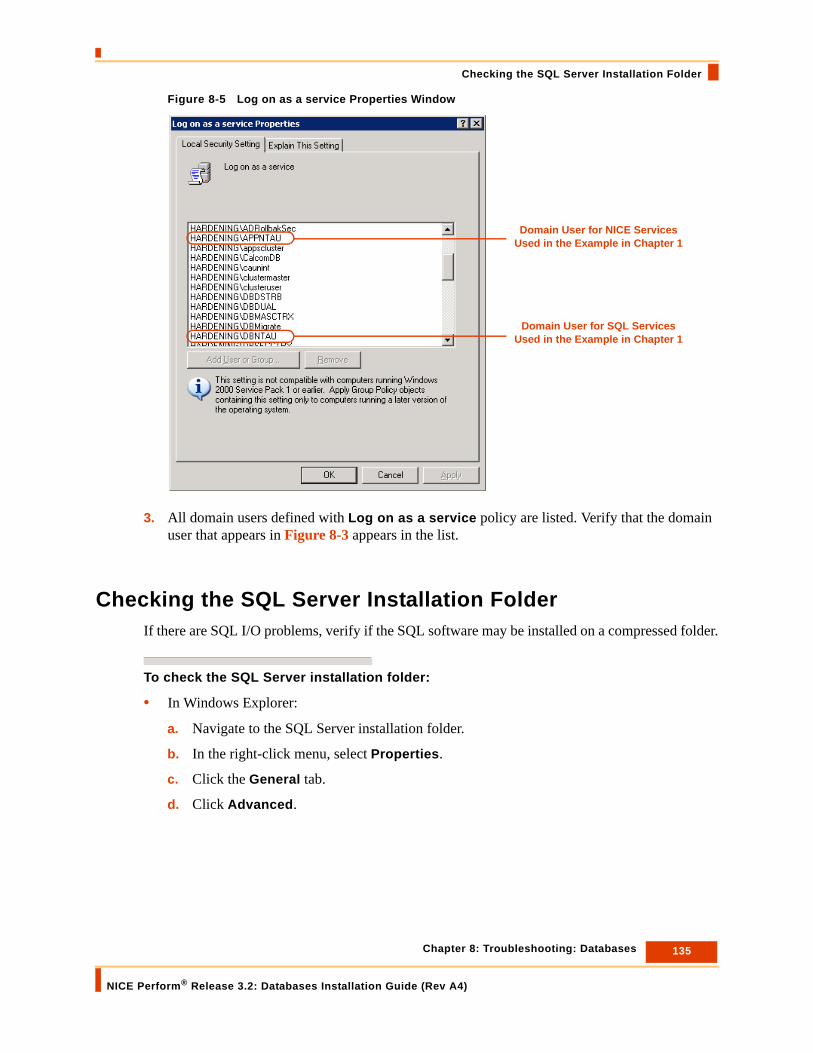
135 Chapter 8: Troubleshooting: Databases
NICE Perform® Release 3.2: Databases Installation Guide (Rev A4)
Checking the SQL Server Installation Folder
Figure 8-5 Log on as a service Properties Window
3. All domain users defined with Log on as a service policy are listed. Verify that the domain user that appears in Figure 8-3 appears in the list.
Checking the SQL Server Installation FolderIf there are SQL I/O problems, verify if the SQL software may be installed on a compressed folder.
To check the SQL Server installation folder:
• In Windows Explorer:
a. Navigate to the SQL Server installation folder.
b. In the right-click menu, select Properties.
c. Click the General tab.
d. Click Advanced.
Domain User for NICE Services Used in the Example in Chapter 1
Domain User for SQL Services Used in the Example in Chapter 1

136 Chapter 8: Troubleshooting: Databases
NICE Perform® Release 3.2: Databases Installation Guide (Rev A4)
Monitoring Performance Objects and Counters
Figure 8-6 Advanced Attributes Window
e. Ensure that Compress contents to save disk space is not selected.
Monitoring Performance Objects and CountersYou can use the Performance Monitor to check the activity on the SQL Server.
To monitor performance objects and counters:
1. In the Run window enter perfmon and click OK.
The Performance window appears.
2. Click the Add button .
3. For each object listed in the table below, do the following:
Object CountersProcessor %Processor Time
Memory Pages/sec
PhysicalDisk %Disk TimeAvg Disk Queue LengthAvg Disk Write Queue LengthAvg Disk Read Queue LengthDisk Read/secDisk Write/sec

137 Chapter 8: Troubleshooting: Databases
NICE Perform® Release 3.2: Databases Installation Guide (Rev A4)
Checking for Performance Problems
a. From the Performance Object drop-down list, select the object listed in the table.
b. Select Select counters from list and select the counter corresponding to that object in the table above.
c. Select All instances if it is enabled.
d. Click Add.
The object you selected is added to the Performance chart.
4. Click Close.
5. Click the View Report button .
6. Check the results for irregularities.
Checking for Performance ProblemsYou can check for performance problems in several ways.
To check for performance problems:
1. Use SQL Profiler to run a trace:
a. In the Start menu, select Programs > Microsoft SQL Server > Performance Tools > SQL Server Profiler.
b. In the File menu, click New Trace.
c. Connect to the computer on which the SQL Server is installed.
The Trace Properties dialog box appears.
d. In the Use The Template name drop-down list, select TSQL.
e. Click the Events Selection tab.
f. Select Show all events and Show all columns.
g. Scroll down to the TSQL.
SQL Server:BufferManager Buffer catch hit ratioPage life expectancy
SQL Server:MemoryManager SQL Cache MemoryTotal Server Memory
Object Counters

138 Chapter 8: Troubleshooting: Databases
NICE Perform® Release 3.2: Databases Installation Guide (Rev A4)
Checking for Performance Problems
h. Ensure that the following events are selected:
• SQL:BatchStarting
• SQL:StmtCompleted.
• SQL:StmtStarting
i. For each of these event classes, click Column Filters.
The Edit Filter window appears.Figure 8-7 Edit Filter Window
j. Select the Duration filter.
k. Select Greater than or equal to and enter a value. A value of 1000 milliseconds, for example, would cause the filter to show only those queries that take longer than one second to run.
l. Remain in the Events Selection tab of the Trace Properties window, and scroll up to Security Audit.
m. Clear Audit Login and Audit Logout.
n. Click Run to run the trace.
The SQL Server Profiler enables you to view the trace data. Only information satisfying the filter is captured.
-or-
2. To check consistency and integrity for different tables and databases, in the SQL Query Analyzer, run the following commands:
a. To check database consistency, run the following query using the following syntax: dbcc checkdb (database name).
b. To check the tables, run the following query using the following syntax:dbcc checktable (table name).

139 Chapter 8: Troubleshooting: Databases
NICE Perform® Release 3.2: Databases Installation Guide (Rev A4)
Scanning the Disk for Errors
c. To check table index fragmentation, run the following query using the following syntax:dbcc showcontig (<table name>) with all_indexes.
Verify that the value for Scan Density [Best Count:Actual Count] is greater than 60%.
-or-
3. Use Nice Performance Collector to check the performance. See Checking Performance Using the NICE Performance Collector on page 144.
Scanning the Disk for Errors
To scan the disk for errors:
1. On the SQL Server, run a disk scan on the drives where the data and log files are located.
2. Select the drive, and from the right-click menu select Properties.
3. Click the Tools tab, and then click Check Now.
Changing the Database Passwords in SQL AuthenticationIt is generally recommended to change the user passwords after installation. You can change the passwords after the DBSetup installation, after completing the entire site installation, or in a live production system. Since passwords are kept in several places, you must update the password using the System Administrator to ensure that the passwords are updated in all these locations.
There are two passwords:
• nice sa - this password the same privileges as the Microsoft SQL Server sa user, and is used for the following tasks:
• Changing passwords
• Replication
• Linking servers (such as Data Mart)
The nice sa password must be identical across all SQL Servers.
• nice - this password is used as a connection string for all NICE applications to the database. You can use a different nice password for each SQL Server.
The nice and nice sa passwords are stored in encryption in the tblDbPassword table in the nice_admin database.
The nice password is also stored in encryption in the System Administrator configuration file.

140 Chapter 8: Troubleshooting: Databases
NICE Perform® Release 3.2: Databases Installation Guide (Rev A4)
Changing the Database Passwords in SQL Authentication
Figure 8-8 System Administrator Configuration File
Changing the nice sa Login Password
To change the nice sa login password:
1. In the System Administrator, under Master Site select Database Servers.
2. From the Actions menu, select SQL Server Security.
The SQL Server Security window for nice sa login appears.Figure 8-9 SQL Server Security Window for nice sa Login
3. Enter and confirm the new password.
4. To use a blank password, select Blank Password.
5. Click OK.
The password is changed on all SQL Servers in both the Primary and the Secondary Data Hubs.
IMPORTANT • You must work in Technician Mode to change the password.
• You must remove all replication before changing the password.
Make Sure You are in the Security Window for
nice sa Login

141 Chapter 8: Troubleshooting: Databases
NICE Perform® Release 3.2: Databases Installation Guide (Rev A4)
Changing the Database Passwords in SQL Authentication
Changing the nice Login Password
To change the nice login password:
1. In the System Administrator, under Master Site > Database Servers, select the database server on which you want to change the password.
2. From the Actions menu, select SQL Server Security.
The SQL Server Security window for nice login appears.Figure 8-10 SQL Server Security Window for nice Login
3. Enter and confirm the new password.
4. To use a blank password, select Blank Password.
5. Click OK.
The password is changed on this SQL Server only.
IMPORTANT • You must work in Technician Mode to change the password.
• You must remove all replication before changing the password.
NOTE: • It may take up to one minute for the configuration file to be updated; do not use the
new password during this time.
• If your site includes the Data Mart server, you must recreate links. For details see the NICE Perform System Administrator’s Guide.
Make Sure You are in the Security Window for
Nice Login
142 Chapter 8: Troubleshooting: Databases
NICE Perform® Release 3.2: Databases Installation Guide (Rev A4)
Checking the Database Backup
Checking the Database BackupYou can check the database backup in System Administrator.
To check the database backup:
1. In System Administrator, navigate to Master Site > Database Servers:
a. Select the desired database and click the Backup tab.
b. Verify that all backup jobs are predefined and that there no errors in the Status column.
-or-
2. Connect to the SQL Server Management Studio:
a. Navigate to SQL Server Agent > Jobs.
b. If an error icon appears in the Differential Backup job or the Full Backup job, it indicates that the last database backup job has failed.
-or-
3. Check if the source of the problem is the cassette as follows:
a. Check that there is a DAT/AIT cassette in the tape drive.
b. Check that the cassette is not in write-protect mode.
c. Check that the cassette is not corrupted.
-or-
4. Connect to the SQL Server Management Studio:
a. Navigate to SQL Server Agent > Jobs.
b. Select the desired job and select View History in the right-click menu.
-or-
5. Run the job again:
a. Right-click the job and select Start Job.
b. Wait until the job finishes and check if the backup succeeded.
-or-
6. Check if the source of the problem is the tape driver:
• Open the operating system backup program and try to backup a file to the tape drive. If you succeed, the tape driver is working properly and the reason for the failure is not the tape.
-or-

143 Chapter 8: Troubleshooting: Databases
NICE Perform® Release 3.2: Databases Installation Guide (Rev A4)
Increasing the Size of a Database
7. Connect to the SQL Server Management Studio:
a. Select the nice_admin database.
b. In the right-click menu select Tasks > Back Up.
c. Configure the destination to be a local file on the hard disk and try to backup the database.
If the backup succeeds, then the problem is not in the database.
-or-
8. Verify that the total database space used does not exceed the cassette capacity, as indicated in the following table:
Increasing the Size of a Database
To increase the size of a database:
1. Connect to the SQL Server Management Studio.
2. Under Databases, select the database for which you want to increase the size.
3. From the right-click menu, select Properties.
The Database Properties window appears.
4. Select the Files page.
Cassette Type Capacity
DAT DDS2 4 GB
DAT DDS3 12 GB
DAT DDS4 20 GB
AIT1 35 GB
AIT2 50 GB
DAT72 72 GB
DVD Panasonic 9576 9.4 GB (double-sided)
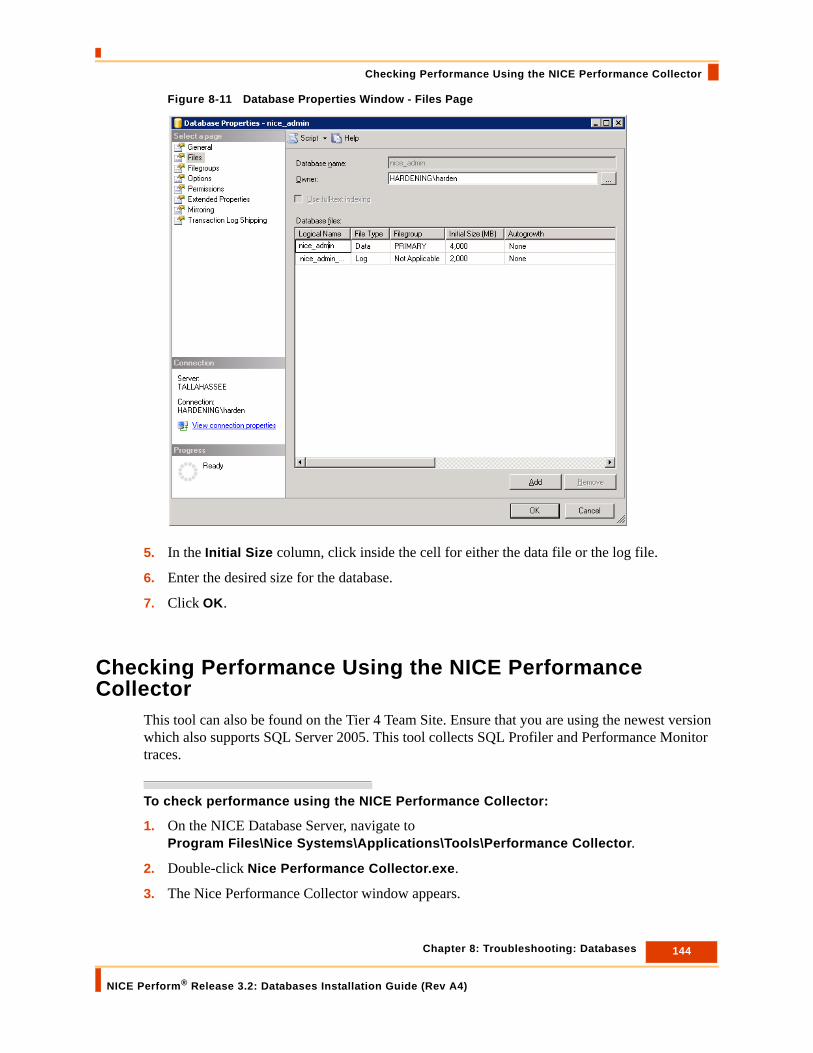
144 Chapter 8: Troubleshooting: Databases
NICE Perform® Release 3.2: Databases Installation Guide (Rev A4)
Checking Performance Using the NICE Performance Collector
Figure 8-11 Database Properties Window - Files Page
5. In the Initial Size column, click inside the cell for either the data file or the log file.
6. Enter the desired size for the database.
7. Click OK.
Checking Performance Using the NICE Performance Collector
This tool can also be found on the Tier 4 Team Site. Ensure that you are using the newest version which also supports SQL Server 2005. This tool collects SQL Profiler and Performance Monitor traces.
To check performance using the NICE Performance Collector:
1. On the NICE Database Server, navigate to Program Files\Nice Systems\Applications\Tools\Performance Collector.
2. Double-click Nice Performance Collector.exe.
3. The Nice Performance Collector window appears.

145 Chapter 8: Troubleshooting: Databases
NICE Perform® Release 3.2: Databases Installation Guide (Rev A4)
Checking Performance Using the NICE Performance Collector
Figure 8-12 NICE Performance Collector
4. In the SQL Server field, enter the SQL Server name or the IP Address.
5. Select the authentication method you are using.
6. Click Get Data/Log Drive.
The program automatically detects the location of the data and log files and enters them in the respective fields.
7. In the Destination Folder field, define a location for the files which the Nice Performance Collector creates.
8. In the schedule area, define a start and stop time.
9. Click Start.
Two files are created, one for counters and one for SQL Profiler.

146 Chapter 8: Troubleshooting: Databases
NICE Perform® Release 3.2: Databases Installation Guide (Rev A4)
Defining Autogrowth
Defining Autogrowth
Beginning with Release 3.2, autogrow is now defined as the default setting for all NICE Perform databases. If a database reaches its maximum defined capacity, autogrow will grow the data files by 10%; the log files are not affected. This can avoid unwanted loss of data. The effects on system performance are usually minimal.
To define autogrowth:
1. Open the Microsoft SQL Server Management Studio.
2. Under Databases, select the database for which you want to define the autogrowth.Figure 8-13 Microsoft SQL Server Management Studio
IMPORTANT • Autogrow continues to grow the database until the disk space for that drive is full. It is
therefore important to closely monitor database space at all times; it is recommended to use NICE Sentinel.
• Autogrow is intended as a precaution only; it does not take the place of proper database size design.
• Depending on a site’s configurations, autogrowth may impact performance; it is therefore recommended to make changes to autogrowth settings only in coordination with Customer Services.

147 Chapter 8: Troubleshooting: Databases
NICE Perform® Release 3.2: Databases Installation Guide (Rev A4)
Defining Autogrowth
3. In the right-click menu select Properties.
The Database Properties window appears.
4. In the Select a Page area, select Files.Figure 8-14 Database Properties Window
5. In the Autogrowth column, select either the Data file or the Log file and click the corresponding Autogrowth Parameters button.
6. The Change Autogrowth window appears.Figure 8-15 Change Autogrowth Window
Autogrowth Parameters
Buttons

148 Chapter 8: Troubleshooting: Databases
NICE Perform® Release 3.2: Databases Installation Guide (Rev A4)
Verifying Database Space Using the NICE DBSpace Utility
7. To enable autogrowth, select Enable Autogrowth.
-or-
To disable autogrowth, clear Enable Autogrowth.
8. If you enabled autogrowth:
a. Under File Growth select either In Percent or In Megabytes and select the desired parameter from the corresponding drop-down box.
b. Under Maximum File Size select either Restricted File Growth and choose the desired parameter from the corresponding drop-down box, or select Unrestricted File Growth.
9. Click OK.
The parameters you defined appear in the Autogrowth column of the Properties window.
Verifying Database Space Using the NICE DBSpace UtilityThe DBSpace utility enables you to verify database space usage and to monitor its status. DBSpace offers the following features:
• Indicates databases that have less than 20% space available.
• Shows the used and free disk space for each database.
• Shows the used and free disk space for data and log files.
• Shows all tables in each database and their current status.
• Predicts the approximate number of days that remain until the tables reach full capacity.
To run the DBSpace utility:
1. Copy the DBSpace utility from the NICE Perform Applications Server to any convenient location on the NICE Perform server.
2. Extract the files from the Nice DBspace.zip file.
3. In the folder containing the extracted files, double-click Nice DBspace.exe.
The Nice DBSpace window appears.
IMPORTANTYou must run the DBSpace utility locally. Therefore, before running the DBSpace utility, you must copy it to the NICE Perform server(s) on which the NICE Perform databases are installed.

149 Chapter 8: Troubleshooting: Databases
NICE Perform® Release 3.2: Databases Installation Guide (Rev A4)
Verifying Database Space Using the NICE DBSpace Utility
Figure 8-16 Nice DBSpace Window - Data/Log Tab
4. In the SQL Server field, enter the SQL Server name or the IP Address, or select the SQL Server from the drop-down list.
Select either Use Windows Authentication or Use SQL Authentication. If you selected SQL Authentication, enter your SQL Server Login name and the SQL Server password in the Login and Password fields respectively.
5. Click the Connect button.
The Database Status area is populated.
NOTE: For SQL Authentication only:By default, the sa Login password is blank. It is highly recommended to define a unique sa Login password for your site. However, if you did not define a unique sa Login password, leave the Password field blank.
SQL Server Connection
Area
Low Space Databases
Area
Database Status Area

150 Chapter 8: Troubleshooting: Databases
NICE Perform® Release 3.2: Databases Installation Guide (Rev A4)
Verifying Database Space Using the NICE DBSpace Utility
6. In the Data/Log tab, select either Data to see the status of the SQL Server data files or Log to see the status of the SQL Server log files.
The DBSpace utility displays the following:
7. Click the Tables tab.
Area StatusLow Space Databases Lists all databases in which the amount of free space
is less than 20%, and the percentage of the remaining free space.
Drive Status Area Displays the amount of used space (displayed in blue) and free space (displayed in green) on the drive on which either the Data files or the Log files are located.
Databases Status Area Displays the amount of used space (displayed in blue) and free space (displayed in green) in each database in the NICE Perform Database Suite. The status of each database is displayed both as a table and a graph.TIP: Use the scroll bar under the table to display the portion of the table not visible.
NOTE: The DBSpace utility does not display the status of the databases in real time. To refresh the display, click the Connect button.
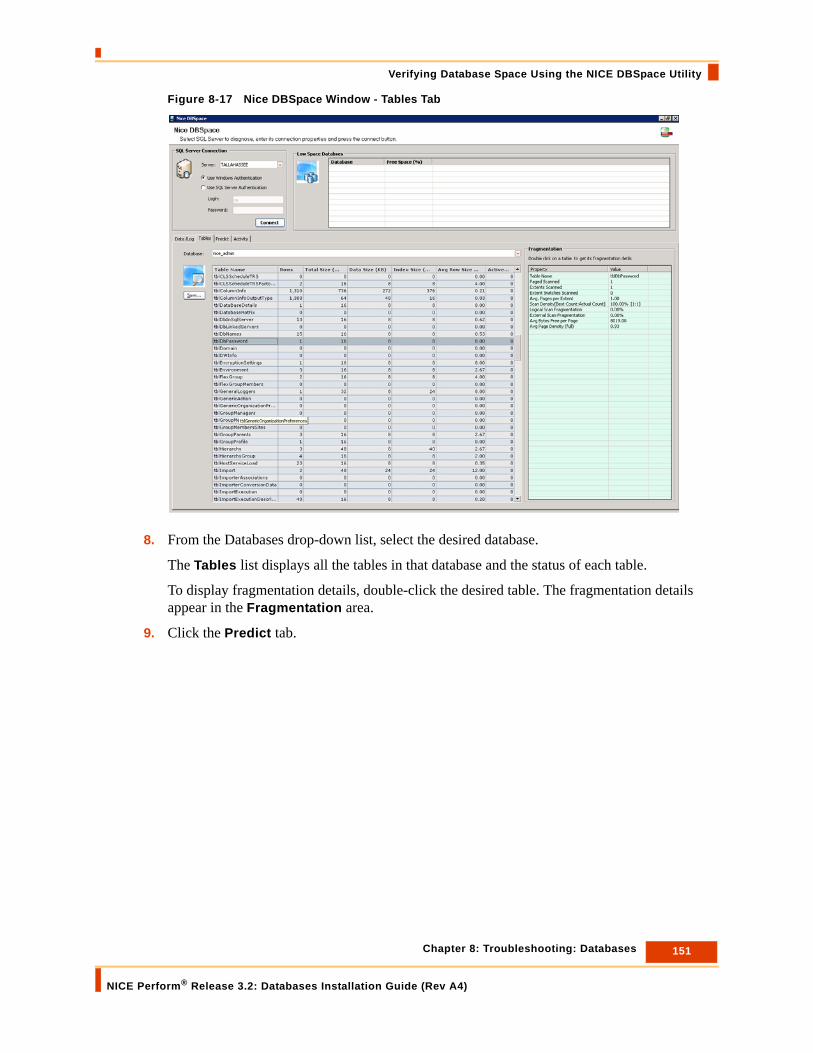
151 Chapter 8: Troubleshooting: Databases
NICE Perform® Release 3.2: Databases Installation Guide (Rev A4)
Verifying Database Space Using the NICE DBSpace Utility
Figure 8-17 Nice DBSpace Window - Tables Tab
8. From the Databases drop-down list, select the desired database.
The Tables list displays all the tables in that database and the status of each table.
To display fragmentation details, double-click the desired table. The fragmentation details appear in the Fragmentation area.
9. Click the Predict tab.

152 Chapter 8: Troubleshooting: Databases
NICE Perform® Release 3.2: Databases Installation Guide (Rev A4)
Verifying Database Space Using the NICE DBSpace Utility
Figure 8-18 Nice DBSpace Window - Predict Tab
10. The Predict table gives an estimate of how much time remains until each of the listed tables reaches full capacity. The calculations are based on the parameters listed at the top of each column.
11. Click the Activity tab.
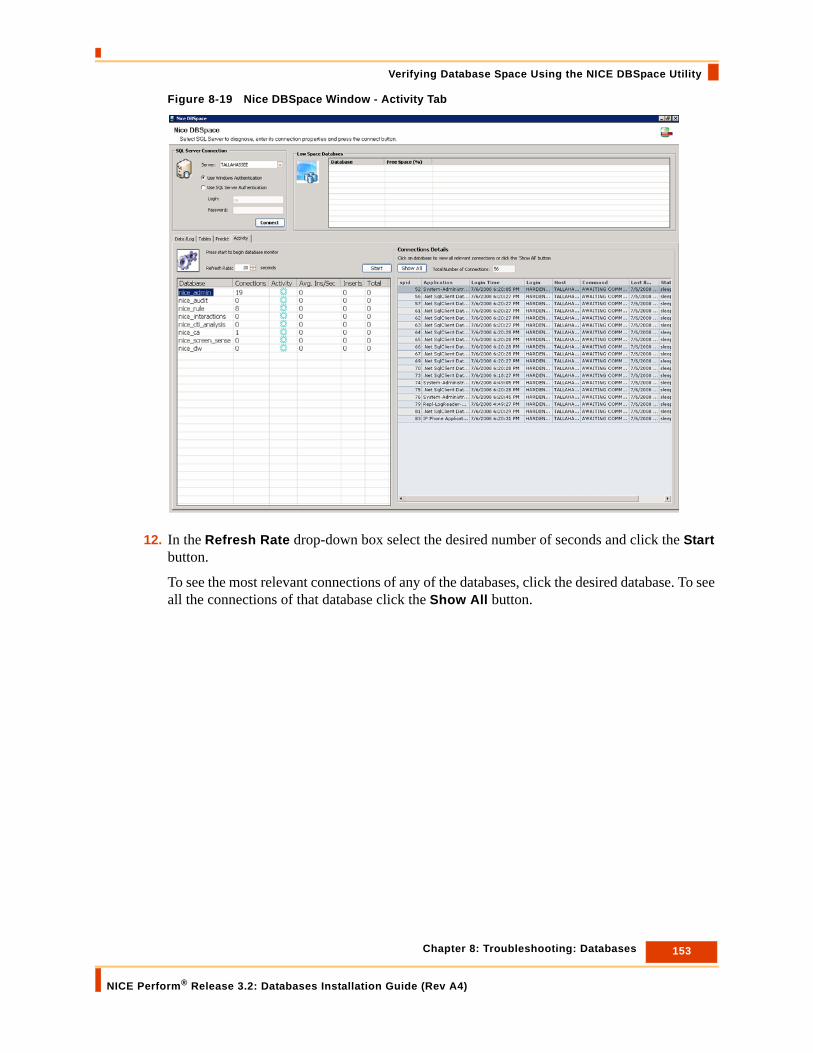
153 Chapter 8: Troubleshooting: Databases
NICE Perform® Release 3.2: Databases Installation Guide (Rev A4)
Verifying Database Space Using the NICE DBSpace Utility
Figure 8-19 Nice DBSpace Window - Activity Tab
12. In the Refresh Rate drop-down box select the desired number of seconds and click the Start button.
To see the most relevant connections of any of the databases, click the desired database. To see all the connections of that database click the Show All button.

Blank page for double-sided printing.

Chapter 9: Troubleshooting: Data Mart Server
NICE Perform® Release 3.2: Databases Installation Guide (Rev A4)
155
9
Troubleshooting: Data Mart Server
This chapter describes some of the most common problems that may arise during and after installing the NICE Perform databases, and offers probable solutions.
Contents
General Data Mart Troubleshooting Flow...................................................................156
Checking Free Space in the Database ........................................................................157
Recreating Links...........................................................................................................158
Checking the Data Mart Database Version.................................................................159
Checking Connectivity Between the Database and Data Mart Servers ...................160
Checking a Data Mart Job Failure ...............................................................................160
IMPORTANT These procedures must be perform only by authorized personnel. For full assistance, contact NICE Systems Customer Services.

156 Chapter 9: Troubleshooting: Data Mart Server
NICE Perform® Release 3.2: Databases Installation Guide (Rev A4)
General Data Mart Troubleshooting Flow
General Data Mart Troubleshooting FlowIf you experience a problem with the Data Mart, the following workflow lists the steps to isolate the problem. Each step in the workflow is a section in this chapter.Figure 9-1 Data Mart Troubleshooting Flow

157 Chapter 9: Troubleshooting: Data Mart Server
NICE Perform® Release 3.2: Databases Installation Guide (Rev A4)
Checking Free Space in the Database
Checking Free Space in the DatabaseCheck to see if the size of the database is sufficient. There are several ways to check the free space in the NICE Perform databases.
To check free database space:
1. Check the NMS alarms.
-or-
2. Connect to the SQL Server Management Studio.
a. Navigate to Databases and select the relevant database.
b. From the right-click menu select Properties.
c. In the General page check Space available.
-or-
3. Right-click the database and select Reports > Standard reports > Disk usage. The usage is displayed graphically and indicates both the Data files and the Log files separately.
-or-
4. Use the Nice DBSpace utility to check the database space (see Verifying Database Space Using the NICE DBSpace Utility on page 148).
-or-
5. In the NICE System Administrator, navigate to Master Site > Database Servers > Databases and select each database to see the used and free space percentages.
NOTE: The space available relates to the free space of the entire database, and does not distinguish between the sizes of the Data files and the Log files.
NOTE: It is recommended not to work in Technical Mode in order to prevent making unintentional changes to the database configuration.

158 Chapter 9: Troubleshooting: Data Mart Server
NICE Perform® Release 3.2: Databases Installation Guide (Rev A4)
Recreating Links
Figure 9-2 NICE System Administrator
-or-
6. Use Nice DBSpace to check the database space.
Recreating Links
To recreate links to the Data Mart:
1. In the System Administrator, expand the Master Site > Data Marts and select the required Data Mart server.
2. Click the Sites tab.

159 Chapter 9: Troubleshooting: Data Mart Server
NICE Perform® Release 3.2: Databases Installation Guide (Rev A4)
Checking the Data Mart Database Version
Figure 9-3 Data Marts - Sites Tab
3. Click Recreate Links.
Checking the Data Mart Database VersionEnsure that the database version is the same on all sites.
To check the Data Mart database version:
• Verify that the database version in the tblDatabaseDetails table of each database is identical.Figure 9-4 tblDatabaseDetails
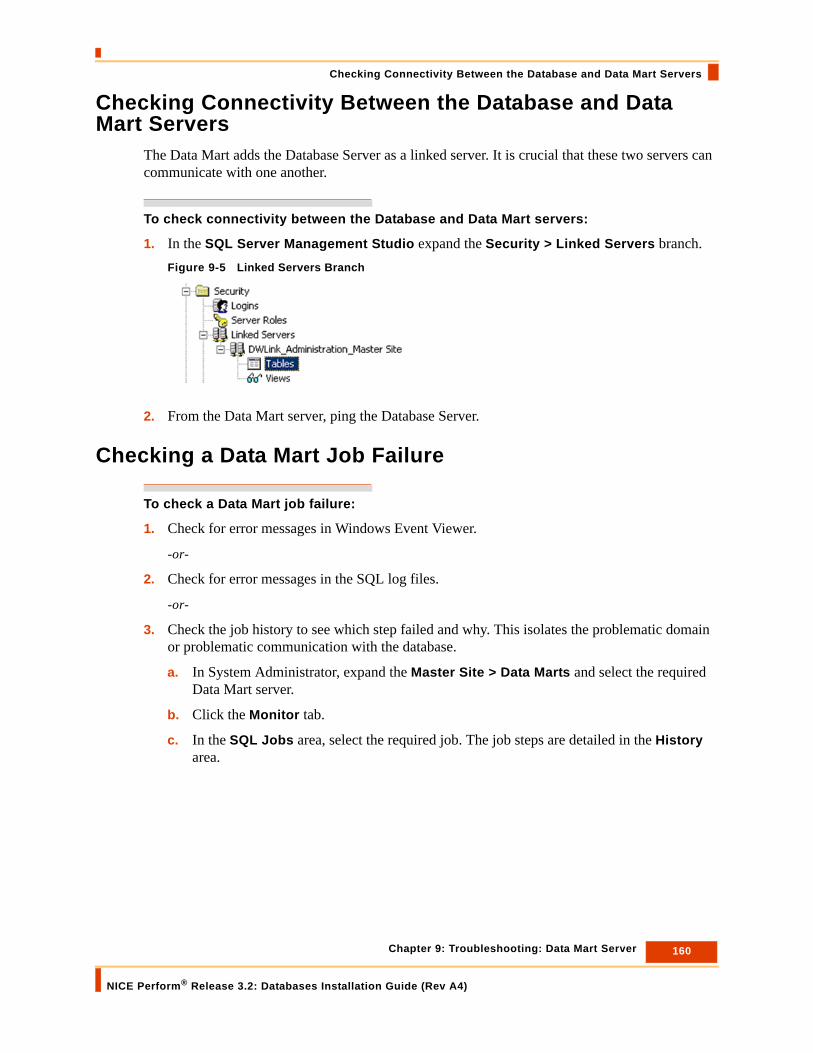
160 Chapter 9: Troubleshooting: Data Mart Server
NICE Perform® Release 3.2: Databases Installation Guide (Rev A4)
Checking Connectivity Between the Database and Data Mart Servers
Checking Connectivity Between the Database and Data Mart Servers
The Data Mart adds the Database Server as a linked server. It is crucial that these two servers can communicate with one another.
To check connectivity between the Database and Data Mart servers:
1. In the SQL Server Management Studio expand the Security > Linked Servers branch.Figure 9-5 Linked Servers Branch
2. From the Data Mart server, ping the Database Server.
Checking a Data Mart Job Failure
To check a Data Mart job failure:
1. Check for error messages in Windows Event Viewer.
-or-
2. Check for error messages in the SQL log files.
-or-
3. Check the job history to see which step failed and why. This isolates the problematic domain or problematic communication with the database.
a. In System Administrator, expand the Master Site > Data Marts and select the required Data Mart server.
b. Click the Monitor tab.
c. In the SQL Jobs area, select the required job. The job steps are detailed in the History area.

161 Chapter 9: Troubleshooting: Data Mart Server
NICE Perform® Release 3.2: Databases Installation Guide (Rev A4)
Checking a Data Mart Job Failure
Figure 9-6 Monitor Tab

Blank page for double-sided printing.

Chapter 10: Troubleshooting: Multi Data Hub
NICE Perform® Release 3.2: Databases Installation Guide (Rev A4)
163
10
Troubleshooting: Multi Data Hub
This chapter describes some of the most common problems that may arise during and after installing the NICE Perform databases, and offers probable solutions.
Contents
General Considerations ...............................................................................................164
Multi Data Hub Implications.........................................................................................164
Checking Connectivity .................................................................................................166
Checking Replication in Multi Data-Hub Environments............................................166
Troubleshooting Communication Problems between Primary and Secondary Data Hubs...............................................................................................................................167
Troubleshooting Database Structure Differences .....................................................168
Stopping Replication when Upgrading all Data Hubs...............................................168
Changing Passwords ...................................................................................................168
Enabling MSDTC to Function in Multi Site Environments ........................................169
Tips for Troubleshooting Replication .........................................................................169
IMPORTANT These procedures must be perform only by authorized personnel. For full assistance, contact NICE Systems Customer Services.

164 Chapter 10: Troubleshooting: Multi Data Hub
NICE Perform® Release 3.2: Databases Installation Guide (Rev A4)
General Considerations
General ConsiderationsBefore attempting to troubleshoot any database problems, it is advisable to consider the issues listed below. These will better enable you to analyze your problems and determine if the issues are indeed related to the database.
• Is this a new installation or an upgrade of an existing system?
• For new installations, when was the installation performed? How long after the installation did the problems appear?
• For upgrades, when was the upgrade performed? Did the problems arise before or after the upgrade?
• Were there any changes to the environment that might have influenced the system? If yes, check these changes first.
• How often does the problem occur? Are the circumstances similar?
• Is the problem reproducible? If yes, what were the steps?
• Were the Servers restarted? If yes, did this resolve the problem?
Multi Data Hub ImplicationsA Multi Data Hub system has site implications that affect the different system components. Changes in the components are all done automatically with no user intervention or configuration.
Database
• The nice_admin, nice_interactions, nice_audit, and nice_rule databases are mandatory on all Data Hubs.
• The nice_interactions databases are not replicated across Data Hubs.
System Administrator
• Administration updates are blocked when the Primary Data Hub is not available.
• The login mechanism checks login token on all Data Hubs.
• Users belong to a specific Data Hub.
Rule Engine
• All rules are replicated from the Primary Data Hub to the Secondary Data Hubs.
• Each local rule engine handles the local rules.
• However, Storage Center rules are an exception as they are all stored only on the Master Data Hub. Therefore, all Data Hubs operate using the same Storage Center rules.

165 Chapter 10: Troubleshooting: Multi Data Hub
NICE Perform® Release 3.2: Databases Installation Guide (Rev A4)
Multi Data Hub Implications
Business Analyzer
• Public, private and saved items are replicated between all Data Hubs.
• User preferences are local.
• Running a query on Multi Data Hubs:
• The Unified Query engine queries the local Data Hub.
• Each remote Data Hub with agents from the query filter are also queried.
• All results are combined into one result.
• The Unified Query service connects all relevant Locate services in all Data Hubs.
• The Locate process looks only in the local Data Hub according to the locate order.
Playback
• Each Data Hub has its own Media Server.
• One or more Playback Servers can be configured in each Data Hub.
Monitor
• User preferences are saved on the local Data Hub.
• Monitor will subscribe to events to the local CLS or remote Monitor service.
Quality Management
• All Quality Management (QM) objects (such as Evaluations, Coaching Packages, Calibrations and Clips) are saved in the user’s local Data Hub.
• Evaluations on remote calls will be replicated to the remote Data Hubs.
• Form definitions are replicated to all remote servers.
My Universe
• Preferences are stored locally.
Interactions Center
• All recording rules are replicated.
• Only local integrations are handled.
Storage Center
• Tasks are read from the Master Data Hub only.
• Archiving can be done from all Data Hubs.

166 Chapter 10: Troubleshooting: Multi Data Hub
NICE Perform® Release 3.2: Databases Installation Guide (Rev A4)
Checking Connectivity
Checking ConnectivityCheck connectivity between sites by pinging the server using the IP address and/or hostname.
Checking Replication in Multi Data-Hub EnvironmentsUse the following methods to check replication in Multi Data Hub environments:
To check replication in multi data hub environments:
1. In the NICE System Administrator, verify that the replication is defined using only the machine names.
-or-
2. Check the connectivity between the Primary and Secondary Data Hubs.
-or-
3. Connect to the SQL Server Management Studio. In the Object Explorer, navigate to Replication and check if there are components with an error.
-or-
4. In the NICE System Administrator navigate to Master Site > Database Servers > Databases and click the Replication tab. Verify that no errors appear in the Status column.
-or-
5. If the Primary and Secondary Data Hubs have different database structures, replication will fail at those specific points. To ensure that the replicated data is identical, run tests on all data hubs to ensure that additional information (such as business data or any external additions such as PS solutions) can be accessed from different sites.
-or-
6. Verify that the identical version of the NICE Perform Database and the same updates are installed on all sites. Check the following tables in the nice_admin database:
a. The database version appears in the tblDatabaseDetails table.
NOTE: • If you want to make any changes to the database schema of replicated or
un-replicated tables, you must first shut down the replication for that site.
• When running the replication, the created scripts and log files are saved in Documents and Settings\[System Admin User]\Application Data.
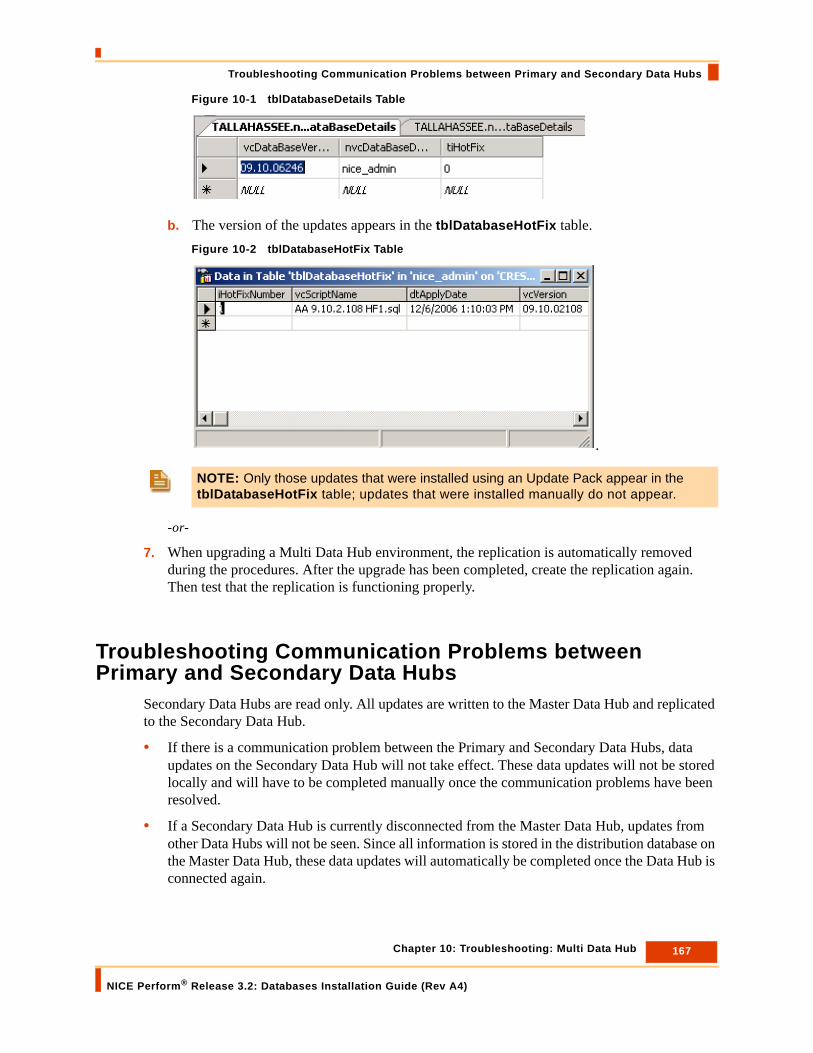
167 Chapter 10: Troubleshooting: Multi Data Hub
NICE Perform® Release 3.2: Databases Installation Guide (Rev A4)
Troubleshooting Communication Problems between Primary and Secondary Data Hubs
Figure 10-1 tblDatabaseDetails Table
b. The version of the updates appears in the tblDatabaseHotFix table.Figure 10-2 tblDatabaseHotFix Table
.
-or-
7. When upgrading a Multi Data Hub environment, the replication is automatically removed during the procedures. After the upgrade has been completed, create the replication again. Then test that the replication is functioning properly.
Troubleshooting Communication Problems between Primary and Secondary Data Hubs
Secondary Data Hubs are read only. All updates are written to the Master Data Hub and replicated to the Secondary Data Hub.
• If there is a communication problem between the Primary and Secondary Data Hubs, data updates on the Secondary Data Hub will not take effect. These data updates will not be stored locally and will have to be completed manually once the communication problems have been resolved.
• If a Secondary Data Hub is currently disconnected from the Master Data Hub, updates from other Data Hubs will not be seen. Since all information is stored in the distribution database on the Master Data Hub, these data updates will automatically be completed once the Data Hub is connected again.
NOTE: Only those updates that were installed using an Update Pack appear in the tblDatabaseHotFix table; updates that were installed manually do not appear.
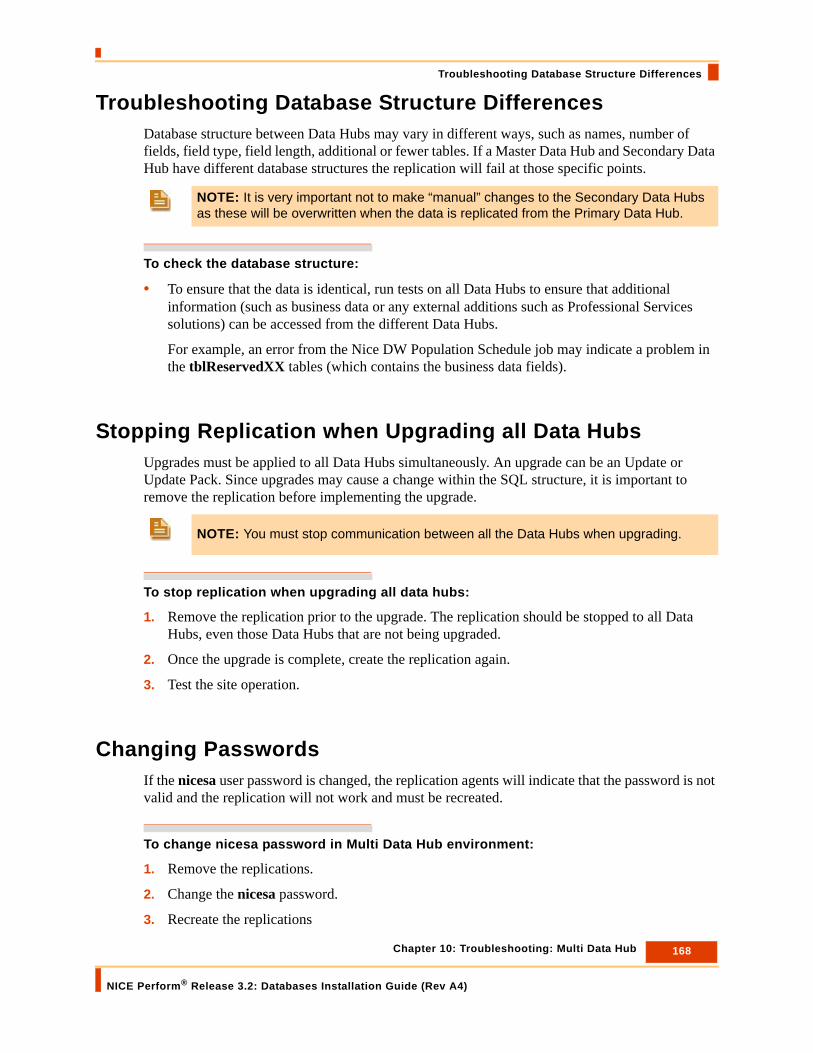
168 Chapter 10: Troubleshooting: Multi Data Hub
NICE Perform® Release 3.2: Databases Installation Guide (Rev A4)
Troubleshooting Database Structure Differences
Troubleshooting Database Structure DifferencesDatabase structure between Data Hubs may vary in different ways, such as names, number of fields, field type, field length, additional or fewer tables. If a Master Data Hub and Secondary Data Hub have different database structures the replication will fail at those specific points.
To check the database structure:
• To ensure that the data is identical, run tests on all Data Hubs to ensure that additional information (such as business data or any external additions such as Professional Services solutions) can be accessed from the different Data Hubs.
For example, an error from the Nice DW Population Schedule job may indicate a problem in the tblReservedXX tables (which contains the business data fields).
Stopping Replication when Upgrading all Data HubsUpgrades must be applied to all Data Hubs simultaneously. An upgrade can be an Update or Update Pack. Since upgrades may cause a change within the SQL structure, it is important to remove the replication before implementing the upgrade.
To stop replication when upgrading all data hubs:
1. Remove the replication prior to the upgrade. The replication should be stopped to all Data Hubs, even those Data Hubs that are not being upgraded.
2. Once the upgrade is complete, create the replication again.
3. Test the site operation.
Changing PasswordsIf the nicesa user password is changed, the replication agents will indicate that the password is not valid and the replication will not work and must be recreated.
To change nicesa password in Multi Data Hub environment:
1. Remove the replications.
2. Change the nicesa password.
3. Recreate the replications
NOTE: It is very important not to make “manual” changes to the Secondary Data Hubs as these will be overwritten when the data is replicated from the Primary Data Hub.
NOTE: You must stop communication between all the Data Hubs when upgrading.

169 Chapter 10: Troubleshooting: Multi Data Hub
NICE Perform® Release 3.2: Databases Installation Guide (Rev A4)
Enabling MSDTC to Function in Multi Site Environments
Enabling MSDTC to Function in Multi Site EnvironmentsThe SQL Server uses Microsoft Distribute Transaction Coordinator (MSDTC) to execute distributed transactions. MSDTC will not function properly in an environment where the two servers are using the same Windows OS image, for example where the ‘Ghost’ program is used to copy the Windows image to the disk. The reason for the problem is that both servers that are installed from the same image have an identical key in the MSTDC section in the SQL registry. If the distributed transaction fails even when the registry keys are different, refer to Technical Note 0676 Enabling Microsoft Distribute TransactionCoordinator (MSDTC) to Function in Multi Site Environments. This note describes how to fix the problem without re-installing the entire system.
Tips for Troubleshooting Replication• In most instances, the Master database is updated with information. If there is a problem
updating the Master database, the replication itself will not begin. This indicates that the problem lies elsewhere. It is therefore important to first verify that the Master database is being updated properly, and only then start troubleshooting replication problems.
• Replication works with the Machine Name only.
• Any change to the database scheme of replicated or un-replicated tables requires that the replication be shut down for that site.
• In a Multi Data Hub environment, some of the information in nice_admin is replicated. If replication is down, you cannot save in System Administrator.
• If the replication error Cannot insert explicit value for identity column in table 'tblColumnInfo' appears, it indicates that the subscription table tblColumnInfo.iColumnId identity is set to true. Set the identity value to false.
• If you are unable to solve problems with replication, submit the following log file to NICE Systems Customer Services
Program Files\NICE Systems\Applications\ServerBin\NiceApplications.SystemAdministrator.Host.exe.log

Blank page for double-sided printing.

Appendix A: Verifying Windows Authentication Security Settings
NICE Perform®Release 3.2: Databases Installation Guide (Rev A4)
171
A
Verifying Windows Authentication Security Settings
After completing the installation of the NICE Perform system, use the following procedure to verify that Windows Authentication has been defined and configured according to the requirements of NICE Perform.
To verify Windows Authentication security settings:
1. On the NICE Perform Application Server, open the following configuration file:
Program Files\NICE Systems\Applications\ServerBin\NiceApplications.SystemAdministrator.Host.exe.config
2. Scroll down to <ApplicationConfiguration> (see Figure A-1).
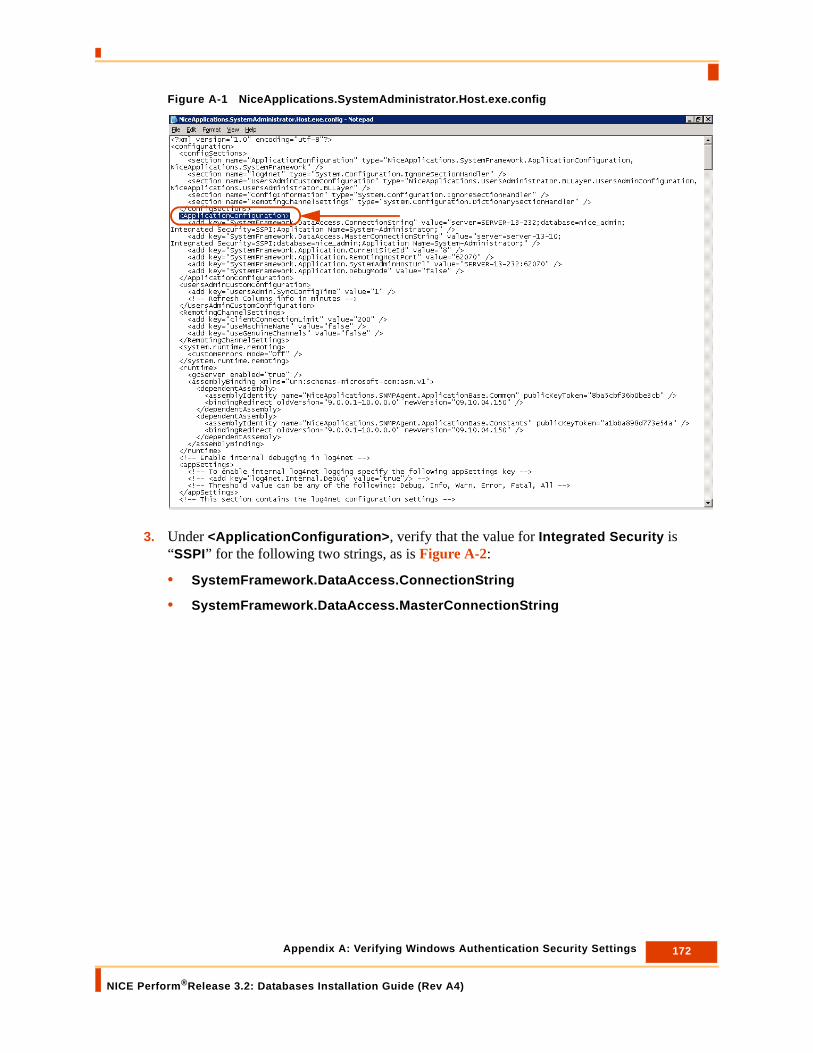
172 Appendix A: Verifying Windows Authentication Security Settings
NICE Perform®Release 3.2: Databases Installation Guide (Rev A4)
Figure A-1 NiceApplications.SystemAdministrator.Host.exe.config
3. Under <ApplicationConfiguration>, verify that the value for Integrated Security is “SSPI” for the following two strings, as is Figure A-2:
• SystemFramework.DataAccess.ConnectionString
• SystemFramework.DataAccess.MasterConnectionString

173 Appendix A: Verifying Windows Authentication Security Settings
NICE Perform®Release 3.2: Databases Installation Guide (Rev A4)
Figure A-2 NiceApplications.SystemAdministrator.Host.exe.config
The value “SSPI” indicates that Windows Authentication is properly defined for use with NICE Perform. If “SSPI” does not appear, it may be due to a number of reasons. Check your configurations and definitions; if necessary contact NICE Systems Customer Services.
Value Must be “SSPI”

Blank page for double-sided printing.
Appendix B: Establishing Access to the Multidimensional Databases
NICE Perform® Release 3.2: Databases Installation Guide (Rev A4)
175
B
Establishing Access to the Multidimensional Databases
After installing the NICE Perform multidimensional databases, and after installing and configuring the NICE Perform Applications, it is highly recommended to verify that the NICE Perform Applications are able to connect to the multidimensional databases.
If you are unable to establish connection, you must define the domain user roles in the Analysis Services Management Studio.
Contents
Verifying Connection to the Multidimensional Databases........................................176
Defining Domain Users for the nice_as_kpi Database..............................................179
Defining Domain Users for the nice_as_my_universe Database.............................185
Defining Domain Users for the nice_as_text_analysis .............................................187

176 Appendix B: Establishing Access to the Multidimensional Databases
NICE Perform® Release 3.2: Databases Installation Guide (Rev A4)
Verifying Connection to the Multidimensional Databases
Verifying Connection to the Multidimensional DatabasesYou perform the following verification procedures on the server on which the multidimensional databases are installed.
To verify access to the multidimensional databases:
1. In the Start menu, navigate to Programs > Microsoft SQL Server 2008 > SQL Server Management Studio.
2. Right-click SQL Server Management Studio and select Run as.Figure B-1 Start Menu
3. The Run As window appears.Figure B-2 Run As Window
4. Select The following user.
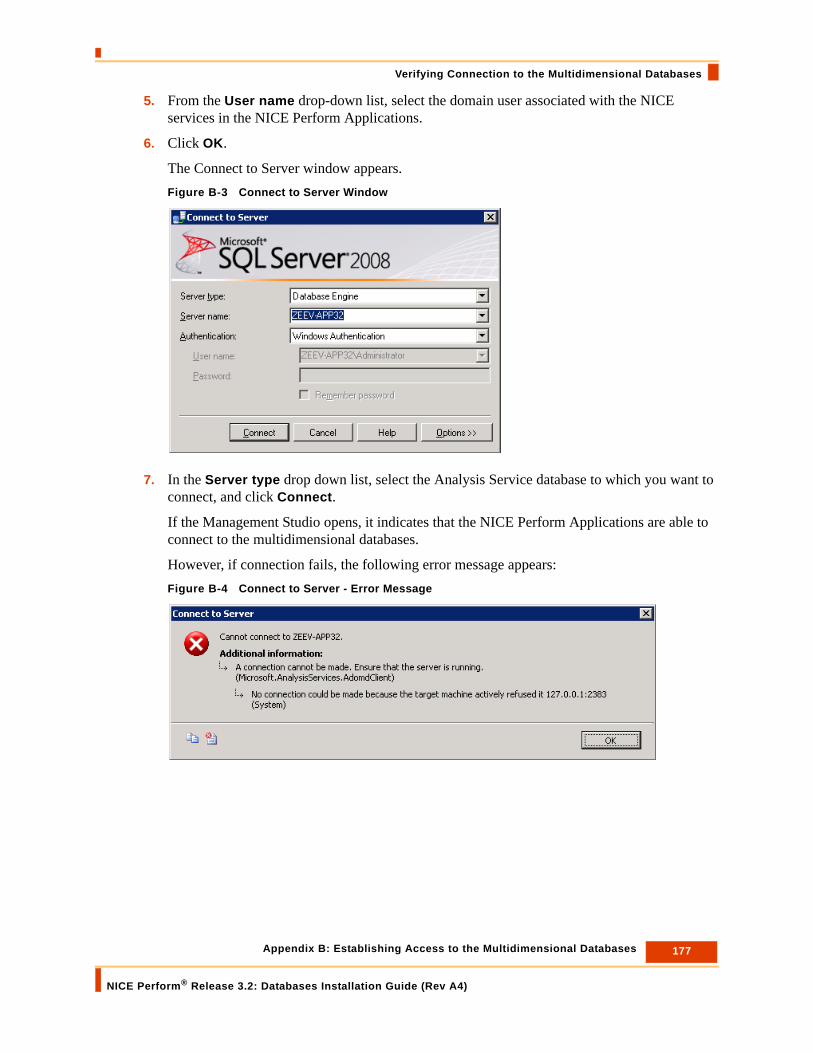
177 Appendix B: Establishing Access to the Multidimensional Databases
NICE Perform® Release 3.2: Databases Installation Guide (Rev A4)
Verifying Connection to the Multidimensional Databases
5. From the User name drop-down list, select the domain user associated with the NICE services in the NICE Perform Applications.
6. Click OK.
The Connect to Server window appears.Figure B-3 Connect to Server Window
7. In the Server type drop down list, select the Analysis Service database to which you want to connect, and click Connect.
If the Management Studio opens, it indicates that the NICE Perform Applications are able to connect to the multidimensional databases.
However, if connection fails, the following error message appears:Figure B-4 Connect to Server - Error Message

178 Appendix B: Establishing Access to the Multidimensional Databases
NICE Perform® Release 3.2: Databases Installation Guide (Rev A4)
Verifying Connection to the Multidimensional Databases
If you are unable to establish connection between the NICE Perform Applications and the multidimensional databases, you must define the domain user roles in the Analysis Services Management Studio for each of the multidimensional databases:
• nice_as_kpi Database
To define the domain user roles for the nice_as_kpi database, see Defining Domain Users for the nice_as_kpi Database on page 179.
• nice_as_my_universe Database
To define the domain user roles for the nice_as_my_universe database, see Defining Domain Users for the nice_as_my_universe Database on page 185.
• nice_as_text_analysis Database
To define the domain user roles for the nice_as_text_analysis database, see Defining Domain Users for the nice_as_text_analysis on page 187.
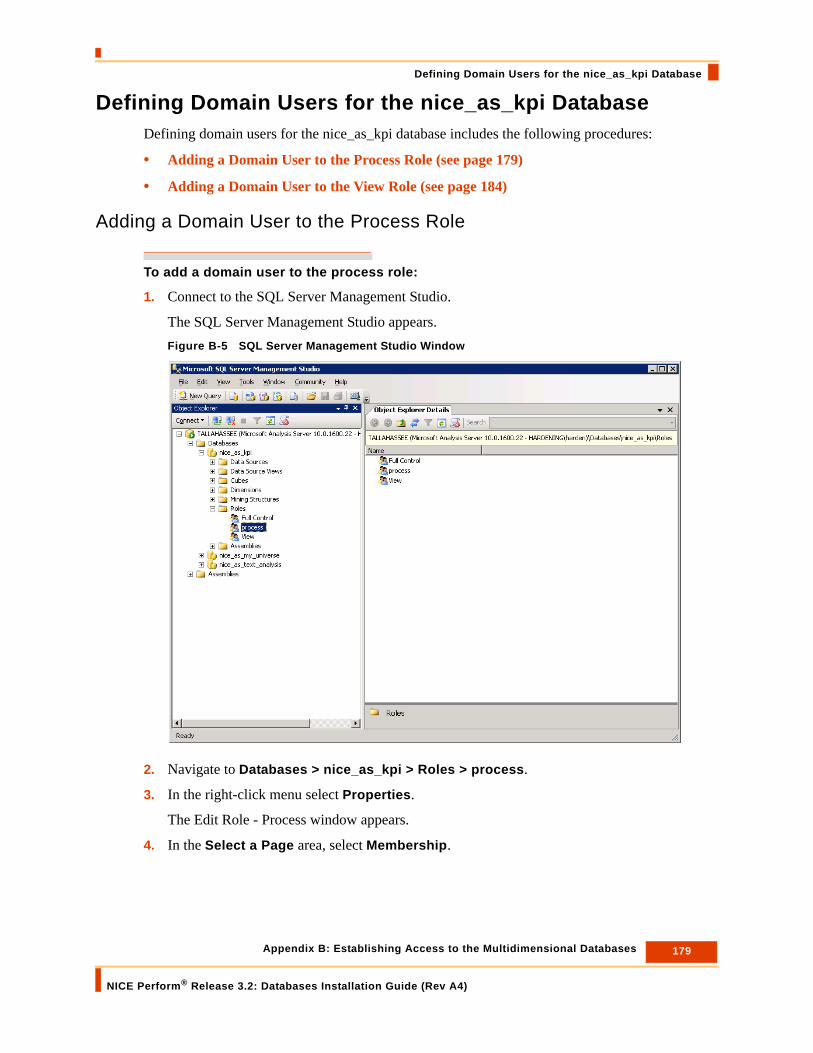
179 Appendix B: Establishing Access to the Multidimensional Databases
NICE Perform® Release 3.2: Databases Installation Guide (Rev A4)
Defining Domain Users for the nice_as_kpi Database
Defining Domain Users for the nice_as_kpi DatabaseDefining domain users for the nice_as_kpi database includes the following procedures:
• Adding a Domain User to the Process Role (see page 179)
• Adding a Domain User to the View Role (see page 184)
Adding a Domain User to the Process Role
To add a domain user to the process role:
1. Connect to the SQL Server Management Studio.
The SQL Server Management Studio appears.Figure B-5 SQL Server Management Studio Window
2. Navigate to Databases > nice_as_kpi > Roles > process.
3. In the right-click menu select Properties.
The Edit Role - Process window appears.
4. In the Select a Page area, select Membership.

180 Appendix B: Establishing Access to the Multidimensional Databases
NICE Perform® Release 3.2: Databases Installation Guide (Rev A4)
Defining Domain Users for the nice_as_kpi Database
Figure B-6 Edit Role - Process Window
5. Click the Add button.
The Select Users or Groups window appears.Figure B-7 Select Users or Groups Window
6. Click the Locations button.
The Locations window appears.

181 Appendix B: Establishing Access to the Multidimensional Databases
NICE Perform® Release 3.2: Databases Installation Guide (Rev A4)
Defining Domain Users for the nice_as_kpi Database
Figure B-8 Locations Window
7. Select the domain associated with the NICE services on the NICE Perform Applications Server and click OK.
The Select Users or Groups window reappears.
8. Click the Advanced button.
The Select Users or Groups window expands.
9. Click the Find Now button.
A list of domain users for the domain you selected is displayed in the Search Results field.

182 Appendix B: Establishing Access to the Multidimensional Databases
NICE Perform® Release 3.2: Databases Installation Guide (Rev A4)
Defining Domain Users for the nice_as_kpi Database
Figure B-9 Select Users or Groups Window - Search Results Area
10. Select the domain user associated with the NICE Applications Services, and click OK.
The Select Users or Groups window reappears displaying the domain user. Figure B-10 Select Users or Groups Window
11. Click OK.
The Edit Role - Process window reappears displaying the domain user.

183 Appendix B: Establishing Access to the Multidimensional Databases
NICE Perform® Release 3.2: Databases Installation Guide (Rev A4)
Defining Domain Users for the nice_as_kpi Database
Figure B-11 Edit Role - Process Window
12. Click OK.
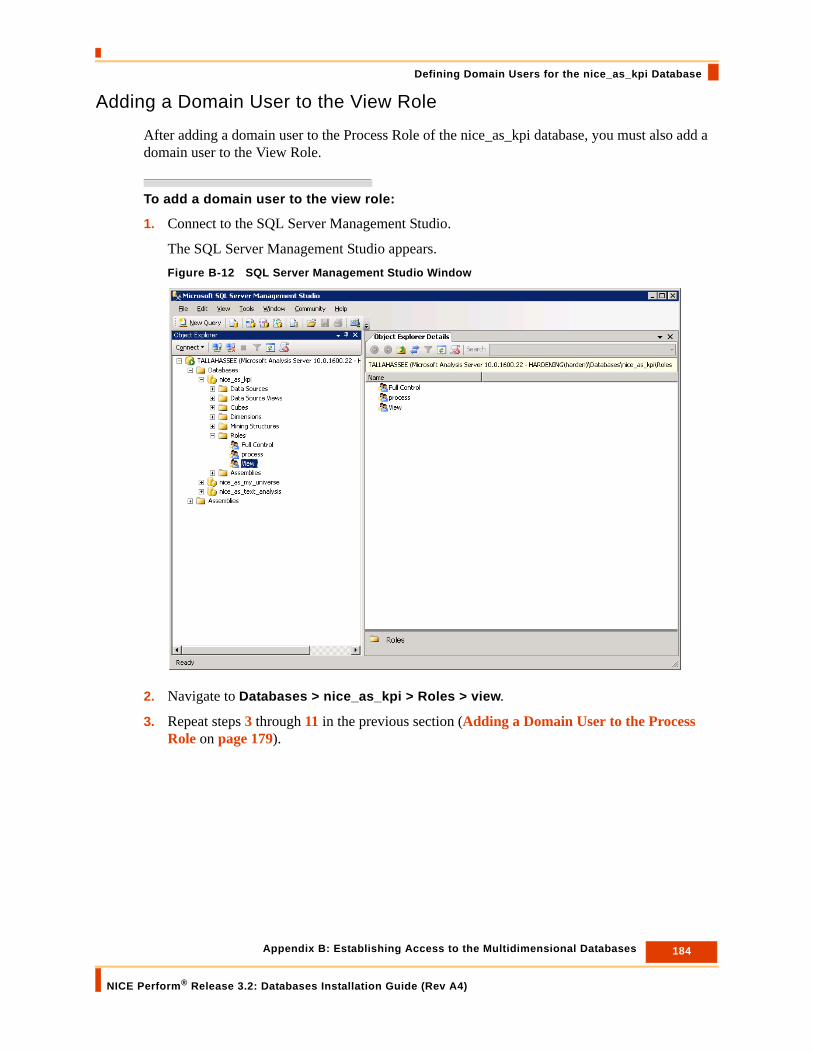
184 Appendix B: Establishing Access to the Multidimensional Databases
NICE Perform® Release 3.2: Databases Installation Guide (Rev A4)
Defining Domain Users for the nice_as_kpi Database
Adding a Domain User to the View Role
After adding a domain user to the Process Role of the nice_as_kpi database, you must also add a domain user to the View Role.
To add a domain user to the view role:
1. Connect to the SQL Server Management Studio.
The SQL Server Management Studio appears.Figure B-12 SQL Server Management Studio Window
2. Navigate to Databases > nice_as_kpi > Roles > view.
3. Repeat steps 3 through 11 in the previous section (Adding a Domain User to the Process Role on page 179).

185 Appendix B: Establishing Access to the Multidimensional Databases
NICE Perform® Release 3.2: Databases Installation Guide (Rev A4)
Defining Domain Users for the nice_as_my_universe Database
Defining Domain Users for the nice_as_my_universe Database
After defining the domain user for the Process and View roles in the nice_as_kpi database, you define the Process and View roles in the nice_as_my_universe database.
Adding a Domain User to the Process Role
To add a domain user to the process role:
1. Connect to the SQL Server Management Studio.
The SQL Server Management Studio appears.Figure B-13 SQL Server Management Studio Window
2. Navigate to Databases > nice_as_my_universe > Roles > process.
3. Repeat steps 3 through 11 in the section Adding a Domain User to the Process Role on page 179.
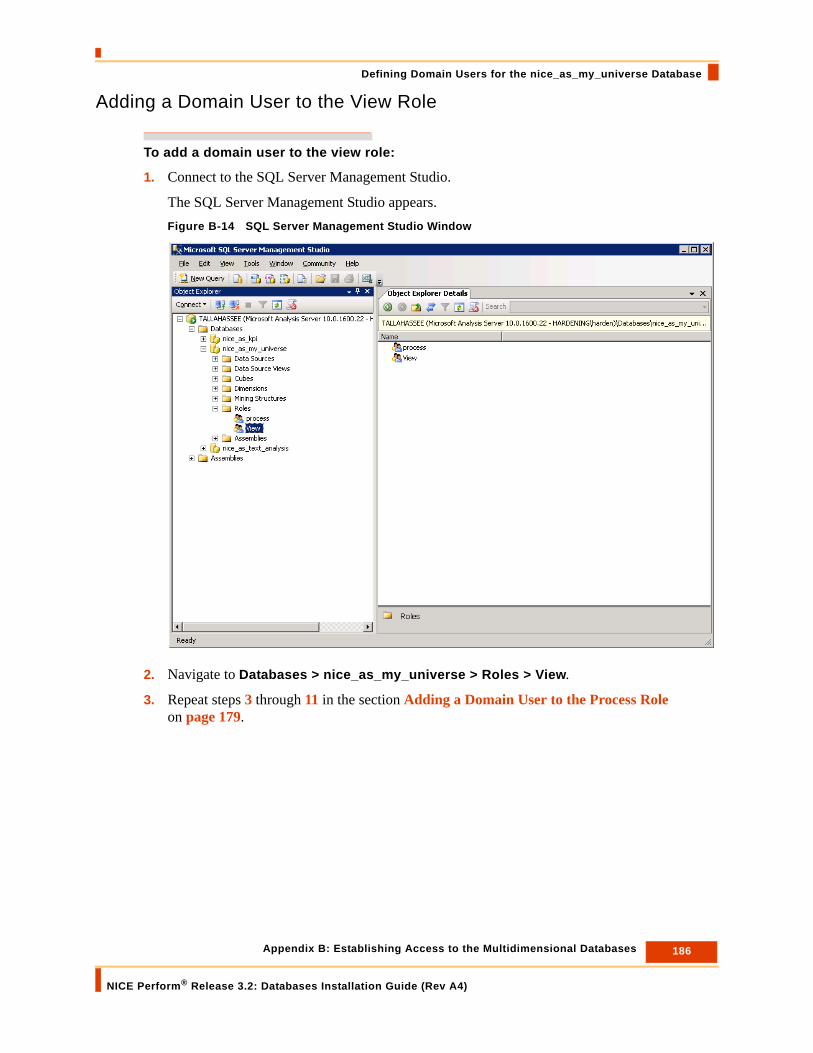
186 Appendix B: Establishing Access to the Multidimensional Databases
NICE Perform® Release 3.2: Databases Installation Guide (Rev A4)
Defining Domain Users for the nice_as_my_universe Database
Adding a Domain User to the View Role
To add a domain user to the view role:
1. Connect to the SQL Server Management Studio.
The SQL Server Management Studio appears.Figure B-14 SQL Server Management Studio Window
2. Navigate to Databases > nice_as_my_universe > Roles > View.
3. Repeat steps 3 through 11 in the section Adding a Domain User to the Process Role on page 179.

187 Appendix B: Establishing Access to the Multidimensional Databases
NICE Perform® Release 3.2: Databases Installation Guide (Rev A4)
Defining Domain Users for the nice_as_text_analysis
Defining Domain Users for the nice_as_text_analysisAfter defining the domain user for the Process and View roles in the nice_as_my_universe database, you define the Process and View roles in the nice_as_text_analysis database.
Adding a Domain User to the Process Role
To add a domain user to the process role:
1. Connect to the SQL Server Management Studio.
The SQL Server Management Studio appears.Figure B-15 SQL Server Management Studio Window
2. Navigate to Databases > nice_as_text_analysis > Roles > process.
3. Repeat steps 3 through 11 in the section Adding a Domain User to the Process Role on page 179.

188 Appendix B: Establishing Access to the Multidimensional Databases
NICE Perform® Release 3.2: Databases Installation Guide (Rev A4)
Defining Domain Users for the nice_as_text_analysis
Adding a Domain User to the View Role
To add a domain user to the view role:
1. Connect to the SQL Server Management Studio.
The SQL Server Management Studio appears.Figure B-16 SQL Server Management Studio Window
2. Navigate to Databases > nice_as_text_analysis > Roles > view.
3. Repeat steps 3 through 11 in the section Adding a Domain User to the Process Role on page 179.

Appendix C: Configuring Kerberos Delegation
NICE Perform® Release 3.2: Databases Installation Guide (Rev A4)
189
C
Configuring Kerberos Delegation
Contents
Overview........................................................................................................................190Verifying the SQL Server Protocol ...........................................................................191Verifying the SQL Port Number................................................................................192
Configuring Kerberos...................................................................................................193Configuring the Service Principal Name on the Active Directory .............................193Disabling the Named Pipes Protocol on the SQL Server.........................................195
Configuring Delegations..............................................................................................197
NOTE: The procedures described in this Appendix are identical for SQL Server 2005 and or SQL Server 2008.
190 Appendix C: Configuring Kerberos Delegation
NICE Perform® Release 3.2: Databases Installation Guide (Rev A4)
Overview
OverviewWhen using Windows Authentication in a Multi Data Hub environment, or in a Distributed environment in which there are two or more NICE Perform databases, evaluations are replicated through Linked Servers. For replication of Evaluations data to succeed, you must define Delegation for the Kerberos protocol.
Requirements
Before configuring the SQL Server to use the Kerberos protocol, your system must meet the following requirements:
• You must install the Operating System Resource Kit on the Domain Controller.
• The Domain Function Level on the Domain Controller must be set to Windows Server 2003.
Also note that after raising the Domain Function Level to Windows Server 2003, you cannot introduce any domain controllers that are running versions of Windows earlier than Windows Server 2003 into that domain. This applies to the forest functional level as well.
• All SQL Servers must be part of the same domain.
-or-
If the SQL Servers are in different domains, these two domains must be configured as a two-way trust.
• An SPN (Service Principal Name) must be defined for each SQL Server. Each service that uses Kerberos authentication must have an SPN to enable clients to identify that service on the network. The SPN is registered in the Active Directory under either a Computer account or a User account.
• The time clock of each SQL Server must be synchronized with that of the Active Directory. To synchronize the SQL Server, run the following command:
net time/set \\<Domain Controller hostname>
IMPORTANT These procedures apply only to environments using Windows Authentication; you cannot configure Kerberos protocol when using SQL Authentication.
WARNINGBe aware that this process is irreversible, and if not done properly may severely impact the systems connected to this Active Directory.THEREFORE, THIS PROCEDURE MUST BE PERFORMED ONLY BY AUTHORIZED AND QUALIFIED PERSONNEL.

191 Appendix C: Configuring Kerberos Delegation
NICE Perform® Release 3.2: Databases Installation Guide (Rev A4)
Overview
Verifying the SQL Server Protocol
Use the following procedure to verify which protocol is currently configured for your server:
To verify the SQL Server protocol:
1. Open the SQL Management Studio on the SQL Server installed on the Primary Data Hub.
2. Connect to SQL Server on the Secondary Data Hub.
3. Run the following query:
select auth_scheme from sys.dm_exec_connections where session_id=@@spid
The protocol currently configured for your server appears in the Results area.Figure C-1 SQL Management Studio
4. If the NTLM protocol appears, you must configure Kerberos for both the SQL Server and for the Active Directory. Continue with Configuring Kerberos on page 193.
If the Kerberos protocol appears, continue with Configuring Delegations on page 197.

192 Appendix C: Configuring Kerberos Delegation
NICE Perform® Release 3.2: Databases Installation Guide (Rev A4)
Overview
Verifying the SQL Port Number
The default port number of the SQL Server is 1433. However, since you must enter the actual port number of the SQL Server when configuring Kerberos Delegation, it is recommended to verify the port number before beginning.
To verify the SQL port number:
1. In the SQL Server Configuration Manager, navigate to SQL Server Network Configuration > Protocols for Master > TCP/IP, and right-click Properties.
The TCP/IP Properties window appears.Figure C-2 TCP/IP Properties Window
2. Scroll down to IPAll > TCP Port.
3. The SQL Port number appears in the right-hand column.
193 Appendix C: Configuring Kerberos Delegation
NICE Perform® Release 3.2: Databases Installation Guide (Rev A4)
Configuring Kerberos
Configuring KerberosConfiguring the SQL Server includes the following procedures:
• Configuring the Service Principal Name on the Active Directory (see page 193)
• Disabling the Named Pipes Protocol on the SQL Server (see page 195)
Configuring the Service Principal Name on the Active Directory
Log on to the Active Directory, and run the following set of commands:
• setspn.exe -A MSSQLSvc/<Fully_Qualified_Domain Name>:<port> <Domain\DomainUserAccountForSQLServer>
• setspn.exe -A MSSQLSvc/<ServerHostName>:<port> <Domain\DomainUserAccountForSQLServer>
IMPORTANT • Verify that the Operating System Resource Kit is installed on the Domain Controller.
• Make sure you run the commands listed in this section on the Active Directory.
• The following commands are case sensitive.
• You must run this set of commands for each SQL Server in the Multi Data Hub environment (see the example below).
NOTE: Leave spaces (not an underscore) as follows:• between setspn.exe and the dash
• between the A and MSSQLSvc
• between the port number and the domain
194 Appendix C: Configuring Kerberos Delegation
NICE Perform® Release 3.2: Databases Installation Guide (Rev A4)
Configuring Kerberos
EXAMPLE: Let’s say we have a Primary Data Hub and two Secondary Data Hubs, where:• Name of SQL Server on the Primary Data Hub - Master_DB
• Name of SQL Server on the first Secondary Data Hub - Secondary1_DB
• Name of SQL Server on the second Secondary Data Hub - Secondary2_DB
• Name of the Domain - Domain
• Name of the domain user account for the SQL Server - SQLUser
• Port number - 1433
You therefore run six commands (three sets of two commands), all on the Active Directory, as follows:• setspn.exe -A MSSQLSvc/Master_DB.domain.com:1433 Domain\SQLUser
• setspn.exe -A MSSQLSvc/Master_DB:1433 Domain\SQLUser
• setspn.exe -A MSSQLSvc/Secondary1_DB.domain.com:1433 Domain\SQLUser
• setspn.exe -A MSSQLSvc/ Secondary1_DB:1433 Domain\SQLUser
• setspn.exe -A MSSQLSvc/ Secondary2_DB.domain.com:1433 Domain\SQLUser
• setspn.exe -A MSSQLSvc/ Secondary2_DB:1433 Domain\SQLUser

195 Appendix C: Configuring Kerberos Delegation
NICE Perform® Release 3.2: Databases Installation Guide (Rev A4)
Configuring Kerberos
Disabling the Named Pipes Protocol on the SQL Server
To disable the Named Pipes protocol on the SQL Server:
1. On the Master site, open the SQL Server Configuration Manager using the following path:
Start > Programs > Microsoft SQL Server > Configuration Tools > SQL Server Configuration Manager.
The SQL Server Configuration Manager window appears.Figure C-3 SQL Server Configuration Manager Window
2. Under SQL Server Network Connection, select the SQL instance.
A list of protocols appears in the right-hand pane.

196 Appendix C: Configuring Kerberos Delegation
NICE Perform® Release 3.2: Databases Installation Guide (Rev A4)
Configuring Kerberos
Figure C-4 SQL Server Configuration Manager Window
3. Double-click Named Pipes.
The Named Pipes Properties window appears.Figure C-5 Named Pipes Properties Window
4. Change the value of Enabled to No and click OK.

197 Appendix C: Configuring Kerberos Delegation
NICE Perform® Release 3.2: Databases Installation Guide (Rev A4)
Configuring Delegations
5. Run the following command:
gpupdate /force
6. Reboot the computer
7. Repeat these procedures for each SQL Server in the Multi Data Hub environment.
Upon completion, it is recommended to run a query to verify that the Kerberos protocol is currently configured for your server. For details, see Verifying the SQL Server Protocol on page 191.
Configuring Delegations
To configure Kerberos Delegation:
1. In the Control Panel, select Administrative Tools > Active Directory Users and Computers, and select the domain account.
2. Under the domain account, select Computers.Figure C-6 Active Directory Users and Computers Window
3. Double-click the SQL Server located on the Primary Site.
The Properties window appears.
4. Click the Delegation tab.
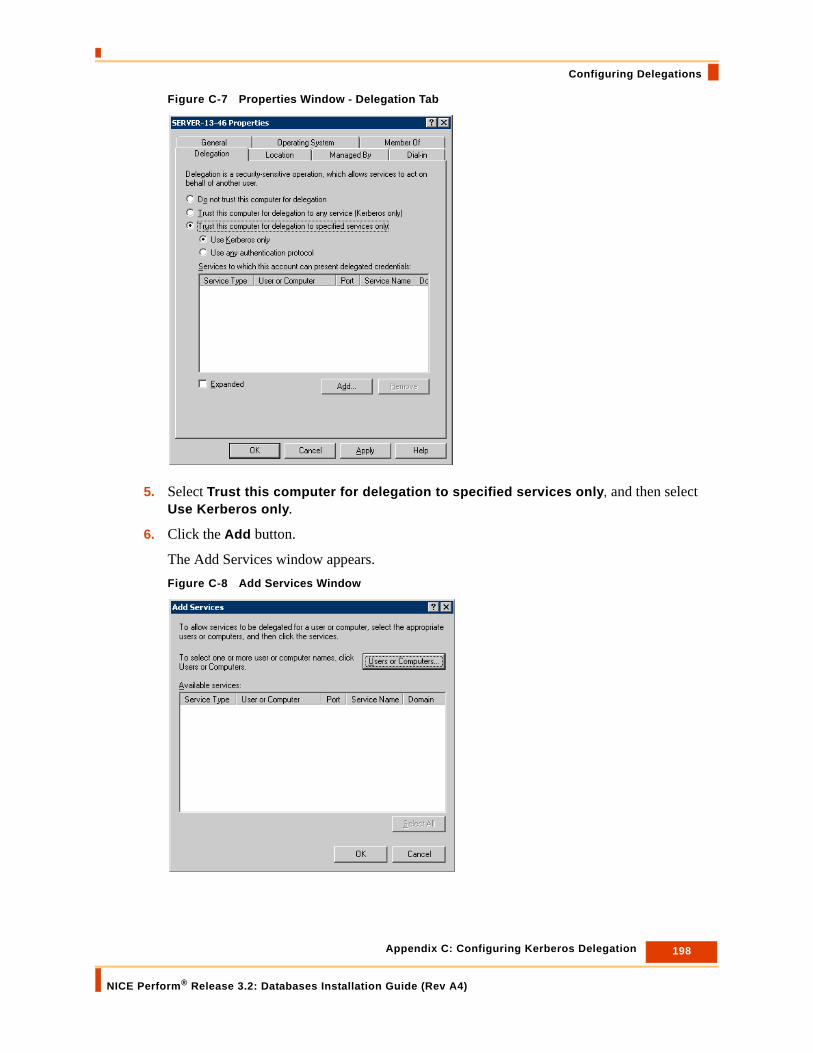
198 Appendix C: Configuring Kerberos Delegation
NICE Perform® Release 3.2: Databases Installation Guide (Rev A4)
Configuring Delegations
Figure C-7 Properties Window - Delegation Tab
5. Select Trust this computer for delegation to specified services only, and then select Use Kerberos only.
6. Click the Add button.
The Add Services window appears.Figure C-8 Add Services Window

199 Appendix C: Configuring Kerberos Delegation
NICE Perform® Release 3.2: Databases Installation Guide (Rev A4)
Configuring Delegations
7. Click the Users or Computers button.
The Select Users or Computers window appears.Figure C-9 Select Users or Computers Window
8. Click the Advanced button to browse for the domain user account.
-or-
In the Enter the Object Names to Select field, enter the name of the domain user account for the SQL services and click the Check Names button.
The program automatically checks the validity of the user name you entered. If the name is valid, it appears in the Enter the Object Names to Select field.
9. Click OK.
All the services (that is, the SPNs) on all the servers in the domain that apply to the domain user account defined in step 8 appear in the Add Services window.Figure C-10 Add Services Window
10. Select only those SPNs defined for the SQL Servers in the Multi Data Hub environment, and click OK.
The Properties window reappears listing the selected SPNs.
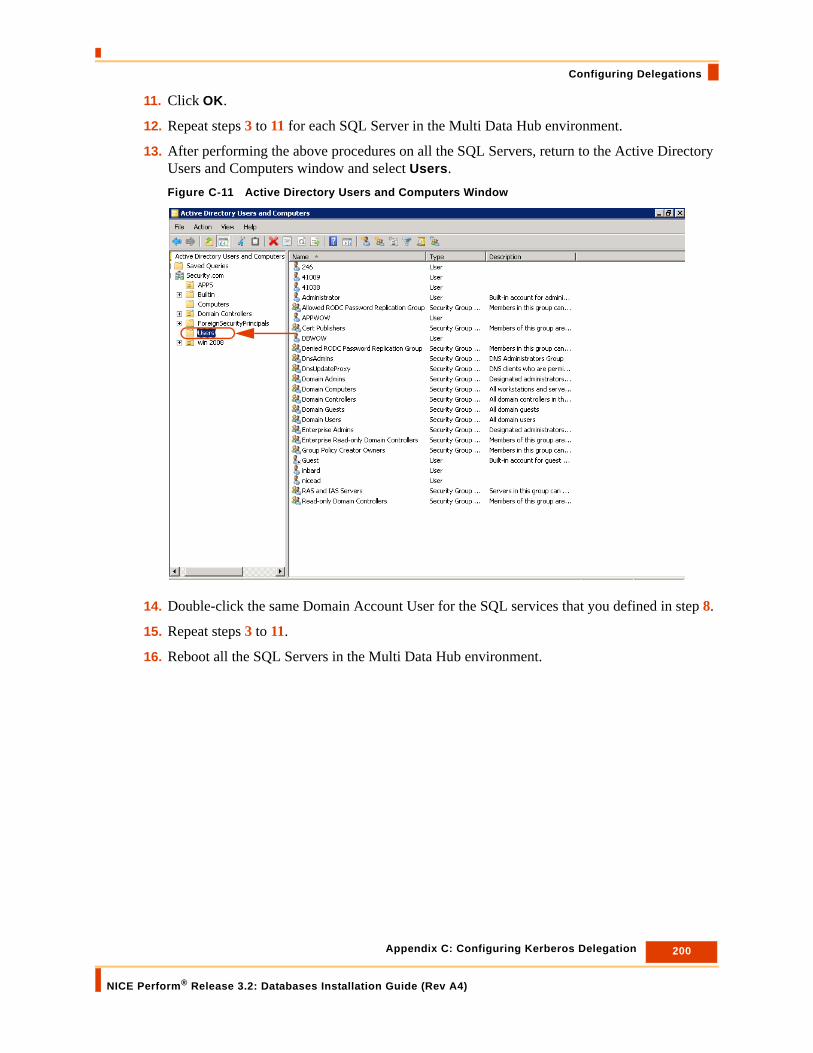
200 Appendix C: Configuring Kerberos Delegation
NICE Perform® Release 3.2: Databases Installation Guide (Rev A4)
Configuring Delegations
11. Click OK.
12. Repeat steps 3 to 11 for each SQL Server in the Multi Data Hub environment.
13. After performing the above procedures on all the SQL Servers, return to the Active Directory Users and Computers window and select Users.Figure C-11 Active Directory Users and Computers Window
14. Double-click the same Domain Account User for the SQL services that you defined in step 8.
15. Repeat steps 3 to 11.
16. Reboot all the SQL Servers in the Multi Data Hub environment.

Appendix D: Running the NICE DBSpace Utility
NICE Perform® Release 3.2: Databases Installation Guide (Rev A4)
201
D
Running the NICE DBSpace Utility
The DBSpace utility enables you to verify database space usage and to monitor its status. DBSpace offers the following features:
• Indicates databases that have less than 20% space available.
• Shows the used and free disk space for each database.
• Shows the used and free disk space for data and log files.
• Shows all tables in each database and their current status.
• Predicts the approximate number of days that remain until the tables reach full capacity.
To run the DBSpace utility:
1. On the NICE Perform Applications Server, navigate to the Tools > Nice DBspace.
2. In the Nice DBspace folder, double-click Nice DBspace.exe.
The Nice DBSpace window appears.
IMPORTANTYou must run the DBSpace utility locally. Therefore, before running the DBSpace utility, you must copy it to the NICE Perform server(s) on which the NICE Perform databases are installed.
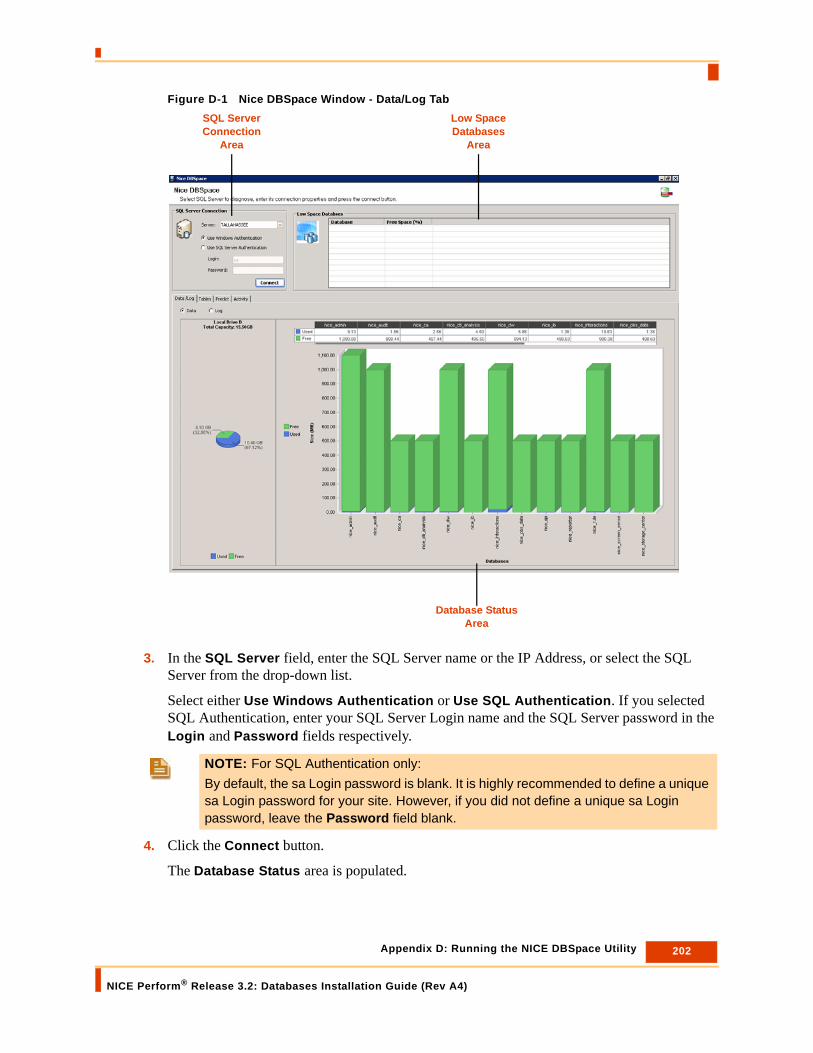
202 Appendix D: Running the NICE DBSpace Utility
NICE Perform® Release 3.2: Databases Installation Guide (Rev A4)
Figure D-1 Nice DBSpace Window - Data/Log Tab
3. In the SQL Server field, enter the SQL Server name or the IP Address, or select the SQL Server from the drop-down list.
Select either Use Windows Authentication or Use SQL Authentication. If you selected SQL Authentication, enter your SQL Server Login name and the SQL Server password in the Login and Password fields respectively.
4. Click the Connect button.
The Database Status area is populated.
NOTE: For SQL Authentication only:By default, the sa Login password is blank. It is highly recommended to define a unique sa Login password for your site. However, if you did not define a unique sa Login password, leave the Password field blank.
SQL Server Connection
Area
Low Space Databases
Area
Database Status Area

203 Appendix D: Running the NICE DBSpace Utility
NICE Perform® Release 3.2: Databases Installation Guide (Rev A4)
5. In the Data/Log tab, select either Data to see the status of the SQL Server data files or Log to see the status of the SQL Server log files.
The DBSpace utility displays the following:
6. Click the Tables tab.
Area StatusLow Space Databases Lists all databases in which the amount of free space
is less than 20%, and the percentage of the remaining free space.
Drive Status Area Displays the amount of used space (displayed in blue) and free space (displayed in green) on the drive on which either the Data files or the Log files are located.
Databases Status Area Displays the amount of used space (displayed in blue) and free space (displayed in green) in each database in the NICE Perform Database Suite. The status of each database is displayed both as a table and a graph.TIP: Use the scroll bar under the table to display the portion of the table not visible.
NOTE: The DBSpace utility does not display the status of the databases in real time. To refresh the display, click the Connect button.

204 Appendix D: Running the NICE DBSpace Utility
NICE Perform® Release 3.2: Databases Installation Guide (Rev A4)
Figure D-2 Nice DBSpace Window - Tables Tab
7. From the Databases drop-down list, select the desired database.
The Tables list displays all the tables in that database and the status of each table.
To display fragmentation details, double-click the desired table. The fragmentation details appear in the Fragmentation area.
8. Click the Predict tab.

205 Appendix D: Running the NICE DBSpace Utility
NICE Perform® Release 3.2: Databases Installation Guide (Rev A4)
Figure D-3 Nice DBSpace Window - Predict Tab
9. The Predict table gives an estimate of how much time remains until each of the listed tables reaches full capacity. The calculations are based on the parameters listed at the top of each column.
10. Click the Activity tab.

206 Appendix D: Running the NICE DBSpace Utility
NICE Perform® Release 3.2: Databases Installation Guide (Rev A4)
Figure D-4 Nice DBSpace Window - Activity Tab
11. In the Refresh Rate drop-down box select the desired number of seconds and click the Start button.
To see the most relevant connections of any of the databases, click the desired database. To see all the connections of that database click the Show All button.

Appendix E: Enabling Microsoft SQL Server 2008/2008 R2 Analysis Services
NICE Perform®Release 3.2: Databases Installation Guide (Rev A4)
207
E
Enabling Microsoft SQL Server 2008/2008 R2 Analysis Services
Microsoft SQL 2008/2008 R2 Analysis Services runs as a Microsoft Window service. Therefore, to enable the Analysis Services, you define the Analysis Services service.
Contents
Enabling the SQL Server Analysis Services Service ................................................208
Defining the Local System Account in the nice_dw Database................................. 211
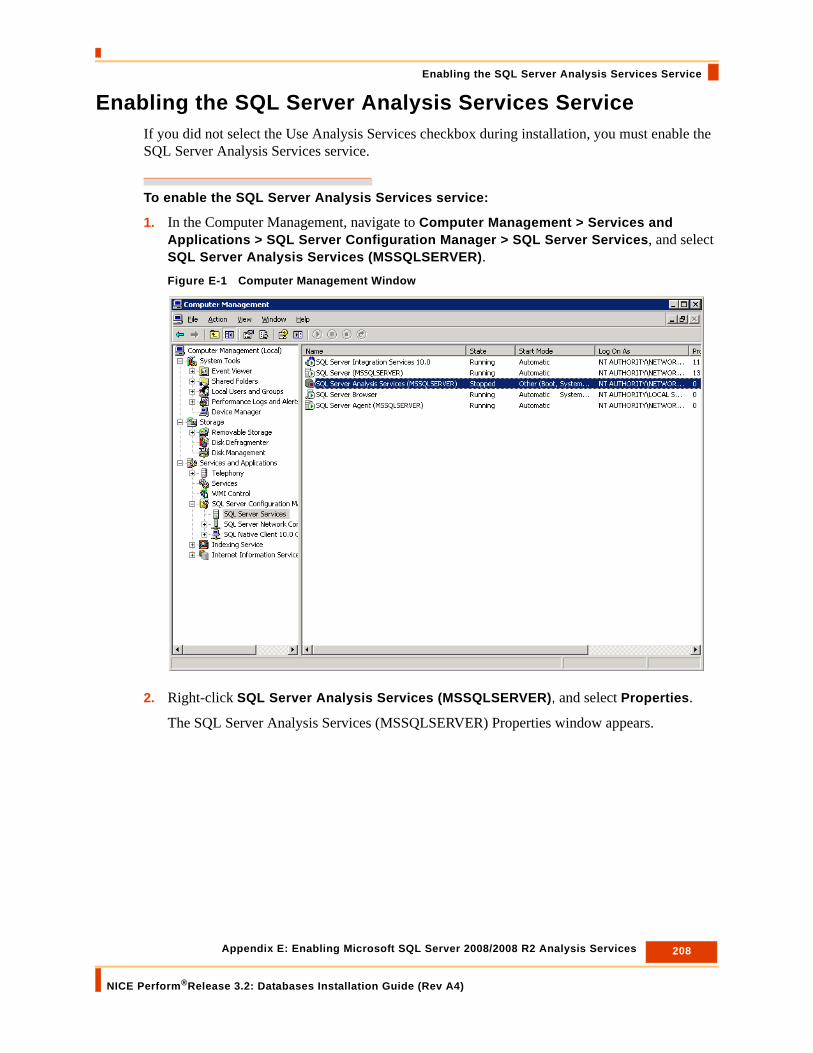
208 Appendix E: Enabling Microsoft SQL Server 2008/2008 R2 Analysis Services
NICE Perform®Release 3.2: Databases Installation Guide (Rev A4)
Enabling the SQL Server Analysis Services Service
Enabling the SQL Server Analysis Services ServiceIf you did not select the Use Analysis Services checkbox during installation, you must enable the SQL Server Analysis Services service.
To enable the SQL Server Analysis Services service:
1. In the Computer Management, navigate to Computer Management > Services and Applications > SQL Server Configuration Manager > SQL Server Services, and select SQL Server Analysis Services (MSSQLSERVER).Figure E-1 Computer Management Window
2. Right-click SQL Server Analysis Services (MSSQLSERVER), and select Properties.
The SQL Server Analysis Services (MSSQLSERVER) Properties window appears.

209 Appendix E: Enabling Microsoft SQL Server 2008/2008 R2 Analysis Services
NICE Perform®Release 3.2: Databases Installation Guide (Rev A4)
Enabling the SQL Server Analysis Services Service
Figure E-2 SQL Server Analysis Services (MSSQLSERVER) Properties Window
3. Click the Service tab.
The SQL Server Analysis Services - Service tab appears.Figure E-3 SQL Server Analysis Services - Service Tab

210 Appendix E: Enabling Microsoft SQL Server 2008/2008 R2 Analysis Services
NICE Perform®Release 3.2: Databases Installation Guide (Rev A4)
Enabling the SQL Server Analysis Services Service
4. Select Start Mode. Click the drop-down arrow and select Automatic.Figure E-4 SQL Server Analysis Services - Service Tab
5. Click OK.
If the Logon account of the Analysis Services is not a local administrator, you must define reading privileges in that account for the nice_dw database (see Defining the Local System Account in the nice_dw Database on page 211).

211 Appendix E: Enabling Microsoft SQL Server 2008/2008 R2 Analysis Services
NICE Perform®Release 3.2: Databases Installation Guide (Rev A4)
Defining the Local System Account in the nice_dw Database
Defining the Local System Account in the nice_dw Database
If the Logon account of the Analysis Services is not a local administrator, you must define reading privileges in that account for the nice_dw database.
To define the Local System account in the nice_dw database:
1. On the computer on which the nice_dw database is installed, open the SQL Server Management Studio.
2. Under Databases, select the nice_dw database.Figure E-5 SQL Server Management Studio
3. In the right-click menu, select Properties.
The Database Properties window appears.
4. Click the Permissions page.

212 Appendix E: Enabling Microsoft SQL Server 2008/2008 R2 Analysis Services
NICE Perform®Release 3.2: Databases Installation Guide (Rev A4)
Defining the Local System Account in the nice_dw Database
Figure E-6 Database Properties Window - Permissions Page
5. In the Connect row, select Grant.
6. Click OK.

Appendix F: Creating Domain Users and Updating Privileges
NICE Perform®Release 3.2: Databases Installation Guide (Rev A4)
213
F
Creating Domain Users and Updating Privileges
Before installing the NICE Perform Database Suite, you must first create two domain users, one for NICE services and one for SQL services.
This appendix describes how to create the domain users and assign the necessary privileges.
Contents
Setting up a Domain User Account on the Active Directory ....................................214
Setting up the Domain User on the Domain Client....................................................221
Updating Privileges of the Domain User on the Domain Client ...............................224
NOTE: Domain users for NICE Perform must meet the following requirements:• The domain user must have Administrator privileges for the local machine.
• The domain user must be a member of the local Administrator’s Group.

214 Appendix F: Creating Domain Users and Updating Privileges
NICE Perform®Release 3.2: Databases Installation Guide (Rev A4)
Setting up a Domain User Account on the Active Directory
Setting up a Domain User Account on the Active Directory
First, you set up domain user accounts for the NICE services and for the SQL services on the Active Directory. There are two steps:
• Creating a Domain User Account on the Active Directory (see page 214)
• Assigning User Rights Assignments for the Domain User Account on the Active Directory (see page 217)
Creating a Domain User Account on the Active Directory
First you create a domain user account on the Active Directory.
To create a domain user account on the Active Directory:
1. In the Control Panel, select Administrative Tools and double-click Active Directory Users and Computers.
2. Under Active Directory Users and Computers, select the domain in which you want to create the domain user, and select Users.
IMPORTANT Since you create two domain user accounts, you must perform the procedures in this section twice, once for the domain user account for NICE services and once for the domain user account for SQL services.

215 Appendix F: Creating Domain Users and Updating Privileges
NICE Perform®Release 3.2: Databases Installation Guide (Rev A4)
Setting up a Domain User Account on the Active Directory
Figure F-1 Active Directory Users and Computers Window
3. In the right-click menu, select New > User.
The New Object - User Name window appears.Figure F-2 New Object - User Name Window

216 Appendix F: Creating Domain Users and Updating Privileges
NICE Perform®Release 3.2: Databases Installation Guide (Rev A4)
Setting up a Domain User Account on the Active Directory
4. Enter the First and Last names in the respective fields.
In the User Logon Name field, define the Logon Name for this user.
5. Click Next.
The New Object - User Password window appears.Figure F-3 New Object - User Password Window
6. Enter and confirm a password for this user.
Select User cannot change password and Password never expires. DO NOT select the other two options.
7. Click Next.
The New Object - Finished window appears.
NOTE: The First Name field is required; the Last Name field is optional.
NOTE: Use a strong and restricted password.

217 Appendix F: Creating Domain Users and Updating Privileges
NICE Perform®Release 3.2: Databases Installation Guide (Rev A4)
Setting up a Domain User Account on the Active Directory
Figure F-4 New Object - Finished Window
8. Click Finish.
The user you defined appears in the list of users.
Assigning User Rights Assignments for the Domain User Account on the Active Directory
After creating the domain user account on the Active Directory, you assign the necessary User Rights Assignments for that domain user account.
To assign User Rights Assignments for the domain user account:
1. In the Control Panel, select Administrative Tools and double-click Domain Security Policy.
The Default Domain Security Settings window appears.
2. Under Security Settings, select Local Policies > User Rights Assignment.

218 Appendix F: Creating Domain Users and Updating Privileges
NICE Perform®Release 3.2: Databases Installation Guide (Rev A4)
Setting up a Domain User Account on the Active Directory
Figure F-5 Default Domain Security Settings Window
3. Double-click the Log on as a service policy.
The Log on as a Service Properties window appears.

219 Appendix F: Creating Domain Users and Updating Privileges
NICE Perform®Release 3.2: Databases Installation Guide (Rev A4)
Setting up a Domain User Account on the Active Directory
Figure F-6 Log on as a Service Properties Window
4. Verify that the Define These Policy Settings checkbox is selected, and click the Add User or Group button.
The Add User or Group window appears.Figure F-7 Add User or Group Window
5. Click the Browse button.
The Select Users, Computers, or Groups window appears.

220 Appendix F: Creating Domain Users and Updating Privileges
NICE Perform®Release 3.2: Databases Installation Guide (Rev A4)
Setting up a Domain User Account on the Active Directory
Figure F-8 Select Users, Computers, or Groups Window
6. In the Enter the Object Names to Select field, enter the name of the user for whom you want to assign this User Right Assignment.
7. Click the Check Names button.
The program automatically checks the validity of the user name you entered. If the name is valid, it appears in the Enter the Object Names to Select field.
8. Click OK.
The program attaches the domain user account as the Log on as a Service Properties window reappears.
9. Click Apply, and then click OK.
10. Repeat steps 3 to 9 for the policies listed in the following table:
Domain User Accounts for Nice Services and for SQL Services*
(When Using Windows Authentication)
Domain User Account(When Using SQL Authentication)
• Log on as a service
• Log on as a batch job
• Act as part of the operating system
• Create a token object
• Manage auditing and security log
• Replace a process level token
• Log on as a service
• Log on as a batch job
* Kerberos protocol requires that all these policies are assigned to all services using Windows Authentication.

221 Appendix F: Creating Domain Users and Updating Privileges
NICE Perform®Release 3.2: Databases Installation Guide (Rev A4)
Setting up the Domain User on the Domain Client
Setting up the Domain User on the Domain Client
After you have created the two domain user accounts on the Active Directory, you must add them to the Administrators group on the domain client. This allows those domain user accounts to have local administrative rights on the domain client.
To set up the domain user on the domain client:
1. In the Control Panel, select Administrative Tools > Computer Management.
2. Under System Tools, select Local Users and Groups > Groups.Figure F-9 Computer Management Window
3. Double-click Administrators.
The Administrators Properties window appears.
IMPORTANTYou must also perform the procedures in this section twice, once for NICE services and once for SQL services, on all the NICE Perform domain clients.
NOTE: Log in to the domain client via any domain user that belongs to the local Administrator Group.

222 Appendix F: Creating Domain Users and Updating Privileges
NICE Perform®Release 3.2: Databases Installation Guide (Rev A4)
Setting up the Domain User on the Domain Client
Figure F-10 Administrators Properties Window
4. Click the Add button.
The Select Users, Computers, or Groups window appears.Figure F-11 Select Users, Computers, or Groups Window
5. In the Enter the object names to select field, enter the name of the domain user account you want to assign to this Group.

223 Appendix F: Creating Domain Users and Updating Privileges
NICE Perform®Release 3.2: Databases Installation Guide (Rev A4)
Setting up the Domain User on the Domain Client
6. Click the Check Names button.
The program automatically checks the validity of the user name you entered. If the name is valid, it appears in the Enter the Object Names to Select field.
7. Click OK.
The program attaches the domain user account to the local Group as the Administrators Properties window reappears.
8. Click Apply, and then click OK.
NOTE: Verify that the user appears as a fully qualified domain name, that is, that the name appears in the following syntax:• nnnn@domain name.com, in which “nnnn” is the User Name.
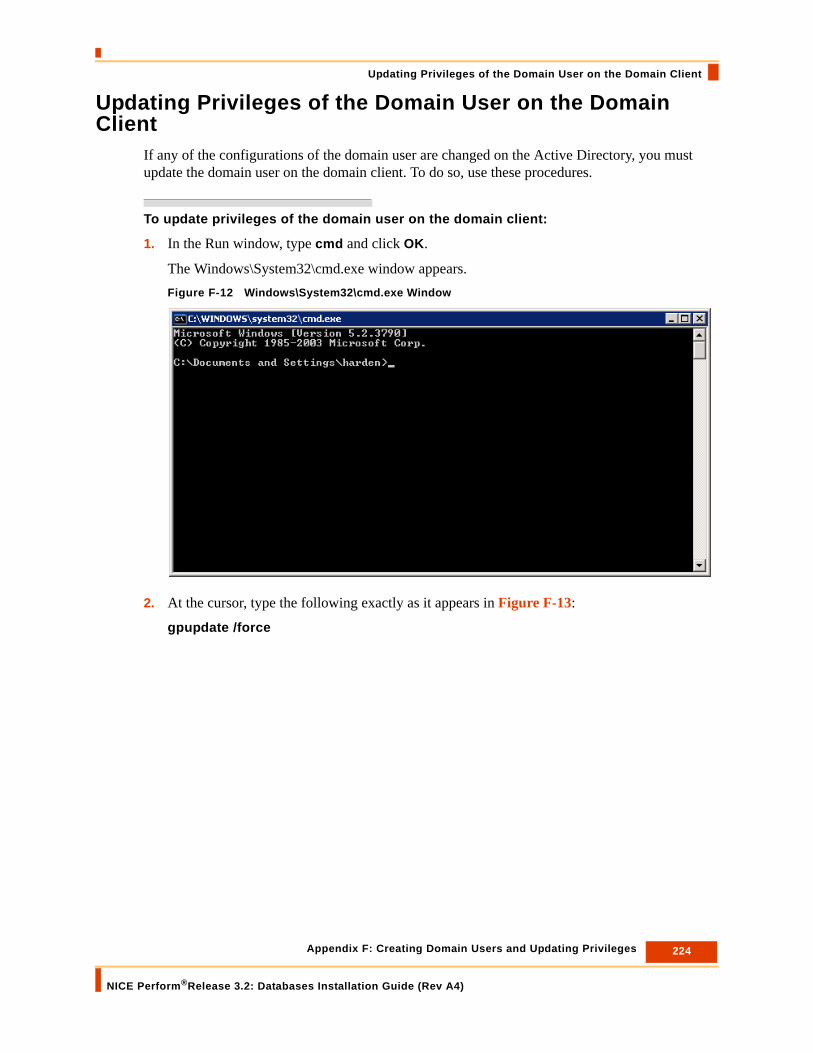
224 Appendix F: Creating Domain Users and Updating Privileges
NICE Perform®Release 3.2: Databases Installation Guide (Rev A4)
Updating Privileges of the Domain User on the Domain Client
Updating Privileges of the Domain User on the Domain Client
If any of the configurations of the domain user are changed on the Active Directory, you must update the domain user on the domain client. To do so, use these procedures.
To update privileges of the domain user on the domain client:
1. In the Run window, type cmd and click OK.
The Windows\System32\cmd.exe window appears.Figure F-12 Windows\System32\cmd.exe Window
2. At the cursor, type the following exactly as it appears in Figure F-13:
gpupdate /force
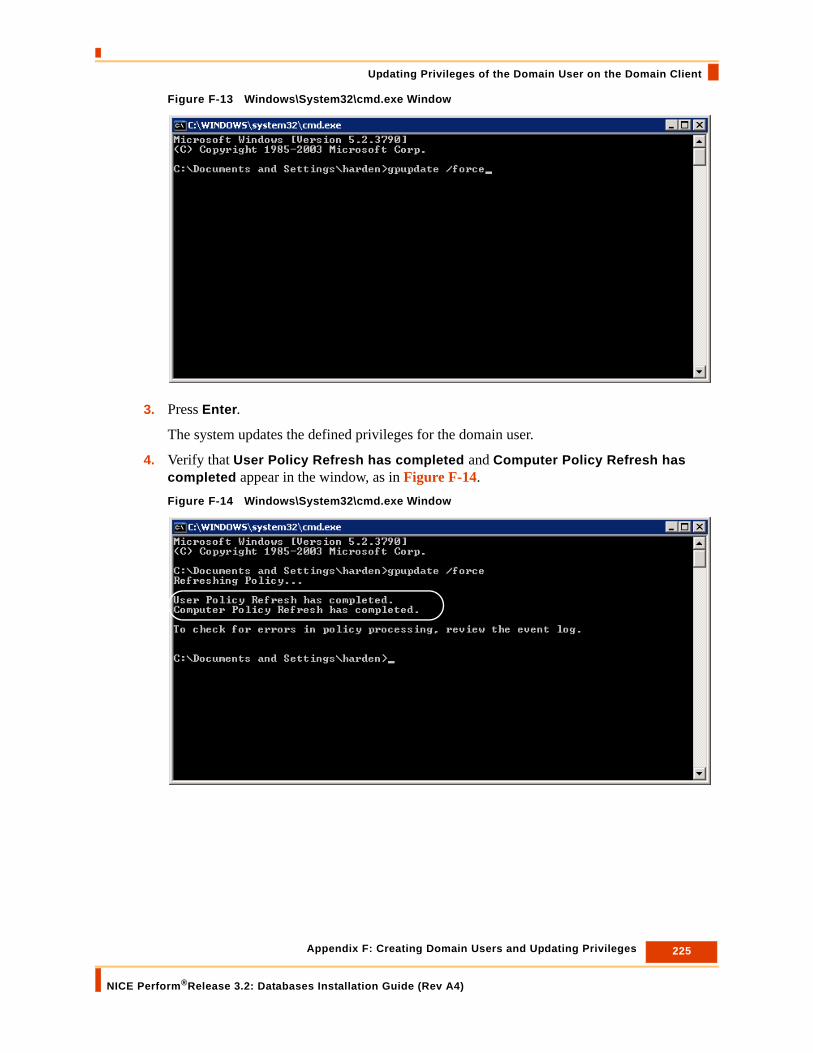
225 Appendix F: Creating Domain Users and Updating Privileges
NICE Perform®Release 3.2: Databases Installation Guide (Rev A4)
Updating Privileges of the Domain User on the Domain Client
Figure F-13 Windows\System32\cmd.exe Window
3. Press Enter.
The system updates the defined privileges for the domain user.
4. Verify that User Policy Refresh has completed and Computer Policy Refresh has completed appear in the window, as in Figure F-14.Figure F-14 Windows\System32\cmd.exe Window

Blank page for double-sided printing.

Appendix G: Scheduling the ReIndex Job
NICE Perform® Release 3.2: Databases Installation Guide (Rev A4)
227
G
Scheduling the ReIndex Job
The SQL Server Agent Reindex job is critical for maintaining proper system performance; however, the NICE Perform Database Suite does not archive calls while the Reindex job is running. Therefore, this job is defined by default to run every Sunday morning at 02:00 (2 am), when there is no activity at most sites.
If this time is not suitable for the needs of your site, you must define a different, more convenient time. This appendix describes the procedures for changing the scheduled time for running the ReIndex job.
To schedule the ReIndex job:
1. Connect to the SQL Server Management Studio.
2. Under the SQL Server, navigate to SQL Server Agent > Jobs, and select Nice ReIndex.

228 Appendix G: Scheduling the ReIndex Job
NICE Perform® Release 3.2: Databases Installation Guide (Rev A4)
Figure G-1 SQL Server Management Studio
3. In the right-click menu, select Properties.
The Job-Properties - Nice ReIndex window appears.
4. Select the Schedules page.
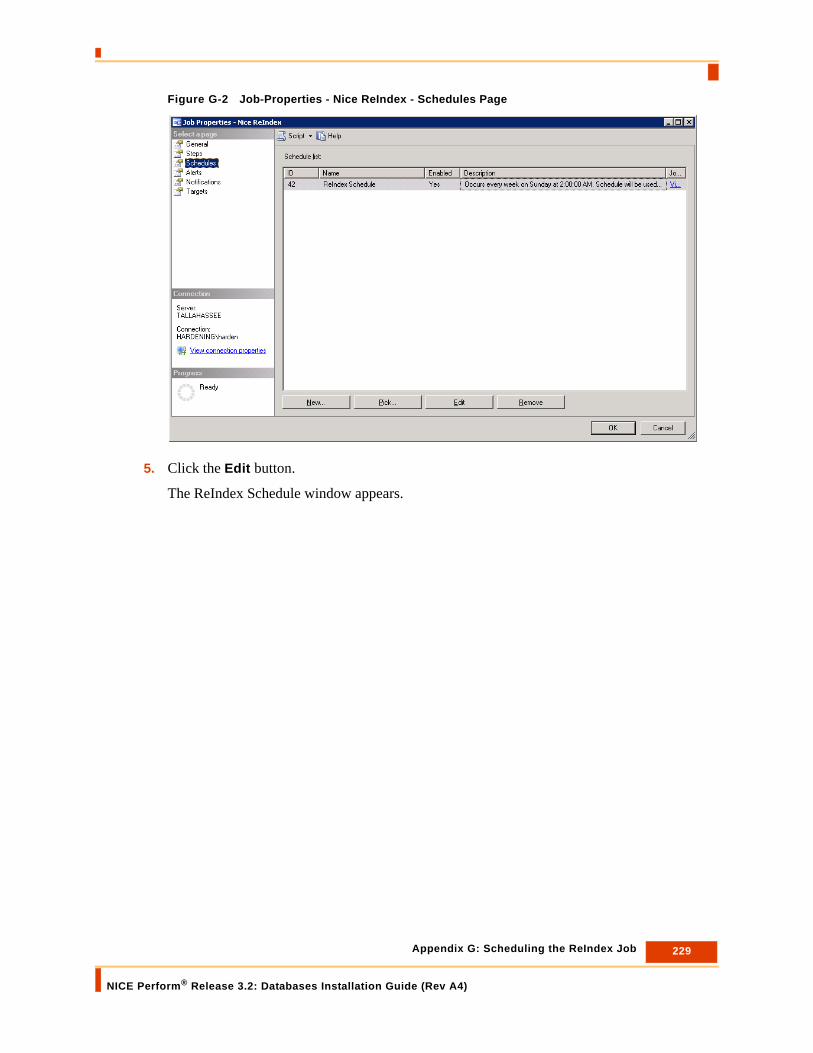
229 Appendix G: Scheduling the ReIndex Job
NICE Perform® Release 3.2: Databases Installation Guide (Rev A4)
Figure G-2 Job-Properties - Nice ReIndex - Schedules Page
5. Click the Edit button.
The ReIndex Schedule window appears.

230 Appendix G: Scheduling the ReIndex Job
NICE Perform® Release 3.2: Databases Installation Guide (Rev A4)
Figure G-3 ReIndex Schedule Window
6. In the Frequency and Daily Frequency areas, select the desired days and time respectively.
7. Click OK.
Appendix H: Enabling Summary Page Display of NICE System Information
NICE Perform® Release 3.2: Databases Installation Guide (Rev A4)
231
H
Enabling Summary Page Display of NICE System Information
Contents
Overview........................................................................................................................232
Common Terms.............................................................................................................233
Windows 2008 / Windows 2008 R2: Enabling Summary Page Display ...................234Adding the System Administrator User to Computers not in an Active Directory Environment .............................................................................................................234Editing DCOM Permissions......................................................................................237
Windows 2003: Enabling Summary Page Display.....................................................244Verifying the System Administrator User..................................................................244Adding the System Administrator User to Computers not in an Active Directory Environment .............................................................................................................246Installing WMI Windows Management Instrumentation ...........................................249Editing DCOM Permissions......................................................................................251Setting Security Permissions through the WMI Control ...........................................257
IMPORTANT Not all NICE components are supported by all of the operating systems described here! To verify which operating systems are supported for NICE components, see the Certified Servers Guide.

232 Appendix H: Enabling Summary Page Display of NICE System Information
NICE Perform® Release 3.2: Databases Installation Guide (Rev A4)
Overview
OverviewThe System Administrator includes a summary page that displays the NICE product version and the installed Updates. See the System Administrator Guide for more information. Figure H-1 Summary Page in the System Administrator
This summary page is generated by accessing the product information from the computers in the NICE system. In order to access this product information, the System Administrator user needs to be included in the DCOM and WMI security settings on each computer in the NICE system. The System Administrator user is the user associated with the Nice SystemAdministrator service. This association is defined when NICE Perform applications are installed on the Applications Server.
In this appendix, we describe how to change the security settings to enable the System Administrator user to access information on these computers.

233 Appendix H: Enabling Summary Page Display of NICE System Information
NICE Perform® Release 3.2: Databases Installation Guide (Rev A4)
Common Terms
Common TermsSome common Microsoft terms used in this appendix are listed in the table below.
Table H-1: Common Microsoft Terms
Term Meaning
COM Component Object Model. COM is a platform-independent, distributed, object-oriented system for creating binary software components that can interact.
DCOM Distributed Component Object Model. DCOM is a protocol that enables software components to communicate directly over a network.
WMI Windows Management Instrumentation. WMI is the Microsoft implementation of Web-based Enterprise Management (WBEM), which is an industry initiative to develop a standard technology for accessing management information in an enterprise environment. Remote WMI connections are made through DCOM.
WMI Namespace Each WMI namespace has a security descriptor, which allows each namespace to have unique security settings that determine who has access to the namespace data and methods.

234 Appendix H: Enabling Summary Page Display of NICE System Information
NICE Perform® Release 3.2: Databases Installation Guide (Rev A4)
Windows 2008 / Windows 2008 R2: Enabling Summary Page Display
Windows 2008 / Windows 2008 R2: Enabling Summary Page Display
In these procedures, you will be doing the following:
1. Add a new System Administrator user through the Control Panel. This user will not use Local System as its Log On. For details see, Adding the System Administrator User to Computers not in an Active Directory Environment on page 234.
2. Edit the DCOM permissions to enable the remote launch and remote activation of WMI queries. For details see, Editing DCOM Permissions on page 237.
Adding the System Administrator User to Computers not in an Active Directory Environment
The System Administrator user needs to be included on all computers in the NICE system. If you are not working in an Active Directory environment, you need to add this user through the Control Panel, if necessary.
To add the System Administrator user to a computer:
1. On the Recording Machine desktop, right-click the Computer icon and select Manage.
The Server Manager window appears.
IMPORTANT These procedures must be repeated on each Recording Machine!
IMPORTANT These procedures must be repeated on each Recording Machine!

235 Appendix H: Enabling Summary Page Display of NICE System Information
NICE Perform® Release 3.2: Databases Installation Guide (Rev A4)
Windows 2008 / Windows 2008 R2: Enabling Summary Page Display
Figure H-2 Server Manager Window
2. In the left-hand pane, navigate to Server Manager > Configuration > Local Users and Groups > Users.Figure H-3 Server Manager - Local Users and Groups
3. In the left pane, right-click Users and select New User.
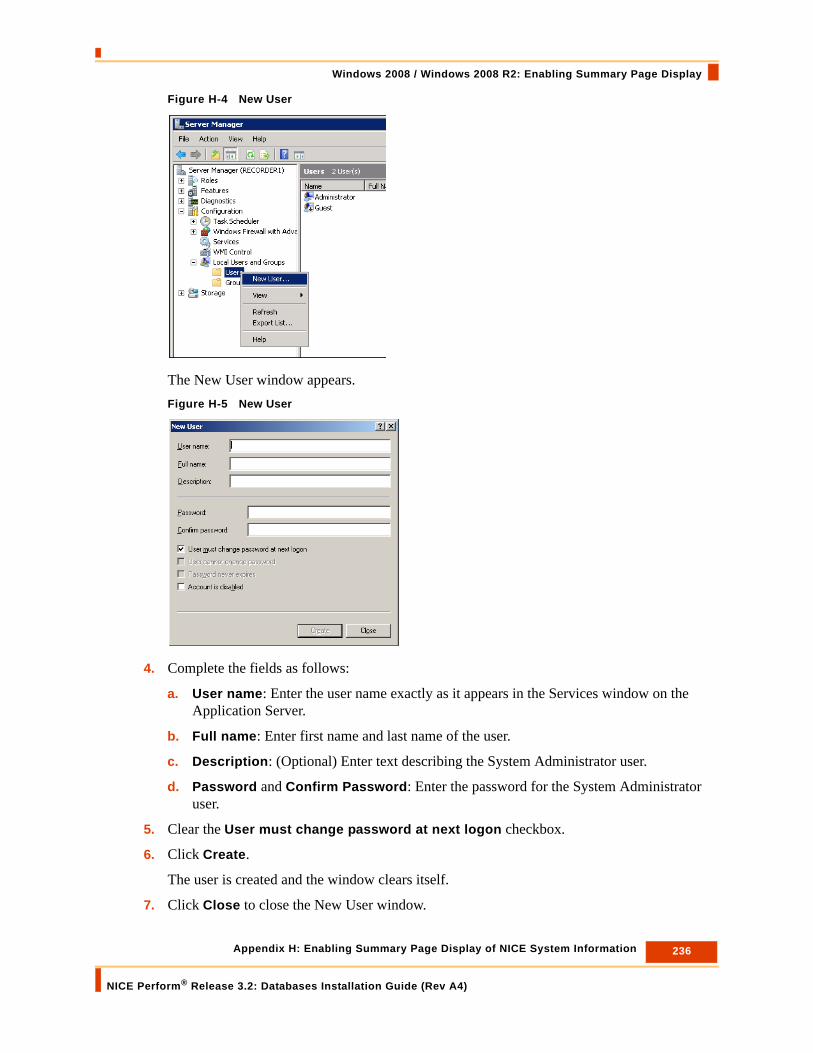
236 Appendix H: Enabling Summary Page Display of NICE System Information
NICE Perform® Release 3.2: Databases Installation Guide (Rev A4)
Windows 2008 / Windows 2008 R2: Enabling Summary Page Display
Figure H-4 New User
The New User window appears.Figure H-5 New User
4. Complete the fields as follows:
a. User name: Enter the user name exactly as it appears in the Services window on the Application Server.
b. Full name: Enter first name and last name of the user.
c. Description: (Optional) Enter text describing the System Administrator user.
d. Password and Confirm Password: Enter the password for the System Administrator user.
5. Clear the User must change password at next logon checkbox.
6. Click Create.
The user is created and the window clears itself.
7. Click Close to close the New User window.

237 Appendix H: Enabling Summary Page Display of NICE System Information
NICE Perform® Release 3.2: Databases Installation Guide (Rev A4)
Windows 2008 / Windows 2008 R2: Enabling Summary Page Display
A new system administrator user appears in the list in the right pane. Figure H-6 Server Manager Window - New User
Editing DCOM Permissions
You edit the DCOM permissions to enable the remote launch and remote activation of WMI queries.
To edit DCOM permissions:
1. Open the Run window and enter dcomcnfg. Click OK.
2. If the Active Directory messages appears, click OK.Figure H-7 Active Directory Message
System Administrator User
IMPORTANT • Before you begin this procedure, you need the System Administrator user name.
• The System Administrator user cannot be Local System. The Local System user cannot be granted the correct permissions for all the machines in the system. If the System Administrator user is Local System, you need to change it to another user.
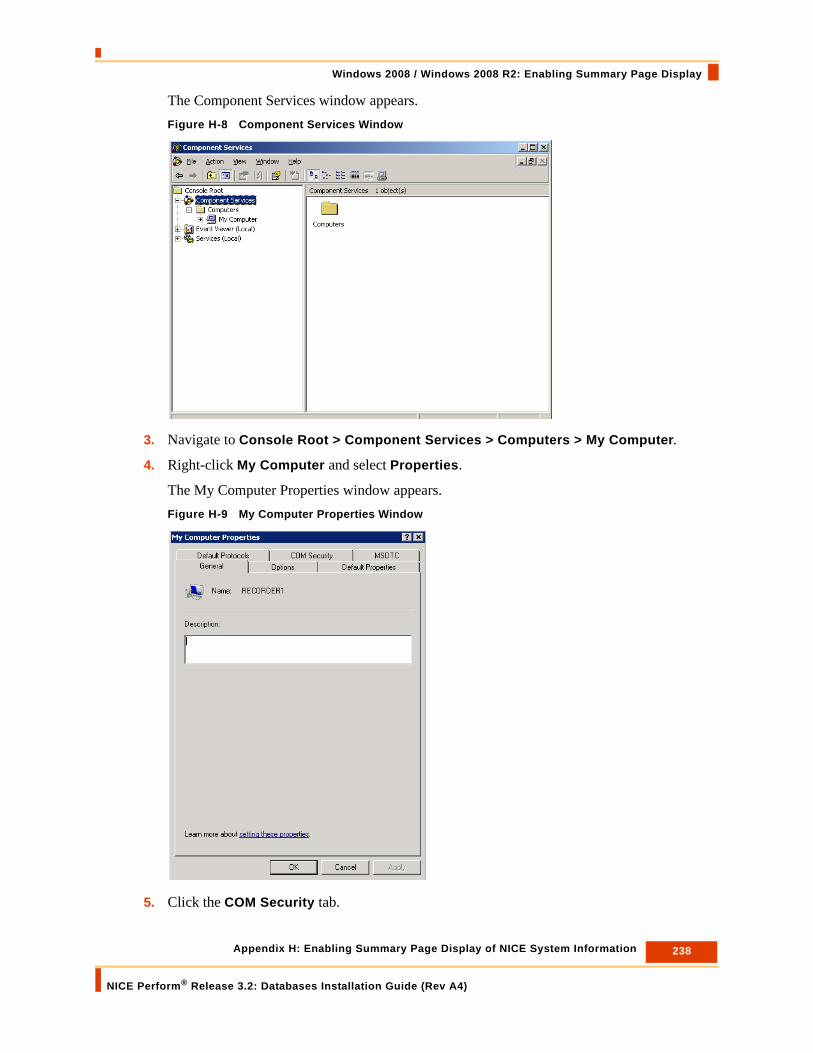
238 Appendix H: Enabling Summary Page Display of NICE System Information
NICE Perform® Release 3.2: Databases Installation Guide (Rev A4)
Windows 2008 / Windows 2008 R2: Enabling Summary Page Display
The Component Services window appears.Figure H-8 Component Services Window
3. Navigate to Console Root > Component Services > Computers > My Computer.
4. Right-click My Computer and select Properties.
The My Computer Properties window appears. Figure H-9 My Computer Properties Window
5. Click the COM Security tab.

239 Appendix H: Enabling Summary Page Display of NICE System Information
NICE Perform® Release 3.2: Databases Installation Guide (Rev A4)
Windows 2008 / Windows 2008 R2: Enabling Summary Page Display
Figure H-10 COM Security Tab
6. In the Launch and Activation Permissions area, click Edit Limits.
The Launch and Activation Permission window appears.Figure H-11 Launch and Activation Permission Window
7. Verify that the name of the System Administrator user appears in the Group or user names area.
8. If the name of the System Administrator user appears, proceed to Step 9.
-or-
If the name of the System Administrator user does not appear, do the following:
a. Click Add. The Select Users or Groups window appears.
Click Edit Limits
Launch and Activation Permissions
System Administrator User

240 Appendix H: Enabling Summary Page Display of NICE System Information
NICE Perform® Release 3.2: Databases Installation Guide (Rev A4)
Windows 2008 / Windows 2008 R2: Enabling Summary Page Display
Figure H-12 Select Users or Groups Window
b. In the Enter the object names to select area, enter the name of the System Administrator user.
c. Click Check Names. The domain and user name appears. Figure H-13 Select Users or Groups Window
d. Click OK. The Launch and Activation Permission window reappears.Figure H-14 Launch and Activation Permission Window
9. In the Group or user names area, select the System Administrator user.
Click Check Names
Enter System AdministratorUser
Domain and User name
System Administrator User
Select Remote Launch
Select Remote Activation

241 Appendix H: Enabling Summary Page Display of NICE System Information
NICE Perform® Release 3.2: Databases Installation Guide (Rev A4)
Windows 2008 / Windows 2008 R2: Enabling Summary Page Display
10. In the Permissions for <User> area, select the Allow column for the following (see Figure H-14):
• Remote Launch
• Remote Activation
11. Click OK.
The Properties window, displaying the COM Security tab, reappears.Figure H-15 COM Security Tab
12. In the Access Permissions area, click Edit Limits.
Click Edit Limits
Access Permissions

242 Appendix H: Enabling Summary Page Display of NICE System Information
NICE Perform® Release 3.2: Databases Installation Guide (Rev A4)
Windows 2008 / Windows 2008 R2: Enabling Summary Page Display
The Access Permission window appears.Figure H-16 Access Permission Window
13. Verify that the name of the System Administrator user appears in the Group or user names area.
14. If the name of the System Administrator user appears, proceed to Step 15.
-or-
If the name of the System Administrator user does not appear, do the following:
a. Click Add. The Select Users or Groups window appears.Figure H-17 Select Users or Groups Window
b. In the Enter the object names to select area, enter the name of the System Administrator user.
c. Click Check Names. The domain and user name appears.
System Administrator User
Click Check Names
Enter System Administrator User name
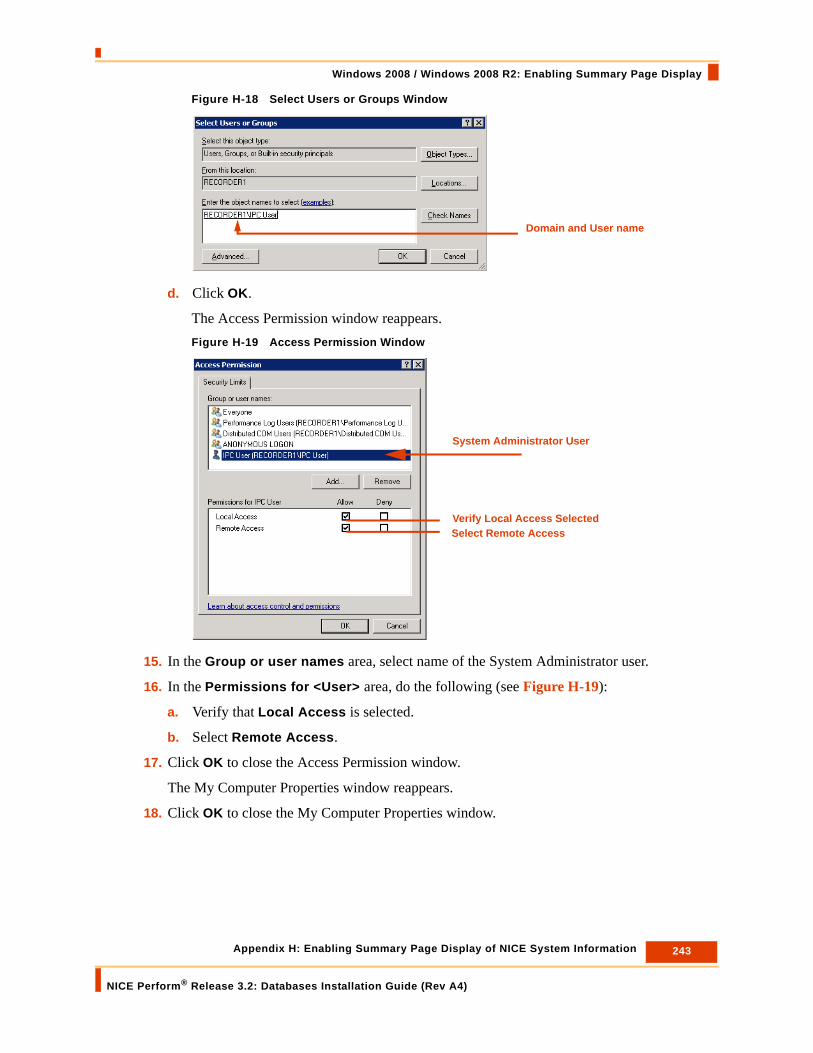
243 Appendix H: Enabling Summary Page Display of NICE System Information
NICE Perform® Release 3.2: Databases Installation Guide (Rev A4)
Windows 2008 / Windows 2008 R2: Enabling Summary Page Display
Figure H-18 Select Users or Groups Window
d. Click OK.
The Access Permission window reappears.Figure H-19 Access Permission Window
15. In the Group or user names area, select name of the System Administrator user.
16. In the Permissions for <User> area, do the following (see Figure H-19):
a. Verify that Local Access is selected.
b. Select Remote Access.
17. Click OK to close the Access Permission window.
The My Computer Properties window reappears.
18. Click OK to close the My Computer Properties window.
Domain and User name
Verify Local Access SelectedSelect Remote Access
System Administrator User

244 Appendix H: Enabling Summary Page Display of NICE System Information
NICE Perform® Release 3.2: Databases Installation Guide (Rev A4)
Windows 2003: Enabling Summary Page Display
Windows 2003: Enabling Summary Page Display The workflow differs slightly depending on whether or not you are working in an Active Directory environment.
1. Verifying the System Administrator User. To verify the identity of the System Administrator user, you check which user is associated with the Nice SystemAdministrator service.
2. (Not Active Directory Environment Only) Adding the System Administrator User to Computers not in an Active Directory Environment. The System Administrator user needs to be included on all computers in the NICE system. If you are not working in an Active Directory environment, you need to add this user through the Control Panel, if necessary.
3. Installing WMI Windows Management Instrumentation. You install WMI in order to access management information.
4. Editing DCOM Permissions. You edit the DCOM permissions to enable the remote launch and remote activation of WMI queries.
5. Setting Security Permissions through the WMI Control. By means of the WMI Control, you set security permissions that enable the System Administrator user to remotely access NICE system information.
Verifying the System Administrator User
The System Administrator user is the user associated with the Nice SystemAdministrator service. This association is defined when NICE Perform applications are installed on the Applications Server. If you need to verify the identity of the System Administrator user, you check which user is associated with the Nice SystemAdministrator service.
To verify the System Administrator user:
1. On the Applications Server, click Start, and then select Run.
The Run window appears.Figure H-20 Run Window
2. In the Open field, enter services.msc, and click OK.
The Services window appears.
NOTE: In an Active Directory environment, verify that the domain name of the System Administrator user is the same domain as that of the computer, or is a trusted domain.
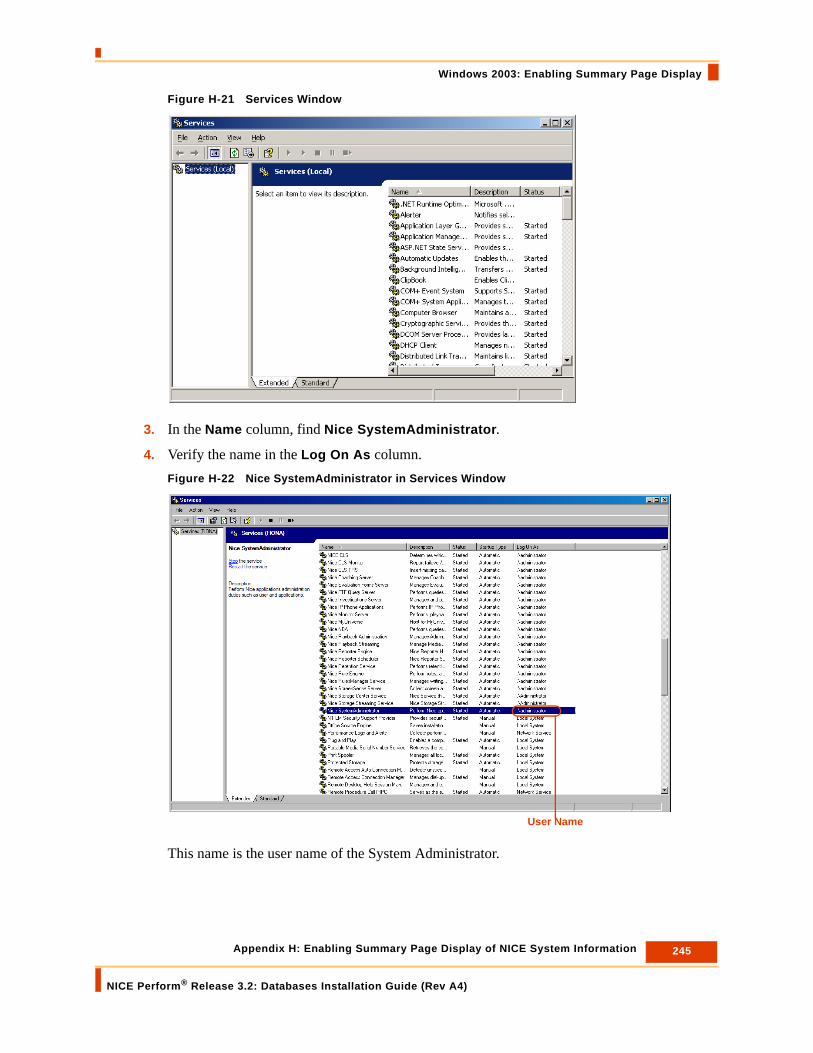
245 Appendix H: Enabling Summary Page Display of NICE System Information
NICE Perform® Release 3.2: Databases Installation Guide (Rev A4)
Windows 2003: Enabling Summary Page Display
Figure H-21 Services Window
3. In the Name column, find Nice SystemAdministrator.
4. Verify the name in the Log On As column.Figure H-22 Nice SystemAdministrator in Services Window
This name is the user name of the System Administrator.
User Name

246 Appendix H: Enabling Summary Page Display of NICE System Information
NICE Perform® Release 3.2: Databases Installation Guide (Rev A4)
Windows 2003: Enabling Summary Page Display
Adding the System Administrator User to Computers not in an Active Directory Environment
The System Administrator user needs to be included on all computers in the NICE system. If you are not working in an Active Directory environment, you need to add this user through the Control Panel, if necessary.
To add the System Administrator user to a computer:
1. From the Start menu, select Control Panel.
The Control Panel appears.Figure H-23 Control Panel
IMPORTANT The System Administrator user cannot be Local System. The Local System user cannot be granted the correct permissions for all the machines in the system. If the System Administrator user is Local System, you need to change it to another user.
IMPORTANT Before starting this procedure, obtain the user name and password of the System Administrator user. See Verifying the System Administrator User on page 244 to obtain the user name.
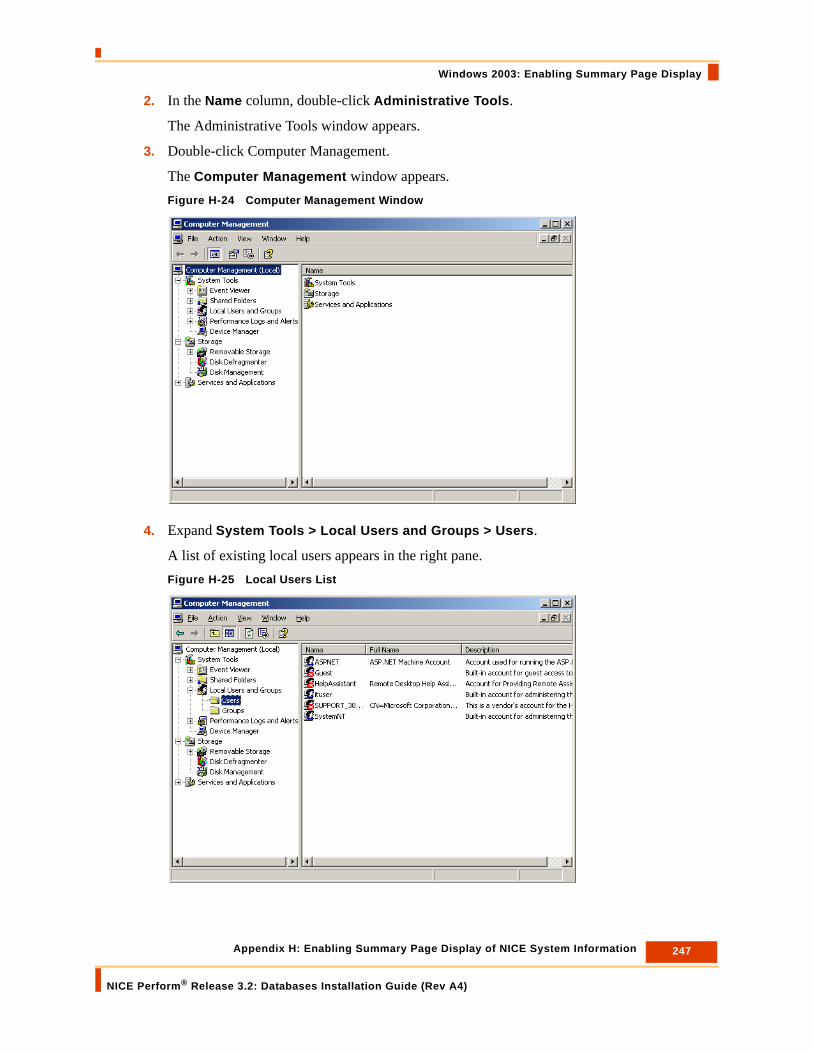
247 Appendix H: Enabling Summary Page Display of NICE System Information
NICE Perform® Release 3.2: Databases Installation Guide (Rev A4)
Windows 2003: Enabling Summary Page Display
2. In the Name column, double-click Administrative Tools.
The Administrative Tools window appears.
3. Double-click Computer Management.
The Computer Management window appears.Figure H-24 Computer Management Window
4. Expand System Tools > Local Users and Groups > Users.
A list of existing local users appears in the right pane.Figure H-25 Local Users List

248 Appendix H: Enabling Summary Page Display of NICE System Information
NICE Perform® Release 3.2: Databases Installation Guide (Rev A4)
Windows 2003: Enabling Summary Page Display
5. Verify that the System Administrator user appears in the list. If the user does not appear, proceed to Step 6.
6. Right-click the Users directory, and then select New User.Figure H-26 New User
The New User window appears.Figure H-27 New User
7. Complete the fields as follows:
a. User name: Enter the user name exactly as it appears in the Services window on the Applications Server. See Verifying the System Administrator User on page 244.
b. Full name: Enter the first name and last name of the user.
c. Description: (Optional) Enter text describing the System Administrator user.
d. Password and Confirm Password: Enter the password for the System Administrator user.

249 Appendix H: Enabling Summary Page Display of NICE System Information
NICE Perform® Release 3.2: Databases Installation Guide (Rev A4)
Windows 2003: Enabling Summary Page Display
8. Clear the User must change password at next logon checkbox.
9. Click Create. The System Administrator user appears in the list in the left pane.
10. Proceed to Installing WMI Windows Management Instrumentation on page 249.
Installing WMI Windows Management Instrumentation
In order to install WMI:
1. From the Start menu, select Settings > Control Panel > Add or Remove Programs.
The Add or Remove Window Programs window appears.
2. Select Add/Remove Windows Components.
The Windows Components Wizard window appears.Figure H-28 Windows Components Wizard
3. Select Management and Monitoring Tools, and click Details.
The Management and Monitoring Tools window appears.

250 Appendix H: Enabling Summary Page Display of NICE System Information
NICE Perform® Release 3.2: Databases Installation Guide (Rev A4)
Windows 2003: Enabling Summary Page Display
Figure H-29 Management and Monitoring Tools Window
4. Select WMI Windows Installer Provider.
5. Click OK.
The Windows Components Wizard (Figure H-28 on page 249) reappears.
6. Click Next.
You are prompted to insert a disk to continue the installation.Figure H-30 Insert Disk
7. Click OK.
The Locate File window appears.
8. Browse to the i386 folder, and select the MSI.MF file.

251 Appendix H: Enabling Summary Page Display of NICE System Information
NICE Perform® Release 3.2: Databases Installation Guide (Rev A4)
Windows 2003: Enabling Summary Page Display
Figure H-31 Locate File Window
9. Click Open.
The installation process begins.
Upon completion of installation, the Windows Components Wizard window (Figure H-28 on page 249) reappears.
10. Select Finish.
Editing DCOM Permissions
You edit the DCOM permissions to enable the remote launch and remote activation of WMI queries.
To edit DCOM permissions:
1. From the Start menu, select Run.
The Run window appears.Figure H-32 Run Window
2. In the Open field, enter DCOMCNFG, and then click OK.
IMPORTANT • Before you begin this procedure, you need the System Administrator user name.
• The System Administrator user cannot be Local System. The Local System user cannot be granted the correct permissions for all the machines in the system. If the System Administrator user is Local System, you need to change it to another user.

252 Appendix H: Enabling Summary Page Display of NICE System Information
NICE Perform® Release 3.2: Databases Installation Guide (Rev A4)
Windows 2003: Enabling Summary Page Display
The Component Services window appears.Figure H-33 Component Services Window
3. In the Console Root tree, expand Component Services > Computers.Figure H-34 Component Services Window
4. Right-click My Computer and select Properties.
The My Computer Properties window appears.
Right-clickMy Computer

253 Appendix H: Enabling Summary Page Display of NICE System Information
NICE Perform® Release 3.2: Databases Installation Guide (Rev A4)
Windows 2003: Enabling Summary Page Display
Figure H-35 My Computer Properties Window
5. Click the COM Security tab.Figure H-36 COM Security Tab
6. In the Launch and Activation Permissions area, click Edit Limits.
The Launch Permission window appears.
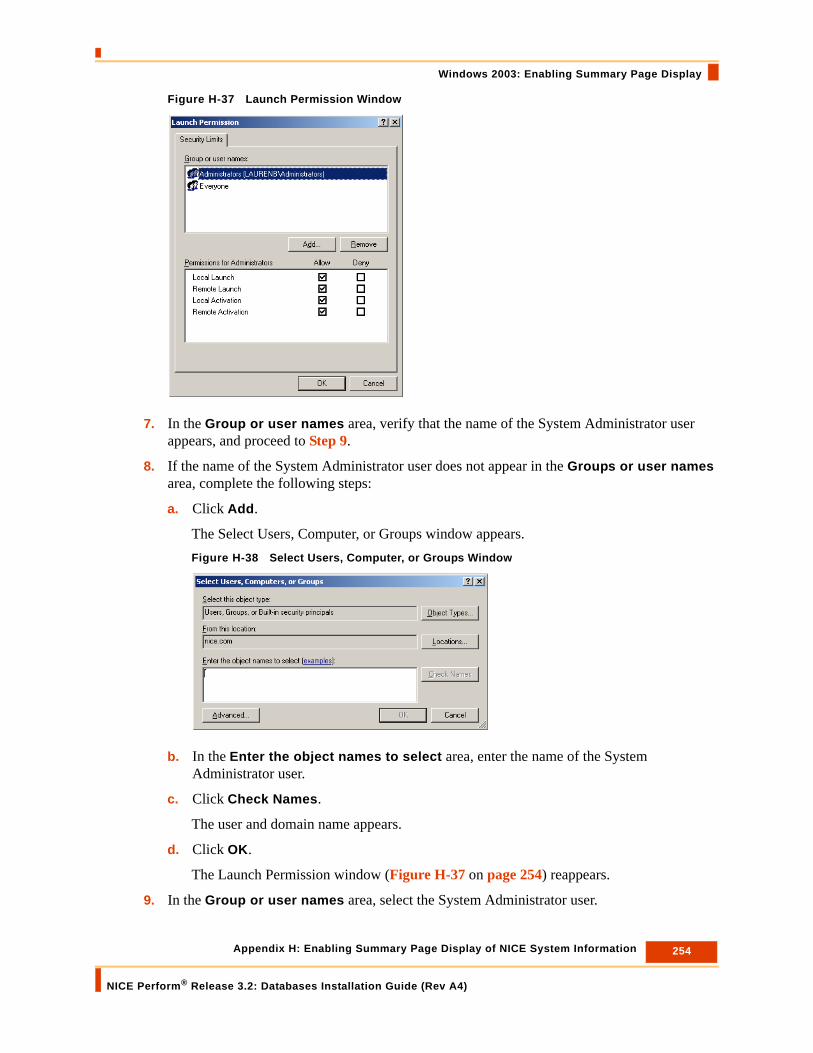
254 Appendix H: Enabling Summary Page Display of NICE System Information
NICE Perform® Release 3.2: Databases Installation Guide (Rev A4)
Windows 2003: Enabling Summary Page Display
Figure H-37 Launch Permission Window
7. In the Group or user names area, verify that the name of the System Administrator user appears, and proceed to Step 9.
8. If the name of the System Administrator user does not appear in the Groups or user names area, complete the following steps:
a. Click Add.
The Select Users, Computer, or Groups window appears.Figure H-38 Select Users, Computer, or Groups Window
b. In the Enter the object names to select area, enter the name of the System Administrator user.
c. Click Check Names.
The user and domain name appears.
d. Click OK.
The Launch Permission window (Figure H-37 on page 254) reappears.
9. In the Group or user names area, select the System Administrator user.
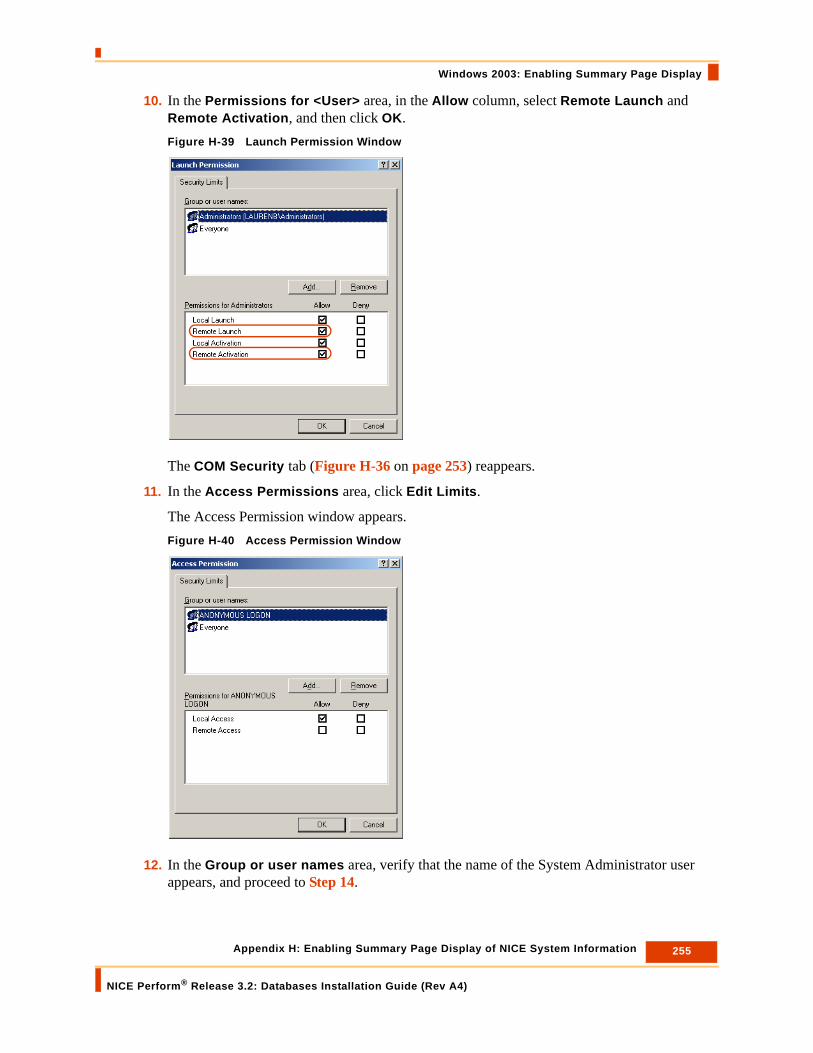
255 Appendix H: Enabling Summary Page Display of NICE System Information
NICE Perform® Release 3.2: Databases Installation Guide (Rev A4)
Windows 2003: Enabling Summary Page Display
10. In the Permissions for <User> area, in the Allow column, select Remote Launch and Remote Activation, and then click OK. Figure H-39 Launch Permission Window
The COM Security tab (Figure H-36 on page 253) reappears.
11. In the Access Permissions area, click Edit Limits.
The Access Permission window appears.Figure H-40 Access Permission Window
12. In the Group or user names area, verify that the name of the System Administrator user appears, and proceed to Step 14.
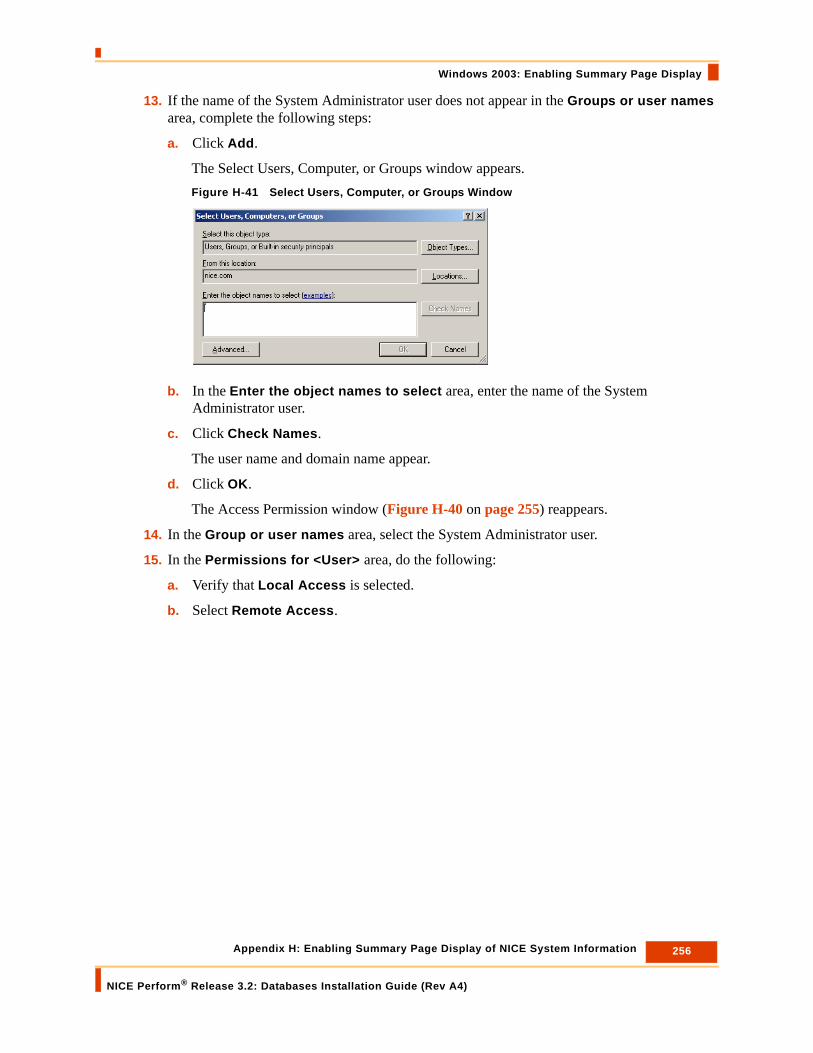
256 Appendix H: Enabling Summary Page Display of NICE System Information
NICE Perform® Release 3.2: Databases Installation Guide (Rev A4)
Windows 2003: Enabling Summary Page Display
13. If the name of the System Administrator user does not appear in the Groups or user names area, complete the following steps:
a. Click Add.
The Select Users, Computer, or Groups window appears.Figure H-41 Select Users, Computer, or Groups Window
b. In the Enter the object names to select area, enter the name of the System Administrator user.
c. Click Check Names.
The user name and domain name appear.
d. Click OK.
The Access Permission window (Figure H-40 on page 255) reappears.
14. In the Group or user names area, select the System Administrator user.
15. In the Permissions for <User> area, do the following:
a. Verify that Local Access is selected.
b. Select Remote Access.

257 Appendix H: Enabling Summary Page Display of NICE System Information
NICE Perform® Release 3.2: Databases Installation Guide (Rev A4)
Windows 2003: Enabling Summary Page Display
Figure H-42 Security Limits Window
16. Click OK.
The COM Security tab (Figure H-36 on page 253) reappears.
17. Click OK to close the My Computer Properties (Figure H-35 on page 253) window.
18. Proceed to Setting Security Permissions through the WMI Control on page 257.
Setting Security Permissions through the WMI Control
By means of the WMI Control, you set security permissions that enable the System Administrator user to remotely access NICE system information.
To set security permissions through the WMI Control:
1. From the Start menu, select Run.
The Run window appears.Figure H-43 Run Window
2. In the Open field, enter wmimgmt.msc, and then click OK.
The Windows Management Infrastructure (WMI) window appears.
Verify Local Access SelectedSelect Remote Access

258 Appendix H: Enabling Summary Page Display of NICE System Information
NICE Perform® Release 3.2: Databases Installation Guide (Rev A4)
Windows 2003: Enabling Summary Page Display
Figure H-44 Windows Management Infrastructure (WMI) Window
3. Right-click the WMI Control (Local) icon, and then click Properties.
The WMI Control (Local) Properties window appears.Figure H-45 WMI Control (Local) Properties Window
4. Expand Root, and select the DEFAULT namespace.
Right-click WMI Control

259 Appendix H: Enabling Summary Page Display of NICE System Information
NICE Perform® Release 3.2: Databases Installation Guide (Rev A4)
Windows 2003: Enabling Summary Page Display
Figure H-46 WMI Control (Local) Properties Window
5. Click Security.
The Security for ROOT\DEFAULT window appears.Figure H-47 Security for ROOT\DEFAULT Window
6. In the Group or user name area, verify that the name of the System Administrator user appears, and proceed to Step 8.
7. If the name of the System Administrator user does not appear in the Groups or user names area, complete the following steps:
a. Click Add.
The Select Users, Computer, or Groups window appears.

260 Appendix H: Enabling Summary Page Display of NICE System Information
NICE Perform® Release 3.2: Databases Installation Guide (Rev A4)
Windows 2003: Enabling Summary Page Display
Figure H-48 Select Users, Computer, or Groups Window
b. In the Enter the object names to select area, enter the name of the System Administrator user.
c. Click Check Names.
The user and domain name appears.
d. Click OK.
The Security for ROOT\DEFAULT window (Figure H-47 on page 259) reappears.
8. In the Group or user names area, select the System Administrator user.
9. In the Permissions for <User> area, in the Allow column, select Execute Methods and Remote Enable.Figure H-49 Security for ROOT\DEFAULT Window
10. Click OK.
The Windows Management Infrastructure (WMI) window reappears.

261 Appendix H: Enabling Summary Page Display of NICE System Information
NICE Perform® Release 3.2: Databases Installation Guide (Rev A4)
Windows 2003: Enabling Summary Page Display
Figure H-50 Windows Management Infrastructure (WMI) Window
11. Right-click the WMI Control (Local) icon, and then click Properties.
The WMI Control (Local) Properties window appears.Figure H-51 WMI Control (Local) Properties Window
12. Expand Root, and select the CIMV2 namespace.

262 Appendix H: Enabling Summary Page Display of NICE System Information
NICE Perform® Release 3.2: Databases Installation Guide (Rev A4)
Windows 2003: Enabling Summary Page Display
Figure H-52 Security for ROOT\DEFAULT Window
13. Repeat Step 5 to Step 12.
14. Close the Windows Management Infrastructure (WMI) window (Figure H-50 on page 261).
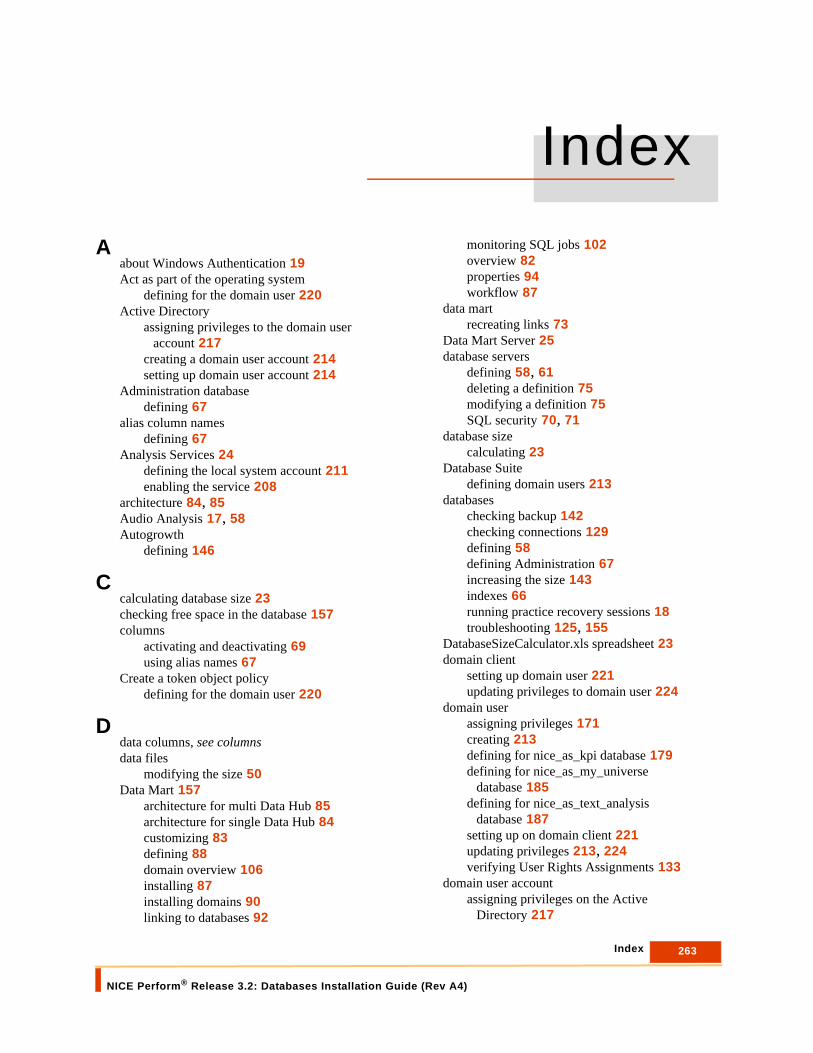
Index
NICE Perform® Release 3.2: Databases Installation Guide (Rev A4)
263
IndexA
about Windows Authentication 19Act as part of the operating system
defining for the domain user 220Active Directory
assigning privileges to the domain user account 217
creating a domain user account 214setting up domain user account 214
Administration databasedefining 67
alias column namesdefining 67
Analysis Services 24defining the local system account 211enabling the service 208
architecture 84, 85Audio Analysis 17, 58Autogrowth
defining 146
Ccalculating database size 23checking free space in the database 157columns
activating and deactivating 69using alias names 67
Create a token object policydefining for the domain user 220
Ddata columns, see columnsdata files
modifying the size 50Data Mart 157
architecture for multi Data Hub 85architecture for single Data Hub 84customizing 83defining 88domain overview 106installing 87installing domains 90linking to databases 92
monitoring SQL jobs 102overview 82properties 94workflow 87
data martrecreating links 73
Data Mart Server 25database servers
defining 58, 61deleting a definition 75modifying a definition 75SQL security 70, 71
database sizecalculating 23
Database Suitedefining domain users 213
databaseschecking backup 142checking connections 129defining 58defining Administration 67increasing the size 143indexes 66running practice recovery sessions 18troubleshooting 125, 155
DatabaseSizeCalculator.xls spreadsheet 23domain client
setting up domain user 221updating privileges to domain user 224
domain userassigning privileges 171creating 213defining for nice_as_kpi database 179defining for nice_as_my_universe
database 185defining for nice_as_text_analysis
database 187setting up on domain client 221updating privileges 213, 224verifying User Rights Assignments 133
domain user accountassigning privileges on the Active
Directory 217

Index
NICE Perform® Release 3.2: Databases Installation Guide (Rev A4)
264
creating on Active Directory 214for NICE services 21for SQL services 22setting up on Active Directory 214
domainsinstalling 90linking databases 92overview 106
Eencryption
encryption keys 17, 58
Iincreasing the size of a database 143indexing reserved columns 66installations
Microsoft SQL Server 2008 23NICE Perform Database Suite 41site overview 16
instancesmulti instances syntax 46
KKey Storage Manager application 17, 58
Llinks
recreating to the Data Mart Server 158local system account
defining 211log files
modifying the size 50recommended size 51
Log on as a batch job policydefining for the domain user 220
Log on as a servicedefining for the domain user 218, 220verifying 132
loginnice password 71nice sa password 70
MManage auditing and security log policy
defining for the domain user 220Microsoft SQL Server 2005 143
Analysis Services 24changing passwords in SQL
Authentication 139checking database connections 129checking free database space 131
checking missing databases 130checking performance 137checking SQL jobs 129checking the installation folder 135error logs and events 128instances 46, 121multi instances syntax 46scanning the disk 139setting up 23
Microsoft SQL Server 2008 143Analysis Services 24changing passwords in SQL
Authentication 139checking database connections 129checking free database space 131checking missing databases 130checking SQL jobs 129checking the installation folder 135error logs and events 128instances 46, 121multi instances syntax 46scanning the disk 139setting up 23
Multi Data Hub environmenttroubleshooting 163
Multi Data-Hub environmentchecking replication 166
multidimensional databasesabout 24configuring in System Administrator 110establishing connection with the Applications
Server 175verifying connection with the Applications
Server 176
NNICE DBSpace utility 148NICE KSM application 17, 58nice login password
changing 141NICE Perform ClearSight
use with nice_as_text_analysis database 24NICE Perform Data Mart Server
installing the Update Pack 41NICE Perform Database Server 25
checking the connection to 129installing the Update Pack 41
NICE Perform Database Suite 19calculating size of the databases 23checking free database space 131defining Windows SQL Authentication 46installing the software 41

Index
NICE Perform® Release 3.2: Databases Installation Guide (Rev A4)
265
modifying size of database 50multidimensional databases 17, 59relational databases 17, 58servers used for 19troubleshooting 125, 155using the Data Mart Server 25
NICE Performance Collector 144nice sa login password
changing 140NICE services
defining domain users 213domain user account 21
nice_admin databasedescription 17, 58
nice_as_kpi database 24, 25, 110configuring in System Administrator 110defining domain users 179description 17, 59
nice_as_my_universe database 24, 25, 110configuring in System Administrator 110defining domain users 185description 17, 59
nice_as_text_analysis database 19, 24, 25, 110configuring in System Administrator 110defining domain users 187description 17, 59
nice_audit databasedescription 17, 58
nice_ca databasedescription 17, 58
nice_crypto databasedescription 17, 58
nice_cti_analysis databasedescription 17, 58
nice_dw databasedefining the local system account 211description 17, 58
nice_ib databasedescription 17, 58
nice_interactions databasedescription 17, 58
nice_pbs databasedescription 17, 58
nice_qa databasedescription 17, 58
nice_reporter databasedescription 17, 58
nice_rule databasedescription 17, 58
nice_screen_sense databasedescription 17, 58
nice_storage_center databasedescription 17, 58
NT Authenticationsee Windows Authentication
Ppassword
changing in SQL Authentication 139SQL server 70, 71
Playback Server 17, 58process role
adding domain user in the nice_as_kpi database 179
adding domain user in the nice_as_my_universe database 185
adding domain user in the nice_as_text_analysis database 187
Rrecreating links 73Reindex Job 23
scheduling 227Replace a process level token policy
defining for the domain user 220replication
checking 166requirements
hardware 18software 18
reserved columnsindexing 66
Rules Manager 17, 58
Ssa password 46, 149, 202service account
verifying 132site installation overview 16SQL Authentication
changing passwords 139defining 46entering definitions during database
installation 46, 47SQL jobs
checking 129Data Marts 102defining schedules 114
SQL security, System Administrator 70, 71SQL servers, see database serversSQL services
defining domain users 213domain user account 22

Index
NICE Perform® Release 3.2: Databases Installation Guide (Rev A4)
266
System Administrator 110configuring the multidimensional
databases 110configuring the nice_as_kpi database 110configuring the nice_as_my_universe
database 110configuring the nice_as_text_analysis
database 110database configuration 58
Ttroubleshooting 125, 155
checking database backup 142checking database connections 129checking free database space 131checking free space in the Data Mart
database 157checking missing databases 130checking performance 137, 144checking replication 166checking SQL jobs 129checking the connection to the Database
Server 129checking the installation folder 135Data Mart flow 156general considerations 128monitoring performance objects and
counters 136Multi Data Hub environment 163scanning the disk 139SQL error logs 128SQL events 128verifying Log on as a service 132verifying the service account 132Windows Event Viewer 128
UUpdate Pack
NICE Perform Database Suite 41User Rights Assignments
verifying domain users 133verifying Log on as a service 132
Vview role
adding domain user in the nice_as_kpi database 184
adding domain user in the nice_as_my_universe database 186
adding domain user in the nice_as_text_analysis database 188
WWindows Authentication
about 19domain users 20entering definitions during database
installation 44, 45establishing connection between the
multidimensional databases and the Applications Server 175
usage of 19verifying connection between the
multidimensional databases and the Applications Server 176
verifying security settings 171verifying User Rights Assignments 133
Windows Event Viewerchecking 128
workflowData Mart 87