How to retrieve orders which were sent to vendor and not arrived Version 16 and up Yoel Kortick.
Upload
trinhtuyenCategory
view
221download
3
1 | P a g e
Dashlane
User manual

2 | P a g e
Table of Contents
Getting Started With Dashlane ..........................................................................................3
How to use Dashlane in your browser..............................................................................6
How to quickly sign in to Dashlane directly from my browser? ...................................12
How do I search in Dashlane? ........................................................................................15
How do I sync between all my devices? Do I need to be Premium? ............................17
How do I use my account on a new device, or after reinstalling my computer? .........18
How do I add personal data to Dashlane? .....................................................................22
Adding and managing IDs in Dashlane ..........................................................................25
Adding and managing payment types in Dashlane .......................................................27
How does Dashlane handle online check-out? ..............................................................30
Can I add a purchase manually?.....................................................................................31
How do I add a login and password as a new credential? ............................................32
How can I edit or delete a credential? ............................................................................35
What is the Web app and what can it do? ......................................................................38
Find out how secure your Internet life is using our Security Dashboard ....................40
How to use Dashlane to generate a password? ............................................................49
Finding any password that Dashlane generated on a website .....................................51

3 | P a g e
Getting started With Dashlane
With Dashlane, you no longer have to manage multiple usernames and
passwords and you'll save time as we sign you up and sign you in to
millions of different websites with ease. This is a quick guide to get you up
and running and into Dashlane right away.
Create your Dashlane account
The first time you launch
Dashlane, you will need to
set up your account. It's
quick and easy to setup.
The first thing you will need
to do is assign an email
address and password to
your Dashlane account.

4 | P a g e
Remember this is your , the to all your others, so master password key
pick something strong but also one you can remember. To keep security as
strong as possible we do not store your master password anywhere, but
this means if you forget it, we can't send it to you.
Now you can go through all
the introduction screens. Hit
the NEXT button at the
bottom right to get started.

5 | P a g e
Import your passwords
Your passwords will be
automatically imported from your
browser, but you can manually
import them if you need to. This is
in FILE > IMPORT
PASSWORDS.
Select what browsers you want to use Dashlane in and we will link up with
them and import your credentials over. You can also import from other
password managers from this menu.
Now you are ready to start!

6 | P a g e
How to use Dashlane in your browser
When you open your browser after installing Dashlane you will see the
Dashlane icon in the toolbar, and it will have a green light if you're logged in
and it's properly installed. This is what it will look like:
If you don't see please view our FAQ page on
Installing your Browser Extensions:
http://support.dashlane.com/customer/portal/articles/363203-how-do-i-
enable-dashlane-in-my-browser-
What Dashlane can do for you online
Dashlane will log you in to all your web accounts 1. Easy one-step log in:
in one simple click. When you go to a website, look for the Dashlane
impalas in empty fields. A blue impala means that we have the information
already and a gray one means that we don't and you will have to enter it
manually.

7 | P a g e
Click in the field and
Dashlane will display a drop-
down list for you to choose
the information or identity that
you want to use. Click on one
and we will automatically fill in
all the fields based on the information you've saved in the application. For
example, if you click in the "Username" field and then click on your login...
...then Dashlane will log you in
automatically

8 | P a g e
Tired of 2. Filling out forms for you:
filling in registration forms for every
website you sign up for? Dashlane
will do all the legwork for you! Simply
click in a field and choose what
information you want to use to fill out
the form.
Click on one of these choices from
the drop-down menu then Dashlane
will automatically fill in the form for you.
9 | P a g e
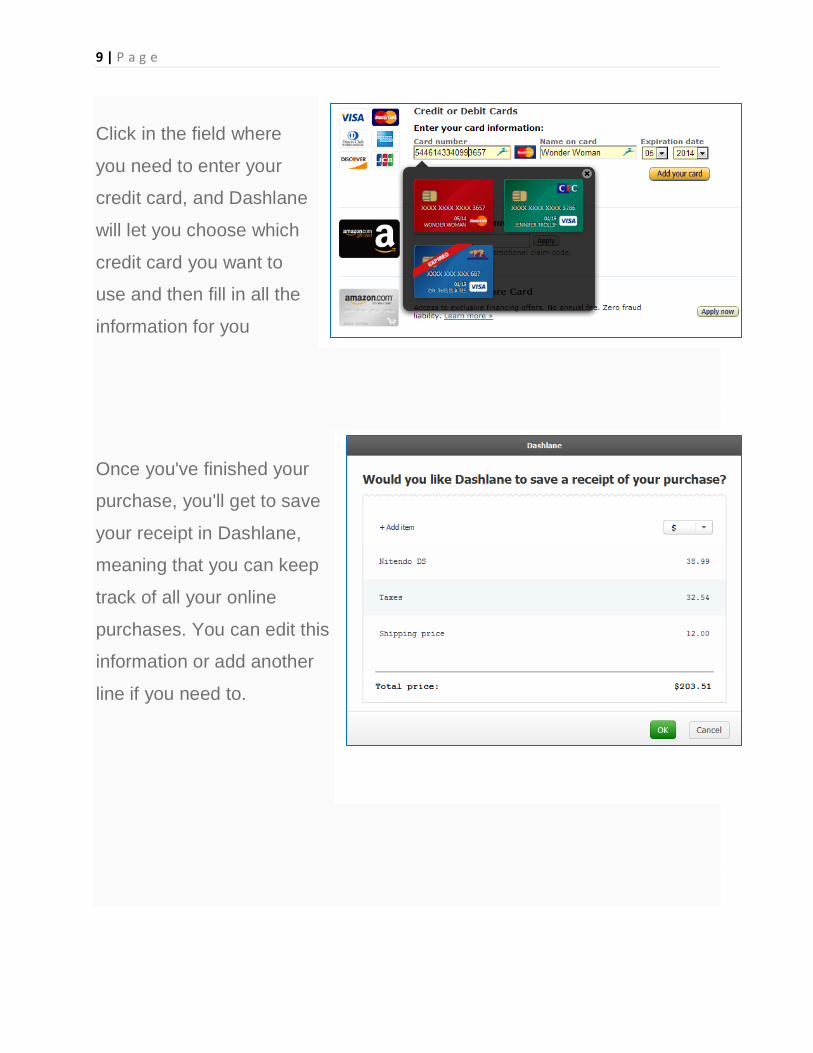
Click in the field where
you need to enter your
credit card, and Dashlane
will let you choose which
credit card you want to
use and then fill in all the
information for you
Once you've finished your
purchase, you'll get to save
your receipt in Dashlane,
meaning that you can keep
track of all your online
purchases. You can edit this
information or add another
line if you need to.

10 | P a g e
One of Dashlane's best features if the 4. Generating a strong password:
ability to automatically create and store unique and secure passwords.
When you click in a field where you need to enter a new password, you will
see a drop-down green box saying "Generate Strong Password". Click on
this and we'll generate a password and save it for you so that whenever
you return to this site in the future, you can use Dashlane to sign you in
with a secure password, that you don't even need to remember.

11 | P a g e
Using the Dashlane browser extension menu in your browser
Now, you can access all your data straight from the Dashlane browser
extension. Click on the Dashlane icon in your toolbar and you'll see all your
logins and passwords. Simply click on one of your credentials and you'll be
redirected and logged into this site. If you want to access the application
then click on the cog symbol next to your credential.
Please note that this new extension works on Safari for Mac,
and Chrome and Firefox for both PC and Mac, but NOT on Internet
Explorer.

12 | P a g e
How to quickly sign in to Dashlane directly
from my browser?
Dashlane lets you stay signed
off while using your computer,
and then to quickly log in to
your Dashlane account when
you need it.
How this works
When you come
across a login or
registration form in
your browser, simply
click on the
username field, or on
the e-mail address
field depending on
what the form
requires, and you will
see the special webcard appear.

13 | P a g e
The webcard does not appear on all forms, but only forms relating to a
credential. This way, Dashlane does not bother you when a form has
nothing to do with creating or signing in to an account.
Clicking on this webcard will open the Dashlane login pop-up window, and
ask you to enter your master password.You will then be logged in to your
Dashlane account.
Note that the main application window of Dashlane will stay hidden
You will be able to keep on reading and using the website after you log in.
you are on, without any distractions.
How to enable or disable this help?
On Mac OS X
Simply open the Dashlane
application, and then click on
the Preferences from the Dashlane
menu. "Help on Internet" is
available in the General tab,
whether you are logged in or logged
out.

14 | P a g e
On Windows
Open the Dashlane
application, and then click on
the
Tools > Preferences menu.
"In the browser" is available
in the General tab.

15 | P a g e
How do I search in Dashlane?
The search bar in
the Dashlane
application is a great
way to get around
the application
quickly.
Just start typing
and we will
immediately pull up
suggestions that will help you refine your search as you type.
You can access
credentials, purchases,
IDs, contacts and just
about everything saved in
Dashlane quickly using
search. You can even go
directly to a website
associated with a credential by clicking on the 'Play' icon or pull up the
editor using the down arrow button.

16 | P a g e
To get direct access to the Search box, simply press CTRL + F and then
type in the first letters of what you are looking for.
Search will also let you quickly access Dashlane tools like password
importers.
17 | P a g e
How do I sync between all my devices? Do
I need to be Premium?
You can install Dashlane on several devices (computers, phones, tablets...)
and securely sync all your data across each device.
To make the most of unlimited backup of your data and the ability to
sync across all your devices, you need to have Dashlane Premium.
How to access my account on a new device
You can access your Dashlane account for free on all your devices. Simply
or from the Google Play Store for your Android download it from our site
device, or from the . Please check theApp Store on your iPhone or iPad
. For instructions on minimum requirements to install and use Dashlane
how to install on a new device go to:
http://support.dashlane.com/customer/portal/articles/470149-how-do-
i-use-my-account-on-a-new-device-or-after-reinstalling-my-computer-
How does sync work?
Simply add or edit your data in your Dashlane account and this will
automatically sync to your account on all your devices. This is the case if
you have enabled sync on all your devices

18 | P a g e
How do I use my account on a new device,
or after reinstalling my computer?
To use Dashlane on a new device for the first time, you must first authorize
the device.
Be sure that you always have access to your contact mail box,
because the security code required to add a new device is sent to this
address and it is only valid for 30 minutes.
We cannot send security codes using text messages unfortunately, as this
feature hasn't been added yet.
Adding a new device to your Dashlane account
If Dashlane is not installed yet, download and install it. Then launch the
application.
You will see one of these two windows:
1 - If no accounts
already exist on
this computer
The welcome screen
is displayed.

19 | P a g e
Click on I already have an account at the bottom left of this window.
If you do not click on that button, and fill the actual form, Dashlane will try
to create a new account, and it will not work as your e-mail address has
already been used. Only one account is possible for an e-mail address.
Then, click here to follow the
2 - If an account already exists
on this computer
The login window will be directly
displayed.
Click in the Email field and delete its
content.
To add a new account to that list,
you can also click on the triangle
icon, right next to the field, and
choose Other account…
Next steps
In both cases, you will now have this window in front of you..
In the Login (email address) field, type in your , which is the Dashlane ID
email address you used to first set up Dashlane.
Then enter your master password and click on Log in.

20 | P a g e
If you have forgotten your masterpassword see this FAQ Article:
http://support.dashlane.com/customer/portal/articles/363024
Using security codes to identity your
new device
After clicking on Log in Dashlane ,
will require you to authorize your
computer, so your account can be
used on it.
Receiving and using a security code
For that, you will see a new window and a security code will be sent by e-
mail. You should receive this code in less than 30 seconds. Make sure you
click on Log in, otherwise the code will not be sent.
Now check your email address for an e-mail from Dashlane. This email
is only sent to the registered address that you set up in Dashlane.

21 | P a g e
This is either the e-mail address you used when creating your account or
your contact e-mail address if you changed it afterwards in the Preferences
section of the application.
Enter your security code from the email and name the device so you can
manage it from the web application settings

22 | P a g e
How do I add personal data to Dashlane?
To get the most out of Dashlane you should enter your personal
information into the app. This data is securely encrypted just like your login
information and can be used to help you quickly and accurately fill out
registration forms, delivery information, job applications and any online
forms that require your personal information.
To get started, go to the Contact section in the Dashlane application.
In here you will find headings for all the different types of data we can
manage. Click the + icon to add a new entry to the heading.
The Identity heading
can be filled when you
create an account, but
you can also create as
many as you need if
you share Dashlane
with others or manage
many identities. Each
field is optional and represents a field we could fill online.

23 | P a g e
The Emails heading
can help you save and
manage all your email
addresses in one
location.
Below that,
the Phones section
can do the same for
your numbers.
The Addresses section
lets you store your
address and any other
addresses you want to
keep track of or may need
provide online.Finally

24 | P a g e
the Company
and Website
sections
can help you supply
company info or a
web address when
needed.

25 | P a g e
Adding and managing IDs in Dashlane
Adding an ID to Dashlane is simple.
Open the IDs section of
the Dashlane application
. Click on first Add New at
the top left to add a new ID
type. Select the type of ID
you want to add here and it
will open a new window for
you to enter your
information.
ID Card
Passport
Driver's License
Social Security Card
Tax Numbers
If you want to add , you can do this in the other kinds of IDs Notes section.

26 | P a g e
Fill out the
information
and click OK
and the ID will
be stored in
Dashlane. It
can then
be filled into
sites that
request it
using
Dashlane and is securely stored in your encrypted Dashlane data.
You can edit or delete an ID at any time by clicking on it in the application.

27 | P a g e
Adding and managing payment types in
Dashlane
Adding your credit and debit card or PayPal account to Dashlane can help
you use our automatic checkout feature on many sites, saving you time and
preventing you from having to fish out your debit card whenever you want
to purchase online.
First, head to the
Payment section in the
Dashlane application. To
add a new payment type,
click the Add New button
at the top and select what
you want to add.

28 | P a g e
Choosing credit or debit will give you these options:
Name the card to help you identify it. Be sure to fill out the "Owner name",
"Card number" and "Dates" exactly as they appear on your card. All fields
are optional, so if your card does not supply an Issue number, for example,
you do not need to fill this in.
You can also choose
a color for your card.
This is the color our
icon of the card will
be, which can be
helpful when selecting
from multiple cards on
a website.

29 | P a g e
Choosing PayPal will give you these options:
Here you just need
to provide the name
of your PayPal
account and the
login and password
associated with it.

30 | P a g e
How does Dashlane handle online check-
out?
Dashlane Check-Out allows you to automatically fill out check-out fields
enabling purchasing that would normally take minutes to complete instead
within seconds – without
even touching a keyboard.
Just click into the field and
a popup will appear to
confirm your account,
name or card as saved in
Dashlane.
Choose and Dashlane will fill in the form instantly. Dashlane Check-Out lets
you save and sort all the information about the purchase for later use;
Dashlane also takes a screenshot of the final purchase screen for your
records and automatically stores it for you so you can easily track your
online receipts.

31 | P a g e
Can I add a purchase manually?
It is indeed possible to add a purchase manually in Dashlane.
Simply go to
the Purchases
section,
and add your new
purchase.
You will then be
able to edit the
receipt, and add
more details.

32 | P a g e
How do I add a login and password as a
new credential?
On Dashlane your saved logins and passwords are called credentials.
These are the keys stored in Dashlane that let you experience your
favorite sites without friction.
There are a number of ways to get your credentials into Dashlane.
You can import credentials you've
saved in other tools before Dashlane
by clicking FILE > IMPORT
PASSWORDS then choosing where
you want to import from.
To add new credentials into Dashlane, you can either let Dashlane save
them automatically when you use them on the actual site or you can add
them manually.

33 | P a g e
Letting Dashlane save a credential automatically
The first time you log into a website,
Dashlane will ask you if you want to save
this login. If you click on SAVE then this
means that next time you visit the site,
Dashlane will sign you in automatically.
In this pop-up, you can edit the Email or
Login if it's not correct. Then select a
category for this credential and click
the Save button to add it to Dashlane. The
next time you visit this site, you can use
your saved credential to sign in
automatically!

34 | P a g e
Adding a credential manually into Dashlane
To do this, go into the section of the application and click on Passwords
Add New Credential at the bottom.
Then you'll
see the
fields you
need to fill in
to save your
credential.
Enter the URL for the site you want to save (i.e. www.facebook.com).
Name the credential something to help you identify it. Then enter your login
and password for this site. You can select a category with the arrow or add
a new one with the pencil icon.
After you save your credential, the next time you vist the site you can use
Dashlane to login.

35 | P a g e
How can I edit or delete a credential?
To edit or delete a credential saved in Dashlane, go in to the application
and on the left select Passwords. Your list of registered accounts in
Dashlane is displayed here. When you hover over the credential you want
to edit, you will see some buttons on the icon.
For Windows:
The button on the right will take you to the site itself and the one on
the left will let you edit the information stored in the credential. Click on this
one to change the name, the login or e-mail, the password and the
category of this credential.
Click on the pencil icon next to the Category and URL boxes to edit these
fields. You can edit all the other fields directly in the box.

36 | P a g e
At the bottom of the page, you can delete this credential from Dashlane,
cancel, or confirm all changes made to this credential by clicking OK.

37 | P a g e
For Mac:
Double-click an icon in your PASSWORDS section to see this edit view. From here, you
can change any details, go to the website to log in automatically (the arrow icon next to
the Website),
copy or reveal your password, delete this login, send it to someone else, etc.. Click on
OK when you have finished.

38 | P a g e
What is the Web app and what can it do?
Access your data on any computer using the Web app
You can use our Web app on any computer or device using the browser of
your choice. It provides a read-only access to the encrypted data that are
stored on our servers. Your local data cannot be viewed using the Web
app. Please use the desktop version of Dashlane for this.
Visit and click on "Log in" at the top right of the page. our website
You can also go directly to: www.dashlane.com/app/en
On the Web app, you can:
View all your credentials (logins and passwords) if you enabled the
synchronization to our servers,

39 | P a g e
View all the authorized devices that can access your account, and
remove any of them,
Invite people from Outlook, Hotmail, Yahoo, Gmail, and share your
referral link on Facebook and Twitter,
View a summary of all the invitations you have previously sent,
Switch the type of your account from Free to Premium.
Note: It is not possible at the moment to access your Notes, your Payment
and ID data, and your Purchases on the Web app.

40 | P a g e
Find out how secure your Internet life is
using our Security Dashboard
To help you be more secure and protect your digital life, we have
completely redesigned and rebuilt our Security Dashboard from scratch.
Now when you open Dashlane, you get a clear and instant , Security Score
which will help you become aware of any flaws that may exist in your
accounts and that could compromise your Internet identity.
Note that the Security Dashboard is only available on Windows and Mac
OS X for now.
Your Security Score
Your Security Score is calculated by our own algorithm, giving a higher
priority to the web sites that are important in your digital life or that are often
targeted by people who want to steal sensitive and personal information.

41 | P a g e
If your bank account password is weak or has been reused on another
website, it will obviously have a high impact on your Security Score. But
having weak or reused passwords on your Facebook or Twitter account, or
even on e-commerce web sites that often save your credit card number, is
also crucial in your Secure Score.
Keep in mind that using a password more than once is actually very
dangerous and risky This is one of the main reasons people often get .
several of their web accounts stolen in a few minutes. The easiest way to
prevent that is to use Dashlane to generate a new and unique password
for each web account.
We will help you use your Security Score and take action immediately by
displaying our best security tips right under your score. Check this section
often and try to increase your score!
It will definitely improve your overall Internet experience and you will stay
safe from most of the security problems that happen on the Internet.

42 | P a g e
If you already see less than three security tips under your score, then you
are well on your way to being 100% secure!
To start improving your Security Score, click on Replace Now in one of
these three or four boxes to instantly take action, by changing your
password on that website.
We also take into account other actions that help you be more secure
online, for example:
Enabling Two-Factor Authentication to add an extra layer of security for
your Dashlane account
Deleting passwords that are stored insecurely in your browsers (did you know that
anyone who opens your Chrome browser can see all the passwords you have saved
inside?)
And many other security features
Understanding the full analysis of your passwords
You will notice four different tabs that give you even more control over your
security. The number in the circle lets you know how many passwords in
this group you have. Click on this number to display the related information.
In these four sections and for all your credentials, you will find:
The name of this Website

43 | P a g e
Your Login & Password
If the password has been reused on another website and how many
times
The safety level of your password (whether it would be easy to work out
or not)
How to take action
All Accounts
Use the main panel to have an overall view of the passwords you use.
Weak Passwords
This tab filters all your passwords to show only the ones that are
considered unsafe This could be because they are too short, or they do .

44 | P a g e
not have a combination of numbers, uppercase and lowercase letters that
makes it secure.
Basically, it means that your current password could be easily worked out
by someone else, and we strongly recommend you change it.If a website
does not let you have a stronger password for your account (for example, if
they do not let you enter special characters) or you do not want to change
it, then you can mark that website as . The website will still appear checked
in that section (because your password has not changed) but it will not be
counted in the top panel anymore. Refer to Mark as checked in the Using
the right-click menu section below for more information.
Compromised
Here you will find all the websites who have recently had a security
breach .
You should definitely change all your passwords in this section! It means
that someone stole many passwords from each of these websites, and that
your password may be one of them. If that is the case, your login info may
not be secret anymore at all, so you need to change it as soon as possible!
It is even more urgent if your password is reused somewhere else,
because these persons may already be trying to access your other
accounts.
Once you've marked this as checked, the website will disappear from the
section and from the top panel (unlike in the other sections where the

45 | P a g e
website still shows up). It doesn't disappear immediately, so you can still
uncheck the website if you made a mistake and still need to change your
password there. Please refer to Mark as checked in the Using the right-
section below for more information. click menu
Reused Passwords
Reusing a password on multiple websites is very risky, and clearly a
mistake when it comes to security on social networks or important
websites. Now you can see instantly all the websites where you need to go
and generate a new password for as soon as possible.
In this list, you may see some international websites that have only one
user database (which means you have only one account on all these
websites), but several different websites depending on where you live.
For instance, , , amazon.com amazon.fr amazon.co.uk and amazon.de are
considered to be different websites even though you use the same
password on all of them. Taking this into account, Dashlane lets you mark
these websites as checked.
Once you've marked this as checked, the website will still appear in that
section (because your password has not changed and it is still used on
multiple websites) but it will not be counted anymore at the top of the panel.
Refer to Mark as checked in the section Using the right-click menu
below for more information.

46 | P a g e
Start improving your security
Using the action column
Clicking on Change password in the action column opens the website.
See the credential details in Dashlane
To open the details of a credential from the Security Dashboard, double-
click anywhere in the row. For instance, you can double-click on the name
of the site, or on the login or password. The credential details will be
displayed as long as you do not click on the Lock icon, on the Mark as
checked box or in the Actions column, as clicking on one of these three
areas will trigger a different action.
Using the right-click menu (Windows only)
Right-clicking on a credential opens a special menu.Here's what you can
do:

47 | P a g e
Edit
Clicking on Edit brings you directly to the Credential details, in the
Passwords section. From there, you can see all the information that wasn't
displayed in the Security Dashboard.
Remove
This option will delete this password from your Dashlane account so make
sure you want to do this since there's no way to cancel this action.
Mark as checked
You may want to mark a credential as checked if you know that a password
is weak, compromised or reused, but have some good reasons to keep it
like that. Select the credential here and click on Mark as checked so it is
not taken into account anymore when showing the number of passwords in
the top panel.
Note that the password will not appear in the “Compromised” panel
anymore, but it will still show up if you are in the “Reused passwords” or
“Weak passwords” panels.

48 | P a g e
Change password
Clicking on Change password will open the website for this login. This is
where you can change your password immediately.To do that, you first
need to find the page on that website for managing you account details.
Once you have found where to change your password, click in the "new
password" field to generate a new password with Dashlane.
Now that your password has been changed on that website, Dashlane will
automatically detect it and give you a pop-up window to confirm the
change. Click on Replace and the password will be automatically updated
in your Dashlane account!

49 | P a g e
How to use Dashlane to generate a
password?
To generate a strong password for one of your logins, you need to go to the
site in question and change your password on that site. There, Dashlane
will offer to generate a strong password for you and save it in your
Dashlane account. Here's how!
Generating a strong password from the password field
You can use Dashlane to create and
store secure, one-of-a-kind passwords.
To do this, simply click in the new
password field of a site when you
register or when you are changing
your password You will see a button .
appear to generate a password.
How to save your new, strong password
Don't forget to save this information when Dashlane asks - you will see a
pop-up window and you need to click on the REPLACE or SAVE button
(depending on whether you're changing a password on a site or creating a
new account with a strong password).

50 | P a g e
Generating a custom strong password from the browser
extension
. To You can also generate a password through the browser extension
do this click on the extension in your browser's toolbar and then click on the
2nd passwords tab.
(This feature is not available in IE)
How to see a list of all your generated passwords
If you need to, you can go to Tools >
See Generated Passwords in the
Dashlane application to view all the
passwords generated by Dashlane

51 | P a g e
Finding any password that Dashlane
generated on a website
Dashlane offers a tool to see any password generated by Dashlane, ever.
Even if you did not save the password to a credential Dashlane will keep a
log of all generated passwords. This can be especially helpful if you
accidentally forget to save a password or if something goes wrong and
Dashlane does not offer to.
To access this list, go to the Tools section of the menu bar and choose See
Generated Passwords .
In this window, the green tick means this password has been properly
saved to a credential at one point. If you don't see this tick, then it means
that it has not been saved at all in your Dashlane credentials.
Scroll to the bottom to see the latest generated passwords.

52 | P a g e
To view the password, click the lock icon.
To copy the password directly to your clipboard, click the carbon
paper icon.
To remove an entry, click the X to delete it.

53 | P a g e
For more detailed info on Dashlane’s features
please visit our FAQ Page:
http://support.dashlane.com/