Dan Boothby - BSMPG will receive a score of zero if pain is associated with any portion of this...
9
5/14/2012 1 Dan Boothby M.S. C.S.C.S. Director of Strength and Conditioning Northeastern University Assessing & Programming for Training Age “Results? Why, man, I have gotten results! If I find 10,000 ways something won’t work, I haven’t failed. I am not discouraged, because every wrong attempt discarded is often a step forward..” -Thomas Edison Northeastern Sports Performance • Test & Retest – Evaluate physiological development and the effectiveness of interventions. Use Layers of information to trend development and make appropriate changes to program that will best support athletic development I am extremely fortunate to work in a department with the vision and resources that allow me to collect as much information as I do. Care Model Assessment Layers • Performance • • PPE • • SFMA • Opto • Volume & Intensity • Evaluating Yearly Development • Evaluate Dysfunction: Stability vs. Mobility • Athletic Training – Mobility • Strength & Conditioning - Stability • Track Trends – Evaluate the effectiveness of program Goals: In our setting (S&C) – this must be done efficiently • Identify Postural/Movement Dysfunction caused by Stability, Mobility, or Neuromuscular Deficiencies. • Identify Appropriate treatment and skill set - AT, PT, S&C, MD • Decrease Risk for Injury – Today and Lifelong • Augment Performance with appropriate patterns during High Intensity • We want our athletes to get stronger! – Full Range of Motion and Joint Centration = • Varied Modes of Resistance • Increased Intensities – Moderate, Low, High, Deload • Increased Movement Complexities Performance Testing Plan Testing Schedule around Competition, Practice & Academic Calendars • Clean – 3 Rep Test Goal 1.0 – 1.5 BW Velocity – 1.0 m/s Test – 3x/Year • Squat – 1 – 3 Rep Test Goal 1.5 – 2.0 BW Test – 3x/Year • Pull Up Max Reps 5 Reps with Load • Bench – 5 Rep Test Only to find % for upper movements • Vertical Jump 1 Jump – bi-weekly 4 Jump – bi-weekly Right Jump – 3x/Year Left Jump – 3x/Year • Pro Agility – 2x/Year • 200 YD Short Shuttle 1x/year • 10 Reps under :40 2:00 Rest between • Body Weight - Weekly • Body Comp – Calipers - Monthly Pre-Participation Exam • Performed 2 – 3 times/year. • Pre-season, Mid season, & Post season • Provide baseline numbers for each athlete at the start of every year, and helps us to evaluate our programs as well as the athletes work habits.
Transcript of Dan Boothby - BSMPG will receive a score of zero if pain is associated with any portion of this...

5/14/2012
1
Dan Boothby M.S. C.S.C.S.
Director of Strength and Conditioning Northeastern University
Assessing & Programming for Training Age
“Results? Why, man, I have gotten results! If I find
10,000 ways something won’t work, I haven’t failed. I am not discouraged, because every wrong attempt
discarded is often a step forward..” -Thomas Edison
Northeastern Sports Performance
• Test & Retest – Evaluate physiological development and the effectiveness of interventions.
Use Layers of information to trend development and make appropriate changes to program that will best support athletic development I am extremely fortunate to work in a department with the vision and resources that allow me to collect as much information as I do.
Care Model
Assessment Layers
• Performance
•
• PPE
•
• SFMA
• Opto
• Volume & Intensity
• Evaluating Yearly Development
• Evaluate Dysfunction: Stability vs. Mobility
• Athletic Training – Mobility
• Strength & Conditioning - Stability
• Track Trends – Evaluate the effectiveness of program
Goals: In our setting (S&C) – this must be done efficiently
• Identify Postural/Movement Dysfunction caused by Stability, Mobility, or Neuromuscular Deficiencies.
• Identify Appropriate treatment and skill set - AT, PT, S&C, MD
• Decrease Risk for Injury – Today and Lifelong
• Augment Performance with appropriate patterns during High Intensity
• We want our athletes to get stronger! – Full Range of Motion and Joint Centration =
• Varied Modes of Resistance • Increased Intensities – Moderate, Low, High, Deload
• Increased Movement Complexities
Performance Testing
Plan Testing Schedule around Competition, Practice & Academic Calendars
• Clean – 3 Rep Test Goal 1.0 – 1.5 BW Velocity – 1.0 m/s Test – 3x/Year
• Squat – 1 – 3 Rep Test Goal 1.5 – 2.0 BW Test – 3x/Year
• Pull Up Max Reps 5 Reps with Load
• Bench – 5 Rep Test Only to find % for upper
movements
• Vertical Jump 1 Jump – bi-weekly
4 Jump – bi-weekly
Right Jump – 3x/Year
Left Jump – 3x/Year
• Pro Agility – 2x/Year
• 200 YD Short Shuttle 1x/year
• 10 Reps under :40 2:00 Rest between
• Body Weight - Weekly
• Body Comp – Calipers - Monthly
Pre-Participation Exam
• Performed 2 – 3 times/year.
• Pre-season, Mid season, & Post season
• Provide baseline numbers for each athlete at the start of every year, and helps us to evaluate our programs as well as the athletes work habits.
5/14/2012
2
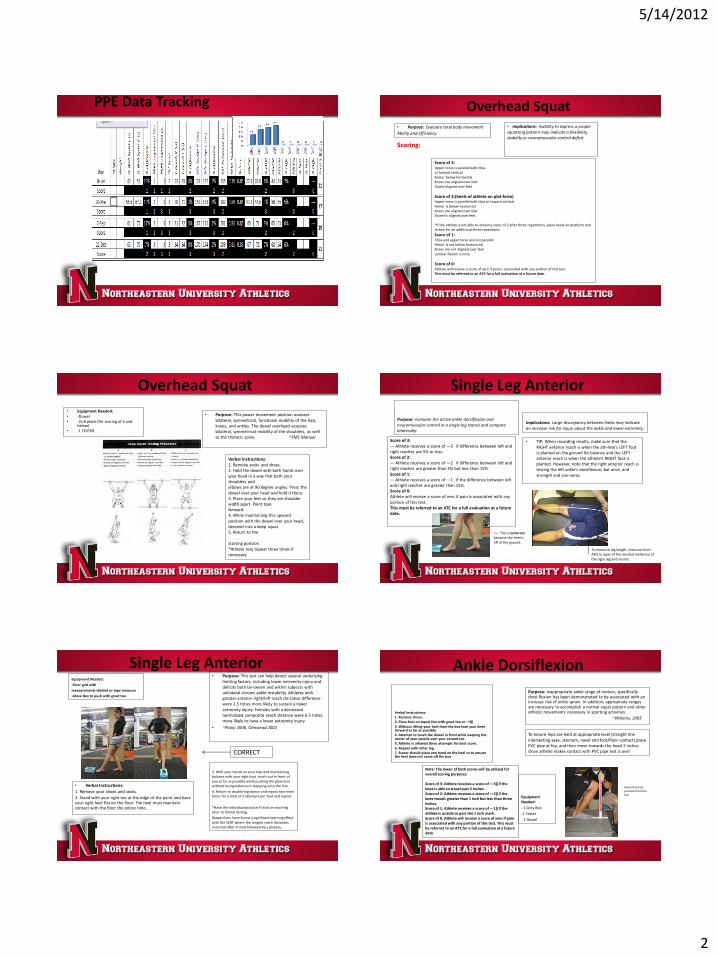
PPE Data Tracking
Overhead Squat • Purpose: Evaluate total body movement
Ability and efficiency.
• Implications: Inability to express a proper squatting pattern may indicate a flexibility, stability or neuromuscular control deficit.
Score of 3: Upper torso is parallel with tibia or toward vertical
Femur below horizontal Knees are aligned over feet Dowel aligned over feet
Score of 2:(heels of athlete on plat-form) Upper torso is parallel with tibia or toward vertical Femur is below horizontal Knees are aligned over feet Dowel is aligned over feet *If the athlete is not able to obtain a score of 3 after three repetitions, place heels on platform and re-test for an additional three repetitions.
Score of 1: Tibia and upper torso are not parallel Femur is not below horizon-tal Knees are not aligned over feet Lumbar flexion is note
Score of 0: Athlete will receive a score of zero if pain is associated with any portion of this test. This must be referred to an ATC for a full evaluation at a future date.
Scoring:
Overhead Squat
• Equipment Needed: • -Dowel • -2x 6 plank (for scoring of 2 and
below) • -1 TESTER
• Purpose: This power movement position assesses bilateral, symmetrical, functional mobility of the hips, knees, and ankles. The dowel overhead assesses bilateral, symmetrical mobility of the shoulders, as well as the thoracic spine. ~FMS Manual
Verbal Instructions: 1. Remove socks and shoes. 2. Hold the dowel with both hands over your head in a way that both your shoulders and elbows are at 90 degree angles. Press the dowel over your head and hold it there. 3. Place your feet so they are shoulder width apart. Point toes forward. 4. While maintaining this upward position with the dowel over your head, descend into a deep squat. 5. Return to the starting position. *Athlete may repeat three times if necessary.
Single Leg Anterior
Purpose: Evaluate the active ankle dorsiflexion and neuromuscular control in a single leg stance and compare bilaterally.
• TIP: When recording results, make sure that the RIGHT anterior reach is when the ath-lete’s LEFT foot is planted on the ground for balance and the LEFT anterior reach is when the athlete’s RIGHT foot is planted. However, note that the right anterior reach is testing the left ankle’s dorsiflexion, bal-ance, and strength and vise versa.
Implications: Large discrepancy between limbs may indicate an increase risk for injury about the ankle and lower extremity.
<— This is incorrect because the heel is
off of the ground.
Score of 3: — Athlete receives a score of ―3‖ if difference between left and right reaches are 5% or less. Score of 2: — Athlete receives a score of ―2‖ if difference between left and right reaches are greater than 5% but less than 15%. Score of 1: — Athlete receives a score of ―1‖ if the difference between left and right reaches are greater than 15%. Score of 0: Athlete will receive a score of zero if pain is associated with any portion of this test. This must be referred to an ATC for a full evaluation at a future date.
To measure leg length, measure from ASIS to apex of the me-dial malleolus of
the right leg and record.
Single Leg Anterior Equipment Needed:
-Floor grid with
measurements labeled or tape measure
-Glove Box to push with great toe.
• Purpose: This test can help detect several underlying limiting factors, including lower extremity injury and deficits both be-tween and within subjects with unilateral chronic ankle instability. Athletes with greater anterior right/left reach dis-tance difference were 2.5 times more likely to sustain a lower extremity injury. Females with a decreased normalized composite reach distance were 6.5 times more likely to have a lower extremity injury.
• ~Plisky 2006, Olmstead 2002
3. With your hands on your hips and maintaining balance with your right foot, reach out in front of
you as far as possible while pushing the glove box without losing balance or stepping onto the line.
4. Return to double-leg stance and repeat two more times for a total of 3 attempts per foot and repeat.
*Have the individual practice 4 trials on each leg prior to formal testing.
Researchers have found a significant learning effect
with the SEBT where the longest reach distances occurred after 4 trials followed by a plateau.
• Verbal Instructions:
1. Remove your shoes and socks.
2. Stand with your right toe at the edge of the paint and have your right heel flat on the floor. The heel must maintain contact with the floor the entire time.
CORRECT
Ankle Dorsiflexion
Equipment Needed:
- 1 Grey Box
-1 Tester
- 1 Dowel
Purpose: Inappropriate ankle range of motion, specifically dorsi-flexion has been demonstrated to be associated with an increase risk of ankle sprain. In addition, appropriate ranges are necessary to accomplish a normal squat pattern and other athletic movements necessary in sporting activities.
~Willems, 2005 Verbal Instructions: 1. Remove shoes. 2. Place foot on taped line with great toe at ―0‖ 3. Without lifting your heel from the box lean your knee forward as far as possible. 4. Attempt to touch the dowel in front while keeping the center of your patella over your second toe. 5. Athlete is allowed three attempts for best score. 6. Repeat with other leg. 7. Scorer should place one hand on the heel so to ensure the heel does not come off the box
To ensure hips are held at appropriate level (straight line intersecting eyes, sternum, navel and foot/floor contact) place PVC pipe at hip, and then move towards the head 2 inches. Once athlete makes contact with PVC pipe test is over
View of correct position from the top
Note: The lower of both scores will be utilized for overall scoring purposes. Score of 3: Athlete receives a score of ―3‖ if the knee is able to travel past 3 inches. Score of 2: Athlete receives a score of ―2‖ if the knee travels greater than 1 inch but less than three inches. Score of 1: Athlete receives a score of ―1‖ if the athlete is unable to pass the 1 inch mark. Score of 0: Athlete will receive a score of zero if pain is associated with any portion of this test. This must be referred to an ATC for a full evaluation at a future date.

5/14/2012
3
Side Bridge: Core Endurance
This test will be scored utilizing two criteria:
• A) time to fatigue for each side, and
• B) Ratio between left and right sided time.
Score of 3:
A— Athlete receives a score of ―3‖ if the lowest of the two side is equal to or greater than 90 seconds
B—Athlete receives a score of ―3‖ if the difference between the two sides is less than 5%
Score of 2:
A— Athlete receives a score of ―2‖ if the lowest of the two sides is between 70-90 seconds.
B– Athlete receives a score of ―2‖ if the difference between the two sides is between 5 –15%
Score of 1:
A— Athlete receives a score of ―1‖ if the lowest of the two sides is be-tween 50-70 seconds
B– Athlete receives a score of ―1‖ if the difference between the two sides is greater than 15%.
Score of 0:
Athlete will receive a score of zero if pain is associated with any portion of this test or they can not hold the side bridge position for at least 50 seconds.
This must be referred to an ATC for a full evaluation at a future date.
Purpose: Evaluate static frontal plane stability as well as overall symmetry of core Musculature.
Implications: Large discrepancy between sides may indicate an increase risk for injury about the back. An inappropriate ratio between side bridge and back extension times may indicate poor ability to handle training loads and increase risk for back injury.
Side Bridge: Core Endurance
Equipment Needed:
- 1 4‖ Pipe
-1 Tester
Purpose: This core-challenging position tests many aspects of an athlete’s physical abilities relating to endurance. Females who demonstrated good core control experienced a 62% decrease in serious knee ligament injuries. Also, weak hip abductors and tight hip flexors are seen in association with anterior knee pain and chondromalacia. Athletes who experienced an injury over the course of the season generally demonstrated lower core stability than those who did not, therefore this test can detect risks for injury before the season actually begins.
~Leetun 2004, Wilson 2005, McGill 1999, Kibler 2006
To ensure hips are held at appropriate level (straight line intersecting eyes,
sternum, navel and foot/floor contact) place PVC pipe at hip, and then move
towards the head 2 inches. Once
athlete makes contact with PVC pipe test is over.
Verbal Instructions: 1. Remove shoes and socks. 2. Lay on your side with your legs extended. Your top foot should be in front with the heel of the top foot in contact with the toes of the bottom foot. Hold an abdominal braced posture while keeping a neutral spine. 3. Your body should be in a straight line with ear, shoulder, hip and toe/heel intersect in line. Place the pipe underneath hip. 4. Hold this position for as long as possible. Time stops when body breaks from the straight line or when the hip touches the pipe underneath. 5. Record time in total seconds.
View of correct position from the top:
Extension Endurance Purpose: Evaluate back extensors and posterior chain for endurance strength .
Score of 3: Athlete will receive a score of ―3‖ if higher side bridge time is between 70-80% of their back extension time. (Note: goal is to have each side bridge time 75% of an athletes back extension time)
Score of 1: Athlete will receive a score of ―1‖ if higher side bridge time is between 90-100% of their back extensor time.
Score of 2: Athlete will receive a score of ―2‖ if higher side bridge time is between 80-90 % of their back extension time.
Score of 0: Athlete will receive a score of zero if higher side bridge time is greater than 100% or less than 70 percent of their back extension time OR athlete experiences pain with any portion of this test. This must be referred to an ATC for a full evaluation at a future date.
Implications: Poor back extension strength compared to side bridge time my indicated an increase risk for back injury.
Extension Endurance
Equipment Needed:
-Glute/hamstring machine
-Treatment table/ step-up box
-Straps if utilizing a treatment table.
Purpose: This extension endurance test, like the side bridge test, is used to determine if a weak core strength can lead to possible risks for injury during an athlete’s season. Studies by McGill suggest Inappropriate ratios between left and right Side Plank times and Back Ex-tension time may indicate poor overall extensor strength and should raise a red flag in both injury and performance areas and again be re-ferred out for further evaluation and treatment. ~(McGill 2010)
To ensure consistent measuring between testers and test dates, place treatment table and low box step underneath athlete to properly record failed time.
Verbal Instructions: 1. Remove shoes and socks. 2. Place an examination table beneath the glute-ham machine with a small step up box on top of the examination table. 3. Hips or ASIS should be directly at apex of padding with ankles firmly fixed in position. 4. Put your hands across your chest with upper torso horizontal to the floor. 5. Maintain a neutral spine, abdominal bracing, while keeping neck neutral. 6. A straight line should be formed from ankle, knee, greater trochanter, shoulder, and ear. 7. Hold this position for as long as possible. Time stops when the body is no longer in a straight line.
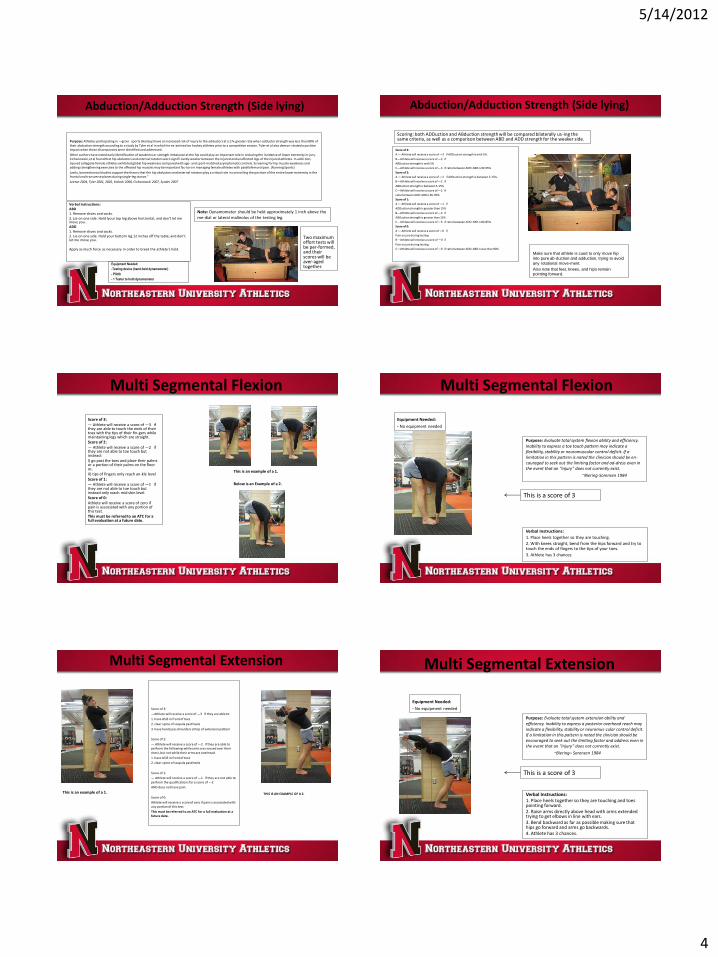
Abduction/Adduction Strength
Scoring: both ADDuction and Abduction strength will be compared bilaterally us-ing the same criteria, as well as a comparison between ABD and ADD strength for the weaker side.
Score of 3: A — Athlete will receive a score of ―3‖ if ADDuction strength is with 5%. B—Athlete will receive a score of ―3‖ if ABDuction strength is with 5% C—Athlete will receive a score of ―3‖ if ratio between ADD: ABD is 90-95% Score of 2: A — Athlete will receive a score of ―2‖ if ADDuction strength is between 5-15%. B—Athlete will receive a score of ―2‖ if ABDuction strength is between 5-15% C—Athlete will receive a score of ―2‖ if ratio between ADD: ABD is 85-90% Score of 1: A — Athlete will receive a score of ―1‖ if ADDuction strength is greater than 15% B—Athlete will receive a score of ―3‖ if ABDuction strength is greater than 15% C—Athlete will receive a score of ―3‖ if ratio be-tween ADD: ABD is 80-85% Score of 0: A — Athlete will receive a score of ―0‖ if Pain occurs during testing B—Athlete will receive a score of ―0‖ if Pain occurs during testing C—Athlete will receive a score of ―0‖ if ratio between ADD: ABD is less than 80%
Make sure that athlete is cued to only move hip into pure abduction and adduc-tion, trying to avoid any rota-tional movement. Also note that feet, knees, and hips remain pointing for-ward.
Purpose: Evaluate lower extremity adduction and abduction strength.
Implications: Poor symmetry and ratio between adduction and abduction strength has been shown to increase injury rates. risk of injury or poor strength in lower extremity.
Abduction/Adduction Strength
Equipment Needed:
-Testing device (MicroFETT) with stabilization belt
- Dowel for balance
- 1 Tester to hold HHD
- 1 Recorder
Purpose: Athletes participating in ―groin‖ sports have an increased risk of injury to the adductors at a 17x greater rate when adductor strength was less than 80% of their abduction strength according to a study by Tyler et al in which he examined ice hockey athletes prior to a competitive season. Tyler et al also demonstrated a positive impact when these discrepancies were identified and addressed. Other authors have noted early identification of weakness or strength imbalance at the hip could play an important role in reducing the incidence of lower extremity injury. Cichanowski, et al found that hip abductors and external rotators were significantly weaker between the injured and unaffected legs of the injured athletes. In addition, injured collegiate female athletes exhibited global hip weakness compared with age- and sport-matched asymptomatic controls. Screening for hip muscle weakness and adding strengthening exercises to the affected hip muscles may be important factors in managing female athletes with patellofemoral pain.
~Leetun 2004, Tyler 2001, 2002, Kollock 2008, Cichanowski 2007
Note: Dowel should be held at
sternum slightly in front of athlete regardless of leg or direction being tested to ensure consistency.
Verbal Instructions:
1. Remove shoes and socks.
2. Stand tall with feet shoulder width apart. You will be asked to push or pull (depending on the direction) against the testing device with full force for 2 seconds.
This will be repeated 3 times. Best score will be recorded.
3. The testing device shall be placed and only held (not pushed against) by the tester within the constraints of the stabilization belt.
4. Athlete may use his hand on the same side as the stance leg to hold a dowel for balance in each of the tests while the other hand rests on the hip.
5. Record best measure for each limb and direction.
5/14/2012
4
Abduction/Adduction Strength (Side lying)
Equipment Needed:
-Testing device (hand-held dynamometer)
- Plinth
- 1 Tester to hold dynamometer
Purpose: Athletes participating in ―groin‖ sports (Hockey) have an increased risk of injury to the adductors at a 17x greater rate when adductor strength was less than 80% of their abduction strength according to a study by Tyler et al in which he ex-amined ice hockey athletes prior to a competitive season. Tyler et al also demon-strated a positive impact when these discrepancies were identified and addressed.
Other authors have noted early identification of weakness or strength imbalance at the hip could play an important role in reducing the incidence of lower extremity in-jury. Cichanowski, et al found that hip abductors and external rotators were signifi-cantly weaker between the injured and unaffected legs of the injured athletes. In addi-tion, injured collegiate female athletes exhibited global hip weakness compared with age- and sport-matched asymptomatic controls. Screening for hip muscle weakness and adding strengthening exercises to the affected hip muscles may be important fac-tors in managing female athletes with patellofemoral pain. (Running Sports)
Lastly, biomechanical studies support the theory that the hip abductors and external rotators play a critical role in controlling the position of the entire lower extremity in the frontal and transverse planes during single-leg stance.”
Leetun 2004, Tyler 2001, 2002, Kollock 2008, Cichanowski 2007, Synder 2007
Two maximum effort tests will be per-formed, and their scores will be aver-aged together.
Verbal Instructions: ABD 1. Remove shoes and socks. 2. Lie on one side. Hold lyour top leg above horizontal, and don’t let me move you. . ADD
1. Remove shoes and socks. 2. Lie on one side. Hold your bottom leg 12 inches off the table, and don’t let me move you.
Apply as much force as necessary in order to break the athlete’s hold.
Note: Dynamometer should be held approximately 1 inch above the me-dial or lateral malleolus of the testing leg.
Abduction/Adduction Strength (Side lying)
Scoring: both ADDuction and ABduction strength will be compared bilaterally us-ing the same criteria, as well as a comparison between ABD and ADD strength for the weaker side.
Score of 3:
A — Athlete will receive a score of ―3‖ if ADDuction strength is with 5%.
B—Athlete will receive a score of ―3‖ if
ABDuction strength is with 5%
C—Athlete will receive a score of ―3‖ if ratio between ADD: ABD is 90-95%
Score of 2:
A — Athlete will receive a score of ―2‖ if ADDuction strength is between 5-15%.
B—Athlete will receive a score of ―2‖ if
ABDuction strength is between 5-15%
C—Athlete will receive a score of ―2‖ if
ratio between ADD: ABD is 85-90%
Score of 1:
A — Athlete will receive a score of ―1‖ if
ADDuction strength is greater than 15%
B—Athlete will receive a score of ―3‖ if
ABDuction strength is greater than 15%
C—Athlete will receive a score of ―3‖ if ratio between ADD: ABD is 80-85%
Score of 0:
A — Athlete will receive a score of ―0‖ if
Pain occurs during testing
B—Athlete will receive a score of ―0‖ if
Pain occurs during testing
C—Athlete will receive a score of ―0‖ if ratio between ADD: ABD is less than 80%
Make sure that athlete is cued to only move hip
into pure ab-duction and adduction, trying to avoid
any rotational move-ment.
Also note that feet, knees, and hips remain pointing forward.
Multi Segmental Flexion
Score of 3: — Athlete will receive a score of ―3‖ if they are able to touch the ends of their toes with the tips of their fin-gers while maintaining legs which are straight. Score of 2: — Athlete will receive a score of ―2‖ if they are not able to toe touch but instead: I) go past the toes and place their palms or a portion of their palms on the floor or, II) tips of fingers only reach an-kle level Score of 1: — Athlete will receive a score of ―1‖ if they are not able to toe touch but instead only reach mid shin level. Score of 0: Athlete will receive a score of zero if pain is associated with any portion of this test. This must be referred to an ATC for a full evaluation at a future date.
This is an example of a 1.
Below is an Example of a 2.
Multi Segmental Flexion
Equipment Needed:
- No equipment needed
Purpose: Evaluate total system flexion ability and efficiency. Inability to express a toe touch pattern may indicate a flexibility, stability or neuromuscular control deficit. If a limitation in this pattern is noted the clinician should be en-couraged to seek out the limiting factor and ad-dress even in the event that an “injury” does not currently exist.
~Biering-Sorensen 1984
Verbal Instructions:
1. Place heels together so they are touching.
2. With knees straight, bend from the hips forward and try to touch the ends of fingers to the tips of your toes.
3. Athlete has 3 chances.
This is a score of 3
Multi Segmental Extension
Score of 3:
—Athlete will receive a score of ―3‖ if they are able to:
1. have ASIS in front of toes
2. clear spine of scapula past heels
3. have hands pas shoulders at top of extension pattern
Score of 2:
— Athlete will receive a score of ―2‖ if they are able to perform the following-while arms are crossed over their chest, but not while their arms are overhead.
1. have ASIS in front of toes
2. clear spine of scapula past heels
Score of 1:
— Athlete will receive a score of ―1‖ if they are not able to perform the qualifications for a score of ―2‖
AND does not have pain.
Score of 0:
Athlete will receive a score of zero if pain is associated with any portion of this test.
This must be referred to an ATC for a full evaluation at a future date.
This is an example of a 1. THIS IS AN EXAMPLE OF A 2.
Multi Segmental Extension
Equipment Needed:
- No equipment needed
Purpose: Evaluate total system extension ability and efficiency. Inability to express a posterior overhead reach may indicate a flexibility, stability or neuromus-cular control deficit. If a limitation in this pattern is noted the clinician should be encouraged to seek out the limiting factor and address even in the event that an “injury” does not currently exist.
~Biering– Sorensen 1984
Verbal Instructions: 1. Place heels together so they are touching and toes pointing forward. 2. Raise arms directly above head with arms extended trying to get elbows in line with ears. 3. Bend backward as far as possible making sure that hips go forward and arms go backwards. 4. Athlete has 3 chances.
This is a score of 3
5/14/2012
5
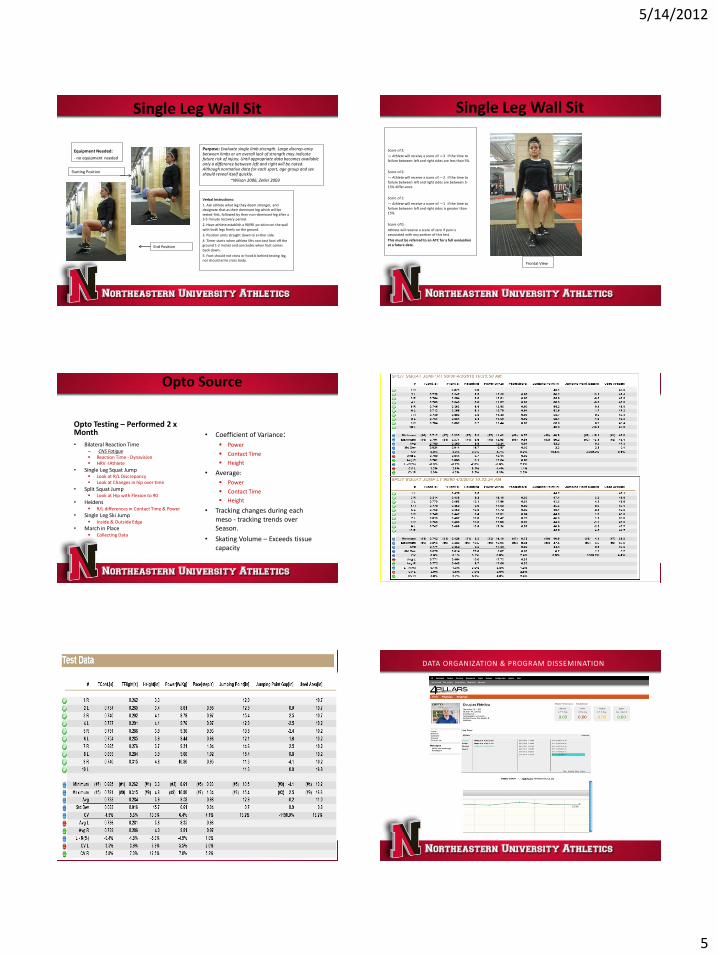
Single Leg Wall Sit
Equipment Needed:
- no equipment needed
Purpose: Evaluate single limb strength. Large discrep-ancy between limbs or an overall lack of strength may indicate future risk of injury. Until appropriate data becomes available only a difference between left and right will be noted. Although normative data for each sport, age group and sex should reveal itself quickly.
~Wilson 2006, Zeller 2003
Verbal Instructions:
1. Ask athlete what leg they deem stronger, and designate that as their dominant leg which will be
tested first, followed by their non-dominant leg after a 3-5 minute recovery period.
2. Have athlete establish a 90/90 po-sition on the wall with both legs firmly on the ground.
3. Position arms straight down to ei-ther side.
4. Timer starts when athlete lifts non-test foot off the ground 1-2 inches and concludes when foot comes back down.
5. Foot should not cross or hook b behind testing leg, nor should arms cross body.
Starting Position
End Position
Single Leg Wall Sit
Score of 3:
— Athlete will receive a score of ―3‖ if the time to failure between left and right sides are less than 5%.
Score of 2:
— Athlete will receive a score of ―2‖ if the time to failure between left and right sides are between 5-15% differ-ence
Score of 1:
— Athlete will receive a score of ―1‖ if the time to failure between left and right sides is greater than 15%.
Score of 0:
Athlete will receive a score of zero if pain is associated with any portion of this test.
This must be referred to an ATC for a full evaluation at a future date.
Frontal View
Opto Source
Opto Testing – Performed 2 x Month
• Bilateral Reaction Time – CNS Fatigue Reaction Time - Dynavision HRV -IAthlete
• Single Leg Squat Jump Look at R/L Discrepancy Look at Changes in hip over time
• Split Squat Jump Look at Hip with Flexion to 90
• Heidens R/L differences in Contact Time & Power
• Single Leg Ski Jump Inside & Outside Edge
• March in Place Collecting Data
• Coefficient of Variance: Power
Contact Time
Height
• Average:
Power
Contact Time
Height
• Tracking changes during each meso - tracking trends over Season.
• Skating Volume – Exceeds tissue capacity
DATA ORGANIZATION & PROGRAM DISSEMINATION

5/14/2012
6
Individualized programs
• Meeting with athletic trainer to discuss specific Corrective Strategies for individual “athletes to watch” and global sport
specific patterns
• Adjust Card Selection • Adjust Volume or Intensity
• Movement Selection
• Most importantly we identify the small % of athletes that may need some more individualized care – PT or MD pre-injury
• Utilize SFMA Protocols identify appropriate skill set – at or S&C
Multi Year Plan
• Rookie Program – 4 – 8 weeks • Level 1 – Neuromuscular – Strength Endurance
– No Olympic Movements – Bilateral Hip Dominant, Unilateral Knee Dominant
– Master Hip Hinge
• Level 2 – Strength – Introduce Olympic – Unilateral Hip Dominant, Bilateral Knee Dominant
– Hip Stability
• Level 3 – All Levels, All Movements
Card Layout – Off Season
• Day 1 – Tier A) Total Body – Max Effort
– Tier B) Unilateral Lower – Strength Endurance – Tier C) Dynamic Upper
• Day 2 – Tier A) Lower Body – Max Effort
– Tier B) Unilateral Upper – Tier C) Dynamic Total
• Day 3 – Tier A) Upper Body – Max Effort
– Tier B) Unilateral Total – Tier C) Dynamic Lower
• Day 4 – Will Change throughout the offseason • Superset – A) Posterior Chain
Yearly Plan
Yearly Training Plan Cont. Control Panel

5/14/2012
7
Volume and intensity card
Rep Schemes
Micro 1 Micro 2 Micro 3 Micro 4 Micro 5 Micro 6 Micro 7 Micro 8 Micro 9 Micro 10 Micro 11
Max % Top Sets Max % Top Sets Max % Top Sets Max % Top Sets Max % Top Sets Max % Top Sets Max % Top Sets Max % Top Sets Max % Top Sets Max % Top Sets Max % Top Sets
70% 2 x 5 73% 2 x 5 75% 2 x 5 78% 2 x 3 80% 2 x 3 83% 2 x 3 85% 2 x 3 88% 2 x 3 90% 2 x 3 93% 2 x 3 95% 1 x 1
Max Int. Total Vol. Max Int. Total Vol. Max Int. Total Vol. Max Int. Total Vol. Max Int. Total Vol. Max Int. Total Vol. Max Int. Total Vol. Max Int. Total Vol. Max Int. Total Vol. Max Int. Total Vol. Max Int. Total Vol.
-15.7 10.0 -13.2 10.4 -10.7 10.8 -13.4 8.2 -10.9 8.4 -8.4 7.1 -5.9 7.4 -3.4 7.6 -0.9 7.8 1.6 8.0 -1.8 6.0
Micro 1 Micro 2 Micro 3 Micro 4 Micro 5 Micro 6 Micro 7 Micro 8 Micro 9 Micro 10 Micro 11
Max % Top Sets Max % Top Sets Max % Top Sets Max % Top Sets Max % Top Sets Max % Top Sets Max % Top Sets Max % Top Sets Max % Top Sets Max % Top Sets Max % Top Sets
70% 3 x 6 72% 3 x 6 75% 4 x 4 77% 4 x 4 80% 5 x 3 82% 7 x 2 85% 6 x 2 87% 5 x 2 90% 4 x 2 92% 3 x 2 95% 3 x 1
Max Int. Total Vol. Max Int. Total Vol. Max Int. Total Vol. Max Int. Total Vol. Max Int. Total Vol. Max Int. Total Vol. Max Int. Total Vol. Max Int. Total Vol. Max Int. Total Vol. Max Int. Total Vol. Max Int. Total Vol.
-13.3 12.6 -11.3 13.0 -13.2 12.0 -11.2 12.3 -10.9 12.0 -11.8 11.5 -8.8 10.2 -6.8 9.6 -3.8 7.2 -1.8 5.5 -1.8 2.9
Micro 1 Micro 2 Micro 3 Micro 4 Micro 5 Micro 6 Micro 7 Micro 8 Micro 9 Micro 10 Micro 11
Max % Top Sets Max % Top Sets Max % Top Sets Max % Top Sets Max % Top Sets Max % Top Sets Max % Top Sets Max % Top Sets Max % Top Sets Max % Top Sets Max % Top Sets
60% 3 x 10 63% 3 x 10 65% 3 x 10 68% 3 x 10 70% 3 x 10 73% 3 x 10 0% #N/A 0% #N/A 0% #N/A 0% #N/A 0% #N/A
Max Int. Total Vol. Max Int. Total Vol. Max Int. Total Vol. Max Int. Total Vol. Max Int. Total Vol. Max Int. Total Vol. Max Int. Total Vol. Max Int. Total Vol. Max Int. Total Vol. Max Int. Total Vol. Max Int. Total Vol.
-15.0 18.0 -12.5 18.8 -10.0 19.5 -7.5 20.3 -5.0 21.0 -2.5 21.8 --- #DIV/0! --- #DIV/0! --- #DIV/0! --- #DIV/0! --- #DIV/0!
Micro 1 Micro 2 Micro 3 Micro 4 Micro 5 Micro 6 Micro 7 Micro 8 Micro 9 Micro 10 Micro 11
Max % Top Sets Max % Top Sets Max % Top Sets Max % Top Sets Max % Top Sets Max % Top Sets Max % Top Sets Max % Top Sets Max % Top Sets Max % Top Sets Max % Top Sets
72% 4 x 3 77% 4 x 3 82% 5 x 2 85% 3 x 2 87% 4 x 2 90% 2 x 2 92% 3 x 1 95% 2 x 1 0% #N/A 0% #N/A 0% #N/A
Max Int. Total Vol. Max Int. Total Vol. Max Int. Total Vol. Max Int. Total Vol. Max Int. Total Vol. Max Int. Total Vol. Max Int. Total Vol. Max Int. Total Vol. Max Int. Total Vol. Max Int. Total Vol. Max Int. Total Vol.
-18.9 8.6 -13.9 9.2 -11.8 8.2 -8.8 5.1 -6.8 7.0 -3.8 3.6 -4.8 2.8 -1.8 1.9 --- #DIV/0! --- #DIV/0! --- #DIV/0!
Activation Using Different Modes of Tension:
Isometric Eccentric High Volume Perturbations Variable Resistance (Stress Anchor Point)
Using Different Movement Patterns: Bilateral Unilateral Contralateral Ipsilateral
Basic Push/Pull Supported/non-Supported Open Chain/Closed Chain
True Goal of our Activation
• Brace – achieved easily in controlled setting – even with near maximum loads.
• Involuntary Brace - “Joint Centration” in all three planes and along the 8 lines.
• Involuntary Brace is far more difficult to achieve in comepetition when pattern is unpredictable & Reactionary –
• Fascia is the real problem! • - Must address Soft Tissue – Fascia – 12 – 18 months • - Correct Antagonistic and Synergistic Imbalances • - Maintain Brace through Movement To maximize force production – Charlie W.
• You must add stability in order to maintain changes to joint mobility • - Chicken & The Egg Relationship: • Train Stability through slow controlled ROM without Compensatory patterns and as the sequence of innervation
improves Mobility. Use appropriate Modalities to address Mobility issues and togther change is more sustainable.
• We must accept that body is going to have constantly changing asymmetries, and we must program to manage those asymmetries.
Activation: Test & Retest • “Athletic PRINT” – The dynamics of specific joints and
their relationship with one another during multi-joint movements – Promote Joint Centration and Proper Joint Mechanics – stability & mobility:
• Soft Tissue • Muscle Balance Advanced Modalities – Refer to Sports Med
• Neuromuscular • “Money Ball” – Trying to determine based off of
results what risk for injury athlete may have based off of current injury trends for chosen sport, as well as determining areas of Performance may be strengths.
• Determine Patterns that best fit need • Validate - Continue to Collect data and allow people
smarter than me to determine correlations. • * Always remembering that Intrinsic motivation is key
– psychology tops physiology in team sports if not all
Regressions
5/14/2012
8
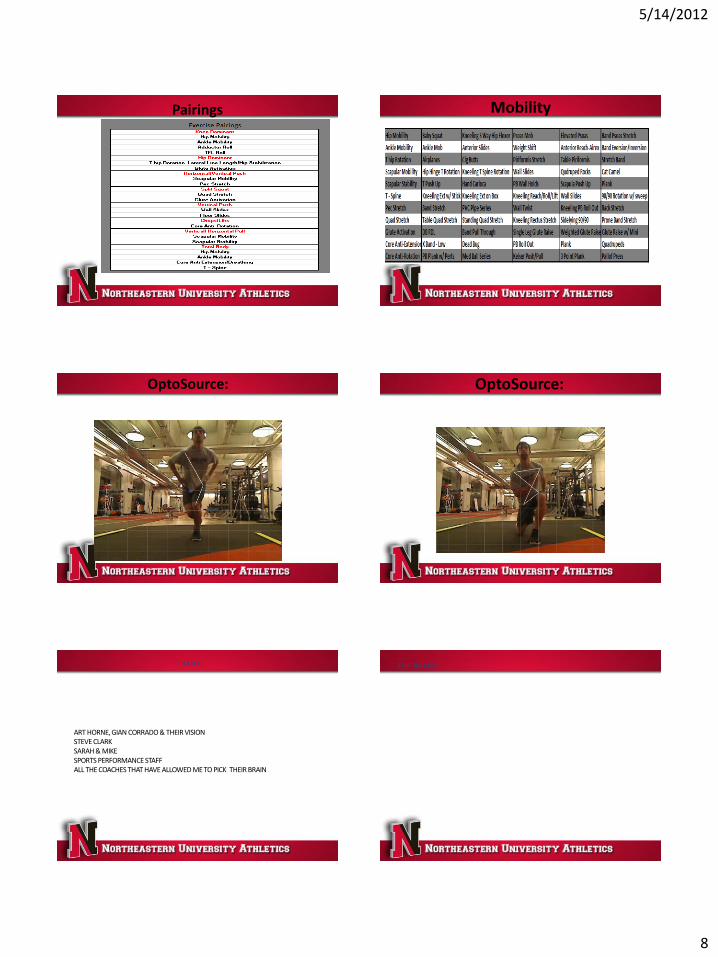
Pairings Mobility
OptoSource: OptoSource:
ART HORNE, GIAN CORRADO & THEIR VISION STEVE CLARK SARAH & MIKE SPORTS PERFORMANCE STAFF ALL THE COACHES THAT HAVE ALLOWED ME TO PICK THEIR BRAIN
THANKS THE BRAIN:

5/14/2012
9
HORMONES: