DALI SUB P-10 DSS P-10 DSS MANUAL EUPHONIA HELICON MK2 N MENTOR IKON® LEKTOR® CONCEPT SUBWOO FER...
14
DALI P-10 DSS MANUAL ENGLISH - DEUTSCH - DANSK Item No. 951017-0-0A MEGALINE EUPHONIA HELICON MK2 MENTOR IKON® LEKTOR® CONCEPT N SUBWOOFER DALI SUB P-10 DSS MANUAL 2 ENGLISH FIGURE 1 FIGURE 2 FIGURE 3 DALI Denmark +45 9672 1155 www.dali-speakers.com TABLE 1 P-10 DSS Speaker(s) pr. carton x1 x1 x1 x1 1 Movie Music 20 Hz 100 Hz x4
Transcript of DALI SUB P-10 DSS P-10 DSS MANUAL EUPHONIA HELICON MK2 N MENTOR IKON® LEKTOR® CONCEPT SUBWOO FER...

MEGALINEEUPHONIA
HELICON MK2
N
MENTORIKON®
LEKTOR®
CONCEPTSUBWOOFER
D A L I P - 1 0 D S SM A N U A L
ENGLISH - DEUTSCH - DANSK
Item
No.
951
017-
0-0A
MEGALINE
EUPHONIA
HELICON MK2
MENTOR
IKON®
LEKTOR®
CONCEPT
N SUBWOOFER
DALI SUB P-10 DSSMANUAL
2
ENGLISH
FIGURE 1 FIGURE 2 FIGURE 3
DALI Denmark +45 9672 1155www.dali-speakers.com
TABLE 1
P-10 DSS
Speaker(s) pr. carton
x1
x1
x1
x1
1
Movie Music
20 Hz 100 Hz
x4
FIGURE 5
+
VOLFREQ
PHASE
MEMORIES
1 32
CINEMAHIFI
DALI P-10 DSS SUB IR REMOTE CONTROL
43 17
All technical specifications are subject to change without notice.INPU
T
LFE
RIGHT
Designed and engineered in Denmark by DALI A/S
POWER
ON
OFF220-240V~ 450W 50/60Hz
T
RISK OF FIRE REPLACE FUSE AS MARKED
T2.5AL/250V
Danish Audiophile Loudspeaker Industries
CROSSOVER
POWER MODE
FOR INDOOR USE ONLY
CAUTION
WARNING: SHOCK HAZARD - DO NOT OPENAVIS: RISQUE DE CHOC ELECTRIQUE - NE PAS OUVRIR
CAUTIONDISCONNECT SUPPLY CORD BEFORE REPLACING FUSE. FOR CONTINUED PROTECTION AGAINST RISK OF FIRE
REPLACE ONLY WITH SAME TYPE FUSE.
RISK OF ELECTRIC SHOCKDO NOT OPEN
VOLUMEPHASE
+
AUTO
MANUAL
LEFT
FIGURE 7
FIGURE 4
C
I
D
E
F
G
A
B
CDE
G
FIGURE 6
H
DALI SUB P-10 DSS
Frequency Range [+/- 3] dB [Hz] 24 - 250
Input Impedance [kohm] 26
Maximum SPL [dB] 112
Crossover Frequencies [Hz] 40 - 120
Low Frequency Driver(s) 1 x 10” long stroke active, 2 x 10” long stroke passive
Enclosure Type Closed box with dual passive radiators
Bass Tuning Frequency [Hz] 31.5
Connection Input(s) RCA, Stereo (low-pass filtered) LFE (Mono)
Recommended Placement Floor, near wall or corner
Magnetic Shielding No
Max. Amplifier Power Output [RMS Watts] 500
Continous IEC Power Output [RMS Watts] 300
Max. Power Consumption [Watts] 550
Dimensions (H x W x D) [mm] 370 x 340 x 340
Dimensions (H x W x D) [inches] 14.6 x 13.4 x 13.4
Weight [kg/lb] 19.5/43.0
TABLE 2 - DALI SUB P-10 DSS TECHNICAL SPECIFICATIONS
F
B A
H

5
UK
CONTENTS
ENGLISH 6
6
C A U T I O NRISK OF ELECTRIC SHOCK DO NOT OPEN.TO REDUCE THE RISK OF ELECTRIC SHOCK,DO NOT REMOVE THE BACK PANEL.NO USER-SERVICEABLE PARTS INSIDE.REFER SERVICING TO QUALIFIED PERSONNEL.
The lightning flash within an equilateral triangle isintended to alert you to the presence of non insulated“dangerous voltage” within the product’s enclosure thatmay be of sufficient magnitude to constitute an electricshock to persons.
The exclamation point within an equilateral triangleis intended to alert you to the presence of importantoperating and maintenance (servicing) instructions inthe literature accompanying the appliance.
1 Read instructions - all the safety and operating instructions should be read before the appliance is operated.
2 Retain instructions - the safety and operating instructions should be retained for future reference.
3 Heed warnings - all warnings on the appliance and in the operating instructions should be adhered to.
4 Follow instructions - all operating and use instructions should be followed.
5 Water and moisture - the appliance should not be used near water - for example, near a bathtub, washbowl, kitchen sink, laundry tub, in a wet basement, or near a swimming pool and the like.
6 Carts and stands - the appliance should be used only with a cart or stand if recommended by the manufacturer.
7 Wall or ceiling mounting - the appliance should be mounted to a wall or ceiling only as recommended by the manufacturer.
8 Ventilation - the appliance should be situated so that its location or position does not interfere with proper ventilation. For example, the appliance should not be situated on a bed, sofa, rug, or similar surface that may block the ventilation openings; or placed in a built-in installation, such as a bookcase or cabinet, that may impede the flow of air through the ventilation openings.
9 Heat - the appliance should be situated away from heat sources such as radiators, heat registers, stoves, or other appliances that produce heat.
10 Power sources - the appliance should be connected to a power supply only of the type described in the operating instructions or as marked on the appliance.
11 Power cord protection - power-supply cords should be routed so that they are not likely to be walked on or pinched by items placed on or against them, paying particular attention to cords at plugs, convenience receptacles and the point where they exit from appliance. Appliance coupler serves as disconnecting device.
12 Cleaning - do not use any liquid cleaners. Use only a dry cloth to wipe off dust and grease.
13 Non-use periods - the power cord of the appliance should be unplugged from the outlet when left unused for a long period of time.
14 Object and liquid entry - care should be taken so that objects do not fall and liquids are not spilled into the enclosure through openings.
15 Damage requiring service - the appliance should be serviced by qualified personnel when:
a) The power-supply cord or the plug has been damaged; or
b) Objects have fallen, or liquid has been spilled into the appliance; or
c) The appliance has been exposed to rain; ord) The appliance does not appear to operate normally,
or exhibits a marked change in performance; ore) The appliance has been dropped, or the enclosure
damaged.
16 Servicing - the user should not attempt to service the appliance beyond that described in the opera ting instructions. All other servicing should be referred to qualified service personnel.
7
UK
CONTENTS
1.0 INTRODUCTION 8
2.0 UNPACKING 8
3.0 POSITIONING 8
4.0 CONNECTION 8
5.0 INSTALLING AND ADJUSTING 10
6.0 RUNNING-IN 14
7.0 OVERLOADING 14
8.0 MAINTENANCE 14
9.0 DISPOSAL 14
10.0 AMPLIFIER BACK PLATE 15
11.0 TECHNICAL SPECIFICATIONS 15
8
1.0 INTRODUCTIONCongratulations on your new DALI SUB P-10 DSS subwoofer. Please read this manual thoroughly before unpacking and installing the subwoofer in order to get the most from your purchase.You can find more information on our website: www.dali-speakers.com or by contacting your authorized DALI dealer.
Remember to sign up for the DALI newsletter at www.dali-speakers.com.
Enjoy!
2.0 UNPACKINGBe careful not to damage the contents when unpacking the parts. Check that all parts are included in the cardboard box (see Table 1). Keep the packaging materials in case your speaker needs to be relocated or serviced.
3.0 POSITIONINGBoth the amount and quality of the deep bass depend on the size and shape of the room, the position of the subwoofer(s) and the main speakers. If positioned near a side or back wall, the bass will be accentuated. A corner position will accentuate it even more, and we recommend this position, as it increases the maximum bass output while simultaneously reducing the risk of overloading your subwoofer.
DALI SUB P-10 DSS features a down-firing woofer, two side-firing passive radiators, and, at the rear side of the subwoofer, an amplifier metal plate which can become hot when the subwoofer is powered.Make sure that the woofer and the passive radiators are not blocked or covered. Ensure that there is a minimum distance of 5 cm / 2” between the metal plate and the nearest object in the room to secure a free airflow.
DALI SUB P-10 DSS can be used with the enclosed spikes or with the pre-mounted rubber bumpers under the speakers, see Figure 1 and 2. Be careful not to over tighten the locking nuts. Spikes can improve the sound quality. You can try both to hear what gives the best sound quality in your setup. Please be aware, that spikes may damage the floor.
4.0 CONNECTIONDALI SUB P-10 DSS has a built-in power amplifier with an active crossover. The inputs of the subwoofer amplifier should be connected to your stereo or surround sound (pre-) amplifier/receiver using a RCA cable (sold separately).
NOTE: When changing connections, always disconnect the mains voltage from the subwoofer to prevent damage.
9
UK
The subwoofer can be connected to your stereo or surround sound amplifier/receiver in two ways:1) LINE input: The signal from the amplifier is low pass filtered inside the subwoofer using
one or both of the LINE INPUTS. This way of connecting the subwoofer is typically used for connecting to a stereo amplifier/receiver.
2) LFE input: The signal from the amplifier is already filtered inside the amplifier when using the LFE input connector. This way of connecting the subwoofer is typically used for surround sound (A/V receiver) setups.
NOTE: When the subwoofer is connected to the music/home cinema system, do not power up the subwoofer until all other components are “ON”.
4.1 STEREO CONNECTIONSIf you want to use DALI SUB P-10 DSS in a stereo setup, your stereo (pre-) amplifier/receiver should have either a set of stereo RCA line outputs or a mono RCA line output available (please refer to the instruction manual of your stereo (pre-)amplifier/receiver). The line output connector(s) of your stereo (pre-)amplifier/receiver must be connected to the LINE INPUT connectors (LEFT/RIGHT) of the subwoofer via one or two RCA cables (sold separately).
4.2 SURROUND SOUND CONNECTIONS4.2.1 LINE INPUTUse the LINE INPUT connectors LEFT or RIGHT if you want to adjust the subwoofer frequency output using the DALI SUB P-10 DSS crossover control.
To use this option, connect the subwoofer output connector(s) of your surround sound (pre-)amplifier/receiver with the LINE INPUT connectors on the subwoofer using an RCA cable (sold separately). If the surround sound (pre-)amplifier/receiver has only one subwoofer output connector, connect it to the LINE INPUT LEFT connector (white) of the subwoofer using an RCA cable.
Please refer to chapter “5.0 Installing and Adjusting” for instructions on how to make the adjustments.
4.2.2 LFE INPUTUse the LFE input connector (black), if you want to adjust the subwoofer output from your surround sound (pre-) amplifier/receiver. When the LFE input connector is used, the built-in crossovers are bypassed and the crossover control will not be functioning.
To use this option, connect the surround sound (pre-) amplifier/receiver subwoofer output to the LFE input connector on the DALI SUB P-10 DSS with an RCA cable (sold separately).
Please refer to the instruction manual of your surround sound (pre-) amplifier/receiver on how to adjust the crossover settings.

10
4.3 USING TWO DALI SUB P-10 DSS SUBWOOFERSIn most cases you will achieve excellent results with one DALI SUB P-10 DSS. Use of two subwoofers is possible as a no-compromise stereo solution, or for reproduction of very powerful sound pressures in a stereo or surround setup in larger rooms.
The connections are basically the same as stated in previous chapters, but for stereo setup you should only connect the left channel output connector of your stereo or surround (pre-)amplifier/receiver to the LINE INPUT LEFT connector on the DALI SUB P-10 DSS placed to the left in your room. In a similar way you should connect the right channel output connector of your stereo or surround (pre-) amplifier/receiver to the LINE INPUT RIGHT connector on the DALI SUB P-10 DSS placed to the right in your room.
For a surround setup, split the output signal from your surround sound (pre-) amplifier/receiver using a RCA splitter (sold separately) and connect the two outputs. In all other respects, follow the instructions above - but use separate channels. Please consult your authorized DALI dealer if you have further questions.
5.0 INSTALLING AND ADJUSTINGStart by checking that the voltage of your mains output corresponds to the indication on the back of your DALI SUB P-10 DSS.
WARNING: If the wrong voltage is supplied, there is a serious risk that the electronics of the subwoofer will suffer permanent damage.
After checking the voltage, connect the mains cable and move the POWER switch to ‘ON’. The subwoofer is adjusted using the remote control (see chapter 5.7 ‘Remote Control’), or by using the controls on the rear side of the subwoofer (see chapter “10.0 Amplifier Back Plate”) in accordance with the following tuning method which will help you achieve the best results: Play a piece of music you know well, preferably one including rhythmic bass such as kettle drums, bass guitar etc.
Since the performance is highly dependent on the main speakers, the listening room, the subwoofer position in the room and your personal preferences, we recommend experimenting with different settings to achieve the best listening results rather than giving any specific advice on settings.
NOTE: The position of the subwoofer will significantly affect its contribution to the overall sound (see chapter “3.0 Positioning”). When you have decided which method of connection you want to use and you have positioned the subwoofer, you can begin the process of tuning the system.
You are now ready to adjust your DALI SUB P-10 DSS.
11
UK
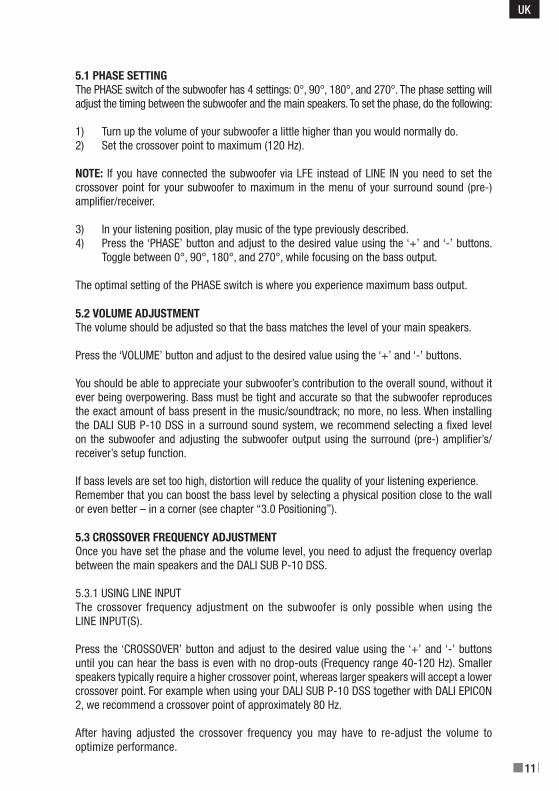
5.1 PHASE SETTINGThe PHASE switch of the subwoofer has 4 settings: 0°, 90°, 180°, and 270°. The phase setting will adjust the timing between the subwoofer and the main speakers. To set the phase, do the following:
1) Turn up the volume of your subwoofer a little higher than you would normally do.2) Set the crossover point to maximum (120 Hz).
NOTE: If you have connected the subwoofer via LFE instead of LINE IN you need to set the crossover point for your subwoofer to maximum in the menu of your surround sound (pre-)amplifier/receiver.
3) In your listening position, play music of the type previously described.4) Press the ‘PHASE’ button and adjust to the desired value using the ‘+’ and ‘-’ buttons.
Toggle between 0°, 90°, 180°, and 270°, while focusing on the bass output.
The optimal setting of the PHASE switch is where you experience maximum bass output.
5.2 VOLUME ADJUSTMENTThe volume should be adjusted so that the bass matches the level of your main speakers.
Press the ‘VOLUME’ button and adjust to the desired value using the ‘+’ and ‘-’ buttons.
You should be able to appreciate your subwoofer’s contribution to the overall sound, without it ever being overpowering. Bass must be tight and accurate so that the subwoofer reproduces the exact amount of bass present in the music/soundtrack; no more, no less. When installing the DALI SUB P-10 DSS in a surround sound system, we recommend selecting a fixed level on the subwoofer and adjusting the subwoofer output using the surround (pre-) amplifier’s/receiver’s setup function.
If bass levels are set too high, distortion will reduce the quality of your listening experience.Remember that you can boost the bass level by selecting a physical position close to the wall or even better – in a corner (see chapter “3.0 Positioning”).
5.3 CROSSOVER FREQUENCY ADJUSTMENTOnce you have set the phase and the volume level, you need to adjust the frequency overlap between the main speakers and the DALI SUB P-10 DSS.
5.3.1 USING LINE INPUTThe crossover frequency adjustment on the subwoofer is only possible when using the LINE INPUT(S).
Press the ‘CROSSOVER’ button and adjust to the desired value using the ‘+’ and ‘-’ buttons until you can hear the bass is even with no drop-outs (Frequency range 40-120 Hz). Smaller speakers typically require a higher crossover point, whereas larger speakers will accept a lower crossover point. For example when using your DALI SUB P-10 DSS together with DALI EPICON 2, we recommend a crossover point of approximately 80 Hz.
After having adjusted the crossover frequency you may have to re-adjust the volume to optimize performance.

12
5.3.2 USING LFE INPUTWhen connecting your DALI SUB P-10 DSS to smaller speakers, e.g. the DALI EPICON 2, we recommend a crossover point of approximately 80 Hz. This must be entered in the menu system of your (pre-) amplifier. You might need to enter the ‘small’ setting when selecting type of front speakers in the AV receiver menu.
Connecting larger speakers (typically floor-standing front speakers) will allow you to choose a lower crossover point, and to define your speakers as ‘large’ in the menu system.
If in doubt about the capacity of your speakers, we recommend setting the crossover point quite high, defining your speakers as small, and finally reducing the crossover point to the lowest possible position while maintaining an even bass with no drop-outs.
5.4 CINEMA / HIFI MODEDALI SUB P-10 DSS allows you to choose between two sound modes, one which is optimized for watching movies, and another for listening to music. See Figure 3.
For a realistic and powerful rendering of e.g. explosions in a movie, you should set the sound mode to CINEMA. This will amplify the lowest frequencies to ensure a realistic experience.
For a neutral and very linear performance, you should set the sound mode to HIFI. This will ensure a precise rendering of all the details of the music, while optimizing the integration with your front speakers.
To toggle between the two sound modes, simultaneously press the ‘+’ and ‘-’ buttons on the back of the amplifier.
5.5 POWERThe POWER switch is the main ON/OFF switch. We recommend switching ‘OFF’ the subwoofer when it is not to be used for extended periods. When changing connections, always disconnect the mains voltage from the subwoofer. We recommend that you ALWAYS turn ‘OFF’ the POWER switch on the rear side of the subwoofer BEFORE turning off the mains switch.
5.6 ON / STAND BY MODEThe subwoofer has a built-in circuit that will power up the amplifier of the subwoofer when an input signal is detected (given that the POWER is set to ‘ON’ and the POWER MODE switch is set to ‘AUTO’). When the subwoofer is ‘ON’, the ON/STANDBY LED will light up green. If an input signal is not detected for approximately 20 minutes, the subwoofer will go into standby mode and the ON/STANDBY LED will light up red.
Setting the POWER MODE switch to ‘MANUAL’ means that the subwoofer can only be switched ‘ON’ or ‘OFF’ by means of the remote control.
13
UK
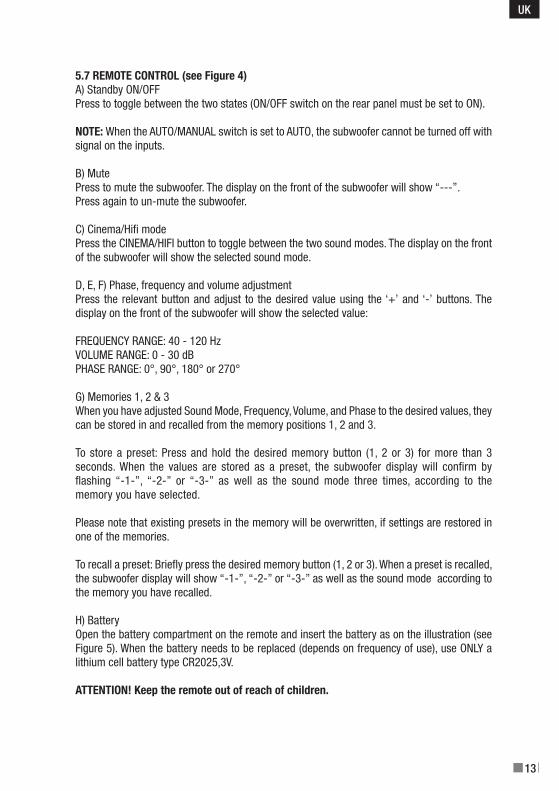
5.7 REMOTE CONTROL (see Figure 4)A) Standby ON/OFF Press to toggle between the two states (ON/OFF switch on the rear panel must be set to ON).
NOTE: When the AUTO/MANUAL switch is set to AUTO, the subwoofer cannot be turned off with signal on the inputs.
B) MutePress to mute the subwoofer. The display on the front of the subwoofer will show “---”.Press again to un-mute the subwoofer.
C) Cinema/Hifi modePress the CINEMA/HIFI button to toggle between the two sound modes. The display on the front of the subwoofer will show the selected sound mode.
D, E, F) Phase, frequency and volume adjustmentPress the relevant button and adjust to the desired value using the ‘+’ and ‘-’ buttons. The display on the front of the subwoofer will show the selected value:
FREQUENCY RANGE: 40 - 120 HzVOLUME RANGE: 0 - 30 dBPHASE RANGE: 0°, 90°, 180° or 270°
G) Memories 1, 2 & 3When you have adjusted Sound Mode, Frequency, Volume, and Phase to the desired values, they can be stored in and recalled from the memory positions 1, 2 and 3.
To store a preset: Press and hold the desired memory button (1, 2 or 3) for more than 3 seconds. When the values are stored as a preset, the subwoofer display will confirm by flashing “-1-”, “-2-” or “-3-” as well as the sound mode three times, according to the memory you have selected.
Please note that existing presets in the memory will be overwritten, if settings are restored in one of the memories.
To recall a preset: Briefly press the desired memory button (1, 2 or 3). When a preset is recalled, the subwoofer display will show “-1-”, “-2-” or “-3-” as well as the sound mode according to the memory you have recalled.
H) BatteryOpen the battery compartment on the remote and insert the battery as on the illustration (see Figure 5). When the battery needs to be replaced (depends on frequency of use), use ONLY a lithium cell battery type CR2025,3V.
ATTENTION! Keep the remote out of reach of children.
14
Display (see Figure 6)On the front of the subwoofer there is a translucent logo badge/display. The settings of the subwoofer can be seen on the display when the subwoofer is operated by the remote control or the buttons on the amplifier.
5.8 FACTORY RESETTo reset all memory settings to factory default, press the ‘+’ and ‘-’ buttons on the back of the SUB P-10 DSS simultaneously for 10 seconds. This will set the values to:
VOLUME: 25PHASE: 0CROSSOVER: 120SOUND MODE: CINEMA
6.0 RUNNING-INYou should expect the sound quality from your new subwoofer to gradually improve during the initial period of use. Nothing particular has to be done in order to run in the subwoofer – but expect up to 100 hours of playback (depending on playback level) before full performance level is reached. Use normal music for running-in the subwoofer.
7.0 OVERLOADINGIf DALI SUB P-10 DSS is overloaded, the built-in safety circuit will power down the subwoofer. The subwoofer will power on again when the temperature of the built-in amplifier is within safe working range. If overloaded, we recommend that you turn off the subwoofer for a few minutes before turning it on again.
NOTE: The built-in safety circuit is no guarantee against damage as a result of overloading.
8.0 MAINTENANCECleaning the subwoofer surfaces can be done with ordinary household cleaning agents and using a micro fibre cloth. Avoid using products that are abrasive or contains acid, alkali or antibacterial agents. Avoid using aerosols. Avoid using cleaning agents directly on the drive units and clean them with extreme care.
8.1 AVOID DIRECT SUNLIGHTThe surfaces of the subwoofer may fade or become discoloured over time when exposed to direct sunlight. Therefore avoid positioning the subwoofer in direct sunlight.
9.0 DISPOSALDALI products are designed to meet the international directives concerning Restriction of Hazardous Substances (RoHS) and disposal of Waste Electrical and Electronic Equipment (WEEE). The waste symbol indicates that the subwoofer meet the directives. The subwoofer must be processed or recycled appropriately. Please consult your local waste authority for guidance.
15
UK
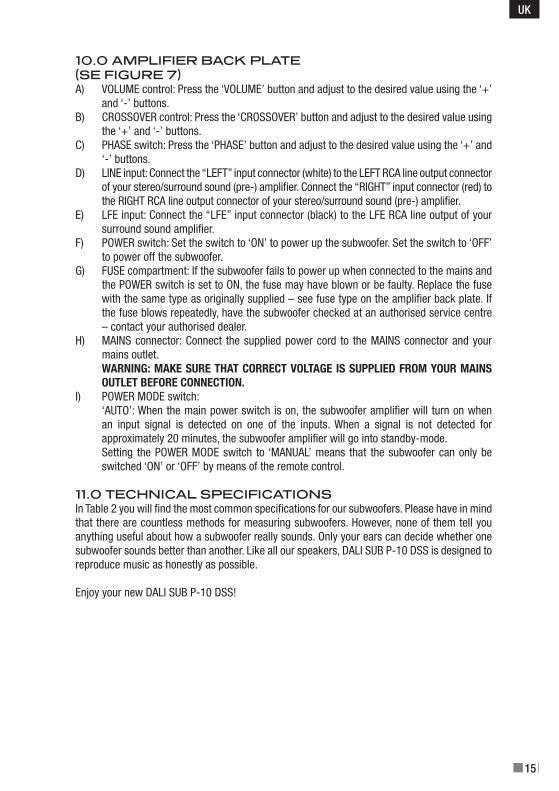
10.0 AMPLIFIER BACK PLATE (SE FIGURE 7)A) VOLUME control: Press the ‘VOLUME’ button and adjust to the desired value using the ‘+’
and ‘-’ buttons.B) CROSSOVER control: Press the ‘CROSSOVER’ button and adjust to the desired value using
the ‘+’ and ‘-’ buttons. C) PHASE switch: Press the ‘PHASE’ button and adjust to the desired value using the ‘+’ and
‘-’ buttons. D) LINE input: Connect the “LEFT” input connector (white) to the LEFT RCA line output connector
of your stereo/surround sound (pre-) amplifier. Connect the “RIGHT” input connector (red) to the RIGHT RCA line output connector of your stereo/surround sound (pre-) amplifier.
E) LFE input: Connect the “LFE” input connector (black) to the LFE RCA line output of your surround sound amplifier.
F) POWER switch: Set the switch to ‘ON’ to power up the subwoofer. Set the switch to ‘OFF’ to power off the subwoofer.
G) FUSE compartment: If the subwoofer fails to power up when connected to the mains and the POWER switch is set to ON, the fuse may have blown or be faulty. Replace the fuse with the same type as originally supplied – see fuse type on the amplifier back plate. If the fuse blows repeatedly, have the subwoofer checked at an authorised service centre – contact your authorised dealer.
H) MAINS connector: Connect the supplied power cord to the MAINS connector and your mains outlet.
• WARNING: MAKE SURE THAT CORRECT VOLTAGE IS SUPPLIED FROM YOUR MAINS OUTLET BEFORE CONNECTION.
I) POWER MODE switch:• ‘AUTO’: When the main power switch is on, the subwoofer amplifier will turn on when
an input signal is detected on one of the inputs. When a signal is not detected for approximately 20 minutes, the subwoofer amplifier will go into standby-mode.
• Setting the POWER MODE switch to ‘MANUAL’ means that the subwoofer can only be switched ‘ON’ or ‘OFF’ by means of the remote control.
11.0 TECHNICAL SPECIFICATIONSIn Table 2 you will find the most common specifications for our subwoofers. Please have in mind that there are countless methods for measuring subwoofers. However, none of them tell you anything useful about how a subwoofer really sounds. Only your ears can decide whether one subwoofer sounds better than another. Like all our speakers, DALI SUB P-10 DSS is designed to reproduce music as honestly as possible.
Enjoy your new DALI SUB P-10 DSS!

16