Daily Processing Quick Guide For Suppliers - Pitney...
83
Supply Network Collaboration Daily Processing Quick Guide For Suppliers
Transcript of Daily Processing Quick Guide For Suppliers - Pitney...

Supply Network Collaboration
Daily Processing Quick Guide For Suppliers
Supply Network Collaboration
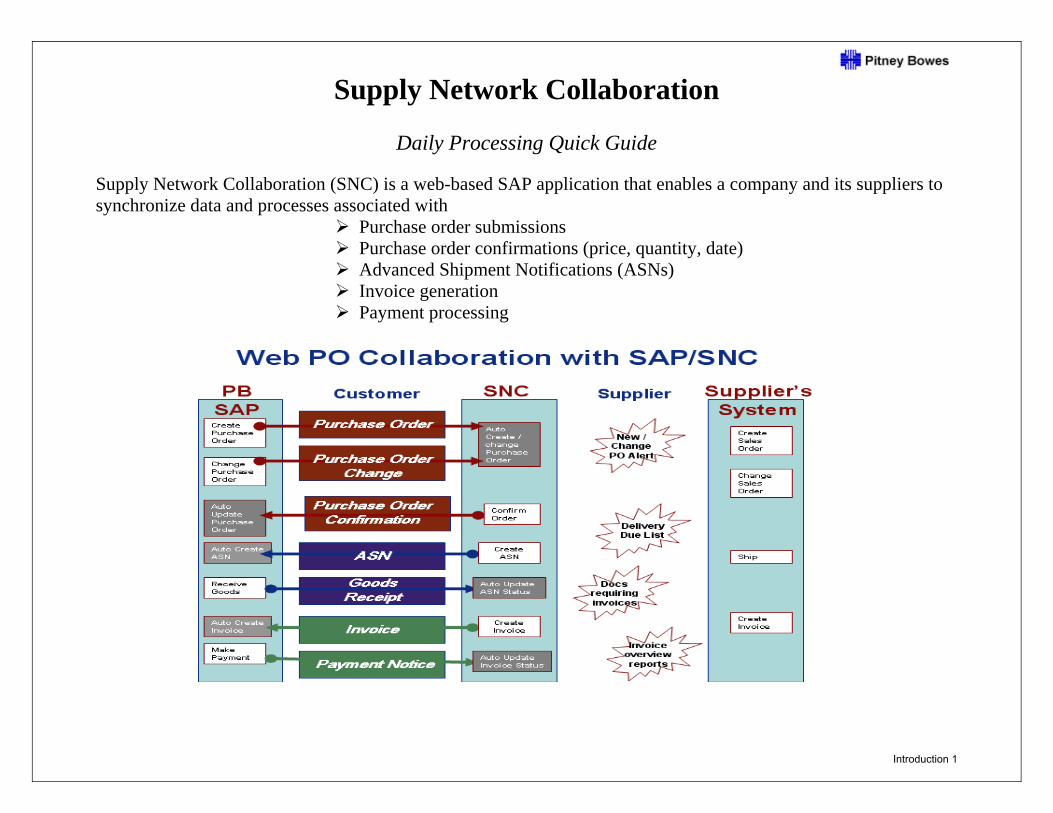
Daily Processing Quick Guide Supply Network Collaboration (SNC) is a web-based SAP application that enables a company and its suppliers to synchronize data and processes associated with
Purchase order submissions Purchase order confirmations (price, quantity, date) Advanced Shipment Notifications (ASNs) Invoice generation Payment processing
Introduction 1
Supply Network Collaboration
Daily Processing Quick Guide
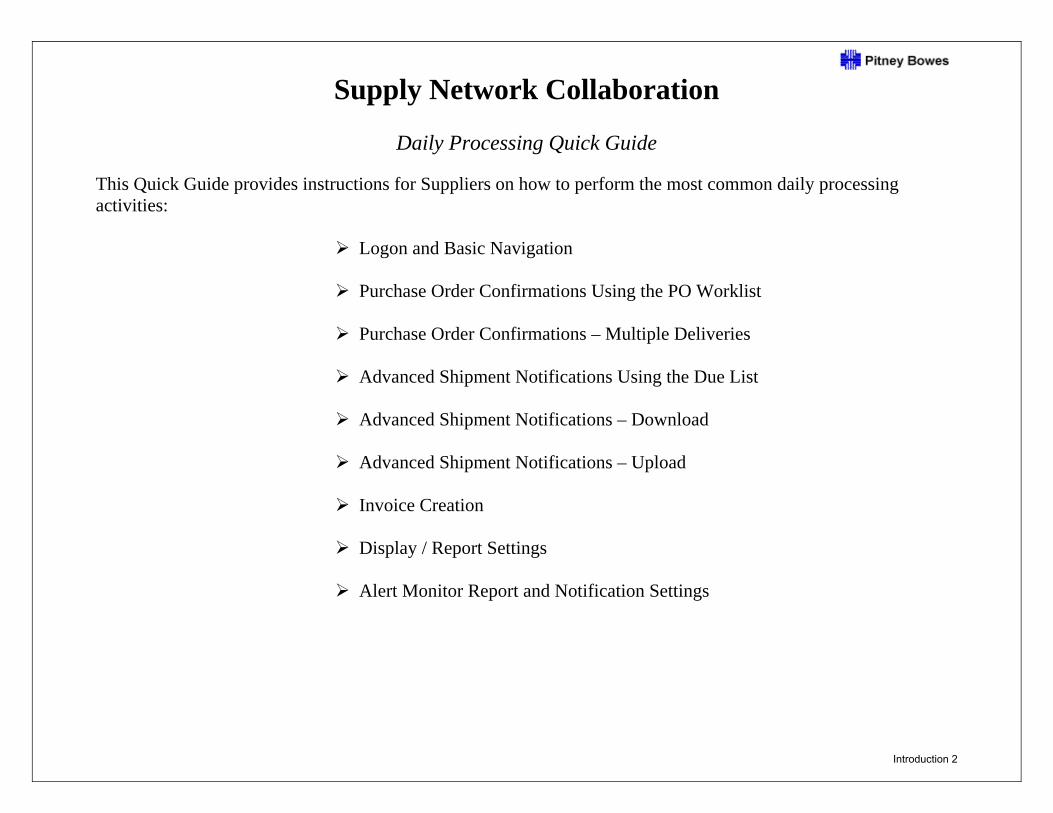
This Quick Guide provides instructions for Suppliers on how to perform the most common daily processing activities:
Logon and Basic Navigation
Purchase Order Confirmations Using the PO Worklist
Purchase Order Confirmations – Multiple Deliveries
Advanced Shipment Notifications Using the Due List
Advanced Shipment Notifications – Download
Advanced Shipment Notifications – Upload
Invoice Creation
Display / Report Settings
Alert Monitor Report and Notification Settings
Introduction 2
Supply Network Collaboration
Daily Processing Quick Guide
Logon and Basic Navigation
Logon & Navigation 1
Supply Network Collaboration
Logon and Basic Navigation
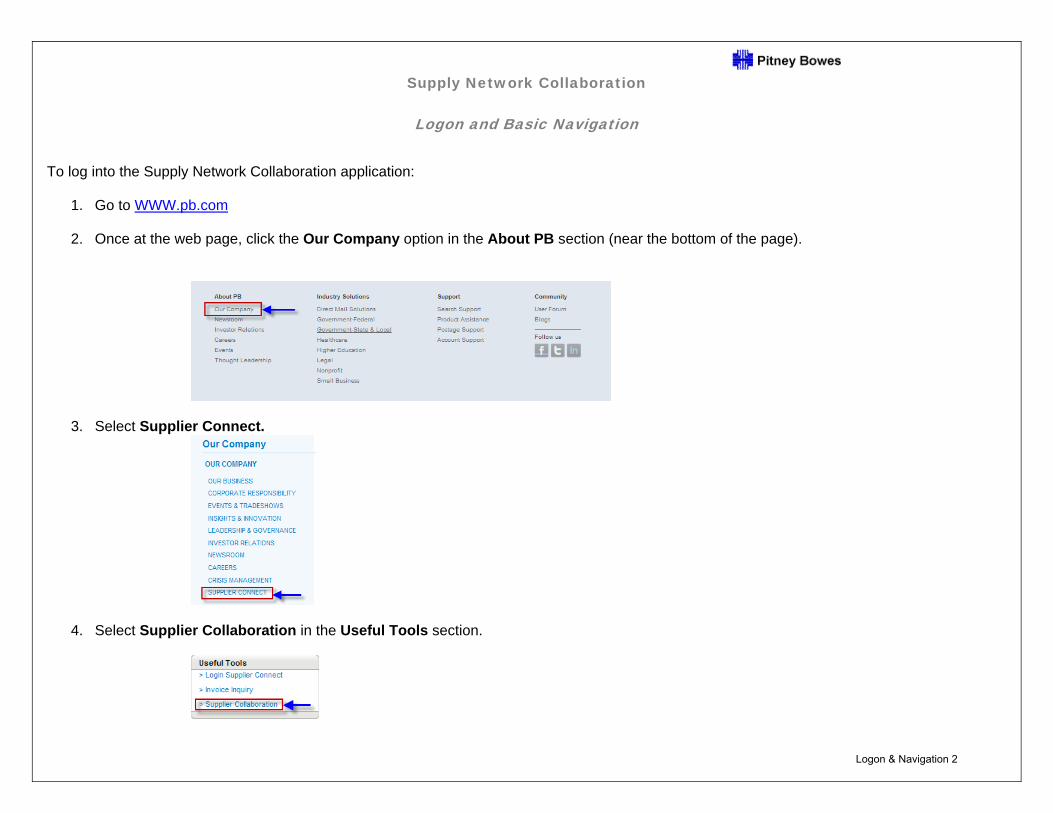
To log into the Supply Network Collaboration application:
1. Go to WWW.pb.com
2. Once at the web page, click the Our Company option in the About PB section (near the bottom of the page).
3. Select Supplier Connect.
4. Select Supplier Collaboration in the Useful Tools section.
Logon & Navigation 2
Supply Network Collaboration
Logon and Basic Navigation
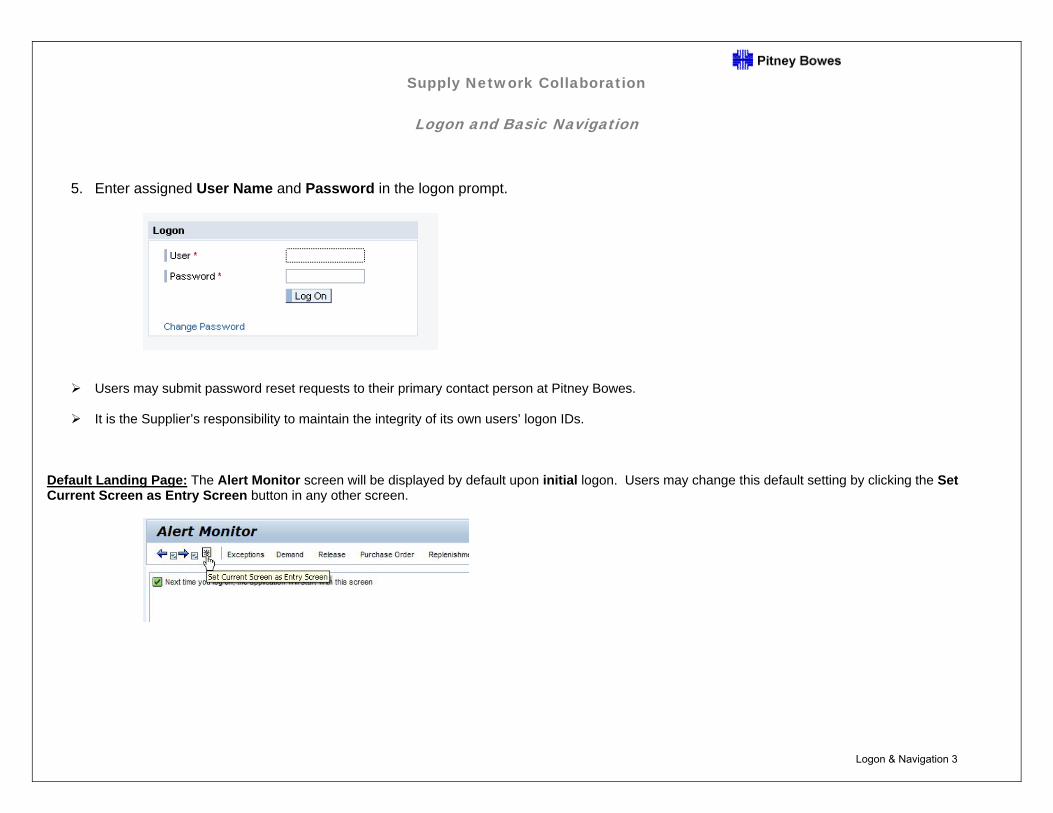
5. Enter assigned User Name and Password in the logon prompt.
Users may submit password reset requests to their primary contact person at Pitney Bowes.
It is the Supplier’s responsibility to maintain the integrity of its own users’ logon IDs. Default Landing Page: The Alert Monitor screen will be displayed by default upon initial logon. Users may change this default setting by clicking the Set Current Screen as Entry Screen button in any other screen.
Logon & Navigation 3
Supply Network Collaboration
Logon and Basic Navigation
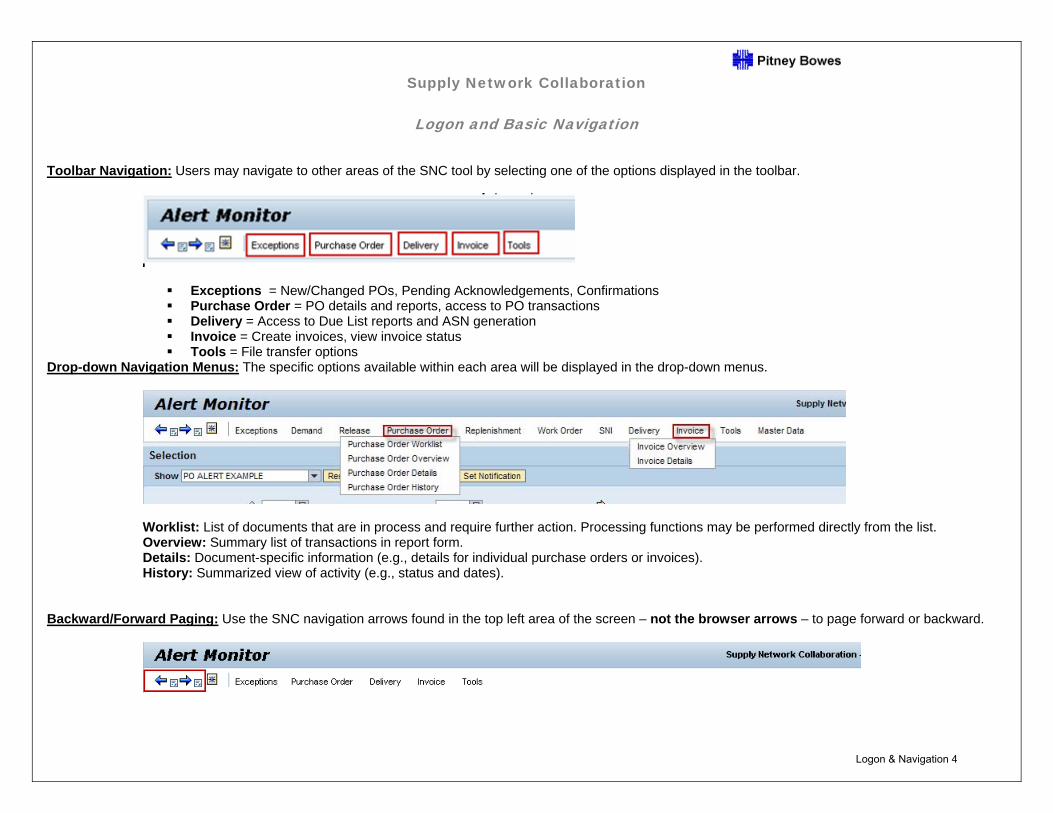
Toolbar Navigation: Users may navigate to other areas of the SNC tool by selecting one of the options displayed in the toolbar.
Exceptions = New/Changed POs, Pending Acknowledgements, Confirmations Purchase Order = PO details and reports, access to PO transactions Delivery = Access to Due List reports and ASN generation Invoice = Create invoices, view invoice status Tools = File transfer options
Drop-down Navigation Menus: The specific options available within each area will be displayed in the drop-down menus.
Worklist: List of documents that are in process and require further action. Processing functions may be performed directly from the list. Overview: Summary list of transactions in report form. Details: Document-specific information (e.g., details for individual purchase orders or invoices). History: Summarized view of activity (e.g., status and dates).
Backward/Forward Paging: Use the SNC navigation arrows found in the top left area of the screen – not the browser arrows – to page forward or backward.
Logon & Navigation 4

Supply Network Collaboration
Logon and Basic Navigation
Run/Execute: Click Go to run reports or execute transactions.
Scrollbars: Both standard and embedded scrollbars will appear in order to facilitate navigation.
Logon & Navigation 5
Supply Network Collaboration
Logon and Basic Navigation
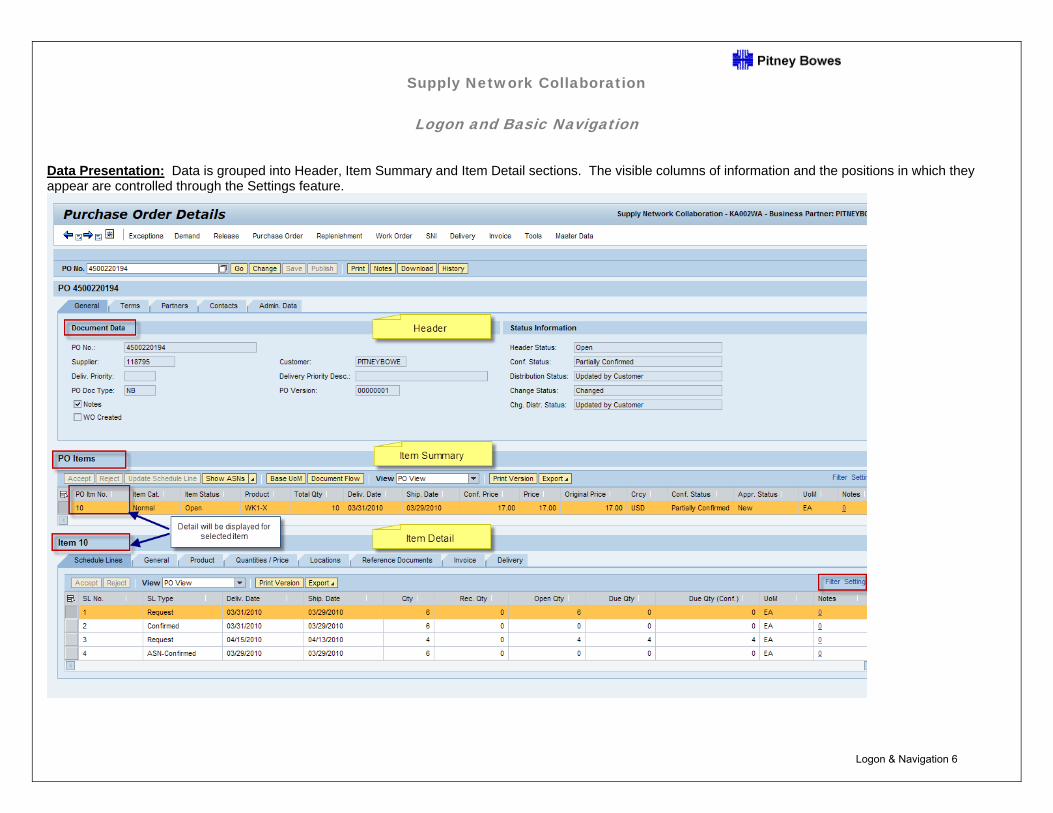
Data Presentation: Data is grouped into Header, Item Summary and Item Detail sections. The visible columns of information and the positions in which they appear are controlled through the Settings feature.
Logon & Navigation 6
Supply Network Collaboration
Logon and Basic Navigation
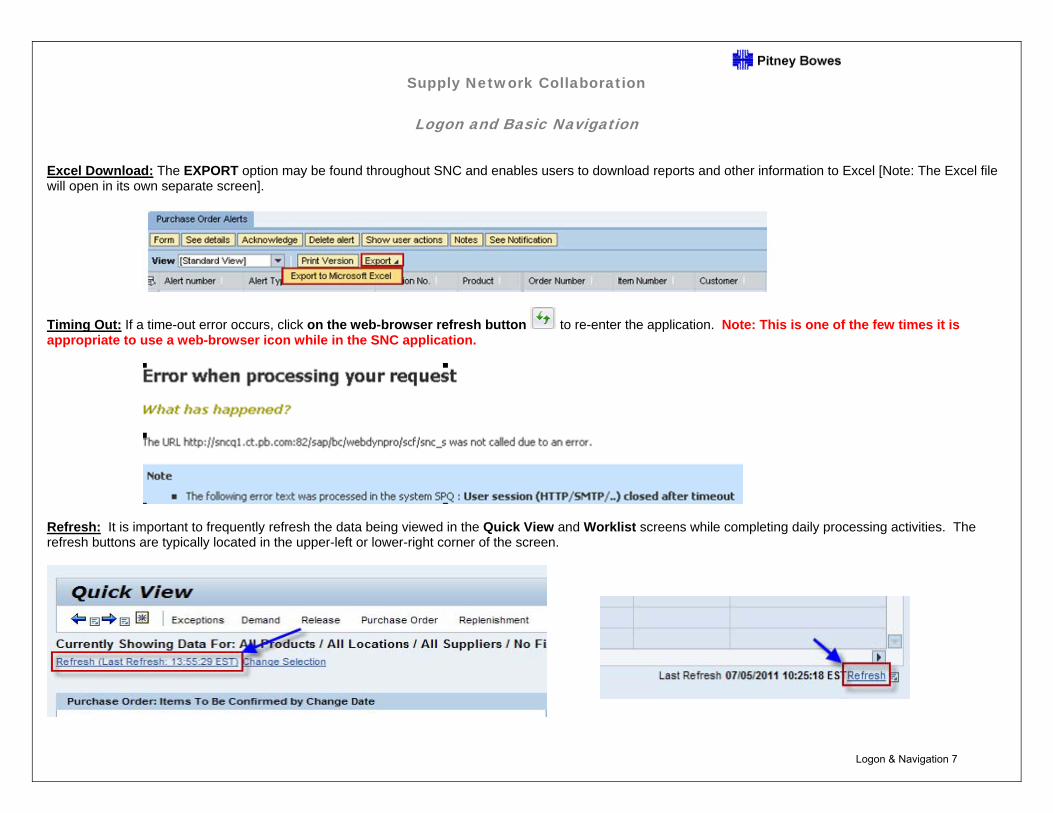
Excel Download: The EXPORT option may be found throughout SNC and enables users to download reports and other information to Excel [Note: The Excel file will open in its own separate screen].
Timing Out: If a time-out error occurs, click on the web-browser refresh button to re-enter the application. Note: This is one of the few times it is appropriate to use a web-browser icon while in the SNC application.
Refresh: It is important to frequently refresh the data being viewed in the Quick View and Worklist screens while completing daily processing activities. The refresh buttons are typically located in the upper-left or lower-right corner of the screen.
Logon & Navigation 7
Supply Network Collaboration
Daily Processing Quick Guide
Purchase Order Confirmations Using the PO Worklist
Purchase Order Processing 1
Daily Processing Using Quick View
Purchase Order Confirmations Using the PO Worklist
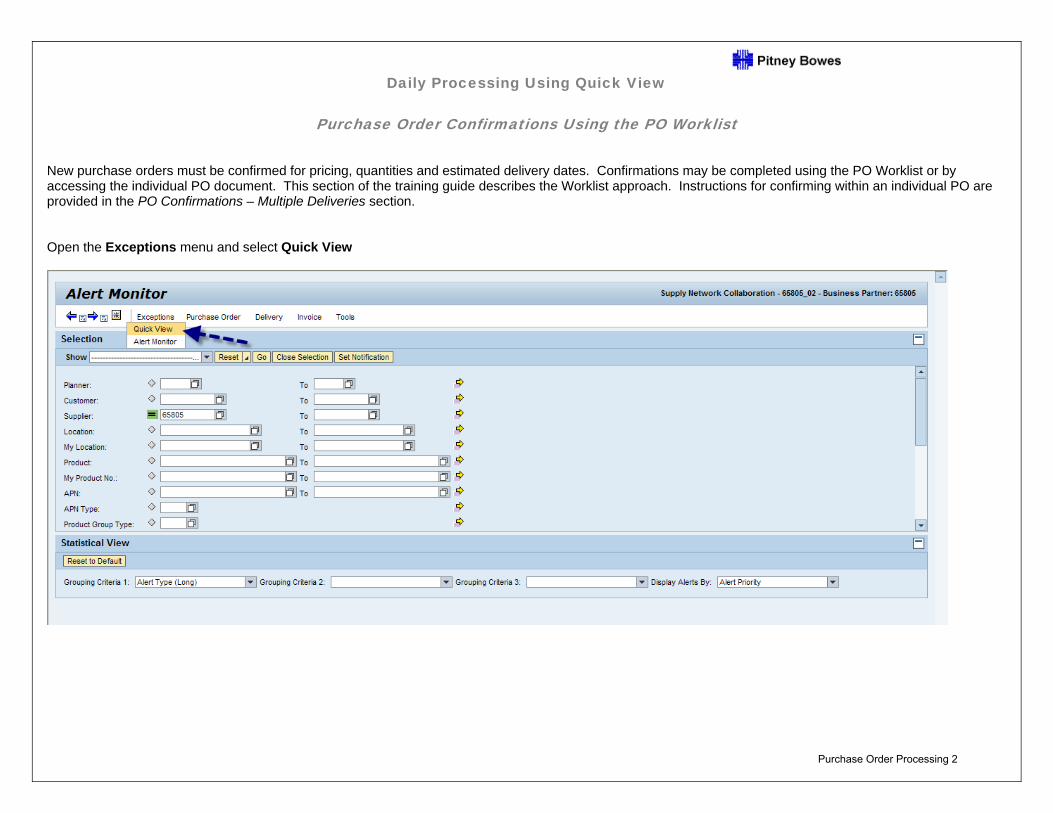
New purchase orders must be confirmed for pricing, quantities and estimated delivery dates. Confirmations may be completed using the PO Worklist or by accessing the individual PO document. This section of the training guide describes the Worklist approach. Instructions for confirming within an individual PO are provided in the PO Confirmations – Multiple Deliveries section. Open the Exceptions menu and select Quick View
Purchase Order Processing 2
Daily Processing Using Quick View
Purchase Order Confirmations Using the PO Worklist
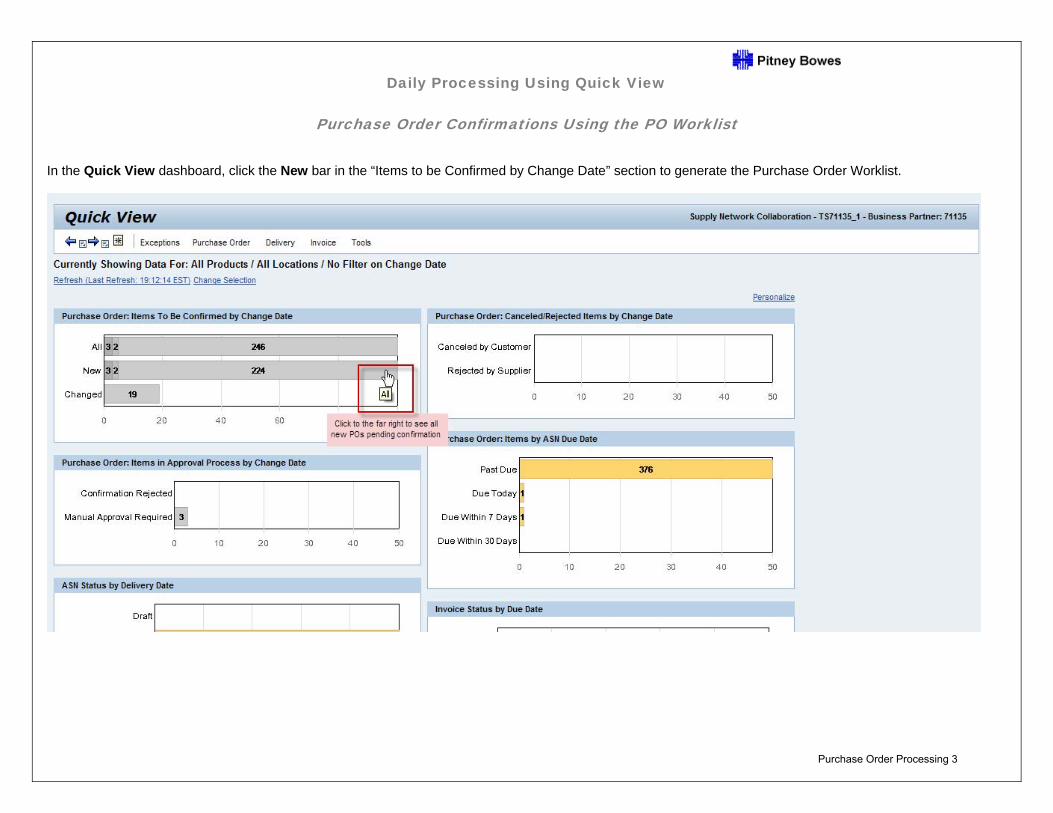
In the Quick View dashboard, click the New bar in the “Items to be Confirmed by Change Date” section to generate the Purchase Order Worklist.
Purchase Order Processing 3
Daily Processing Using Quick View
Purchase Order Confirmations Using the PO Worklist
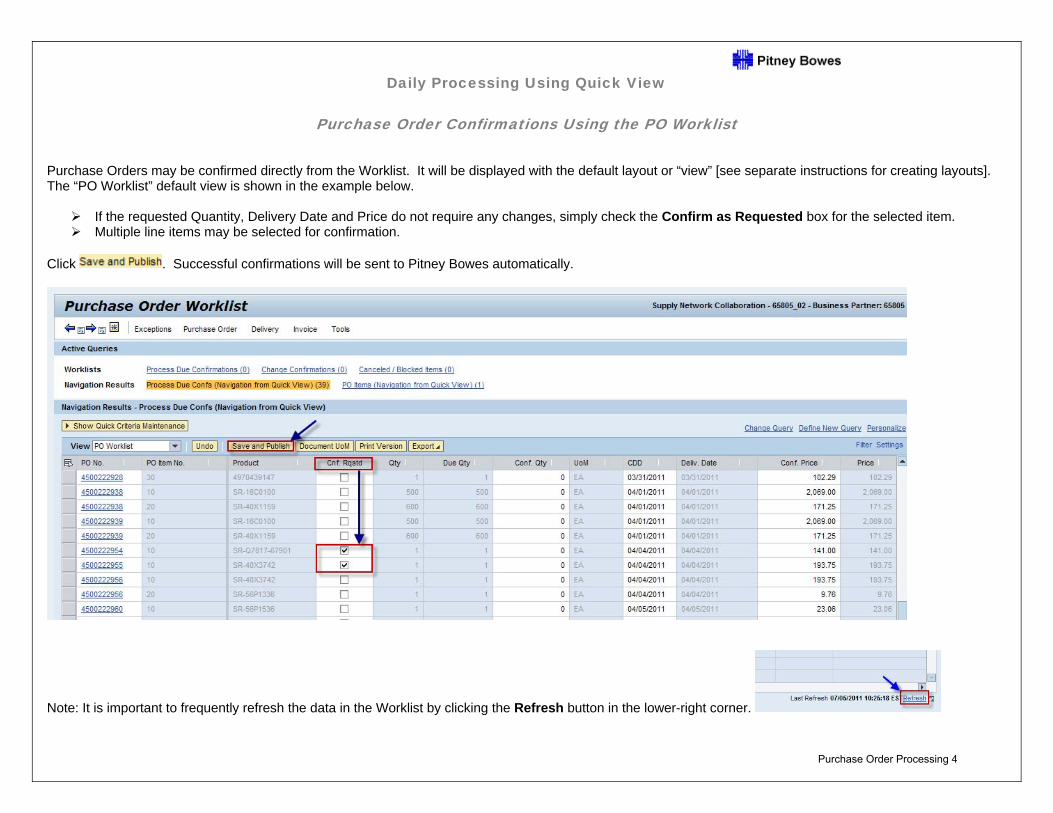
Purchase Orders may be confirmed directly from the Worklist. It will be displayed with the default layout or “view” [see separate instructions for creating layouts]. The “PO Worklist” default view is shown in the example below.
If the requested Quantity, Delivery Date and Price do not require any changes, simply check the Confirm as Requested box for the selected item. Multiple line items may be selected for confirmation.
Click . Successful confirmations will be sent to Pitney Bowes automatically.
Note: It is important to frequently refresh the data in the Worklist by clicking the Refresh button in the lower-right corner.
Purchase Order Processing 4
Daily Processing Using Quick View
Purchase Order Confirmations Using the PO Worklist
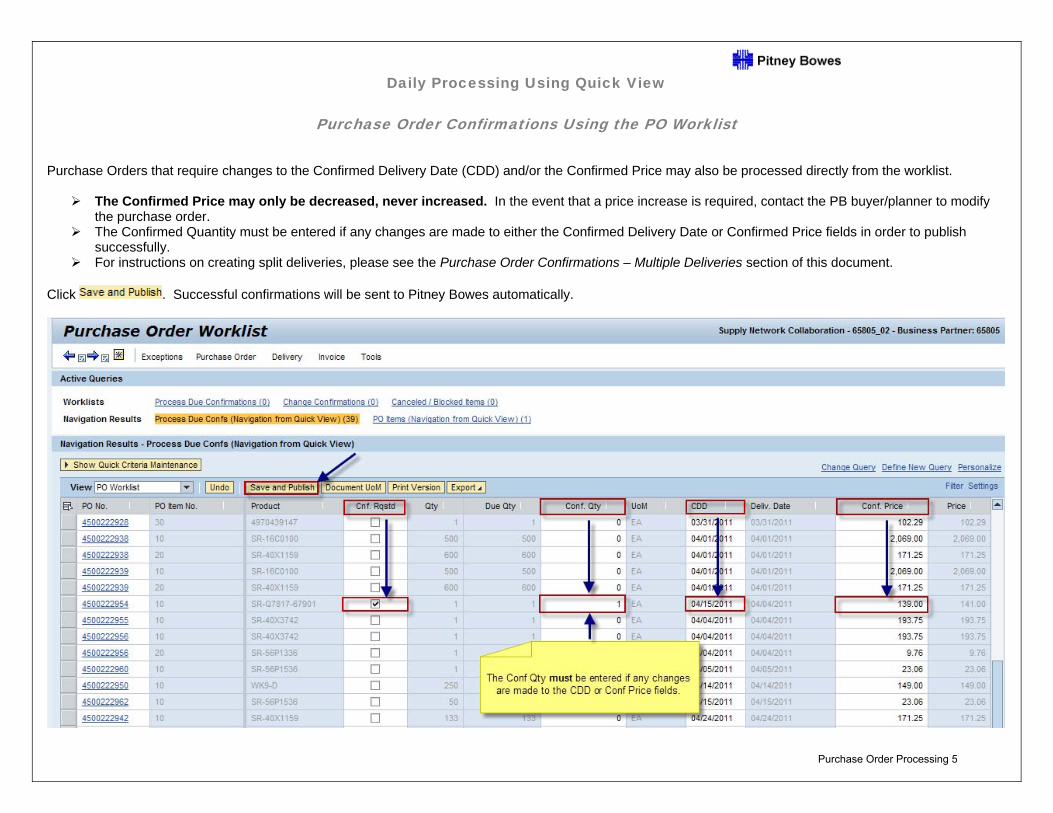
Purchase Orders that require changes to the Confirmed Delivery Date (CDD) and/or the Confirmed Price may also be processed directly from the worklist.
The Confirmed Price may only be decreased, never increased. In the event that a price increase is required, contact the PB buyer/planner to modify the purchase order.
The Confirmed Quantity must be entered if any changes are made to either the Confirmed Delivery Date or Confirmed Price fields in order to publish successfully.
For instructions on creating split deliveries, please see the Purchase Order Confirmations – Multiple Deliveries section of this document. Click . Successful confirmations will be sent to Pitney Bowes automatically.
Purchase Order Processing 5
Daily Processing Using Quick View
Purchase Order Confirmations Using the PO Worklist
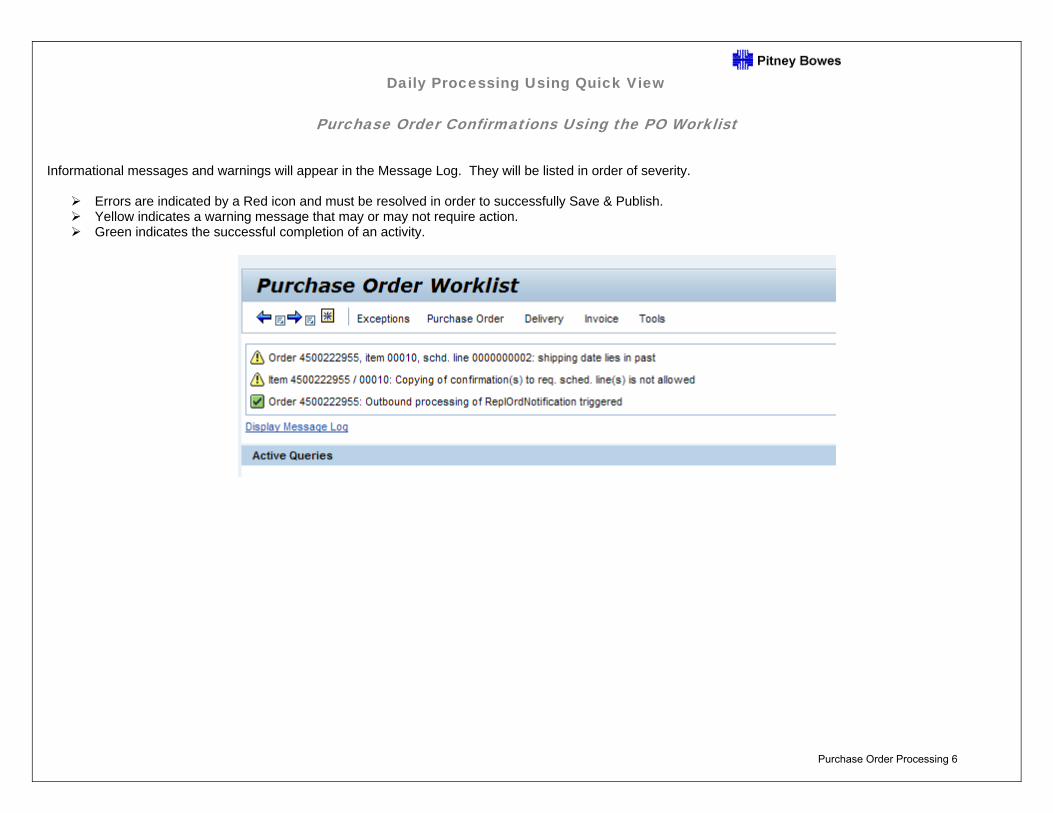
Informational messages and warnings will appear in the Message Log. They will be listed in order of severity.
Errors are indicated by a Red icon and must be resolved in order to successfully Save & Publish. Yellow indicates a warning message that may or may not require action. Green indicates the successful completion of an activity.
Purchase Order Processing 6
Supply Network Collaboration
Daily Processing Quick Guide
Purchase Order Confirmations Multiple Deliveries
Purchase Order Processing 7
Daily Processing Using Quick View
PO Confirmations - Multiple Deliveries
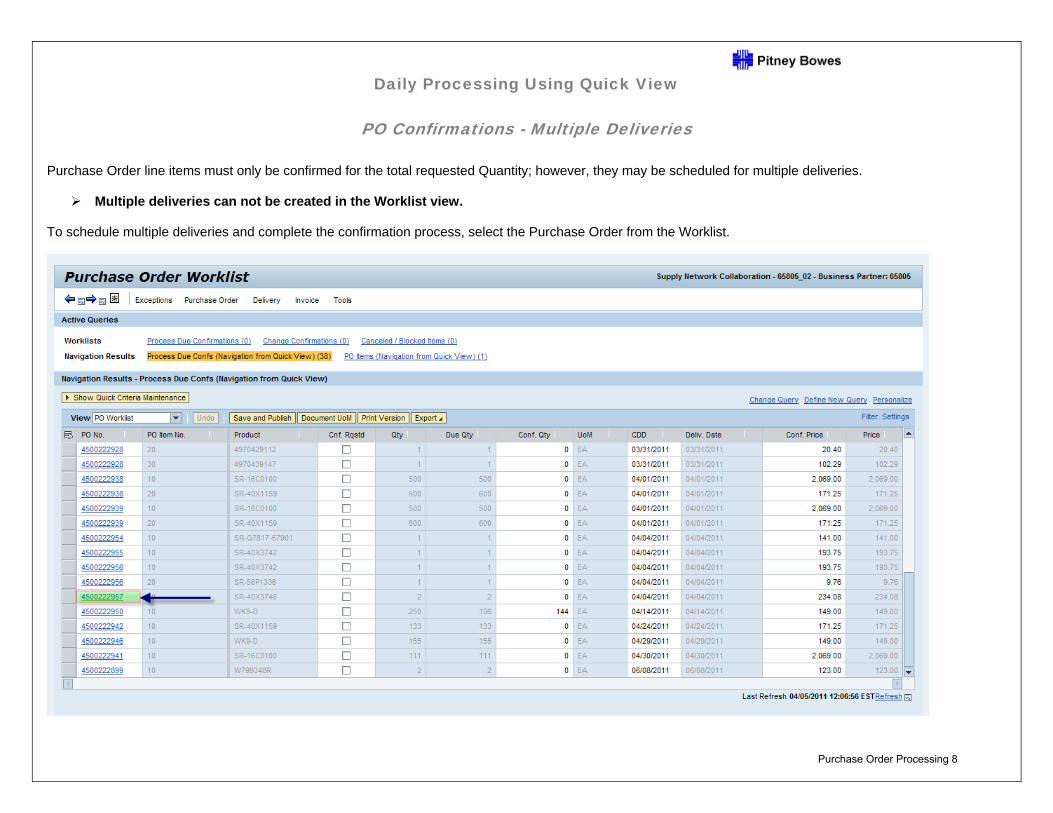
Purchase Order line items must only be confirmed for the total requested Quantity; however, they may be scheduled for multiple deliveries.
Multiple deliveries can not be created in the Worklist view. To schedule multiple deliveries and complete the confirmation process, select the Purchase Order from the Worklist.
Purchase Order Processing 8
Daily Processing Using Quick View
PO Confirmations - Multiple Deliveries
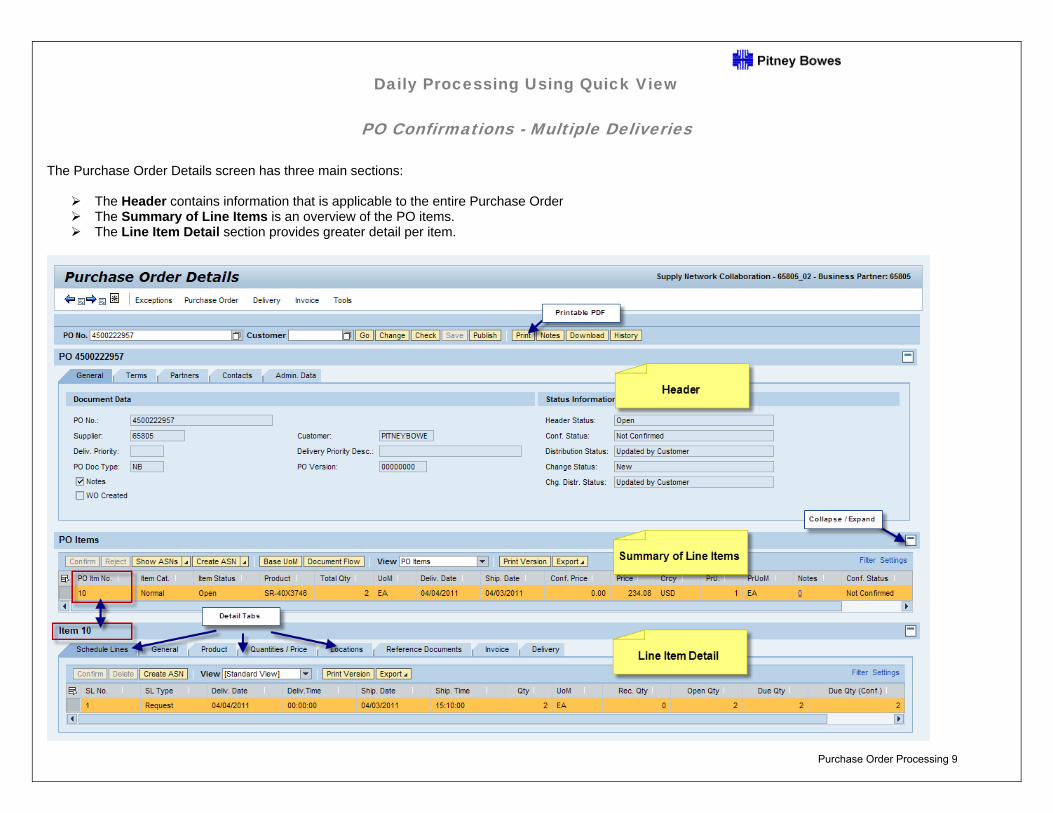
The Purchase Order Details screen has three main sections:
The Header contains information that is applicable to the entire Purchase Order The Summary of Line Items is an overview of the PO items. The Line Item Detail section provides greater detail per item.
Purchase Order Processing 9
Daily Processing Using Quick View
PO Confirmations - Multiple Deliveries
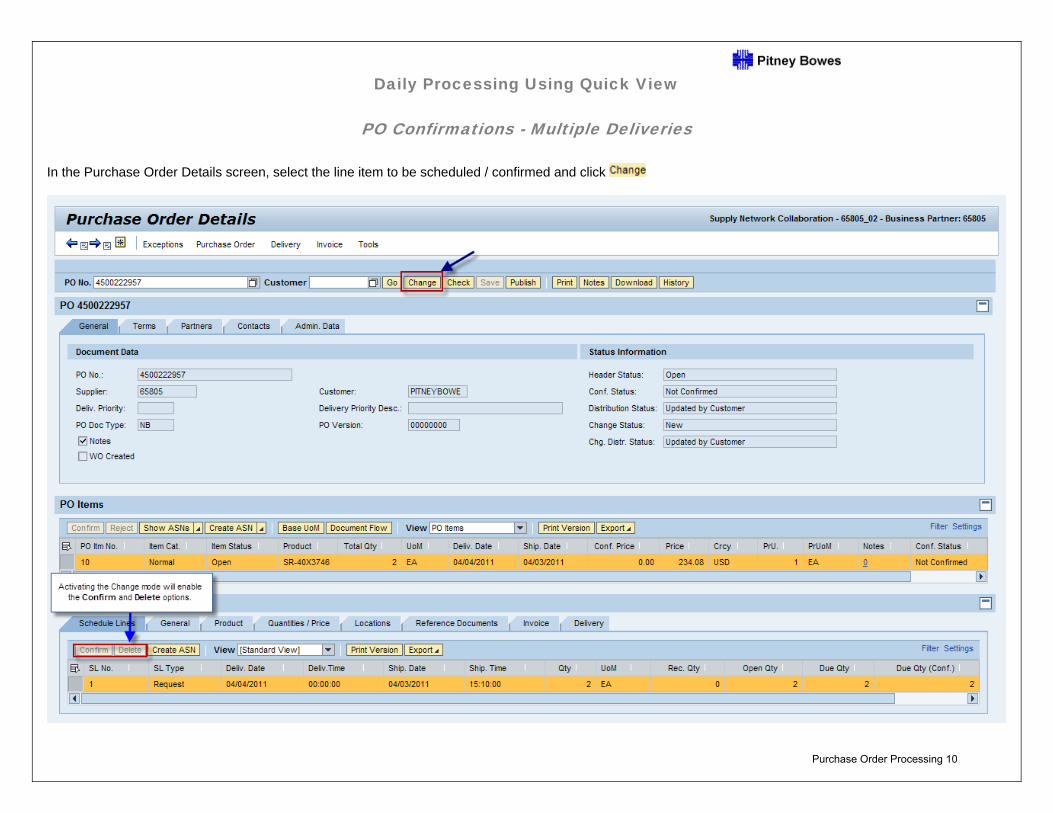
In the Purchase Order Details screen, select the line item to be scheduled / confirmed and click
Purchase Order Processing 10
Daily Processing Using Quick View
PO Confirmations - Multiple Deliveries
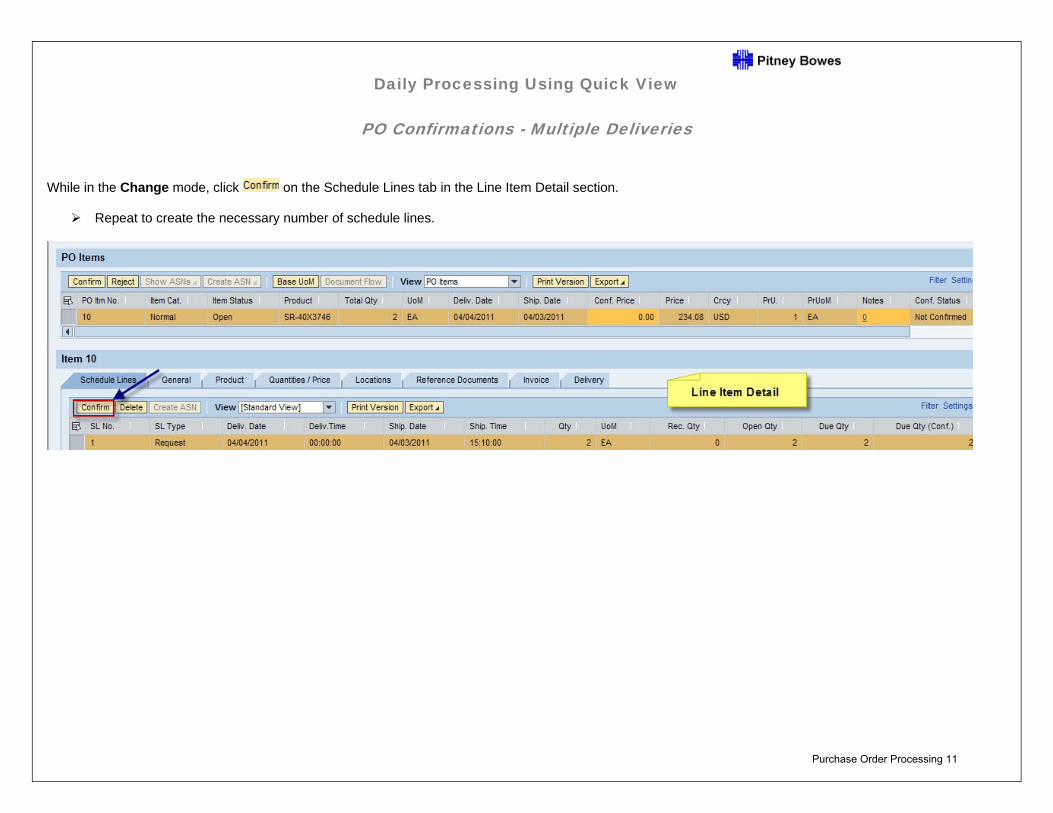
While in the Change mode, click on the Schedule Lines tab in the Line Item Detail section.
Repeat to create the necessary number of schedule lines.
Purchase Order Processing 11
Daily Processing Using Quick View
PO Confirmations - Multiple Deliveries
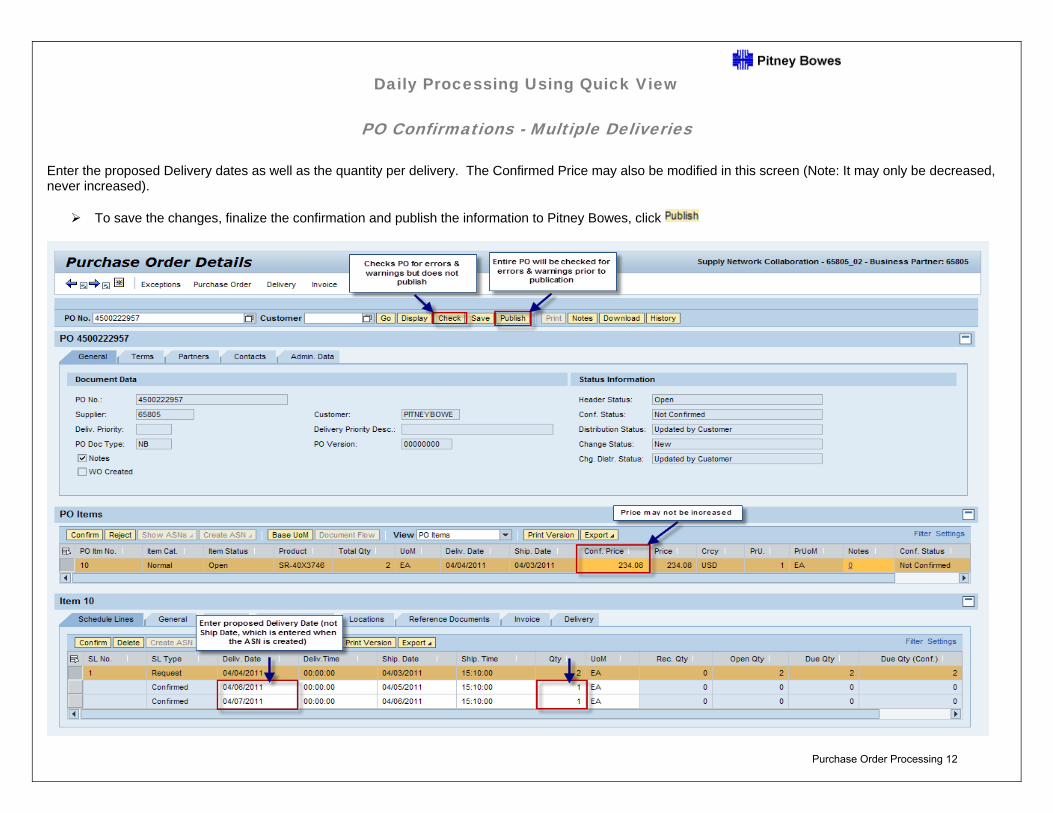
Enter the proposed Delivery dates as well as the quantity per delivery. The Confirmed Price may also be modified in this screen (Note: It may only be decreased, never increased).
To save the changes, finalize the confirmation and publish the information to Pitney Bowes, click
Purchase Order Processing 12
Daily Processing Using Quick View
PO Confirmations - Multiple Deliveries
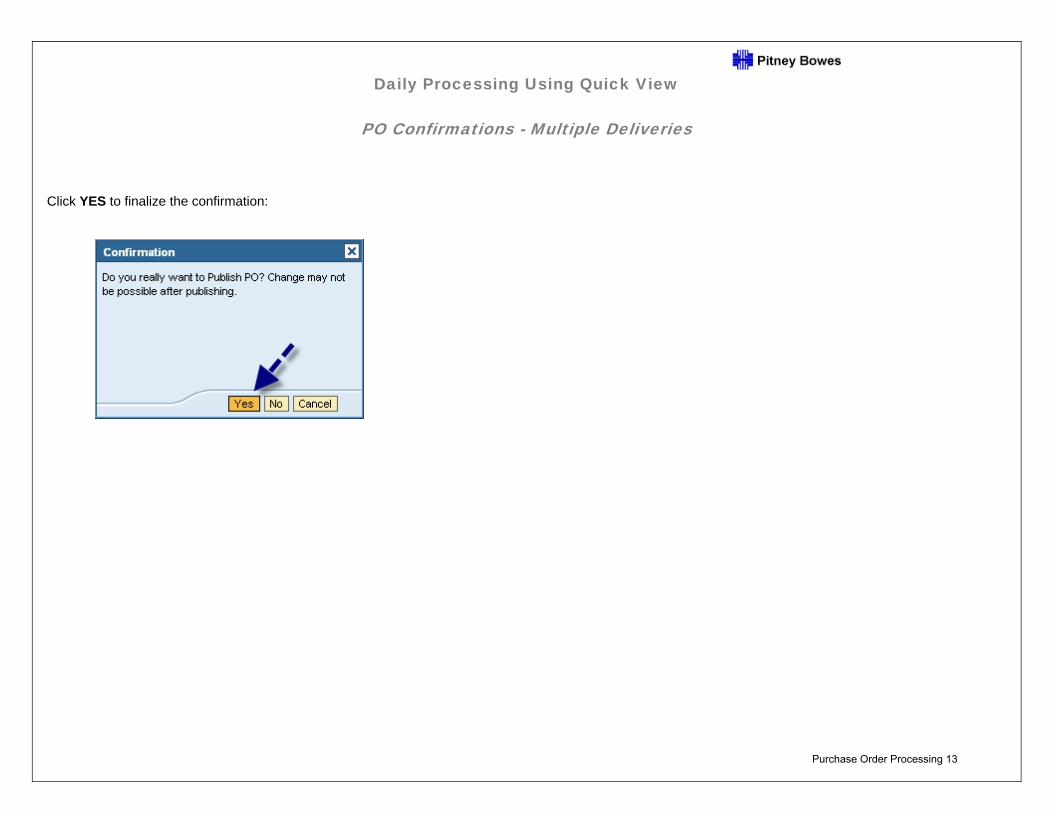
Click YES to finalize the confirmation:
Purchase Order Processing 13
Daily Processing Using Quick View
PO Confirmations - Multiple Deliveries
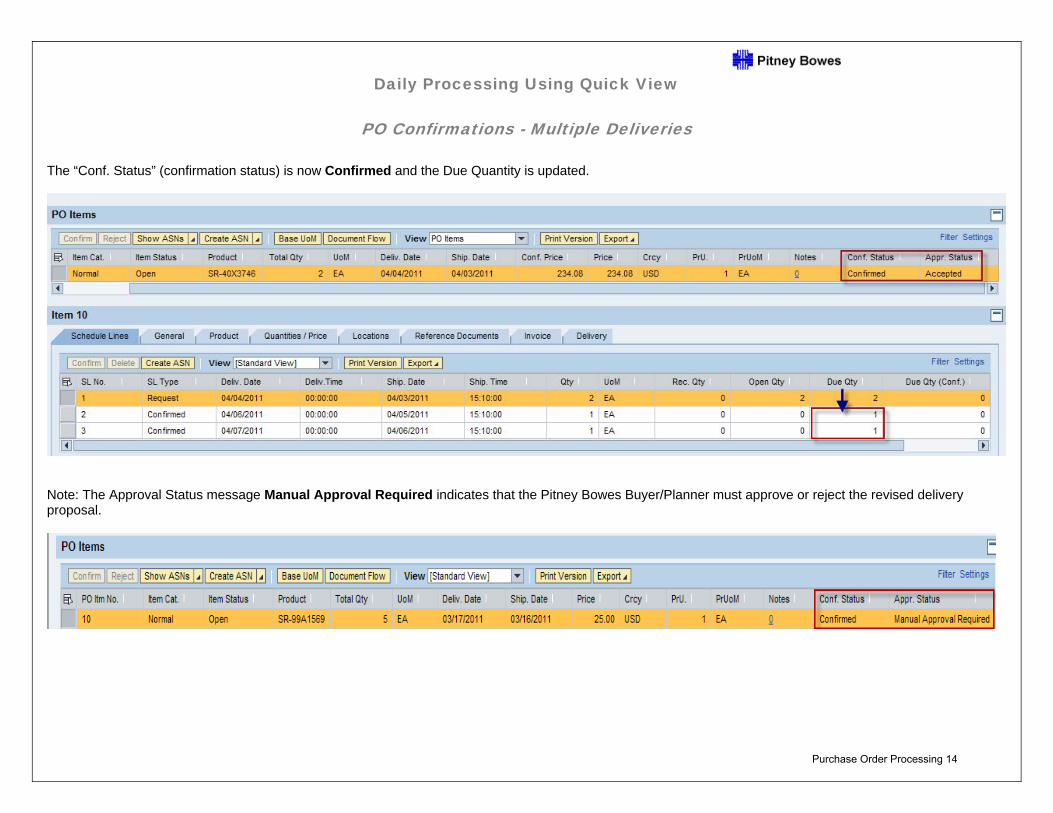
The “Conf. Status” (confirmation status) is now Confirmed and the Due Quantity is updated.
Note: The Approval Status message Manual Approval Required indicates that the Pitney Bowes Buyer/Planner must approve or reject the revised delivery proposal.
Purchase Order Processing 14
Daily Processing Using Quick View
PO Confirmations - Multiple Deliveries
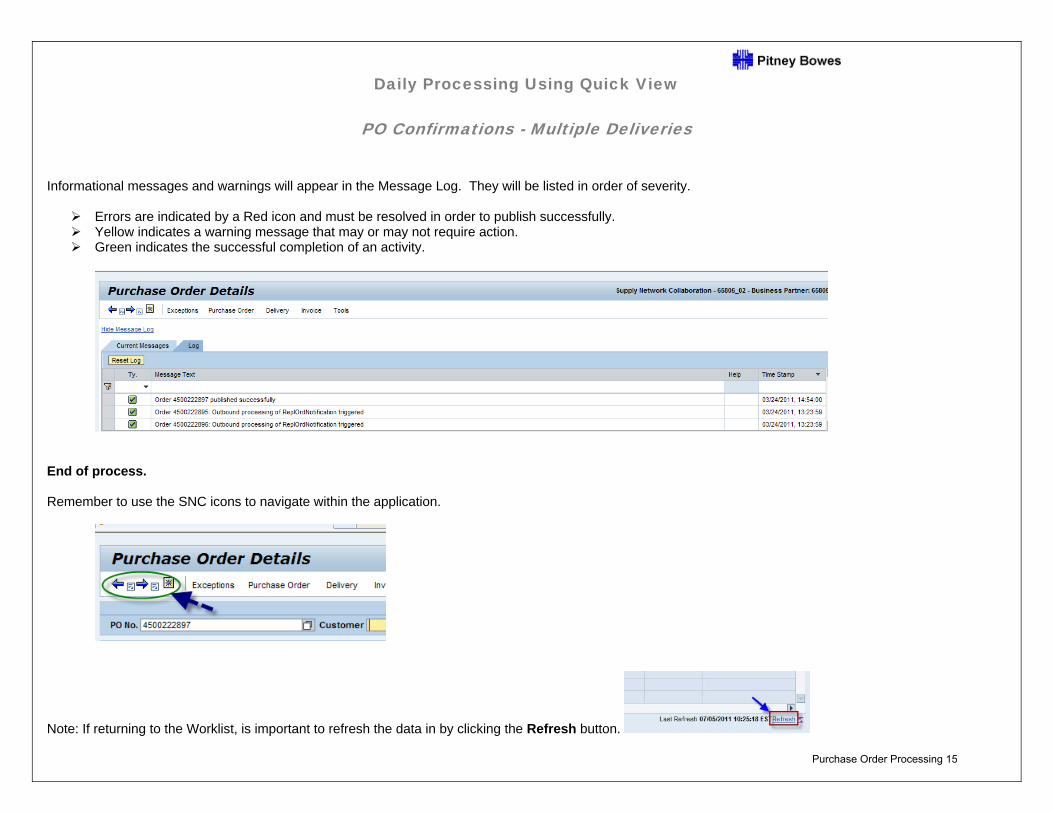
Informational messages and warnings will appear in the Message Log. They will be listed in order of severity.
Errors are indicated by a Red icon and must be resolved in order to publish successfully. Yellow indicates a warning message that may or may not require action. Green indicates the successful completion of an activity.
End of process. Remember to use the SNC icons to navigate within the application.
Note: If returning to the Worklist, is important to refresh the data in by clicking the Refresh button.
Purchase Order Processing 15
Supply Network Collaboration
Daily Processing Quick Guide
Advanced Shipment Notifications Using the Due List
ASN Processing 1
Daily Processing Using Quick View
Advanced Shipment Notifications Using the Due List
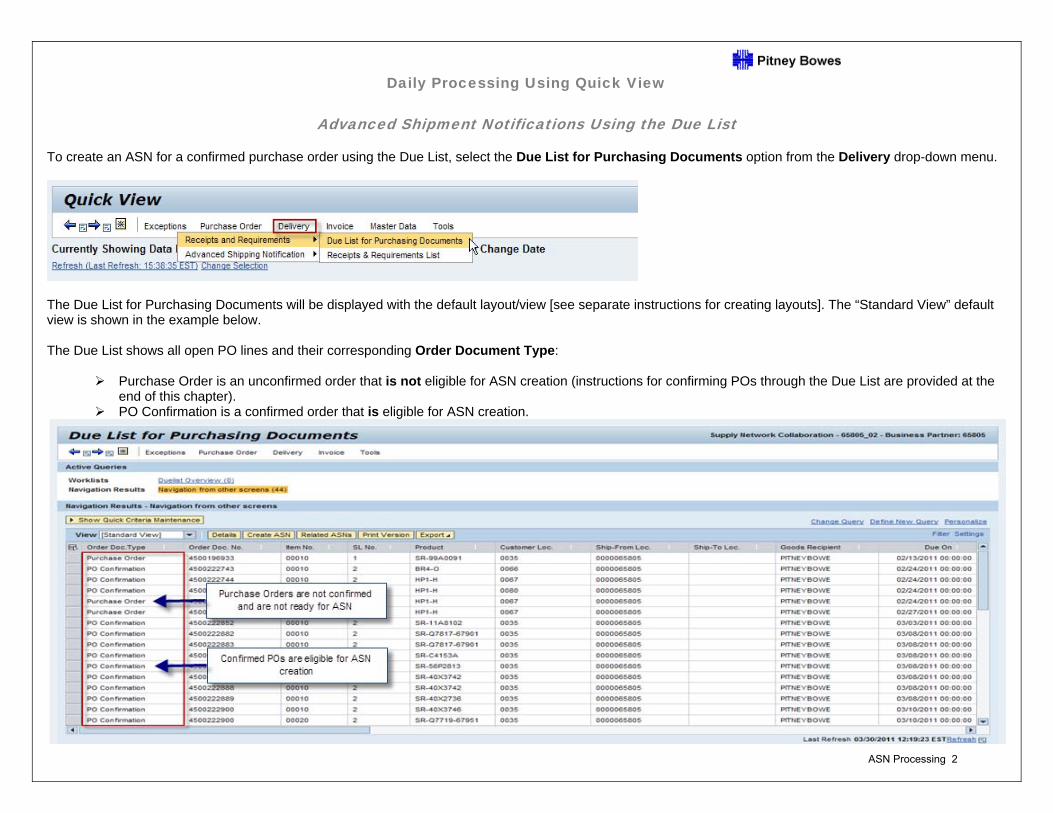
To create an ASN for a confirmed purchase order using the Due List, select the Due List for Purchasing Documents option from the Delivery drop-down menu.
The Due List for Purchasing Documents will be displayed with the default layout/view [see separate instructions for creating layouts]. The “Standard View” default view is shown in the example below. The Due List shows all open PO lines and their corresponding Order Document Type:
Purchase Order is an unconfirmed order that is not eligible for ASN creation (instructions for confirming POs through the Due List are provided at the end of this chapter).
PO Confirmation is a confirmed order that is eligible for ASN creation.
ASN Processing 2
Daily Processing Using Quick View
Advanced Shipment Notifications Using the Due List
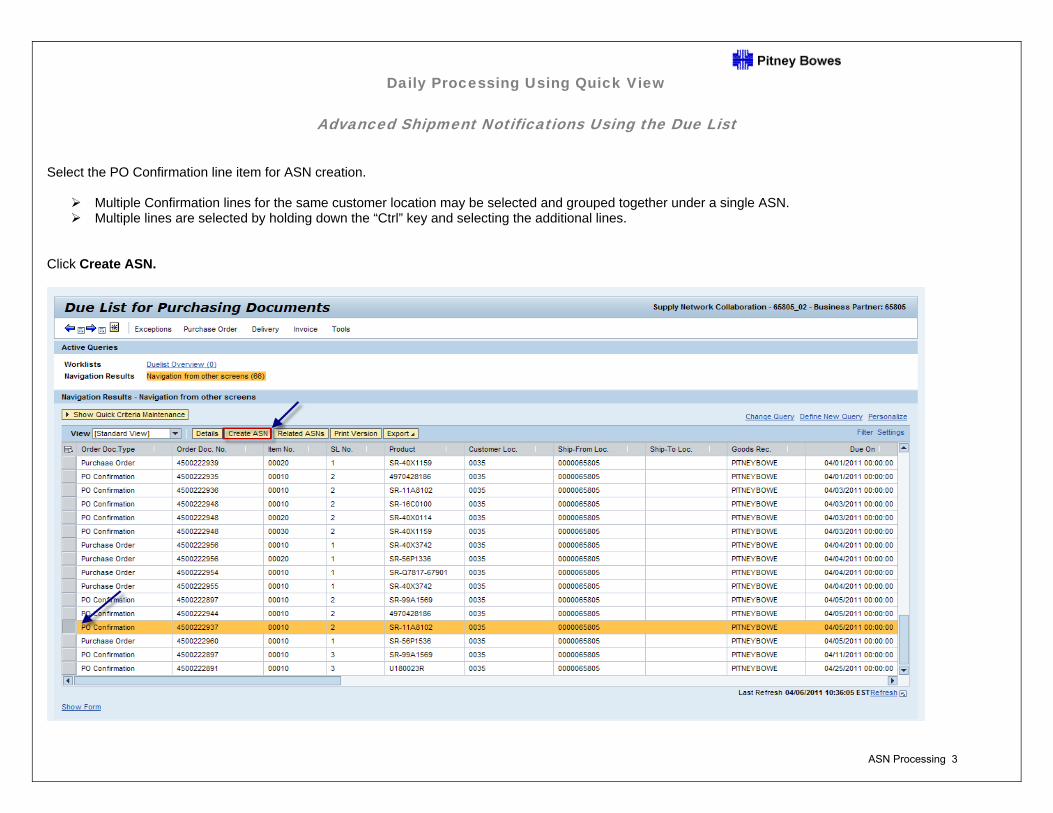
Select the PO Confirmation line item for ASN creation.
Multiple Confirmation lines for the same customer location may be selected and grouped together under a single ASN. Multiple lines are selected by holding down the “Ctrl” key and selecting the additional lines.
Click Create ASN.
ASN Processing 3
Daily Processing Using Quick View
Advanced Shipment Notifications Using the Due List
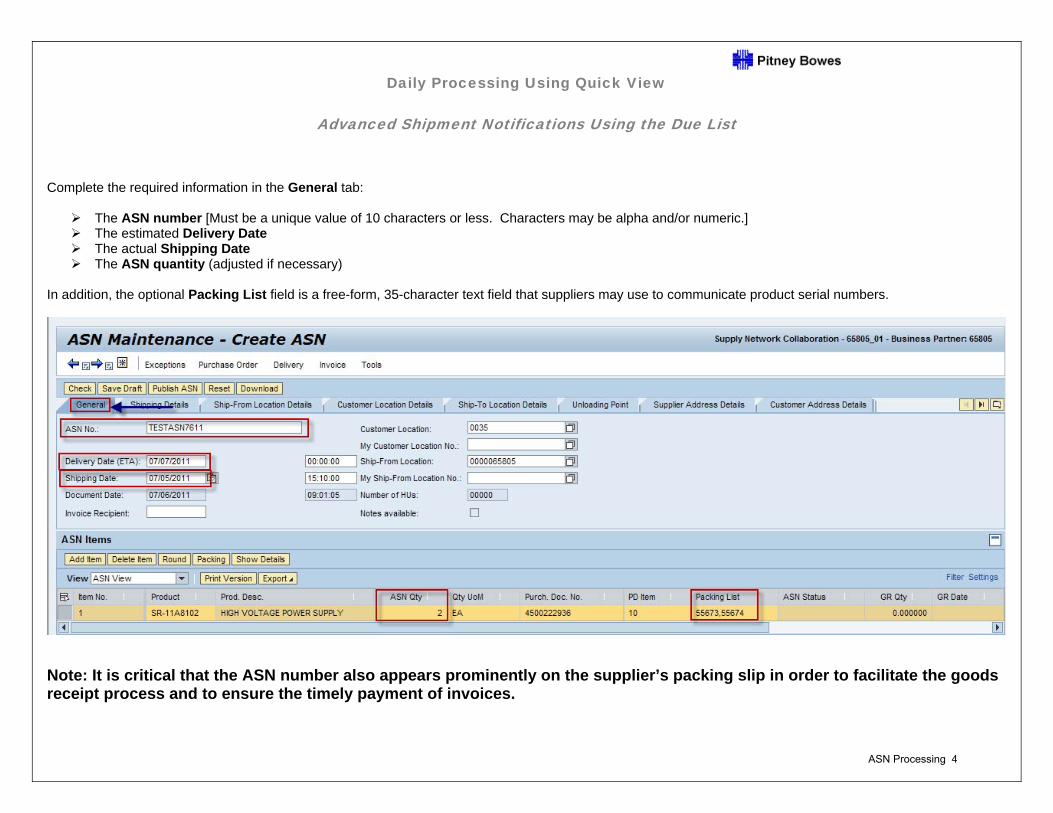
Complete the required information in the General tab:
The ASN number [Must be a unique value of 10 characters or less. Characters may be alpha and/or numeric.] The estimated Delivery Date The actual Shipping Date The ASN quantity (adjusted if necessary)
In addition, the optional Packing List field is a free-form, 35-character text field that suppliers may use to communicate product serial numbers.
Note: It is critical that the ASN number also appears prominently on the supplier’s packing slip in order to facilitate the goods receipt process and to ensure the timely payment of invoices.
ASN Processing 4
Daily Processing Using Quick View
Advanced Shipment Notifications Using the Due List
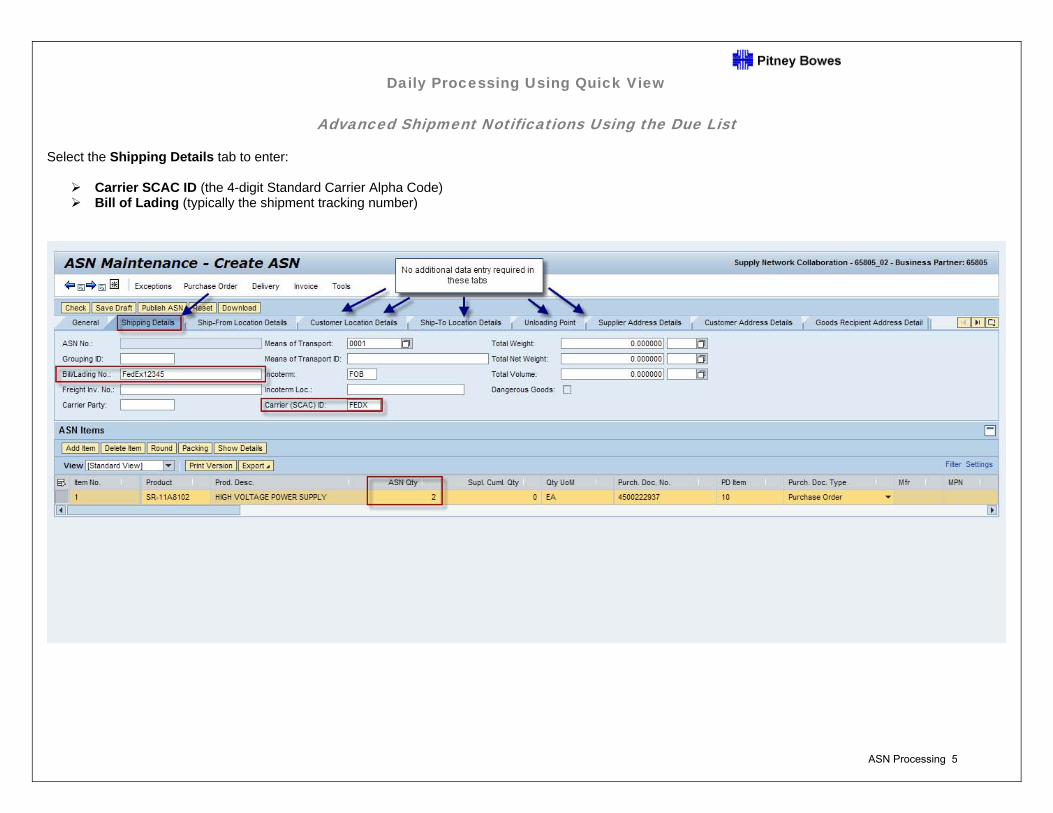
Select the Shipping Details tab to enter:
Carrier SCAC ID (the 4-digit Standard Carrier Alpha Code) Bill of Lading (typically the shipment tracking number)
ASN Processing 5
Daily Processing Using Quick View
Advanced Shipment Notifications Using the Due List
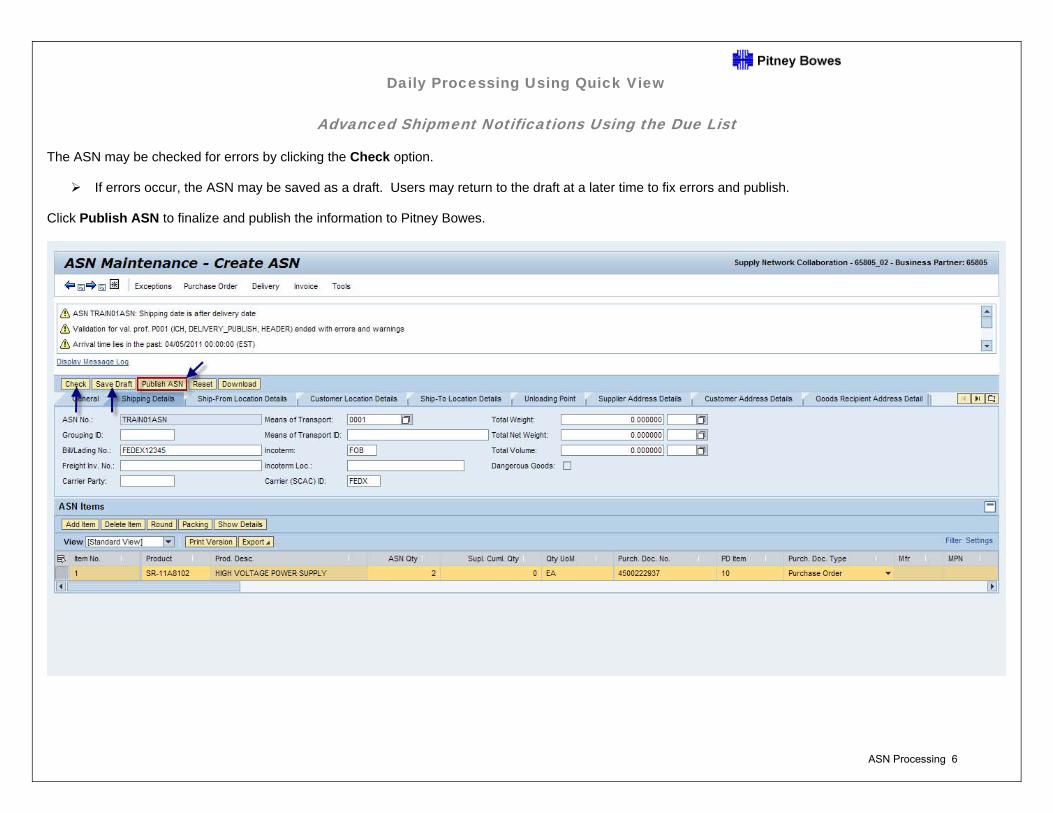
The ASN may be checked for errors by clicking the Check option.
If errors occur, the ASN may be saved as a draft. Users may return to the draft at a later time to fix errors and publish. Click Publish ASN to finalize and publish the information to Pitney Bowes.
ASN Processing 6

Daily Processing Using Quick View
Advanced Shipment Notifications Using the Due List
A final prompt will appear to confirm publication:
ASN Processing 7

Daily Processing Using Quick View
Advanced Shipment Notifications Using the Due List
Upon publication, the ASN Maintenance – ASN Details screen will appear. The ASN Status is updated to “PB-Published.”
End of ‘Create ASN’ Process
ASN Processing 8
Daily Processing Using Quick View
Advanced Shipment Notifications Using the Due List
Important! If it becomes necessary to cancel or modify an ASN after it has been published to Pitney Bowes, it is imperative that the supplier notifies the Pitney Bowes purchasing contact referenced in the purchase order before taking any action in SNC. The PB contact will facilitate any required changes.
ASN Processing 9
Daily Processing Using Quick View
Advanced Shipment Notifications Using the Due List
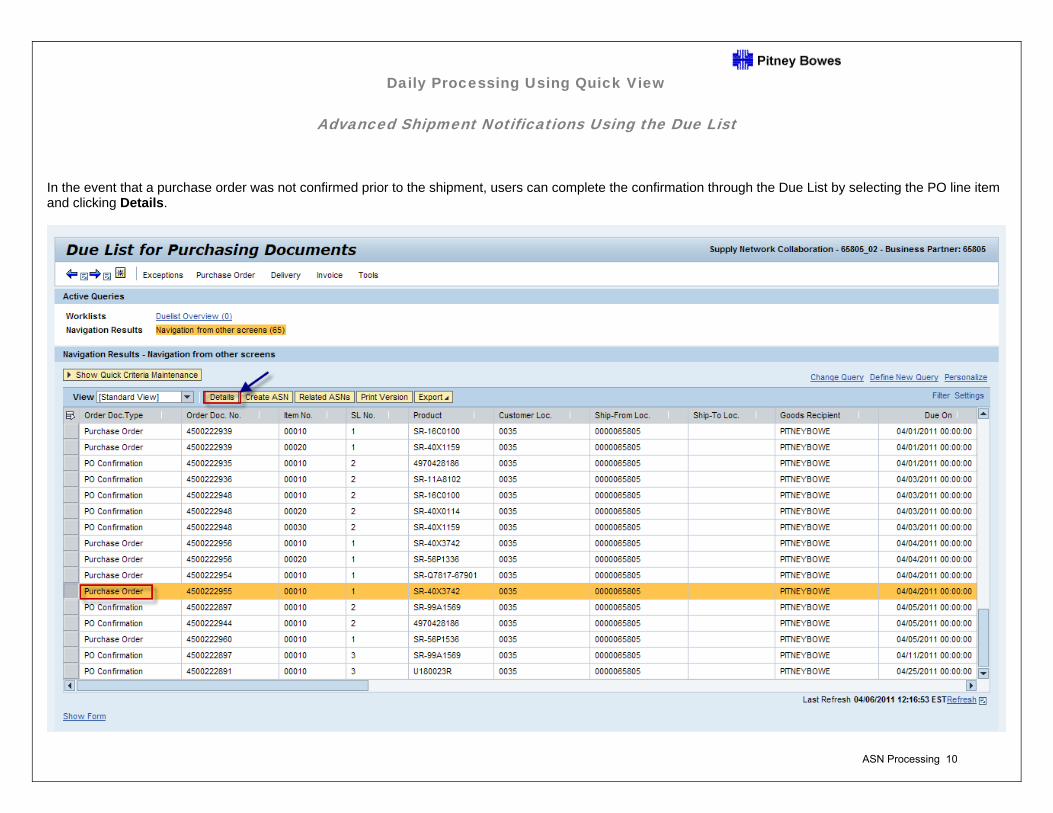
In the event that a purchase order was not confirmed prior to the shipment, users can complete the confirmation through the Due List by selecting the PO line item and clicking Details.
ASN Processing 10
Daily Processing Using Quick View
Advanced Shipment Notifications Using the Due List
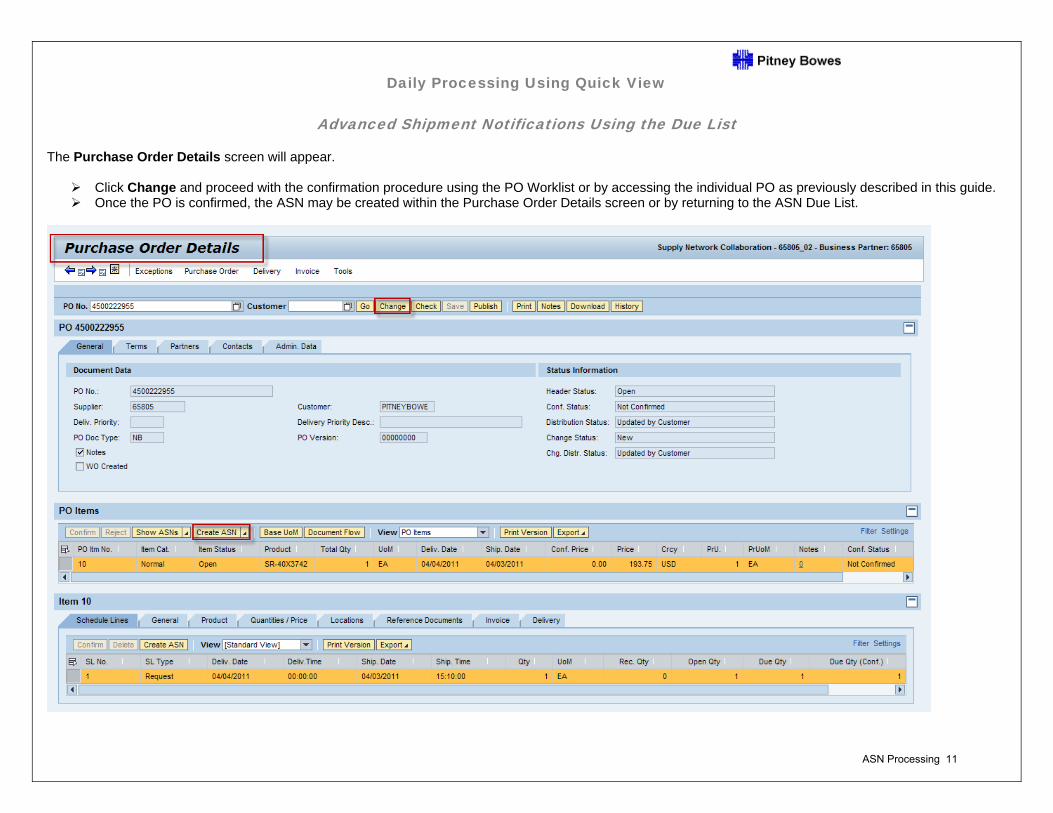
The Purchase Order Details screen will appear.
Click Change and proceed with the confirmation procedure using the PO Worklist or by accessing the individual PO as previously described in this guide. Once the PO is confirmed, the ASN may be created within the Purchase Order Details screen or by returning to the ASN Due List.
ASN Processing 11
Supply Network Collaboration
Daily Processing Quick Guide
Advanced Shipment Notifications Download
ASN Processing 12
Daily Processing Using File Transfer
Advanced Shipment Notifications – Download
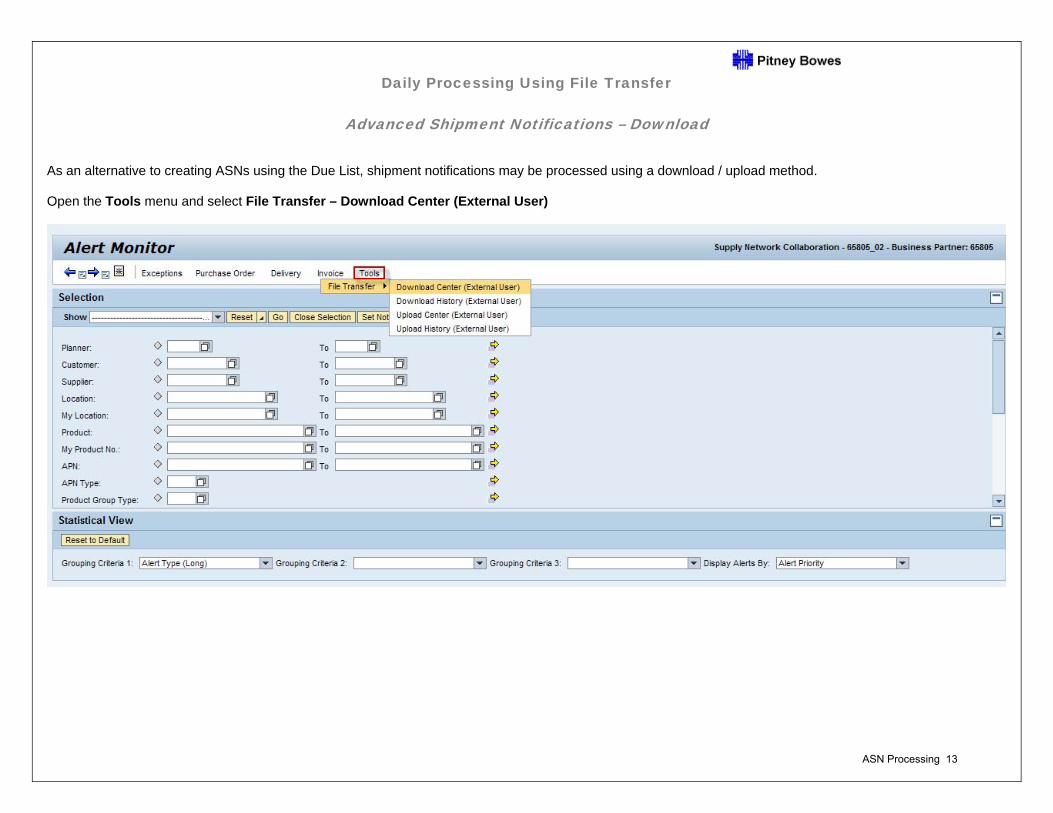
As an alternative to creating ASNs using the Due List, shipment notifications may be processed using a download / upload method. Open the Tools menu and select File Transfer – Download Center (External User)
ASN Processing 13
Daily Processing Using File Transfer
Advanced Shipment Notifications – Download
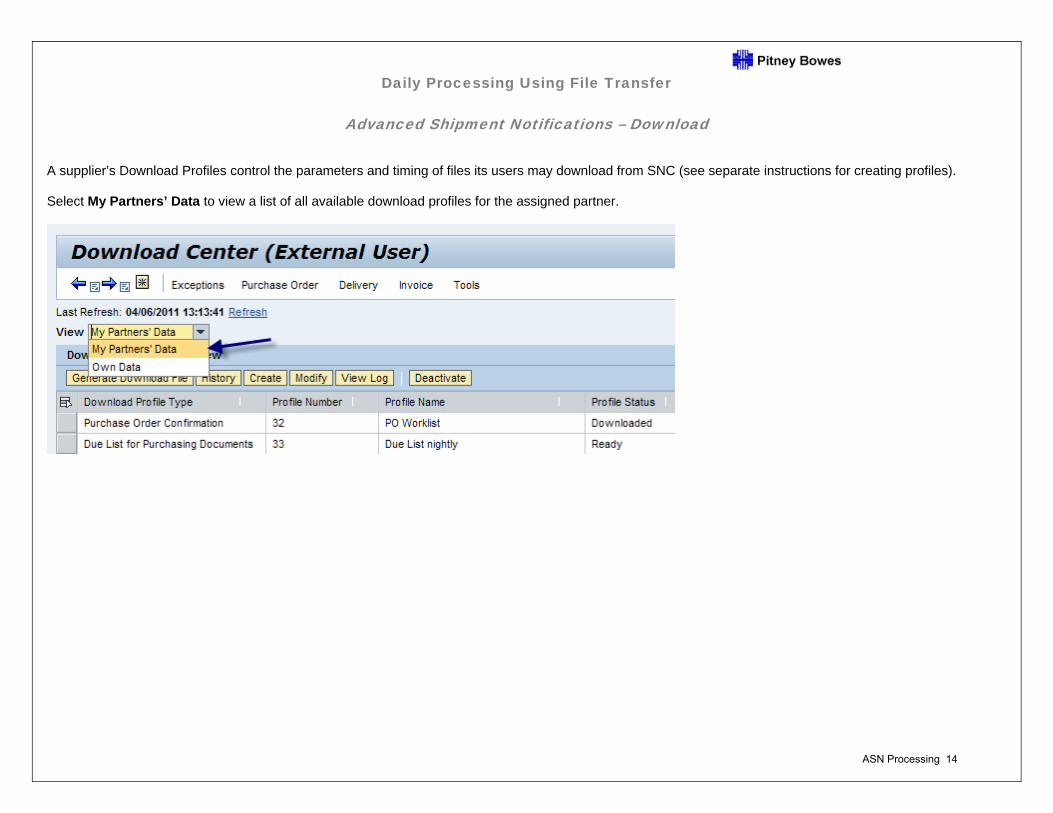
A supplier’s Download Profiles control the parameters and timing of files its users may download from SNC (see separate instructions for creating profiles). Select My Partners’ Data to view a list of all available download profiles for the assigned partner.
ASN Processing 14
Daily Processing Using File Transfer
Advanced Shipment Notifications – Download
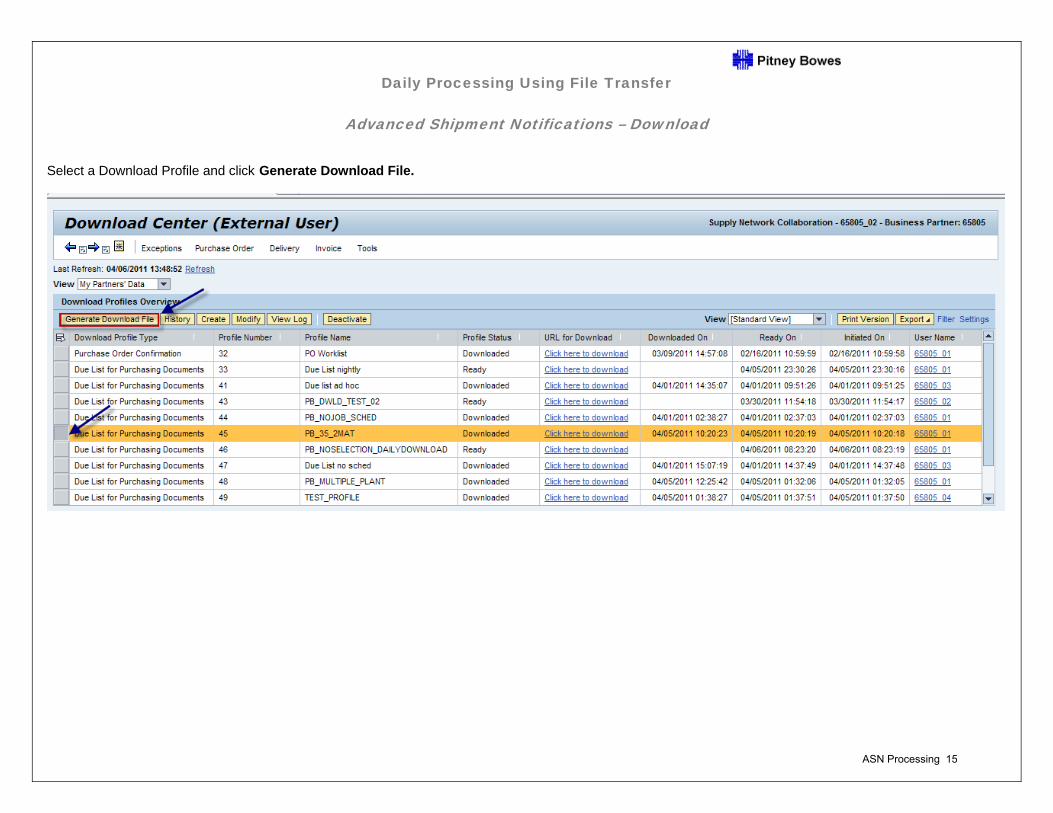
Select a Download Profile and click Generate Download File.
ASN Processing 15
Daily Processing Using File Transfer
Advanced Shipment Notifications – Download
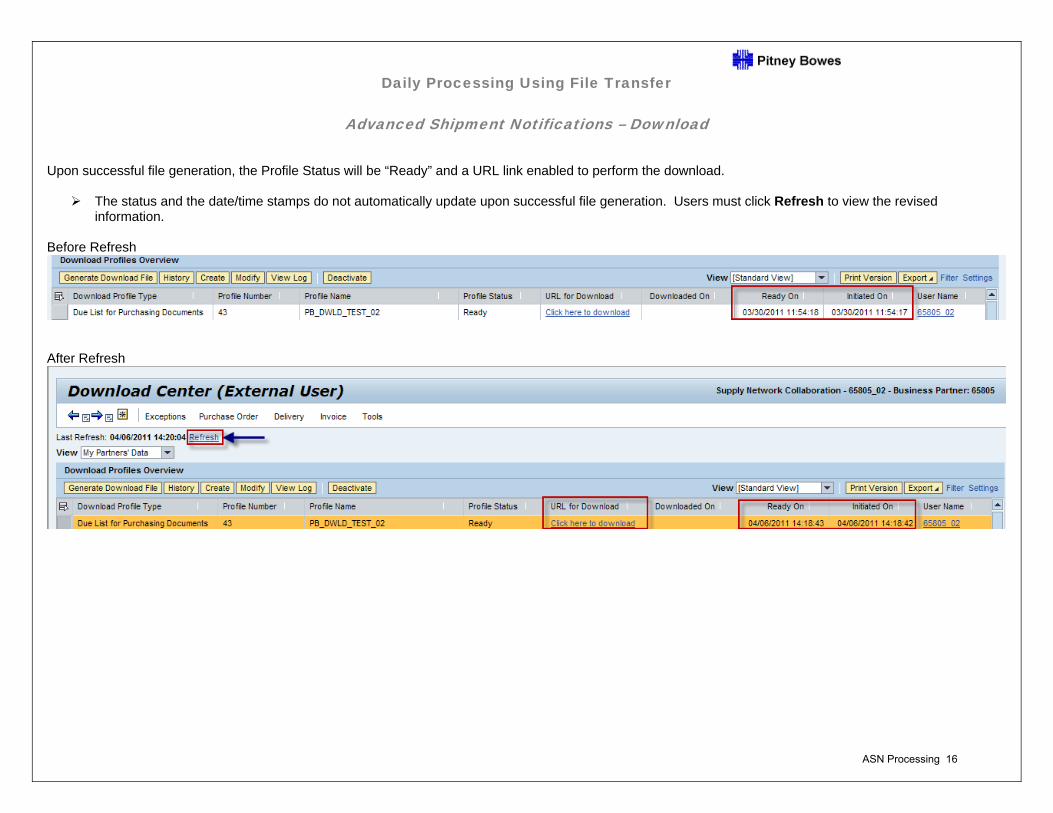
Upon successful file generation, the Profile Status will be “Ready” and a URL link enabled to perform the download.
The status and the date/time stamps do not automatically update upon successful file generation. Users must click Refresh to view the revised information.
Before Refresh
After Refresh
ASN Processing 16
Daily Processing Using File Transfer
Advanced Shipment Notifications – Download
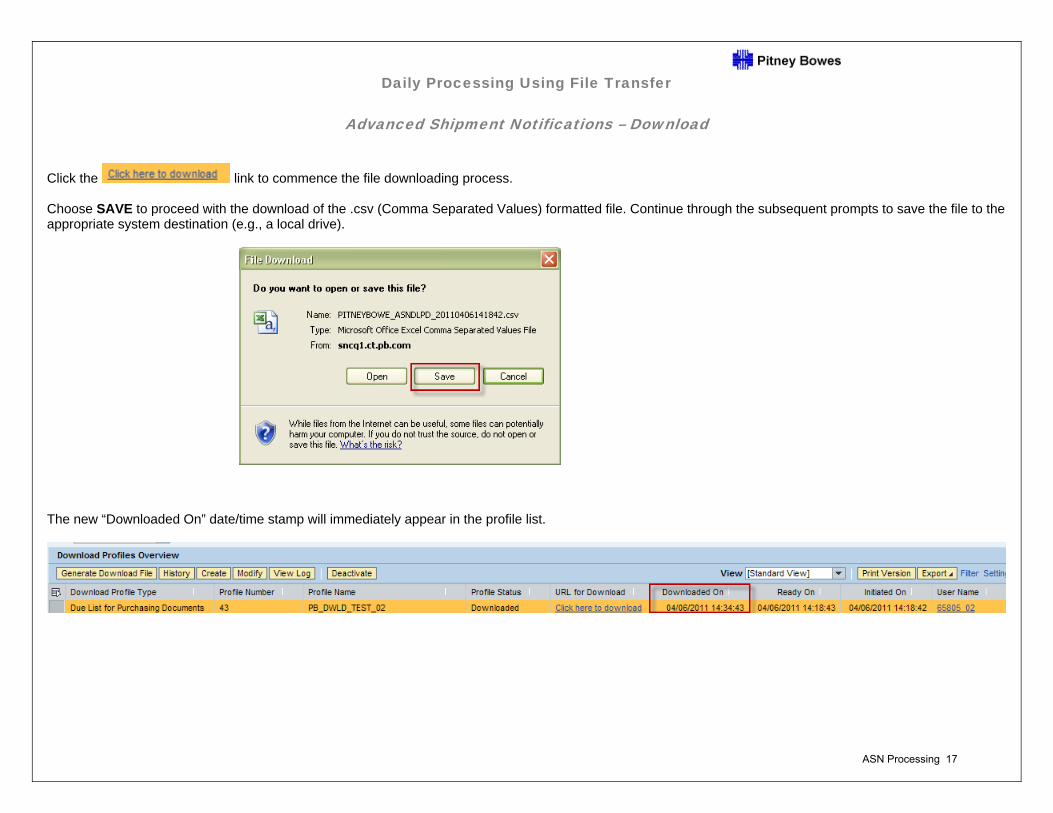
Click the link to commence the file downloading process. Choose SAVE to proceed with the download of the .csv (Comma Separated Values) formatted file. Continue through the subsequent prompts to save the file to the appropriate system destination (e.g., a local drive).
The new “Downloaded On” date/time stamp will immediately appear in the profile list.
ASN Processing 17

Daily Processing Using File Transfer
Advanced Shipment Notifications – Download
To see the detailed history for a profile, select it from the Download Center list and click History.
ASN Processing 18
Daily Processing Using File Transfer
Advanced Shipment Notifications – Download
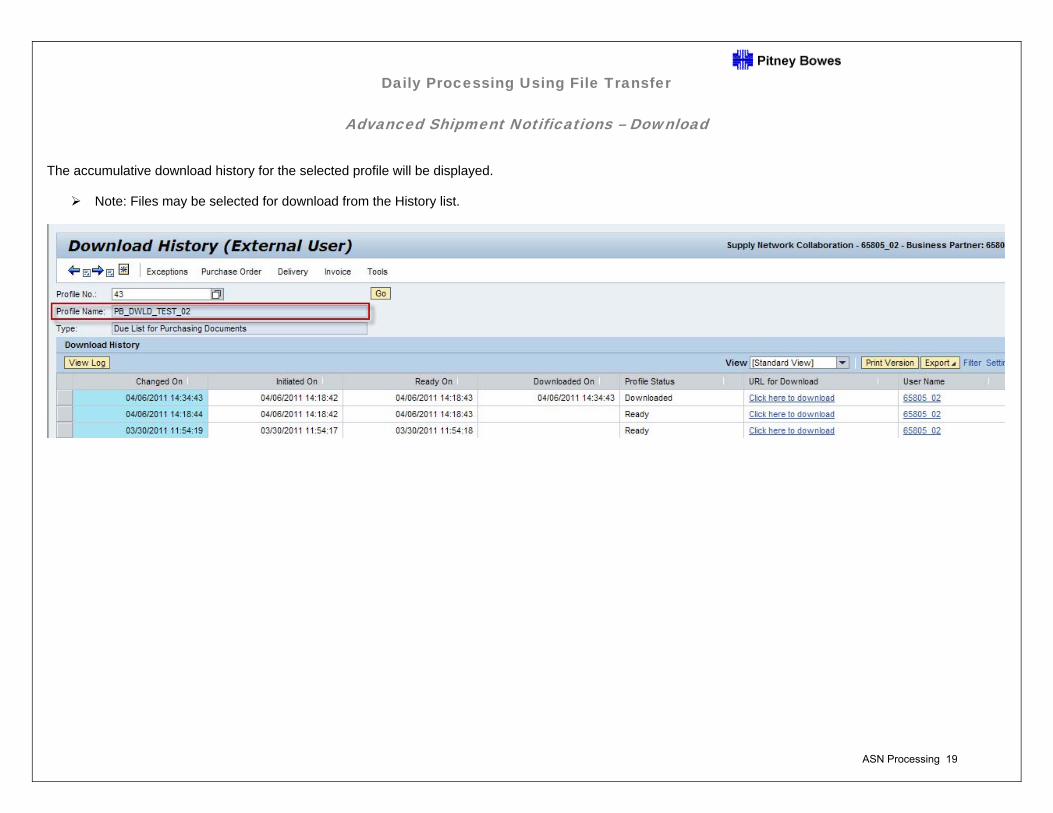
The accumulative download history for the selected profile will be displayed.
Note: Files may be selected for download from the History list.
ASN Processing 19
Daily Processing Using File Transfer
Advanced Shipment Notifications – Download
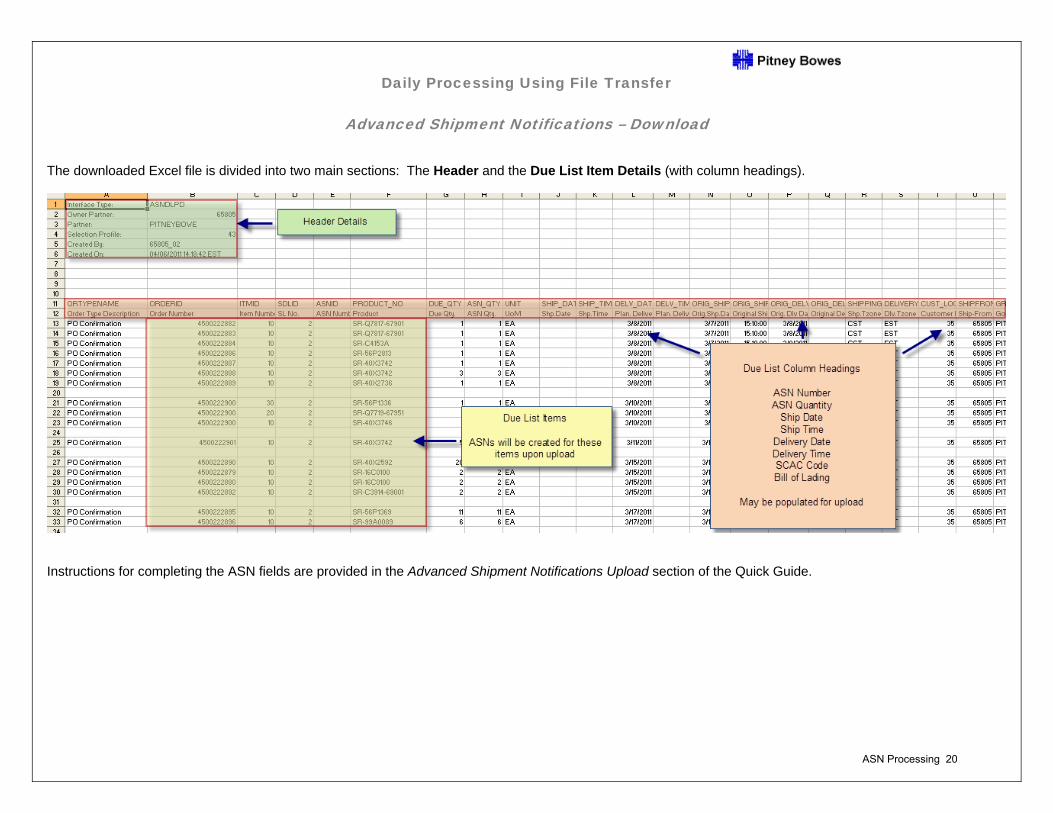
The downloaded Excel file is divided into two main sections: The Header and the Due List Item Details (with column headings).
Instructions for completing the ASN fields are provided in the Advanced Shipment Notifications Upload section of the Quick Guide.
ASN Processing 20
Supply Network Collaboration
Daily Processing Quick Guide
Advanced Shipment Notifications Upload
ASN Processing 21
Daily Processing Using File Transfer
Advanced Shipment Notifications – Upload
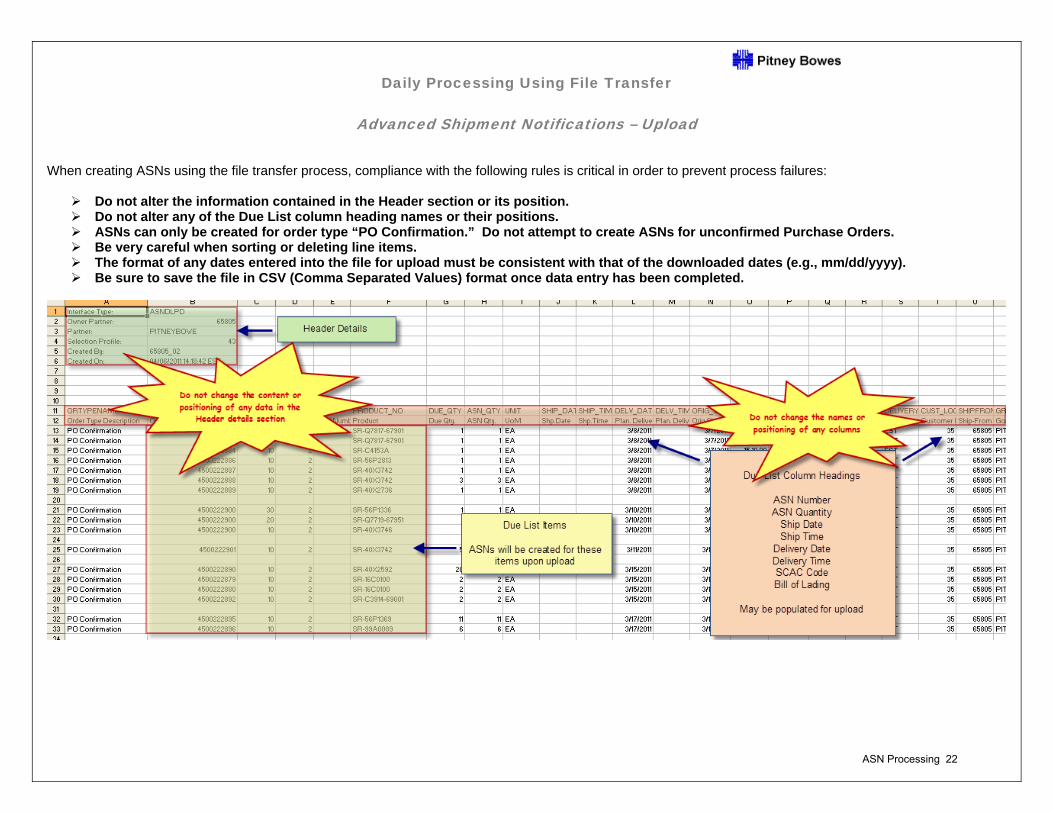
When creating ASNs using the file transfer process, compliance with the following rules is critical in order to prevent process failures:
Do not alter the information contained in the Header section or its position. Do not alter any of the Due List column heading names or their positions. ASNs can only be created for order type “PO Confirmation.” Do not attempt to create ASNs for unconfirmed Purchase Orders. Be very careful when sorting or deleting line items. The format of any dates entered into the file for upload must be consistent with that of the downloaded dates (e.g., mm/dd/yyyy). Be sure to save the file in CSV (Comma Separated Values) format once data entry has been completed.
ASN Processing 22
Daily Processing Using File Transfer
Advanced Shipment Notifications – Upload
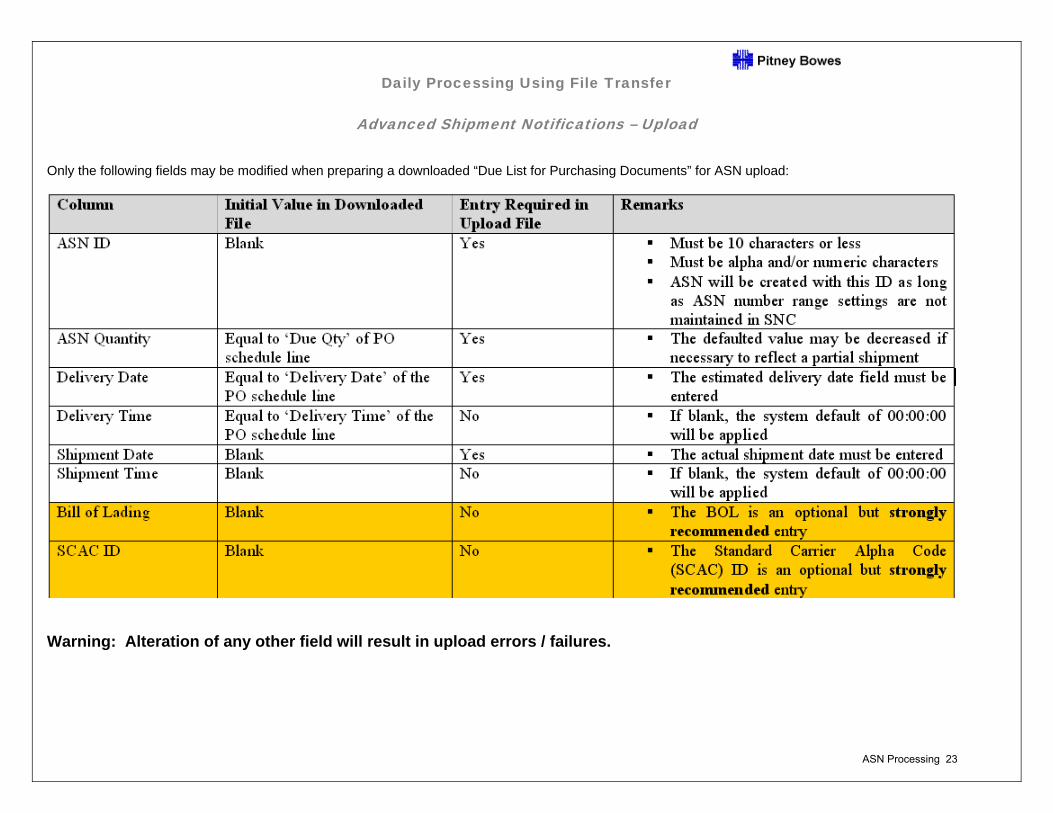
Only the following fields may be modified when preparing a downloaded “Due List for Purchasing Documents” for ASN upload:
Warning: Alteration of any other field will result in upload errors / failures.
ASN Processing 23
Daily Processing Using File Transfer
Advanced Shipment Notifications – Upload
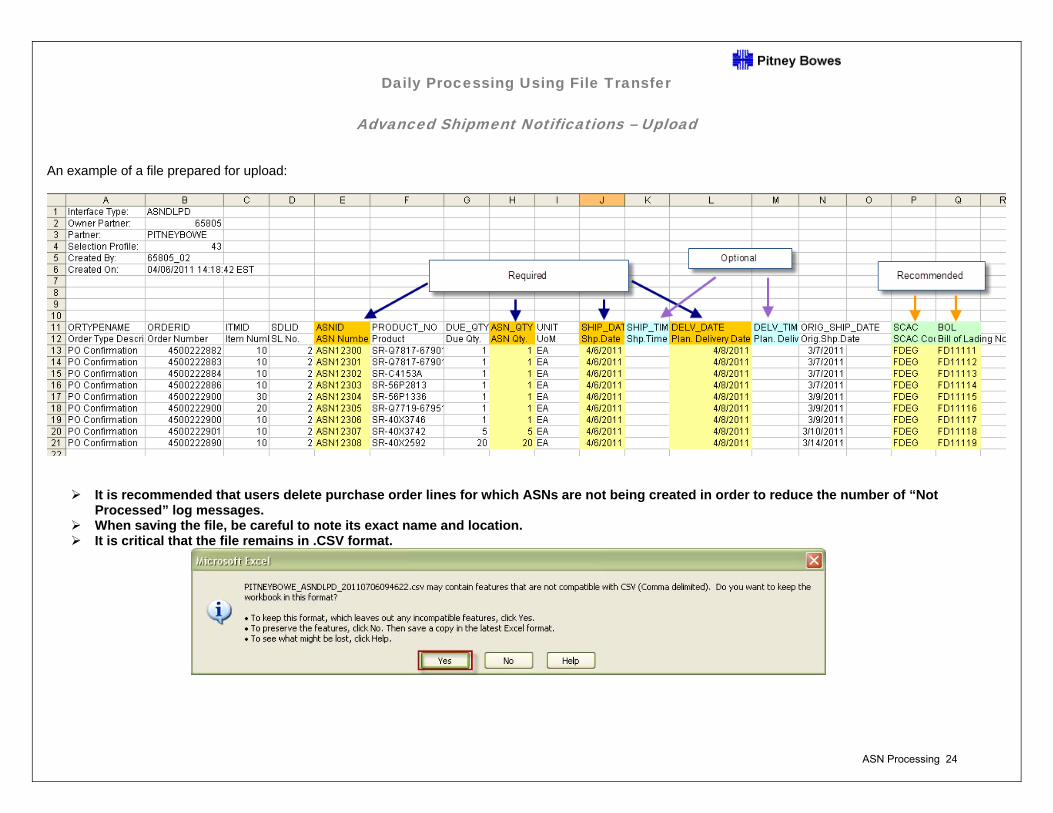
An example of a file prepared for upload:
It is recommended that users delete purchase order lines for which ASNs are not being created in order to reduce the number of “Not Processed” log messages.
When saving the file, be careful to note its exact name and location. It is critical that the file remains in .CSV format.
ASN Processing 24
Daily Processing Using File Transfer
Advanced Shipment Notifications – Upload
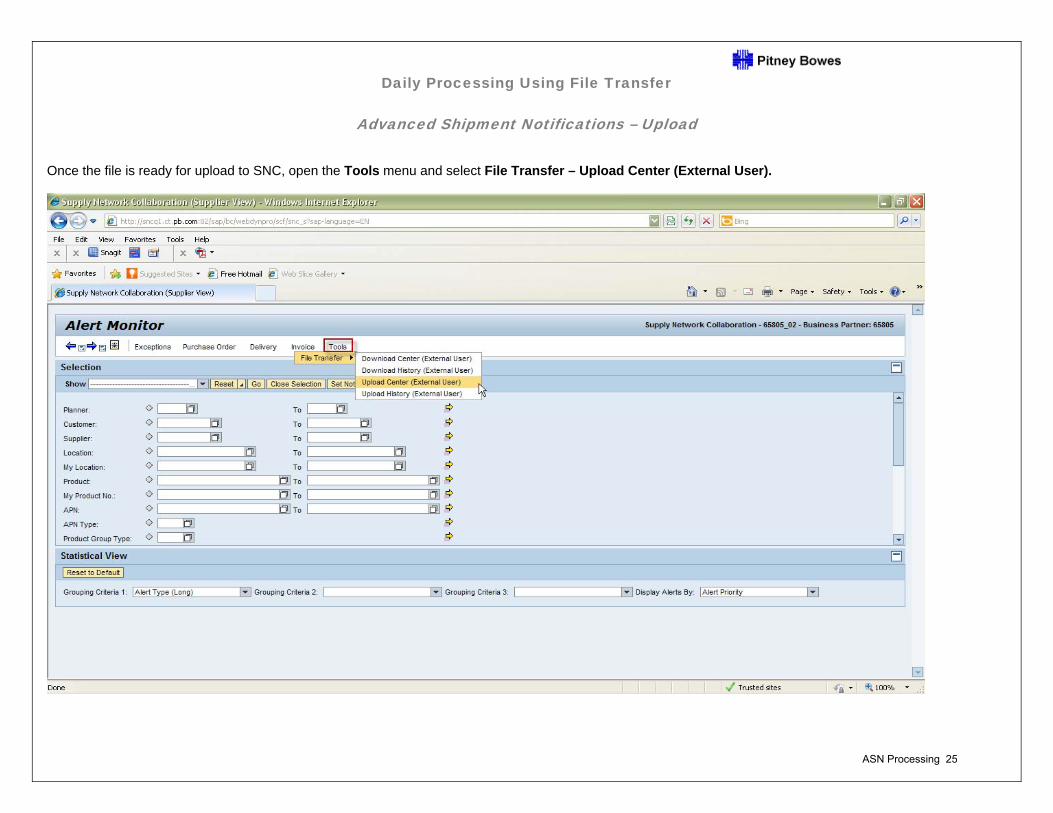
Once the file is ready for upload to SNC, open the Tools menu and select File Transfer – Upload Center (External User).
ASN Processing 25

Daily Processing Using File Transfer
Advanced Shipment Notifications – Upload
Select a view option for a list of available Upload Profiles.
ASN Processing 26
Daily Processing Using File Transfer
Advanced Shipment Notifications – Upload
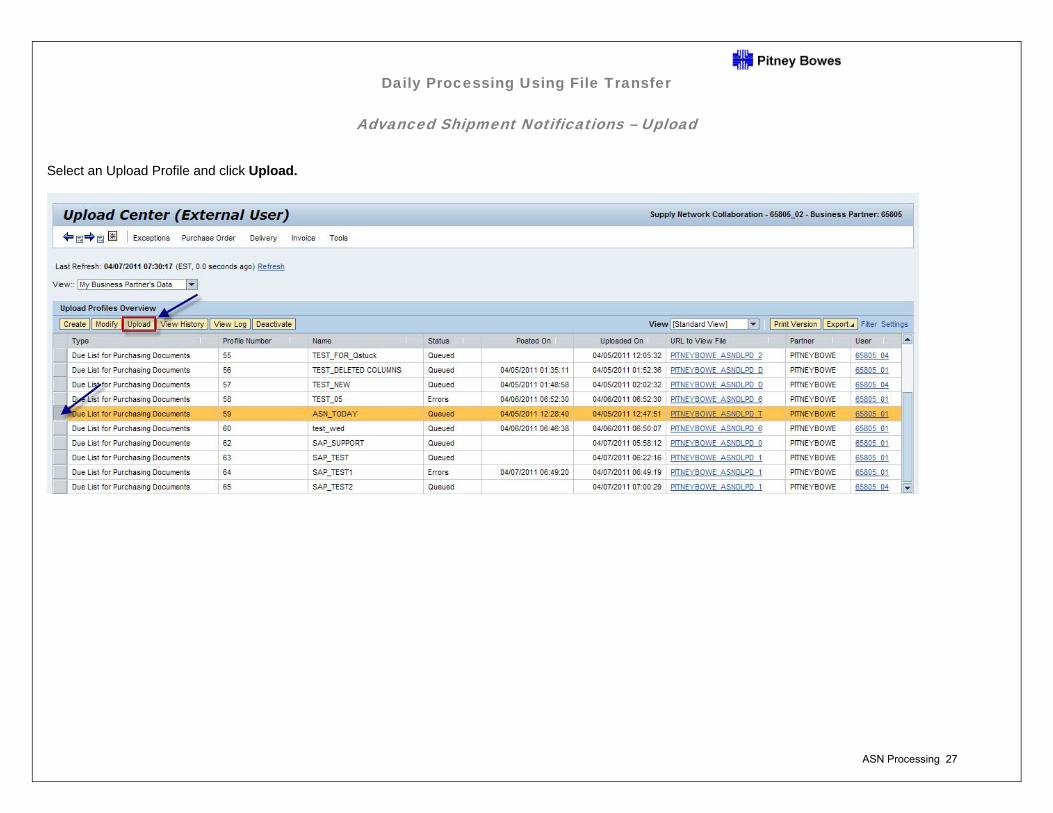
Select an Upload Profile and click Upload.
ASN Processing 27
Daily Processing Using File Transfer
Advanced Shipment Notifications – Upload
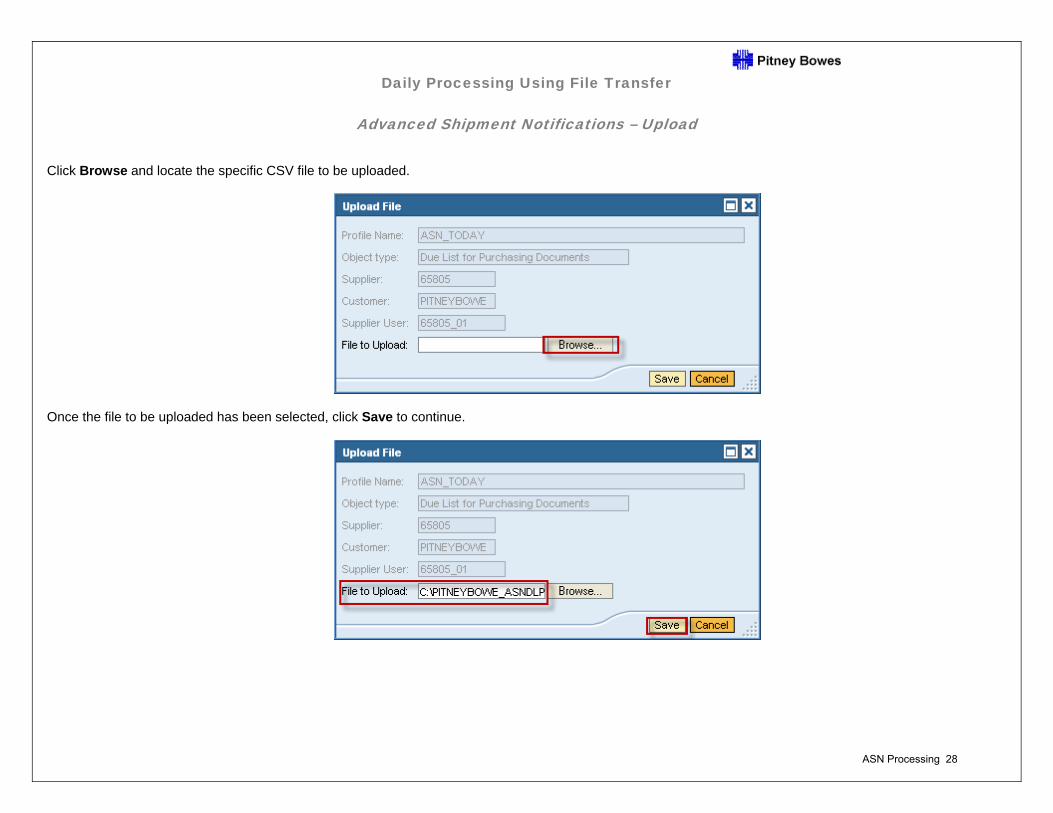
Click Browse and locate the specific CSV file to be uploaded.
Once the file to be uploaded has been selected, click Save to continue.
ASN Processing 28
Daily Processing Using File Transfer
Advanced Shipment Notifications – Upload
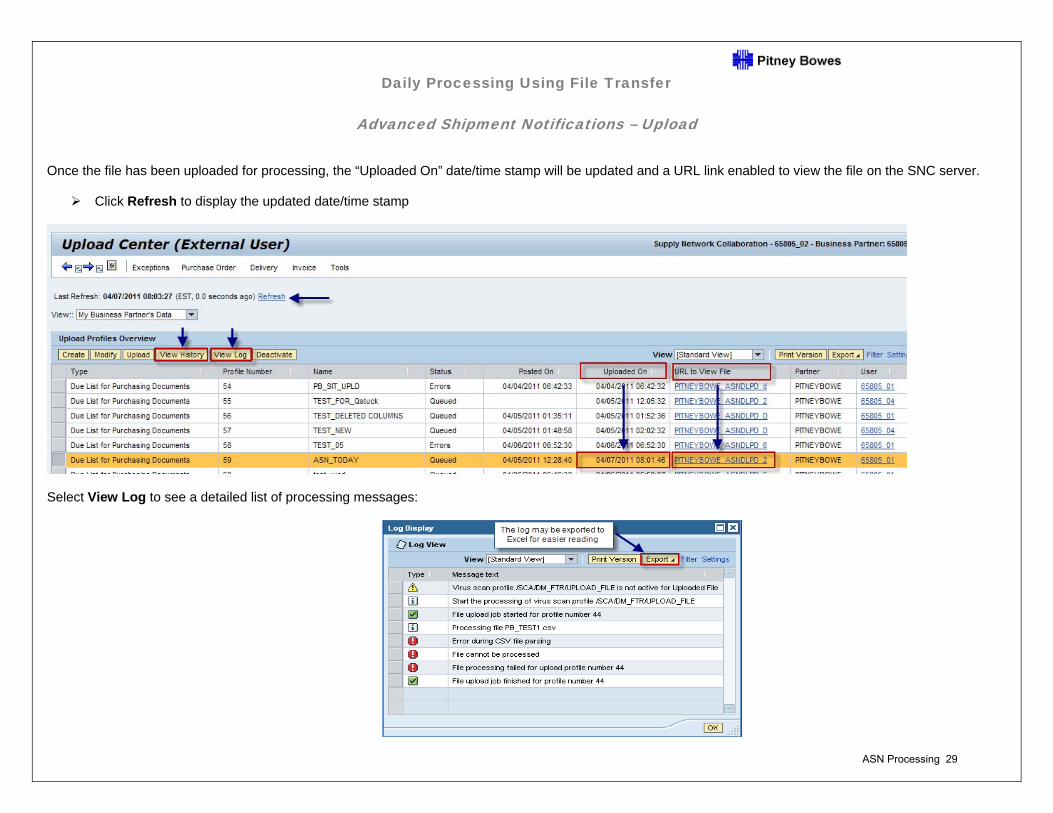
Once the file has been uploaded for processing, the “Uploaded On” date/time stamp will be updated and a URL link enabled to view the file on the SNC server.
Click Refresh to display the updated date/time stamp
Select View Log to see a detailed list of processing messages:
ASN Processing 29
Daily Processing Using File Transfer
Advanced Shipment Notifications – Upload
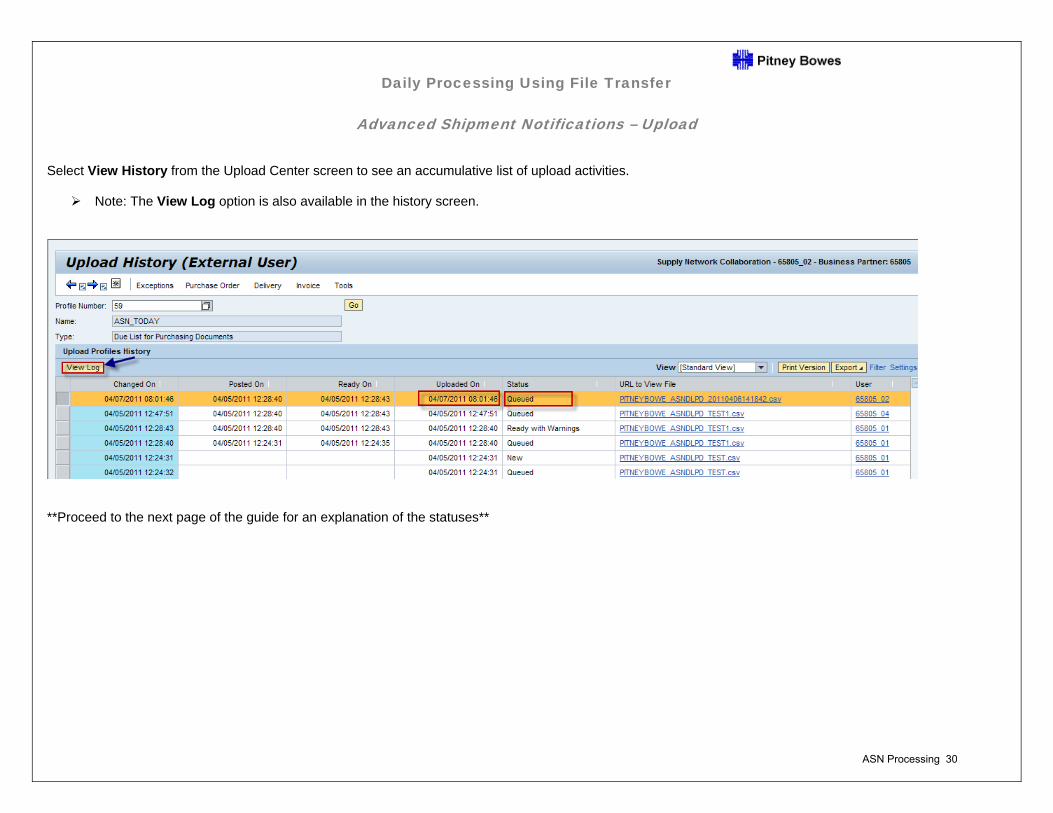
Select View History from the Upload Center screen to see an accumulative list of upload activities.
Note: The View Log option is also available in the history screen.
**Proceed to the next page of the guide for an explanation of the statuses**
ASN Processing 30
Daily Processing Using File Transfer
Advanced Shipment Notifications – Upload
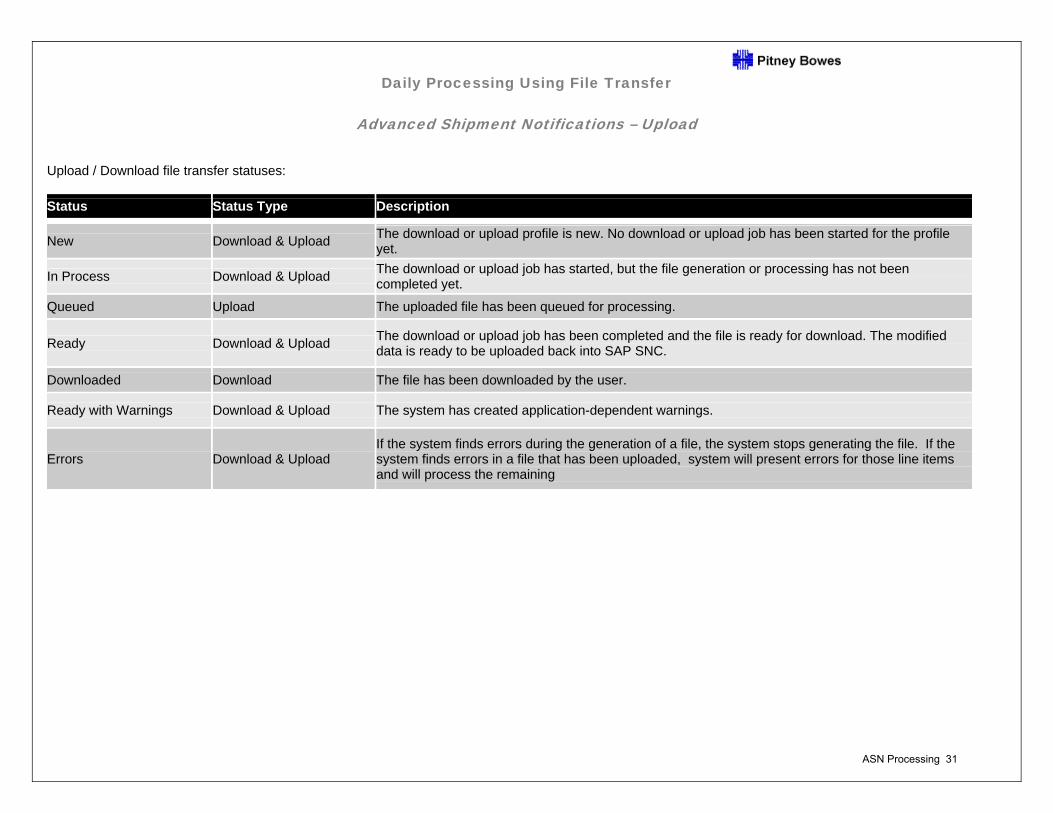
Upload / Download file transfer statuses: Status Status Type Description
New Download & Upload The download or upload profile is new. No download or upload job has been started for the profile yet.
In Process Download & Upload The download or upload job has started, but the file generation or processing has not been completed yet.
Queued Upload The uploaded file has been queued for processing.
Ready Download & Upload The download or upload job has been completed and the file is ready for download. The modified data is ready to be uploaded back into SAP SNC.
Downloaded Download The file has been downloaded by the user.
Ready with Warnings Download & Upload The system has created application-dependent warnings.
Errors Download & Upload If the system finds errors during the generation of a file, the system stops generating the file. If the system finds errors in a file that has been uploaded, system will present errors for those line items and will process the remaining
ASN Processing 31
Supply Network Collaboration
Daily Processing Quick Guide
Invoice Creation
Invoice 1
Daily Processing Using Alert Monitor
Invoice Creation
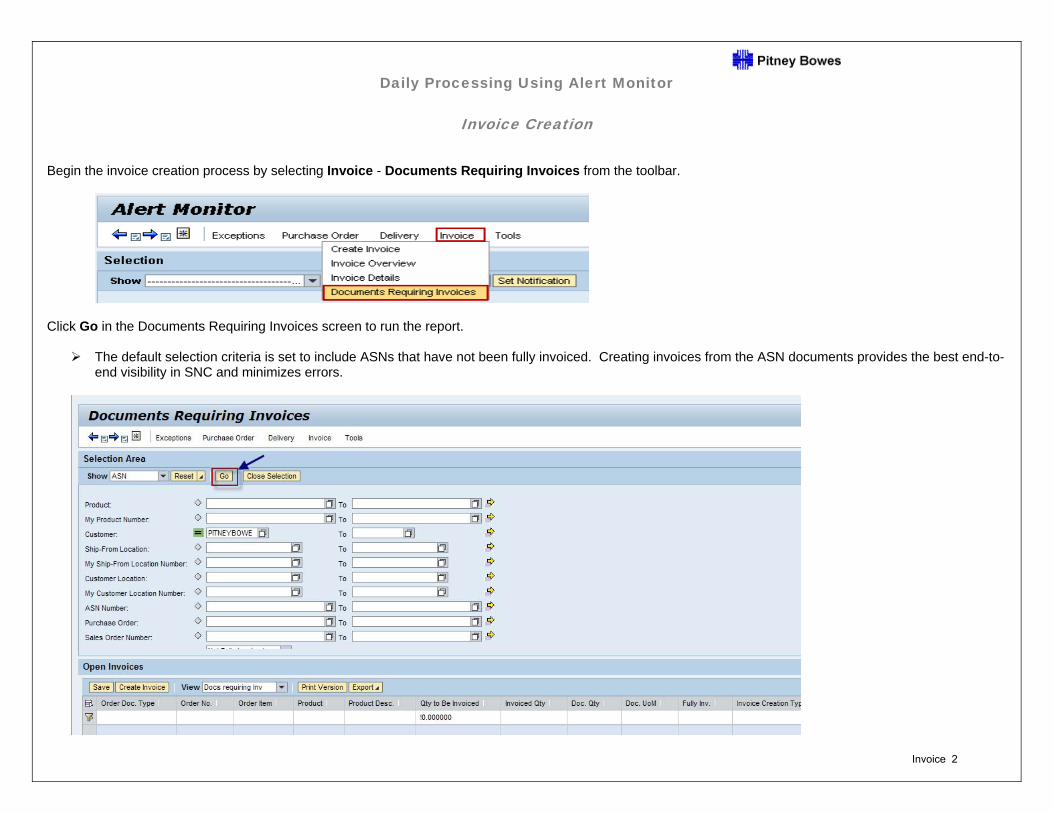
Begin the invoice creation process by selecting Invoice - Documents Requiring Invoices from the toolbar.
Click Go in the Documents Requiring Invoices screen to run the report.
The default selection criteria is set to include ASNs that have not been fully invoiced. Creating invoices from the ASN documents provides the best end-to-end visibility in SNC and minimizes errors.
Invoice 2
Daily Processing Using Alert Monitor
Invoice Creation
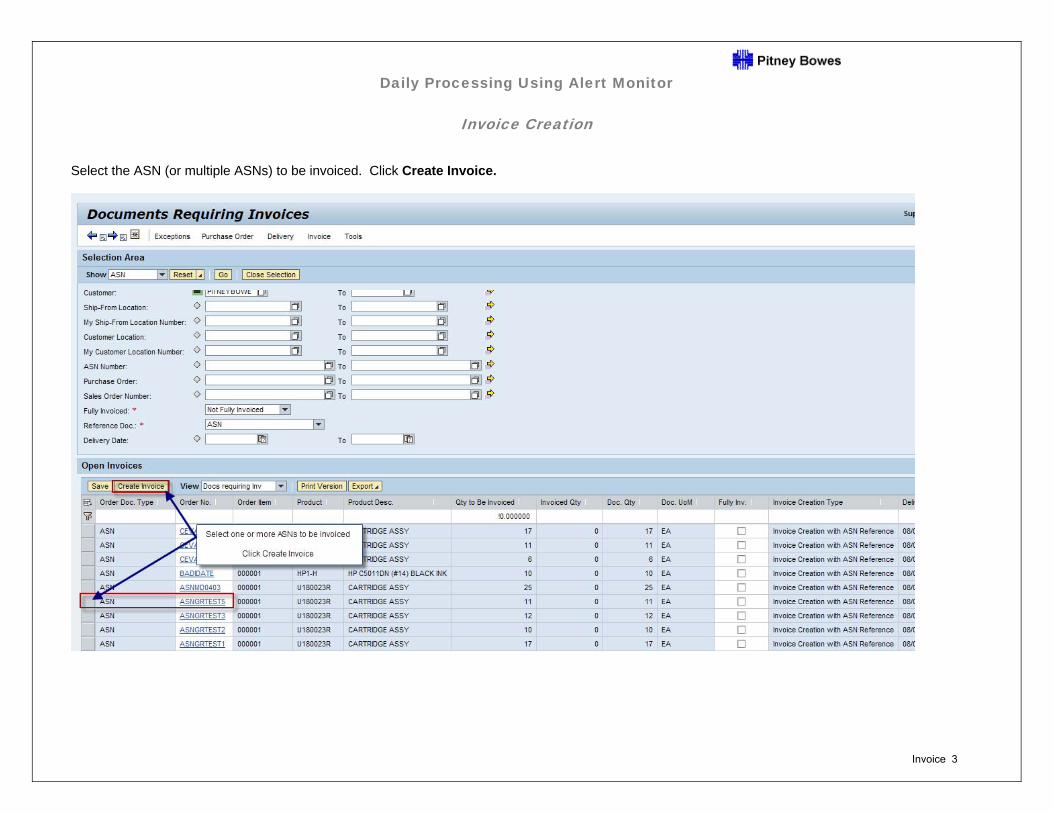
Select the ASN (or multiple ASNs) to be invoiced. Click Create Invoice.
Invoice 3
Daily Processing Using Alert Monitor
Invoice Creation
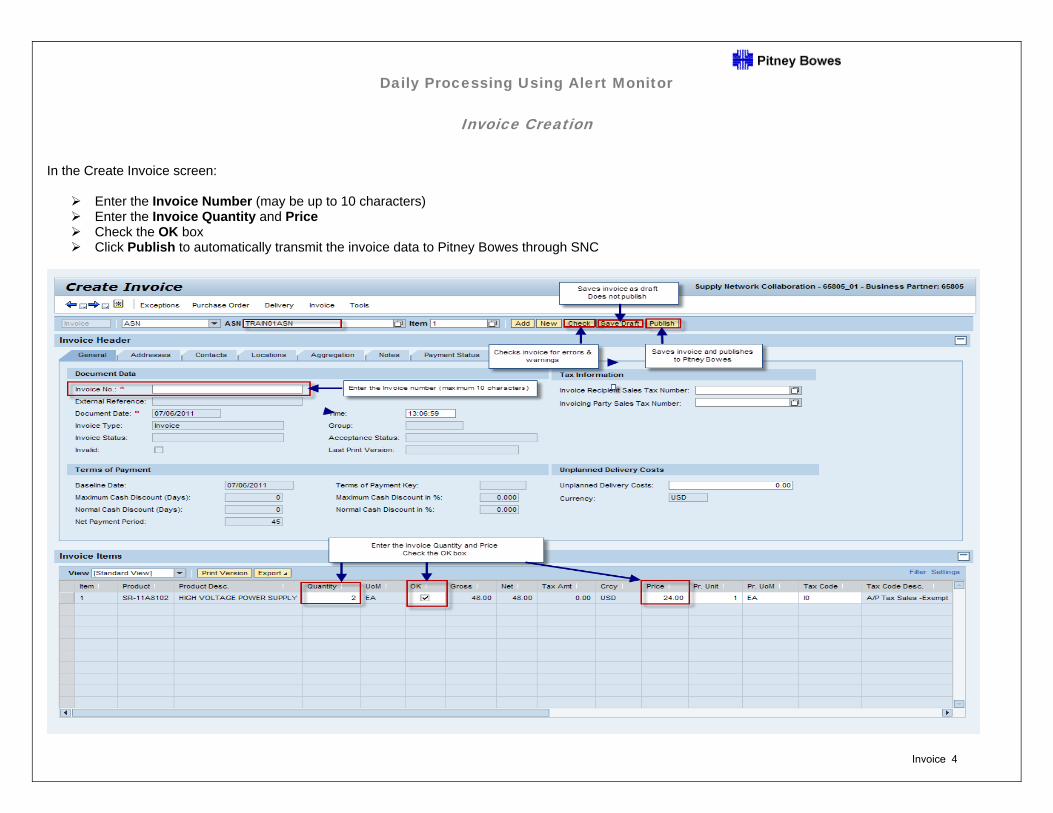
In the Create Invoice screen:
Enter the Invoice Number (may be up to 10 characters) Enter the Invoice Quantity and Price Check the OK box Click Publish to automatically transmit the invoice data to Pitney Bowes through SNC
Invoice 4
Daily Processing Using Alert Monitor
Invoice Creation
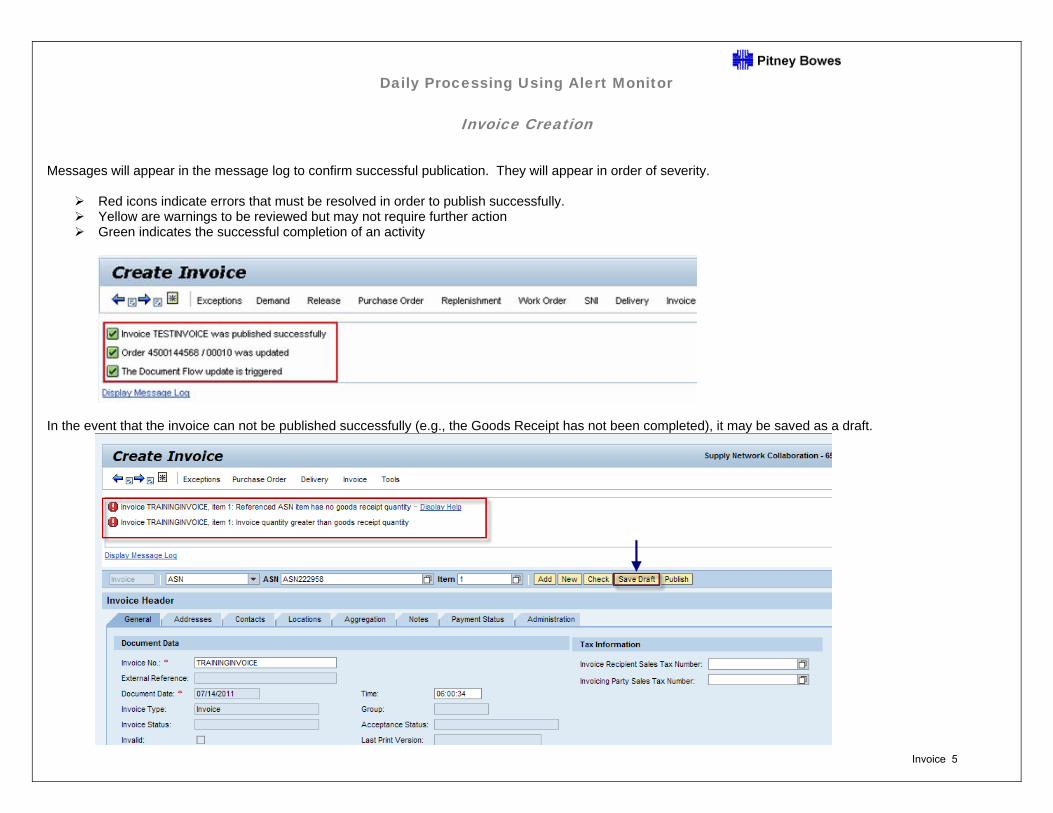
Messages will appear in the message log to confirm successful publication. They will appear in order of severity.
Red icons indicate errors that must be resolved in order to publish successfully. Yellow are warnings to be reviewed but may not require further action Green indicates the successful completion of an activity
In the event that the invoice can not be published successfully (e.g., the Goods Receipt has not been completed), it may be saved as a draft.
Invoice 5
Daily Processing Using Alert Monitor
Invoice Creation
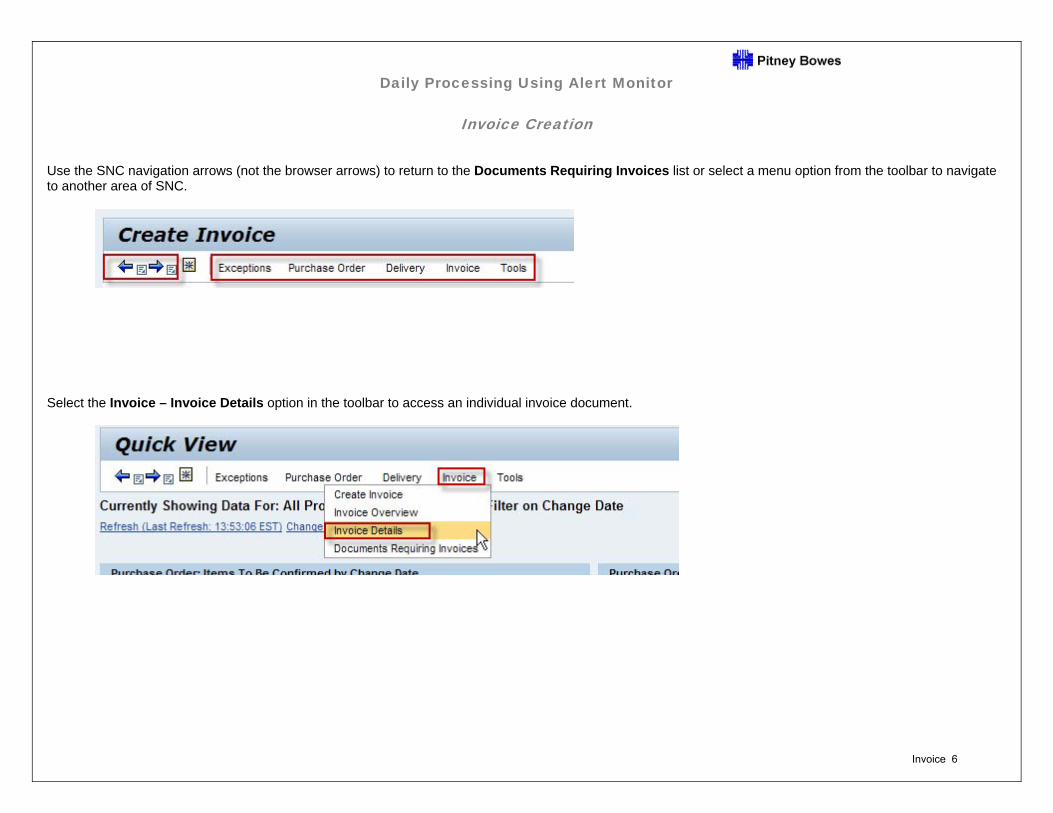
Use the SNC navigation arrows (not the browser arrows) to return to the Documents Requiring Invoices list or select a menu option from the toolbar to navigate to another area of SNC.
Select the Invoice – Invoice Details option in the toolbar to access an individual invoice document.
Invoice 6
Daily Processing Using Alert Monitor
Invoice Creation
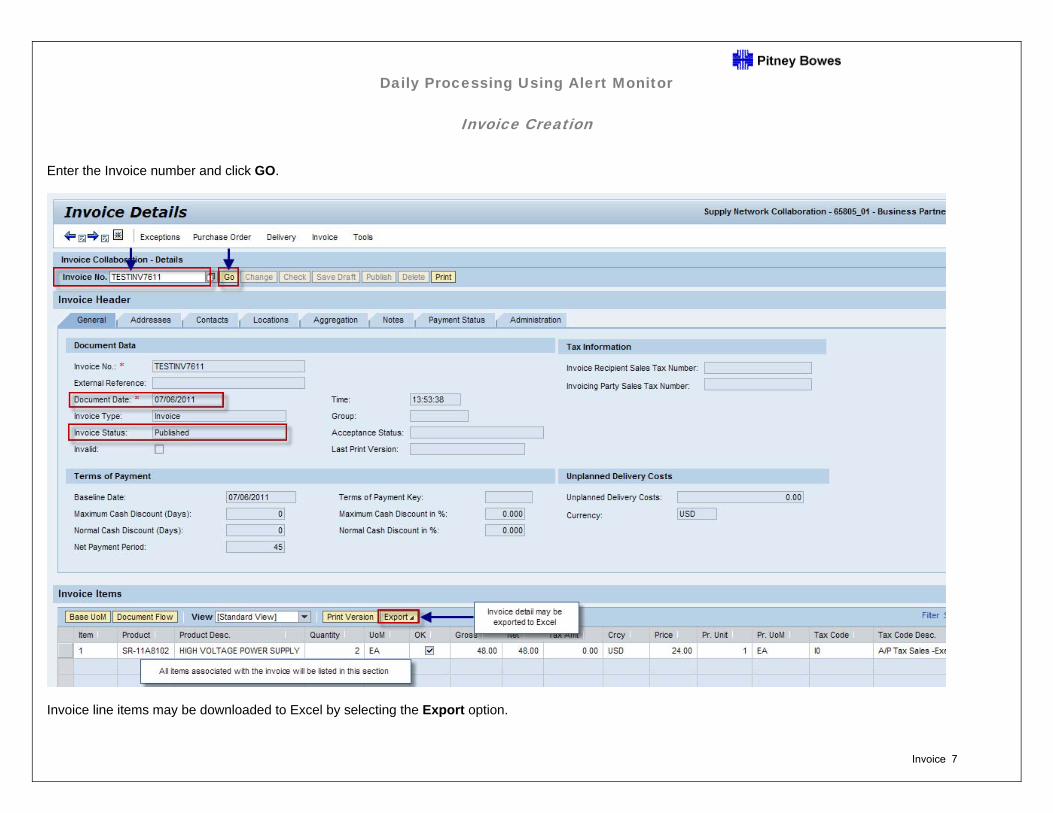
Enter the Invoice number and click GO.
Invoice line items may be downloaded to Excel by selecting the Export option.
Invoice 7
Daily Processing Using Alert Monitor
Invoice Creation
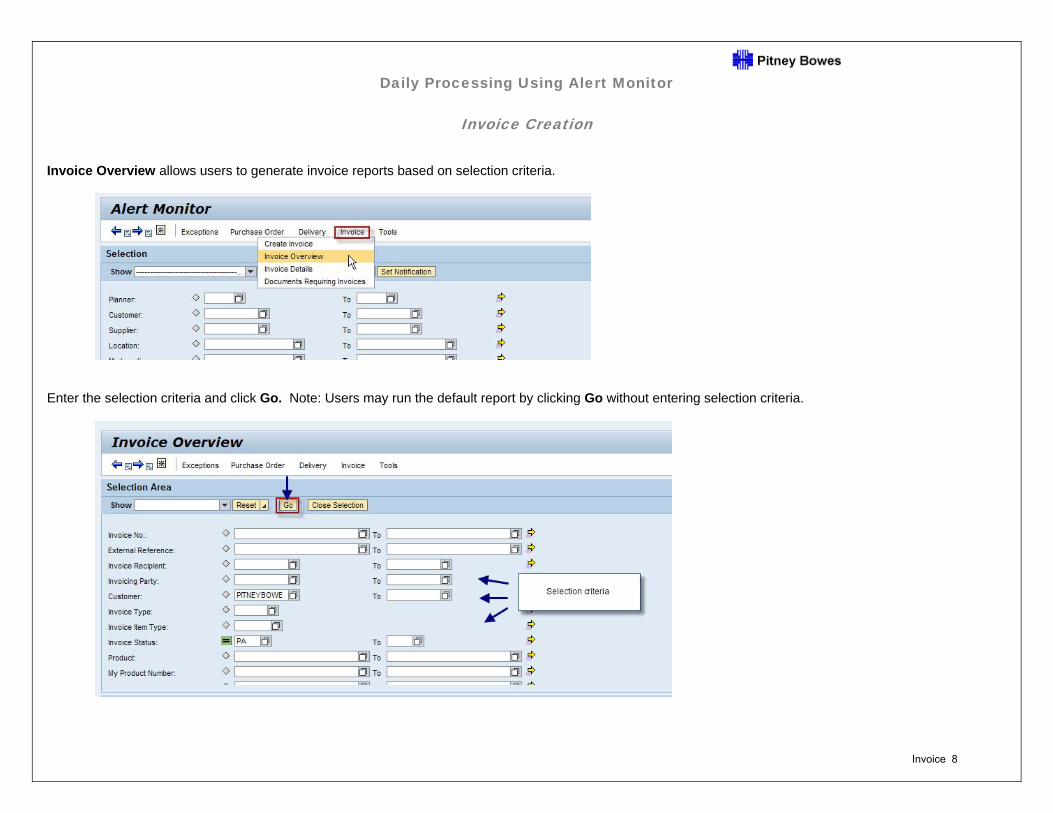
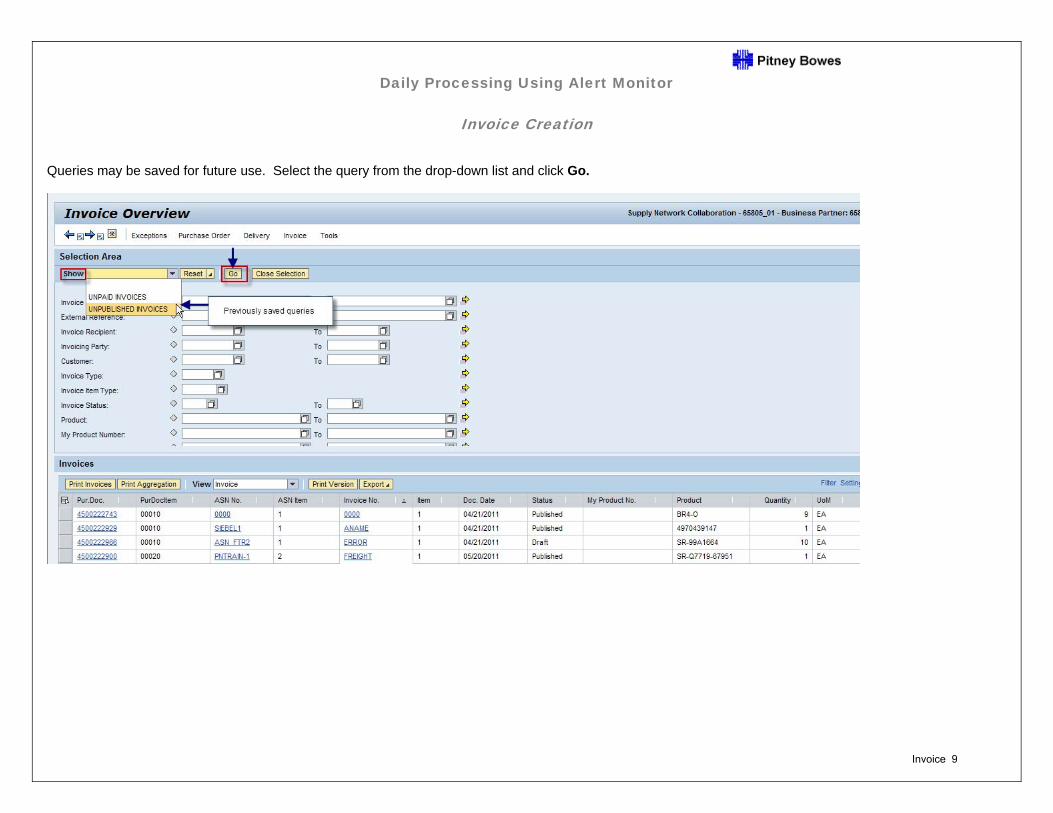
Invoice Overview allows users to generate invoice reports based on selection criteria.
Enter the selection criteria and click Go. Note: Users may run the default report by clicking Go without entering selection criteria.
Invoice 8
Daily Processing Using Alert Monitor
Invoice Creation
Queries may be saved for future use. Select the query from the drop-down list and click Go.
Invoice 9
Supply Network Collaboration
Daily Processing Quick Guide
Display / Report Settings
Display / Report Settings 1
Supply Network Collaboration
Display / Report Settings
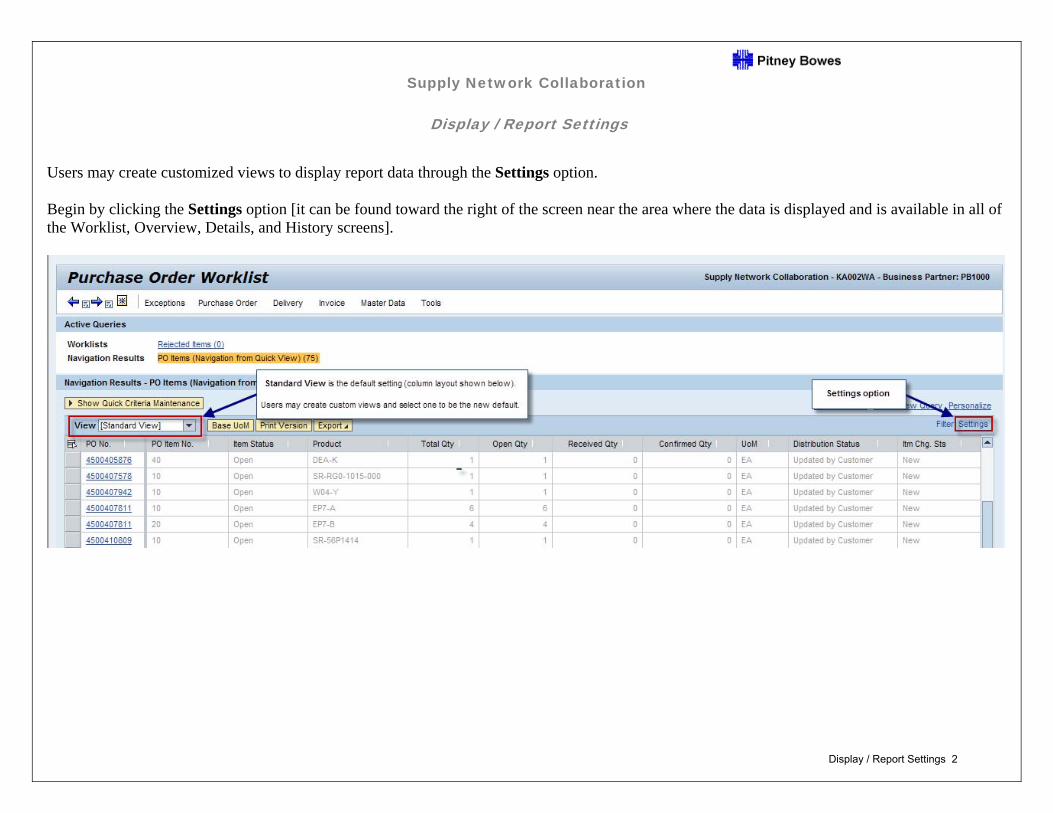
Users may create customized views to display report data through the Settings option. Begin by clicking the Settings option [it can be found toward the right of the screen near the area where the data is displayed and is available in all of the Worklist, Overview, Details, and History screens].
Display / Report Settings 2

Supply Network Collaboration
Display / Report Settings
The Settings window will appear. On the Column Selection tab, select the columns to be added or removed from the list of Displayed Columns. Note that beginning with the first column in the Displayed Column list, a small number of columns may be set as fixed position.
Click the Apply button to view the results of selection changes while remaining in the Settings mode.
Display / Report Settings 3
Supply Network Collaboration
Display / Report Settings
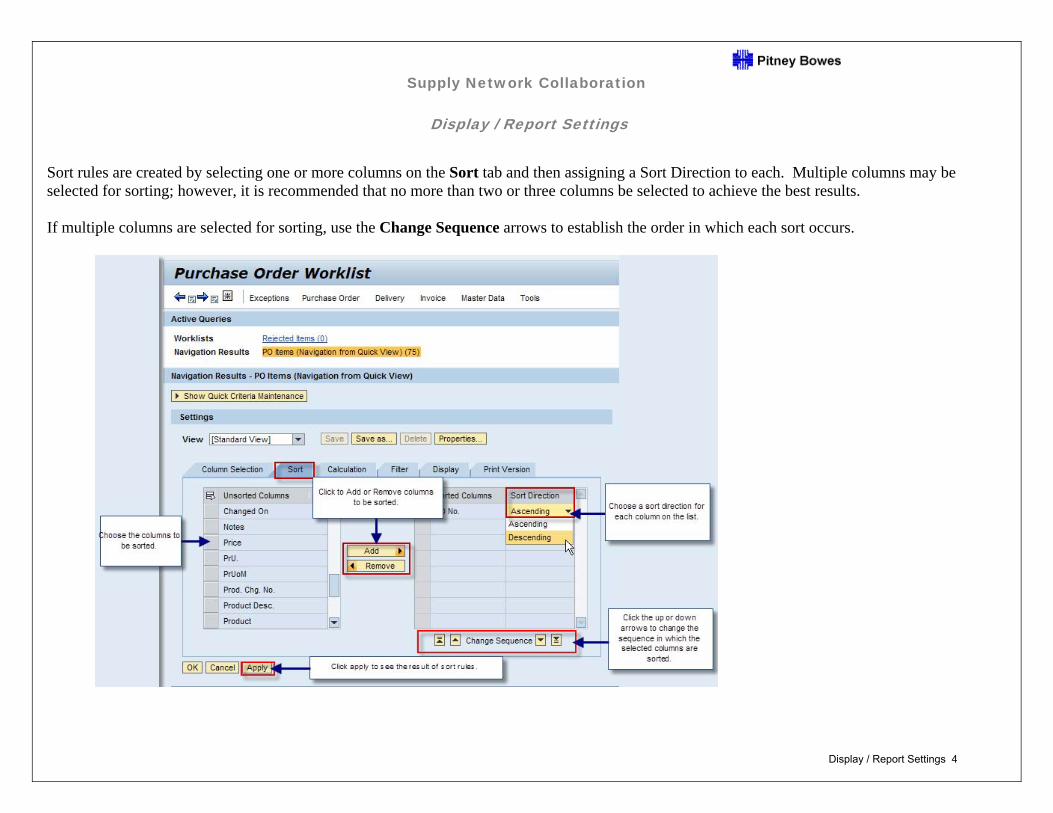
Sort rules are created by selecting one or more columns on the Sort tab and then assigning a Sort Direction to each. Multiple columns may be selected for sorting; however, it is recommended that no more than two or three columns be selected to achieve the best results. If multiple columns are selected for sorting, use the Change Sequence arrows to establish the order in which each sort occurs.
Display / Report Settings 4
Supply Network Collaboration
Display / Report Settings
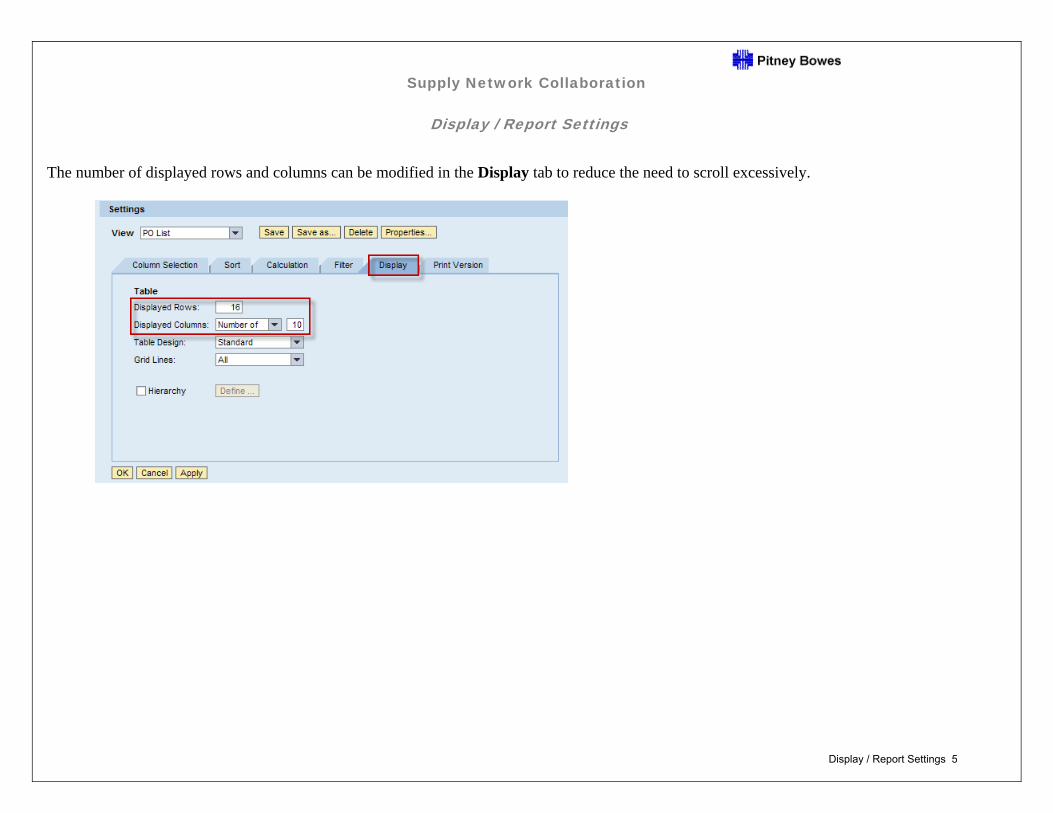
The number of displayed rows and columns can be modified in the Display tab to reduce the need to scroll excessively.
Display / Report Settings 5
Supply Network Collaboration
Display / Report Settings
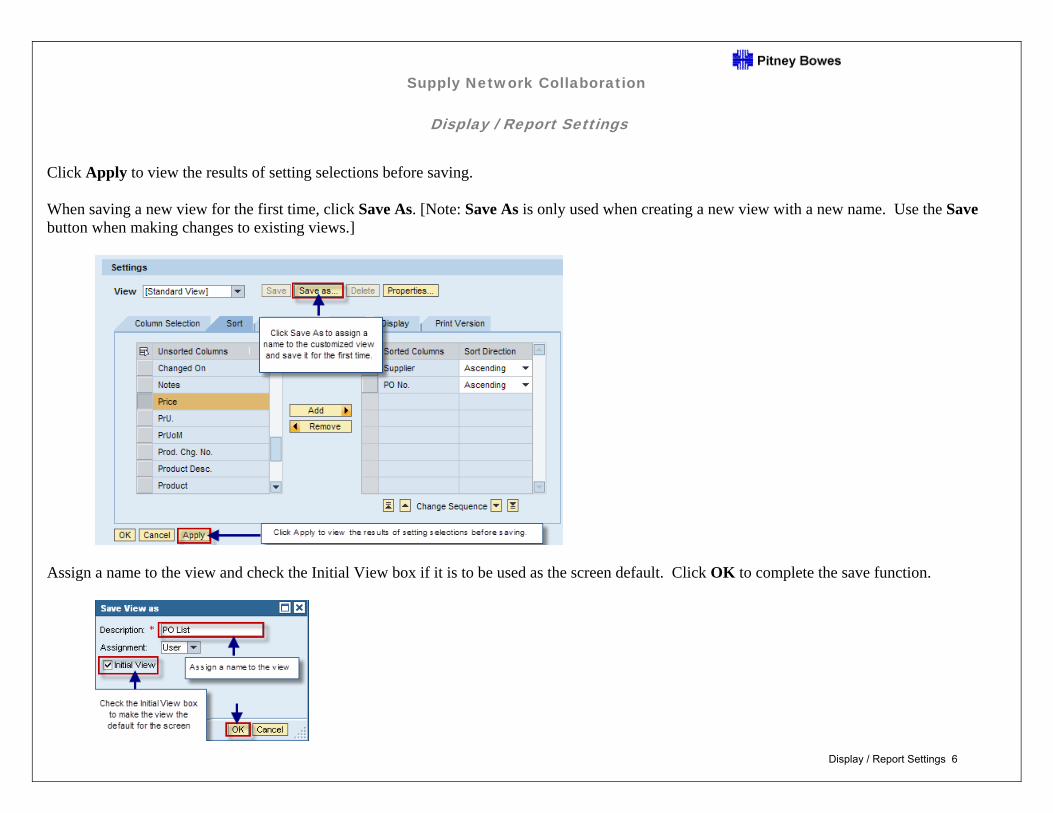
Click Apply to view the results of setting selections before saving. When saving a new view for the first time, click Save As. [Note: Save As is only used when creating a new view with a new name. Use the Save button when making changes to existing views.]
Assign a name to the view and check the Initial View box if it is to be used as the screen default. Click OK to complete the save function.
Display / Report Settings 6
Supply Network Collaboration
Display / Report Settings
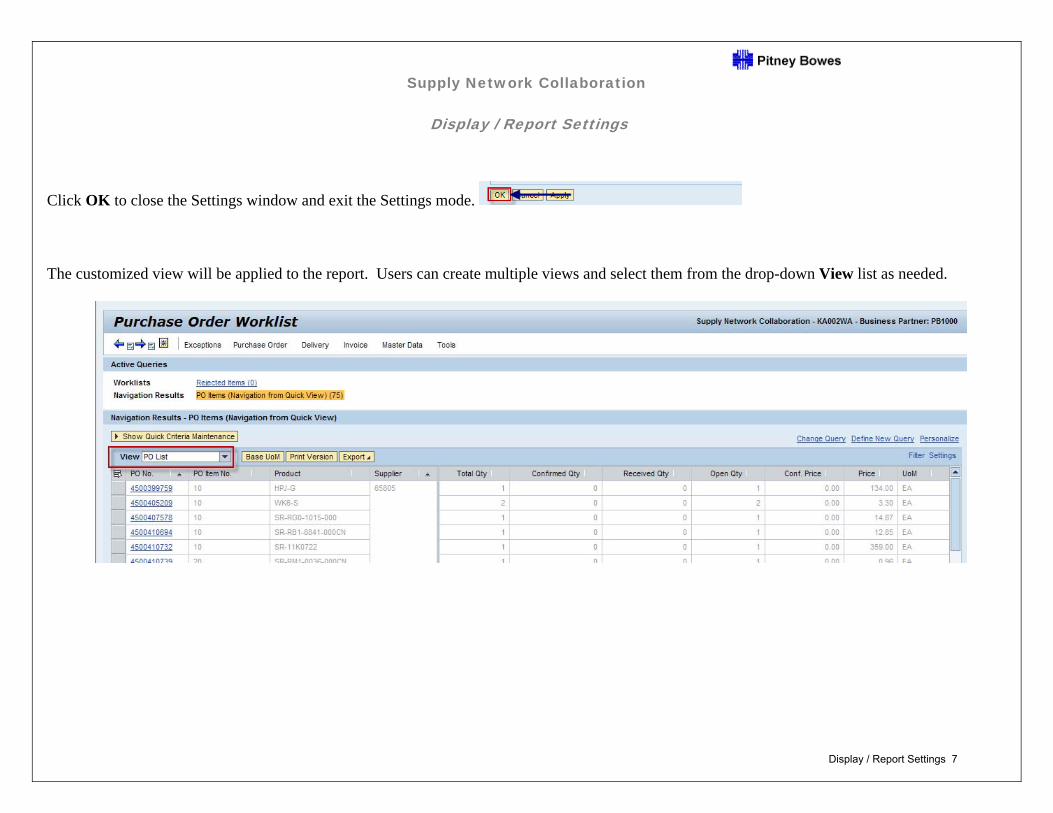
Click OK to close the Settings window and exit the Settings mode. The customized view will be applied to the report. Users can create multiple views and select them from the drop-down View list as needed.
Display / Report Settings 7
Supply Network Collaboration
Display / Report Settings
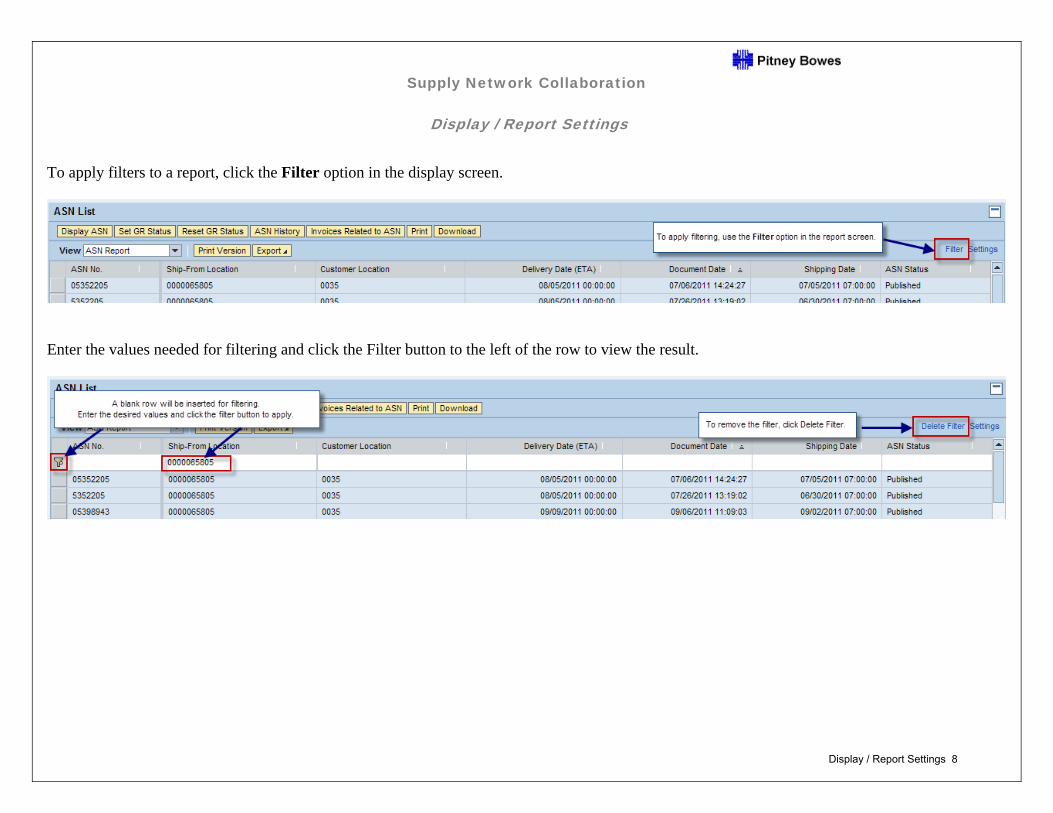
To apply filters to a report, click the Filter option in the display screen.
Enter the values needed for filtering and click the Filter button to the left of the row to view the result.
Display / Report Settings 8
Supply Network Collaboration
Daily Processing Quick Guide
Alert Monitor Report and Notification Settings
Alert Monitor 1
Supply Network Collaboration
Alert Monitor Report and Notification Settings
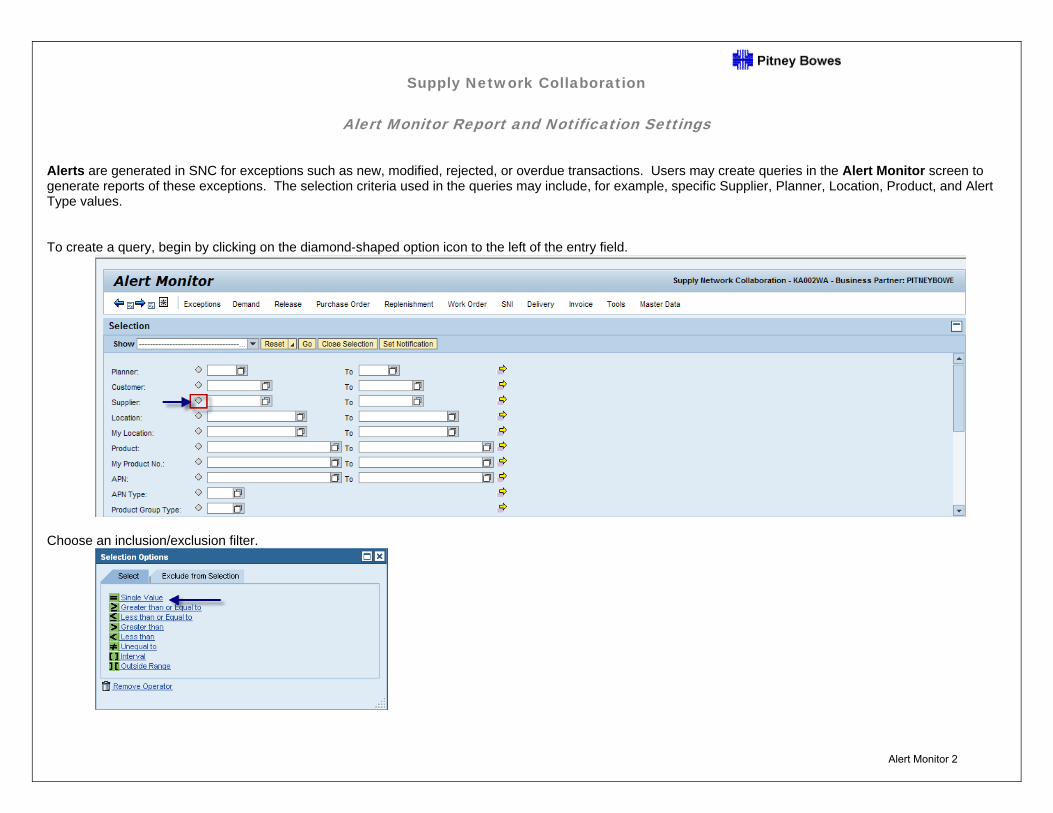
Alerts are generated in SNC for exceptions such as new, modified, rejected, or overdue transactions. Users may create queries in the Alert Monitor screen to generate reports of these exceptions. The selection criteria used in the queries may include, for example, specific Supplier, Planner, Location, Product, and Alert Type values. To create a query, begin by clicking on the diamond-shaped option icon to the left of the entry field.
Choose an inclusion/exclusion filter.
Alert Monitor 2
Supply Network Collaboration
Alert Monitor Report and Notification Settings
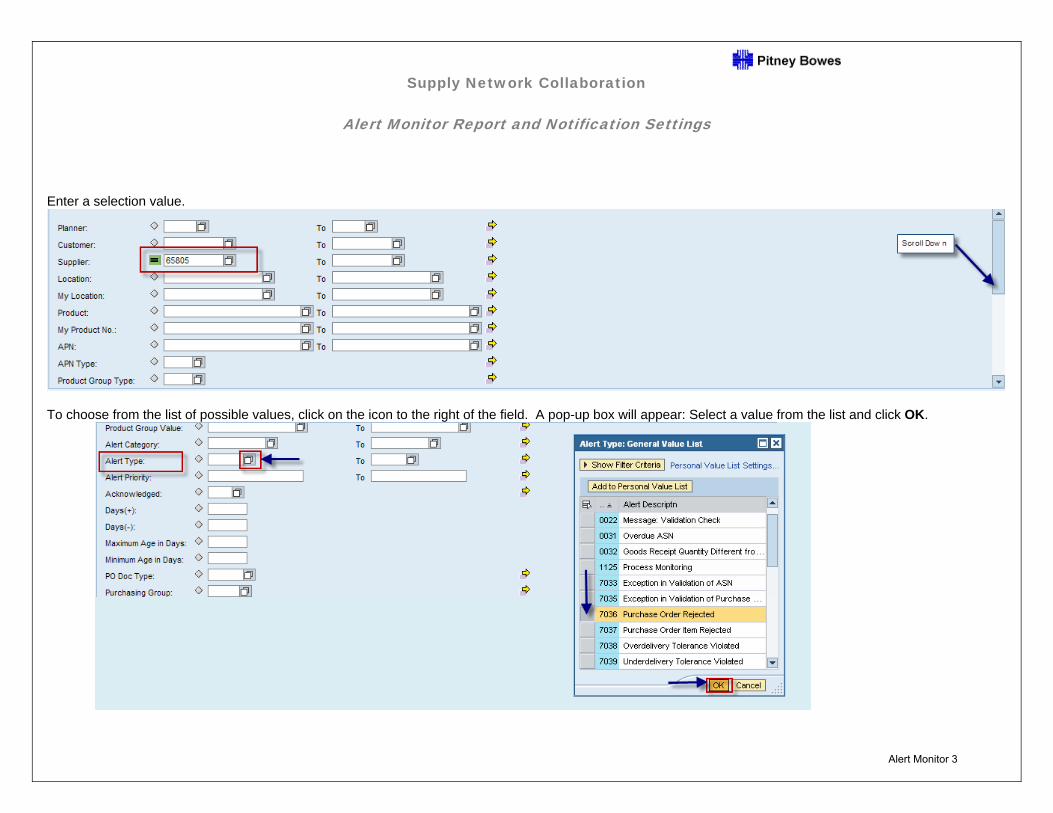
Enter a selection value.
To choose from the list of possible values, click on the icon to the right of the field. A pop-up box will appear: Select a value from the list and click OK.
Alert Monitor 3

Supply Network Collaboration
Alert Monitor Report and Notification Settings
To enter multiple selection values, click on the yellow arrow to the right. A pop-up box will appear in which a list of values can be entered. Note: A filter option must be entered for each value on the list.
When the Multiple Selection list is completed, click OK.
Repeat these steps for each selection criteria to be included in the query.
Alert Monitor 4
Supply Network Collaboration
Alert Monitor Report and Notification Settings
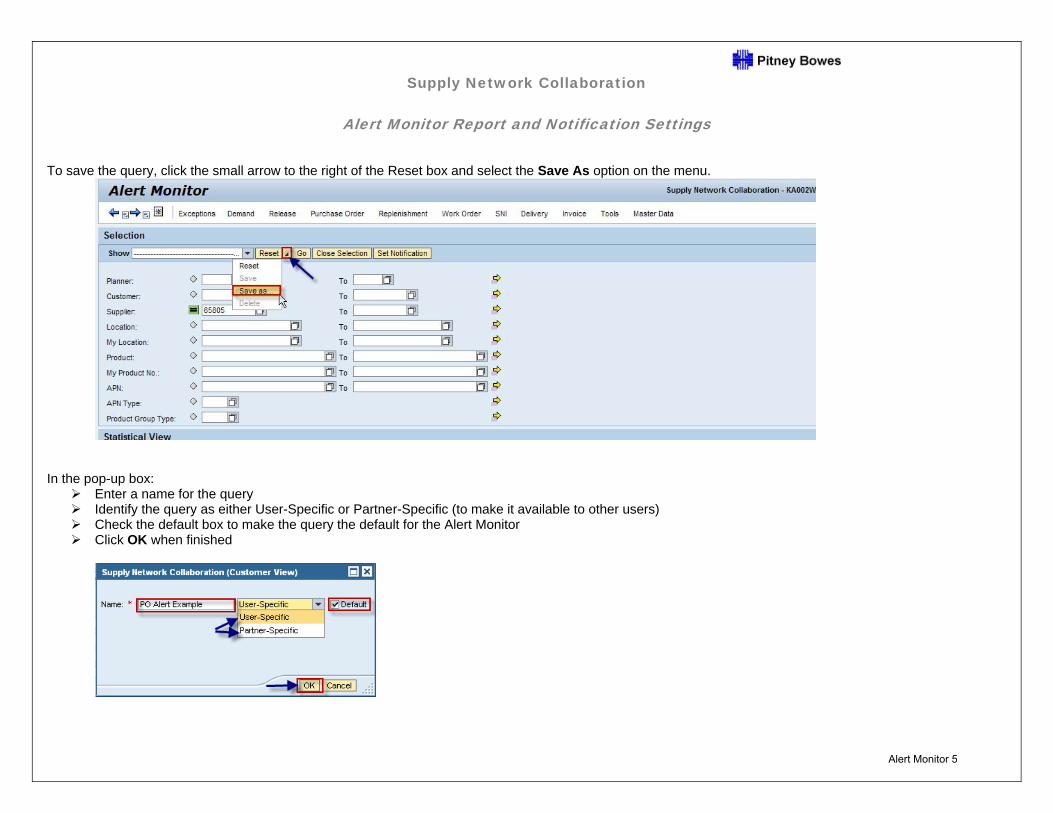
To save the query, click the small arrow to the right of the Reset box and select the Save As option on the menu.
In the pop-up box:
Enter a name for the query Identify the query as either User-Specific or Partner-Specific (to make it available to other users) Check the default box to make the query the default for the Alert Monitor Click OK when finished
Alert Monitor 5
Supply Network Collaboration
Alert Monitor Report and Notification Settings
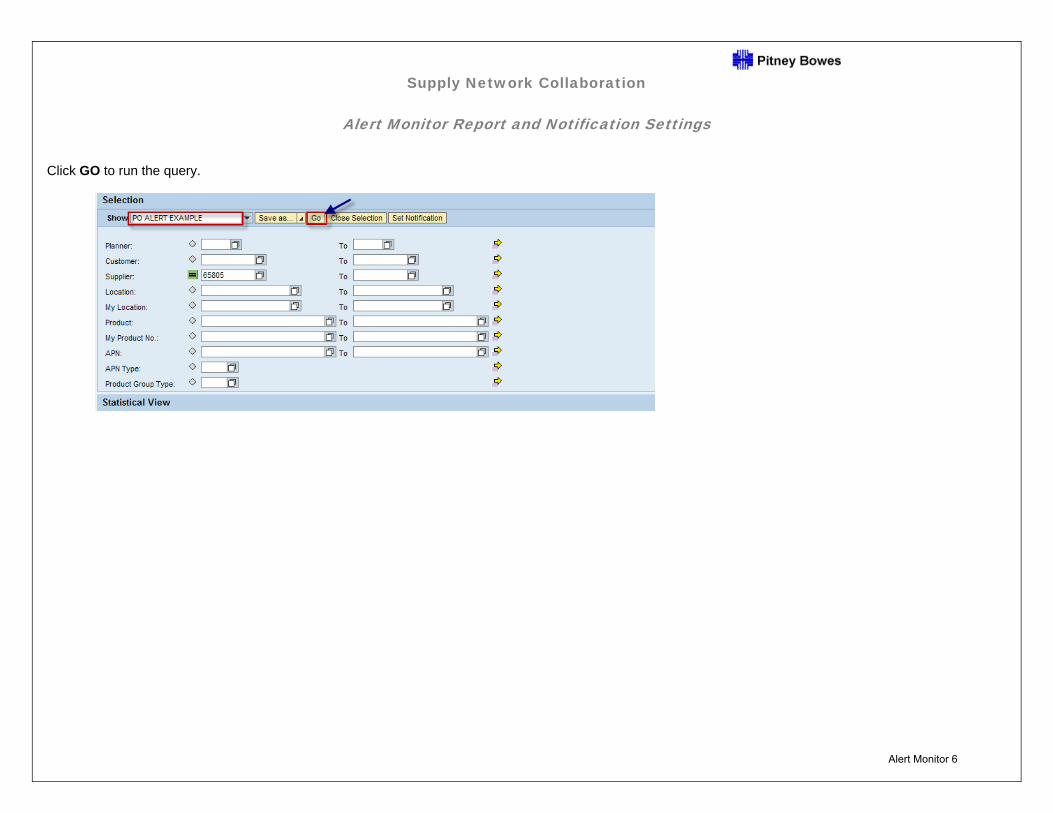
Click GO to run the query.
Alert Monitor 6
Supply Network Collaboration
Alert Monitor Report and Notification Settings
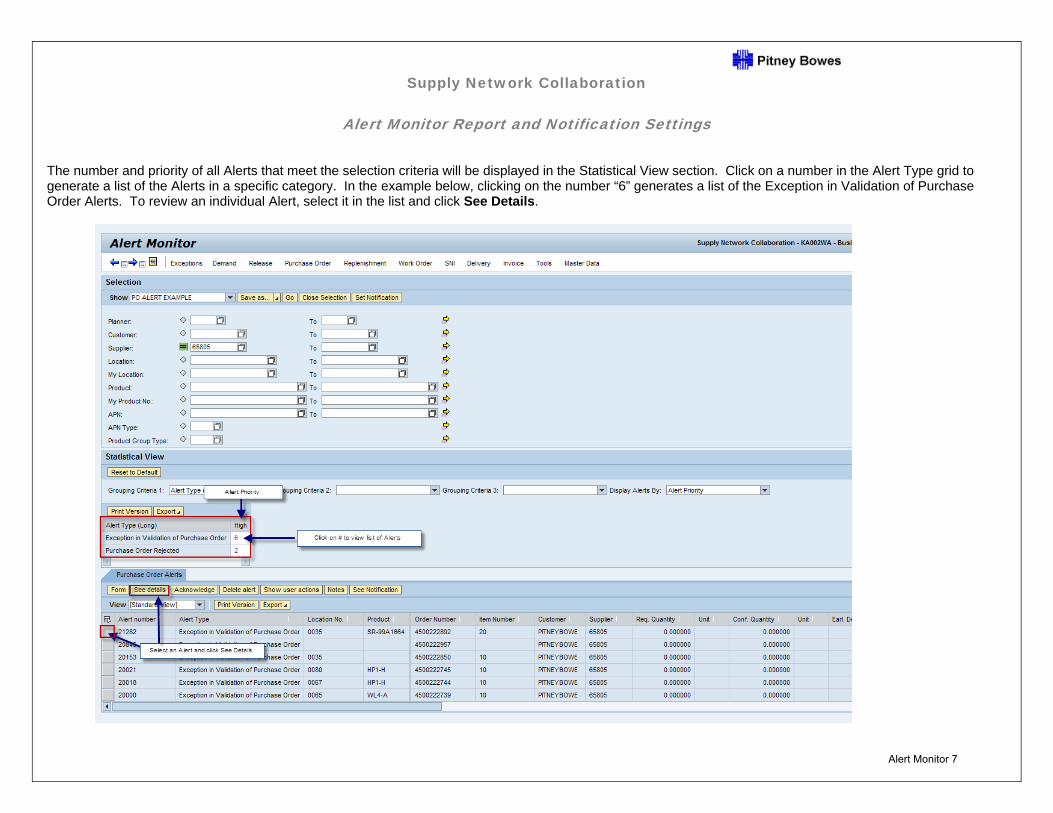
The number and priority of all Alerts that meet the selection criteria will be displayed in the Statistical View section. Click on a number in the Alert Type grid to generate a list of the Alerts in a specific category. In the example below, clicking on the number “6” generates a list of the Exception in Validation of Purchase Order Alerts. To review an individual Alert, select it in the list and click See Details.
Alert Monitor 7
Supply Network Collaboration
Alert Monitor Report and Notification Settings
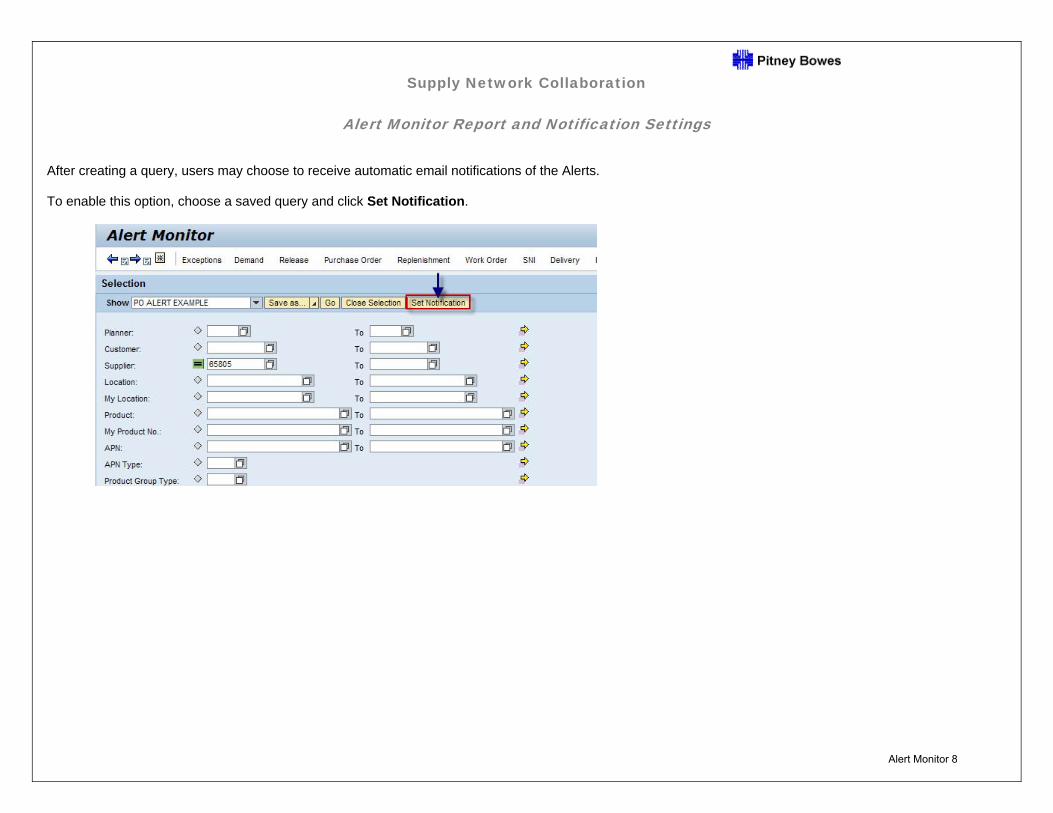
After creating a query, users may choose to receive automatic email notifications of the Alerts. To enable this option, choose a saved query and click Set Notification.
Alert Monitor 8
Supply Network Collaboration
Alert Monitor Report and Notification Settings
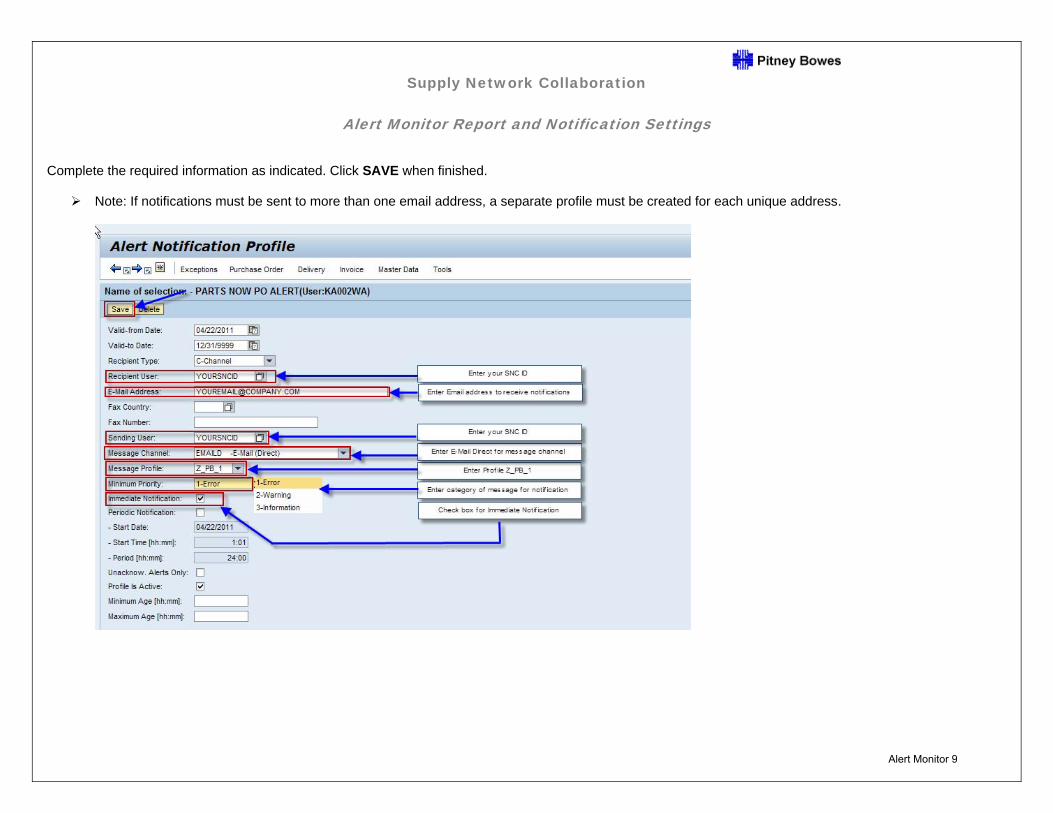
Complete the required information as indicated. Click SAVE when finished.
Note: If notifications must be sent to more than one email address, a separate profile must be created for each unique address.
Alert Monitor 9
Supply Network Collaboration
Alert Monitor Report and Notification Settings
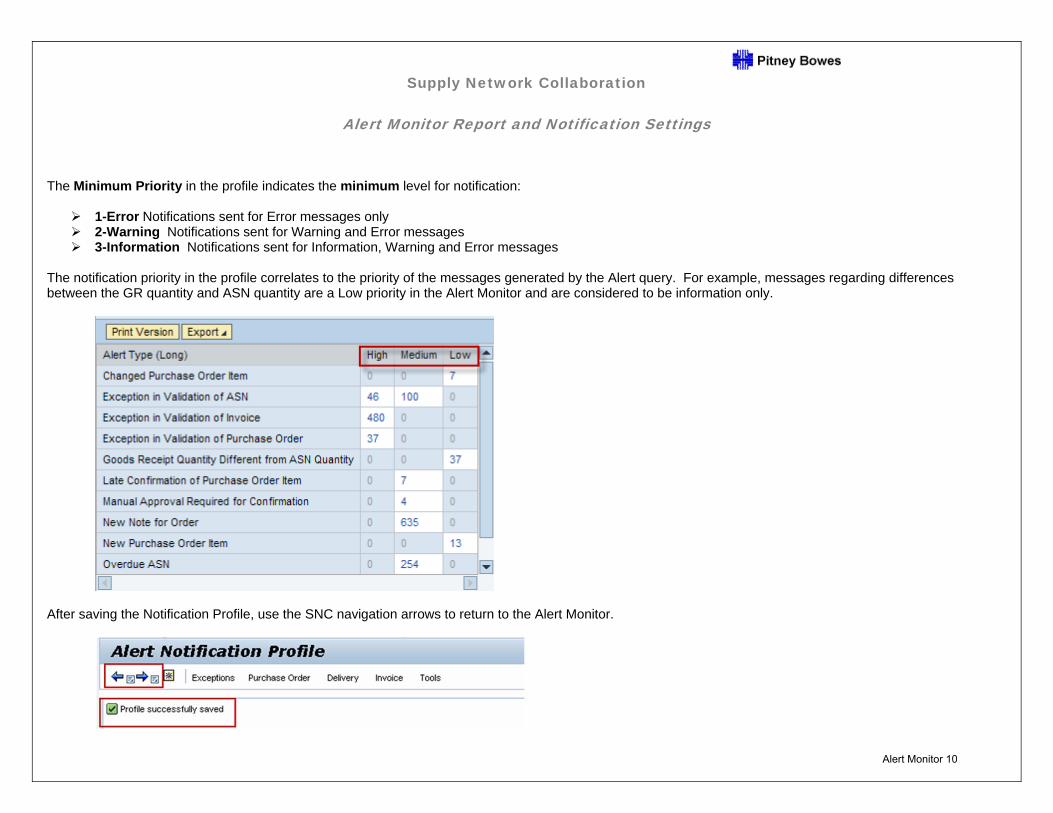
The Minimum Priority in the profile indicates the minimum level for notification:
1-Error Notifications sent for Error messages only 2-Warning Notifications sent for Warning and Error messages 3-Information Notifications sent for Information, Warning and Error messages
The notification priority in the profile correlates to the priority of the messages generated by the Alert query. For example, messages regarding differences between the GR quantity and ASN quantity are a Low priority in the Alert Monitor and are considered to be information only.
After saving the Notification Profile, use the SNC navigation arrows to return to the Alert Monitor.
Alert Monitor 10