D-2 INCORPORATED ASTM Test Method D-2624...
23
JF-1A-HH Hand Held Conductivity Sensor Page 1 of 23 D-2 INCORPORATED Jet Fuel 1A Conductivity Sensor Hand Held ASTM Test Method D-2624 JF-1A-HH OWNERS MANUAL REVISION 6 P/N 445-003 Revision History: Rev Date Description 1 01/28/08 Written AJF 2 07/30/09 ASTM D-2624 Listing Added DLF 3 12/18/09 USB Version – Eliminate Blue Tooth AJF 4 4/24/10 Updates – Immersion Depth, Menu- Structure, General Corrections AJF 5 7/1/2010 ECO 10-012 CE Mark and Related Updates AJF 6 9/1/2011 Ability to turn on/off sensor through keyboard SWS
Transcript of D-2 INCORPORATED ASTM Test Method D-2624...

JF-1A-HH Hand Held Conductivity Sensor
Page 1 of 23
D-2 INCORPORATED
Jet Fuel 1A Conductivity Sensor Hand Held
ASTM Test Method D-2624
JF-1A-HH
OWNERS MANUAL
REVISION 6 P/N 445-003
Revision History: Rev Date Description 1 01/28/08 Written AJF 2 07/30/09 ASTM D-2624 Listing Added DLF 3 12/18/09 USB Version – Eliminate Blue Tooth AJF 4 4/24/10 Updates – Immersion Depth, Menu- Structure, General Corrections AJF 5 7/1/2010 ECO 10-012 CE Mark and Related Updates AJF 6 9/1/2011 Ability to turn on/off sensor through keyboard SWS

JF-1A-HH Hand Held Conductivity Sensor
Page 2 of 23
This manual covers the operational aspects of the D-2 JF-1A-HH Hand Held Conductivity Sensor. The manual does not differentiate between the sensor’s possible measurement ranges other than to list the proper ordering number, see Appendix C. D-2 continuously strives to meet the full expectations of our customers and we welcome comments on the structure, content and the ability of this manual to answer your questions regarding our product. If you have any suggestions or comments, please contact us at [email protected]. This document is provided with the understanding that future versions of this instrument may have additional commands, and the function of the commands shown in this document may vary from the present operation.

JF-1A-HH Hand Held Conductivity Sensor
Page 3 of 23
Table of Contents
Notes for User: .................................................................................................................. 4 1.0 CONTENTS OF THE BOX ....................................................................................... 6 2.0 GENERAL DESCRIPTION ...................................................................................... 7 3.0 CHARGING PROCEDURE ...................................................................................... 7 4.0 SPECIFICATIONS .................................................................................................... 8 5.0 OPERATION ............................................................................................................ 10
5.1 Sampling Data (Please Reference to Menu Structure) .................................................. 10
5.2 Reviewing Data (Please refer to Menu Structure) ......................................................... 12
5.3 Preferred Sampling Procedure ........................................................................................ 12
6.0 MENU STRUCTURE .............................................................................................. 13 7.0 USB SERIAL DATA INTERFACE ........................................................................ 16
7.1 Serial Port Parameters ..................................................................................................... 16
7.2 Firmware Commands ....................................................................................................... 16
8.0 CALIBRATION ........................................................................................................ 17 8.1 Calibration Check ......................................................................................................... 17
8.2 Reading Check ............................................................................................................. 17
9.0 MAINTENANCE ..................................................................................................... 18 9.1 Cleaning ......................................................................................................................... 18
9.2 Removable Tip Assembly (optional) .................................................................... 18
APPENDIX A: LIMITED WARRANTY ....................................................................... 20 APPENDIX B: Serial Port Command List .................................................................... 22 APPENDIX C: Ordering Information .......................................................................... 23

JF-1A-HH Hand Held Conductivity Sensor
Page 4 of 23
Notes for User: Use the following conventions when reading this manual.
WARNING! There is a danger to life and limb or a risk of serious injury if the notes on safety are disregarded!
CAUTION! There is a risk of injury and damage to property if the notes on safety are disregarded!
ATTENTION! There is a risk of damage to property if the notes on safety are disregarded!
! IMPORTANT Notes on working procedures.
Read the instructions in this manual carefully before using the sensor. Note throughout this manual the term JF-1A-HH applies to all models of the instrument, unless specific individual model numbers are detailed. This manual uses the convention of bold uppercase letters to describe the two buttons on the keypad SCROLL – scroll button ENTER – enter button D-2 Incorporated will accept no liability for damages due to non-observance of this manual.
ATTENTION! If the instructions in the operating manual are not adhered to or are inadequately adhered to, there shall be no entitlement to services under the warranty and the CE Declaration of Conformity shall cease to be valid.

JF-1A-HH Hand Held Conductivity Sensor
Page 5 of 23
Information in this manual is subject to change without notice and does not represent a commitment on the part of D-2 Incorporated. No part of this manual may be reproduced or transmitted in any form or by any means, electronic or mechanical, without the prior written permission of D-2 Incorporated. Where manuals are written in several languages, the text it was created in is considered the original. D-2 Incorporated 23 Edgerton Drive Suite A North Falmouth, MA USA 02556 Phone: 01 508-329-2046 Telefax: 01 508-536-5206 E-Mail: [email protected] Internet: http://www.D-2Inc.com © Copyright 2014, D-2 Incorporated, North Falmouth, MA, USA

JF-1A-HH Hand Held Conductivity Sensor
Page 6 of 23
1.0 CONTENTS OF THE BOX
1.1 Inspection Upon arrival, visually inspect the box for any damages. Damage must be reported to the shipping carrier first.
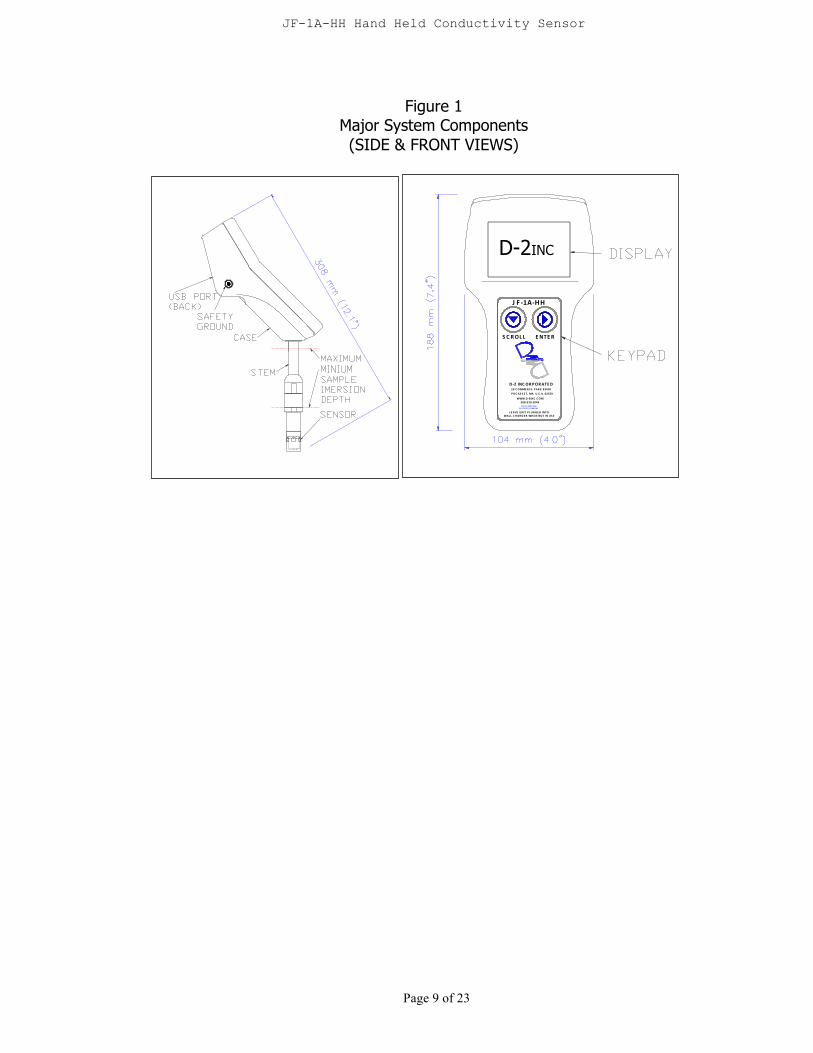
1.2 Unpacking the Sensor The JF-1A-HH is a delicate instrument and care should be taken during the unpacking of the box. The Contents of the box vary depending on exact purchase order. The following list of components can be considered the minimal shipment for the JF-1A-HH 1. JF-1A-HH: Hand-Held sensor. See figure 1. 2. JF-1A-HH-WA: Power Supply Brick. (With international plug
adaptors) 3. 445-003: Owner’s Manual (this document) 4. JF-1A-HH-SP: Graphing Software Package
1.3 Accessories
Other items may be included in the box depending on what was exactly ordered. Always check contents versus the purchase order/packing slip. Available accessories can be found on the web at www.d-2inc.com or by D-2 Incorporated’s document number 445-013.
! IMPORTANT Due to the unknown length of the shipping process, an overnight recharge of the JF-1A-HH is necessary before use.

JF-1A-HH Hand Held Conductivity Sensor
Page 7 of 23
2.0 GENERAL DESCRIPTION
D-2 Incorporated is pleased to announce the release of their newest version of the JF-1A-HH. This version has the ability to turn on and off with the press of the enter key for approximately 2 seconds. This allows the user many more operations between charges and the need to keep the sensor plugged into the wall charger when not in use has been eliminated.
The D-2 JF-1A-HH Hand Held Conductivity Sensor is a reliable instrument for the spot sampling measurement of electrical conductivity of fuels. The JF-1A-HH Conductivity Sensor incorporates innovative electronic Digital Signal Processing (DSP) techniques to accurately determine the electrical conductivity of fuel products, identical to those used in the ASTM approved JF-1A. The instrument will measure fuel electrical conductivities between 0 and 2000 picosiemens/meter (pS/m), although other ranges can be configured. The sensor offers internal LI-ION rechargeable battery and can link with any USB equipped personal computer for ease of data transfer. Up to 8 sampled data points along with temperature and a time/date stamp can be held in internal non-volatile memory, for either readout on the display or transfer to a personal computer. Optional software is available from D-2 for data analysis plotting and archiving. Calibration relies on the physical stability and cleanliness of the sensor, which by design is stable. The conductivity sensor also incorporates a high stability temperature sensor.
3.0 CHARGING PROCEDURE
Charging of the battery can be accomplished in two different ways; either
by plugging in the JF-1A-HH-WA or by plugging in the JF-1A-HH-USB cable. Plugging in the JF-1A-HH-WA is the faster of the two methods to
recharge the battery. Due to USB port specifications, which restrict the amount of current that can be pulled from the host USB port, the wall adaptor charges the battery twice as fast as the USB port.
When either charging process is being used, the display (when on) will
display the battery charging icon on the left-hand side, middle of the display. Seeing the icon means the sensor has detected the charging cable. Seeing the icon blink means the battery is being charged and seeing the icon stop blinking and stay steady state means the battery has been charged to its maximum capacity. Removal of charging cable is then recommended.

JF-1A-HH Hand Held Conductivity Sensor
Page 8 of 23
4.0 SPECIFICATIONS
Table 1 SENSOR SPECIFICATIONS
JF-1A-HH-2000 Parameter Conductivity Temperature
Range 0 - 2000 pS/m* 0 - 35°C Accuracy ±1.5 pS/m (±1.5% of reading) ±0.5°C Resolution 0.1 pS/m 0.1C *Alternate ranges available – contact factory JF-1A-HH-P-2000
Parameter Conductivity Temperature Range 0 - 2000 pS/cm* 0 - 35°C Accuracy ±1.5 pS/cm (±1.5% of reading) ±0.5°C Resolution 0.1 pS/cm 0.1C *Alternate ranges available – contact factory JF-1A-HH Series
Parameter Conductivity Temperature Sensor Type 316SS Coaxial Electrode Electronic Calibration NIST Traceable NIST Traceable
Table 2 SYSTEM SPECIFICATIONS
Power Built-In 2.6AHr Lithium Ion Battery (1000 Samples) Universal Voltage Wall Mount Charger Charger Input: Typical 100- 250 VAC, 50-60 Hz, 0.5A Charger Output: Typical 9 VDC Charger Connector: 0.097”Center Pin 712 Jack w/center pin positive Battery Life: up to 100 hours without recharging
Outputs 128X64 Dot Matrix Display Indicating Conductivity and Temperature, Non-Backlit Sample Trend Line Graph to Assist Data Collection USB Data Interface* LCD Charging Indicator
Materials Housing Polyamide – Grey; Stem – Delrin (Opaque); Sensor - 316SS and PEEK
Weight 1 – 2 Lbs Certification Housing – FM, CSA, UL, CENELEC
CE (Completed) * Virtual serial data com port driver necessary
JF-1A-HH Hand Held Conductivity Sensor
Page 9 of 23
Figure 1 Major System Components (SIDE & FRONT VIEWS)
AN IS O 9001:2000C E R TIF IE D C OMPANY
WAL L C HARGE R WHEN NOT IN US EL E AVE UNIT P LUGGED INTO
508-‐329-‐2046WWW.D-‐2INC .C OM
POC AS S E T, MA U.S .A. 0255919 C OMMERC E PARK ROADD-‐2 INC ORPORATED
J F -‐1A-‐HH
S C ROL L ENTER
D-2INC

JF-1A-HH Hand Held Conductivity Sensor
Page 10 of 23
5.0 OPERATION
The JF-1A-HH Hand Held Conductivity Sensor runs on a rechargeable LI-ION battery. The Battery is charged by either the USB cable or the JF-1A-HH-WA power adaptor. It is recommended to charge the sensor for an overnight period before initial use.
To turn the sensor on, depress the ENTER key for approximately 2 seconds and release. The user will see the display flash which indicates the ENTER key should be released. The user will see the D-2 Incorporated Logo first, then the next date for scheduled calibration and finally the first operational screen.
To turn the sensor off, depress the ENTER key for approximately 3 seconds and release. The display will go blank which indicates the sensor is off. The sensor also has a built in timer to shut down the sensor if no key has been pressed in the past 60 seconds. This safeguard prevents against battery drain if someone inadvertently forgets to power down the sensor. The sensor basically has two modes of operation…
1. Sampling fluid and storing the data into one of the 8 storage locations in the sensor.
2. Viewing samples already taken and stored in one of the 8 storage locations in the sensor.
All sensor operations are performed by depressing one of the two buttons
on the keypad. The sequence of the button pressing guides the user through the necessary steps to achieve the two modes of operation. See sections 5 and 6 for proper operational sequences.
WARNING: The instrument must be disconnected from the wall charger and cover in place prior use as a measuring device. WARNING: The instrument USB port must be disconnected from any external device and the cover installed prior to use as a measuring device.
5.1 Sampling Data (Please Reference to Menu Structure)
Proper techniques as described in ASTM D2624 should be used to collect a fuel sample from your test location.

JF-1A-HH Hand Held Conductivity Sensor
Page 11 of 23
! IMPORTANT
Cross contamination of fuels can lead to erroneous conductivity values. Always clean sensor tip prior to and between sampling; recommended cleaning practices include an alcohol rinse and air dry, see section on Maintenance.
WARNING: The user should employ proper bonding techniques when taking samples of low conduction fluids and when sampling these fluids using the JF-1A-HH instrument. Containers should be tied to Safety Ground during product line sampling. The JF-1A-HH has been provided with a Safety Ground banana jack to allow the user to bond the instrument when required by local codes.
o Prior to sampling fuel, the sensor tip should be immersed into and
out of the fuel 3 times up to the “minimum” mark (top of the sensor tip).
o Use the ENTER key to power up the sensor. Using the SCROLL key step through to the sample storage location that you want to collect data for. When ready to sample press ENTER key.
o Press the ENTER key to commence sampling. The display has three critical sections during the sampling... 1. Right below the words “Enter to Store”, dots will increment across the
screen. Each dot represents a sample and there are a total of ten samples per acquisition.
2. In the center of the screen is the actual value of each sample. 3. Across the bottom of the screen, is a Bar Graph and Caret depicting
the stability of the reading. At the center of the bar graph is a vertical line used to display the “stable” region. The Caret moves along the Bar Graph in relation to the percent difference of the previous reading.
Watching the bar graph and the number of sample dots shows the status of the current sample. There are several options for acquisition at this time
o Pressing the ENTER key when the Caret reaches the center vertical line (preferred method), stores the data along with temp, time and date in the current selected location. The menu screen then displays all the data just taken.
o After the ten samples have been updated during the acquisition the bar graph disappears and is replaced with “SCR TO CLEAR”. At

JF-1A-HH Hand Held Conductivity Sensor
Page 12 of 23
this time, pressing the ENTER button stores the last sample’s value taken. The menu screen then displays all the data just taken. If pressing the Scroll button instead, the acquisition’s data is cleared and the user is placed back in the choose location menu. The user then has the ability to choose another location for storing another sample.
o By choosing neither button the sensor enters its sixty-second timeout mode. At this point in the menu structure, the first timeout will clear all the data and place the user back in the choose location menu; after sixty seconds more, the sensor will power down.
5.2 Reviewing Data (Please refer to Menu Structure)
o The SCROLL key can be used to move to the location of the
stored data of interest. o Pressing the ENTER key will display the last data sample for that
storage location along with temperature and date collected.
! IMPORTANT Sampling new data to any storage location overwrites previous data. 5.3 Preferred Sampling Procedure o Sensor Probe Cleaning o Check Calibration o Proper Fuel Sample Collection o Proper Sample Bonding to Safety Ground o Proper Insertion of Sensor Probe o Selection of Storage Location o Initiating Sample Measurement o Saving at Stable Reading o Confirming Storage of Sample in Correct Location

JF-1A-HH Hand Held Conductivity Sensor
Page 13 of 23
6.0 MENU STRUCTURE The following pages contain the flow charts of the menu structure/keypad sequences of all the functionality of the JF-1A-HH.
Diagram Power-Up Sequence
UNIT OFFDISPLAY OFF
WAITING FOR USER KEY STROKE,ENTER BUTTON
DISPLAY TURNS "ON"
DISPLAY INDICATES
SCROLL ENTERTO TO
DISPLY SAMPLE
ENTER (HOLD 2 SECS)
SCROLL
TIME OUT60 SEC'S
Button Flow DiagramPower-Up Sequence
A. FougereD-2 Incorporated24 APRIL 2010
Revision 2
ENTER
TO TAKE NEWDATA
TO DISPLAYSTORED
DATA
ENTER (HOLD 3 SECS)POWER DOWN
D-2 SPLASHSCREEN
DISPLAYS NEXTCALIBRATION DATE

JF-1A-HH Hand Held Conductivity Sensor
Page 14 of 23
Flow Diagram Sampling Sequence
UNIT TURNEDOFF
Select Sample#0 Location
Select Sample#1 LocationScroll
ENTER
Select Sample #N LocationScroll
ENTER
Select Sample#7 LocationScroll
ENTER
DISPLAY DATAAND TEMP
STORE DATA IN LOCATION SELECTEDPRESS ENTER AGAIN TO POWER DOWN
SCROLL FOR CONTINUED DATACOLLECTION NEXT MEMORY LOCATION
ENTER (STORE DATA)
ENTER
ENTERSINTO
SAMPLINGMODE
ScrollIF LAST
LOCATION #0
ENTER
ENTER
Scroll
ENTER
ScrollIF LAST
LOCATION #N-1
ScrollIF LAST
LOCATION #7
Scroll (quit)
TIME OUT60 SEC'S
Button Flow DiagramSAMPLINGA. Fougere
D-2 Incorporated18APR14Revision 3
POWER UPSEQUENCE
ENTER (HOLD 2 SECS)
TIME OUT60 SEC'S

JF-1A-HH Hand Held Conductivity Sensor
Page 15 of 23
Flow Diagram Display Stored Data Display Sequence
UNITTURNED
OFF
Display Sample#0 Location
Display Sample#1 LocationScroll
ENTER
Display Sample #N LocationScroll
ENTER
Display Sample#7 LocationScroll
ENTER
SCROLLTIME OUT60 SEC'S
ENTER
Scroll
TIME OUT60 SEC'S
Button Flow DiagramDISPLAY DATA
A. FougereD-2 Incorporated
19APR14Revision 3
POWER UPSEQUENCE
ENTER (2 SECS)
SAMPLINGFOR LASTLOCATIONDISPLAYED
(PROCEED TOSAMPLING FLOW
DIAGRAM)

JF-1A-HH Hand Held Conductivity Sensor
Page 16 of 23
7.0 USB SERIAL DATA INTERFACE
The D-2 JF-1A-HH has an industry standard USB Interface. To properly connect to the sensor certain USB drivers are needed. These drivers may or may not be already loaded on your computer. These drivers can be found accompanying the optional D-2 INC. software or online from http://www.ftdichip.com/Drivers/VCP.htm and looking for the FT232R product line. This USB connection will have properties of a virtual serial port and the connection shall automatically be given a comport number. This Comport number will be needed for communications with the sensor through D-2 Inc.’s Windows® software. The optional software allows for download of data, time synchronization, graphing, trending, change of location names, and calibration status. Follow software menus and instructions as required.
7.1 Serial Port Parameters Once connected to the Virtual Serial Port, communication parameters
must be set to 9600 N 8 1 (D-2 Inc. software shall do this automatically). Baud Rate of 9600 BPS No Parity 8 Data bits 1 Stop bit No handshaking of any kind 7.2 Firmware Commands
A list of commands has been developed to communicate with the sensor
to enhance operation. All commands end with a carriage return. The ability to read a parameter needs only the command, the ability to set a parameter needs the command, an equal sign, and the formatted parameter, i.e. to set the time to 1:35 PM, the command structure would be: time=13:35:00<cr>. To find the time, the command structure would be: time<cr>.
A list of available commands can be found in Appendix B.

JF-1A-HH Hand Held Conductivity Sensor
Page 17 of 23
8.0 CALIBRATION
! IMPORTANT
Cross contamination of fuels can lead to erroneous conductivity values. Always clean sensor tip prior to and between sampling. Recommended cleaning practices include an alcohol rinse and air dry; see section on Maintenance.
8.1 Calibration Check At time of every power up the date of the next scheduled calibration is
displayed on the screen. Using the sensor is not recommended after this date has passed. Normal re-calibration interval for the JF-1A-HH is one year.
8.2 Reading Check A good indication of proper calibration is through the use of the JF-1A-
HH-VF accessory. This accessory can be used in conjunction with the JF-1A-HH to verify two standard conductivity points in the calibrated range. If either reading is observed to be out of tolerance or the user suspects that the unit is not reading properly the sensor should be returned to the factory for certified re-calibration.
The JF-1A-HH-VF accessory can also be used to perform an in-house
calibration. The calibration procedure is performed with the use of D-2 Incorporated software running on a Windows® based operating system. The calibration
See Appendix A for Warranty and Return Merchandise Information.

JF-1A-HH Hand Held Conductivity Sensor
Page 18 of 23
9.0 MAINTENANCE
ATTENTION! There are no user-serviceable components inside the D-2 JF-1A-HH Conductivity Sensor. There are no electronic adjustments inside the sensor. At no time should the sensor housing be dismantled or the screws removed. Accessing the interior of the housing shall void all warrantees The total Maintenance of the instrument has been reduced to sensor
probe cleaning and ensuring the battery charger is plugged in at all times when the sensor is not in use.
9.1 Cleaning
The JF-1A-HH Hand Held Conductivity Sensor should be cleaned prior to and in between sampling procedures. Fuel additives or particulate may build up on the sensor, degrading its performance. The sensor can be cleaned using the following procedure.
With the charger removed from the sensor and the sensor removed from
the sample, rinse the sensor in “Clean” Isopropyl Alcohol and blow-dry using “dry” compressed air. Note that this step should be repeated until all signs of fuel residues have been removed from the sensor.
Note: Isopropyl Alcohol is highly conductive and any residual traces inside the sensor between the two electrodes will over-range the instrument. Note that if the Isopropyl Alcohol is well blown off with dry compressed air no residuals will be left.
Make sure the sensor does not display a large reading when sampling in air. This could be due to an improper cleaning procedure or residual Isopropyl Alcohol in the sensor cavity
9.2 Removable Tip Assembly (optional) If the JF-1A-HH sensor is ordered with the removable tip option, cleaning
the inner electrode is even easier. To remove the outer electrode, turn the outer electrode counter clockwise. Follow cleaning procedure outline in section 7.1.

JF-1A-HH Hand Held Conductivity Sensor
Page 19 of 23
ATTENTION! Care must be taken when the outer electrode has been removed. The outer electrode can become damaged if dropped or inappropriately handled. The threads on the outer electrode are delicate and extreme care should be taken when screwing the electrode back on.
ATTENTION! While the outer electrode has been removed, the inner electrode should not be spun or twisted during the cleaning process. This action could render the sensor inoperable. Always take extreme care when the outer electrode has been removed.

JF-1A-HH Hand Held Conductivity Sensor
Page 20 of 23
APPENDIX A: LIMITED WARRANTY One year from date of shipment, D-2 Incorporated, guarantees its products to be free of defects in materials and workmanship. In the event a product malfunctions during this period, the company obligation is limited to repair of the defective item at our factory, or the defective item may be replaced at our option. Instruments found defective should be returned to the factory prepaid and carefully packed, as customer will be responsible for freight damage. D-2 will pay return shipping on any warranty repairs. Repairs or replacements under warranty will be at no cost to the customer for parts, labor, or return shipment from our factory to the customer. This warranty is void if in our opinion the instrument has been damaged by accident, mishandled, altered or repaired by the customer where such treatment has affected its performance or reliability. In the event of such abuse by the customer, all costs for repairs plus freight costs will be borne by the customer. All equipment supplied by D-2 that is designed for use under hydrostatic loading has been certified by actual pressure testing prior to shipment. The customer will be charged a diagnostic fee plus all shipping costs if an instrument is returned for warranty repair and the factory finds no defect. Incidental or consequential damages or costs incurred as a result of product malfunction are not the responsibility of D-2 Incorporated. Equipment not manufactured by D-2 Incorporated, is supported only to the extent of the original manufacturer’s original warranties. All OEM sensors that utilize electrodes (oxygen cartridges, pH, ORP, etc.) are warranted at the time of shipment, and shall perform upon initial installation within stated specifications. If the product proves to be defective within the OEM’s warranty we will replace the product or defective part with a similar model, product or part, but only to the extent that the OEM will warrant. All returned products must be accompanied by a Returned Material Authorization (RMA) number issued by D-2 Incorporated. Shipments will not be accepted without the RMA number. An RMA number can be obtained by calling Customer Service Department at 508-329-2046 or by emailing [email protected].

JF-1A-HH Hand Held Conductivity Sensor
Page 21 of 23
The following information should accompany any instrument being returned to the factory: Return Authorization Number Model/Serial Number Brief Description of the Problem Customer Contact/Telephone Number CALIBRATION SERVICE POLICY A calibration only service is available for JF-1A-HH Hand Held Conductivity Sensors. The service is limited to instruments requiring only calibration and minor adjustment. Instruments that are not operating properly and require repair or replacement parts will not be covered. If repair is necessary the customer will be contacted and apprised of the additional cost. The customer will be charged the standard repair cost, which includes repair and calibration. In the event that the customer does not approve repair, the unit will be returned in "as received" condition and the teardown and inspection charge will be invoked. The customer will be required to obtain a return authorization number from Customer Service at D-2 Incorporated prior to the return of the instrument. This number should be displayed on the outside of the container, preferably on the shipping label, and included on the shipping documentation sent with the instrument. If possible, the following information should accompany the instrument: Return Authorization Number Model/Serial Number Customer Contact/Telephone Number All Correspondence/Shipping: Customer Service D-2 Incorporated 23 Edgerton Drive Suite A North Falmouth, MA 02556

JF-1A-HH Hand Held Conductivity Sensor
Page 22 of 23
APPENDIX B: Serial Port Command List Function Command Format Save parameters ***E List variables RCAL Set one Timeout of 30 min TOFF Get all data for all locations DUMP Get firmware version VER Get list of help commands ? *Date DATE = mm/dd/yy Time TIME = hh:mm:ss Location 0 Name LOC0 = 4 characters Location 1 Name LOC1 = 4 characters Location 2 Name LOC2 = 4 characters Location 3 Name LOC3 = 4 characters Location 4 Name LOC4 = 4 characters Location 5 Name LOC5 = 4 characters Location 6 Name LOC6 = 4 characters Location 7 Name LOC7 = 4 characters Conductivity value filter number N = 0 > whole number < 100 *all commands listed after and including this one have the ability to read or set the parameter.

JF-1A-HH Hand Held Conductivity Sensor
Page 23 of 23
APPENDIX C: Ordering Information The JF-1A-HH series has the versatililty to cover a wide range of applications. The ability to measure a wide range of conductivity can be obtained through the Ordering Matrix Below. Please consult the factory with any questions you may have.
End Item Number Range Tip JF-1A-HH - - 2000 - 0 - 2,000 pS/m Non removable JF-1A-HH - - 4000 - 0 - 4,000 pS/m Non removable JF-1A-HH - - 20000 - 0 - 20,000 pS/m Non removable JF-1A-HH - P - 2000 - 0 - 2,000 pS/cm Non removable JF-1A-HH - P - 4000 - 0 - 4,000 pS/cm Non removable JF-1A-HH - N - 2000 - 0 - 2,000 nS/cm Non removable JF-1A-HH - N - 4000 - 0 - 4,000 nS/cm Non removable JF-1A-HH - U - 2000 - 0 - 2,000 uS/cm Non removable JF-1A-HH - U - 4000 - 0 - 4,000 uS/cm Non removable JF-1A-HH - M - 2000 - 0 - 2,000 mS/cm Non removable JF-1A-HH - M - 4000 - 0 - 4,000 mS/cm Non removable JF-1A-HH - P - 2000 - R 0 - 2,000 pS/cm Removable (outer electrode) JF-1A-HH - P - 4000 - R 0 - 4,000 pS/cm Removable (outer electrode) JF-1A-HH - N - 2000 - R 0 - 2,000 nS/cm Removable (outer electrode) JF-1A-HH - N - 4000 - R 0 - 4,000 nS/cm Removable (outer electrode) JF-1A-HH - U - 2000 - R 0 - 2,000 uS/cm Removable (outer electrode) JF-1A-HH - U - 4000 - R 0 - 4,000 uS/cm Removable (outer electrode) JF-1A-HH - M - 2000 - R 0 - 2,000 mS/cm Removable (outer electrode) JF-1A-HH - M - 4000 - R 0 - 4,000 mS/cm Removable (outer electrode) INDICATES REMOVABLE TIP* INDICATES MAX RANGE INDICATES DISPLAY UNITS i.e. JF-1A-HH-2000 BLANK = pS/m - picoSiemens per meter (no column) P= pS/cm - picoSiemens per centimeter N= nS/cm - nanoSiemens per centimeter U= uS/cm - microSiemens per centimeter M= mS/cm - milliSiemens per centimeter BASE MODEL * The Removable tip aids in the cleaning of the sensor.


![[Accessory] [2624] Uncaged - Faces of Sigil](https://static.fdocuments.in/doc/165x107/55cf8d115503462b1391d6a6/accessory-2624-uncaged-faces-of-sigil.jpg)