CytoInspectTM - Greiner Bio One files for the UK... · Test Kit for the identification of 40...
36
Mycoplasma DNA-Chip Greiner Bio-One GmbH Maybachstr. 2 • 72636 Frickenhausen • Germany Phone: +49 (0) 7022 948-0 • Fax +49 (0) 7022 948-514 [email protected] • www.gbo.com/bioscience Revision: BQ-019-09 March 2012 Test Kit for the identification of 40 mycoplasma species in biological materials such as cell cultures For use with CheckReport TM Software 4.0 and higher REF 464 060, 464 070 Validated in accordance with the guidelines of the European Pharmacopoeia CytoInspect TM Instructions For Use
Transcript of CytoInspectTM - Greiner Bio One files for the UK... · Test Kit for the identification of 40...

Mycoplasma DNA-Chip
Greiner Bio-One GmbH Maybachstr. 2 • 72636 Frickenhausen • Germany Phone: +49 (0) 7022 948-0 • Fax +49 (0) 7022 948-514 [email protected] • www.gbo.com/bioscience
Revision: BQ-019-09March 2012
Test Kit for the identification of 40 mycoplasma species in biological materials such as cell culturesFor use with CheckReportTMSoftware 4.0 and higher
REF 464 060, 464 070Validated in accordance with the guidelines of the European Pharmacopoeia
CytoInspectTM
Instructions For Use

CytoInspectTM - Instructions For UseRevision: BQ-019-09 / March 2012
2
GLOSSARY OF SYMBOLS
!en Store in
the darkUse by Consult
Instruc-tions for Use
Catalog Number
Manufac-turer
Tempe-rature limitation
Contents sufficient for <n> tests
Irritant Batch code Important Note
de Im Dun-keln lagern
Mindes-tens haltbar bis
Vor Gebrauch Anweisung lesen
Katalog-nummer
Hersteller Tempera-turbegren-zung
Inhalt aus-reichend für <n> Tests
Reizend Chargen-bezeich-nung
Wichtiger Hinweis
fr À stocker à l‘abri de la lumière
Date limite de con-servation jusqu’au
Lire les in-structions avant utilisation
Numéro de référence
Fabricant Limite de tempéra-ture
Contenu suffisant pour <n> tests
irritant No de lot Note im-portante
es Conservar en un lugar oscuro
A utilizar preferib-lemente antes de
Antes de usar, lea las instruc-ciones
Número de catálogo
Fabricante Limitación de tempera-tura
Contenido suficiente para <n> ensayos
irritante Código de lote
Nota im-portante
it Conserva-re al buio
Da utilizzare entro e non oltre
Leggere le istruzioni prima dell’uso
Numero catalogo
Produttore Limitazio-ne tempe-ratura
Contenuto sufficiente per test <n>
Irritante Codice del lotto
Nota im-portante
pt Conservar num local escuro
A utilizar preferí-velmente antes de
Antes de usar, leia as inst-ruções
Número de catálogo
Fabricante Limitação de tempera-tura
Conteúdo suficiente para <n> ensaios
irritante Código do lote
Aviso im-portante
nl Donker bewaren
Tenminste houdbaar tot
Gebruik-saanwij-zing lezen
Catalogus-nummer
Fabrikant Tempera-tuurbeper-king
Voldoende inhoud voor <n> tests
Irriterend Lot nummer
Belangrijke opmerking
da Opbevares mørkt
Anvendes senest
Læs brugsan-visningen
Katalog-nummer
Producent Tempera-turbegra-ensær
Indeholder nok til <n> test
Lokalirrite-rende
Lotnum-mer
Vigtig hen-visning
sv Förvaras mörkt.
Sista för-bruknings-dag
Läs bruk-sanvisnin-gen före använd-ning
Katalog-nummer
Tillverkare Tempe-ratur-be-gränsning
Innehållet räcker till <n> tester
irriterande Lot nummer
Viktigt medde-lande
pl Przechow-ywa ć w ciemności
Termin zydatności
Przed użyciem przeczytać instrukcję
Numer katalogowy
Producent Ogranicze-nie tempera-tury
Zawartość wystarcza na <n> testów
drażniący Kod partii Ważne
no Oppbeva-res mørkt
holdbar til Les bruk-sanvisning før bruk
katalog-nummer
produsent tempe-raturbe-grensning
Innhold tilstrekkelig for <n> tester
irriterende batch nr. Viktig merknad
el Αποθηκεύεται στα σκοτεινά
το λιγότερο διατηρείται
πριν την χρήση διαβάστε τις οδηγίες
Αριθμός Καταλόγου
Παραγωγός περιoριoμός θερμοκραο ίας
Περιεχόμενο αροκετό για <n> τεοτ
ερεθιστικό κωδικός παρτίδας
Σημαντική υπόδειξη
tr Karanlık yerde saklayınız
Son kullanma tarihi:
Kullanma-dan önce talimatı okuyun
Katalog numarası
Üretici firma
Sıcaklık sınırlaması
İçeriği <n> test için yeterlidir
Tahriş edici Parti kodu Önemli Not

CytoInspectTM - Instructions For UseRevision: BQ-019-09 / March 2012
3
Table of Contents
1. CyToInSPECT™ KIT ComPonEnTS ................................................................................ 5
1.1 Cat. no. 464 060: CytoInspect™ (5 x 2 reactions) .........................................................................51.2 Cat. no. 464 070: CytoInspect™ (5 x 12 reactions) .......................................................................6
2. ConSUmABLES, EQUIPmEnT AnD HARDWARE REQUIRED .................................... 7
2.1 Components Required for the Extraction of mycoplasma DnA .................................................72.2 General Laboratory Equipment and Consumables Required ......................................................7
2.2.1 Laboratory equipment required ..............................................................................................72.2.2 Consumables required ...........................................................................................................8
3. SHIPmEnT AnD SToRAGE InSTRUCTIonS ................................................................... 9
3.1 General Information for Handling DnA Chips ...............................................................................9
4. SAFETy InSTRUCTIonS ...................................................................................................... 9
5. InTRoDUCTIon .................................................................................................................... 10
5.1 Assay Principle .............................................................................................................................. 115.2 Assay Procedure ............................................................................................................................125.3 Description of the CytoInspect™ DnA Chip ................................................................................13
5.3.1 Signals at emission wavelength ~ 570 nm (green fluorescence) .........................................135.3.1.1. Printing control .....................................................................................................135.3.1.2. Hybridisation control ............................................................................................135.3.1.3. Orientation control ...............................................................................................13
5.3.2 Signals at emission wavelength ~ 670 nm (red fluorescence) .............................................135.3.2.1. Internal positive control ........................................................................................135.3.2.2. External positive control ......................................................................................145.3.2.3. Detection of mycoplasma ....................................................................................145.3.2.4. Universal probe ...................................................................................................14
5.3.3 Order of the measurement points for mycoplasmas ............................................................145.3.4 Automated analysis of on-chip controls ...............................................................................15

CytoInspectTM - Instructions For UseRevision: BQ-019-09 / March 2012
4
6. CyToInSPECTTM WoRKFLoW .......................................................................................... 16
6.1 Working Steps and Laboratory Set-up .........................................................................................166.2 Sample Collection and DnA Extraction with CytoInspectTM DnA Extraction Kit .....................186.3 Polymerase Chain Reaction (PCR) ...............................................................................................18
6.3.1 Set-up of thermal cycler .......................................................................................................196.3.2 Set-up of PCR reactions and Uracil-N-glycosylase (UNG) treatment ..................................19
6.4 Hybridisation and Washing ...........................................................................................................216.4.1 Preparation of Washing Solution I and II .............................................................................216.4.2 Hybridisation ........................................................................................................................226.4.3 Washing ...............................................................................................................................22
6.5 Scanning and Evaluation ..............................................................................................................236.5.1 Setting up the sample sheet ................................................................................................236.5.2 Scanning slides ....................................................................................................................236.5.3 Analysis ................................................................................................................................24
6.5.3.1. Assessment of tests ............................................................................................246.5.3.2. Check controls .....................................................................................................25
6.5.4 Accept tests ........................................................................................................................266.5.5 Generate reports ..................................................................................................................266.5.6 Reports for normal tests .......................................................................................................266.5.7 Reports for negative control tests ........................................................................................276.5.8 Print report and export report ...............................................................................................276.5.9 Summary and interpretation of CytoInspectTM results ..........................................................28
7. TRoUBLESHooTInG .......................................................................................................... 30
8. TECHnICAL ASSISTAnCE ................................................................................................. 32
9. REFEREnCES ....................................................................................................................... 32
10. CyToInSPECTTM SHoRT PRoToCoL ............................................................................. 33
10.1 Room 2: PCR - Set-up of reaction mix .........................................................................................3310.2 Room 2: PCR - DnA template addition / PCR ..............................................................................3410.3 Room 3: Hybridisation - Preparation / Hybridisation reaction ...................................................3510.4 Room 3: Washing & drying / Scanning & evalution ....................................................................36

CytoInspectTM - Instructions For UseRevision: BQ-019-09 / March 2012
5
1. CyToInSPECT™ KIT ComPonEnTS
1.1 Cat. no. 464 060: CytoInspect™ (5 x 2 reactions)
CytoInspectTM Test Kit Content Quantity
Slidebox, 5 x 2 Arrays 1 x CytoInspectTM Slidebox with 5 CytoInspectTM chips1 5 x 2 Arrays
iPCR 1 x Internal positive control (ready to use) 700 µl
PCR MasterMix 1 x CytoInspectTM PCR MasterMix (ready to use)2 600 µl
Hybridisation Buffer 1 x CytoInspectTM Hybridisation Buffer (ready to use)3 1.2 ml
BUF A conc. 1 x CytoInspectTM Buffer A (concentrate) 1 x 40 ml
BUF B conc. 1 x CytoInspectTM Buffer B (concentrate) 1 x 15 ml
1 One CytoInspectTM chip contains two CytoInspectTM microarrays.2 Contains all components required for performing PCR (specific red-labelled primers, external positive control, buffers
and nucleotides), except Taq Polymerase3 Contains all components required for performing hybridisation (stringent buffer, green-labelled probes for spot and
hybridisation control)

CytoInspectTM - Instructions For UseRevision: BQ-019-09 / March 2012
6
1.2 Cat. no. 464 070: CytoInspect™ (5 x 12 reactions)
CytoInspectTM Test Kit Content Quantity
Slidebox, 5 x 12 Arrays 1 x CytoInspectTM Slidebox with 5 CytoInspectTM chips1 5 x 12 Arrays
iPCR 2 x Internal positive control (ready to use) 2 x 700 µl
PCR MasterMix 5 x CytoInspectTM PCR MasterMix (ready to use)2 5 x 600 µl
Hybridisation Buffer 2 x CytoInspectTM Hybridisation Buffer (ready to use)3 2 x 1.2 ml
BUF A conc. 1 x CytoInspectTM Buffer A (concentrate) 1 x 40 ml
BUF B conc. 1 x CytoInspectTM Buffer B (concentrate) 1 x 15 ml
1 One CytoInspectTM chip contains 12 CytoInspectTM microarrays.2 Contains all components required for performing PCR (specific red-labelled primers, external positive control, buffers
and nucleotides), except Taq Polymerase3 Contains all components required for performing hybridisation (stringent buffer, green-labelled probes for spot and
hybridisation control)

CytoInspectTM - Instructions For UseRevision: BQ-019-09 / March 2012
7
2. ConSUmABLES, EQUIPmEnT AnD HARDWARE REQUIRED
2.1 Components Required for the Extraction of mycoplasma DnA
Recommendation for manual extraction:CytoInspect™ DNA Extraction Kit (Greiner Bio-One; Cat. No. 516 070)
2.2 General Laboratory Equipment and Consumables Required
2.2.1 Laboratory equipment required
Equipment Greiner Bio-one Cat. no. Quantity
CheckScannerTM 862 070 1
CheckReportTMSoftware Basic Version (4.x or higher)orCheckReportTMSoftware US Basic Version(FDA compliance)
862 080
862 090
1
1
CheckReportTMSoftware CytoInspectTM pluginorCheckReportTMSoftware CytoInspectTM plugin(US version; FDA compliance)
862 082
862 092
1
1
oCheck® Hybridisation Chamber 447 070 1
Additional equipment required
• Microcentrifuge for 1.5 ml reaction tubes / optional centrifuge for 15 ml PP test tubes• Heating block for 1.5 ml reaction tubes• Centrifuge for 50 ml tubes or microcentrifuge for microarrays • Thermocycler for PCR (recommendations): 1. GeneAmp® PCR system 9700 (Applied Biosystems) 2. Eppendorf Mastercycler 5333 3. Veriti Thermal Cycler (Applied Biosystems)• Incubator or water bath (50 °C and 56 °C required)• Micropipettes (variable from 1 - 1000 µl)• For Cat. No. 464 070: 8-channel multipipette (variable from 5 - 100 µl)
Additional hardware required
• Computer (for system requirements see Instructions For Use of the CheckSannerTM and the CheckReportTMSoftware; contact your local distributor for more details)

CytoInspectTM - Instructions For UseRevision: BQ-019-09 / March 2012
8
2.2.2 Consumables required
Consumables Greiner Bio-one Cat. no. Quantity
CytoInspectTM Test Kit 464 060 or464 070
Test kit for 10 reactionsTest kit for 60 reactions
CytoInspectTM DNA Extraction Kit 516 070 Test kit for 50 preparations
15 ml PP test tubes, sterile 188 271 100/1000
Pasteur pipettes, sterile 612 361612 362
1/80025/1000
Sterile pipette tips
0.5 - 10 µl tips (transparent)10 - 100 µl tips (yellow)100 - 1000 µl tips (blue)0.5 - 10 µl filter tips10 - 100 µl filter tips100 - 1000 µl filter tips
765 280685 280686 280765 288772 288750 288
96/480096/480060/240096/96096/96060/600
Dnase-free reaction tubes
Reaction tube 1.5 mlReaction tube 0.2 mlReaction tube 50 mlReaction tube 8 x 0.2 ml (transparent)Cap strips for 8 x 0.2 ml PCR strips
616 201683 201210 261673 210373 270
500/4000500/100025/450
125/1250125/1250
Enzymes required
• mandatory: HotStar Taq® DNA Polymerase (5 U/µl, Qiagen)
• mandatory: Uracil-N-glycosylase (1 U/µl, InvitrogenTM life technologies)

CytoInspectTM - Instructions For UseRevision: BQ-019-09 / March 2012
9
3. SHIPmEnT AnD SToRAGE InSTRUCTIonS
Although the CytoInspect™ kit is shipped at room temperature, the internal positive control and the PCR MasterMix must be stored at -20 °C upon receipt of the kit. The plastic box containing the CytoInspect™ chips, the Hybridisation Buffer, as well as Buffers A and B must be stored at 4 °C to 8 °C and be protected from light.
! Liquid components should be brought to room temperature and mixed well before use. Precipitation can especially occur in the Hybridisation Buffer and Buffer B.
3.1 General Information for Handling DnA Chips
The deposition of dust and other particles on the chip surface must be prevented. Avoid direct skin contact with the hybridisation zone on the chip surface.Only the labelled side of the chip is intended for hybridisation.
! Do not use any marker pens for the identification of DNA chips, as they lead to unspecific fluorescence on the chip. During storage, protect chips from light.
4. SAFETy InSTRUCTIonS
CytoInspect™ is for laboratory use only, not for drug, household or other uses. The Hybridisation Buffer contains a cyanate, which is harmful if inhaled, absorbed through the skin or swallowed. Buffer B contains SDS, which is an irritant. Avoid skin contact. Wear gloves, safety glasses and suitable protective clothing when handling these solutions. Please consult the Safety Data Sheet for information regarding hazards and safe handling practices. The current version of the Safety Data Sheet for this product can be downloaded from the Greiner Bio-One website:www.gbo.com/bioscience/biochips_download

CytoInspectTM - Instructions For UseRevision: BQ-019-09 / March 2012
10
5. InTRoDUCTIon
The contamination of cell cultures by mycoplasmas is a widespread and serious problem in both biological research and biopharmaceutical production. Negative effects of mycoplasma contamination on cell cultures are legion and may include alteration of protein synthesis, changes in cellular metabolism and/or alteration of cellular morphology.
Knowing the source of a contamination is the key to prevent the further spread of a mycoplasma infection. The use of CytoInspect™ enables a rapid and convenient determination of the contamination-causing species, which could thereby indicate the source of contamination (Table 1).
Table 1: Specific mycoplasma species identifiable with the CytoInspect™ chip. For each species, the natural host and the likely source of contamination are listed.
SpeciesHost of mycoplasma species
Source of contamination Species
Host of mycoplasma species
Source of contamination
M. buccale human laboratory personnel M. canadense bovine serum
M. pneumoniae human laboratory personnel M. canis bovine serum
M. faucium human laboratory personnel U. diversum bovine serum
M. fermentans human laboratory personnel A. oculi bovine, caprine serum
M. genitalium human laboratory personnel M. arginini bovine, caprine,
ovine serum
M. hominis human laboratory personnel M. flocculare swine serum
M. orale human laboratory personnel M. hyopharyngis swine serum
M. pirum human laboratory personnel M. hyopneumoniae swine serum
M. salivarium human laboratory personnel M. hyorhinis swine serum
M. eqhirhinis horse serum M. hyosynoviae swine serum
A. axanthum bovine serum M. arthritidis rat serum, cells
A. modicum bovine serum M. pulmonis rabbit, rat serum, cells
A. morum bovine serum A. laidlawii poultry media, cells
A. vituli bovine serum M. gallinaceum poultry media, cells
M. alkalescens bovine serum M. gallinarum poultry media, cells
M. bovigenitalium bovine serum M. gallisepticum poultry media, cells
M. bovirhinis bovine serum M. glycophilium poultry media, cells
M. bovis bovine serum M. synoviae poultry media, cells
M. bovoculi bovine serum S. citri plant media, soya peptone
M. californicum bovine serum S. kunkelii plant media, soya peptone

CytoInspectTM - Instructions For UseRevision: BQ-019-09 / March 2012
11
5.1 Assay Principle
CytoInspect™ is a polymerase chain reaction (PCR)-based detection method for mycoplasma species. DNA from cell culture supernatant or other sources is extracted and purified. Subsequently, the 16S – 23S intergenic spacer region of any mycoplasma DNA is amplified by use of specific, high-ly conserved and red-labelled primers in a PCR.1
The amplified and labelled fragments are then hybridised to a DNA microarray comprised of 39 species-specific probes, allowing the identification of the 40 most important mycoplasma species. This selection represents the species found in more than 99 % of all reported contaminations. In addition, a universal probe tests for the presence of any mycoplasma species (including Acholeplasma sp., Spiroplasma sp. and Ureaplasma sp.).
After hybridisation, analysis of the slide is performed using the CheckScanner™, distributed by Greiner Bio-One in conjunction with the CytoInspect™ Test Kits.
The CheckReport™Software enables a rapid and user-friendly evaluation of the test results. The CheckReport™Software is fully compatible with the CheckScanner™ and can be easily integrated into existing laboratory information and management systems.
The test system incorporates on-chip controls, allowing monitoring of each step of the analysis: DNA extraction, PCR and hybridisation.
1 The PCR process is covered by U.S. patents owned by Hoffmann-La Roche Inc. Use of the PCR process requires a license. Nothing in this publication should be construed as an authorisation or implicit license to PCR under patents held by Hoffmann-La Roche Inc.

CytoInspectTM - Instructions For UseRevision: BQ-019-09 / March 2012
12
5.2 Assay Procedure
1. PCR
2. Hybridisation
4. Scanning and analysis
Figure 1: Principle of the CytoInspect™ assayI. After extraction of sample DNA, a sequence of the 16S - 23S intergenic spacer region (found in all mycoplasmas)
is amplified using the polymerase chain reaction (PCR). A highly conserved primer pair is used. The PCR produces fluorescence-labelled amplification products.
II. The labelled products are then hybridised to complementary sequences fixed on the chip. Each mycoplasma species is detected by five measuring points on the chip. In addition, a universal probe broadens the spectrum of detectable species. During subsequent washing steps, improperly bound probes and probes in excess are removed.
III. The bound and labelled probes are detected by excitation with monochromatic light. The analysis of bound probes is then carried out using the CheckReport™Software.

CytoInspectTM - Instructions For UseRevision: BQ-019-09 / March 2012
13
5.3 Description of the CytoInspect™ DnA Chip
The chip has 12 wells, A1 to B6, each having a printable area of 6 x 6 mm. In the case of CytoInspect™ 2 (5 x 2 reactions), only wells A1 and B1 contain a CytoInspect™ microarray, whereas in the case of CytoInspect™ 12 (5 x 12 reactions), all wells contain a microarray. The CytoInspect™ microarray consists of 225 DNA measuring points distributed over an area of approximately 16 mm2.
The DNA measuring points are approximately 150 μm in diameter and are spaced 275 μm from each other. Five on-chip controls enable the monitoring of DNA extraction, PCR efficacy, hybridisation, chip orientation and also the presence and homogeneity of each individual DNA spot.
Due to the use of red fluorophore-labelled PCR primers and green fluorophore-labelled targets for the on-chip control systems, the DNA chip can be analysed with a microarray laser scanner using excitation wavelengths of ~ 532 nm and ~ 635 nm.
5.3.1 Signals at emission wavelength ~ 570 nm (green fluorescence)
5.3.1.1. Printing control
Each spot of the microarray produces a signal at emission wavelength ~ 570 nm. A green-labelled probe in the hybridisation buffer hybridises with each and every measuring point, thus monitoring the presence and homogeneity of all DNA measuring points.
5.3.1.2. Hybridisation control
Additionally, the labelled probe in the hybridisation buffer will also react with a complementary DNA strand, which is spotted in five of the DNA measuring points. This monitors the performance of the hybridisation reaction.
5.3.1.3. orientation control
Ten DNA measuring points produce signals at emission wavelength ~ 570 nm, irrespective of hybridisation performance. They control the orientation of the analysis grid on the array.
5.3.2 Signals at emission wavelength ~ 670 nm (red fluorescence)
5.3.2.1. Internal positive control
CytoInspect™ contains an internal positive control that tests for a successful DNA extraction. A DNA construct containing the primer binding sites, also used for mycoplasma amplification, is added to the test sample before DNA extraction. After successful extraction and amplification, the internal positive control is measured at five DNA measuring points. Samples containing an excess of mycoplasma DNA will cause a decrease of the internal positive control signals. This is a direct result of primer competition during PCR. In such a case, at least one mycoplasma specific probe or the universal probe must exceed a certain threshold, indicated by a green `check mark` in the generated analysis report. This threshold value must be achieved for validation of the results and release of the report.
CytoInspectTM - Instructions For UseRevision: BQ-019-09 / March 2012
14
5.3.2.2. External positive control
Validation of PCR is confirmed using five DNA measuring points. The PCR MasterMix is spiked with a positive control template DNA that is amplified by red-labelled primers. The binding of the labelled PCR products to five specific DNA ‘External positive control’ measuring points on the CytoInspect™ chip thereby allows for the evaluation of PCR quality. In cases where there is an excess of mycoplasma DNA in the sample, signal strength from the external positive control points may decrease or even disappear. This is due to primer competition during PCR. In this case, spot signals from either the mycoplasmas or the universal probe control must surpass a certain fluorescent signal threshold, indicated by a green ‘check mark’ in the generated analysis report. If the external control and the mycoplasma fail to exceed the threshold, the results are not reliable and no analysis report will be released by the software.
5.3.2.3. Detection of mycoplasma
Mycoplasma DNA is detected by the hybridisation of the red-labelled PCR amplification products to DNA probes spotted on the slide. Each DNA probe is spotted five times to ensure assay robustness. 39 species-specific probes enable the detection of the 41 most important and frequently encountered mycoplasma species. S. citri / S. kunkelii and U. diversum / U. urealyticum are each detected with only one probe.
5.3.2.4. Universal probe
The broad spectrum of species-specific probes is further extended by an additional universal probe detecting the presence of nearly all Mollicutes, including Mycoplasma sp., Acholeplasma sp., Spiroplasma sp. and Ureaplasma sp. (Table 2).
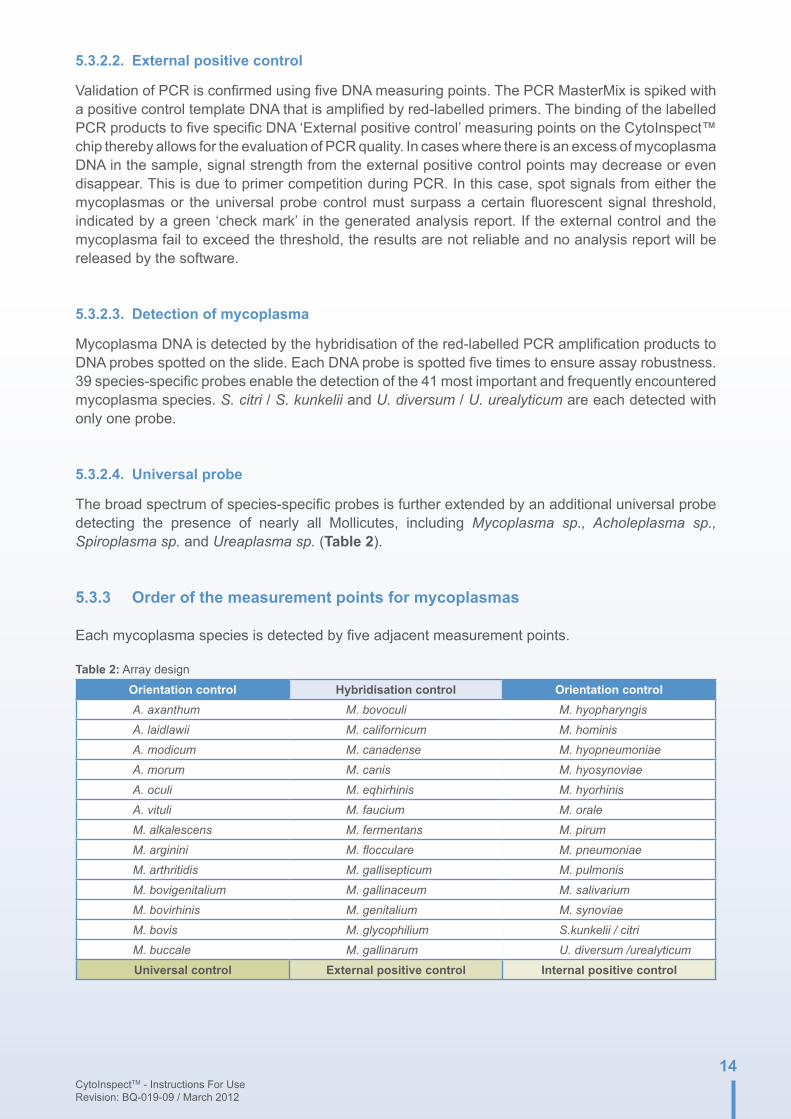
5.3.3 order of the measurement points for mycoplasmas
Each mycoplasma species is detected by five adjacent measurement points.
Table 2: Array design
orientation control Hybridisation control orientation controlA. axanthum M. bovoculi M. hyopharyngis
A. laidlawii M. californicum M. hominis
A. modicum M. canadense M. hyopneumoniae
A. morum M. canis M. hyosynoviae
A. oculi M. eqhirhinis M. hyorhinis
A. vituli M. faucium M. orale
M. alkalescens M. fermentans M. pirum
M. arginini M. flocculare M. pneumoniae
M. arthritidis M. gallisepticum M. pulmonis
M. bovigenitalium M. gallinaceum M. salivarium
M. bovirhinis M. genitalium M. synoviae
M. bovis M. glycophilium S.kunkelii / citri
M. buccale M. gallinarum U. diversum /urealyticum
Universal control External positive control Internal positive control

15CytoInspectTM - Instructions For UseRevision: BQ-019-09 / March 2012
red
chan
nel (
670
nm)
gree
n ch
anne
l (57
0 nm
)UniversalControl
ExternalPositive Control
InternalPositive Control
OrientationControl
HybridisationControl
OrientationControl
Species Identification Probes
Printing and Homogeneity Probes
Figure 2: Set-up of the DnA chip. CytoInspect™ chip at laser emission wavelengths of 570 nm (green) and 670 nm (red).
On-chip control systems allow exact quality determination:• Species identification probes (red-labelled PCR products, five measuring points for each species)• Universal identification probe (red-labelled PCR products, five measuring points)• External positive control (red-labelled PCR products; five measuring points)• Internal positive control (red-labelled PCR products; five measuring points)• Orientation controls (green-labelled probes; ten measuring points)• Hybridisation controls (green-labelled targets; five measuring points)• Printing and homogeneity control of all DNA measuring points (green-labelled target; 225 measuring points) (dotted line).
5.3.4 Automated analysis of on-chip controls
The CytoInspect™ on-chip control system is analysed with the CheckReport™Software. The software interprets the control signals and either retains or releases an analysis report.

16CytoInspectTM - Instructions For UseRevision: BQ-019-09 / March 2012
6. CyToInSPECTTM WoRKFLoW
6.1 Working steps and Laboratory Set-up
An overview of the protocol and approximate time needed for each step are shown in Figure 3. The reagents needed for DNA extraction are not included in the CytoInspect™ kit.
CytoInspectTM working steps
Sample collection
DnA extraction
UnG treatment: hydrolysis of possible PCR contamination
PCR amplification of bacterial DnA using fluorescence-labelled primers
Hybridisation of amplified labelled products to CytoInspectTM DnA chip
Washing of CytoInspectTM DnA chip with the Washing solutions I - II
Scanning and evaluation
Collection of samples from cell culture supernatant or other sources.
Fast extraction using CytoInspectTM DnA Extraction Kit (Cat. no. 516 070).
UnG not provided with CytoInspectTM.
Amplification of the 16S-23S intergenic spacer regions by PCR. The utilisation
of fluorescence-labelled primers enables the later detection of bound DnA (HotStar Taq Polymerase not
provided with the kit).
Hybridisation and washing step I is performed at room temperature (18 °C - 24 °C). Washing step II is done at 50 °C
(solutions for hybridisation and washing steps are provided with the kit).
Automatic scanning and analysis of the CytoInspectTM DnA chips
using the CheckScannerTM and the CheckReportTMSoftware.
20’
10’
90’
3h
30’
10’
15’
Figure 3: Working steps and time expenditure for the CytoInspectTM assay.

17CytoInspectTM - Instructions For UseRevision: BQ-019-09 / March 2012
To prevent cross-contamination of samples and/or stock solutions with previous DNA extractions or previous PCR amplicons, it is necessary to utilise a PCR workflow incorporating separate work areas and rooms. An example is shown in Figure 4.
DNA extraction, PCR and hybridisation procedures are each completed within separate rooms. Colour coding of equipment and consumables may minimise the risk of accidental exchange between the work areas. While PCR utilises closed sample tubes, hybridisation involves sample exposure to air. That said, as hybridisation is the test end-point, small carry-over of PCR amplicons will have a negligible influence on the assay as compared to a contamination occurring during PCR, where even small contaminations can be amplified to detectable signals. Therefore, PCR contamination can be seen as the most dangerous form of contamination affecting CytoInspect™ assay integrity and should be strenuously avoided.
Room 1 Room 2 Room 3
Figure 4: Room separation schematic for the CytoInspectTM protocolRoom 1: The entire DNA extraction procedure should be performed in this room.Room 2: In room 2, the reaction mix for the PCR is prepared and aliquoted (optimally under a PCR hood). Addition of extracted DNA (from room 1) should be carried out at a separate workspace within room 2.Room3: The hybridisation reaction, washing steps and chip drying should take place in room 3. In addition, the CheckScannerTM in conjunction with the CheckReportTMSoftware should be here installed and used for the final analysis of the CytoInspectTM chip.

18CytoInspectTM - Instructions For UseRevision: BQ-019-09 / March 2012
6.2 Sample Collection and DnA Extraction with CytoInspectTM DnA Extraction Kit
DNA extraction components are not provided with the CytoInspect™ kit. For more details, see the manual of CytoInspect™ DNA Extraction Kit.
The sample collection and DNA extraction with the CytoInspect™ DNA Extraction Kit is validated for sample volumes of up to 10 ml. Increasing the total volume of the sample is possible, but depends on the sample collection system (sample matrix).
Sample collection and DNA extraction are important and critical working steps. DNA should be as pure as possible and free from PCR inhibitors.
• All working steps must be performed at room temperature (18 °C - 24 °C).• Use only sterile, DNA-free and single-use materials.• It is absolutely necessary to wear protective gloves and to change them frequently.
6.3 Polymerase Chain Reaction (PCR)
! Taq Polymerase and Uracil-N-glycosylase (UNG) are not provided with the CytoInspectTM kit.
PCR enables the detection of very small quantities of genomic material. Thus the following procedural points are absolutely essential to obtain accurate results:
• Use only sterile and single-use materials. • Use filter tips to minimise the risk of aerosol contamination. • Preparation of samples and PCR should be performed in separated working areas.• Wear protective gloves and change them frequently.

19CytoInspectTM - Instructions For UseRevision: BQ-019-09 / March 2012
6.3.1 Set-up of thermal cycler
! The CytoInspect™ Test Kit was developed and validated for use with the GeneAmp 9700 Thermocycler (Applied Biosystems) and the Eppendorf Mastercycler 5333. It is highly recommended that one of these thermocyclers is used in order to achieve established performance data. The Veriti 96 Well Cycler (Applied Biosystems) can also be used if the ramping conditions of “Mode 9600” are used.
➠ Set the reaction volume on the instrument being used to 50 µl, the ramp speed to 9,600 and amplify the sample DNA by PCR conditions listed below (Table 3):
Table 3: Thermocycler program
Time Temp. °C no. of cycles
20 min 37 °C 1
15 min 95 °C 1
1 min1 min1 min
95 °C67 °C - 57 °C*
72 °C20
1 min1 min1min
95 °C57 °C72 °C
25
Hold 4 °C
* The temperature is decreased by 1 °C in every 2nd cycle.
➠ Set the heating ramp to 1 °C/s and the temperature of the lid to 105 °C. After PCR completion, the amplification products may be immediately hybridised or stored for one week in the dark at -18 °C to -50 °C.
6.3.2 Set-up of PCR reactions and Uracil-n-glycosylase (UnG) treatment
! The kit was validated using Qiagen HotStar Taq Polymerase and UNG from Invitrogen (not provided with kit). It is absolutely necessary to use these components to achieve established performance data.
With the exception of the polymerase and UNG, the MasterMix contains all components required for performing the PCR (buffers, MgCl2, dNTPs, DNase-free water and fluorophore-labelled primers).
The CytoInspect™ MasterMix contains deoxyuridylate (dUTP), which is incorporated into the amplification products during PCR. The PCR products are therefore susceptible to degradation when treated with UNG, as the enzyme cleaves PCR products at any site where a dUTP residue has been incorporated. Cleaved PCR products will not be amplified in subsequent reactions.
Thus, UNG can be used to eliminate carry-over contaminations from previous PCR reactions.2 Other forms of contamination, i.e. from sample preparation, will not be eliminated. Therefore it is still necessary to follow special precautions to avoid contamination (see above).
➠ Dilute UNG 1:50 in PCR water for use in the CytoInspect™ MasterMix. This amount is sufficient to eliminate PCR carry-over contamination. Use of a more concentrated UNG solution may lead to inhibition of the PCR reaction, resulting in reduced sensitivity of the CytoInspect™ assay.
2 Longo, M.C., et al., Use of uracil-N-glycosylase to control carry-over contamination in polymerase chain reactions, Gene, 93, 125-128, 1990

20CytoInspectTM - Instructions For UseRevision: BQ-019-09 / March 2012
To achieve good performance from the UNG treatment, it is necessary to use a fresh dilution. Storage and re-use of the 1:50 dilution is not recommended.
➠ Prepare the MasterMix in a sterile 1.5 ml reaction tube with the components listed in Table 4. Briefly vortex the prepared MasterMix before aliquoting. In the case of multiple samples to be analysed, batch preparation (i.e. in the quantity required for all analyses) of the reaction mix, containing MasterMix, UNG and HotStar Taq Polymerase, is recommended. This will minimise pipetting steps and errors.
The PCR is performed in a total volume of 51 µl, using 0.2 ml thin walled PCR reaction tubes.
! To adjust for volume variations during pipetting, increasing the number of reactions (n) by 1 (n+1), is recommended; for example, prepare a reaction mix for 11 amplification reactions, if ten samples are to be tested. For this reason, the kit contains a surplus of MasterMix.
Including a negative PCR control, by using ultrapure water in the place of mycoplasma DNA for one reaction, is recommended. The negative control reaction can be applied to any well of the chip.
Table 4: PCR reaction set-up
1 reaction 2.5 reactionsCytoInspectTM 2
13 reactionsCytoInspectTM 12
CytoInspect™ MasterMix 39.0 µl 97.5 µl 507 µl
HotStar Taq DNA Polymerase (5 U/µl) 1 µl 2.5 µl 13 µl
1:50 diluted Uracil-N-glycosylase 1 µl 2.5 µl 13 µl
Total volume before addition of sample 41 µl 102.5 µl 533 µl
DNA eluate from extraction 10 µl
Total volume per reaction 51 µl
➠ Incubate reaction mix for 20 minutes at 37 °C (included in Table 3 thermocycler program). ➠ Inactivate UNG by heating samples at 95 °C for 15 minutes (included in Table 3 thermocycler
program). The activity of the enzyme can be partially restored at temperatures below 55 °C. For this reason, the PCR products must be stored in the dark at -18 °C to -50 °C for up to one week or immediately hybridised.

21CytoInspectTM - Instructions For UseRevision: BQ-019-09 / March 2012
6.4 Hybridisation and Washing
6.4.1 Preparation of Washing Solution I and II
Washing solutions must be changed for each chip to avoid signal carry-over. Therefore the kit contains a surplus of Buffers A and B in order to have buffers sufficient to wash each chip.
➠ Prepare Washing Solutions I and II as specified in Tables 5 and 6.
Washing solutions can be stored at 4 °C - 8 °C for one week. They must be brought to the required temperatures before use.
Table 5: Washing Solution I
1 Slide 2 Slides 3 Slides 4 Slides 5 Slides
H2O 40 ml 80 ml 120 ml 160 ml 200 ml
Buffer A 4 ml 8 ml 12 ml 16 ml 20 ml
Buffer B 0.5 ml 1 ml 1.5 ml 2 ml 2.5 ml
final vol. 44.5 ml 89 ml 133.5 ml 178 ml 222.5 ml
Table 6: Washing Solution II
1 Slide 2 Slides 3 Slides 4 Slides 5 Slides
H2O 49 ml 98 ml 147 ml 196 ml 245 ml
Buffer A 0.6 ml 1.2 ml 1.8 ml 2.4 ml 3 ml
Buffer B 0.4 ml 0.8 ml 1.2 ml 1.6 ml 2 ml
final vol. 50 ml 100 ml 150 ml 200 ml 250 ml
➠ For washing step 1, prefill a 50 ml reaction tube with 45 ml of Washing Solution I and keep at room temperature (18 °C – 24 °C).
➠ For washing step 2, prefill a 50 ml reaction tube with 50 ml of Washing Solution II and preheat to 50 °C at least 30 minutes before use.
! Be sure that the temperature of the Washing Solution II is 50 °C. Washing solution temperature deviation of more than 2 °C can lead to signal loss or to an increase in background fluorescence.

22CytoInspectTM - Instructions For UseRevision: BQ-019-09 / March 2012
6.4.2 Hybridisation
A general schematic of the hybridisation and washing process is outlined in Figure 5.
Figure 5: Hybridisation and wash steps.
➠ Place a moistened paper towel in the bottom of an oCheck® Hybridisation Chamber to create a humidity-saturated atmosphere, and then place a CytoInspect™ chip on the magnetic clip rack. Incubate the chip in humidity-saturated atmosphere 10 minutes before using for a hybridisation reaction.
➠ In a fresh reaction tube, mix 24 µl of the Hybridisation Buffer with 13 µl of the PCR product at room temperature (18 °C - 24 °C) and mix by vortexing.
➠ Spin down briefly. ➠ Incubate the hybridisation mix for 3 minutes at 95 °C in a heating block or water bath. Double
stranded DNA is denatured when heated to 95 °C. Denaturation is important for achieving an efficient hybridisation. note: Contact with materials at 95 °C is likely to result in burns to the skin.
➠ Spin down briefly. ➠ To prevent heat evaporation, cool down the hybridisation mix for 30 seconds at room temperature
(18 °C - 24 °C) before opening the tubes. ➠ Transfer 30 µl of the hybridisation mix into each well of the chip containing a microarray.
! Avoid air bubble formation! After addition of hybridisation mix to the chip, handle the chip carefully to avoid spillage of the hybridisation mix and sample mixing.
➠ Incubate the chip for 30 minutes at room temperature (18 °C - 24 °C) in a humidity-saturated oCheck® Hybridisation Chamber.
6.4.3 Washing
➠ Wash the chip at room temperature (18 °C - 24 °C) in Washing Solution I by moving it rapidly up and down for 20 seconds. Do not let the chip surface dry out completely!
➠ Immediately wash the chip at 50 °C in Washing Solution II by moving it rapidly up and down for 30 seconds. Avoid the formation of foam.
➠ Immediately remove any liquid from the chip surface by centrifugation. If you use a special microcentrifuge for microarrays, centrifuge for 10 seconds. If you use a centrifuge applicable for 50 ml tubes, put every washed CytoInspect™ slide in a 50 ml tube and centrifuge it at room temperature (18 °C - 24 °C) for 3 minutes at 500 g. The CytoInspect™ chip is now ready to be scanned.

23CytoInspectTM - Instructions For UseRevision: BQ-019-09 / March 2012
6.5 Scanning and Evaluation
Scanning and analysis of the data is performed using the Greiner Bio-One CheckScannerTM and the CheckReportTMSoftware.
All CytoInspect™ slides are labelled with a unique number in both legible print and barcode format. The barcode uses the nomenclature of 50xxxxxx (8 digits starting with 50) for Cat. No. 464 060 and 51xxxxxx (8 digits starting with 51) for Cat. No. 464 070. This number is used to match the sample sheet with the scanned chip image to the results. The CheckScanner™ reads the barcode automatically. When entering the sample sheet, always use the barcode-number of the chip being analysed.
6.5.1 Setting up the sample sheet
Refer to the CheckReportTMSoftware User Guide. Please note: Do not use semicolons (;) in any of the annotation fields. Semicolons will be interpreted as field delimiter in exported csv-files!
negative Control Checkbox: By checking this box, a sample is designated as a negative control. In this context, a negative control is defined as containing no sample or mycoplasma DNA but may contain the internal positive control. Negative controls are used for assessing contamination by mycoplasma-DNA, which may have occurred during the laboratory workflow. It is necessary to designate these samples as a negative control in the SampleSheet, because normal samples and negative controls are evaluated differently by the software.When the negative Control Checkbox is activated, all annotation fields except for the Sample ID annotation field are disabled.
6.5.2 Scanning slides
➠ Turn the CheckScannerTM on. ➠ Open the lid of the scanner. ➠ Insert up to 4 slides in the slide holder, with the barcode label facing to the right side (label
upwards, Figure 6.). Make sure that the slides are inserted to the stop position. ➠ In case the holder is not visible, close the lid again and press “Unload” in the “Scan Tests” window
of the CheckReportTMSoftware. ➠ Perform the scan according to CheckReportTMSoftware User Guide Chapter 7.
Before the scan process begins, a pop-up window may appear:

24CytoInspectTM - Instructions For UseRevision: BQ-019-09 / March 2012
When the laser reaches its operating temperature, the scan will start automatically.
Figure 6: Insertion of chips into the CheckScannerTM slide holder.
6.5.3 Analysis
! When analysing data using CheckReport™Results, ensure that:• The version of the CheckReportTMSoftware installed on your PC corresponds to the one mentioned on the
kit. If not, reinstall the revised version.• The correct image with respect to the SampleSheet is loaded. Information about the image and SampleSheet
is displayed in the report.
➠ After opening a chip image using the command “Open test”, grid finding and quality control functions are started automatically.
6.5.3.1. Assessment of tests
For each test (i.e. each well of the chip) the results of the evaluation are displayed in the Assessment panel by the symbols , , and ! , respectively.
normal tests: A test is marked as OK (), if all controls are OK.A test is marked as failed (), if one or more controls failed.
negative control tests:A negative control test is marked as OK (), if all controls are OK and no contamination has been detected.A negative control test is marked as contaminated (!), if all controls are OK but a contamination has been detected.A negative control test is marked as failed (), if one or more controls failed.

25CytoInspectTM - Instructions For UseRevision: BQ-019-09 / March 2012
6.5.3.2. Check controls
In the detailed view of the assessment window, the results for each check control are displayed individually. Most controls are evaluated in both channels (532 nm and 635 nm).
indicates that the criteria of the control are met and the control is OK.
indicates that the criteria of the control are not met and the control has failed.! indicates a contamination in negative control samples.
Check Controls in normal samples
• Ctrl_ori: Orientation control guarantees correct positioning of the grid. To be accepted, the orientation control spots must not show a signal in the red channel [Ctrl_Ori (635)], but must show a signal in the green channel [Ctrl_Ori(532)].
• Ctrl_Hyb: Hybridisation control guarantees sufficient hybridisation of the sample. To be accepted, the hybridisation control spots must not show a signal in the red channel [Ctrl_Hyb (635)], but must show a signal in the green channel [Ctrl_Hyb(532)].
• Ctrl_ePoS: The external positive control guarantees sufficient amount of PCR product is present. In the green channel [(Ctrl_ePos (532)] the presence of the PCR control spots is verified, whereas in the red channel [(Ctrl_ePos (635)] the generation of a PCR-product from the external positive control is evaluated.
• Ctrl_iPos: The internal positive control guarantees sufficient quality of the sample preparation and the DNA extraction. In the green channel [(Ctrl_iPos (532)], the presence of the internal positive control spots is verified, whereas in the red channel [(Ctrl_iPos (635)] the generation of a PCR product from the human internal positive control is evaluated.
• Ctrl_Prt_Test: This control guarantees the presence of all array spots. False negative results due to missing spots are excluded. In case of missing spots, the whole well will be assessed as “not valid”.
! Due to PCR competition, the signal of Ctrl_iPos and Ctrl_ePoS can be diminished in the red channel when high amounts of mycoplasma DNA are present in the sample. In this case, Ctrl_iPos and Ctrl_ePoS are automatically accepted as OK () by the CheckReport™ Software, regardless of the signal of PCR control spots and internal positive control spots, respectively. However, at least one mycoplasma species must be detected in the sample.
Check controls in negative control samples:
• Ctrl_ori, Ctrl_Hyb, Ctrl_Prt_Test and Ctrl_ePoS are evaluated in the same way as for normal samples.
• Ctrl_iPos: The spots of the internal positive control are specific for the internal positive control DNA, which is amplified during PCR. The negative control can consist of a sample containing only a water sample or water plus the internal PCR positive control. In both cases, the resulting signal will be accepted 0, the software has a valid test result (marked as OK ). In the green channel [(Ctrl_Smp (532)], the presence of the internal positive control spots is verified.
• Ctrl_Cont: The Contamination Control: This control evaluates signals from all the mycoplasma species spots and the internal positive control spots. If no mycoplasma species are detected, Ctrl_Cont indicates that no contamination was detected(). If at least one mycoplasma species was detected, Ctrl_Cont indicates the contamination by the symbol !. However, if the printing control for at least one mycoplasma species (532) or the Ctrl_iPos (532) failed, also Ctrl_Cont has failed (indicated by ). In this case no decision on the presence or absence of contamination can be made.

26CytoInspectTM - Instructions For UseRevision: BQ-019-09 / March 2012
6.5.4 Accept tests
For details on acceptance of individual tests, refer to the CheckReportTMSoftware User Guide. The operator needs to inspect each test personally and decide whether all spots have been correctly identified by the software. Before the inspection, make sure that both colour channels are activated. In rare incidences, the software is unable to detect all spots correctly, however all controls might still be assessed as ‘OK’. In this case it is the responsibility of the user to exclude these tests from the analysis.
To accept a test, click in the appropriate checkbox for that test. No results will be given for a test when it is not accepted by the user. For rejected tests (), the checkbox is disabled. You cannot accept a test that failed the automatic quality assessment.
! If a negative control test shows a contamination (Ctrl_Cont displays the status “contaminated”) or has failed, the user must decide which results of other test samples must be rejected as well. This decision is not made by the CheckReport™Software automatically.
6.5.5 Generate reports
For details on generation of reports, please refer to the CheckReportTMSoftware User Guide. For each test, there is both a basic and detailed report page. Both contain the sample annotation and common data such as image file name, analysis date, operator name, and software version.
6.5.6 Reports for normal tests
The basic report contains the sample annotation information and a positive (mycoplasma species) or negative (mycoplasma species not detected) statement for each mycoplasma species.
The detailed report additionally contains information on each of the controls, including the number of spots with signal to noise ratios (SNR) greater than the defined threshold and the mean SNR values of these spots.
! The SNR-value for the external positive control and/or the internal positive control can be 0, and the status may still be OK. This is the case when at least one mycoplasma species shows a signal exceeding a certain threshold value. Due to competition in the PCR, the product for the external positive control and/or the internal positive control may be completely suppressed when a high concentration of mycoplasma DNA is present in the sample. This may result in no signal for the external positive control and/or the internal positive control (i.e. SNR=0). However the test is still valid. This aspect is assessed automatically by the CheckReportTMSoftware.
Reports for failed tests and for tests which have not been accepted by the user contain no mycoplasma species table and the cause of failure will be shown in the detailed report.

27CytoInspectTM - Instructions For UseRevision: BQ-019-09 / March 2012
6.5.7 Reports for negative control tests
Meaningful results can be obtained from negative control tests only when Ctrl_Ori, Ctrl_Hyb, Ctrl_Prt_Test and Ctrl_ePOS all display the status OK in both channels and the contamination status is either contaminated or not contaminated.
In case any of Ctrl_Ori, Ctrl_Hyb, Ctrl_Prt_Test or Ctrl_ePOS display the status failed (in either or both channels), or the contamination status is failed, the result of the complete test is not valid. The cause of failure will be shown in the detailed report. No information about absence or presence of a contamination can be obtained from this test.
If a negative control test shows a contamination (Contamination status is “contaminated”) or has failed, the user must decide which results of other test samples must also be rejected. This decision is not automatically made by the CheckReportTMSoftware.
If the negative control test is either not contaminated or contaminated, the detailed report contains the mycoplasma species table in addition to the control table. In this case, the information about the presence or absence of a contamination is displayed as the Contamination status. In case of a contamination, signals for the universal probe and/or mycoplasma-specific probe must be positive and will be displayed.
6.5.8 Print report and export report
Reports can be printed and exported as described in the CheckReportTMSoftware User Guide.
When exporting reports using the csv-Export function of the CheckReportTMSoftware, be aware that the resulting csv files do not include the check controls information and also do not contain sample annotations.

28CytoInspectTM - Instructions For UseRevision: BQ-019-09 / March 2012
6.5.9 Summary and interpretation of CytoInspectTM results
specific probe
universal probe iPC ePC Val Interpretation and explanation
+ + + + + Mycoplasmas in the sample -> test is validIndicative example for a sample that is positive for mycoplasmas!
+ + - + + Mycoplasmas in the sample -> test is validiPC negative: However, DNA extraction was successfully performed because mycoplasmas were detected by specific and universal probes. Probably, the iPC signal is decreased due to an excess of mycoplasma DNA competing for primers.
+ + + - + Mycoplasmas in the sample -> test is validePC negative: However, DNA extraction and PCR were successfully performed because mycoplasmas were detected by specific and univer-sal probes. Probably, the ePC signal is decreased due to an excess of mycoplasma DNA competing for primers.
+ + - - + Mycoplasmas in the sample -> test is validiPC & ePC negative: However, DNA extraction and PCR were success-fully performed because mycoplasmas were detected by specific and universal probes. Probably, the iPC and ePC signals are decreased due to an excess of mycoplasma DNA competing for primers.
- + + + + Mycoplasmas in the sample -> test is validControls are valid. The universal probe is positive:1) The sample contains a mycoplasma species that cannot be detected with a specific probe of CytoInspectTM. 2) In very rare cases only the universal probe can detect a mycoplasma species at very low concentrations whereas other probes are not able to recognise it due to the construction of their oligonucleotide sequences.
- + - + + Mycoplasmas in the sample -> test is valid iPC negative: However, DNA extraction and PCR were successfully performed because mycoplasmas were detected by the universal probe. Probably, the iPC signal is reduced due to an excess of mycoplasma DNA competing for primers.Only the universal probe is positive.1) The sample contains a species that cannot be detected with a speci-fic probe of CytoInspectTM. 2) In very rare cases only the universal probe can detect a mycoplasma species at very low concentrations whereas other probes are not able to recognise it due to the construction of their oligonucleotide sequences.
- + + - + Mycoplasmas in the sample -> test is validePC negative: However, DNA extraction and PCR were successfully performed since mycoplasmas were detected by the universal probe. Probably, the ePC signal is decreased due to an excess of mycoplasma DNA competing for primers.Only the universal probe is positive.1) The sample contains a species that cannot be detected with a speci-fic probe of CytoInspectTM. 2) In very rare cases only the universal probe can detect a mycoplasma species at very low concentrations whereas other probes are not able to recognise it due to the construction of their oligonucleotide sequences.
- + - - + Mycoplasmas in the sample -> test is validiPC & ePC negative: However, DNA extraction and PCR were success-fully performed since mycoplasmas were detected by the universal pro-be. Probably, the iPC and ePC signals are decreased due to an excess of mycoplasma DNA competing for primers.Only the universal probe is positive.1) The sample contains a species that cannot be detected with a speci-fic probe of CytoInspectTM. 2) In very rare cases only the universal probe can detect a mycoplasma species at very low concentrations whereas other probes are not able to recognise it due to the construction of their oligonucleotide sequences.

29CytoInspectTM - Instructions For UseRevision: BQ-019-09 / March 2012
specific probe
universal probe iPC ePC Val Interpretation and explanation
- - + + + No mycoplasmas in the sample -> test is validIndicative example for an analysed sample that is negative for myco-plasmas. DNA extraction and PCR were successfully performed.
- - - + - iPC negative / ePC positive -> test is invalid!If mycoplasmas cannot be detected, iPC and ePC should be positive. However, only the ePC is positive. Therefore, the DNA extraction was either incorrectly performed or inhibited.
- - + - - iPC positive / ePC negative -> test is invalid! If mycoplasmas cannot be detected, iPC and ePC should be positive. However, only the iPC is positive. Therefore, the PCR did not work.
- - - - - Test is invalid!Because none of the controls is positive, the test system is strongly inhibited.
Legend: iPC internal positive control (monitors DNA extraction) ePC external positive control (monitors PCR) Val Validity of the particular test

CytoInspectTM - Instructions For UseRevision: BQ-019-09 / March 2012
30
7. TRoUBLESHooTInG
PRoBLEm and cause Comments and suggestions Alternatives
no SPoTS DETECTABLE, no oRIEnTATIon PoInTS DETECTABLE
Chip is damaged or defectiveScanner is defective
Check the scanner functions with the Verification kit
SIGnALS ARE DETECTED FRom THE oRIEnTATIon SPoTS onLyno SIGnAL DETECTIon FRom THE HyBRIDISATIon ConTRoLS
no or incorrect hybridisationIncorrect dilution of washing buffer
Check the hybridisation temperatureCheck the solutions for washing and hybridisation
Re-assay with new hybridisation solution
oRIEnTATIon AnD HyBRIDISATIon ConTRoLS ARE PoSITIVE, THE ExTERnAL PoSITIVE ConTRoL SHoWS no SIGnAL
no or weak PCR reactionPCR inhibitorsno amplified product was mixed with the hybridisation solutionno polymerase was added to the mastermixWrong thermocycler used (see section 6.3.1)
Check your PCR protocolCheck your PCR instrument and programCheck the DNA. Probably dilute DNA before PCRCheck for inhibitors
Perform the protocol without DNA samples - only the external positive control should be positive
ExTERnAL PoSITIVE ConTRoL SHoWS A WEAK SIGnAL, SnR (SIGnAL-To-noISE RATIo)
PCR inhibitorsWeak amplification of external positive control template due to very high amounts of bacterial DnA (competition). Results may be o.k.Incorrect or too long storage of hybridised chips
Check the PCR product by DNA gel electrophoresis (300 bp)
Perform the protocol without DNA samples – only the external positive control should be positive
HIGH nUmBER oF PoSITIVE SIGnALS By THE myCoPLASmA SPECIES SPoTS
Possibly true resultHybridisation temperature too lowIncorrect performance of the washing protocolUse of incorrect washing buffer
Confirm the red signals of the hybridisation control spots
Check the washing and hybridisation conditions
Repeat the washing procedure and scan chip againAnalyse a known sample or a negative control

CytoInspectTM - Instructions For UseRevision: BQ-019-09 / March 2012
31
PRoBLEm and cause Comments and suggestions Alternatives
ERRoR mESSAGE “CAnnoT FInD GRID AUTomATICALLy”
not all spotted wells have been hybridised
Chip was scanned facing the wells to the downside
orientation control failed
Hybridisation of all chip wells with a minimum of plain Hybridisation Buffer is necessary for correct grid finding.Scan the chip again in correct ori-entation. Attention: Use the Check-ReportTM Admin tool to remove the false chip
Re-assay with new hybridisation solution or hybridise the PCR product again using another well
HyBRIDISATIon ConTRoL FAILED
Check the preparation of the washing solution (i.e. the mixture of Buffer A, Buffer B, and water)Check the temperature of the wa-shing solution
Re-assay with new hybridisation solution or hybridise the PCR product again using another well
InTERnAL PoSITIVE ConTRoL FAILED
Sample is too dilutedSample has not been properly preparedDnA extraction failed
Re-do DNA extraction protocol (check with more concentrated sample if possible)
ExTERnAL PoSITIVE ConTRoL AnD/oR InTERnAL PoSITIVE ConTRoL ARE ASSESSED AS OK, BUT A SnR VALUE oF 0 DIS-PLAyED
Competition by mycoplasma DnA during PCR, internal positi-ve control and/or external positi-ve control may be suppressed.
The software automatically assesses whether at least one mycoplasma species gives a signal above a cer-tain threshold and accordingly sets PCR control and internal positive control in the state OK. This is a correct result
no myCoPLASmA DETECTED
Possibly true result If the result is called in question, make sure that DNA and polymerase were added to the PCR mix
Repeat the PCR and hybridisation and make sure that all components according to 6.3.2 are added to the reaction

CytoInspectTM - Instructions For UseRevision: BQ-019-09 / March 2012
32
8. TECHnICAL ASSISTAnCE
Greiner Bio-One employs a technical service department having extensive practical and theoretical knowledge in molecular biology and with CytoInspectTM products. If you have any questions or experience any difficulties concerning CytoInspectTM, please do not hesitate to contact your local Greiner Bio-One distributor.
9. REFEREnCES
Drexler H. G. et al. Mycoplasma contamination of cell cultures. Encyclopedia of Cell Technology, DOI: 10.1002/0471250570.spi054. online posting: January, 2003
Longo, M.C., et al., Use of uracil-N-glycosylase to control carry-over contamination in polymerase chain reactions, Gene, 93, 125-128, 1990

33CytoInspectTM - Instructions For UseRevision: BQ-019-09 / March 2012
SHORT PROTOCOL
10. CyToInSPECTTM SHoRT PRoToCoL
10.1 Room 2: PCR - Set-up of reaction mix
➠ Dilute the Uracil-N-glycosylase 1:50 in PCR-grade water. ➠ Mix the UNG dilution carefully.
➠ Prepare the MasterMix for the required quantity of PCR reactions.
1 reaction 2.5 reactionsCytoInspectTM
2
13 reactionsCytoInspectTM
12CytoInspect™ mastermix 39.0 µl 97.5 µl 507 µl
HotStar Taq DnA polymerase (5 U/µl) 1 µl 2.5 µl 13 µl
1:50 diluted Uracil-n-glycosylase 1 µl 2.5 µl 13 µl
Total volume before addition of sample 41 µl 102.5 µl 533 µl
DnA-eluate from extraction 10 µl
Total volume per reaction 51 µl
➠ Briefly vortex MasterMix and then briefly spin down.
➠ Aliquot the reaction mix: add 41 µl of the reaction mix for each PCR reaction into a 0.2 ml PCR reaction tube of a PCR strip.
PCR
Room 2

34CytoInspectTM - Instructions For UseRevision: BQ-019-09 / March 2012
SHORT PROTOCOL
10.2 Room 2: PCR - DnA template addition / PCR
➠ Add 10 µl of DNA sample eluate for each PCR reaction. ➠ Mix thoroughly.
➠ Start the PCR reaction with the prepared thermal cycler program, with ramp speed set to “9700”.
➠ Set the heating ramp to 1 °C/s and the lid temperature to 105 °C.
Time Temp. °C no. of cycles
20 min 37 °C 1
15 min 95 °C 1
1 min1 min1 min
95 °C67 °C - 57 °C*
72 °C20
1 min1 min1min
95 °C57 °C72 °C
25
Hold 4 °C
* The temperature is decreased 1 °C every second cycle.
PCR
Room 2

35CytoInspectTM - Instructions For UseRevision: BQ-019-09 / March 2012
SHORT PROTOCOL
10.3 Room 3: Hybridisation - Preparation / Hybridisation reaction
! Begin preparations at least 30 minutes prior to hybridisation.
➠ Dissolve potential precipitates in the hybridisation and washing buffers and mix well. ➠ Prepare the washing solution mix for the number of CytoInspectTM chips to be
analysed.
1 Slide 2 Slides 3 Slides 4 Slides 5 Slides
Water 40 ml 80 ml 120 ml 160 ml 200 ml
Buffer A 4 ml 8 ml 12 ml 16 ml 20 ml
Buffer B 0.5 ml 1 ml 1.5 ml 2 ml 2.5 ml
final vol. 44.5 ml 89 ml 133.5 ml 178 ml 222.5 ml
1 Slide 2 Slides 3 Slides 4 Slides 5 Slides
Water 49 ml 98 ml 147 ml 196 ml 245 ml
Buffer A 0.6 ml 1.2 ml 1.8 ml 2.4 ml 3 ml
Buffer B 0.4 ml 0.8 ml 1.2 ml 1.6 ml 2 ml
final vol. 50 ml 100 ml 150 ml 200 ml 250 ml
➠ For washing step 1, prefill a 50 ml reaction tube with 44.5 ml of Washing Solution I and keep at room temperature (18 °C – 24 °C).
➠ For washing step 2, prefill a 50 ml reaction tube with 50 ml of Washing Solution II and preheat to 50 °C at least 30 minutes before use.
I II
➠ Incubate the number of CytoInspectTM chips to be analysed in the prepared humidity-saturated Hybridisation Chamber for 10 minutes at room temperature (18 °C – 24 °C).
➠ Mix PCR products and briefly spin down. ➠ Mix Hybridisation Buffer and briefly spin down. ➠ Mix 24 µl CytoInspectTM Hybridisation Buffer with 13 µl PCR product. ➠ Mix thoroughly and briefly spin down. ➠ Incubate hybridisation mix for 3 minutes at 95 °C. ➠ Spin down briefly
➠ Transfer 30 µl of the hybridisation mix into each well of the CytoInspectTM chip using a multichannel pipette.
➠ Avoid air bubble formation.
➠ Incubate the CytoInspectTM chip for exactly 30 minutes at room temperature (18 °C – 24 °C).
Hybrid. & Washing
Room 3

36CytoInspectTM - Instructions For UseRevision: BQ-019-09 / March 2012
SHORT PROTOCOL
10.4 Room 3: Washing & drying / Scanning & evalution
➠ Wash the CytoInspectTM chip(s) in washing solution I at room temperature (18 °C – 24 °C) for 20 seconds by moving rapidly up and down.
➠ Avoid foam formation.
➠ Wash the CytoInspectTM chip(s) in preheated Washing solution II in a water bath at 50 °C for 30 seconds by moving rapidly up and down.
➠ Avoid foam formation.
CMYK 92-25-16-4
➠ Remove any liquid from the CytoInspectTM chip surface by centrifugation.
3 minutes500 g
10 smax. speed
or
➠ Scan the CytoInspectTM chip(s) with the CheckScannerTM. ➠ Perform scanning and analysis as described in the User Guide of the
CheckReportTMSoftware. ➠ Create reports.
Hybrid. & Washing
Room 3