Cytherm For Windows - silaresearch.comsilaresearch.com/pctoolold/ds1615pc2.pdfCytherm For Windows...
43
Cytherm For Windows User’s Manual P-7408 Version 1.00 October 31, 2000 Dynasys Technologies Inc. 800 Belleair Road Clearwater, FL 33756 (727) 443-6600 www.dyna-sys.com
-
Upload
nguyenthuy -
Category
Documents
-
view
217 -
download
0
Transcript of Cytherm For Windows - silaresearch.comsilaresearch.com/pctoolold/ds1615pc2.pdfCytherm For Windows...

Cytherm
For Windows
User’s ManualP-7408
Version 1.00October 31, 2000
Dynasys Technologies Inc.800 Belleair Road
Clearwater, FL 33756(727) 443-6600
www.dyna-sys.com


I
Contents
INTRODUCTION.................................................................................................................................. 1
INSTALLING THE CYTHERM PROGRAM...................................................................................... 2
INSTALLING THE THERMOSYNC INTERFACE............................................................................ 5
STARTING THE CYTHERM PROGRAM.......................................................................................... 5
FROM THE DESKTOP .............................................................................................................................. 5FROM THE PROGRAM MANAGER ............................................................................................................ 5
SELECT COM PORT AND POLL MODE .......................................................................................... 6
START-UP WITH AUTO POLL .................................................................................................................. 6START-UP WITHOUT AUTO POLL ............................................................................................................ 7SELECT THE COM PORT ........................................................................................................................ 7
Error Opening the COM Port .......................................................................................................... 8COM Port Opened Successfully ....................................................................................................... 8
ACCESSING THE APPLICATIONS MAIN FUNCTIONS................................................................. 9
USING THE SPEED-BUTTONS .................................................................................................................. 9USING THE DROP-DOWN SELECTION-BOX ............................................................................................ 10
ACCESSING THE APPLICATIONS ON-LINE HELP SYSTEM..................................................... 10
PREPARING FOR A TEMPERATURE DATA LOGGING MISSION ............................................ 11
SETTING THE CYTHERM KEY’S REAL-TIME CLOCK .............................................................................. 11USER DATA MEMORY ......................................................................................................................... 12MISSION CONTROL .............................................................................................................................. 13
Program Temperature Thresholds ................................................................................................. 14Hi and Lo Alarms:......................................................................................................................................15
Enable Roll Over............................................................................................................................ 16Program Sample Rate .................................................................................................................... 16Program Sample Delay .................................................................................................................. 17
Program Number of Minutes:.....................................................................................................................17Program a Particular Date and Time:.........................................................................................................17
STARTING AND STOPPING A MISSION........................................................................................ 18
START A MISSION................................................................................................................................ 18Start Now ....................................................................................................................................... 18External Start ................................................................................................................................ 18
STOP A MISSION .................................................................................................................................. 19Clear Memory ................................................................................................................................ 19
REVIEWING MISSION DATA .......................................................................................................... 19
MISSION CONTROL .............................................................................................................................. 19DATALOG GRAPH................................................................................................................................ 21
Sliding Cursor Information............................................................................................................ 21Datalog Graph Function Speed-buttons......................................................................................... 22Defining a Graphical Zoom Region ............................................................................................... 23Saving the Temperature Datalog Data to Disk ............................................................................... 23Printing the Datalog Data .............................................................................................................. 24
HACCP Reporting Information:.................................................................................................................24Optional Print Information: .......................................................................................................................25

II
HISTOGRAM GRAPH ............................................................................................................................ 26Sliding Cursor Information............................................................................................................ 27Histogram Graph Function Speed-buttons .................................................................................... 27Saving the Temperature Histogram Data to Disk ........................................................................... 28Printing the Histogram Data.......................................................................................................... 29
HACCP Reporting Information:.................................................................................................................29Optional Print Information: .......................................................................................................................30
TEMPERATURE ALARM LOG ................................................................................................................ 31Alarm Log Report Screen............................................................................................................... 32Saving the Temperature Alarm Log to Disk ................................................................................... 33Printing the Alarm Log Report ...................................................................................................... 34
HACCP Reporting Information:.................................................................................................................34Optional Print Information: .......................................................................................................................35
VIEWING ALARM STATUS USING A MISSION CONTROL INTERFACE ....................................................... 35
SAVING AND VIEWING A CYTHERM KEY’S MEMORY IMAGE.............................................. 36
SAVING A CYTHERM KEY’S MEMORY IMAGE TO DISK.......................................................................... 36VIEWING A PREVIOUSLY SAVED MEMORY IMAGE FILE ......................................................................... 37
SELECTING THE POLL MODE ....................................................................................................... 37
EXITING THE CYTHERM FOR WINDOWS PROGRAM.............................................................. 38
CYTHERM DATA SECURITY .......................................................................................................... 38
CYTHERM TEMPERATURE CALIBRATION................................................................................ 39
TROUBLESHOOTING....................................................................................................................... 39

CyTherm
Page 1
Copyright 2000, Dynasys Technologies Inc.All rights reserved.
Introduction
CyTherm Temperature Datalogger is a low cost, reusable, fully integrated temperaturedatalogger, featuring real-time clock, digital thermometer, non-volatile memory andserial data interface in a small key-sized sealed enclosure. It has been designed forapplications that require temperature profiling over a given period of time. Aprogrammable sampling rate feature makes the device ideal for applications requiringtemperature monitoring over short or long time frames.
The CyTherm Datalogger offers the following features:
• Temperature Range of -10 to +85 degrees Celsius• Temperature Resolution of +/-0.5 degrees Celsius• Temperature Accuracy of +/-2 degrees Celsius• LED’s for visual monitoring of Alarm/Status• Datalog memory holds 2048 temperature data samples• Data Histogram memory holds up to 65535 data samples at 2 degrees C resolution• Temperature Sample Rates from 1 to 255 minutes• Programmable high and low temperature alarm trip points• Temperature Sample Start Delay of from 1 to 65535 minutes• 32 bytes of user memory• Self-powered by a lithium battery and will store information for over 4 years
This manual describes how to use the CyTherm logger to record temperature, and how touse the ThermoSync Interface, the CyTherm for Windows program, and your IBM-compatible PC to read the CyTherm key and generate effective and professionallypresented data from the results.
We recommend that you first take the time to read this manual through in its entiretybefore using the CyTherm program. This will minimize the chances of problems later on.
The manual tries to present topics in roughly the same order as you will require them. Itfirst deals with installing CyTherm for Windows; then setting up a CyTherm logger torecord temperature samples, starting and stopping the logger, reading the logged data,and finally viewing and printing the data.

CyTherm
Page 2
Copyright 2000, Dynasys Technologies Inc.All rights reserved.
Installing the CyTherm Program
In order to run the CyTherm for Windows application program you will need an IBM-compatible Pentium computer running Microsoft Windows 95, 98, NT, or 2000 with atleast 8M of free hard disk space, 16M of memory, and at least one com port and oneprinter port.
Insert the 3.5 inch CyTherm Application diskettelabeled “Disk 1 of 2” into the floppy drive.
Move the mouse pointer to the taskbar’s Starticon and click the left mouse button.
When the Program Manager is displayed, movethe mouse pointer to the Run selection and clickthe left mouse button.
Type the name of the installprogram “path:\setup.exe” andclick the OK button.

CyTherm
Page 3
Copyright 2000, Dynasys Technologies Inc.All rights reserved.
Following the “Installation Start-up Banner Screen”, the Welcome dialog is displayed.
Read the Welcome dialogand then click on the Nextbutton to proceed with theinstallation.
Read the SoftwareLicense Agreement andclick on the Yes button ifyou agree to all the termsof the agreement and wishto proceed with theinstallation.

CyTherm
Page 4
Copyright 2000, Dynasys Technologies Inc.All rights reserved.
Read the ChooseDestination Locationdialog and click the Nextbutton when ready toproceed.
The installation processwill now proceed. Atsome point you will beprompted to remove thefirst install diskette andinsert the installationdiskette labeled “Disk 2of 2”.
After the installation completes the CyThermshortcut icon will be added to your desktop.
The application and several useful application components will also be added to theProgram Manager.

CyTherm
Page 5
Copyright 2000, Dynasys Technologies Inc.All rights reserved.
Installing the ThermoSync Interface
Before starting the CyTherm program, if you wish to program or read the data from aCyTherm Logger, you should connect the ThermoSync Interface. Your PC should haveconnectors at the rear for one or more serial ports. These are known as 'COM' ports andmay be labeled COM1 through COM2. Most computers have at least one port. Theconnector will either be a 9-pin male (DB-9M) or a 25-pin male (DB-25M). TheThermoSync Interface is fitted with a DB-9F female connector. If your computer is onlyfitted with a 25-pin male connector, 9-to-25 pin adapters can be purchased from mostcomputer stores. You can connect the ThermoSync Interface to either the COM1 or COM2 port. Makesure the COM port you choose is unused by other applications.
Starting the CyTherm Program
Once installation has been completed and the ThermoSync Interface has been installed,you can run the CyTherm for Windows application program.
From the Desktop
• Double-click on the CyTherm shortcut icon
From the Program Manager
• Left-click on Start• Left-click on Programs• Left-click on the CyTherm program folder• Left-click on CyTherm

CyTherm
Page 6
Copyright 2000, Dynasys Technologies Inc.All rights reserved.
Select COM Port and Poll Mode
The first dialog screen that is displayed after the program is started prompts you to selectthe COM port that the CyTherm key is connected to and to select the desired start-uppolling mode.
Polling is the term used to describe the process of the Cytherm for Windows programperiodically reading the selected COM port to determine the presence or absence of aCyTherm key.
Start-up with Auto Poll
Each time the CyTherm for Windows program is started, the Auto Poll check box on theSelect COM Port and Poll Mode dialog is in its default üü (checked) state. This enablesthe Auto Poll mode.
When started with the Auto Poll mode enabled, the CyTherm for Windows programbegins automatically polling the selected COM port for the presence of a CyTherm key.
If a key is attached to the selected COM port via the ThermoSync Interface, the programwill continue automatically polling the key and displaying the key’s information on thePC’s display screen.

CyTherm
Page 7
Copyright 2000, Dynasys Technologies Inc.All rights reserved.
If a key is not initially attached to the selected COM port or a key is later removed whilein Auto Poll mode, the program will detect the absence of a key and display theCyTherm Not Found dialog.
Start-up without Auto Poll
If you desire to start the CyTherm for Windows program without having a CyTherm keyattached to the selected COM port and still be able to use all the features of the program,simply uncheck the Auto Poll check box to disable the Auto Poll mode.
When the Auto Poll mode is disabled, all the features of the program can be used exceptfor reading or programming a CyTherm key. To read or program a CyTherm key youwill have to enable the Auto Poll mode either before starting the program or from withinthe program.
Select the COM Port
You must select the COM port that is connected to the ThermoSync Interface.
Click on the appropriate button to select the COM port.

CyTherm
Page 8
Copyright 2000, Dynasys Technologies Inc.All rights reserved.
Error Opening the COM Port
If the selected COM port is already in use or does not exist, an error dialog will bedisplayed.
Click on the OK button and select a valid and unused port. If you continue to get theerror dialog, refer to the “Troubleshooting” section of this manual.
COM Port Opened Successfully
If the selected COM port opens successfully, the program will start and display theMission Control Screen.

CyTherm
Page 9
Copyright 2000, Dynasys Technologies Inc.All rights reserved.
Accessing the Applications Main Functions
The main functions in the CyTherm for Windows application can be accessed by twomethods:
Using the Speed-Buttons
The main functions can be accessed by means of the row of buttons (called Speedbuttons) at the top left of the application screen.
The graphic shown on each button is intended to provide a clue as to its function. Toselect the desired main function, simply move the mouse cursor over the appropriatebutton and left-click.

CyTherm
Page 10
Copyright 2000, Dynasys Technologies Inc.All rights reserved.
Using the Drop-down Selection-Box
The main functions can also be accessed by the drop-down Selection box that is locatedjust below the Speed buttons.
To select the desired main function, simply left-click on the down arrow to the right ofthe selection box to display the available selections. To choose a selection, simply movethe mouse cursor over the selection and left-click.
Accessing the Applications On-line Help System
Any time while the CyTherm for Windows application is running, you can access thebuilt-in on-line help system by left-clicking on the ?? (Help) button.
The on-line help system is a comprehensive user manual. The manual describes how toconfigure a CyTherm logger to record temperatures, starting and stopping the logger,reading the logged data, and finally viewing and printing the logged data.

CyTherm
Page 11
Copyright 2000, Dynasys Technologies Inc.All rights reserved.
Preparing for a Temperature Data Logging Mission
A Mission is the term applied to the temperature logging function. A CyTherm key mustbe prepared to perform its temperature-logging mission. All of the operations describedin this section assume there is a CyTherm key in the ThermoSync interface that isattached to the selected COM port. Each operation is presented in the sequence that youwould normally perform it.
Setting the CyTherm Key’s Real-Time Clock
Prior to using a CyTherm key for logging temperature data, the key’s real-time clockshould be read, and if necessary, set to the current date and time. To view and set the realtime clock, use the Speed-button or the Drop-down Selection box to select theDate/Time screen.
The date and time can be set to any value or it can be set to the PC’s system date and timesimply by clicking a single button.

CyTherm
Page 12
Copyright 2000, Dynasys Technologies Inc.All rights reserved.
User Data Memory
Each CyTherm key contains user data memory. The user data memory can store up to 32characters of user data. If the CyTherm key is being used for monitoring perishableproduce within a store, the user data might contain information such as the type andlocation of the produce being monitored, etc. You can type anything you like into the 32-character user memory.
Use the Speed-button or the Drop-down Selection box to select the Edit User Memorydialog.
When the Edit User Memory dialog is opened, the current contents of the user memorywill be displayed. If the dialog is open and you change to a different CyTherm key, youcan read and display the new key’s user memory by left-clicking the Read button.
To edit the user data, move the mouse pointer to the first character in the input edit boxthat is to be edited. While holding down on the left mouse button, drag the mouse pointerover all the character data that is to be changed. The character data that is to be changedwill be highlighted with a blue background. Now type the new user character data. Thenew data will overwrite the previous data.
Left clicking on the Save button will immediately save the new data into the key’s usermemory without closing the Edit User Memory dialog. Left-clicking the Close buttonwill close the dialog if the data in the input edit box is the same as the data contained inthe key. If the data is different the user will be ask if the new data is to be saved prior toclosing the dialog.
CyTherm
Page 13
Copyright 2000, Dynasys Technologies Inc.All rights reserved.
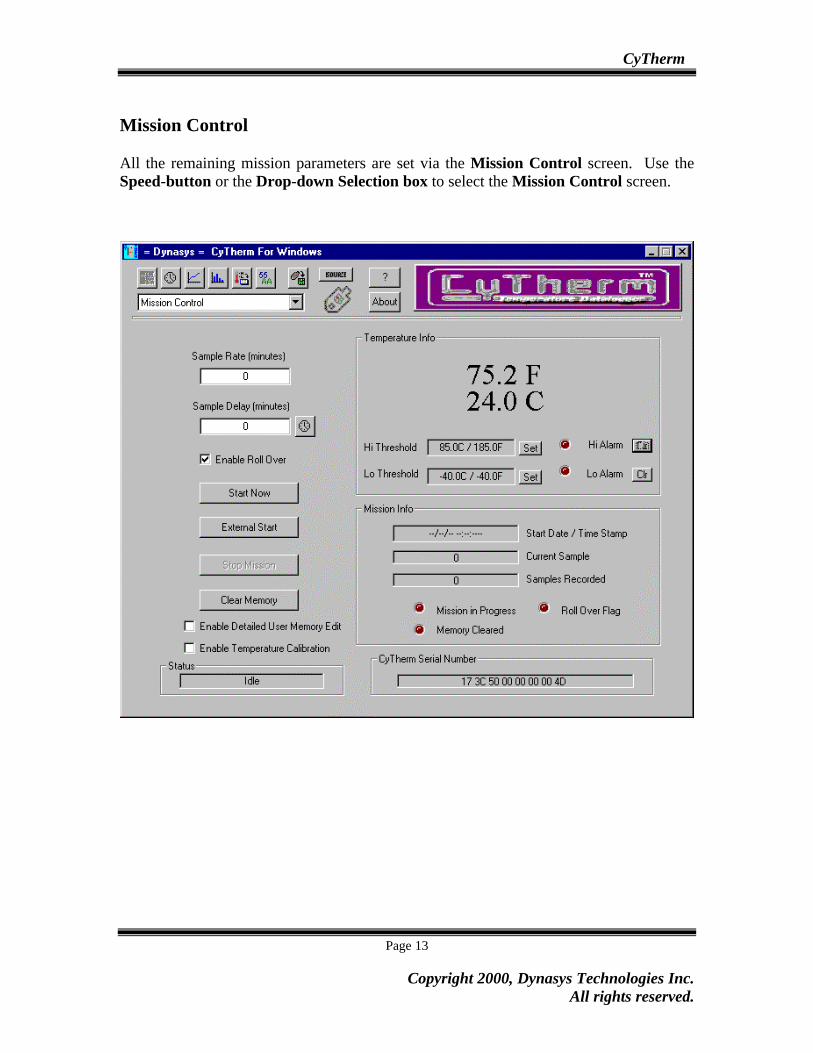
Mission Control
All the remaining mission parameters are set via the Mission Control screen. Use theSpeed-button or the Drop-down Selection box to select the Mission Control screen.

CyTherm
Page 14
Copyright 2000, Dynasys Technologies Inc.All rights reserved.
When you open the Mission Control screen, some of the options may be grayed out. Thisis because the option is not appropriate – for example it is not appropriate to click on theStop Mission button if a mission is not currently in process.
Program Temperature Thresholds
For some applications it may be essential to record if and when a temperature sampleexceeds a predefined tolerance band and for how long the temperature violationremained.
A tolerance band is specified by means of the low and high temperature threshold values.As long as the temperature readings stay within this tolerance band no alarms or flagswill be generated
To set a temperature threshold, click the Set button next to the Lo or Hi Threshold editbox. The following dialog box will appear:
The temperature lo and hi threshold values can be entered in degree Fahrenheit or Celsiusby clicking in the appropriate C or F radio button
Click on the Temperature Edit box and enter the desired threshold value and then clickthe Set button. The new threshold will be displayed next to the Threshold Set button.The allowable range for the lo and hi threshold value is from -40 to +85 degree C or -40to 185 degree F.
? Prior to using a CyTherm key for logging temperature data, the key’s real-time clock should be read, and if necessary, set to the current date and time.

CyTherm
Page 15
Copyright 2000, Dynasys Technologies Inc.All rights reserved.
If Fahrenheit entry is chosen, the entered value will automatically be converted to Celsiususing the following conversion formula:
Degree C = 5/9 (degree F - 32)
Note: The result will be rounded to the nearest ½ degree Celsius value as the CyThermprovides ½ degree C resolution.
Hi and Lo Alarms:
The following LED alarm indicators are available to monitor if the tolerance band wasexceeded:
• Hi Alarm LED will be ON if the any temperature readings were below the LoThreshold value; otherwise the LED will be OFF.
• Lo Alarm LED will be ON if the any temperature readings were above the HiThreshold value; otherwise the LED will be OFF.
Clicking on the alarm’s Clr button can clear the Hi and Lo Alarms.
The user can also monitor the status of the Lo and Hi Threshold Alarms by inserting thekey into the Mission Control Interface. When inserted, the key will pulse its Green LEDfour times if all recorded temperature readings are within the programmed toleranceband. If any recorded readings were outside the tolerance band, the key will blink its RedLED four times when inserted into the Mission Control Interface.
Additional detailed information about the time and duration of temperature alarms isavailable by viewing the Temperature Alarm Log screen.

CyTherm
Page 16
Copyright 2000, Dynasys Technologies Inc.All rights reserved.
Enable Roll Over
The user has two options for dealing with the potential of a data overrun (i.e., more than2048 data samples). The first option is to enable the roll over feature of the CyThermKey. This is accomplished by clicking the Enable Roll Over check box until a üü mark isdisplayed. When the roll over feature is enabled, new data is written over previous data,starting at the first data sample's memory location. For example, if the CyTherm keytakes 2050 temperature measurements, the last two measurements taken will overwritethe first two measurements in the CyTherm’s datalog memory.
The second option for dealing with data overrun is to disable the roll over feature andsimply stop the recording of data after the CyTherm’s datalog memory if full. In otherwords, the CyTherm Key will stop recording temperature data to its datalog memory after2048 temperature readings. Unchecking the Enable Roll Over check box disables the rollover feature. With roll over disabled, no further temperature data will be written to theCyTherm’s datalog memory after it has been filled. Temperature readings, however, willcontinue to be taken at the programmed sample rate and the appropriate histogramregisters will be incremented with each sample. Likewise, the temperature alarms andcurrent samples counter will continue to function until the mission is ended.
Program Sample Rate
You now need to program the desired sample rate for your temperature-logging mission.The sample rate cannot be changed on a CyTherm Key that currently has a mission-in-progress.
The allowable sample rate range is from 1 sample per minute to 1 sample per 255minutes (1 sample every 4 hours and 15 minutes). To program a new sample rate value,move the mouse pointer to the first character in the Sample Rate input edit box. Whileholding down on the left mouse button, drag the mouse pointer over the current samplerate value. The current sample rate value will be highlighted with a blue background.Now type the new desired sample rate value ( 1 to 255 ). If the new value is in the rangeof 1 to 255, the previous contents of the edit box will be replaced with the newly enteredvalue. A value of zero entered for the Sample Rate will not allow a mission to start.
? Choose an appropriate sample rate! CyTherm for Windows has no way ofpredicting the temperature values that occur between sample points. Makesure the sample rate is set to a sufficiently short interval to record the fastestexpected variation in temperature

CyTherm
Page 17
Copyright 2000, Dynasys Technologies Inc.All rights reserved.
Program Sample Delay
The sample delay value determines the amount of delay from when the temperaturelogging mission is started to when the CyTherm begins to take temperaturemeasurements. The amount of delay is roughly equal to the value entered into the sampledelay edit box multiplied by one minute. The range of values that can be entered into thesample delay edit box is from 0 to 65535. A value of zero will produce a delay from 1second to 1 minute depending on the current value contained in the CyTherm’s real-timeclock seconds counter. A value of 65535 will produce a sample delay of roughly 45 anda half days.
The sample delay cannot be changed on a CyTherm Key that currently has a mission-in-progress. Once a value has been programmed into the CyTherm and a mission is started,the value will decrement by one every minute. When the value reaches zero and theCyTherm’s seconds counter reaches zero, the first temperature reading will be taken.
Program Number of Minutes:
To program a new sample delay value, move the mouse pointer to the first character inthe Mission Screen’s Sample Delay input box. While holding down on the left mousebutton, drag the mouse pointer over the current sample delay value. The current sampledelay value will be highlighted with a blue background if successful. Now type the newdesired sample delay value ( 0 to 65535 ). If the new value is in the range of 0 to 65535,the previous contents of the edit box will be replaced with the newly entered value.
Program a Particular Date and Time:
Instead of programming the sample delay in a fixed number of minutes, you can programthe CyTherm key to start taking samples at a particular date and time. Click on the ��(clock) button to the right of the Sample Delay edit box to display the Set Sample Delaydialog.

CyTherm
Page 18
Copyright 2000, Dynasys Technologies Inc.All rights reserved.
Program the desired date and time and then click the OK button.
Starting and Stopping a Mission
Start a Mission
A datalog mission can be started in two ways, by the software application when the StartNow button is clicked, or externally by the Mission Control Interface.
In either case, once the mission is started, the CyTherm Key will indicate the missionstart by simultaneously blinking its green and red status LED’s four times.
Start Now
To start a mission immediately using the CyTherm for Windows application, simply left-click on the Start Now button.
External Start
Left-clicking on the External Start button enables the mission to be started externallywhen the CyTherm Key is inserted into the slot of a Mission Control Interface and theactivate switch is pressed. This feature is useful if you desire to manually start the datalogmission at a remote location.
? The sample delay will be calculated as the number of minutes differencebetween the programmed date and time and the current date and time at thetime of selection. To ensure that the CyTherm key takes its first sampleas close to the programmed date and time as possible, you must start theMission as soon as possible after setting this parameter.
? All mission parameters should be programmed prior to starting a mission.Mission parameters cannot be changed once a mission is in progress.
? Beginning a new mission will clear the CyTherm’s datalog, histogram,current samples, temperature alarms, and time stamp of first sample memory.This action is the same as achieved by clicking the Clear Memory button.

CyTherm
Page 19
Copyright 2000, Dynasys Technologies Inc.All rights reserved.
Stop a Mission
Clicking the Stop Mission button stops a datalog mission. Once a mission has beenstopped on a particular CyTherm Key, you must examine the status and SAVE any dataprior to starting a new mission on the same key as the Start Mission action clears allCyTherm datalog, histogram, temperature alarm, current samples and start time stampmemory.
Clear Memory
Once a mission has been stopped and all data reviewed, printed and/or SAVED thecurrent mission data and parameters can be cleared.
Clicking on the Clear Memory button PERMANENTLY clears all CyTherm datalog,histogram, temperature alarm, current samples, sample rate, sample delay and start timestamp memory. Clicking on the Clear Memory button will have no effect if a mission iscurrently in progress. Clear Memory does not clear the contents of User Memory.
Reviewing Mission Data
Mission Control
Before, during and after a mission, the Mission Control Screen displays the followingmission status information:
• Current Sample Rate via the Sample Rate edit box• Current value in the Sample Delay Counter via the Sample Delay edit box• Current CyTherm key status mode via the Status edit box.• The current Hi Threshold setting via the Hi Threshold edit box.• The Hi Alarm status via the Hi Alarm LED.• The current Lo Threshold setting via the Lo Threshold edit box.• The Lo Alarm status via the Lo Alarm LED.• Date/Time Stamp of first data sample via the Start Date / Time Stamp status box• Current Number of data samples via the Current Sample status box• Total number of samples recorded via the Samples Recorded status box• The Mission In Progress LED is ON if a mission is currently in progress, otherwise it
is OFF.• The Data Rollover LED is ON if a data rollover occurred during the mission,
otherwise it is OFF.• The Memory Cleared LED is ON if the memory is cleared, otherwise it is OFF.• The serial number (if available) of the CyTherm key.

CyTherm
Page 20
Copyright 2000, Dynasys Technologies Inc.All rights reserved.

CyTherm
Page 21
Copyright 2000, Dynasys Technologies Inc.All rights reserved.
Datalog Graph
Once mission data samples have been recorded in the CyTherm, the data can begraphically displayed on the Datalog Graph screen. The display will initially be scaledso that the entire logged temperature history is displayed. The vertical temperature axiswill be automatically scaled according to the lowest and highest temperatures recorded.
Sliding Cursor Information
When the mouse is moved within the graph region, a vertical cursor is displayed. As themouse is moved left or right within the graph region, the sample number, sampledate/time, and temperature information that is displayed at the bottom of the graph isupdated to reflect the position of the cursor within the recorded data.
Also displayed are the start and end date and time and the highest and lowesttemperatures recorded for the displayed plot region.

CyTherm
Page 22
Copyright 2000, Dynasys Technologies Inc.All rights reserved.
Datalog Graph Function Speed-buttons
There are various Speed-buttons at the bottom of the graphical display that allow you toperform other graphical functions. These are described below:
Button Function Function DescriptionRefresh Graph Data Reads an attached CyTherm’s temperature data and
updates the graphical display.Display in Degree C Updates the graphical display and displays temperatures
in degrees Celsius.Display in Degree F Updates the graphical display and displays temperatures
in degrees Fahrenheit.Display Sample Tick Marks Places a tick mark on the graph to highlight the
temperature sample points.Zoom In Zoom in (expand) a defined zoom region. The graph will
be re-scaled and display only those samples within thezoom region. Cursor information at the bottom of thegraphical display will be updated for the zoom region.
Zoom Out Zoom out (compress) the graphical display. The graphwill be incrementally compressed and re-scaled. Cursorinformation at the bottom of the graphical display will beupdated for the compressed plot.
Zoom All Updates the graphical display to show the maximumamount of recorded temperature data
Scale to Hi & Lo Thresholds Re-scales the vertical temperature axis so that the lowend of the scale is at the preset Lo Threshold and the highend of the scale is at the preset Hi Threshold.
Save to Disk Saves the entire datalog temperature data to a disk file.The data is saved in tabular ASCII format.
Print Allows you to print all or any portion of the datalogtemperature data in graphical and/or tabular format.

CyTherm
Page 23
Copyright 2000, Dynasys Technologies Inc.All rights reserved.
Defining a Graphical Zoom Region
Prior to performing a Zoom-In operation a graphical zoom region must be defined. Azoom region is a graphical box drawn onto the datalog graph. The left and right edges ofthe zoom box set the left and right bounds of the zoom region. There must be enoughdistance between the left and right edges of the zoom box to span at least two temperaturesample points. The upper and lower edges of the zoom box do not have anysignificance in defining the zoom region.
To draw a zoom box, move the mouse pointer to the desired location of the left edge ofthe zoom box then click and hold the left mouse button. While holding the left mousebutton, drag the mouse to the right until the distance of the right edge of the zoom boxspans the desired range of temperature sample points. Release the left mouse button tocomplete the creation of the zoom box.
If you make a mistake and wish to destroy the just created zoom box, simply move themouse pointer anywhere on the graph and click the left mouse button.
Once the zoom box is acceptable, left-click the Zoom-In speed button to expand thezoom region.
Saving the Temperature Datalog Data to Disk
You can save the Temperature Datalog memory data to a text file for use in a spreadsheet such as Excel by clicking on the floppy disk Speed-button that is located below thegraph. The entire datalog memory will be saved regardless of the region that is currentlydisplayed on the graph. The data will be saved to the specified file in the followingformat:
Record #1 contains the following comma delimited fields:
field1: number of data samplesfield2: current sample rate in minutesfield3: start time and date of current mission's first samplefield4: low temperature threshold settingfield5: high temperature threshold settingfield6: low temperature threshold flag (1 if set, else 0)field7: high temperature threshold flag (1 if set, else 0)field8: degrees C or Ffield9: 32-byte user memory
The remaining records contain two comma-delimited fields:
field1: sample date and timefield2: temperature reading

CyTherm
Page 24
Copyright 2000, Dynasys Technologies Inc.All rights reserved.
An example file is shown below:
10,30,09/29/2000 09:02,32.0,79.7,0,0,F,Truck #1 – Route 1609/29/2000 09:02, 70.709/29/2000 09:32, 70.709/29/2000 10:02, 81.509/29/2000 10:32, 85.109/29/2000 11:02, 86.009/29/2000 11:32, 87.809/29/2000 12:02, 89.609/29/2000 12:32, 82.409/29/2000 13:02, 81.509/29/2000 13:32, 86.0
Printing the Datalog Data
To print the currently displayed data, click on the printer Speed-button that is locatedbelow the graph.
The region of data printed corresponds to the region currently displayed on the graph, soyou can obtain a printed copy of the whole datalog record, or any desired portion.
Once you select print, you will be presented with numerous printing options. Forexample you can choose to print in graphical and/or tabular format and you can choose toinclude or omit various pieces of information that pertains to the temperature-loggingmission.
HACCP Reporting Information:
You can choose to include HazardAnalysis Critical Control Point (HACCP)reporting information on your printout byfilling in the HACCP Information formand clicking the OK button. Clicking theCancel button on this form will cause theHACCP information to be omitted onyour printout.

CyTherm
Page 25
Copyright 2000, Dynasys Technologies Inc.All rights reserved.
Optional Print Information:
You can choose to include oromit any or all of the availableoptional information on yourprintout.

CyTherm
Page 26
Copyright 2000, Dynasys Technologies Inc.All rights reserved.
Histogram Graph
The Histogram Graph screen displays the current histogram memory in graphicalformat. The histogram is provided by a series of 63 two-byte data bins that are located inthe CyTherm’s Temperature Histogram memory. Each bin consists of a 16-bit binarycounter that is incremented each time an acquired temperature value falls into the rangeof the bin..
After a temperature conversion is completed, the number of the bin to be updated isdetermined by dropping the two least significant bits of the binary temperature value.Thus, bin 0 will be updated with every temperature reading from -40 degree C to –38.5degree C. In the same way, bin 1 is associated with the range of -38 degree C to -36.5degree C. Bin 62, finally, counts temperature values in the range of +84 degree C to +85degree C. Since the CyTherm will not generate temperature values higher than +85degrees C, bin 62 covers only three temperature values.

CyTherm
Page 27
Copyright 2000, Dynasys Technologies Inc.All rights reserved.
Since each data bin contains two bytes, a total of 65535 samples can be accumulated. Ifmore samples are measured, the data bin will remain at the maximum value. In otherwords, the data bin will not roll over in the event of an overrun.
Sliding Cursor Information
When the mouse is moved within the graph region, a vertical cursor is displayed. As themouse is moved left or right within the graph region, the temperature bin and the numberof samples contained in that bin is displayed at the bottom of the graph.
Histogram Graph Function Speed-buttons
There are various Speed-buttons at the bottom of the graphical display that allow you toperform other functions. These are described below:
Button Function Function DescriptionRefresh Graph Data Reads an attached CyTherm’s temperature histogram
data and updates the graphical display.Display in Degree C Updates the graphical display and displays temperatures
in degrees Celsius.Display in Degree F Updates the graphical display and displays temperatures
in degrees Fahrenheit.Save to Disk Saves the entire temperature histogram data to a disk file.
The data is saved in tabular ASCII format.Print Allows you to print all of the temperature histogram data
in graphical and/or tabular format.

CyTherm
Page 28
Copyright 2000, Dynasys Technologies Inc.All rights reserved.
Saving the Temperature Histogram Data to Disk
You can save the Temperature Histogram memory data to a text file for use in a spreadsheet such as Excel by clicking on the floppy disk Speed-button that is located below thegraph. The entire histogram memory will be saved. The data will be saved to thespecified file in the following format:
Record #1 contains the following comma delimited fields:
field1: number of bins (always 63)field2: current sample rate in minutesfield3: start time and date of current mission's first samplefield4: low temperature threshold settingfield5: high temperature threshold settingfield6: low temperature threshold flag (1 if set, else 0)field7: high temperature threshold flag (1 if set, else 0)field8: degrees C or Ffield9: 32-byte user memory
The remaining records contain two comma delimited fields:
field1: temperature binfield2: samples in bin
An example file is shown below:
63,30,09/29/00 09:02,32.0,79.7,0,0,F,Truck #1 – Route 16-40.0 / -37.3, 0-36.4 / -33.7, 0-32.8 / -30.1, 0-29.2 / -26.5, 0-25.6 / -22.9, 0-22.0 / -19.3, 0-18.4 / -15.7, 0-14.8 / -12.1, 0

CyTherm
Page 29
Copyright 2000, Dynasys Technologies Inc.All rights reserved.
Printing the Histogram Data
To print the displayed histogram data, click on the printer Speed-button that is locatedbelow the graph.
Once you select print, you will be presented with numerous printing options. Forexample you can choose to print in graphical and/or tabular format and you can choose toinclude or omit various pieces of information that pertains to the temperature-loggingmission.
HACCP Reporting Information:
You can choose to include HazardAnalysis Critical Control Point (HACCP)reporting information on your printout byfilling in the HACCP Information formand clicking the OK button. Clicking theCancel button on this form will cause theHACCP information to be omitted onyour printout.

CyTherm
Page 30
Copyright 2000, Dynasys Technologies Inc.All rights reserved.
Optional Print Information:
You can choose to include oromit any or all of the availableoptional information on yourprintout.

CyTherm
Page 31
Copyright 2000, Dynasys Technologies Inc.All rights reserved.
Temperature Alarm Log
For some applications it may be essential to record exactly when a temperature sampleexceeds a predefined tolerance band and for how long the temperature violationremained.
A tolerance band is specified by means of the Temperature Alarm registers. The user canset a high and a low temperature threshold. As long as the temperature samples staywithin this tolerance band (i.e., are higher than the low threshold and lower than the highthreshold), the CyTherm will not record any temperature alarm. If the temperatureviolates the temperature band, the CyTherm will generate an alarm and set either theTemperature High Flag (THF) or the Temperature Low Flag (TLF) in the Status register.In addition, the device generates a time stamp of when the alarm occurred and records theduration of the alarming condition.
The device stores a time stamp of a violating condition by copying contents of the three-byte Current Samples Counter when the alarm occurred. In addition to the time stamp,the CyTherm maintains a one-byte duration counter that stores the number of times thetemperature was found to be beyond the threshold. If this counter has reached its limitafter 255 consecutive temperature readings and the temperature has not yet returned to alevel within the tolerance band, the device will issue another time stamp and start anothercounter to record the duration. If the temperature returns to normal before the counter hasreached its limit, the duration counter of the particular time stamp will not increment anyfurther. Should the temperature again cross this threshold, another time stamp will berecorded and its associated counter will increment with each temperature reading outsidethe tolerance band. This algorithm is implemented for the low as well as for the hightemperature threshold.
Time stamps and durations where the temperature violates the low temperature thresholdare stored in a separate memory location than those reserved for time stamps and durationwhere the temperature exceeds the high temperature threshold. This allocation allowsrecording 24 individual alarm events and periods (12 periods for too hot and 12 for toocold).

CyTherm
Page 32
Copyright 2000, Dynasys Technologies Inc.All rights reserved.
Alarm Log Report Screen
The Temperature Alarm Log screen displays the complete alarm log of the CyTherm.The report screen displays the alarm condition, the date and time and the duration of thealarm in tabular format.

CyTherm
Page 33
Copyright 2000, Dynasys Technologies Inc.All rights reserved.
Saving the Temperature Alarm Log to Disk
You can save the Temperature Alarm Log to a text file for use in a spread sheet such asExcel by clicking on the Save to File button that is located below the report screen. Theentire alarm log will be saved. The data will be saved to the specified file in thefollowing format:
Record #1 contains the following comma delimited fields:
field1: number of data samplesfield2: current sample rate in minutesfield3: start time and date of current mission's first samplefield4: low temperature threshold settingfield5: high temperature threshold settingfield6: low temperature threshold flag (1 if set, else 0)field7: high temperature threshold flag (1 if set, else 0)field8: degrees C or Ffield9: 32-byte user memory
The remaining records contain the hi and lo alarm register number and the date and timeand duration of the alarm.
An example file is shown below:
347, 30, 09/29/00 09:02, 32.0, 79.7, 0, 0, F, Truck #1 – Route 16
High Threshold Time Stamps and Durations:
01 11/13/2000 07:48:00am 000d 00h 14m 02 11/13/2000 01:18:00pm 000d 02h 14m 03 11/13/2000 08:18:00pm 000d 02h 00m 04 09/29/2000 11:02:00am 000d 00h 30m 05 09/29/2000 06:02:00pm 000d 01h 14m 06 09/30/2000 12:32:00am 000d 00h 44m 07 09/30/2000 10:32:00pm 000d 01h 30m 08 10/01/2000 12:32:00am 000d 01h 00m 09 10/01/2000 03:02:00am 000d 01h 44m 10 10/01/2000 10:02:00am 000d 00h 30m 11 10/01/2000 11:02:00pm 000d 00h 30m 12 10/02/2000 01:02:00am 000d 04h 00m

CyTherm
Page 34
Copyright 2000, Dynasys Technologies Inc.All rights reserved.
Printing the Alarm Log Report
To print the displayed alarm log, click on the Print button that is located below the reportscreen.
Once you select print, you will be presented with numerous printing options. Forexample you can choose to include or omit various pieces of information that pertains tothe temperature-logging mission.
HACCP Reporting Information:
You can choose to include HazardAnalysis Critical Control Point (HACCP)reporting information on your printout byfilling in the HACCP Information formand clicking the OK button. Clicking theCancel button on this form will cause theHACCP information to be omitted onyour printout.

CyTherm
Page 35
Copyright 2000, Dynasys Technologies Inc.All rights reserved.
Optional Print Information:
You can choose to include oromit any or all of the availableoptional information on yourprintout.
Viewing Alarm Status Using a Mission Control Interface
The user can also monitor the status of the Lo and Hi Temperature Alarms by insertingthe CyTherm key into a Mission Control Interface. When inserted and the switch ispressed, the key will pulse its Green LED four times if all recorded temperature readingsare within the programmed tolerance band. If any recorded readings were outside thetolerance band, the key will blink its Red LED four times.
? Use caution in handling the CyTherm key. Your body heat cantrigger a temperature alarm on keys that are programmed for shortduration sample rates.

CyTherm
Page 36
Copyright 2000, Dynasys Technologies Inc.All rights reserved.
Saving and Viewing a CyTherm Key’s Memory Image
An attached CyTherm key’s memory image can be saved to disk and viewed at a latertime by using the following Speed-buttons:
Button Function Function DescriptionSave Key Image to Disk Saves the entire memory image of an attached key to a
disk file.Select Source Allows the user to choose the CyTherm for Windows
data source. The user can choose between a live attachedCyTherm key or a previously saved memory image file.
Saving a CyTherm Key’s Memory Image to Disk
When the Save Key Image to Disk Speed-button is clicked, the entire memory contentsof the attached CyTherm key will be saved to the specified disk file. The result is thecreation of an exact memory image of the CyTherm’s internal memory.
? Due to the nature of this operation – a datalog mission currently in processwill be stopped. The user will have the opportunity to allow the mission tobe stopped and the memory image saved to disk or to abort the save processand allow the mission to continue.

CyTherm
Page 37
Copyright 2000, Dynasys Technologies Inc.All rights reserved.
Viewing a Previously Saved Memory Image File
To view a previously saved memory image file, click on the Source Speed-button tochoose the CyTherm for Windows data source.
Click the Disk Memory Image File radiobutton and then click the File Used buttonto specify the image file that is to be usedas the data source.
When you click the OK button, theCyTherm for Windows will read theselected image file. The CyTherm forWindows program can now be used just asif a live key were attached.
To select an attached key as a source, simply repeat the process and click on theCyTherm Key radio button.
Selecting the Poll Mode
The Pole Mode used by the CyTherm for Windows program can be selected when theprogram first runs, as described in “Select COM Port and Poll Mode” section of thisdocument, or by clicking on the Source Speed-button.
Checking the Auto Poll check box enablesthe Auto Poll mode. When the Auto Pollmode is enabled, the CyTherm forWindows program begins automaticallypolling the selected COM port for thepresence of a CyTherm key.
If a key is attached to the selected COMport via the ThermoSync Interface, theprogram will continue automaticallypolling the key and displaying the key’sinformation on the PC’s display screen.
If a key is removed while in Auto Poll mode, the program will detect the absence of a keyand display the CyTherm Not Found dialog.

CyTherm
Page 38
Copyright 2000, Dynasys Technologies Inc.All rights reserved.
Unchecking the Auto Poll check box will disable the Auto Poll mode.When the Auto Poll mode is disabled the program no longer reads or writes to the COMport. All the features of the program can be used except for reading or programming aCyTherm key. To read or program a CyTherm key you will have to enable the Auto Pollmode.
Exiting the CyTherm for Windows Program
You can exit the application program using the following shortcut methods:
Using the Mouse: Double-click the application program's App Icon.
Using Keyboard Key Combination: ALT+F4
CyTherm Data Security
As a security feature, the CyTherm key has been designed such that the user cannot writeto its temperature datalog, histogram or alarm log memory, thus preventing falsificationof data.
In addition, once a datalog mission has been started no mission parameter can be changedwithout first stopping the current mission. Starting a new mission will automaticallyclear the contents of the datalog, histogram and alarm log memory.
The CyTherm key’s Samples Recorded counter cannot be cleared, thus providing ahistory of the total number of samples recorded since the time of manufacture.

CyTherm
Page 39
Copyright 2000, Dynasys Technologies Inc.All rights reserved.
CyTherm Temperature Calibration
The Temperature Calibration option is not implemented in the current release of theCyTherm for Windows application program.
Troubleshooting
This section is a listing of common problems experienced by CyTherm for Windowsusers, and the most likely solution.
I get the “CyTherm Not Found” dialog.
• Make sure a CyTherm key is plugged into the ThermoSync Interface and theinterface is securely connected to your PC’s COM port.
• Make sure the COM port selected at the start of the program is the COM portthat is connected to the ThermoSync Interface.
• Make sure your COM port is not being used by another program.• The CyTherm key or the ThermoSync Interface may be faulty - try using
another key and interface.
I get the “Error: Can not open Port” message when the program is first started.
• Make sure the selected COM port is not being used by another program.Programs such as 3COM’s HotSync Manager are installed when yourcomputer is turned on and may be using the serial port you selected for theCyTherm for Windows program.
The program is running but no data is displayed regardless of the key attached.
• Make sure the Auto Poll mode is enabled.
The same data is displayed regardless of the key attached.
• Make sure the Data Source is set for a CyTherm key and not an image file.• Click on the graphs Refresh button to update the displayed information.