Cybersafety and cyberbullying - Education Queensland
12
INFLIBNET Centre Quick Installation Guide for Layman: Dspace 4.0 on CentOS 6.x 1 Quick Installation Guide for Layman: DSpace 4.x on Linux (CentOS 6.x) December 19, 2013 Yatrik Patel INFLIBNET Centre [email protected] Disclaimer: This Guide has been adapted from http://www.dspace.org with an intension to provide set of instructions to participants of DSpace workshop as well as novice users, any feedback to author will be appreciated. Preparing your System for DSpace( Pre-requisites). As per standard installation guide you will need Java(JDK), Apache Tomcat, Apache Maven, Apache Ant, PostgreSQL and DSpace source. You can download the same from following URLS (Look for appropriate versions 32/64 bits as per your OS) JAVA (JDK) http://www.oracle.com/technetwork/java/javase/downloads/index. html (Choose JAVA SE 7xXX, JDK) Apache Tomcat http://tomcat.apache.org/download-70.cgi Apache Maven http://maven.apache.org/download.html Apache Ant http://ant.apache.org/bindownload.cgi PostgreSQL http://www.enterprisedb.com/products-services- training/pgdownload DSpace http://sourceforge.net/projects/dspace/files/DSpace%20Stable/4.0/ dspace-4.0-src-release.zip/download This files are available and kept in folder /opt/source To reach to that folder “Right Click” on your Linux desktop and Choose “Open in Terminal”
Transcript of Cybersafety and cyberbullying - Education Queensland

INFLIBNET Centre Quick Installation Guide for Layman: Dspace 4.0 on CentOS 6.x
1
Quick Installation Guide for Layman: DSpace 4.x on Linux (CentOS 6.x)
December 19, 2013
Yatrik Patel
INFLIBNET Centre [email protected]
Disclaimer: This Guide has been adapted from http://www.dspace.org with an intension to
provide set of instructions to participants of DSpace workshop as well as novice users, any feedback to author will be appreciated.
Preparing your System for DSpace( Pre-requisites).
As per standard installation guide you will need Java(JDK), Apache Tomcat, Apache Maven,
Apache Ant, PostgreSQL and DSpace source.
You can download the same from following URLS (Look for appropriate versions 32/64 bits as per your OS)
JAVA (JDK) http://www.oracle.com/technetwork/java/javase/downloads/index.html (Choose JAVA SE 7xXX, JDK)
Apache Tomcat http://tomcat.apache.org/download-70.cgi
Apache Maven http://maven.apache.org/download.html
Apache Ant http://ant.apache.org/bindownload.cgi
PostgreSQL http://www.enterprisedb.com/products-services-training/pgdownload
DSpace http://sourceforge.net/projects/dspace/files/DSpace%20Stable/4.0/dspace-4.0-src-release.zip/download
This files are available and kept in folder /opt/source To reach to that folder “Right Click” on your Linux desktop and Choose “Open in Terminal”
INFLIBNET Centre Quick Installation Guide for Layman: Dspace 4.0 on CentOS 6.x
2
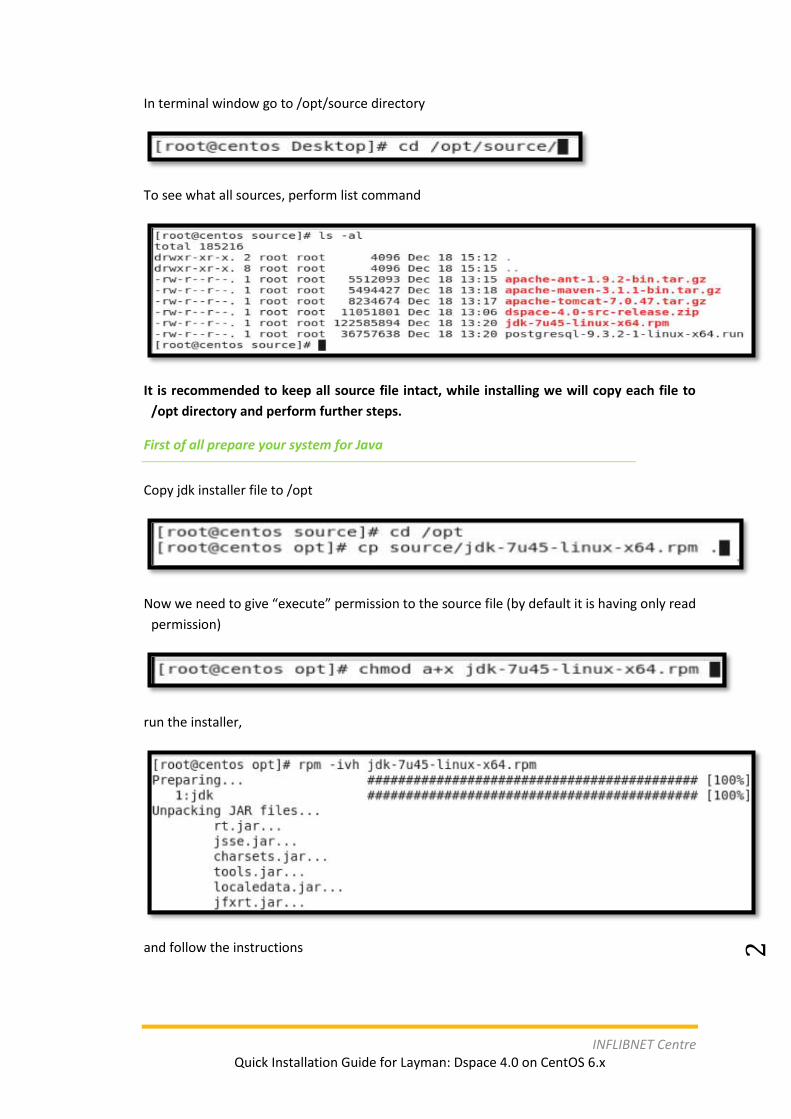
In terminal window go to /opt/source directory
To see what all sources, perform list command
It is recommended to keep all source file intact, while installing we will copy each file to
/opt directory and perform further steps.
First of all prepare your system for Java
Copy jdk installer file to /opt
Now we need to give “execute” permission to the source file (by default it is having only read
permission)
run the installer,
and follow the instructions
INFLIBNET Centre Quick Installation Guide for Layman: Dspace 4.0 on CentOS 6.x
3
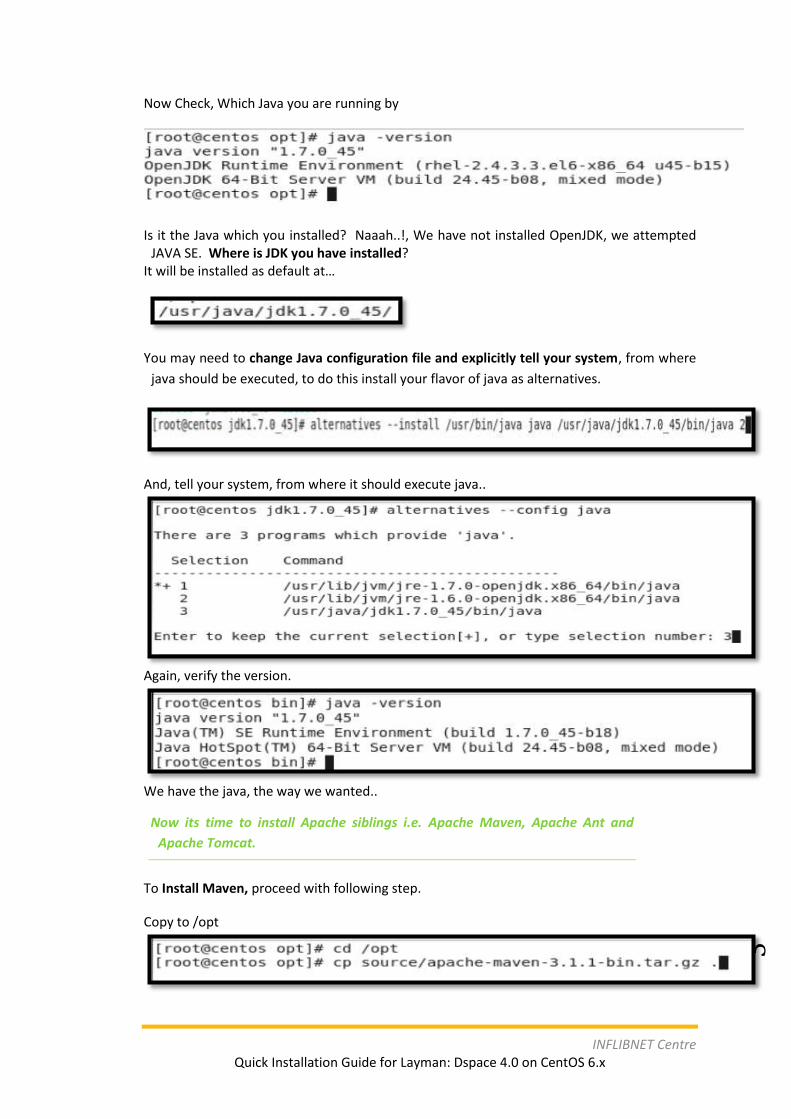
Now Check, Which Java you are running by
Is it the Java which you installed? Naaah..!, We have not installed OpenJDK, we attempted JAVA SE. Where is JDK you have installed?
It will be installed as default at…
You may need to change Java configuration file and explicitly tell your system, from where
java should be executed, to do this install your flavor of java as alternatives.
And, tell your system, from where it should execute java..
Again, verify the version.
We have the java, the way we wanted..
Now its time to install Apache siblings i.e. Apache Maven, Apache Ant and
Apache Tomcat.
To Install Maven, proceed with following step.
Copy to /opt
INFLIBNET Centre Quick Installation Guide for Layman: Dspace 4.0 on CentOS 6.x
4
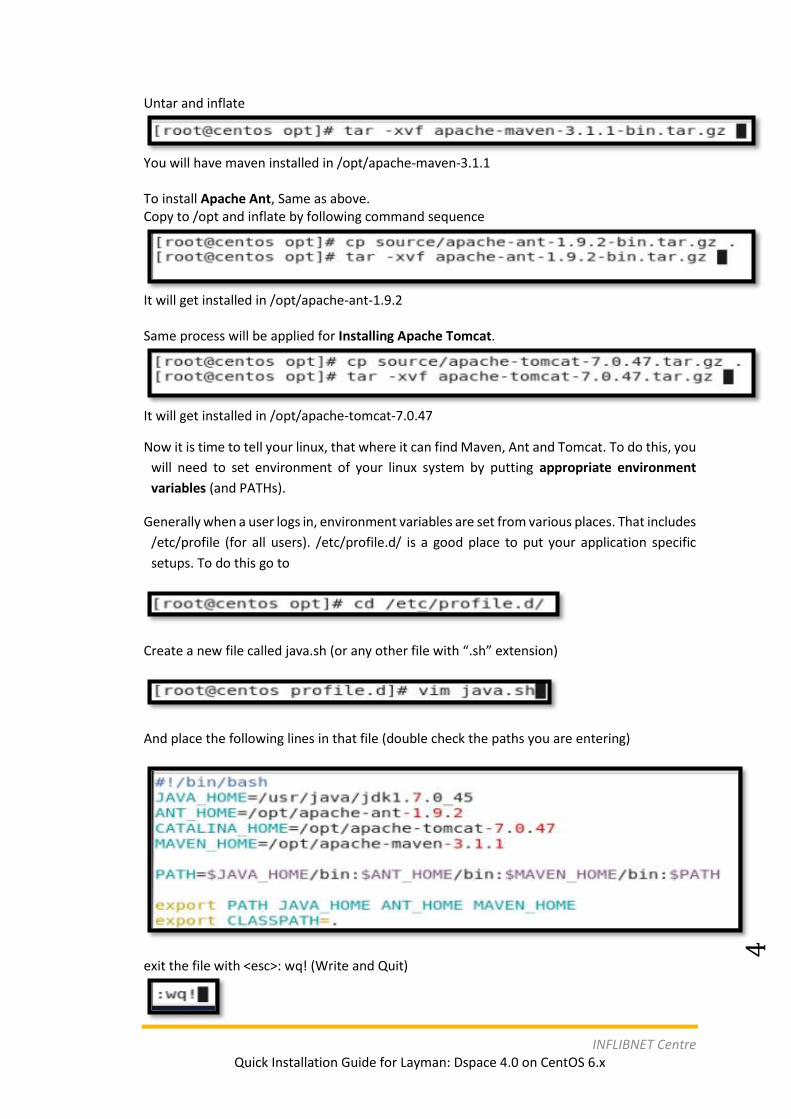
Untar and inflate
You will have maven installed in /opt/apache-maven-3.1.1 To install Apache Ant, Same as above. Copy to /opt and inflate by following command sequence
It will get installed in /opt/apache-ant-1.9.2 Same process will be applied for Installing Apache Tomcat.
It will get installed in /opt/apache-tomcat-7.0.47
Now it is time to tell your linux, that where it can find Maven, Ant and Tomcat. To do this, you
will need to set environment of your linux system by putting appropriate environment
variables (and PATHs).
Generally when a user logs in, environment variables are set from various places. That includes
/etc/profile (for all users). /etc/profile.d/ is a good place to put your application specific
setups. To do this go to
Create a new file called java.sh (or any other file with “.sh” extension)
And place the following lines in that file (double check the paths you are entering)
exit the file with <esc>: wq! (Write and Quit)
INFLIBNET Centre Quick Installation Guide for Layman: Dspace 4.0 on CentOS 6.x
5
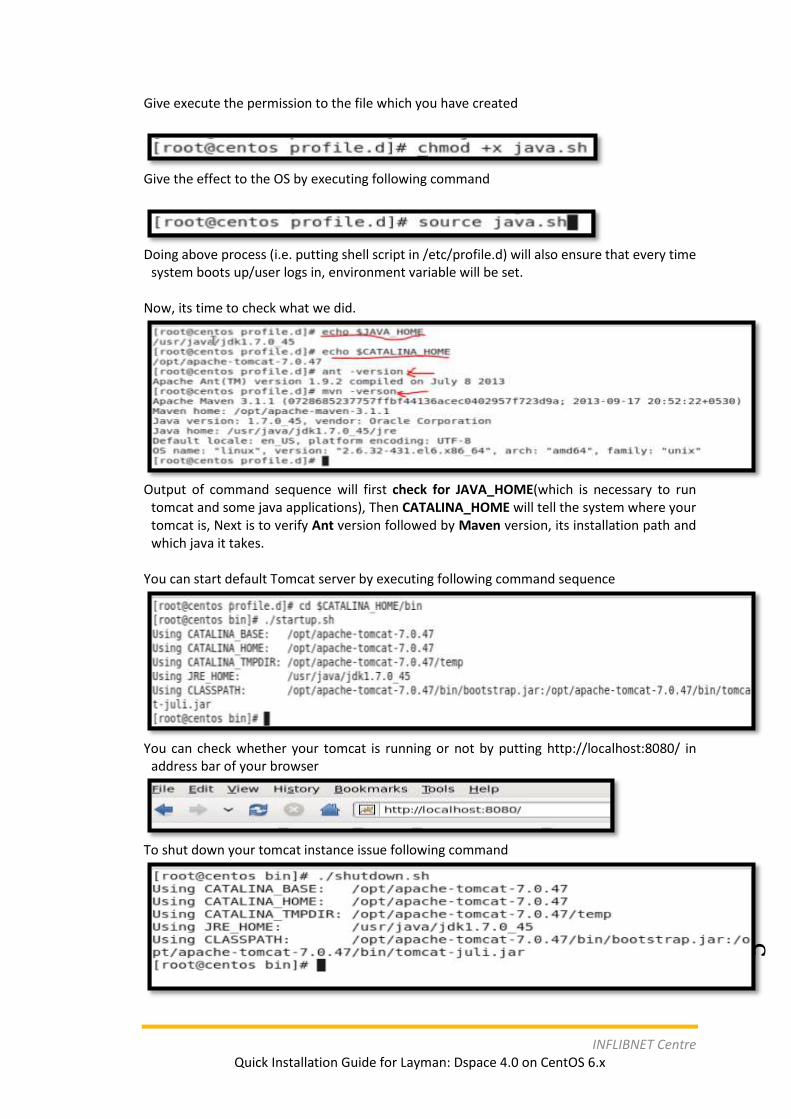
Give execute the permission to the file which you have created
Give the effect to the OS by executing following command
Doing above process (i.e. putting shell script in /etc/profile.d) will also ensure that every time
system boots up/user logs in, environment variable will be set. Now, its time to check what we did.
Output of command sequence will first check for JAVA_HOME(which is necessary to run
tomcat and some java applications), Then CATALINA_HOME will tell the system where your tomcat is, Next is to verify Ant version followed by Maven version, its installation path and which java it takes.
You can start default Tomcat server by executing following command sequence
You can check whether your tomcat is running or not by putting http://localhost:8080/ in
address bar of your browser
To shut down your tomcat instance issue following command
INFLIBNET Centre Quick Installation Guide for Layman: Dspace 4.0 on CentOS 6.x
6
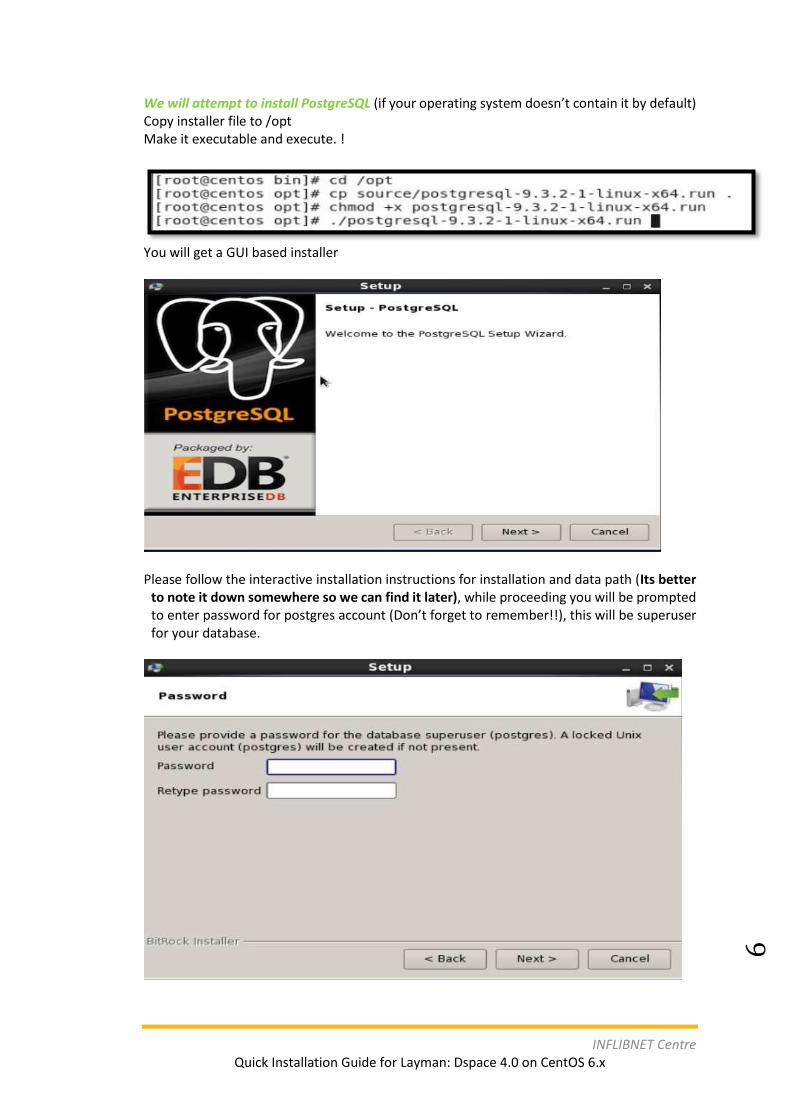
We will attempt to install PostgreSQL (if your operating system doesn’t contain it by default) Copy installer file to /opt Make it executable and execute. !
You will get a GUI based installer
Please follow the interactive installation instructions for installation and data path (Its better
to note it down somewhere so we can find it later), while proceeding you will be prompted to enter password for postgres account (Don’t forget to remember!!), this will be superuser for your database.
INFLIBNET Centre Quick Installation Guide for Layman: Dspace 4.0 on CentOS 6.x
7
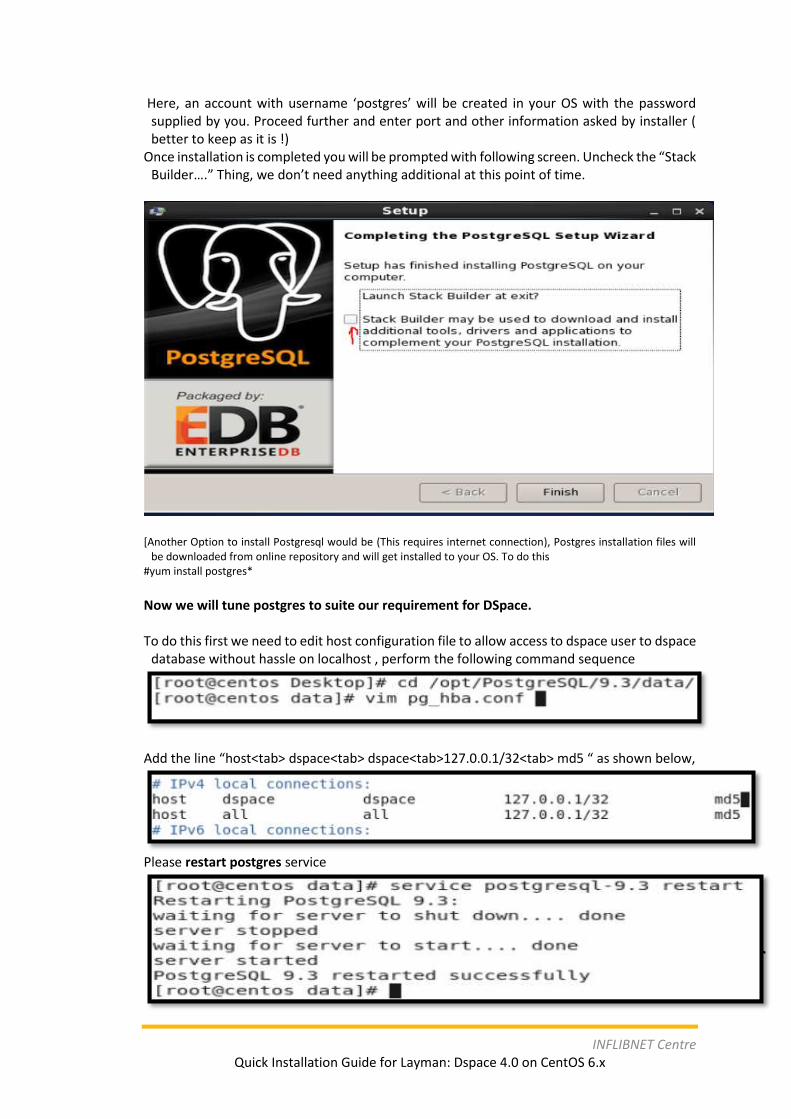
Here, an account with username ‘postgres’ will be created in your OS with the password supplied by you. Proceed further and enter port and other information asked by installer ( better to keep as it is !)
Once installation is completed you will be prompted with following screen. Uncheck the “Stack Builder….” Thing, we don’t need anything additional at this point of time.
[Another Option to install Postgresql would be (This requires internet connection), Postgres installation files will
be downloaded from online repository and will get installed to your OS. To do this #yum install postgres*
Now we will tune postgres to suite our requirement for DSpace. To do this first we need to edit host configuration file to allow access to dspace user to dspace
database without hassle on localhost , perform the following command sequence
Add the line “host<tab> dspace<tab> dspace<tab>127.0.0.1/32<tab> md5 “ as shown below,
Please restart postgres service
INFLIBNET Centre Quick Installation Guide for Layman: Dspace 4.0 on CentOS 6.x
8
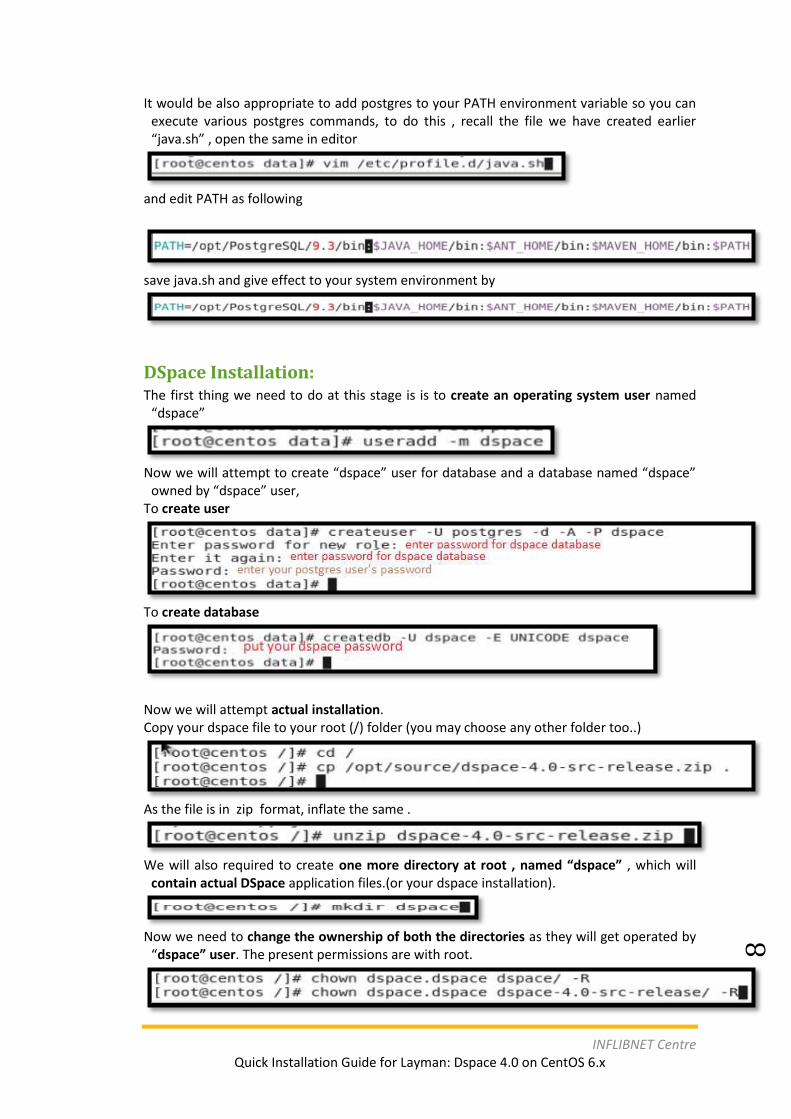
It would be also appropriate to add postgres to your PATH environment variable so you can execute various postgres commands, to do this , recall the file we have created earlier “java.sh” , open the same in editor
and edit PATH as following
save java.sh and give effect to your system environment by
DSpace Installation: The first thing we need to do at this stage is is to create an operating system user named
“dspace”
Now we will attempt to create “dspace” user for database and a database named “dspace”
owned by “dspace” user, To create user
To create database
Now we will attempt actual installation. Copy your dspace file to your root (/) folder (you may choose any other folder too..)
As the file is in zip format, inflate the same .
We will also required to create one more directory at root , named “dspace” , which will
contain actual DSpace application files.(or your dspace installation).
Now we need to change the ownership of both the directories as they will get operated by
“dspace” user. The present permissions are with root.
INFLIBNET Centre Quick Installation Guide for Layman: Dspace 4.0 on CentOS 6.x
9
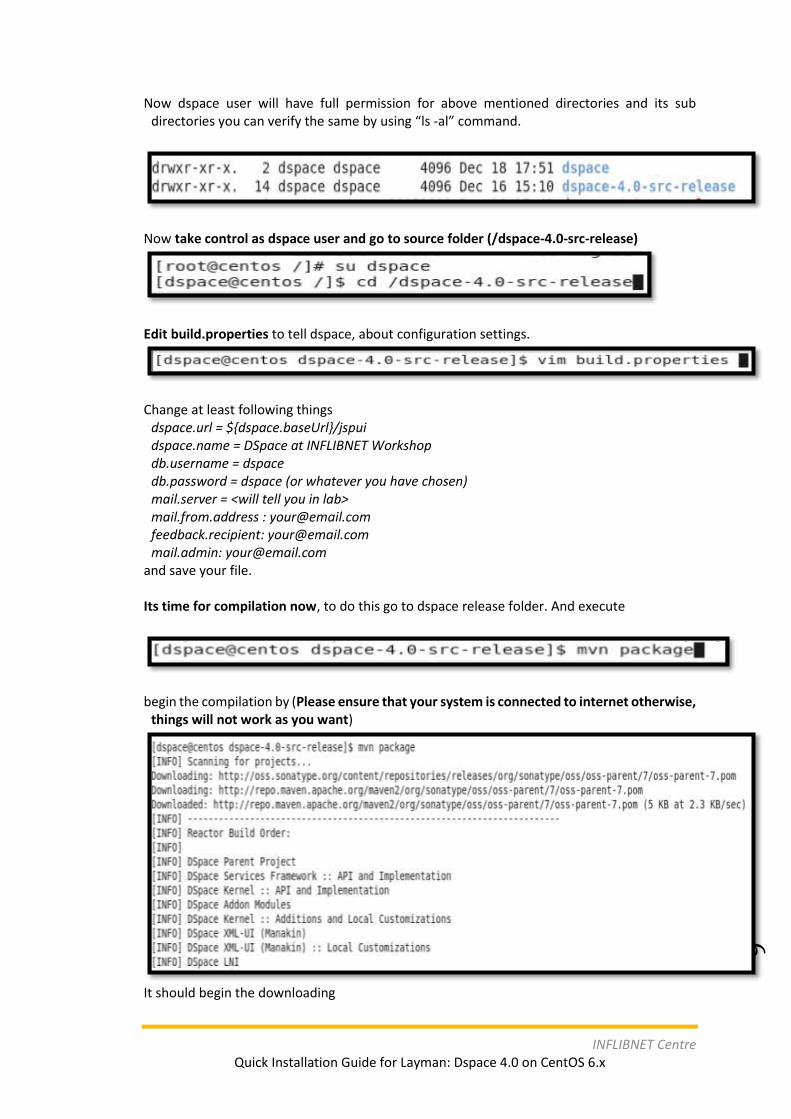
Now dspace user will have full permission for above mentioned directories and its sub directories you can verify the same by using “ls -al” command.
Now take control as dspace user and go to source folder (/dspace-4.0-src-release)
Edit build.properties to tell dspace, about configuration settings.
Change at least following things
dspace.url = ${dspace.baseUrl}/jspui dspace.name = DSpace at INFLIBNET Workshop db.username = dspace db.password = dspace (or whatever you have chosen) mail.server = <will tell you in lab> mail.from.address : [email protected] feedback.recipient: [email protected] mail.admin: [email protected]
and save your file. Its time for compilation now, to do this go to dspace release folder. And execute
begin the compilation by (Please ensure that your system is connected to internet otherwise,
things will not work as you want)
It should begin the downloading
INFLIBNET Centre Quick Installation Guide for Layman: Dspace 4.0 on CentOS 6.x
10
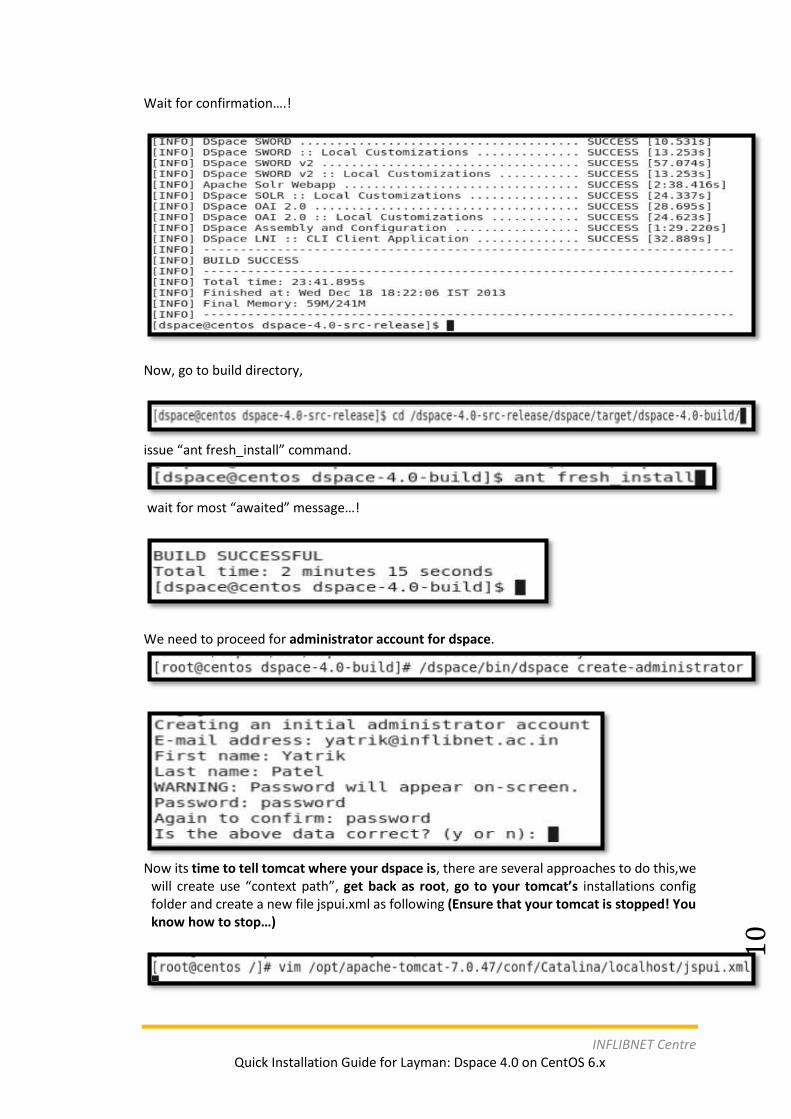
Wait for confirmation….!
Now, go to build directory,
issue “ant fresh_install” command.
wait for most “awaited” message…!
We need to proceed for administrator account for dspace.
Now its time to tell tomcat where your dspace is, there are several approaches to do this,we
will create use “context path”, get back as root, go to your tomcat’s installations config folder and create a new file jspui.xml as following (Ensure that your tomcat is stopped! You know how to stop…)
INFLIBNET Centre Quick Installation Guide for Layman: Dspace 4.0 on CentOS 6.x
11
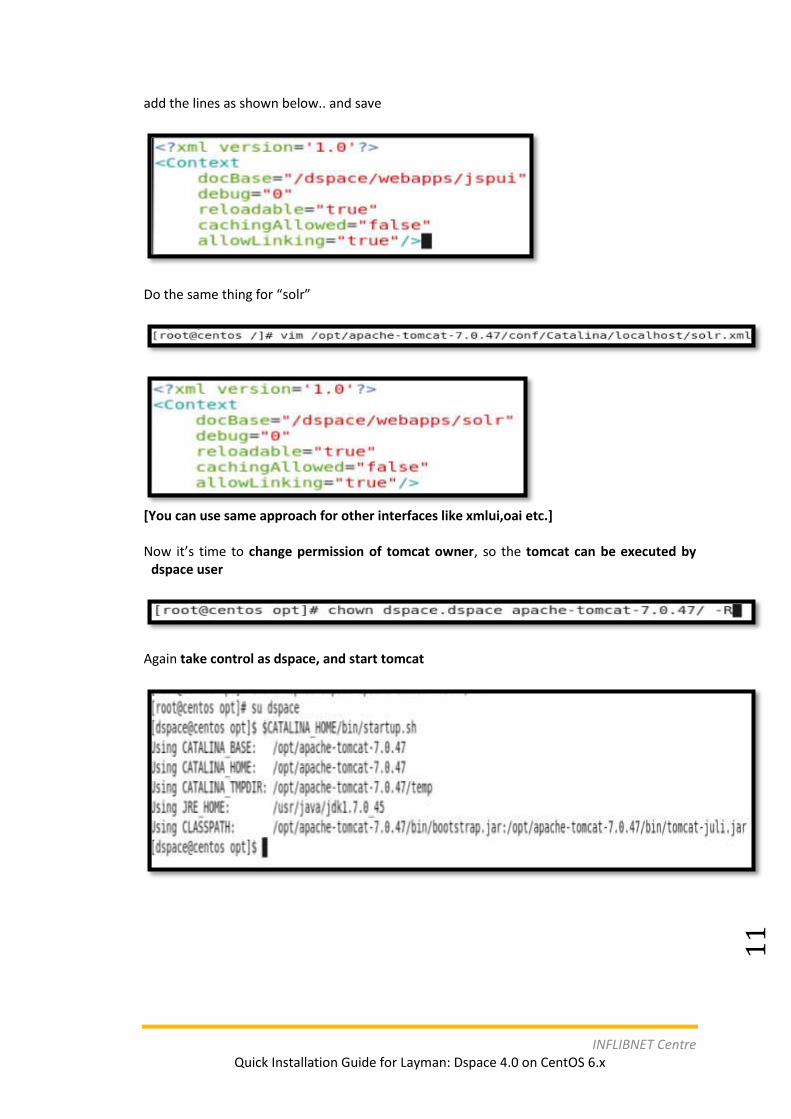
add the lines as shown below.. and save
Do the same thing for “solr”
[You can use same approach for other interfaces like xmlui,oai etc.] Now it’s time to change permission of tomcat owner, so the tomcat can be executed by
dspace user
Again take control as dspace, and start tomcat
INFLIBNET Centre Quick Installation Guide for Layman: Dspace 4.0 on CentOS 6.x
12
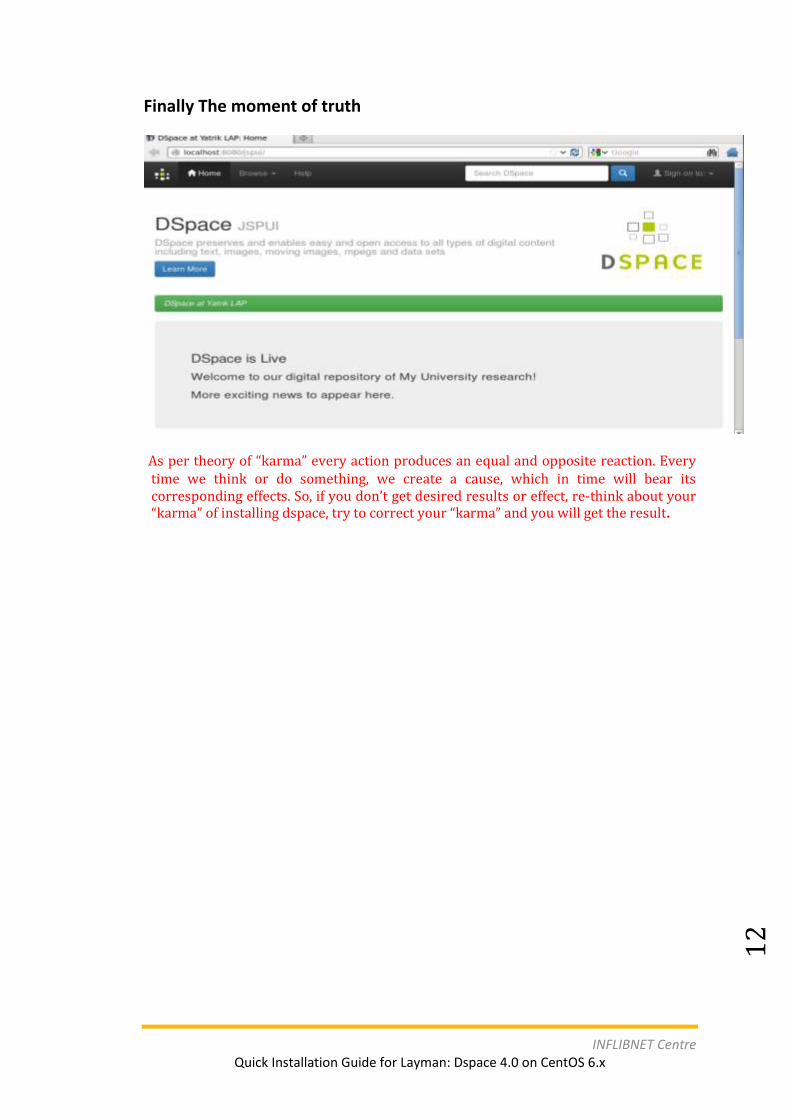
Finally The moment of truth
As per theory of “karma” every action produces an equal and opposite reaction. Every
time we think or do something, we create a cause, which in time will bear its corresponding effects. So, if you don’t get desired results or effect, re-think about your “karma” of installing dspace, try to correct your “karma” and you will get the result.