Localization of Unknown Primary Site with 68Ga-DOTATOC PET/CT ...

1
How to Customize Your CT Homes Replica Site

2
Table of Contents How to Change the Logo ............................................................................................................................... 1
How to Change the Phone Number .............................................................................................................. 2
How to Change the Business Name .............................................................................................................. 2
How to Change Your Email Address .............................................................................................................. 3
How to Change Your Time Zone ................................................................................................................... 4
Change the Homepage Slider ....................................................................................................................... 5
Integrate Forms with Realeflow.................................................................................................................... 2
Use Niche Builder Forms ............................................................................................................................... 8
Use Custom Forms ........................................................................................................................................ 9
Change Homepage Content ........................................................................................................................ 10
Change the Testimonial on the Home Page ............................................................................................... 13
Change The Facebook Box .......................................................................................................................... 14
Social Media Links on Homepage ............................................................................................................... 15
How to Change Footer ................................................................................................................................ 17
Change Site Fonts & Colors ......................................................................................................................... 18
Get More Fonts ........................................................................................................................................... 19
Available Short Codes ................................................................................................................................. 20
How to Post Properties ............................................................................................................................... 21
How to Post Blogs ....................................................................................................................................... 28

1
Step 1: Click Edit Site Design from the left hand menu, then go to the General Section. Click the Blue Plus
button to add your logo (you can choose from images in your media library or upload a new image).
Once your logo has been added click “save change” Please note that the logo should be resized to
250x77 pixels (if you are unsure how to do this please ask our live chat support to assist you)
Below is a screenshot of your media library, you can choose “upload files” from the top left to upload a
new image

2
Step 1: Click Edit Site Design from the left hand menu, then go to the General Section. Type your phone
number into the space provided and click “save changes”
Step 1: Click Edit Site Design from the left hand menu, then go to the General Section. Type your business name
into the space provided and click “save changes”

3
Step 1: Click Edit Site Design from the left hand menu, then go to the General Section. Type your email address
into the space provided and click “save changes”

4
Step 1: Click Edit Site Design from the left hand menu, then go to the General Section. Click the tiem zone drop
down and select your timze zone. Then click “save changes”
5
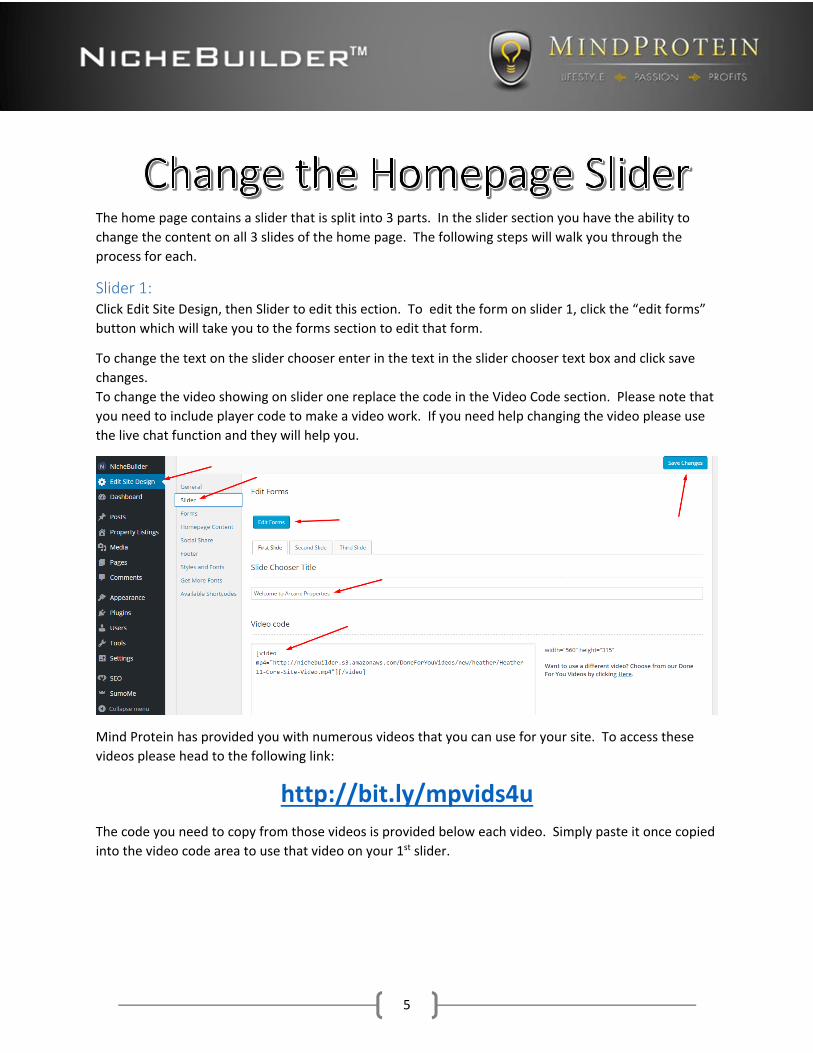
The home page contains a slider that is split into 3 parts. In the slider section you have the ability to
change the content on all 3 slides of the home page. The following steps will walk you through the
process for each.
Slider 1: Click Edit Site Design, then Slider to edit this ection. To edit the form on slider 1, click the “edit forms”
button which will take you to the forms section to edit that form.
To change the text on the slider chooser enter in the text in the slider chooser text box and click save
changes.
To change the video showing on slider one replace the code in the Video Code section. Please note that
you need to include player code to make a video work. If you need help changing the video please use
the live chat function and they will help you.
Mind Protein has provided you with numerous videos that you can use for your site. To access these
videos please head to the following link:
http://bit.ly/mpvids4u
The code you need to copy from those videos is provided below each video. Simply paste it once copied
into the video code area to use that video on your 1st slider.
6
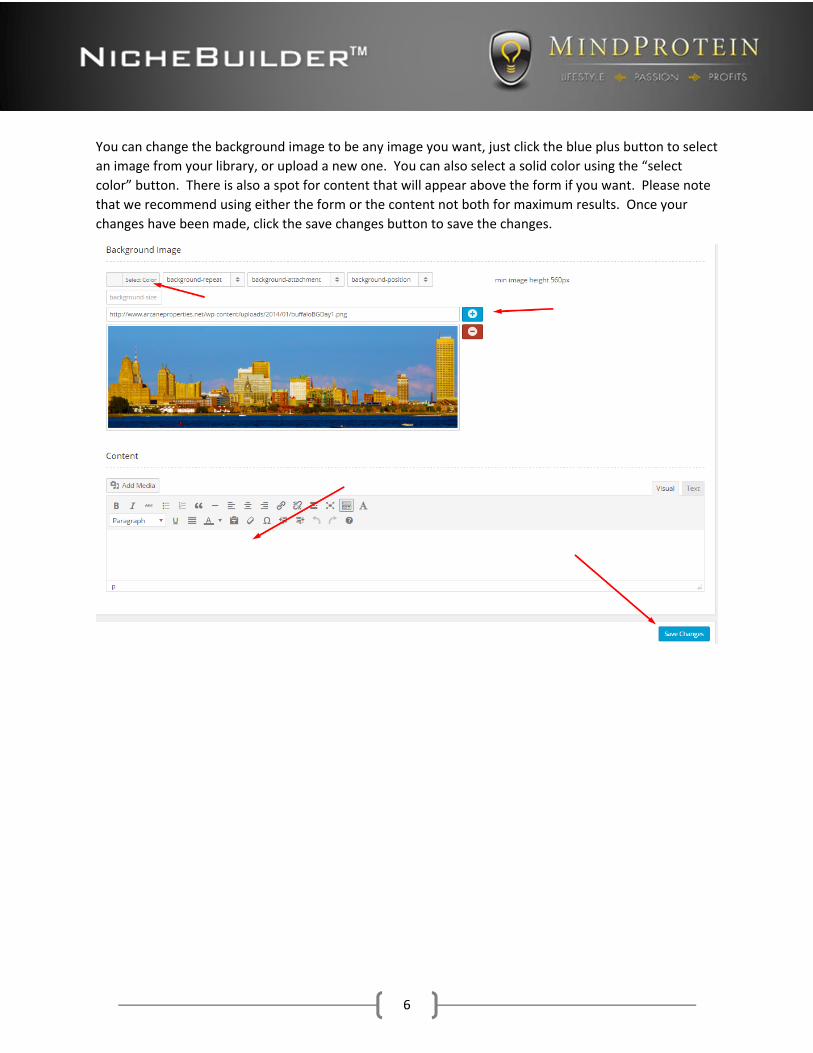
You can change the background image to be any image you want, just click the blue plus button to select
an image from your library, or upload a new one. You can also select a solid color using the “select
color” button. There is also a spot for content that will appear above the form if you want. Please note
that we recommend using either the form or the content not both for maximum results. Once your
changes have been made, click the save changes button to save the changes.

7
Slider 2: On slider 2 you can change the title of the slider by entering the text into slide chooser text. You can
select the property that is being featured from the featured property drop down list. This will pull from
all properties that you add using the property listings functionality on your site. You can also choose a
background image by clicking the blue plus button, or a solid color by clicking the select color button.
1
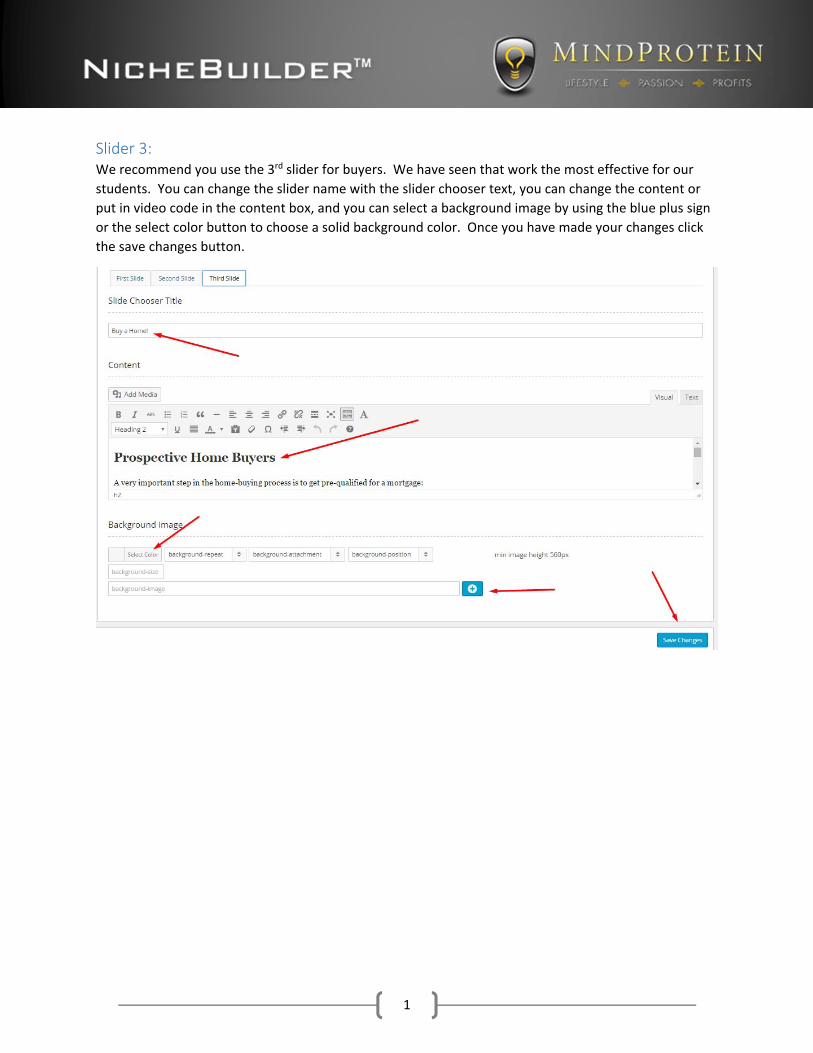
Slider 3: We recommend you use the 3rd slider for buyers. We have seen that work the most effective for our
students. You can change the slider name with the slider chooser text, you can change the content or
put in video code in the content box, and you can select a background image by using the blue plus sign
or the select color button to choose a solid background color. Once you have made your changes click
the save changes button.

2
There are 4 forms on your site. The process to integrate with Realeflow is the same for all 4 forms. Go
through this process for each form, then repeat for the next. Mind Protein will integrate your forms
with Realeflow for you if you would like. Please put in a support ticket and we will take care of this for
you.
Step 1: First you need to get your Realeflow User ID. To get this ID please log into Realeflow, hover over
leadflow then click Optin Form Generator
Click the Styled Widget option

3
Pick any form design (it doesn’t matter as we are not going to be using that design)

4
Your Realeflow User ID will be displayed to you here. IMPORTANT!!!! – if you enter in the wrong user ID
your visitors form submissions will go to someone else’s Realeflow account, so be sure to get this
number right!
Once you have the user ID, put it into the Realeflow ID box within the Forms section of your site

5
Step 2: For Main Form 1 and Main Form 2 (which are on sliders 1 and 3 respectively), choose “Realeflow Form”
from the drop down list.
Next you need to get your Realeflow Autoresponder ID. To get this ID please log into Realeflow, hover
over leadflow then click Optin Form Generator

6
Click the Styled Widget option
Pick any form design (it doesn’t matter as we are not going to be using that design)

7
Click the autoresponder drop down and find the number located next to the autoresponder you want to
use.
The last step is to enter in a thank you URL to send the users to once they enter their information. You
can enter in any web address here you want to. By default your site already has a thank you page for
Buyers and for sellers.
Those addresses are as follows:
yourdomain.com/seller‐thank‐you
yourdomain.com/buyer‐thank‐you
Simply add “/seller‐thank‐you” or “/buyer‐thank‐you” to the end of your domain to access those thank
you pages. Put the address of the thank you page you want to send users to in the “Redirect URL” box.

8
If you would like to use a form you build on Niche Builder (not one integrated with Realeflow) then
please follow these steps.
Step 1: Choose Niche Builder Form from the first drop down. Then select the form from your Niche Builder
account from the second drop down box. The second drop down box will auto populate the available
forms from your niche builder account.

9
If you would like to use custom forms from any other form builder or autoresponder (not Realeflow)
then please follow these steps.
Step 1: Choose Custom Form Form from the first drop down. Then paste your custom form code in the Custom
code box provided.

10
Property Showcase The property show case is set to “off” by default. We recommend you leave this off until you have 4‐5
properties on you site (they can be sold properties, for sale, or even properties from an agent you work
with, they don’t have to be yours to start with, but once you have anough of your own it should be).
Slide the button to on to turn on the property showcase for your home page.
Featured Area Content (Why Work With Us): The featured area content starts out as the “Why Work With Us” section but can be changed to be
anything you want. To change this simply type in a new Title and and new Contnet in the spaces
provided

11
Info Boxes 1‐4 There are 4 info boxes on your home page. By default they are “about us”, “buy a home”,
“testimonials”, and “sell a home”. You can change these 4 to be anything you want (including the icons
in the circles). The process to change all 4 is the same, just choose which info box you want to edit from
the tabs in the Homepage Content section.

12
To change the title, change the text in the title box. To change the icon use the drop down to select the
one you want. Once you have selected the one you want the picture of the icon will show up to the left
of the words. To change the page link choose from the drop down box for your list of pages. You can
also enter in a custom link by choose the “custom link option”. Lastly you can change the content of
that box in the content section. Please note you have a 150 character (including spaces) limit for these
boxes.

13
Step 1: Click Edit Site Design, then click Home Page Content, then click the Testimonials Tab, then enter in the
testimonial you want to display. Please note that ONLY YOU can do this. Your customers can’t enter
this in from your site (this would allow potential hackers or bad people to do bad things to your site
which is why it is setup this way).
Step 2: Make sure you are in the “General” section, then edit the text in the “Testimonial” text box. Click “save
Changes” at the top or bottom to save your changes.

14
Step 1: Click Edit Site Design, then click Home Page Content, then click the Facebook Widget Tab
Enter in your facebook web address including the “Https://” and then click save changes. Our theme
will take care of the rest for you.

15
Step 1: Your site is ready to link out to all of the major social media sites currently in use. You can link to
Facebook, Twitter, Google Plus, Linkedin, Pinterest, YouTube, Instagram, and an RSS Feed. When you
enter in your web address from any of these social accounts the link with the appropriate social media
icon will be dsipalyed on your home page below the Featured Content (Why Work With Us) area.

16
To add these icons to your home page go to Edit Site Design, then Seocial Share. Then paste in the link
to your social media account / profile in the box noted for that profile. You can’t add custom social
icons at this time.

17
Step 1: You can add a logo to the footer if you would like. By default this is left blank. To add the logo click edit
site design, then footer, then click the blue plus button and select a logo from your media library or
upload a new image to your library.

18
Step 1: Click edit site design, then click Styles and Fonts, from here you can change the colors of the site as well
as the fonts.
You also have an option to dive into advanced style and font options. This will give you even more
granular control over fonts and styles of your site. By default this option is hidden. We recommend you
leave these alone unless you know what you’re doing. The fonts we chose for your site were chosen as
they were the most effective.

19
Step 1: Your site is now connected to the entire Google Font library, which contains over 700 free high quality
fonts to use on your site. If you would like to use a font that is not already installed on your site (one
that is not listed in a font chooser drop down), choose it from the dropdown list, then check mark all the
different styles of that font (regular, bold, italic, etc…) then click add google font. This font will now be
available for use in the styles and fonts section.
20
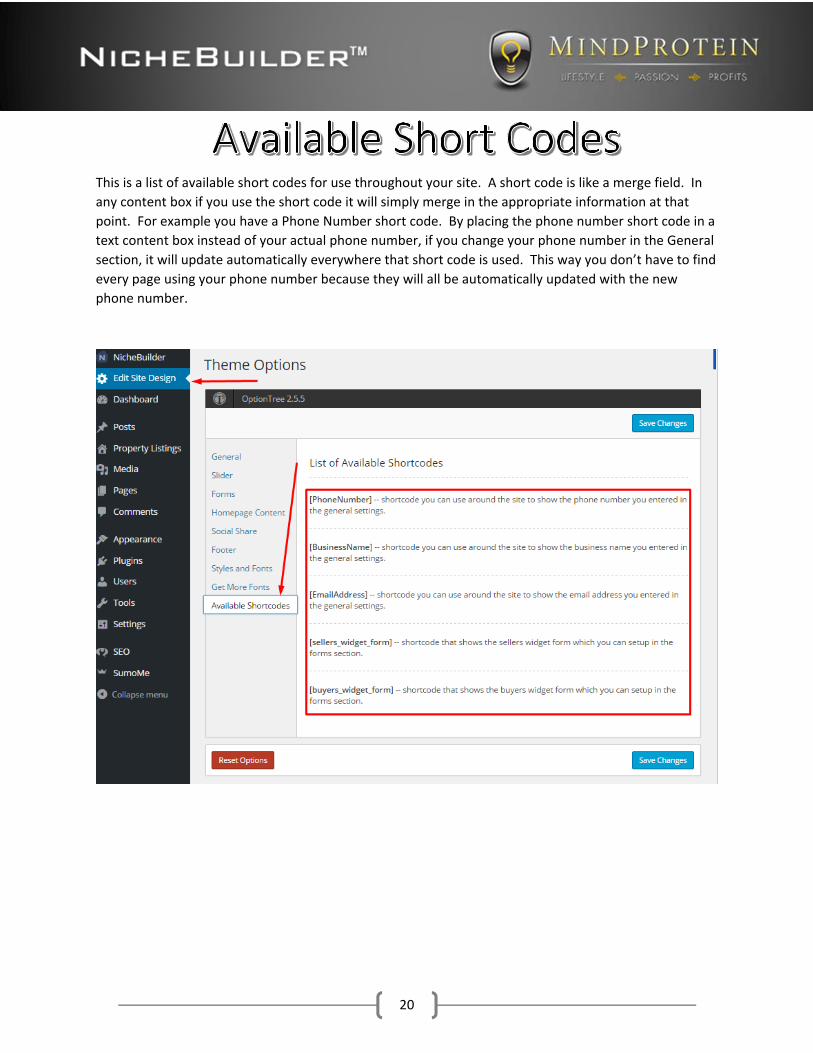
This is a list of available short codes for use throughout your site. A short code is like a merge field. In
any content box if you use the short code it will simply merge in the appropriate information at that
point. For example you have a Phone Number short code. By placing the phone number short code in a
text content box instead of your actual phone number, if you change your phone number in the General
section, it will update automatically everywhere that short code is used. This way you don’t have to find
every page using your phone number because they will all be automatically updated with the new
phone number.

21
Step 1: From the dashboard click the button that says Create a New Property Listing
Step 2: Enter the title of the property in the “Title” area, this is generally best as the address and a short
descriptive property type:
22
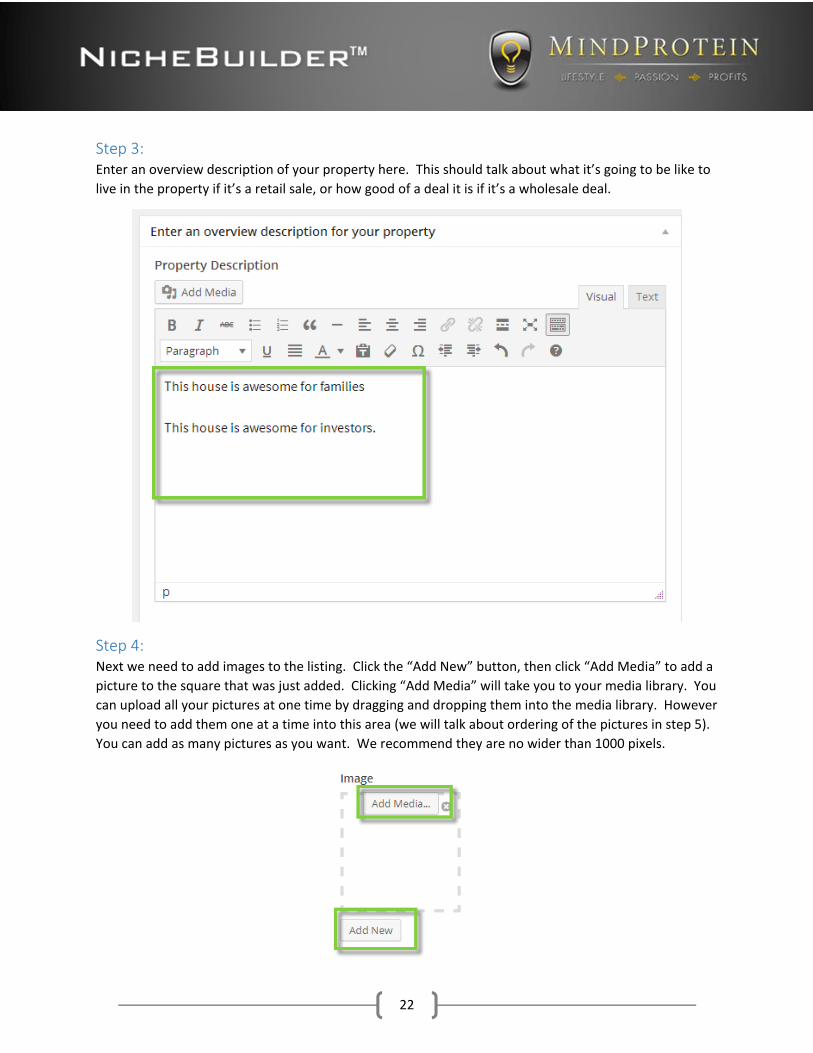
Step 3: Enter an overview description of your property here. This should talk about what it’s going to be like to
live in the property if it’s a retail sale, or how good of a deal it is if it’s a wholesale deal.
Step 4: Next we need to add images to the listing. Click the “Add New” button, then click “Add Media” to add a
picture to the square that was just added. Clicking “Add Media” will take you to your media library. You
can upload all your pictures at one time by dragging and dropping them into the media library. However
you need to add them one at a time into this area (we will talk about ordering of the pictures in step 5).
You can add as many pictures as you want. We recommend they are no wider than 1000 pixels.

23
Step 5: Once all of the images are added, scroll back up to the top and click the “Save draft” button.
Now you can scroll back down to the pictures and we can modify the order and set the “main image”.
You will notice now that if you click on a picture you can drag it around so that you can put the pictures
in the order you want them to appear in.
You will also notice that a white circle radio button has been added over every picture in the bottom
center. This radio button allows you to select which image will be the “Main Image”. The “Main Image”
is the one that will appear on the home page and on the property listings page. We generally
recommend this be a picture of the outside of the house or of the kitchen. To delete an image in the
top right corner of each picture is a grey “x”. Click that “X” to delete that photo.

24
Step 6: Next enter in the street address of the property. This will create the map for the property automatically.
If you don’t enter an address it will hide the map.

25
Step 7: Next is the property details. The first part of this will determine what status is shown on your property.
Pick the status from the drop down that makes the most sense.
Below is an example of how different property status will appear on your home page:
26
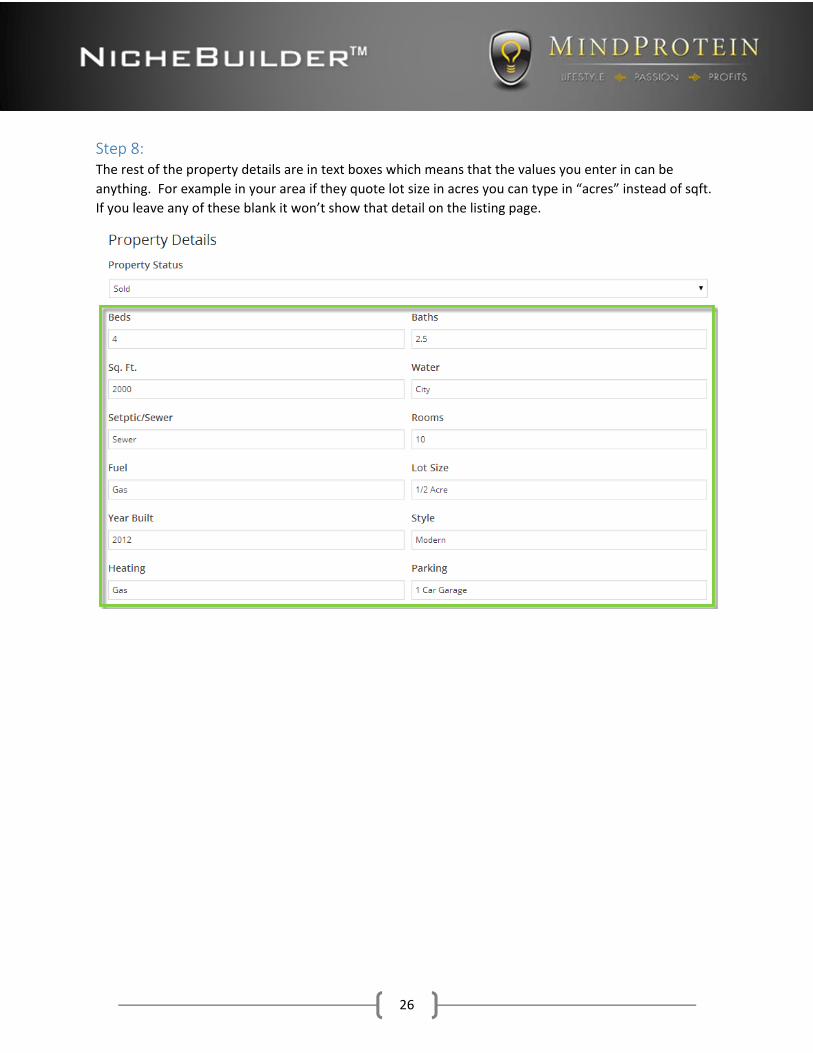
Step 8: The rest of the property details are in text boxes which means that the values you enter in can be
anything. For example in your area if they quote lot size in acres you can type in “acres” instead of sqft.
If you leave any of these blank it won’t show that detail on the listing page.

27
Step 9: The last thing to do is to enter in any custom details you want for the property. To start this click the
“Add New” button. This will add 2 text boxes. This is the area where you can specific a detail that is
unique to your property, for example “Ocean View” or “Fully Finished Basement”. The “Property Detail”
is the title of the item. The detail value is the value for that title. For example, if I had an ocean view
property, the Property Detail would be “View” and the Detail Value would be “Ocean View”. For the
basement example, I would make the “Property Detail” “Basement” and the Detail Value “Fully
Finished”.
If you check mark the box that say’s “make this value appear on all new listings” every time you create a
new listing this custom property detail will be added to that listing. If this box is not checked then this
detail WON’T be added to any new property listings.
Once you are done with this property listing, scroll back up to the top and click “Publish” to go live with
it!

28
Step 1: From the Dashboard of your site, click the “create a blog post” button

29
Your blog post should contain the following: A title (put in where it says Enter Title Here), the content
(enter in where it says Put Your Content Here), and an image (click Set featured image). If you want to
back date or future date (schedule) this blog post click the blue “edit” button located next to the Publish
Immediately text on the top right. Once you have all this click Publish (or the publish button will say
Schedule if you picked a date in the future) to make the article go live or schedule it to go live if its been
future dated.