Cura 13.11.2
41
English Version 1.0 User manual Ultimaker’s software for making 3D prints Cura 13.11.2
Transcript of Cura 13.11.2
English Version 1.0
User manualUltimaker’s software for making 3D prints
Cura 13.11.2

Table of Contents
Table of content User manual
456
789
101112
131415161719
20
212223
2526282930313234
353637383940
A. Welcome to Cura A1. Cura for your Ultimaker A2. Latestupgradeandfixes
B. InstallingandconfiguringCura B1. Compatible systems B2. Downloading and installing Cura B3. ConfigurationwizardUltimaker B4. ContinuethewizardforUltimakerOriginal B5. Configurationwizardother3Dprinters
C. First time starting up Cura C1. Cura software interface C2. Printwithquickprintprofile C3. Basic orientation C4. Adjusting your model C5. WhereUltimaker2andUltimakerOriginaldifferinCura C6. FromSD-cardtoprintyourfile
D. YouMagine.com and sharing with Cura D1. FromYouMaginetoloadfileinCura D2. Upload from Cura to YouMagine.com
E. The use of full settings and dual extrusion E1. Switch and use of full settings E2. Advanced settings E3. ExtrafullsettingsUltimakerOriginal E4. Cura plugins E5. Start/End-GCodeforUltimakerOriginal E6. DualextrusionforUltimakerOriginal E7. Expertconfigurations F. Updating Cura F1. Updating Cura F2. UpdatingfirmwareofyourUltimaker F3. Add a new 3D printer (machine) F4. Preferences of Cura F5. Copyprofiletoclipboard
WELCOME TO CURA
4

The preferred software for your Ultimaker is Cura. This software package prepares your 3D model into instructions that your 3D printer requires to produce an object.
Cura is developed by Ultimaker to make 3D printing as easy and streamlined as possible. It contains everything you need topreparea3Dfileforprinting.Itisfullypreconfiguredtowork on every Ultimaker model. Cura comes with a friendly setupprogramthathelpsyouinstallthelatestfirmwareaswell as to calibrate your printer.
While you make decisions on the look and quality of your 3D object, Cura’s slicer engine prepares your model in the back-ground faster than ever. From there It is just seconds away from your printer and ready to become your physical object.
With the Ultimaker 2 and Cura it’s only possible to copy your printfiletoanSD card and print from it. The USB port on your Ultimaker2canbeusedforfirmwareupdatesandinthenearfuture this gives a possibility for wireless printing. The USB cable that came with your Ultimaker 2 should only be used for firmwareupdates. With the Ultimaker Original it is possible to print with USB cable, but we do not advice you to do that. It is less reliable andotherprocessesonyourcomputerinfluencethespeedofprinting. When available printing with the Ulticontroller is re-commended.
A1. Cura for your Ultimaker
5A1. Cura for you Ultimaker. Welcome to Cura
Almost every month we do a software update where we introduce new functionalities and improvements. In the latest Cura 13.11.2 * Adjusted the gantry height to 55mm for the Ultimaker, as 60mm was 3mm to high for the default setup with an V2 hot-end in the Ultimaker Original. *Addedno-gozonesforUltimaker2glassclips,topreventdamagetothe nozzlesontheUltimaker2. *Addedooze-shieldfordual-colorprinting *Addedwipetowerfordual-extrusion *MadesuretheUltimakerOriginalbedlevelingwizardcannotbeusedon the Ultimaker 2, as this causes problems.
Ultimaker 2 Firmware update version: 13.11-2 *FixedUltimaker2buildvolumeoffsetsothatyoudonotprintoffthe glass plate. *Slightlytweakedthefilamentchangeproceduresothereislesschanceof a blob staying behind. * Slightly tweaked the SD-Card error problems, solving a rare case of SD-Card read errors. * Added LED settings to Tune menu, so you can tune down the LED lighting during printing. *Startheatingthenozzleswhenthebedisnearingitsfinaltemperature,so thenozzlesdonotsithot. *Makesureallcommandsarefinishedbeforestartingaprintorchanging material. This could cause issues when you where too fast.
A2. Latestupgradesandfixes
6A2. Latest upgrades and fixes. Welcome to Cura
INSTALLING AND CONFIGURING
CURA
7
B1. Compatible systems
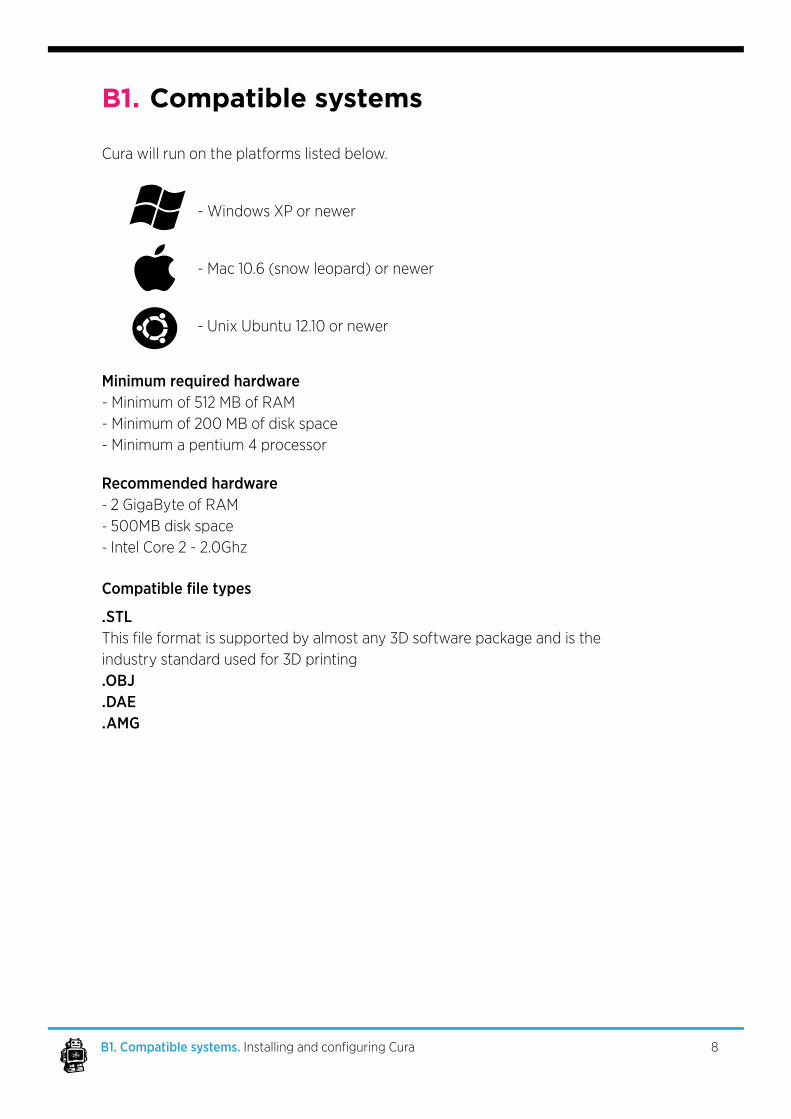
Cura will run on the platforms listed below.
- Windows XP or newer
- Mac 10.6 (snow leopard) or newer
-UnixUbuntu12.10ornewer
Minimum required hardware- Minimum of 512 MB of RAM- Minimum of 200 MB of disk space - Minimum a pentium 4 processor
Recommended hardware- 2 GigaByte of RAM - 500MB disk space - IntelCore2-2.0Ghz
Compatible file types
.STL Thisfileformatissupportedbyalmostany3Dsoftwarepackageandistheindustry standard used for 3D printing.OBJ .DAE.AMG
8B1. Compatible systems. InstallingandconfiguringCura
B2. Downloading and installing Cura
The preferred software for your Ultimaker is Cura from Ultimaker. This software package prepares your 3D model into instructions that your Ultimaker 2 requires to produce an object.
1. The Cura software package can be downloaded from the “Our software” section on our website w w w . u l t i m a k e r . c o m .(direct link: w w w . u l t i m a k e r . c o m / p a g e s / o u r - s o f t w a r e ) 2. Download the latest version of Cura for your operating system.
3. Opentheinstallerandfollowthedirectionstoinstallthesoftware.
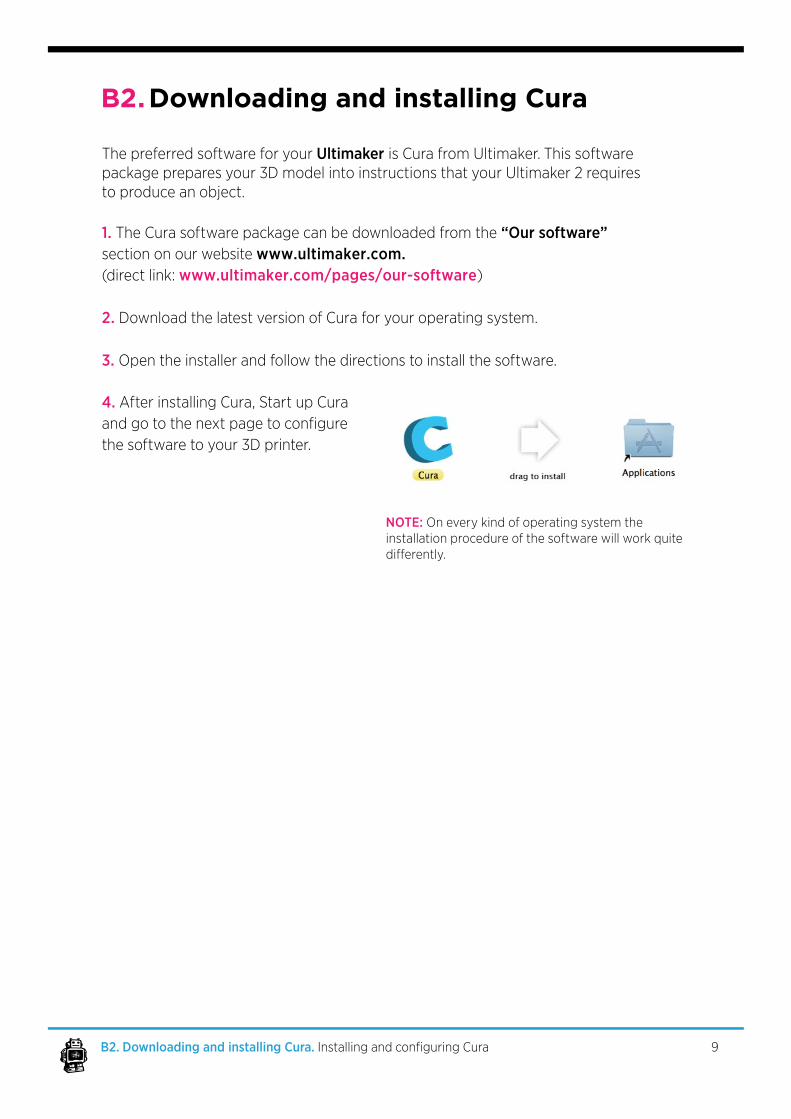
4. After installing Cura, Start up Cura andgotothenextpagetoconfigurethe software to your 3D printer.
NOTE: Oneverykindofoperatingsystemtheinstallation procedure of the software will work quite differently.
9B2. Downloading and installing Cura. InstallingandconfiguringCura
1.Curawelcomesyoufirstwiththenote:”This wizard will help you in setting up Cura for your machine” click [Next>]button to continue.
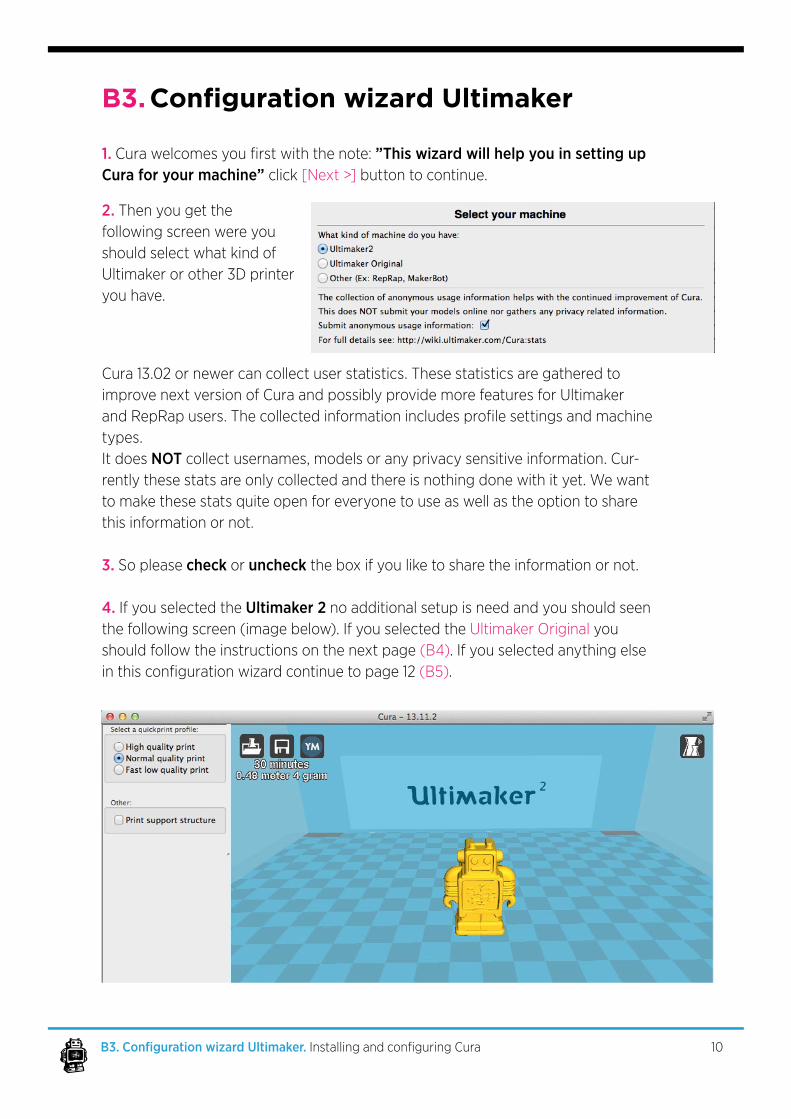
2. Then you get the following screen were you should select what kind of Ultimaker or other 3D printer you have.
Cura 13.02 or newer can collect user statistics. These statistics are gathered to improvenextversionofCuraandpossiblyprovidemorefeaturesforUltimakerandRepRapusers.Thecollectedinformationincludesprofilesettingsandmachinetypes. It does NOT collect usernames, models or any privacy sensitive information. Cur-rently these stats are only collected and there is nothing done with it yet. We want to make these stats quite open for everyone to use as well as the option to share this information or not.
3. So please check or unchecktheboxifyouliketosharetheinformationornot.
4. If you selected the Ultimaker 2 no additional setup is need and you should seen the following screen (image below). If you selected the UltimakerOriginal you shouldfollowtheinstructionsonthenextpage(B4). If you selected anything else inthisconfigurationwizardcontinuetopage12(B5).
B3.ConfigurationwizardUltimaker
10B3. Configuration wizard Ultimaker. InstallingandconfiguringCura
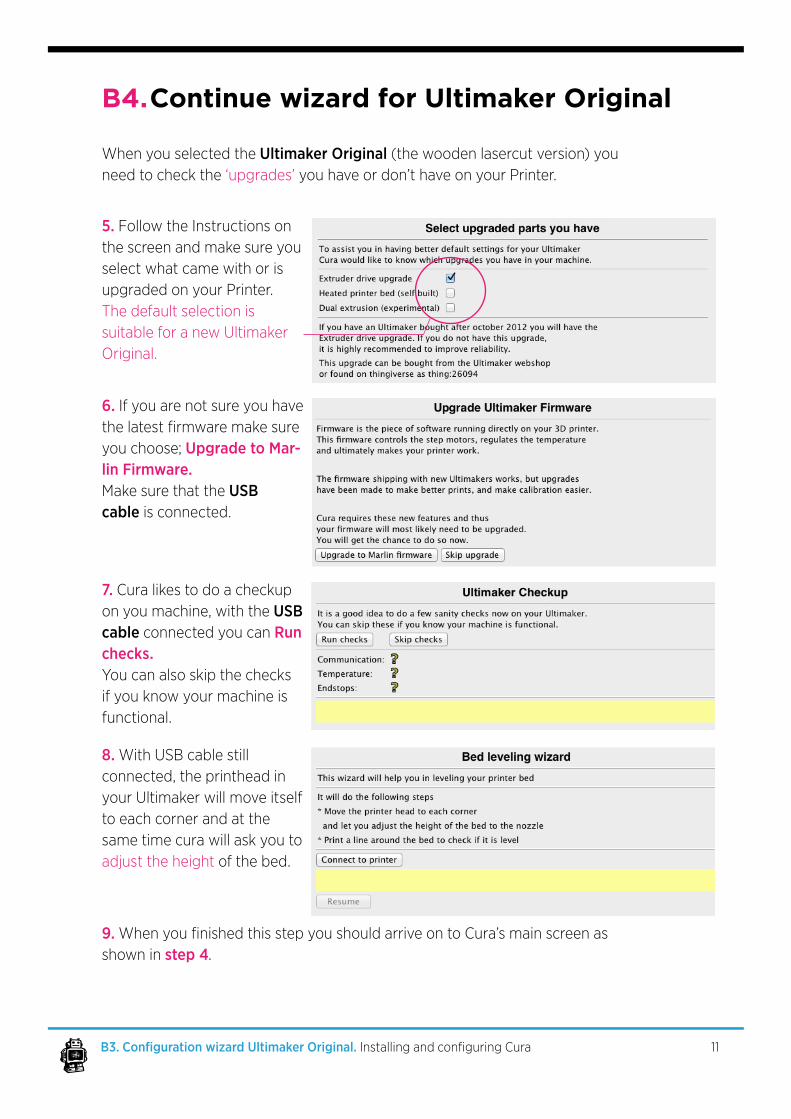
When you selected the Ultimaker Original (the wooden lasercut version) you need to check the ‘upgrades’ you have or don’t have on your Printer.
9.WhenyoufinishedthisstepyoushouldarriveontoCura’smainscreenasshown in step 4.
5. Follow the Instructions on the screen and make sure you select what came with or is upgraded on your Printer. The default selection is suitable for a new Ultimaker Original.
6. If you are not sure you have thelatestfirmwaremakesureyou choose; Upgrade to Mar-lin Firmware. Make sure that the USB cable is connected.
7. Cura likes to do a checkup on you machine, with the USB cable connected you can Run checks. You can also skip the checks if you know your machine is functional.
8. With USB cable still connected, the printhead in your Ultimaker will move itself to each corner and at the same time cura will ask you to adjust the height of the bed.
B4. ContinuewizardforUltimakerOriginal
11B3. Configuration wizard Ultimaker Original. InstallingandconfiguringCura
B5. Configurationwizardother3Dprinters
12B2. Configuration wizard other 3D printers. InstallingandconfiguringCura
When you selected the Other on machine selection, you see a list of other pre- de-finedmachinesthoughifyouwanttoworkwiththem,youmightneedtotweakthem to get to their best performance.
You also have to set up a custom profile where tinkering and some hardware knowledgeofyour3Dprinterisrequired.Moreaboutworkingwithcustomprofilesin chapter E starting at page 26.

FIRST TIME STARTING UP
CURA
13
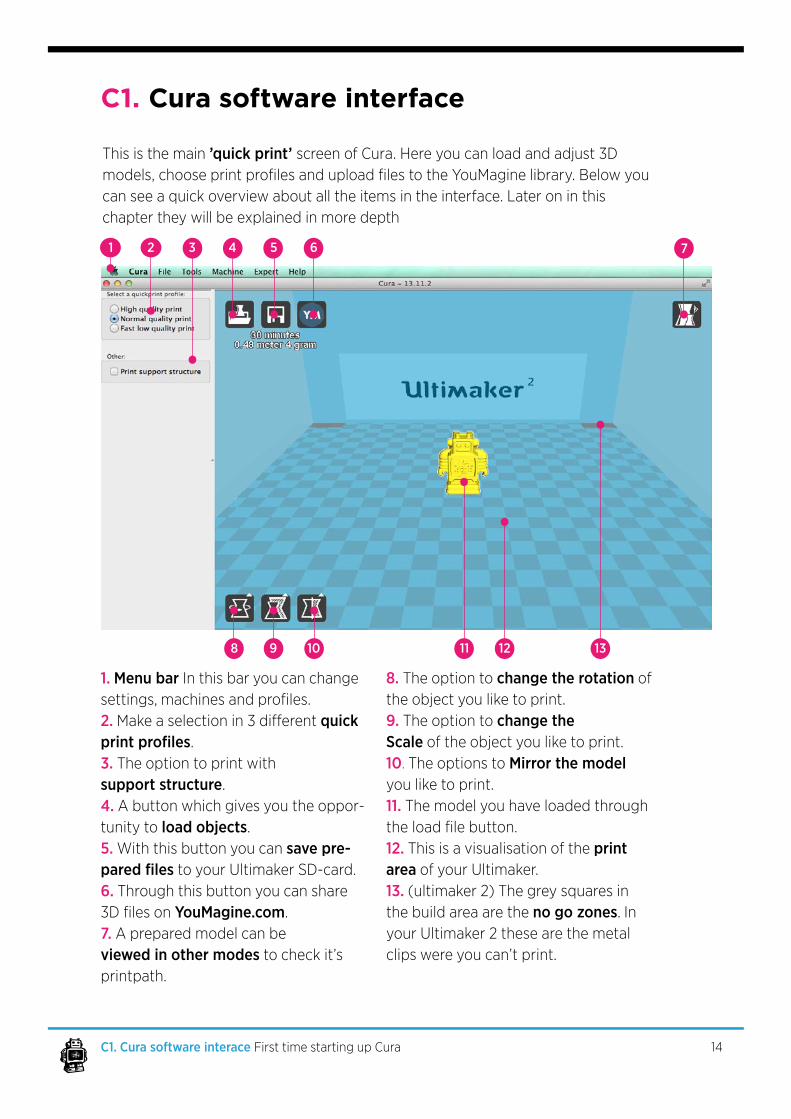
This is the main ’quick print’ screen of Cura. Here you can load and adjust 3D models,chooseprintprofilesanduploadfilestotheYouMaginelibrary.Belowyoucan see a quick overview about all the items in the interface. Later on in this chaptertheywillbeexplainedinmoredepth
1. Menu bar In this bar you can change settings,machinesandprofiles.2. Makeaselectionin3differentquick print profiles.3. The option to print with support structure.4. A button which gives you the oppor-tunity to load objects.5. With this button you can save pre-pared files to your Ultimaker SD-card.6. Through this button you can share 3DfilesonYouMagine.com.7. A prepared model can be viewed in other modes to check it’s printpath.
8. The option to change the rotation of the object you like to print.9. The option to change the Scale of the object you like to print.10. The options to Mirror the model you like to print.11. The model you have loaded through theloadfilebutton.12. This is a visualisation of the print area of your Ultimaker.13. (ultimaker 2) The grey squares in the build area are the no go zones. In your Ultimaker 2 these are the metal clips were you can’t print.
12 13111098
1 2 3 4 5 6 7
C1. Cura software interface
14C1. Cura software interace First time starting up Cura
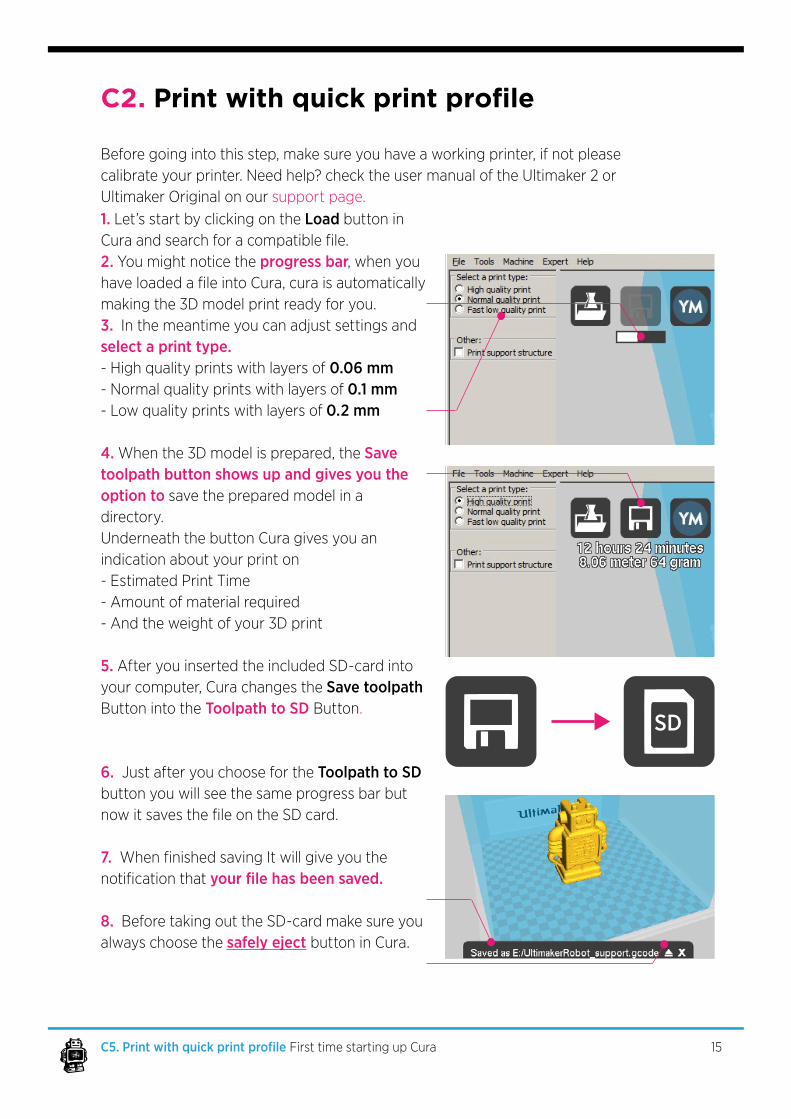
Before going into this step, make sure you have a working printer, if not please calibrate your printer. Need help? check the user manual of the Ultimaker 2 or UltimakerOriginalonoursupport page.
C2. Printwithquickprintprofile
15C5. Print with quick print profile First time starting up Cura
1. Let’s start by clicking on the Load button in Curaandsearchforacompatiblefile.2. You might notice the progress bar, when you haveloadedafileintoCura,curaisautomaticallymaking the 3D model print ready for you. 3. In the meantime you can adjust settings and select a print type.- High quality prints with layers of 0.06 mm- Normal quality prints with layers of 0.1 mm- Low quality prints with layers of 0.2 mm
4. When the 3D model is prepared, the Save toolpath button shows up and gives you the option to save the prepared model in a directory.Underneath the button Cura gives you an indication about your print on- Estimated Print Time - Amount of material required- And the weight of your 3D print
5. After you inserted the included SD-card into your computer, Cura changes the Save toolpath Button into the Toolpath to SD Button.
6. Just after you choose for the Toolpath to SD button you will see the same progress bar but nowitsavesthefileontheSDcard.
7. WhenfinishedsavingItwillgiveyouthenotificationthatyour file has been saved.
8. Before taking out the SD-card make sure you always choose the safely eject button in Cura.
SD
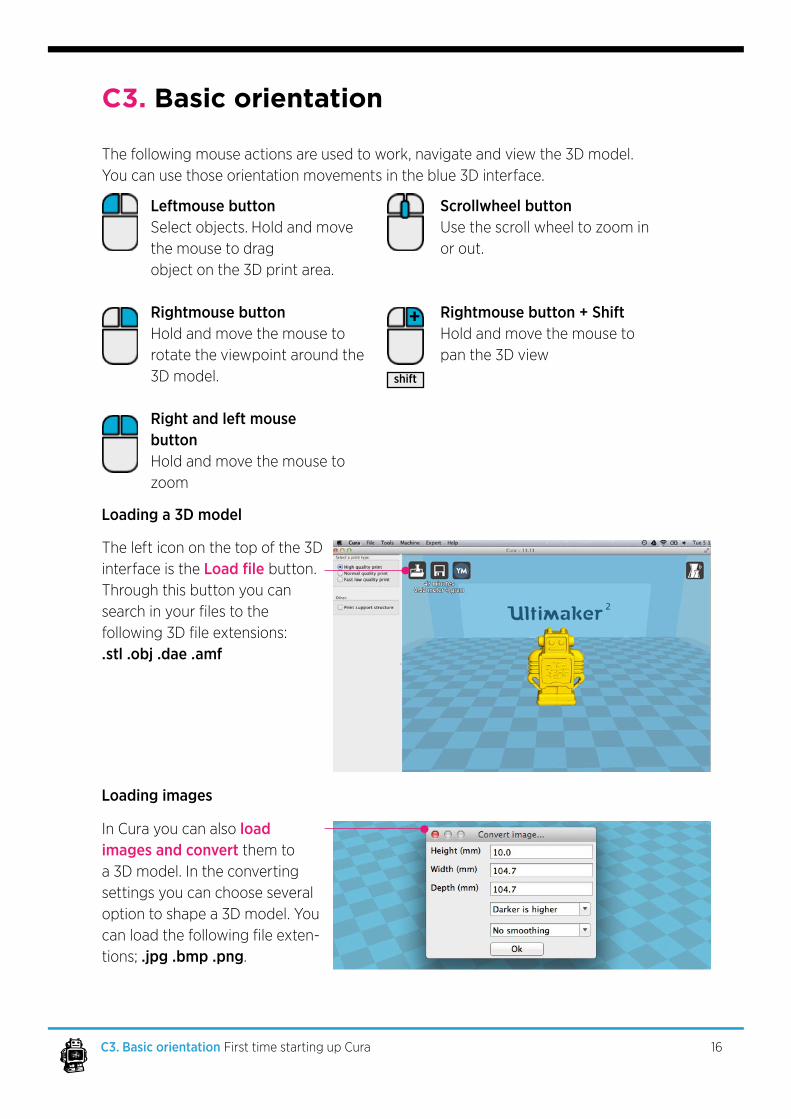
The following mouse actions are used to work, navigate and view the 3D model. You can use those orientation movements in the blue 3D interface.
Loading a 3D model
Loading images
Leftmouse buttonSelect objects. Hold and move the mouse to dragobject on the 3D print area.
Rightmouse buttonHold and move the mouse to rotate the viewpoint around the 3D model.
Right and left mouse buttonHold and move the mouse to zoom
Scrollwheel buttonUsethescrollwheeltozoominor out.
Rightmouse button + ShiftHold and move the mouse to pan the 3D view
+
C3. Basic orientation
16C3. Basic orientation First time starting up Cura
The left icon on the top of the 3D interface is the Load file button.Through this button you can searchinyourfilestothefollowing3Dfileextensions:.stl .obj .dae .amf
In Cura you can also load images and convert them to a 3D model. In the converting settings you can choose several option to shape a 3D model. You canloadthefollowingfileexten-tions; .jpg .bmp .png.
shift
Whenyouhaveloadedyourmodelyoucanchangethesizeororientation,thefollowingstepsexplainyouthebasiconhowyoucanadjustyoumodelonhowyou want it to be.
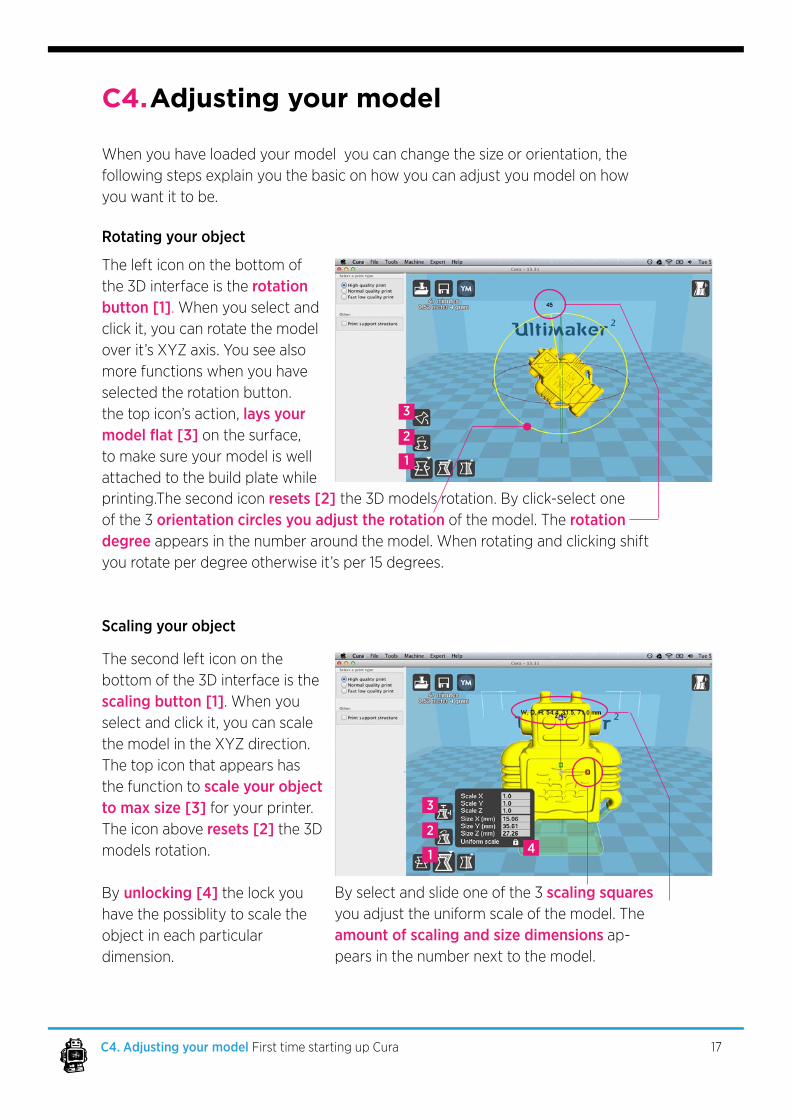
Rotating your object
Scaling your object
printing.The second icon resets [2] the 3D models rotation. By click-select one of the 3 orientation circles you adjust the rotation of the model. The rotation degree appears in the number around the model. When rotating and clicking shift you rotate per degree otherwise it’s per 15 degrees.
By select and slide one of the 3 scaling squares you adjust the uniform scale of the model. The amount of scaling and size dimensions ap-pearsinthenumbernexttothemodel.
The left icon on the bottom of the 3D interface is the rotation button [1]. When you select and click it, you can rotate the model overit’sXYZaxis.Youseealsomore functions when you have selected the rotation button.the top icon’s action, lays your model flat [3] on the surface, to make sure your model is well attached to the build plate while
The second left icon on the bottom of the 3D interface is the scaling button [1]. When you select and click it, you can scale the model in the XYZ direction. The top icon that appears has the function to scale your object to max size [3] for your printer.The icon above resets [2] the 3D models rotation.
By unlocking [4] the lock you have the possiblity to scale the object in each particular dimension.
1
1
2
2
3
3
4
C4. Adjusting your model
17C4. Adjusting your model First time starting up Cura
18C4. Adjusting your model First time starting up Cura
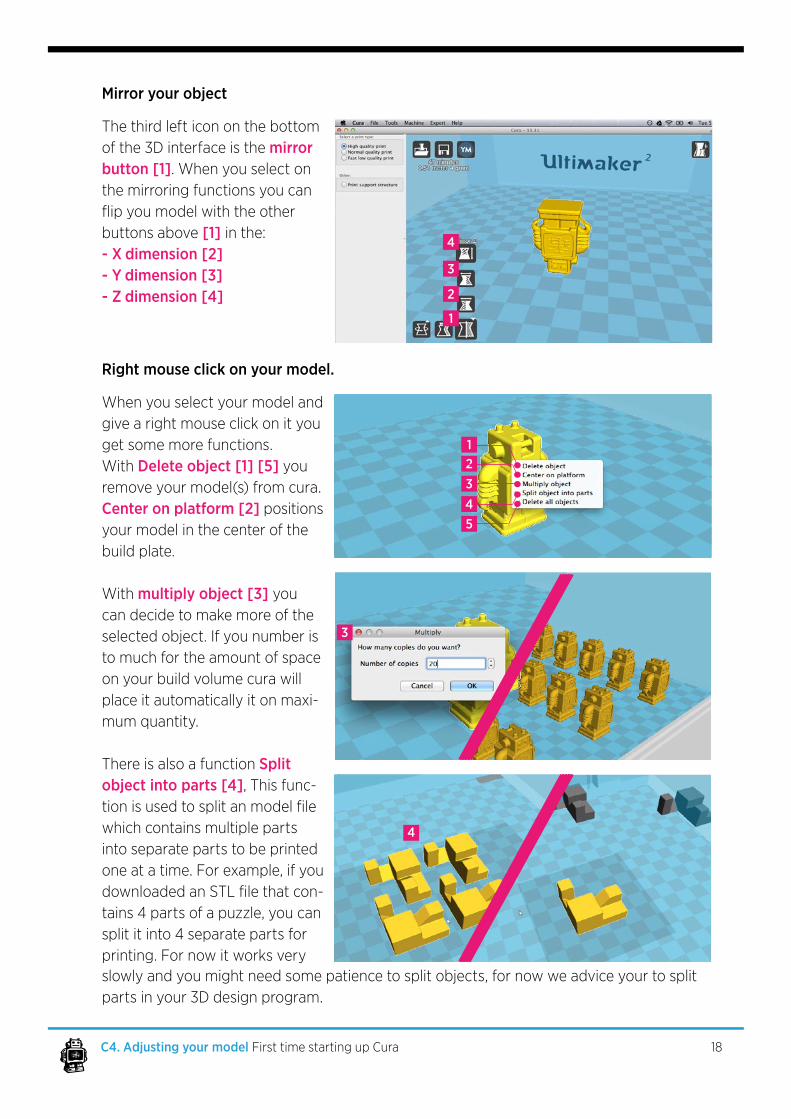
Mirror your object
Right mouse click on your model.
The third left icon on the bottom of the 3D interface is the mirror button [1]. When you select on the mirroring functions you can flipyoumodelwiththeotherbuttons above [1] in the: - X dimension [2]- Y dimension [3]- Z dimension [4]
When you select your model and give a right mouse click on it you get some more functions. With Delete object [1] [5] you remove your model(s) from cura. Center on platform [2] positions your model in the center of the build plate.
With multiply object [3] you can decide to make more of the selected object. If you number is to much for the amount of space on your build volume cura will placeitautomaticallyitonmaxi-mum quantity.
There is also a function Split object into parts [4], This func-tionisusedtosplitanmodelfilewhich contains multiple parts into separate parts to be printed oneatatime.Forexample,ifyoudownloadedanSTLfilethatcon-tains4partsofapuzzle,youcansplit it into 4 separate parts for printing. For now it works very
1
1
4
45
2
2
3
3
3
4
slowly and you might need some patience to split objects, for now we advice your to split parts in your 3D design program.
With the development of the Ultimaker 2 we decided that the print should know what kind of material it has. That’s why when you insert material in your Ultimaker 2 that you also should tell what material it is going to use. The printer adjustitssettingstothematerialrequirements,inthiswayprintfiles(gcode’s)became material independent and can be easier shared with others. That why you alsohadtomakeadecisionearlierintheconfiguration.Thereisalsoaslightdiffe-renceintheCurainterfaceanduserflowwhichwewillexplainonthispage.
Note: most of the images being used are setup for the Ultimaker 2, so keep in mind that the images in this manual may not be the same as the one in your Interface.Wewillmentionwhereyouneedtodotakesomeextraactionorwhereitdiffers.
C5.WereUltimaker2andUltimakerOriginal differinCura
19C2. Were Ultimaker 2 and Ultimaker Original differ in Cura First time starting up Cura
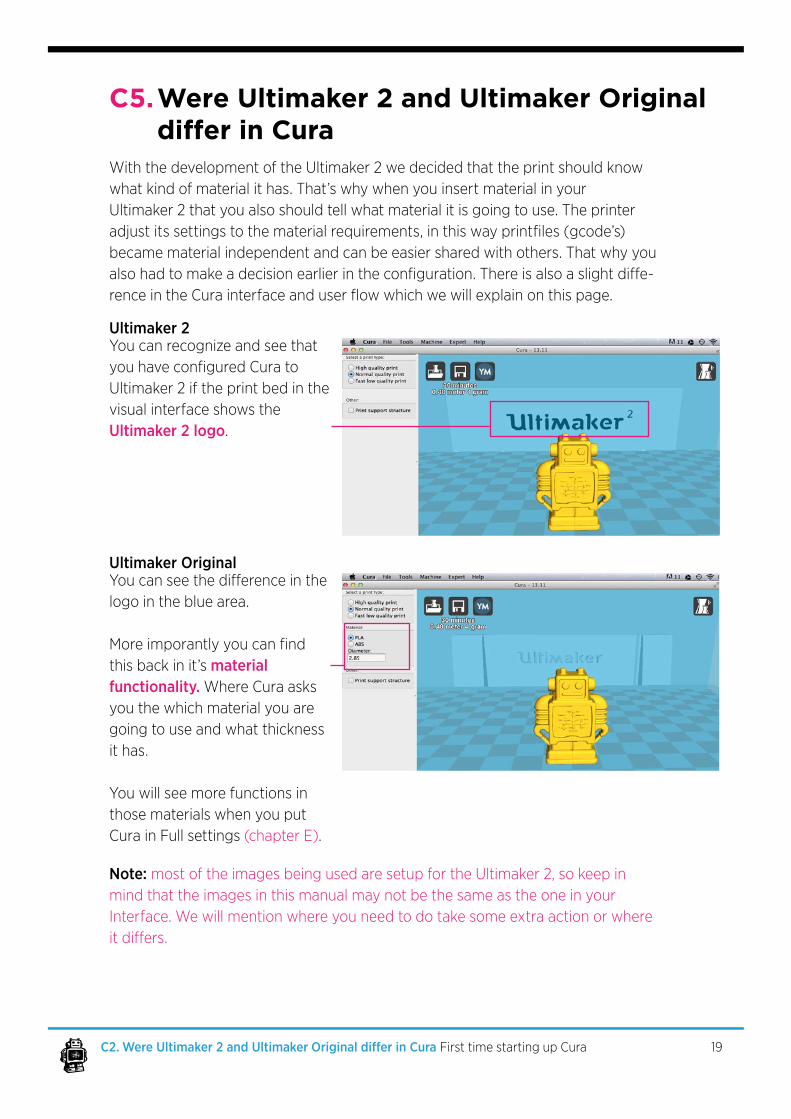
YoucanrecognizeandseethatyouhaveconfiguredCuratoUltimaker 2 if the print bed in the visual interface shows the Ultimaker 2 logo.
Ultimaker 2
Youcanseethedifferenceinthelogo in the blue area.
Moreimporantlyyoucanfindthis back in it’s material functionality. Where Cura asks you the which material you are going to use and what thickness it has.
You will see more functions in those materials when you put Cura in Full settings (chapter E).
Ultimaker Original
20C6. From SD-card to print your file First time starting up Cura
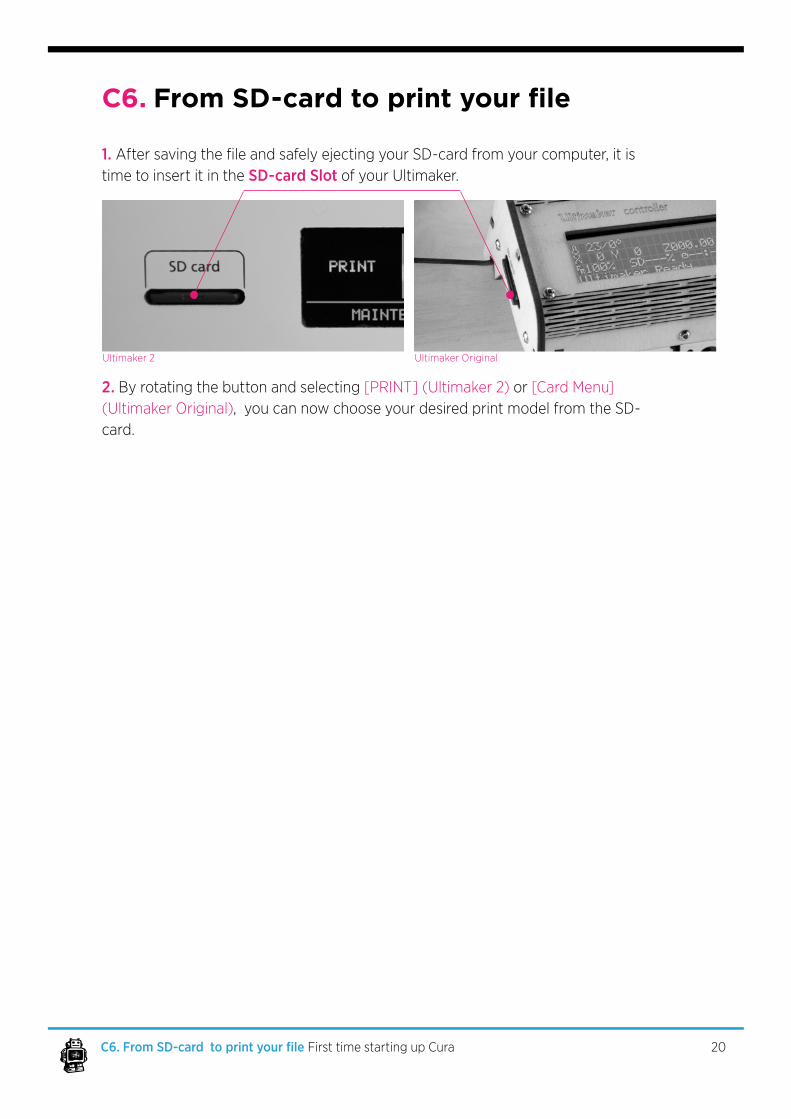
C6. FromSD-cardtoprintyourfile
1. AftersavingthefileandsafelyejectingyourSD-cardfromyourcomputer,itistime to insert it in the SD-card Slot of your Ultimaker.
2. By rotating the button and selecting [PRINT](Ultimaker2)or [CardMenu](UltimakerOriginal), you can now choose your desired print model from the SD-card.
Ultimaker 2 UltimakerOriginal

YouMagine.comand sharing with
CURA
21
22D1. From YouMagine to load file Cura YouMagine and sharing with Cura
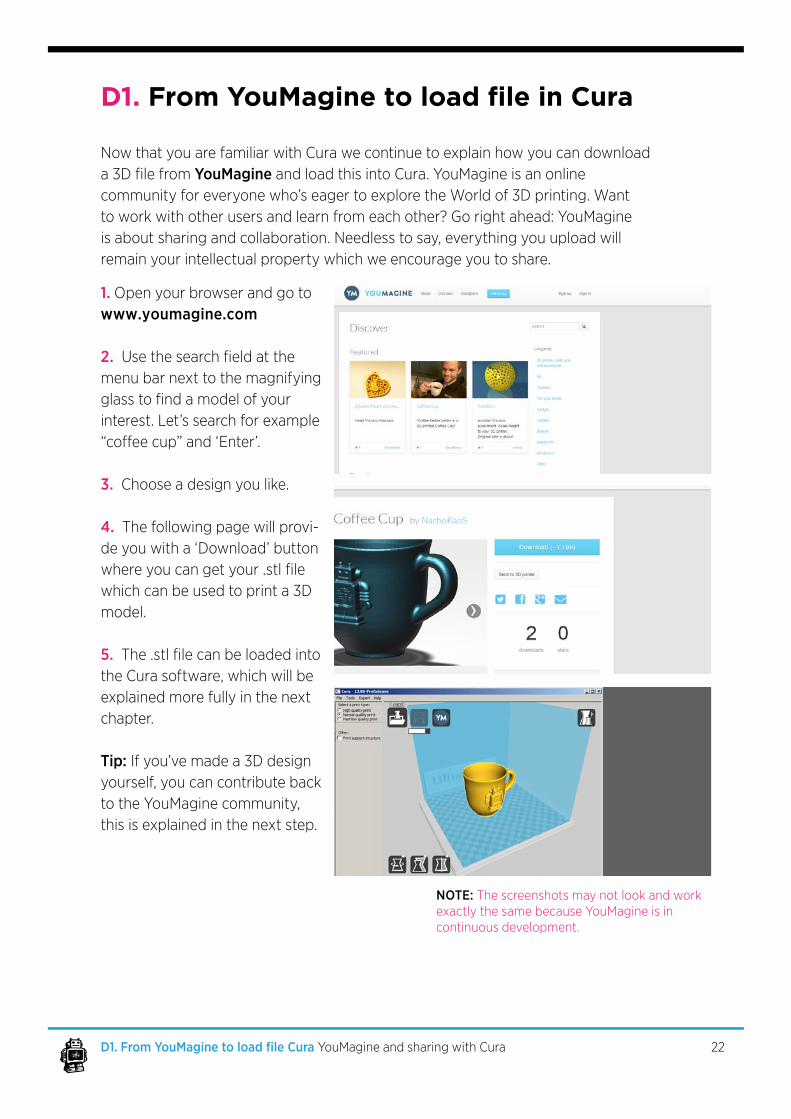
D1.FromYouMaginetoloadfileinCura
1. Openyourbrowserandgotow w w . y o u m a g i n e . c o m
2. Usethesearchfieldatthemenubarnexttothemagnifyingglasstofindamodelofyourinterest.Let’ssearchforexample“coffeecup”and‘Enter’.
3. Choose a design you like.
4. The following page will provi-de you with a ‘Download’ button whereyoucangetyour.stlfilewhich can be used to print a 3D model. 5. The.stlfilecanbeloadedintothe Cura software, which will be explainedmorefullyinthenextchapter.
Tip: If you’ve made a 3D design yourself, you can contribute back to the YouMagine community, thisisexplainedinthenextstep.
NowthatyouarefamiliarwithCurawecontinuetoexplainhowyoucandownloada3DfilefromYouMagine and load this into Cura. YouMagine is an online communityforeveryonewho’seagertoexploretheWorldof3Dprinting.Wantto work with other users and learn from each other? Go right ahead: YouMagine is about sharing and collaboration. Needless to say, everything you upload will remain your intellectual property which we encourage you to share.
NOTE: The screenshots may not look and work exactlythesamebecauseYouMagineisincontinuous development.
D2. Upload from Cura to Youmagine.com YouMagine and sharing with Cura
D2. Upload from Cura to YouMagine.com
23
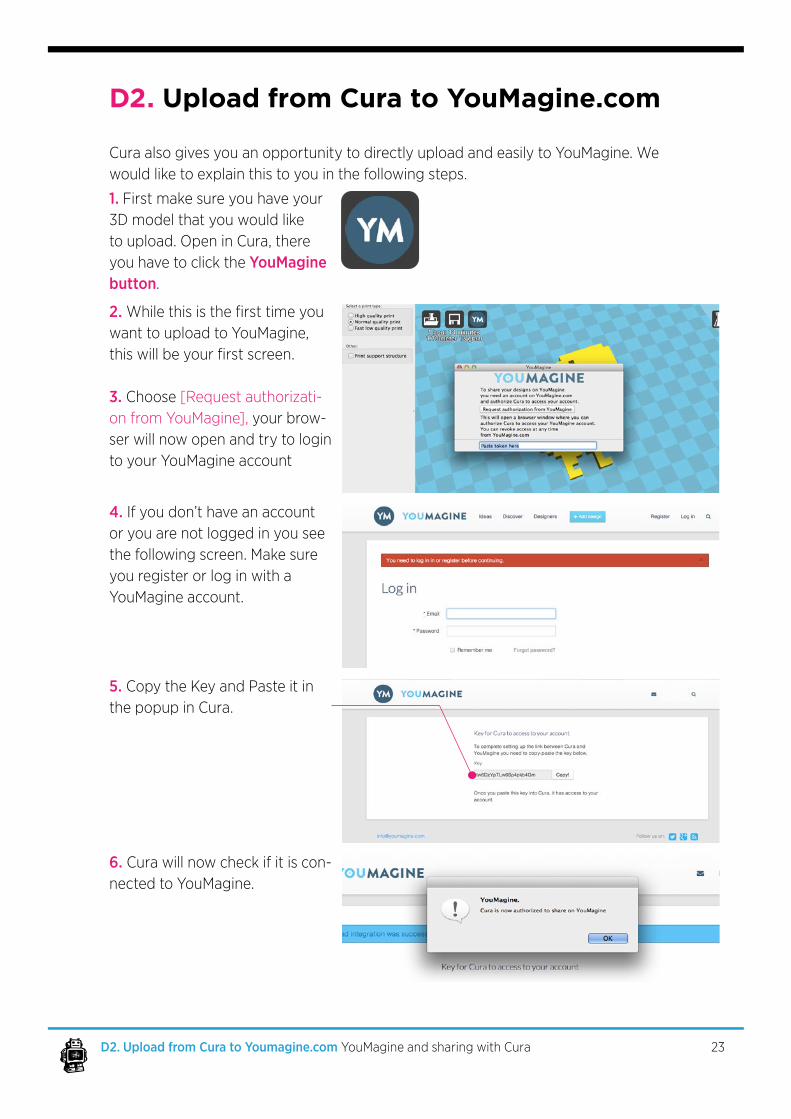
Cura also gives you an opportunity to directly upload and easily to YouMagine. We wouldliketoexplainthistoyouinthefollowingsteps.
1. First make sure you have your 3D model that you would like toupload.OpeninCura,thereyou have to click the YouMagine button.
2. Whilethisisthefirsttimeyouwant to upload to YouMagine, thiswillbeyourfirstscreen.
3. Choose [Requestauthorizati-onfromYouMagine],your brow-ser will now open and try to login to your YouMagine account
4. If you don’t have an account or you are not logged in you see the following screen. Make sure you register or log in with a YouMagine account.
5. Copy the Key and Paste it in the popup in Cura.
6. Cura will now check if it is con-nected to YouMagine.
24D2. Upload from Cura to YouMagine.com YouMagine and sharing with Cura
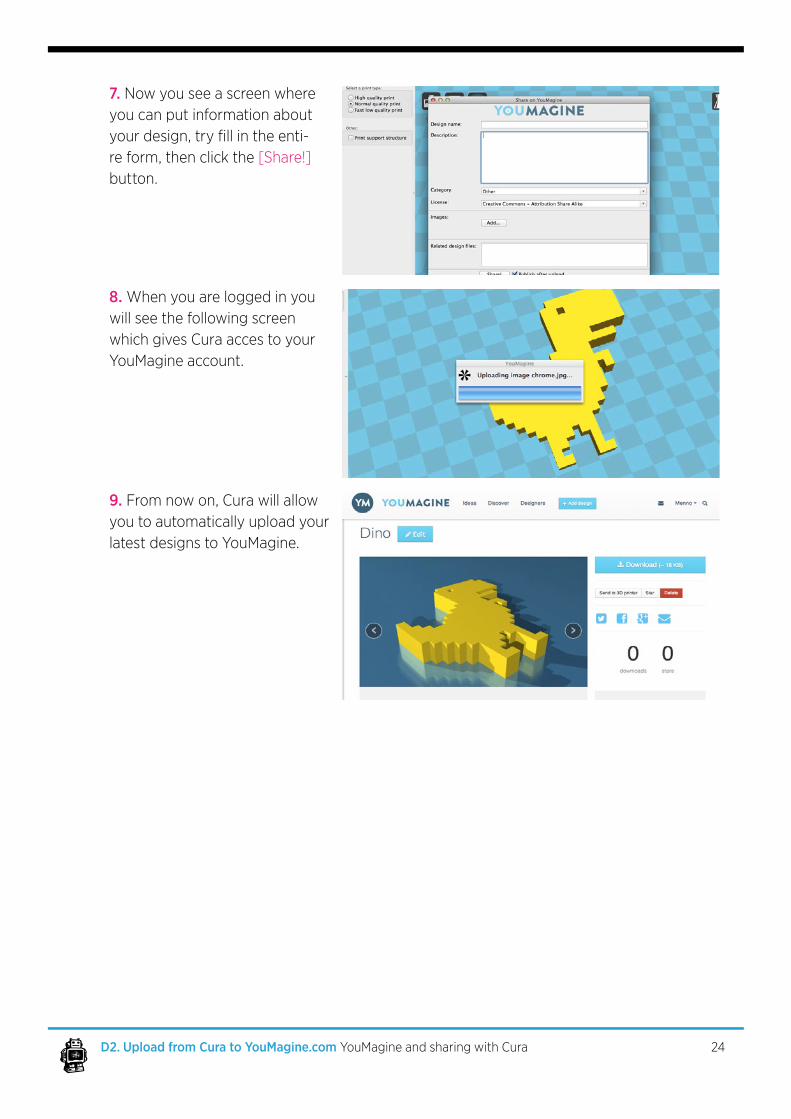
7. Now you see a screen where you can put information about yourdesign,tryfillintheenti-re form, then click the [Share!]button.
8. When you are logged in you will see the following screen which gives Cura acces to your YouMagine account.
9. From now on, Cura will allow you to automatically upload your latest designs to YouMagine.
THE USE OF FULL SETTINGS
ANDDUALEXTRUSION
25

E1. Switch and use of full settings
26E1. Upload from Cura to YouMagine.com. Theuseoffullsettingsanddualextrusion
1. First go in the menu bar to Expertand select Switch to Full settings.Note: WhenyourCuraisconfiguredtoUltimakerOriginalyouhaveafourthtab, start/end-Gcode, were you can change the begin and end process of
yourprintfiles.
2. You can see that you have morefeaturesin3differenttabs:Basic, Advanced and Plugins.
The height of each layer [1]. For print quality and printing time this is the most important set-ting. Usual settings are 0.2mm for a low quality print. 0.1mm for a medium quality print. 0.06mm for a high quality print. And 0.02mm for an ultra-high quality print.
The thickness of the side shells [2], when printing a simple cube, this is the thickness of the side walls. Increasing it improves the strength of the part.
Retraction [3] is pulling the filamentbackwhenmovingover a gap in the print. This reduces the amount of thin lines between printed parts. These thin lines are called strings. Retraction is usually always enabled, unless you want to print faster or are printing with a material that does not allow retraction. Some models don’t require retraction,thisvaseforexample,becausetherearenogaps.
WithCuraweaimforaverysimpleandfriendlyexperienceforourusers.Themoreexperiencedyoubecomewith3Dprintingandoursoftwarethemorespecificyoumightwanttoworkintheproductionofa3Dprint.Morespecificsettings can al be managed through a full setting function we included in the software.Wewillexplainyouthisinthefollowingsteps.
Basic settings: Quality
123
Model from YouMagineVase by Marrit
Model from YouMagineFruit bowl by NachoKaoS
27E1. Upload from Cura to YouMagine.com. Theuseoffullsettingsanddualextrusion
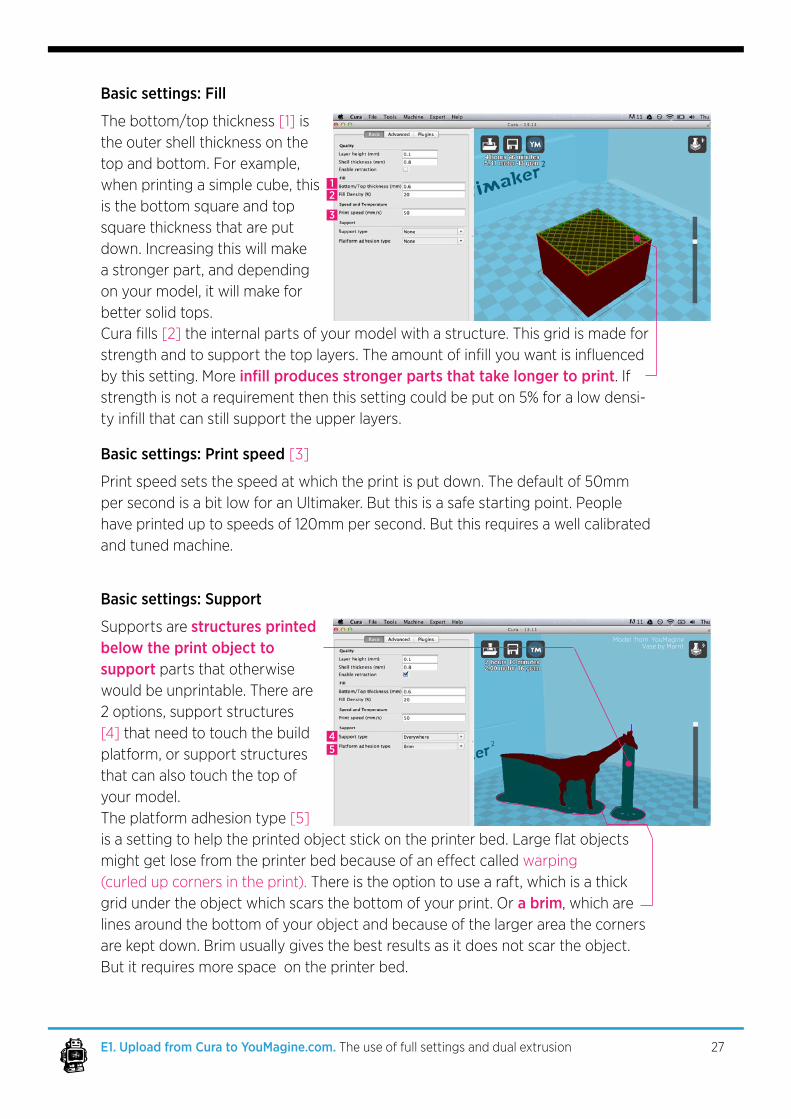
The bottom/top thickness [1] is the outer shell thickness on the topandbottom.Forexample,when printing a simple cube, this is the bottom square and top square thickness that are put down. Increasing this will make a stronger part, and depending on your model, it will make for better solid tops.
Supports are structures printed below the print object to support parts that otherwise would be unprintable. There are 2 options, support structures [4] that need to touch the build platform, or support structures that can also touch the top of your model.The platform adhesion type[5] isasettingtohelptheprintedobjectstickontheprinterbed.Largeflatobjectsmightgetlosefromtheprinterbedbecauseofaneffectcalledwarping (curled up corners in the print). There is the option to use a raft, which is a thick gridundertheobjectwhichscarsthebottomofyourprint.Or a brim, which are lines around the bottom of your object and because of the larger area the corners are kept down. Brim usually gives the best results as it does not scar the object. But it requires more space on the printer bed.
Print speed sets the speed at which the print is put down. The default of 50mm per second is a bit low for an Ultimaker. But this is a safe starting point. People have printed up to speeds of 120mm per second. But this requires a well calibrated and tuned machine.
Basic settings: Fill
Basic settings: Support
Basic settings: Print speed [3]
12
4
3
5
Curafills[2] the internal parts of your model with a structure. This grid is made for strengthandtosupportthetoplayers.Theamountofinfillyouwantisinfluencedby this setting. More infill produces stronger parts that take longer to print. If strength is not a requirement then this setting could be put on 5% for a low densi-tyinfillthatcanstillsupporttheupperlayers.
Model from YouMagineVase by Marrit
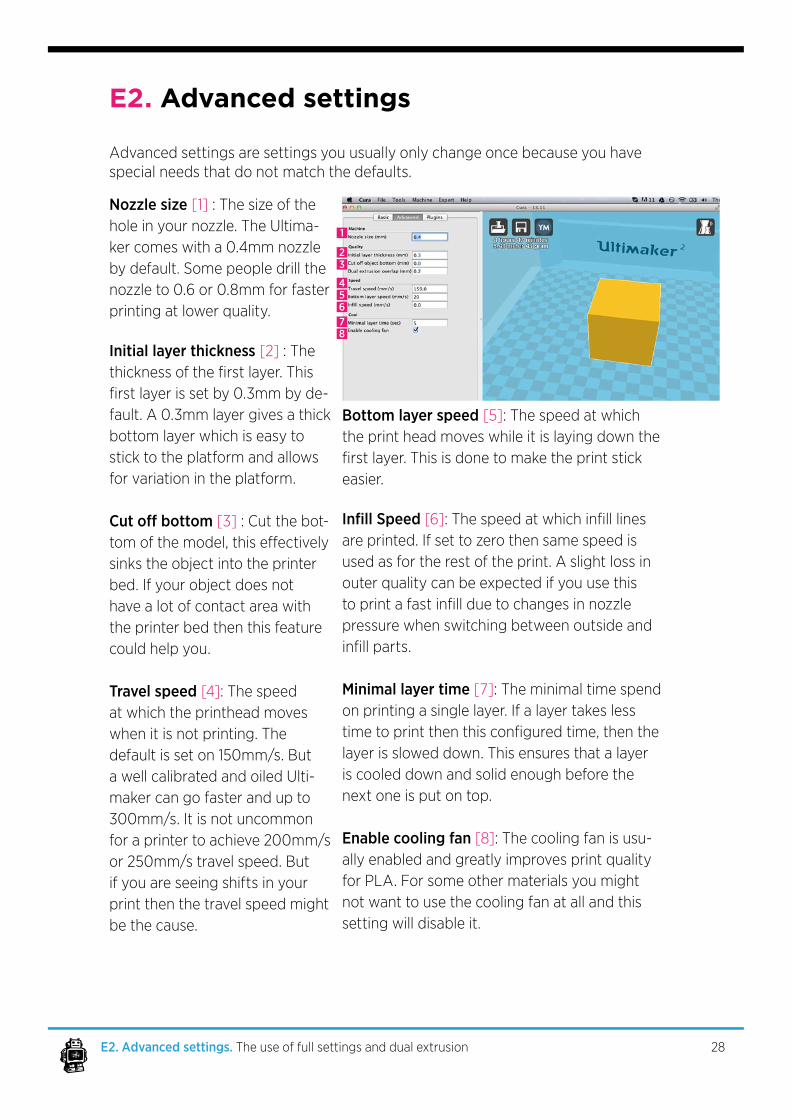
Bottom layer speed [5]: The speed at which the print head moves while it is laying down the firstlayer.Thisisdonetomaketheprintstickeasier.
Infill Speed [6]:Thespeedatwhichinfilllinesareprinted.Ifsettozerothensamespeedisused as for the rest of the print. A slight loss in outerqualitycanbeexpectedifyouusethistoprintafastinfillduetochangesinnozzlepressure when switching between outside and infillparts.
Minimal layer time [7]: The minimal time spend on printing a single layer. If a layer takes less timetoprintthenthisconfiguredtime,thenthelayer is slowed down. This ensures that a layer is cooled down and solid enough before the nextoneisputontop.
Enable cooling fan [8]: The cooling fan is usu-ally enabled and greatly improves print quality for PLA. For some other materials you might not want to use the cooling fan at all and this setting will disable it.
Advanced settings are settings you usually only change once because you have special needs that do not match the defaults.
Nozzle size [1]:Thesizeoftheholeinyournozzle.TheUltima-kercomeswitha0.4mmnozzleby default. Some people drill the nozzleto0.6or0.8mmforfasterprinting at lower quality.
Initial layer thickness [2] : The thicknessofthefirstlayer.Thisfirstlayerissetby0.3mmbyde-fault. A 0.3mm layer gives a thick bottom layer which is easy to stick to the platform and allows for variation in the platform.
Cut off bottom [3]: Cut the bot-tomofthemodel,thiseffectivelysinks the object into the printer bed. If your object does not have a lot of contact area with the printer bed then this feature could help you.
Travel speed [4]: The speed at which the printhead moves when it is not printing. The default is set on 150mm/s. But a well calibrated and oiled Ulti-maker can go faster and up to 300mm/s. It is not uncommon for a printer to achieve 200mm/s or 250mm/s travel speed. But if you are seeing shifts in your print then the travel speed might be the cause.
E2. Advanced settings
28E2. Advanced settings. Theuseoffullsettingsanddualextrusion
1
23
45678
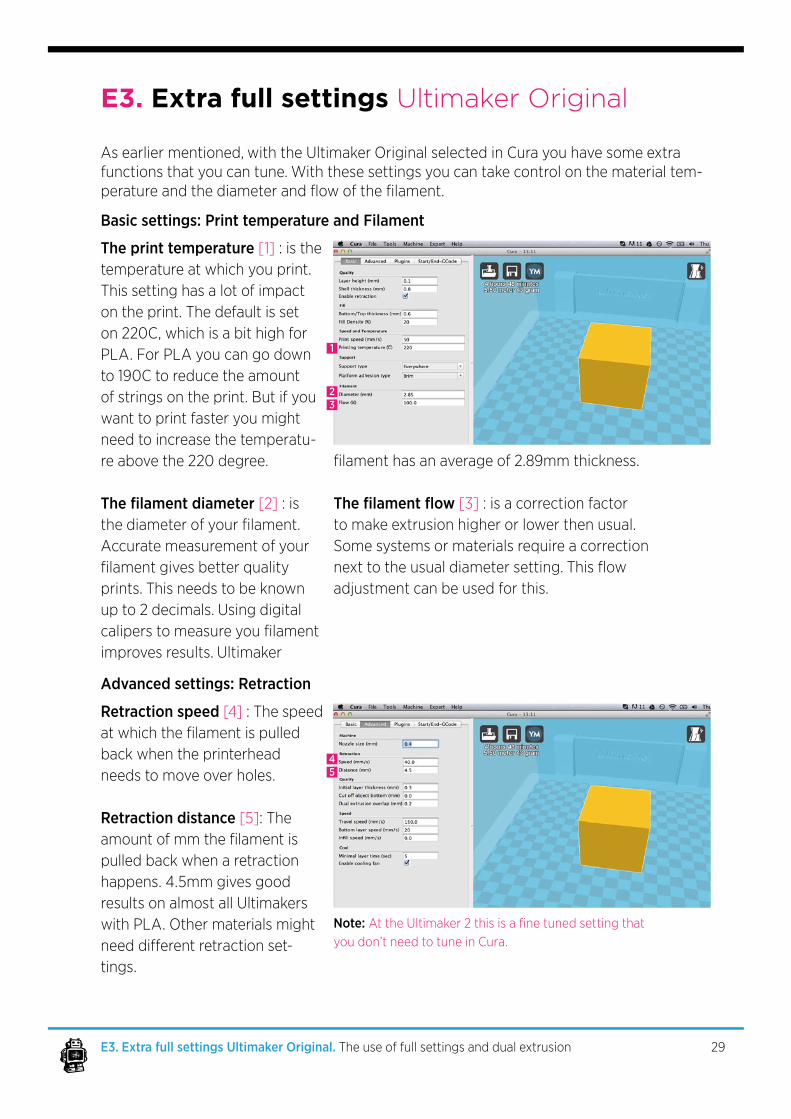
The print temperature [1]: is the temperature at which you print. This setting has a lot of impact on the print. The default is set on 220C, which is a bit high for PLA. For PLA you can go down to 190C to reduce the amount of strings on the print. But if you want to print faster you might need to increase the temperatu-re above the 220 degree. The filament diameter[2]: is thediameterofyourfilament.Accurate measurement of your filamentgivesbetterqualityprints. This needs to be known up to 2 decimals. Using digital caliperstomeasureyoufilamentimproves results. Ultimaker
filamenthasanaverageof2.89mmthickness.
The filament flow [3]: is a correction factor tomakeextrusionhigherorlowerthenusual.Some systems or materials require a correction nexttotheusualdiametersetting.Thisflowadjustment can be used for this.
Asearliermentioned,withtheUltimakerOriginalselectedinCurayouhavesomeextrafunctions that you can tune. With these settings you can take control on the material tem-peratureandthediameterandflowofthefilament.
Basic settings: Print temperature and Filament
Advanced settings: Retraction
1
23
E3. Extra full settings Ultimaker Original
29E3. Extra full settings Ultimaker Original. Theuseoffullsettingsanddualextrusion
Retraction speed[4]: The speed atwhichthefilamentispulledback when the printerhead needs to move over holes.
Retraction distance[5]: The amountofmmthefilamentispulled back when a retraction happens. 4.5mm gives good results on almost all Ultimakers withPLA.Othermaterialsmightneeddifferentretractionset-tings.
Note: AttheUltimaker2thisisafinetunedsettingthatyou don’t need to tune in Cura.
45

E4. Cura plugins
30E4. Cura plugins. Theuseoffullsettingsanddualextrusion
Since Cura version 12.11 there is support for plugins. This enables people to easily include their own features, without having to modify the source code of Cura or the slicer. Plugins are unavailable in quick print mode, you need to have some experience.Ifyouwanttouseit,clickonthe[FullSettings]mode under [expert] in the menu bar at the top. Check this link/button for the plugins: h t t p : / / w i k i . u l t i m a k e r . c o m / C a t e g o r y : C u r a P l u g i n
In the screenshot above you see a list of plugins (e.g. Skew, Tweak at Z and Wave). These can be enabled by clicking on the arrow down button. The plugin will ap-pearintheEnabledpluginsbox.Thereyoucanconfiguretheplugin.Check on this link for how to write a plugin:h t t p : / / w i k i . u l t i m a k e r . c o m / H o w _ t o _ w r i t e _ a _ C u r a _ p l u g i n

What is Gcode GCode is the generic name for a control language for CNC (or Reprap) machines. It is a way for you to tell the machine to move to various points at a desired speed, controlthespindlespeed,turnonandoffvariouscoolants,andallsortsofotherthings. It is fairly standard, and is a useful tool.More about G-code: h t t p : / / r e p l i c a t . o r g / p r i m e r
Start/End-Gcode The start and end gcode are the startup and end procedure of the print. These piecesofcodeinfluencethestartupprocedureandcanbecustomized.Bydefaultthe printer is heated up, homed to the corner, and the head is primed. Editing this requires knowledge of GCode.
E5. Start/End-GCode for Ultimaker Original
31E5. Start/End-Gcode for Ultimaker Original. Theuseoffullsettingsanddualextrusion
E6. Dual extrusion for Ultimaker Original
32E6. Dual extrusion for Ultimaker Original. Theuseoffullsettingsanddualextrusion
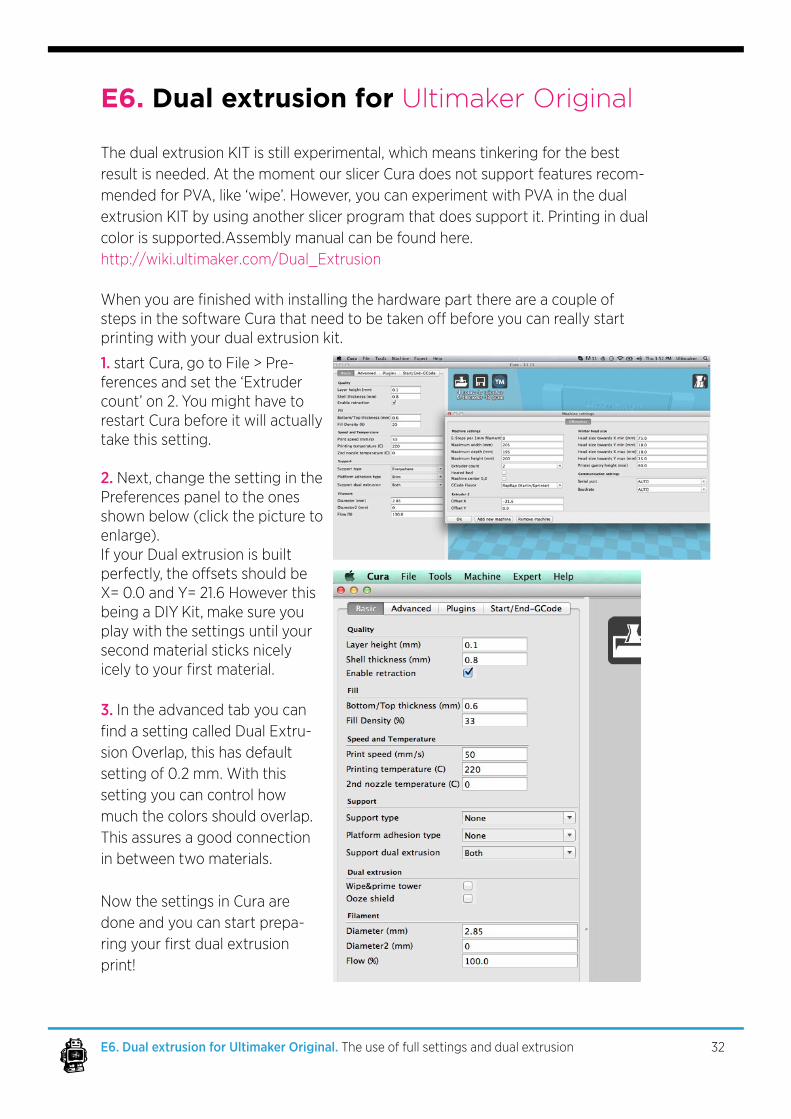
ThedualextrusionKITisstillexperimental,whichmeanstinkeringforthebestresult is needed. At the moment our slicer Cura does not support features recom-mendedforPVA,like‘wipe’.However,youcanexperimentwithPVAinthedualextrusionKITbyusinganotherslicerprogramthatdoessupportit.Printingindualcolor is supported.Assembly manual can be found here. http://wiki.ultimaker.com/Dual_Extrusion WhenyouarefinishedwithinstallingthehardwarepartthereareacoupleofstepsinthesoftwareCurathatneedtobetakenoffbeforeyoucanreallystartprintingwithyourdualextrusionkit.
1. startCura,gotoFile>Pre-ferencesandsetthe‘Extrudercount’ on 2. You might have to restart Cura before it will actually take this setting.
2.Next,changethesettinginthePreferences panel to the ones shown below (click the picture to enlarge).IfyourDualextrusionisbuiltperfectly,theoffsetsshouldbeX= 0.0 and Y= 21.6 However this being a DIY Kit, make sure you play with the settings until your second material sticks nicelyicelytoyourfirstmaterial.
3. In the advanced tab you can findasettingcalledDualExtru-sionOverlap,thishasdefaultsetting of 0.2 mm. With this setting you can control how much the colors should overlap. This assures a good connection in between two materials.
Now the settings in Cura are done and you can start prepa-ringyourfirstdualextrusionprint!
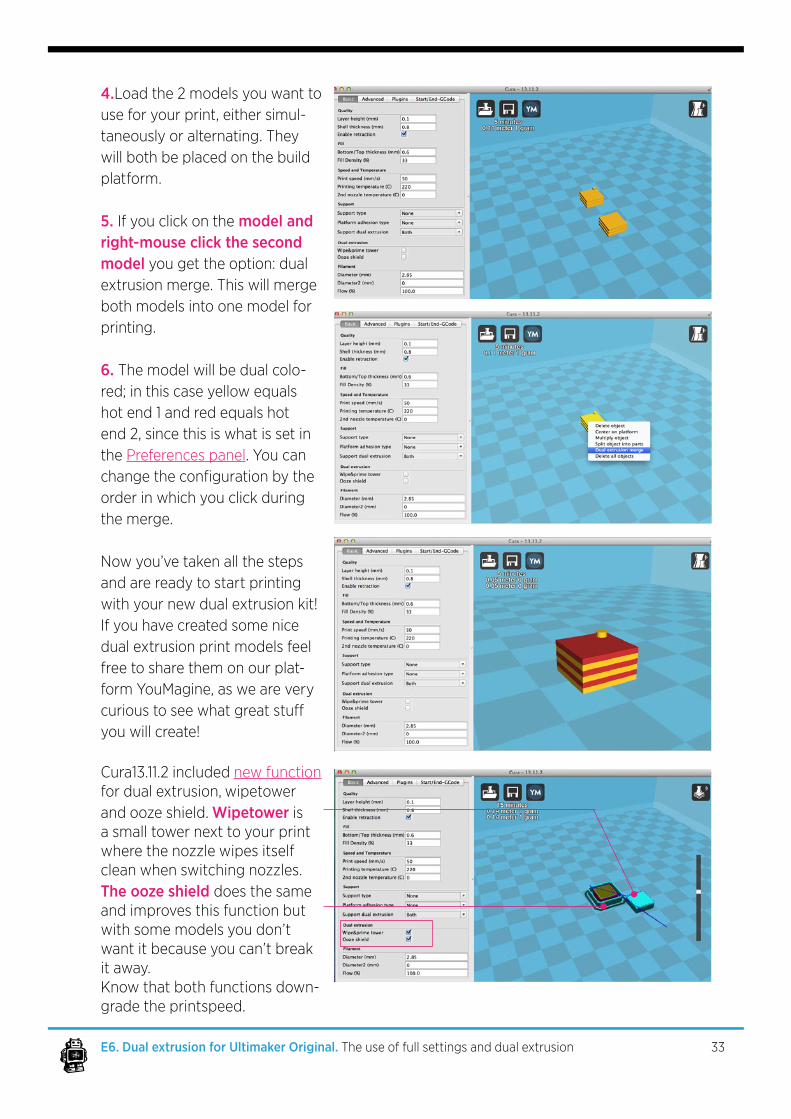
4.Load the 2 models you want to use for your print, either simul-taneously or alternating. They will both be placed on the build platform.
5. If you click on the model and right-mouse click the second model you get the option: dual extrusionmerge.Thiswillmergeboth models into one model for printing. 6. The model will be dual colo-red; in this case yellow equals hot end 1 and red equals hot end 2, since this is what is set in the Preferences panel. You can changetheconfigurationbytheorder in which you click during the merge.
Now you’ve taken all the steps and are ready to start printing withyournewdualextrusionkit!If you have created some nice dualextrusionprintmodelsfeelfree to share them on our plat-form YouMagine, as we are very curioustoseewhatgreatstuffyou will create!
Cura13.11.2 included new function fordualextrusion,wipetowerandoozeshield.Wipetower is asmalltowernexttoyourprintwherethenozzlewipesitselfcleanwhenswitchingnozzles. The ooze shield does the same and improves this function but with some models you don’t want it because you can’t break it away. Know that both functions down- grade the printspeed.
33E6. Dual extrusion for Ultimaker Original. Theuseoffullsettingsanddualextrusion
E7. Expertconfigurations
34E7. Expert configurations. Theuseoffullsettingsanddualextrusion
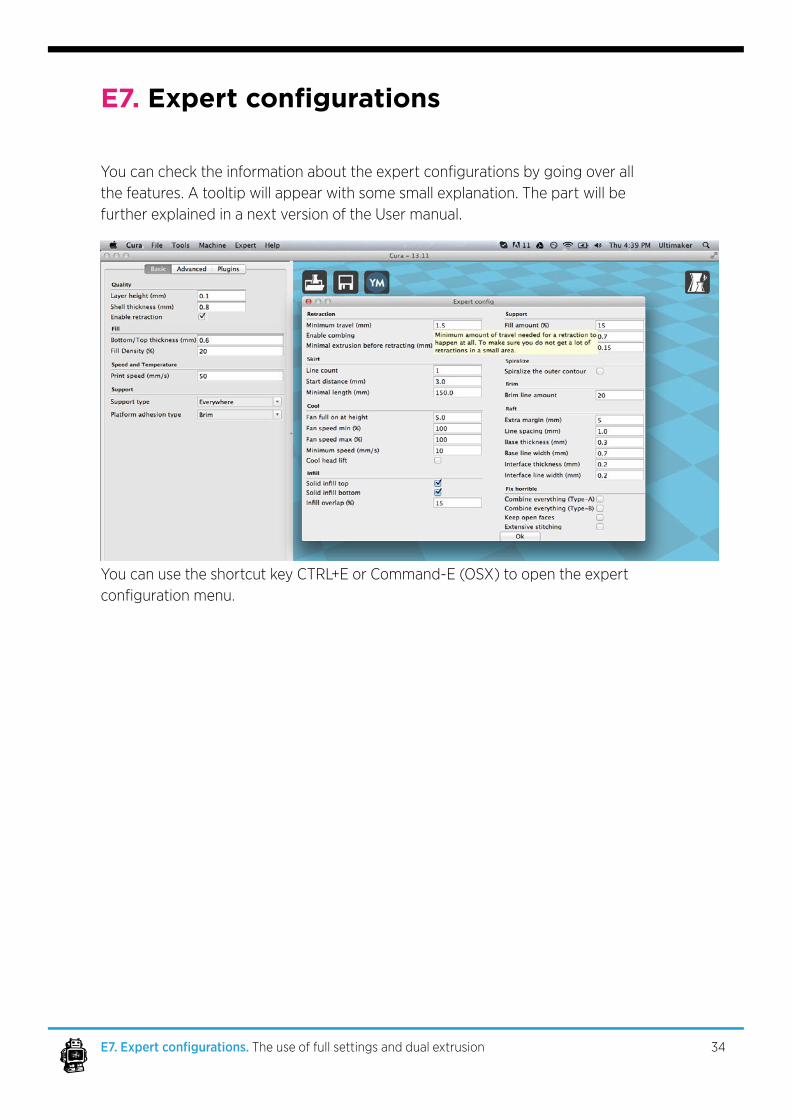
Youcanchecktheinformationabouttheexpertconfigurationsbygoingoverallthefeatures.Atooltipwillappearwithsomesmallexplanation.ThepartwillbefurtherexplainedinanextversionoftheUsermanual.
YoucanusetheshortcutkeyCTRL+EorCommand-E(OSX)toopentheexpertconfigurationmenu.
MACHINE SETTINGS
ANDUPDATES
35
F1. Updating Cura
36F1. Updating Cura. Machine settings and Updates
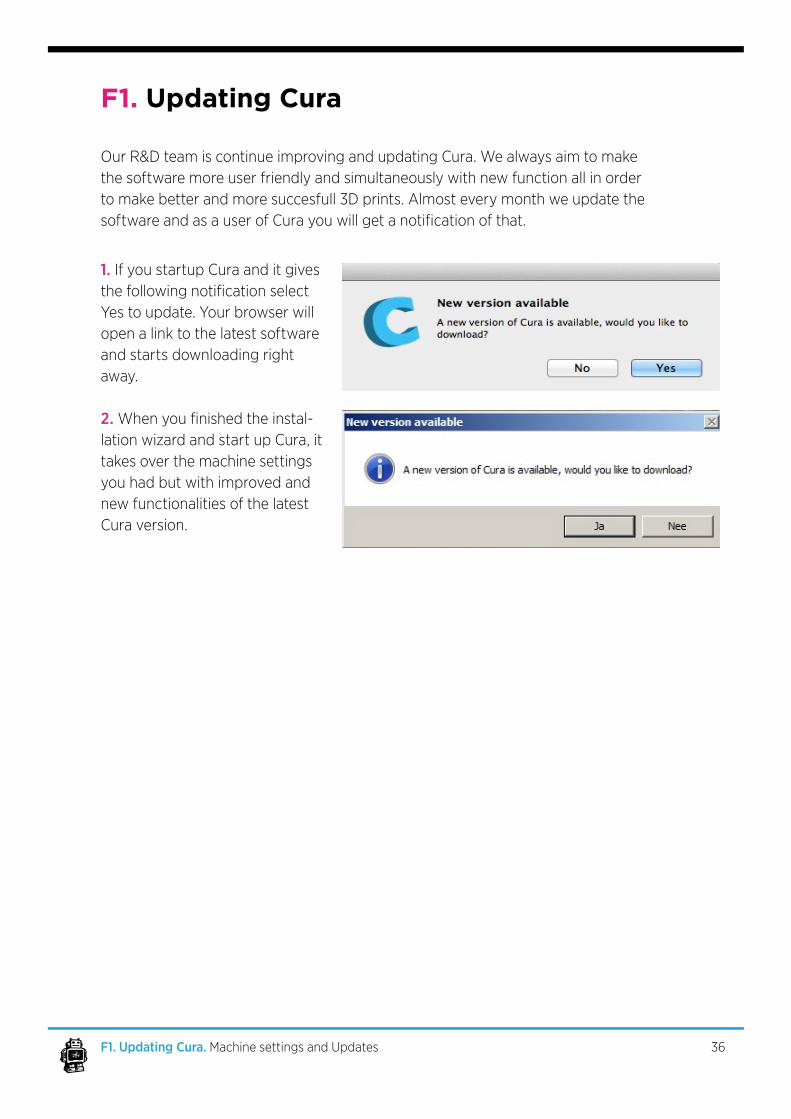
1. If you startup Cura and it gives thefollowingnotificationselectYes to update. Your browser will open a link to the latest software and starts downloading right away.
2. Whenyoufinishedtheinstal-lationwizardandstartupCura,ittakes over the machine settings you had but with improved and new functionalities of the latest Cura version.
OurR&DteamiscontinueimprovingandupdatingCura.Wealwaysaimtomakethe software more user friendly and simultaneously with new function all in order to make better and more succesfull 3D prints. Almost every month we update the softwareandasauserofCurayouwillgetanotificationofthat.
F2. UpdatingfirmwareofyourUltimaker
37F2. Updating firmware of your Ultimaker. Machine settings and Updates
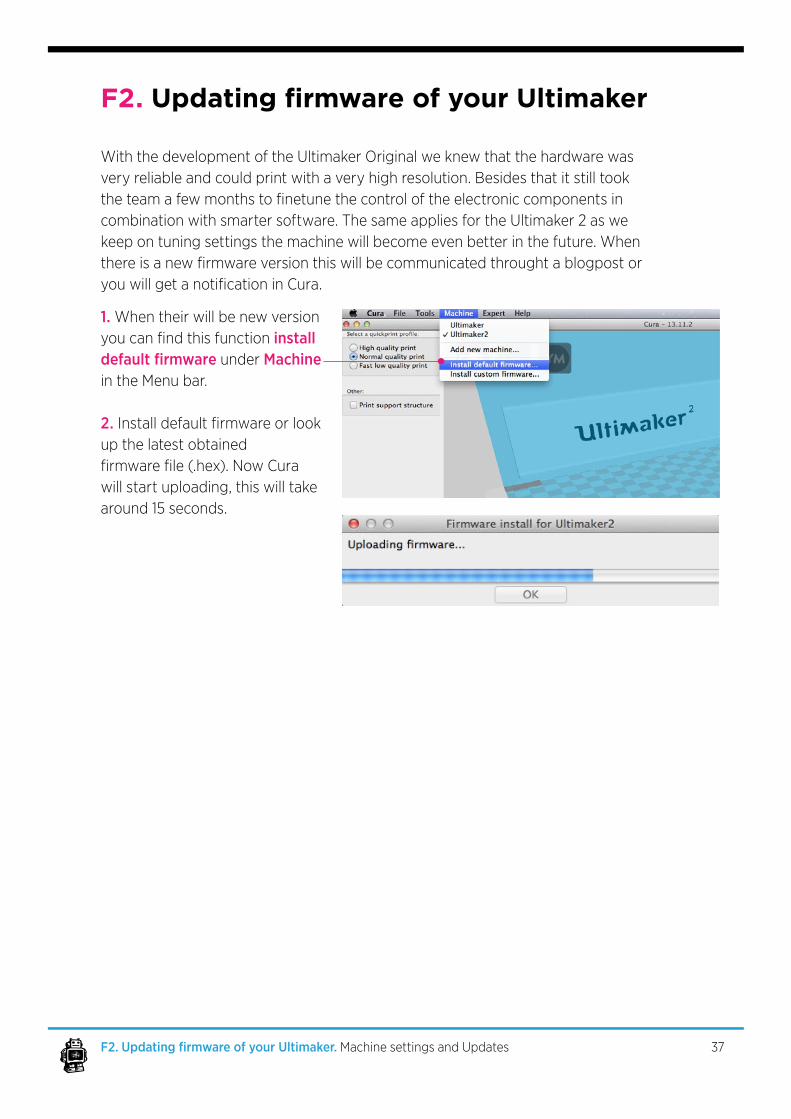
1. When their will be new version youcanfindthisfunctioninstall default firmware under Machine in the Menu bar.
2. Installdefaultfirmwareorlookup the latest obtainedfirmwarefile(.hex).NowCurawill start uploading, this will take around 15 seconds.
WiththedevelopmentoftheUltimakerOriginalweknewthatthehardwarewasvery reliable and could print with a very high resolution. Besides that it still took theteamafewmonthstofinetunethecontroloftheelectroniccomponentsincombination with smarter software. The same applies for the Ultimaker 2 as we keep on tuning settings the machine will become even better in the future. When thereisanewfirmwareversionthiswillbecommunicatedthroughtablogpostoryouwillgetanotificationinCura.
F3. Add a new 3D printer (machine)
38F3. Add a new 3D printer (machine). Machine settings and Updates
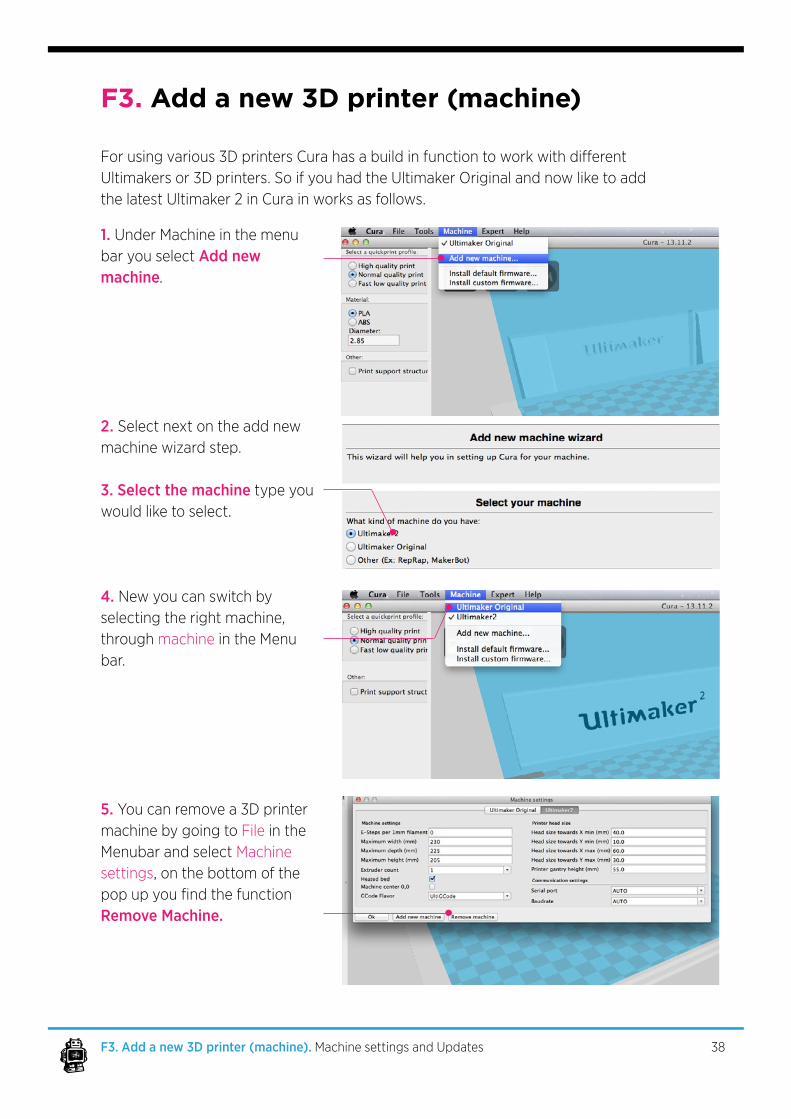
1. Under Machine in the menu bar you select Add new machine.
2. Selectnextontheaddnewmachinewizardstep.
3. Select the machine type you would like to select.
4. New you can switch by selecting the right machine, through machine in the Menu bar.
5. You can remove a 3D printer machine by going to File in the Menubar and select Machine settings, on the bottom of the popupyoufindthefunctionRemove Machine.
Forusingvarious3DprintersCurahasabuildinfunctiontoworkwithdifferentUltimakersor3Dprinters.SoifyouhadtheUltimakerOriginalandnowliketoaddthe latest Ultimaker 2 in Cura in works as follows.
F4. Preferences of Cura
39F4. Preferences of Cura Machine settings and Updates
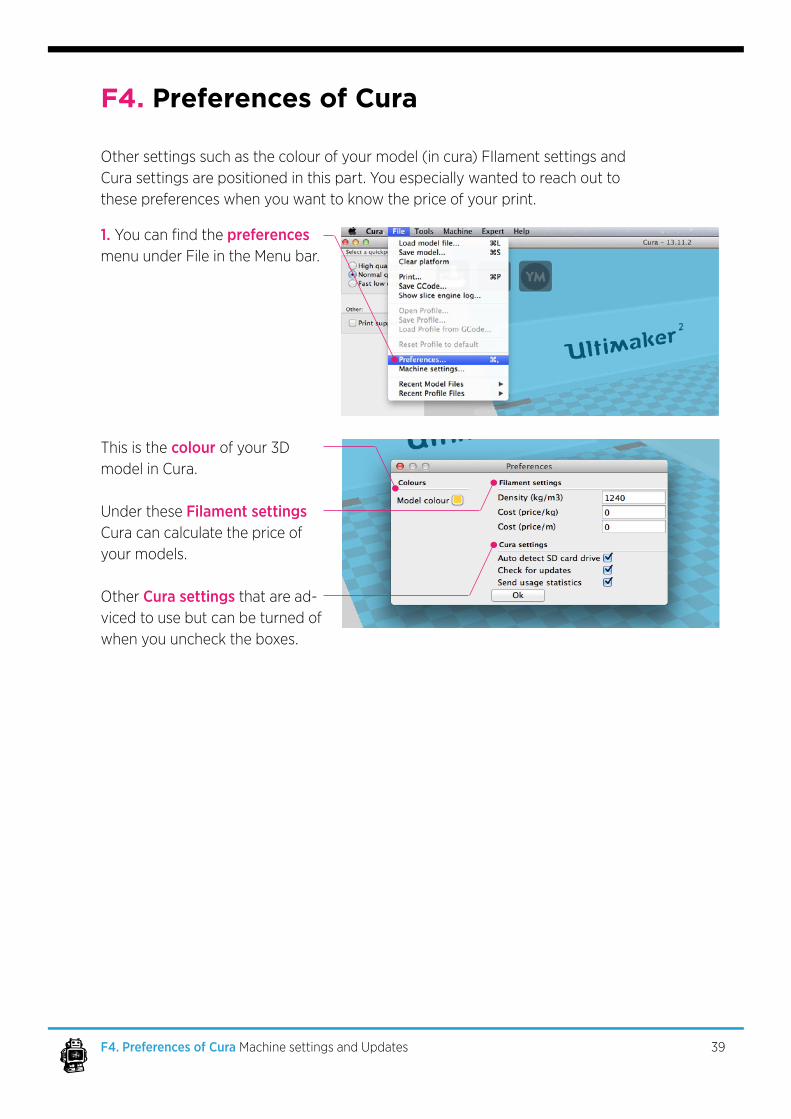
1. Youcanfindthepreferences menu under File in the Menu bar.
This is the colour of your 3D model in Cura.
Under these Filament settings Cura can calculate the price of your models.
OtherCura settings that are ad-viced to use but can be turned of whenyouunchecktheboxes.
Othersettingssuchasthecolourofyourmodel(incura)FIlamentsettingsandCura settings are positioned in this part. You especially wanted to reach out to these preferences when you want to know the price of your print.

F5. Copyprofiletoclipboard
40F5. Copy profile to clipboard. Machine settings and Updates
UnderToolsintheMenubaryouwillfindthefunctionCopyprofiletoclipboard.This function can be used when you would like to send your settings to someone else.YoucanpasteitinaTextarea,likethisyoucanshareorsendittosupport,theforumortosomeone.IfyoucopydoestextandgotoCura,willitautomatically ask you to use these settings.