CSE 30321 – Computer Architecture I – Fall 2011 Lab 02...
7
CSE 30321 – Computer Architecture I – Fall 2011 Lab 02: Procedure Calls in MIPS Assembly – Programming and Performance Total Points: 100 points – due to its complexity, this lab will weight more heavily in your lab average Assigned: September 13, 2011 Due: October 6, 2011 1. Goals Looking back to the course goals, this lab is directly related to Goal #4. Namely, at the end of the semester, you should be able to “explain how code written in (different) high-level languages (like C, Java, C++, Fortran, etc.) can be executed on different microprocessors (i.e. Intel, AMD, etc.) to produce the result intended by the programmer.” More specifically, the primary learning goal for this lab is to become more familiar with how computer hardware allows for the execution of recursive procedure calls. 2. Introduction and Overview For this lab, you will be working with a recursive mergesort function. Mergesort should have been discussed in Fundamentals II, and almost certainly will be (or may already have been) discussed in detail in your data structures class. However, a brief explanation is also included here. Megresort can be used to sort an unordered list. The list is essentially subdivided into smaller and smaller lists, these are sorted, and the lists are then merged back together. An example is shown in Figure 1 below: Figure 1: Graphical example of a mergesort 1 . “Mergesort can sort a file of N elements in N log N time even in the worst case. The prime disadvantage of mergesort is that extra space is required – equivalent to the size of the list (N) – to perform the sort. However, mergesort can be implemented so that it accesses data primarily in a sequential manner (i.e. one item after another). This can be advantageous – i.e. if sorting a linked list, where only sequential accesses are possible.” 2 1 http://upload.wikimedia.org/wikipedia/commons/thumb/e/e6/Merge_sort_algorithm_diagram.svg/500px-Merge_sort_algorithm_diagram.svg.png 2 Paraphrased from: “Algorithms in C” by Robert Sedgewick
Transcript of CSE 30321 – Computer Architecture I – Fall 2011 Lab 02...

CSE 30321 – Computer Architecture I – Fall 2011 Lab 02: Procedure Calls in MIPS Assembly – Programming and Performance Total Points: 100 points – due to its complexity, this lab will weight more heavily in your lab average Assigned: September 13, 2011 Due: October 6, 2011
1. Goals Looking back to the course goals, this lab is directly related to Goal #4. Namely, at the end of the semester, you should be able to “explain how code written in (different) high-level languages (like C, Java, C++, Fortran, etc.) can be executed on different microprocessors (i.e. Intel, AMD, etc.) to produce the result intended by the programmer.” More specifically, the primary learning goal for this lab is to become more familiar with how computer hardware allows for the execution of recursive procedure calls. 2. Introduction and Overview For this lab, you will be working with a recursive mergesort function. Mergesort should have been discussed in Fundamentals II, and almost certainly will be (or may already have been) discussed in detail in your data structures class. However, a brief explanation is also included here. Megresort can be used to sort an unordered list. The list is essentially subdivided into smaller and smaller lists, these are sorted, and the lists are then merged back together. An example is shown in Figure 1 below:
Figure 1: Graphical example of a mergesort1. “Mergesort can sort a file of N elements in N log N time even in the worst case. The prime disadvantage of mergesort is that extra space is required – equivalent to the size of the list (N) – to perform the sort. However, mergesort can be implemented so that it accesses data primarily in a sequential manner (i.e. one item after another). This can be advantageous – i.e. if sorting a linked list, where only sequential accesses are possible.”2 1 http://upload.wikimedia.org/wikipedia/commons/thumb/e/e6/Merge_sort_algorithm_diagram.svg/500px-Merge_sort_algorithm_diagram.svg.png 2 Paraphrased from: “Algorithms in C” by Robert Sedgewick
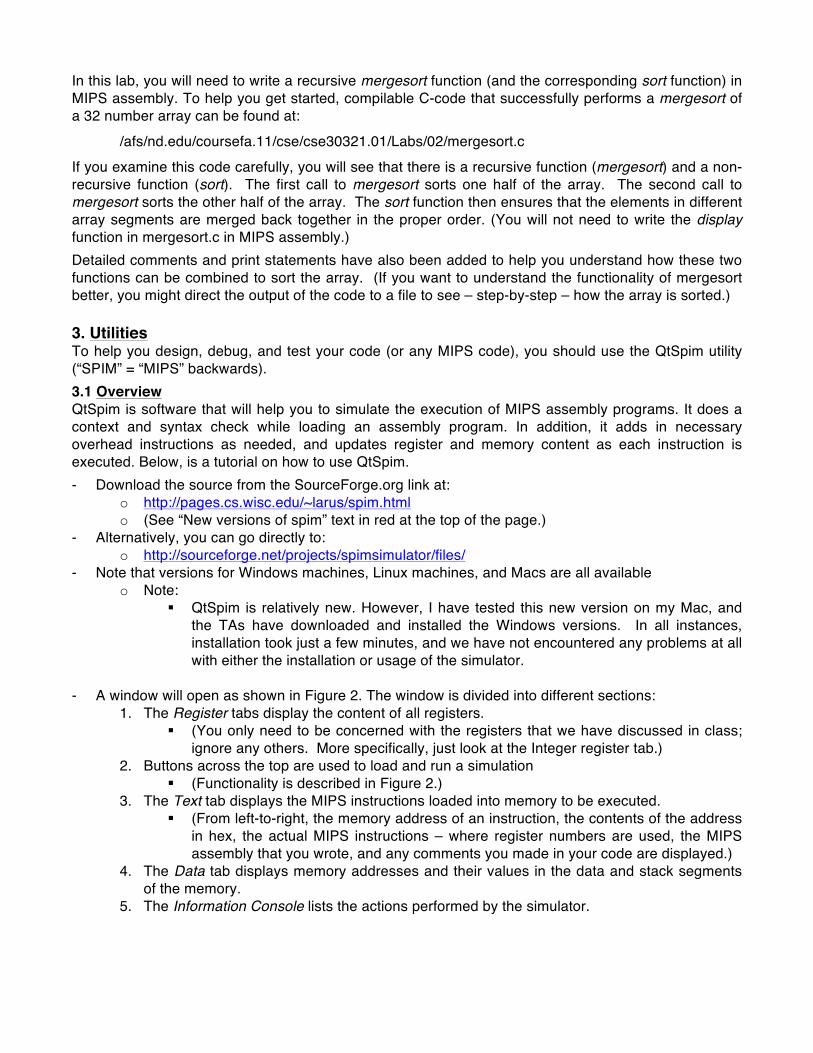
In this lab, you will need to write a recursive mergesort function (and the corresponding sort function) in MIPS assembly. To help you get started, compilable C-code that successfully performs a mergesort of a 32 number array can be found at: /afs/nd.edu/coursefa.11/cse/cse30321.01/Labs/02/mergesort.c If you examine this code carefully, you will see that there is a recursive function (mergesort) and a non-recursive function (sort). The first call to mergesort sorts one half of the array. The second call to mergesort sorts the other half of the array. The sort function then ensures that the elements in different array segments are merged back together in the proper order. (You will not need to write the display function in mergesort.c in MIPS assembly.) Detailed comments and print statements have also been added to help you understand how these two functions can be combined to sort the array. (If you want to understand the functionality of mergesort better, you might direct the output of the code to a file to see – step-by-step – how the array is sorted.) 3. Utilities To help you design, debug, and test your code (or any MIPS code), you should use the QtSpim utility (“SPIM” = “MIPS” backwards). 3.1 Overview QtSpim is software that will help you to simulate the execution of MIPS assembly programs. It does a context and syntax check while loading an assembly program. In addition, it adds in necessary overhead instructions as needed, and updates register and memory content as each instruction is executed. Below, is a tutorial on how to use QtSpim. - Download the source from the SourceForge.org link at:
o http://pages.cs.wisc.edu/~larus/spim.html o (See “New versions of spim” text in red at the top of the page.)
- Alternatively, you can go directly to: o http://sourceforge.net/projects/spimsimulator/files/
- Note that versions for Windows machines, Linux machines, and Macs are all available o Note:
QtSpim is relatively new. However, I have tested this new version on my Mac, and the TAs have downloaded and installed the Windows versions. In all instances, installation took just a few minutes, and we have not encountered any problems at all with either the installation or usage of the simulator.
- A window will open as shown in Figure 2. The window is divided into different sections:
1. The Register tabs display the content of all registers. (You only need to be concerned with the registers that we have discussed in class;
ignore any others. More specifically, just look at the Integer register tab.) 2. Buttons across the top are used to load and run a simulation
(Functionality is described in Figure 2.) 3. The Text tab displays the MIPS instructions loaded into memory to be executed.
(From left-to-right, the memory address of an instruction, the contents of the address in hex, the actual MIPS instructions – where register numbers are used, the MIPS assembly that you wrote, and any comments you made in your code are displayed.)
4. The Data tab displays memory addresses and their values in the data and stack segments of the memory.
5. The Information Console lists the actions performed by the simulator.
New… print register, data, etc. content!
Load file!
Reinitialize and load file!
New…!Save log!
Clear registers!
Reinitialize simulation!
Run simulation!
Pause, stop simulation!(will likely not use)!
Step through simulation!
Content of integer registers!- Can view as binary, hex, or decimal!- Do not need to consider floating point
(FP) register tab!- PC value also included here!
MIPS code!
Simulator generated code!(ignore) !
User code: (a) your comments appear, (b) register name, number appear !
Figure 2: QtSpim window.

3.2 An Example Program To help you get started with QtSpim, I’ve placed an example program that you can load (and immediately run) in the simulator. It will probably be helpful for you to quickly step through this example, as it will introduce you to a few syntactical statements that you will need to use in other programs that you write (to be run in QtSpim). This program (as seen in Figure 3) loads 5 pieces of data in memory, adds them together, and store’s the result in memory. Be sure that you understand:
o How you can load data into memory o How you can get the starting address of a data array o How you exit a program cleanly
!#! !# Simple Summation program! !# cse30321! !#! !.data ! ! !# Put Global Data here! !N: !.word 5 ! !# loop count!X: !.word 2,4,6,8,10 ! !# array of numbers to be added!SUM: !.word 0 ! !# location of the final sum!!! !.text ! ! !# Put program here!! !.globl main ! !# globally define 'main'!main: !lw !$s0, N ! !# load loop counter into $s0! !la !$t0, X ! !# load the address of X into $t0! !and !$s1, $s1, $zero ! !# clear $s1 aka temp sum!loop: !lw !$t1, 0($t0) ! !# load the next value of x! !add !$s1, $s1, $t1 ! !# add it to the running sum! !addi !$t0, $t0, 4 !# increment to the next address! !addi !$s0, $s0, -1 !# decrement the loop counter! !bne !$0, $s0, loop ! !# loop back until complete! !sw !$s1, SUM ! !# store the final total!! !li !$v0, 10 ! !# syscall to exit cleanly from main only! !syscall ! !# this ends execution! !.end!
QtSpim will assign “physical” addresses!- Can specify data you want in memory here.!- Can use “label” in code.!
Syntax used to cleanly “end” program!- Should place in main()!
Use this syntax – i.e. in main() – to get value of physical address in register; QtSpim will convert to necessary instructions for you.!
1.!
2.!
Can then use & update register for later loads as we have discussed in class.!
3.!
4.!
Figure 3: Example program to load in QtSpim. To run this program in QtSpim:
1. Download the program source from: /afs/nd.edu/coursefa.11/cse/cse30321.01/Labs/02/addarray.s
2. Click on the “load” button and open addarray.s 3. You can then run the program in 1 of 2 ways:
a. You can simply press the “run” (play) button – all instructions will be executed, and the final contents of memory and the register file will be reflected in the QtSpim window.

b. You can step through the program by pressing the “step” button (see Figure 2). A new instruction will be executed every time that you press the step button. The contents of memory, the register file, etc. will change dynamically. Additionally, the instruction being executed will be highlighted in the “Text” tab.
Note that at the conclusion of this program, $s1 should be equal to 0x1e (in hex) as the sum of 210, 410, 610, 810, and 1010 is 3010 (i.e. 111102 or 0x1e16). 3.3 Generally Useful Information When using QtSpim, you may find the following information to be useful:
• You can access all of the commands in Figure 2 via the “File” and “Simulator” menus as well. • When examining register or memory data, you can view the data in binary, hex, or decimal
format. Just use the “Register” pull down menu to select. • I would suggest NOT displaying the Kernel Text in the Text tab. This can be set by unselecting
“Kernel Text” in the “Text Segment” pull down menu. (You do not need any of this information to complete this lab.)
• I would suggest NOT displaying Kernel Data in the Data tab. Again, this can be set by unselecting “Kernel Data” in the “Data Segment” pull down menu.
o (You might also unselect the User Stack as well.) • You can set breakpoints in your code simply by right clicking on an instruction in the Text tab. • To view memory data, simply click on the Data tab. An description of how to interpret what
appears – and how data you write in a .s file is translated into the simulator’s address space – is shown in Figure 4.
• By right clicking on a register file value or memory address value, you can change its contents dynamically.
1. Change from the Text tab to the Data tab to see the contents of memory!
2. Assume at the beginning of your MIPS assembly, you wrote some code to put the following 17 numbers into memory…!
3. You can see data loaded into memory in the SPIM simulator in the “Data” tab!
4. Note that addresses (in HEX) are incremented by 4 as is the case in MIPS!
Address!10010010! Address!
10010014!
Address!10010018! Address!
1001001C!
Figure 4: Memory data in QtSpim.
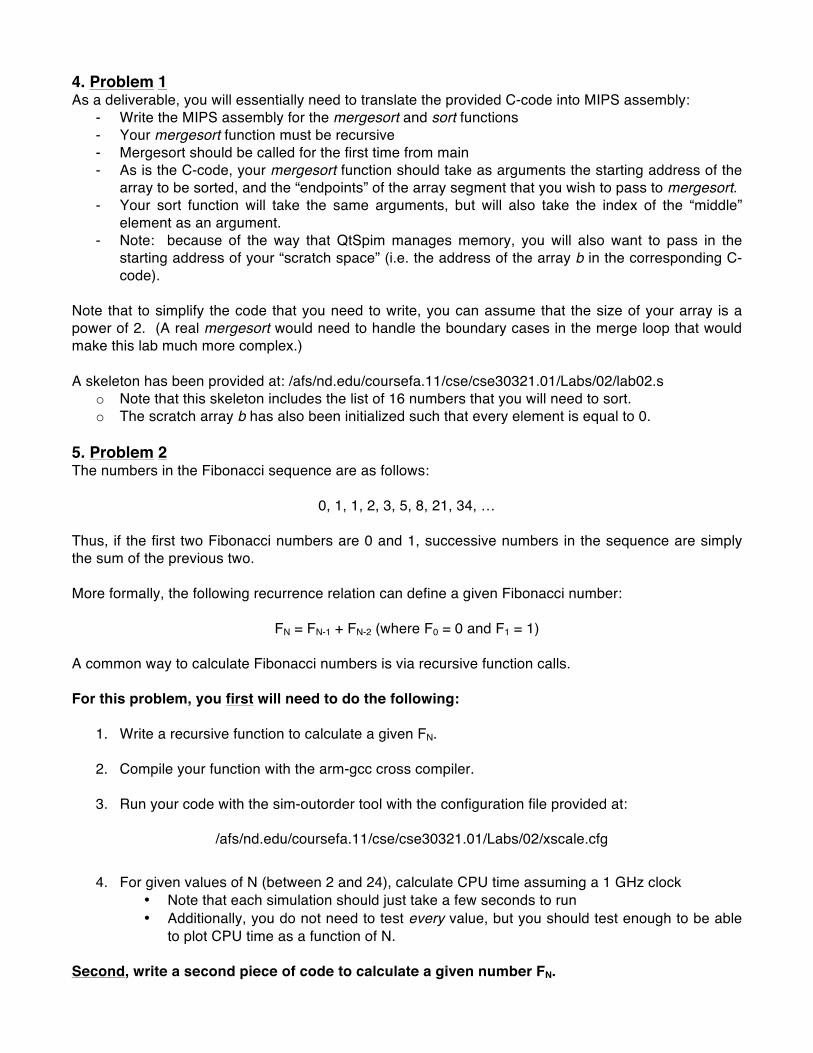
4. Problem 1 As a deliverable, you will essentially need to translate the provided C-code into MIPS assembly:
- Write the MIPS assembly for the mergesort and sort functions - Your mergesort function must be recursive - Mergesort should be called for the first time from main - As is the C-code, your mergesort function should take as arguments the starting address of the
array to be sorted, and the “endpoints” of the array segment that you wish to pass to mergesort. - Your sort function will take the same arguments, but will also take the index of the “middle”
element as an argument. - Note: because of the way that QtSpim manages memory, you will also want to pass in the
starting address of your “scratch space” (i.e. the address of the array b in the corresponding C-code).
Note that to simplify the code that you need to write, you can assume that the size of your array is a power of 2. (A real mergesort would need to handle the boundary cases in the merge loop that would make this lab much more complex.) A skeleton has been provided at: /afs/nd.edu/coursefa.11/cse/cse30321.01/Labs/02/lab02.s
o Note that this skeleton includes the list of 16 numbers that you will need to sort. o The scratch array b has also been initialized such that every element is equal to 0.
5. Problem 2 The numbers in the Fibonacci sequence are as follows:
0, 1, 1, 2, 3, 5, 8, 21, 34, … Thus, if the first two Fibonacci numbers are 0 and 1, successive numbers in the sequence are simply the sum of the previous two. More formally, the following recurrence relation can define a given Fibonacci number:
FN = FN-1 + FN-2 (where F0 = 0 and F1 = 1) A common way to calculate Fibonacci numbers is via recursive function calls. For this problem, you first will need to do the following:
1. Write a recursive function to calculate a given FN.
2. Compile your function with the arm-gcc cross compiler.
3. Run your code with the sim-outorder tool with the configuration file provided at:
/afs/nd.edu/coursefa.11/cse/cse30321.01/Labs/02/xscale.cfg
4. For given values of N (between 2 and 24), calculate CPU time assuming a 1 GHz clock • Note that each simulation should just take a few seconds to run • Additionally, you do not need to test every value, but you should test enough to be able
to plot CPU time as a function of N. Second, write a second piece of code to calculate a given number FN.
• Your second program should calculate FN iteratively, rather than recursively.
• Repeat steps 2-4 above.
Third, compare and contrast the execution time of the recursive version to the non-recursive version for various values of N.
• You should include a plot to describe your results.
• Explain any performance differences that you might see. Be sure to make references to your C-code, CPI and instruction count data, etc. – as any performance comparisons should be explained “architecturally.” (In other words, think about what kind of assembly might be generated and executed based on the HLL code that you have written.)
• Note that there could be multiple “correct answers” to this question – and your score will be
based on how well you justify any execution time differences. 6. What to Turn In
o Put your code for lab02.s in the dropbox of one group member. (Create a folder called Lab02) o Be sure that your code runs in QtSpim – as we will use it to test your code with a
different array. o No report is required for Problem 1. The questions posed in Problem 2 constitute your report.