
Cryoplunge™3 Plunge-freezing Instrument for Cryo TEM · Part Number: 930.50500 ... ƒigure 1-7...
70
Gatan, Inc. 5794 W. Las Positas Blvd. Pleasanton, CA 94588 Tel. (925) 463-0200 Fax. (925) 463-0204 Cryoplunge™3 Plunge-freezing Instrument for Cryo TEM Owner’s Manual and User’s Guide Model Number: 930 Part Number: 930.50500 Revision 01
Transcript of Cryoplunge™3 Plunge-freezing Instrument for Cryo TEM · Part Number: 930.50500 ... ƒigure 1-7...

Cryoplunge™3Plunge-freezing Instrument for Cryo TEM
Owner’s Manual and User’s Guide
Model Number: 930Part Number: 930.50500
Revision 01
Gatan, Inc.5794 W. Las Positas Blvd.Pleasanton, CA 94588
Tel. (925) 463-0200Fax. (925) 463-0204

ii Cryoplunge™3 Owner’s Manual and User’s Guide

Table of Contents
Preface 1
About this Guide . . . . . . . . . . . . . . . . . . . . . . . . . . . . . . . . . . . . . . . . . . . . . . . . . . . . . . . . .1
Disclaimer . . . . . . . . . . . . . . . . . . . . . . . . . . . . . . . . . . . . . . . . . . . . . . . . . . . . . . . . . . . . . .1
Copyright and Trademarks . . . . . . . . . . . . . . . . . . . . . . . . . . . . . . . . . . . . . . . . . . . . . . . . .1
Returns . . . . . . . . . . . . . . . . . . . . . . . . . . . . . . . . . . . . . . . . . . . . . . . . . . . . . . . . . . . . . . . . .2
Support and Customer Service. . . . . . . . . . . . . . . . . . . . . . . . . . . . . . . . . . . . . . . . . . . . . . .2
Agency Approvals and Safety Information . . . . . . . . . . . . . . . . . . . . . . . . . . . . . . . . . . . . .3
Safety and Attention Symbols . . . . . . . . . . . . . . . . . . . . . . . . . . . . . . . . . . . . . . . . . . . . . . .5
Product Safety Information . . . . . . . . . . . . . . . . . . . . . . . . . . . . . . . . . . . . . . . . . . . . . . . . .5
Equipment Ratings and Technical Specifications . . . . . . . . . . . . . . . . . . . . . . . . . . . . . . . .8
Assembly, Location, and Mounting Requirements . . . . . . . . . . . . . . . . . . . . . . . . . . . . . . .9
Cryoplunge3 Owner’s Manual and User’s Guide 11
Overview . . . . . . . . . . . . . . . . . . . . . . . . . . . . . . . . . . . . . . . . . . . . . . . . . . . . . . . . . . . . . .11
Features . . . . . . . . . . . . . . . . . . . . . . . . . . . . . . . . . . . . . . . . . . . . . . . . . . . . . . . . . . . . . . .11Easy Installation . . . . . . . . . . . . . . . . . . . . . . . . . . . . . . . . . . . . . . . . . . . . . . . . . .11Safe Operation . . . . . . . . . . . . . . . . . . . . . . . . . . . . . . . . . . . . . . . . . . . . . . . . . . .12Humidity Chamber . . . . . . . . . . . . . . . . . . . . . . . . . . . . . . . . . . . . . . . . . . . . . . . .12Specimen Blotting. . . . . . . . . . . . . . . . . . . . . . . . . . . . . . . . . . . . . . . . . . . . . . . . .12Plunge and Tweezer Securing Mechanism . . . . . . . . . . . . . . . . . . . . . . . . . . . . . .12Cryo Workstation . . . . . . . . . . . . . . . . . . . . . . . . . . . . . . . . . . . . . . . . . . . . . . . . .12Maintenance . . . . . . . . . . . . . . . . . . . . . . . . . . . . . . . . . . . . . . . . . . . . . . . . . . . . .13
Description and Specifications . . . . . . . . . . . . . . . . . . . . . . . . . . . . . . . . . . . . . . . . . . . . .13
Physical Specifications . . . . . . . . . . . . . . . . . . . . . . . . . . . . . . . . . . . . . . . . . . . . . . . . . . .17
Gas Requirements and Connectors for Pneumatics . . . . . . . . . . . . . . . . . . . . . . . . . . . . . .17
Preparing the Nitrogen Cylinder and 2-Stage Regulator . . . . . . . . . . . . . . . . . . . . . . . . . .17
Cryogenic Requirements and Safe Handling. . . . . . . . . . . . . . . . . . . . . . . . . . . . . . . . . . .18
Preparing the Ethane Cylinder and 2-Stage Regulator . . . . . . . . . . . . . . . . . . . . . . . . . . .19Preparing the Ethane Cylinder and Regulator . . . . . . . . . . . . . . . . . . . . . . . . . . .19Leak Testing the Connections. . . . . . . . . . . . . . . . . . . . . . . . . . . . . . . . . . . . . . . .20
Cryoplunge3 Owner’s Manual and User’s Guide iii

Adjusting the Gas Pressure . . . . . . . . . . . . . . . . . . . . . . . . . . . . . . . . . . . . . . . . . 20Leaving the Ethane Cylinder in Stand-by Mode . . . . . . . . . . . . . . . . . . . . . . . . . 20Important Safety Precautions . . . . . . . . . . . . . . . . . . . . . . . . . . . . . . . . . . . . . . . 21
Installation and Setup of Cp3 . . . . . . . . . . . . . . . . . . . . . . . . . . . . . . . . . . . . . . . . . . . . . . 21Unpacking and Inspection . . . . . . . . . . . . . . . . . . . . . . . . . . . . . . . . . . . . . . . . . . 21Removing Cp3 and Accessories from the Shipping Container. . . . . . . . . . . . . . 22Matching the Contents against the Packing List . . . . . . . . . . . . . . . . . . . . . . . . . 22
Connections and System Test. . . . . . . . . . . . . . . . . . . . . . . . . . . . . . . . . . . . . . . . . . . . . . 23Installing and Testing Cp3. . . . . . . . . . . . . . . . . . . . . . . . . . . . . . . . . . . . . . . . . . 23Preparing the Humidity Chamber . . . . . . . . . . . . . . . . . . . . . . . . . . . . . . . . . . . . 30Preparing the Filter Paper Disks . . . . . . . . . . . . . . . . . . . . . . . . . . . . . . . . . . . . . 30Preparing the Blotters . . . . . . . . . . . . . . . . . . . . . . . . . . . . . . . . . . . . . . . . . . . . . 31
Cooling the Workstation with Liquid Nitrogen . . . . . . . . . . . . . . . . . . . . . . . . . . . . . . . . 34
Condensing Ethane and Filling the Ethane Pot . . . . . . . . . . . . . . . . . . . . . . . . . . . . . . . . 35
Blotting Techniques for Freezing the Sample . . . . . . . . . . . . . . . . . . . . . . . . . . . . . . . . . 402-sided Blotting . . . . . . . . . . . . . . . . . . . . . . . . . . . . . . . . . . . . . . . . . . . . . . . . . . 40
Returning Cp3 to Stand-by Conditions . . . . . . . . . . . . . . . . . . . . . . . . . . . . 461-sided Blotting . . . . . . . . . . . . . . . . . . . . . . . . . . . . . . . . . . . . . . . . . . . . . . . . . . 47Manual Multiple Blotting . . . . . . . . . . . . . . . . . . . . . . . . . . . . . . . . . . . . . . . . . . 48No Blotting Method. . . . . . . . . . . . . . . . . . . . . . . . . . . . . . . . . . . . . . . . . . . . . . . 49
Routine Maintenance . . . . . . . . . . . . . . . . . . . . . . . . . . . . . . . . . . . . . . . . . . . . . . . . . . . . 50Removing the Humidity Chamber for Cleaning . . . . . . . . . . . . . . . . . . . . . . . . . 50Cleaning the Outside Surfaces of Cp3 . . . . . . . . . . . . . . . . . . . . . . . . . . . . . . . . 54
Appendix A: Troubleshooting 55
iv Cryoplunge3 Owner’s Manual and User’s Guide

List of Figures
ƒigure 1-1 Cryoplunge3 front view . . . . . . . . . . . . . . . . . . . . . . . . . . . . . 14
ƒigure 1-2 Cryoplunge3 side view left . . . . . . . . . . . . . . . . . . . . . . . . . . . . 15
ƒigure 1-3 Cryoplunge3 side view back and right . . . . . . . . . . . . . . . . . . . . . . 16
ƒigure 1-4 Workstation. . . . . . . . . . . . . . . . . . . . . . . . . . . . . . . . . . . . 16
ƒigure 1-5 Pneumatics supply for Cp3 (left), 2-stage nitrogen regulator (right) . . . . . . 18
ƒigure 1-6 Ethane tank and regulator . . . . . . . . . . . . . . . . . . . . . . . . . . . . 19
ƒigure 1-7 Cp3 in the shipping crate . . . . . . . . . . . . . . . . . . . . . . . . . . . . . 21
ƒigure 1-8 Pneumatic connection . . . . . . . . . . . . . . . . . . . . . . . . . . . . . . 24
ƒigure 1-9 Pneumatic, mains, and protective earth connections . . . . . . . . . . . . . . . 25
ƒigure 1-10 Safety interlock for workstation . . . . . . . . . . . . . . . . . . . . . . . . . 26
ƒigure 1-11 Workstation overflow port with Tygon tubing attached . . . . . . . . . . . . . 26
ƒigure 1-12 Insertion of Omega temperature/humidity sensor . . . . . . . . . . . . . . . . 27
ƒigure 1-13 Omega temperature/humidity sensor connector . . . . . . . . . . . . . . . . . 27
ƒigure 1-14 Inserting the humidity wand . . . . . . . . . . . . . . . . . . . . . . . . . . . 28
ƒigure 1-15 Meters and alarms for Cp3 . . . . . . . . . . . . . . . . . . . . . . . . . . . . 29
ƒigure 1-16 Filter paper die cutter . . . . . . . . . . . . . . . . . . . . . . . . . . . . . . . 31
ƒigure 1-17 Inserting/removing a blotter from the right-hand blot assembly . . . . . . . . . 31
ƒigure 1-18 Removing the spindle . . . . . . . . . . . . . . . . . . . . . . . . . . . . . . 32
ƒigure 1-19 Inserting the sponge pad . . . . . . . . . . . . . . . . . . . . . . . . . . . . . 32
ƒigure 1-20 Replacing and tightening the spindle. . . . . . . . . . . . . . . . . . . . . . . 32
ƒigure 1-21 Loading the filter paper disk and protective plastic backer . . . . . . . . . . . 33
ƒigure 1-22 Attaching the filter paper disk and inserting the blotter . . . . . . . . . . . . . 33
ƒigure 1-23 Meter for ethane temperature controller . . . . . . . . . . . . . . . . . . . . . 34
ƒigure 1-24 Initial cool-down of the workstation and ethane pot . . . . . . . . . . . . . . . 35
ƒigure 1-25 Condensing ethane directly into the pre-cooled ethane pot . . . . . . . . . . . 37
ƒigure 1-26 Pre-cooling the conical tube and then pouring the condensed ethane into the pre-cooled ethane pot . . . . . . . . . . . . . . . . . . . . . . . . . . . . . . . . . 38
ƒigure 1-27 Making the ethane popsicle . . . . . . . . . . . . . . . . . . . . . . . . . . . 38
Cryoplunge3 Owner’s Manual and User’s Guide v

ƒigure 1-28 Securing the specimen grid to the plunge tweezers . . . . . . . . . . . . . . . 41
ƒigure 1-29 Inserting the tweezers into slot at the base of the plunge rod. . . . . . . . . . . 41
ƒigure 1-30 Raising the plunge rod to full upward (firing) position. . . . . . . . . . . . . . 42
ƒigure 1-31 Applying sample aliquot to the support film . . . . . . . . . . . . . . . . . . . 42
ƒigure 1-32 2-sided specimen blotting. . . . . . . . . . . . . . . . . . . . . . . . . . . . . 43
ƒigure 1-33 Grid plunging into the liquid ethane . . . . . . . . . . . . . . . . . . . . . . . 43
ƒigure 1-34 Pressing the quick disconnect push button to release the plunge tweezers from the plunge rod. . . . . . . . . . . . . . . . . . . . . . . . . . . . . . . . . . . . . 44
ƒigure 1-35 Tilting the tweezers . . . . . . . . . . . . . . . . . . . . . . . . . . . . . . . . 44
ƒigure 1-36 Blotting excess ethane . . . . . . . . . . . . . . . . . . . . . . . . . . . . . . 45
ƒigure 1-37 Disconnect the black securing clip on the plunge tweezers to free the frozen hydrated grid . . . . . . . . . . . . . . . . . . . . . . . . . . . . . . . . . . . 45
ƒigure 1-38 Transfer the grid box to the storage tube filled with liquid nitrogen . . . . . . . 46
ƒigure 1-39 Removing the blotters . . . . . . . . . . . . . . . . . . . . . . . . . . . . . . 50
ƒigure 1-40 Removing the humidity wand . . . . . . . . . . . . . . . . . . . . . . . . . . 51
ƒigure 1-41 Removing the temperature/humidity sensor . . . . . . . . . . . . . . . . . . . 51
ƒigure 1-42 Disconnect the pneumatic supply for the blotter assemblies . . . . . . . . . . . 52
ƒigure 1-43 Removing the humidity chamber . . . . . . . . . . . . . . . . . . . . . . . . . 52
ƒigure 1-44 Replacing the humidity chamber . . . . . . . . . . . . . . . . . . . . . . . . . 53
ƒigure 1-45 Reconnecting the pneumatic supply . . . . . . . . . . . . . . . . . . . . . . . 53
vi Cryoplunge3 Owner’s Manual and User’s Guide

Preface
About this Guide
This Cryoplunge™3 Owner’s Manual and User’s Guide provides information on the Cryoplunge3 features and functions, along with procedures for installing and operating the unit. Routine maintenance and troubleshooting procedures are also included in this manual.
The following typographical conventions are used for special comments:
NOTE: Recommendations for getting the best performance from the equip-ment.
CAUTION:Precautionary notes and advice to avoid personal injury or damage to the equipment.
WARNING: Advisory to call attention to a potentially hazardous situation which, if not avoided, could result in death or serious injury.
Disclaimer
Gatan, Inc., makes no express or implied representations or warranties with respect to the contents or use of this manual, and specifically disclaims any implied warranties of merchantability or fitness for a particular purpose. Gatan, Inc., further reserves the right to revise this manual and to make changes to its contents at any time, without obligation to notify any person or entity of such revisions or changes.
Copyright and Trademarks
© 2008 Gatan, Inc. The Gatan logo is a registered trademark of Gatan, Inc. Cryoplunge is a trademark of Gatan, Inc.
All rights reserved. No part of this publication may be reproduced, stored in a retrieval system, or transmitted, in any form or by any means, electronic, mechanical, photocopying, recording, or otherwise, without the prior written permission of Gatan, Inc.
Cryoplunge™3 Owner’s Manual and User’s Guide 1

Returns
The text and graphics are for the purpose of illustration and reference only. The specifications on which they are based are subject to change without notice.
Returns
If there is a need to return equipment to the factory, please call Gatan to obtain a Returned Merchandise Authorization Number (RMA #). This RMA number must appear on your shipping document, to help in tracking and to ensure that proper actions will be taken to repair or replace your equipment.
Support and Customer Service
Gatan, Inc. provides free technical support via phone, fax, and electronic mail. To reach Gatan technical support, contact the facility nearest you, or send an email to [email protected].
USA, Canada, & Latin AmericaCorporate HeadquartersWestern USA SalesCentral USA & Latin America Sales5794 W. Las Positas Blvd.Pleasanton, CA 94588Tel. +1 (925) 463-0200Fax. +1 (925) 463-0204Contact: [email protected]
Gatan, Inc.Eastern USA Sales780 Commonwealth DriveWarrendale, PA 15086Tel. +1 (724) 776-5260Fax. +1 (724) 776-3360 Contact: [email protected]
Asia & Pacific RimNippon Gatan3F Sakurai building2-8-19 Fukagawa, Koto-kuTokyo 135-0033, JapanTel: +81 3 5639 2772Fax: +81 3 5639 2763Contact: [email protected]
2 Cryoplunge™3 Owner’s Manual and User’s Guide

Agency Approvals and Safety Information
Gatan Singapore10 Eunos Road 8#12-06Singpore Post CentreSingapore 408600Tel: (65) 6293 3160 Fax: (65) 6293 3307 Contact: [email protected]
EuropeGatan GmbH, München, GermanyIngolstadterstr. 12D-80807 München Germany Tel. +49 89 358084-0 Fax. +49 89 358084-77Contact: [email protected]
Gatan UK25 Nuffield WayABINGDONOX14 1RLUKTel: +44 1235 540160Fax: +44 1235 540169Contact: [email protected]
Gatan FranceDivision de ROPER Scientific SAS8, rue du ForezZI petite montagne Sud - CE 170291017 EVRY CedexTel: + 33 1 69 11 03 69Fax: + 33 1 64 97 19 67 Contact: [email protected]
NOTE: The above information is subject to change. Please consult the “contact” section of the Gatan website at www.gatan.com for the latest information.
Agency Approvals and Safety Information
This chapter presents agency approval and certification information for the Cryoplunge3. It also provides a summary of the safety recommendations through-out this manual. Gatan, Inc., recommends following all safety precautions to pre-vent harm to yourself or the equipment. Please follow all warnings marked on the equipment as well.
Cryoplunge™3 Owner’s Manual and User’s Guide 3

Agency Approvals and Safety Information
CE CertificationThe product described in this manual meets the intent of:
● 2004/108/EC EMC Directive
● 2006/95/EC Low Voltage Directive
● 2002/95/EC Restriction of Hazardous Substances (ROHS) Directive
● 2002/96/EC Waste Electrical and Electronic Equipment (WEEE) Directive
Compliance with RoHS and WEEE DirectivesAs a company that has always been firmly committed to environmentally respon-sible practices, Gatan, Inc., is in complete accord with the content and spirit of Directive 2002/96/EC of the European Parliament and of the Council of 27 Janu-ary 2003 on “Waste Electrical and Electronic Equipment” (commonly referred to as the WEEE Directive). The WEEE Directive applies to all products placed on the controlled market after 13 August 2005.
At present, any Gatan, Inc. products sold within the European Union may be returned to Gatan for proper disposal. We have placed great emphasis on creating a truly easy-to-use return process for our many customers around the world. To return a product for disposal, customers simply need to contact our customer ser-vice department to obtain an RMA number authorizing the return.
We are pleased that our current disposal process is a relatively streamlined one. Of course, we are still busy evaluating other options that will further reduce the transport overhead of recycled products. Every day, we are actively working with design engineers, vendors, and additional key partners to enact even more effi-cient end-of-life strategies for our products!
This product is compliant with Directive 2002/96/EC. This product is compliant with 2002/96/EC as Category 9 equipment.
The Declaration of Conformance is available from Gatan, Inc., or from your authorized distributor.
4 Cryoplunge™3 Owner’s Manual and User’s Guide

Safety and Attention Symbols
Safety and Attention Symbols
You must be aware of safety when you install and use this system. This guide pro-vides various procedures that require careful attention to precautions. The follow-ing symbols appear in this document, as referenced from ANSI Z535.1-4.
Product Safety Information
CE MarkingThe Cryoplunge3 is designed to meet the regulatory standards and CE require-ments. This product has been tested by an independent accredited third party and has been found to be in compliance with applicable CE Marking requirements per the EMC Directive and the Low Voltage Directive. See the Declaration of Con-formity at the end of this manual for applicable standards and tests. The most recent Declaration of Conformity is available by request from Gatan, Inc.
SYMBOL NAME DESCRIPTION
Danger An immediately hazardous situation which, if not avoided, will result in death or serious injury. Danger is limited to the most extreme situations.
Warning A potentially hazardous situation which, if not avoided, could result in death or serious injury.
Caution A potentially hazardous situation which, if not avoided, may result in minor or moderate injury. Caution may also be used to alert against unsafe practices.
Electrical hazard A potential electrical or electric shock hazard.
Pinch point A potential pinch point/mechanical hazard.
Cold A potential cold surface hazard.
Flammable A potential flammable material hazard.
Biohazard A potential biological hazard.
Cryoplunge™3 Owner’s Manual and User’s Guide 5

Product Safety Information
WarningsBefore you attempt to install or operate this equipment for the first time, please make sure that you are aware of the precautions that you must take to ensure your own safety.
Caution read this section first!
This section is only to be used for guidance. Please consult the Product Safety and Assembly, Location and Mounting Requirements sections of this manual prior to installation of this instrument. If unsure, consult your Safety Officer.
Safety Precautions
Review the following precautions to avoid injury and prevent damage to this product, or any products to which it is connected. To avoid potential hazards, use the product only as specified. Read all safety information provided in the compo-nent product user manuals and understand the precautions associated with safety symbols, written warnings, and cautions before accessing parts or locations within the unit. Save this document for future reference. Follow all warnings and instruc-tions marked on the equipment. Ensure that the voltage and frequency of your power source matches the voltage and frequency inscribed on the equipment’s electrical rating label. Never push objects of any kind through the openings in the equipment. Dangerous voltages might be present. Conductive foreign objects could produce a short circuit that could cause fire, electrical shock, or damage your equipment. If in doubt, contact your local Safety Officer for guidance.
● Disconnect power before replacing fuses and only use the value specified on the product’s rating label.
● Do Not Operate Without Covers: To avoid electric shock or fire hazard, do not operate this product with any removed enclosure covers or panels.
● Always use a power cable with a grounded plug (third grounding pin).
● Disconnect all external power connections before servicing.
● Should a leak occur, remove power. Use paper towels or Kimwipe to clean up the spill.
● Cryoplunge3 makes use of liquid ethane.
● To ensure your safety, ethane gas must only be ordered in consultation with the Laboratory Services Manager and site Safety Officer. Please follow your laboratory and site Safety Officer’s recommendations for storage and use.
● The size of ethane gas cylinder should be restricted to “lecture theater” size or the smallest size that is available for the purity rating required (at least CP grade, which is 99% pure) fitted with a 2-stage regulator that is suitable for use with ethane.
● Always check the ethane cylinder for any signs of corrosion prior to use.
6 Cryoplunge™3 Owner’s Manual and User’s Guide

Product Safety Information
● Liquefaction of ethane must only be carried out using purpose-built equip-ment designed to be used in conjunction with liquid nitrogen as the primary coolant.
● The ethane should be condensed in an explosion-proof (spark-proof) fume hood.
● The ethane cylinder should be supported in an approved stand within the fume hood.
● The fume hood must not contain any flammable or harmful substances and should be clear of any unnecessary equipment that could impede air flow. Other sources of ignition such as electrical equipment (including ovens) must also be removed from the fume hood before using ethane.
● The flow of ethane gas through the liquefaction apparatus must be such that only liquid ethane is produced, thus avoiding any unnecessary venting of ethane gas into the fume hood. Use caution in high-flow fume hoods as they tend to draw the ethane out of the hood before it can become condensed into liquid form.
● To ensure your safety, do not condense more than 10 mL of liquid ethane at one time.
● When sufficient ethane has been liquefied, the ethane cylinder valves should be closed and the 2-stage regulator should be drained of any residual ethane.
● The liquid ethane must be maintained at near liquid nitrogen temperature to prevent boil off into the atmosphere.
● The workstation of Cryoplunge3 incorporates a liquid nitrogen bath that maintains the liquid ethane at an operating temperature just above its melting point.
● The boil off of the liquid nitrogen produces an inert blanket of gas over the ethane, preventing oxygen from the atmosphere condensing on the surface of the ethane to form an explosive mixture. The liquid ethane must be kept cov-ered by nitrogen gas at all times that are practicable to prevent dangerous oxy-gen/ethane mixtures from forming. Maintaining the level of liquid nitrogen within the workstation of Cryoplunge3 will ensure that a layer of nitrogen gas will enshroud the ethane vessel at all times.
● Ensure that all equipment is adequately earthed. The instrument must always be connected to an electrical ground when it is being used, to reduce the risk of electric shock. The ground wire (green/yellow) in the instrument power cable must be connected to the laboratory electrical ground. Only use exten-sion cables if they have an earth conductor. Do not disconnect the protective ground inside or outside the instrument and do not have external circuits con-nected to the instrument when its protective ground is disconnected.
● The instrument does not stop working if the earth wire is not connected, and there is no indication that you might be in danger. Make sure that it is checked regularly (and at least annually).
Cryoplunge™3 Owner’s Manual and User’s Guide 7

Equipment Ratings and Technical Specifications
WARNING: To avoid electrical hazards (heat, shock, and/or fire hazard), do not make connections to terminals outside the range specified for that ter-minal. See the product user manual for correct connections.
● Electronic components on printed circuit boards are extremely sensitive to static electricity. Ordinary amounts of static electricity generated by your clothing or work environment can damage the electronic equipment. When installing the board in a system, you must use anti-static grounding straps and anti-static mats to prevent damage due to electrostatic discharge.
● To avoid injury, fire hazard, or explosion, do not operate this product in an explosive atmosphere.
● During plunger operation, timer count-down in process, never attempt to open the guards or access the tweezers. Always wait until the plunger has com-pleted its operation and is at full rest.
● Always use appropriate personal protective equipment when working with liquid nitrogen and liquid ethane, such as safety glasses or face shield and temperature-resistant gloves.
● Consider all clinical specimens, reagents, controls, calibrators, etc. that con-tain blood, and surfaces or components that have come into contact with blood, as potentially infectious. Wear gloves, lab coats, and safety glasses, and follow other biosafety practices as specified in OSHA Bloodborne Patho-gen Rule (29 CFR Part 1910.1030) or other equivalent biosafety procedures.
● Instrument cleaning and decontamination: Instruments must be properly decontaminated prior to servicing or shipment. For users that process biologi-cal samples, Gatan, Inc. recommends contracting with a licensed firm special-izing in use specific decontamination processes to meet customers specific needs. Prior to servicing, ensure service personnel are aware of what has been processed and ensure proper decontamination has been performed.
Equipment Ratings and Technical Specifications
Power is applied to the units via a line cord connection. Grounding is provided through this main input connection using a make-first-break-last method.
Electrical Ratings and Specifications● Input Voltage = 100-240V~● Input Power = 1.35A● Frequency = 47-63Hz● Output Voltage = 24VDC● Output Current = 2.08A max.
NOTE: Use only with a Gatan-specified power supply.
8 Cryoplunge™3 Owner’s Manual and User’s Guide

Assembly, Location, and Mounting Requirements
Environmental Storage/Shipping/Operating Conditions● Non-operating relative humidity (non-condensing) 25–85%
● Storage Temperature Range 0–33°C
● Operating Humidity Range 0–100%
● Operating maximum thermal gradient 15°C/hr.
● Operating temperature range (ambient) 4–24°C
● Ventilation: do not block or cover ventilation holes
Assembly, Location, and Mounting Requirements
Prior to Unpacking the InstrumentThe carton comprising the shipment should be inspected for any signs of damage before unpacking. If any severe damage is visible, the following procedures should be carried out:
● Photograph the extent of the damage. Digital photographs sent by email are often the best method (Gatan, Inc. [email protected]).
Describe the extent of the damage to Gatan, Inc. to estimate possible damage to the enclosed equipment and decide whether an insurance assessor and engineer need to be present before further unpacking.
InstallationCryoplunge3 is intended only for use in laboratory applications and is designed specifically for workstation (table top) installations. The product is intended for operation in a controlled work environment, laboratory, or clean-room environ-ment. It is recommended the unit not be blocked from general room ventilation.
Connection to the PowerPrior to plugging the unit in, read all safety precautions contained within this man-ual and ensure the power switch on the unit has been turned off (I refers to ON, and O refers to OFF). Apply all applicable connections detailed above. Use only the power cord provided with this product and proper electrical power as specified on the equipment rating label. Ensure the outlet is equipped with a proper ground pin. A separate ground wire is required for connection at the main PE terminal at the back of the main column and designated by the IEC 60417-5019 symbol . Should there be any questions as to how to connect the ground, contact a licensed electrician.
Cryoplunge™3 Owner’s Manual and User’s Guide 9

Assembly, Location, and Mounting Requirements
When power is applied to unit, the meters on the front panel illuminate, indicating that the unit is on.
If Cp3 is going to be moved or stored, close the pneumatic supply (nitrogen gas cylinder or house air supply connection) and vent any residual pressure in the pneumatic lines by first ensuring that the plunge piston is in its full upward (fir-ing) position and then repeatedly pressing the RESET push-button. Disconnect the pneumatic supply line from Cp3. Switch the ON/OFF switch to OFF and unplug the mains connection.
10 Cryoplunge™3 Owner’s Manual and User’s Guide

Overview
Cryoplunge3 Owner’s Manual andUser’s Guide
Overview
Cryoplunge™3 (Cp3) is a semi-automated plunge freezing instrument used for the preparation of frozen hydrated specimens for cryo transmission electron microscopy. Cp3 incorporates a humidity chamber and timed single or multiple blot capabilities for either 1-sided or 2-sided blotting. The specimen grid, clamped between the tines of plunge tweezers and containing generally 3 microliters of the specimen suspension, is blotted to produce a thin, aqueous film. It is then plunged into a temperature-monitored ethane bath to produce a uniformly thin layer of vit-reous ice with the specimen embedded in it. A liquid nitrogen workstation, with a remote fill funnel and two removable covers, maintains the temperature of the liq-uid ethane vessel, which can be held at a temperature just above the melting point of liquid ethane (-182°C). As liquid nitrogen is added to the workstation, a blanket of cold, inert nitrogen gas fills the workstation chamber, minimizing condensation of atmospheric oxygen onto the surface of the ethane and providing a protective cryo interface for transferring the frozen hydrated grid within the workstation. The workstation covers are positioned to allow the operator easy access to the fro-zen hydrated specimen grid. One press of the quick disconnect on the plunge rod allows the operator to quickly and easily disconnect the plunge tweezers from the plunge rod. The frozen hydrated grid can then be moved to a pre-cooled cryo grid storage box within a removable, liquid nitrogen filled transfer pot. The specimen grid can then be safely transferred to a liquid nitrogen storage vessel or to the workstation of the cryo transfer holder for low electron dose imaging on the trans-mission electron microscope.
Features
Easy Installation● Everything is included for fast, easy set-up
● Light weight and portable
● Small footprint
Cryoplunge3 Owner’s Manual and User’s Guide 11

Features
Safe Operation● Safety interlocks protect the user during the blotting and plunging cycle
Humidity Chamber● Safe guards the specimen from drying during the blotting process
● Temperature/humidity metering within the specimen blotting chamber
● 98% RH within ~15 minutes
● 3 entry points for specimen loading (right, left, and front)
Specimen Blotting● 1- or 2-sided blotting
● Single and multiple blotting
● Filter paper loading jig to minimize contact with filter paper while loading onto blot assemblies
● Electronic blotting timer accurate to 0.1 sec.
● Interchangeable blot assemblies
● Adjustable blotting pressure
● Any filter paper type available can be used
Plunge and Tweezer Securing Mechanism● Pneumatically assisted, multi-positional plunge piston
● Plunge speed 1.7 m/sec.
● Quick disconnect tweezer mounting mechanism
Cryo Workstation● Removable liquid nitrogen cryo workstation allows transport to and from
explosion-proof (spark-proof) fume hood for filling and disposal of liquid ethane
● Long hold, temperature-monitored ethane vessel
● Cryo grid box receptacle (round and square cryo grid boxes)
● Filter paper blot stand, kept at the temperature of the FH grid within the work-station, allows blotting excess ethane for immediate viewing on the TEM
● External funnel for filling workstation with liquid nitrogen
● Workstation covers protect frozen hydrated grid during transfer from ethane to cryo grid storage box
12 Cryoplunge3 Owner’s Manual and User’s Guide

Description and Specifications
● Liquid nitrogen cryo grid box transfer pot (allows cryo grid box to be moved to a cryo holder workstation or a liquid nitrogen storage dewar while sub-merged under liquid nitrogen)
Maintenance● Preventative maintenance plan is available
Description and Specifications
The Cryoplunge3 (Cp3) is a self-contained unit, as shown in the following images.
NOTE: It might be helpful to print these images and use them as a guide when reading the instruction manual.
Cryoplunge3 Owner’s Manual and User’s Guide 13

Description and Specifications
ƒigure 1-1 Cryoplunge3 front view
Ethane temperature controller (Omron E5CN)
Specimen loading port
Humidity chamber
Plunge rod (in firing position)
Temperature/humidity sensor
Liquid nitrogen workstation
Temperature/humidity meter (Omega iSeries)
Blotting timer (Omron H5CX)
Base plate
START push button
RESET push button
Mains ON/OFF
Ethane pot TC-heater connector
Safety shield
Pneumatic supply for blotters
Right side blotter
Securing screw for humidity chamber
Humidity wand with sponges attached
Temperature/humidity sensor connector
Ethane temperature audible alarm ON/OFF
Left side blotter
Ethane temperature warning lamp
14 Cryoplunge3 Owner’s Manual and User’s Guide

Description and Specifications
ƒigure 1-2 Cryoplunge3 side view left
Plunge rod dampening pot
Plunge rod (plunge tweezers not attached)
Liquid nitrogen overflow
Push-in connector for blot assembly pneumatics
Workstation cover (large)
Specimen loading port
Humidity wand with sponge attached
Liquid nitrogen funnel
Cryoplunge3 Owner’s Manual and User’s Guide 15

Description and Specifications
ƒigure 1-3 Cryoplunge3 side view back and right
ƒigure 1-4 Workstation
Pneumatic push-in connection
Protective earth stud
Mains connection
Cryo grid box transfer pot (with square cryo grid box inserted)
Cryo grid box staging area
Ethane pot
Filter paper clip for pre-blotting frozenhydrated grid prior to storage
Liquid nitrogen overflow port
Liquid nitrogen filling portwith funnel attached
16 Cryoplunge3 Owner’s Manual and User’s Guide
Physical Specifications
Physical Specifications
Gas Requirements and Connectors for Pneumatics
Cp3 requires a pneumatics supply. The high-pressure tubing connection to the pneumatic inlet at the back of the instrument is a 6mm (outer diameter) “push-in” fitting.
● It is recommended that a nitrogen gas cylinder is used to provide the pneu-matic supply to operate Cp3. A compatible 2-stage regulator should be fitted and the second stage of this regulator must be capable of delivering 100 psi (7 bar) of pressure in order to achieve the operating pressures for Cp3; 60 (min) to 80 (max) psi of pressure (4.1 to 5.5 bar). Two thread to push-in fittings for the second stage of the 2-stage regulator are provided. Choose the one with the proper diameter that fits your regulator (1/4 inch or 1/2 inch are provided with Cp3).
● Alternatively, a dry, oil free compressed air supply that can deliver 60–80 psi of air pressure output (4.1 to 5.5 bar) can also be used.
Preparing the Nitrogen Cylinder and 2-Stage Regulator
NOTE: The 2-stage regulator (not provided) must be suitable for use with nitrogen gas. The second stage of the regulator should be able to deliver 100 psi (7 bar) with an outlet fitting (1/4 inch or 1/2 inch) that accepts one of the thread to push-in fittings provided. The following instructions are intended as guidelines.
1. If you are unsure as to how to connect a 2-stage regulator to a compressed gas tank, please seek assistance from your on-site Safety Officer or laboratory advisor.
2. The tank must be secured to a wall, stand or cart using a safety chain so that it cannot tip over during use.
3. The main tank valve should be closed (as indicated on the top of the valve).
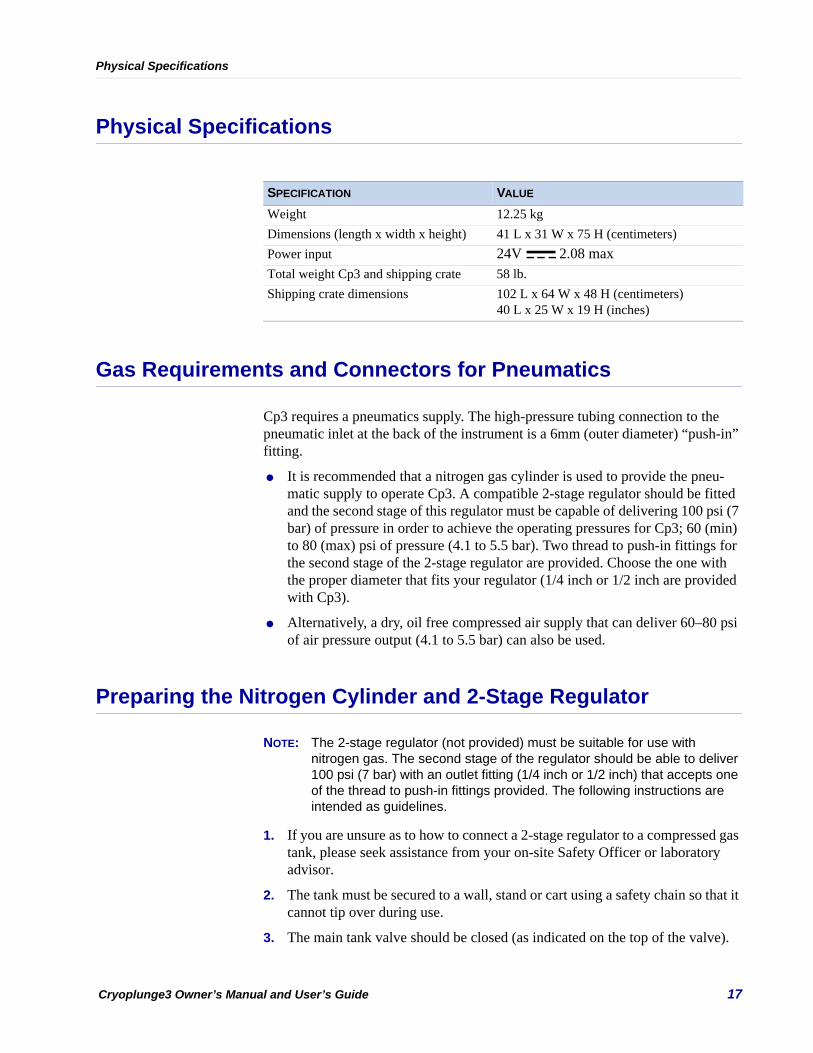
SPECIFICATION VALUE
Weight 12.25 kgDimensions (length x width x height) 41 L x 31 W x 75 H (centimeters)Power input 24V 2.08 maxTotal weight Cp3 and shipping crate 58 lb.Shipping crate dimensions 102 L x 64 W x 48 H (centimeters)
40 L x 25 W x 19 H (inches)
Cryoplunge3 Owner’s Manual and User’s Guide 17

Cryogenic Requirements and Safe Handling
4. Prior to attaching the 2-stage regulator to the tank, make sure the mating sur-faces are clean and free of any particulate matter.
5. Wrap the threaded end of one of the thread to push-in fittings with Teflon tape and attach to the exit port of the second stage of the regulator.
6. Press one end of the pneumatic tubing (provided) fully into the thread to push-in fitting. There is an o-ring within the fitting that the tubing must go through. When fully inserted, check by pulling the tubing away from the fitting. If the tubing does not disengage from the fitting, it is properly installed. The oppo-site end of this tubing fits into the push-in fitting on the back panel of Cp3.
ƒigure 1-5 Pneumatics supply for Cp3 (left), 2-stage nitrogen regulator (right)
Cryogenic Requirements and Safe Handling
● Liquid nitrogen: Please refer to the latest MSDS on the world wide web for safe handling information.
● Liquid ethane: Please refer to the latest MSDS on the world wide web for safe handling information.
Stage 2Stage 1
Thread to push-in fitting for Cp3 pneumatics
Cp3 pneumatic tubing
Regulator adjusting spring handle
Nitrogen gas tank secured in support stand
Cylinder valve handle
2-stage regulator
18 Cryoplunge3 Owner’s Manual and User’s Guide

Preparing the Ethane Cylinder and 2-Stage Regulator
Preparing the Ethane Cylinder and 2-Stage Regulator
ƒigure 1-6 Ethane tank and regulator
NOTE: The 2-stage regulator (not provided) must be suitable for use with ethane gas. The second stage of the regulator should be able to deliver 40 psi (~3 bar) with an outlet fitting that accepts narrow bore Tygon tubing (not provided).
Preparing the Ethane Cylinder and Regulator1. Locate the ethane tank in an explosion-proof (spark-proof) fume hood.
2. If you are unsure as to how to connect a 2-stage regulator to a compressed gas tank, please seek assistance from your on-site Safety Officer or laboratory advisor.
3. The tank must be secured with a safety chain such that it cannot tip over dur-ing use.
4. The main tank valve should be closed (as indicated on the top of the valve).
5. Prior to attaching the 2-stage regulator to the tank, make sure the mating sur-faces are clean and free of any particulate matter.
Second stage pressure gauge on ethane regulator
Pipette tip affixed to the end of the flexible tubing
Gas pressure regulator adjusting spring handle
Outlet valve
Conical tube for condensing the ethane
Styrofoam box for precooling the conical tube prior to condensing the ethane
Flexible tubing
Ethane tank
Safety chain
Main tank valve
First stage pressure gaugeon ethane regulator
Cryoplunge3 Owner’s Manual and User’s Guide 19

Preparing the Ethane Cylinder and 2-Stage Regulator
6. Wrap the regulator’s threaded mating surface with Teflon tape and screw securely into place on the ethane tank.
7. Close the outlet valve on the second stage of the regulator and open the sec-ond stage gas pressure regulating adjusting spring handle fully (i.e., no gas pressure to the second stage).
8. Affix a short length (~60 to 90 cm) of narrow bore flexible tubing (Tygon, for example) to the outlet port on the second stage of the ethane regulator so that it can reach the vessel within which the ethane will be condensed.
9. Attach a small pipette tip to the other end and cut approximately 3 mm to widen the opening at the tip of the pipette.
Leak Testing the Connections1. Open the main tank valve. This fills the regulator with gas but no gas should
escape through the flexible tubing because the outlet valve of the 2-stage reg-ulator is closed from the previous step above. The first stage of the regulator indicates the pressure of the gas coming directly from the tank.
2. Using a dilute soap solution, leak test the fitting between the ethane tank and the 2-stage regulator to make sure that the connection is tight and that no gas is escaping from this connection (if gas is escaping at the connection, bubbles form at the connection site). If this occurs, close the main tank valve, tighten the connection, and then repeat the procedure until the connection no longer indicates a leak.
Adjusting the Gas Pressure1. Check to be sure that the outlet valve of the second stage of the regulator is
closed so that no gas can escape.
2. Open the main tank valve.
3. Adjust the pressure of the second stage of the ethane regulator to deliver the ethane at about 2 to 4 psi (0.14 to 0.28 bar) by turning the regulator adjusting spring handle clockwise.
4. At this point, the system is now ready to use for condensing ethane. However, if you are not going to immediately condense ethane for freezing your sam-ples, the ethane tank and regulator should be left in “stand-by” mode.
Leaving the Ethane Cylinder in Stand-by ModeLeave the ethane tank in “stand-by” mode until you are ready to condense ethane for freezing your samples. When the ethane is not being used, always close the main tank valve after use and drain the regulator of any residual ethane by following these steps:
20 Cryoplunge3 Owner’s Manual and User’s Guide

Installation and Setup of Cp3
1. Close the main tank valve.
2. Open the outlet valve of the second stage of the regulator to bleed off any gas remaining in the regulator and the flexible tubing.
3. Fully open the regulator adjusting spring handle for the second stage of the regulator (turn counter clockwise until loose but not disconnected from the regulator).
4. Close the outlet valve of the second stage of the regulator.
Important Safety Precautions● The volume of the ethane pot for Cp3 is 4.1 mL to the upper rim of the pot.
● During use, do not condense more than 10 mL of ethane at one time.
● Review the latest MSDS available on the world wide web for ethane.
Installation and Setup of Cp3
Unpacking and InspectionNOTE: Do not discard shipping container. Keep all packing materials.
The shipping container has been specifically designed for Cp3 and must be used in the event that the instrument must be returned to Gatan, Inc. for repair.
ƒigure 1-7 Cp3 in the shipping crate
Cryoplunge3 Owner’s Manual and User’s Guide 21
Installation and Setup of Cp3
Removing Cp3 and Accessories from the Shipping ContainerNOTE: All components of Cp3 are located in one shipping container.
To unpack Cp3:1. Cut the two securing straps that surround the outside of the box.
2. Turn the lid locks (as indicated on the locks) to release the cover.
3. Open the cover. Cp3 and all accessories are packaged within several layers of sturdy foam.
4. Remove the layers of foam packing material to expose the contents within the packing crate.
5. Remove the accessories box and the workstation.
6. Remove addition layers of foam packing material to fully expose Cp3.
7. Remove Cp3 by carefully and gently lifting it out of the box and placing it in the designated area where it will be used (for example, a laboratory bench top).
8. Replace all of the foam layers.
9. Close the box, lock the lid, and store the shipping container in a suitable loca-tion. Do not discard the shipping box.
Matching the Contents against the Packing ListMake sure that these items are included in the box:
● Cryoplunge3
● Instruction manuals
❍ Cryoplunge3 instruction manual❍ Digital blotting timer instruction manual (Omron H5CX)❍ Digital thermohygrometer instruction manual (Omega iSeries)❍ Digital temperature controller manual (Omron E5CN)
● Cryoplunge3 accessories kit
❍ Blot assembly O-ring (2-004 Buna)❍ Tubing for pneumatic supply (5 meters)❍ 1/8 inch NPT, thread to push-in fitting, 6 mm❍ 1/4 inch NPT, thread to push-in fitting, 6 mm❍ Standard workstation (Cryoplunge3 pot assembly)❍ Liquid nitrogen filling funnel❍ Humidity wand (to retain cellulose sponges)❍ Humidity wand sponge (2)❍ Chamber assembly (includes 2 blotter assemblies)
22 Cryoplunge3 Owner’s Manual and User’s Guide

Connections and System Test
❍ Blotter assembly❍ Cp3 tweezers (2)❍ Filter paper pin pack (pack of 10)❍ Filter paper pack of 100 disks (Whatman #1)❍ Backing, plastic disk (pack of 20) ❍ Blotter cushioning foam (pack of 20)❍ Cryo grid box (square)❍ Grid box handling rod❍ Grid transfer/storage tube❍ Conical tube for condensing ethane❍ Cryo grid box transfer pot❍ Filter paper loading tweezers❍ Tygon tubing for workstation overflow port (1 meter)❍ Blotter blanking plug❍ Workstation cover (small)❍ Workstation cover (large) filter paper loading jig❍ Blot pad spindle wrench
Connections and System Test
Installing and Testing Cp31. Place Cp3 onto a stable work surface (away from drafts and open flames) and
oriented so that you can easily see the connection points at the back and right-hand side of the instrument.
2. Suggested supply for the pneumatic operation of Cp3 is a clean, dry nitrogen source.
● If using nitrogen gas, ensure that the nitrogen tank is secured (follow local safety regulations for securing the tank) and that the main tank valve is closed before proceeding. Operating pressure for Cp3 is 60 (min) to 80 (max) psi of pressure (4.1 to 5.5 bar). Pressure should not exceed 80 psi (5.5 bar) when the valve is fully open during use.
● If using house air supply, ensure that the supply valve is closed before proceeding. Operating pressure for Cp3 is 60 (min) to 80 (max) psi of pressure (4.1 to 5.5 bar). Pressure should not exceed 80 psi (5.5 bar) when the valve is fully open during use.
3. Connect high pressure tubing to the quick disconnect fitting for the pneumatic supply on the back panel of Cp3.
Cryoplunge3 Owner’s Manual and User’s Guide 23

Connections and System Test
● Simply press the end of the tubing fully into opening (see red arrow in image). There is a slight resistance as the tubing goes through the o-ring within the fitting.
● Connect the opposite end of the high pressure tubing to the thread to push-in fitting on a 2-stage nitrogen regulator or to the outlet for the house air supply. The connection to the to the thread to push-in fitting on the 2-stage nitrogen regulator was describe previously in “Preparing the Nitro-gen Cylinder and 2-Stage Regulator”.
ƒigure 1-8 Pneumatic connection
NOTE: In the event that you need to remove the tubing, always make sure the main nitrogen tank valve or house air valve is fully off, and while pressing the outer rim of the quick disconnect fitting in towards the inner rim of the fitting, pull the high-pressure tubing out. There will be slight resistance from the o-ring connection located within the fitting. Upon disconnecting the high-pressure tubing, the residual gas in the tubing is released.
4. Connect the protective earth cable to the protective earth post at the back panel of Cp3 and attach the opposite end to a ground source.
5. Connect the power supply to the mains cable.
6. Connect the cable to the mains receptacle on back of Cp3.
Inner rim of quick disconnect fitting
Push high-pressurepneumatic tubing firmly intothe quick disconnect fitting
Outer rim of quick disconnect fitting
24 Cryoplunge3 Owner’s Manual and User’s Guide

Connections and System Test
ƒigure 1-9 Pneumatic, mains, and protective earth connections
7. Connect the plug to the house electrical supply.
8. Orient Cp3 to a comfortable working position on the laboratory bench.
9. If using nitrogen gas for the pneumatics, make sure that the second stage of the regulator is not pressurized at this point.
10. Open the main tank valve on the nitrogen gas tank and note pressure on the first stage of the regulator. This is the tank pressure.
11. Adjust the second stage pressure to at least 60 psi (approximately 4.1 bar) by turning the regulator adjusting spring handle clockwise.
NOTE: Make sure that all connections are secure to avoid personal injury. When fully pressurized, the high-pressure pneumatic tubing carries 60–80 psi (4.1 to 5.5 bar) to Cp3. As a safety precaution, it is recommended that the remainder of the tubing is secured to a stationary object.
12. Place the liquid nitrogen workstation onto the base of Cp3, and align the groove at the base of the workstation with the workstation guide plate. Slide the workstation onto the guide plate until it stops. When the workstation is pressed fully into position, the safety interlock is engaged.
Pneumatic connection
Mains power connection
Protective earth connection
Cryoplunge3 Owner’s Manual and User’s Guide 25

Connections and System Test
ƒigure 1-10 Safety interlock for workstation
NOTE: There are two safety interlocks on Cp3: one is on the safety shield and the other is on the liquid nitrogen workstation.
13. Place the large cover over the top of the workstation with the detent for the small cover to the right. Place the small cover on top of the large cover so that it engages the detent in the large cover. With the small cover in place, the safety shield cannot close. This is done purposefully so that one cannot acci-dentally plunge the tweezers into the small cover.
14. Connect a piece of Tygon tubing (provided) to the overflow port of the work-station such that it extends beyond the edge of the base plate.
ƒigure 1-11 Workstation overflow port with Tygon tubing attached
15. Connect the ethane pot TC-heater connector to its receptacle on the back right-hand side of Cp3 (there is only one orientation for this connector).
16. Insert the Omega temperature/humidity sensor into the large hole on the top left-hand side of the humidity chamber. Insert the electrical connection for the sensor into its receptacle on the right-hand side of the column for Cp3. The connector for the sensor is configured such that it can only be inserted in one orientation.
Safety interlock
Workstation slides over glide plate
26 Cryoplunge3 Owner’s Manual and User’s Guide

Connections and System Test
ƒigure 1-12 Insertion of Omega temperature/humidity sensor
ƒigure 1-13 Omega temperature/humidity sensor connector
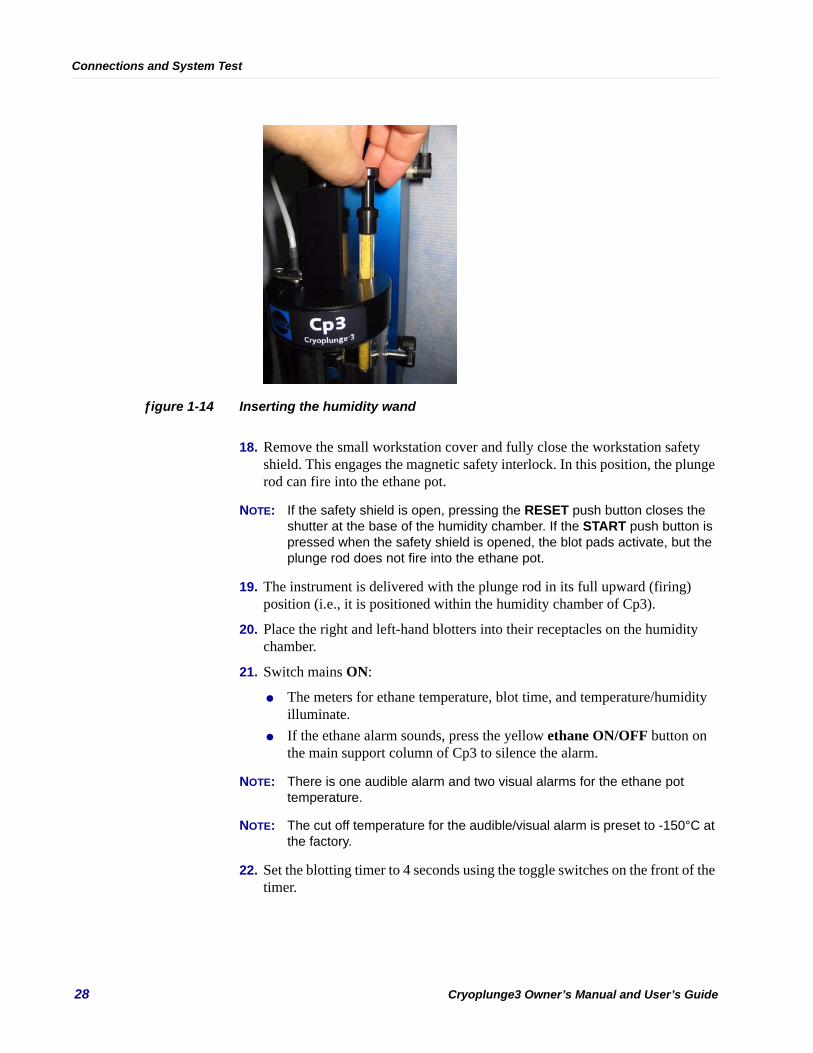
17. Insert the humidity wand into the small hole on the top right-hand side of the humidity chamber.
Cryoplunge3 Owner’s Manual and User’s Guide 27
Connections and System Test
ƒigure 1-14 Inserting the humidity wand
18. Remove the small workstation cover and fully close the workstation safety shield. This engages the magnetic safety interlock. In this position, the plunge rod can fire into the ethane pot.
NOTE: If the safety shield is open, pressing the RESET push button closes the shutter at the base of the humidity chamber. If the START push button is pressed when the safety shield is opened, the blot pads activate, but the plunge rod does not fire into the ethane pot.
19. The instrument is delivered with the plunge rod in its full upward (firing) position (i.e., it is positioned within the humidity chamber of Cp3).
20. Place the right and left-hand blotters into their receptacles on the humidity chamber.
21. Switch mains ON:
● The meters for ethane temperature, blot time, and temperature/humidity illuminate.
● If the ethane alarm sounds, press the yellow ethane ON/OFF button on the main support column of Cp3 to silence the alarm.
NOTE: There is one audible alarm and two visual alarms for the ethane pot temperature.
NOTE: The cut off temperature for the audible/visual alarm is preset to -150°C at the factory.
22. Set the blotting timer to 4 seconds using the toggle switches on the front of the timer.
28 Cryoplunge3 Owner’s Manual and User’s Guide

Connections and System Test
ƒigure 1-15 Meters and alarms for Cp3
23. Check to make sure that the plunge rod is in its full upward (firing) position, then press the RESET button to close the shutter located at the base of the humidity chamber.
24. Press the START button. The blotters come together for 4 seconds and then the plunge rod fires towards the ethane pot.
25. Raise the plunge rod to the full upward (firing) position.
NOTE: Remember to return the plunge rod to its full upward (firing) position before pressing the RESET button or depressurizing the pneumatic supply to Cp3. Failure to do this causes the shutter at the base of the humidity chamber to close against the plunge rod. This situation can be corrected by manually moving the shutter towards the front of the instrument while raising the plunge rod to the full upward (firing) position. Refer to the “Troubleshooting” section of this manual for further instructions, if necessary.
NOTE: The plunge rod does not fire unless the following preconditions are met:
● The workstation is in the innermost position (safety interlock engaged).● The safety shield is fully closed and the safety interlock is engaged
(large cover should be in place on top of the workstation but the small workstation cover must be removed in order of the safety shield to close).
● The pneumatic supply is on.
Ethane pot audible alarm ON/OFFEthane temperature warning lamp
Blotting timer(Omron H5CX)
Ethane temperature controller(Omron E5CN)
Temperature/humidity meter(Omega iSeries)
Ethane pot temperature reading
User preset for ethane temperature
Ethane temperature up/down push buttons
Blot time count down window
Blot time
Buttons to adjust the blotting time
Humidity readout
Temperature readout
Cryoplunge3 Owner’s Manual and User’s Guide 29

Connections and System Test
Preparing the Humidity ChamberTo prepare the chamber:1. Switch mains ON and make sure the temperature/humidity sensor is inserted
into the top of the humidity chamber.
2. Raise the plunge rod to the full upward (firing) position.
3. Press the RESET button to close the shutter at the base of the humidity cham-ber.
4. Remove the humidity wand from its receptacle on the top of the humidity chamber.
5. Insert one of the (compressed) cellulose sponges within the three metal sup-ports of the wand.
6. Soak the wand sponge in hot tap water to expand the cellulose sponge.
7. Remove any excess water by blotting against absorbent paper.
NOTE: Soak the sponge in hot water to rapidly raise the chamber humidity.
8. Replace the humidity wand.
9. Wait approximately 15 minutes for the humidity chamber to reach 98% RH.
10. Resoak the humidity wand as needed to maintain 98% RH within the humid-ity chamber.
Preparing the Filter Paper DisksNOTE: The die cutter for preparing filter paper disks comes pre-cleaned from the
factory, but should be cleaned periodically to keep the filter paper disks free from contaminants. To clean the die cutter, wear protective gloves and gently wipe the upper and lower cutting surfaces with a cotton swab or lint-free cloth moistened with ethanol. Clean the support surface with a lint-free cloth moistened with ethanol. Never touch the surface of the filter paper disks with your bare hands. Always wear protective gloves to ensure that the disks remain contamination free.
To prepare the filter paper disks:1. Place the die cutter on a firm, clean surface.
2. Clean the cutting surfaces to ensure that the filter paper disks are free from contaminants.
3. Prepare a pertri dish to capture the freshly cut filter paper disks.
4. Wear protective gloves (for example, RNAse-free Nitrile gloves).
5. Insert the desired type of filter paper into the die cutter and press the lever downward to cut the disk.
6. Move the cut disk to the petri dish.
30 Cryoplunge3 Owner’s Manual and User’s Guide

Connections and System Test
7. Continue until the suitable quantity of filter paper disks have been produced for your blotting needs.
ƒigure 1-16 Filter paper die cutter
Preparing the BlottersTo mount the blotting foam onto the blotters:
NOTE: Cp3 is shipped without the filter paper or foam attached to the blot assembly.
1. Remove the blotters from the humidity chamber by grasping onto the outer surface of the blotter and pulling straight out and away from the humidity chamber. There may be a slight resistance from the o-rings on the shaft of the blotter.
ƒigure 1-17 Inserting/removing a blotter from the right-hand blot assembly
2. Using the blot pad spindle wrench, unscrew the top spindle.
Cryoplunge3 Owner’s Manual and User’s Guide 31

Connections and System Test
ƒigure 1-18 Removing the spindle
3. Insert one sponge pad over the outer spindle making sure it is properly aligned with the spindle core.
ƒigure 1-19 Inserting the sponge pad
4. Replace the top spindle and tighten using the spindle wrench.
5. Make sure the foam pads are uniform and flat when the spindle is tightened.
6. Repeat for the other blot assembly.
ƒigure 1-20 Replacing and tightening the spindle
Loading the filter paper disk onto the blotters
NOTE: To prevent contamination of the filter paper disks, wear protective gloves or handle the disks with pre-cleaned tweezers.
NOTE: If necessary, clean and dry the filter paper loading jig prior to loading the filter paper.
32 Cryoplunge3 Owner’s Manual and User’s Guide

Connections and System Test
1. Remove the blotters from the humidity chamber by grasping onto the outer surface of the blotter and pulling straight out from the humidity chamber (see Figure 1-17 on page 31).
2. Place the filter paper pin flat side down into the filter paper loading jig.
3. Place a new piece of filter paper over the pin.
4. Place the plastic backer on top of the filter paper.
ƒigure 1-21 Loading the filter paper disk and protective plastic backer
5. Guide the blotter down the barrel of the filter paper loading jig and press down firmly to connect the pin.
6. Remove the blotter from the jig and gently press down on the head of the pin to ensure that it is firmly seated and that the filter paper is flat.
7. Reinsert the blotter to the humidity chamber.
8. Repeat with the other blotter.
ƒigure 1-22 Attaching the filter paper disk and inserting the blotter
Cryoplunge3 Owner’s Manual and User’s Guide 33

Cooling the Workstation with Liquid Nitrogen
Cooling the Workstation with Liquid Nitrogen
NOTE: Starting from room temperature conditions, It takes approximately 20 minutes for the workstation to stabilize at liquid nitrogen temperature. It is important for the ethane pot temperature to be at stable temperature below -170°C prior to condensing ethane into the ethane pot.
To cool the workstation with liquid nitrogen:1. Have a ready supply of liquid nitrogen available along with several small
dewars or liquid nitrogen transfer vessels for the next steps.
2. Make sure that the TC-heater connector for the ethane pot is plugged in.
3. Switch on the mains supply.
4. Set the ethane temperature using the up/down push buttons on the ethane tem-perature controller to -172°C.
ƒigure 1-23 Meter for ethane temperature controller
5. Remove the covers from the workstation.
6. Insert the liquid nitrogen transfer pot into the front of the workstation
7. Fill the workstation and the ethane pot with liquid nitrogen to start rapid cooldown of the workstation. As liquid nitrogen is added to both the worksta-tion and the ethane pot, there will be rapid boil off of the liquid nitrogen. Con-tinue to fill both until the workstation reaches equilibrium and the ethane pot maintains at least -170°C. This takes at least 20 minutes.
Ethane pot temperature reading
User preset for ethane temperature
Ethane temperature up/down push buttons
34 Cryoplunge3 Owner’s Manual and User’s Guide

Condensing Ethane and Filling the Ethane Pot
ƒigure 1-24 Initial cool-down of the workstation and ethane pot
8. When the workstation is at the low temperature equilibrium, prepare to con-dense the ethane.
Condensing Ethane and Filling the Ethane Pot
NOTE: The following safety recommendations are summarized below for your convenience. You are strongly advised to review the latest MSDS available on the world wide web for safe handling procedures for liquid ethane and liquid nitrogen.
WARNING: REVIEW AND REMEMBER THESE IMPORATANT SAFETY PRE-CAUTIONS WHEN HANDLING THE LIQUID CRYOGENS USED IN THIS PROCEDURE!
● FIRE AND EXPLOSION: Fire and explosion are the primary hazards associated with flammable, liquefied gases such as ethane. Flamma-ble gases can be ignited by static electricity or by a heat source (such as a flame or any hot object). Cryogens (including nonflammable nitro-gen) which achieve temperatures below -183 °C can liquefy oxygen from the surrounding environment to form potentially dangerous oxy-gen mixtures which support violent combustion.
● EXPLOSION DUE TO EXPANSION: At temperatures above boiling point, all liquid cryogens expand rapidly by factors in excess of 700 times. Any cryogen contained or trapped in a sealed compartment or vessel is a potential explosion risk if allowed to warm up.
● SPILLAGE DUE TO FAILURE OF STORAGE VESSELS: Glass vac-uum dewars can shatter when liquid cryogens are introduced causing a spill and potential lacerations from glass shards. Take care when using glass vacuum dewars. If the vacuum integrity of the dewar is in doubt, use stainless steel vessels.
● SPILLAGE OF ETHANE DUE TO NITROGEN ENTRAPMENT: If the liquid nitrogen used to cool the ethane vessel overflows into the ethane, it can freeze the top layer of ethane within the ethane pot. This
Cryoplunge3 Owner’s Manual and User’s Guide 35
Condensing Ethane and Filling the Ethane Pot
in turn can trap ethane gas which can explode through the frozen layer of ethane showering the surrounding area.
● ASPHYXIATION: Asphyxia is a potential hazard with all cryogens if they are allowed to warm and produce large volumes of gas. Because the gases produced by ethane and nitrogen are colorless and odor-less, they can escape into the atmosphere undetected and quickly reduce the concentration of oxygen below the level necessary to sup-port life (<19.5% v/v). Victims might be unaware. At low concentra-tions, ethane can cause narcotic effects and symptoms can include dizziness, headache, nausea, and loss of coordination.
● COLD BURNS: Because of extremely low temperatures, cryogens are capable of producing severe cryogenic burns and frostbite. When spilled on a surface, they tend to cover it completely and, therefore, cool a large area. The vapors from these liquids are also extremely cold and can produce burns. Exposure, which might be too brief to affect the skin of the face or hands, can damage delicate tissues, such as the eyes. Flesh sticks to extremely cold materials such as non-insu-lated pipes or metallic vessels containing cryogenic liquids. Even non-metallic materials are dangerous to touch at low temperature. In addi-tion to the hazards of frostbite or flesh sticking to cold materials, objects that are soft and pliable at room temperature, such as rubber or plastic, become hard and brittle and are easily broken at these extremely low temperatures.
NOTE: For this next procedure, you will be working in an explosion-proof fume hood. No flames or explosive chemicals are allowed in this hood.
NOTE: If the fume hood has an exceptionally high draw rate, you might have to minimize the draw for this procedure and then restore the draw rate at the close of the procedure.
NOTE: Have a ready supply of liquid nitrogen available to maintain the workstation at the low temperature equilibrium.
NOTE: Always wear eye protection when working with liquefied ethane or any cryogens.
Important:● The volume of the ethane pot for Cp3 is 4.1 mL to the upper rim of the
pot. ● Do not condense more than 10 mL of ethane at one time.● Always make sure that the containers that will receive the condensed
ethane do not contain any residual liquid nitrogen. In a closed environ-ment and upon evaporation, the liquid nitrogen pushes the liquid ethane out of the vessel at a high rate and can cause injury.
● Always position the ethane vessel away from you.● Ethane vaporizes at -88.6°C so it is very important to maintain the
level of liquid nitrogen within the workstation of Cp3 when the ethane pot is filled.
36 Cryoplunge3 Owner’s Manual and User’s Guide
Condensing Ethane and Filling the Ethane Pot
To condense the ethane:1. When the pre-cooled workstation has reached its low temperature equilib-
rium, switch mains OFF.
2. Disconnect the ethane pot TC-heater connector.
3. Place the workstation in the explosion-proof fume hood.
4. Remove the small workstation cover.
5. Top off the workstation with liquid nitrogen via the filling funnel.
6. Remove any residual liquid nitrogen that might be in the ethane pot. (Given time, the liquid nitrogen evaporates on its own. Alternatively, one can speed up this process by inserting a small piece of clean Tygon tubing into the ethane pot. Be sure to face the opening of the Tygon tubing away from you to prevent injury.)
7. Adjust the gas pressure for the 2-stage regulator on the ethane tank.
a. Check to be sure that the outlet valve of the second stage of the regulator is closed so that no gas can escape.
b. Open the main tank valve.c. Adjust the pressure of the second stage of the ethane regulator to deliver
the ethane at about 2 to 4 psi (0.14 to 0.28 bar) by turning the regulator adjusting spring handle clockwise.
d. At this point, the system is now ready to use for condensing ethane.
8. There are several methods that are commonly used to condense the ethane. Three examples of these methods follow:
NOTE: Make sure that the containers receiving the ethane are free of any particulate matter.
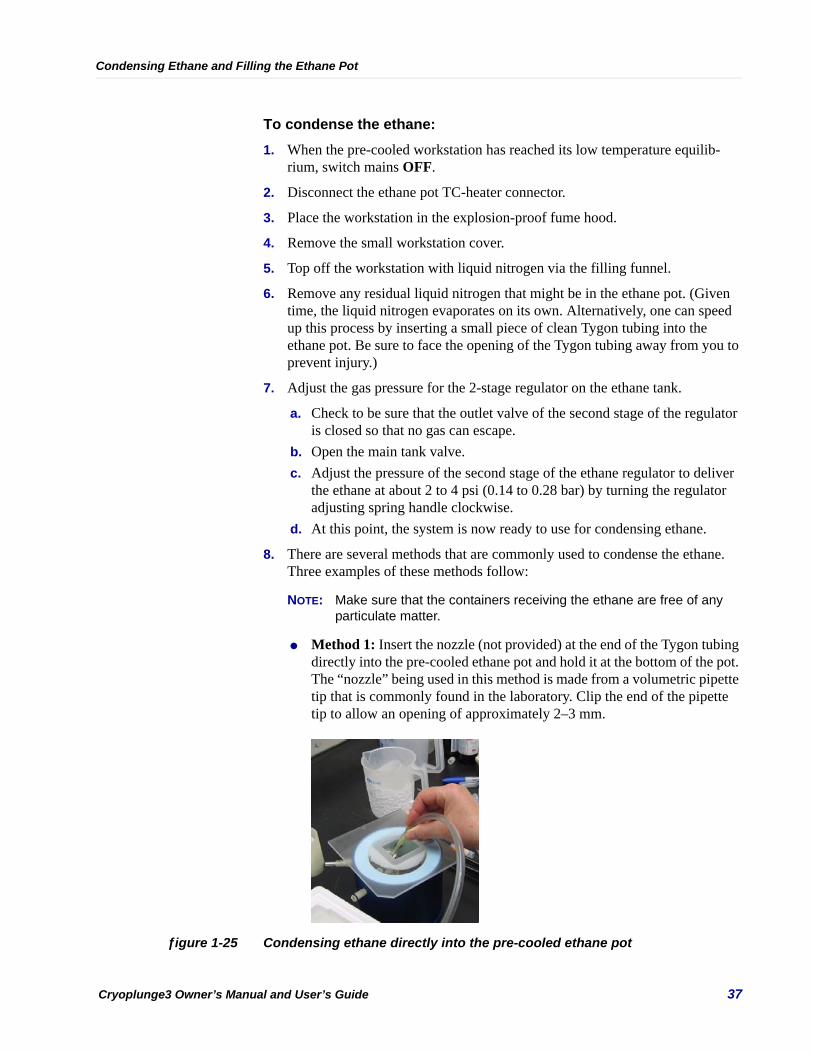
● Method 1: Insert the nozzle (not provided) at the end of the Tygon tubing directly into the pre-cooled ethane pot and hold it at the bottom of the pot. The “nozzle” being used in this method is made from a volumetric pipette tip that is commonly found in the laboratory. Clip the end of the pipette tip to allow an opening of approximately 2–3 mm.
ƒigure 1-25 Condensing ethane directly into the pre-cooled ethane pot
Cryoplunge3 Owner’s Manual and User’s Guide 37

Condensing Ethane and Filling the Ethane Pot
● Method 2: Pre-cool a conical tube (provided) in a small bath of liquid nitrogen. Condense 6-7 mL of ethane in the bottom of the tube. Carefully pour the condensed ethane into the pre-cooled ethane pot.
ƒigure 1-26 Pre-cooling the conical tube and then pouring the condensed ethane into the pre-cooled ethane pot
● Method 3: Pre-cool a conical tube (provided) in a small bath of liquid nitrogen and pre-cool three or four 2 mL volumetric tubes. Pipette the ethane into the pre-cooled tubes and allow them to freeze. When frozen, partially thaw the ethane by touching the outside of the plastic tube to a warm surface such as the counter top of the fume hood. Invert the tube over the ethane pot and allow the “ethane popsicle” to slide out. Exercise caution when using this method as the 2 mL volumetric tubes must be dry (no liquid nitrogen) prior to filling with liquid ethane.
ƒigure 1-27 Making the ethane popsicle
38 Cryoplunge3 Owner’s Manual and User’s Guide

Condensing Ethane and Filling the Ethane Pot
9. To condense the ethane, open the outlet valve on the second stage of the ethane regulator such that the ethane gas flows into the bottom of the pre-cooled ethane pot or the bottom of the conical tube depending on the chosen method for condensing the ethane.
10. Adjust the outlet valve on ethane regulator as needed to control the rate of condensation of the ethane. It takes approximately 2 minutes to directly fill the ethane pot to the upper most rim of the pot (4 mL). If using the conical tube method to pour the ethane, condense about 6-7 mL (no more than 10 mL) to allow for some potential lost ethane on pouring into the ethane pot. If using the “ethane popsicle” method, carefully pipette the ethane into the 2 mL volu-metric plastic tubes and allow a few minutes for the ethane to freeze.
11. When the ethane pot is full or you have a suitable quantity of ethane con-densed within the conical tube, close the outlet valve on the 2-stage regulator of the ethane tank and leave the ethane tank in “stand-by” mode.
12. Leave the ethane tank in stand-by mode.
Stand-by mode for the ethane tank
NOTE: Always close the main tank valve after use and drain the regulator of any residual ethane by following these steps:
a. Close the main tank valve.b. Point the Tygon transfer tubing towards the back of the explosion-proof
(spark-proof) fume hood.c. Open the outlet valve of the second stage of the regulator to bleed off any
gas remaining in the regulator and the flexible tubing. d. Fully open the regulator adjusting spring handle for the second stage of
the regulator (turn counter clockwise until loose but not disconnected from the regulator).
e. Close the outlet valve of the second stage of the regulator.
13. Add liquid nitrogen to the workstation if needed.
14. Replace the covers for the workstation.
15. If necessary, reset the flow rate for the fume hood.
16. Carefully remove the workstation and install it on Cp3.
17. Insert the TC-heater connector and switch the mains ON.
18. Adjust the up/down push buttons on the ethane meter until the ethane is main-tained just above its melting point. For example, if the ethane freezes when the temperature reads -172°C on the meter, press the up push button to main-tain a temperature just slightly above this value until the ethane melts.
19. Wait several minutes for the ethane temperature to stabilize and add liquid nitrogen through the remote fill funnel as necessary to maintain the volume within the workstation.
20. You are now ready to freeze your sample.
Cryoplunge3 Owner’s Manual and User’s Guide 39

Blotting Techniques for Freezing the Sample
Blotting Techniques for Freezing the Sample
NOTE: For best results, always pre-treat the specimen support (for example, holey carbon film or continuous carbon film) to render the surface hydrophilic or hydrophobic depending upon the needs of the sample.
NOTE: The plunge tweezers are specially designed and aligned to provide optimal contact with the blot pad assemblies.
NOTE: The black plastic securing clip for the plunge tweezers has a small and a large rectangular opening. The small opening should always be placed onto the tweezer shaft from the blunt end and the first detent position on the shaft of the tweezer should always be used to secure the specimen grid (first detent furthest from the tweezer tip). Pressing the securing clip further down on the tweezer shaft can damage the tip of the tweezer or cause the specimen grid to disengage prematurely during the plunging cycle.
NOTE: During the process of plunging the sample grids, it is necessary to monitor and/or adjust the ethane temperature, humidity of the chamber, and the volume of the liquid nitrogen in the workstation and in the liquid nitrogen transfer pot.
NOTE: The sample concentration, sample volumes, and blotting time generally have to be determined for each new specimen that will be plunge frozen in order to produce optimal results. The following recommendations are guidelines.
2-sided BlottingTo freeze the sample using 2-sided blotting:1. Pre-cool the cryo grid box by placing it inside of the liquid nitrogen transfer
pot within the workstation.
2. Pre-cool a second cryo grid box in the staging receptacle located on the metal mesh base of the workstation.
3. Secure the specimen support grid to the specially designed plunge tweezers and lock the grid in place by sliding the black plastic securing clip until it engages the first clickstop on the tweezer shaft.
40 Cryoplunge3 Owner’s Manual and User’s Guide

Blotting Techniques for Freezing the Sample
ƒigure 1-28 Securing the specimen grid to the plunge tweezers
4. Test to make sure that the grid is held firmly in the tweezer.
5. If the plunge rod is in the full upward (firing) position, it is necessary to run a blot and plunge cycle so that the tweezer can be loaded onto the plunge rod.
a. Remove the small workstation cover.b. Close the safety shield.c. Press RESET to close the shutter at the base of the humidity chamber.d. Press START to initiate the blot and plunge cycle.e. The plunge rod fires towards the ethane pot.f. Open the safety shield and replace the small cover.
6. Raise the plunge rod several centimeters and insert the base of the plunge tweezer into the slot at the base of the plunge rod and press until it clicks into place taking care not to damage the specimen grid.
ƒigure 1-29 Inserting the tweezers into slot at the base of the plunge rod
7. Raise the plunge rod to the full upward (firing) position until it clicks into place.
Cryoplunge3 Owner’s Manual and User’s Guide 41

Blotting Techniques for Freezing the Sample
ƒigure 1-30 Raising the plunge rod to full upward (firing) position
8. Press the RESET button to close the shutter at the base of the workstation
9. Position the blot pads:
● There are four blotting positions as indicated on the blot assemblies.● Each blotter has a white index line. ● Start by positioning the index line on each blotter so that it is aligned with
the 12 o'clock (uppermost) position on the blot assembly.● Remember to rotate the blotters after each plunge cycle so that each grid
being blotted is exposed to an unused area of the filter paper (for example, after each blot/plunge cycle, rotate the blotters towards the back of the instrument).
10. Open the specimen loading port on the front of the humidity chamber.
11. Apply a small aliquot of the sample suspension to the pre-treated surface of the support grid using an accurate volumetric pipetting device.
● 3 micro liters is a good starting point.
ƒigure 1-31 Applying sample aliquot to the support film
12. Close the specimen loading port to maintain the high humidity environment within the humidity chamber.
13. Rotate the plunge rod 90 degrees to the left or right so that the grid is now aligned with the blot pads.
42 Cryoplunge3 Owner’s Manual and User’s Guide

Blotting Techniques for Freezing the Sample
● There are four detent positions for the plunge rod to allow accurate align-ment of the grid with respect to the blot pads.
14. Set the timer for the desired blotting time.
● For example, for two-sided blotting where a 3 mL volume is applied to the support grid, set the blot time for 4 seconds (therefore volume plus one second).
15. Remove the small workstation cover and close the safety shield.
16. Press START.
a. The blot pads come together and blot the specimen for the time indicated on the timer.
ƒigure 1-32 2-sided specimen blotting
b. The grid is plunged into the liquid ethane.
ƒigure 1-33 Grid plunging into the liquid ethane
To remove the frozen hydrated grid from the ethane pot:
NOTE: The freshly frozen hydrated grid is protected while immersed in the liquid ethane. It is also protected while transferred within the cryogenic environment of the workstation. Prior to transferring the frozen hydrated grid from the ethane, refresh the positive outflow of cryogenic nitrogen gas from the chamber by adding a small volume of liquid nitrogen via the filling funnel. Do not breathe into the workstation when transferring the frozen hydrated grid as this will damage the grid.
NOTE: Make sure that the cryo grid box is at liquid nitrogen temperature and ready to receive the frozen hydrated grid. If necessary, top off the liquid nitrogen level within the liquid nitrogen transfer pot.
Cryoplunge3 Owner’s Manual and User’s Guide 43

Blotting Techniques for Freezing the Sample
NOTE: If you wish to blot excess ethane from your frozen hydrated grid prior to storing it within the cryo grid box, insert a piece of filter paper into the paper clip within the workstation.
NOTE: The specimen grids are fragile and must be handled with care to avoid damage (bending of the grid or breakage of the support film).
1. Hold the plunge tweezers with one hand.
2. Press the blue quick disconnect pushbutton on the plunge rod with your other hand.
ƒigure 1-34 Pressing the quick disconnect push button to release the plunge tweezers from the plunge rod
3. Push the plunge rod upwards approximately 3 cm to clear the top of the plunge tweezer.
4. Tilt the plunge tweezer slightly while keeping the frozen hydrated grid immersed within the center of the liquid ethane pot.
ƒigure 1-35 Tilting the tweezers
5. Gently lower the plunge piston to its bottom most position and leave it at this position for the next steps.
6. Remove the tweezer from the ethane pot keeping it well within the worksta-tion to prevent devitrification of the frozen hydrated grid
44 Cryoplunge3 Owner’s Manual and User’s Guide

Blotting Techniques for Freezing the Sample
7. OPTIONAL: If you want to view your grid on the same day that it is plunged, it is helpful to blot off any excess ethane that is sticking to the grid. To blot the excess ethane, place the grid just below the filter paper such that the tines of the plunge tweezers contact the filter paper without touching the grid. This action draws away any excess ethane that is trapped between the tines of the plunge tweezers and subsequently from the surface of the grid.
ƒigure 1-36 Blotting excess ethane
8. Position the tweezers such that the grid is in the liquid nitrogen of the cryo grid box transfer pot and, at this point, disconnect the black plastic securing clip for the plunge tweezers taking care not to drop the grid.
ƒigure 1-37 Disconnect the black securing clip on the plunge tweezers to free the frozen hydrated grid
9. The grid can now be placed within one of the receptacles of the cryo grid box.
10. If the cryo grid box has a rotating cover secured with a screw, position the slot of the cover and tighten the screw such that the grids cannot fall out of the box when it is transported for the next step.
To remove the frozen hydrated grids from the workstation:
NOTE: This step requires that you have a ready supply of liquid nitrogen, a liquid nitrogen transfer dewar, a liquid nitrogen storage dewar, and large tweezers to manipulate the liquid nitrogen transfer pot containing the blue cryo grid box.
Cryoplunge3 Owner’s Manual and User’s Guide 45

Blotting Techniques for Freezing the Sample
NOTE: Add liquid nitrogen to the workstation through the filling funnel as necessary to maintain the temperature of the workstation.
NOTE: There are many methods for storing the frozen hydrated grids prior to viewing on the cryo TEM. A grid transfer storage tube (conical tube provided) can be used to contain the blue cryo grid boxes. This tube has holes drilled near the cap to allow liquid nitrogen to flow freely in and out of the tube. Affixing a piece of string to this tube (through the holes provided) allows transport of the storage tube, containing the cryo grid box with the frozen hydrated grids, into a large liquid nitrogen storage dewar (for example, 35 liter dewar).
1. The frozen hydrated grids should be secured within the grid box.
2. Remove the small workstation cover and ensure that the cryo grid box transfer pot is filled with liquid nitrogen.
3. Prepare a liquid nitrogen transfer dewar by filling with liquid nitrogen and waiting several minutes for the temperature of the dewar to stabilize.
4. Remove the cap on the grid transfer storage tube (conical tube provide) and immerse the tube into the dewar of liquid nitrogen.
5. Using a pair of large tweezers, remove the cryo grid box transfer pot from the workstation and place inside of the transfer dewar.
6. Transfer the grid box to the storage tube using the large tweezers.
ƒigure 1-38 Transfer the grid box to the storage tube filled with liquid nitrogen
7. Return the cryo grid box transfer pot to the workstation.
8. Refill the remove the cryo grid box transfer pot and the workstation with liq-uid nitrogen to continue freezing more grids. If you no longer wish to freeze more grids, return Cp3 to stand-by for the next user.
Returning Cp3 to Stand-by Conditions
To return Cp3 to stand-by conditions for the next user:1. Clean and dry the plunge tweezers and store them with the protective cap in
place.
2. Clean and dry the filter paper loading tweezers and store them in their protec-tive sleeve.
46 Cryoplunge3 Owner’s Manual and User’s Guide

Blotting Techniques for Freezing the Sample
3. Clean and dry the filter paper loading jig and store it in its protective plastic bag.
4. Close the main tank valve on the nitrogen gas supply (pneumatics supply to Cp3).
5. Raise the plunge rod to its fully upward (firing) position within the humidity chamber.
6. Open the safety shield.
7. Press RESET several times to bleed the nitrogen gas from the pneumatic lines (the shutter opens and closes during this process).
8. Switch the mains OFF.
9. Unplug the TC-heater connector for the ethane pot.
10. Remove the workstation and place in the explosion-proof (spark-proof) fume hood.
11. Remove the small and large workstation covers.
12. Close the protective screen on the fume hood to allow the cryogens to vent out of the hood. When the workstation is dry (all of the cryogens have vented off), it can be returned to Cp3 for the next user.
WARNING: Never use a heat gun to speed up the drying process. These instru-ments produce very high, concentrated heat that damages (melts) the workstation. If you wish to dry the workstation when all of the cryogens have vented off, it is acceptable to use a hair dryer with a low heat set-ting.
13. Remove the humidity wand from the humidity chamber to air dry.
14. Open the specimen loading door.
15. Remove the blotters (optional).
16. Allow the humidity chamber to equilibrate to room temperature/humidity conditions.
1-sided BlottingTo freeze the sample using 1-sided blotting:
NOTE: Follow the instructions for freezing the sample using 2-sided blotting with the following exceptions.
1. Remove one of the blotters and insert the blotter blanking plug.
2. Apply a small aliquot of the sample suspension to the pre-treated surface of the support grid using an accurate volumetric pipetting device.
3. Orient the grid for 1-sided front or backside blotting.
a. 1-sided backside blotting blots the aliquot of the sample droplet through the holes on the holey carbon film.
Cryoplunge3 Owner’s Manual and User’s Guide 47
Blotting Techniques for Freezing the Sample
● This method is helpful to use when, for example, the sample concen-tration is very low.
b. 1-sided frontside blotting blots the aliquot of the sample directly onto the filter paper.
4. Because only one blot pad is being used to remove excess solution from the surface of the support film, set the blotting timer for two times the blotting time that would normally be used for 2-sided blotting.
a. For example, if you add 3 microliters of your sample and normally blot for 4 seconds with 2-sided blotting, use an 8 second blot time for 1-sided blotting.
b. Upon blotting, the bulk of the solution is removed within approximately the first four seconds, after which time the grid and filter paper disengage. The remaining four seconds allow the solution to slowly evaporate in the high humidity of the chamber to the desired thickness before it is finally plunged into the ethane pot.
Manual Multiple BlottingTo freeze the sample using manual multiple blotting:
NOTE: When the safety shield is left slightly ajar, pressing RESET closes the shutter, but pressing START blots the specimen without plunging the specimen grid into the ethane pot. This feature allows the user to perform manual multiple blots of the specimen grid prior to plunging it into the ethane pot.
NOTE: This technique is useful when multiple reagents or additional sample aliquots are to be added to the specimen grid prior to plunging.
NOTE: Because each blot cycle is manual for multiple blotting, different blotting times can be entered on the blotting timer to accommodate the constraints of the experiment being performed.
NOTE: Follow the instructions for freezing the sample using 2-sided blotting with the following exceptions.
1. Apply a small aliquot of the sample suspension to the pre-treated surface of the support grid using an accurate volumetric pipetting device.
2. Close the sample loading port to maintain the high-humidity environment within the humidity chamber.
3. Rotate the plunge rod 90 degrees to the left or right to engage one of the four detent positions; the grid is now aligned with the blot pad(s).
4. Set the timer for the desired blotting time.
5. Remove the small workstation cover and leave the safety shield slightly ajar to override the safety interlock (the shield is still in a protective position).
6. If necessary, press RESET to close the shutter.
48 Cryoplunge3 Owner’s Manual and User’s Guide

Blotting Techniques for Freezing the Sample
7. Allow the sample aliquot to adsorb onto the grid substrate for the desired amount of time (for example, 5 to 15 seconds).
8. Press START. The blot pad(s) blots the specimen for the time indicated on the timer, but the grid does not plunge into the ethane.
9. Press RESET. The shutter closes to maintain the high-humidity environment of the chamber.
10. Add additional sample or reagent to the grid if desired.
11. Close the safety shield completely to engage the safety interlock.
12. Press START. The specimen grid is blotted and plunged into the ethane pot.
No Blotting MethodMethod 1: Forming the thin film by slow evaporation under high humidity conditions
NOTE: In some cases, the experiment might require that the grid not be blotted at all. There are two methods to accomplish this with Cp3.
NOTE: Cp3 is delivered with one blanking plug. Additional blanking plugs are available as an accessory item at an additional charge.
NOTE: Follow the instructions for freezing the sample using 2-sided blotting with the following exceptions.
1. Remove the blotters.
2. Insert a blanking plug into the right and left-hand blot assemblies.
3. Apply a small aliquot of the sample suspension to the pre-treated surface of the support grid using an accurate volumetric pipetting device.
4. Press RESET to close the shutter.
5. Set the blotting timer for the desired time (for example, 10 minutes).
6. There should be no need to orient the grid with the blot axis because the grid is not blotted.
7. Press the START pushbutton. The specimen slowly dries to a thin film in the high humidity of the chamber prior to plunging into the ethane. The exact time for this to occur must be determined based on the humidity in the cham-ber.
Method 2: Immediate plunge with no blotting
NOTE: In some cases, the specimen aliquot is applied in such small volumes that blotting or drying is not required. An example of this method would be spraying a small volume of the sample directly onto the surface of the support film within the high-humidity environment of the chamber.
NOTE: Follow the instructions for freezing the sample using 2-sided blotting with the following exceptions.
Cryoplunge3 Owner’s Manual and User’s Guide 49

Routine Maintenance
1. Apply a small volume of the sample directly to the surface of the support film using a spray technique.
2. Set the blotting timer to zero (with the blotting timer set to zero, the blotters do not fire).
3. Press the START pushbutton.
4. The sample grid fires directly into the ethane pot.
Routine Maintenance
Removing the Humidity Chamber for CleaningNOTE: The humidity chamber can be removed for cleaning. Use a mild soap and
water solution to clean the chamber.
To remove the humidity chamber:1. Return Cp3 to stand-by conditions.
2. Remove the blotters.
ƒigure 1-39 Removing the blotters
3. Remove the humidity wand.
50 Cryoplunge3 Owner’s Manual and User’s Guide

Routine Maintenance
ƒigure 1-40 Removing the humidity wand
4. Remove the temperature/humidity sensor.
ƒigure 1-41 Removing the temperature/humidity sensor
5. Disconnect the pneumatic supply for the blot assemblies by pressing the outer ring of the “push-in” fitting while removing the pneumatic supply tube.
Cryoplunge3 Owner’s Manual and User’s Guide 51
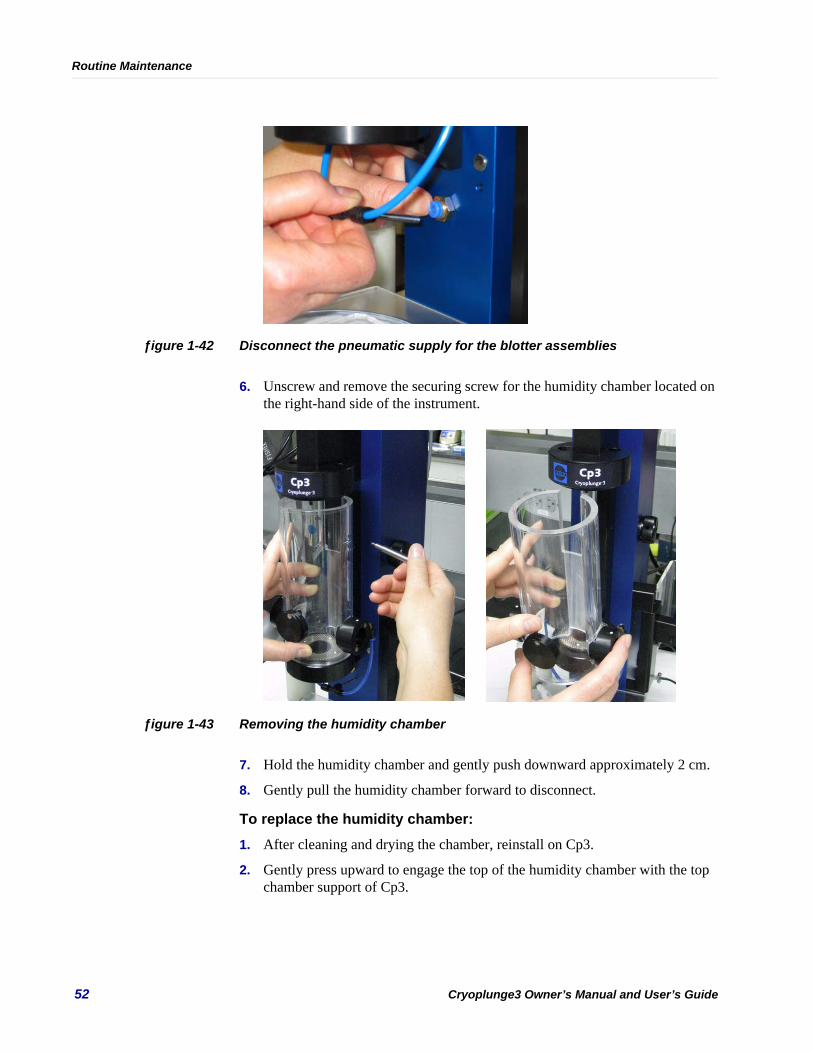
Routine Maintenance
ƒigure 1-42 Disconnect the pneumatic supply for the blotter assemblies
6. Unscrew and remove the securing screw for the humidity chamber located on the right-hand side of the instrument.
ƒigure 1-43 Removing the humidity chamber
7. Hold the humidity chamber and gently push downward approximately 2 cm.
8. Gently pull the humidity chamber forward to disconnect.
To replace the humidity chamber:1. After cleaning and drying the chamber, reinstall on Cp3.
2. Gently press upward to engage the top of the humidity chamber with the top chamber support of Cp3.
52 Cryoplunge3 Owner’s Manual and User’s Guide

Routine Maintenance
ƒigure 1-44 Replacing the humidity chamber
3. Insert the securing screw and make finger tight.
4. Reconnect the pneumatic supply to the blot assemblies; press the pneumatic tubing inward making sure that the connection is tight within the push-in fit-ting.
ƒigure 1-45 Reconnecting the pneumatic supply
5. Insert the blotters.
6. Insert the humidity wand.
7. Insert the temperature/humidity sensor.
8. Maintain the instrument in stand-by conditions for the next user
Cryoplunge3 Owner’s Manual and User’s Guide 53

Routine Maintenance
Cleaning the Outside Surfaces of Cp3Use a mild soap solution on a soft cloth to clean the outside surfaces of Cp3. Do not use harsh chemicals or alcohol based cleaners as this may cause damage.
54 Cryoplunge3 Owner’s Manual and User’s Guide

Cryoplunge™3 Owner’s Manual and User’s Guide
Appendix A:
TroubleshootingPROBLEM THINGS TO CHECK ACTION TO TAKE
Meters do not illuminate ● Mains power supply and ON/OFF switch
Check connections of mains power supply and make sure electrical connection is made. Switch ON/OFF switch to ON position.
Plunge rod does not fire ● Pneumatic supply Make sure that the pneumatic source is on, i.e., the main tank valve for the nitrogen gas tank which supplies the pneumatic pressure is open and set the second stage of the nitrogen gas regulator on the tank to a value of 60 and 80 psi (4.1 to 5.5 bar). If using house air supply, make sure that it is deliv-ering the proper pressure.
● Safety interlock for workstation Make sure that the workstation is fully pressed into the innermost position on the base plate of Cp3 and that the safety interlock for the workstation is engaged.
● Safety shield interlock Check that the safety shield is fully closed to ensure that the safety interlock on the door hinge of the shield is engaged.
Plunge rod cannot be raised into humidity chamber
● Power was shut off with plunge rod in downward position
Look at the bottom of the humidity chamber and, using your fingertip, gently push the shutter towards the front of Cp3 while raising the plunge rod to its full upward (firing) position. Release the shutter.
The shutter is impinged upon plunge rod. This conditions results when the plunge rod is in its full downward position and the power for Cp3 is switched off. Plunge rod cannot be raised to full upward (firing) position in this condition.
Shutter as viewed from the base of the humidity chamber
Using your fingertip, press the shutter forward (do not press the plunge rod forward). This action will free the plunge rod. Hold the shutter in this position and raise the plunge rod to the full upward (firing) position. Release the shutter.
55

Blot pads do not come together to blot the grid
● Pneumatic supply pressure Make sure that the pneumatic source is on, i.e., the main tank valve for the nitrogen gas tank which supplies the pneumatic pressure is open and set the second stage of the nitrogen gas regulator on the tank to a value of 60 and 80 psi (4.1 to 5.5 bar). If using house air supply, make sure that it is deliv-ering the proper pressure.
● The blotters are not fully inserted into the blot assembly at one of the four detent positions for blotting.
Press the blotters to their fully in and align with one of the four detent positions.
Ethane warning lamp does not illuminate
● Mains power supply and ON/OFF switch
Make sure the connector for the temperature/humidity sensor is inserted in the proper orientation and that it is secure and the mains power is switched ON.
● The bulb is burned out. Replace the bulb. Contact Gatan, Inc. for part number.
Ethane alarm ON/OFF pushbutton does not illuminate
● Mains OFF. Check to make sure that the electrical connection is made and that the ON/OFF switch is switched ON.
● The bulb is burned out. Replace the bulb.Temperature/humidity not indicated on meter
● Temperature/humidity connector Check to be sure that the connector for the temper-ature/humidity sensor is inserted in the proper orien-tation and that it is secure
Loss of high humidity condition within humidity chamber
● The shutter and/or specimen loading port is open.
Close the shutter and/or specimen loading port by first returning the plunge rod to its full upward (firing) position and then pressing RESET.
● The humidity wand sponge is too dry to maintain humidity.
Re-soak the wand with water to increase the humidity within the chamber.
Plunge tweezers do not hold grid
● The black securing clip is not properly inserted on the tweezers shaft.
Make sure that the smaller of the two openings on the securing clip is inserted onto the tweezers shaft such that it faces the tip of the tweezers and locks onto the first detent (furthest from the tweezers tip).
● The tweezers tips are “splayed” apart due to misuse.
Remove the black securing clip and, with the tweezers opened, gently press each tip of the tweezers against a solid surface to re-align tips. (If necessary, the tips of the plunge tweezers can be gently filed against the surface of a sharpening stone as needed to improve performance and longevity.)
Grid disconnects from plunge tweezers during plunge cycle
● Black securing clip not properly inserted on tweezers shaft
Make sure that the smaller of the two openings on the securing clip is inserted onto the tweezers shaft such that it faces the tip of the tweezers and locks onto the first detent (furthest from the tweezers tip).
● Tweezers tips are “splayed” apart due to misuse
Remove the black securing clip and, with the tweezers opened, gently press each tip of the tweezers against a solid surface to re-align tips.
● Plunge rod dampening pot damaged Check to make sure the plunge rod dampening pot is intact.
PROBLEM THINGS TO CHECK ACTION TO TAKE
56 Cryoplunge™3 Owner’s Manual and User’s Guide

Ethane temperature does not display on meter
● TC-heater connector Check to be sure this connection is secure.
Ethane freezes ● Ethane temperature setting Set the ethane temperature to a value just above its melting point of -182°C using the up/down push buttons on the ethane meter until the desired temper-ature is obtained.
PROBLEM THINGS TO CHECK ACTION TO TAKE
Cryoplunge™3 Owner’s Manual and User’s Guide 57

58 Cryoplunge™3 Owner’s Manual and User’s Guide

Gatan Product WarrantyGatan warrants that products manufactured by Gatan shall be free of defects in materials and workmanship for the warranty period, which com-mences at date of shipment. Gatan tests the performance of a unit as part of its final test procedure, prior to shipment from its factory. Gatan war-rants that the unit meets Gatan’s published specifications at time of shipment from its factory. All product warranties provide, for a period of one year after shipment to customer, parts (excluding all normal consumable, wear, and maintenance items) and labor. For Specimen Preparation Equipment and Specimen Holders, Gatan will correct any defects in the instrument either by repair in our facility or replacing the defective part, with the shipping party responsible for shipping costs. For products which attach to the column (Cameras, DigiScan, GIF, and PEELS), travel of up to 100 miles from a Gatan authorized repair center (Pleasanton, CA; Warrendale, PA; Munich, GmbH; and Corby, UK) is included. Travel expenses for service beyond 100 miles will be charged for. Instruments, parts, and accessories not manufactured by Gatan will be warranted by Gatan for the specific items and periods in accordance with and provided by the warranty received by Gatan from the Original Equipment Manufacturer. All such accessory warranties extended by Gatan are limited in accordance with all the terms, conditions, and other provisions stated in this Original Equipment Manufacturer warranty. Gatan makes no warranty whatsoever concerning products or accessories not of its manufacture, except as noted above.Customer ResponsibilitiesThe customer bears the following responsibilities with regard to maintaining the warranty. The customer shall:1. Perform the routine maintenance and cleaning procedures at the required intervals as specified in Gatan’s operating manuals. Failure to per-
form specified maintenance will automatically void warranty.2. Use Gatan replacement parts. Failure to use the specified replacement parts will automatically void warranty.3. Use Gatan or Gatan-approved consumables.4. Provide Gatan authorized service representatives access to the products during normal Gatan working hours during the coverage periods to
perform service.5. Provide adequate and safe working space around the products for servicing by Gatan authorized service representatives.6. Provide access to, and use of, all information and facilities determined necessary by Gatan to service and/or maintain the products. (Insofar as
these items may contain proprietary or classified information, the customer shall assume full responsibility for safe-guarding and protecting them from wrongful use.)
Repairs and ReplacementsGatan will, at its option, either repair or replace defective instruments or components with conforming goods. Repair or replacement of products or parts under warranty does not extend the original warranty period. With the exception of consumable and maintenance items, the replacement parts or products used on instruments out of warranty are themselves warranted to be free of defects in materials and workmanship for 90 days.Any products, part, or assembly returned to Gatan for examination or repair shall have Gatan’s prior approval, with the customer requesting a Returned Material Authorization (RMA) approval. This RMA and the associated RMA number may be obtained through Gatan Service or directly from Gatan’s Warrendale facility at 724-776-5260. If the item is not under warranty, to obtain an RMA, the customer must provide a Purchase Order (PO) for the repair. If the item is under warranty and the customer is requesting an expedited exchange, as may be the case for a printed cir-cuit board, a PO will be required. A credit against this PO will be issued by Gatan upon receipt of the item as returned in accordance with the RMA instructions. The returned item should be shipped prepaid by the customer with the RMA number clearly marked on the exterior of the shipping container and on the enclosed shipping documents. If the returned item is under warranty, return transportation will be prepaid by Gatan. If the returned item is not under warranty, return transportation will be charged to the customer. Warranty LimitationsThe warranty does not cover:1. Parts and accessories which are expendable or consumable in the normal operation of the instrument.2. Any loss, damage, and/or instrument malfunction resulting from shipping or storage, accident (fire, flood, or similar catastrophes normally
covered by insurance), abuse, alteration, misuse, neglect, or breakage or abuse of parts by User.3. Operation other than in accordance with correct operational procedures and environmental and electrical specifications.4. Performance to specifications or safety of use (including X-ray emissions) if the unit is physically installed on, used in conjunction with, or
used as part of a third party’s equipment and is not installed by a Gatan service engineer. 5. Performance to specifications or safety of use (including X-ray emissions) as a result of the use of Gatan’s equipment with that of a third
party due to the third party’s product design.6. Modification of, or tampering with, the system.7. Improper or inadequate care, maintenance, adjustment, or calibration by User.8. User-induced contamination or leaks.9. Any loss, damage, and/or instruments malfunction resulting from use of User-supplied software, hardware, interfaces, or consumables other
than those specified by Gatan.Warranty ExclusionsIn the course of normal use and maintenance, certain parts have finite lifetimes. For this reason, the consumables, wear, and maintenance parts as specified in Gatan’s operating manuals carry a 90-day warranty unless otherwise specified.Post Warranty Period Support and Product ObsolescenceAfter the expiration of the warranty period described above, Gatan will provide service support for Gatan manufactured products at Gatan’s service labor rates and parts pricing in effect at the time of the repair. Gatan will continue to provide billable service support for the products for a period of three years after discontinuance or design obsolescence by Gatan. After this three year period, service support will be offered at the sole discre-tion of Gatan. Liability LimitationsThis warranty is in lieu of and excludes all other expressed or implied warranties, including (but not limited to) warranties of merchantability of fitness for a particular purpose. Under no circumstances will Gatan Inc. or Gatan International be liable for any direct, indirect, special, inciden-tal or consequential damages (including lost profit) or loss of any kind, whether based on warranty, contract, tort, or any other legal theory. The limits of Gatan liability in any dispute shall be the price received from the purchaser for the specific equipment at issue. The laws of the state of Pennsylvania apply to all aspects of this warranty.


Part Number: 001.02113 Rev 1
(According to ISO/IEC GUIDE 22 and EN 45014)DECLARATION OF CONFORMITY
Manufacturer’s Name: Gatan Inc.
Manufacturer’s AddressPleasanton, CA 94588 U.S.A.
: 5794, W. Las Positas Blvd.
DECLARES THAT THE PRODUCT
Product Name: CryoplungeTM3
Model Number: 930
CONFORMS TO THE FOLLOWING EUROPEAN DIRECTIVES
2006/95/EC Low Voltage Directive
2004/108/EC EMC Directive
2002/96/EC Waste Electrical and Electronic Equipment (WEEE) Directive
2002/95/EC Restriction of Hazardous Substances (RoHS) Directive*
* Exempt as Category 9 - Monitoring and Control instruments
In accordance with the following standards:
Safety
and laboratory use – Part 1: General requirements
: EN/IEC 61010-1:2001 2nd
Edition Safety requirements for
electrical equipment for measurement, control,
EMCEN55011 Radiated Emissions - Class A
: EN 61326-1:2006 Emissions and Immunity
EN61000-4-2 ESD Immunity
EN61000-4-3 RF Immunity
EN61000-4-4 EFT Immunity
EN61000-4-5 Surge Immunity
EN61000-4-6 Conducted Immunity
EN61000-4-8 Magnetic Field Immunity
EN61000-4-11 Voltage Dip Immunity
I, the undersigned, hereby declare that the equipment specified above conforms to the above Directives and Standards.
Place: Pleasanton, CA Signature:
Date: July 29, 2008 Full Name: Thomas G. Connelly
Position: President and CEO
Digitally signed by Thomas G. Connelly DN: cn=Thomas G. Connelly, c=US, o=Gatan, Inc., ou=Administration, [email protected] Reason: I attest to the accuracy and integrity of this documentLocation: 5794 W. Las Positas Blvd., Pleasanton, CA Date: 2008.07.30 12:41:29 -07'00'


SP830100EX01_REV02
Declaration of Contamination
The repair and/or service of any Gatan instruments will only be performed if a properly completed declaration has been submittedplease FAX this completed form prior to returning the instrument. Gatan maintains the right to refuse acceptance of any equipment without a declaration.
Please FAX completed form to our Pennsylvania office at 724-766-3360. This declaration must be completed and signed by authorized and qualified persons.
1. Description of instrument:
Model:
Serial No.:
Ship Date:
2. Reason for return:
3. Equipment condition:
Is the equipment functioning?
Yes No
Is the equipment free from potentially harmful
substances?
Yes No
* NOTE: We will not accept delivery of any equipment that has been radioactively or microbiologically contaminated without written evidence of decontamination!
4. Process related contamination of equipment. Toxic Yes No
Corrosive Yes No
Microbiological hazard* Yes No
Explosive* Yes No
Radioactive Yes No
Other harmful substance Yes No
Please list all substances, gases, and by-products which may have been used in the instrument and supply the Material Safety Data sheets with the return.
Trade name Chemical name Danger Class Precautions associated Action if human contact Product name (or Symbol) with substance
5. Legally Binding DeclarationI hereby declare the information supplied on this form is complete and accurate. The shipping of equipment will be in
accordance with the appropriate regulations covering Packaging, Transportation, and Labeling of Dangerous Substances.
Name of Organization: ___________________________________________________________________ Date:_______________ Address: __________________________________________________________________________________________________ City: ___________________________ State: ____________________ Zip Code: ________________ Country: ________________ Phone: __________________ FAX: ____________________ Email: _________________________________________________ Name: ____________________________________________ Job Title: _______________________________________________
Legally Binding Signature: ___________________________________________________________