Crossover Blazer 06/2012
6
Crossover Blazer 06/2012 By: burda style magazine http://www.burdastyle.com/projects/crossover-blazer-062012 This blazer has a unique button-up front closure, with button down lapels. It can be worn with a multitude of outfits, from a dress to a suit for the office. This blazer also features a functional sleeve button placket detail and a stylized front hemline. Here it is made in a Linen twill for a more casual look, you could make the interior a color or print for a fun detail. 1
Transcript of Crossover Blazer 06/2012

Crossover Blazer 06/2012
By: burda style magazine
http://www.burdastyle.com/projects/crossover-blazer-062012
This blazer has a unique button-up front closure, with button down lapels. It can be worn with a multitude ofoutfits, from a dress to a suit for the office. This blazer also features a functional sleeve button placket detailand a stylized front hemline. Here it is made in a Linen twill for a more casual look, you could make theinterior a color or print for a fun detail.
1

Materials
Back length approx. 55 cm (22 ins)
Step 1 — Preparations
This pattern is printed on 8.5″ × 11″ sheets of plain paper. Do not scale or center pages before printing. Waituntil all sheets are printed out before beginning to tape them together. Do not cut out pattern pieces yet—Arrange the sheets on a large, hard, flat surface so that they fit together, matching up like numbers and letters(i.e. 6A to 6A). To tape pattern together, fold under the margin of one piece (6A) and tape right against theline of it’s matching number/letter (6A).
Trace the pattern pieces from the pattern sheet according to your size.
The buttonholes on piece 1 are marked for size 36. For remaining sizes, remark the buttonholes accord ing tothe size lines. Adjust the spacing between the buttonholes.
burda style magazine pattern do not have seam allowance included.Seam and hem allowances to be added:Seams and edges 1.5 cm (5/8 in).
Step 2 — Cutting Out
2
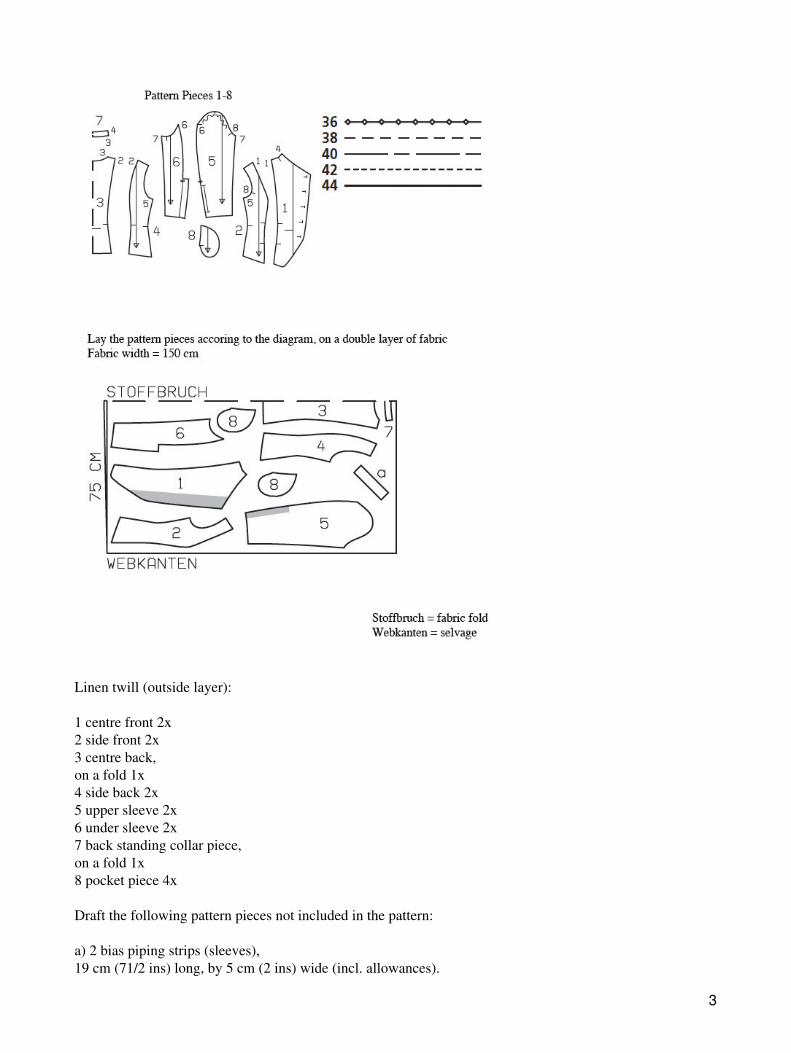
Linen twill (outside layer):
1 centre front 2x2 side front 2x3 centre back,on a fold 1x4 side back 2x5 upper sleeve 2x6 under sleeve 2x7 back standing collar piece,on a fold 1x8 pocket piece 4x
Draft the following pattern pieces not included in the pattern:
a) 2 bias piping strips (sleeves),19 cm (71/2 ins) long, by 5 cm (2 ins) wide (incl. allowances).
3
Cotton twill (inside layer):
pieces 1 to 7.
Interfacing: On right front edge, iron a strip of interfacing, 5 cm (2 ins) wide, to wrong side of fabric, toreinforce fabric for the bound buttonholes. On each upper sleeve piece, iron strip of interfacing, 3 cm (11/4ins) wide, to wrong side of fabric, to reinforce fabric for the buttonhole slit.
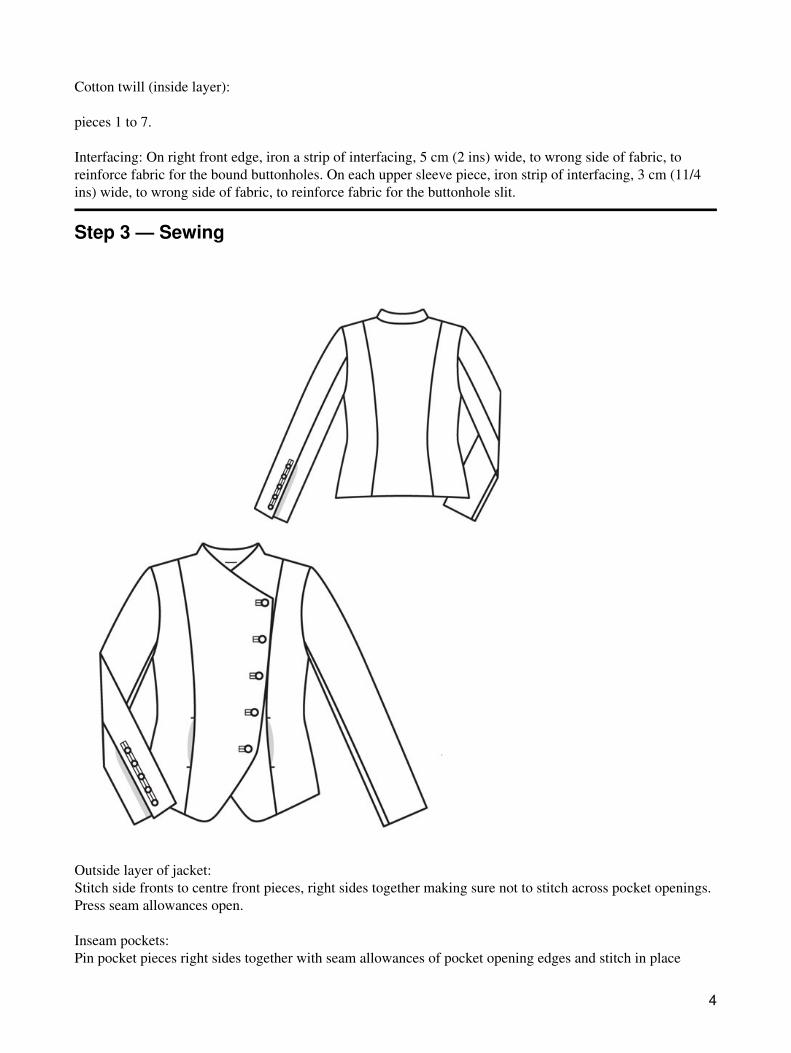
Step 3 — Sewing
Outside layer of jacket:Stitch side fronts to centre front pieces, right sides together making sure not to stitch across pocket openings.Press seam allowances open.
Inseam pockets:Pin pocket pieces right sides together with seam allowances of pocket opening edges and stitch in place
4
directly along marked seam lines. Press pocket pieces forward and stitch together. At ends of pocketopenings.
Sew bound buttonholes in right front edge:Working top buttonhole also on left front edge. For each buttonhole, cut a piece of fabric, on the bias,approx. 2 cm (3/4 in) longer than the finished buttonhole and 5 cm (2 ins) wide. Pin each fabric piece overbuttonhole marking, right sides facing. Work from the wrong fabric side and use a small stitch setting tostitch a rectangle, 6 – 8 mm (approx. 1/4 in) wide, around the marked line. Slash between lines of stitchingand clip diagonally into corners. Turn the fabric piece through the slash to the inside. Press seam allowancesopen. At ends of the buttonhole, pull the fabric strip flat and then baste it in place the basting should not bewider than the rectangular buttonhole opening. Take both long edges of the fabric piece and fold the pieceinto the opening, to form the lips of the buttonhole. The fold edges of the lips must meet, exactly at centre ofbuttonhole. Hand baste lips together with diagonal stitches and press. Work from right side of fabric to stitchexactly along seam, with small backstitches by hand, or by machine.Undo basting. Remove basting. Stitch small triangles at ends of buttonhole to the lips.
Stitch back section seams, right sides together. Stitch back standing collar piece to back neck edge (seamnumber 3), beginning and ending stitching exactly at marked shoulder seam lines. Press allowances of collarjoining seam open.
Stitch collar seams, from seam number 4, then continue stitching, to stitch shoulder seams. Clip seamallowances of fronts at seam marks. Press seam allow ances open.
Stitch side seams, right sides together.
For the buttonholes on each upper sleeve, sew one long bound slit, to the marked length, as described forbound buttonholes, above. On the finished slit, sew fold edges of lips together, 8 mm (a generous 1/4 in)long, spaced 2.5 cm (1 in) apart (= 5 buttonholes for the smaller buttons). Stitch back sleeve seams as far asslit mark. Clip seam allowance of under sleeves into corners. Press seam allowances open. Stitch front sleeveseams, right sides together.
Set in sleeves, easing sleeve caps, and matching underarm points. Trim allowances of sleeve attachmentseams to 7 mm (1/4 in) wide, in area of underarm, and neaten edges of allowances.
Inside layer of jacket:
Sew as described for outside layer. Omit inseam pockets, bound buttonholes, and bound buttonhole slits onsleeves.
Join outer and inner layers:Pin jacket units right sides together. Stitch together along hem edge, up front edges, neck edge, and collaredges, leaving approx. 20 cm (8 ins) open at centre of back hem edge, for turning. Turn jacket right side outand pulling inside sleeve layers into outside layers. On lower end of one sleeve vent, turn slit edges of outerand inner layers under and pin together. Reach up from bottom edge, between outer and inner layers, to graspthe pinned edges and pull them out. Stitch slit edges of upper sleeves right sides together, then continuestitching to stitch along edges of hem and underlap, stitching at right angle to sleeve seam at upper end ofunderlap. Trim seam allowances, trimming corners diagonally. Push sleeve layers in place again. Sew secondsleeve in same manner. Press edges and sew seam opening closed.
Finishing bound buttonholes:Mark ends of buttonholes with straight pins. Cut buttonholes open in inside layer and clip approx. 3 mm (1/8
5

in) diagonally up and down at the ends. Turn cut edges under and sew to lips by hand, with small stitches. Onsleeves, finish bound buttonhole slits as instructed for buttonholes.
Crossover Blazer 06/2012
6