Cronotermostat de Ambianta Fara Fir Honeywell CM727 RF Fisa Tehnica
16
1 CM721..................................2-6 CM727................................7-11 USER GUIDE
Transcript of Cronotermostat de Ambianta Fara Fir Honeywell CM727 RF Fisa Tehnica

1
CM721 ..................................2-6
CM727 ................................7-11
USER GUIDE

2
Features• Ergonomicuserinterfacefeaturingan‘OK-button’.
• LargeLCD(LiquidCrystalDisplay)Screen.
• 4independenttemperaturelevels(from5°Cto35°C).
• AutomaticSummer/WinterTimeChange.• OptimumStarttoachievetherighttemperatureatthe
righttime.• Built-inMemoryholdstheuserprogramindefinitely.
DescriptionThe Honeywell CM721 is aprogrammable room thermostatdesigned to control your heatingsystem efficiently, providingcomfortable temperatures whenyou are at home and energysavings when you are away. Thefollowing instructions explain howtoprogramandusethethermostattoprovidethemosthomecomfortattheleastcost.
Controls Layout
LCDScreen
BatteryLowIndicator
TimeDisplay
BurnerOnIndicator
TemperatureDisplay
123
6 111213
78910
45
BatteryCover
ProgramButtons
TimeChangeButtons
SetDateButton
TemperatureChangeButtons
TemperatureEnquiryButton
OperatingModeButtons
GreenOKButton
BatteryCompartment
1..4
AUTO
AUTO
MAN
OFF
13
1 2 43 5
7
8
9
6
11
12
10
PROGRAM
CM721
DATE14
14
CM721 - USER GUIDE
3
SETTING-UP THE CM721 ‘Getting Started’
This section shows you how to setup and run the thermostat in 3 simple steps:
STEP 1: Installing the BatteriesNote: Please follow the instructions in this section only if the thermostat screen is blank (no symbols or digits are displayed). If the room temperature is already displayed move on to Step 2: Setting the Date and Time.
To install the Batteries:a. Lift up the front cover of the thermostat to reveal the battery cover and product controls.
b. Remove the battery cover by pressing down and sliding out.
c. Insert the 2 x AA LR6 Alkaline Batteries supplied with the thermostat, ensuring the correct orientation (see ‘Controls Layout’ on page 2).
d. After a short pause the thermostat will display information on the screen and is now ready for use.
e. Replace the battery cover by sliding it firmly back into the front of the thermostat.
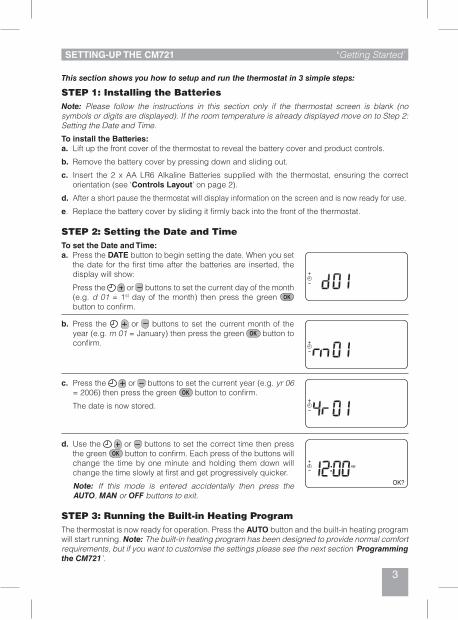
STEP 2: Setting the Date and TimeTo set the Date and Time:a. PresstheDATEbuttontobeginsettingthedate.When you set
the date for the first time after the batteries are inserted, the display will show:
Press the or buttons to set the current day of the month (e.g. d 01 = 1st day of the month) then press the green button to confirm.
b. Press the or buttons to set the current month of the year (e.g. m 01 = January) then press the green button to confirm.
c. Press the or buttons to set the current year (e.g. yr 06 = 2006) then press the green button to confirm.
The date is now stored.
d. Use the or buttons to set the correct time then press the green button to confirm. Each press of the buttons will change the time by one minute and holding them down will change the time slowly at first and get progressively quicker.
Note: If this mode is entered accidentally then press the AUTO, MAN or OFF buttons to exit.
STEP 3: Running the Built-in Heating ProgramThethermostatisnowreadyforoperation.PresstheAUTO buttonandthebuilt-inheatingprogramwillstartrunning.Note: The built-in heating program has been designed to provide normal comfort requirements, but if you want to customise the settings please see the next section ‘Programming the CM721’.
AM

4
Period 1 2 3 4 Time 6:30 8:00 18:00 22:30Temperature 21°C 18°C 21°C 16°C
The Built-in Heating ProgramThebuilt-inheatingprogramhas4temperaturelevelchangesthatcanbesetbetween3.00amand2.50amthefollowingday-allowingyoutomaintaintheeveningtemperatureaftermidnight.Eachtemperaturelevelcanbesetbetween5°Cand35°C,andadjustedin0.5°Cincrements.Thefactorydefaultprogramforheatingisasfollows.
Reviewing the Heating ProgramTorevieworedittheheatingprogramusethePROGRAM or buttonstonavigatebetweenthe4individualprogrammingperiods.
Modifying the Heating ProgramTo change the heating program:a. Press either of the PROGRAM or buttons to
entertheprogrammingmode.Thetime/temperaturesettings forperiod 1 willbeflashingasshown.Theactive period is highlighted by a flashing squarearoundthenumbersatthebottomofthescreen.
b. Toadjusttheperiodstarttimeusethe or buttons,thedisplaywillstopflashingandthe‘OK?’indicatorwillbedisplayed.Holdingthebuttondownwillchangethetimequickly.
Note: If you are pressing the or buttons and the display flashes the next period, it means the next period will be pushed forward.
c. Oncetherequiredtimeisreachedpressthegreen buttontoconfirm.
Note: If the original time setting did not require adjustment press the green button to move to step ‘d’.
d. Thetemperaturesettingforperiod 1 willnowbeflashing.Toadjustthispressthe or buttonsandconfirmthesettingagainbypressingthegreen button.
e. Thenext timeand temperatureperiodwillnowbeactive.Adjust thisby repeatingstepsb - d aboveuntilall4periodsaresetorpresstheAUTO buttontoruntheprogramasset,atanytime.
Disabling / Enabling Time PeriodsThethermostathas4periodsthatcanbeprogrammed,butyoumaynotneedalloftheseswitchpointsforyourheatingrequirements.Therefore,anyperiodfrom2to4canberemovedfrom(orreturnedto)theheatingprogramprofile.
To disable or enable time periods:a. Todisableunwantedperiodsgotothedesiredperiod( 2 to 4 )usingthePROGRAM or
buttonstonavigate,ensurethecorrectperiodishighlightedwiththeflashingsquaresymbol.Pressandholdthe buttonforatleast2secondsandthedisplaywillindicatetheperiodhasbeenremovedfromtheprogram.
b. Toenableperiodsagainfollowthesameprocedureasabove,navigatingtothealreadydisabledperiod.Toenablethisperiodagainpressandholdthe buttonforatleast2seconds.
4321
‘Efficient Daily Use’ PROGRAMMING THE CM721
5
Choosing the Operating ModeThethermostatcanoperateinthreedifferentmodes:Automatic,ManualorOff.Tosettheoperatingmode press either of the AUTO, MAN or OFF buttons. The screen indicates which mode iscurrentlyactivebydisplayingAUTO,MAN orOFF.
• AUTO (automatic)modesetsthethermostattofollowthebuilt-intemperatureprogram(defaultorpersonalised).Operatingthethermostatinthismodeisthebestwaytomaintainahighleveloftemperaturecomfortwhilstmaximisingyourenergysavings.
• MAN (manual) mode sets the thermostat to act as a simple thermostat with a fixed setpointthroughouttheday.Thesetpointcanbeadjustedfrom5°Cto35°Cbyusingthe or buttons.Thethermostatwillcontinuetomaintainthistemperatureuntilanotheroperatingmodeortemperatureisselected.
• OFFmodesetsthethermostattocontroltoaminimumtemperaturesettingof5°C(default)thatactsasafrostprotectionmeasureforyourhome.
During Normal Operation• Temperature Enquiry
In AUTO, MAN and OFF operating modes the thermostat will display the current roomtemperature. To review the programmed ‘target’ temperature (the temperature which thethermostat is trying tomaintain) press the button. This ‘target’ temperature valuewill bedisplayedflashingfor5secondsbeforereturningtothecurrentroomtemperaturevalue.
• Temperature Override
Duringnormaloperation(AUTOmode)theprogrammedtemperaturecanbeadjustedmanuallybypressingthe or buttonsorthe button.The‘target’temperaturewillbedisplayedandflashfor5seconds-duringthistimethe or buttonscanbeusedtomodifythesetvalue.Note: This temperature override is cancelled at the next programmed temperature change.
Adjusting the TimeToadjustonlythetimeduringnormaloperationusethe or buttonstoadjustthetimeandpressthegreen buttonagaintoconfirmanychanges.
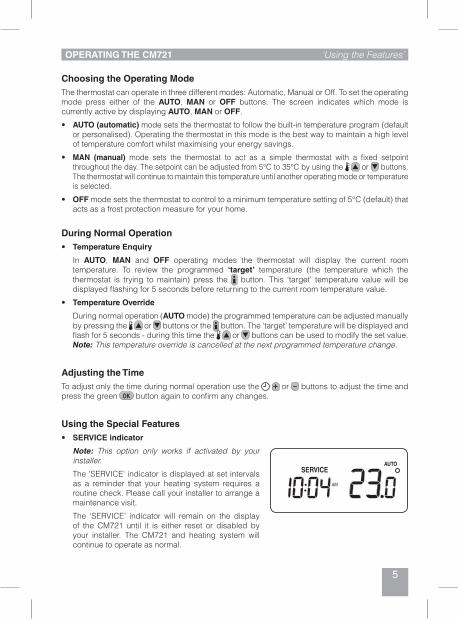
Using the Special Features• SERVICE indicator
Note: This option only works if activated by your installer.
The 'SERVICE' indicator is displayed at set intervals as a reminder that your heating system requires a routine check. Please call your installer to arrange a maintenance visit.
The ‘SERVICE’ indicator will remain on the display of the CM721 until it is either reset or disabled by your installer. The CM721 and heating system will continue to operate as normal.
OPERATING THE CM721 ‘Using the Features’

6
How do I change the batteries on the thermostat when they run out?The thermostat constantly monitors the batterypower level, which typically lasts for about 2yearsbeforeneedingreplaced.Whenthepoweris running low a flashing symbol will bedisplayedonthescreen.Tochangethebatteriesfollow thesteps in theabovesection(‘STEP 1: Installing the Batteries’ onpage3), replacingthe used batteries with new ones in Step c.Note:Whilechangingthebatteriesyourprogramsettingswillbestoredbutyoumayneedtoadjustthetimesettingstobecorrect.
How do I set one temperature for the whole day?To operate as a simple thermostat with onetemperature throughout the day, select themanual operating mode by pressing theMAN button. Adjust the temperature bypressing the or buttons - thiscanbesetanywherefrom5°Cto35°Cin0.5°Csteps.The thermostat will continue to maintain thistemperature until another operating mode isselectedorthetemperatureisadjusted.
FAQ’s
• Automatic Summer/Winter Time Change
The CM721 has a built-in Automatic Summer/Winter Time Change feature that will automatically adjust the clock forward or backward by one hour for ‘Daylight Saving Time’. This is carried out on the last Sunday of March and October each year.
• Optimum Start
Optimum Start is a program which ensures that the optimum temperature conditions are achieved at the required times. This is an Energy Efficiency feature that adjusts the start time of your heating system depending upon how cold it is. For example, on cold days your heating system will be started earlier to ensure that your home is warm when you get up (at the target temperature) and on warmer days the heating system will be started later to save energy. So, if the Optimum Start Feature is used, then the time / temperature settings which are entered into the thermostat should be set to when you want to be warm by and not when you want the heating system to start.
‘Using the Features’ OPERATING THE CM721
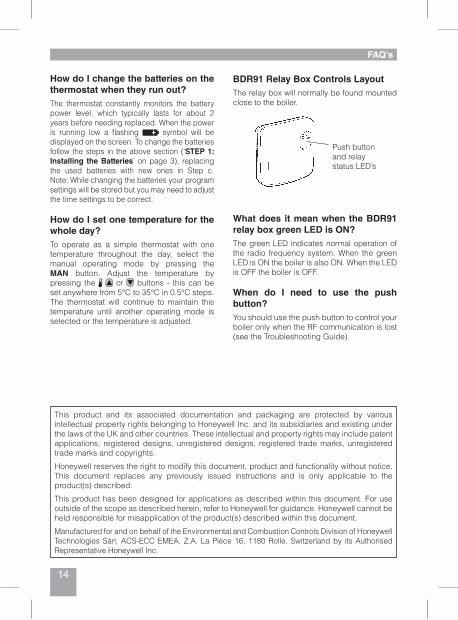
BDR91 Relay Box Controls LayoutThe relay box will normally be found mounted close to the boiler.
What does it mean when the BDR91 relay box green LED is ON?The green LED indicates normal operation of the radio frequency system. When the green LED is ON the boiler is also ON. When the LED is OFF the boiler is OFF.
When do I need to use the push button?You should use the push button to control your boiler only when the RF communication is lost (see the Troubleshooting Guide).
Push button and relay status LED’s

7
Symptom
BlankDisplay(PowerLoss).
Displayshowsflashing symbol.
Displayshows symbol.
Displayshowstheword'SERVICE'
BDR91redLEDisconstantlyonorflashing
Remedy
Checkbatteriesareinstalledbyremovingthebatterycover.
Checkbatterieshavebeeninstalledinthecorrectorientation.
Replacethebatteries.
Thebatteriesinthethermostatarelowonpower-Replacethebatteries.
Afaulthasoccurredinyourheatingsystem.Removeandre-insertthebatteries.
Ifthe symboldoesnotclearafterafewminutescontactyourinstaller.
Your installer has set a scheduled maintenance alert period on your CM721 as a recommendation that your heating system should receive a routine inspection.
Call your installer to arrange a maintenance visit.
Note: The CM721 and heating system will continue to operate as normal.
RF communication lost due to the wrong location of the room unit - Hook the room unit back on the wall bracket where RF communication was reliable.
Call installer
NOTE: You can control the boiler manually when the RF communication is lost: Press the BDR91 push button to switch the boiler on and off. When the green LED is on – the boiler is on.
TROUBLESHOOTING THE CM721
8
CM727 - USER GUIDE
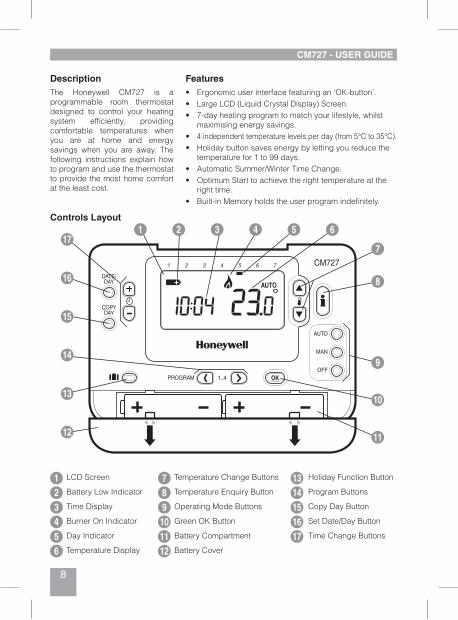
Features• Ergonomicuserinterfacefeaturingan‘OK-button’.• LargeLCD(LiquidCrystalDisplay)Screen.• 7-dayheatingprogramtomatchyourlifestyle,whilst
maximisingenergysavings.• 4independenttemperaturelevelsperday(from5°Cto35°C).• Holidaybuttonsavesenergybylettingyoureducethe
temperaturefor1to99days.• AutomaticSummer/WinterTimeChange.• OptimumStarttoachievetherighttemperatureatthe
righttime.• Built-inMemoryholdstheuserprogramindefinitely.
DescriptionThe Honeywell CM727 is aprogrammable room thermostatdesigned to control your heatingsystem efficiently, providingcomfortable temperatures whenyou are at home and energysavings when you are away. Thefollowing instructions explain howtoprogramandusethethermostattoprovidethemosthomecomfortattheleastcost.
Controls Layout
LCDScreen
BatteryLowIndicator
TimeDisplay
BurnerOnIndicator
DayIndicator
TemperatureDisplay
123456
HolidayFunctionButton
ProgramButtons
CopyDayButton
SetDate/DayButton
TimeChangeButtons
TemperatureChangeButtons
TemperatureEnquiryButton
OperatingModeButtons
GreenOKButton
BatteryCompartment
BatteryCover
789101112
1314151617
COPYDAY
DATE/DAY
1..4
AUTO
1 2 3 4 5 6 7
AUTO
MAN
OFF
16
15
171 2 43 5
8
9
10
7
12
13
14
11
6
PROGRAM
CM727

9
SETTING-UP THE CM727 ‘Getting Started’
This section shows you how to setup and run the thermostat in 3 simple steps:
STEP 1: Installing the BatteriesNote: Please follow the instructions in this section only if the thermostat screen is blank (no symbols or digits are displayed). If the room temperature is already displayed move on to Step 2: Setting the Date and Time.
To install the Batteries:a. Lift up the front cover of the thermostat to reveal the battery cover and product controls.
b. Remove the battery cover by pressing down and sliding out.
c. Insert the 2 x AA LR6 Alkaline Batteries supplied with the thermostat, ensuring the correct orientation (see ‘Controls Layout’ on page 8).
d. After a short pause the thermostat will display information on the screen and is now ready for use.
e. Replace the battery cover by sliding it firmly back into the front of the thermostat.
STEP 2: Setting the Date and TimeTo set the Date and Time:a. Press theDATE/DAYbutton tobeginsetting thedate.When
you set the date for the first time after the batteries are inserted, the display will show:
Press the or buttons to set the current day of the month (e.g. d 01 = 1st day of the month) then press the green button to confirm.
b. Press the or buttons to set the current month of the year (e.g. m 01 = January) then press the green button to confirm.
c. Press the or buttons to set the current year (e.g. yr 06 = 2006) then press the green button to confirm.
The date is now stored and the Day Indicator will be displayed under the current day of the week (e.g. 1 = Monday, 2 = Tuesday, etc.)
d. Use the or buttons to set the correct time then press the green button to confirm. Each press of the buttons will change the time by one minute and holding them down will change the time slowly at first and get progressively quicker.
Note: If this mode is entered accidentally then press the AUTO, MAN or OFF buttons to exit.
STEP 3: Running the Built-in Heating ProgramThethermostatisnowreadyforoperation.PresstheAUTO buttonandthebuilt-inheatingprogramwillstartrunning.Note: The built-in heating program has been designed to provide normal comfort requirements, but if you want to customise the settings please see the next section ‘Programming the CM727’.
AM

10
‘Efficient Daily Use’ PROGRAMMING THE CM727
Modifying the Heating ProgramTo change the heating program:a. Press either of the PROGRAM or buttons to
entertheprogrammingmode.Thetime/temperaturesettings for period 1 on Monday (Day 1) will beflashingasshown.Theactiveperiodishighlightedbyaflashingsquarearoundthenumbersatthebottomofthescreenandtheselecteddayisshownwiththedayindicator.
b. Toadjusttheperiodstarttimeusethe or buttons,the‘OK?’indicatorwillbedisplayedtoconfirmthechange.Holdingthebuttondownwillchangethetimequickly.
Note: If you are pressing the or buttons and the display flashes the next period, it means the next period will be pushed forward.
c. Oncetherequiredtimeisreachedpressthegreen buttontoconfirm.
Note: If the original time setting did not require adjustment press the green button to move to step ‘d’.
d. Thetemperaturesettingforperiod 1 onMonday(Day1)willnowbeflashing.Toadjustthispressthe or buttonsandconfirmthesettingagainbypressingthegreen button.
e. Thenexttimeandtemperatureperiodwillnowbeactive.Adjustthisbyrepeatingstepsb-daboveuntilall4periodsaresetforMondayorpresstheAUTO buttontoruntheprogramasset,atanytime.
You now have a choice of how to set the program for the next day:
1 2 3 4 5 6 7
4321
The Built-in Heating ProgramThebuilt-inheatingprogramhas4temperaturelevelchangesperdaythatcanbesetbetween3.00amand2.50amthe followingday -allowingyou tomaintain theevening temperatureaftermidnight. Each temperature level can be set between 5°C and 35°C, and adjusted in 0.5°Cincrements.Thefactorydefaultprogramforheatingisasfollows.
Reviewing the Heating ProgramTorevieworedittheheatingprogramusethePROGRAM or buttonstonavigatebetweenthe4individualprogrammingperiodsforthatday.UsetheDATE/DAY buttontostepthrougheachdayoftheweek,sothecomplete7dayheatingprogramcanbereviewedoredited.
Period 1 2 3 4 Time 6:30 8:00 18:00 22:30Temperature 21°C 18°C 21°C 16°C
Monday to Friday (Day 1 to 5)
Period 1 2 3 4 Time 8:00 10:00 18:00 23:00Temperature 21°C 21°C 21°C 16°C
Saturday & Sunday (Day 6 & 7)

11
PROGRAMMING THE CM727 ‘Efficient Daily Use’
f. i)PresstheCOPY DAYbuttontocopyMonday’sprogramintoTuesday.Thedisplaywillgoblankapartfromthe‘nonflashing’dayindicator,whichindicatesthedaycopiedandthe‘flashing’targetdaytocopytheprogramto.Toacceptthisdaypressthegreen button.Toselectadifferenttarget day press theDATE/DAY button until the ‘flashing’ day indicator is under the requiredday,thenacceptitbypressingthegreen button.Note: Once the target day is confirmed it becomes the day that is copied if the COPY DAY button is pressed again.
OR
ii)PresstheDATE/DAY buttontomovethedayindicatortoTuesday(Day2).Theprogramforthatdaycanthenbeadjustedbyfollowingstepsb to e.Programsfortheremainingdayscanbesetinthesameway,usingtheDATE/DAY buttontomovetothenextday.
ToexittheprogrammingmodeselectthedesiredoperatingmodebypressingtheAUTO,MAN orOFF buttons.Note: To run the adjusted program select the AUTO mode.
Disabling / Enabling Time PeriodsThethermostathas4periodseachdaythatcanbeprogrammed,butyoumaynotneedalloftheseswitchpointsforyourheatingrequirements.Therefore,anyperiodfrom2to4canberemovedfrom(orreturnedto)theheatingprogramprofile.
To disable or enable time periods:a. Todisableunwantedperiodsgotothedesiredperiod( 2 to 4 )usingthePROGRAM or
buttonstonavigate,ensurethecorrectperiodishighlightedwiththeflashingsquaresymbol.Pressandholdthe buttonforatleast2secondsandthedisplaywillindicatetheperiodhasbeenremovedfromtheprogram.
b. Toenableperiodsagainfollowthesameprocedureasabove,navigatingtothealreadydisabledperiod.Toenablethisperiodagainpressandholdthe buttonforatleast2seconds.
OPERATING THE CM727 ‘Using the Features’
Choosing the Operating ModeThethermostatcanoperateinthreedifferentmodes:Automatic,ManualorOff.Tosettheoperatingmode press either of the AUTO, MAN or OFF buttons. The screen indicates which mode iscurrentlyactivebydisplayingAUTO,MAN orOFF.
• AUTO (automatic)modesetsthethermostattofollowthebuilt-intemperatureprogram(defaultorpersonalised).Operatingthethermostatinthismodeisthebestwaytomaintainahighleveloftemperaturecomfortwhilstmaximisingyourenergysavings.
• MAN (manual)modesetsthethermostattoactasasimplethermostatwithafixedsetpointthroughout theday.Thesetpointcanbeadjusted from5°C to35°Cbyusing the or buttons.Thethermostatwillcontinuetomaintainthistemperatureuntilanotheroperatingmodeortemperatureisselected.
• OFFmodesetsthethermostattocontroltoaminimumtemperaturesettingof5°C(default)thatactsasafrostprotectionmeasureforyourhome.

12
During Normal Operation• Temperature Enquiry
In AUTO, MAN and OFF operating modes the thermostat will display the current roomtemperature. To review the programmed ‘target’ temperature (the temperature which thethermostat is trying tomaintain) press the button. This ‘target’ temperature valuewill bedisplayedflashingfor5secondsbeforereturningtothecurrentroomtemperaturevalue.
• Temperature Override
Duringnormaloperation(AUTOmode)theprogrammedtemperaturecanbeadjustedmanuallybypressingthe or buttonsorthe button.The‘target’temperaturewillbedisplayedandflashfor5seconds-duringthistimethe or buttonscanbeusedtomodifythesetvalue.Note: This temperature override is cancelled at the next programmed temperature change.
Adjusting the TimeTo adjust only the time during normal operation use the or buttons to adjust the time and press the green button again to confirm any changes.
Using the Special Functions• HOLIDAY Function
Theholidayfunctionallowsyoutosetaconstanttemperature(default=10°C)foraspecifiednumberofdays(from1-99days).Thisletsyousaveenergyandrelatedcostswhenyouareawayfromhome,butresumesnormaloperationonthedayofyourreturn.
To set the Holiday function:
a. EnsurethethermostatisrunninginAUTO orMAN operatingmodes.
b. Presstheholiday buttontodisplaytheholidaydayscounterandtemperaturesetting,alongwiththeholidayindicator .
c. Pressthe or timebuttonstosettheholidaytime(1-99days)andpressthegreenbuttontoconfirm.
d. Pressthe or buttonstosettheholidaytemperature(5°C-35°C)andpressthegreenbuttontoconfirm.
Thethermostatwillnowcontroltothenewtemperatureforthesetnumberofdaysthatyourhomeisvacant.Atmidnighttheholidaycounterwillbereducedbyoneuntiltheselectednumberofdayshavepassed.ThethermostatwillthenreturntonormaloperationassetbytheMAN orAUTO mode.TocanceltheHOLIDAYfunctionortoexitthefunctionatanytimepressthe buttonasecondtime.
‘Using the Features’ OPERATING THE CM727

13
Using the Special Features• SERVICE indicator (optional)
Note: This option only works if activated by your installer.
The 'SERVICE' indicator is displayed at set intervals as a reminder that your heating system requires a routine check. Please call your installer to arrange a maintenance visit.
The ‘SERVICE’ indicator will remain on the display of the CM727 until it is either reset or disabled by your installer. The CM727 and heating system will continue to operate as normal.
• Automatic Summer/Winter Time Change
The CM727 has a built-in Automatic Summer/Winter Time Change feature that will automatically adjust the clock forward or backward by one hour for ‘Daylight Saving Time’. This is carried out on the last Sunday of March and October each year.
• Optimum Start
Optimum Start is a program which ensures that the optimum temperature conditions are achieved at the required times. This is an Energy Efficiency feature that adjusts the start time of your heating system depending upon how cold it is. For example, on cold days your heating system will be started earlier to ensure that your home is warm when you get up (at the target temperature) and on warmer days the heating system will be started later to save energy. So, if the Optimum Start Feature is used, then the time / temperature settings which are entered into the thermostat should be set to when you want to be warm by and not when you want the heating system to start.
PROGRAMMING THE CM727 ‘Using the Features’
14
How do I change the batteries on the thermostat when they run out?The thermostat constantly monitors the batterypower level, which typically lasts for about 2yearsbeforeneedingreplaced.Whenthepoweris running low a flashing symbol will bedisplayedonthescreen.Tochangethebatteriesfollow thesteps in theabovesection(‘STEP 1: Installing the Batteries’ onpage3), replacingthe used batteries with new ones in Step c.Note:Whilechangingthebatteriesyourprogramsettingswillbestoredbutyoumayneedtoadjustthetimesettingstobecorrect.
How do I set one temperature for the whole day?To operate as a simple thermostat with onetemperature throughout the day, select themanual operating mode by pressing theMAN button. Adjust the temperature bypressing the or buttons - thiscanbesetanywherefrom5°Cto35°Cin0.5°Csteps.The thermostat will continue to maintain thistemperature until another operating mode isselectedorthetemperatureisadjusted.
FAQ’s
BDR91 Relay Box Controls LayoutThe relay box will normally be found mounted close to the boiler.
What does it mean when the BDR91 relay box green LED is ON?The green LED indicates normal operation of the radio frequency system. When the green LED is ON the boiler is also ON. When the LED is OFF the boiler is OFF.
When do I need to use the push button?You should use the push button to control your boiler only when the RF communication is lost (see the Troubleshooting Guide).
Push button and relay status LED’s
This product and its associated documentation and packaging are protected by various intellectual property rights belonging to Honeywell Inc. and its subsidiaries and existing under the laws of the UK and other countries. These intellectual and property rights may include patent applications, registered designs, unregistered designs, registered trade marks, unregistered trade marks and copyrights.
Honeywell reserves the right to modify this document, product and functionality without notice. This document replaces any previously issued instructions and is only applicable to the product(s) described.
This product has been designed for applications as described within this document. For use outside of the scope as described herein, refer to Honeywell for guidance. Honeywell cannot be held responsible for misapplication of the product(s) described within this document.
Manufactured for and on behalf of the Environmental and Combustion Controls Division of Honeywell Technologies Sàrl, ACS-ECC EMEA, Z.A. La Pièce 16, 1180 Rolle, Switzerland by its Authorised Representative Honeywell Inc.

15
Symptom
BlankDisplay(PowerLoss).
Displayshowsflashing symbol.
Displayshows symbol.
Displayshowstheword'SERVICE'
BDR91redLEDisconstantlyonorflashing
Remedy
Checkbatteriesareinstalledbyremovingthebatterycover.
Checkbatterieshavebeeninstalledinthecorrectorientation.
Replacethebatteries.
Thebatteriesinthethermostatarelowonpower-Replacethebatteries.
Afaulthasoccurredinyourheatingsystem.Removeandre-insertthebatteries.
Ifthe symboldoesnotclearafterafewminutescontactyourinstaller.
Your installer has set a scheduled maintenance alert period on your CM727 as a recommendation that your heating system should receive a routine inspection.
Call your installer to arrange a maintenance visit.
Note: The CM727 and heating system will continue to operate as normal.
RF communication lost due to the wrong location of the room unit - Hook the room unit back on the wall bracket where RF communication was reliable.
Call installer
NOTE: You can control the boiler manually when the RF communication is lost: Press the BDR91 push button to switch the boiler on and off. When the green LED is on – the boiler is on.
TROUBLESHOOTING THE CM727

16
50039991-003A©2009HoneywellInternationalInc.
Honeywell Control Systems Ltd.
Arlington Business Park,BracknellBerkshireRG12 1EBTechnical Help Desk: 08457 678999www.honeywelluk.com
WHAT IS A PROGRAMMABLE ROOM THERMOSTAT?
...an explanation for householdersA programmable room thermostat is both a programmer and a room thermostat. A programmer allows you to set ‘On’ and ‘Off’ time periods to suit your own lifestyle. A room thermostat works by sensing the air temperature, switching on the heating when the air temperature falls below the thermostat setting, and switching it off once this set temperature has been reached.
So, a programmable room thermostat lets you choose what times you want the heating to be on, and what temperature it should reach while it is on. It will allow you to select different temperatures in your home at different times of the day (and days of the week) to meet your particular needs.
Turning a programmable room thermostat to a higher setting will not make the room heat up any faster. How quickly the room heats up depends on the design of the heating system, for example, the size of boiler and radiators.
Neither does the setting affect how quickly the room cools down. Turning a programmable room thermostat to a lower setting will result in the room being controlled at a lower temperature, and saves energy.
The way to set and use your programmable room thermostat is to find the lowest temperature settings that you are comfortable with at the different times you have chosen, and then leave it alone to do its job. The best way to do this is to set low temperatures first, say 18°C, and then turn them up by one degree each day until you are comfortable with the temperatures. You won’t have to adjust the thermostat further. Any adjustments above these settings will waste energy and cost you more money.
If your heating system is a boiler with radiators, there will usually be only one programmable room thermostat to control the whole house. But you can have different temperatures in individual rooms by installing thermostatic radiator valves (TRVs) on individual radiators. If you don’t have TRVs, you should choose a temperature that is reasonable for the whole house. If you do have TRVs, you can choose a slightly higher setting to make sure that even the coldest room is comfortable, then prevent any overheating in other rooms by adjusting the TRVs.
The time on the programmer must be correct. Some types have to be adjusted in spring and autumn at the changes between Greenwich Mean Time and British Summer Time.
You may be able to temporarily adjust the heating programme, for example, ‘Override’, ‘Advance’ or ‘Boost’. These are explained in the manufacturer’s instructions.
Programmable room thermostats need a free flow of air to sense the temperature, so they must not be covered by curtains or blocked by furniture. Nearby electric fires, televisions, wall or table lamps may prevent the thermostat from working properly.
®