CRONOS Riing RGB - Tt eSPORTSde.ttesports.com/files/Product_download/cronosriingrgb7.1gui... · -...
18
CRONOS Riing RGB
Transcript of CRONOS Riing RGB - Tt eSPORTSde.ttesports.com/files/Product_download/cronosriingrgb7.1gui... · -...

CRONOS Riing RGB

CRONOS Riing RGB 7.1 GUI SOFTWARE GUIDE
English
CRONOS Riing RGB 7.1 GAMING HEADSET
Device Overview
1. Auto-adjusting headband for all head sizes
2. Signature soft foam and premium fabric headband design for optimal ear comfort
3. 25mm ear cushion thickness for increased comfort during long gaming sessions
4. Fold flat design for maximum portability and comfort
5. 16.8 million RGB color across 2 zones: earcup & battle dragon logo
6. Retractable and adjustable microphone
7. In-line control: 3D 7.1 button
8. In-line control: 4 EQ button
9. Illuminated battle dragon logo
10. In-line control: Volume down button
11. In-line control: Volume up button
1
2
3
4
5
6
7 8 9
10 11

Installing the Tt eSPORTS CRONOS Riing RGB 7.1 Gaming Headset
Driver - Plug the CRONOS Riing RGB 7.1 into the USB port of your computer.
- Download the CRONOS Riing RGB 7.1 driver from the Tt eSPORTS Global website.
- Follow the on-screen instructions to complete installation.
Configuring Your CRONOS Riing RGB 7.1 Gaming Headset
- Launch the CRONOS Riing RGB 7.1 Gaming Headset application by double-clicking
the desktop shortcut icon.
Move the mouse cursor to the “Speakers” icon and double-click to browse the
drop-down selection menu for “Speakers” , “Mic” and “Lighting Effects”.

FUNCTIONS: Speakers
1. Volume Control Adjust the volume for speakers.
1. Volume Control Bar:
Master – Adjust volume level for all channels.
Front - Adjust volume levels for L&R front channels.
2. Left/Right Channel Lock:
Click to lock/unlock left-channel and right-channel levels.
3. Mute/Unmute:
Click to mute/unmute all channels.
4. dB Input Area
Manually enter desired dB value.
1
2 3 4

2. Sample Rate Select desired sample rate between: 44.1KHz, 48KHz, 88.2KHz, 96KHz and 16Bits,
24Bits.
1. Sample Rate Button
44.1 KHz - set playback sample rate to 44.1K
48 KHz - set playback sample rate to 48K
88.2 KHz - set playback sample rate to 88.2K
96 KHz - set playback sample rate to 96K
2. Bit Depth Button
16 Bits - set playback bit depth to 16bit
24 Bits - set playback bit depth to 24bit
2
1

3. Equalizer By Hardware
Press the EQ button on the in-line control box to enable the 4 present EQ settings
functions for: FPS, MMORPG, ARP and RTS genres. The dedicated EQ button lets you
cycle through the EQs on-the-fly.
By Software
The full audio band is divided into 10 different frequency bands. Users can
adjust desired sound effects in the Equalizer with 4 present EQ settings (FPS,
MMORPG, ARP, RTS genres) and 10-band software equalizer with 8 preset
modes.
1. EQ Enable/Disable Switch
Click on the check box to enable/disable EQ settings.
2. Preset Mode
Select from 12 preset modes such as Bass, Treble, Live, Rock, Jazz, etc.
1
2
3
4

3. EQ band controller
Change gain setting for each band between:
(30/ 60/ 120/ 250/ 500/ 1K/ 2K/ 4K/ 8K/ 16K)
4. Manual mode
Change gain settings manually for each band and give it a name in the “A. Input Field”
and then click “ ” to add your new setting into the “B. Manual Mode List”. Click
“ ” to delete settings.
4. 3D Surround Sound Effects By Hardware
Press the 3D 7.1 button on the in-line control box to enable 3D surround sound
By Software
Enable Surround.
Select desired environment and room size settings for optimal listening experience.
1. Enable Surround
1
2
3

Select the check box to enable the Xear Surround sound effect.
2. Surround HP Mode
The Xear Surround Headphone settings provide 2 different surround modes for different
applications.
3. Room Size:
The Xear Surround Headphone settinngs also provide 3 room size modes and one free
from echo “anechoic” room mode. You can change the “Room Size Button” to simulate
different room sizes and room types.
5. Xear Audio Brilliant Enable Xear Audio Brilliant
1. Enable Audio Brilliant
Select the check box to enable the Xear Audio Brilliant.
2. Brilliant Level
You can increase/decrease the Brilliant Level.
3. Reset
Return to default value.
1
2 3
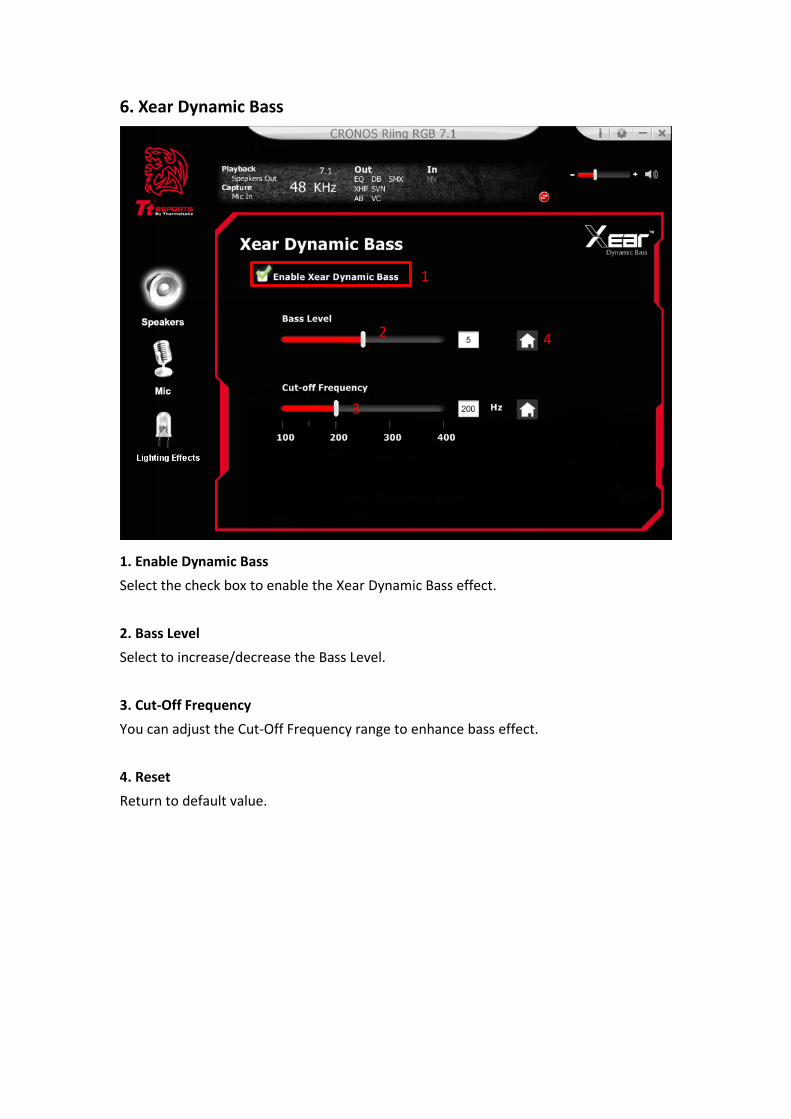
6. Xear Dynamic Bass
1. Enable Dynamic Bass
Select the check box to enable the Xear Dynamic Bass effect.
2. Bass Level
Select to increase/decrease the Bass Level.
3. Cut-Off Frequency
You can adjust the Cut-Off Frequency range to enhance bass effect.
4. Reset
Return to default value.
2
1
3
4

7. Xear Smart Volume
1. Enable Smart Volume
Select the check box to enable the Xear Smart Volume.
2. Volume Level
Select desired sound level.
3. Mode
Select from Music mode and Speech Mode
1
2
3

8. Xear Voice Clarity
1. Enable Voice Clarity
Select the check box to enable the Xear Voice Clarity.
2. Voice Clarity Level
Select to increase voice clarity level.
3. Noise Suppression for communication
Select to eliminate background noise.
4. Reset
Return to default volume.
1
2
3 4

9. Xear Surround Sound Max Optimize and maximize your surround sound 7.1 experience with immersive sound
1. Enable Surround Max
Select the check box to enable the Xear Surround Max.
1

FUNCTIONS: Mic
1. Volume Control Adjust Mic volume.
1. Volume Control Bar:
Mic-in – Adjust recording volume level .
Monitor- Adjust mic-in monitor volume level .
2. Mute/Unmute:
Click on the mute/unmute button to mute/unmute all channels.
3. Left/Right Channel Lock:
Click on the lock/unlock button to lock/unlock left and right channel.
4. dB Input Area
Manually enter desired dB value.
1
2
3
4

2. Sample Rate Select desired sample rate: 44.1KHz or 48KHz.
1. Sample Rate button
44.1 KHz - set playback sample rate to 44.1K
48 KHz - set playback sample rate to 48K
1

3. Xear Magic Voice Magic Voice is a great voice changer that changes your voice in fun and amazing ways.
Choose from monster, cartoon and male/female effect settings for VOIP and online
gaming applications.
1. Magic Voice
Select the check box to enable the Magic Voice effect.
2. Magic Voice mode
You can click on the either one button to set the magic voice mode.
Monster
Carton
Male
Female
1
2

FUNCTIONS: Lighting Effects Page Introduction
1. Lighting ON/OFF
Select the check box to enable the LED and function settings.
2. Input RGB value:
Input Red, Green, Blue value (0 to 255) into the fields.
3. Color Meter:
You can use the color meter to get desired RGB color value on the color palette.
Click on the button, and then click on the color you want on the color palette,
the RGB value will show up in the RGB value fields.
2
1
3
RGB Value Field
Color Meter
Color Palette
4

4. Lighting Effects & Speed
LIGHTING EFFECTS LED flashing action SPEED Bar
STATIC Solid LED lighting effect
N/A
PULSE Fade in and out color effect
Support
SPECTRUM RUNNING LED colors will run through
all 16.8million color
spectrum
Support
MUSIC RHYTHM Static RGB color will sync with music
playback
N/A
SINGLE BLINK Static RGB color will flash with single
blink
Support
DOUBLE BLINK Static RGB color will flash with double
blink
Support
RAPID BLINK Static RGB color will flash with rapid
blink
Support
RAPID PULSE RGB color will fade in and out with
rapid pulse
Support
4. Application Setting
Select and check the ‘Show System Tray’ icon for the CRONOS Riing RGB 7.1 gaming
headset.
Adjust the UI transparent level
Select desired language

Trademarks and Statements
All trademarks are the properties of their respective owners.
WARNING: Adjust your headset volume to a comfortable level. Using the device at
high volume levels for prolonged periods of time may cause potential hearing injuries
and is not advised or recommended.