Critical Care Resident Respiratory Education Series · 2018-07-07 · Critical Care Resident...
19
Critical Care Resident Respiratory Education Series Respiratory Care Department Alfred I. duPont Hospital for Children Wilmington, DE.
Transcript of Critical Care Resident Respiratory Education Series · 2018-07-07 · Critical Care Resident...

Critical Care Resident Respiratory Education Series
Respiratory Care Department
Alfred I. duPont Hospital for Children
Wilmington, DE.

Objectives:
• Negative Pressure Ventilationa. Theory of operationb. Care of the patient
• Oscillatora. Theory of operationb. Care of the patient
• BiPAPa. Theory of operationb. Care of the patient

Oscillator Initial Set-Up:1. Document conventional ventilator settings, blood gases, medications and hemodynamics
2. Just prior to instituting HFOV, suction patient well and give 10 second sustained inflation at 35 cmH2O
Initial Parameters:1. FiO2 1.0
2. mPaw - start with a Paw 4-8 cmH2O about the Paw on conventional ventilation. Increase by increments of 1-2 cmH2O to achieve optimal lung volume if necessary
*optimal lung volume is reached once you see an increase in SaO2 enabling you to wean the FiO2. Keep Paw setting at this value until you decrease FiO2<.60.
*On CXR, diaphragm should be to the level of T-9
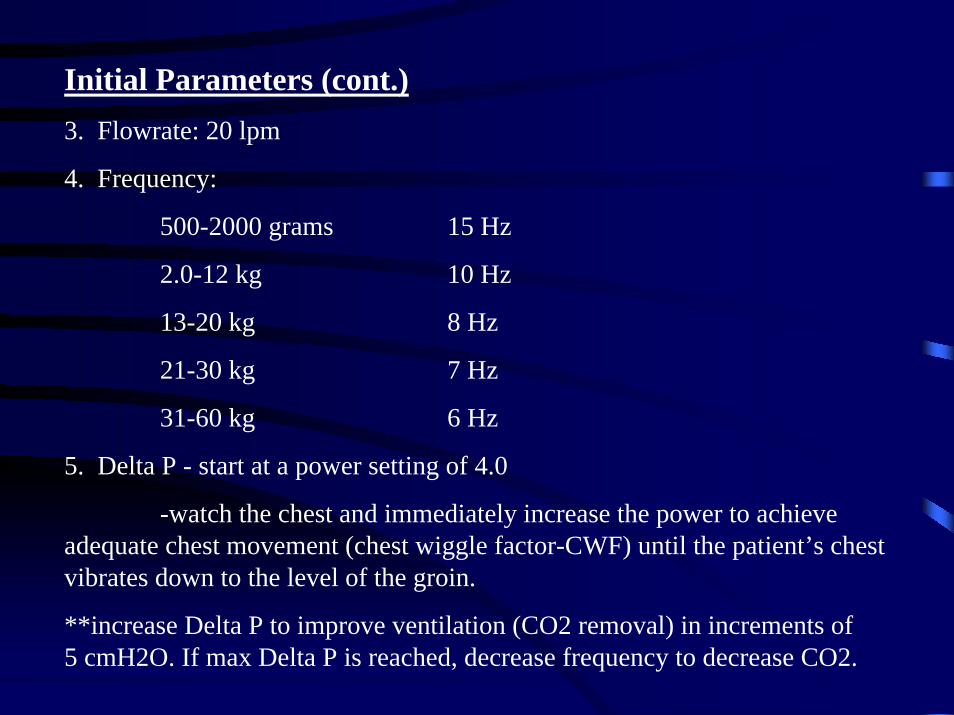
Initial Parameters (cont.)3. Flowrate: 20 lpm
4. Frequency:
500-2000 grams 15 Hz
2.0-12 kg 10 Hz
13-20 kg 8 Hz
21-30 kg 7 Hz
31-60 kg 6 Hz
5. Delta P - start at a power setting of 4.0
-watch the chest and immediately increase the power to achieve adequate chest movement (chest wiggle factor-CWF) until the patient’s chest vibrates down to the level of the groin.
**increase Delta P to improve ventilation (CO2 removal) in increments of 5 cmH2O. If max Delta P is reached, decrease frequency to decrease CO2.

Initial Parameters (cont.):6. % Inspiratory Time - set to 33%
-increase only to decrease PaCO2 only when amplitude is maximized and frequency is minimized (3 Hz)

Weaning:1. Wean FiO2 for arterial saturation >90%
2. Once FiO2 is < 60%, may decrease mPaw in increments of 1 cm H2O
3. Delta P is weaned by increments of 5 cmH2O for PaCO2<desired goal
4. Once optimal frequency is found, leave the frequency the same throughout the HFOV ventilation
Parameters for Conversion from HFOV to CMV(conventional)If FiO2 is < 40%, mPaw requirements 15-20 cmH20, and a Delta P < 40 cmH2O, patient can transition to CMV. Some patients will plateau for several days at these settings. This may also be a good indicator to switch back to CMV.
**Before going to CMV:
1. Set conventional ventilator at settings which approximate those necessary to manually bag the patient.
2. Set FiO2 10% higher than on HFOV.

Failure Criteria:1. Failure to improve oxygenation as determined by the inability to decrease FiO2 by 10% within 24 hours of institution
2. Failure to improve or maintain adequate ventilation as determined by the inability to maintain PCO2 < 80 cmH2O with pH > 7.27. It is extremely important to monitor PaCO2 in larger patients.
3. If failure is secondary to inadequate oxygenation, maintain HFOV and contact ECMO if applicable
4. An oxygen index < 42 at 24 hours of HFOV is a good indicator of a positive response.
Hemodynamics:1. Maintain normal mean arterial pressure (minimum of 60 mmHg)
2. Initially increase CVP to 15-20 mmHg by giving volume (colloid or crystalloid).

Suctioning:1. Start by suctioning the patient 24-48 hours after the initiation of HFOV and PRN for visible airway secretions. Immediately following suctioning, sustained inflation may be required. If the patient takes longer than two hours to achieve pre-suctioning FiO2, consider lengthening suctioning interval.
2. Following suctioning, place the patient back on pre-suctioning settings. If oxygen saturations are below 85%, increase Paw for patients with diffuse alveolar disease. If patient has air leak syndrome, increase FiO2 to achieve adequate saturation.
3. Sustained inflation of 30-35 cmH2O for 10 seconds may be required after disconnection from HFOV. Time of disconnection from HFOV should always be minimized.
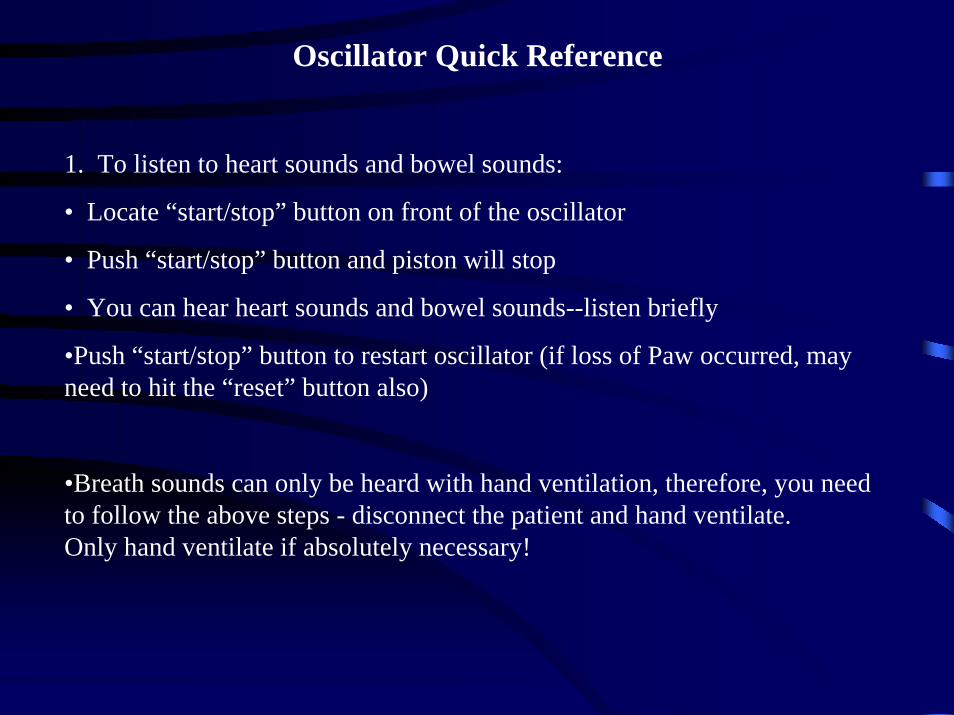
Oscillator Quick Reference
1. To listen to heart sounds and bowel sounds:
• Locate “start/stop” button on front of the oscillator
• Push “start/stop” button and piston will stop
• You can hear heart sounds and bowel sounds--listen briefly
•Push “start/stop” button to restart oscillator (if loss of Paw occurred, may need to hit the “reset” button also)
•Breath sounds can only be heard with hand ventilation, therefore, you need to follow the above steps - disconnect the patient and hand ventilate. Only hand ventilate if absolutely necessary!

2. Suctioning:
• Only done when needed
• Needed when: SaO2 drops, TcCO2 increases, chest wiggle factor decreases
• Follow the above steps (under #1)
• Just pass the suction catheter without bagging--unless absolutely necessary
• Can hyperoxygenate with blender on oscillator
3. Water in tubing is necessary to prevent plugging
4. Angle circuit only slightly to keep water from flowing into the ETT--you want the water to oscillate towards the water trap --never empty the water trap completely, you will lose pressure!

1st 24 hours
*Minimal handling/turning of the patient (every 12 hours after the 1st 24 hours)
*No suctioning unless needed (every 12 hours after the 1st 24 hours)
*ABG within 1st hour, then with each change made
*CXR within 4 hours after initiation


Negative Pressure Ventilation:Introduction: Negative pressure ventilation is accomplished by applying subambient, or negative pressure to the outside of the body. A negative pressure generator applies intermittent negative pressure through a device such as a shell, tank or garment.
It more closely imitates normal ventilation than does positive pressure ventilation, having a more physiologic effect on thoracic blood volume. Inspiration is the result of negative pressure around the thorax. Exhalation is passive. Negative pressure can effectively ventilate people during various stages of neuromuscular disease,central hypoventilation syndrome and chronic obstructive pulmonary disease.

Negative Pressure Device

3-ways to apply negative pressure1. Chest Shell
2. Nu-Mo Suit and Pulmo Wrap

3. Pressure Chamber~ most commonly used in our facility.
.

NEV 100 Ventilator settings:
Modes available: Control, Control+Sigh, Assist/Control, Assist/Control+Sigh or CNEP (continuous negative extrathoracic pressure).
Respiratory Rate: 4-60 / minute
Negative Pressure: -5 to -100
Base Pressure: -30 to +30
Inspiratory Time: 0.5 to 5.0 seconds

BiPAP*The BiPAP system is primarily intended to augment patient ventilation by supplying pressurized air through a patient circuit. It senses the patient’s breathing effort by monitoring airflow in the patient circuit and adjusts its output to assist in inhalation or exhalation.
Modes available:
1. Spontaneous (S): the unit cycles between the Inspiratory Positive Airway Pressure (IPAP) and Expiratory Positive Airway Pressure (EPAP) levels in response to patient triggering. In all modes the difference between the IPAP and EPAP is the pressure support level (ex. IPAP=12/ EPAP=5 gives a pressure support of 7cm H20). The patient determines the respiratory rate.
2. Spontaneous/Timed (S/T): the unit cycles between the IPAP and EPAP levels in response to patient triggering. If the patient fails to initiate an inspiration, the unit will cycle to IPAP based on a preset interval determined by the Breaths Per Minute (BPM) control.
3. Timed (T): the unit cycles between the IPAP and EPAP levels based solely on timing intervals as determined by the rate (BPM) and inspiratory time (% IPAP) controls. The patient may superimpose spontaneous respirations over the IPAP and EPAP levels.
4. Continuous Positive Airway Pressure (CPAP): set the Function Selector Knob in either IPAP or EPAP. The pressure on the corresponding dial will be delivered continuously.

BiPAP (cont.)
BiPAP can effectively augment patient ventilation during variousstages of neuromuscular disease, obstructive sleep apnea and post extubation.
Contraindications:
1. Patients incapable of maintaining life-sustaining ventilation in the event of circuit disconnection or malposition of the patient interface
2. A history of allergy or hypersensitivity to the mask material where the risk from allergic reaction outweighs the benefit of ventilatory assistance.
3. Patient’s inability to maintain a patent airway or to adequately clear secretions.
4. Severe respiratory failure where intubation is judged to be immediately necessary.