Crestonwood Router Table Plans
59
ULTIMATE ROUTER TABLE PLANS By Dan Phalen January 2012
-
Upload
iacobgilberto6473 -
Category
Documents
-
view
222 -
download
0
Transcript of Crestonwood Router Table Plans

8/10/2019 Crestonwood Router Table Plans
http://slidepdf.com/reader/full/crestonwood-router-table-plans 1/59
ULTIMATE ROUTER TABLE
PLANS
By Dan Phalen
January 2012

8/10/2019 Crestonwood Router Table Plans
http://slidepdf.com/reader/full/crestonwood-router-table-plans 2/59

8/10/2019 Crestonwood Router Table Plans
http://slidepdf.com/reader/full/crestonwood-router-table-plans 3/59

8/10/2019 Crestonwood Router Table Plans
http://slidepdf.com/reader/full/crestonwood-router-table-plans 4/59
Ultimate Router Table Plans
3
P LYWOOD C UTTING LIST (P ANEL 2)

8/10/2019 Crestonwood Router Table Plans
http://slidepdf.com/reader/full/crestonwood-router-table-plans 5/59
Ultimate Router Table Plans
4
MATERIALS LIST
*NOTE: The MDF pieces are for the top. You may wish to use a single full sheet of 3/4” MDF, 4 ft.
x 8 ft., rather than the 1/2” second piece. It makes the top 1/4” thicker but could save you some
material.
Nominal Dimensions Quantity/Length Part of Project
¾” Birch Plywood 2 pcs. 4ft. x 8 ft long Carcase and drawer fronts¾” Medium Density Fiberboard 1 pc 49 in. x 48 in. Top*
½” Medium Density Fiberboard 1 pc. 49 in x 30 in. Top*
½” Cabinet Grade or ACPlywood
1 pc. 4 ft. x 8 ft. Cleats, drawers
¼” Luan Plywood 1 pc. 4 ft. x 4 ft. Dust collection chute
High Pressure Laminate (anycolor)
1 pc. 4 ft. x 4 ft. Top
1” x 6” Oak or other hardwood 1 pc. 6 ft. long Face frame rails & stiles
1” x 2” Oak or other hardwood 1 pc. 12 ft. long Top edging
⅛” Plexiglas 1 pc. 16 in. x 16 in. Door panel
2” PCC TY 2” PVC Pipe Hose clampsCleaner and glue for PVC
1 pc.1 pc. 1 ft. long3 pcs.1 small can of each
Fittings and glue forvacuum hookup
1 “ Wooden Knobs 8 pcs. Bit and wrench drawers
3” Drawer pulls (hardware) 3 pcs. Storage drawers
1½” Brass No-Mortise Hinge 1 pair Door
Magnetic Catch 1 pc. Door
18” Full Extension HD DrawerSlides 3 sets Storage drawers
3” Casters 2 Locking Swivel2 Swivel
Wheels
Large Router Plate with 2Inserts and Leveling Screws
HardwareIncludes saftety switch, 36”miter track, fence hardware,Levelers and 4” to 2½” reducer
2½” x 10’ Black Hose #89567
Specify make and modelof router when ordering
1 each
1 pc.
Porter Cable RouterModel #75182 or builder’schoice

8/10/2019 Crestonwood Router Table Plans
http://slidepdf.com/reader/full/crestonwood-router-table-plans 6/59

8/10/2019 Crestonwood Router Table Plans
http://slidepdf.com/reader/full/crestonwood-router-table-plans 7/59
Ultimate Router Table Plans
6
C ARCASE DIMENSIONS

8/10/2019 Crestonwood Router Table Plans
http://slidepdf.com/reader/full/crestonwood-router-table-plans 8/59
Ultimate Router Table Plans
7
F ACE F RAME
C LEAT

8/10/2019 Crestonwood Router Table Plans
http://slidepdf.com/reader/full/crestonwood-router-table-plans 9/59

8/10/2019 Crestonwood Router Table Plans
http://slidepdf.com/reader/full/crestonwood-router-table-plans 10/59
Ultimate Router Table Plans
9
B ACK
Note that the overall width of the back piece is exactly 29 inches, whereas the outer width of the
carcase including both sides is 29 + 3/8 + 3/8, or 29 3/4 inches.
Center the 4” Dia. Hole 15 inches from the top for a 4-inch dust collector fitting.
Note: If you are using a 2 ½” fitting instead, mark your center 15 3/4“ from the top of the back.
In either case, the bottom of the hole should be level with the floor of the dust chute.

8/10/2019 Crestonwood Router Table Plans
http://slidepdf.com/reader/full/crestonwood-router-table-plans 11/59
Ultimate Router Table Plans
10
I NNER W ALLS (U PPER , 2 EACH )
Shop or hardwood ply, 17 3/16 x 20 inches with cutout for cleat.

8/10/2019 Crestonwood Router Table Plans
http://slidepdf.com/reader/full/crestonwood-router-table-plans 12/59
Ultimate Router Table Plans
11
LOWER DRAWER DIVIDER
Shop or hardwood ¾” ply 20 x 12 ½

8/10/2019 Crestonwood Router Table Plans
http://slidepdf.com/reader/full/crestonwood-router-table-plans 13/59

8/10/2019 Crestonwood Router Table Plans
http://slidepdf.com/reader/full/crestonwood-router-table-plans 14/59
Ultimate Router Table Plans
13
S IDE P ANEL
Shown is the right side panel. The left side is the inverse. Shelf dados are ¾” W x 1/4”D. The rear panel
fits into the 3/8”W x 3/8”D dado cut into the rear of the panel. Note the 3” x 3” notch cut for the front
kick plate, and the 2 ½”W x 3/8”D mortise for the cleat.

8/10/2019 Crestonwood Router Table Plans
http://slidepdf.com/reader/full/crestonwood-router-table-plans 15/59
Ultimate Router Table Plans
14
T OE K ICK
Notch the top corners ¾” x ¾” for side panel overhang.
W HEELS , W HEEL B LOCKS
My unit uses 3-inch heavy-duty polyurethane swivel casters, two locking at opposite corners, two non-
locking at the other opposing corners. This allows me to lock the wheels solidly with just two toe taps.
Wheels are secured to recessed underside of carcase bottom shelf by four (4) blocks. Use #8 x 2 ½”
wood screws driven through shelf from top (inside the drawer compartments).

8/10/2019 Crestonwood Router Table Plans
http://slidepdf.com/reader/full/crestonwood-router-table-plans 16/59
Ultimate Router Table Plans
15
Wheel Block Placement -- Viewed From Underside

8/10/2019 Crestonwood Router Table Plans
http://slidepdf.com/reader/full/crestonwood-router-table-plans 17/59
Ultimate Router Table Plans
16
DUST CHUTE ASSEMBLY
A – Top
B – Cleat
C – Shelf
D – Walls

8/10/2019 Crestonwood Router Table Plans
http://slidepdf.com/reader/full/crestonwood-router-table-plans 18/59
Ultimate Router Table Plans
17
DUST C HUTE C OMPONENT P LACEMENT
C HUTE W ALL (2)
8/10/2019 Crestonwood Router Table Plans
http://slidepdf.com/reader/full/crestonwood-router-table-plans 19/59
Ultimate Router Table Plans
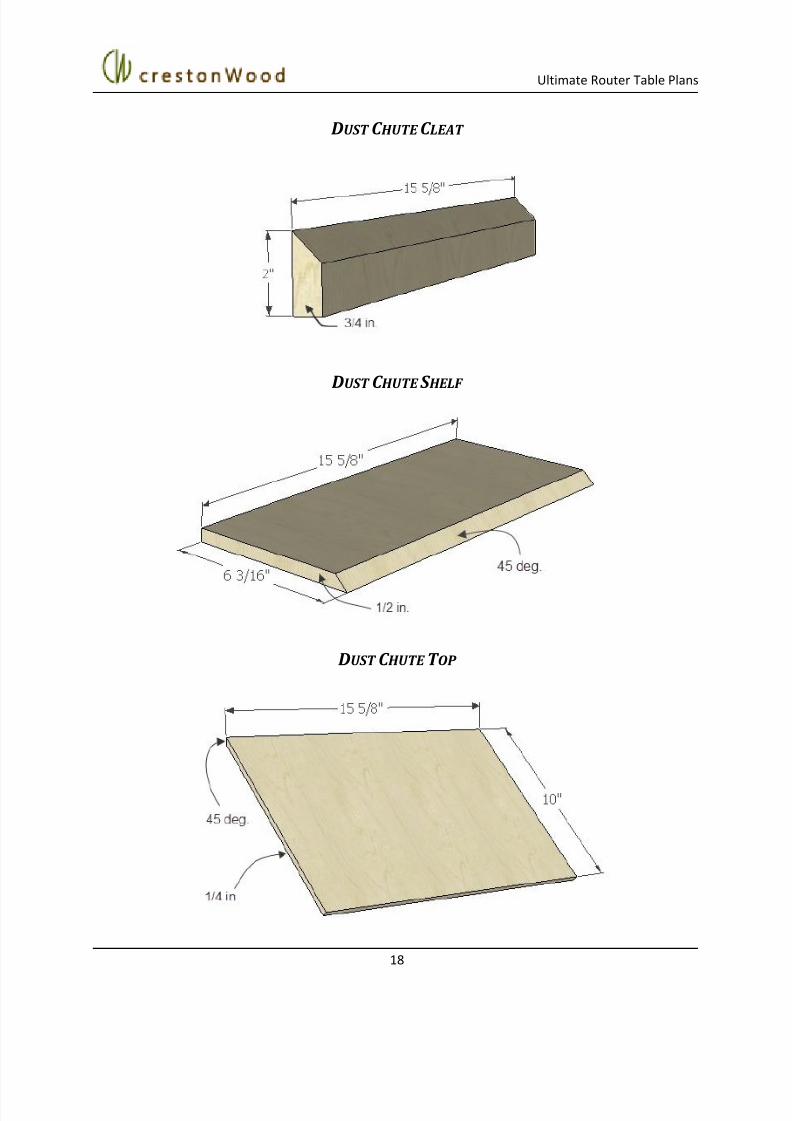
18
DUST C HUTE C LEAT
DUST C HUTE S HELF
DUST C HUTE T OP

8/10/2019 Crestonwood Router Table Plans
http://slidepdf.com/reader/full/crestonwood-router-table-plans 20/59
Ultimate Router Table Plans
19
ROUTER TOP
My top uses a 3/4” MDF piece glued on top of another 3/4” MDF board, with a 1/16” laminate glued to
the top piece. The edging is hard maple 3/4” thick x 1 9/16” deep, attached to the MDF with #20
biscuits. Ease all edges by hand sanding.
3D V IEW

8/10/2019 Crestonwood Router Table Plans
http://slidepdf.com/reader/full/crestonwood-router-table-plans 21/59
Ultimate Router Table Plans
20
DIMENSIONS

8/10/2019 Crestonwood Router Table Plans
http://slidepdf.com/reader/full/crestonwood-router-table-plans 22/59
Ultimate Router Table Plans
21
T OP B LOCK P OSITIONING
Cut four (4) blocks 3” x 3” from ¾” plywood stock. These blocks keep the top secured within the carcase
opening. The dimensions shown are approximate. Yours may vary slightly. Glue and screw blocks in
place.
The best approach is to turn the top and carcase upside down on a work surface, then place the blocks
for a snug fit that doesn’t allow too much play and mark the inside corners. Then glue and clamp or drill
and fasten with #8 1 ½” screws while the carcase and top are still upside down.

8/10/2019 Crestonwood Router Table Plans
http://slidepdf.com/reader/full/crestonwood-router-table-plans 23/59
Ultimate Router Table Plans
22
LOWER DRAWERS
Three lower drawers, two small, one large, same width and depth but heights as shown on next page.
S MALL DRAWER
L ARGE DRAWER

8/10/2019 Crestonwood Router Table Plans
http://slidepdf.com/reader/full/crestonwood-router-table-plans 24/59
Ultimate Router Table Plans
23
DRAWER B OX F RONT AND REAR
Cut a ¼” x 3/16” dado into the front for the drawer bottom. The bottom slides into the dados from the
rear, which is why the rear is shorter.
Large Drawer

8/10/2019 Crestonwood Router Table Plans
http://slidepdf.com/reader/full/crestonwood-router-table-plans 25/59
Ultimate Router Table Plans
24
Small Drawer

8/10/2019 Crestonwood Router Table Plans
http://slidepdf.com/reader/full/crestonwood-router-table-plans 26/59
Ultimate Router Table Plans
25
S IDE P ANELS
Front and rear vertical dados: ½” x 3/8”; rear dado inset by ½”. Bottom dado: ¼” x 3/8”, raised 5/16”
from bottom edge.
Small Drawer
Large Drawer

8/10/2019 Crestonwood Router Table Plans
http://slidepdf.com/reader/full/crestonwood-router-table-plans 27/59
Ultimate Router Table Plans
26
DRAWER F ACES
The drawer faces overhang the drawer box fronts by ½” either side to allow room for the slides.
NOTE: Before you cut the faces, build yourboxes and attach the slides. Then slide the
drawers into place as shown to the left .
Measure your actual inside width and cut
your drawer face accordingly. You should
use a 1/16" shim all around for spacing
around each drawer Face.
Fasten each face to its box with four #8 x
1¼” screws.
The face width shown here (13 ¾”) is
approximate.

8/10/2019 Crestonwood Router Table Plans
http://slidepdf.com/reader/full/crestonwood-router-table-plans 28/59
Ultimate Router Table Plans
27
THE FENCE
The fence assembly is all MDF, comprised of the vertical fence, a base to support theworkpiece, four braces, a fixed fence to hold featherboards, two sliding fences to support the
workpiece, and a dust port. The base knobs are 3/16” “five-star” threaded jig types; the sliderfences are secured with four T-knobs.
F ENCE F RONT
F ENCE REAR

8/10/2019 Crestonwood Router Table Plans
http://slidepdf.com/reader/full/crestonwood-router-table-plans 29/59
Ultimate Router Table Plans
28
F ENCE B ODY
Cut the dust port mouth of each piece with a 2” radius centered 1” from the bottom. Chamfer top
surface of base ¼” to ease dust flow.
Vertical Base

8/10/2019 Crestonwood Router Table Plans
http://slidepdf.com/reader/full/crestonwood-router-table-plans 30/59
Ultimate Router Table Plans
29
F ENCE B LOCKS
Material: ¾” MDF.

8/10/2019 Crestonwood Router Table Plans
http://slidepdf.com/reader/full/crestonwood-router-table-plans 31/59
Ultimate Router Table Plans
30
F IXED F ENCE B LOCK
The fixed fence block accommodates vertically mounted featherboards. Dado is ¾”W x ½”D for Incra
anodized aluminum miter slot. Fasten this piece to the fence body vertical from the back with #8 screws.

8/10/2019 Crestonwood Router Table Plans
http://slidepdf.com/reader/full/crestonwood-router-table-plans 32/59
Ultimate Router Table Plans
31
S LIDING F ENCE W INGS
Two (2) adjustable fence wings support the work piece. The T-slot in the back secures each wing (A) to
the fixed fence with T-knobs and T-bolts. Optional wing (B) has a T-slot cut into the face for an
adjustable stop block.
A B

8/10/2019 Crestonwood Router Table Plans
http://slidepdf.com/reader/full/crestonwood-router-table-plans 33/59
Ultimate Router Table Plans
32
CUSTOM DUST PORT
A simple, easy approach to a tight, secure fitting for a 2 ½” dust collector hose. Center and drill the 2 ½”
hole with a Forstner bit, hole saw, or circle cutter bit.
DUST P ORT DIMENSIONS

8/10/2019 Crestonwood Router Table Plans
http://slidepdf.com/reader/full/crestonwood-router-table-plans 34/59
Ultimate Router Table Plans
33
UPPER DRAWERS
The upper drawers are for wrench and bit storage.
W RENCH DRAWER

8/10/2019 Crestonwood Router Table Plans
http://slidepdf.com/reader/full/crestonwood-router-table-plans 35/59
Ultimate Router Table Plans
34
B IT DRAWERS

8/10/2019 Crestonwood Router Table Plans
http://slidepdf.com/reader/full/crestonwood-router-table-plans 36/59
Ultimate Router Table Plans
35
B IT DRAWER B OTTOMS
Drill ½” holes or ¼” holes on 1 ½” centers as shown for bit shank diameters. I like mine staggered to
allow for the larger bits such as raised panel, tongue-and-groove, rabbets, etc.
After drilling, cement a piece of 1/16” laminate to the underside as a stopper to prevent straight bitsfrom dropping through. You could optionally use ¼” hardboard or ply for this purpose if you reduce the
width by ½” on either side to allow room for the drawer slides.

8/10/2019 Crestonwood Router Table Plans
http://slidepdf.com/reader/full/crestonwood-router-table-plans 37/59
Ultimate Router Table Plans
36
B IT S TOP C LEARANCE I SSUES

8/10/2019 Crestonwood Router Table Plans
http://slidepdf.com/reader/full/crestonwood-router-table-plans 38/59
Ultimate Router Table Plans
37
UPPER DRAWER GUIDE PLACEMENT
CRITICAL NOTE: This is a narrow space! Apply the guides before you assemble the carcase. That way
you’ll have plenty of working room to mark lines, apply glue, and arrange your clamp setup.
Using a straight edge, mark the upper and lower edges of each guide on the side panel. Spread glue on
side panel and guide, then apply two clamps to either end. Use cauls to spread pressure evenly along
the entire 20” length of the guide.

8/10/2019 Crestonwood Router Table Plans
http://slidepdf.com/reader/full/crestonwood-router-table-plans 39/59
Ultimate Router Table Plans
38
To insure straight and square alignment, create spacers 7/8” and 1” thick by 2 or three inches wide by
20” long. Wrap in wax paper and place them between the guides as you clamp.
When working on the inner walls, be sure to add the dado depth to your starting point from the lower
edge of the wall.

8/10/2019 Crestonwood Router Table Plans
http://slidepdf.com/reader/full/crestonwood-router-table-plans 40/59
Ultimate Router Table Plans
39
DOOR
Material: hardwood frame 7/8 x 3/4. Ease outer edges with a block plane after assembly. Drill 1”
diameter holes in 1/8” clear plastic.
8/10/2019 Crestonwood Router Table Plans
http://slidepdf.com/reader/full/crestonwood-router-table-plans 41/59
Ultimate Router Table Plans
40
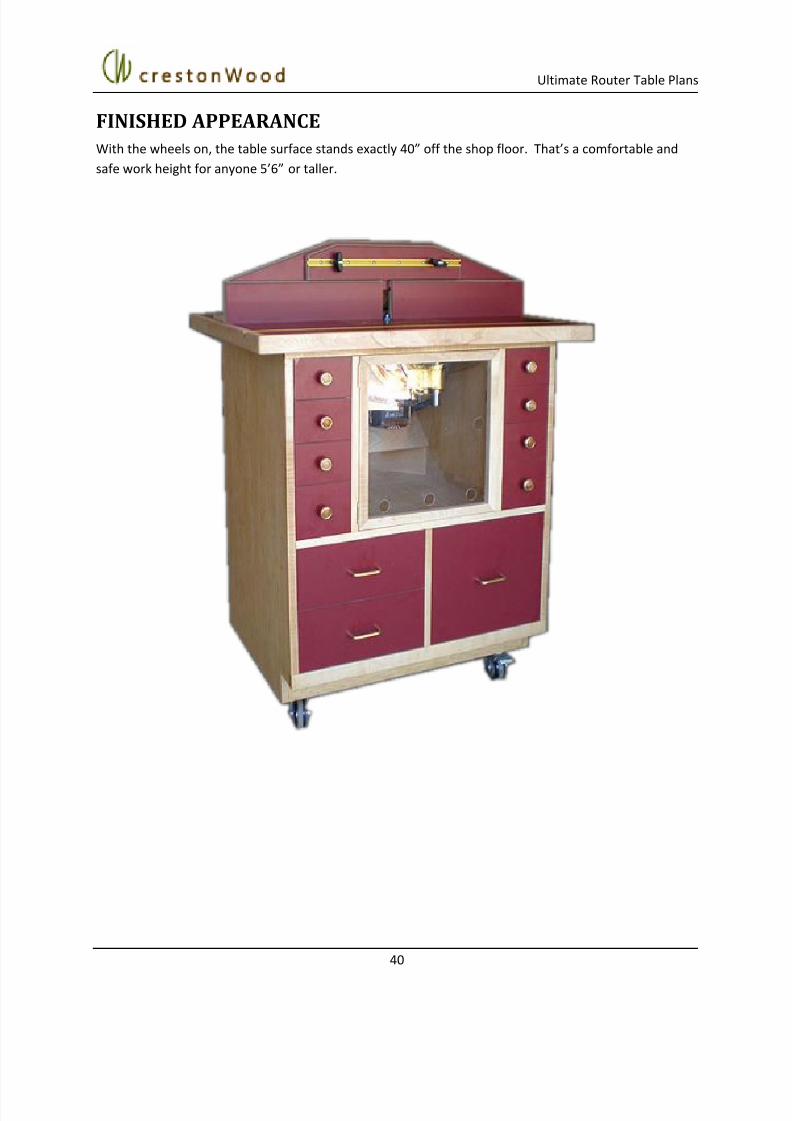
FINISHED APPEARANCE
With the wheels on, the table surface stands exactly 40” off the shop floor. That’s a comfortable and
safe work height for anyone 5’6” or taller.

8/10/2019 Crestonwood Router Table Plans
http://slidepdf.com/reader/full/crestonwood-router-table-plans 42/59
Ultimate Router Table Plans
41
THAT’S IT!
This completes the plan drawings for my Ultimate Router Table as built. Please enjoy and let me hear
from you about your success.
DAN PHALEN
CRESTON WOOD
SCAPPOOSE, OREGON, USA

8/10/2019 Crestonwood Router Table Plans
http://slidepdf.com/reader/full/crestonwood-router-table-plans 43/59
wrench_drawer

8/10/2019 Crestonwood Router Table Plans
http://slidepdf.com/reader/full/crestonwood-router-table-plans 44/59
Vertical

8/10/2019 Crestonwood Router Table Plans
http://slidepdf.com/reader/full/crestonwood-router-table-plans 45/59
Top

8/10/2019 Crestonwood Router Table Plans
http://slidepdf.com/reader/full/crestonwood-router-table-plans 46/59
Sidepanel

8/10/2019 Crestonwood Router Table Plans
http://slidepdf.com/reader/full/crestonwood-router-table-plans 47/59

8/10/2019 Crestonwood Router Table Plans
http://slidepdf.com/reader/full/crestonwood-router-table-plans 48/59
Fixed_fence
Fencebody1

8/10/2019 Crestonwood Router Table Plans
http://slidepdf.com/reader/full/crestonwood-router-table-plans 49/59

8/10/2019 Crestonwood Router Table Plans
http://slidepdf.com/reader/full/crestonwood-router-table-plans 50/59
Fence_sliding

8/10/2019 Crestonwood Router Table Plans
http://slidepdf.com/reader/full/crestonwood-router-table-plans 51/59
Fence

8/10/2019 Crestonwood Router Table Plans
http://slidepdf.com/reader/full/crestonwood-router-table-plans 52/59
Faceframe

8/10/2019 Crestonwood Router Table Plans
http://slidepdf.com/reader/full/crestonwood-router-table-plans 53/59
Dwr_upper

8/10/2019 Crestonwood Router Table Plans
http://slidepdf.com/reader/full/crestonwood-router-table-plans 54/59
Dustport

8/10/2019 Crestonwood Router Table Plans
http://slidepdf.com/reader/full/crestonwood-router-table-plans 55/59
Dust_chute

8/10/2019 Crestonwood Router Table Plans
http://slidepdf.com/reader/full/crestonwood-router-table-plans 56/59
Drawer_lower_small
Drawer_lower_large

8/10/2019 Crestonwood Router Table Plans
http://slidepdf.com/reader/full/crestonwood-router-table-plans 57/59
Door

8/10/2019 Crestonwood Router Table Plans
http://slidepdf.com/reader/full/crestonwood-router-table-plans 58/59
Dim_dwr_lower_large

8/10/2019 Crestonwood Router Table Plans
http://slidepdf.com/reader/full/crestonwood-router-table-plans 59/59
Carcase