![USER MANUAL Electronic Indicating Pressure …...noPn: Normally open contact Change password. Only possible with activated password. [PA.En] Activate password. YES: Password is required](https://static.fdocuments.in/doc/165x107/5f7996398f63084f9710ab8c/user-manual-electronic-indicating-pressure-nopn-normally-open-contact-change.jpg)
CREATING PROJECTS - Kele Network_and_Wireless/PDFs/WebOP...specified password for viewing any global...
20
- i - CHAPTER 2 CREATING PROJECTS 2.1. Project Information and Protection ........................................................... 1 2.2. Global Settings .............................................................................................. 3 2.2.1. Languages ...................................................................................................................... 4 2.2.2. Font Templates............................................................................................................... 5 2.2.3. Picture Database ............................................................................................................ 6 2.2.4. Sound Database ........................................................................................................... 10 2.2.5. Text Database............................................................................................................... 12 2.3. Working with Tags...................................................................................... 15 2.3.1. Types of Tags ............................................................................................................... 15 2.3.2. Opening and Closing Tags Editor ................................................................................ 15 2.3.3. Creating Tags with Tags Editor ................................................................................... 16 2.3.4. Importing and Exporting Tags ..................................................................................... 19 2.3.5. Adding/Deleting/Renaming Tag Groups ..................................................................... 19
Transcript of CREATING PROJECTS - Kele Network_and_Wireless/PDFs/WebOP...specified password for viewing any global...

- i -
CHAPTER 2
CREATING PROJECTS
2.1. Project Information and Protection ........................................................... 1
2.2. Global Settings .............................................................................................. 3
2.2.1. Languages ...................................................................................................................... 4 2.2.2. Font Templates............................................................................................................... 5 2.2.3. Picture Database ............................................................................................................ 6 2.2.4. Sound Database ........................................................................................................... 10 2.2.5. Text Database............................................................................................................... 12
2.3. Working with Tags...................................................................................... 15
2.3.1. Types of Tags ............................................................................................................... 15 2.3.2. Opening and Closing Tags Editor................................................................................ 15 2.3.3. Creating Tags with Tags Editor................................................................................... 16 2.3.4. Importing and Exporting Tags..................................................................................... 19 2.3.5. Adding/Deleting/Renaming Tag Groups..................................................................... 19

4 2
2-1
2.1. Project Information and Protection
You can get project information and set up passwords to protect your project, password table, and global macros by using the Project information & Protection dialog box. To open the dialog box, you can do one of the following: 1) In the Project Manager tool window, double-click the Project node ( ). 2) In the menu bar, click Project to bring up the Project sub-menu. Then, click Information & Protection….
The following is an example of the Project Information and Protection dialog box.
CHAPTER 2 CREATING PROJECTS

2
2-2
The following table describes how to read or use each of the items in the dialog box.
Item Description Project Name The name of the project. It is also the file name of the project. Author The author of the project. Created Time/date The time and date when the project was created. Last Saved Time/date The last time and date when the project was saved. Version The version number of the Software that was used to save the project last time. Developer Password
Click it to bring up the Edit Developer Password dialog box and specify the developer password. The developer password must be an unsigned integer and can have up to 9 digits. The default developer password is 000000000 (nine 0s) for new projects and new panels. When the runtime data of an application is downloaded to a panel, the panel compares its developer password with the developer password of the application. If the passwords match, the panel accepts the download operation immediately. If the passwords are different, the panel prompts for the entry of the developer password of the application. This ensures that one has the right to use the runtime data. After the entry of the application's developer password, the panel accepts the download operation and takes the developer password of the application as its own developer password.
Protect Check this item to enable project file protection. You need to enter the specified password to open the project file when this item is checked.
Use Developer Password
Available when the Protect item is checked. Check this item if you want to use the developer password as the protection.
Project File Protection
Available when the Use Developer Password item is unchecked. Click it to bring up the Edit Password dialog box and specify the password.
Protect Check this item to enable the password table protection. You need to enter the specified password in order to view the password table of any panel application of the project when this item is checked.
Use Developer Password
Available when the Protect item is checked. Check this item if you want to use the developer password for the protection.
Password Table Protection
Available when the Use Developer Password item is unchecked. Click it to bring up the Edit Password dialog box and specify the password.
Protect Check this item to enable the global macro protection. You need to enter the specified password for viewing any global macro of the project when this item is checked.
Use Developer Password
Available when the Protect item is checked. Check this item if you want to use the developer password as the protection.
Global Macro Protection
Available when the Use Developer Password item is unchecked. Click it to bring up the Edit Password dialog box and specify the password.
Note You can type a note for the project. OK Click it to close the dialog box and accept all changes. Cancel Click it to close the dialog box and discard all changes.
Click it to open the help document for more details about the dialog and how to use it.
Click it to close the dialog box and discard all changes.
CHAPTER 2 CREATING PROJECTS

4 2
2-3 CHAPTER 2 CREATING PROJECTS
2.2. Global Settings
Global settings are the settings that can be used by all panel applications in the same project. They are accessible and modifiable throughout the project. Global settings help a designer to construct a project that is flexible and easy to update. Designers can make changes to the overall design of the panel application by revising the global settings directly. You can modify the Global settings in the corresponding dialog box. To open the dialog box, double-click the related node under the Global node in the Project Manager tool window. Alternatively, click Project to access the Project sub-menu in the menu bar, and then click the related command in the Project sub-menu. The global settings contain the following items.
■ Languages Described in Section 2.2.1.
■ Font Templates Described in Section 2.2.2.
■ Picture Database Described in Section 2.2.3.
■ Sound Database Described in Section 2.2.4.
■ Text Database Described in Section 2.2.5.
■ Global Tags Described in Section 2.3.
■ Global Macros Described in Chapter 14.

2
2-4
2.2.1. Languages
This section describes how to set up the languages for the project using the Languages dialog box. Each panel application in the project can have up to 10 languages for the screen texts. The following is an example of the Languages dialog box.
The following table describes each property in the Languages dialog box.
Property Description Number of languages Specifies how many languages the project will have. Language The index of the language. Name Specifies a name for a language. The name must be unique within the project. Character Set Specifies the character set for a language to determine how to translate the bytes in the
text into characters on the screen. Import... Click it to import the languages settings from a LNG file. Export... Click it to export the languages settings to a LNG file. OK Click it to close the dialog box and accepts all changes. Cancel Click it to close the dialog box and discard all changes.
Click it to open the help document for more details about the dialog and how to use it.
Click it to close the dialog box and discard all changes.
CHAPTER 2 CREATING PROJECTS

4 2
2-5
2.2.2. Font Templates
The following is an example of the Font Templates dialog box.
The following table describes how to read or use each of the items in the dialog box.
Item Description Language Specifies the language to apply the font settings to. Template List Lists the font templates of the selected language. You can select a font template
here as the current template. Name The name of the current template. Windows Font Specifies the Windows font for the current template. Font Style Specifies the font style for the current template. Size Specifies the size for the current template. Underline Specifies if the Underline feature is selected for the current template. Strikeout Specifies if the Strikeout feature is selected for the current template.
Current Template
Update Click it to update the selected template using the new settings. Import... Click it to import the font templates from an FTF file. Export... Click it to export the font templates to an FTF file. OK Click it to close the dialog box and accepts all changes. Cancel Click it to close the dialog box and discard all changes.
Click it to open the help document for more details about the dialog and how to use it.
Click it to close the dialog box and discard all changes.
CHAPTER 2 CREATING PROJECTS

2
2-6
2.2.3. Picture Database The picture database contains all the pictures used by the project. The picture database is empty when the project is initially created.
2.2.3.1. Importing and Exporting Pictures
■ Importing Pictures
You need to import a picture before you can use it for the project. There are 5 ways to import pictures: 1) Use the Picture Database dialog box to import one picture at a time from a picture file. The types of importable picture
files include: BMP, JPG, GIF, and WMF. 2) Use the Picture Database dialog box to import many pictures at a time from a picture database (PDB) file. 3) Use the Picture Database dialog box to import one or many pictures at a time by dragging the pictures files from
Windows Explorer to the Picture Database list.
4) Click the icon to select and import a picture file when you specify a picture in a dialog box or a property sheet.
5) Click the icon to select and import a picture in a picture database file when you specify a picture in a dialog box or a property sheet.
■ Exporting Pictures
You can export the pictures of the project so other projects can use those pictures by importing them. There are 2 ways to export pictures: 1) Use the Picture Database dialog box to export one picture at a time to a picture file. 2) Use the Picture Database dialog box to export many pictures at a time to a picture database (PDB) file.
CHAPTER 2 CREATING PROJECTS

4 2
2-7
2.2.3.2. Picture Groups
The picture database can contain picture groups. A picture group is a collection of pictures. Each picture in a picture group represents one state. When a picture group is displayed as the picture shape of an object, the picture that corresponds to the current object state is shown. This is the main benefit of using a picture group as the object shape because it can show each object state with a different picture. When a picture group is used as the shape for buttons or switches, you may want it to look differently when it is pressed. In order to support the pressed look, a picture group needs two pictures for each state: one picture for the normal (released) look, and another picture is for the pressed look. For example, a 3-state multi-state switch needs a picture group that contains 6 pictures as its picture shape if the pressed look is required. The following is an example of a picture group supporting 3 states and the pressed look.
Picture Group State Pictures 0 (Normal/Released)
0 (Pressed)
1 (Normal/Released)
1 (Pressed)
2 (Normal/Released)
2 (Pressed)
CHAPTER 2 CREATING PROJECTS

2
2-8
2.2.3.3. Picture Database dialog box
The following is an example of the Picture Database dialog box.
The following table describes how to read or use each of the items in the dialog box.
Item Description
Click it to open the help document for more details about the dialog and how to use it.
Click it to close the dialog box and discard all changes.
Pictures Lists the pictures and picture groups of the project. You can select a picture or a picture group as the current selection. You can also make multiple selections.
View Shows the current selection. If the selection is a picture group, the first picture of the group will be shown.
OK Closes the dialog box and accepts all changes to the picture database. Cancel Closes the dialog box and discards all changes to the picture database. Import... Imports a picture from a picture file. The types of importable picture files include: BMP, JPG, GIF,
and WMF. Import From... Imports pictures from a picture database (PDB) file. Export... Exports the current picture to a picture file. Export To... Exports the current selection to a picture database (PDB) file. Add Group Adds one picture group to the picture database. Add Item Imports a picture from a picture file and adds the picture to the current picture group.
Continued
CHAPTER 2 CREATING PROJECTS

4 2
2-9
Item Description Add From... Imports pictures from a picture database (PDB) file and adds those pictures to the current picture
group. Move Up Moves the selection down in the list Move Down Moves the selection up in the list Delete Delete the selection. Color Conversion
Select Dithering or Nearest Color as the color conversion method. If the color resolution of a picture is not compatible with the target panel, the application compiler will use the specified method to convert the picture data so it can be displayed without too much color distortion at runtime.
Support Pressed Look
Available when the selection is a picture group. Check this item so the current picture group supports the pressed look. When a picture group supports the pressed look, it needs two pictures for each state; one picture is for the normal (released) look and another picture is for the pressed look.
Transparent Check this item to enable the transparent feature of the selection; if the selection is a picture, the picture will be transparent for the specified transparent color; if the selection is a picture group, all the pictures of the picture group will be transparent for the specified transparent color. Note that this feature is effective only when a picture or a picture group is shown as the picture shape for an object. It is a common practice to make a picture transparent for a certain color so the picture can be shown as a non-rectangle shape. The following are some examples:
Original Picture Transparent Color Picture Shown
Transparent Color
Available when the Transparent item is checked. Select a color for the transparent color.
Rename Click this button to rename the current picture or the current picture group. Rotate/Flip Rotates or flips the current picture and saves it as another picture in the picture database.
You can select one of the following 7 methods for the Rotate/Flip operation. Method Description 90° Rotates the picture clockwise by 90 degrees 180° Rotates the picture clockwise by 180 degrees 270° Rotates the picture clockwise by 270 degrees X Flips the picture over the X axis 90° & X Rotates the picture clockwise by 90 degrees and flips it over the X Axis Y Flips the picture over the Y axis 90° & Y Rotates the picture clockwise by 90 degrees and flips it over the Y Axis
CHAPTER 2 CREATING PROJECTS

2
2-10CHAPTER 2 CREATING PROJECTS
2.2.4. Sound Database The sound database contains all the sounds used by the project. The sound database is empty when the project is initially created. You can use a function button to play or stop playing a sound. For details, please see Section 5.4.1 Basic Operations of function buttons You can use the Execute General Command ($C2.f) command flag setting in the Command Block to play a sound. For details, please see Section 3.6.7 Using General Commands.
2.2.4.1. Importing and Exporting Sounds
■ Importing Sounds
You need to import a sound before you can use it for the project. There are two ways to import sounds: 1) Use the Sound Database dialog box to import one sound at a time from a sound file. The types of importable sound
files include: WAV. 2) Use the Sound Database dialog box to import many sounds at a time from a sound database (SDB) file. ■ Exporting Sounds
You can export the sounds of the project so other projects can import those sounds. There are 2 ways to export sounds: 1) Use the Sound Database dialog box to export one sound at a time to a sound file. 2) Use the Sound Database dialog box to export many sounds at a time to a sound database (SDB) file.

4 2
2-11
2.2.4.2. Sound Database dialog box
The following is an example of the Sound Database dialog box.
The following table describes how to read or use each of the items in the dialog box.
Item Description
Click it to open the help document for more details about the dialog and how to use it.
Click it to close the dialog box and discard all changes.
Sounds Lists the sounds of the project. You can select a sound as the current selection. You can also make multiple selections.
Sound Information
Displays the sound information of the current selection such as sound format and length.
You can click to start playing the sound, click to pause, and click to stop playing the sound.
OK Closes the dialog box and accepts all changes to the sound database. Cancel Closes the dialog box and discards all changes to the sound database. Import... Imports a sound from a sound file. The types of importable sound files include: WAV. Import From... Imports sounds from a sound database (SDB) file. Export... Exports the current sound to a sound file. Export To... Exports the current selection to a sound database (SDB) file. Rename Click this button to rename the current sound. Delete Delete the selection. Move Up Moves the selection down in the list Move Down Moves the selection up in the list
CHAPTER 2 CREATING PROJECTS

2
2-12
2.2.5. Text Database
The Text Database is a dockable window. With the Text Database, you can manage the texts of the multiple languages in your project easily. To open the Text Database, check the Text Database menu item in the Project menu, or double click the Text Database node under the Global node in the Project Manager tool window.
The following is an example of the Text Database that lists the texts in all the languages of the project.
CHAPTER 2 CREATING PROJECTS
Table to Application Icon Application to Table IconTable to File Icon File to Table Icon
Name of the table. You can select a table from Table A to Table L.
To edit text, select a text row by first left-click anywhere in it, and then click the cell of the row to bring up the edit box. In the edit box, type in the text. To stop or confirm editing, click anywhere outside the selected row.
4 2
2-13
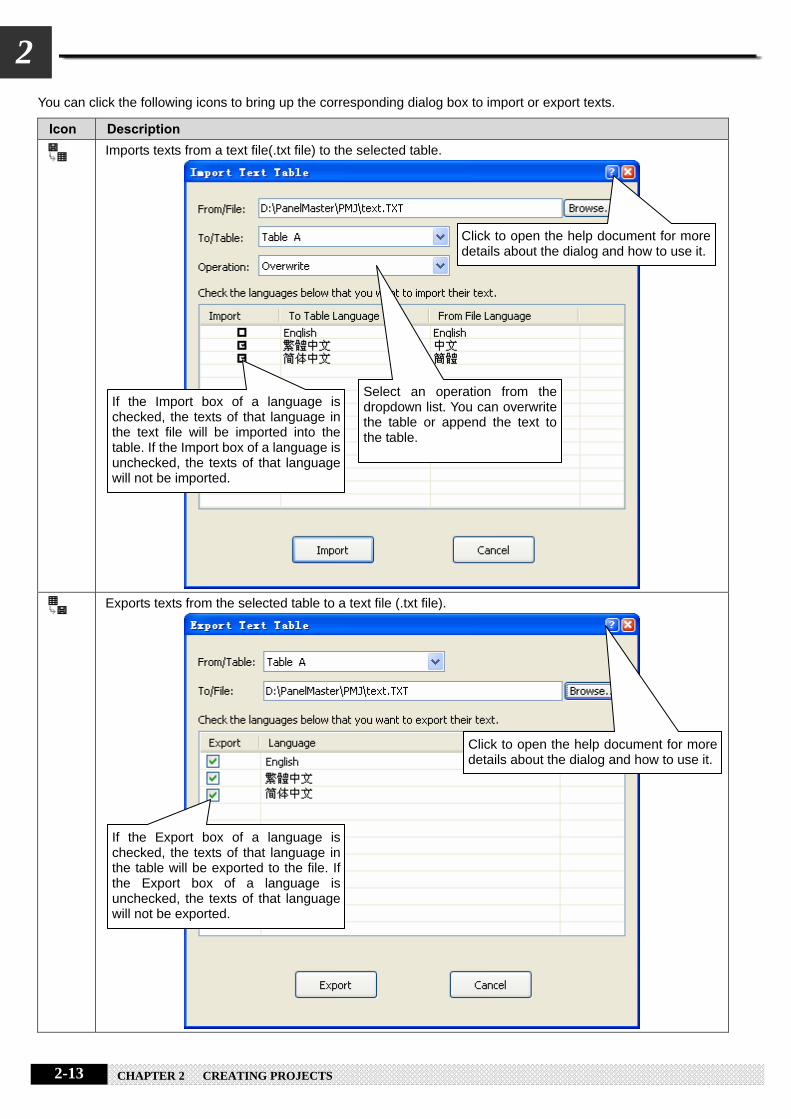
You can click the following icons to bring up the corresponding dialog box to import or export texts.
Icon Description
Imports texts from a text file(.txt file) to the selected table.
Exports texts from the selected table to a text file (.txt file).
Click to open the help document for more details about the dialog and how to use it.
If the Export box of a language is checked, the texts of that language in the table will be exported to the file. If the Export box of a language is unchecked, the texts of that language will not be exported.
Click to open the help document for more details about the dialog and how to use it.
Select an operation from the dropdown list. You can overwrite the table or append the text to the table.
If the Import box of a language is checked, the texts of that language in the text file will be imported into the table. If the Import box of a language is unchecked, the texts of that language will not be imported.
CHAPTER 2 CREATING PROJECTS

2
2-14
Icon Description
Imports texts from the selected table to a panel application in the same project.
Exports texts from a panel application of the project to the selected table.
Table Name
Application Name
Click to open the help document for more details about the dialog and how to use it.If the Import box of a language is
checked, the texts of that language in the table will be imported into the application. If the Import box of a language is unchecked, the texts of that language will not be imported.
Click to open the help document for more details about the dialog and how to use it.
You can right-click the Text Database to get the pop-up menu with the following menu items:
Menu Item Description Cut Cut the selected text and put it on the Clipboard. Copy Copy the selected text and put it on the Clipboard. Paste Insert the text on the Clipboard to the current table. Delete Delete the selected text. <Language name> Check the language name to display the text of objects in the selected
language.
CHAPTER 2 CREATING PROJECTS

4 2
2-15 CHAPTER 2 CREATING PROJECTS
2.3. Working with Tags
A tag represents a single input or output variable monitored or controlled by the system. By changing tags, you can use any PLC or controller without re-developing the application. This chapter explains how you can define and manage tags with the tags editor. After the tag is created in tags editor, you can use it in your application using the Select Tag Dialog Box. Please see Section 4.4.3.3 Selecting Tags for details. Or you can specify the tag by yourself. The format of a tag is Link Number\Tag Group Name\Tag Name.
For example:
Tags Description 1\MONITOR\CORE DISPLAY Indicates a local tag named CORE DISPLAY in MONITOR tag group of link 1 0\BOT\DECLARE Indicates a local tag named DECLARE in BOT tag group of internal memory 0\_ALARM SHOW Indicates a global tag named _ALARM SHOW of internal memory
Note that the maximum text amount of the tag/tag group name is 48 characters. You are allowed to define not only tags for the link, but also the tags for a tag group of the link.
2.3.1. Types of Tags
There are two types of tags: global tags and local tags.
■ Global Tag A global tag is a tag that can be used by all panel applications in the same project. With global tags, the panel applications in the same project can share the common address declaration without having to keep and maintain the same set of tags locally. Note that a global tag can only be associated with internal variables. ■ Local Tag A local tag is a tag that can only be used by the panel application in which the tag is located.
2.3.2. Opening and Closing Tags Editor ■ Opening Tags Editor
To open the global tags editor, use the Global Tags… command in the Project menu, or double click Global > Global Tags in the Project Manager tool window, or right-click Global > Global Tags in the Project Manager tool window to bring out the pop-up menu, and then use the Open command on the pop-up menu.
To open the local tags editor, use the Tags… command on the Panel menu, or double click Panel Application > Tags in the Project Manager tool window, or right-click the Panel Application > Tags in the Project Manager tool window to bring out the pop-up menu, and then use the Open command on the pop-up menu. ■ Closing Tags Editor
To close the tags editor, select the window and click the close button, or choose Windows... on the Window menu, select the window to close in the window dialog, and then click the Close Window(s) button. You can also right-click Global > Global Tags (Panel Application > Tags) in the Project Manager tool window to bring out the pop-up menu, and then use the Close command on the pop-up menu to close the tags editor.

2
2-16
2.3.3. Creating Tags with Tags Editor You can use tags editor to create and manage tags. Tags editor is split into two panes: Tag Group Explorer on the left and Tag List Window on the right. Each pane scrolls separately, and both horizontally and vertically. You can position the mouse over the vertical splitter bar to drag the bar and resize the panes.
The following is an example of the tags editor.
CHAPTER 2 CREATING PROJECTS
List all the Tags for the link
List all the Tags for the active tag group named MONITOR Tag Group Explorer Tag List Window
Tag Groups
Vertical Splitter Bar
4 2
2-17
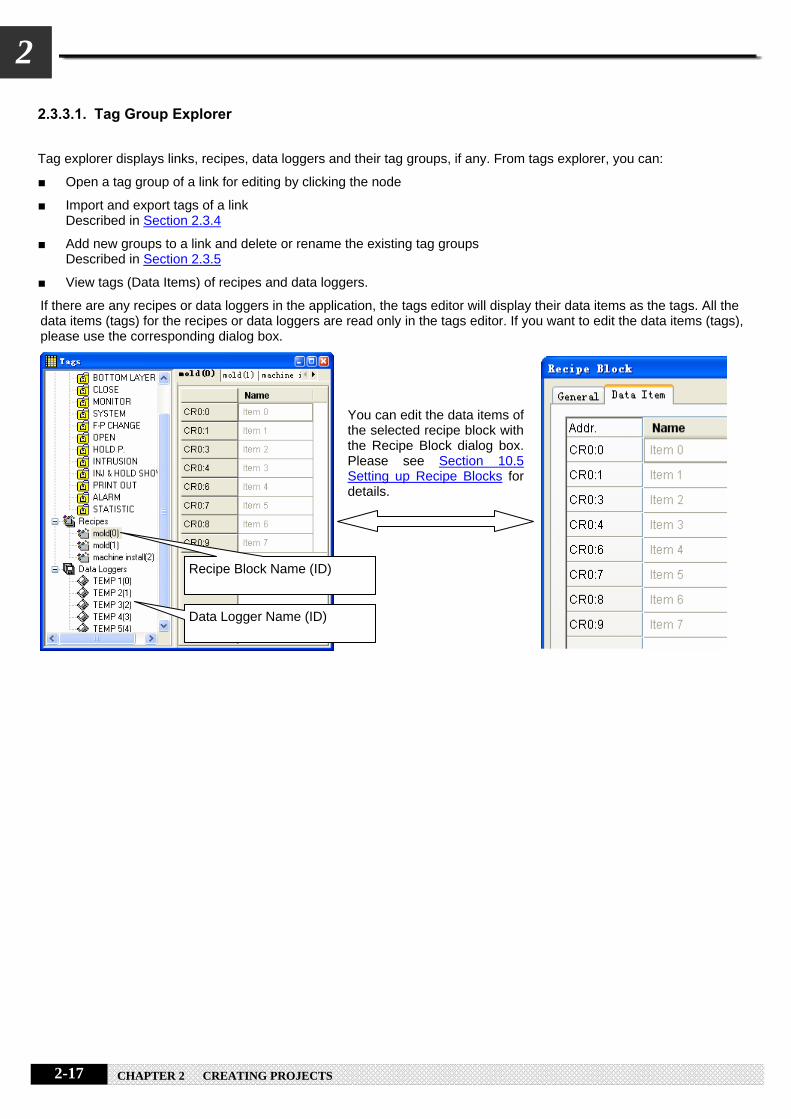
2.3.3.1. Tag Group Explorer
Tag explorer displays links, recipes, data loggers and their tag groups, if any. From tags explorer, you can:
■ Open a tag group of a link for editing by clicking the node
■ Import and export tags of a link Described in Section 2.3.4
■ Add new groups to a link and delete or rename the existing tag groups Described in Section 2.3.5
■ View tags (Data Items) of recipes and data loggers.
If there are any recipes or data loggers in the application, the tags editor will display their data items as the tags. All the data items (tags) for the recipes or data loggers are read only in the tags editor. If you want to edit the data items (tags), please use the corresponding dialog box.
You can edit the data items of the selected recipe block with the Recipe Block dialog box. Please see Section 10.5 Setting up Recipe Blocks for details.
Recipe Block Name (ID)
Data Logger Name (ID)
CHAPTER 2 CREATING PROJECTS

2
2-18
2.3.3.2. Tag List Window
Tag list window displays all the tags related to the selected tag group. In the tag list window, you can:
■ Switch between tag groups by clicking the window tab
■ Click any column header to sort the list
■ Add a tag by defining the tag name and then click other cells to edit the elements of the tag
The following table describes each attribute of the tag.
Item Description Name Specifies the name for the tag.
The name must be unique in the tag group. The maximum text amount of the name is 48 characters. Chinese characters are supported. The name cannot start with a number, and cannot be the same as a macro keyword. The name of global tags must start with underscore ( _ ). The name of the local tags cannot start with underscore ( _ ).
Data Type Selects the data type for the tag from the dropdown list. The supported data types for each tag are the following: 16-Bit Unsigned Integer, 32-Bit Unsigned Integer, 16-Bit Signed Integer, 32-Bit Signed Integer, 16-Bit BCD, 32-Bit BCD, 32-Bit Floating Point, ASCII String, Bit.
<Edit Box>
Specifies the bit address when the Data Type is Bit, otherwise specifies the word address. Address
Click this icon to bring up the Address Input Keypad and specify the desired address for the <Edit Box> field.
Length Specifies the string length when the Data Type is ASCII string, otherwise displays n/a Scan Rate Selects the scan rate for the tag from the dropdown list. The supported scan rates for each tag
are Fast and Normal. Comment Type a comment for the tag.
■ Cut, copy, paste and delete selected tags using menu commands or key combinations.
You can right-click the number column to display a pop-up menu of editing commands. The editing commands available vary depending on what is selected.
The following table shows the supported editing commands.
Menu Command Key Combination Description Cut CTRL+X Removes selected tags from the active window and saves them to
the Clipboard. Copy CTRL+C Duplicates selected tags in the active window. Paste CTRL+V Pastes cut or copied tags into an active window. Delete DELETE Deletes tags without copying it to the Clipboard.
Note that all editing commands require a selection in order to work. To select a tag, click the row on its header number column. To select multiple tags, click the row on its heard column and use Ctrl+Click to add a row to the selection.
CHAPTER 2 CREATING PROJECTS

4 2
2-19 CHAPTER 2 CREATING PROJECTS
2.3.4. Importing and Exporting Tags
■ Importing Tags
1) Right-click the Internal Memory, a link, or any tag groups item in the Tag Group Explorer to bring out the pop-up menu. Then use the Import Tags… command on the pop-up menu.
2) Click the *.csv file you want to import. If you want to open a tags import file that is saved in a different folder, locate and open the folder first.
3) Click Open. Note: If the file format is not correct, the import operation will be cancelled. Note: The tags import file can contain tags only, or many tag groups and their tags. Note: If the name of a tag already exists in the tag group, you will be asked to confirm whether to replace the existing tag
or not. If Yes, the tag in the tag group will be replaced by the tag from the file. If No, only the tag with nonexisting names will be imported. If Cancel, the import operation will be cancelled.
Note: If the tag group name already exists, you will be asked to confirm whether to replace the existing tag group or not. If Yes, the tags in the existing tag group will be removed and replaced by the tags from the file. If No, only the tag group with nonexistent name and its tags will be imported. If Cancel, the import operation will be cancelled.
■ Exporting Tags If you have tags you want to reuse in another application panel, export the tags of the selected tag group as a .csv file. You may do the following: 1) Locate the tag group you would like to export. 2) Right-click on the tag group to display the pop-up menu; and then click Export Tags.., 3) If you want to save tags in a different folder, locate and open the folder first, then click Save. You can export all the tags of the internal memory as a .csv file by right-clicking on the internal memory and then using the Export All Tags command on the pop-up menu.
2.3.5. Adding/Deleting/Renaming Tag Groups
■ Adding a Tag Group 1) Click the internal memory you want to add a tag group for. 2) Right-click the selected item to display the pop-up menu, and then click Add Group. 3) The new tag group will be added, and the default tag group name will become selected for renaming. ■ Deleting a Tag Group: 1) Locate the tag group you would like to delete. 2) Right-click on the tag group to display the pop-up menu, and then click Delete Group. Note: You can only select one tag group to delete at one time. ■ Renaming a Tag Group: 1) Locate the tag group you would like to rename. 2) Right-click on the tag group to display the pop-up menu, and then click Rename Group or click the tag group. 3) The tag group name will become selected. Simply type the new name over the selected text, and then press the
ENTER key or click anywhere outside the editing field.