Creating Custom Wall Types in Revit Architecture. · Creating Custom Wall Types in Revit...
7
Creating Custom Wall Types in Revit Architecture. Will Harris Book & Video Author Many people are excited about their first project in Revit Architecture. However, that excitement subsides when they are force to create their first custom wall. The confident designer gets overwhelmed with doubt and confusion. This tutorial is designed to alleviate that confusion and doubt. In this example, we will use a new educational building. The bathrooms within this building need a 5ft tile wainscot, as shown below, on Gypsum Wall Board over Metal Stud. Although the concept is simple, the process involves family editing and wall type editing. The wainscot is made up of the following components: 2” x 6” Bull Nose 6” x 6” Tile 4” x 12” Cove Base Here is a quick overview of the procedure we will use: Create profiles for all three sections of the wainscot Duplicate the existing wall type Apply the profiles with appropriate materials to the new wall types Let’s start with the end. Below you will see the structure of the Metal ST 6” RESTROOM Wall as well as the section preview of the top of our Restroom wainscot wall.
Transcript of Creating Custom Wall Types in Revit Architecture. · Creating Custom Wall Types in Revit...
Creating Custom Wall Types in Revit Architecture.
Will Harris
Book & Video Author
Many people are excited about their first project in Revit Architecture. However, that excitement subsides when they are force to create their first custom wall. The confident designer gets overwhelmed with doubt and confusion. This tutorial is designed to alleviate that confusion and doubt.
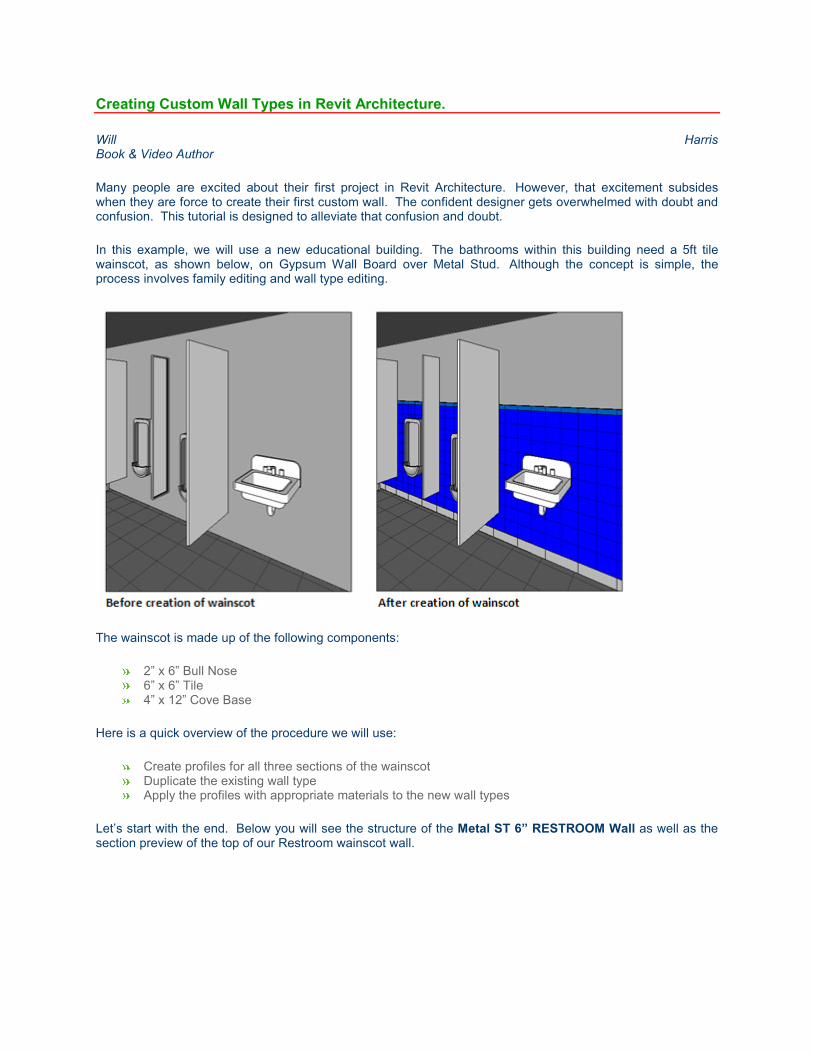
In this example, we will use a new educational building. The bathrooms within this building need a 5ft tile wainscot, as shown below, on Gypsum Wall Board over Metal Stud. Although the concept is simple, the process involves family editing and wall type editing.
The wainscot is made up of the following components:
2” x 6” Bull Nose 6” x 6” Tile 4” x 12” Cove Base
Here is a quick overview of the procedure we will use:
Create profiles for all three sections of the wainscot Duplicate the existing wall type Apply the profiles with appropriate materials to the new wall types
Let’s start with the end. Below you will see the structure of the Metal ST 6” RESTROOM Wall as well as the section preview of the top of our Restroom wainscot wall.

Notice that the 2”Bullnose and 6” x 6” Tile are not shown in the layers of the wall. This is because Sweeps (circled in red) and Profiles were used to create the wainscot.
Let’s now look at the actual steps involved.
Creating the Profiles
1. Start a new Family file by going to File > New > Family.
2. Select the “Profile.rft” family template.
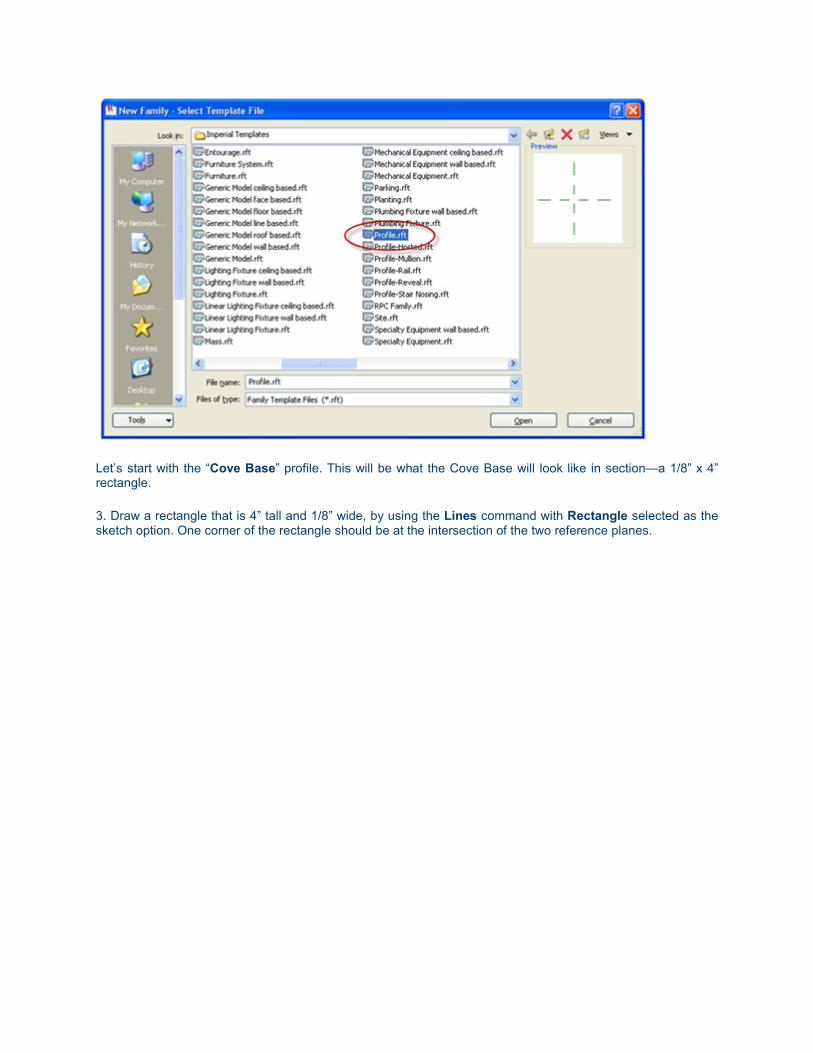
Let’s start with the “Cove Base” profile. This will be what the Cove Base will look like in section—a 1/8” x 4” rectangle.
3. Draw a rectangle that is 4” tall and 1/8” wide, by using the Lines command with Rectangle selected as the sketch option. One corner of the rectangle should be at the intersection of the two reference planes.

4. Save the family “Cove Base Profile.rfa” to your family folder.
5. Load the profile family into your project.
The next step is to create a profile for the tiles. First, we’re going to do some math to ensure that the wall measures up. The wainscot will be a total of 5’ tall. The bull nose is 2” tall and the base cove is 4” tall. That makes the 6” x 6” tile 4’ - 6” tall.
1. Start a new profile family.
2. Draw a 1/8” by 4’ - 6” Rectangle, following the same process as described for the Cove Base profile.
3. Save the family “6 x 6 Tile Profile.rfa” to your family folder.
4. Load the profile family into your project.
Finally, we will create the profile for the 2” Bull Nose.
1. Start a new profile family.
2. Draw a 1/8” by 2” rectangle (same process as before).

3. Save the family “Bullnose Profile.rfa” to your family folder.
4. Load the profile family into your project.
Creating the Wall Type
You are now ready to create the Restroom wall type. You should have the three profile families loaded into the project before you start.
1. Select an existing metal stud wall.
2. Open the Properties dialog for the METAL ST 6” wall type, click Edit/New, click Duplicate, and name it METAL ST 6” RESTROOM. Click OK.
The final step is to add profiles to the new wall type for the wainscot.
1. In the Type Properties dialog for the METAL ST 6” RESTROOM wall type, click the Edit button for the Structure parameter.

2. In the Edit Assembly dialog, click on the Preview button and set the View to Section. Now you can add Sweeps by selecting the Sweeps button.
You should have the profiles already loaded into the project at this point. If not, you can load them from the Wall Sweeps dialog anyway. We are going to create three new sweeps; each of these will have one of the profiles assigned to them. Although the order of the sweeps doesn’t matter, the Profile and the Distance from the Base (of the wall) does.
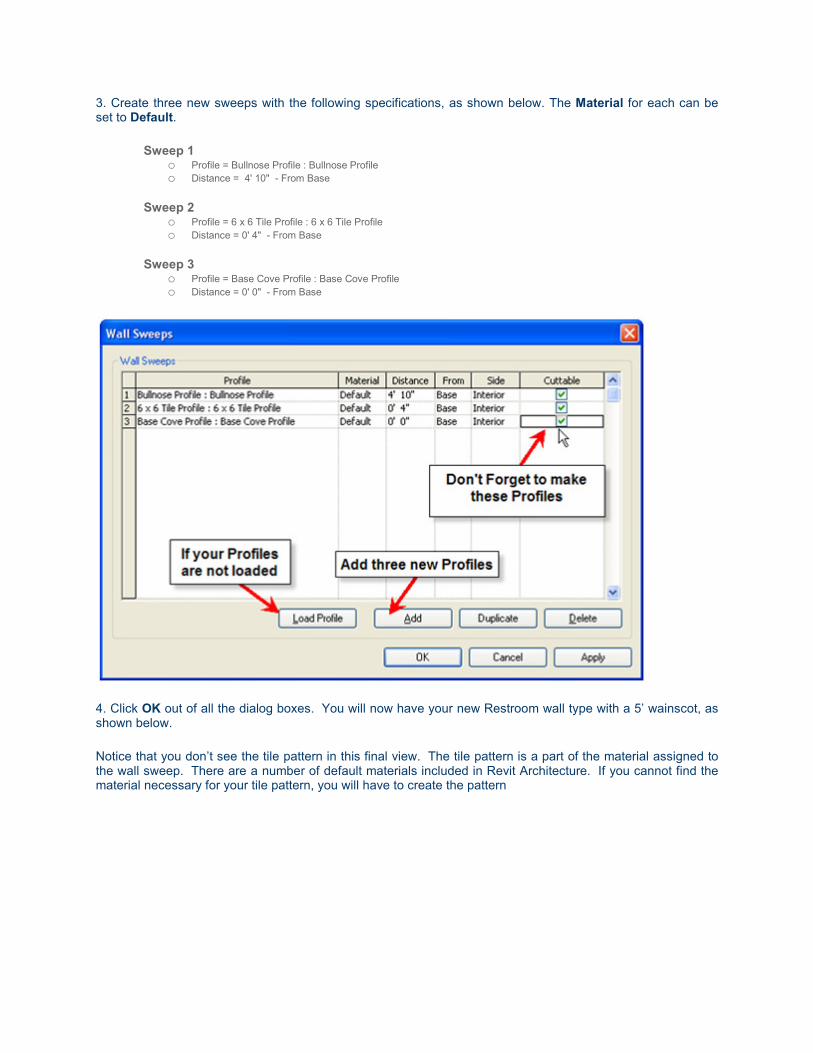
3. Create three new sweeps with the following specifications, as shown below. The Material for each can be set to Default.
Sweep 1 o Profile = Bullnose Profile : Bullnose Profile
o Distance = 4' 10" - From Base
Sweep 2 o Profile = 6 x 6 Tile Profile : 6 x 6 Tile Profile
o Distance = 0' 4" - From Base
Sweep 3 o Profile = Base Cove Profile : Base Cove Profile
o Distance = 0' 0" - From Base
4. Click OK out of all the dialog boxes. You will now have your new Restroom wall type with a 5’ wainscot, as shown below.
Notice that you don’t see the tile pattern in this final view. The tile pattern is a part of the material assigned to the wall sweep. There are a number of default materials included in Revit Architecture. If you cannot find the material necessary for your tile pattern, you will have to create the pattern