Creating Believable Acting in Animation - hig.diva...
30
Beteckning:________________ Faculty of Engineering and Sustainable Development Creating Believable Acting in Animation Christofer Brandtieng June 2012 Bachelor Thesis, 15 hp, C Computer Science Creative Computer Graphics Supervisor: Sharon Lazenby Examiner: Torsten Jonsson
Transcript of Creating Believable Acting in Animation - hig.diva...
Beteckning:________________
Faculty of Engineering and Sustainable Development
Creating Believable Acting in Animation
Christofer Brandtieng
June 2012
Bachelor Thesis, 15 hp, C
Computer Science
Creative Computer Graphics
Supervisor: Sharon Lazenby
Examiner: Torsten Jonsson

Creating Believable Acting in Animation
by
Christofer Brandtieng
Faculty of Engineering and Sustainable Development
University of Gävle
S-801 76 Gävle, Sweden
Email:
Abstract
Creating a believable acting experience with character animation is essential for
animators that want to work in the animation industry. This research focus on
developing guidelines for planning the animation, with the goal to ensure that every
animation feel as believable and emotionally true as possible. The two animation
software that are being used in this research are Autodesk Maya 2012 and Digicel
Flipbook. Two animation shots are created and compared in order to analyze if a
common set of guidelines can be used for every animation the animator may
encounter.
Keywords: Animation, believable acting, body language, facial expression,
cinematography, emotions, gestures, 3D character animation.

Table of Contents
1 Introduction .............................................................................................................. 1 1.1 Background ..................................................................................................................... 1
1.1.1 The principles of animation ............................................................................... 1-4 1.1.2 Background of acting in animation .................................................................... 4-5 1.1.3 The psychology of emotions ............................................................................... 5-7 1.1.4 Cinematography to enhance acting choices ......................................................... 8
1.2 Aims of research .............................................................................................................. 9 1.3 Research questions .......................................................................................................... 9
2 Method ...................................................................................................................... 9 2.1 First animation shot ....................................................................................................... 10
2.1.1 Planning and layout ....................................................................................... 10-12 2.1.2 Blocking ......................................................................................................... 13-14 2.1.3 Blocking plus ...................................................................................................... 14 2.1.4 Polish .................................................................................................................. 14
2.2 Second animation shot ................................................................................................... 14 2.2.1 Planning and layout ....................................................................................... 15-16 2.2.2 Blocking ......................................................................................................... 17-18 2.2.3 Blocking plus ...................................................................................................... 18 2.2.4 Polish .................................................................................................................. 18
3 Results ..................................................................................................................... 19
4 Discussion .......................................................................................................... 19-21 4.1 Conclusion ..................................................................................................................... 22
References ................................................................................................................... 23
Appendix 1: Word definitions ................................................................................... 24
Appendix 2: Time management Gannt chart .......................................................... 25
Appendix 3: Web URL to final animations ............................................................. 26

1
1 Introduction
Being able to convey a story or emotions with animation is an essential task for the
animation industry of today. With animation, we try to tell stories. The more
believable the stories are being told, the greater the experience will be for the
audiences. This also leads to more money towards the animation industry and also the
possibility to develop the craft even further, as well as the ability to pass it on to the
next generations. This dissertation focuses on the idea of creating believable acting in
animation.
1.1 Background
The animation industry has been growing with a fast pace since Walt Disney and his
“nine old men” carved out the Principles of Animation. They brought animation to the
masses and they loved it [1 pp.3-4] [2]. Since then, there has been an enormous
development as how to approach character animation. Today, you have to be able to
communicate the story through animated characters which are supposed to feel as
alive as you and me. This can be a hard task at hand if you do not know how to
communicate it through the animation language.
1.1.1 The principles of animation
Walt Stanchfield was an old time animator and mentor at the Walt Disney Studio. He
listed The Principles of Animation in his book “Drawn to life” as 28 different
principles. However, these also took into consideration principles for drawing, design
and pacing of the scene, which has been removed from the actual animation principles
that we use today. These “hidden” principles are however still being used by
animators in order to create great animations [3]. They are just not on the “public list”
anymore.
The principles from Walt Stanchfield’s book “Drawn to life” [4 p.4]:
-Pose and mood -Shape and form
-Anatomy -Model or character
-Weight -Line and silhouette
-Action and reaction -Perspective
-Direction -Tension
-Planes -Solidity
-Arcs -Squash and stretch
-Beat and rhythm -Depth and volume
-Overlap and followthru [sic] -Timing
-Working from extreme to extreme -Straights and Curves
-Primary and secondary action -Staging and composition
-Anticipation -Caricature
-Details -Texture
-Simplification -Positive and negative shapes
2
The principles above have then been reduced down to what is now known as the
Twelve Principles of Animation which are the building blocks used in today's 3D
animation, and mentioned in “The Illusion of Life” by Frank Thomas and Ollie
Johnston, two of Disneys “nine old men” [5 Ch.3]. These are:
Squash and stretch “This action gives the illusion of weight and volume to a character as it moves. Also
squash and stretch is useful in animating dialogue and doing facial expressions. How
extreme the use of squash and stretch is, depends on what is required in animating the
scene. Usually it's broader in a short style of picture and subtler in a feature. It is used in
all forms of character animation from a bouncing ball to the body weight of a person
walking. This is the most important element you will be required to master and will be
used often.” [10]
Anticipation “This movement prepares the audience for a major action the character is about to
perform, such as, starting to run, jump or change expression. A dancer does not just leap
off the floor. A backwards motion occurs before the forward action is executed. The
backward motion is the anticipation. A comic effect can be done by not using
anticipation after a series of gags that used anticipation. Almost all real action has
major or minor anticipation such as a pitcher's wind-up or a golfers' back swing.
Feature animation is often less broad than short animation unless a scene requires it to
develop a characters personality.” [10]
Staging “A pose or action should clearly communicate to the audience the attitude, mood,
reaction or idea of the character as it relates to the story and continuity of the story line.
The effective use of long, medium, or close up shots, as well as camera angles also helps
in telling the story. There is a limited amount of time in a film, so each sequence, scene
and frame of film must relate to the overall story. Do not confuse the audience with too
many actions at once. Use one action clearly stated to get the idea across, unless you are
animating a scene that is to depict clutter and confusion. Staging directs the audience's
attention to the story or idea being told. Care must be taken in background design so it
isn't obscuring the animation or competing with it due to excess detail behind the
animation. Background and animation should work together as a pictorial unit in a
scene.” [10]
Straight ahead action and pose to pose
“Straight ahead animation starts at the first drawing and works drawing to drawing to
the end of a scene. You can lose size, volume, and proportions with this method, but it
does have spontaneity and freshness. Fast, wild action scenes are done this way. Pose to
Pose is more planned out and charted with key drawings done at intervals throughout the
scene. Size, volumes, and proportions are controlled better this way, as is the action. The
lead animator will turn charting and keys over to his assistant. An assistant can be better
used with this method so that the animator doesn't have to draw every drawing in a
scene. An animator can do more scenes this way and concentrate on the planning of the
animation. Many scenes use a bit of both methods of animation.” [10]
Follow through and overlapping action
“When the main body of the character stops all other parts continue to catch up to the
main mass of the character, such as arms, long hair, clothing, coat tails or a dress,
floppy ears or a long tail (these follow the path of action). Nothing stops all at once. This
is follow through. Overlapping action is when the character changes direction while his
clothes or hair continues forward. The character is going in a new direction, to be
3
followed, a number of frames later, by his clothes in the new direction. 'DRAG,' in
animation, for example, would be when Goofy starts to run, but his head, ears, upper
body, and clothes do not keep up with his legs. In features, this type of action is done
more subtly. Example: When Snow White starts to dance, her dress does not begin to
move with her immediately but catches up a few frames later. Long hair and animal tail
will also be handled in the same manner. Timing becomes critical to the effectiveness of
drag and the overlapping action.” [10]
Slow in and slow out
“As action starts, we have more drawings near the starting pose, one or two in the
middle, and more drawings near the next pose. Fewer drawings make the action faster
and more drawings make the action slower. Slow-ins and slow-outs soften the action,
making it more life-like. For a gag action, we may omit some slow-out or slow-ins for
shock appeal or the surprise element. This will give more snap to the scene.” [10]
Arcs
“All actions, with few exceptions (such as the animation of a mechanical device), follow
an arc or slightly circular path. This is especially true of the human figure and the action
of animals. Arcs give animation a more natural action and better flow. Think of natural
movements in the terms of a pendulum swinging. All arm movement, head turns and even
eye movements are executed on an arc.” [10]
Secondary action
“This action adds to and enriches the main action and adds more dimension to the
character animation, supplementing and/or re-enforcing the main action. Example: A
character is angrily walking toward another character. The walk is forceful, aggressive,
and forward leaning. The leg action is just short of a stomping walk. The secondary
action is a few strong gestures of the arms working with the walk. Also, the possibility of
dialogue being delivered at the same time with tilts and turns of the head to accentuate
the walk and dialogue, but not so much as to distract from the walk action. All of these
actions should work together in support of one another. Think of the walk as the primary
action and arm swings, head bounce and all other actions of the body as secondary or
supporting action.” [10]
Timing (and Spacing)
“Expertise in timing comes best with experience and personal experimentation, using the
trial and error method in refining technique. The basics are: more drawings between
poses slow and smooth the action. Fewer drawings make the action faster and crisper. A
variety of slow and fast timing within a scene adds texture and interest to the movement.
Most animation is done on twos (one drawing photographed on two frames of film) or on
ones (one drawing photographed on each frame of film). Twos are used most of the time,
and ones are used during camera moves such as trucks, pans and occasionally for subtle
and quick dialogue animation. Also, there is timing in the acting of a character to
establish mood, emotion, and reaction to another character or to a situation. Studying
movement of actors and performers on stage and in films is useful when animating
human or animal characters. This frame by frame examination of film footage will aid
you in understanding timing for animation. This is a great way to learn from the others.”
[10]
Exaggeration “Exaggeration is not extreme distortion of a drawing or extremely broad, violent action
all the time. It's like a caricature of facial features, expressions, poses, attitudes and
actions. Action traced from live action film can be accurate, but stiff and mechanical. In
feature animation, a character must move more broadly to look natural. The same is true
of facial expressions, but the action should not be as broad as in a short cartoon style.
4
Exaggeration in a walk or an eye movement or even a head turn will give your film more
appeal. Use good taste and common sense to keep from becoming too theatrical and
excessively animated” [10]
Solid drawing (same or different as weight)
“The basic principles of drawing form, weight, volume solidity and the illusion of three
dimension apply to animation as it does to academic drawing. The way you draw
cartoons, you draw in the classical sense, using pencil sketches and drawings for
reproduction of life. You transform these into color and movement giving the characters
the illusion of three-and four-dimensional life. Three dimensional is movement in space.
The fourth dimension is movement in time.” [10]
Appeal “A live performer has charisma. An animated character has appeal. Appealing
animation does not mean just being cute and cuddly. All characters have to have appeal
whether they are heroic, villainous, comic or cute. Appeal, as you will use it, includes an
easy to read design, clear drawing, and personality development that will capture and
involve the audience's interest. Early cartoons were basically a series of gags strung
together on a main theme. Over the years, the artists have learned that to produce a
feature there was a need for story continuity, character development and a higher quality
of artwork throughout the entire production. Like all forms of storytelling, the feature
has to appeal to the mind as well as to the eye.” [10]
The twelve principles of animation mainly describe how to achieve good movements.
In order to create great animation, additional thought has to go into acting,
storytelling, pacing and cinematography as well.
1.1.2 Background of acting in animation
In average 65 percent of our language is non verbal [6 p.9]. These are hints in our
body language and facial expressions that as humans we pick up on a subconscious
level and interpret. These are what we can call acting in animation. Animators provide
hints with body gestures and expressions to the audience. This in turn allows the
audience to feel what an inanimate object feels even though that object clearly has no
feelings in reality. In real life, these expressions can be very subtle [7 p.105] and if
done so in an animation, they can be missed. In order to convey the emotion, the
animator often removes all the misleading nuances and tries to make an expression or
gesture which can only be interpret in the approach that the story demands. This is of
course different for every production. Some animations have to be more realistic
looking and then it is time to put in all those small nuances instead in order to achieve
that proper feeling.
Thought can be a difficult thing to express in animations since it is an internal process
of the character. In order to convey thought of an animated character, extroverted
versus introverted posing can be used, as Kieth Lango mentions in his VTS video
series [8]. What this means in reality is, when a character is thinking for himself poses
should reflect this. In a sense, it can be said that the character is talking to himself
when thinking. Therefore, the poses should be small and compact around the
characters center. When the character is then ready to express his thoughts,
extroverted poses should be applied. These poses should reflect that the character now
focuses outside of himself and that he is trying to communicate with his surroundings.
5
It is important when creating character animation to remember that the character is
“alive” and that he or she is a real person in him/herself. Acting is reacting, and in
order to make a believable performance, the character at hand needs to react to the
surrounding world. Every action must have a reason behind it. As mentioned before,
thought process is an important thing to portray within the animation if the animation
shot is to have depth, complexity and believability. Look for opportunities to show
thoughts, these thoughts will then force the character to make decisions. Ultimately
this will lead to actions.
1.1.3 The psychology of emotions
In order to create natural emotions that the audience can relate to in animation,
animators need to understand how the human psychology functions. Both how humans
express emotions by facial expression and by body gestures, since both these methods
are prominent in how humans interpret the message sent out from the animation
character.
There are seven universal emotional facial expressions in the world that does not
differ between different cultures. Henrik Fexeus, mentalist and author in the subject
practical psychology, names them “the seven samurais” in his book “Konsten att läsa
tankar – Hur du förstår och påverkar andra utan att de märker något” and these are:
surprise, sorrow, anger, fear, joy, repulsion and disdain [7 p.110].
By using these emotions, staying away from cultural emotional differences, we can
increase the number of viewers that will interpret the message in the manner intended.
However, this should only be used as a starting point. Other emotions will have to be
added as well, in order to make the strongest performance possible.
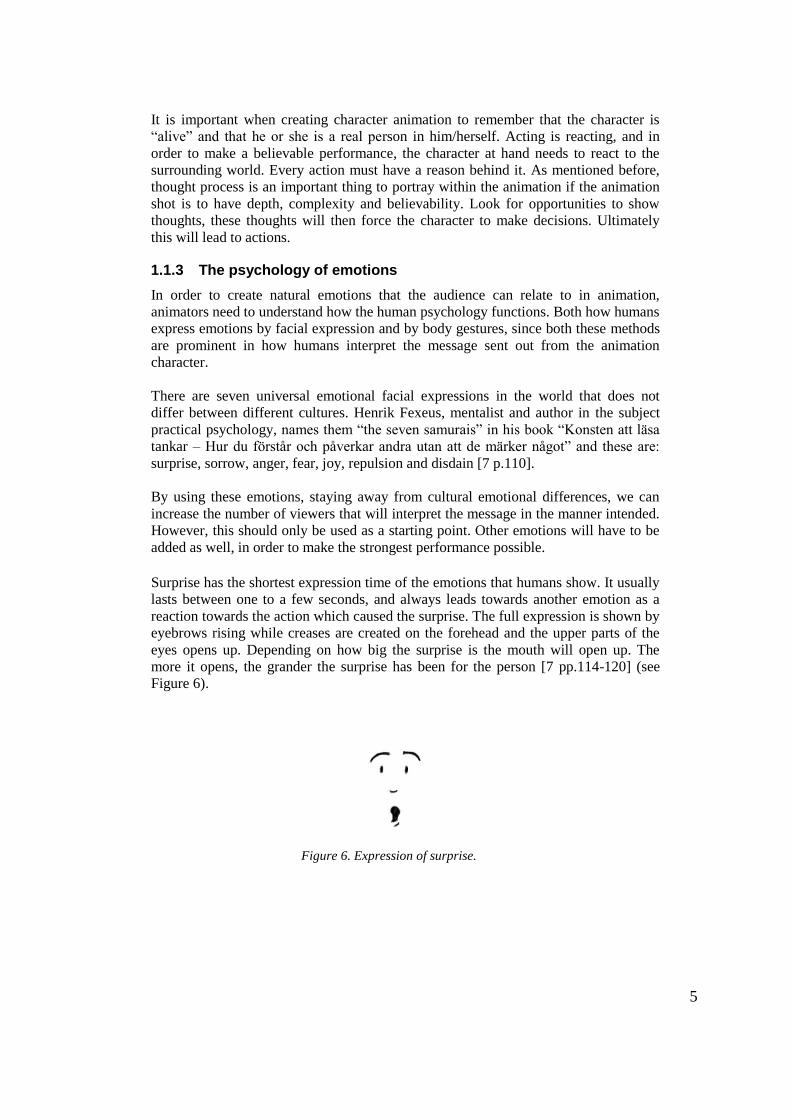
Surprise has the shortest expression time of the emotions that humans show. It usually
lasts between one to a few seconds, and always leads towards another emotion as a
reaction towards the action which caused the surprise. The full expression is shown by
eyebrows rising while creases are created on the forehead and the upper parts of the
eyes opens up. Depending on how big the surprise is the mouth will open up. The
more it opens, the grander the surprise has been for the person [7 pp.114-120] (see
Figure 6).
Figure 6. Expression of surprise.
6
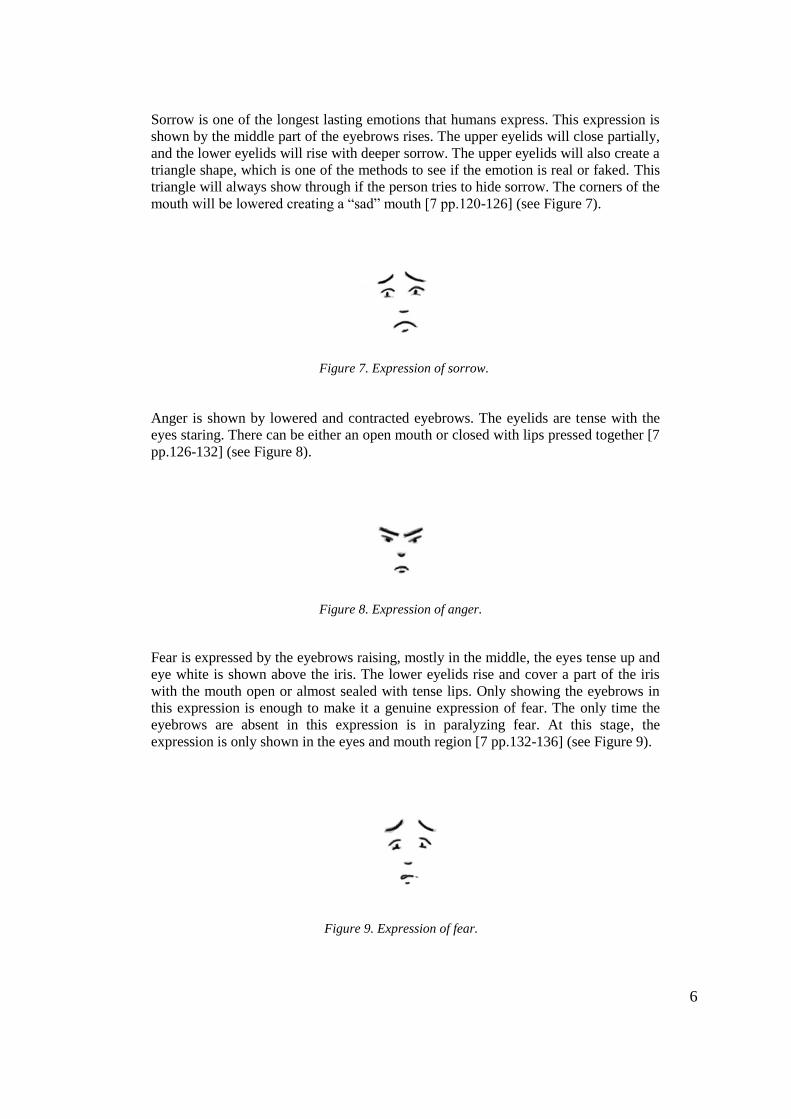
Sorrow is one of the longest lasting emotions that humans express. This expression is
shown by the middle part of the eyebrows rises. The upper eyelids will close partially,
and the lower eyelids will rise with deeper sorrow. The upper eyelids will also create a
triangle shape, which is one of the methods to see if the emotion is real or faked. This
triangle will always show through if the person tries to hide sorrow. The corners of the
mouth will be lowered creating a “sad” mouth [7 pp.120-126] (see Figure 7).
Figure 7. Expression of sorrow.
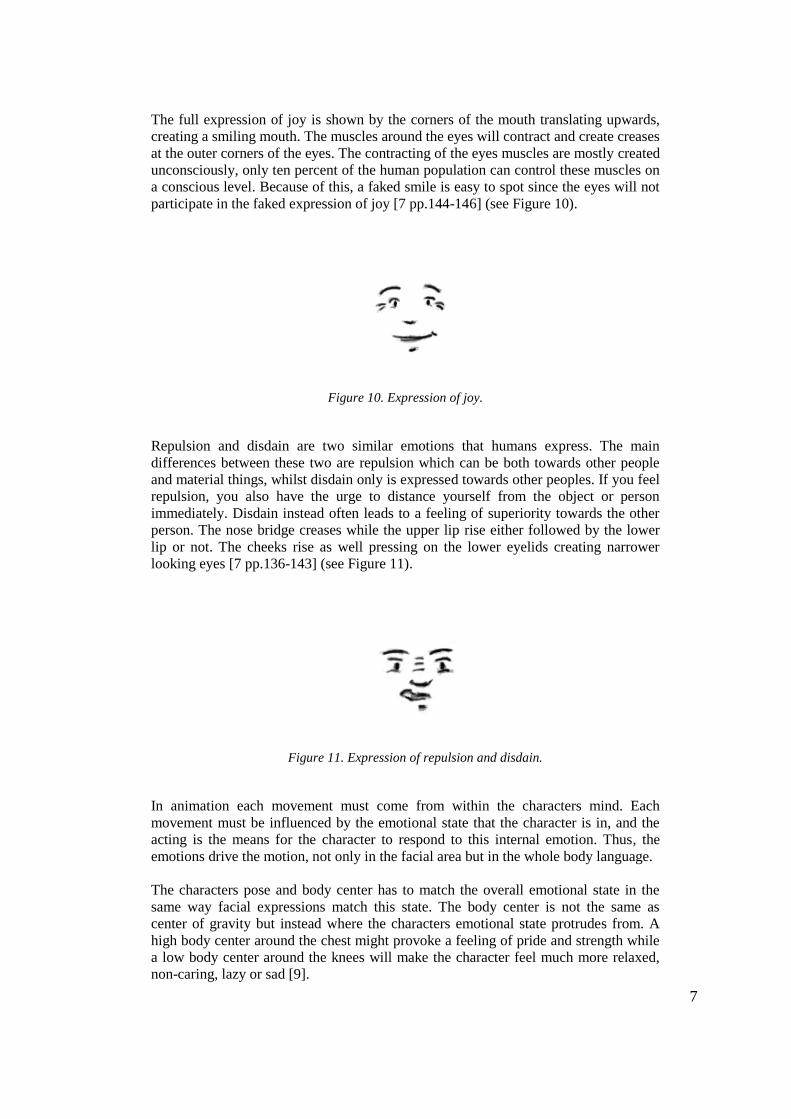
Anger is shown by lowered and contracted eyebrows. The eyelids are tense with the
eyes staring. There can be either an open mouth or closed with lips pressed together [7
pp.126-132] (see Figure 8).
Figure 8. Expression of anger.
Fear is expressed by the eyebrows raising, mostly in the middle, the eyes tense up and
eye white is shown above the iris. The lower eyelids rise and cover a part of the iris
with the mouth open or almost sealed with tense lips. Only showing the eyebrows in
this expression is enough to make it a genuine expression of fear. The only time the
eyebrows are absent in this expression is in paralyzing fear. At this stage, the
expression is only shown in the eyes and mouth region [7 pp.132-136] (see Figure 9).
Figure 9. Expression of fear.
7
The full expression of joy is shown by the corners of the mouth translating upwards,
creating a smiling mouth. The muscles around the eyes will contract and create creases
at the outer corners of the eyes. The contracting of the eyes muscles are mostly created
unconsciously, only ten percent of the human population can control these muscles on
a conscious level. Because of this, a faked smile is easy to spot since the eyes will not
participate in the faked expression of joy [7 pp.144-146] (see Figure 10).
Figure 10. Expression of joy.
Repulsion and disdain are two similar emotions that humans express. The main
differences between these two are repulsion which can be both towards other people
and material things, whilst disdain only is expressed towards other peoples. If you feel
repulsion, you also have the urge to distance yourself from the object or person
immediately. Disdain instead often leads to a feeling of superiority towards the other
person. The nose bridge creases while the upper lip rise either followed by the lower
lip or not. The cheeks rise as well pressing on the lower eyelids creating narrower
looking eyes [7 pp.136-143] (see Figure 11).
Figure 11. Expression of repulsion and disdain.
In animation each movement must come from within the characters mind. Each
movement must be influenced by the emotional state that the character is in, and the
acting is the means for the character to respond to this internal emotion. Thus, the
emotions drive the motion, not only in the facial area but in the whole body language.
The characters pose and body center has to match the overall emotional state in the
same way facial expressions match this state. The body center is not the same as
center of gravity but instead where the characters emotional state protrudes from. A
high body center around the chest might provoke a feeling of pride and strength while
a low body center around the knees will make the character feel much more relaxed,
non-caring, lazy or sad [9].

8
1.1.4 Cinematography to enhance acting choices
Depending on how you choose to film your shot, what angle, depth of field, wide or
narrow, high or low angle, to name a few, the shot’s character can drastically change.
In order to enhance the experience, cinematography must be taken into account.
Will a wide shot or a close up shot be used? It all depends on what the scene itself
demands. There are many different methods to film the same shot.
extreme wide shot
wide shot
medium shot
medium close up shot
close up shot
extreme close up shot
These can also be filmed from a high or a low angle, as well as with different tilts on
the camera. By experimenting with camera angles and reading up on cinematography,
the animator can aim towards making the best decision possible to enhance the
performance of the animated character. This is crucial in order to make the most
coherent experience for the audience.
One of the most basic rules in cinematography is the rule of thirds [15]. The cameras
image is divided into thirds by drawing vertical and horizontal lines. The intersecting
of these lines is the basic focal points of the image. At these intersections, the shots
point of interest should be placed. This “rule” however should only be considered as a
guideline since there are times when other compositions are to be preferred. As said
before, it all depends on what the story demands and what communicates the idea in
the clearest way.
When addressing cuts between different shots, it is a good idea to take into
consideration where the last shot's point of interest was and where the new shot's point
of interest will be. In order to make the cut coherent while keeping the flow, it is a
good idea to match these two points of interests on the images. An example would be
if the last shot ends up in the right corner, then the following shot should begin from
the right corner.

9
1.2 Aims of research
This research searched for guidelines and rules for creating a believable acting
experience with animated characters. In order to propel the story forward, focus was
towards communicating the mood and emotions the animated characters were going
through. This was accomplished with the help of studying human psychology to make
sure the expressions and reactions were as believable as possible. This would
hopefully lead to a stronger and more entertaining performance and experience.
1.3 Research questions
Whilst creating two different animation shots this dissertation aimed to find
conclusions and explanations for four protruding questions when talking about
character animation.
How can believable acting be created in animation?
What characteristics make the acting choices believable?
How can the animator choose the correct acting for every animation shot?
What psychological factors deal with the perceived emotions?
2 Method
In order to research and draw conclusions for the four above stated questions, two
different animation shots were created. One pantomime acting shot and one dialogue
based shot. Since these two animations were so different towards one another this
would lead to well-rounded conclusions for what was needed in order to achieve
believable acting, as well as to see if a common foundation could be used for both
shots to obtain emotionally true acting choices.
The computer software that were used for the animations were Autodesk Maya 2012
[11] and Digicel Flipbook [12]. These are two prominent applications used in the
animation industry today.
Both shots followed the same workflow of planning and layout, blocking, blocking
plus and polish.
10
2.1 First animation shot
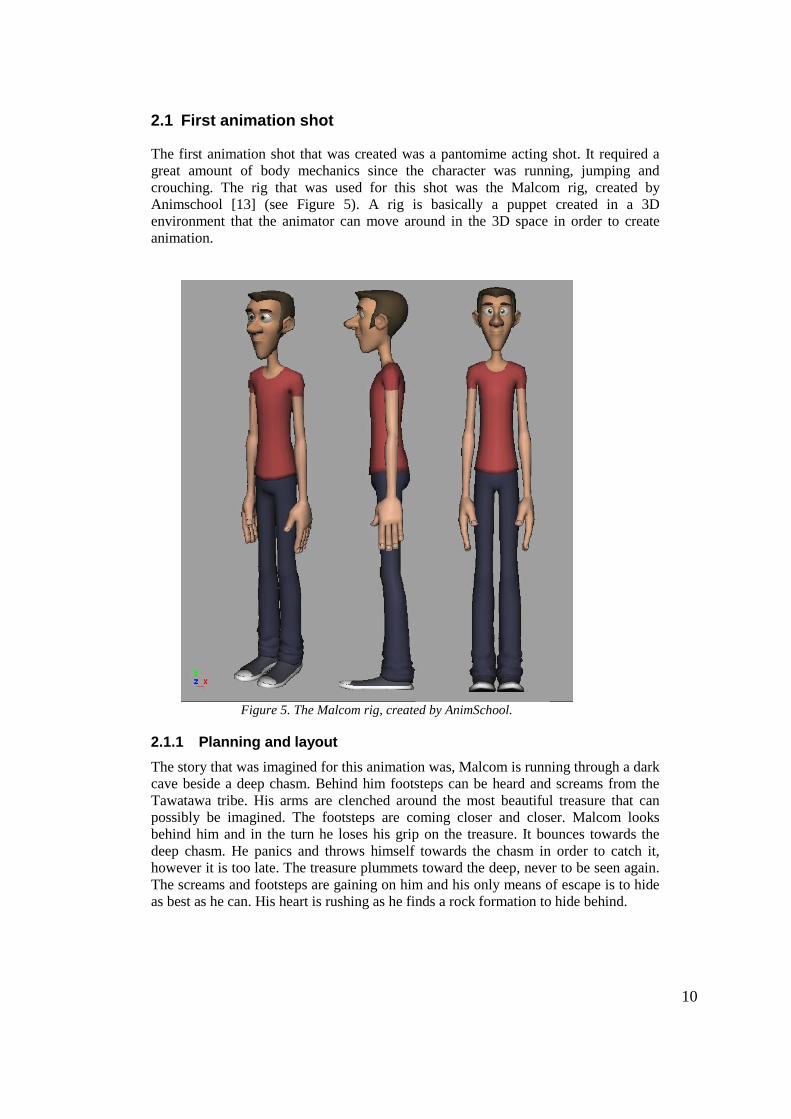
The first animation shot that was created was a pantomime acting shot. It required a
great amount of body mechanics since the character was running, jumping and
crouching. The rig that was used for this shot was the Malcom rig, created by
Animschool [13] (see Figure 5). A rig is basically a puppet created in a 3D
environment that the animator can move around in the 3D space in order to create
animation.
Figure 5. The Malcom rig, created by AnimSchool.
2.1.1 Planning and layout
The story that was imagined for this animation was, Malcom is running through a dark
cave beside a deep chasm. Behind him footsteps can be heard and screams from the
Tawatawa tribe. His arms are clenched around the most beautiful treasure that can
possibly be imagined. The footsteps are coming closer and closer. Malcom looks
behind him and in the turn he loses his grip on the treasure. It bounces towards the
deep chasm. He panics and throws himself towards the chasm in order to catch it,
however it is too late. The treasure plummets toward the deep, never to be seen again.
The screams and footsteps are gaining on him and his only means of escape is to hide
as best as he can. His heart is rushing as he finds a rock formation to hide behind.

11
A scene was modeled in Autodesk Maya 2012, creating the basic environment of the
cave the character was placed in. A low camera placement was chosen in order to tell
the story in the clearest method, showing the chasm, as well as the cave path besides it
(see Figure 1). The rule of thirds was used, having the character enter at the focus
point in the upper left and ending with him in the upper right.
Figure 1. The layout that was created.
The Malcom rig was referenced into the scene and a Malcom Picker script was
imported in order to speed up the selection process of the animation controls. The rig
was then placed inside the shot-cam's view in order to provide a size reference for the
rough 2D animation that was created in Digicel Flipbook. An image was rendered out
of the shots layout. This was then imported into Digicel Flipbook as a background
image.
References was collected, created and acted out in order to figure out how a run is
affecting the body, as well as to figure out different body mechanics that the shot
demanded.
12
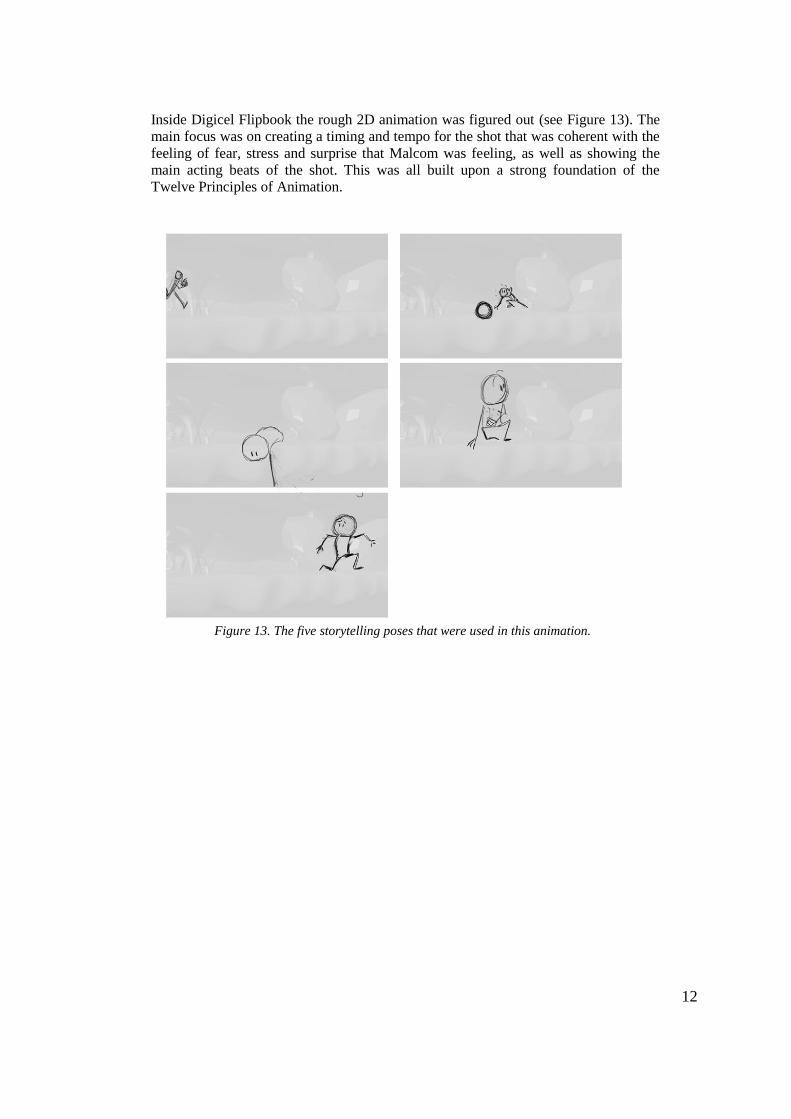
Inside Digicel Flipbook the rough 2D animation was figured out (see Figure 13). The
main focus was on creating a timing and tempo for the shot that was coherent with the
feeling of fear, stress and surprise that Malcom was feeling, as well as showing the
main acting beats of the shot. This was all built upon a strong foundation of the
Twelve Principles of Animation.
Figure 13. The five storytelling poses that were used in this animation.
13
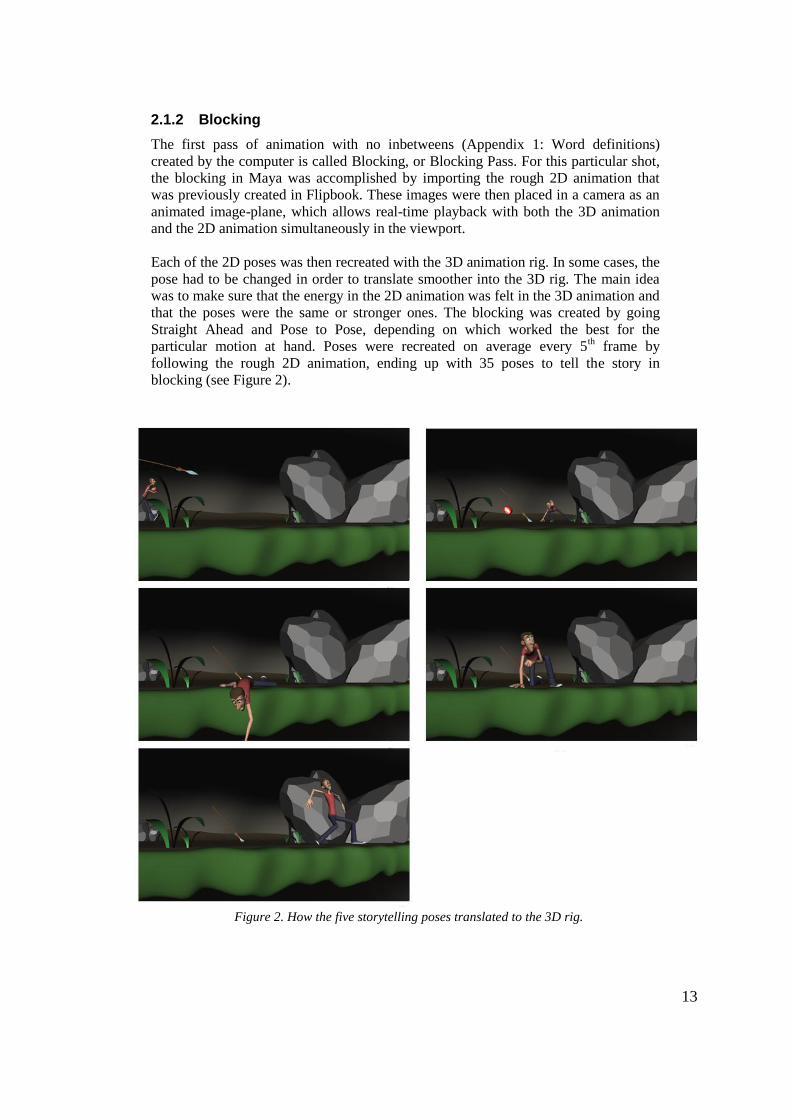
2.1.2 Blocking
The first pass of animation with no inbetweens (Appendix 1: Word definitions)
created by the computer is called Blocking, or Blocking Pass. For this particular shot,
the blocking in Maya was accomplished by importing the rough 2D animation that
was previously created in Flipbook. These images were then placed in a camera as an
animated image-plane, which allows real-time playback with both the 3D animation
and the 2D animation simultaneously in the viewport.
Each of the 2D poses was then recreated with the 3D animation rig. In some cases, the
pose had to be changed in order to translate smoother into the 3D rig. The main idea
was to make sure that the energy in the 2D animation was felt in the 3D animation and
that the poses were the same or stronger ones. The blocking was created by going
Straight Ahead and Pose to Pose, depending on which worked the best for the
particular motion at hand. Poses were recreated on average every 5th frame by
following the rough 2D animation, ending up with 35 poses to tell the story in
blocking (see Figure 2).
Figure 2. How the five storytelling poses translated to the 3D rig.

14
In order to keep the poses organized and easy to handle changes, keyframes were
placed on every control curve for each pose, making it easy to slide them across the
time-line for timing changes.
2.1.3 Blocking Plus
After the blocking had been completed, all the characters control curves was then set
to interpolate between the different poses. The interpolation used was Maya's built in
Auto Tagent (Appendix 1: Word definitions) as the base. Changes was then made for
each individual action (control curve) if it demanded a different interpolation.
These inbetweens that the computer created were not always what was needed in order
to create the desired motion. At this stage, it was a matter of adjusting or changing the
inbetweens in order to follow the Principles of Animation. It was also important to
make sure that the acting choices were communicating well with enough timing and
good spacing, as well as providing the entire shot a good rhythm.
Some significant timing changes had to be made in order to provide the shot more
time up front, having the character enter from off-screen instead of starting in the
camera view as it had originally been planned. The final action that the character
performed was also timed again since the motion went by too fast from the method
that had been blocked out previously. Beside these two major timing changes, small
changes was made, providing each move an adequate time to read, as well as to settle.
The spacing of the entire character throughout the shot was refined and pushed into
arcs.
All nuances of the characters acting was added in, such as the nervous fast breathing,
the facial expression changes and eye-darts. At this stage, key-frames were only
created on individual control curves where they were needed and not on the entire
body. Control curves was offset in order to make sure that the entire character did not
start or stop moving at the same time, most of this was created previously in blocking,
however some areas needed tweaking after that as well.
2.1.4 Polish
When the acting choices were nailed down and the timing was figured out the Polish
Pass started. At this pass, all small textural animation parts were added, such as weight
on fingers as they were being pressed and released on from the upper torso. Every part
of Malcom's body was observed and analyzed frame by frame, trying to spot any
weird glitches or out of place movement and pushing every movement into an arc. The
shot would not require any major, if any, timing changes during this pass. The story,
movement and acting should all be working already and the focus was instead aimed
towards obtaining the desired spacing on each frame.
2.2 Second animation shot
The second shot that was animated was a dialogue acting shot. The twelve second
audio was borrowed from the movie Dumb & Dumber and was of Jim Carrey saying
the line “I'm sick and tired to having to eke my way through life......breathing in.......
Sick and tired of being a nobody [14].” The rig that was used for this shot was the
same Malcom rig utilized in the previous shot, created by Animschool [13].
15
2.2.1 Planning and layout
The audio was analyzed with the goal to imagine the context and subtext of the
dialogue. The idea for this particular shot was to have Malcom come home from a
hard day of work. He had sat himself down in his couch in the corner of his living
room. His wife sits beside him, out of frame, while he explains and feels pity about his
job. He does not get any credit or recognition for the work he performs and is treated
like air from his coworkers and superiors. He does not understand why he cannot get a
break in this world.
In order to stay true to the emotional state Malcom was in, the poses that were chosen
had to evoke the feelings of despondent, suppressed anger and sorrow. He would also
have to stay in a defensive state since he would want to keep out the surroundings and
protect himself in this vulnerable state he was in. His overall movement had to stay in
a slower pace to help evoke the feeling of sorrow and despondent. One major item to
add to the animation was to animate the breathing between the spoken lines in order to
connect the animation with the audio throughout the shot since it was so prominent in
the audio file.
References were collected by the means of acting out the shot and analyzing what
movements and poses that could work best in the given situation.
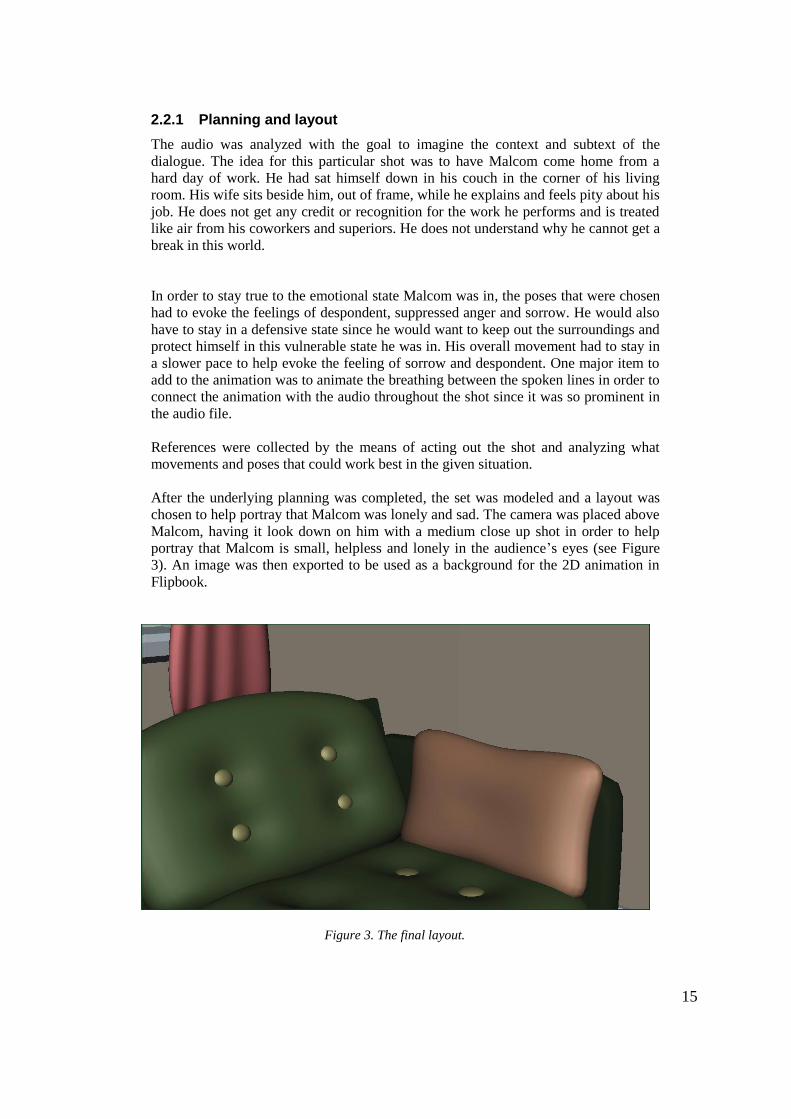
After the underlying planning was completed, the set was modeled and a layout was
chosen to help portray that Malcom was lonely and sad. The camera was placed above
Malcom, having it look down on him with a medium close up shot in order to help
portray that Malcom is small, helpless and lonely in the audience’s eyes (see Figure
3). An image was then exported to be used as a background for the 2D animation in
Flipbook.
Figure 3. The final layout.
16
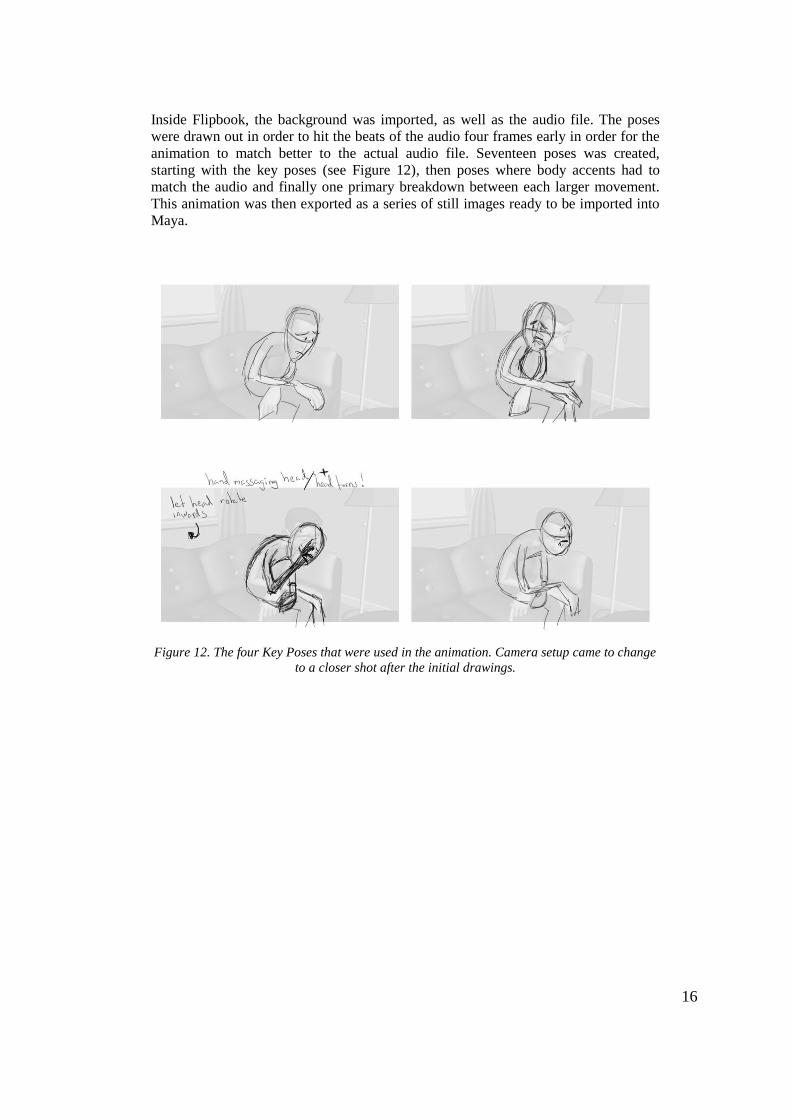
Inside Flipbook, the background was imported, as well as the audio file. The poses
were drawn out in order to hit the beats of the audio four frames early in order for the
animation to match better to the actual audio file. Seventeen poses was created,
starting with the key poses (see Figure 12), then poses where body accents had to
match the audio and finally one primary breakdown between each larger movement.
This animation was then exported as a series of still images ready to be imported into
Maya.
Figure 12. The four Key Poses that were used in the animation. Camera setup came to change
to a closer shot after the initial drawings.

17
2.2.2 Blocking
The Blocking in Maya started by importing the still images which were created in
Flipbok and then placing them as an animated image-plane, as well as importing the
audio file.
The previous seventeen poses that had been planned out in Flipbook were then
recreated with the 3D rig (see Figure 4). At this stage, mouth shapes were also created
in order to match up to the dialogue. Except the seventeen original planning poses, a
great amount of additional poses were created as extremes for head accents, as well as
primary and secondary breakdowns between most of the different moves. These were
made in order to figure out all accents to the dialogue and adding the correct mouth
shapes to them as well. This was accomplished with Maya in order to reduce the
drawings that had to be created in Flipbook and speed up the rough 2D pass, since it
was only going to be used as a guide and poses might change slightly well inside
Maya.
Figure 4. The four Key Poses translated to the 3D model.
Effort was put in order to make sure that the body accentuated the spoken words
around four frames before the audio, and that the mouth shapes occurred between one
to three frames before. This was in order to make sure that the audience would see the
accents before they hear the sound. This is to mimic what happens in real life.
The pacing of the shot had to stay in a relatively slow state throughout since the
feeling of sadness affect us humans as to slow down our movement and make us act in
a smoother manner. Then small bursts of fast actions were sprinkled on top of this
base in order to create an entertaining rhythm to the shot. This was considered for
every breakdown and extreme pose that was created in Maya after the first seventeen
poses that had already been planned out.
18
In all, forty-five different poses were created in order to tell the story through the
Blocking pass.
2.2.3 Blocking Plus
In Blocking Plus, the whole characters control curves were set to Auto Tangent which
allows the computer to “draw” inbetweens between the created poses in order to
smooth out the animation. These inbetweens were then modified in order to
compliment the original poses and retain the desired spacing and having them move in
arcs.
Some minor adjustments with the timing had to be made on different body parts in
order to achieve the desired feeling. Some body parts were also offset to avoid having
the animation looking to much pose to pose, with every part of the body starting and
stopping at the same time.
The lip sync was added and the facial features were reviewed for accuracy and cleaned
up. It was important to make sure that the facial expressions translated from one to
another in a believable manner without any weird pops, as well as making sure that
they accentuated the spoken dialogue and showed emotions.
A breathing pass was added with the intent to show some breathing before each
spoken line, where it demonstrated that the character had air in his lungs and therefore
could produce the spoken words.
2.2.4 Polish
In order to have the face feel like one big unit instead of several different control
curves, cheek pushes were added with the intent to show that different parts of the face
affects others and causes them to move as well.
Other changes that were made during polish were on correcting frames that only
showed eye white within the eyes. Adding small finger movements and making sure
that the pressure was felt when the character rested his head on his clenched fist.
The entire shot was examined frame by frame, taking lists of all the small mistakes
that could be found and then correcting them.
19
3 Results
The two animation shots that were created accomplished to tell a story and evoke
emotional interest for the viewer. This is based on the comments that I received when
showing them to both people with and without professional animation experience.
These comments will be analyzed in more depth under Discussion, both positive and
negative, and how to improve on these areas. However, even though the story came
across, there is still room for improvement on how to make the characters feel as a real
person, what acting choices to choose for each different character and how to add
more unique characteristics to each character.
The two shots demanded different emotions and methods these emotions were shown,
both with and without spoken words. Still, the same fundamentals of creating a
believable acting experience were used in both shots. And since they both managed to
tell the story in a believable manner, a common ground of guidelines should work for
most animations as a base to build on in order to achieve believable acting in
animation. These guidelines will be discussed under Discussion.
The first animation shot can be viewed here: https://vimeo.com/42967007
The second animation shot can be viewed here: https://vimeo.com/42967006
4 Discussion
After the animations were completed, they were shown to both professional animators
and people without animation experience, in order to obtain comments on what they
thought of the shots. This was achieved by sending out the final animation movie clips
to three professional animators, three people without animation experience, as well as
posting these two animations on “The 11 Second Club” [16], which is a forum for
both professional animators and people studying animation. The responses I received
were generally positive. However, I also received some comments on how to improve
the animation.
One of the things were that the emotions and story were not unambiguous enough
which led to confusion in the audience on what was going on in the scene. It is really
important that the audience do not become confused and can follow the story without
distractions. Thus, it might be better to have a simple but definite emotion that the
character expresses instead of trying to show too much. This can hopefully help guide
the audience through the story in a smoother manner.
Another comment were that the first shot lacked a bit of tension from the middle to the
end and that the acting choices could have been more stressed and panicked, having
the character miss footsteps, almost crawling just to get away from the danger.
However, I also received comments from people saying that they liked the acting
choices but that the tension were not really there.
20
I went back in to the animation and tightened up the timing of some moves from the
middle to the end of the shot and tried to make everything feel more stressed with
tension. This seemed to be the problem. The characters movement was to slow though
the acting portrayed the desired emotions. This is another thing to be really mindful of,
the entire character, emotions, body language and tempo, must express the desired
emotion that the animator is after. If one thing is out of sync, the feeling will not be
expressed as strongly as desired and the storytelling might get lost in confusion.
To answer the research questions previously stated, I will take one topic at the time
and try to answer to the fullest extent on how to solve these problems.
How can believable acting be created in animation?
There are a many aspects that lead to creating believable acting for character
animation. A strong fundamental understanding of the Principles of Animation is
needed. These are absolutely necessary if any high-quality animation is to be
accomplished. The animator also needs to have the adequate experience of
cinematography in order to help tell both the story and emotional feeling of the
characters and scenes.
Define the character and know who that person really is. What makes this character
unique? Has he or she any special characteristic that stands out? Is he or she lazy or
full of energy? All these background questions will help to obtain an idea of how that
character behaves and portrays him or her in different situations. You should try and
obtain as much background information as possible of your characters entire life.
These are information that can be use in order to make acting choices that are true to
that specific character. This is also a great approach to stay away from cliché acting
choices that are overused.
Be observant of real life and try to draw from your own experiences. People will often
connect with things that they have experienced themselves and the chances are that if
you have experienced it, others have as well. Stay true to the character and make them
feel emotions, if the character exhibit no internal emotions, there is a big probability
that the audience will feel disconnected from him/her. Allow the emotions to drive the
motion. If the character is joyful, everything that character does has to express this
emotion until the emotional state is changed. Show thoughts; make sure that the
character reflects inside him/her over the things that are actually happening around
him/her. This will enforce that the world around the character is real and that it truly
affects this characters decisions. Do not forget to animate the character breathing since
this will help ground the character in its world, unless of course it is a world without
air.
What characteristics make the acting choices believable?
In order to achieve emotionally true acting performances for the characters, the
animator has to consider who the character is. What protruding characteristics each
character has and what makes him or her unique? This will help the animator to
realize how each different character would act in certain circumstances. On top of this,
the animator must also analyze the scene. What is happening and what is the story at
this particular point? How does this affect the character and how does this make him
or her feel?
21
When imagining the acting for this character, everything of the above mentioned
needs to be boiled down into one strong performance that is true to your character at
this time in the story. It can be of great help to act out the performance yourself and
find acting choices that feel natural and motions/poses that do not feel forced, as well
as subtle nuances of motions that would not have otherwise been thought of.
The main point is to have the character react to the surrounding world and show
feelings and emotions that are true for that character at each specific time.
How can the animator choose the correct acting for every animation shot?
For each individual shot the character is going to have wants or needs that cannot be
fulfilled at this particular point in time, unless it is the end of the movie or a side story
that comes to a conclusion. This want or need will help determine what emotional
state the character is in at any given time. For an example, a guy is in love with a girl,
but she does not know it, and the guy's personality is nervous and jumpy. The shot is
that the guy wants to tell the girl how much he loves her and he has just gathered the
courage to walk up to her and is now in front of her. His want or need is to tell her
how much he loves her, but you cannot just do it simply because of his personality,
now can you? He will probably stumble on his words, avoid eye contact, and say the
wrong things instead of how he really feels because of his personality. This scenario
might be a cliché but his reactions and intentions will be emotionally true for that
given situation at that given time for this particular character.
Therefore, in order to choose the appropriate acting for every shot, the background
and characteristics of the character must be layered on top of the shots current text,
context and subtext in which the character has wants or needs to act upon.
What psychological factors deal with the perceived emotions?
The main factors that animators can use in order to evoke emotional connections with
the audience are body language and facial expression. Since humans read and analyze
these on subconscious levels, they are really important for communicating the right
message with animated characters. However, the scenes layout and the graphical
design can also help evoke the desired feelings in the audience. It is important to be
consistent with what feelings the animator are portraying in each given shot, this is to
stay away from confusion and make the scene as easy to read for the audience as
possible.
22
4.1 Conclusion
From this research, I draw the conclusion that there is a common foundation that can
be applied for most acting shots in animation that will help the animator obtain a
believable acting experience. This foundation focuses on the planning stages of the
animation process since every animator has a different workflow well inside their
animation software, may it be drawn 2D animation, 3D animation or stop motion.
Still, all these different branches use the same base, to plan out the shot before the
animating begins.
This foundation is a combination of questions that needs to be answered and things to
keep in mind when dealing with character animation, apart from a deep understanding
of the Principles of Animation.
Define the character:
Who is the character?
What is his/her story?
What makes him/her unique?
Has he/she any particular characteristics?
Define the scene:
What are the text, context and subtext of the scene?
What are the characters wants or needs for the scene?
What are the characters wants or needs for the entire story?
What is the character feeling in this scene?
If it is a sequel of shots, what has happened before this shot and what will
happen after?
Define the acting:
Let the emotion drive the motion.
Make sure that the acting is true to the character at this given time.
Express the emotion with the whole character, poses,
facial expressions and tempo must act together as a whole.
Give room to express the thoughts of the character.
Add breathing to your characters.
Use natural movements, act it out and see if it feels weird to you if in doubt.
Stay away from clichés.
23
References
[1] Jones, A., Oliff, J., "Thinking animation – Bridging the gap between 2D and
CG", Thomson Course Technology PTR, Boston MA, 2007.
[2] Wikipedia, (2012, Mars 19) [Online]. Available:
http://en.wikipedia.org/wiki/Disney%27s_Nine_Old_Men
[3] Fountain, K., “Ken Fountain: Animating a basic acting shot”, [Video] JRA
Webinars, 2011.
[4] Stanchfield, W., “Drawn to life: Volume one”, Focal Press, Burlington MA,
2009.
[5] Thomas, F., Johnston, O., “The illusion of life – Disney animation”, Walt Disney
Productions, NY, 1981.
[6] Pease, A., “Dina gester avslöjar dig” Solveig Rasmussen Trans., 2nd
ed. Sverige,
B. Wahlströms Bokförlag AB. 2003. (Original work: Pease A., “Body language.
How to read others' thoughts by their gestures” 2nd
ed. Published 1991)
[7] Fexeus, H., “Konsten att läsa tankar – Hur du förstår och påverkar andra utan att
de märker något”, Bokförlaget Forum, Stockholm, Sverige, 2007.
[8] Lango, K., “Kieth Lango VTS”, [Video], 2005-2012.
[9] Fountain, K., ”Ken Fountain – Attitude & Acting Beats”, [Video] JRA Webinars,
2012
[10] Frank Thomas and Ollie Johnston's website, (2012, April 26) [Online].
Available: http://www.frankanollie.com/PhysicalAnimation.html
[11] Autodesk official webpage, (2012, May 22) [Online]. Available:
http://usa.autodesk.com/maya/
[12] Digicel inc (2012, May 22) [Online]. Available: http://www.digicelinc.com/
[13] AnimSchool (2012, May 22) [Online]. Available: http://www.animschool.com/
[14] IMDB, (2012, May 22) [Online]. Available:
http://www.imdb.com/title/tt0109686/
[15] Wikipedia, (2012, May 24) [Online]. Available:
http://en.wikipedia.org/wiki/Rule_of_thirds
[16] The 11 Second Club, (2012, June 11) [Online]. Available:
http://www.11secondclub.com/
24
Appendix 1: Word definitions
Thumbnailing – Fast sketches done at the size of your thumb.
2D animation – Hand drawn animation. Done by pen and paper or by tools on the
computer like wacom's pens that you can plug into the computer and draw with.
Blocked in or Blocking – Blocking is when you build your poses and do not let the
computer interpolate between the different poses you have created.
Key poses – These are the main storytelling poses that your scene depend on. The
main poses that express what is happening in the shot and propel the story forward.
Breakdowns – These are the poses that are between key poses and define how the
movement will act out. What will lead the movement and what will follow, is there
any overlapping action happening, for example.
Frames – In animation time is counted in frames, in theaters there are 24 frames on
each second. For television there can be both 25 frames for each second as well as 30
frames per second depending if the television is shown in PAL or NTSC.
Playblast – A quick way of making a movie clip in Autodesk Maya which is used for
looking at animation in real time.
Offset – Offset is often mentioned when animators makes sure that different parts of
the body starts and stops at different times. The motion looks unbelievable if every
movement in the body starts or stops at the same time.
Knee pops – A common problem that is happening in 3D animation is that the knees
will twitch over a few frames causing weird looking “pops” in the motion. This has to
be manually fixed for each frame sometimes.
Breathing pass – A animation pass done in order to make the character feel like he or
she is breathing according to the tempo he or she is currently in mentally.
Tangent and interpolation – In 3D animation the animation itself is calculated
numbers of different attributes. These attributes are shown in graphs. The computer
calculates for example between the value 1 and 10, between these values which are
represented by points, the computer draw lines in order to see how the value is
changed to the other over time. This process can be done in more than just one way.
The line can be a straight for example, linear interpolation, or it can be calculated with
a curved line causing the animation between the two values appear in a completely
different way.
Animated image plane – In Autodesk Maya there is a way to import images and play
them in sequence on screen. These can then be used as references for the task at hand.
Inbetweens – Inbetweens are the drawings or poses that are created between key
poses, extremes and breakdowns. Basically, the drawing or pose in between.
Auto tangent – This interpolation tries to make sure that the extreme values are not
overshot and that the interpolation between is a smooth curve.

25
Appendix 2: Time management Gannt chart

26
Appendix 3: Web URL to final animations
First animation shot: https://vimeo.com/42967007
Second animation shot: https://vimeo.com/42967006

![LeveragingtheTalentofHandAnimators toCreateThree … · 2015. 12. 11. · of Articulated Figures, Believable Motion, Computer Vision for Animation]: 1.Introduction Character animation](https://static.fdocuments.in/doc/165x107/60541653eb26e14aea1029f7/leveragingthetalentofhandanimators-tocreatethree-2015-12-11-of-articulated.jpg)


![A tool for constructing 3D Environments with Virtual …modeling of skin, hair and clothes [13], so as to produce more believable animation. The calculation of the skin and cloth motion](https://static.fdocuments.in/doc/165x107/5f1ded3420a4d1598b45c7b5/a-tool-for-constructing-3d-environments-with-virtual-modeling-of-skin-hair-and.jpg)