Creating Animations – Lesson 71 Creating Animations Lesson 7.
18
Creating Animations – Lesson 7 1 Creating Animations Lesson 7
-
Upload
elijah-samuels -
Category
Documents
-
view
248 -
download
3
Transcript of Creating Animations – Lesson 71 Creating Animations Lesson 7.
Creating Animations – Lesson 7 1
Creating Animations
Lesson 7

2 Creating Animations – Lesson 7
Objectives Add a reusable animation symbol to the Library
panel. Create animation by using frames. Preview and edit animations by using onion
skinning. Control the playback of frame animations. Automate the animation process with tweening. Export an animation as an animated GIF file. Optimize your animation settings by using
Export Preview. Import and export symbols for use in other files.
3 Creating Animations – Lesson 7
Create animations in Fireworks MX
You can create animations in Fireworks MX and export them as animated GIFs.
You can create an animation in two ways: Tweening – With this method, you create the
starting and ending frames of the animation and Fireworks MX automatically creates the intervening frames.
Frame-by-frame – You can create each frame of the animation yourself, one frame at a time.

4 Creating Animations – Lesson 7
Use animation symbols If you are creating an animation in Fireworks
MX that you want to use more than once, create it as an animation symbol.
Once the animation is in the symbol library, you can add as many instances of the symbol as you want to your document.
Changes made to the symbol are reflected in all instances of the symbol, but changes made to an instance do not affect the master copy in the library.
Symbols can also be exported for use in Web sites or other Fireworks MX documents.

5 Creating Animations – Lesson 7
Create an animated symbol To create an animated symbol from a new or
existing object: Select the object to be converted. Click the Modify menu, point to Symbol, then click
Convert to Symbol. Assign a name to the symbol, click the Animation
option, and click OK to open the Animate dialog box. Specify the number of frames, then set the Move and
Direction options and other settings as required. Click the OK button.
If you see a message that frames need to be added for the animation, click OK.
6 Creating Animations – Lesson 7
Create a frame-by-frame animation To animate an object moving across the
screen: Select the object and make as many
duplicates of the object as you need for your animation.
Space them on the screen in the direction of the animation, then select all objects.
Click the Distribute to Frames button on the Frames panel, and each object will be placed on a frame of its own.
Click Frame 1 (if necessary) and click the Play button at the bottom of the window. You will see your object march across the screen.

7 Creating Animations – Lesson 7
Example of frame-by-frame animation
The figure on the left shows nine copies of a compass image spaced across the screen. When selected and distributed to frames, the Frame panel (right-side figure) shows that a separate frame was created for each object.
Distribute to Frames button

8 Creating Animations – Lesson 7
Use onion skinning to edit your animation When you have created your animation,
the onion skinning technique can help you refine it and adjust it.
Onion skinning allows you to see objects in frames before and after the current frame without having to skip back and forth.
This is helpful in aligning objects and repositioning objects so your animation will look as expected.
Turn onion skinning on with the Onion Skinning button in the Frames panel.
9 Creating Animations – Lesson 7
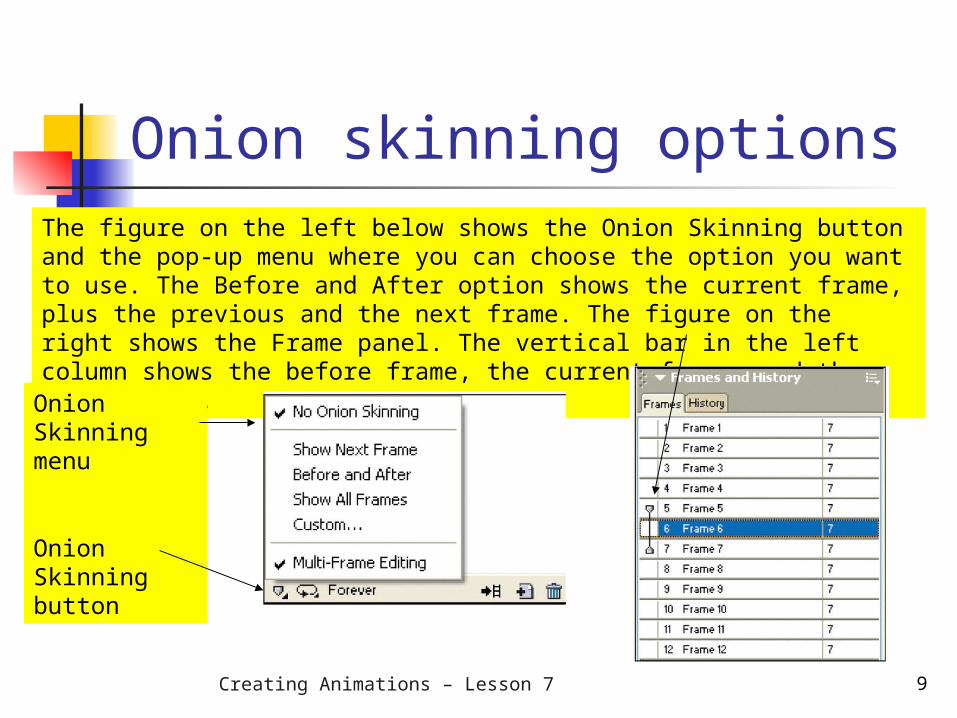
Onion skinning optionsThe figure on the left below shows the Onion Skinning button and the pop-up menu where you can choose the option you want to use. The Before and After option shows the current frame, plus the previous and the next frame. The figure on the right shows the Frame panel. The vertical bar in the left column shows the before frame, the current frame, and the after frame.
Onion Skinning menu
Onion Skinning button

10 Creating Animations – Lesson 7
Control the playback of your animation The frame delay determines how long each
frame is displayed when played. To control the playback frame delay:
Select all frames of the animation. Click the Frame panel’s Options menu, then click
Properties. Enter the frame delay value in the Frame Delay box.
Frame delays are specified in hundredths of a second. You can also set a looping value if you want
your animation to play repeatedly. Click the GIF Animation Looping button on the
Frames Panel. Choose a loop value (or No Looping) from the pop-up
menu.

11 Creating Animations – Lesson 7
Create animation with tweening
Let Fireworks do the animating for you using tweening. You create the first frame and the last frame and Fireworks does the rest.
Select the object to be animated and convert it to a symbol.
Drag another instance of the symbol to the canvas and position it where it should be for the last frame of the animation.
Edit it to make any other changes that are required. Select both instances, click the Modify menu, point to
Symbol, then click Tween Instances. Enter a value for the number of steps, click Distribute
to Frames, and click OK. Fireworks creates the frames between the start and
end frame.

12 Creating Animations – Lesson 7
Export a GIF animation Once your animation is complete in
Fireworks MX, it can be exported for use in a Web page. To do so: Click the Window menu and then Optimize to
open the Optimize panel. Select Animated GIF as the file format. Set the Indexed Palette to WebSnap Adaptive
or Web Adaptive. Click the File menu, then Export. Assign a
name for the file, and select Images Only in the Save As box.
Click the Save button to export the image.

13 Creating Animations – Lesson 7
The Optimize panel for an animated GIF
This figure shows the Optimize panel for a file being exported as an animated GIF image.

14 Creating Animations – Lesson 7
Optimize your image using Export Preview
You can choose default settings when exporting your file or set custom settings in the Export Preview window.
One option you can set is the disposal method, which determines what happens to the previous frame when the next frame is loaded. Disposal methods you can choose include:
Unspecified – Creates the smallest possible animated GIF file.
None – Use for full-frame animations and for frame optimization and transparency.
Restore to background – Use when moving an object across the screen.
Restore to Previous – Use when animating objects across a background image within the animation.

15 Creating Animations – Lesson 7
The Export Preview window
In addition to the disposal method, the Export Preview window allows you to set many other options to optimize your image. This window shows a preview of the image using the current settings.
16 Creating Animations – Lesson 7
Import and Export symbols Once an animation is created as a
symbol, it can be exported from the library for use in another document.
You can export all symbols in the library or just selected symbols. Exporting all symbols allows you to import
the entire library for one document into some other Fireworks MX document.
To export one or all symbols, click the Options menu in the Library panel, click the Export Symbols option, choose Select All or some other option from the menu, and then click Export.

17 Creating Animations – Lesson 7
The Import Symbols dialog box
This figure shows the Import Symbols dialog box. To open this from a Fireworks MX document, click the Options menu in the Library panel and then click Import Symbols. Locate the file to import. You can select all symbols in the file or just selected symbols.

18 Creating Animations – Lesson 7
SummaryIn this lesson, you learned: How to add a reusable animation symbol to the Library
panel. To create animation by using frames. To preview and edit animations by using onion skinning. How to control the playback of frame animations. How to automate the animation process with tweening. How to export an animation process with tweening. How to export an animation as an animated GIF file. How to optimize your animation settings by using Export
Preview. How to import and export symbols for use in other files.