Creating an Accessible Book for the iPad using the ... · Creating an Accessible Book for the iPad...
10
SET-BC www.setbc.org 1 of 10 July 2011 Creating an Accessible Book for the iPad using the Pictello App Introduction AssistiveWare offers an iPad application – Pictello – that allows users to combine picture slides with narration. This inexpensive app provides a quick and easy environment for teachers and students to create, edit, and view accessible books on an iPad. . This tutorial assumes that … You have an iPad, You know how to download apps to your iPad, and that You have a means of getting images to your iPad using DropBox, iTunes, or the Camera Connector kit for iPad. Learning Objectives Completion of this tutorial will give you experience with the following: Importing pictures into Pictello Recording your voice Using the text to speech label feature Case Study Tracey is a student with autism in grade 1. She is highly motivated by listening to picture books. Her school team and her parents would like Tracey to become independent with story reading so that she can participate autonomously during silent reading at school. So far, Tracey and her support team have used an iPad that she received from Set-BC. Now, they want to design their own talking books to complement the curriculum that Tracey and her fellow students are following.
Transcript of Creating an Accessible Book for the iPad using the ... · Creating an Accessible Book for the iPad...
SET-BC www.setbc.org 1 of 10 July 2011
Creating an Accessible Book for the iPad using the Pictello App Introduction AssistiveWare offers an iPad application – Pictello – that allows users to combine picture slides with narration. This inexpensive app provides a quick and easy environment for teachers and students to create, edit, and view accessible books on an iPad. . This tutorial assumes that …
You have an iPad,
You know how to download apps to your iPad, and that
You have a means of getting images to your iPad using DropBox, iTunes, or the Camera Connector kit for iPad.
Learning Objectives Completion of this tutorial will give you experience with the following:
Importing pictures into Pictello
Recording your voice
Using the text to speech label feature
Case Study Tracey is a student with autism in grade 1. She is highly motivated by listening to picture books. Her school team and her parents would like Tracey to become independent with story reading so that she can participate autonomously during silent reading at school. So far, Tracey and her support team have used an iPad that she received from Set-BC. Now, they want to design their own talking books to complement the curriculum that Tracey and her fellow students are following.

SET-BC www.setbc.org 2 of 10 July 2011
Creating an Accessible Book in Pictello
1
From your iPad desktop
Tap on the Pictello App to open it.
2
From your Pictello Library Screen,
Tap the plus sign (+) at the bottom of the page.
3
A pop-up presents you with a choice of 2 design modes: “Wizard” or “Expert.” As a beginner,
Choose “Wizard.”

SET-BC www.setbc.org 3 of 10 July 2011
4
The Cover Title page opens. Using the on-screen keyboard provided
Enter the title of your story, and
Tap “Done.” The keyboard will disappear. Now
Tap the forward arrow at the bottom right of the page.
5
This brings you to the Cover Picture screen. To choose your picture,
Tap on the picture frame.
SET-BC www.setbc.org 4 of 10 July 2011
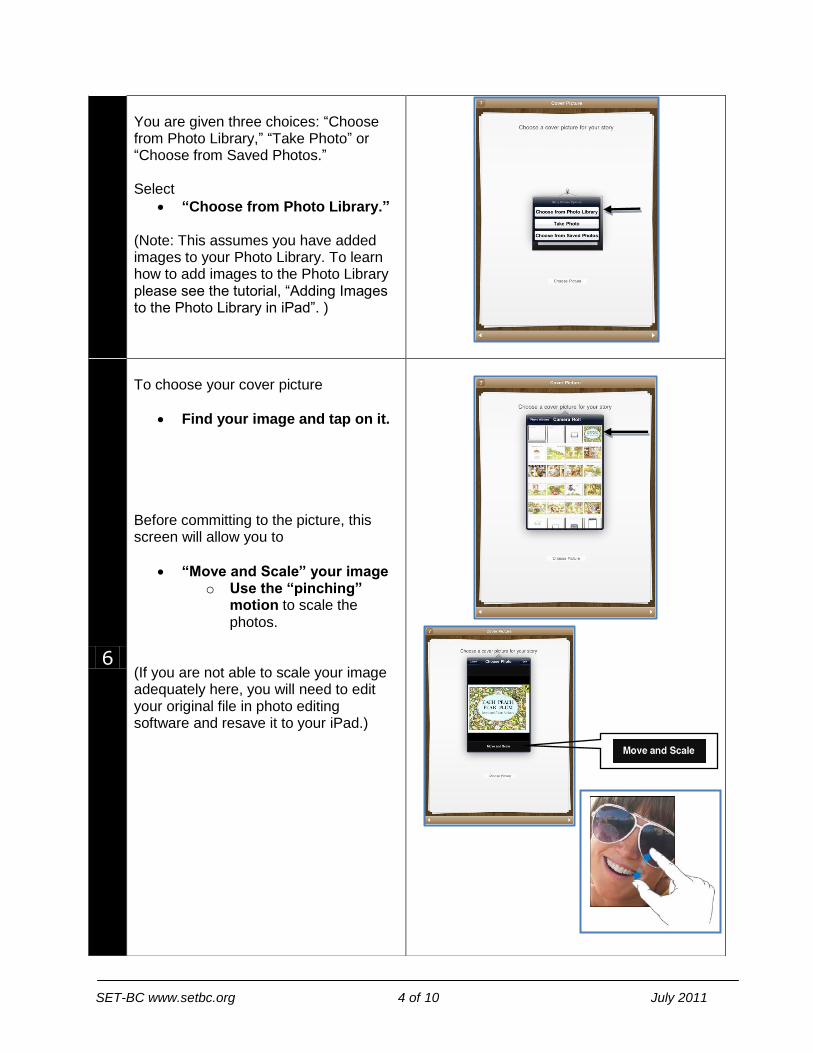
You are given three choices: “Choose from Photo Library,” “Take Photo” or “Choose from Saved Photos.” Select
“Choose from Photo Library.”
(Note: This assumes you have added images to your Photo Library. To learn how to add images to the Photo Library please see the tutorial, “Adding Images to the Photo Library in iPad”. )
6
To choose your cover picture
Find your image and tap on it. Before committing to the picture, this screen will allow you to
“Move and Scale” your image o Use the “pinching”
motion to scale the photos.
(If you are not able to scale your image adequately here, you will need to edit your original file in photo editing software and resave it to your iPad.)

SET-BC www.setbc.org 5 of 10 July 2011
If the image is as you like it, then
Tap “Use.”
7
The cover is now complete. To move on to the pages of your story
Tap the forward arrow at the bottom right of the screen.
8
This reveals a screen that you will return to many times and that represents an editing home base for your story. From here,
Tap “Add a Page.”
9
This brings you to the Page 1 – Picture screen. Again, to choose your picture follow the steps outlined in steps 5 and 6:
Tap the picture frame,
Find and select your image,
Move and scale, if necessary, and
Tap “Use.”
SET-BC www.setbc.org 6 of 10 July 2011
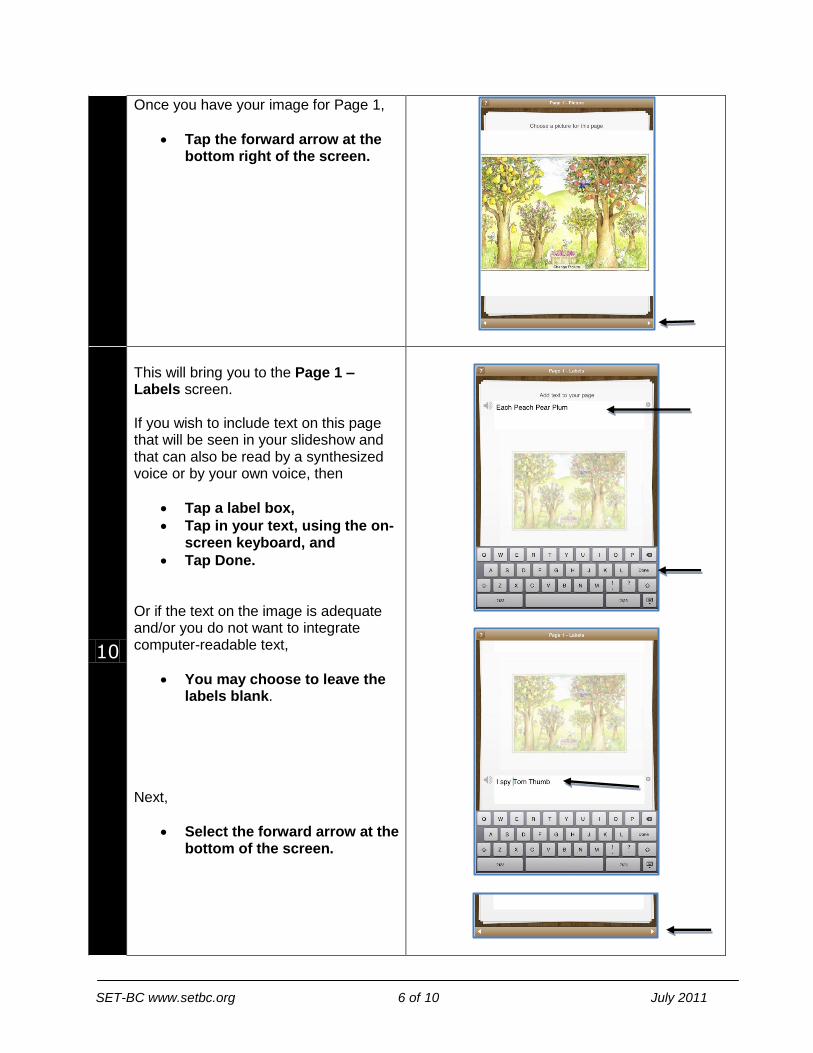
Once you have your image for Page 1,
Tap the forward arrow at the bottom right of the screen.
10
This will bring you to the Page 1 – Labels screen. If you wish to include text on this page that will be seen in your slideshow and that can also be read by a synthesized voice or by your own voice, then
Tap a label box,
Tap in your text, using the on-screen keyboard, and
Tap Done.
Or if the text on the image is adequate and/or you do not want to integrate computer-readable text,
You may choose to leave the labels blank.
Next,
Select the forward arrow at the bottom of the screen.
SET-BC www.setbc.org 7 of 10 July 2011
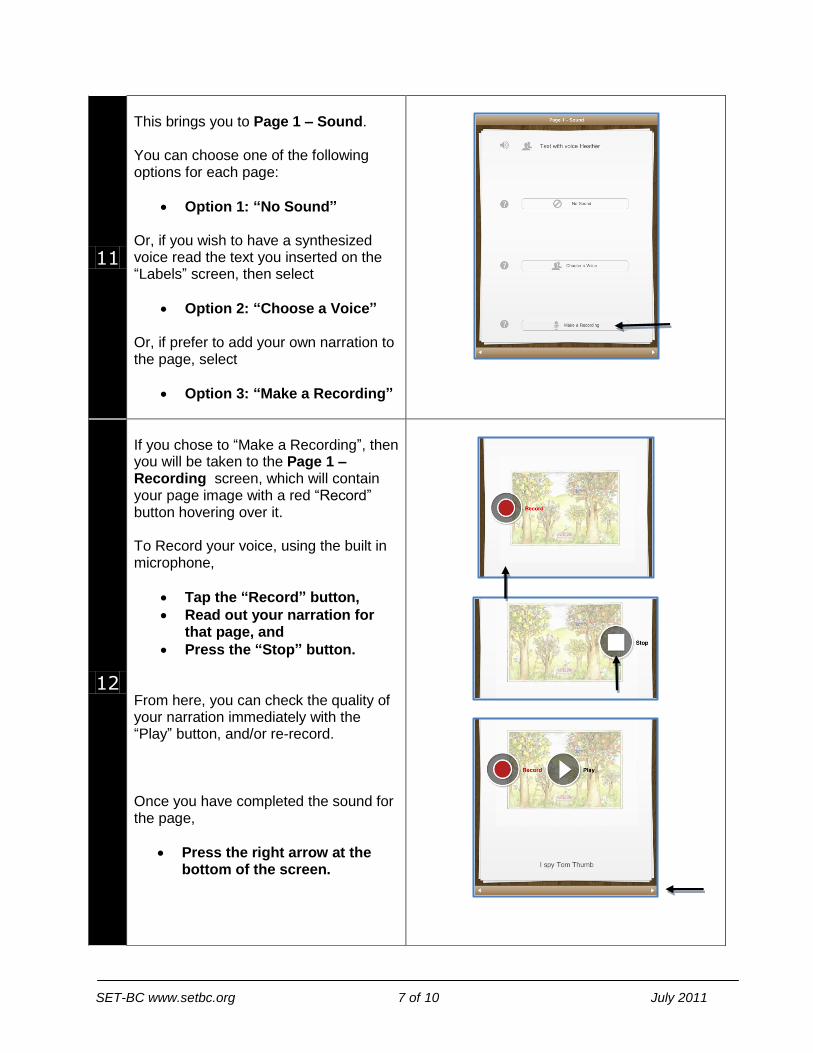
11
This brings you to Page 1 – Sound. You can choose one of the following options for each page:
Option 1: “No Sound” Or, if you wish to have a synthesized voice read the text you inserted on the “Labels” screen, then select
Option 2: “Choose a Voice” Or, if prefer to add your own narration to the page, select
Option 3: “Make a Recording”
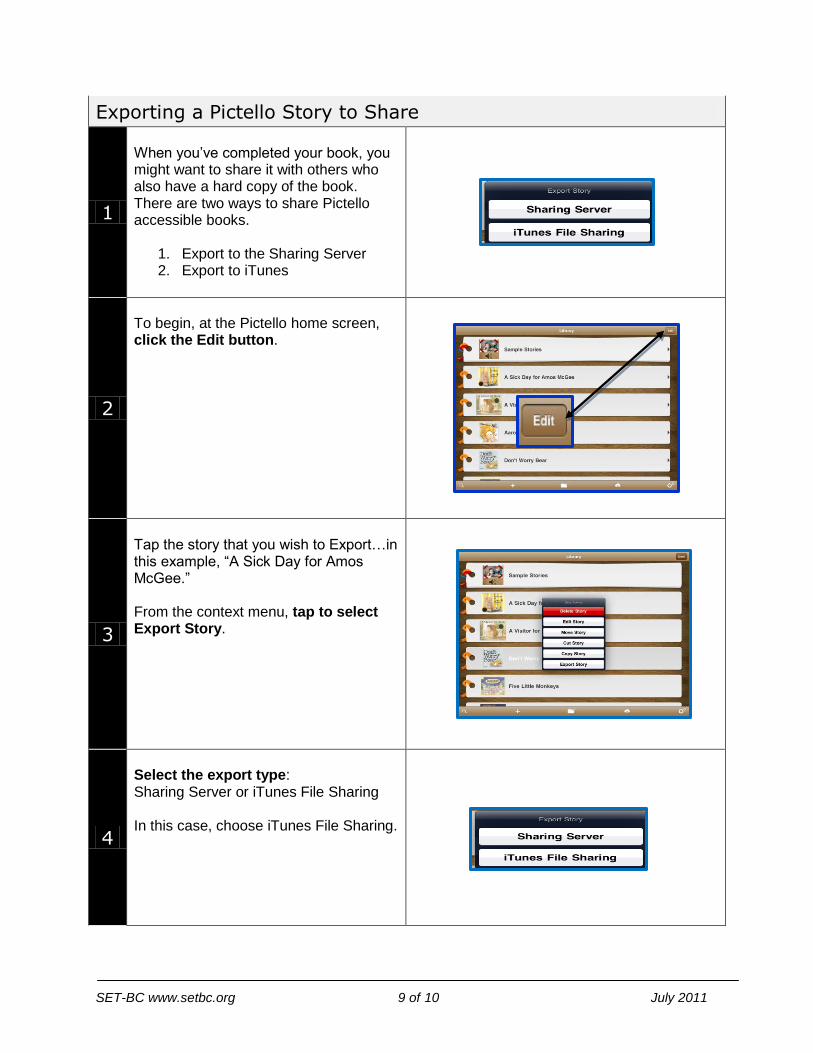
12
If you chose to “Make a Recording”, then you will be taken to the Page 1 – Recording screen, which will contain your page image with a red “Record” button hovering over it. To Record your voice, using the built in microphone,
Tap the “Record” button,
Read out your narration for that page, and
Press the “Stop” button. From here, you can check the quality of your narration immediately with the “Play” button, and/or re-record. Once you have completed the sound for the page,
Press the right arrow at the bottom of the screen.

SET-BC www.setbc.org 8 of 10 July 2011
13
This will bring you back the home base screen for your story. When you have completed the last page of the story, and you are returned again to the home base screen, then
Tap “Done with Story”
14
This will bring you back to the Library screen. You will see your finished book on the shelves here.
Tap on your story
Enjoy!
15
Even though you are finished, you can Edit and Add pages to your story at any time.
Go to the Library screen
Tap “Edit” in the top right,
Tap the story you wish to work on,
Select “Edit Story,”
Select Wizard
Tap “Edit Pages.” This will bring you to a list of all of the pages in your story. Tap the page you wish to Edit and it will take you through the same Image and Sound options as outlined in this tutorial.
SET-BC www.setbc.org 9 of 10 July 2011
Exporting a Pictello Story to Share
1
When you’ve completed your book, you might want to share it with others who also have a hard copy of the book. There are two ways to share Pictello accessible books.
1. Export to the Sharing Server 2. Export to iTunes
2
To begin, at the Pictello home screen, click the Edit button.
3
Tap the story that you wish to Export…in this example, “A Sick Day for Amos McGee.” From the context menu, tap to select Export Story.
4
Select the export type: Sharing Server or iTunes File Sharing In this case, choose iTunes File Sharing.
SET-BC www.setbc.org 10 of 10 July 2011
5
When the Export process completes, connect the iPad to your computer.
6
Open iTunes. Click on your iPad in the Devices list (left window) to access its features.
7
On the Menu list click on Apps. An app list appears in the window – bottom left.
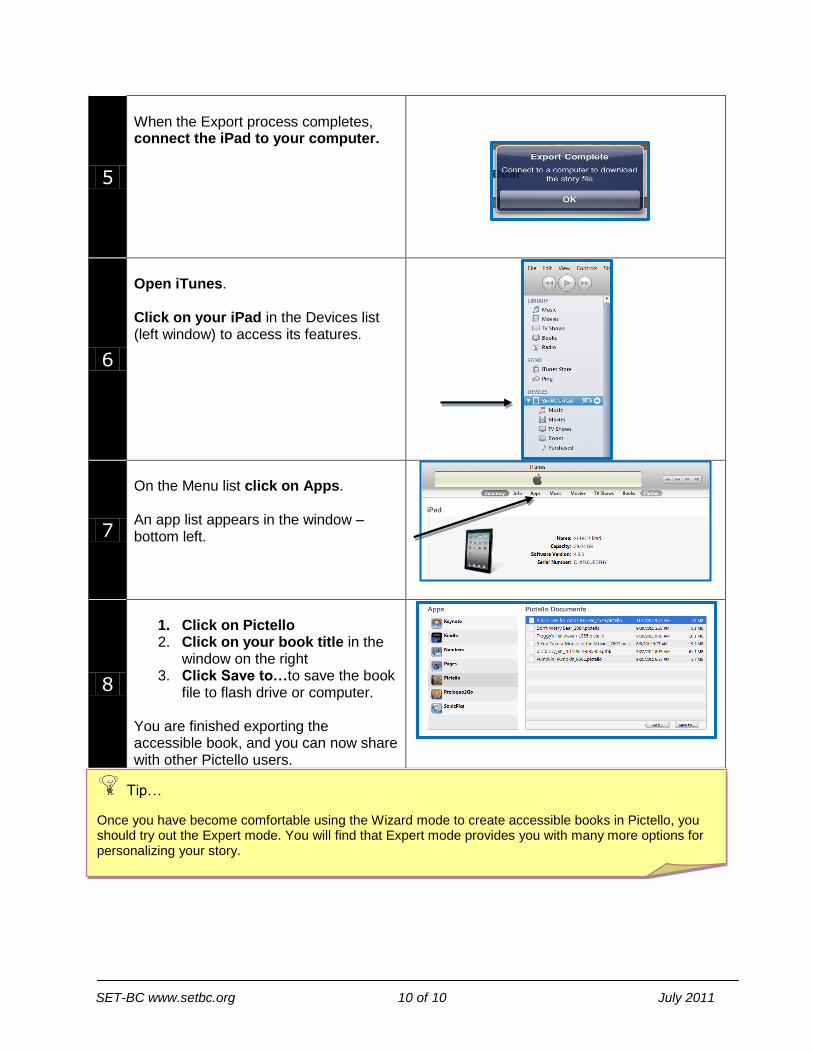
8
1. Click on Pictello 2. Click on your book title in the
window on the right 3. Click Save to…to save the book
file to flash drive or computer. You are finished exporting the accessible book, and you can now share with other Pictello users.
Tip… Once you have become comfortable using the Wizard mode to create accessible books in Pictello, you should try out the Expert mode. You will find that Expert mode provides you with many more options for personalizing your story.