Creating a Paternoster · beads and strung them) were a common sight in many of the major European...
8
Creating a Paternoster Copyright © 2011 Alice Cantrell ~ www.gardensofgrace.net
Transcript of Creating a Paternoster · beads and strung them) were a common sight in many of the major European...

Creating a Paternoster
Copyright © 2011 Alice Cantrell ~ www.gardensofgrace.net

What is a Paternoster?
For centuries man has recited repeated prayers as a form of penance or
petition. No one knows exactly when strings of beads were first used to
keep count of prayers, but the earliest historical mention of prayer
counters were the pebbles and knotted strings employed by the desert
hermits in the 4th century.
As part of their daily prayer, the 12th century religious (monks, friars)
were required to read all 150 Psalms. As they were joined by less
educated (illiterate) brothers, the substitution of 150 Our Fathers (or in
Latin, 'Pater Noster') in place of the Psalms was made. The practice
caught on, and became widely popular among the laity also. A string of
10, 50 or 150 beads was commonly used to keep count of one's prayers
and came to known as a "paternoster".
By the 13th century, guilds of paternosterers, (those who made the
beads and strung them) were a common sight in many of the major
European cities. The beads were both carried for prayer and worn
as an accessory attached to the clothing or around the wrist or neck.
Quite a number of medieval paintings include prayer beads, mostly
held in the hand or hung on a wall.
Many early rosaries and paternosters did not have a cross or crucifix
but instead had a medallion, medal or tassel. Tassels have a long
history of use in articles of prayer. For centuries, people of the
Jewish faith have used tassels hanging from the four corners of their
prayer shawls to remind them to live according to God's laws.
"The Lord spoke to Moses and said, "Speak to the sons of Israel and
tell them to put tassels on the hems of their garments, and to put a
violet cord on this tassel at the hem. You must have a tassel, then, and
the sight of it will remind you of all the commandments of the Lord."
(Numbers 15: 37-39)
Sometimes, larger beads were used to separate smaller groups of
beads. These larger beads were called "gauds" and it is not known
whether there were, originally, any particular prayers attached to
them. Some scholars theorize that as the Hail Mary prayer grew in
popularity, the smaller beads were used for the Aves while the larger
gauds were reserved for the Our Fathers.
Copyright © 2011 Alice Cantrell ~ www.gardensofgrace.net

Supplies
To make your Paternoster, you will
need just a few simple supplies.
1. Beads ~ In this tutorial I will be
using 8mm burnt horn beads. Feel
free to use smaller or larger beads if
you like.
2. Tassel Thread ~ You can use
either embroidery floss or Pearl (or
Perle) Cotton in size 8. Pearl is
inexpensive and has a lovely sheen to
it that looks nice as a tassel.
3. Cross ~ Any cross or crucifix can
be used. I am partial to a more rustic or primitive looking cross for Paternosters, but the choice is
completely up to you.
4. Cone ~ A cone is not absolutely necessary, but many Paternoster tassels had them, and I think it makes
a nice authentic touch.
5. Beading Wire ~ I like using a
medium gauge (such as .019)
beading wire.
6. Crimp Pliers ~ You can use
regular needle-nose pliers for the
crimps, but crimp pliers do a much
neater job.
7. Crimps ~ With beading wire you
will need the 2mm crimp beads of
your choice.
8. Small Spacer Beads ~ Here I am
using 2mm brass “African trade”
beads. Any small bead will work, but not so small that it slips into the hole of the bigger Pater beads. I
like using a 2mm – 3mm spacer bead with 8mm Pater beads.

Making the Tassel
Step 1 ~ You will need a small
piece of folded paper or cardstock
measuring 3”x 4”. If you have a
4”x 6” index card around, folding
this in half makes the perfect size.
Step 2 ~ Wrap your thread (floss)
of choice around the little card
(around the 3” end) you have made.
Because it is thinner, you will need
to wrap the Pearl Cotton more times
than embroidery floss. A good rule
of thumb is about 24 wraps (this
gives you a 48 strand tassel) for embroidery floss and about 44 wraps (an 88 strand tassel) for Pearl
Cotton. You can actually wrap a few more times if you like a thicker tassel, but the bigger it is, the harder
it is to squeeze into the cone.
Step 3 ~ After you are done wrapping, cut a
length of thread 12” to 18” long. Slip this
thread under all of the wraps you have
made, and tie securely (a simple square knot
works well). Slide the tassel off of the card.
Step 4 ~ While pulling the strands of the tassel downward, begin
tightly wrapping first one side of the tie thread around the tassel
top, and then the other. Wrap these threads in opposite directions,
and after 3 or 4 tight wraps, tie the ends together securely.

Step 5 ~ Using a toothpick, place a
tiny dot of white glue onto the top
of the knot, and then knot once
more for good measure. You can
now line the ends of the tie thread
with the rest of the tassel threads. (I
like to wait and give the tassel its
final trim when the Paternoster is
complete.)
Attaching the Tassel
Step 6 ~ To make threading the
beading wire through the tassel
easier, simply use a needle to “pre-
drill” a hole through the top of the
tassel. The little hole should hold its
shape long enough to thread the
beading wire through.
Step 7 ~ First, slide the cone (wide
end toward the tassel) onto the
wire, and then one crimp bead.
Next, thread the beading wire
through the hole that you have
“drilled”.
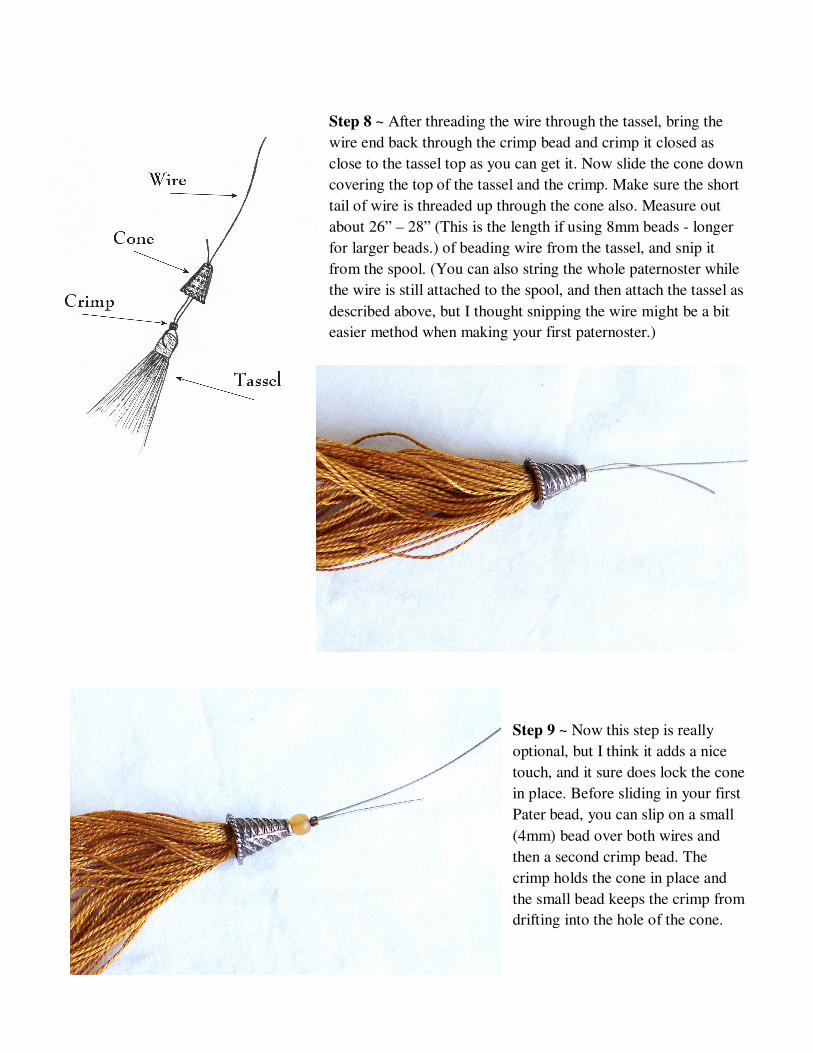
Step 8 ~ After threading the wire through the tassel, bring the
wire end back through the crimp bead and crimp it closed as
close to the tassel top as you can get it. Now slide the cone down
covering the top of the tassel and the crimp. Make sure the short
tail of wire is threaded up through the cone also. Measure out
about 26” – 28” (This is the length if using 8mm beads - longer
for larger beads.) of beading wire from the tassel, and snip it
from the spool. (You can also string the whole paternoster while
the wire is still attached to the spool, and then attach the tassel as
described above, but I thought snipping the wire might be a bit
easier method when making your first paternoster.)
Step 9 ~ Now this step is really
optional, but I think it adds a nice
touch, and it sure does lock the cone
in place. Before sliding in your first
Pater bead, you can slip on a small
(4mm) bead over both wires and
then a second crimp bead. The
crimp holds the cone in place and
the small bead keeps the crimp from
drifting into the hole of the cone.

Step 10 ~ Slide on the first Pater
bead over both wires and trim the
short tail end close to the top of this
bead. The tail of your beading wire
is now hidden inside the first Pater
bead and you can begin stringing
your paternoster alternating Pater
beads and spacer beads.
Step 11 ~ Keep stringing beads until you have 50 of the large Pater beads on your wire.

Step 12 ~ When you finish stringing the beads, slide a crimp bead on after the last Pater bead. If you used
a small bead in Step 9, you might like to add a second small (4mm) bead after the crimp, but this is
optional. Next, loop the wire through the cross or crucifix, back up through the small bead (if used),
through the crimp bead and then through the final Pater bead. Close the crimp carefully and trim the wire
tail close to the top of the last Pater bead. The end of your wire is now hidden inside this last bead.
Step 13 ~ Now all that remains is to
give your tassel a trim. I like mine
to be about 1 3/4” from the base of
the cone, but the length is really up
to you. Congratulations! You have
just completed a beautiful
Paternoster! If you are giving this
little work of art as a gift, consider
printing out page 2 of this tutorial
to include a little history for the
lucky recipient.
Copyright © 2011 Alice Cantrell ~ www.gardensofgrace.net